static.lavazza-nederland.nl · Istruzioni per l’uso - Instructions for Use - Guide...
116
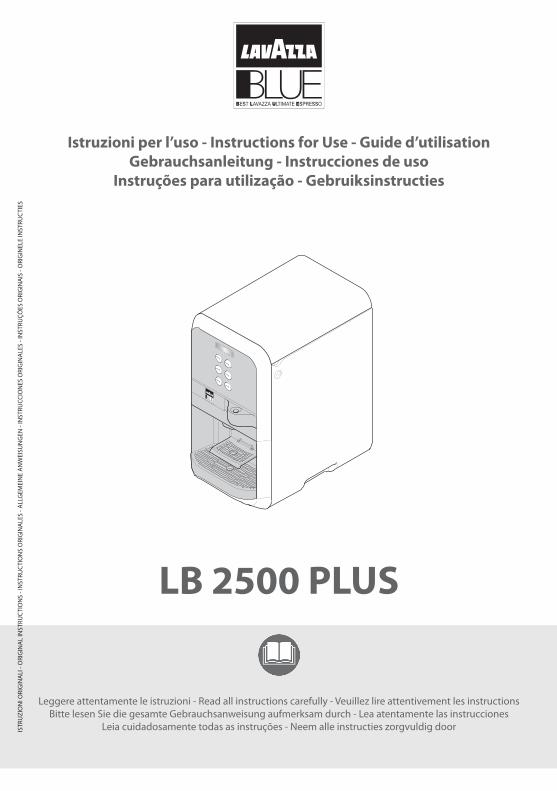
Istruzioni per l’uso - Instructions for Use - Guide d’utilisation Gebrauchsanleitung - Instrucciones de uso Instruções para utilização - Gebruiksinstructies Leggere attentamente le istruzioni - Read all instructions carefully - Veuillez lire attentivement les instructions Bitte lesen Sie die gesamte Gebrauchsanweisung aufmerksam durch - Lea atentamente las instrucciones Leia cuidadosamente todas as instruções - Neem alle instructies zorgvuldig door ISTRUZIONI ORIGINALI - ORIGINAL INSTRUCTIONS - INSTRUCTIONS ORIGINALES - ALLGEMEINE ANWEISUNGEN - INSTRUCCIONES ORIGINALES - INSTRUÇÕES ORIGINAIS - ORIGINELE INSTRUCTIES LB 2500 PLUS
-
Upload
dinhnguyet -
Category
Documents
-
view
216 -
download
0
Transcript of static.lavazza-nederland.nl · Istruzioni per l’uso - Instructions for Use - Guide...
Istruzioni per l’uso - Instructions for Use - Guide d’utilisationGebrauchsanleitung - Instrucciones de uso
Instruções para utilização - Gebruiksinstructies
Leggere attentamente le istruzioni - Read all instructions carefully - Veuillez lire attentivement les instructionsBitte lesen Sie die gesamte Gebrauchsanweisung aufmerksam durch - Lea atentamente las instrucciones
Leia cuidadosamente todas as instruções - Neem alle instructies zorgvuldig doorISTR
UZI
ON
I ORI
GIN
ALI
- O
RIG
INA
L IN
STRU
CTI
ON
S - I
NST
RUC
TIO
NS
ORI
GIN
ALE
S - A
LLG
EMEI
NE
AN
WEI
SUN
GEN
- IN
STRU
CCIO
NES
ORI
GIN
ALE
S - I
NST
RUÇÕ
ES O
RIG
INA
IS -
ORI
GIN
ELE
INST
RUC
TIES
LB 2500 PLUS
Congratulazioni!Gentile Cliente, ci congratuliamo per aver scelto la macchina espresso Lavazza LB 2500 PLUS e la ringraziamo per la fiducia accordataci. Prima di mettere in funzione la macchina, consigliamo di leggere attentamente le istruzioni per l’uso che spiegano come utilizzarla, pulirla e mantenerla in perfetta efficienza. Non ci resta che augurarle la preparazione di tanti ottimi caffè grazie a Lavazza!
IT
Pagina1
Herzlichen Glückwunsch!Sehr geehrter Kunde wir gratulieren Ihnen zum Kauf der Espressomaschine Lavazza LB 2500 PLUS und bedanken uns für Ihr Vertrauen, das Sie uns entgegengebracht haben. Vor Inbetriebnahme der Maschine raten wir Ihnen die Betriebsanleitungen sorgfältig zu lesen, die Ihnen erklären wie sie zu benutzen, zu reinigen und in einem perfekten Zustand zu halten ist. Wir wünschen Ihnen, dass Sie dank Lavazza viele ausgezeichnete Tassen Kaffee zubereiten werden!
DE
Sei te4 9
¡Enhorabuena!Estimado Cliente le damos nuestra más sincera enhorabuena por haber elegido la máquina espresso Lavazza LB 2500 PLUS y le agradecemos por depositar su confianza en nosotros. Antes de poner en funcionamiento la máquina, le aconsejamos leer atentamente las instrucciones de empleo que explican cómo utilizarla, limpiarla y mantenerla en perfecto estado de funcionamiento. Sólo nos queda desearle ¡muchos deliciosos cafés gracias a Lavazza!
ES
Página6 5
Parabéns!Prezado Cliente, parabéns por ter escolhido a máquina expresso Lavazza LB 2500 PLUS e agradecemos a confiança dada. Antes de usar a máquina, aconselhamos ler atentamente as instruções de uso, que explicam como utilizá-la, limpá-la e mantê-la perfeitamente eficiente. Depois disso, desejamos que prepare tantos ótimos cafés com a Lavazza!
Pagina? ?PT
Página8 1
Gefeliciteerd!Geachte Klant, wij feliciteren u met de keuze van het espressoapparaat Lavazza LB 2500 PLUS en danken u voor het getoonde vertrouwen in ons. Wij raden u aan, voordat u het apparaat in gebruik neemt, deze instructies aandachtig te lezen. In deze gebruiksaanwijzing wordt namelijk uitgelegd hoe u het apparaat het beste kunt gebruiken, schoonmaken en onderhouden. Tot slot wensen wij dat u nog vele heerlijke koffie zult bereiden danzij Lavazza!
NL
Pagina9 7
Congratulations!Dear Customer, we would like to congratulate you on your choice of the Lavazza LB 2500 PLUS espresso machine and thank you for choosing us. Before using the machine we would advise you to closely read the instruction booklet, which explains how to use it, clean it and keep it in proper working condition. All that remains is for us to wish you all the best in preparing many excellent Lavazza coffees!
EN
Page1 7
Félicitations!Cher Client, nous vous félicitons d’avoir choisi la machine pour espresso Lavazza LB 2500 PLUS, et nous vous remercions de votre confiance. Avant de faire fonctionner la machine, nous vous conseillons de lire attentivement le mode d’emploi qui explique comment l’utiliser, la nettoyer et la maintenir en excellent état. Il ne nous reste qu’à vous souhaiter de préparer beaucoup d’excellents cafés grâce à Lavazza!
FR
Page3 3
È importante leggere attentamente le istruzioni contenute nel presente libretto.
Carefully read the instrctions in this booklet.
Il est important de lire attentivement ce mode d’emploi.
Bitte die Gebrauchsanweisung in diesem Heft sowie.
Es importante leer atentamente las instrucciones del presente manual.
É importante ler com atenção as istruções contidas no presente manual.
Het is van belang zorgvuldig de in deze handleiding.

1
ITINDICE GENERALE
INDICE GENERALE ...........................................................................................................................................................1COMPONENTI .....................................................................................................................................................................2MESSAGGI A DISPLAY STATO MACCHINA .............................................................................................................2PREDISPOSIZIONE MACCHINA ..................................................................................................................................3
DISIMBALLO E POSIZIONAMENTO ..............................................................................................................................................................................3AVVIAMENTO MACCHINA ................................................................................................................................................................................................ 3
MENU’ IMPOSTAZIONI ...................................................................................................................................................5MENU’ IMPOSTAZIONI PRIMO LIVELLO .....................................................................................................................................................................5CREDITI RESIDUI ..........................................................................................................................................................................................................................................................5IMPOSTAZIONE DOSI ...............................................................................................................................................................................................................................................5MENU’ IMPOSTAZIONI DI SECONDO LIVELLO ......................................................................................................................................................6SCELTA LINGUA............................................................................................................................................................................................................................................................6DECALCIFICAZIONE ..................................................................................................................................................................................................................................................6DUREZZA H2O .............................................................................................................................................................................................................................................................7DELTA TEMP ...................................................................................................................................................................................................................................................................7MODIFICA PASSWORD ............................................................................................................................................................................................................................................7ENERGY SAVING ..........................................................................................................................................................................................................................................................8INNESCO POMPE ........................................................................................................................................................................................................................................................8VERIFICA CARD ............................................................................................................................................................................................................................................................8CONTATORE ...................................................................................................................................................................................................................................................................8
PREPARAZIONE BEVANDE ...........................................................................................................................................9PREDISPOSIZIONE ALLA PREPARAZIONE DELLE BEVANDE .........................................................................................................................9EROGAZIONE BEVANDE.....................................................................................................................................................................................................9ESPRESSO ........................................................................................................................................................................................................................................................................9ESPRESSO LUNGO ...................................................................................................................................................................................................................................................10ESPRESSO MACCHIATO .......................................................................................................................................................................................................................................10BEVANDA AL GUSTO DI LATTE MACCHIATO/CAPPUCCINO .........................................................................................................................................................10BEVANDE CALDE CON CAPSULA ..................................................................................................................................................................................................................10
MANUTENZIONE E PULIZIA ...................................................................................................................................... 11PULIZIA MANUALE GRUPPO MIXER ........................................................................................................................................................................ 11PULIZIA CASSETTO RACCOGLI GOCCE/CAPSULE USATE .......................................................................................................................... 12DECALCIFICAZIONE CIRCUITO IDRAULICO ......................................................................................................................................................... 13
MESSAGGI DI ALLARME SUL DISPLAY................................................................................................................. 14MESSAGGI SUL DISPLAY DURANTE LE OPERAZIONI CON CHIP CARD ................................................ 15CARATTERISTICHE TECNICHE .................................................................................................................................. 15SICUREZZA ....................................................................................................................................................................... 15
DESTINAZIONE D’USO ..................................................................................................................................................................................................... 15UBICAZIONE........................................................................................................................................................................................................................... 16ALIMENTAZIONE ................................................................................................................................................................................................................. 16CAVO ALIMENTAZIONE ................................................................................................................................................................................................... 16PERICOLO DI FOLGORAZIONE .................................................................................................................................................................................... 16PROTEZIONE D’ALTRE PERSONE ................................................................................................................................................................................ 16PERICOLO D’USTIONI........................................................................................................................................................................................................ 16PULIZIA ..................................................................................................................................................................................................................................... 16CUSTODIA DELLA MACCHINA .................................................................................................................................................................................... 16RIPARAZIONI / MANUTENZIONE ............................................................................................................................................................................... 16SERBATOIO ACQUA ........................................................................................................................................................................................................... 16VANO CAPSULE .................................................................................................................................................................................................................... 16SMALTIMENTO DELLA MACCHINA A FINE VITA (Direttiva Europea 2002/96/CE - D.L. 25 luglio 2005 n. 151) ........... 16
2
IT COMPONENTI
MESSAGGI A DISPLAY STATO MACCHINA
1
2
3
4
5
6
Coperchio serbatoiosolubile
Coperchio serbatoioacqua CAPSULE UTILIZZABILI
LAVAZZA BLUE
Cassetto caricamentocapsula
Maniglia perla presa
Presa di alimentazione
Interruttoregenerale
Vano inserimento chip card
Serbatoio acqua
Serratura aperturaanta vano solubile e serbatoio acqua
Anta vano solubile
Cavo alimentazione
Serbatoiosolubile
Display
Tasti selezionebevande
BeccuccioerogatoreGriglia ribaltabile per tazzina espresso
Griglia poggiatazza grande/bicchiere
Cassetto raccoglicapsule usate
Cassetto raccogligocce
STATO MACCHINA 1 2 3 4 5 6 SUONO EVENTI DISPLAY
Accensione LB 2500 PLUSIn riscaldamento
Energy Saving ENERGY SAVING
Raggiunta temperatura,macchina pronta
LB 2500 PLUSIn riscaldamento
SELEZIONARE BEVANDA
Bevanda che richiede capsulasenza introduzione capsula
ATTENZIONE!Inserire capsula
Cassetto inserimentocapsula aperto
LB 2500 PLUSInserire capsula
Prodotto selezionato in erogazione
BEVANDAIn preparazione
Selezione bevanda concassetto aperto
Suonobreve
ATTENZIONE!Inserire capsula
Erogazione terminata Suonoprolungato
BEVANDA PRONTAGRAZIE
Ciclo di pulizia con il prodotto decalcificante in corso CICLO PULIZIA IN CORSO
Ciclo di risciacquo con acqua in corso CICLO LAVAGGIO IN CORSO
SuonoLampeggianteAccesoSpento
3
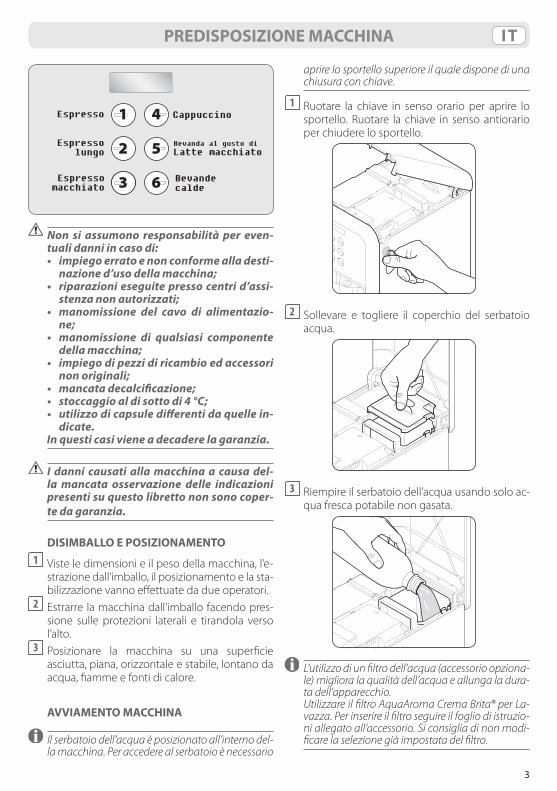
ITPREDISPOSIZIONE MACCHINA
Cappuccino
Bevanda al gusto diLatte macchiato
6
5
4
3
2
1
caldeBevandeEspresso
macchiato
Espressolungo
Espresso
Non si assumono responsabilità per even-tuali danni in caso di:
• impiegoerratoenonconformealladesti-nazione d’uso della macchina;
• riparazionieseguitepressocentrid’assi-stenza non autorizzati;
• manomissione del cavo di alimentazio-ne;
• manomissione di qualsiasi componentedella macchina;
• impiegodipezzidiricambioedaccessorinon originali;
• mancatadecalcificazione; • stoccaggioaldisottodi4°C; • utilizzodicapsuledifferentidaquellein-
dicate. Inquesticasivieneadecaderelagaranzia.
I danni causati alla macchina a causa del-la mancata osservazione delle indicazioni presentisuquestolibrettononsonocoper-te da garanzia.
DISIMBALLO E POSIZIONAMENTO1 Viste le dimensioni e il peso della macchina, l’e-
strazione dall’imballo, il posizionamento e la sta-bilizzazione vanno effettuate da due operatori.
2 Estrarre la macchina dall’imballo facendo pres-sione sulle protezioni laterali e tirandola verso l’alto.
3 Posizionare la macchina su una superficie asciutta, piana, orizzontale e stabile, lontano da acqua, fiamme e fonti di calore.
AVVIAMENTO MACCHINA
Il serbatoio dell’acqua è posizionato all’interno del-la macchina. Per accedere al serbatoio è necessario
aprire lo sportello superiore il quale dispone di una chiusura con chiave.
1 Ruotare la chiave in senso orario per aprire lo sportello. Ruotare la chiave in senso antiorario per chiudere lo sportello.
2 Sollevare e togliere il coperchio del serbatoio acqua.
3 Riempire il serbatoio dell’acqua usando solo ac-qua fresca potabile non gasata.
L’utilizzo di un filtro dell’acqua (accessorio opziona-le) migliora la qualità dell’acqua e allunga la dura-ta dell’apparecchio.
Utilizzare il filtro AquaAroma Crema Brita® per La-vazza. Per inserire il filtro seguire il foglio di istruzio-ni allegato all’accessorio. Si consiglia di non modi-ficare la selezione già impostata del filtro.
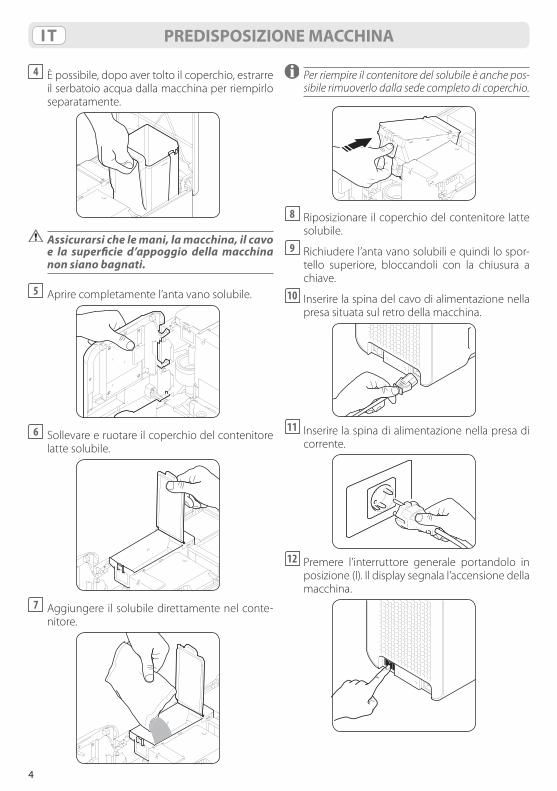
4
IT
4 È possibile, dopo aver tolto il coperchio, estrarre il serbatoio acqua dalla macchina per riempirlo separatamente.
Assicurarsi che le mani, la macchina, il cavo e la superficie d’appoggio dellamacchinanon siano bagnati.
5 Aprire completamente l’anta vano solubile.
6 Sollevare e ruotare il coperchio del contenitore
latte solubile.
7 Aggiungere il solubile direttamente nel conte-
nitore.
Per riempire il contenitore del solubile è anche pos-sibile rimuoverlo dalla sede completo di coperchio.
8 Riposizionare il coperchio del contenitore latte
solubile.9 Richiudere l’anta vano solubili e quindi lo spor-
tello superiore, bloccandoli con la chiusura a chiave.
10 Inserire la spina del cavo di alimentazione nella presa situata sul retro della macchina.
11 Inserire la spina di alimentazione nella presa di
corrente.
12 Premere l’interruttore generale portandolo in
posizione (I). Il display segnala l’accensione della macchina.
PREDISPOSIZIONE MACCHINA
5
IT
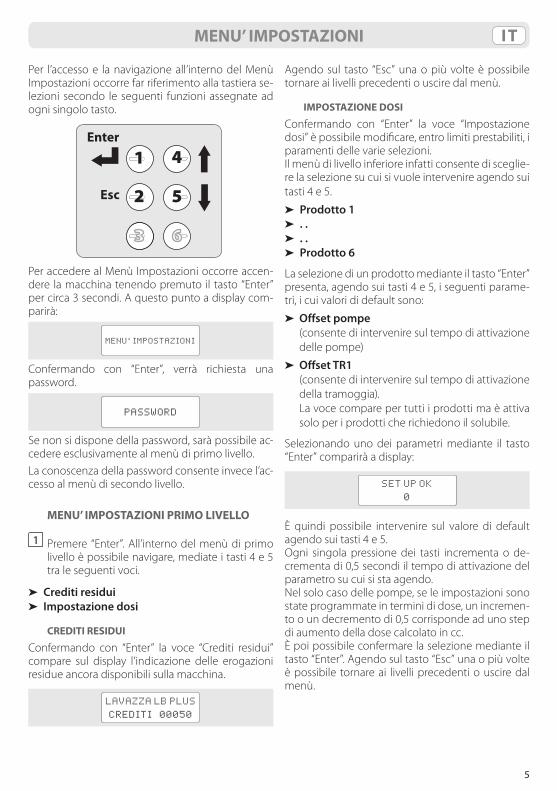
Per l’accesso e la navigazione all’interno del Menù Impostazioni occorre far riferimento alla tastiera se-lezioni secondo le seguenti funzioni assegnate ad ogni singolo tasto.
1
2
3
4
5
6
Esc
Enter
Per accedere al Menù Impostazioni occorre accen-dere la macchina tenendo premuto il tasto “Enter” per circa 3 secondi. A questo punto a display com-parirà:
MENU’ IMPOSTAZIONI
Confermando con “Enter”, verrà richiesta unapassword.
PASSWORD
Se non si dispone della password, sarà possibile ac-cedere esclusivamente al menù di primo livello. La conoscenza della password consente invece l’ac-cesso al menù di secondo livello.
MENU’ IMPOSTAZIONI PRIMO LIVELLO
1 Premere “Enter”. All’interno del menù di primo livello è possibile navigare, mediate i tasti 4 e 5 tra le seguenti voci.
➤ Crediti residui➤ Impostazione dosi
CREDITI RESIDUI
Confermando con “Enter” la voce “Crediti residui” compare sul display l’indicazione delle erogazioni residue ancora disponibili sulla macchina.
LAVAZZA LB PLUS
CREDITI 00050
MENU’ IMPOSTAZIONI
Agendo sul tasto “Esc” una o più volte è possibile tornare ai livelli precedenti o uscire dal menù.
IMPOSTAZIONE DOSI
Confermando con “Enter” la voce “Impostazione dosi” è possibile modificare, entro limiti prestabiliti, i paramenti delle varie selezioni.Il menù di livello inferiore infatti consente di sceglie-re la selezione su cui si vuole intervenire agendo sui tasti 4 e 5.
➤ Prodotto 1➤ . .➤ . .➤ Prodotto 6
La selezione di un prodotto mediante il tasto “Enter” presenta, agendo sui tasti 4 e 5, i seguenti parame-tri, i cui valori di default sono:
➤ Offset pompe (consente di intervenire sul tempo di attivazione
delle pompe)
➤ Offset TR1 (consente di intervenire sul tempo di attivazione
della tramoggia). La voce compare per tutti i prodotti ma è attiva
solo per i prodotti che richiedono il solubile.
Selezionando uno dei parametri mediante il tasto “Enter” comparirà a display:
SET UP OK
0
È quindi possibile intervenire sul valore di default agendo sui tasti 4 e 5.Ogni singola pressione dei tasti incrementa o de-crementa di 0,5 secondi il tempo di attivazione del parametro su cui si sta agendo.Nel solo caso delle pompe, se le impostazioni sono state programmate in termini di dose, un incremen-to o un decremento di 0,5 corrisponde ad uno step di aumento della dose calcolato in cc.È poi possibile confermare la selezione mediante il tasto “Enter”. Agendo sul tasto “Esc” una o più volte è possibile tornare ai livelli precedenti o uscire dal menù.
6
IT
MENU’ IMPOSTAZIONI DI SECONDO LIVELLO
Il menù di impostazioni di secondo livello è riserva-to al personale qualificato e autorizzato.
1 Digitare la password corretta e quindi premere “Enter”. La password di default è 33333.
All’interno del menù di secondo livello è possibile navigare, mediate i tasti 4 e 5, tra le seguenti voci.
➤ Scelta lingua➤ Decalcificazione➤ Durezza H2O➤ Delta Temp➤ Modifica password➤ Energy saving➤ Innesco pompe➤ Verifica card➤ Contatore
SCELTA LINGUA
Confermando con “Enter” la voce “Scelta Lingua” è possibile modificare la lingua del menù e delle se-gnalazioni a display.Il menù di livello inferiore infatti consente di sce-gliere la lingua desiderata agendo sui tasti 4 e 5 e selezionarla mediante il tasto “Enter”.
➤ Italiano➤ English➤ Français➤ Deutsch➤ Espanõl➤ Português➤ NederlandsAgendo sul tasto “Esc” una o più volte è possibile tornare ai livelli precedenti o uscire dal menù.
DECALCIFICAZIONE
Il ciclo di decalcificazione può essere attivato in qualsiasi momento, anche se la macchina non lo richiede. Confermando con “Enter” la voce “Decal-cificazione” comparirà a scorrimento sul display il seguente messaggio.
DECALCIFICAZIONE
INSERIRE PRODOTTO DECALCI-
FICANTE NEL SERBATOIO E
PREMERE OK
Non è più possibile erogare bevande fino a quando non viene completato il ciclo.
A questo punto seguire le seguenti indicazioni.
1 Riempire il serbatoio con il prodotto decalcifi-cante diluito in acqua secondo le quantità ripor-tate sulle istruzione dello stesso.
2 Posizionare un contenitore, più capiente possi-bile, sotto il beccuccio erogatore.
3 Premere quindi “Enter”; verranno attivate le pom-pe ed attraverso il beccuccio erogatore fluirà la soluzione decalcificante che ha effettuato la sua azione all’interno del circuito della macchina. Sul display comparirà il messaggio:
CICLO PULIZIA
IN CORSO
• Nonbereorischiaredifarberelasoluzio-nedecalcificante.
• Pericolodiscottature,lasoluzionedecal-cificantevieneerogataadaltatempera-tura.
4 La macchina erogherà il volume di soluzione pre-visto.
E’ comunque possibile, premendo “Enter”, inter-rompere momentaneamente il ciclo per consen-tire lo svuotamento e lo smaltimento del con-tenuto del contenitore utilizzato per la raccolta della soluzione.
Per aumentare l’efficacia dell’azione del prodotto decalcificante è consigliabile comunque, ogni due minuti c.a. di erogazione continua, effettua-re delle pause di c.a. un minuto, interrompendo il ciclo attraverso la pressione del tasto “Enter”.
5 Riposizionare il contenitore svuotato sotto il beccuccio erogatore.
6 Premere “Enter” per riavviare il ciclo.
In caso di interruzione dell’alimentazione elettrica durante il ciclo di decalcificazione, alla successiva ri-accensione, la macchina si riporterà automati-camente nella condizione di partenza dello stesso.
7 Allo svuotamento del serbatoio, sul display comparirà il messaggio:
MENU’ IMPOSTAZIONI
7
IT
RISCIACQUARE IL
SERBATOIO
Alternato al messaggio:
RIEMPIRE
SERBATOIO
8 Risciacquare e lavare quindi accuratamente il serbatoio con acqua fresca potabile.
Rabboccare poi lo stesso sempre con acqua fre-sca, potabile e non gasata. Sul display apparirà il messaggio:
AVVIARE
RISCIACQUO
9 Posizionare un contenitore, più capiente possi-bile, sotto il beccuccio erogatore.
10 Premere “Enter” per avviare il risciacquo del cir-cuito idraulico della macchina, sul display com-parirà il messaggio:
CICLO LAVAGGIO
IN CORSO
11 La macchina erogherà il volume di acqua pre-visto. E’ comunque possibile, premendo “Enter”, interrompere momentaneamente il ciclo per consentire lo svuotamento e lo smaltimento del contenuto del contenitore utilizzato per la rac-colta dell’acqua.
12 Riposizionare il contenitore svuotato sotto il beccuccio erogatore.
13 Premere “Enter” per riavviare il ciclo.14 La macchina può richiedere di riempire nuova-
mente il serbatoio in caso in cui non sia raggiun-to il volume d’acqua previsto. La segnalazione in questo caso è quella indicata al punto 7. Ri-partire quindi dal punto 8 per terminare il ciclo.
15 Quando la macchina avrà erogato il volume d’acqua previsto, viene visualizzato il messag-gio:
DECALCIFICAZIONE
COMPLETATA
MENU’ IMPOSTAZIONI
E’ quindi possibile erogare nuovamente bevande rabboccando se necessario il serbatoio con acqua fresca, potabile e non gasata.
DUREZZA H2O Confermando con “Enter” la voce “Durezza H2O” è possibile inserire il dato relativo alla durezza dell’ac-qua tipico della locazione in cui viene installata la macchina.Tale valore è misurabile attraverso le apposite stri-sce viranti disponibili in commercio.Agendo sui tasti 4 e 5 è possibile inserire un valore in un range da 5 a 50 gradi francesi.Il valore è impostato di default a 20 gradi francesi. Se si utilizza un filtro addolcitore impostare un va-lore di durezza dell’acqua in funzione del potere di abbattimento del filtro.
DELTA TEMP
Confermando con “Enter” la voce “Delta Temp” è possibile modificare la temperatura di lavoro della caldaia in maniera tale da aumentare o diminuire leggermente la temperatura del prodotto erogato. Agendo sui tasti 4 e 5 è possibile aumentare o dimi-nuire il valore in un range di ± 4 °C.
MODIFICA PASSWORD
Confermando con “Enter” la voce “Modifica Pas-sword” compare a display:
PASSWORD
Digitando la password compare la seguente segna-lazione:
MODIFICA PASSWORD
A questo punto è possibile inserire la password de-siderata che deve essere composta da 6 caratteri.È poi possibile confermare la password digitata me-diante il tasto “Enter”.Agendo sul tasto “Esc” una o più volte è possibile tornare ai livelli precedenti o uscire dal menù.
8
IT
ENERGY SAVING
La macchina è programmata per poter andare in condizione di risparmio energia dopo un certo tempo di inattività. Il valore pre-impostato è 2 ore.
In condizione di Energy Saving la macchina segnala a display:
ENERGY SAVING
Per riportare la macchina in condizione pronta è sufficiente premere un qualsiasi tasto di selezione. Confermando con “Enter” la voce “Energy Saving” è possibile scegliere, agendo sui tasti 4 e 5, tra le due opzioni seguenti:
➤ Energy saving disattivato➤ Energy saving attivatoÈ possibile selezionare l’attivazione o la disattiva-zione dell’Energy saving mediante il tasto “Enter”. Agendo sul tasto “Esc” una o più volte è possibile tornare ai livelli precedenti o uscire dal menù.
INNESCO POMPE
Confermando con “Enter” la voce “Innesco Pompe” è possibile scegliere, agendo sui tasti 4 e 5, tra le due opzioni seguenti:
➤ Innesco pompe attivato➤ Innesco pompe disattivatoÈ possibile selezionare l’attivazione o la disattivazio-ne della funzione mediante il tasto “Enter”.Agendo sul tasto “Esc” una o più volte è possibile tornare ai livelli precedenti o uscire dal menù.La funzione di innesco pompe è eseguibile, in stato di macchina pronta, premendo contemporanea-mente i tasti 3 e 6 per almeno 3 secondi.
Prima di attivare la funzione di innesco pompe è necessario posizionare una tazza od un bicchiere sotto l’erogatore, sulla gri-glia poggia tazze.
Durante l’innesco pompe compare a display il se-guente messaggio:
INNESCO
POMPE IN CORSO
A seconda dell’esito della procedura ed al termine di essa, a display compare il seguente messaggio.
INNESCO POMPE
POSITIVO/NEGATIVO
Al primo avviamento della macchina o dopo un prolungato inutilizzo potrebbe essere necessario eseguire l’operazione di caricamento idraulico. La funzione, se preventivamente attivata da menù, viene eseguita automaticamente dalla macchina attraverso la pressione contemporanea dei tasti 3 e 6 per almeno 3 secondi.
VERIFICA CARD
Questa funzione consente all’operatore di verificare una chip card, indipendentemente dal suo utilizzo. Confermando con “Enter” la voce “Verifica Card” comparirà a display il seguente messaggio.
INSERISCI CARD
Inserendo la chip card nell’apposita fessura della macchina compariranno sul display le informazioni relative ad essa.Estrarre quindi la chip card e agire sul tasto “Esc” una o più volte per tornare ai livelli precedenti o uscire dal menù.
CONTATORE
Questa funzione consente di analizzare il totalizza-tore delle erogazioni e le statistiche delle varie sele-zioni della macchina.Confermando con “Enter” la voce “Contatore” è pos-sibile scorrere, agendo sui tasti 4 e 5 , i vari totaliz-zatori.
➤ Tot erogazioni eseguite 000079➤ Tot prodotto 1 eseguite 000027➤ . .➤ . .➤ Tot prodotto 6 eseguite 000008
MENU’ IMPOSTAZIONI
9
IT
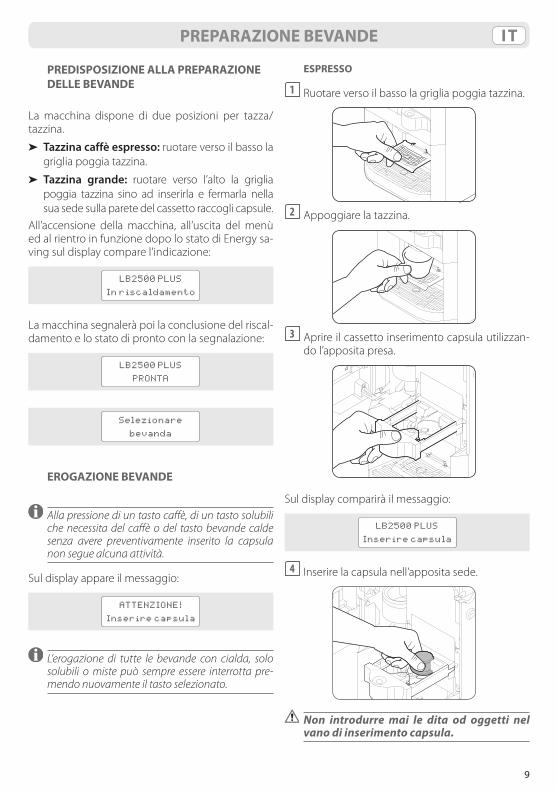
PREDISPOSIZIONE ALLA PREPARAZIONE DELLE BEVANDE
La macchina dispone di due posizioni per tazza/tazzina.
➤ Tazzina caffè espresso: ruotare verso il basso la griglia poggia tazzina.
➤ Tazzina grande: ruotare verso l’alto la griglia poggia tazzina sino ad inserirla e fermarla nella sua sede sulla parete del cassetto raccogli capsule.
All’accensione della macchina, all’uscita del menù ed al rientro in funzione dopo lo stato di Energy sa-ving sul display compare l’indicazione:
LB2500 PLUS
In riscaldamento
La macchina segnalerà poi la conclusione del riscal-damento e lo stato di pronto con la segnalazione:
LB2500 PLUS
PRONTA
Selezionare
bevanda
EROGAZIONE BEVANDE
Alla pressione di un tasto caffè, di un tasto solubili che necessita del caffè o del tasto bevande calde senza avere preventivamente inserito la capsula non segue alcuna attività.
Sul display appare il messaggio:
ATTENZIONE!
Inserire capsula
L’erogazione di tutte le bevande con cialda, solo solubili o miste può sempre essere interrotta pre-mendo nuovamente il tasto selezionato.
PREPARAZIONE BEVANDE
ESPRESSO
1 Ruotare verso il basso la griglia poggia tazzina.
2 Appoggiare la tazzina.
3 Aprire il cassetto inserimento capsula utilizzan-
do l’apposita presa.
Sul display comparirà il messaggio:
LB2500 PLUS
Inserire capsula
4 Inserire la capsula nell’apposita sede.
Non introdurre mai le dita od oggetti nel vano di inserimento capsula.
10
IT
Nel vano inserimento capsula devono esse-re inserite esclusivamente capsule Lavazza Blue monodose. Inserire una sola capsula per volta.
5 Chiudere il cassetto caricamento capsula ed at-tendere che sul display appaia il messaggio:
LB2500 PLUS
PRONTA
Selezionare
bevanda
6 Premere il tasto relativo all’ESPRESSO. Sul display comparirà il messaggio:
Bevanda
In preparazione
7 Attendere che sul display compaia il messaggio:
Bevanda pronta
Grazie Il caffè è pronto.
ESPRESSO LUNGO
1 Ruotare verso l’alto la griglia poggia tazzina sino ad inserirla e fermarla nella sua sede sulla parete del cassetto raccogli capsule.
2 Eseguire i passaggi 2, 3, 4 del paragrafo ESPRES-
SO.3 Premere il tasto relativo all’ESPRESSO LUNGO.4 Seguire i punti 6 e 7 del paragrafo ESPRESSO.
ESPRESSO MACCHIATO
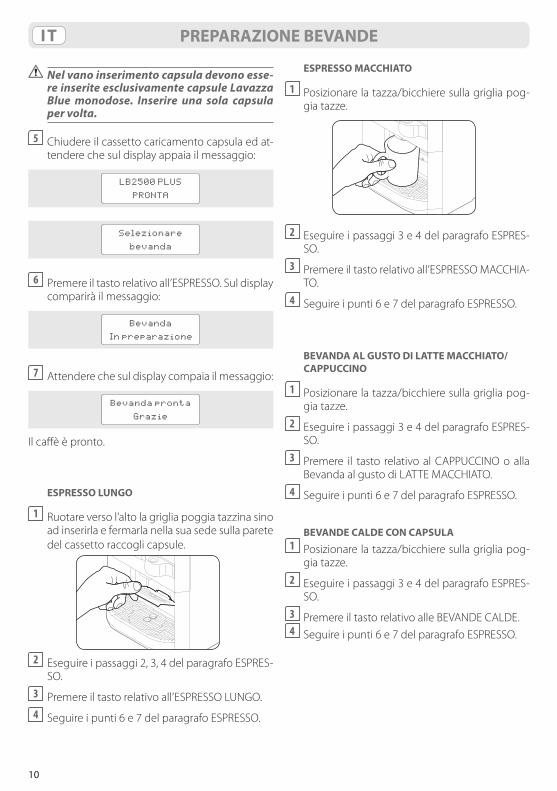
1 Posizionare la tazza/bicchiere sulla griglia pog-gia tazze.
2 Eseguire i passaggi 3 e 4 del paragrafo ESPRES-
SO.3 Premere il tasto relativo all’ESPRESSO MACCHIA-
TO.4 Seguire i punti 6 e 7 del paragrafo ESPRESSO.
BEVANDA AL GUSTO DI LATTE MACCHIATO/CAPPUCCINO
1 Posizionare la tazza/bicchiere sulla griglia pog-gia tazze.
2 Eseguire i passaggi 3 e 4 del paragrafo ESPRES-SO.
3 Premere il tasto relativo al CAPPUCCINO o alla Bevanda al gusto di LATTE MACCHIATO.
4 Seguire i punti 6 e 7 del paragrafo ESPRESSO.
BEVANDE CALDE CON CAPSULA1 Posizionare la tazza/bicchiere sulla griglia pog-
gia tazze.2 Eseguire i passaggi 3 e 4 del paragrafo ESPRES-
SO.3 Premere il tasto relativo alle BEVANDE CALDE.4 Seguire i punti 6 e 7 del paragrafo ESPRESSO.
PREPARAZIONE BEVANDE
11
IT
Prima di eseguire operazioni di pulizia assi-curarsi sempre che l’alimentazione elettri-casiascollegataedattendere ilraffredda-mento della macchina.
Si consiglia di risciacquare quotidianamente il ser-batoio dell’acqua e di riempirlo con acqua fresca. Lavare ogni giorno il beccuccio erogatore. Svuo-tare e pulire il cassetto raccogli gocce ogni due/tre giorni o comunque quando è pieno. Non utilizza-re forni a microonde o tradizionali per asciugare la macchina o sue parti. Mai utilizzare detergenti alcalini, solventi, alcol o sostanze aggressive. Non immergere la macchina in acqua. Salvo specifi-che indicazioni tutti i componenti non smontabili (esclusi quelli elettrici) della macchina vanno lavati utilizzando acqua fredda o tiepida e panni o spu-gne non abrasive.
PULIZIA MANUALE GRUPPO MIXER
La macchina dispone di funzioni di pulizia auto-matica del gruppo mixer, eseguibile attraverso la pressione contemporanea dei tasti 1 e 2 per alme-no 3 secondi. Di default la macchina è program-mata per avvisare l’utente sulla necessità di esecu-zione del lavaggio ogni 50 erogazioni di prodotto attraverso la seguente segnalazione.
LAVAGGIO MIXER
RICHIESTO
La pulizia automatica può altresì essere effettuata in ogni momento sempre utilizzando la pressione contemporanea dei tasti 1 e 2 per almeno 3 secon-di. Durante la pulizia automatica del mixer la mac-china presenta la seguente segnalazione:
LAVAGGIO MIXER
IN CORSO
Per la pulizia manuale del gruppo mixer, seguire la seguente procedura.
1 Spegnere la macchina.
2 Ruotare la chiave, aprire il coperchio superiore e l’anta del solubile.
Rimuovere il contenitore del solubile.
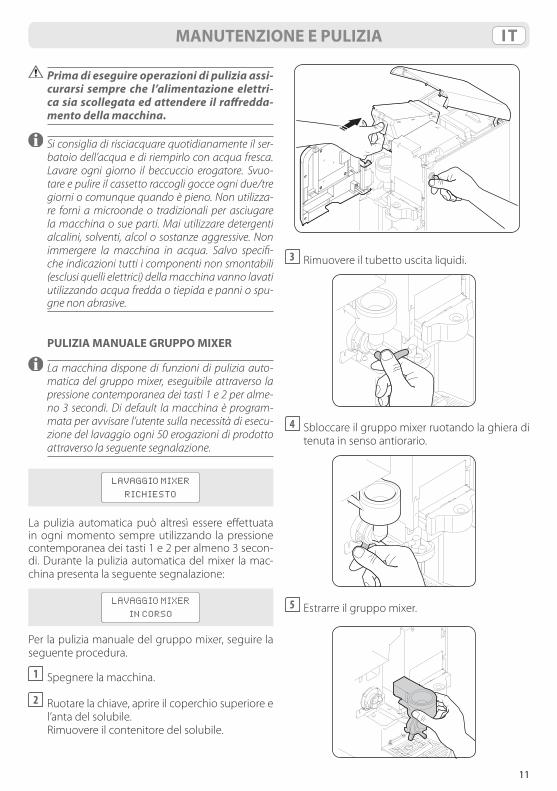
3 Rimuovere il tubetto uscita liquidi.
4 Sbloccare il gruppo mixer ruotando la ghiera di
tenuta in senso antiorario.
5 Estrarre il gruppo mixer.
MANUTENZIONE E PULIZIA
12
IT MANUTENZIONE E PULIZIA
6 Rimuovere la ghiera dal gruppo mixer.
7 Sganciare la parte superiore del gruppo mixer
da quella inferiore.
8 Lavare i componenti con acqua fredda o tiepi-
da, quindi asciugarli e rimontarli correttamente.
Per rimontare il gruppo mixer eseguire le operazio-ni fin qui descritte in modo inverso.
PULIZIA CASSETTO RACCOGLI GOCCE/CAPSULE USATE
La pulizia del cassetto raccogli gocce/capsule usa-te deve essere eseguita regolarmente e comunque ogni qualvolta il display mostri il seguente messag-gio:
LB2500 PLUS
Cassetto pieno
In caso di apertura del cassetto inserimento capsu-le quando il cassetto raccogli capsule usate è pieno, viene segnalato sul display il seguente messaggio.
LB2500 PLUS
Svuota cassetto
1 Estrarre il cassetto raccogli gocce/capsule com-pleto. Il display segnala:
LB2500 PLUS
Cassetto aperto
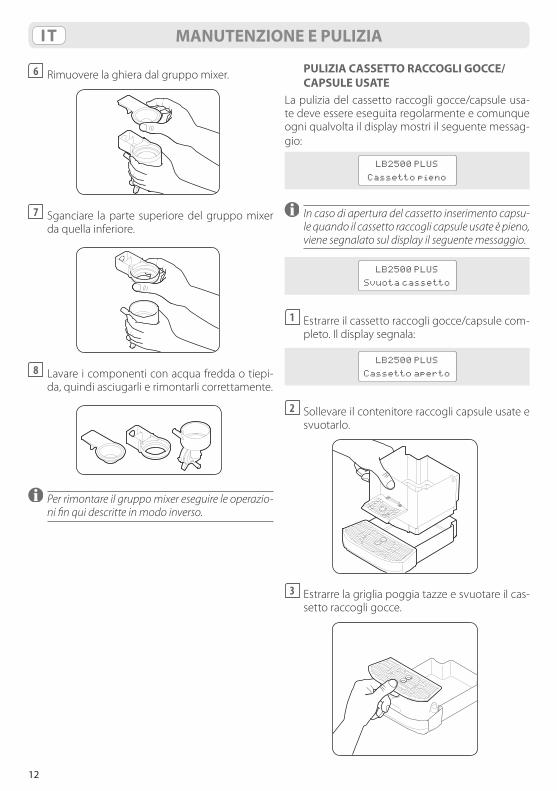
2 Sollevare il contenitore raccogli capsule usate e svuotarlo.
3 Estrarre la griglia poggia tazze e svuotare il cas-
setto raccogli gocce.
13
ITMANUTENZIONE E PULIZIA
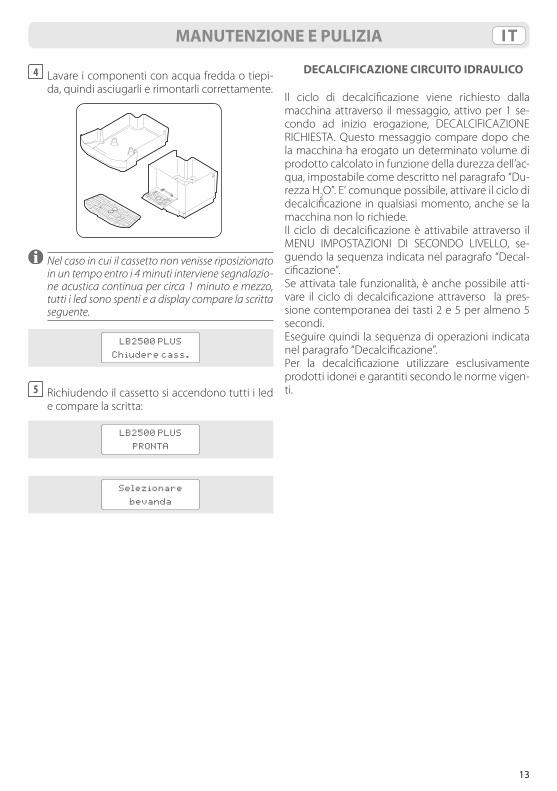
4 Lavare i componenti con acqua fredda o tiepi-da, quindi asciugarli e rimontarli correttamente.
Nel caso in cui il cassetto non venisse riposizionato in un tempo entro i 4 minuti interviene segnalazio-ne acustica continua per circa 1 minuto e mezzo, tutti i led sono spenti e a display compare la scritta seguente.
LB2500 PLUS
Chiudere cass.
5 Richiudendo il cassetto si accendono tutti i led e compare la scritta:
LB2500 PLUS
PRONTA
Selezionare
bevanda
DECALCIFICAZIONE CIRCUITO IDRAULICO
Il ciclo di decalcificazione viene richiesto dalla macchina attraverso il messaggio, attivo per 1 se-condo ad inizio erogazione, DECALCIFICAZIONE RICHIESTA. Questo messaggio compare dopo che la macchina ha erogato un determinato volume di prodotto calcolato in funzione della durezza dell’ac-qua, impostabile come descritto nel paragrafo “Du-rezza H2O”. E’ comunque possibile, attivare il ciclo di decalcificazione in qualsiasi momento, anche se la macchina non lo richiede.Il ciclo di decalcificazione è attivabile attraverso il MENU IMPOSTAZIONI DI SECONDO LIVELLO, se-guendo la sequenza indicata nel paragrafo “Decal-cificazione”.Se attivata tale funzionalità, è anche possibile atti-vare il ciclo di decalcificazione attraverso la pres-sione contemporanea dei tasti 2 e 5 per almeno 5 secondi.Eseguire quindi la sequenza di operazioni indicata nel paragrafo “Decalcificazione”.Per la decalcificazione utilizzare esclusivamente prodotti idonei e garantiti secondo le norme vigen-ti.

14
IT MESSAGGI DI ALLARME SUL DISPLAY
Display Stato macchina Eventi RimediLAVAZZA LB PLUSCassetto pieno
Cassetto capsule usate pieno
È possibile l’erogazionedi solubili
Svuotare cassetto e lavarlo
LAVAZZA LB PLUSCassetto aperto
Apertura cassetto con macchina in temperatura
Non è possibile effettuare erogazioni
Chiudere il cassetto
ATTENZIONEMancanza acqua
Manca acqua nel serbatoio o manca serbatoio
Lampeggio dei tasti selezione
Riempire il serbatoio con acqua potabile, fresca, non gasata
ATTENZIONEAnta aperta
Anta solubili apertaNon è possibile effettuare erogazioni
Chiudere l’anta solubili
SURRISCALDAMENTO ATTENDERE
Temperatura troppo elevata
Non è possibile effettuare erogazioni
Attendere raffreddamento. Se il messaggio non scompare, contattare l’assistenza
ATTENDERERAFFREDDAMENTO
Componenti macchina in fase di raffreddamento
Non è possibile effettuare erogazioni
Attendere raffreddamento.Se il messaggio non scompare, contattare l’assistenza
CREDITO ESAURITO
Credito esauritoNon è possibile effettuare erogazioni
Ricaricare il credito
TIMEOUT EROGAZIONE
Erogazione terminata per assenza flusso acqua
Erogazione prodotto incompleta
Eseguire la procedura di innesco pompe. In caso di permanenza del messaggio o mancato innesco contattare l’assistenza
INSERIRECREDITO
Inserire credito, quando le erogazioni sono a pagamento e manca il credito
Non è possibile effettuare erogazioni
Ricaricare il credito
ALLARME RISCALDAMENTO
Riscaldamento non avvenuto
Non è possibile effettuare erogazioni
Contattare l’assistenza
GUASTO AL FLUSSIMETRO
Flussimetro guasto, numero impulsi non raggiunti
Non è possibile effettuare erogazioni
Contattare l’assistenza
ALLARMESONDA
Allarme sonda (in corto o aperta)
Non è possibile effettuare erogazioni
Contattare l’assistenza
INNESCO POMPENEGATIVO
Esito negativo dell’innesco pompe
-Ripetere l’operazione. In caso di esito negativo, contattare l’assistenza
DECALCIFICAZIONERICHIESTA
La macchina richiede la decalcificazione del circuito idraulico
-
Eseguire il ciclo di decalcificazione come indicato nel capitolo “Manutenzione e pulizia”
15
ITMESSAGGI SUL DISPLAY DURANTE LE OPERAZIONI CON CHIP CARD
Display EventiNO IMPOSTAZIONISCHEDA VERGINE La scheda non è inizializzata. Mancano le impostazioni
OPERAZ. NON OKESTRARRE LA CARD I dati non sono congruenti
OPERAZIONE OKESTRARRE LA CARD Il trasferimento dei dati è stato effettuato, si può estrarre la card
CARD IMPOSTAZ.SCRITT. IN CORSO Scrittura in corso su macchina da una card. Scrittura impostazioni
CARD IMPOSTAZ.LETTURA IN CORSO Lettura in corso dalla macchina su una card. Lettura impostazioni
CARD ONE TIMETRASFER.IN CORSO Trasferimento in corso da una card OneTime
MASTERCARDTRASFER.IN CORSO Trasferimento da una MasterCard
CARD PROVAINSERITA Conferma inserimento card prova
CARD CREDITIINSERITA Conferma inserimento card crediti
CARD MULTINSCONTATORE NULLO Verifica su Multins, assenza crediti
CARD MULTINSPREMERE TASTO 1 Con card Multins inserita premere tasto 1 per trasferire i crediti
CARD MULTINSANNULLAM.CREDITI Con card Multins inserita, trasferimento annullato
TRASFERIMENTOCREDITI xxxxx Visualizza totale crediti trasferiti
CARD AUTOTESTINSERITA Conferma inserimento card autotest
Per le caratteristiche tecniche fare riferimento alla targhetta dati presente sulla macchina.
➤ Voltaggio: 220 - 240 V, 50/60 Hz➤ Potenza totale: 1450 W➤ Capacità serbatoio: 3 l➤ Peso: 12 kg
SICUREZZA
DESTINAZIONE D’USOQuesto apparecchio è destinato ad essere utilizzato nelle applicazioni professionali. È vietato qualun-que utilizzo improprio (non descritto nelle presenti istruzioni). È vietato apportare modifiche tecniche. La macchina non è destinata ad essere utilizzata
CARATTERISTICHE TECNICHE
➤ Materiali impiegati per la carrozzeria: termoplastico➤ Capacità cassetto capsule usate: 20 capsule La-
vazza Blue➤ Dimensioni: Altezza 470 mm ; Larghezza 260 mm ;
Profondità 400 mm➤ Conformità: 2006/42 CE - 2004/108 CE - 2006 /95
CE
da bambini o persone con ridotte capacità fisiche, mentali o sensoriali, o senza esperienza e conoscen-za, a meno che abbiano ricevuto istruzioni relativa-mente all’uso della macchina e siano controllati da una persona responsabile per la loro sicurezza.
16
IT SICUREZZA
UBICAZIONESistemare la macchina per caffè in un posto sicuro, su una superficie piana, orizzontale e stabile, dove nes-suno possa rovesciarla o venirne ferito. Non tenere la macchina a temperatura inferiore a 4 °C poiché il gelo potrebbe danneggiarla. Non usare la macchina per caffè all’aperto. Non posare la macchina su super-fici molto calde e/o nelle vicinanze di fiamme libere. Utilizzare la macchina a temperatura ambiente.
ALIMENTAZIONECollegare la macchina per caffè soltanto ad una presa di corrente adeguata. La tensione deve cor-rispondere a quella indicata sulla targhetta della macchina.
CAVO ALIMENTAZIONENon usare la macchina per caffè se il cavo d’alimen-tazione è difettoso o danneggiato. In tali casi deve essere sostituito immediatamente. Non far passare il cavo d’alimentazione per angoli e su spigoli vivi, sopra oggetti molto caldi e proteggerlo dall’olio. Non portare o tirare la macchina per caffè tenen-dola per il cavo. Non estrarre la spina tirando il cavo; non toccare la spina con le mani bagnate. Evitare che il cavo d’alimentazione cada liberamente da ta-voli o scaffali.
PERICOLO DI FOLGORAZIONENon mettere mai a contatto dell’acqua le parti sotto corrente. Assicurarsi che le mani, la macchina, il cavo e la superficie d’appoggio della macchina non siano bagnati.
PROTEZIONE D’ALTRE PERSONETenere i bambini sotto supervisione, per evitare che giochino con l’apparecchio. I bambini non si rendo-no conto del pericolo connesso agli elettrodomesti-ci. Non lasciare alla loro portata i materiali utilizzati per imballare la macchina.
PERICOLO D’USTIONINon toccare le parti calde (gruppo porta capsula, etc.) subito dopo l’uso dell’apparecchio. Durante l’erogazione della bevanda prestare attenzione ad eventuali schizzi di liquido caldo.
PULIZIAPrima di pulire la macchina, è indispensabile stacca-re la spina dalla presa di corrente ed aspettare che la macchina si raffreddi. Non immergere la macchina nell’acqua! È severamente vietato cercare d’inter-venire all’interno della macchina. Non utilizzare per scopi alimentari l’acqua presente nel serbatoio.
CUSTODIA DELLA MACCHINAQuando la macchina rimane inutilizzata per un pe-riodo prolungato, staccare la spina dalla presa e cu-stodirla in luogo asciutto e non accessibile ai bam-bini. Proteggerla dalla polvere e dallo sporco.
RIPARAZIONI / MANUTENZIONENel caso di guasti, difetti o sospetto di difetto dopo una caduta, staccare subito la spina dalla presa. Non mettere in funzione una macchina difettosa. Soltan-to i Centri di Assistenza Autorizzati possono effet-tuare interventi e riparazioni. Nel caso di interventi non eseguiti a regola d’arte, si declina ogni respon-sabilità per eventuali danni.
SERBATOIO ACQUAImmettere nel serbatoio soltanto acqua fresca po-tabile non gasata. Non mettere in funzione la mac-china se l’acqua non supera almeno il livello minimo indicato sul serbatoio.
VANO CAPSULENel vano capsule devono essere inserite solo cap-sule Lavazza BLUE monodose; non inserire le dita o qualsiasi altro oggetto. Le capsule sono da utilizzare una sola volta.
SMALTIMENTO DELLA MACCHINA A FINE VITA (Direttiva Europea 2002/96/CE - D.L. 25 luglio 2005 n. 151)
Il simbolo del cassonetto apposto sull’apparecchia-tura e/o sulla sua confezione indica che il prodot-to alla fine della propria vita utile non deve essere gettato tra i normali rifiuti. La macchina deve essere portata in uno dei centri di raccolta differenziata specifici per i rifiuti elettrici ed elettronici esistenti sul territorio nazionale oppure riconsegnata al ri-venditore al momento dell’acquisto di un’apparec-chiatura nuova equivalente, in ragione di uno a uno.L’utente è responsabile del conferimento dell’appa-recchio alle appropriate strutture di raccolta, pena le sanzioni previste dalla vigente legislazione su questa materia. L’adeguata raccolta differenziata di tali apparecchiature per il riciclaggio e/o lo smalti-mento ambientalmente compatibile, contribuisce ad evitare possibili effetti negativi sull’ambiente e sulla salute e favorisce il reimpiego e/o riciclo dei materiali di cui è composta la macchina. Per infor-mazioni più dettagliate inerenti il sistema di raccol-ta disponibile, rivolgersi al locale servizio di smalti-mento rifiuti o al rivenditore dove è stato effettuato l’acquisto.
17
ENGENERAL INDEX
GENERAL INDEX ............................................................................................................................................................ 17COMPONENTS................................................................................................................................................................. 18MESSAGES TO DISPLAY MACHINE STATUS ....................................................................................................... 18MACHINE SETUP ............................................................................................................................................................ 19
UNPACKING AND POSITIONING ................................................................................................................................................................................ 19STARTING THE MACHINE ................................................................................................................................................................................................ 19
SETTINGS MENU ............................................................................................................................................................ 21LEVEL ONE SETTINGS MENU ....................................................................................................................................................................................... 21REMAINING CREDIT................................................................................................................................................................................................................................................21DOSE SETTINGS........................................................................................................................................................................................................................................................21LEVEL TWO SETTINGS MENU ...................................................................................................................................................................................... 22LANGUAGE CHOICE ...............................................................................................................................................................................................................................................22DESCALING .................................................................................................................................................................................................................................................................22H2O HARDNESS ........................................................................................................................................................................................................................................................23DELTA TEMP ................................................................................................................................................................................................................................................................23CHANGE PASSWORD ............................................................................................................................................................................................................................................23ENERGY SAVING .......................................................................................................................................................................................................................................................24START PUMPS ............................................................................................................................................................................................................................................................24CARD CHECK ..............................................................................................................................................................................................................................................................24COUNTER .....................................................................................................................................................................................................................................................................24
DRINKS PREPARATION ................................................................................................................................................ 25INITIALISING FOR DRINKS PREPARATION.............................................................................................................................................................. 25DRINKS DISPENSING ......................................................................................................................................................................................................... 25ESPRESSO .....................................................................................................................................................................................................................................................................25LONG ESPRESSO ......................................................................................................................................................................................................................................................26ESPRESSO MACCHIATO .......................................................................................................................................................................................................................................26LATTE MACCHIATO/CAPPUCCINO FLAVOURED DRINK ..................................................................................................................................................................26HOT DRINKS WITH CAPSULES .........................................................................................................................................................................................................................26
MAINTENANCE AND CLEANING ............................................................................................................................. 27MANUAL CLEANING OF MIXER GROUP ................................................................................................................................................................ 27CLEANING OF DRIP TRAY/USED CAPSULES DRAWER .................................................................................................................................. 28DESCALING THE HYDRAULIC CIRCUIT ................................................................................................................................................................... 29
ALARM MESSAGES ON THE DISPLAY ................................................................................................................... 30MESSAGES ON THE DISPLAY DURING CHIP CARD OPERATIONS ............................................................ 31TECHNICAL SPECIFICATIONS ................................................................................................................................... 31SAFETY ............................................................................................................................................................................... 31
INTENDED USE ..................................................................................................................................................................................................................... 31POSITION ................................................................................................................................................................................................................................. 32POWER SUPPLY .................................................................................................................................................................................................................... 32POWER SUPPLY CORD ..................................................................................................................................................................................................... 32ELECTRIC SHOCK HAZARD ........................................................................................................................................................................................... 32PROTECTION OF OTHERS .............................................................................................................................................................................................. 32BURN HAZARD ..................................................................................................................................................................................................................... 32CLEANING ............................................................................................................................................................................................................................... 32LOOKING AFTER THE MACHINE ................................................................................................................................................................................. 32REPAIRS / MAINTENANCE .............................................................................................................................................................................................. 32WATER TANK ........................................................................................................................................................................................................................... 32CAPSULES COMPARTMENT .......................................................................................................................................................................................... 32DISPOSAL OF THE MACHINE AT THE END OF ITS LIFE CYCLE(European Directive 2002/96/EC - D.L. 25 July 2005 no. 151) ................................................................................................................. 32

18
EN COMPONENTS
MESSAGES TO DISPLAY MACHINE STATUS
1
2
3
4
5
6
Soluble powder tank cover
Water tank coverUSABLE CAPSULES
LAVAZZA BLUE
Capsules insertion drawer
Grip handle
Power socket
General switch
Chip card insertion compartment
Water tank
Lock for soluble powder compartment door and water tankSoluble powder compartment door
Power supply cord
Soluble powder tank
Display
Drink selection buttons
Nozzle
Folding espresso cup-support rack
Large cup/glass- support rack
Used capsules drawer
Drip tray drawer
SoundFlashingOnOff
MACHINE STATUS 1 2 3 4 5 6 SOUND SOUND DISPLAY
Turning on LB 2500 PLUSWarming up
Energy Saving ENERGY SAVING
Temperature reached,machine ready
LB 2500 PLUSWarming up
DRINK SELECTION
Drink requiring capsule no capsule inserted
WARNING!Insert capsule
Capsule insertion drawer open LB 2500 PLUSInsert capsule
Selected product is being dispensed DRINKIn preparation
Drink selection with drawer open
Shortsound
WARNING!Insert capsule
Finished dispensing Longsound
DRINK READYTHANK YOU
Cleaning cycle with descaling product in progress
CLEANING CYCLE IN PROGRESS
Rinsing cycle with water in progress WASHING CYCLE IN PROGRESS
19
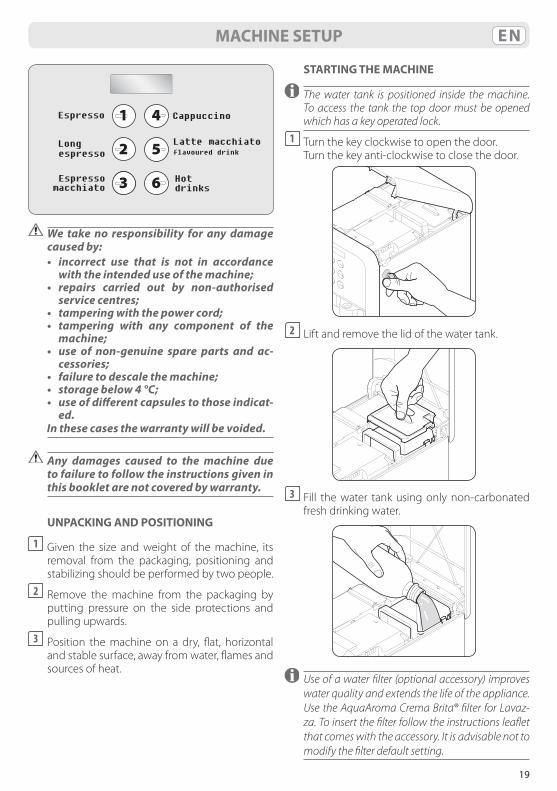
ENMACHINE SETUP
Cappuccino
flavoured drinkLatte macchiato
6
5
4
3
2
1
drinksHot Espresso
macchiato
Long espresso
Espresso
We take no responsibility for any damage caused by:
• incorrect use that is not in accordancewith the intended use of the machine;
• repairs carried out by non-authorisedservice centres;
• tamperingwiththepowercord; • tampering with any component of the
machine; • use of non-genuine spare parts and ac-
cessories; • failuretodescalethemachine; • storagebelow4°C; • useofdifferentcapsulestothoseindicat-
ed. In these cases the warranty will be voided.
Any damages caused to the machine due to failure to follow the instructions given in this booklet are not covered by warranty.
UNPACKING AND POSITIONING
1 Given the size and weight of the machine, its removal from the packaging, positioning and stabilizing should be performed by two people.
2 Remove the machine from the packaging by putting pressure on the side protections and pulling upwards.
3 Position the machine on a dry, flat, horizontal and stable surface, away from water, flames and sources of heat.
STARTING THE MACHINE
The water tank is positioned inside the machine. To access the tank the top door must be opened which has a key operated lock.
1 Turn the key clockwise to open the door. Turn the key anti-clockwise to close the door.
2 Lift and remove the lid of the water tank.
3 Fill the water tank using only non-carbonated
fresh drinking water.
Use of a water filter (optional accessory) improves water quality and extends the life of the appliance. Use the AquaAroma Crema Brita® filter for Lavaz-za. To insert the filter follow the instructions leaflet that comes with the accessory. It is advisable not to modify the filter default setting.
20
EN
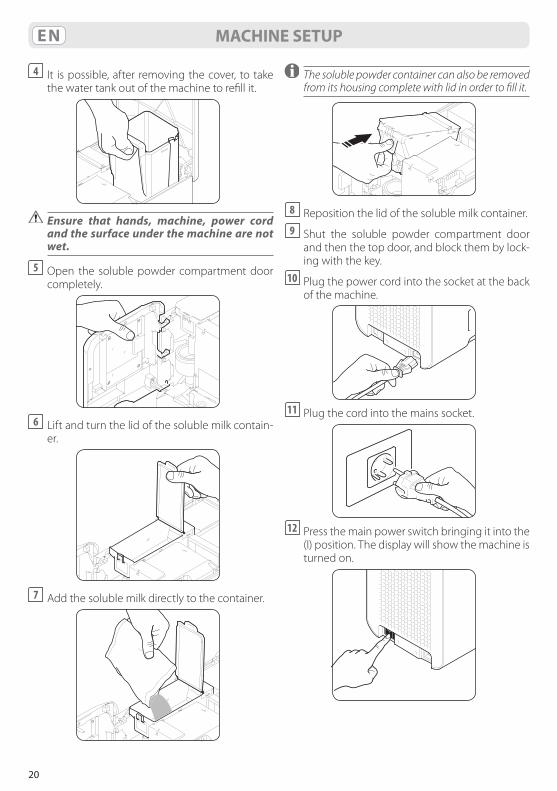
4 It is possible, after removing the cover, to take the water tank out of the machine to refill it.
Ensure that hands, machine, power cord and the surface under the machine are not wet.
5 Open the soluble powder compartment door completely.
6 Lift and turn the lid of the soluble milk contain-
er.
7 Add the soluble milk directly to the container.
The soluble powder container can also be removed from its housing complete with lid in order to fill it.
8 Reposition the lid of the soluble milk container.9 Shut the soluble powder compartment door
and then the top door, and block them by lock-ing with the key.
10 Plug the power cord into the socket at the back of the machine.
11 Plug the cord into the mains socket.
12 Press the main power switch bringing it into the
(I) position. The display will show the machine is turned on.
MACHINE SETUP
21
EN
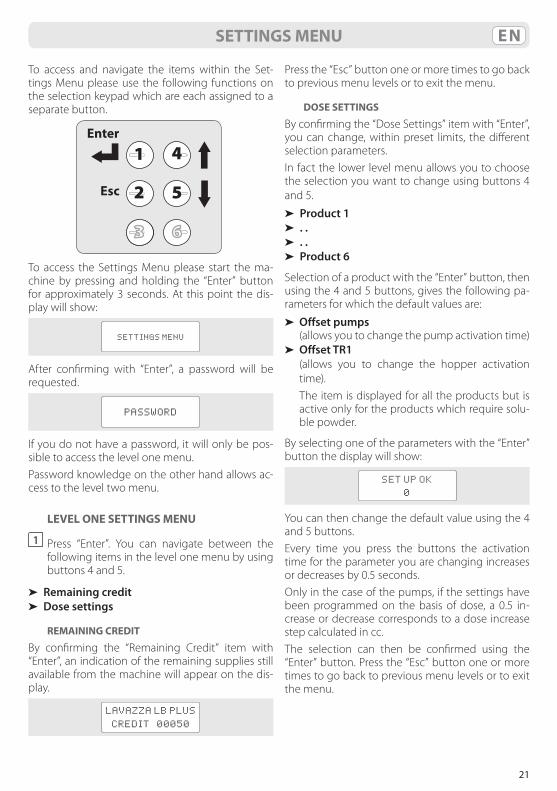
To access and navigate the items within the Set-tings Menu please use the following functions on the selection keypad which are each assigned to a separate button.
1
2
3
4
5
6
Esc
Enter
To access the Settings Menu please start the ma-chine by pressing and holding the “Enter” button for approximately 3 seconds. At this point the dis-play will show:
SETTINGS MENU
After confirming with “Enter”, a password will be requested.
PASSWORD
If you do not have a password, it will only be pos-sible to access the level one menu. Password knowledge on the other hand allows ac-cess to the level two menu.
LEVEL ONE SETTINGS MENU
1 Press “Enter”. You can navigate between the following items in the level one menu by using buttons 4 and 5.
➤ Remaining credit➤ Dose settings
REMAINING CREDIT
By confirming the “Remaining Credit” item with “Enter”, an indication of the remaining supplies still available from the machine will appear on the dis-play.
LAVAZZA LB PLUS
CREDIT 00050
Press the “Esc” button one or more times to go back to previous menu levels or to exit the menu.
DOSE SETTINGS
By confirming the “Dose Settings” item with “Enter”, you can change, within preset limits, the different selection parameters.In fact the lower level menu allows you to choose the selection you want to change using buttons 4 and 5.
➤ Product 1➤ . .➤ . .➤ Product 6
Selection of a product with the “Enter” button, then using the 4 and 5 buttons, gives the following pa-rameters for which the default values are:
➤ Offset pumps (allows you to change the pump activation time)➤ Offset TR1 (allows you to change the hopper activation
time). The item is displayed for all the products but is
active only for the products which require solu-ble powder.
By selecting one of the parameters with the “Enter” button the display will show:
SET UP OK
0
You can then change the default value using the 4 and 5 buttons.Every time you press the buttons the activation time for the parameter you are changing increases or decreases by 0.5 seconds.Only in the case of the pumps, if the settings have been programmed on the basis of dose, a 0.5 in-crease or decrease corresponds to a dose increase step calculated in cc.The selection can then be confirmed using the “Enter” button. Press the “Esc” button one or more times to go back to previous menu levels or to exit the menu.
SETTINGS MENU
22
EN
LEVEL TWO SETTINGS MENU
The level two settings menu is reserved to qualified and authorised personnel.
1 Type in the correct password and then press “Enter”. The default password is 33333.
You can navigate between the following items in the level two menu by using buttons 4 and 5.
➤ Language choice➤ Descaling➤ H2O Hardness➤ Delta Temp➤ Change password➤ Energy saving➤ Start pumps➤ Card check➤ Counter
LANGUAGE CHOICEBy confirming the “Language choice” item with “Enter” you can change the menu and display lan-guage.In fact the lower level menu allows you to choose the language you want by pressing buttons 4 and 5 and making a choice using the “Enter” button.➤ Italiano➤ English➤ Français➤ Deutsch➤ Espanõl➤ Português➤ Nederlands
Press the “Esc” button one or more times to go back to previous menu levels or to exit the menu.
DESCALING
The descaling cycle can be activated at any time, including when the machine does not show it is required. By confirming the “Descaling” item with “Enter”, the following message will run across the display.
DESCALING
INSERT DESCALING PRODUCT
INTO THE TANK AND PRESS OK
No more beverages can be dispensed until the cy-cle has been completed.
At this point follow the instructions.1 Fill the tank with descaling product diluted in
water according to the quantities indicated in the instructions.
2 Position as large a container as possible under the nozzle.
3 Then push “Enter”; the pumps will be activated and the descaling solution will run out through the nozzle after executing its action inside the machine’s circuit. The display will show the mes-sage:
CLEANING CYCLE
IN PROGRESS
• Donotdrinkorriskcausingthedescalingsolution to be drunk.
• Danger of scalding, the descaling solu-tion is dispensed at high temperature.
4 The machine will dispense the correct volume of solution.
It is however possible to momentarily interrupt the cycle, by pressing “Enter”, to allow the con-tents of the container used to collect the solu-tion to be emptied and disposed of.
To increase the efficacy of the descaling prod-uct’s action it is in any case advisable to stop for pauses of approximately one minute, ap-proximately every two minutes of continuous dispensing, by interrupting the cycle by press-ing the “Enter” button.
5 Reposition the empty container under the noz-zle.
6 Push “Enter” to restart the cycle.
In case of interruption to the electrical supply dur-ing the descaling cycle, upon being restarted again the machine will automatically reposition itself in the start position once more.
7 When the tank is emptied, the display will show the message:
SETTINGS MENU
23
EN
RINSE
TANK
Alternated with the message:
FILL
TANK
8 So proceed to carefully wash and rinse the tank with fresh drinking water.
Then refill it with non-carbonated, fresh drink-ing water.
The display will show the message:
START
RINSE
9 Position as large a container as possible under the nozzle.
10 Press “Enter” to start rinsing the machine’s hy-draulic circuit, the display will show the mes-sage:
WASHING CYCLE
IN PROGRESS
11 The machine will dispense the correct volume of water. It is however possible to momentarily interrupt the cycle, by pressing “Enter”, to allow the contents of the container used to collect the water to be emptied and disposed of.
12 Reposition the empty container under the noz-zle.
13 Push “Enter” to restart the cycle.
14 The machine may require the tank to be refilled if the required volume of water has not been reached.
The message in this case is the one indicated for point 7. Start again from point 8 to complete the cycle.
15 When the machine has dispensed the required volume of water, the following message is dis-played:
DESCALING
FINISHED
It is then possible to dispense beverages once again, topping up the tank if necessary with non-carbonated, fresh drinking water.
H2O HARDNESS
By confirming “H2O Hardness” with “Enter” it is pos-sible to input the data for the typical water hardness of the location where the machine is installed.This value can be measured with the special colour changing strips available on the market.A value in a range between 5 and 50 French de-grees can be input with buttons 4 and 5.This value is set by default to 20 French degrees. If a water softener filter is used, set a water hardness value based on the hardness abatement capability of the filter.
DELTA TEMP
By confirming “Delta Temp” with “Enter”, it is pos-sible to change the working temperature of the boiler so as to slightly increase or reduce the tem-perature of the dispensed product. The value can be increased or reduced by a range of ±4 °C using buttons 4 and 5.
CHANGE PASSWORD
By confirming the “Change Password” item with “Enter” the display will show:
PASSWORD
By typing in the password the following message will be shown:
CHANGE PASSWORD
At this point you can input your desired password which must be composed of 6 characters.You can then confirm the password using the “En-ter” button. Press the “Esc” button one or more times to go back to previous menu levels or to exit the menu.
SETTINGS MENU
24
EN SETTINGS MENU
ENERGY SAVING
The machine is programmed to be able to go into energy saving mode after a certain time of inactiv-ity. The preset value is 2 hours.
In Energy Saving mode the display on the machine shows:
ENERGY SAVING
To bring the machine back to ready mode it is suf-ficient to press any selection button. By confirm-ing the “Energy Saving” item with “Enter” you can choose between the following two options by pressing the 4 and 5 buttons:
➤ Energy saving deactivated➤ Energy saving activated
You can choose to activate or deactivate Energy Saving using the “Enter” button. Press the “Esc” but-ton one or more times to go back to previous menu levels or to exit the menu.
START PUMPS
By confirming the “Start pumps” item with “Enter” you can choose between the following two options by pressing the 4 and 5 buttons:
➤ Start pumps activated➤ Start pumps deactivated
You can choose to activate or deactivate the func-tion using the “Enter” button.Press the “Esc” button one or more times to go back to previous menu levels or to exit the menu.The start pumps function can be executed, in ma-chine ready mode, by pressing buttons 3 and 6 at the same time for at least 3 seconds.
Before activating the start pumps function acuporglassmustfirstbepositionedunderthe nozzle, on the cup-support rack.
During start pumps the display will show the fol-lowing message:
START
PUMPS IN PROGRESS
According to the result of the process and at the end of it, the display will show the following mes-sage.
START PUMPS
POSITIVE/NEGATIVE
When the machine is started for the first time or af-ter a prolonged period of not being used, it may be necessary to refill the water system. The function, if activated beforehand from the menu, is executed automatically by the machine by pressing buttons 3 and 6 at the same time for at least 3 seconds.
CARD CHECK
This function allows the operator to check a chip card, independently of its use. By confirming the “Check card” item with “Enter” the display will show the following message.
INSERT CARD
By inserting a chip card into the slot on the machine the information on it will be shown on the display.Pull out the chip card and press the “Esc” button one or more times to go back to previous menu lev-els or to exit the menu.
COUNTER
This function allows analysis of the drinks dispensed totalizer and of the statistics for the various selec-tions on the machine.By confirming the “Counter” item with “Enter” you can run through the various totalizers by pressing the 4 and 5 buttons.
➤ Tot drinks dispensed 000079➤ Tot product 1 dispensed 000027➤ . .➤ . .➤ Tot product 6 dispensed 000008
25
EN
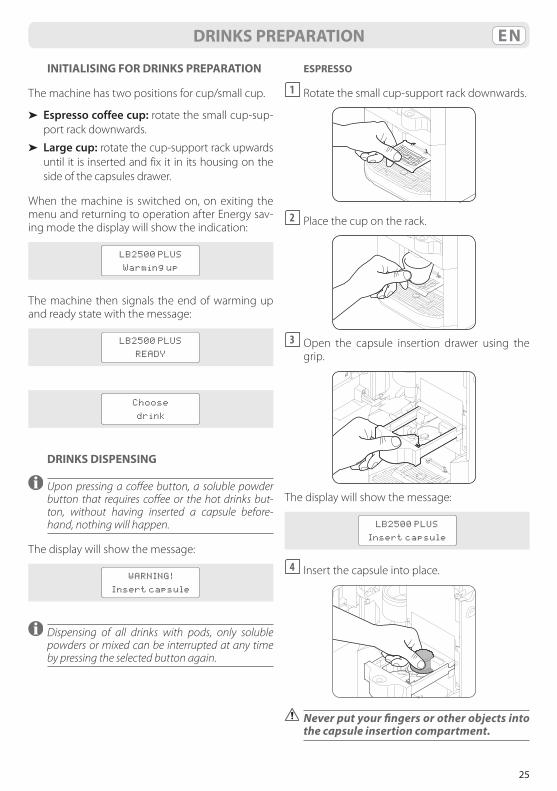
INITIALISING FOR DRINKS PREPARATION
The machine has two positions for cup/small cup.
➤ Espresso coffee cup: rotate the small cup-sup-port rack downwards.
➤ Large cup: rotate the cup-support rack upwards until it is inserted and fix it in its housing on the side of the capsules drawer.
When the machine is switched on, on exiting the menu and returning to operation after Energy sav-ing mode the display will show the indication:
LB2500 PLUS
Warming up
The machine then signals the end of warming up and ready state with the message:
LB2500 PLUS
READY
Choose
drink
DRINKS DISPENSING
Upon pressing a coffee button, a soluble powder button that requires coffee or the hot drinks but-ton, without having inserted a capsule before-hand, nothing will happen.
The display will show the message:
WARNING!
Insert capsule
Dispensing of all drinks with pods, only soluble powders or mixed can be interrupted at any time by pressing the selected button again.
DRINKS PREPARATION
ESPRESSO
1 Rotate the small cup-support rack downwards.
2 Place the cup on the rack.
3 Open the capsule insertion drawer using the
grip.
The display will show the message:
LB2500 PLUS
Insert capsule
4 Insert the capsule into place.
Neverputyourfingersorotherobjectsintothe capsule insertion compartment.
26
EN
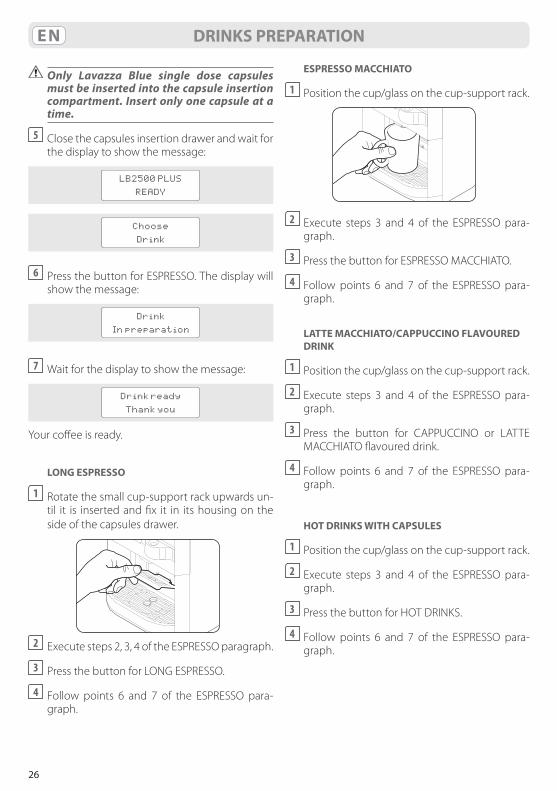
Only Lavazza Blue single dose capsules must be inserted into the capsule insertion compartment. Insert only one capsule at a time.
5 Close the capsules insertion drawer and wait for the display to show the message:
LB2500 PLUS
READY
Choose
Drink
6 Press the button for ESPRESSO. The display will show the message:
Drink
In preparation
7 Wait for the display to show the message:
Drink ready
Thank you Your coffee is ready.
LONG ESPRESSO
1 Rotate the small cup-support rack upwards un-til it is inserted and fix it in its housing on the side of the capsules drawer.
2 Execute steps 2, 3, 4 of the ESPRESSO paragraph.
3 Press the button for LONG ESPRESSO.
4 Follow points 6 and 7 of the ESPRESSO para-graph.
DRINKS PREPARATION
ESPRESSO MACCHIATO
1 Position the cup/glass on the cup-support rack.
2 Execute steps 3 and 4 of the ESPRESSO para-
graph.
3 Press the button for ESPRESSO MACCHIATO.
4 Follow points 6 and 7 of the ESPRESSO para-graph.
LATTE MACCHIATO/CAPPUCCINO FLAVOURED DRINK
1 Position the cup/glass on the cup-support rack.
2 Execute steps 3 and 4 of the ESPRESSO para-graph.
3 Press the button for CAPPUCCINO or LATTE MACCHIATO flavoured drink.
4 Follow points 6 and 7 of the ESPRESSO para-graph.
HOT DRINKS WITH CAPSULES
1 Position the cup/glass on the cup-support rack.
2 Execute steps 3 and 4 of the ESPRESSO para-graph.
3 Press the button for HOT DRINKS.
4 Follow points 6 and 7 of the ESPRESSO para-graph.
27
EN
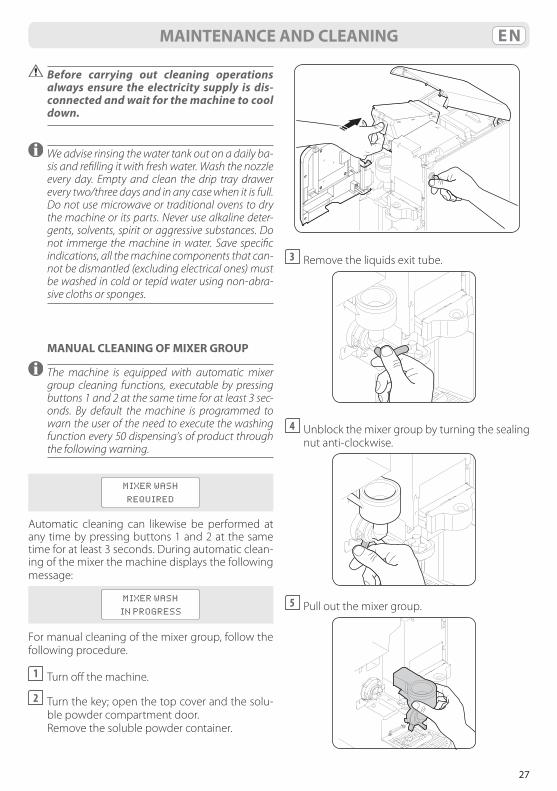
Before carrying out cleaning operations always ensure the electricity supply is dis-connected and wait for the machine to cool down.
We advise rinsing the water tank out on a daily ba-sis and refilling it with fresh water. Wash the nozzle every day. Empty and clean the drip tray drawer every two/three days and in any case when it is full. Do not use microwave or traditional ovens to dry the machine or its parts. Never use alkaline deter-gents, solvents, spirit or aggressive substances. Do not immerge the machine in water. Save specific indications, all the machine components that can-not be dismantled (excluding electrical ones) must be washed in cold or tepid water using non-abra-sive cloths or sponges.
MANUAL CLEANING OF MIXER GROUP
The machine is equipped with automatic mixer group cleaning functions, executable by pressing buttons 1 and 2 at the same time for at least 3 sec-onds. By default the machine is programmed to warn the user of the need to execute the washing function every 50 dispensing’s of product through the following warning.
MIXER WASH
REQUIRED
Automatic cleaning can likewise be performed at any time by pressing buttons 1 and 2 at the same time for at least 3 seconds. During automatic clean-ing of the mixer the machine displays the following message:
MIXER WASH
IN PROGRESS
For manual cleaning of the mixer group, follow the following procedure.
1 Turn off the machine.
2 Turn the key; open the top cover and the solu-ble powder compartment door.
Remove the soluble powder container.
MAINTENANCE AND CLEANING
3 Remove the liquids exit tube.
4 Unblock the mixer group by turning the sealing nut anti-clockwise.
5 Pull out the mixer group.

28
EN
6 Remove the mixer group nut.
7 Unhook the upper part of the mixer group from the lower part.
8 Wash the components with cold or tepid water, then dry and reassemble them correctly.
To reassemble the mixer group perform the opera-tions described up to here in reverse.
MAINTENANCE AND CLEANING
CLEANING OF DRIP TRAY/USED CAPSULES DRAWER
Cleaning of the drip tray/used capsules drawer must be performed regularly and in any case every time the display shows the following message:
LB2500 PLUS
Drawer full
If the capsules insertion drawer is opened when the used capsules drawer is full, the display shows the following message.
LB2500 PLUS
Empty drawer
1 Pull the complete drip tray/capsules drawer out. The display shows:
LB2500 PLUS
Drawer open
2 Lift out the used capsules container and empty it.
3 Pull the cup-support rack out and empty the
drip tray drawer.
29
ENMAINTENANCE AND CLEANING
4 Wash the components with cold or tepid water, then dry and reassemble them correctly.
If the drawer is not repositioned within a 4 minute time limit a continuous acoustic signal sounds for approximately 1 and a half minutes, all the LEDs are turned off and the display shows the following message.
LB2500 PLUS
Close drawer
5 When the drawer is closed all the LEDs light up and the following message appears:
LB2500 PLUS
READY
Select drink
DESCALING THE HYDRAULIC CIRCUIT
The machine alerts to the need to run the descaling cycle with a message, which is active for 1 second at the start of dispensing, DESCALING REQUIRED. This message is displayed after the machine has dispensed a determinate volume of product cal-culated on the basis of the water hardness, which can be set as described in the paragraph entitled “H2O Hardness”. It is however possible, to activate the descaling cycle at any time, including when the machine does not show it is required.The descaling cycle can be activated through the LEVEL TWO SETTINGS MENU, by following the se-quence indicated in the paragraph entitled “Descal-ing”.If this function has been activated, it is also possible to activate the descaling cycle by pushing buttons 2 and 5 contemporaneously for at least 5 seconds.Then perform the sequence of operations indicated in the “Descaling” paragraph.Use only suitable products, guaranteed pursuant to current regulations, for descaling.
30
EN ALARM MESSAGES ON THE DISPLAY
Display Machine status Events RemediesLAVAZZA LB PLUSDrawer full
Used capsules drawer full
Soluble drink dispensing is possible
Empty drawer and wash it
LAVAZZA LB PLUSDrawer full
Drawer opened with machine at temperature
Not possible to dispense Close the drawer
WARNINGNo water
No water in the tank or tank missing
Selection buttons flashing
Fill the tank with non-carbonated fresh drinking water
WARNINGDoor open
Soluble element door open Not possible to dispense Close the soluble
element door
OVERHEATING WAIT Temperature too high Not possible to dispense
Wait for machine to cool down. If the message does not disappear, contact the service engineers
WAIT FOR COOLING DOWN
Machine components cooling down Not possible to dispense
Wait for components to cool. If the message does not disappear, contact the service engineers
CREDIT USED UP Credit used up Not possible to dispense Reload credit
DISPENSINGTIMEOUT
Dispensing terminated due to absence of water flow
Incomplete product dispensing
Carry out start pumps procedure. If the message remains or the pumps fail to start, contact the service engineers
INSERT CREDIT
Insert credit, when dispensing is by payment and there is no credit left
Not possible to dispense Reload credit
WARMING UP ALARM
Warming up has not succeeded Not possible to dispense Contact service
engineers
FAULT ON FLOW METER
Flow meter faulty, number of pulses not reached
Not possible to dispense Contact service engineers
SENSOR ALARM Sensor alarm (shorted or open) Not possible to dispense Contact service
engineers
NEGATIVE START PUMPS
Negative result on start pumps -
Repeat operation. In case of a negative result, contact service engineers
DESCALINGREQUIRED
The machine needs descaling of the hydraulic circuit
-
Run the descaling cycle as described in chapter "Maintenance and cleaning”
31
ENMESSAGES ON THE DISPLAY DURING CHIP CARD OPERATIONS
Display EventsNO SETTINGSVIRGIN CARD The card has not been initialised. Settings missing
OPERAT. NOT OKREMOVE CARD Data is not congruent
OPERATION OKREMOVE CARD Data transfer executed, you can remove the card
CARD SETTINGSWRITING Writing in progress on machine from a card. Writing settings
CARD SETTINGSREADING Reading in progress by the machine on a card. Reading settings
ONE TIME CARDTRANSFER IN PROG. Transfer in progress from a OneTime card
MASTERCARDTRANSFER IN PROG. Transfer from a MasterCard
TEST CARDINSERTED Confirms insertion of test card
CREDITS CARDINSERTED Confirms insertion of credits card
MULTINS CARDNULL COUNTER Check on Multins, absence of credits
MULTINS CARDPUSH BUTTON 1 With Multins card inserted push button 1 to transfer credits
MULTINS CARDCANCEL CREDITS Transfer cancelled, with Multins card inserted
TRANSFER CREDITS xxxxx Displays total credits transferred
SELF-TEST CARDINSERTED Confirms insertion of self-test card
TECHNICAL SPECIFICATIONS
SAFETY
For technical specifications please refer to the ma-chine data plate.
➤ Voltage: 220 - 240 V, 50/60 Hz➤ Total power: 1450 W➤ Tank capacity: 3 l➤ Weight: 12 kg
➤ Materials used for the casing: thermoplastic➤ Used capsules drawer capacity: 20 Lavazza Blue
capsules➤ Dimensions: Height 470 mm ; Width 260 mm ;
Depth 400 mm➤ Compliance: 2006/42 CE - 2004/108 CE - 2006 /95
CE
INTENDED USEThis device is intended for professional use. Any im-proper use (not described in these instructions) is prohibited. The making of technical modifications is prohibited. The machine is not intended for use by children or persons with reduced physical or mental
capacity or a sensory impairment, or without expe-rience and knowledge, unless they have received training in the correct use of the machine and are under the supervision of a person responsible for their safety.
32
EN
POSITIONPlace the coffee machine in a safe location, on a flat, horizontal and stable surface, where it cannot be ac-cidentally knocked over or cause injury. Do not store the machine at a temperature below 4 °C as it may be damaged by frost. Do not use the coffee machine outdoors. Do not place the machine on very hot sur-faces and/or near naked flames. Use the machine at room temperature.
POWER SUPPLYOnly connect the coffee machine to a suitable mains outlet socket. The voltage must correspond to that shown on the machine data plate.
POWER SUPPLY CORDDo not use the coffee machine if the power sup-ply cord is defective or damaged. In such cases it must be replaced immediately. Do not run the power cord around corners and along sharp edges, over very hot objects and protect it from oil. Do not move or pull the coffee machine by holding onto the cord. Do not remove the plug by pulling the cord; do not touch the plug with wet hands. Avoid letting the power cord hang freely from tables or shelves.
ELECTRIC SHOCK HAZARDNever put live parts in contact with water. Ensure that hands, machine, power cord and the surface under the machine are not wet.
PROTECTION OF OTHERSAlways keep children under supervision, to avoid them playing with the equipment. Children are unaware of the danger connected to electric appli-ances. Do not leave the materials used to package the machine within their reach.
BURN HAZARDDo not touch hot parts (capsules holder group, etc.) immediately after use of the equipment. Dur-ing drinks dispensing be careful of any hot liquid splashing.
CLEANINGBefore cleaning the machine, the power supply must be unplugged from the mains and the ma-chine must be left to cool down. Do not immerge the machine in water! Attempting any repair work inside the machine is strictly prohibited. Do not use the water in the tank for food purposes.
LOOKING AFTER THE MACHINEWhen the machine is not used for prolonged pe-riods, unplug the power cord from the mains and keep it in a dry place that is not accessible to chil-dren. Protect from dust and dirt.
REPAIRS / MAINTENANCEIn case of faults, defects or suspicion of defect after a fall, unplug the machine immediately. Do not turn on a defective machine. Any servicing and repairs must be performed only by Authorised Service Centres. We decline all responsibility for any dam-ages in case of repairs not performed up to stand-ard and in a workmanlike manner.
WATER TANKFill the tank with only non-carbonated fresh drink-ing water. Do not turn on the machine if the water does not come above the minimum level indicated on the tank.
CAPSULES COMPARTMENTOnly Lavazza Blue single dose capsules must be inserted into the capsule insertion compartment; do not put your fingers or other objects into it. The capsules must be used once only.
DISPOSAL OF THE MACHINE AT THE END OF ITS LIFE CYCLE (European Directive 2002/96/EC - D.L. 25 July 2005 no. 151)
The litter bin symbol affixed to the equipment and/or its packaging indicates that the product must not be discarded with normal household rubbish at the end of its life cycle. The machine must be taken to one of the separate waste collection cen-tres specifically for waste electrical and electronic equipment (WEEE) existing in national territory or returned to the reseller at the time of purchasing new equivalent equipment, on a one-to-one basis.The user is responsible for delivery of the equip-ment to the designated collection facilities, under penalty of the fines prescribed by current appli-cable legislation. Adequate separate collection of such equipment for recycling and/or environmen-tally friendly disposal, contributes towards avoiding possible negative effects on the environment and health and favours the re-use and/or recycling of the materials that make up the machine. For more detailed information concerning available collec-tion systems, please contact your local waste dis-posal service or the reseller where the purchase was made.
SAFETY
33
FRSOMMAIRE GÉNÉRAL
SOMMAIRE GÉNÉRAL ................................................................................................................................................. 33COMPOSANTS ................................................................................................................................................................. 34MESSAGES VISUELS SITUATION DE LA MACHINE .......................................................................................... 34PRÉPARATION DE LA MACHINE .............................................................................................................................. 35
DÉBALLAGE ET MISE EN PLACE ................................................................................................................................................................................. 35DÉMARRAGE DE LA MACHINE .................................................................................................................................................................................... 35
MENU DES CONFIGURATIONS ................................................................................................................................. 37MENU DES CONFIGURATIONS PREMIER NIVEAU ............................................................................................................................................ 37CRÉDITS RESTANTS .................................................................................................................................................................................................................................................37CONFIGURATION DOSES ....................................................................................................................................................................................................................................37MENU CONFIGURATIONS SECOND NIVEAU ...................................................................................................................................................... 38CHOIX DE LA LANGUE .........................................................................................................................................................................................................................................38DÉTARTRAGE ..............................................................................................................................................................................................................................................................38DURETÉ H2O ..............................................................................................................................................................................................................................................................39DELTA TEMP ................................................................................................................................................................................................................................................................39MODIFICATION MOT DE PASSE ......................................................................................................................................................................................................................39ÉCONOMIE D’ÉNERGIE .........................................................................................................................................................................................................................................40AMORÇAGE POMPES ............................................................................................................................................................................................................................................40VÉRIFICATION CARTE ............................................................................................................................................................................................................................................40COMPTEUR ..................................................................................................................................................................................................................................................................40
PRÉPARATION DE BOISSONS ................................................................................................................................... 41PRÉPARATIFS POUR LA PRÉPARATION DES BOISSONS ................................................................................................................................. 41DISTRIBUTION DES BOISSONS .................................................................................................................................................................................... 41EXPRESSO ....................................................................................................................................................................................................................................................................41EXPRESSO ALLONGÉ .............................................................................................................................................................................................................................................42EXPRESSO MACCHIATO .......................................................................................................................................................................................................................................42BOISSON GOÛT LATTE MACCHIATO/CAPPUCCINO ..........................................................................................................................................................................42BOISSONS CHAUDES AVEC CAPSULE .........................................................................................................................................................................................................42
ENTRETIEN ET NETTOYAGE....................................................................................................................................... 43NETTOYAGE MANUEL DU GROUPE MIXEUR...................................................................................................................................................... 43NETTOYAGE DU TIROIR RAMASSE-GOUTTES/CAPSULES USAGÉES .................................................................................................... 44DÉTARTRAGE CIRCUIT HYDRAULIQUE................................................................................................................................................................... 45
MESSAGES D’ALARME SUR L’ÉCRAN .................................................................................................................... 46MESSAGES SUR L’ÉCRAN LORS DES OPÉRATIONS AVEC CARTE À PUCE ............................................ 47CARACTÉRISTIQUES TECHNIQUES ........................................................................................................................ 47SÉCURITÉ ........................................................................................................................................................................... 47
USAGES DE L’APPAREIL ................................................................................................................................................................................................... 47EMPLACEMENT ................................................................................................................................................................................................................... 48ALIMENTATION ..................................................................................................................................................................................................................... 48CÂBLE D’ALIMENTATION................................................................................................................................................................................................. 48RISQUE DE FOUDROIEMENT ...................................................................................................................................................................................... 48PROTECTION DES PERSONNES ................................................................................................................................................................................. 48RISQUE DE BRÛLURES ..................................................................................................................................................................................................... 48NETTOYAGE .......................................................................................................................................................................................................................... 48STOCKAGE DE LA MACHINE ....................................................................................................................................................................................... 48RÉPARATIONS/ENTRETIEN ............................................................................................................................................................................................ 48RÉSERVOIR D’EAU ............................................................................................................................................................................................................... 48RÉCEPTACLE CAPSULE ................................................................................................................................................................................................... 48ÉLIMINATION DE LA MACHINE EN FIN DE VIE(Directive Européenne 2002/96/CE - D.L. du 25 juillet 2005 n. 151) ................................................................................................. 48
34
FR COMPOSANTS
Couvercle réservoir solubles
Couvercle du réservoir d’eau CAPSULES CONFORMES
LAVAZZA BLUE
Tiroir de chargement capsule
Poignée pour la prise
Fiche d’alimentation
Interrupteur général
Réceptacle insertion carte à puce
Réservoir d’eau
Serrure ouverture porte du réceptacle solubles et réservoir d’eau
Porte du réceptacle soluble
Câble d’alimentation
Réservoir solubles
Écran
Touches sélection des boissons
Bec verseur
Grille rabattablepour petite tasse expresso
Grille appuie-tasse pour grande tasse/verre
Tiroir ramasse capsules usagées
Tiroir ramasse-gouttes
Signal sonoreClignotant AlluméÉteint
MESSAGES VISUELS SITUATION DE LA MACHINE
1
2
3
4
5
6
ÉTAT DE LA MACHINE 1 2 3 4 5 6 SIGNAL ACTIONS ÉCRAN
Mise en route LB 2500 PLUSEn préchauffage
Économie d’énergie ÉCONOMIE D’ÉNERGIE
Température atteinteMachine prête
LB 2500 PLUSEn préchauffage
SÉLECTIONNER BOISSON
Boisson nécessitant une capsulesans introduction de capsule
ATTENTION !Insérer capsule
Tiroir insertion capsule ouvert LB 2500 PLUSInsérer capsule
Produit sélectionné en distribution BOISSONEn préparation
Sélection boisson avec tiroir ouvert Signal sonore bref
ATTENTION !Insérer capsule
Distribution terminée Signal sonore long
BOISSON PRÊTEMERCI
Cycle de nettoyage avec le produit détartrant en cours
CYCLE NETTOYAGE EN COURS
Cycle de rinçage à l’eau en cours CYCLE LAVAGE EN COURS
35
FR
Cappuccino
Boisson goût Latte macchiato
6
5
4
3
2
1
Boissonschaudes
Espressomacchiato
Expresso allongé
Expresso
Nous n’assumons aucune responsabilité quantauxdommageséventuelsprovoquéspar:
• uneutilisation erronée et non conformeauxusagesprévuspourlamachine;
• des réparations effectuées auprès decentres d’assistance non-autorisés;
• unemodificationducâbled’alimentation; • unemodificationdetoutcomposantdela
machine; • l’usagedepiècesderechangesetd’acces-
soiresnon-originaux; • undéfautdedétartrage; • unstockageendessousde4°C; • l’utilisation de capsules distinctes de
celles préconisées. Danslescasprécitéslagarantiedeviendra
caduque.
Les dommages causés à la machine décou-lant du non-respect des indications présen-tées dans ce livret ne sont pas couverts par la garantie.
DÉBALLAGE ET MISE EN PLACE
1 Étant donné les dimensions et le poids de la machine, le déballage, la mise en place et la sta-bilisation de la machine doivent être effectués par deux personnes.
2 Sortir la machine de son emballage en ap-puyant sur les protections latérales et en la tirant vers le haut.
3 Placer la machine sur une surface sèche, plane, horizontale et stable, loin de sources d’eau, flammes et de sources de chaleur.
DÉMARRAGE DE LA MACHINE
Le réservoir d’eau se trouve à l’intérieur de la ma-
PRÉPARATION DE LA MACHINE
chine. Pour accéder au réservoir, il faut ouvrir le cou-vercle supérieur qui comporte une fermeture à clé.
1 Faire tourner la clé dans le sens des aiguilles d’une montre pour ouvrir le couvercle. Faire tourner la clé dans le sens inverse aux aiguilles d’une montre pour fermer le couvercle.
2 Soulever et enlever le couvercle du réservoir
d’eau.
3 Remplir le réservoir d’eau en n’utilisant que de
l’eau fraîche potable non gazeuse.
L’utilisation d’un filtre pour l’eau (accessoire en op-tion) améliore la qualité de l’eau et allonge la durée de vie de l’appareil. Utiliser le filtre AquaAroma Crema Brita® pour Lavazza. Pour mettre en place le filtre, suivre les indications fournies avec l’acces-soire. Nous vous conseillons de ne pas modifier la sélection déjà établie du filtre.
36
FR
4 Après avoir ôté le couvercle, il est possible de sortir le réservoir d’eau de la machine pour le remplir séparément.
Assurez-vousquevosmains,lamachine,lecâbleetlasurfaced’appuidelamachinenesoient pas humides.
5 Ouvrir entièrement la porte du réceptacle à solubles.
6 Soulever et faire tourner le couvercle du réci-
pient de lait liquide.
7 Ajouter le soluble directement dans le récipient.
Pour remplir le récipient à solubles, il est également possible de l’enlever de sa place, muni de son cou-vercle.
8 Remettre en place le couvercle du récipient de
lait liquide.9 Refermer la porte du réceptacle à solubles puis
fermer le couvercle supérieur en verrouillant l’ensemble avec la clé.
10 Insérer la fiche du câble d’alimentation dans la prise située sur l’arrière de la machine.
11 Insérer la fiche d’alimentation dans la prise de
courant.
12 Appuyer sur l’interrupteur général en le plaçant
sur la position (I). L’écran affiche la mise en route de la machine.
PRÉPARATION DE LA MACHINE
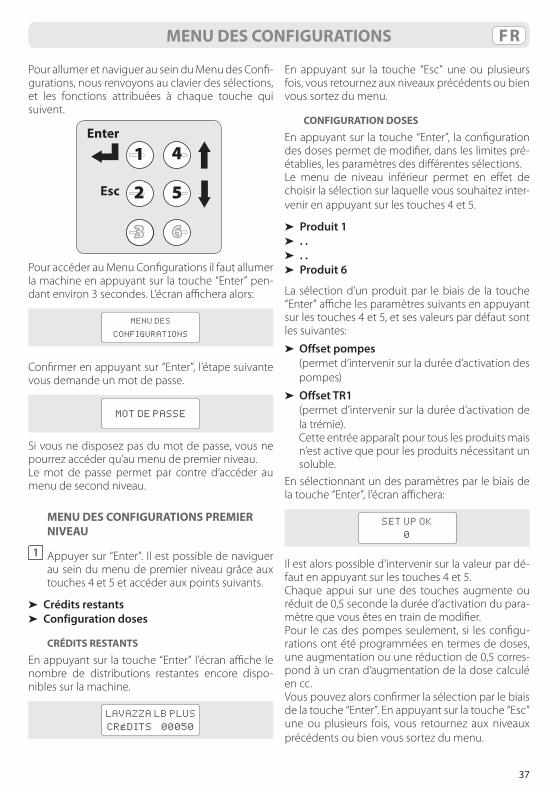
37
FR
Pour allumer et naviguer au sein du Menu des Confi-gurations, nous renvoyons au clavier des sélections, et les fonctions attribuées à chaque touche qui suivent.
1
2
3
4
5
6
Esc
Enter
Pour accéder au Menu Configurations il faut allumer la machine en appuyant sur la touche “Enter” pen-dant environ 3 secondes. L’écran affichera alors:
MENU DES
CONFIGURATIONS
Confirmer en appuyant sur “Enter”, l’étape suivante vous demande un mot de passe.
MOT DE PASSE
Si vous ne disposez pas du mot de passe, vous ne pourrez accéder qu’au menu de premier niveau. Le mot de passe permet par contre d’accéder au menu de second niveau.
MENU DES CONFIGURATIONS PREMIER NIVEAU
1 Appuyer sur “Enter”. Il est possible de naviguer au sein du menu de premier niveau grâce aux touches 4 et 5 et accéder aux points suivants.
➤ Crédits restants➤ Configuration doses
CRÉDITS RESTANTS
En appuyant sur la touche “Enter” l’écran affiche le nombre de distributions restantes encore dispo-nibles sur la machine.
LAVAZZA LB PLUS
CRÉDITS 00050
En appuyant sur la touche “Esc” une ou plusieurs fois, vous retournez aux niveaux précédents ou bien vous sortez du menu.
CONFIGURATION DOSES
En appuyant sur la touche “Enter”, la configuration des doses permet de modifier, dans les limites pré-établies, les paramètres des différentes sélections.Le menu de niveau inférieur permet en effet de choisir la sélection sur laquelle vous souhaitez inter-venir en appuyant sur les touches 4 et 5.
➤ Produit 1➤ . .➤ . .➤ Produit 6
La sélection d’un produit par le biais de la touche “Enter” affiche les paramètres suivants en appuyant sur les touches 4 et 5, et ses valeurs par défaut sont les suivantes:
➤ Offset pompes (permet d’intervenir sur la durée d’activation des
pompes)
➤ Offset TR1 (permet d’intervenir sur la durée d’activation de
la trémie). Cette entrée apparaît pour tous les produits mais
n’est active que pour les produits nécessitant un soluble.
En sélectionnant un des paramètres par le biais de la touche “Enter”, l’écran affichera:
SET UP OK
0
Il est alors possible d’intervenir sur la valeur par dé-faut en appuyant sur les touches 4 et 5.Chaque appui sur une des touches augmente ou réduit de 0,5 seconde la durée d’activation du para-mètre que vous êtes en train de modifier.Pour le cas des pompes seulement, si les configu-rations ont été programmées en termes de doses, une augmentation ou une réduction de 0,5 corres-pond à un cran d’augmentation de la dose calculé en cc.Vous pouvez alors confirmer la sélection par le biais de la touche “Enter”. En appuyant sur la touche “Esc” une ou plusieurs fois, vous retournez aux niveaux précédents ou bien vous sortez du menu.
MENU DES CONFIGURATIONS
38
FR
MENU CONFIGURATIONS SECOND NIVEAU
Le menu de configurations de second niveau est réservé au personnel qualifié et agréé.
1 Entrer le mot de passe correct puis appuyer sur “Enter”. Le mot de passe par défaut est 33333.
Il est possible de naviguer au sein du menu de se-cond niveau grâce aux touches 4 et 5 et accéder aux choix suivants.
➤ Choix de la langue➤ Détartrage➤ Dureté H2O➤ Delta Temp➤ Modification mot de passe➤ Économie d’énergie➤ Amorçage pompes➤ Vérification carte➤ Compteur
CHOIX DE LA LANGUE
En appuyant sur “Enter”, l’entrée “Choix de la langue” permet de modifier la langue du menu et des affichages sur l’écran. Le menu de niveau infé-rieur permet en effet de choisir la langue souhaitée en appuyant sur les touches 4 et 5 et de la confirmer en appuyant sur la touche “Enter”.➤ Italiano➤ English➤ Français➤ Deutsch➤ Espanõl➤ Português➤ Nederlands
En appuyant sur la touche “Esc” une ou plusieurs fois, vous retournez aux niveaux précédents ou bien vous sortez du menu.
DÉTARTRAGE
Le cycle de détartrage peut être activé à tout mo-ment, même si la machine ne le demande pas. Dans la sélection “Détartrage” en appuyant sur “Enter” l’écran fera défiler le message suivant:
DÉTARTRAGE
AJOUTER LE PRODUIT
DÉTARTRANT DANS LE RÉSERVOIR
ET APPUYER SUR OK
La distribution de boissons n’est plus possible jusqu’à la fin du cycle.
À partir de là, respecter les indications suivantes.
1 Remplir le réservoir avec le produit détartrant dilué dans l’eau en respectant les quantités indi-quées sur les instructions du produit.
2 Placer un récipient, le plus grand possible, sous le bec verseur.
3 Puis appuyer sur “Enter”. Les pompes se mettent en marche et le bec verseur distribuera la solu-tion détartrante qui a agi à l’intérieur du circuit de la machine. L’écran affichera le message sui-vant:
CYCLE NETTOYAGE
EN COURS
• Nepasboirelasolutiondétartranteouendonner la possibilité.
• Risque de brûlures, la solution détar-trante est distribuée à haute tempéra-ture.
4 La machine distribue le volume de solution pré-vu. En appuyant sur “Enter”, il est toujours pos-sible d’interrompre momentanément le cycle afin de permettre de vider et jeter le contenu du récipient utilisé pour recueillir la solution. Pour que l’action du produit détartrant soit encore plus efficace, nous vous conseillons d’effectuer des pauses d’environ une minute, au bout d’en-viron deux minutes suivies de distribution. Vous pouvez interrompre le cycle en appuyant sur la touche “Enter”.
5 Replacer le récipient vidé sous le bec verseur.
6 Appuyer sur “Enter” pour relancer le cycle.
En cas d’interruption de l’alimentation électrique lors du cycle de détartrage, dès lors que la machine sera de nouveau allumée, elle reviendra automati-quement en position de départ du cycle.
7 Lorsque l’on vide le réservoir, l’écran affiche le message suivant:
MENU DES CONFIGURATIONS

39
FR
RINCER LE
RÉSERVOIR
En alternance avec le message suivant:
REMPLIR LE
RÉSERVOIR
8 Rincer alors et laver soigneusement le réservoir avec de l’eau fraîche et potable.
Le remplir, toujours avec de l’eau fraîche, po-table et non gazeuse. L’écran affichera le mes-sage suivant:
DÉMARRER
RINÇAGE
9 Placer un récipient, le plus grand possible, sous le bec verseur.
10 Appuyer sur “Enter” pour démarrer le rinçage du circuit hydraulique de la machine, l’écran affichera le message suivant:
CYCLE LAVAGE EN
COURS
11 La machine distribue le volume d’eau prévu. En appuyant sur “Enter”, il est toujours possible d’interrompre momentanément le cycle afin de permettre de vider et jeter le contenu du réci-pient utilisé pour recueillir l’eau.
12 Replacer le récipient vidé sous le bec verseur.
13 Appuyer sur “Enter” pour relancer le cycle.14 La machine peut demander de remplir à nou-
veau le réservoir si le volume d’eau prévu n’est pas atteint.
Dans ce cas, le message est celui indiqué au point 7.
Reprendre par conséquent à partir du point 8 pour terminer le cycle.
15 Lorsque la machine a distribué tout le volume d’eau prévu, l’écran affiche le message suivant:
DÉTARTRAGE
COMPLÉTÉ
Il est alors possible de distribuer à nouveau les bois-sons, en remplissant si nécessaire le réservoir avec de l’eau fraîche, potable et non gazeuse.
DURETÉ H2O
Dans la sélection “Dureté H2O”, en appuyant sur “En-ter” il est possible d’insérer la donnée concernant la dureté de l’eau de la zone géographique où la machine est installée.Cette valeur est mesurable avec des bandelettes de test disponibles dans le commerce.En appuyant sur les touches 4 et 5, il est possible d’inscrire une valeur sur une échelle de 5 à 50 de-grés français.La valeur par défaut est de 20 degrés français. En cas d’utilisation d’un filtre adoucisseur, insérer une valeur de dureté de l’eau en fonction de la capacité adoucissante du filtre.
DELTA TEMP
Dans la sélection “Delta Temp”, en appuyant sur “Enter” il est possible de modifier la température de fonctionnement de la chaudière pour augmenter ou diminuer légèrement la température du produit distribué.En appuyant sur les touches 4 et 5 il est possible d’augmenter ou diminuer la valeur sur une échelle de ± 4 °C.
MODIFICATION MOT DE PASSE
En appuyant sur “Enter”, l’entrée “Modification Mot de passe” affiche à l’écran:
MOT DE PASSE
En insérant le mot de passe, le signal suivant s’affiche:
MODIFICATION MOT
DE PASSE
Vous pouvez alors insérer le mot de passe souhaité, qui doit être composé de 6 caractères. Vous pouvez alors confirmer le nouveau mot de passe par le biais de la touche “Enter”. En appuyant sur la touche “Esc” une ou plusieurs fois, vous retournez aux niveaux précédents ou bien vous sortez du menu.
MENU DES CONFIGURATIONS
40
FR
ÉCONOMIE D’ÉNERGIE
La machine est programmée pour pouvoir fonc-tionner en mode économie d’énergie après un cer-tain temps d’inactivité. La valeur par défaut est de 2 heures.
Lorsqu’elle est en mode Économie d’énergie, l’écran de la machine affiche:
ÉCONOMIE
D’ÉNERGIE
Pour remettre la machine en condition de prête à l’emploi, il suffit d’appuyer sur n’importe quelle touche de sélection. En appuyant sur “Enter”, l’en-trée Économie d’énergie permet de choisir, par le biais des touches 4 et 5, entre les deux options sui-vantes:➤ Économie d’énergie désactivée➤ Économie d’énergie activéeVous pouvez confirmer l’activation ou la désactiva-tion en appuyant sur la touche “Enter”. En appuyant sur la touche “Esc” une ou plusieurs fois, vous re-tournez aux niveaux précédents ou bien vous sor-tez du menu.
AMORÇAGE POMPES
En appuyant sur la touche “Enter”, l’entrée “Amor-çage Pompes” permet de choisir, par le biais des touches 4 et 5, entre les deux options suivantes:➤ Amorçage pompes activé➤ Amorçage pompes désactivéVous pouvez confirmer l’activation ou la désactiva-tion de cette fonction en appuyant sur la touche “Enter”. En appuyant sur la touche “Esc” une ou plusieurs fois, vous retournez aux niveaux précé-dents ou bien vous sortez du menu. La fonction d’amorçage des pompes est également accessible, si la machine est en condition prête à l’emploi, en appuyant simultanément sur les touches 3 et 6 pen-dant au moins 3 secondes.
Avant d’activer la fonction d’amorçage des pompes, il est nécessaire de placer une tasse ou un verre sous le bec verseur, sur la grille appuie-tasse.
Lors de l’amorçage des pompes, l’écran affiche le message suivant:
AMORÇAGE
POMPES EN COURS
En fonction du succès de la procédure et dès lors qu’elle est terminée, l’écran affiche le message sui-vant.
AMORÇAGE POMPES
RÉUSSI/ÉCHOUÉ
Au premier démarrage de la machine ou bien après une inutilisation prolongée, il convient d’exécuter l’opération d’amorçage du circuit hydraulique. La fonction, si elle a été au préalable activée dans le menu, s’exécute automatiquement en appuyant simultanément sur les touches 3 et 6 pendant au moins 3 secondes.
VÉRIFICATION CARTE
Cette fonction permet de vérifier une carte à puce, indépendamment de son utilisation. En appuyant sur la touche “Enter”, l’entrée “Vérification de la carte” affiche sur l’écran le message suivant.
INSÉRER CARTE
En insérant la carte à puce dans le lecteur prévu à cet effet sur la machine, l’écran affichera les infor-mations de la carte.Pour revenir aux niveaux précédents ou sortir du menu, enlever la carte et appuyer sur la touche “Esc” une ou plusieurs fois.
COMPTEUR
Cette fonction permet d’analyser le décompte glo-bal des distributions ainsi que les statistiques des différentes sélections effectuées sur la machine.En appuyant sur “Enter”, l’entrée “Compteur” per-met de visualiser les différents décomptes, en ap-puyant sur les touches 4 et 5.
➤ Tot. distributions effectuées 000079➤ Total produit 1 distribué 000027➤ . .➤ . .
➤ Total produit 6 distribué 000008
MENU DES CONFIGURATIONS
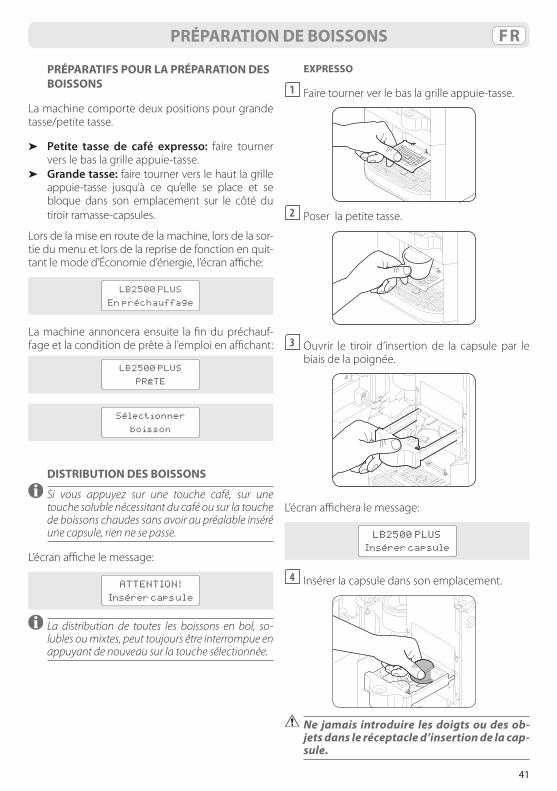
41
FR
PRÉPARATIFS POUR LA PRÉPARATION DES BOISSONS
La machine comporte deux positions pour grande tasse/petite tasse.
➤ Petite tasse de café expresso: faire tourner vers le bas la grille appuie-tasse.
➤ Grande tasse: faire tourner vers le haut la grille appuie-tasse jusqu’à ce qu’elle se place et se bloque dans son emplacement sur le côté du tiroir ramasse-capsules.
Lors de la mise en route de la machine, lors de la sor-tie du menu et lors de la reprise de fonction en quit-tant le mode d’Économie d’énergie, l’écran affiche:
LB2500 PLUS
En préchauffage
La machine annoncera ensuite la fin du préchauf-fage et la condition de prête à l’emploi en affichant:
LB2500 PLUS
PRÊTE
Sélectionner
boisson
DISTRIBUTION DES BOISSONS
Si vous appuyez sur une touche café, sur une touche soluble nécessitant du café ou sur la touche de boissons chaudes sans avoir au préalable inséré une capsule, rien ne se passe.
L’écran affiche le message:
ATTENTION!
Insérer capsule
La distribution de toutes les boissons en bol, so-lubles ou mixtes, peut toujours être interrompue en appuyant de nouveau sur la touche sélectionnée.
PRÉPARATION DE BOISSONS
EXPRESSO
1 Faire tourner ver le bas la grille appuie-tasse.
2 Poser la petite tasse.
3 Ouvrir le tiroir d’insertion de la capsule par le
biais de la poignée.
L’écran affichera le message:
LB2500 PLUS
Insérer capsule
4 Insérer la capsule dans son emplacement.
Ne jamais introduire lesdoigtsoudesob-jetsdansleréceptacled’insertiondelacap-sule.
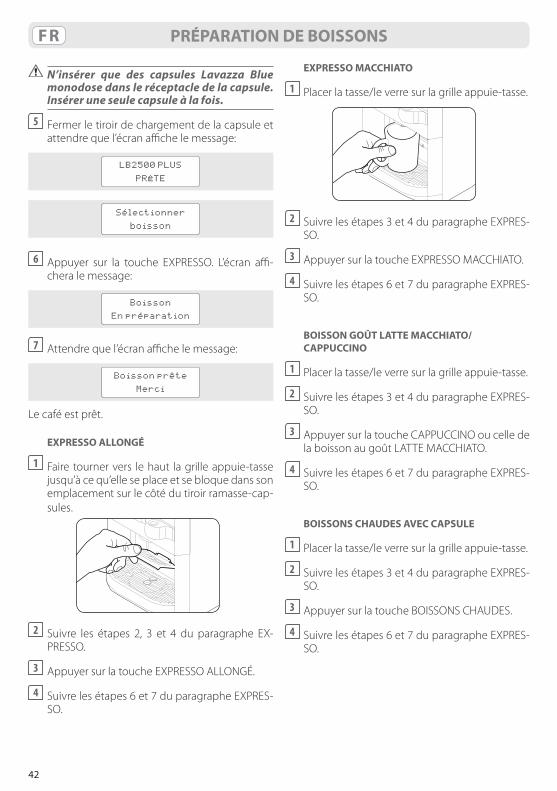
42
FR
N’insérer que des capsules Lavazza Bluemonodose dans le réceptacle de la capsule. Insérer une seule capsule à la fois.
5 Fermer le tiroir de chargement de la capsule et attendre que l’écran affiche le message:
LB2500 PLUS
PRÊTE
Sélectionner
boisson
6 Appuyer sur la touche EXPRESSO. L’écran affi-chera le message:
Boisson
En préparation
7 Attendre que l’écran affiche le message:
Boisson prête
Merci Le café est prêt.
EXPRESSO ALLONGÉ
1 Faire tourner vers le haut la grille appuie-tasse jusqu’à ce qu’elle se place et se bloque dans son emplacement sur le côté du tiroir ramasse-cap-sules.
2 Suivre les étapes 2, 3 et 4 du paragraphe EX-
PRESSO.
3 Appuyer sur la touche EXPRESSO ALLONGÉ.
4 Suivre les étapes 6 et 7 du paragraphe EXPRES-SO.
EXPRESSO MACCHIATO
1 Placer la tasse/le verre sur la grille appuie-tasse.
2 Suivre les étapes 3 et 4 du paragraphe EXPRES-
SO.
3 Appuyer sur la touche EXPRESSO MACCHIATO.
4 Suivre les étapes 6 et 7 du paragraphe EXPRES-SO.
BOISSON GOÛT LATTE MACCHIATO/CAPPUCCINO
1 Placer la tasse/le verre sur la grille appuie-tasse.
2 Suivre les étapes 3 et 4 du paragraphe EXPRES-SO.
3 Appuyer sur la touche CAPPUCCINO ou celle de la boisson au goût LATTE MACCHIATO.
4 Suivre les étapes 6 et 7 du paragraphe EXPRES-SO.
BOISSONS CHAUDES AVEC CAPSULE
1 Placer la tasse/le verre sur la grille appuie-tasse.
2 Suivre les étapes 3 et 4 du paragraphe EXPRES-SO.
3 Appuyer sur la touche BOISSONS CHAUDES.
4 Suivre les étapes 6 et 7 du paragraphe EXPRES-SO.
PRÉPARATION DE BOISSONS
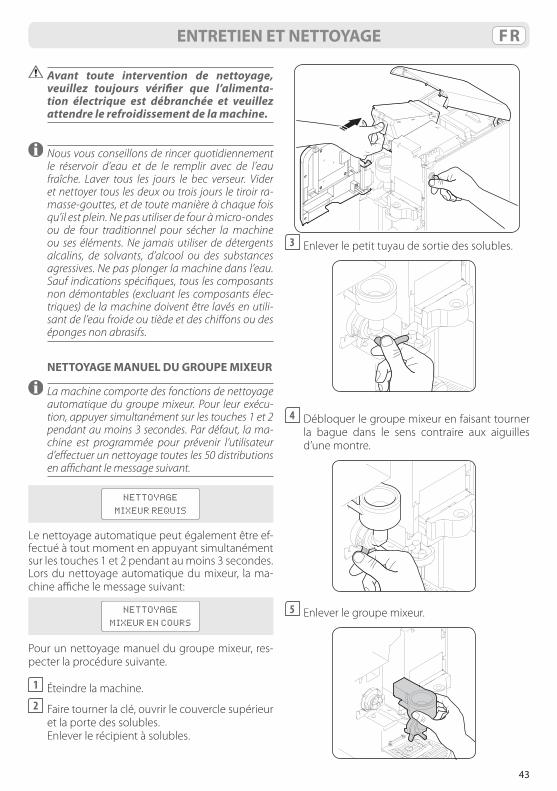
43
FR
Avant toute intervention de nettoyage, veuillez toujours vérifier que l’alimenta-tion électrique est débranchée et veuillezattendre le refroidissement de la machine.
Nous vous conseillons de rincer quotidiennement le réservoir d’eau et de le remplir avec de l’eau fraîche. Laver tous les jours le bec verseur. Vider et nettoyer tous les deux ou trois jours le tiroir ra-masse-gouttes, et de toute manière à chaque fois qu’il est plein. Ne pas utiliser de four à micro-ondes ou de four traditionnel pour sécher la machine ou ses éléments. Ne jamais utiliser de détergents alcalins, de solvants, d’alcool ou des substances agressives. Ne pas plonger la machine dans l’eau. Sauf indications spécifiques, tous les composants non démontables (excluant les composants élec-triques) de la machine doivent être lavés en utili-sant de l’eau froide ou tiède et des chiffons ou des éponges non abrasifs.
NETTOYAGE MANUEL DU GROUPE MIXEUR
La machine comporte des fonctions de nettoyage automatique du groupe mixeur. Pour leur exécu-tion, appuyer simultanément sur les touches 1 et 2 pendant au moins 3 secondes. Par défaut, la ma-chine est programmée pour prévenir l’utilisateur d’effectuer un nettoyage toutes les 50 distributions en affichant le message suivant.
NETTOYAGE
MIXEUR REQUIS
Le nettoyage automatique peut également être ef-fectué à tout moment en appuyant simultanément sur les touches 1 et 2 pendant au moins 3 secondes. Lors du nettoyage automatique du mixeur, la ma-chine affiche le message suivant:
NETTOYAGE
MIXEUR EN COURS
Pour un nettoyage manuel du groupe mixeur, res-pecter la procédure suivante.
1 Éteindre la machine.2 Faire tourner la clé, ouvrir le couvercle supérieur
et la porte des solubles. Enlever le récipient à solubles.
3 Enlever le petit tuyau de sortie des solubles.
4 Débloquer le groupe mixeur en faisant tourner la bague dans le sens contraire aux aiguilles d’une montre.
5 Enlever le groupe mixeur.
ENTRETIEN ET NETTOYAGE
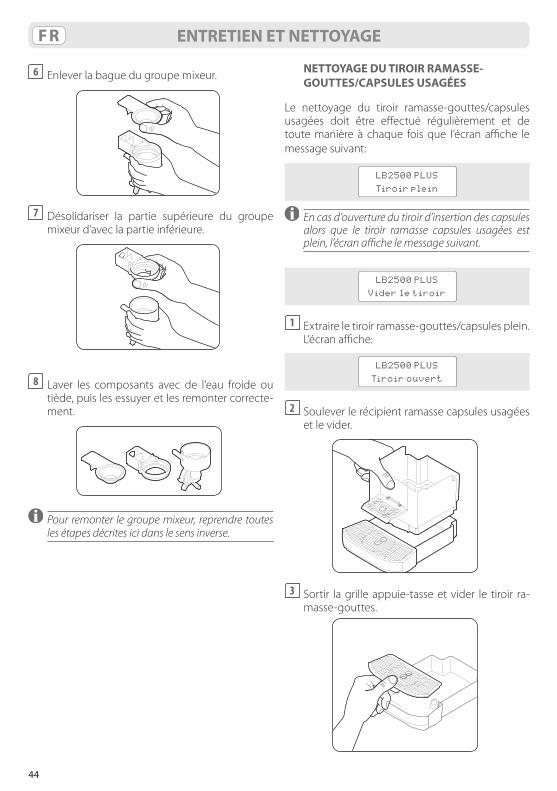
44
FR ENTRETIEN ET NETTOYAGE
6 Enlever la bague du groupe mixeur.
7 Désolidariser la partie supérieure du groupe
mixeur d’avec la partie inférieure.
8 Laver les composants avec de l’eau froide ou tiède, puis les essuyer et les remonter correcte-ment.
Pour remonter le groupe mixeur, reprendre toutes les étapes décrites ici dans le sens inverse.
NETTOYAGE DU TIROIR RAMASSE-GOUTTES/CAPSULES USAGÉES
Le nettoyage du tiroir ramasse-gouttes/capsules usagées doit être effectué régulièrement et de toute manière à chaque fois que l’écran affiche le message suivant:
LB2500 PLUS
Tiroir plein
En cas d’ouverture du tiroir d’insertion des capsules alors que le tiroir ramasse capsules usagées est plein, l’écran affiche le message suivant.
LB2500 PLUS
Vider le tiroir
1 Extraire le tiroir ramasse-gouttes/capsules plein. L’écran affiche:
LB2500 PLUS
Tiroir ouvert
2 Soulever le récipient ramasse capsules usagées et le vider.
3 Sortir la grille appuie-tasse et vider le tiroir ra-
masse-gouttes.
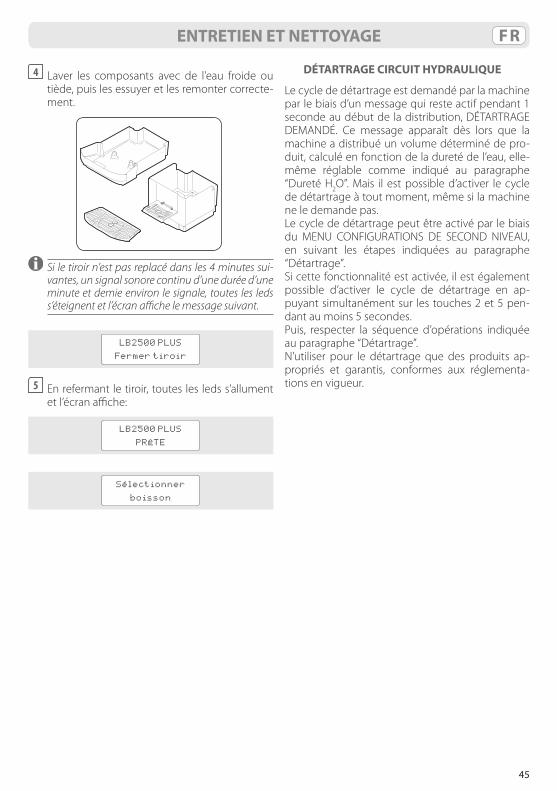
45
FR
4 Laver les composants avec de l’eau froide ou tiède, puis les essuyer et les remonter correcte-ment.
Si le tiroir n’est pas replacé dans les 4 minutes sui-vantes, un signal sonore continu d’une durée d’une minute et demie environ le signale, toutes les leds s’éteignent et l’écran affiche le message suivant.
LB2500 PLUS
Fermer tiroir
5 En refermant le tiroir, toutes les leds s’allument et l’écran affiche:
LB2500 PLUS
PRÊTE
Sélectionner
boisson
ENTRETIEN ET NETTOYAGE
DÉTARTRAGE CIRCUIT HYDRAULIQUE
Le cycle de détartrage est demandé par la machine par le biais d’un message qui reste actif pendant 1 seconde au début de la distribution, DÉTARTRAGE DEMANDÉ. Ce message apparaît dès lors que la machine a distribué un volume déterminé de pro-duit, calculé en fonction de la dureté de l’eau, elle-même réglable comme indiqué au paragraphe “Dureté H2O”. Mais il est possible d’activer le cycle de détartrage à tout moment, même si la machine ne le demande pas.Le cycle de détartrage peut être activé par le biais du MENU CONFIGURATIONS DE SECOND NIVEAU, en suivant les étapes indiquées au paragraphe “Détartrage”.Si cette fonctionnalité est activée, il est également possible d’activer le cycle de détartrage en ap-puyant simultanément sur les touches 2 et 5 pen-dant au moins 5 secondes.Puis, respecter la séquence d’opérations indiquée au paragraphe “Détartrage”.N’utiliser pour le détartrage que des produits ap-propriés et garantis, conformes aux réglementa-tions en vigueur.
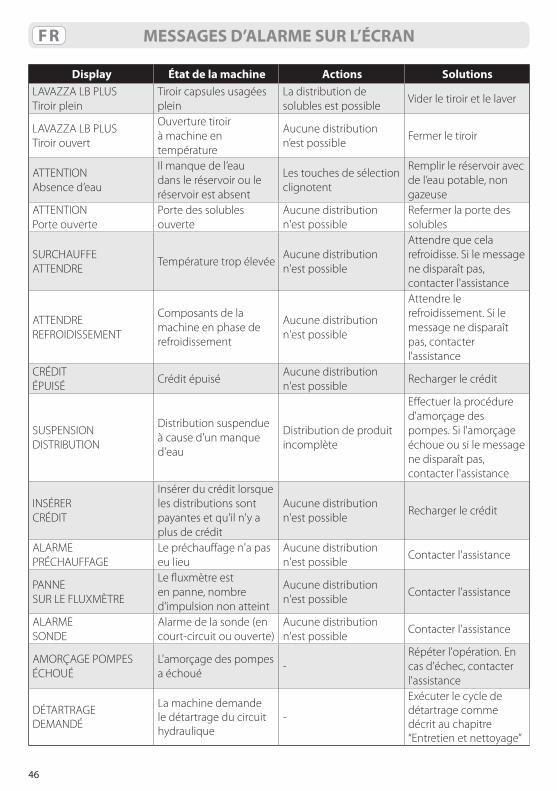
46
FR MESSAGES D’ALARME SUR L’ÉCRAN
Display État de la machine Actions Solutions LAVAZZA LB PLUSTiroir plein
Tiroir capsules usagées plein
La distribution de solubles est possible
Vider le tiroir et le laver
LAVAZZA LB PLUSTiroir ouvert
Ouverture tiroir à machine en température
Aucune distribution n’est possible
Fermer le tiroir
ATTENTION Absence d’eau
Il manque de l’eau dans le réservoir ou le réservoir est absent
Les touches de sélection clignotent
Remplir le réservoir avec de l’eau potable, non gazeuse
ATTENTION Porte ouverte
Porte des solubles ouverte
Aucune distribution n'est possible
Refermer la porte des solubles
SURCHAUFFE ATTENDRE
Température trop élevéeAucune distribution n'est possible
Attendre que cela refroidisse. Si le message ne disparaît pas, contacter l'assistance
ATTENDREREFROIDISSEMENT
Composants de la machine en phase de refroidissement
Aucune distribution n'est possible
Attendre le refroidissement. Si le message ne disparaît pas, contacter l'assistance
CRÉDIT ÉPUISÉ
Crédit épuiséAucune distribution n'est possible
Recharger le crédit
SUSPENSION DISTRIBUTION
Distribution suspendue à cause d'un manque d'eau
Distribution de produit incomplète
Effectuer la procédure d'amorçage des pompes. Si l'amorçage échoue ou si le message ne disparaît pas, contacter l'assistance
INSÉRERCRÉDIT
Insérer du crédit lorsque les distributions sont payantes et qu'il n'y a plus de crédit
Aucune distribution n'est possible
Recharger le crédit
ALARME PRÉCHAUFFAGE
Le préchauffage n'a pas eu lieu
Aucune distribution n'est possible
Contacter l'assistance
PANNE SUR LE FLUXMÈTRE
Le fluxmètre est en panne, nombre d'impulsion non atteint
Aucune distribution n'est possible
Contacter l'assistance
ALARMESONDE
Alarme de la sonde (en court-circuit ou ouverte)
Aucune distribution n'est possible
Contacter l'assistance
AMORÇAGE POMPESÉCHOUÉ
L'amorçage des pompes a échoué
-Répéter l'opération. En cas d'échec, contacter l'assistance
DÉTARTRAGEDEMANDÉ
La machine demande le détartrage du circuit hydraulique
-
Exécuter le cycle de détartrage comme décrit au chapitre “Entretien et nettoyage”
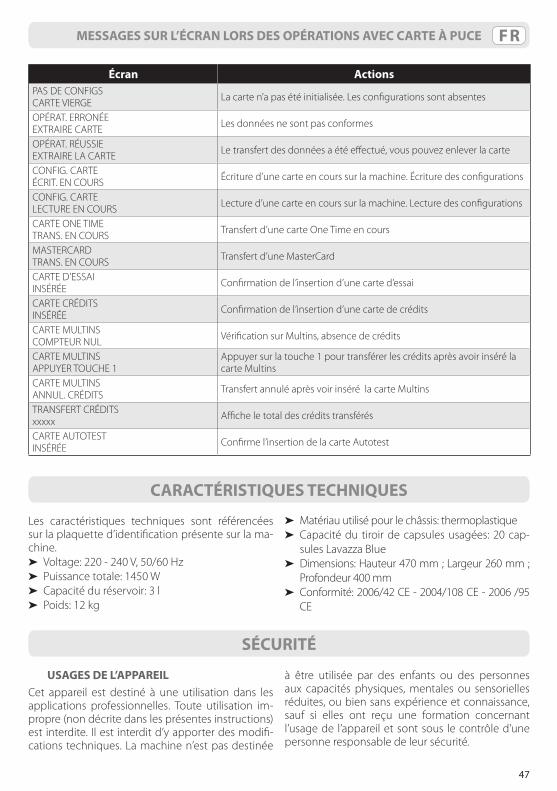
47
FRMESSAGES SUR L’ÉCRAN LORS DES OPÉRATIONS AVEC CARTE À PUCE
Écran ActionsPAS DE CONFIGSCARTE VIERGE La carte n’a pas été initialisée. Les configurations sont absentes
OPÉRAT. ERRONÉEEXTRAIRE CARTE Les données ne sont pas conformes
OPÉRAT. RÉUSSIEEXTRAIRE LA CARTE Le transfert des données a été effectué, vous pouvez enlever la carte
CONFIG. CARTEÉCRIT. EN COURS Écriture d’une carte en cours sur la machine. Écriture des configurations
CONFIG. CARTELECTURE EN COURS Lecture d’une carte en cours sur la machine. Lecture des configurations
CARTE ONE TIMETRANS. EN COURS Transfert d’une carte One Time en cours
MASTERCARDTRANS. EN COURS Transfert d’une MasterCard
CARTE D’ESSAIINSÉRÉE Confirmation de l’insertion d’une carte d’essai
CARTE CRÉDITSINSÉRÉE Confirmation de l’insertion d’une carte de crédits
CARTE MULTINSCOMPTEUR NUL Vérification sur Multins, absence de crédits
CARTE MULTINSAPPUYER TOUCHE 1
Appuyer sur la touche 1 pour transférer les crédits après avoir inséré la carte Multins
CARTE MULTINSANNUL. CRÉDITS Transfert annulé après voir inséré la carte Multins
TRANSFERT CRÉDITSxxxxx Affiche le total des crédits transférés
CARTE AUTOTESTINSÉRÉE Confirme l’insertion de la carte Autotest
Les caractéristiques techniques sont référencées sur la plaquette d’identification présente sur la ma-chine.➤ Voltage: 220 - 240 V, 50/60 Hz➤ Puissance totale: 1450 W➤ Capacité du réservoir: 3 l➤ Poids: 12 kg
SÉCURITÉ
CARACTÉRISTIQUES TECHNIQUES
➤ Matériau utilisé pour le châssis: thermoplastique➤ Capacité du tiroir de capsules usagées: 20 cap-
sules Lavazza Blue➤ Dimensions: Hauteur 470 mm ; Largeur 260 mm ;
Profondeur 400 mm➤ Conformité: 2006/42 CE - 2004/108 CE - 2006 /95
CE
USAGES DE L’APPAREIL Cet appareil est destiné à une utilisation dans les applications professionnelles. Toute utilisation im-propre (non décrite dans les présentes instructions) est interdite. Il est interdit d’y apporter des modifi-cations techniques. La machine n’est pas destinée
à être utilisée par des enfants ou des personnes aux capacités physiques, mentales ou sensorielles réduites, ou bien sans expérience et connaissance, sauf si elles ont reçu une formation concernant l’usage de l’appareil et sont sous le contrôle d’une personne responsable de leur sécurité.
48
FR
EMPLACEMENT Placer la machine à café sur une surface plane, hori-zontale et stable dans un endroit sûr, où personne ne pourra la renverser ou être blessé. Ne pas conserver la machine à une température inférieure à 4 °C dans la mesure où le gel pourrait l’endommager. Ne pas utiliser la machine à café en extérieur. Ne pas poser la machine sur des surfaces très chaudes et/ou à proxi-mité de flammes libres. Utiliser la machine à tempé-rature ambiante.
ALIMENTATIONNe brancher la machine à café qu’à une prise de cou-rant idoine. La tension doit correspondre à celle indi-quée sur la plaquette d’identification de la machine.
CÂBLE D’ALIMENTATIONNe pas utiliser la machine à café si le câble d’ali-mentation est défectueux ou endommagé. Le cas échéant, il doit être remplacé immédiatement. Ne pas faire passer le câble d’alimentation dans des angles ou sur des arêtes vives, au-dessus d’objets très chauds et la protéger des graisses. Ne pas por-ter ou tirer la machine à café en la tenant par le câble. Ne pas retirer la fiche en tirant sur le câble, ne pas la toucher avec les mains humides. Éviter que le câble d’alimentation pende de tables ou d’étagères.
RISQUE DE FOUDROIEMENT Ne jamais mettre les parties sous tension en contact avec de l’eau. Assurez-vous que vos mains, la ma-chine, le câble et la surface d’appui de la machine ne soient pas humides.
PROTECTION DES PERSONNES Garder les enfants sous surveillance afin d’évi-ter qu’ils jouent avec l’appareil. Les enfants ne se rendent pas compte du danger lié aux équipe-ments électroménagers. Ne pas laisser à leur portée les matériaux utilisés pour emballer la machine.
RISQUE DE BRÛLURES Ne pas toucher les parties chaudes (groupe porte-capsule, etc.) juste après avoir utilisé la machine. Lors de la distribution de la boisson, faire attention à de possibles jets de liquide chaud.
NETTOYAGE Avant de nettoyer l’appareil, il est indispensable de débrancher la fiche de la prise de courant et d’attendre que l’appareil refroidisse. Ne pas plon-ger la machine dans l’eau ! Il est strictement interdit d’essayer d’intervenir sur les composants intérieurs de l’appareil. Ne pas utiliser l’eau présente dans le réservoir à des fins alimentaires.
STOCKAGE DE LA MACHINE Si la machine est inutilisée pendant une longue pé-riode, débrancher la fiche de la prise et la conserver dans un endroit sec et qui ne soit pas à la portée des enfants. La protéger de la poussière et de la saleté.
RÉPARATIONS/ENTRETIEN En cas de pannes, défauts avérés ou estimés après une chute, débrancher immédiatement la fiche de la prise. Ne pas faire fonctionner une machine dé-fectueuse. Seuls les Centres d’Assistance Autorisés peuvent effectuer des interventions ou des répara-tions. En cas d’interventions qui ne sont pas exécu-tées dans les règles de l’art, nous déclinons toute responsabilité sur les dommages éventuels.
RÉSERVOIR D’EAUNe verser dans le réservoir que de l’eau fraîche, potable et non gazeuse. Ne pas mettre en route la machine si l’eau n’a pas atteint le niveau minimal indiqué sur le réservoir.
RÉCEPTACLE CAPSULE Le réceptacle des capsules ne doit contenir que des capsules Lavazza Blue monodoses. Ne pas y mettre les doigts ou tout autre objet. Les capsules ne s’uti-lisent qu’une seule fois.
ÉLIMINATION DE LA MACHINE EN FIN DE VIE (Directive Européenne 2002/96/CE - D.L. du 25 juillet 2005 n. 151)
Le symbole d’une poubelle placé sur l’équipement et/ou sur l’emballage indique que l’appareil arrivé en fin de vie ne peut être jeté dans les ordures ména-gères normales. L’appareil doit être amené dans une déchetterie spécifique pour déchets électriques et électroniques du territoire national ou bien ramené sur le lieu d’achat ou dans un lieu d’achat d’équipe-ments neufs de même type, à raison d’un pour un.L’utilisateur est responsable du dépôt de la machine dans un point d’apport volontaire, sous peine des sanctions prévues par la législation en vigueur en la matière. Un traitement adapté de ces équipements pour leur recyclage et/ou leur élimination respon-sable contribue à éviter d’éventuels effets néga-tifs sur l’environnement et sur la santé et favorise le réemploi et/ou le recyclage des matériaux qui composent la machine. Pour de plus amples ren-seignements concernant le système de ramassage disponible, veuillez vous adresser au service local d’élimination des déchets ou bien auprès du reven-deur où l’achat a été effectué.
SÉCURITÉ
49
DEINHALT
INHALT ................................................................................................................................................................................ 49TEILE .................................................................................................................................................................................... 50DISPLAYSTATUSMELDUNGEN ................................................................................................................................. 50ERSTE INBETRIEBNAHME DES GERÄTS ............................................................................................................... 51
AUSPACKEN UND AUFSTELLEN ................................................................................................................................................................................. 51VORBEREITUNG DES GERÄTS ....................................................................................................................................................................................... 51
MENÜ EINSTELLUNGEN.............................................................................................................................................. 53MENÜ EINSTELLUNGEN ERSTE STUFE .................................................................................................................................................................... 53VERBLEIBENDE KREDITE ......................................................................................................................................................................................................................................53DOSIERUNGSEINSTELLUNG ..............................................................................................................................................................................................................................53MENÜ EINSTELLUNGEN ZWEITE STUFE ................................................................................................................................................................ 54SPRACHE AUSWÄHLEN ........................................................................................................................................................................................................................................54ENTKALKUNG ............................................................................................................................................................................................................................................................54WASSERHÄRTE ..........................................................................................................................................................................................................................................................55EINSTELLUNG TEMP ...............................................................................................................................................................................................................................................55PASSWORT ÄNDERN .............................................................................................................................................................................................................................................55STANDBY.......................................................................................................................................................................................................................................................................56PUMPEN STARTEN ..................................................................................................................................................................................................................................................56KARTE ÜBERPRÜFEN ..............................................................................................................................................................................................................................................56ZÄHLER ..........................................................................................................................................................................................................................................................................56
VORBEREITUNG GETRÄNKE ..................................................................................................................................... 57VORRICHTUNG ZUR VORBEREITUNG DER GETRÄNKE ................................................................................................................................. 57GETRÄNKEAUSGABE ......................................................................................................................................................................................................... 57ESPRESSO .....................................................................................................................................................................................................................................................................57ESPRESSO LUNGO ...................................................................................................................................................................................................................................................58ESPRESSO MACCHIATO .......................................................................................................................................................................................................................................58LATTE MACCHIATO/CAPPUCCINO GETRÄNK ........................................................................................................................................................................................58HEISSGETRÄNKE MIT KAPSEL ...........................................................................................................................................................................................................................58
WARTUNG UND REINIGUNG .................................................................................................................................... 59MANUELLE REINIGUNG MIXER ................................................................................................................................................................................... 59REINIGUNG DER ABTROPFSCHALE/KAPSELAUFFANGBEHÄLTER ........................................................................................................ 60ENTKALKUNG DES WASSERSYSTEMS ..................................................................................................................................................................... 61
ALARMMELDUNGEN IM DISPLAY .......................................................................................................................... 62MELDUNGEN IM DISPLAY BEI VORGANG MIT CHIP-KARTE ...................................................................... 63TECHNISCHE DATEN .................................................................................................................................................... 63SICHERHEIT ...................................................................................................................................................................... 63
BESTIMMUNGSZWECK .................................................................................................................................................................................................... 63STANDORT .............................................................................................................................................................................................................................. 64NETZVERSORGUNG ........................................................................................................................................................................................................... 64NETZKABEL ............................................................................................................................................................................................................................. 64STROMSCHLAGGEFAHR ................................................................................................................................................................................................. 64SCHUTZ ANDERER PERSONEN ................................................................................................................................................................................... 64VERBRENNUNGSGEFAHR ............................................................................................................................................................................................... 64REINIGUNG ............................................................................................................................................................................................................................. 64AUFBEWAHRUNG DES GERÄTS .................................................................................................................................................................................. 64REPARATUREN / INSTANDHALTUNG ....................................................................................................................................................................... 64WASSERTANK......................................................................................................................................................................................................................... 64KAPSELFACH .......................................................................................................................................................................................................................... 64ENTSORGUNG DES GERÄTS AM ENDE DES BETRIEBSLEBENS(EU-Richtlinie 2002/96/EG - Italienisches Gesetz 25. Juli 2005 n. 151) .............................................................................................. 64
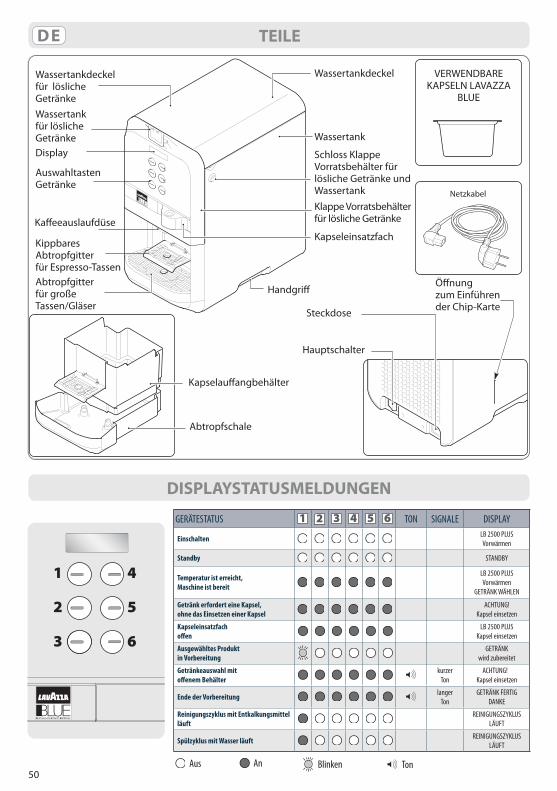
50
DE TEILE
DISPLAYSTATUSMELDUNGEN
Wassertankdeckel für lösliche Getränke
Wassertankdeckel VERWENDBARE KAPSELN LAVAZZA
BLUE
Kapseleinsatzfach
Handgriff
Steckdose
Hauptschalter
Öffnung zum Einführender Chip-Karte
Wassertank
Schloss Klappe Vorratsbehälter für lösliche Getränke und WassertankKlappe Vorratsbehälter für lösliche Getränke
Netzkabel
Wassertank für lösliche GetränkeDisplay
Auswahltasten Getränke
Kaffeeauslaufdüse
KippbaresAbtropfgitter für Espresso-TassenAbtropfgitterfür großeTassen/Gläser
Kapselauffangbehälter
Abtropfschale
TonBlinkenAnAus
1
2
3
4
5
6
GERÄTESTATUS 1 2 3 4 5 6 TON SIGNALE DISPLAY
Einschalten LB 2500 PLUSVorwärmen
Standby STANDBY
Temperatur ist erreicht,Maschine ist bereit
LB 2500 PLUSVorwärmen
GETRÄNK WÄHLEN
Getränk erfordert eine Kapsel,ohne das Einsetzen einer Kapsel
ACHTUNG!Kapsel einsetzen
Kapseleinsatzfachoffen
LB 2500 PLUSKapsel einsetzen
Ausgewähltes Produkt in Vorbereitung
GETRÄNK wird zubereitet
Getränkeauswahl mitoffenem Behälter
kurzerTon
ACHTUNG!Kapsel einsetzen
Ende der Vorbereitung langerTon
GETRÄNK FERTIGDANKE
Reinigungszyklus mit Entkalkungsmittel läuft
REINIGUNGSZYKLUS LÄUFT
Spülzyklus mit Wasser läuft REINIGUNGSZYKLUS LÄUFT
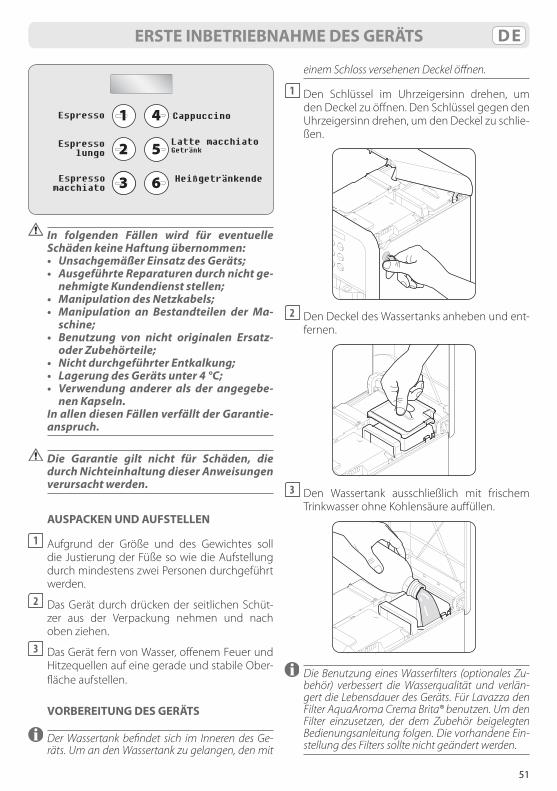
51
DE
Cappuccino
GetränkLatte macchiato
6
5
4
3
2
1
HeißgetränkendeEspressomacchiato
Espressolungo
Espresso
In folgenden Fällen wird für eventuelle Schäden keine Haftung übernommen:
• UnsachgemäßerEinsatzdesGeräts; • AusgeführteReparaturendurchnichtge-
nehmigte Kundendienst stellen; • ManipulationdesNetzkabels; • Manipulation an Bestandteilen der Ma-
schine; • Benutzung von nicht originalen Ersatz-
oder Zubehörteile; • NichtdurchgeführterEntkalkung; • LagerungdesGerätsunter4°C; • Verwendung anderer als der angegebe-
nen Kapseln. In allen diesen Fällen verfällt der Garantie-
anspruch.
Die Garantie gilt nicht für Schäden, diedurch Nichteinhaltung dieser Anweisungen verursacht werden.
AUSPACKEN UND AUFSTELLEN
1 Aufgrund der Größe und des Gewichtes soll die Justierung der Füße so wie die Aufstellung durch mindestens zwei Personen durchgeführt werden.
2 Das Gerät durch drücken der seitlichen Schüt-zer aus der Verpackung nehmen und nach oben ziehen.
3 Das Gerät fern von Wasser, offenem Feuer und Hitzequellen auf eine gerade und stabile Ober-fläche aufstellen.
VORBEREITUNG DES GERÄTS
Der Wassertank befindet sich im Inneren des Ge-räts. Um an den Wassertank zu gelangen, den mit
einem Schloss versehenen Deckel öffnen.
1 Den Schlüssel im Uhrzeigersinn drehen, um den Deckel zu öffnen. Den Schlüssel gegen den Uhrzeigersinn drehen, um den Deckel zu schlie-ßen.
2 Den Deckel des Wassertanks anheben und ent-
fernen.
3 Den Wassertank ausschließlich mit frischem
Trinkwasser ohne Kohlensäure auffüllen.
Die Benutzung eines Wasserfilters (optionales Zu-behör) verbessert die Wasserqualität und verlän-gert die Lebensdauer des Geräts. Für Lavazza den Filter AquaAroma Crema Brita® benutzen. Um den Filter einzusetzen, der dem Zubehör beigelegten Bedienungsanleitung folgen. Die vorhandene Ein-stellung des Filters sollte nicht geändert werden.
ERSTE INBETRIEBNAHME DES GERÄTS
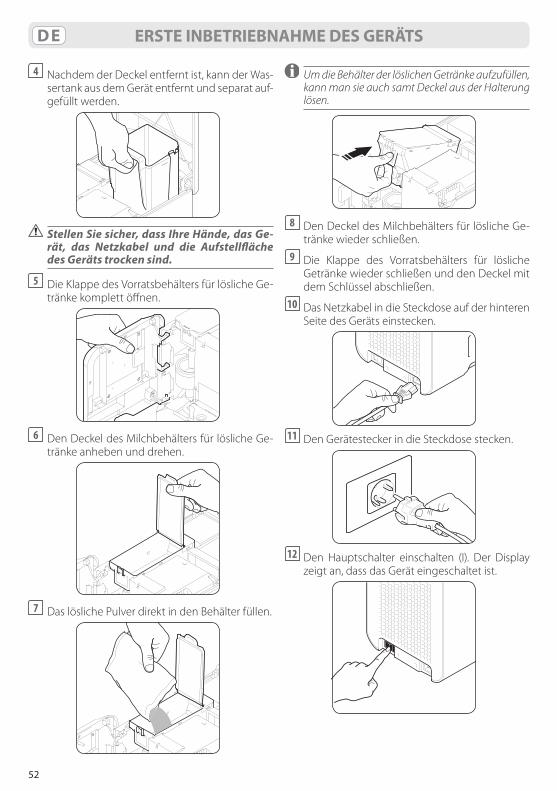
52
DE
4 Nachdem der Deckel entfernt ist, kann der Was-sertank aus dem Gerät entfernt und separat auf-gefüllt werden.
Stellen Sie sicher, dass Ihre Hände, das Ge-rät, das Netzkabel und die Aufstellfläche des Geräts trocken sind.
5 Die Klappe des Vorratsbehälters für lösliche Ge-tränke komplett öffnen.
6 Den Deckel des Milchbehälters für lösliche Ge-
tränke anheben und drehen.
7 Das lösliche Pulver direkt in den Behälter füllen.
Um die Behälter der löslichen Getränke aufzufüllen, kann man sie auch samt Deckel aus der Halterung lösen.
8 Den Deckel des Milchbehälters für lösliche Ge-
tränke wieder schließen.9 Die Klappe des Vorratsbehälters für lösliche
Getränke wieder schließen und den Deckel mit dem Schlüssel abschließen.
10 Das Netzkabel in die Steckdose auf der hinteren Seite des Geräts einstecken.
11 Den Gerätestecker in die Steckdose stecken.
12 Den Hauptschalter einschalten (I). Der Display
zeigt an, dass das Gerät eingeschaltet ist.
ERSTE INBETRIEBNAHME DES GERÄTS
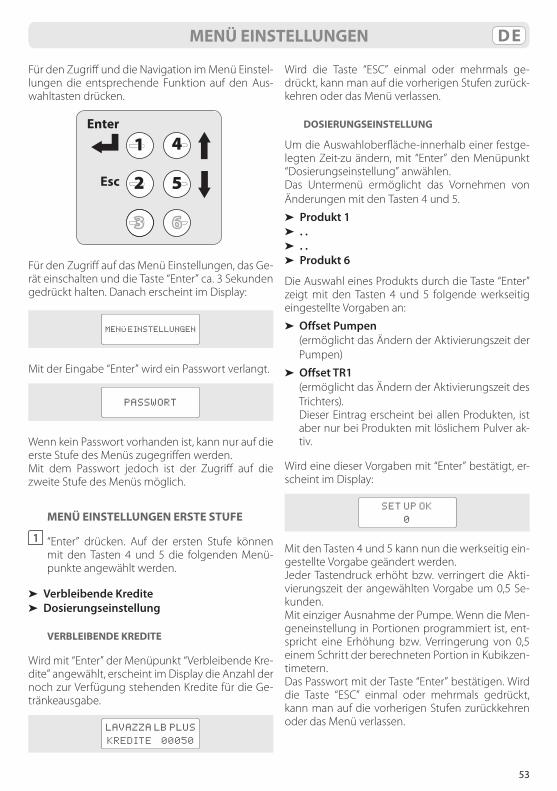
53
DE
Für den Zugriff und die Navigation im Menü Einstel-lungen die entsprechende Funktion auf den Aus-wahltasten drücken.
1
2
3
4
5
6
Esc
Enter
Für den Zugriff auf das Menü Einstellungen, das Ge-rät einschalten und die Taste “Enter” ca. 3 Sekunden gedrückt halten. Danach erscheint im Display:
MENÜ EINSTELLUNGEN
Mit der Eingabe “Enter” wird ein Passwort verlangt.
PASSWORT
Wenn kein Passwort vorhanden ist, kann nur auf die erste Stufe des Menüs zugegriffen werden. Mit dem Passwort jedoch ist der Zugriff auf die zweite Stufe des Menüs möglich.
MENÜ EINSTELLUNGEN ERSTE STUFE
1 “Enter” drücken. Auf der ersten Stufe können mit den Tasten 4 und 5 die folgenden Menü-punkte angewählt werden.
➤ Verbleibende Kredite➤ Dosierungseinstellung
VERBLEIBENDE KREDITE
Wird mit “Enter” der Menüpunkt “Verbleibende Kre-dite” angewählt, erscheint im Display die Anzahl der noch zur Verfügung stehenden Kredite für die Ge-tränkeausgabe.
LAVAZZA LB PLUS
KREDITE 00050
Wird die Taste “ESC” einmal oder mehrmals ge-drückt, kann man auf die vorherigen Stufen zurück-kehren oder das Menü verlassen.
DOSIERUNGSEINSTELLUNG
Um die Auswahloberfläche-innerhalb einer festge-legten Zeit-zu ändern, mit “Enter” den Menüpunkt “Dosierungseinstellung” anwählen. Das Untermenü ermöglicht das Vornehmen von Änderungen mit den Tasten 4 und 5.
➤ Produkt 1➤ . .➤ . .➤ Produkt 6
Die Auswahl eines Produkts durch die Taste “Enter” zeigt mit den Tasten 4 und 5 folgende werkseitig eingestellte Vorgaben an:
➤ Offset Pumpen (ermöglicht das Ändern der Aktivierungszeit der
Pumpen)
➤ Offset TR1 (ermöglicht das Ändern der Aktivierungszeit des
Trichters). Dieser Eintrag erscheint bei allen Produkten, ist
aber nur bei Produkten mit löslichem Pulver ak-tiv.
Wird eine dieser Vorgaben mit “Enter” bestätigt, er-scheint im Display:
SET UP OK
0
Mit den Tasten 4 und 5 kann nun die werkseitig ein-gestellte Vorgabe geändert werden.Jeder Tastendruck erhöht bzw. verringert die Akti-vierungszeit der angewählten Vorgabe um 0,5 Se-kunden.Mit einziger Ausnahme der Pumpe. Wenn die Men-geneinstellung in Portionen programmiert ist, ent-spricht eine Erhöhung bzw. Verringerung von 0,5 einem Schritt der berechneten Portion in Kubikzen-timetern.Das Passwort mit der Taste “Enter” bestätigen. Wird die Taste “ESC” einmal oder mehrmals gedrückt, kann man auf die vorherigen Stufen zurückkehren oder das Menü verlassen.
MENÜ EINSTELLUNGEN
54
DE
MENÜ EINSTELLUNGEN ZWEITE STUFE
Das Menü der Einstellungen auf der zweiten Stufe ist autorisiertem Fachpersonal vorbehalten.
1 Korrektes Passwort eingeben und “Enter” drü-cken. Das werkseitig eingestellte Passwort ist 33333.
Auf der zweiten Ebene kann man mit den Tasten 4 und 5 die folgenden Menüpunkte anwählen.
➤ Sprache auswählen➤ Entkalkung➤ Wasserhärte➤ Einstellung Temp➤ Passwort ändern➤ Standby➤ Pumpen starten➤ Karte überprüfen➤ Zähler
SPRACHE AUSWÄHLEN
Um die Sprache des Menüs und der Displaymel-dungen zu ändern, den Menüpunkt “Sprache aus-wählen” mit “Enter” bestätigen. Die gewünschte Sprache im Untermenü mit den Tasten 4 und 5 anwählen und mit der Taste “Enter” bestätigen.➤ Italiano➤ English➤ Français➤ Deutsch➤ Espanõl➤ Português➤ Nederlands
Wird die Taste “ESC” einmal oder mehrmals ge-drückt, kann man auf die vorherigen Stufen zurück-kehren oder das Menü verlassen.
ENTKALKUNG
Der Entkalkungszyklus kann jederzeit ausgeführt werden, auch wenn keine Aufforderung zur Entkal-kung erscheint. Wird mit der Enter-Taste der Menü-punkt „Entkalkung“ angewählt, erscheint im Display folgende Meldung.
ENTKALKUNG
DAS ENTKALKUNGSMITTEL
IN DEN TANK FÜLLEN UND OK
DRÜCKEN
Während des Entkalkungszyklus können keine Ge-tränke ausgegeben werden.
Nun müssen folgende Anweisungen befolgt wer-den.
1 Den Tank gemäß Dosierempfehlung des Her-stellers mit Entkalkungsmittel und Wasser fül-len.
2 Ein ausreichend großes Gefäß unter die Auslauf-düse stellen.
3 Sobald die Enter-Taste gedrückt wird, starten die Pumpen und das Entkalkungsmittel wird nach Beendigung des Entkalkungsprozesses über die Auslaufdüse ausgegeben. Im Display erscheint folgende Meldung:
REINIGUNGSZYKLUS
LÄUFT
• DasEntkalkungsmitteldarfnichtgetrun-ken werden.
• Verbrennungsgefahr! Das Entkalkungs-mittel kann hohe Temperaturen errei-chen.
4 Das Gerät gibt die benötigte Menge des Mittels aus.
Durch Drücken der Enter-Taste kann der Zyklus vorübergehend unterbrochen werden, um die Flüssigkeit im Auffanggefäß zu entleeren.
Die Wirkung des Entkalkungsmittels kann er-höht werden, indem der Zyklus ca. alle zwei Mi-nuten für etwa eine Minute durch Drücken der Enter-Taste unterbrochen wird.
5 Das entleerte Gefäß wieder unter die Auslauf-düse stellen.
6 Mit der Enter-Taste den Zyklus fortsetzen.
Wird die Stromzufuhr während des Entkalkungszy-klus unterbrochen, startet der Zyklus beim nächs-ten Einschalten automatisch wieder von Anfang an.
7 Beim Entleeren des Tanks erscheint folgende Meldung im Display:
MENÜ EINSTELLUNGEN
55
DE
TANK SPÜLEN
Gefolgt von der Meldung:
TANK FÜLLEN
8 Den Tank gründlich mit frischem Trinkwasser ausspülen und reinigen.
Anschließend den Tank mit frischem Trinkwas-ser ohne Kohlensäure auffüllen. Im Display er-scheint folgende Meldung:
SPÜLUNG
STARTEN
9 Ein ausreichend großes Gefäß unter die Auslauf-düse stellen.
10 Mit der Enter-Taste die Spülung des Wasser-systems starten. Im Display erscheint folgende Meldung:
REINIGUNGSZYKLUS
LÄUFT
11 Das Gerät gibt die benötigte Wassermenge aus. Durch Drücken der Enter-Taste kann der Zyklus vorübergehend unterbrochen werden, um die Flüssigkeit im Auffanggefäß zu entleeren.
12 Das entleerte Gefäß wieder unter die Auslauf-düse stellen.
13 Mit der Enter-Taste den Zyklus fortsetzen.
14 Wenn die vorgesehene Wassermenge noch nicht erreicht ist, wird das Gerät zu einer erneu-ten Auffüllung des Tanks auffordern. In diesem Fall erscheint im Display die im Punkt 7 ange-zeigte Meldung. Den Zyklus mit den ab Punkt 8 beschriebenen Schritten beenden.
15 Wenn das Gerät die benötigte Wassermenge ausgegeben hat, erscheint im Display folgende Meldung:
ENTKALKUNG
BEENDET
MENÜ EINSTELLUNGEN
Getränkeausgabe ist wieder möglich. Falls nötig den Tank mit frischem Trinkwasser ohne Kohlensäu-re auffüllen.
WASSERHÄRTE
Wird mit der Enter-Taste der Menüpunkt „Wasser-härte“ angewählt, kann das Gerät an den Härtegrad des verwendeten Wassers angepasst werden.Dieser Wert kann mit Teststreifen ermittelt werden, die im Handel erhältlich sind.Mit den Tasten 4 und 5 kann ein Wert im Bereich zwischen 5 und 50 eingegeben werden (französi-sche Härtegrade).Der werkseitig eingestellte Wert beträgt 20 franzö-sische Härtegrade. Wird ein Enthärtungsfilter be-nutzt, sollte der Wert in Übereinstimmung mit der Filterwirkung eingestellt werden.
EINSTELLUNG TEMP
Wird mit der Enter-Taste der Menüpunkt „Einstel-lung Temp“ angewählt, besteht die Möglichkeit, die Temperatur für die Getränkeausgabe zu erhöhen oder zu senken. Mit den Tasten 4 und 5 kann die Temperatur im Bereich von ± 4 °C erhöht oder ge-senkt werden.
PASSWORT ÄNDERN
Wird der Menüpunkt “Passwort ändern” mit “Enter” bestätigt, erscheint im Display:
PASSWORT
Wird das Passwort eingegeben, erscheint folgende Meldung:
PASSWORT ÄNDERN
Das gewählte Passwort eingeben, das aus 6 Zei-chen bestehen muss.Das Passwort mit der Taste “Enter” bestätigen. Wird die Taste “ESC” einmal oder mehrmals gedrückt, kann man auf die vorherigen Stufen zurückkehren oder das Menü verlassen.
56
DE
STANDBY
Das Gerät ist so programmiert, dass es nach einer bestimmten Zeit in den Standby-Modus wechselt. Die voreingestellte Zeit beträgt 2 Stunden.
Im Standby-Modus erscheint im Display folgende Meldung:
STANDBY
Um das Gerät wieder betriebsbereit zu machen, eine beliebige Auswahltaste drücken. Wird der Menüpunkt “Standby” mit der Taste “Enter” bestä-tigt, können mit den Tasten 4 und 5 die folgenden zwei Optionen angewählt werden:
➤ Standby deaktiviert➤ Standby aktiviert
Mit der Taste “Enter” kann der Standby-Modus akti-viert oder deaktiviert werden. Wird die Taste “ESC” einmal oder mehrmals gedrückt, kann man auf die vorherigen Stufen zurückkehren oder das Menü verlassen.
PUMPEN STARTEN
Wird mit der Taste “Enter” der Menüpunkt “Pumpen starten” bestätigt, können mit den Tasten 4 und 5 die folgenden Optionen angewählt werden:
➤ Pumpen starten aktiviert➤ Pumpen starten deaktiviert
Mit der Taste “Enter” kann die Funktion aktiviert oder deaktiviert werden. Wird die Taste “ESC” einmal oder mehrmals gedrückt, kann man auf die vorheri-gen Stufen zurückkehren oder das Menü verlassen. Die Pumpen können im betriebsbereiten Modus mit dem gleichzeitigen Drücken der Tasten 3 und 6 für mindestens 3 Sekunden gestartet werden.
Bevor die Pumpen aktiviert werden, eine Tasse oder ein Glas auf den Abstellrost, un-ter den Getränkeauslauf stellen.
Während die Pumpen laufen, erscheint im Display folgende Meldung:
START
PUMPEN IM GANGE
Am Ende des Vorgangs und je nach Ergebnis er-scheint folgende Meldung im Display.
PUMPEN STARTEN
POSITIV/NEGATIV
Bei der ersten Inbetriebnahme des Geräts oder nach einer längeren Nichtbenutzung sollte das Wassersystem entlüftet werden. Wenn die Funkti-on zuvor im Menü aktiviert wurde, setzt der Vor-gang durch das gleichzeitige Drücken der Tasten 3 und 6 für mindestens 3 Sekunden automatisch ein.
KARTE ÜBERPRÜFEN
Diese Funktion ermöglicht dem Benutzer unabhän-gig von seinem Gebrauch die Überprüfung einer Chip-Karte. Wird der Menüpunkt “Karte überprüfen” mit “Enter” bestätigt, erscheint im Display folgende Meldung:
KARTE
EINFÜHREN
Mit der Einführung der Chip Karte in den dafür vor-gesehenen Schlitz, werden die darauf gespeicher-ten Informationen im Display ersichtlich.Danach die Karte entnehmen und die Taste “ESC” einmal oder mehrmals drücken, um auf die vor-herigen Stufen zurückzukehren oder das Menü zu verlassen.
ZÄHLER
Diese Funktion ermöglicht eine Analyse des Mess-geräts für die Getränkeausgabe und der Statistiken der verschiedenen Auswahlen.Wird mit der Taste “Enter” der Menüpunkt “Zähler” bestätigt, können mit den Tasten 4 und 5 die ver-schiedenen Messgeräte angewählt werden.
➤ Getränkeausgaben ausgeführt 000079➤ Tot produziert 1 ausgeführt 000027➤ . .➤ . .➤ Tot produziert 6 ausgeführt 000008
MENÜ EINSTELLUNGEN
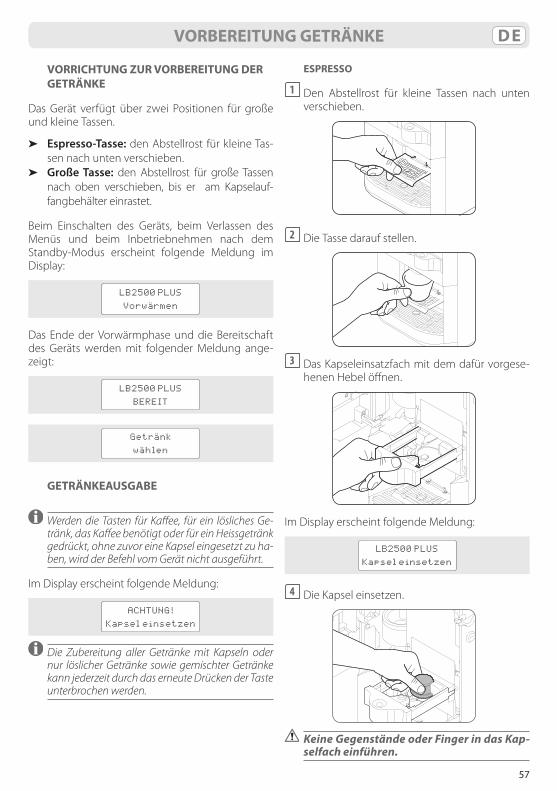
57
DE
VORRICHTUNG ZUR VORBEREITUNG DER GETRÄNKE
Das Gerät verfügt über zwei Positionen für große und kleine Tassen.
➤ Espresso-Tasse: den Abstellrost für kleine Tas-sen nach unten verschieben.
➤ Große Tasse: den Abstellrost für große Tassen nach oben verschieben, bis er am Kapselauf-fangbehälter einrastet.
Beim Einschalten des Geräts, beim Verlassen des Menüs und beim Inbetriebnehmen nach dem Standby-Modus erscheint folgende Meldung im Display:
LB2500 PLUS
Vorwärmen
Das Ende der Vorwärmphase und die Bereitschaft des Geräts werden mit folgender Meldung ange-zeigt:
LB2500 PLUS
BEREIT
Getränk
wählen
GETRÄNKEAUSGABE
Werden die Tasten für Kaffee, für ein lösliches Ge-tränk, das Kaffee benötigt oder für ein Heissgetränk gedrückt, ohne zuvor eine Kapsel eingesetzt zu ha-ben, wird der Befehl vom Gerät nicht ausgeführt.
Im Display erscheint folgende Meldung:
ACHTUNG!
Kapsel einsetzen
Die Zubereitung aller Getränke mit Kapseln oder nur löslicher Getränke sowie gemischter Getränke kann jederzeit durch das erneute Drücken der Taste unterbrochen werden.
VORBEREITUNG GETRÄNKE
ESPRESSO
1 Den Abstellrost für kleine Tassen nach unten verschieben.
2 Die Tasse darauf stellen.
3 Das Kapseleinsatzfach mit dem dafür vorgese-
henen Hebel öffnen.
Im Display erscheint folgende Meldung:
LB2500 PLUS
Kapsel einsetzen
4 Die Kapsel einsetzen.
Keine Gegenstände oder Finger in das Kap-selfach einführen.
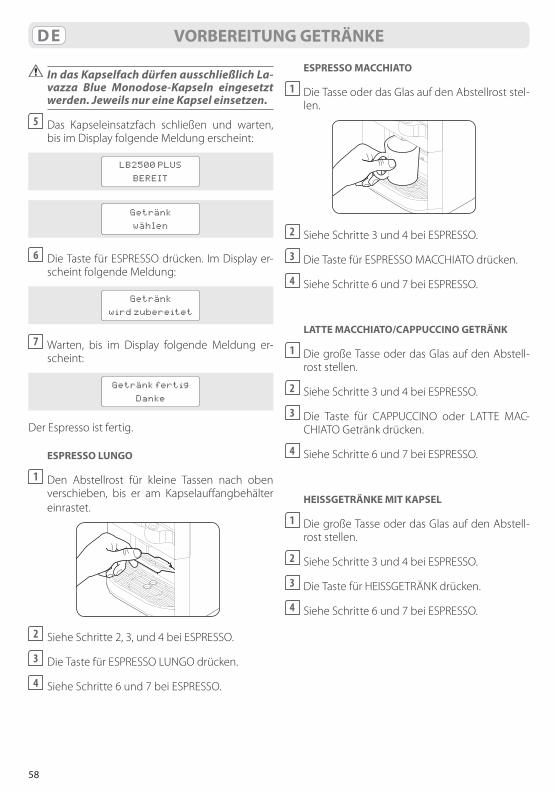
58
DE
IndasKapselfachdürfenausschließlichLa-vazza Blue Monodose-Kapseln eingesetztwerden. Jeweils nur eine Kapsel einsetzen.
5 Das Kapseleinsatzfach schließen und warten, bis im Display folgende Meldung erscheint:
LB2500 PLUS
BEREIT
Getränk
wählen
6 Die Taste für ESPRESSO drücken. Im Display er-scheint folgende Meldung:
Getränk
wird zubereitet
7 Warten, bis im Display folgende Meldung er-scheint:
Getränk fertig
Danke Der Espresso ist fertig.
ESPRESSO LUNGO
1 Den Abstellrost für kleine Tassen nach oben verschieben, bis er am Kapselauffangbehälter einrastet.
2 Siehe Schritte 2, 3, und 4 bei ESPRESSO.
3 Die Taste für ESPRESSO LUNGO drücken.
4 Siehe Schritte 6 und 7 bei ESPRESSO.
ESPRESSO MACCHIATO
1 Die Tasse oder das Glas auf den Abstellrost stel-len.
2 Siehe Schritte 3 und 4 bei ESPRESSO.
3 Die Taste für ESPRESSO MACCHIATO drücken.
4 Siehe Schritte 6 und 7 bei ESPRESSO.
LATTE MACCHIATO/CAPPUCCINO GETRÄNK
1 Die große Tasse oder das Glas auf den Abstell-rost stellen.
2 Siehe Schritte 3 und 4 bei ESPRESSO.
3 Die Taste für CAPPUCCINO oder LATTE MAC-CHIATO Getränk drücken.
4 Siehe Schritte 6 und 7 bei ESPRESSO.
HEISSGETRÄNKE MIT KAPSEL
1 Die große Tasse oder das Glas auf den Abstell-rost stellen.
2 Siehe Schritte 3 und 4 bei ESPRESSO.
3 Die Taste für HEISSGETRÄNK drücken.
4 Siehe Schritte 6 und 7 bei ESPRESSO.
VORBEREITUNG GETRÄNKE
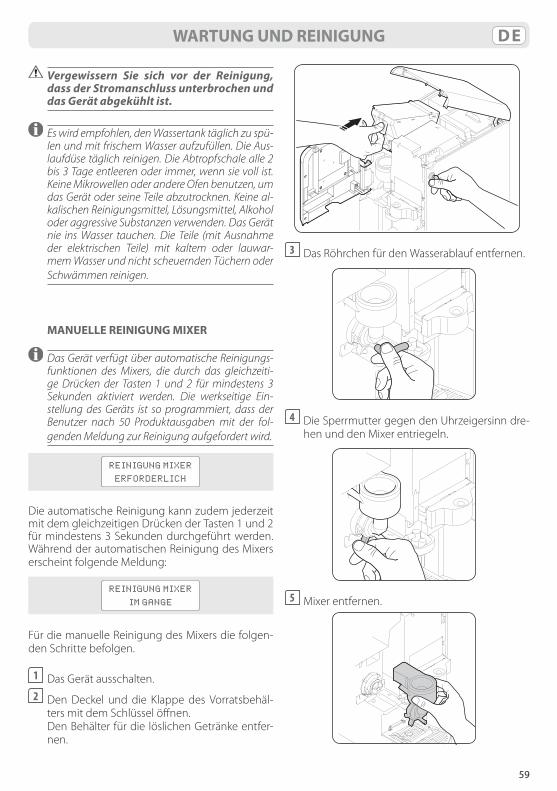
59
DE
Vergewissern Sie sich vor der Reinigung,dass der Stromanschluss unterbrochen und das Gerät abgekühlt ist.
Es wird empfohlen, den Wassertank täglich zu spü-len und mit frischem Wasser aufzufüllen. Die Aus-laufdüse täglich reinigen. Die Abtropfschale alle 2 bis 3 Tage entleeren oder immer, wenn sie voll ist. Keine Mikrowellen oder andere Ofen benutzen, um das Gerät oder seine Teile abzutrocknen. Keine al-kalischen Reinigungsmittel, Lösungsmittel, Alkohol oder aggressive Substanzen verwenden. Das Gerät nie ins Wasser tauchen. Die Teile (mit Ausnahme der elektrischen Teile) mit kaltem oder lauwar-mem Wasser und nicht scheuernden Tüchern oder Schwämmen reinigen.
MANUELLE REINIGUNG MIXER
Das Gerät verfügt über automatische Reinigungs-funktionen des Mixers, die durch das gleichzeiti-ge Drücken der Tasten 1 und 2 für mindestens 3 Sekunden aktiviert werden. Die werkseitige Ein-stellung des Geräts ist so programmiert, dass der Benutzer nach 50 Produktausgaben mit der fol-genden Meldung zur Reinigung aufgefordert wird.
REINIGUNG MIXER
ERFORDERLICH
Die automatische Reinigung kann zudem jederzeit mit dem gleichzeitigen Drücken der Tasten 1 und 2 für mindestens 3 Sekunden durchgeführt werden. Während der automatischen Reinigung des Mixers erscheint folgende Meldung:
REINIGUNG MIXER
IM GANGE
Für die manuelle Reinigung des Mixers die folgen-den Schritte befolgen.
1 Das Gerät ausschalten.2 Den Deckel und die Klappe des Vorratsbehäl-
ters mit dem Schlüssel öffnen. Den Behälter für die löslichen Getränke entfer-
nen.
3 Das Röhrchen für den Wasserablauf entfernen.
4 Die Sperrmutter gegen den Uhrzeigersinn dre-
hen und den Mixer entriegeln.
5 Mixer entfernen.
WARTUNG UND REINIGUNG
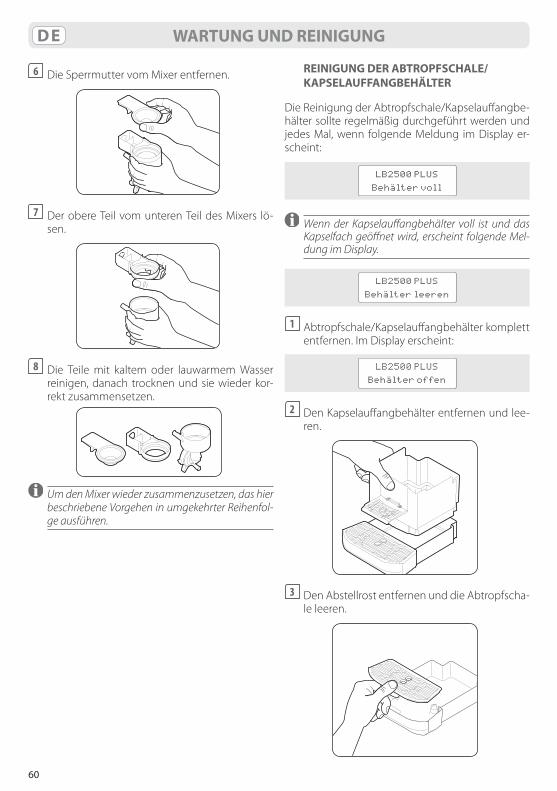
60
DE WARTUNG UND REINIGUNG
6 Die Sperrmutter vom Mixer entfernen.
7 Der obere Teil vom unteren Teil des Mixers lö-
sen.
8 Die Teile mit kaltem oder lauwarmem Wasser
reinigen, danach trocknen und sie wieder kor-rekt zusammensetzen.
Um den Mixer wieder zusammenzusetzen, das hier beschriebene Vorgehen in umgekehrter Reihenfol-ge ausführen.
REINIGUNG DER ABTROPFSCHALE/KAPSELAUFFANGBEHÄLTER
Die Reinigung der Abtropfschale/Kapselauffangbe-hälter sollte regelmäßig durchgeführt werden und jedes Mal, wenn folgende Meldung im Display er-scheint:
LB2500 PLUS
Behälter voll
Wenn der Kapselauffangbehälter voll ist und das Kapselfach geöffnet wird, erscheint folgende Mel-dung im Display.
LB2500 PLUS
Behälter leeren
1 Abtropfschale/Kapselauffangbehälter komplett entfernen. Im Display erscheint:
LB2500 PLUS
Behälter offen
2 Den Kapselauffangbehälter entfernen und lee-ren.
3 Den Abstellrost entfernen und die Abtropfscha-
le leeren.
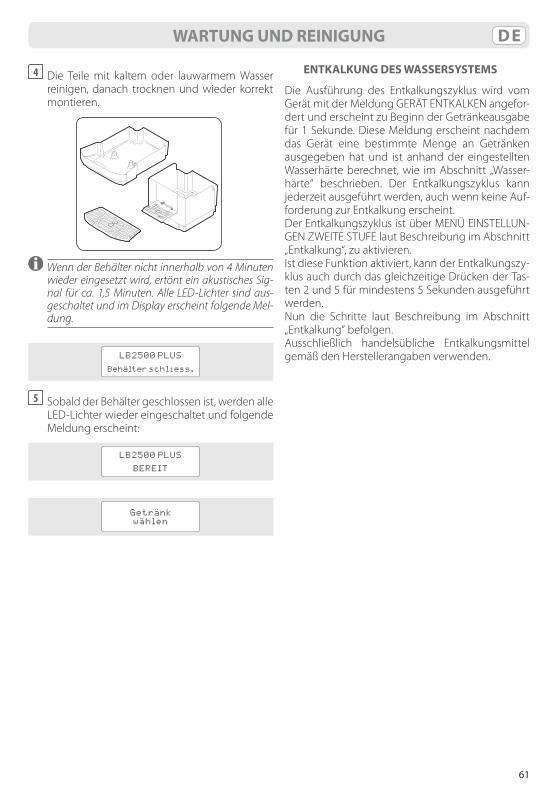
61
DEWARTUNG UND REINIGUNG
4 Die Teile mit kaltem oder lauwarmem Wasser reinigen, danach trocknen und wieder korrekt montieren.
Wenn der Behälter nicht innerhalb von 4 Minuten wieder eingesetzt wird, ertönt ein akustisches Sig-nal für ca. 1,5 Minuten. Alle LED-Lichter sind aus-geschaltet und im Display erscheint folgende Mel-dung.
LB2500 PLUS
Behälter schliess.
5 Sobald der Behälter geschlossen ist, werden alle LED-Lichter wieder eingeschaltet und folgende Meldung erscheint:
LB2500 PLUS
BEREIT
Getränk
wählen
ENTKALKUNG DES WASSERSYSTEMS
Die Ausführung des Entkalkungszyklus wird vom Gerät mit der Meldung GERÄT ENTKALKEN angefor-dert und erscheint zu Beginn der Getränkeausgabe für 1 Sekunde. Diese Meldung erscheint nachdem das Gerät eine bestimmte Menge an Getränken ausgegeben hat und ist anhand der eingestellten Wasserhärte berechnet, wie im Abschnitt „Wasser-härte“ beschrieben. Der Entkalkungszyklus kann jederzeit ausgeführt werden, auch wenn keine Auf-forderung zur Entkalkung erscheint.Der Entkalkungszyklus ist über MENÜ EINSTELLUN-GEN ZWEITE STUFE laut Beschreibung im Abschnitt „Entkalkung“, zu aktivieren.Ist diese Funktion aktiviert, kann der Entkalkungszy-klus auch durch das gleichzeitige Drücken der Tas-ten 2 und 5 für mindestens 5 Sekunden ausgeführt werden.Nun die Schritte laut Beschreibung im Abschnitt „Entkalkung“ befolgen.Ausschließlich handelsübliche Entkalkungsmittel gemäß den Herstellerangaben verwenden.
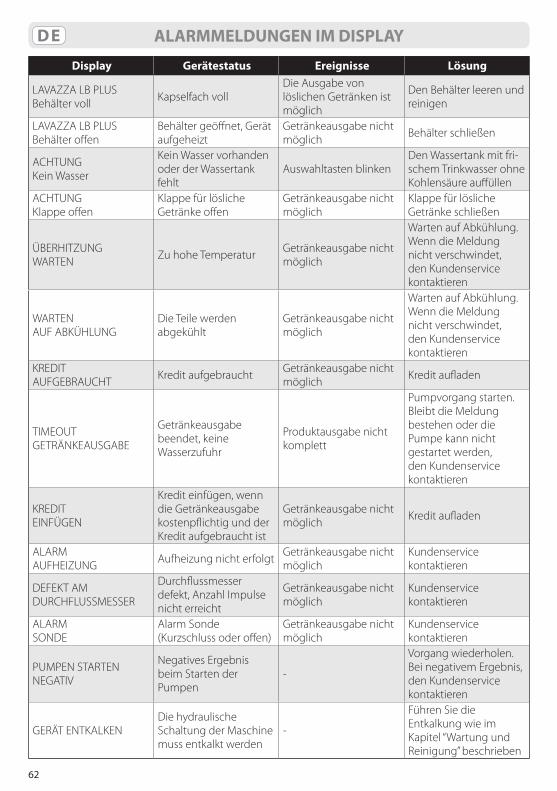
62
DE ALARMMELDUNGEN IM DISPLAY
Display Gerätestatus Ereignisse Lösung
LAVAZZA LB PLUSBehälter voll Kapselfach voll
Die Ausgabe vonlöslichen Getränken ist möglich
Den Behälter leeren und reinigen
LAVAZZA LB PLUSBehälter offen
Behälter geöffnet, Gerät aufgeheizt
Getränkeausgabe nicht möglich Behälter schließen
ACHTUNGKein Wasser
Kein Wasser vorhanden oder der Wassertank fehlt
Auswahltasten blinkenDen Wassertank mit fri-schem Trinkwasser ohne Kohlensäure auffüllen
ACHTUNGKlappe offen
Klappe für lösliche Getränke offen
Getränkeausgabe nicht möglich
Klappe für lösliche Getränke schließen
ÜBERHITZUNG WARTEN Zu hohe Temperatur Getränkeausgabe nicht
möglich
Warten auf Abkühlung. Wenn die Meldung nicht verschwindet, den Kundenservice kontaktieren
WARTENAUF ABKÜHLUNG
Die Teile werden abgekühlt
Getränkeausgabe nicht möglich
Warten auf Abkühlung. Wenn die Meldung nicht verschwindet, den Kundenservice kontaktieren
KREDIT AUFGEBRAUCHT Kredit aufgebraucht Getränkeausgabe nicht
möglich Kredit aufladen
TIMEOUT GETRÄNKEAUSGABE
Getränkeausgabe beendet, keine Wasserzufuhr
Produktausgabe nicht komplett
Pumpvorgang starten. Bleibt die Meldung bestehen oder die Pumpe kann nicht gestartet werden, den Kundenservice kontaktieren
KREDITEINFÜGEN
Kredit einfügen, wenn die Getränkeausgabe kostenpflichtig und der Kredit aufgebraucht ist
Getränkeausgabe nicht möglich Kredit aufladen
ALARM AUFHEIZUNG Aufheizung nicht erfolgt Getränkeausgabe nicht
möglichKundenservice kontaktieren
DEFEKT AM DURCHFLUSSMESSER
Durchflussmesser defekt, Anzahl Impulse nicht erreicht
Getränkeausgabe nicht möglich
Kundenservice kontaktieren
ALARMSONDE
Alarm Sonde (Kurzschluss oder offen)
Getränkeausgabe nicht möglich
Kundenservice kontaktieren
PUMPEN STARTENNEGATIV
Negatives Ergebnis beim Starten der Pumpen
-
Vorgang wiederholen. Bei negativem Ergebnis, den Kundenservice kontaktieren
GERÄT ENTKALKENDie hydraulische Schaltung der Maschine muss entkalkt werden
-
Führen Sie die Entkalkung wie im Kapitel “Wartung und Reinigung” beschrieben
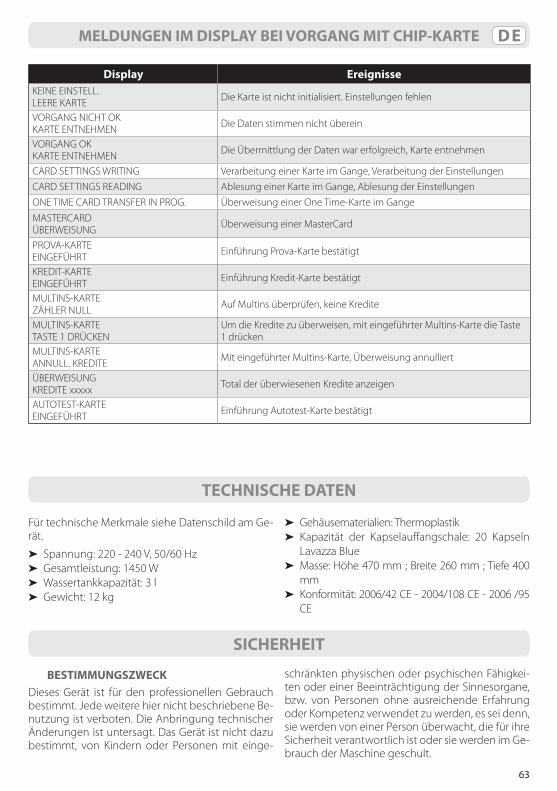
63
DE
Für technische Merkmale siehe Datenschild am Ge-rät.
➤ Spannung: 220 - 240 V, 50/60 Hz➤ Gesamtleistung: 1450 W➤ Wassertankkapazität: 3 l➤ Gewicht: 12 kg
➤ Gehäusematerialien: Thermoplastik➤ Kapazität der Kapselauffangschale: 20 Kapseln
Lavazza Blue➤ Masse: Höhe 470 mm ; Breite 260 mm ; Tiefe 400
mm➤ Konformität: 2006/42 CE - 2004/108 CE - 2006 /95
CE
BESTIMMUNGSZWECKDieses Gerät ist für den professionellen Gebrauch bestimmt. Jede weitere hier nicht beschriebene Be-nutzung ist verboten. Die Anbringung technischer Änderungen ist untersagt. Das Gerät ist nicht dazu bestimmt, von Kindern oder Personen mit einge-
schränkten physischen oder psychischen Fähigkei-ten oder einer Beeinträchtigung der Sinnesorgane, bzw. von Personen ohne ausreichende Erfahrung oder Kompetenz verwendet zu werden, es sei denn, sie werden von einer Person überwacht, die für ihre Sicherheit verantwortlich ist oder sie werden im Ge-brauch der Maschine geschult.
MELDUNGEN IM DISPLAY BEI VORGANG MIT CHIP-KARTE
Display EreignisseKEINE EINSTELL.LEERE KARTE Die Karte ist nicht initialisiert. Einstellungen fehlen
VORGANG NICHT OKKARTE ENTNEHMEN Die Daten stimmen nicht überein
VORGANG OKKARTE ENTNEHMEN Die Übermittlung der Daten war erfolgreich, Karte entnehmen
CARD SETTINGS WRITING Verarbeitung einer Karte im Gange, Verarbeitung der EinstellungenCARD SETTINGS READING Ablesung einer Karte im Gange, Ablesung der EinstellungenONE TIME CARD TRANSFER IN PROG. Überweisung einer One Time-Karte im GangeMASTERCARDÜBERWEISUNG Überweisung einer MasterCard
PROVA-KARTEEINGEFÜHRT Einführung Prova-Karte bestätigt
KREDIT-KARTEEINGEFÜHRT Einführung Kredit-Karte bestätigt
MULTINS-KARTEZÄHLER NULL Auf Multins überprüfen, keine Kredite
MULTINS-KARTETASTE 1 DRÜCKEN
Um die Kredite zu überweisen, mit eingeführter Multins-Karte die Taste 1 drücken
MULTINS-KARTEANNULL. KREDITE Mit eingeführter Multins-Karte, Überweisung annulliert
ÜBERWEISUNGKREDITE xxxxx Total der überwiesenen Kredite anzeigen
AUTOTEST-KARTEEINGEFÜHRT Einführung Autotest-Karte bestätigt
SICHERHEIT
TECHNISCHE DATEN
64
DE
STANDORTDas Gerät sollte auf einer ebenen Stellfläche, an ei-nem sicheren Ort aufgestellt werden, an dem nicht die Gefahr des Umkippens oder der Verletzung von Personen besteht. Das Gerät sollte Temperaturen von unter 4 °C nicht ausgesetzt werden, da sie durch gefrierendes Wasser beschädigt werden könnte. Nicht im Freien benutzen. Das Gerät nicht auf heiße Oberflächen und/oder in die Nähe von offenem Feu-er stellen. Das Gerät bei Raumtemperatur benutzen.
NETZVERSORGUNGDas Gerät darf ausschließlich an eine geeignete Steckdose angeschlossen werden. Die Spannung muss mit derjenigen übereinstimmen, die auf dem Typenschild des Geräts angegeben ist.
NETZKABELDas Gerät darf keinesfalls mit beschädigtem oder defektem Netzkabel betrieben werden. Bei Schä-den muss dieses umgehend ersetzt werden. Das Netzkabel darf nicht in Ecken, über scharfe Kanten oder auf heißen Gegenständen verlegt werden. Es sollte vor Öl geschützt werden. Das Gerät darf nicht am Kabel getragen oder gezogen werden. Der Stecker darf nicht durch Ziehen am Kabel aus der Steckdose herausgezogen werden. Der Stecker darf nicht mit nassen Händen berührt werden. Der freie Fall des Netzkabels von Tischen oder Regalen sollte vermieden werden.
STROMSCHLAGGEFAHRDie unter Strom stehenden Teile dürfen keinesfalls mit Wasser in Berührung kommen. Stellen Sie sicher, dass Ihre Hände, das Gerät, das Netzkabel und die Aufstellfläche des Geräts trocken sind.
SCHUTZ ANDERER PERSONENKinder beaufsichtigen, damit diese nicht mit dem Gerät spielen. Kinder können Gefahrensituationen, die durch Haushaltsgeräte entstehen können, nicht abschätzen. Die für die Verpackung des Geräts be-nutzten Materialien sollten nicht in Reichweite von Kindern aufbewahrt werden.
VERBRENNUNGSGEFAHRUnmittelbar nach dem Gebrauch des Geräts das Berühren der heißen Teile vermeiden (Kapselhalter usw.). Achtung: während der Getränkeausgabe kön-nen Spritzer mit heißem Wasser auftreten.Achtung: während der Getränkeausgabe können Spritzer mit heißem Wasser auftreten.
REINIGUNGVor der Reinigung muss der Netzstecker gezogen werden. Warten, bis das Gerät abgekühlt ist. Das Gerät nicht ins Wasser tauchen! Der Versuch von Eingriffen im Inneren des Geräts ist strengstens ver-boten. Das Wasser im Wassertank darf nicht für Le-bensmittelzwecke genutzt oder getrunken werden.
AUFBEWAHRUNG DES GERÄTSWird das Gerät für längere Zeit nicht benutzt, den Netzstecker ziehen und das Gerät an einem trocke-nen und für Kinder unzugänglichen Ort aufbewah-ren. Vor Staub und Schmutz schützen.
REPARATUREN / INSTANDHALTUNGDas Gerät bei Störungen, Defekten oder bei Ver-dacht auf Defekte nach einem Sturz nicht verwen-den und unverzüglich den Netzstecker ziehen. Ein defektes Gerät keinesfalls in Betrieb setzen. Eingriffe und Reparaturen dürfen ausschließlich von autori-sierten Kundendienststellen vorgenommen wer-den. Im Falle von nicht fachgerecht ausgeführten Eingriffen wird jede Haftung für eventuelle Schäden abgelehnt.
WASSERTANKDen Wassertank ausschließlich mit frischem Trink-wasser ohne Kohlensäure auffüllen. Das Gerät nicht in Betrieb setzen, wenn das Wasser nicht mindes-tens den im Tank gekennzeichneten Mindestfüll-stand übersteigt.
KAPSELFACHIn das Kapselfach dürfen ausschließlich Lavazza Blue Monodose-Kapseln eingesetzt werden. Keine Gegenstände oder Finger in das Kapselfach ein-führen. Die Kapseln dürfen nur ein Mal verwendet werden.
ENTSORGUNG DES GERÄTS AM ENDE DES BETRIEBSLEBENS (EU-Richtlinie 2002/96/EG - Italienisches Gesetz 25. Juli 2005 n. 151)
Das Symbol mit dem durchgestrichenen Mülleimer auf dem Gerät und/oder auf seiner Verpackung gibt an, dass das Produkt zum Ende seines Betriebs-lebens getrennt vom Hausmüll entsorgt werden muss. Der Benutzer muss das außer Betrieb genom-mene Gerät aus diesem Grunde entsprechenden Entsorgungsstellen für Elektro- und Elektronikmüll zuführen oder beim Kauf einer neuen, gleichwerti-gen Vorrichtung zurückgeben. Die ungesetzliche Entsorgung des Produkts durch den Besitzer zieht die Verhängung von Verwal-tungsstrafen gemäß der geltenden Gesetzgebung nach sich. Die umweltgerechte Entsorgung dieser Geräte in das Recycling und/oder die Aufbereitung tragen zur Vermeidung von möglichen negativen Auswirkungen auf die Umwelt und die menschliche Gesundheit bei und ermöglichen die Wiederver-wendung der Materialien, aus denen die Maschine besteht. Weitere Informationen über das Recycling dieses Geräts erhalten Sie bei Ihrer lokalen Müllab-fuhr oder dem Geschäft, in dem Sie das Produkt gekauft haben.
SICHERHEIT
65
ESÍNDICE GENERAL
ÍNDICE GENERAL .......................................................................................................................................................... 65COMPONENTES .............................................................................................................................................................. 66MENSAJES PARA VISUALIZAR EL ESTADO DE LA MÁQUINA .................................................................... 66PREPARACIÓN DE LA MÁQUINA ............................................................................................................................ 67
DESEMBALAJE Y UBICACIÓN ....................................................................................................................................................................................... 67PUESTA EN MARCHA DE LA MÁQUINA ................................................................................................................................................................. 67
MENÚ DE CONFIGURACIÓN ..................................................................................................................................... 69MENÚ DE CONFIGURACIÓN DE PRIMER NIVEL ................................................................................................................................................ 69CRÉDITOS RESTANTES ..........................................................................................................................................................................................................................................69SELECCIÓN DE DOSIS ...........................................................................................................................................................................................................................................69MENÚ DE CONFIGURACIÓN DE SEGUNDO NIVEL ......................................................................................................................................... 70SELECCIÓN DE IDIOMA .......................................................................................................................................................................................................................................70DESCALCIFICACIÓN ...............................................................................................................................................................................................................................................70DUREZA H2O .............................................................................................................................................................................................................................................................71INTERVALO TEMP......................................................................................................................................................................................................................................................71CAMBIO DE CONTRASEÑA ................................................................................................................................................................................................................................71AHORRO DE ENERGÍA ..........................................................................................................................................................................................................................................72CEBADO DE LAS BOMBAS .................................................................................................................................................................................................................................72COMPROBACIÓN DE LAS TARJETAS ............................................................................................................................................................................................................72CONTADOR .................................................................................................................................................................................................................................................................72
PREPARACIÓN DE LAS BEBIDAS ............................................................................................................................. 73PUESTA A PUNTO PARA LA PREPARACIÓN DE BEBIDAS ............................................................................................................................. 73PREPARACIÓN DE BEBIDAS ........................................................................................................................................................................................... 73ESPRESSO .....................................................................................................................................................................................................................................................................73ESPRESSO LARGO ...................................................................................................................................................................................................................................................74ESPRESSO MACCHIATO .......................................................................................................................................................................................................................................74BEBIDA CON SABOR A LATTE MACCHIATO Y CAPUCHINO ...........................................................................................................................................................74BEBIDAS CALIENTES CON CÁPSULA ............................................................................................................................................................................................................74
MANTENIMIENTO Y LIMPIEZA ................................................................................................................................ 75LIMPIEZA MANUAL DEL MEZCLADOR ................................................................................................................................................................... 75LIMPIEZA DE LA BANDEJA DE GOTEO Y DE LA BANDEJA PARA CÁPSULAS USADAS ............................................................. 76DESCALCIFICACIÓN DEL CIRCUITO HIDRÁULICO ........................................................................................................................................... 77
MENSAJES DE ALERTA EN LA PANTALLA ........................................................................................................... 78MENSAJES EN LA PANTALLA DURANTE LAS OPERACIONES CON UNA TARJETA CON CHIP...... 79CARACTERÍSTICAS TÉCNICAS ................................................................................................................................. 79SEGURIDAD ...................................................................................................................................................................... 79
USO PREVISTO DE LA MÁQUINA ............................................................................................................................................................................... 79UBICACIÓN ..................................................................................................................................................................................................................................................................80ALIMENTACIÓN ELÉCTRICA ..............................................................................................................................................................................................................................80CABLE DE ALIMENTACIÓN .................................................................................................................................................................................................................................80PELIGRO DE ELECTROCUCIÓN........................................................................................................................................................................................................................80PROTECCIÓN DE OTRAS PERSONAS ............................................................................................................................................................................................................80PELIGRO DE QUEMADURAS .............................................................................................................................................................................................................................80LIMPIEZA ......................................................................................................................................................................................................................................................................80ALMACENAMIENTO DE LA MÁQUINA .......................................................................................................................................................................................................80REPARACIONES Y MANTENIMIENTO ............................................................................................................................................................................................................80DEPÓSITO DE AGUA ..............................................................................................................................................................................................................................................80ESPACIO PARA LA INSERCIÓN DE CÁPSULAS ........................................................................................................................................................................................80ELIMINACIÓN DE LA MÁQUINA AL FINAL DE SU VIDA ÚTIL(Directiva europea 2002/96/CE - D.L. 25 de julio de 2005 n.º 151) ..........................................................................................................................................80
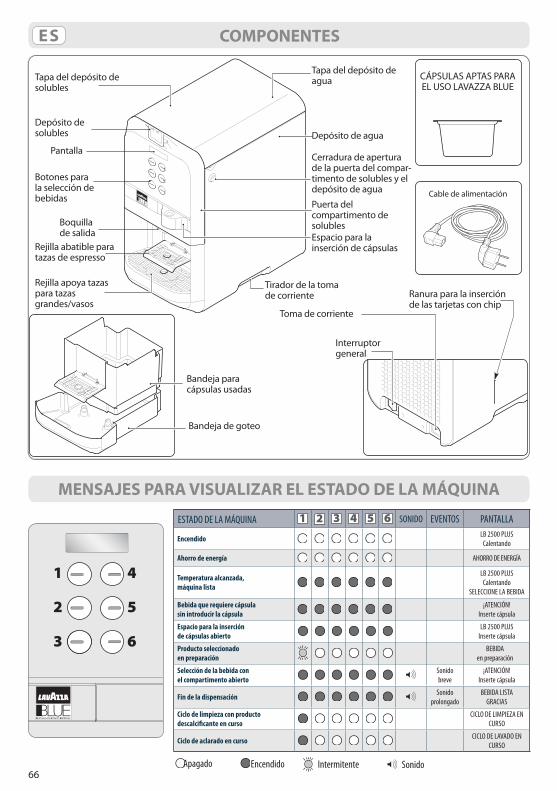
66
ES COMPONENTES
MENSAJES PARA VISUALIZAR EL ESTADO DE LA MÁQUINA
Tapa del depósito de solubles
Tapa del depósito de agua CÁPSULAS APTAS PARA
EL USO LAVAZZA BLUE
Espacio para lainserción de cápsulas
Tirador de la toma de corriente
Toma de corriente
Interruptor general
Ranura para la inserción de las tarjetas con chip
Depósito de agua
Cerradura de aperturade la puerta del compar-timento de solubles y el depósito de agua
Puerta delcompartimento de solubles
Cable de alimentación
Depósito de solubles
Pantalla
Botones para la selección de bebidas
Boquilla de salida
Rejilla abatible paratazas de espresso
Rejilla apoya tazaspara tazasgrandes/vasos
Bandeja para cápsulas usadas
Bandeja de goteo
SonidoIntermitenteEncendidoApagado
1
2
3
4
5
6
ESTADO DE LA MÁQUINA 1 2 3 4 5 6 SONIDO EVENTOS PANTALLA
Encendido LB 2500 PLUSCalentando
Ahorro de energía AHORRO DE ENERGÍA
Temperatura alcanzada,máquina lista
LB 2500 PLUSCalentando
SELECCIONE LA BEBIDA
Bebida que requiere cápsulasin introducir la cápsula
¡ATENCIÓN!Inserte cápsula
Espacio para la inserciónde cápsulas abierto
LB 2500 PLUSInserte cápsula
Producto seleccionado en preparación
BEBIDAen preparación
Selección de la bebida conel compartimento abierto
Sonidobreve
¡ATENCIÓN!Inserte cápsula
Fin de la dispensación Sonidoprolongado
BEBIDA LISTAGRACIAS
Ciclo de limpieza con producto descalcificante en curso
CICLO DE LIMPIEZA EN CURSO
Ciclo de aclarado en curso CICLO DE LAVADO EN CURSO
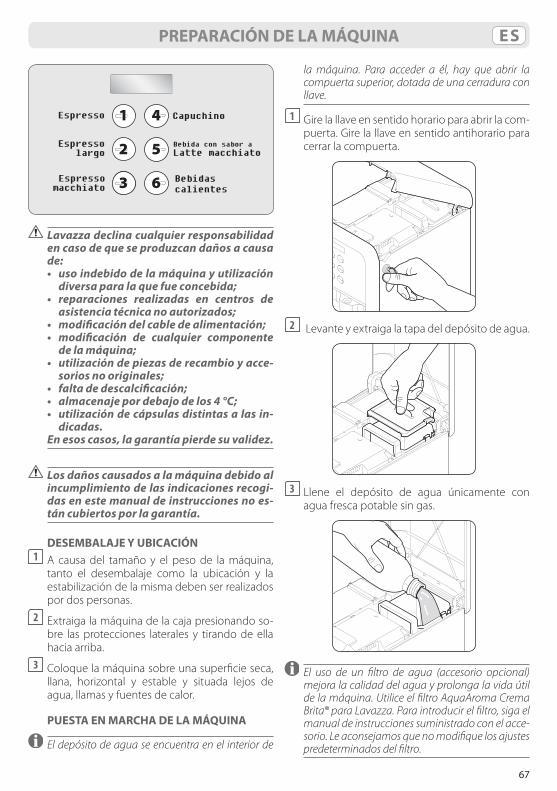
67
ES
Capuchino
Bebida con sabor aLatte macchiato
6
5
4
3
2
1
Bebidascalientes
Espressomacchiato
Espressolargo
Espresso
Lavazzadeclinacualquierresponsabilidadencasodequeseproduzcandañosacausade:
• usoindebidodelamáquinayutilizacióndiversaparalaquefueconcebida;
• reparaciones realizadas en centros deasistencia técnica no autorizados;
• modificacióndelcabledealimentación; • modificación de cualquier componente
delamáquina; • utilizacióndepiezasderecambioyacce-
sorios no originales; • faltadedescalcificación; • almacenajepordebajodelos4°C; • utilizacióndecápsulasdistintasalasin-
dicadas. En esos casos, la garantía pierde su validez.
Losdañoscausadosalamáquinadebidoalincumplimiento de las indicaciones recogi-das en este manual de instrucciones no es-táncubiertosporlagarantía.
DESEMBALAJE Y UBICACIÓN1 A causa del tamaño y el peso de la máquina,
tanto el desembalaje como la ubicación y la estabilización de la misma deben ser realizados por dos personas.
2 Extraiga la máquina de la caja presionando so-bre las protecciones laterales y tirando de ella hacia arriba.
3 Coloque la máquina sobre una superficie seca, llana, horizontal y estable y situada lejos de agua, llamas y fuentes de calor.
PUESTA EN MARCHA DE LA MÁQUINA
El depósito de agua se encuentra en el interior de
PREPARACIÓN DE LA MÁQUINA
la máquina. Para acceder a él, hay que abrir la compuerta superior, dotada de una cerradura con llave.
1 Gire la llave en sentido horario para abrir la com-puerta. Gire la llave en sentido antihorario para cerrar la compuerta.
2 Levante y extraiga la tapa del depósito de agua.
3 Llene el depósito de agua únicamente con
agua fresca potable sin gas.
El uso de un filtro de agua (accesorio opcional) mejora la calidad del agua y prolonga la vida útil de la máquina. Utilice el filtro AquaAroma Crema Brita® para Lavazza. Para introducir el filtro, siga el manual de instrucciones suministrado con el acce-sorio. Le aconsejamos que no modifique los ajustes predeterminados del filtro.
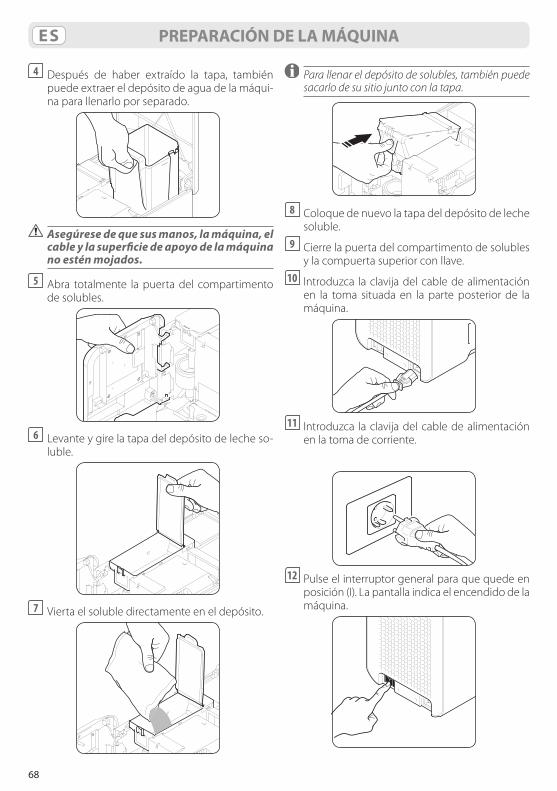
68
ES PREPARACIÓN DE LA MÁQUINA
4 Después de haber extraído la tapa, también puede extraer el depósito de agua de la máqui-na para llenarlo por separado.
Asegúresedequesusmanos,lamáquina,elcableylasuperficiedeapoyodelamáquinanoesténmojados.
5 Abra totalmente la puerta del compartimento de solubles.
6 Levante y gire la tapa del depósito de leche so-
luble.
7 Vierta el soluble directamente en el depósito.
Para llenar el depósito de solubles, también puede sacarlo de su sitio junto con la tapa.
8 Coloque de nuevo la tapa del depósito de leche
soluble.9 Cierre la puerta del compartimento de solubles
y la compuerta superior con llave. 10 Introduzca la clavija del cable de alimentación
en la toma situada en la parte posterior de la máquina.
11 Introduzca la clavija del cable de alimentación
en la toma de corriente.
12 Pulse el interruptor general para que quede en
posición (I). La pantalla indica el encendido de la máquina.
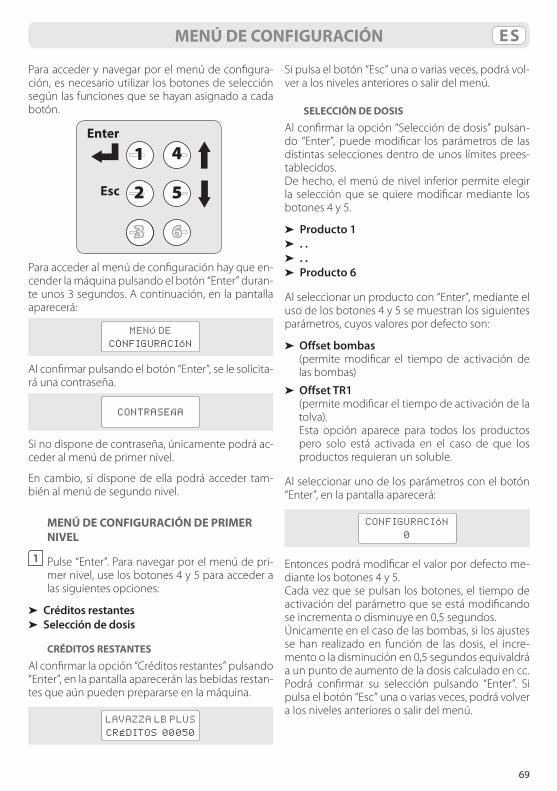
69
ESMENÚ DE CONFIGURACIÓN
Para acceder y navegar por el menú de configura-ción, es necesario utilizar los botones de selección según las funciones que se hayan asignado a cada botón.
1
2
3
4
5
6
Esc
Enter
Para acceder al menú de configuración hay que en-cender la máquina pulsando el botón “Enter” duran-te unos 3 segundos. A continuación, en la pantalla aparecerá:
MENÚ DE
CONFIGURACIÓN
Al confirmar pulsando el botón “Enter”, se le solicita-rá una contraseña.
CONTRASEÑA
Si no dispone de contraseña, únicamente podrá ac-ceder al menú de primer nivel.
En cambio, si dispone de ella podrá acceder tam-bién al menú de segundo nivel.
MENÚ DE CONFIGURACIÓN DE PRIMER NIVEL
1 Pulse “Enter”. Para navegar por el menú de pri-mer nivel, use los botones 4 y 5 para acceder a las siguientes opciones:
➤ Créditos restantes➤ Selección de dosis
CRÉDITOS RESTANTES
Al confirmar la opción “Créditos restantes” pulsando “Enter”, en la pantalla aparecerán las bebidas restan-tes que aún pueden prepararse en la máquina.
LAVAZZA LB PLUS
CRÉDITOS 00050
Si pulsa el botón “Esc” una o varias veces, podrá vol-ver a los niveles anteriores o salir del menú.
SELECCIÓN DE DOSIS
Al confirmar la opción “Selección de dosis” pulsan-do “Enter”, puede modificar los parámetros de las distintas selecciones dentro de unos límites prees-tablecidos.De hecho, el menú de nivel inferior permite elegir la selección que se quiere modificar mediante los botones 4 y 5.
➤ Producto 1➤ . .➤ . .➤ Producto 6
Al seleccionar un producto con “Enter”, mediante el uso de los botones 4 y 5 se muestran los siguientes parámetros, cuyos valores por defecto son:
➤ Offset bombas (permite modificar el tiempo de activación de
las bombas)
➤ Offset TR1 (permite modificar el tiempo de activación de la
tolva). Esta opción aparece para todos los productos
pero solo está activada en el caso de que los productos requieran un soluble.
Al seleccionar uno de los parámetros con el botón “Enter”, en la pantalla aparecerá:
CONFIGURACIÓN
0
Entonces podrá modificar el valor por defecto me-diante los botones 4 y 5.Cada vez que se pulsan los botones, el tiempo de activación del parámetro que se está modificando se incrementa o disminuye en 0,5 segundos.Únicamente en el caso de las bombas, si los ajustes se han realizado en función de las dosis, el incre-mento o la disminución en 0,5 segundos equivaldrá a un punto de aumento de la dosis calculado en cc.Podrá confirmar su selección pulsando “Enter”. Si pulsa el botón “Esc” una o varias veces, podrá volver a los niveles anteriores o salir del menú.
70
ES
MENÚ DE CONFIGURACIÓN DE SEGUNDO NIVEL
El menú de configuración de segundo nivel está reservado a personal cualificado y autorizado.
1 Introduzca la contraseña correcta y, a continua-ción, pulse “Enter”. La contraseña predetermina-da por defecto es 33333.
Para navegar por el menú de segundo nivel use los botones 4 y 5 para acceder a las siguientes opcio-nes:➤ Selección de idioma➤ Descalcificación➤ Dureza H2O➤ Intervalo temp.➤ Cambio de contraseña➤ Ahorro de energía➤ Cebado de las bombas➤ Comprobación de las tarjetas➤ Contador
SELECCIÓN DE IDIOMA
Al confirmar la opción “Selección de idioma” pul-sando “Enter”, podrá modificar el idioma del menú y de los mensajes de la pantalla.De hecho, el menú de nivel inferior permite selec-cionar el idioma deseado pulsando los botones 4 y 5 y confirmarlo con “Enter”.
➤ Italiano➤ English➤ Français➤ Deutsch➤ Espanõl➤ Português➤ Nederlands
Si pulsa el botón “Esc” una o varias veces, podrá vol-ver a los niveles anteriores o salir del menú.
DESCALCIFICACIÓN
El ciclo de descalcificación puede activarse en cual-quier momento, incluso aunque la máquina no lo solicite. Al confirmar la opción “Descalcificación” pulsando “Enter”, en la pantalla aparecerá el siguien-te mensaje:
DESCALCIFICACIÓN
INTRODUZCA EL PRODUCTO
DESCALCIFICANTE EN EL
DEPÓSITO Y PULSE OK
MENÚ DE CONFIGURACIÓN
Ya no podrán prepararse bebidas hasta que se complete el ciclo.
En ese momento, siga las siguientes indicaciones.
1 Llene el depósito con el producto descalcifican-te diluido en agua según las cantidades indica-das en las instrucciones del mismo.
2 Sitúe un recipiente, lo más grande posible, de-bajo de la boquilla de salida.
3 A continuación, pulse “Enter”. Las bombas se ac-tivarán y a través de la boquilla de salida empe-zará a fluir la solución descalcificante tras haber realizado su función en el circuito de la máquina. En la pantalla aparecerá el siguiente mensaje:
CICLO DE LIMPIEZA
EN CURSO
• No ingiera la solución descalcificante nipermitaqueotroslohagan.
• Peligrodequemaduras.Lasolucióndes-calcificanteseexpulsaaunatemperatu-ra elevada.
4 La máquina expulsará la cantidad de solución prevista.
De todas formas, puede pulsar “Enter” para inte-rrumpir momentáneamente el ciclo para vaciar y eliminar el contenido del recipiente utilizado para recoger la solución.
Ahora bien, para incrementar la eficacia de la acción del producto descalcificante, es aconse-jable que, cada dos minutos de expulsión con-tinua aproximadamente, se realicen pausas de casi un minuto y se interrumpa el ciclo pulsan-do “Enter”.
5 Coloque de nuevo el recipiente vacío debajo de la boquilla de salida.
6 Pulse “Enter” para activar de nuevo el ciclo.
En caso de que se interrumpa la alimentación eléc-trica durante el ciclo de descalcificación, cuando vuelva a encenderse la máquina el ciclo se iniciará de nuevo automáticamente.
7 Cuando vacíe el depósito, en la pantalla apare-cerá el siguiente mensaje:
71
ES
ACLARE EL
DEPÓSITO
Seguido del mensaje:
LLENE EL
DEPÓSITO
8 Aclare y lave a conciencia el depósito con agua fresca potable.
A continuación, llénelo con agua fresca pota-ble sin gas. En la pantalla aparecerá el siguiente mensaje:
ACTIVE
ACLARADO
9 Sitúe un recipiente, lo más grande posible, de-bajo de la boquilla de salida.
10 Pulse “Enter” para activar el aclarado del circuito hidráulico de la máquina. En la pantalla apare-cerá el siguiente mensaje:
CICLO DE LAVADO
EN CURSO
11 La máquina expulsará la cantidad de agua pre-vista. De todas formas, puede pulsar “Enter” para interrumpir momentáneamente el ciclo para vaciar y eliminar el contenido del recipien-te utilizado para recoger el agua.
12 Coloque de nuevo el recipiente vacío debajo de la boquilla de salida.
13 Pulse “Enter” para activar de nuevo el ciclo.
14 La máquina podría solicitarle que llene nueva-mente el depósito en caso de que no dispon-ga de la cantidad de agua prevista. El mensaje que aparecerá en ese caso es el mismo que el indicado en el punto 7. Por lo tanto, continúe a partir del punto 8 para terminar el ciclo.
15 Cuando la máquina haya expulsado la cantidad de agua prevista, aparecerá el mensaje:
DESCALCIFICACIÓN
COMPLETADA
MENÚ DE CONFIGURACIÓN
Entonces podrá volver a preparar bebidas después de haber rellenado, si es necesario, el depósito con agua fresca potable sin gas.
DUREZA H2O
Al confirmar con “Enter” la opción “Dureza H2O”, es posible introducir el dato relativo a la dureza del agua habitual en la localidad en la que se instala la máquina.Dicho valor puede medirse con las tiras disponibles en el mercado.Al pulsar los botones 4 y 5 es posible introducir un valor comprendido en el intervalo de 5 a 50 grados franceses.El valor predeterminado es de 20 grados franceses. Si se utiliza un filtro para ablandar el agua, introduz-ca un valor de dureza del agua en función del poder de ablandamiento del filtro.
INTERVALO TEMP.
Al confirmar con “Enter” la opción “Intervalo temp.” se puede modificar la temperatura de trabajo de la caldera para aumentar o disminuir ligeramente la temperatura de la bebida que se está preparando. Al pulsar los botones 4 y 5 es posible incrementar o reducir el valor en un intervalo de ± 4 °C.
CAMBIO DE CONTRASEÑA
Al confirmar la opción “Cambio de contraseña” con el botón “Enter”, en la pantalla aparecerá:
CONTRASEÑA
Introduzca la contraseña y aparecerá el siguiente mensaje:
CAMBIO DE
CONTRASEÑA
En ese momento, podrá introducir la contraseña que prefiera, que deberá constar de 6 caracteres.Podrá confirmar la contraseña que ha introducido con el botón “Enter”. Si pulsa el botón “Esc” una o varias veces, podrá volver a los niveles anteriores o salir del menú.
72
ES
AHORRO DE ENERGÍA
La máquina está programada para que se active el modo de ahorro de energía después de un cierto tiempo de inactividad. El valor predeterminado es de 2 horas.
Cuando la máquina se encuentra en modo de aho-rro de energía, en la pantalla aparece:
AHORRO DE ENERGÍA
Para que la máquina esté lista para la preparación de bebidas, basta con pulsar cualquier botón de se-lección. Al confirmar con “Enter” la opción “Ahorro de energía”, con los botones 4 y 5 es posible selec-cionar una de las siguientes opciones:
➤ Ahorro de energía desactivado➤ Ahorro de energía activado
Puede activar o desactivar la opción de “Ahorro de energía” pulsando el botón “Enter”. Si pulsa el botón “Esc” una o varias veces, podrá volver a los niveles anteriores o salir del menú.
CEBADO DE LAS BOMBAS
Al confirmar la opción “Cebado de las bombas” con “Enter”, mediante los botones 4 y 5 es posible elegir una de las siguientes opciones:
➤ Cebado de las bombas activado➤ Cebado de las bombas desactivadoPuede activar o desactivar esta función pulsando el botón “Enter”. Si pulsa el botón “Esc” una o varias veces, podrá volver a los niveles anteriores o salir del menú. La función de cebado de las bombas se realiza cuando la máquina está lista pulsando simul-táneamente los botones 3 y 6 durante 3 segundos como mínimo.
Antesdeactivarlafuncióndecebadodelasbombashayquecolocarunatazaounvasodebajodelaboquilla,enlarejillaapoyata-zas.
Durante el cebado de las bombas, en la pantalla aparecerá el siguiente mensaje:
CEBADO DE LA
BOMBAS EN CURSO
MENÚ DE CONFIGURACIÓN
Según el resultado del proceso de cebado cuando este llegue a su fin, en la pantalla aparecerá el si-guiente mensaje:
CEBADO DE LAS BOMBAS
POSITIVO/NEGATIVO
La primera vez que ponga en marcha la máquina o después de un largo periodo de tiempo en que no la haya utilizado podría ser necesario llevar a cabo una carga hidráulica. En el caso de que se haya activado previamente esta opción en el menú, la máquina realizará automáticamente esta función al pulsar simultáneamente los botones 3 y 6 duran-te 3 segundos como mínimo.
COMPROBACIÓN DE LAS TARJETAS
Esta función permite comprobar una tarjeta con chip, independientemente de su uso. Al confirmar la opción “Comprobación de las tarjetas” pulsando “Enter”, en la pantalla aparecerá el siguiente men-saje:
INTRODUZCA LA
TARJETA
Cuando introduzca la tarjeta con chip en la ranura correspondiente de la máquina, en la pantalla apa-recerá la información relacionada con ella.Después, extraiga la tarjeta con chip y pulse el bo-tón “Esc” una o varias veces para volver a niveles anteriores o salir del menú.
CONTADOR
Esta función permite analizar el total de bebidas preparadas y las estadísticas de las diversas selec-ciones de la máquina. Al confirmar la opción “Contador” pulsando “Enter”, mediante los botones 4 y 5 es posible visualizar los diversos contadores.
➤ Total de bebidas preparadas: 000079➤ Total de bebidas del producto 1 preparadas:
000027➤ . .➤ . .➤ Total de bebidas del producto 6 preparadas:
000008
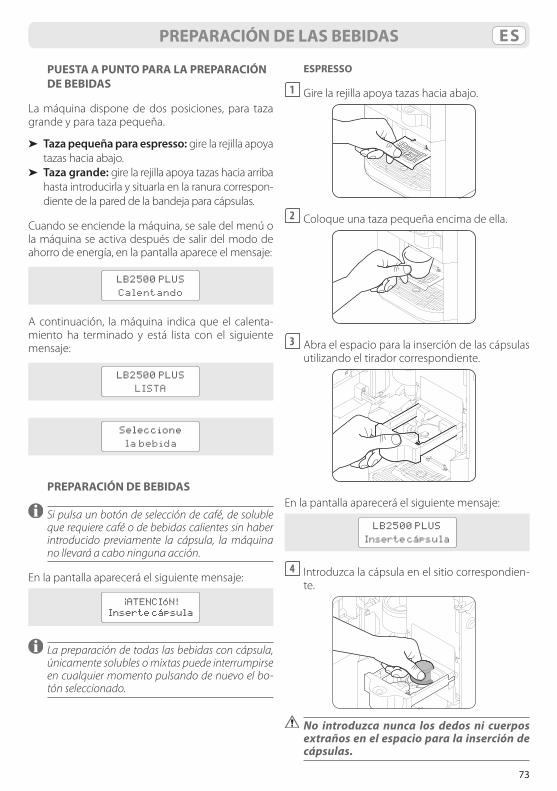
73
ES
PUESTA A PUNTO PARA LA PREPARACIÓN DE BEBIDAS
La máquina dispone de dos posiciones, para taza grande y para taza pequeña.
➤ Taza pequeña para espresso: gire la rejilla apoya tazas hacia abajo.
➤ Taza grande: gire la rejilla apoya tazas hacia arriba hasta introducirla y situarla en la ranura correspon-diente de la pared de la bandeja para cápsulas.
Cuando se enciende la máquina, se sale del menú o la máquina se activa después de salir del modo de ahorro de energía, en la pantalla aparece el mensaje:
LB2500 PLUS
Calentando
A continuación, la máquina indica que el calenta-miento ha terminado y está lista con el siguiente mensaje:
LB2500 PLUS
LISTA
Seleccione
la bebida
PREPARACIÓN DE BEBIDAS
Si pulsa un botón de selección de café, de soluble que requiere café o de bebidas calientes sin haber introducido previamente la cápsula, la máquina no llevará a cabo ninguna acción.
En la pantalla aparecerá el siguiente mensaje:
¡ATENCIÓN!
Inserte cápsula
La preparación de todas las bebidas con cápsula, únicamente solubles o mixtas puede interrumpirse en cualquier momento pulsando de nuevo el bo-tón seleccionado.
PREPARACIÓN DE LAS BEBIDAS
ESPRESSO
1 Gire la rejilla apoya tazas hacia abajo.
2 Coloque una taza pequeña encima de ella.
3 Abra el espacio para la inserción de las cápsulas
utilizando el tirador correspondiente.
En la pantalla aparecerá el siguiente mensaje:
LB2500 PLUS
Inserte cápsula
4 Introduzca la cápsula en el sitio correspondien-te.
No introduzca nunca los dedos ni cuerpos extrañosenelespacioparalainsercióndecápsulas.
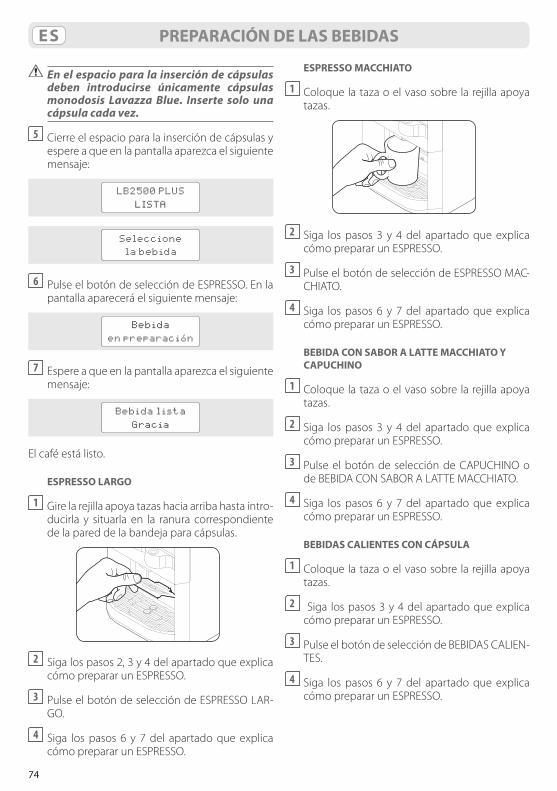
74
ES
Enelespacioparalainsercióndecápsulasdeben introducirse únicamente cápsulasmonodosis Lavazza Blue. Inserte solo una cápsulacadavez.
5 Cierre el espacio para la inserción de cápsulas y espere a que en la pantalla aparezca el siguiente mensaje:
LB2500 PLUS
LISTA
Seleccione
la bebida
6 Pulse el botón de selección de ESPRESSO. En la pantalla aparecerá el siguiente mensaje:
Bebida
en preparación
7 Espere a que en la pantalla aparezca el siguiente mensaje:
Bebida lista
Gracia
El café está listo.
ESPRESSO LARGO
1 Gire la rejilla apoya tazas hacia arriba hasta intro-ducirla y situarla en la ranura correspondiente de la pared de la bandeja para cápsulas.
2 Siga los pasos 2, 3 y 4 del apartado que explica
cómo preparar un ESPRESSO.
3 Pulse el botón de selección de ESPRESSO LAR-GO.
4 Siga los pasos 6 y 7 del apartado que explica cómo preparar un ESPRESSO.
PREPARACIÓN DE LAS BEBIDAS
ESPRESSO MACCHIATO
1 Coloque la taza o el vaso sobre la rejilla apoya tazas.
2 Siga los pasos 3 y 4 del apartado que explica
cómo preparar un ESPRESSO.
3 Pulse el botón de selección de ESPRESSO MAC-CHIATO.
4 Siga los pasos 6 y 7 del apartado que explica cómo preparar un ESPRESSO.
BEBIDA CON SABOR A LATTE MACCHIATO Y CAPUCHINO
1 Coloque la taza o el vaso sobre la rejilla apoya tazas.
2 Siga los pasos 3 y 4 del apartado que explica cómo preparar un ESPRESSO.
3 Pulse el botón de selección de CAPUCHINO o de BEBIDA CON SABOR A LATTE MACCHIATO.
4 Siga los pasos 6 y 7 del apartado que explica cómo preparar un ESPRESSO.
BEBIDAS CALIENTES CON CÁPSULA
1 Coloque la taza o el vaso sobre la rejilla apoya tazas.
2 Siga los pasos 3 y 4 del apartado que explica cómo preparar un ESPRESSO.
3 Pulse el botón de selección de BEBIDAS CALIEN-TES.
4 Siga los pasos 6 y 7 del apartado que explica cómo preparar un ESPRESSO.
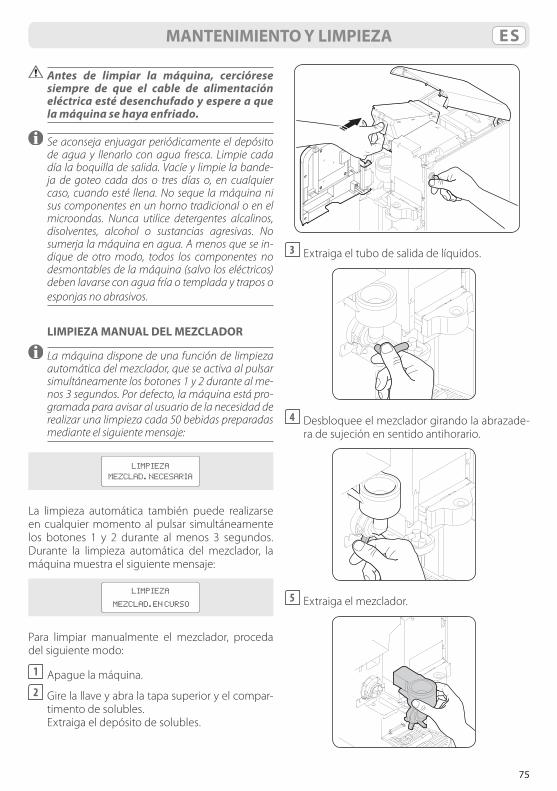
75
ESMANTENIMIENTO Y LIMPIEZA
Antes de limpiar la máquina, cercióresesiempre de que el cable de alimentacióneléctricaestédesenchufadoyespereaquelamáquinasehayaenfriado.
Se aconseja enjuagar periódicamente el depósito de agua y llenarlo con agua fresca. Limpie cada día la boquilla de salida. Vacíe y limpie la bande-ja de goteo cada dos o tres días o, en cualquier caso, cuando esté llena. No seque la máquina ni sus componentes en un horno tradicional o en el microondas. Nunca utilice detergentes alcalinos, disolventes, alcohol o sustancias agresivas. No sumerja la máquina en agua. A menos que se in-dique de otro modo, todos los componentes no desmontables de la máquina (salvo los eléctricos) deben lavarse con agua fría o templada y trapos o esponjas no abrasivos.
LIMPIEZA MANUAL DEL MEZCLADOR
La máquina dispone de una función de limpieza automática del mezclador, que se activa al pulsar simultáneamente los botones 1 y 2 durante al me-nos 3 segundos. Por defecto, la máquina está pro-gramada para avisar al usuario de la necesidad de realizar una limpieza cada 50 bebidas preparadas mediante el siguiente mensaje:
LIMPIEZA
MEZCLAD. NECESARIA
La limpieza automática también puede realizarse en cualquier momento al pulsar simultáneamente los botones 1 y 2 durante al menos 3 segundos. Durante la limpieza automática del mezclador, la máquina muestra el siguiente mensaje:
LIMPIEZA
MEZCLAD. EN CURSO
Para limpiar manualmente el mezclador, proceda del siguiente modo:
1 Apague la máquina.2 Gire la llave y abra la tapa superior y el compar-
timento de solubles. Extraiga el depósito de solubles.
3 Extraiga el tubo de salida de líquidos.
4 Desbloquee el mezclador girando la abrazade-
ra de sujeción en sentido antihorario.
5 Extraiga el mezclador.
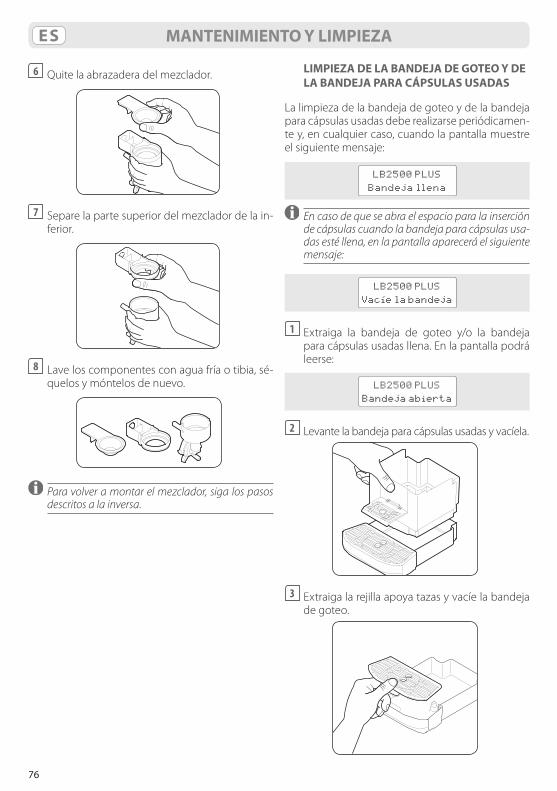
76
ES
6 Quite la abrazadera del mezclador.
7 Separe la parte superior del mezclador de la in-
ferior.
8 Lave los componentes con agua fría o tibia, sé-
quelos y móntelos de nuevo.
Para volver a montar el mezclador, siga los pasos descritos a la inversa.
MANTENIMIENTO Y LIMPIEZA
LIMPIEZA DE LA BANDEJA DE GOTEO Y DE LA BANDEJA PARA CÁPSULAS USADAS
La limpieza de la bandeja de goteo y de la bandeja para cápsulas usadas debe realizarse periódicamen-te y, en cualquier caso, cuando la pantalla muestre el siguiente mensaje:
LB2500 PLUS
Bandeja llena
En caso de que se abra el espacio para la inserción de cápsulas cuando la bandeja para cápsulas usa-das esté llena, en la pantalla aparecerá el siguiente mensaje:
LB2500 PLUS
Vacíe la bandeja
1 Extraiga la bandeja de goteo y/o la bandeja para cápsulas usadas llena. En la pantalla podrá leerse:
LB2500 PLUS
Bandeja abierta
2 Levante la bandeja para cápsulas usadas y vacíela.
3 Extraiga la rejilla apoya tazas y vacíe la bandeja
de goteo.

77
ESMANTENIMIENTO Y LIMPIEZA
4 Lave los componentes con agua fría o tibia, sé-quelos y móntelos de nuevo.
En caso de que la bandeja no vuelva a colocarse en un máximo de 4 minutos, se oirá una señal acús-tica continua durante 90 segundos aproximada-mente. Todas las luces LED permanecerán apaga-das y en la pantalla aparecerá el siguiente mensaje.
LB2500 PLUS
Cierre bandeja
5 Cuando se cierre la bandeja, se encenderán to-das las luces LED y aparecerá el mensaje:
LB2500 PLUS
LISTA
Seleccione la
bebida
DESCALCIFICACIÓN DEL CIRCUITO HIDRÁULICO
La máquina solicita el ciclo de descalcificación a tra-vés del mensaje DESCALCIFICACIÓN SOLICITADA, que aparece durante 1 segundo al inicio de la pre-paración de la bebida. Este mensaje aparece des-pués de que la máquina haya preparado una deter-minada cantidad de bebidas, calculada en función de la dureza del agua, que se puede configurar tal como se describe en el apartado “Dureza H2O”. De todas formas, el ciclo de descalcificación puede ac-tivarse en cualquier momento, incluso aunque la máquina no lo solicite.El ciclo de descalcificación puede activarse a través del MENÚ CONFIGURACIÓN DE SEGUNDO NIVEL si-guiendo la secuencia indicada en el apartado “Des-calcificación”.Cuando se activa esta función también puede acti-varse el ciclo de descalcificación pulsando a la vez los botones 2 y 5 durante al menos 5 segundos.Luego hay que realizar la secuencia de operaciones indicada en el apartado “Descalcificación”.Para llevar a cabo la descalcificación, utilice única-mente productos apropiados y garantizados según la normativa vigente.
78
ES MENSAJES DE ALERTA EN LA PANTALLA
Pantalla Estado de la máquina Eventos SoluciónLAVAZZA LB PLUSBandeja llena
Bandeja para cápsulas usadas llena
Es posible prepararsolubles
Vacíe la bandeja y límpiela
LAVAZZA LB PLUSBandeja abierta
Apertura de la bandeja con la máquina caliente
No es posible preparar bebidas
Cierre la bandeja
¡ATENCIÓN!Falta agua
Falta agua en el depósito o falta el depósito
Parpadeo de los boto-nes de selección
Llene el depósito con agua potable fresca sin gas
¡ATENCIÓN!Puerta abierta
Puerta del compartimento de solubles abierta
No es posible preparar bebidas
Cierre la tapa del com-partimento de solubles
SOBRECALENTAM. ESPERE
Temperatura demasiado elevada
No es posible preparar bebidas
Espere a que la máquina se enfríe. Si el mensaje no desaparece, póngase en contacto con un técnico
ESPEREENFRIAMIENTO
Los componentes de la máquina se están enfriando
No es posible preparar bebidas
Espere a que se enfríen. Si el mensaje no desaparece, póngase en contacto con un técnico
CRÉDITO AGOTADO
Crédito agotadoNo es posible preparar bebidas
Recargue el crédito
SUPERACIÓN DEL TIEMPO PREPARAC.
Preparación terminada por ausencia de flujo de agua
Preparación del producto incompleta
Lleve a cabo el cebado de las bombas. Si el mensaje no desaparece o no se lleva a cabo el cebado, póngase en contacto con un técnico
INTRODUZCACRÉDITO
Introduzca crédito en caso de que la preparación de bebidas sea de pago y no haya crédito
No es posible preparar bebidas
Recargue el crédito
ALERTA CALENTAMIENTO
No ha sido posible calentar la máquina
No es posible preparar bebidas
Póngase en contacto con un técnico
AVERÍA EN EL MEDIDOR DE FLUJO
El medidor de flujo está averiado. No se alcanzan el número de impulsos
No es posible preparar bebidas
Póngase en contacto con un técnico
ALERTASONDA
Alerta de sonda (en cortocircuito o abierta)
No es posible preparar bebidas
Póngase en contacto con un técnico
CEBADO DE LAS BOMBASNEGATIVO
El resultado del cebado de las bombas ha sido negativo
-
Repita la operación. En caso de resultado negativo, póngase en contacto con un técnico
DESCALCIFICACIÓN SOLICITADA
La máquina necesita descalcificación del circuito hidráulico
-
Ejecute el ciclo de descalcificación como se describe en el capítulo “Mantenimiento y limpieza”
79
ESMENSAJES EN LA PANTALLA DURANTE LAS OPERACIONES CON UNA TARJETA CON CHIP
Pantalla EventosSIN CONFIG.TARJETA VIRGEN La tarjeta no ha sido inicializada. No existe configuración alguna
OPERAC. ERRÓNEAEXTRAIGA TARJETA Los datos no son válidos
OPERAC. CORRECTAEXTRAIGA TARJETA La transferencia de datos ha sido realizada. Puede extraer la tarjeta
ESCRITURA DE LA CONFIGURACIÓN Escritura desde la tarjeta hasta la máquina en curso. Escritura de la configuración
LECTURA DE LA CONFIGURACIÓN Lectura desde la máquina hasta una tarjeta en curso. Lectura de la configuración
TARJETA ONETIMETRANSFER. EN CURSO Transferencia desde una tarjeta OneTime en curso
MASTERCARDTRANSF. EN CURSO Transferencia desde una MasterCard
TARJETA PRUEBA INSERTADA Confirme la inserción de la tarjeta de pruebaTARJETA CRÉDITOSINSERTADA Confirme la inserción de la tarjeta de créditos
TARJETA MULTINSCONTADOR NULO Compruebe la falta de crédito en su tarjeta Multins
TARJETA MULTINSPULSE EL BOTÓN 1
Con la tarjeta Multins insertada en la máquina, pulse el botón 1 para transferir los créditos
TARJETA MULTINS ANULACIÓN CRÉDITOS Con la tarjeta Multins insertada en la máquina, transferencia anulada
TRANSFERENCIA DE CRÉDITOS xxxxx Visualice el total de créditos transferidosTARJETA AUTOTESTINSERTADA Confirme la inserción de la tarjeta de autotest
CARACTERÍSTICAS TÉCNICAS
Para conocer las características técnicas de la má-quina, consulte su placa de datos técnicos.
➤ Voltaje: 220 - 240 V, 50/60 Hz➤ Potencia total: 1450 W➤ Capacidad del depósito: 3 l➤ Peso: 12 kg
➤ Materiales utilizados para el cuerpo: termoplástico➤ Capacidad de la bandeja para cápsulas usadas:
20 cápsulas Lavazza Blue➤ Dimensiones: altura 470 mm ; anchura 260 mm ;
profundidad 400 mm➤ Cumplimiento de las normativas: 2006/42 CE -
2004/108 CE - 2006 /95 CE
USO PREVISTO DE LA MÁQUINAEste aparato ha sido concebido para ser usado con fines profesionales. Se prohíbe cualquier uso inde-bido (no descrito en estas instrucciones). Se prohíbe realizar cualquier modificación técnica. La máquina no ha sido concebida para ser utilizada por niños
SEGURIDADo personas con las capacidades físicas, mentales o sensoriales reducidas o sin experiencia o conoci-mientos al respecto, a menos que hayan recibido instrucciones acerca del uso de la máquina y se encuentren bajo la supervisión de una persona res-ponsable de su seguridad.
80
ES
UBICACIÓNSitúe la máquina de café en un lugar seguro, sobre una superficie llana, horizontal y estable y donde nadie pueda estropearla o resultar herido. No co-loque la máquina en lugares con una temperatura inferior a 4 °C , ya que el hielo podría estropearla. No utilice la máquina de café a la intemperie. No instale la máquina sobre superficies muy calientes y/o cer-ca de llamas libres. Utilice la máquina a temperatura ambiente.
ALIMENTACIÓN ELÉCTRICAConecte la máquina de café únicamente a una toma de corriente apropiada. La tensión debe co-rresponderse con la indicada en la placa de datos técnicos de la máquina.
CABLE DE ALIMENTACIÓNNo utilice la máquina de café si el cable de alimenta-ción es defectuoso o está estropeado. En ese caso, sustitúyalo por otro inmediatamente. No permita que el cable de alimentación entre en contacto con esquinas, aristas vivas u objetos muy calientes. Protéjalo del contacto con el aceite. No use el cable de alimentación para transportar la máquina o tirar de ella. No saque la clavija de la toma de corriente tirando del cable. No toque la clavija con las manos mojadas. Evite que el cable de alimentación se cai-ga desde una mesa o una estantería.
PELIGRO DE ELECTROCUCIÓNNo deje que las piezas eléctricas entren en contacto con el agua. Asegúrese de que sus manos, la máqui-na, el cable y la superficie de apoyo de la máquina no estén mojados.
PROTECCIÓN DE OTRAS PERSONASVigile a los niños para evitar que jueguen con el aparato. Los niños no se dan cuenta del peligro que entrañan los electrodomésticos. No deje a su alcance los materiales utilizados para embalar la máquina.
PELIGRO DE QUEMADURASNo toque las piezas calientes (portacápsulas, etc.) justo después de utilizar el aparato. Durante la pre-paración de la bebida, tenga cuidado con las posi-bles salpicaduras de líquido.
LIMPIEZAAntes de limpiar la máquina, es indispensable que desconecte la clavija de la toma de corriente y que espere a que la máquina se enfríe. ¡No sumerja la máquina en agua! Está totalmente prohibido ma-nipular el interior de la máquina. No utilice el agua presente del depósito para fines alimentarios.
ALMACENAMIENTO DE LA MÁQUINACuando la máquina permanezca inutilizada durante un periodo de tiempo prolongado, desconecte la clavija de la toma de corriente y guarde la máquina en un lugar seco al que los niños no puedan acce-der. Protéjala del polvo y la suciedad.
REPARACIONES Y MANTENIMIENTO En caso de averías, defectos o sospecha de avería después de una caída, desconecte inmediatamen-te la clavija de la toma de corriente. No utilice una máquina defectuosa. Solo los Centros de Asistencia Técnica autorizados pueden manipular la máquina y repararla. En caso de que se manipule la máqui-na en centros no autorizados, se declina cualquier responsabilidad por los posibles daños que puedan producirse.
DEPÓSITO DE AGUAVierta en el depósito únicamente agua fresca po-table sin gas. No ponga en marcha la máquina si el agua no supera por lo menos el nivel mínimo indi-cado en el depósito.
ESPACIO PARA LA INSERCIÓN DE CÁPSULASEn el espacio para la inserción de cápsulas solo de-ben introducirse cápsulas monodosis Lavazza Blue. No introduzca los dedos ni cualquier otro cuerpo extraño. Las cápsulas solo deben utilizarse una vez.
ELIMINACIÓN DE LA MÁQUINA AL FINAL DE SU VIDA ÚTIL (Directiva europea 2002/96/CE - D.L. 25 de julio de 2005 n.º 151)
El símbolo de un contenedor sobre el producto o sobre el embalaje indica que no debe ser eliminado como un residuo doméstico al final de su vida útil. Debe depositarlo en uno de los puntos de recogida selectiva específicos para residuos eléctricos y elec-trónicos existentes en el territorio nacional o debe entregarlo en el establecimiento donde compre un aparato nuevo equivalente, a razón de uno por uno.El usuario es responsable de llevar el aparato a las instalaciones de recogida apropiadas. En caso con-trario, se enfrenta a las sanciones previstas por la legislación vigente sobre la materia. La recogida selectiva de estos aparatos para su reciclaje y/o su eliminación respetuosa con el medio ambiente contribuye a evitar posibles efectos negativos en el entorno y en la salud y favorece la reutilización y/o reciclaje de los materiales de los que está compues-ta la máquina. Para obtener información más de-tallada sobre los sistemas de recogida disponibles, diríjase a un centro de eliminación de residuos o al establecimiento donde ha adquirido el producto.
SEGURIDAD
81
PTÍNDICE GERAL
ÍNDICE GERAL ................................................................................................................................................................ 81COMPONENTES .............................................................................................................................................................. 82MENSAGENS NO ECRÃ DE ESTADO DA MÁQUINA ........................................................................................ 82CONFIGURAÇÃO DA MÁQUINA .............................................................................................................................. 83
DESEMBALAMENTO E INSTALAÇÃO ....................................................................................................................................................................... 83INICIAR A MÁQUINA ......................................................................................................................................................................................................... 83
MENU DE REGULAÇÃO ............................................................................................................................................... 85MENU DE REGULAÇÃO DO PRIMEIRO NÍVEL .................................................................................................................................................... 85CRÉDITOS NÃO UTILIZADOS ............................................................................................................................................................................................................................85REGULAÇÃO DE DOSES ......................................................................................................................................................................................................................................85MENU DE REGULAÇÃO DO SEGUNDO NÍVEL ................................................................................................................................................... 86ESCOLHA DE IDIOMA ...........................................................................................................................................................................................................................................86DESCALCIFICAÇÃO ................................................................................................................................................................................................................................................86DUREZA DA ÁGUA (H2O) ...................................................................................................................................................................................................................................87VARIAÇÃO DE TEMPERATURA ..........................................................................................................................................................................................................................87MODIFICAÇÃO DE PALAVRA-PASSE .............................................................................................................................................................................................................87MODO ECONÓMICO (ENERGY SAVING) ....................................................................................................................................................................................................88DESCARGA DE BOMBAS .....................................................................................................................................................................................................................................88VERIFICAÇÃO DE CARTÃO .................................................................................................................................................................................................................................88CONTADOR .................................................................................................................................................................................................................................................................88
PREPARAÇÃO DE BEBIDAS ....................................................................................................................................... 89CONFIGURAÇÃO PARA A PREPARAÇÃO DE BEBIDAS ................................................................................................................................... 89DISTRIBUIÇÃO DE BEBIDAS........................................................................................................................................................................................... 89ESPRESSO .....................................................................................................................................................................................................................................................................89ESPRESSO CHEIO .....................................................................................................................................................................................................................................................90ESPRESSO MACCHIATO .......................................................................................................................................................................................................................................90BEBIDA COM SABOR A LATTE MACCHIATO/CAPPUCCINO ...........................................................................................................................................................90BEBIDAS QUENTES COM CÁPSULA ..............................................................................................................................................................................................................90
MANUTENÇÃO E LIMPEZA ........................................................................................................................................ 91LIMPEZA MANUAL DO GRUPO MISTURADOR .................................................................................................................................................. 91LIMPEZA DA GAVETA PARA GOTAS/CÁPSULAS USADAS ........................................................................................................................... 92DESCALCIFICAÇÃO DO CIRCUITO HIDRÁULICO.............................................................................................................................................. 93
MENSAGENS DE ALARME NO ECRÃ...................................................................................................................... 94MENSAGENS NO ECRÃ DURANTE AS OPERAÇÕES COM CARTÃO INTELIGENTE ............................ 95CARACTERÍSTICAS TÉCNICAS ................................................................................................................................. 95SEGURANÇA .................................................................................................................................................................... 95
INDICAÇÕES DE USO........................................................................................................................................................................................................ 95LOCALIZAÇÃO ...................................................................................................................................................................................................................... 96ALIMENTAÇÃO ..................................................................................................................................................................................................................... 96CABO ELÉCTRICO ............................................................................................................................................................................................................... 96PERIGO DE ELECTROCUSSÃO ..................................................................................................................................................................................... 96PROTECÇÃO DE TERCEIROS ......................................................................................................................................................................................... 96PERIGO DE QUEIMADURA ............................................................................................................................................................................................. 96LIMPEZA ................................................................................................................................................................................................................................... 96ARRUMAÇÃO DA MÁQUINA........................................................................................................................................................................................ 96REPARAÇÕES/MANUTENÇÃO ..................................................................................................................................................................................... 96DEPÓSITO DE ÁGUA ......................................................................................................................................................................................................... 96ESPAÇO PARA CÁPSULAS .............................................................................................................................................................................................. 96ELIMINAÇÃO DA MÁQUINA EM FIM DE VIDA(Directiva Europeia 2002/96/CE – D. L. de 25 de Julho de 2005 n.º 151) ........................................................................................ 96
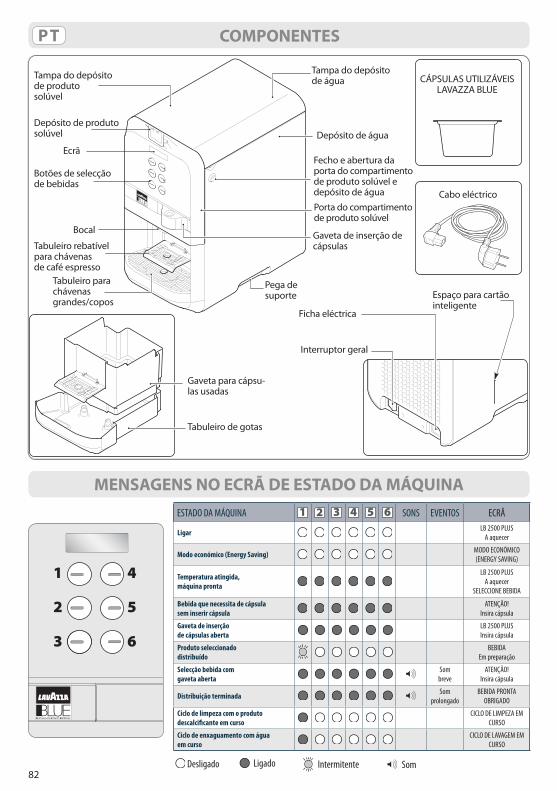
82
PT COMPONENTES
MENSAGENS NO ECRÃ DE ESTADO DA MÁQUINA
Tampa do depósitode produto solúvel
Tampa do depósito de água CÁPSULAS UTILIZÁVEIS
LAVAZZA BLUE
Gaveta de inserção de cápsulas
Pega de suporte
Ficha eléctrica
Interruptor geral
Espaço para cartão inteligente
Depósito de água
Fecho e abertura da porta do compartimento de produto solúvel e depósito de água
Porta do compartimento de produto solúvel
Cabo eléctrico
Depósito de produto solúvel
Ecrã
Botões de selecção de bebidas
Bocal
Tabuleiro rebatível para chávenasde café espresso
Tabuleiro parachávenasgrandes/copos
Gaveta para cápsu-las usadas
Tabuleiro de gotas
SomIntermitenteLigadoDesligado
1
2
3
4
5
6
ESTADO DA MÁQUINA 1 2 3 4 5 6 SONS EVENTOS ECRÃ
Ligar LB 2500 PLUSA aquecer
Modo económico (Energy Saving) MODO ECONÓMICO (ENERGY SAVING)
Temperatura atingida,máquina pronta
LB 2500 PLUSA aquecer
SELECCIONE BEBIDA
Bebida que necessita de cápsulasem inserir cápsula
ATENÇÃO!Insira cápsula
Gaveta de inserçãode cápsulas aberta
LB 2500 PLUSInsira cápsula
Produto seleccionado distribuído
BEBIDAEm preparação
Selecção bebida comgaveta aberta
Sombreve
ATENÇÃO!Insira cápsula
Distribuição terminada Somprolongado
BEBIDA PRONTAOBRIGADO
Ciclo de limpeza com o produto descalcificante em curso
CICLO DE LIMPEZA EM CURSO
Ciclo de enxaguamento com água em curso
CICLO DE LAVAGEM EM CURSO
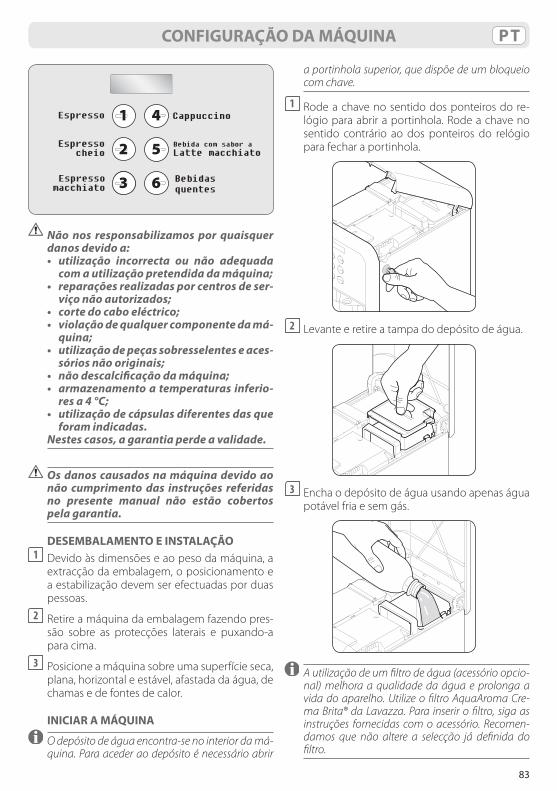
83
PT
Cappuccino
Bebida com sabor aLatte macchiato
6
5
4
3
2
1
Bebidasquentes
Espressomacchiato
Espressocheio
Espresso
Nãonos responsabilizamos por quaisquerdanos devido a:
• utilização incorrecta ou não adequadacomautilizaçãopretendidadamáquina;
• reparaçõesrealizadasporcentrosdeser-viço não autorizados;
• cortedocaboeléctrico; • violaçãodequalquercomponentedamá-
quina; • utilizaçãodepeçassobresselenteseaces-
sóriosnãooriginais; • nãodescalcificaçãodamáquina; • armazenamentoatemperaturasinferio-
resa4°C; • utilizaçãodecápsulasdiferentesdasque
foram indicadas. Nestes casos, a garantia perde a validade.
Osdanoscausadosnamáquinadevidoaonão cumprimentodas instruções referidasno presente manual não estão cobertos pela garantia.
DESEMBALAMENTO E INSTALAÇÃO1 Devido às dimensões e ao peso da máquina, a
extracção da embalagem, o posicionamento e a estabilização devem ser efectuadas por duas pessoas.
2 Retire a máquina da embalagem fazendo pres-são sobre as protecções laterais e puxando-a para cima.
3 Posicione a máquina sobre uma superfície seca, plana, horizontal e estável, afastada da água, de chamas e de fontes de calor.
INICIAR A MÁQUINA
O depósito de água encontra-se no interior da má-quina. Para aceder ao depósito é necessário abrir
CONFIGURAÇÃO DA MÁQUINA
a portinhola superior, que dispõe de um bloqueio com chave.
1 Rode a chave no sentido dos ponteiros do re-lógio para abrir a portinhola. Rode a chave no sentido contrário ao dos ponteiros do relógio para fechar a portinhola.
2 Levante e retire a tampa do depósito de água.
3 Encha o depósito de água usando apenas água
potável fria e sem gás.
A utilização de um filtro de água (acessório opcio-nal) melhora a qualidade da água e prolonga a vida do aparelho. Utilize o filtro AquaAroma Cre-ma Brita® da Lavazza. Para inserir o filtro, siga as instruções fornecidas com o acessório. Recomen-damos que não altere a selecção já definida do filtro.
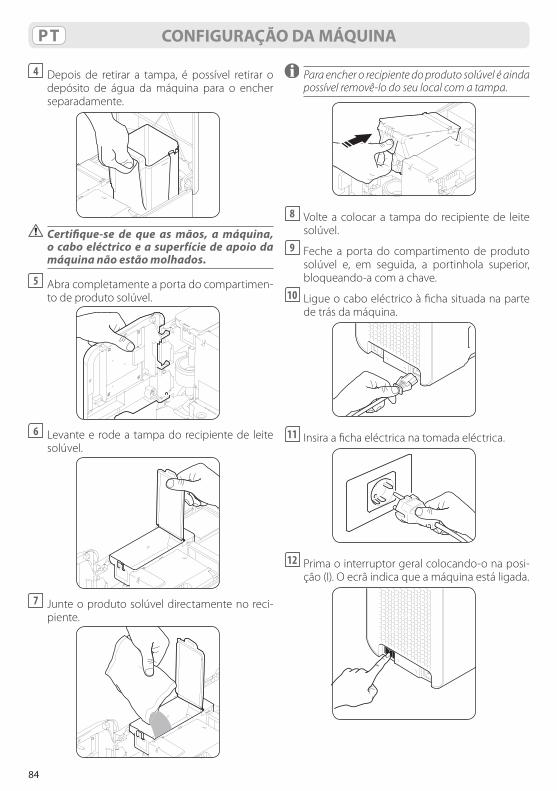
84
PT CONFIGURAÇÃO DA MÁQUINA
4 Depois de retirar a tampa, é possível retirar o depósito de água da máquina para o encher separadamente.
Certifique-se de que asmãos, amáquina,o cabo eléctrico e a superfície de apoio da máquinanãoestãomolhados.
5 Abra completamente a porta do compartimen-to de produto solúvel.
6 Levante e rode a tampa do recipiente de leite
solúvel.
7 Junte o produto solúvel directamente no reci-
piente.
Para encher o recipiente do produto solúvel é ainda possível removê-lo do seu local com a tampa.
8 Volte a colocar a tampa do recipiente de leite
solúvel.9 Feche a porta do compartimento de produto
solúvel e, em seguida, a portinhola superior, bloqueando-a com a chave.
10 Ligue o cabo eléctrico à ficha situada na parte de trás da máquina.
11 Insira a ficha eléctrica na tomada eléctrica.
12 Prima o interruptor geral colocando-o na posi-
ção (I). O ecrã indica que a máquina está ligada.
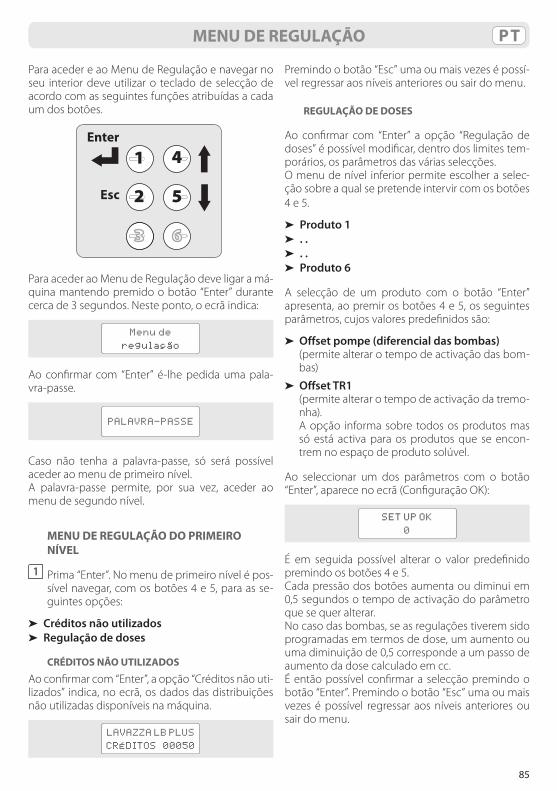
85
PTMENU DE REGULAÇÃO
Para aceder e ao Menu de Regulação e navegar no seu interior deve utilizar o teclado de selecção de acordo com as seguintes funções atribuídas a cada um dos botões.
1
2
3
4
5
6
Esc
Enter
Para aceder ao Menu de Regulação deve ligar a má-quina mantendo premido o botão “Enter” durante cerca de 3 segundos. Neste ponto, o ecrã indica:
Menu de
regulação
Ao confirmar com “Enter” é-lhe pedida uma pala-vra-passe.
PALAVRA-PASSE
Caso não tenha a palavra-passe, só será possível aceder ao menu de primeiro nível. A palavra-passe permite, por sua vez, aceder ao menu de segundo nível.
MENU DE REGULAÇÃO DO PRIMEIRO NÍVEL
1 Prima “Enter”. No menu de primeiro nível é pos-sível navegar, com os botões 4 e 5, para as se-guintes opções:
➤ Créditos não utilizados➤ Regulação de doses
CRÉDITOS NÃO UTILIZADOS
Ao confirmar com “Enter”, a opção “Créditos não uti-lizados” indica, no ecrã, os dados das distribuições não utilizadas disponíveis na máquina.
LAVAZZA LB PLUS
CRÉDITOS 00050
Premindo o botão “Esc” uma ou mais vezes é possí-vel regressar aos níveis anteriores ou sair do menu.
REGULAÇÃO DE DOSES
Ao confirmar com “Enter” a opção “Regulação de doses” é possível modificar, dentro dos limites tem-porários, os parâmetros das várias selecções.O menu de nível inferior permite escolher a selec-ção sobre a qual se pretende intervir com os botões 4 e 5.
➤ Produto 1➤ . .➤ . .➤ Produto 6
A selecção de um produto com o botão “Enter” apresenta, ao premir os botões 4 e 5, os seguintes parâmetros, cujos valores predefinidos são:
➤ Offset pompe (diferencial das bombas) (permite alterar o tempo de activação das bom-
bas)
➤ Offset TR1 (permite alterar o tempo de activação da tremo-
nha). A opção informa sobre todos os produtos mas
só está activa para os produtos que se encon-trem no espaço de produto solúvel.
Ao seleccionar um dos parâmetros com o botão “Enter”, aparece no ecrã (Configuração OK):
SET UP OK
0
É em seguida possível alterar o valor predefinido premindo os botões 4 e 5.Cada pressão dos botões aumenta ou diminui em 0,5 segundos o tempo de activação do parâmetro que se quer alterar.No caso das bombas, se as regulações tiverem sido programadas em termos de dose, um aumento ou uma diminuição de 0,5 corresponde a um passo de aumento da dose calculado em cc.É então possível confirmar a selecção premindo o botão “Enter”. Premindo o botão “Esc” uma ou mais vezes é possível regressar aos níveis anteriores ou sair do menu.
86
PTMENU DE REGULAÇÃO
MENU DE REGULAÇÃO DO SEGUNDO NÍVEL
O menu de regulação de segundo nível está reser-vado para o pessoal qualificado e autorizado.
1 Digite a palavra-passe correcta e, em seguida, prima “Enter”. A palavra-passe predefinida é 33333.
No menu de segundo nível é possível navegar, com os botões 4 e 5, para as seguintes opções.
➤ Escolha de idioma➤ Descalcificação➤ Dureza da água (H2O)➤ Variação de Temperatura➤ Modificação de palavra-passe➤ Modo económico (Energy Saving)➤ Descarga de bombas➤ Verificação de cartão➤ Contador
ESCOLHA DE IDIOMA
Ao confirmar com “Enter” a opção “Escolha de idio-ma” é possível modificar o idioma do menu e das sinalizações no ecrã.O menu de nível inferior permite escolher o idioma pretendido premindo os botões 4 e 5 e seleccioná--lo com o botão “Enter”.
➤ Italiano➤ English➤ Français➤ Deutsch➤ Espanõl➤ Português➤ Nederlands
Premindo o botão “Esc” uma ou mais vezes é possí-vel regressar aos níveis anteriores ou sair do menu.
DESCALCIFICAÇÃO
O ciclo de descalcificação pode ser activado em qualquer momento, mesmo que a máquina não o solicite. Ao confirmar com “Enter” a indicação “Des-calcificação”, aparece no visor a mensagem que se segue.
DescalcificaçãoINSERIR PRODUTO DESCALCI-
FICANTE NO RESERVATÓRIO E
PREMIR OK
Não é possível dispensar bebidas enquanto não for concluído o ciclo.
Nesse momento, seguir as indicações que se se-guem.
1 Encher o reservatório com o produto descalci-ficante diluído em água segundo a quantidade indicada nas instruções do mesmo.
2 Colocar um recipiente, com a maior capacidade possível, debaixo do bico de saída.
3 Em seguida, premir “Enter”; as bombas são acti-vadas e a solução descalcificante flui através do bico de saída depois de ter efectuado a sua ac-ção no interior do circuito da máquina. No visor surge a mensagem:
CICLO DE LIMPEZA
EM CURSO
• Nãobebernemdarabeberasoluçãodes-calcificante.
• Perigodequeimadura;asoluçãodescal-cificantesaidamáquinaaumatempera-tura elevada.
4 A máquina dispensará o volume de solução pre-visto.
É igualmente possível, ao premir “Enter”, inter-romper momentaneamente o ciclo para permi-tir o esvaziamento e a eliminação do conteúdo do recipiente utilizado para recolher a solução.
Para aumentar a eficácia da acção do produto descalcificante é ainda aconselhável efectuar, de dois em dois minutos de dispensa contínua, pausas de cerca de um minuto, interrompendo o ciclo mediante a pressão do botão “Enter”.
5 Voltar a colocar o recipiente vazio debaixo do bico de saída.
6 Premir “Enter” para reiniciar o ciclo.
Em caso de interrupção na alimentação eléctrica durante o ciclo de descalcificação, quando a má-quina volta a ser ligada fica automaticamente no modo de início do mesmo.
7 Depois de esvaziado o reservatório, aparece no visor a mensagem:
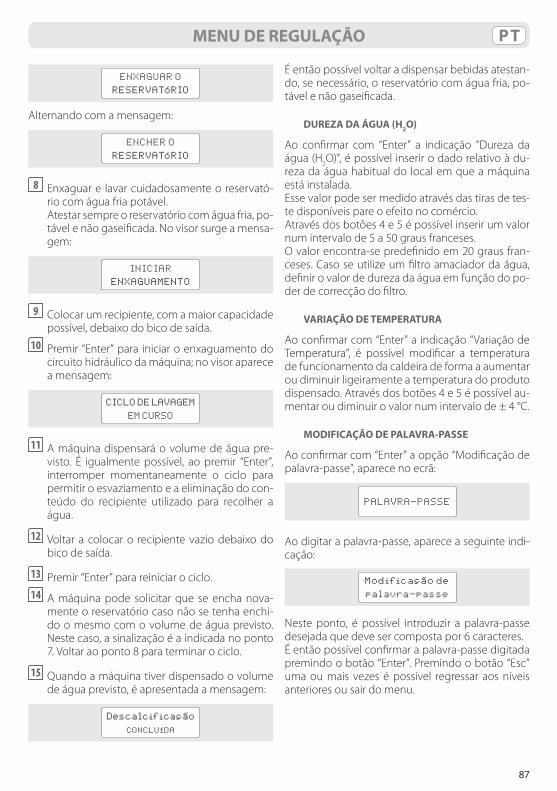
87
PTMENU DE REGULAÇÃO
ENXAGUAR O
RESERVATÓRIO
Alternando com a mensagem:
ENCHER O
RESERVATÓRIO
8 Enxaguar e lavar cuidadosamente o reservató-rio com água fria potável.
Atestar sempre o reservatório com água fria, po-tável e não gaseificada. No visor surge a mensa-gem:
INICIAR
ENXAGUAMENTO
9 Colocar um recipiente, com a maior capacidade possível, debaixo do bico de saída.
10 Premir “Enter” para iniciar o enxaguamento do circuito hidráulico da máquina; no visor aparece a mensagem:
CICLO DE LAVAGEM
EM CURSO
11 A máquina dispensará o volume de água pre-visto. É igualmente possível, ao premir “Enter”, interromper momentaneamente o ciclo para permitir o esvaziamento e a eliminação do con-teúdo do recipiente utilizado para recolher a água.
12 Voltar a colocar o recipiente vazio debaixo do bico de saída.
13 Premir “Enter” para reiniciar o ciclo.14 A máquina pode solicitar que se encha nova-
mente o reservatório caso não se tenha enchi-do o mesmo com o volume de água previsto. Neste caso, a sinalização é a indicada no ponto 7. Voltar ao ponto 8 para terminar o ciclo.
15 Quando a máquina tiver dispensado o volume de água previsto, é apresentada a mensagem:
Descalcificação
CONCLUÍDA
É então possível voltar a dispensar bebidas atestan-do, se necessário, o reservatório com água fria, po-tável e não gaseificada.
DUREZA DA ÁGUA (H2O)
Ao confirmar com “Enter” a indicação “Dureza da água (H2O)”, é possível inserir o dado relativo à du-reza da água habitual do local em que a máquina está instalada.Esse valor pode ser medido através das tiras de tes-te disponíveis pare o efeito no comércio.Através dos botões 4 e 5 é possível inserir um valor num intervalo de 5 a 50 graus franceses.O valor encontra-se predefinido em 20 graus fran-ceses. Caso se utilize um filtro amaciador da água, definir o valor de dureza da água em função do po-der de correcção do filtro.
VARIAÇÃO DE TEMPERATURA
Ao confirmar com “Enter” a indicação “Variação de Temperatura”, é possível modificar a temperatura de funcionamento da caldeira de forma a aumentar ou diminuir ligeiramente a temperatura do produto dispensado. Através dos botões 4 e 5 é possível au-mentar ou diminuir o valor num intervalo de ± 4 °C.
MODIFICAÇÃO DE PALAVRA-PASSE
Ao confirmar com “Enter” a opção “Modificação de palavra-passe”, aparece no ecrã:
PALAVRA-PASSE
Ao digitar a palavra-passe, aparece a seguinte indi-cação:
Modificação de
palavra-passe
Neste ponto, é possível introduzir a palavra-passe desejada que deve ser composta por 6 caracteres.É então possível confirmar a palavra-passe digitada premindo o botão “Enter”. Premindo o botão “Esc” uma ou mais vezes é possível regressar aos níveis anteriores ou sair do menu.
88
PT MENU DE REGULAÇÃO
MODO ECONÓMICO (ENERGY SAVING)
A máquina está programada para poder funcio-nar em condições de economia de energia depois de um determinado tempo de inactividade. O va-lor predefinido é de 2 horas.
Em condições de economia de energia, a máquina mostra no ecrã (MODO ECONÓMICO):
ENERGY SAVING
Para voltar a colocar a máquina em condições de funcionamento basta premir qualquer botão de se-lecção. Ao confirmar com “Enter” a opção “Energy saving” é possível escolher, com os botões 4 e 5, en-tre as duas opções seguintes:
➤ Energy saving desactivado➤ Energy saving activadoÉ possível seleccionar a activação ou desactivação do modo económico com o botão “Enter”. Premin-do o botão “Esc” uma ou mais vezes é possível re-gressar aos níveis anteriores ou sair do menu.
DESCARGA DE BOMBAS
Ao confirmar com “Enter” a opção “Descarga de bombas” é possível escolher, com os botões 4 e 5, entre as duas opções seguintes:
➤ Descarga de bombas activada➤ Descarga de bombas desactivadaÉ possível seleccionar a activação ou desactivação da função com o botão “Enter”. Premindo o bo-tão “Esc” uma ou mais vezes é possível regressar aos níveis anteriores ou sair do menu. A função de descarga de bombas pode ser escolhida, quando a máquina está pronta, premindo simultaneamente os botões 3 e 6 durante, pelo menos, 3 segundos.
Antes de activar a função de descarga de bombasénecessáriocolocarumachávenaou um copo sob o bocal, em cima do tabu-leiroparachávenas.
Durante a descarga de bombas aparece no ecrã a seguinte mensagem:
DESCARGA
DE BOMBAS EM CURSO
Depois de terminado o procedimento, o ecrã apre-senta a seguinte mensagem:
DESCARGA DE BOMBAS
POSITIVA/NEGATIVA
Da primeira vez que a máquina é ligada ou de-pois de um período de inactividade prolongado poderá ser necessário executar a operação de carregamento hidráulico. A função, se tiver sido previamente activada no menu, é executada au-tomaticamente pela máquina ao premir simulta-neamente os botões 3 e 6 durante, pelo menos, 3 segundos.
VERIFICAÇÃO DE CARTÃO
Esta função permite ao operador verificar um car-tão inteligente, independentemente da utilização do mesmo. Ao confirmar com “Enter” a opção “Veri-ficação de cartão”, aparece no ecrã a seguinte men-sagem:
Inserir cartão
Ao inserir o cartão inteligente na ranhura respectiva da máquina aparecem no ecrã as informações rela-tivas ao mesmo.Retire em seguida o cartão inteligente e prima o botão “Esc” uma ou mais vezes para regressar aos níveis anteriores ou sair do menu.
CONTADOR
Esta função permite analisar o totalizador das dis-tribuições e as estatísticas das várias selecções da máquina.Ao confirmar com “Enter” a opção “Contador” é pos-sível escolher, com os botões 4 e 5, os vários totali-zadores.
➤ Distribuições efectuadas 000079➤ Tot produto 1 efectuado 000027➤ . .➤ . .➤ Tot produto 6 efectuado 000008
89
PTPREPARAÇÃO DE BEBIDAS
CONFIGURAÇÃO PARA A PREPARAÇÃO DE BEBIDAS
A máquina dispõe de duas posições para chávenas.
➤ Chávena pequena de café espresso: rode para baixo o tabuleiro para chávenas.
➤ Chávena grande: rode para cima o tabuleiro para chávenas, inserindo-o e fechando-o na res-pectiva posição na parede da gaveta para cápsu-las.
Ao ligar a máquina, saindo do menu e depois de voltar a funcionar após o estado de Energy Saving, aparece no ecrã a indicação:
LB2500 PLUS
A aquecer
A máquina assinala em seguida a conclusão do aquecimento e o estado de pronta com a indicação:
LB2500 PLUS
PRONTA
Seleccione
bebida
DISTRIBUIÇÃO DE BEBIDAS
Se premir um botão de café, de produto solúvel que necessite de café ou de bebida quente sem ter anteriormente inserido a cápsula, não acontece nada.
No ecrã surge a mensagem:
Atenção!
Insira cápsula
A distribuição de todas as bebidas com cápsula, só produtos solúveis ou mistas, pode sempre ser interrompida premindo novamente o botão selec-cionado.
ESPRESSO
1 Rode para baixo o tabuleiro para chávenas.
2 Apoie a chávena.
3 Abra a gaveta para inserção de cápsulas utili-
zando a pega respectiva.
No ecrã aparece a mensagem:
LB2500 PLUS
Insira cápsula
4 Insira a cápsula no local respectivo.
Nãointroduzanuncaosdedosouobjectosnoespaçodeinserçãodacápsula.
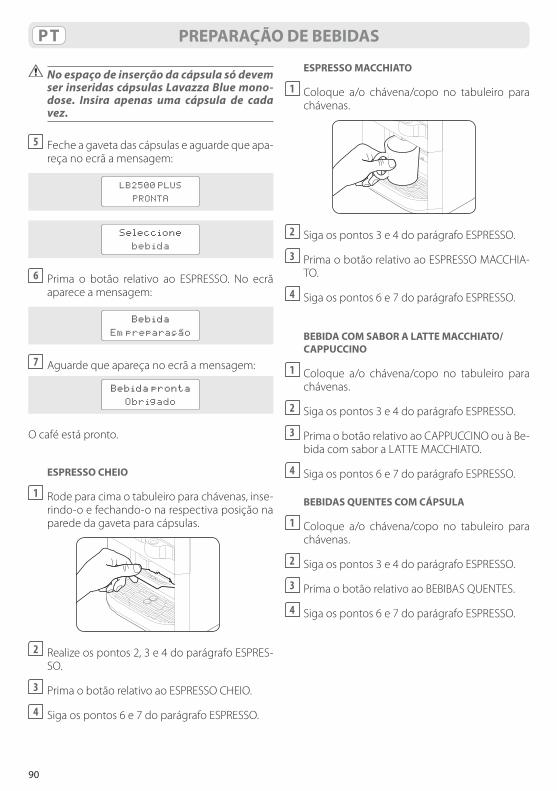
90
PT PREPARAÇÃO DE BEBIDAS
NoespaçodeinserçãodacápsulasódevemserinseridascápsulasLavazzaBluemono-dose. Insira apenas uma cápsula de cadavez.
5 Feche a gaveta das cápsulas e aguarde que apa-reça no ecrã a mensagem:
LB2500 PLUS
PRONTA
Seleccione
bebida
6 Prima o botão relativo ao ESPRESSO. No ecrã aparece a mensagem:
Bebida
Em preparação
7 Aguarde que apareça no ecrã a mensagem:
Bebida pronta
Obrigado
O café está pronto.
ESPRESSO CHEIO
1 Rode para cima o tabuleiro para chávenas, inse-rindo-o e fechando-o na respectiva posição na parede da gaveta para cápsulas.
2 Realize os pontos 2, 3 e 4 do parágrafo ESPRES-
SO.
3 Prima o botão relativo ao ESPRESSO CHEIO.
4 Siga os pontos 6 e 7 do parágrafo ESPRESSO.
ESPRESSO MACCHIATO
1 Coloque a/o chávena/copo no tabuleiro para chávenas.
2 Siga os pontos 3 e 4 do parágrafo ESPRESSO.
3 Prima o botão relativo ao ESPRESSO MACCHIA-TO.
4 Siga os pontos 6 e 7 do parágrafo ESPRESSO.
BEBIDA COM SABOR A LATTE MACCHIATO/CAPPUCCINO
1 Coloque a/o chávena/copo no tabuleiro para chávenas.
2 Siga os pontos 3 e 4 do parágrafo ESPRESSO.
3 Prima o botão relativo ao CAPPUCCINO ou à Be-bida com sabor a LATTE MACCHIATO.
4 Siga os pontos 6 e 7 do parágrafo ESPRESSO.
BEBIDAS QUENTES COM CÁPSULA
1 Coloque a/o chávena/copo no tabuleiro para chávenas.
2 Siga os pontos 3 e 4 do parágrafo ESPRESSO.
3 Prima o botão relativo ao BEBIBAS QUENTES.
4 Siga os pontos 6 e 7 do parágrafo ESPRESSO.
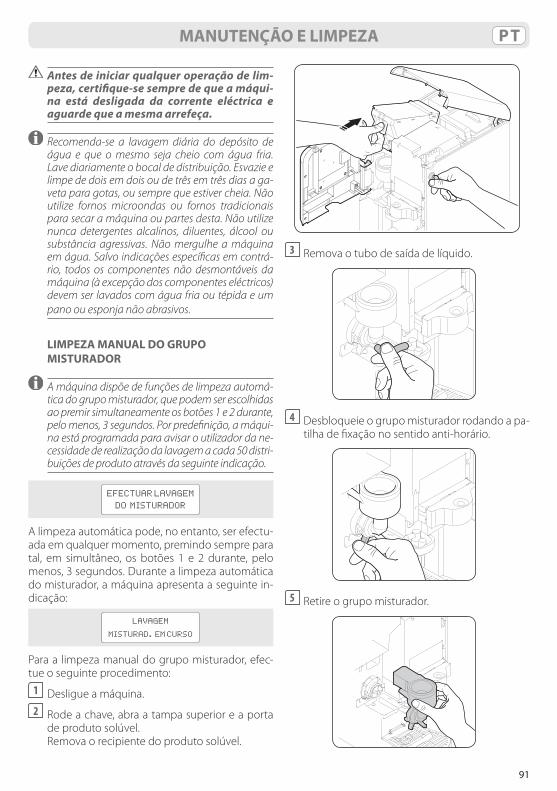
91
PTMANUTENÇÃO E LIMPEZA
Antesdeiniciarqualqueroperaçãodelim-peza,certifique-sesempredequeamáqui-na está desligada da corrente eléctrica eaguardequeamesmaarrefeça.
Recomenda-se a lavagem diária do depósito de água e que o mesmo seja cheio com água fria. Lave diariamente o bocal de distribuição. Esvazie e limpe de dois em dois ou de três em três dias a ga-veta para gotas, ou sempre que estiver cheia. Não utilize fornos microondas ou fornos tradicionais para secar a máquina ou partes desta. Não utilize nunca detergentes alcalinos, diluentes, álcool ou substância agressivas. Não mergulhe a máquina em água. Salvo indicações específicas em contrá-rio, todos os componentes não desmontáveis da máquina (à excepção dos componentes eléctricos) devem ser lavados com água fria ou tépida e um pano ou esponja não abrasivos.
LIMPEZA MANUAL DO GRUPO MISTURADOR
A máquina dispõe de funções de limpeza automá-tica do grupo misturador, que podem ser escolhidas ao premir simultaneamente os botões 1 e 2 durante, pelo menos, 3 segundos. Por predefinição, a máqui-na está programada para avisar o utilizador da ne-cessidade de realização da lavagem a cada 50 distri-buições de produto através da seguinte indicação.
EFECTUAR LAVAGEM
DO MISTURADOR
A limpeza automática pode, no entanto, ser efectu-ada em qualquer momento, premindo sempre para tal, em simultâneo, os botões 1 e 2 durante, pelo menos, 3 segundos. Durante a limpeza automática do misturador, a máquina apresenta a seguinte in-dicação:
LAVAGEM
MISTURAD. EM CURSO
Para a limpeza manual do grupo misturador, efec-tue o seguinte procedimento:
1 Desligue a máquina.2 Rode a chave, abra a tampa superior e a porta
de produto solúvel. Remova o recipiente do produto solúvel.
3 Remova o tubo de saída de líquido.
4 Desbloqueie o grupo misturador rodando a pa-
tilha de fixação no sentido anti-horário.
5 Retire o grupo misturador.
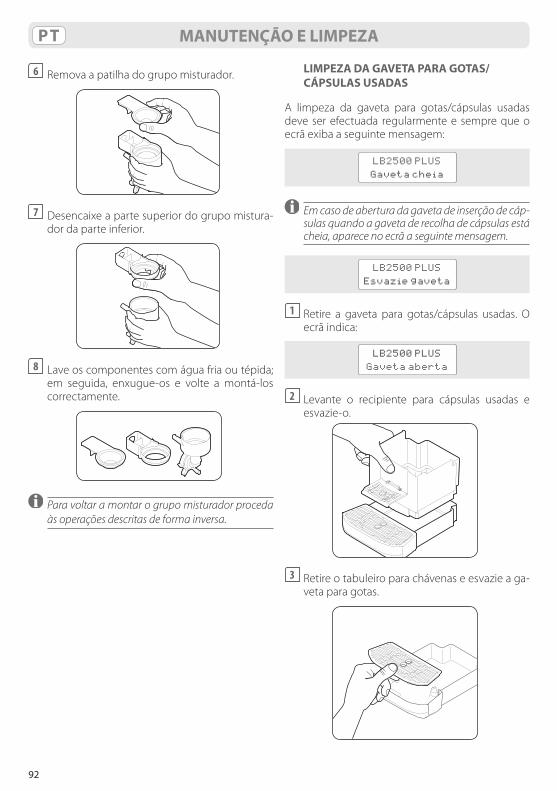
92
PT MANUTENÇÃO E LIMPEZA
6 Remova a patilha do grupo misturador.
7 Desencaixe a parte superior do grupo mistura-
dor da parte inferior.
8 Lave os componentes com água fria ou tépida;
em seguida, enxugue-os e volte a montá-los correctamente.
Para voltar a montar o grupo misturador proceda às operações descritas de forma inversa.
LIMPEZA DA GAVETA PARA GOTAS/CÁPSULAS USADAS
A limpeza da gaveta para gotas/cápsulas usadas deve ser efectuada regularmente e sempre que o ecrã exiba a seguinte mensagem:
LB2500 PLUS
Gaveta cheia
Em caso de abertura da gaveta de inserção de cáp-sulas quando a gaveta de recolha de cápsulas está cheia, aparece no ecrã a seguinte mensagem.
LB2500 PLUS
Esvazie gaveta
1 Retire a gaveta para gotas/cápsulas usadas. O ecrã indica:
LB2500 PLUS
Gaveta aberta
2 Levante o recipiente para cápsulas usadas e esvazie-o.
3 Retire o tabuleiro para chávenas e esvazie a ga-
veta para gotas.
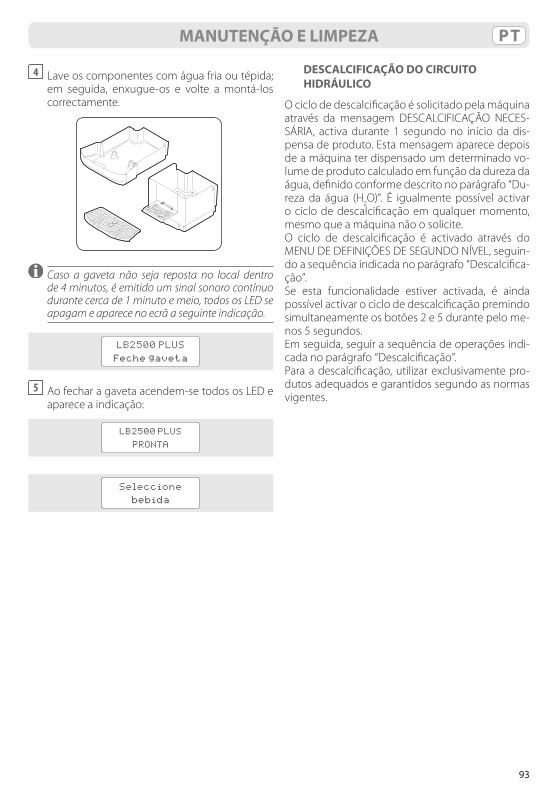
93
PT
4 Lave os componentes com água fria ou tépida; em seguida, enxugue-os e volte a montá-los correctamente.
Caso a gaveta não seja reposta no local dentro de 4 minutos, é emitido um sinal sonoro contínuo durante cerca de 1 minuto e meio, todos os LED se apagam e aparece no ecrã a seguinte indicação.
LB2500 PLUS
Feche gaveta
5 Ao fechar a gaveta acendem-se todos os LED e aparece a indicação:
LB2500 PLUS
PRONTA
Seleccione
bebida
MANUTENÇÃO E LIMPEZA
DESCALCIFICAÇÃO DO CIRCUITO HIDRÁULICO
O ciclo de descalcificação é solicitado pela máquina através da mensagem DESCALCIFICAÇÃO NECES-SÁRIA, activa durante 1 segundo no início da dis-pensa de produto. Esta mensagem aparece depois de a máquina ter dispensado um determinado vo-lume de produto calculado em função da dureza da água, definido conforme descrito no parágrafo “Du-reza da água (H2O)”. É igualmente possível activar o ciclo de descalcificação em qualquer momento, mesmo que a máquina não o solicite.O ciclo de descalcificação é activado através do MENU DE DEFINIÇÕES DE SEGUNDO NÍVEL, seguin-do a sequência indicada no parágrafo “Descalcifica-ção”.Se esta funcionalidade estiver activada, é ainda possível activar o ciclo de descalcificação premindo simultaneamente os botões 2 e 5 durante pelo me-nos 5 segundos.Em seguida, seguir a sequência de operações indi-cada no parágrafo “Descalcificação”.Para a descalcificação, utilizar exclusivamente pro-dutos adequados e garantidos segundo as normas vigentes.
94
PT MENSAGENS DE ALARME NO ECRÃ
Ecrã Estado da máquina Eventos SoluçõesLAVAZZA LB PLUSGaveta cheia
Gaveta para cápsulas usadas cheia
É possível a distribuiçãode produtos solúveis
Esvazie e lave a gaveta
LAVAZZA LB PLUSGaveta aberta
Abertura da gaveta com a máquina quente
Não é possível efectuar a distribuição
Feche a gaveta
ATENÇÃOFalta de água
Falta água no depósito ou falta o depósito
Botões de selecção intermitentes
Encha o depósito com água potável, fria e sem gás
ATENÇÃOPorta aberta
Porta do produto so-lúvel aberta
Não é possível efectuar a distribuição
Feche a porta do produto solúvel
TEMPERATURA EXCEDIDA AGUARDE
Temperatura demasiado elevada
Não é possível efectuar a distribuição
Aguarde o arrefecimento. Se a mensagem não desaparecer, contacte a assistência técnica
AGUARDEARREFECIMENTO
Componentes da máquina em fase de arrefecimento
Não é possível efectuar a distribuição
Aguarde o arrefecimento. Se a mensagem não desaparecer, contacte a assistência técnica
CRÉDITO EXCEDIDO
Crédito excedidoNão é possível efectuar a distribuição
Recarregue o crédito
TEMPO LIMITE DE DISTRIB. EXCEDIDO
Distribuição terminada por ausência de fluxo de água
Distribuição de produto incompleta
Efectue o procedimento de descarga de bombas. Caso a mensagem se mantenha ou não se efectue a descarga, contacte a assistência técnica
INSIRACRÉDITO
Insira crédito quando as distribuições forem a pagar e faltar o crédito
Não é possível efectuar a distribuição
Recarregue o crédito
ALARME AQUECIMENTO
O aquecimento não ocorre
Não é possível efectuar a distribuição
Contacte a assistência técnica
AVARIA DO FLUXÓMETRO
Fluxómetro avariado, número de impulsos não atingido
Não é possível efectuar a distribuição
Contacte a assistência técnica
ALARMESONDA
Alarme sonda (no mínimo ou aberta)
Não é possível efectuar a distribuição
Contacte a assistência técnica
DESCARGA DE BOMBASNEGATIVA
Resultado negativo da descarga das bombas
-
Repita a operação. Em caso de resultado negativo, contacte a assistência técnica
DESCALCIFICAÇÃO NECESSÁRIA
A máquina precisa de descalcificação do circuito hidráulico
-
Executar o ciclo de descalcificação conforme descrito em capítulo “Manutenção e limpeza”
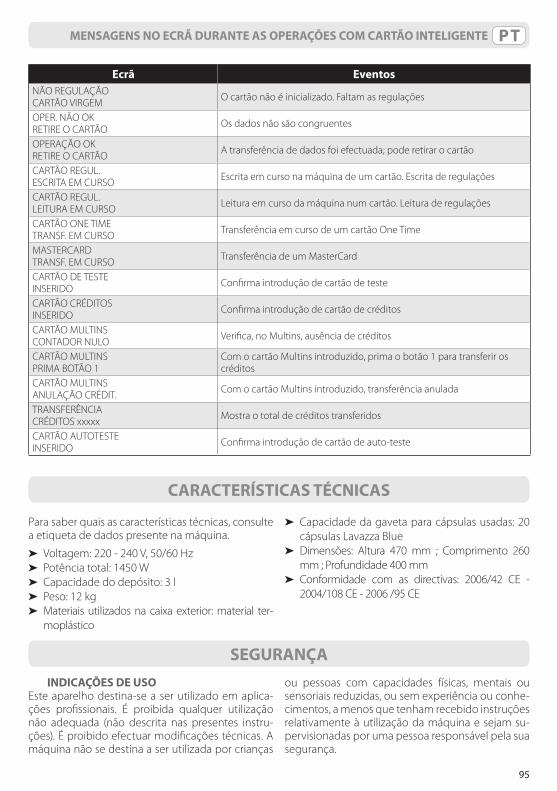
95
PTMENSAGENS NO ECRÃ DURANTE AS OPERAÇÕES COM CARTÃO INTELIGENTE
Ecrã EventosNÃO REGULAÇÃOCARTÃO VIRGEM O cartão não é inicializado. Faltam as regulações
OPER. NÃO OKRETIRE O CARTÃO Os dados não são congruentes
OPERAÇÃO OKRETIRE O CARTÃO A transferência de dados foi efectuada; pode retirar o cartão
CARTÃO REGUL.ESCRITA EM CURSO Escrita em curso na máquina de um cartão. Escrita de regulações
CARTÃO REGUL.LEITURA EM CURSO Leitura em curso da máquina num cartão. Leitura de regulações
CARTÃO ONE TIMETRANSF. EM CURSO Transferência em curso de um cartão One Time
MASTERCARDTRANSF. EM CURSO Transferência de um MasterCard
CARTÃO DE TESTEINSERIDO Confirma introdução de cartão de teste
CARTÃO CRÉDITOSINSERIDO Confirma introdução de cartão de créditos
CARTÃO MULTINSCONTADOR NULO Verifica, no Multins, ausência de créditos
CARTÃO MULTINSPRIMA BOTÃO 1
Com o cartão Multins introduzido, prima o botão 1 para transferir os créditos
CARTÃO MULTINSANULAÇÃO CRÉDIT. Com o cartão Multins introduzido, transferência anulada
TRANSFERÊNCIACRÉDITOS xxxxx Mostra o total de créditos transferidos
CARTÃO AUTOTESTE INSERIDO Confirma introdução de cartão de auto-teste
SEGURANÇA
CARACTERÍSTICAS TÉCNICAS
Para saber quais as características técnicas, consulte a etiqueta de dados presente na máquina.
➤ Voltagem: 220 - 240 V, 50/60 Hz➤ Potência total: 1450 W➤ Capacidade do depósito: 3 l➤ Peso: 12 kg➤ Materiais utilizados na caixa exterior: material ter-
moplástico
➤ Capacidade da gaveta para cápsulas usadas: 20 cápsulas Lavazza Blue
➤ Dimensões: Altura 470 mm ; Comprimento 260 mm ; Profundidade 400 mm
➤ Conformidade com as directivas: 2006/42 CE - 2004/108 CE - 2006 /95 CE
INDICAÇÕES DE USOEste aparelho destina-se a ser utilizado em aplica-ções profissionais. É proibida qualquer utilização não adequada (não descrita nas presentes instru-ções). É proibido efectuar modificações técnicas. A máquina não se destina a ser utilizada por crianças
ou pessoas com capacidades físicas, mentais ou sensoriais reduzidas, ou sem experiência ou conhe-cimentos, a menos que tenham recebido instruções relativamente à utilização da máquina e sejam su-pervisionadas por uma pessoa responsável pela sua segurança.
96
PT SEGURANÇA
LOCALIZAÇÃOColoque a máquina para café em local seguro, so-bre uma superfície plana, horizontal e estável onde ninguém possa magoar-se ou fazê-la tombar. Não mantenha a máquina a temperaturas abaixo dos 4 °C, uma vez que o gelo pode danificá-la. Não utilize a máquina de café ao ar livre. Não pouse a máquina sobre superfícies muito quentes e/ou nas proximi-dades de chamas vivas. Utilize a máquina à tempe-ratura ambiente.
ALIMENTAÇÃOLigue a máquina de café apenas a uma tomada eléctrica adequada. A tensão eléctrica deverá cor-responder à indicada na etiqueta da máquina.
CABO ELÉCTRICONão use a máquina de café se o cabo eléctrico es-tiver danificado ou tiver defeito. Caso tal aconteça, o mesmo deve ser imediatamente substituído. Não faça passar o cabo eléctrico por esquinas e arestas vivas nem sobre objectos muito quentes, e proteja--o do óleo. Não transporte ou puxe a máquina de café segurando-a pelo cabo eléctrico. Não extraia a ficha puxando pelo cabo e não toque na mesma com as mãos molhadas. Evite que o cabo eléctrico fique livremente suspenso de mesas ou prateleiras.
PERIGO DE ELECTROCUSSÃONão coloque nunca em contacto com a água as partes sob tensão eléctrica. Certifique-se de que as mãos, a máquina, o cabo eléctrico e a superfície de apoio da máquina não estão molhados.
PROTECÇÃO DE TERCEIROSMantenha as crianças sob vigilância para evitar que brinquem com o aparelho. As crianças não se dão conta do perigo associado aos electrodomésticos. Não deixe ao alcance das crianças os materiais utili-zados para embalar a máquina.
PERIGO DE QUEIMADURANão toque nas partes quentes (grupo porta-cápsu-las, etc.) imediatamente após a utilização do apare-lho. Durante a distribuição da bebida, preste aten-ção a eventuais salpicos de líquido quente.
LIMPEZAAntes de limpar a máquina, é indispensável retirar a ficha da tomada eléctrica e esperar que a máquina arrefeça. Não mergulhe a máquina na água! É rigo-rosamente proibido tentar efectuar qualquer inter-venção no interior da máquina. Não utilize a água presente no depósito para fins alimentares.
ARRUMAÇÃO DA MÁQUINAQuando a máquina não for utilizada durante um
período de tempo prolongado, retire a ficha da to-mada e arrume a máquina num lugar seco e não acessível a crianças. Proteja a máquina do pó e da sujidade.
REPARAÇÕES/MANUTENÇÃOEm caso de avaria, defeitos ou suspeita de defeitos depois de uma queda, retire de imediato a ficha da tomada. Não coloque em funcionamento uma máquina com defeito. Apenas os Centros de Assis-tência Técnica Autorizados podem efectuar inter-venções e reparações na máquina. Caso ocorram intervenções que não estejam em conformidade com as normas do sector, declina-se qualquer res-ponsabilidade por eventuais danos.
DEPÓSITO DE ÁGUADeite no depósito apenas água fria potável, não ga-seificada. Não ponha a máquina em funcionamento se a água não ultrapassar, pelo menos, o nível míni-mo indicado no depósito.
ESPAÇO PARA CÁPSULASNo espaço para cápsulas só devem ser introduzi-das cápsulas Lavazza Blue monodose; não insira os dedos nem qualquer outro objecto. As cápsulas destinam-se a uma única utilização.
ELIMINAÇÃO DA MÁQUINA EM FIM DE VIDA (Directiva Europeia 2002/96/CE – D. L. de 25 de Julho de 2005 n.º 151)
O símbolo do caixote do lixo aposto no dispositivo e/ou na embalagem do mesmo indica que, ao che-gar ao final da vida útil, o produto não deve ser dei-tado fora juntamente com os resíduos normais. A máquina deve ser entregue num dos centros de re-colha selectiva específicos para resíduos eléctricos e electrónicos existentes no território nacional, ou entregue ao revendedor no momento de aquisição de um novo equipamento equivalente, na razão de um para um.O utilizador da máquina é responsável pela entrega da mesma nas instalações adequadas de recolha, sob pena de sanção prevista pela legislação vigente nesta matéria. A adequada recolha selectiva destes equipamentos para reciclagem e/ou eliminação compatíveis com o ambiente, contribui para evitar possíveis efeitos negativos no ambiente e na saúde, além de favorecer a reutilização e/ou reciclagem dos materiais que compõem a máquina. Para ob-ter informações mais detalhadas sobre o sistema de recolha disponível, consulte o serviço local de elimi-nação de resíduos ou o revendedor onde efectuou a aquisição da máquina.
97
NLINDEX
INDEX .................................................................................................................................................................................. 97ONDERDELEN .................................................................................................................................................................. 98BERICHTEN OP DE DISPLAY OVER STATUS VAN HET APPARAAT ............................................................ 98INSTELLING MACHINE ................................................................................................................................................ 99
UITPAKKEN EN POSITIONEREN ................................................................................................................................................................................... 99HET OPSTARTEN VAN HET APPARAAT .................................................................................................................................................................... 99
INSTELLINGENMENU .................................................................................................................................................101INSTELLINGENMENU EERSTE NIVEAU ..................................................................................................................................................................101RESTTEGOEDEN .................................................................................................................................................................................................................................................... 101INSTELLING DOSES .............................................................................................................................................................................................................................................. 101INSTELLINGENMENU TWEEDE NIVEAU ...............................................................................................................................................................102TAALKEUZEA ........................................................................................................................................................................................................................................................... 102ONTKALKING........................................................................................................................................................................................................................................................... 102HARDHEID H2O ...................................................................................................................................................................................................................................................... 103DELTA TEMP ............................................................................................................................................................................................................................................................. 103PASSWORD WIJZIGEN........................................................................................................................................................................................................................................ 103ENERGY SAVING .................................................................................................................................................................................................................................................... 104OPSTARTEN VAN DE POMPEN ...................................................................................................................................................................................................................... 104VERIFICATIE VAN DE CARD .............................................................................................................................................................................................................................. 104TELLER ......................................................................................................................................................................................................................................................................... 104
BEREIDING DRANKEN ...............................................................................................................................................105INSTELLING VOOR DE BEREIDING VAN DE DRANKEN ................................................................................................................................105AFGIFTE DRANKEN ..........................................................................................................................................................................................................105ESPRESSO .................................................................................................................................................................................................................................................................. 105ESPRESSO LUNGO ................................................................................................................................................................................................................................................ 106ESPRESSO MACCHIATO .................................................................................................................................................................................................................................... 106DRANK MET DE SMAAK LATTE MACCHIATO/CAPPUCCINO ...................................................................................................................................................... 106WARME DRANKEN MET CAPSULE.............................................................................................................................................................................................................. 106
ONDERHOUD EN REINIGING ..................................................................................................................................107HANDMATIGE REINIGING MIXERGROEP .............................................................................................................................................................107REINIGING LEKBAK/CAPSULELADE ........................................................................................................................................................................108ONTKALKING HYDRAULISCH CIRCUIT .................................................................................................................................................................109
ALARMBERICHTEN OP HET DISPLAY .................................................................................................................110MESSBERICHTEN OP HET DISPLAY TIJDENS DE HANDELINGEN MET DE CHIP CARD ................111TECHNISCHE KARAKTERISTIEKEN ......................................................................................................................111VEILIGHEID .....................................................................................................................................................................111
GEBRUIKSBESTEMMING ................................................................................................................................................................................................111POSITIONERING .................................................................................................................................................................................................................112VOEDING ................................................................................................................................................................................................................................112VOEDINGSNOER ................................................................................................................................................................................................................112ELEKTROCUTIEGEVAAR .................................................................................................................................................................................................112BESCHERMING VAN DERDEN ....................................................................................................................................................................................112GEVAAR OP BRANDWONDEN ...................................................................................................................................................................................112REINIGING ..............................................................................................................................................................................................................................112HET BEWAREN VAN HET APPARAAT ......................................................................................................................................................................112REPARATIES / ONDERHOUD .......................................................................................................................................................................................112WATERRESERVOIR .............................................................................................................................................................................................................112CAPSULEBAKJE ..................................................................................................................................................................................................................112VERWIJDERING VAN HET APPARAAT NA EINDE LEVENSDUUR(Europese Richtlijn 2002/96/EG - Wetsbesluit nr. 151 van 25 juli 2005) .........................................................................................112
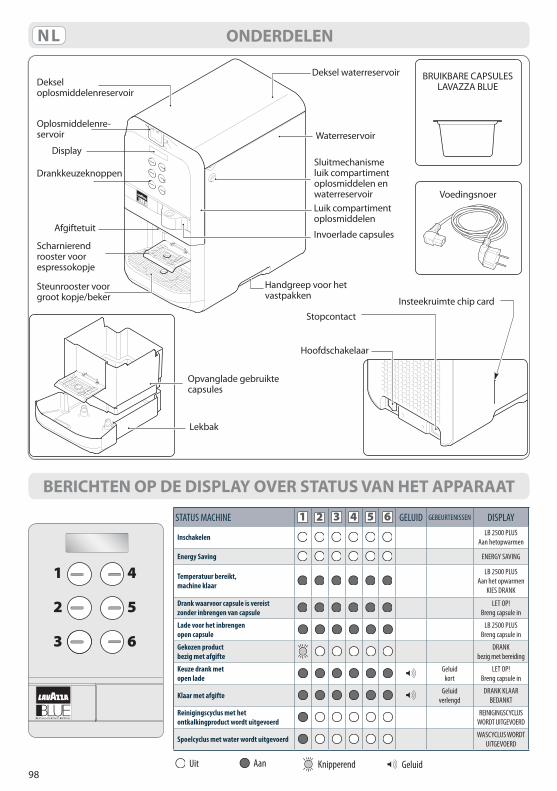
98
NL ONDERDELEN
BERICHTEN OP DE DISPLAY OVER STATUS VAN HET APPARAAT
Deksel oplosmiddelenreservoir
Deksel waterreservoir BRUIKBARE CAPSULES LAVAZZA BLUE
Invoerlade capsules
Handgreep voor het vastpakken
Stopcontact
Hoofdschakelaar
Insteekruimte chip card
Waterreservoir
Sluitmechanisme luik compartiment oplosmiddelen en waterreservoirLuik compartiment oplosmiddelen
Voedingsnoer
Oplosmiddelenre-servoir
Display
Drankkeuzeknoppen
Afgiftetuit
Scharnierendrooster voor espressokopje
Steunrooster voor groot kopje/beker
Opvanglade gebruikte capsules
Lekbak
GeluidKnipperendAanUit
1
2
3
4
5
6
STATUS MACHINE 1 2 3 4 5 6 GELUID GEBEURTENISSEN DISPLAY
Inschakelen LB 2500 PLUSAan hetopwarmen
Energy Saving ENERGY SAVING
Temperatuur bereikt,machine klaar
LB 2500 PLUSAan het opwarmen
KIES DRANK
Drank waarvoor capsule is vereistzonder inbrengen van capsule
LET OP!Breng capsule in
Lade voor het inbrengenopen capsule
LB 2500 PLUSBreng capsule in
Gekozen product bezig met afgifte
DRANKbezig met bereiding
Keuze drank metopen lade
Geluidkort
LET OP!Breng capsule in
Klaar met afgifte Geluidverlengd
DRANK KLAARBEDANKT
Reinigingscyclus met het ontkalkingproduct wordt uitgevoerd
REINIGINGSCYCLUS WORDT UITGEVOERD
Spoelcyclus met water wordt uitgevoerd WASCYCLUS WORDT UITGEVOERD
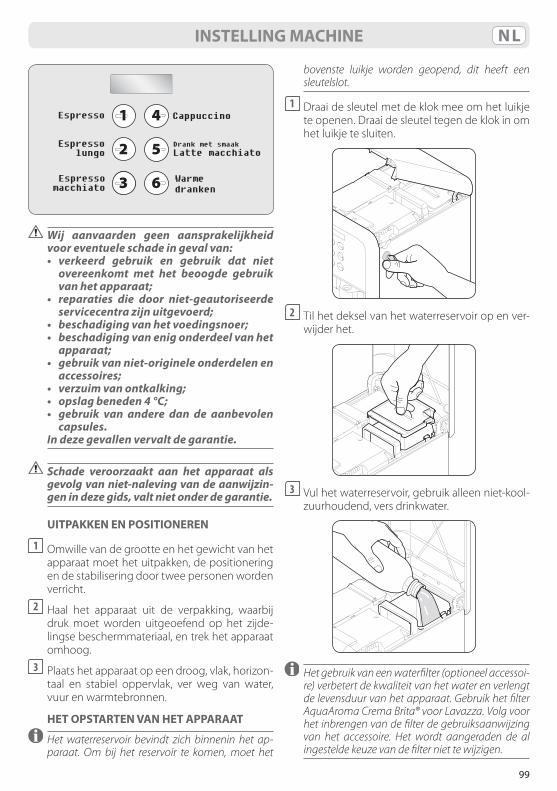
99
NLINSTELLING MACHINE
Cappuccino
Drank met smaak Latte macchiato
6
5
4
3
2
1
Warmedranken
Espressomacchiato
Espressolungo
Espresso
Wij aanvaarden geen aansprakelijkheidvoor eventuele schade in geval van:
• verkeerd gebruik en gebruik dat nietovereenkomt met het beoogde gebruik van het apparaat;
• reparaties die door niet-geautoriseerdeservicecentrazijnuitgevoerd;
• beschadigingvanhetvoedingsnoer; • beschadigingvanenigonderdeelvanhet
apparaat; • gebruikvanniet-origineleonderdelenen
accessoires; • verzuimvanontkalking; • opslagbeneden4°C; • gebruik van andere dan de aanbevolen
capsules. In deze gevallen vervalt de garantie.
Schade veroorzaakt aan het apparaat als gevolgvanniet-nalevingvandeaanwijzin-gen in deze gids, valt niet onder de garantie.
UITPAKKEN EN POSITIONEREN
1 Omwille van de grootte en het gewicht van het apparaat moet het uitpakken, de positionering en de stabilisering door twee personen worden verricht.
2 Haal het apparaat uit de verpakking, waarbij druk moet worden uitgeoefend op het zijde-lingse beschermmateriaal, en trek het apparaat omhoog.
3 Plaats het apparaat op een droog, vlak, horizon-taal en stabiel oppervlak, ver weg van water, vuur en warmtebronnen.
HET OPSTARTEN VAN HET APPARAAT
Het waterreservoir bevindt zich binnenin het ap-paraat. Om bij het reservoir te komen, moet het
bovenste luikje worden geopend, dit heeft een sleutelslot.
1 Draai de sleutel met de klok mee om het luikje te openen. Draai de sleutel tegen de klok in om het luikje te sluiten.
2 Til het deksel van het waterreservoir op en ver-
wijder het.
3 Vul het waterreservoir, gebruik alleen niet-kool-
zuurhoudend, vers drinkwater.
Het gebruik van een waterfilter (optioneel accessoi-re) verbetert de kwaliteit van het water en verlengt de levensduur van het apparaat. Gebruik het filter AquaAroma Crema Brita® voor Lavazza. Volg voor het inbrengen van de filter de gebruiksaanwijzing van het accessoire. Het wordt aangeraden de al ingestelde keuze van de filter niet te wijzigen.
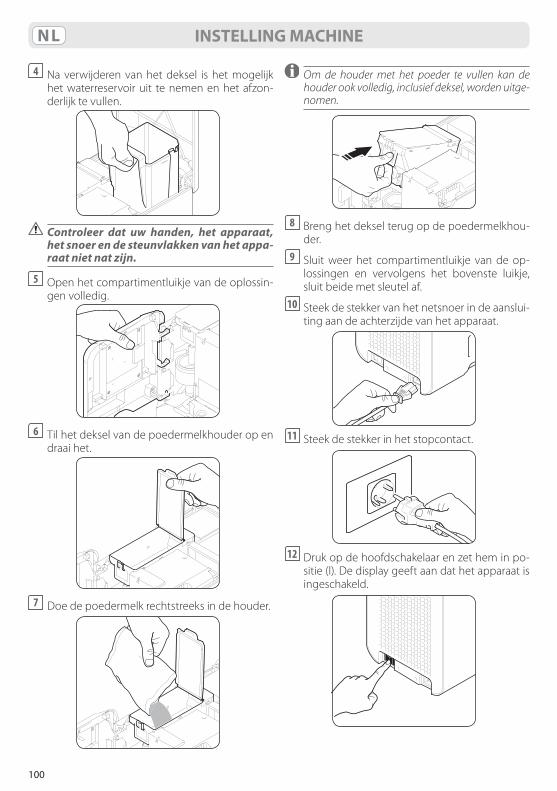
100
NL INSTELLING MACHINE
4 Na verwijderen van het deksel is het mogelijk het waterreservoir uit te nemen en het afzon-derlijk te vullen.
Controleer dat uw handen, het apparaat, het snoer en de steunvlakken van het appa-raatnietnatzijn.
5 Open het compartimentluikje van de oplossin-gen volledig.
6 Til het deksel van de poedermelkhouder op en
draai het.
7 Doe de poedermelk rechtstreeks in de houder.
Om de houder met het poeder te vullen kan de houder ook volledig, inclusief deksel, worden uitge-nomen.
8 Breng het deksel terug op de poedermelkhou-
der.9 Sluit weer het compartimentluikje van de op-
lossingen en vervolgens het bovenste luikje, sluit beide met sleutel af.
10 Steek de stekker van het netsnoer in de aanslui-ting aan de achterzijde van het apparaat.
11 Steek de stekker in het stopcontact.
12 Druk op de hoofdschakelaar en zet hem in po-
sitie (l). De display geeft aan dat het apparaat is ingeschakeld.
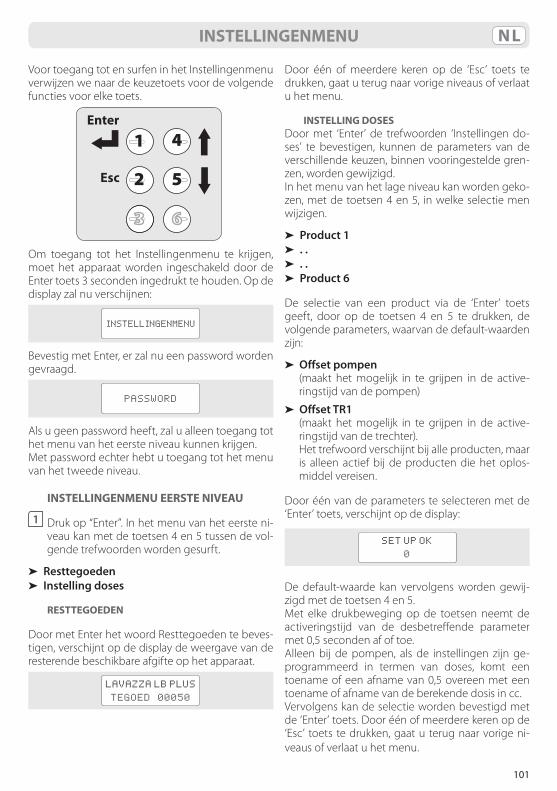
101
NLINSTELLINGENMENU
Voor toegang tot en surfen in het Instellingenmenu verwijzen we naar de keuzetoets voor de volgende functies voor elke toets.
1
2
3
4
5
6
Esc
Enter
Om toegang tot het Instellingenmenu te krijgen, moet het apparaat worden ingeschakeld door de Enter toets 3 seconden ingedrukt te houden. Op de display zal nu verschijnen:
INSTELLINGENMENU
Bevestig met Enter, er zal nu een password worden gevraagd.
PASSWORD
Als u geen password heeft, zal u alleen toegang tot het menu van het eerste niveau kunnen krijgen. Met password echter hebt u toegang tot het menu van het tweede niveau.
INSTELLINGENMENU EERSTE NIVEAU
1 Druk op “Enter”. In het menu van het eerste ni-veau kan met de toetsen 4 en 5 tussen de vol-gende trefwoorden worden gesurft.
➤ Resttegoeden➤ Instelling doses
RESTTEGOEDEN
Door met Enter het woord Resttegoeden te beves-tigen, verschijnt op de display de weergave van de resterende beschikbare afgifte op het apparaat.
LAVAZZA LB PLUS
TEGOED 00050
Door één of meerdere keren op de ‘Esc’ toets te drukken, gaat u terug naar vorige niveaus of verlaat u het menu.
INSTELLING DOSESDoor met ‘Enter’ de trefwoorden ‘Instellingen do-ses’ te bevestigen, kunnen de parameters van de verschillende keuzen, binnen vooringestelde gren-zen, worden gewijzigd.In het menu van het lage niveau kan worden geko-zen, met de toetsen 4 en 5, in welke selectie men wijzigen.
➤ Product 1➤ . .➤ . .➤ Product 6
De selectie van een product via de ‘Enter’ toets geeft, door op de toetsen 4 en 5 te drukken, de volgende parameters, waarvan de default-waarden zijn:
➤ Offset pompen (maakt het mogelijk in te grijpen in de active-
ringstijd van de pompen)
➤ Offset TR1 (maakt het mogelijk in te grijpen in de active-
ringstijd van de trechter). Het trefwoord verschijnt bij alle producten, maar
is alleen actief bij de producten die het oplos-middel vereisen.
Door één van de parameters te selecteren met de ‘Enter’ toets, verschijnt op de display:
SET UP OK
0
De default-waarde kan vervolgens worden gewij-zigd met de toetsen 4 en 5.Met elke drukbeweging op de toetsen neemt de activeringstijd van de desbetreffende parameter met 0,5 seconden af of toe.Alleen bij de pompen, als de instellingen zijn ge-programmeerd in termen van doses, komt een toename of een afname van 0,5 overeen met een toename of afname van de berekende dosis in cc. Vervolgens kan de selectie worden bevestigd met de ‘Enter’ toets. Door één of meerdere keren op de ‘Esc’ toets te drukken, gaat u terug naar vorige ni-veaus of verlaat u het menu.
102
NL INSTELLINGENMENU
INSTELLINGENMENU TWEEDE NIVEAU
Het instellingenmenu van het tweede niveau is voorbehouden aan gekwalificeerd en geautori-seerd personeel.
1 Toets het password in en druk vervolgens op ‘Enter’. Het default-password is 33333.
In het menu van het tweede niveau kan met de toetsen 4 en 5 tussen de volgende trefwoorden worden gesurft.
➤ Taalkeuze➤ Ontkalking➤ Hardheid H2O➤ Delta Temp➤ Password wijzigen➤ Energy saving➤ Opstarten van de pompen➤ Card verificatie➤ Teller
TAALKEUZEA
Door met ‘Enter’ de ‘Taalkeuze’ te bevestigen, kun-nen de taal van het menu en van de displaymeldin-gen worden gewijzigd.In het menu van het laagste niveau kan de gewens-te taal worden gekozen door op de toetsen 4 en 5 te drukken en de taal te kiezen door op ‘Enter’ te drukken.
➤ Italiano➤ English➤ Français➤ Deutsch➤ Espanõl➤ Português➤ Nederlands
Door één of meerdere keren op de ‘Esc’ toets te drukken, gaat u terug naar vorige niveaus of verlaat u het menu.
ONTKALKING
De ontkalkingcyclus kan op elk moment worden geactiveerd, ook wanneer de machine er niet om vraagt. Na met ‘Enter’ ‘Ontkalking’ te hebben beves-tigd, zal over de display het volgende bericht gaan lopen.
ONTKALKING
DOE HET ONTKALKINGSPRODUCT
IN HET RESERVOIR EN DRUK
OP OK
De afgifte van dranken is niet mogelijk zolang de cyclus niet is voltooid.
Volg nu de volgende aanwijzingen op.
1 Vul het reservoir met het met water verdunde ontkalkingproduct volgens de hoeveelheden vermeld in de instructies van het product.
2 Plaats een zo groot mogelijke bak onder de af-giftetuit.
3 Druk vervolgens op “Enter”; nu worden de pom-pen geactiveerd en via de afgiftetuit stroomt de ontkalkingoplossing naar buiten die zijn werking in het circuit van de machine heeft verricht. Op de display verschijnt het bericht:
REINIGINGSCYCLUS
WORDT UITGEVOERD
• Drink de ontkalkingoplossing niet enloop niet het risico dat het door een ander wordt gedronken.
• Gevaar van brandwonden, de ontkal-kingoplossingwordtafgegevenbijhogetemperatuur.
4 De machine zal de totale hoeveelheid oplos-sing afgeven. Het is echter mogelijk, door op “Enter” te drukken, om de cyclus tijdelijk te on-derbreken om de inhoud van de bak die wordt gebruikt voor het opvangen van de oplossing te legen en af te voeren. Om de doelmatigheid van de werking van het ontkalkingproduct te verhogen wordt het aangeraden om na ca. elke twee minuten van continue afgifte de cyclus ca. één minuut te onderbreken, hiertoe moet op “Enter” worden gedrukt.
5 Plaats de geleegde bak terug onder de afgifte-tuit.
6 Druk op “Enter” om de cyclus opnieuw op te starten.
In het geval van een elektrische stroomstoring tij-dens de ontkalkingcyclus, zal de machine bij de volgende nieuwe inschakeling, automatisch terug-gaan naar de beginpositie van de cyclus.
7 Bij het legen van het reservoir verschijnt op de display het bericht:
103
NLINSTELLINGENMENU
SPOEL
RESERVOIR
Afgewisseld met het bericht:
VUL
RESERVOIR
8 Spoel en was dus het reservoir zorgvuldig met vers drinkwater.
Vul het reservoir altijd bij met niet-koolzuurhou-dend, vers drinkwater Op de display verschijnt het bericht:
BEGIN MET
SPOELEN
9 Plaats zo groot mogelijke bak onder de afgifte-tuit.
10 Druk op “Enter” om het spoelen van het hydrau-lische circuit van de machine te starten, op de display verschijnt het bericht:
WASCYCLUS WORDT
UITGEVOERD
11 De machine zal al het water afgeven. Het is ech-ter mogelijk, door op “Enter” te drukken, om de cyclus tijdelijk te onderbreken om de inhoud van de bak die wordt gebruikt voor het opvan-gen van het water te legen en af te voeren.
12 Plaats de geleegde bak terug onder de afgifte-tuit.
13 Druk op “Enter” om de cyclus opnieuw op te starten.
14 De machine kan vragen om opnieuw het re-servoir te vullen in het geval dat niet de totale hoeveelheid water is bereikt. In dit geval is de signalering die welke onder punt 7 wordt aan-gegeven. Ga vervolgens verder vanaf punt 8 om de cyclus te voltooien.
15 Wanneer de machine de totale hoeveelheid water heeft afgegeven, wordt het volgende be-richt weergegeven:
ONTKALKING
VOLTOOID
De afgifte van dranken is vervolgens weer mogelijk, vul het reservoir altijd bij met niet-koolzuurhou-dend, vers drinkwater.
HARDHEID H2O
Na met ‘Enter’ ‘HARDHEID H2O’ te hebben beves-tigd, kan men de waarde van de hardheid van het water invoeren die het water op de locatie van de machine heeft.Deze waarde is meetbaar met speciale teststrookjes die in de handel verkrijgbaar zijn.Met behulp van toetsen 4 en 5 kan een waarde worden ingevoerd binnen een range van 5 tot 50 Franse graden.De defaultwaarde is ingesteld op 20 Franse graden. Als u een waterfilter gebruikt, stel dan een hard-heidswaarde van het water in afhankelijk van het reducerende vermogen van de filter.
DELTA TEMP
Na met ‘Enter’ ‘Delta Temp’ te hebben bevestigd, kan men de bedrijfstemperatuur van de ketel wij-zigen zodat de temperatuur van het af te geven product enigszins is te verhogen of te verlagen. Met behulp van toetsen 4 en 5 kan de waarde worden verhoogd of verlaagd binnen een range van ± 4 °C.
PASSWORD WIJZIGEN
Na met ‘Enter’ ‘Password wijzigen’ te hebben beves-tigd, verschijnt op de display:
PASSWORD
Na het password te hebben ingegeven verschijnt de volgende melding:
PASSWORD WIJZIGEN
Nu kan het gewenste password worden ingegeven, dit moet uit 6 tekens bestaan.Vervolgens kan de selectie worden bevestigd met de ‘Enter’ toets. Door één of meerdere keren op de ‘Esc’ toets te drukken, gaat u terug naar vorige ni-veaus of verlaat u het menu.
104
NL INSTELLINGENMENU
ENERGY SAVING
Het apparaat is geprogrammeerd om naar de mo-dus energiebesparing te gaan na een bepaalde pe-riode van inactiviteit. De vooringestelde tijd is 2 uur.
In de modus Energy Saving meldt de display:
ENERGY SAVING
Om het apparaat terug in de gebruiksmodus te brengen, volstaat het om op een willekeurige keu-zetoets te drukken. Na Energy Saving met ‘Enter’ te hebben bevestigd, kan via de toetsen 4 en 5 tussen de volgende twee opties worden gekozen:
➤ Energy saving gedeactiveerd➤ Energy saving geactiveerd
Met de ‘Enter’ toets kan de activering of de deacti-vering van de Energy Saving worden gekozen. Door één of meerdere keren op de ‘Esc’ toets te drukken, gaat u terug naar vorige niveaus of verlaat u het menu.
OPSTARTEN VAN DE POMPEN
Na met ‘Enter’ ‘Opstarten van de pompen’ te heb-ben bevestigd, kan met de toetsen 4 en 5 tussen de volgende twee opties worden gekozen:
➤ Opstarten van de pompen geactiveerd➤ Opstarten van de pompen gedeactiveerd
Met de ‘Enter’ toets kan de activering of de deacti-vering van de functie worden gekozen. Door één of meerdere keren op de ‘Esc’ toets te drukken, gaat u terug naar vorige niveaus of verlaat u het menu. De functie opstarten van de pompen is uitvoerbaar, in modus machine gereed, door gelijktijdig op de toetsen 3 en 6 te drukken gedurende ten minste 3 seconden.
Er moet een kopje of een beker onder deafgifteopening worden geplaatst, op het rooster, alvorens de functie opstarten van de pompen te activeren.
Tijdens het opstarten verschijnt op de display het volgende bericht:
OPSTARTEN
POMP. AAN DE GANG
Naargelang de uitkomst van de procedure en aan het einde hiervan verschijnt op de display het vol-gende bericht.
OPSTART POMPEN
POSITIEF/NEGATIEF
Bij de eerste opstart of na lange tijd van inactiviteit zou het noodzakelijk kunnen zijn de accu hydrau-lisch op te laden. De functie, als deze eerst vanuit het menu wordt geactiveerd, wordt automatisch door het apparaat uitgevoerd middels het gelijk-tijdig drukken op de toetsen 3 en 6 gedurende ten minste 3 seconden.
VERIFICATIE VAN DE CARD
Met deze functie kan de bediener een chip card verifiëren, onafhankelijk van het gebruik ervan. Na met ‘Enter’ ‘Verificatie Card’ te hebben bevestigd, verschijnt op de display het volgende bericht.
CARD INGEVEN
Steek de chip card in de betreffende gleuf van het apparaat, de display geeft nu informatie over de card.Haal de chip card vervolgens uit en druk één of meerdere keren op toets ‘Esc’ om naar de vorige niveaus te gaan of om het menu te verlaten.
TELLER
Met deze functie kan het totaal van de afgifte en de statistieken van de verschillende selecties van het apparaat worden geanalyseerd.Na met ‘Enter’ ‘Teller’ te hebben bevestigd, kan langs de verschillende totaaltellers worden gescrold middels de toetsen 4 en 5.
➤ Tot. uitgevoerde afgifte 00079➤ Totaal product 1 uitgevoerd 000027➤ . .➤ . .➤ Totaal product 6 uitgevoerd 000008
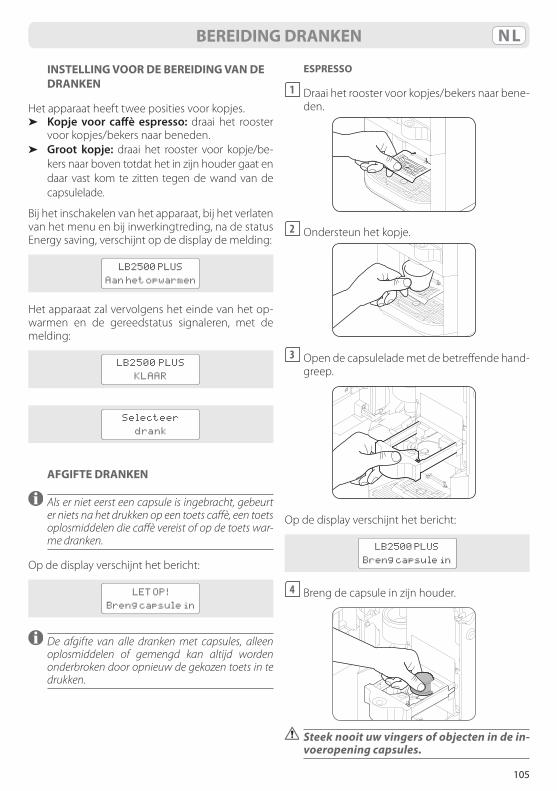
105
NLBEREIDING DRANKEN
INSTELLING VOOR DE BEREIDING VAN DE DRANKEN
Het apparaat heeft twee posities voor kopjes.➤ Kopje voor caffè espresso: draai het rooster
voor kopjes/bekers naar beneden.➤ Groot kopje: draai het rooster voor kopje/be-
kers naar boven totdat het in zijn houder gaat en daar vast kom te zitten tegen de wand van de capsulelade.
Bij het inschakelen van het apparaat, bij het verlaten van het menu en bij inwerkingtreding, na de status Energy saving, verschijnt op de display de melding:
LB2500 PLUS
Aan het opwarmen
Het apparaat zal vervolgens het einde van het op-warmen en de gereedstatus signaleren, met de melding:
LB2500 PLUS
KLAAR
Selecteer
drank
AFGIFTE DRANKEN
Als er niet eerst een capsule is ingebracht, gebeurt er niets na het drukken op een toets caffè, een toets oplosmiddelen die caffè vereist of op de toets war-me dranken.
Op de display verschijnt het bericht:
LET OP!
Breng capsule in
De afgifte van alle dranken met capsules, alleen oplosmiddelen of gemengd kan altijd worden onderbroken door opnieuw de gekozen toets in te drukken.
ESPRESSO
1 Draai het rooster voor kopjes/bekers naar bene-den.
2 Ondersteun het kopje.
3 Open de capsulelade met de betreffende hand-
greep.
Op de display verschijnt het bericht:
LB2500 PLUS
Breng capsule in
4 Breng de capsule in zijn houder.
Steeknooituwvingersofobjectenindein-voeropening capsules.

106
NL BEREIDING DRANKEN
In de invoeropening capsules mogen uit-sluitend capsules Lavazza Blue enkele dosis worden ingebracht. Breng één capsule te-gelijkin.
5 Sluit de capsulelade en wacht tot op de display het bericht verschijnt:
LB2500 PLUS
KLAAR
Selecteer
drank
6 Druk op de toets voor ESPRESSO. Op de display verschijnt het bericht:
Drank
bezig met bereiding
7 Wacht tot op de display het bericht verschijnt:
Drank klaar
Bedankt De koffie is klaar.
ESPRESSO LUNGO
1 Draai het rooster voor kopje/bekers naar boven totdat het in zijn houder gaat en daar vast komt te zitten tegen de wand van de capsulelade.
2 Voer de stappen 2, 3 en 4 van de paragraaf ES-
PRESSO uit.
3 Druk op de toets voor ESPRESSO LUNGO.4 Volg de punten 6 en 7 op van de paragraaf ES-
PRESSO.
ESPRESSO MACCHIATO
1 Plaats het kopje/de beker op het rooster.
2 Voer de punten 3 en 4 uit van de paragraaf ES-
PRESSO.
3 Druk op de toets voor ESPRESSO MACCHIATO.
4 Volg de punten 6 en 7 op van de paragraaf ES-PRESSO.
DRANK MET DE SMAAK LATTE MACCHIATO/CAPPUCCINO
1 Plaats het kopje/de beker op het rooster.
2 Voer de punten 3 en 4 uit van de paragraaf ES-PRESSO.
3 Druk op de toets voor CAPPUCCINO of voor de Drank met de smaak LATTE MACCHIATO.
4 Volg de punten 6 en 7 op van de paragraaf ES-PRESSO.
WARME DRANKEN MET CAPSULE
1 Plaats het kopje/de beker op het rooster.
2 Voer de punten 3 en 4 uit van de paragraaf ES-PRESSO.
3 Druk op de toets voor WARME DRANKEN.
4 Volg de punten 6 en 7 op van de paragraaf ES-PRESSO.
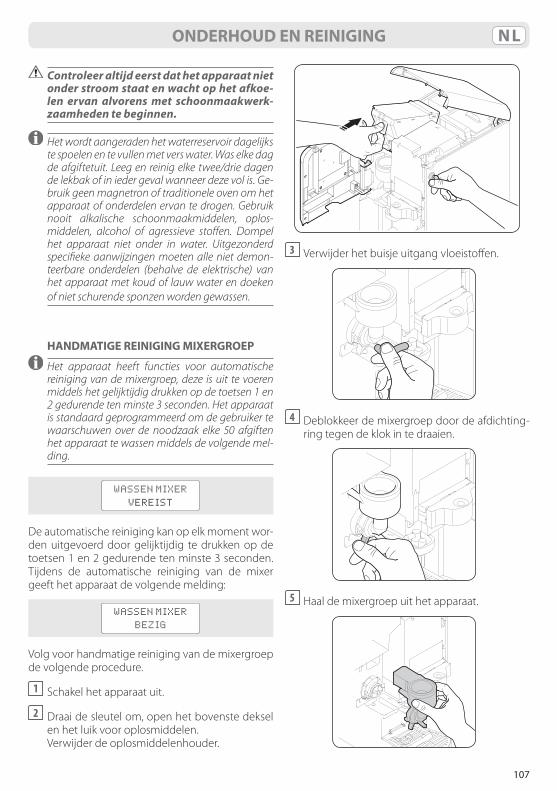
107
NLONDERHOUD EN REINIGING
Controleeraltijdeerstdathetapparaatnietonder stroom staat en wacht op het afkoe-len ervan alvorens met schoonmaakwerk-zaamheden te beginnen.
Het wordt aangeraden het waterreservoir dagelijks te spoelen en te vullen met vers water. Was elke dag de afgiftetuit. Leeg en reinig elke twee/drie dagen de lekbak of in ieder geval wanneer deze vol is. Ge-bruik geen magnetron of traditionele oven om het apparaat of onderdelen ervan te drogen. Gebruik nooit alkalische schoonmaakmiddelen, oplos-middelen, alcohol of agressieve stoffen. Dompel het apparaat niet onder in water. Uitgezonderd specifieke aanwijzingen moeten alle niet demon-teerbare onderdelen (behalve de elektrische) van het apparaat met koud of lauw water en doeken of niet schurende sponzen worden gewassen.
HANDMATIGE REINIGING MIXERGROEP
Het apparaat heeft functies voor automatische reiniging van de mixergroep, deze is uit te voeren middels het gelijktijdig drukken op de toetsen 1 en 2 gedurende ten minste 3 seconden. Het apparaat is standaard geprogrammeerd om de gebruiker te waarschuwen over de noodzaak elke 50 afgiften het apparaat te wassen middels de volgende mel-ding.
WASSEN MIXER
VEREIST
De automatische reiniging kan op elk moment wor-den uitgevoerd door gelijktijdig te drukken op de toetsen 1 en 2 gedurende ten minste 3 seconden. Tijdens de automatische reiniging van de mixer geeft het apparaat de volgende melding:
WASSEN MIXER
BEZIG
Volg voor handmatige reiniging van de mixergroep de volgende procedure.
1 Schakel het apparaat uit.
2 Draai de sleutel om, open het bovenste deksel en het luik voor oplosmiddelen.
Verwijder de oplosmiddelenhouder.
3 Verwijder het buisje uitgang vloeistoffen.
4 Deblokkeer de mixergroep door de afdichting-
ring tegen de klok in te draaien.
5 Haal de mixergroep uit het apparaat.
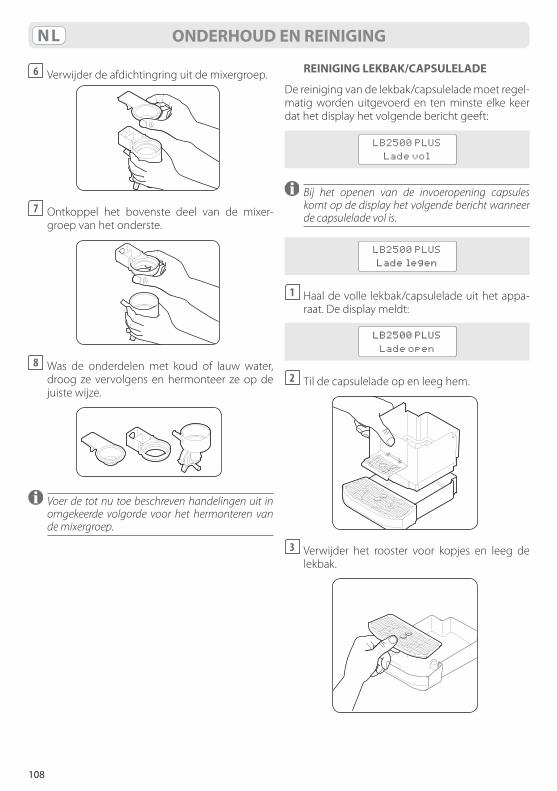
108
NL
6 Verwijder de afdichtingring uit de mixergroep.
7 Ontkoppel het bovenste deel van de mixer-
groep van het onderste.
8 Was de onderdelen met koud of lauw water,
droog ze vervolgens en hermonteer ze op de juiste wijze.
Voer de tot nu toe beschreven handelingen uit in omgekeerde volgorde voor het hermonteren van de mixergroep.
ONDERHOUD EN REINIGING
REINIGING LEKBAK/CAPSULELADE
De reiniging van de lekbak/capsulelade moet regel-matig worden uitgevoerd en ten minste elke keer dat het display het volgende bericht geeft:
LB2500 PLUS
Lade vol
Bij het openen van de invoeropening capsules komt op de display het volgende bericht wanneer de capsulelade vol is.
LB2500 PLUS
Lade legen
1 Haal de volle lekbak/capsulelade uit het appa-raat. De display meldt:
LB2500 PLUS
Lade open
2 Til de capsulelade op en leeg hem.
3 Verwijder het rooster voor kopjes en leeg de
lekbak.
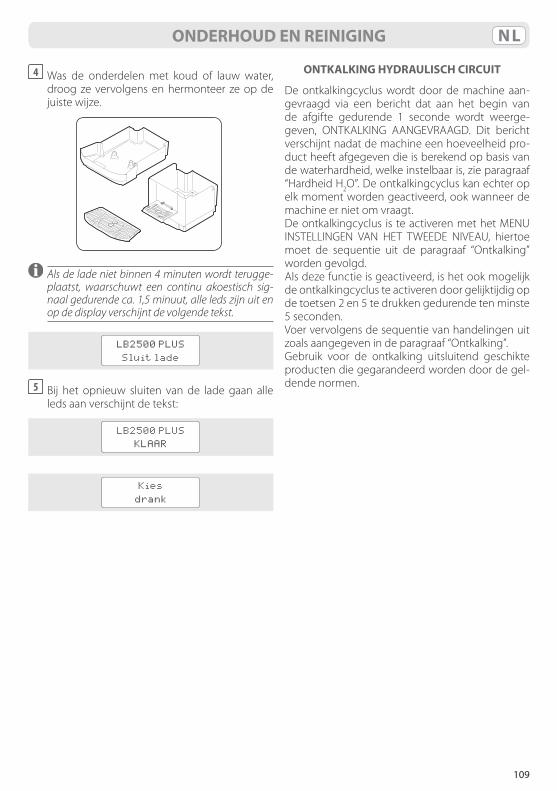
109
NL
4 Was de onderdelen met koud of lauw water, droog ze vervolgens en hermonteer ze op de juiste wijze.
Als de lade niet binnen 4 minuten wordt terugge-plaatst, waarschuwt een continu akoestisch sig-naal gedurende ca. 1,5 minuut, alle leds zijn uit en op de display verschijnt de volgende tekst.
LB2500 PLUS
Sluit lade
5 Bij het opnieuw sluiten van de lade gaan alle leds aan verschijnt de tekst:
LB2500 PLUS
KLAAR
Kies
drank
ONDERHOUD EN REINIGING
ONTKALKING HYDRAULISCH CIRCUIT
De ontkalkingcyclus wordt door de machine aan-gevraagd via een bericht dat aan het begin van de afgifte gedurende 1 seconde wordt weerge-geven, ONTKALKING AANGEVRAAGD. Dit bericht verschijnt nadat de machine een hoeveelheid pro-duct heeft afgegeven die is berekend op basis van de waterhardheid, welke instelbaar is, zie paragraaf “Hardheid H2O”. De ontkalkingcyclus kan echter op elk moment worden geactiveerd, ook wanneer de machine er niet om vraagt.De ontkalkingcyclus is te activeren met het MENU INSTELLINGEN VAN HET TWEEDE NIVEAU, hiertoe moet de sequentie uit de paragraaf “Ontkalking” worden gevolgd.Als deze functie is geactiveerd, is het ook mogelijk de ontkalkingcyclus te activeren door gelijktijdig op de toetsen 2 en 5 te drukken gedurende ten minste 5 seconden.Voer vervolgens de sequentie van handelingen uit zoals aangegeven in de paragraaf “Ontkalking”.Gebruik voor de ontkalking uitsluitend geschikte producten die gegarandeerd worden door de gel-dende normen.
110
NL ALARMBERICHTEN OP HET DISPLAY
Display Status machine Gebeurtenissen Oplossingen
LAVAZZA LB PLUSLade vol
Capsulelade is volAfgifte van oplosmiddelen is mogelijk
Leeg de lade en was hem
LAVAZZA LB PLUSLade open
Openen lade bij machine op temperatuur
Afgifte is niet mogelijk Sluit de lade
LET OPGeen water
Geen water in het reservoir of reservoir ontbreekt
Knippering van de keuzeknoppen
Vul het reservoir met niet-koolzuurhoudend, vers drinkwater
LET OPLuik open
Luik voor oplosmiddelen open
Afgifte is niet mogelijkSluit het luik oplosmiddelen
OVERVERHITTING WACHT
Temperatuur te hoog Afgifte is niet mogelijk
Wacht op afkoeling. Als het bericht niet verdwijnt, neem dan contact op met de hulpdienst
WACHT OPAFKOELING
Machineonderdelen in afkoelingsfase
Afgifte is niet mogelijk
Wacht op afkoeling. Als het bericht niet verdwijnt, neem dan contact op met hulpdienst
TEGOED VERBRUIKT
Tegoed verbruikt Afgifte is niet mogelijk Tegoed opladen
TIMEOUT AFGIFTE
Afgifte gestopt door afwezigheid stromend water
Afgifte product onvolledig
Voer de procedure opstarten pompen uit. In geval van aanblijven van het bericht of uitblijven van het opstarten, contact opnemen met de hulpdienst
BRENGTEGOED IN
Breng tegoed in bij betaalde afgifte zonder tegoed
Afgifte is niet mogelijk Tegoed opladen
ALARM OPWARMING
Opwarmen niet gebeurd
Afgifte is niet mogelijkNeem contact op met de hulpdienst
DEFECT AAN FLOW METER
Flow meter defect, aantal impulsen niet bereikt
Afgifte is niet mogelijkNeem contact op met de hulpdienst
ALARMSONDE
Alarm sonde (kortsluiting of open)
Afgifte is niet mogelijkNeem contact op met de hulpdienst
OPSTARTEN VAN POMPEN NEGATIEF
Negatieve uitkomst van het opstarten van de pompen
-
Herhaal de handeling. Neem contact met de hulpdienst bij een negatieve uitkomst
ONTKALKING AANGEVRAAGD
De machine vraagt te worden ontkalkt
-
Voer het ontkalkingscyclus, zoals beschreven in het hoofdstuk ‘Onderhoud en reiniging’
111
NLMESSBERICHTEN OP HET DISPLAY TIJDENS DE HANDELINGEN MET DE CHIP CARD
Display GebeurtenissenGEEN INSTELL.BLANCO-KAART De kaart is niet geïnitialiseerd. De instellingen ontbreken
HANDELINGEN KOVERWIJDER CARD De data komen niet overeen
HANDELING OKVERWIJDER CARD De dataoverdracht heeft plaatsgevonden, u kunt de card uitnemen
CARD SETTINGS WRITING Bezig met schrijven op machine vanaf een card. Het schrijven van instellingen
CARD SETTINGS READING Bezig met lezen vanuit het apparaat op een card. Het lezen van instellingen
ONE TIME CARD TRANSFER IN PROG. Bezig met overdracht vanaf een One Time card
MASTERCARD TRANSFER IN PROG. Overdracht vanaf een MasterCardTEST CARDOPGESLAGEN Bevestiging opslag test card
TEGOED CARDOPGESLAGEN Bevestiging opslag tegoed card
MULTINS CARDTELLER NUL Controle op Multins, geen tegoeden
MULTINS CARDDRUK OP TOETS 1
Druk op toets 1 voor de overdracht van de tegoeden met ingevoerde Multins card
MULTINS CARD CANCEL CREDITS Met ingevoerde Multins card, overdracht geannuleerd
OVERDRACHTTEGOEDEN xxxxx Weergave totaal overgedragen tegoeden
AUTOTEST CARDOPGESLAGEN Bevestiging opslag autotest card
VEILIGHEID
TECHNISCHE KARAKTERISTIEKENZie voor de technische karakteristieken het type-plaatje op het apparaat.
➤ Voltage: 220 - 240 V, 50/60 Hz➤ Totaal vermogen: 1450 W➤ Capaciteit reservoir: 3 l➤ Gewicht: 12 kg
➤ De buitenkant van het apparaat bestaat uit de vol-gende materialen: thermoplast
➤ Capaciteit capsulelade: 20 capsules Lavazza Blue➤ Afmetingen: Hoogte 470 mm ; Breedte 260 mm ;
Hoogte 400 mm➤ Conformiteit: 2006/42 CE - 2004/108 CE - 2006 /95
CE
GEBRUIKSBESTEMMINGDit apparaat is bestemd voor professioneel gebruik. Oneigenlijk gebruik (gebruik dat niet is beschreven in deze instructies) is verboden. Het is verboden technische wijzigingen aan te brengen. Het ap-paraat is niet bedoeld voor gebruik door kinderen
of personen met een beperkte fysieke, mentale of zintuiglijke vermogens of zonder ervaring en ken-nis, tenzij zij instructies hebben gekregen over het gebruik van het apparaat en zij worden begeleid door een persoon die verantwoordelijk is voor hun veiligheid.
112
NL VEILIGHEID
POSITIONERINGPlaats het koffie-apparaat op een veilige plek, op een vlak oppervlak, horizontaal en stabiel, waar hij niet kan worden omgestoten of personen kan ver-wonden. Houd het apparaat op een temperatuur van niet lager dan 4 °C, aangezien vorst schade kan toebrengen. Gebruik het koffie-apparaat niet bui-ten. Plaats het apparaat niet op zeer warme opper-vlakken en/of in de buurt van open vuur. Gebruik het apparaat bij kamertemperatuur.
VOEDINGSluit het koffie-apparaat alleen aan op een geschikt stopcontact. De spanning moet overeenkomen met die welke op het typeplaatje van het apparaat is aangegeven.
VOEDINGSNOERGebruik het koffie-apparaat niet als het voe-dingsnoer defect of beschadigd is. In een dergelijk geval dient hij meteen te worden vervangen. Leg de voedingskabel niet langs scherpe kanten en hoeken, op zeer warme objecten en bescherm hem tegen olie. Draag het apparaat niet of trek hem niet door het aan het snoer vast te houden. Trek de stek-ker er niet uit door aan het snoer te trekken; raak de stekker niet aan met natte handen. Vermijd dat het voedingsnoer van tafels of kasten kan vallen.
ELEKTROCUTIEGEVAARDe onder stroom staande delen nooit met water in contact brengen. Controleer dat uw handen, het apparaat, het snoer en de steunvlakken van het ap-paraat niet nat zijn.
BESCHERMING VAN DERDENHoud kinderen onder toezicht, om te vermijden dat ze met het apparaat gaan spelen. Kinderen be-seffen niet het gevaar verbonden met elektrische huishoudapparaten. Laat het verpakkingsmateriaal niet in de buurt van het apparaat.
GEVAAR OP BRANDWONDENRaak de warme delen niet aan (capsulehouder-groep, etc.) meteen na het gebruik van het appa-raat. Let op eventuele spatten warme vloeistof tij-dens de afgifte van de drank.
REINIGINGAlvorens het apparaat te reinigen moet de stek-ker uit het stopcontact worden gehaald en moet worden gewacht op het afkoelen van het apparaat. Dompel het apparaat niet onder in water! Het is streng verboden in het apparaat wijzigingen aan te brengen. Gebruik het water in het reservoir niet voor voedingsdoeleinden.
HET BEWAREN VAN HET APPARAATWanneer het apparaat voor langere tijd niet ge-bruikt wordt, haal dan de stekker uit het stopcon-tact en bewaar het apparaat op een droge plek, buiten het bereik van kinderen. Bescherm het ap-paraat tegen stof en vuil.
REPARATIES / ONDERHOUDHaal meteen de stekker uit het stopcontact in geval van defecten of vermoeden van een defect na een val. Zet een machine met gebreken niet aan. Alleen geautoriseerde assistentiecentra mogen wijzigin-gen en reparaties verrichten. Als de ingrepen niet volgens de regels van goed vakmanschap worden uitgevoerd, vervalt elke aansprakelijkheid bij even-tuele schade.
WATERRESERVOIRDoe alleen niet-koolzuurhoudend, vers drinkwater in het reservoir. Zet het apparaat niet aan als het water niet het aangegeven minimum niveau in het reservoir overschrijdt.
CAPSULEBAKJEIn het capsulebakje mogen alleen capsules Lavazza BLUE enkele dosis worden geplaatst, steek er geen vingers of andere objecten in. De capsules kunnen slechts één keer worden gebruikt.
VERWIJDERING VAN HET APPARAAT NA EINDE LEVENSDUUR (Europese Richtlijn 2002/96/EG - Wetsbesluit nr. 151 van 25 juli 2005)
Het symbool van de container op het apparaat en/of op de verpakking geeft aan dat het product aan het einde van de levensduur niet met het normale afval mag worden afgevoerd. Het apparaat moet naar een centrum voor elektrisch en elektronisch afval worden gebracht in het eigen land, of worden ingeleverd bij de verkoper op het moment van aan-koop van aankoop van eenzelfde apparaat, in een verhouding van een op een. De gebruiker is ver-antwoordelijk voor de overdracht van het apparaat aan de betreffende afvalvoorzieningen, op straffe van de geldende wetgeving ten aanzien van deze materie. De juiste gescheiden inzameling van deze apparaten voor de recycling en/of verwijdering op een milieuvriendelijke wijze, draagt bij aan het ver-mijden van mogelijke negatieve gevolgen voor het milieu en voor de gezondheid, en dit begunstigt het hergebruik en/of recycling van de materialen waaruit het apparaat bestaat. Voor meer gedetail-leerde informatie betreffende het beschikbare af-valsysteem, kunt u zich wenden tot de plaatselijke dienst of tot de verkoper van wie u het apparaat hebt gekocht.

www.lavazza.com
ww
w.u
nist
udio
mod
ena.
it
Mod
el: L
B 25
00 P
LUS
Code
: 100
6554
5 - 0
9/12