AirStation Pro Quick Setup Guidecdn.cloudfiles.mosso.com/c85091/35012939-01.pdfWenn PoE nicht...
2
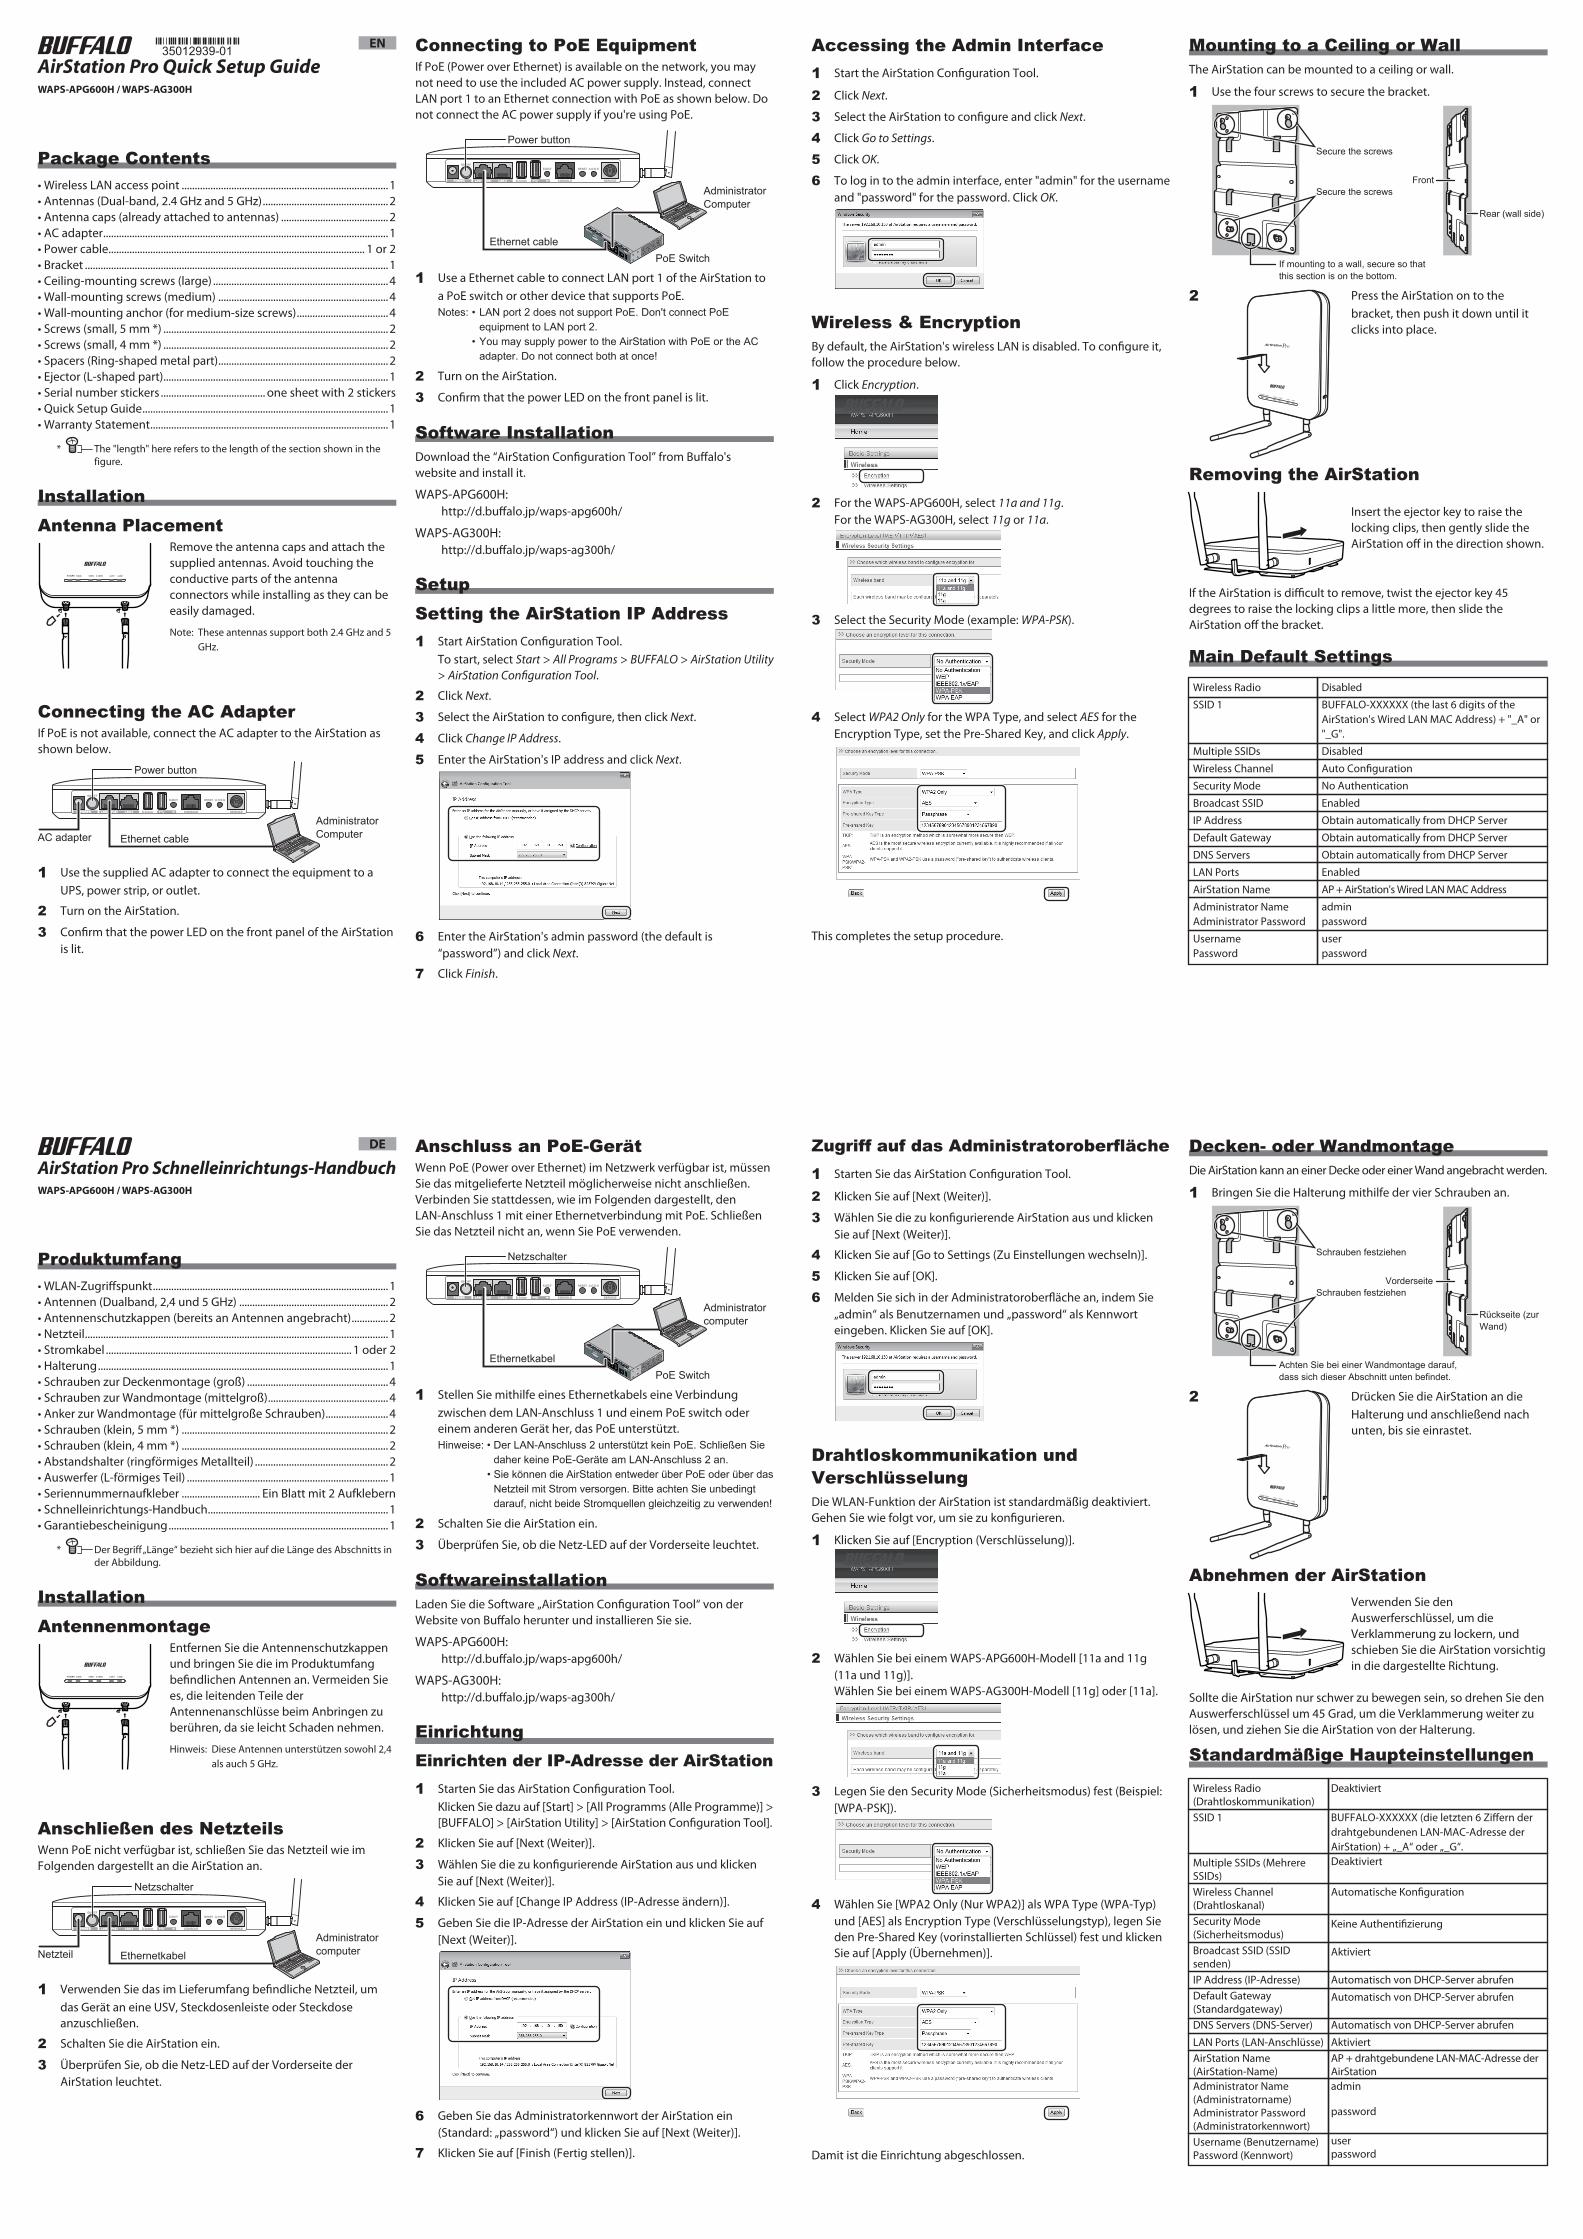
Package Contents • Wireless LAN access point ............................................................................... 1 • Antennas (Dual-band, 2.4 GHz and 5 GHz) ................................................ 2 • Antenna caps (already attached to antennas) ......................................... 2 • AC adapter............................................................................................................. 1 • Power cable.................................................................................................. 1 or 2 • Bracket .................................................................................................................... 1 • Ceiling-mounting screws (large) ................................................................... 4 • Wall-mounting screws (medium) ................................................................. 4 • Wall-mounting anchor (for medium-size screws) ................................... 4 • Screws (small, 5 mm *) ...................................................................................... 2 • Screws (small, 4 mm *) ...................................................................................... 2 • Spacers (Ring-shaped metal part)................................................................. 2 • Ejector (L-shaped part)...................................................................................... 1 • Serial number stickers ........................................ one sheet with 2 stickers • Quick Setup Guide.............................................................................................. 1 • Warranty Statement........................................................................................... 1 Installation Antenna Placement Remove the antenna caps and attach the supplied antennas. Avoid touching the conductive parts of the antenna connectors while installing as they can be easily damaged. Note: These antennas support both 2.4 GHz and 5 GHz. Connecting the AC Adapter If PoE is not available, connect the AC adapter to the AirStation as shown below. 1 Use the supplied AC adapter to connect the equipment to a UPS, power strip, or outlet. 2 Turn on the AirStation. 3 Confirm that the power LED on the front panel of the AirStation is lit. Connecting to PoE Equipment If PoE (Power over Ethernet) is available on the network, you may not need to use the included AC power supply. Instead, connect LAN port 1 to an Ethernet connection with PoE as shown below. Do not connect the AC power supply if you're using PoE. 1 Use a Ethernet cable to connect LAN port 1 of the AirStation to a PoE switch or other device that supports PoE. Notes: • LAN port 2 does not support PoE. Don't connect PoE equipment to LAN port 2. • You may supply power to the AirStation with PoE or the AC adapter. Do not connect both at once! 2 Turn on the AirStation. 3 Confirm that the power LED on the front panel is lit. Software Installation Download the “AirStation Configuration Tool” from Buffalo's website and install it. WAPS-APG600H: http://d.buffalo.jp/waps-apg600h/ WAPS-AG300H: http://d.buffalo.jp/waps-ag300h/ Setup Setting the AirStation IP Address 1 Start AirStation Configuration Tool. To start, select Start > All Programs > BUFFALO > AirStation Utility > AirStation Configuration Tool. 2 Click Next. 3 Select the AirStation to configure, then click Next. 4 Click Change IP Address. 5 Enter the AirStation's IP address and click Next. 6 Enter the AirStation's admin password (the default is “password”) and click Next. 7 Click Finish. Wireless Radio SSID 1 Multiple SSIDs Wireless Channel Security Mode Broadcast SSID IP Address Default Gateway DNS Servers LAN Ports AirStation Name Administrator Name Administrator Password Username Password Disabled BUFFALO-XXXXXX (the last 6 digits of the AirStation's Wired LAN MAC Address) + "_A" or "_G". Disabled Auto Configuration No Authentication Enabled Obtain automatically from DHCP Server Obtain automatically from DHCP Server Obtain automatically from DHCP Server Enabled AP + AirStation's Wired LAN MAC Address admin password user password Accessing the Admin Interface 1 Start the AirStation Configuration Tool. 2 Click Next. 3 Select the AirStation to configure and click Next. 4 Click Go to Settings. 5 Click OK. 6 To log in to the admin interface, enter "admin" for the username and "password" for the password. Click OK. Wireless & Encryption By default, the AirStation's wireless LAN is disabled. To configure it, follow the procedure below. 1 Click Encryption. 2 For the WAPS-APG600H, select 11a and 11g. For the WAPS-AG300H, select 11g or 11a. 3 Select the Security Mode (example: WPA-PSK). 4 Select WPA2 Only for the WPA Type, and select AES for the Encryption Type, set the Pre-Shared Key, and click Apply. This completes the setup procedure. Mounting to a Ceiling or Wall The AirStation can be mounted to a ceiling or wall. 1 Use the four screws to secure the bracket. 2 Press the AirStation on to the bracket, then push it down until it clicks into place. Removing the AirStation Insert the ejector key to raise the locking clips, then gently slide the AirStation off in the direction shown. If the AirStation is difficult to remove, twist the ejector key 45 degrees to raise the locking clips a little more, then slide the AirStation off the bracket. Main Default Settings Produktumfang • WLAN-Zugriffspunkt .......................................................................................... 1 • Antennen (Dualband, 2,4 und 5 GHz) ......................................................... 2 • Antennenschutzkappen (bereits an Antennen angebracht) .............. 2 • Netzteil.................................................................................................................... 1 • Stromkabel .............................................................................................. 1 oder 2 • Halterung ............................................................................................................... 1 • Schrauben zur Deckenmontage (groß) ...................................................... 4 • Schrauben zur Wandmontage (mittelgroß).............................................. 4 • Anker zur Wandmontage (für mittelgroße Schrauben)........................ 4 • Schrauben (klein, 5 mm *) ............................................................................... 2 • Schrauben (klein, 4 mm *) ............................................................................... 2 • Abstandshalter (ringförmiges Metallteil) ................................................... 2 • Auswerfer (L-förmiges Teil) ............................................................................. 1 • Seriennummernaufkleber .............................. Ein Blatt mit 2 Aufklebern • Schnelleinrichtungs-Handbuch..................................................................... 1 • Garantiebescheinigung .................................................................................... 1 Installation Antennenmontage Entfernen Sie die Antennenschutzkappen und bringen Sie die im Produktumfang befindlichen Antennen an. Vermeiden Sie es, die leitenden Teile der Antennenanschlüsse beim Anbringen zu berühren, da sie leicht Schaden nehmen. Hinweis: Diese Antennen unterstützen sowohl 2,4 als auch 5 GHz. Anschließen des Netzteils Wenn PoE nicht verfügbar ist, schließen Sie das Netzteil wie im Folgenden dargestellt an die AirStation an. 1 Verwenden Sie das im Lieferumfang befindliche Netzteil, um das Gerät an eine USV, Steckdosenleiste oder Steckdose anzuschließen. 2 Schalten Sie die AirStation ein. 3 Überprüfen Sie, ob die Netz-LED auf der Vorderseite der AirStation leuchtet. Anschluss an PoE-Gerät Wenn PoE (Power over Ethernet) im Netzwerk verfügbar ist, müssen Sie das mitgelieferte Netzteil möglicherweise nicht anschließen. Verbinden Sie stattdessen, wie im Folgenden dargestellt, den LAN-Anschluss 1 mit einer Ethernetverbindung mit PoE. Schließen Sie das Netzteil nicht an, wenn Sie PoE verwenden. 1 Stellen Sie mithilfe eines Ethernetkabels eine Verbindung zwischen dem LAN-Anschluss 1 und einem PoE switch oder einem anderen Gerät her, das PoE unterstützt. Hinweise: • Der LAN-Anschluss 2 unterstützt kein PoE. Schließen Sie daher keine PoE-Geräte am LAN-Anschluss 2 an. • Sie können die AirStation entweder über PoE oder über das Netzteil mit Strom versorgen. Bitte achten Sie unbedingt darauf, nicht beide Stromquellen gleichzeitig zu verwenden! 2 Schalten Sie die AirStation ein. 3 Überprüfen Sie, ob die Netz-LED auf der Vorderseite leuchtet. Softwareinstallation Laden Sie die Software „AirStation Configuration Tool“ von der Website von Buffalo herunter und installieren Sie sie. WAPS-APG600H: http://d.buffalo.jp/waps-apg600h/ WAPS-AG300H: http://d.buffalo.jp/waps-ag300h/ Einrichtung Einrichten der IP-Adresse der AirStation 1 Starten Sie das AirStation Configuration Tool. Klicken Sie dazu auf [Start] > [All Programms (Alle Programme)] > [BUFFALO] > [AirStation Utility] > [AirStation Configuration Tool]. 2 Klicken Sie auf [Next (Weiter)]. 3 Wählen Sie die zu konfigurierende AirStation aus und klicken Sie auf [Next (Weiter)]. 4 Klicken Sie auf [Change IP Address (IP-Adresse ändern)]. 5 Geben Sie die IP-Adresse der AirStation ein und klicken Sie auf [Next (Weiter)]. 6 Geben Sie das Administratorkennwort der AirStation ein (Standard: „password“) und klicken Sie auf [Next (Weiter)]. 7 Klicken Sie auf [Finish (Fertig stellen)]. Wireless Radio (Drahtloskommunikation) SSID 1 Multiple SSIDs (Mehrere SSIDs) Wireless Channel (Drahtloskanal) Security Mode (Sicherheitsmodus) Broadcast SSID (SSID senden) IP Address (IP-Adresse) Default Gateway (Standardgateway) DNS Servers (DNS-Server) LAN Ports (LAN-Anschlüsse) AirStation Name (AirStation-Name) Administrator Name (Administratorname) Administrator Password (Administratorkennwort) Username (Benutzername) Password (Kennwort) Deaktiviert BUFFALO-XXXXXX (die letzten 6 Ziffern der drahtgebundenen LAN-MAC-Adresse der AirStation) + „_A“ oder „_G“. Deaktiviert Automatische Konfiguration Keine Authentifizierung Aktiviert Automatisch von DHCP-Server abrufen Automatisch von DHCP-Server abrufen Automatisch von DHCP-Server abrufen Aktiviert AP + drahtgebundene LAN-MAC-Adresse der AirStation admin password user password Zugriff auf das Administratoroberfläche 1 Starten Sie das AirStation Configuration Tool. 2 Klicken Sie auf [Next (Weiter)]. 3 Wählen Sie die zu konfigurierende AirStation aus und klicken Sie auf [Next (Weiter)]. 4 Klicken Sie auf [Go to Settings (Zu Einstellungen wechseln)]. 5 Klicken Sie auf [OK]. 6 Melden Sie sich in der Administratoroberfläche an, indem Sie „admin“ als Benutzernamen und „password“ als Kennwort eingeben. Klicken Sie auf [OK]. Drahtloskommunikation und Verschlüsselung Die WLAN-Funktion der AirStation ist standardmäßig deaktiviert. Gehen Sie wie folgt vor, um sie zu konfigurieren. 1 Klicken Sie auf [Encryption (Verschlüsselung)]. 2 Wählen Sie bei einem WAPS-APG600H-Modell [11a and 11g (11a und 11g)]. Wählen Sie bei einem WAPS-AG300H-Modell [11g] oder [11a]. 3 Legen Sie den Security Mode (Sicherheitsmodus) fest (Beispiel: [WPA-PSK]). 4 Wählen Sie [WPA2 Only (Nur WPA2)] als WPA Type (WPA-Typ) und [AES] als Encryption Type (Verschlüsselungstyp), legen Sie den Pre-Shared Key (vorinstallierten Schlüssel) fest und klicken Sie auf [Apply (Übernehmen)]. Damit ist die Einrichtung abgeschlossen. Decken- oder Wandmontage Die AirStation kann an einer Decke oder einer Wand angebracht werden. 1 Bringen Sie die Halterung mithilfe der vier Schrauben an. 2 Drücken Sie die AirStation an die Halterung und anschließend nach unten, bis sie einrastet. Abnehmen der AirStation Verwenden Sie den Auswerferschlüssel, um die Verklammerung zu lockern, und schieben Sie die AirStation vorsichtig in die dargestellte Richtung. Sollte die AirStation nur schwer zu bewegen sein, so drehen Sie den Auswerferschlüssel um 45 Grad, um die Verklammerung weiter zu lösen, und ziehen Sie die AirStation von der Halterung. Standardmäßige Haupteinstellungen * The "length" here refers to the length of the section shown in the figure. * Der Begriff „Länge“ bezieht sich hier auf die Länge des Abschnitts in der Abbildung. Administrator Computer Power button AC adapter Ethernet cable Administrator Computer Power button PoE Switch Ethernet cable Secure the screws Secure the screws If mounting to a wall, secure so that this section is on the bottom. Rear (wall side) Front Administrator computer Netzschalter Netzteil Ethernetkabel Administrator computer Netzschalter PoE Switch Ethernetkabel Schrauben festziehen Schrauben festziehen Achten Sie bei einer Wandmontage darauf, dass sich dieser Abschnitt unten befindet. Rückseite (zur Wand) Vorderseite EN AirStation Pro Quick Setup Guide WAPS-APG600H / WAPS-AG300H DE AirStation Pro Schnelleinrichtungs-Handbuch WAPS-APG600H / WAPS-AG300H
Transcript of AirStation Pro Quick Setup Guidecdn.cloudfiles.mosso.com/c85091/35012939-01.pdfWenn PoE nicht...
Package Contents• Wireless LAN access point ...............................................................................1• Antennas (Dual-band, 2.4 GHz and 5 GHz)................................................2• Antenna caps (already attached to antennas) .........................................2• AC adapter.............................................................................................................1• Power cable.................................................................................................. 1 or 2• Bracket ....................................................................................................................1• Ceiling-mounting screws (large) ...................................................................4• Wall-mounting screws (medium) .................................................................4• Wall-mounting anchor (for medium-size screws)...................................4• Screws (small, 5 mm *) ......................................................................................2• Screws (small, 4 mm *) ......................................................................................2• Spacers (Ring-shaped metal part).................................................................2• Ejector (L-shaped part)......................................................................................1• Serial number stickers ........................................ one sheet with 2 stickers• Quick Setup Guide..............................................................................................1• Warranty Statement...........................................................................................1
InstallationAntenna Placement
Remove the antenna caps and attach the supplied antennas. Avoid touching the conductive parts of the antenna connectors while installing as they can be easily damaged.
Note: These antennas support both 2.4 GHz and 5 GHz.
Connecting the AC AdapterIf PoE is not available, connect the AC adapter to the AirStation as shown below.
1 Use the supplied AC adapter to connect the equipment to a UPS, power strip, or outlet.
2 Turn on the AirStation.
3 Confirm that the power LED on the front panel of the AirStation is lit.
Connecting to PoE EquipmentIf PoE (Power over Ethernet) is available on the network, you may not need to use the included AC power supply. Instead, connect LAN port 1 to an Ethernet connection with PoE as shown below. Do not connect the AC power supply if you're using PoE.
1 Use a Ethernet cable to connect LAN port 1 of the AirStation to a PoE switch or other device that supports PoE.
Notes: • LAN port 2 does not support PoE. Don't connect PoE equipment to LAN port 2.
• You may supply power to the AirStation with PoE or the AC adapter. Do not connect both at once!
2 Turn on the AirStation.
3 Confirm that the power LED on the front panel is lit.
Software InstallationDownload the “AirStation Configuration Tool” from Buffalo's website and install it.
WAPS-APG600H: http://d.buffalo.jp/waps-apg600h/
WAPS-AG300H: http://d.buffalo.jp/waps-ag300h/
SetupSetting the AirStation IP Address1 Start AirStation Configuration Tool. To start, select Start > All Programs > BUFFALO > AirStation Utility
> AirStation Con�guration Tool.
2 Click Next.
3 Select the AirStation to configure, then click Next.
4 Click Change IP Address.
5 Enter the AirStation's IP address and click Next.
6 Enter the AirStation's admin password (the default is “password”) and click Next.
7 Click Finish.
Wireless Radio
SSID 1
Multiple SSIDs
Wireless Channel
Security Mode
Broadcast SSID
IP Address
Default Gateway
DNS Servers
LAN Ports
AirStation Name
Administrator NameAdministrator Password
UsernamePassword
Disabled
BUFFALO-XXXXXX (the last 6 digits of the AirStation's Wired LAN MAC Address) + "_A" or "_G".
Disabled
Auto Configuration
No Authentication
Enabled
Obtain automatically from DHCP Server
Obtain automatically from DHCP Server
Obtain automatically from DHCP Server
Enabled
AP + AirStation's Wired LAN MAC Address
adminpassword
userpassword
Accessing the Admin Interface1 Start the AirStation Configuration Tool.
2 Click Next.
3 Select the AirStation to configure and click Next.
4 Click Go to Settings.
5 Click OK.
6 To log in to the admin interface, enter "admin" for the username and "password" for the password. Click OK.
Wireless & EncryptionBy default, the AirStation's wireless LAN is disabled. To configure it, follow the procedure below.
1 Click Encryption.
2 For the WAPS-APG600H, select 11a and 11g. For the WAPS-AG300H, select 11g or 11a.
3 Select the Security Mode (example: WPA-PSK).
4 Select WPA2 Only for the WPA Type, and select AES for the Encryption Type, set the Pre-Shared Key, and click Apply.
This completes the setup procedure.
Mounting to a Ceiling or WallThe AirStation can be mounted to a ceiling or wall.
1 Use the four screws to secure the bracket.
2 Press the AirStation on to the bracket, then push it down until it clicks into place.
Removing the AirStation
Insert the ejector key to raise the locking clips, then gently slide the AirStation off in the direction shown.
If the AirStation is difficult to remove, twist the ejector key 45 degrees to raise the locking clips a little more, then slide the AirStation off the bracket.
Main Default Settings
Produktumfang• WLAN-Zugriffspunkt..........................................................................................1• Antennen (Dualband, 2,4 und 5 GHz) .........................................................2• Antennenschutzkappen (bereits an Antennen angebracht)..............2• Netzteil....................................................................................................................1• Stromkabel .............................................................................................. 1 oder 2• Halterung...............................................................................................................1• Schrauben zur Deckenmontage (groß) ......................................................4• Schrauben zur Wandmontage (mittelgroß)..............................................4• Anker zur Wandmontage (für mittelgroße Schrauben)........................4• Schrauben (klein, 5 mm *) ...............................................................................2• Schrauben (klein, 4 mm *) ...............................................................................2• Abstandshalter (ringförmiges Metallteil) ...................................................2• Auswerfer (L-förmiges Teil) .............................................................................1• Seriennummernaufkleber .............................. Ein Blatt mit 2 Aufklebern• Schnelleinrichtungs-Handbuch.....................................................................1• Garantiebescheinigung....................................................................................1
InstallationAntennenmontage
Entfernen Sie die Antennenschutzkappen und bringen Sie die im Produktumfang befindlichen Antennen an. Vermeiden Sie es, die leitenden Teile der Antennenanschlüsse beim Anbringen zu berühren, da sie leicht Schaden nehmen.
Hinweis: Diese Antennen unterstützen sowohl 2,4 als auch 5 GHz.
Anschließen des NetzteilsWenn PoE nicht verfügbar ist, schließen Sie das Netzteil wie im Folgenden dargestellt an die AirStation an.
1 Verwenden Sie das im Lieferumfang befindliche Netzteil, um das Gerät an eine USV, Steckdosenleiste oder Steckdose anzuschließen.
2 Schalten Sie die AirStation ein.
3 Überprüfen Sie, ob die Netz-LED auf der Vorderseite der AirStation leuchtet.
Anschluss an PoE-GerätWenn PoE (Power over Ethernet) im Netzwerk verfügbar ist, müssen Sie das mitgelieferte Netzteil möglicherweise nicht anschließen. Verbinden Sie stattdessen, wie im Folgenden dargestellt, den LAN-Anschluss 1 mit einer Ethernetverbindung mit PoE. Schließen Sie das Netzteil nicht an, wenn Sie PoE verwenden.
1 Stellen Sie mithilfe eines Ethernetkabels eine Verbindung zwischen dem LAN-Anschluss 1 und einem PoE switch oder einem anderen Gerät her, das PoE unterstützt.
Hinweise: • Der LAN-Anschluss 2 unterstützt kein PoE. Schließen Sie daher keine PoE-Geräte am LAN-Anschluss 2 an.
• Sie können die AirStation entweder über PoE oder über das Netzteil mit Strom versorgen. Bitte achten Sie unbedingt darauf, nicht beide Stromquellen gleichzeitig zu verwenden!
2 Schalten Sie die AirStation ein.
3 Überprüfen Sie, ob die Netz-LED auf der Vorderseite leuchtet.
SoftwareinstallationLaden Sie die Software „AirStation Configuration Tool“ von der Website von Buffalo herunter und installieren Sie sie.
WAPS-APG600H: http://d.buffalo.jp/waps-apg600h/
WAPS-AG300H: http://d.buffalo.jp/waps-ag300h/
EinrichtungEinrichten der IP-Adresse der AirStation1 Starten Sie das AirStation Configuration Tool. Klicken Sie dazu auf [Start] > [All Programms (Alle Programme)] >
[BUFFALO] > [AirStation Utility] > [AirStation Configuration Tool].
2 Klicken Sie auf [Next (Weiter)].
3 Wählen Sie die zu konfigurierende AirStation aus und klicken Sie auf [Next (Weiter)].
4 Klicken Sie auf [Change IP Address (IP-Adresse ändern)].
5 Geben Sie die IP-Adresse der AirStation ein und klicken Sie auf [Next (Weiter)].
6 Geben Sie das Administratorkennwort der AirStation ein (Standard: „password“) und klicken Sie auf [Next (Weiter)].
7 Klicken Sie auf [Finish (Fertig stellen)].
Wireless Radio (Drahtloskommunikation)SSID 1
Multiple SSIDs (Mehrere SSIDs)Wireless Channel (Drahtloskanal)Security Mode (Sicherheitsmodus)Broadcast SSID (SSID senden)IP Address (IP-Adresse)Default Gateway (Standardgateway)DNS Servers (DNS-Server)
LAN Ports (LAN-Anschlüsse)AirStation Name (AirStation-Name)Administrator Name (Administratorname)Administrator Password (Administratorkennwort)Username (Benutzername)Password (Kennwort)
Deaktiviert
BUFFALO-XXXXXX (die letzten 6 Ziffern der drahtgebundenen LAN-MAC-Adresse der AirStation) + „_A“ oder „_G“.Deaktiviert
Automatische Konfiguration
Keine Authentifizierung
Aktiviert
Automatisch von DHCP-Server abrufen
Automatisch von DHCP-Server abrufen
Automatisch von DHCP-Server abrufen
AktiviertAP + drahtgebundene LAN-MAC-Adresse der AirStationadmin
password
userpassword
Zugriff auf das Administratoroberfläche1 Starten Sie das AirStation Configuration Tool.
2 Klicken Sie auf [Next (Weiter)].
3 Wählen Sie die zu konfigurierende AirStation aus und klicken Sie auf [Next (Weiter)].
4 Klicken Sie auf [Go to Settings (Zu Einstellungen wechseln)].
5 Klicken Sie auf [OK].
6 Melden Sie sich in der Administratoroberfläche an, indem Sie „admin“ als Benutzernamen und „password“ als Kennwort eingeben. Klicken Sie auf [OK].
Drahtloskommunikation und VerschlüsselungDie WLAN-Funktion der AirStation ist standardmäßig deaktiviert. Gehen Sie wie folgt vor, um sie zu konfigurieren.
1 Klicken Sie auf [Encryption (Verschlüsselung)].
2 Wählen Sie bei einem WAPS-APG600H-Modell [11a and 11g (11a und 11g)].
Wählen Sie bei einem WAPS-AG300H-Modell [11g] oder [11a].
3 Legen Sie den Security Mode (Sicherheitsmodus) fest (Beispiel: [WPA-PSK]).
4 Wählen Sie [WPA2 Only (Nur WPA2)] als WPA Type (WPA-Typ) und [AES] als Encryption Type (Verschlüsselungstyp), legen Sie den Pre-Shared Key (vorinstallierten Schlüssel) fest und klicken Sie auf [Apply (Übernehmen)].
Damit ist die Einrichtung abgeschlossen.
Decken- oder WandmontageDie AirStation kann an einer Decke oder einer Wand angebracht werden.
1 Bringen Sie die Halterung mithilfe der vier Schrauben an.
2 Drücken Sie die AirStation an die Halterung und anschließend nach unten, bis sie einrastet.
Abnehmen der AirStationVerwenden Sie den Auswerferschlüssel, um die Verklammerung zu lockern, und schieben Sie die AirStation vorsichtig in die dargestellte Richtung.
Sollte die AirStation nur schwer zu bewegen sein, so drehen Sie den Auswerferschlüssel um 45 Grad, um die Verklammerung weiter zu lösen, und ziehen Sie die AirStation von der Halterung.
Standardmäßige Haupteinstellungen
* The "length" here refers to the length of the section shown in the figure.
* Der Begriff „Länge“ bezieht sich hier auf die Länge des Abschnitts in der Abbildung.
Administrator Computer
Power button
AC adapter Ethernet cable
Administrator Computer
Power button
PoE SwitchEthernet cable
Secure the screws
Secure the screws
If mounting to a wall, secure so that this section is on the bottom.
Rear (wall side)
Front
Administratorcomputer
Netzschalter
Netzteil Ethernetkabel
Administratorcomputer
Netzschalter
PoE SwitchEthernetkabel
Schrauben festziehen
Schrauben festziehen
Achten Sie bei einer Wandmontage darauf, dass sich dieser Abschnitt unten befindet.
Rückseite (zur Wand)
Vorderseite
EN
AirStation Pro Quick Setup GuideWAPS-APG600H / WAPS-AG300H
DE
AirStation Pro Schnelleinrichtungs-HandbuchWAPS-APG600H / WAPS-AG300H

Contenu du package• Point d'accès LAN sans fil.................................................................................1• Antennes (Double bande, 2,4 GHz et 5 GHz) ............................................2• Caches d'antenne (fixés aux antennes) ......................................................2• Adaptateur secteur ............................................................................................1• Cordon d'alimentation............................................................................ 1 ou 2• Rack..........................................................................................................................1• Vis de fixation au plafond (grandes) ............................................................4• Vis de fixation au mur (moyennes)...............................................................4• Ancrage de fixation au mur (pour les vis de taille moyenne) .............4• Vis (petites, 5 mm *) ...........................................................................................2• Vis (petites, 4 mm *) ...........................................................................................2• Rondelles (pièces métalliques en forme de cercle) ................................2• Éjecteur (élément en forme de L)..................................................................1• Étiquettes du numéro de série................. une feuille avec 2 étiquettes• Guide de configuration rapide.......................................................................1• Conditions de la garantie.................................................................................1
InstallationInstallation de l'antenne
Retirez les caches d'antenne et fixez les antennes fournies. Veillez à ne pas toucher les éléments conducteurs des connectiques d'antenne lors de l'installation, vous risqueriez de les endommager.
Remarque : Ces antennes prennent en charge les bandes 2,4 GHz et 5 GHz.
Connexion de l'adaptateur secteurSi le PoE n'est pas disponible, connectez l'adaptateur secteur à l'AirStation comme indiqué ci-dessous.
1 Utilisez l'adaptateur secteur fourni pour connecter le matériel à un onduleur, une multiprise ou une prise.
2 Allumez l'AirStation.
3 Vérifiez que le voyant LED d'alimentation du panneau avant de l'AirStation est bien allumé.
Connexion au matériel PoESi le PoE (Power over Ethernet) est disponible sur le réseau, vous pouvez ne pas utiliser l'adaptateur secteur fourni. À la place, branchez le port LAN 1 à une connexion Ethernet disposant du PoE comme indiqué ci-dessous. Ne branchez pas le câble d'alimentation si vous utilisez le PoE.
1 Utilisez un câble Ethernet pour connecter le port LAN 1 de l'AirStation à un PoE switch ou à tout autre périphérique prenant en charge le PoE.
Remarques : • Le port LAN 2 ne prend pas en charge le PoE. Ne connectez jamais le matériel PoE au port LAN 2.
• Vous pouvez alimenter l'AirStation avec le PoE ou l'adaptateur secteur. Ne connectez jamais les deux sources d'alimentation en même temps !
2 Allumez l'AirStation.
3 Vérifiez que le voyant LED d’alimentation situé sur le panneau avant est allumé.
Installation du logicielTéléchargez l'« AirStation Configuration Tool » depuis le site Web de Buffalo et installez-le.
WAPS-APG600H: http://d.buffalo.jp/waps-apg600h/
WAPS-AG300H: http://d.buffalo.jp/waps-ag300h/
ConfigurationConfiguration de l'adresse IP de l'AirStation1 Lancez l'AirStation Configuration Tool. Pour ce faire, sélectionnez [Start (Démarrer)] > [All Programs
(Tous les programmes)] > [BUFFALO] > [AirStation Utility] > [AirStation Configuration Tool].
2 Cliquez sur [Next (Suivant)].
3 Sélectionnez l'AirStation à configurer, puis cliquez sur [Next (Suivant)].
4 Cliquez sur [Change IP Address (Modifier l’adresse IP)].
5 Saisissez l’adresse IP de l'AirStation et cliquez sur [Next (Suivant)].
6 Saisissez le mot de passe administrateur de l'AirStation (« password » par défaut) et cliquez sur [Next (Suivant)].
7 Cliquez sur [Finish (Terminer)].
Wireless Radio (Radio sans fil)
SSID 1
Multiple SSIDs (SSID multiples)Wireless Channel (Canal sans fil)Security Mode (Mode de sécurité)Broadcast SSID (Diffuser SSID)IP Address (Adresse IP)Default Gateway (Passerelle par défaut)DNS Servers (Serveurs DNS)LAN Ports (Ports LAN)AirStation Name (Nom de l'AirStation)Administrator Name (Nom de l'administrateur)Administrator Password (Mot de passe administrateur)Username (Nom d'utilisateur)Password (Mot de passe)
Désactivé
BUFFALO-XXXXXX (les 6 derniers caractères de l'adresse MAC du LAN filaire de l'AirStation) + « _A » ou « _G ».
Désactivé
Configuration automatique
Aucune authentification
Activé
Obtenir automatiquement du serveur DHCPObtenir automatiquement du serveur DHCP
Obtenir automatiquement du serveur DHCPActivéAP + Adresse MAC de LAN filaire de l'AirStationadmin
password
userpassword
Accès à l'interface Admin1 Lancez l'AirStation Configuration Tool.
2 Cliquez sur [Next (Suivant)].
3 Sélectionnez l'AirStation à configurer, puis cliquez sur [Next (Suivant)].
4 Cliquez sur [Go to Settings (Accéder aux paramètres)].
5 Cliquez sur [OK].
6 Pour vous connecter à l'interface administrateur, saisissez « admin » comme nom d'utilisateur et « password » comme mot de passe. Cliquez sur [OK].
Sans fil & cryptagePar défaut, le LAN sans fil de l'AirStation est désactivé. Pour le configurer, suivez la procédure ci-dessous.
1 Cliquez sur [Encryption (Cryptage)].
2 Pour le WAPS-APG600H, sélectionnez [11a and 11g (11a et 11g)]. Pour le WAPS-AG300H, sélectionnez [11g] ou [11a].
3 Sélectionnez le Security Mode (Mode de sécurité) (exemple : [WPA-PSK]).
4 Sélectionnez [WPA2 Only (WPA2 uniquement)] pour le WPA Type (Type de WPA) et sélectionnez [AES] pour l'Encryption Type (Type de cryptage), configurez la Pre-Shared Key (Clé de cryptage pré-partagée) et cliquez sur [Apply (Appliquer)].
La procédure de configuration est maintenant terminée.
Fixation au plafond ou sur un murL'AirStation peut être installée au plafond ou sur un mur.
1 Fixez le rack à l'aide des quatre vis.
2 Appuyez l'AirStation sur le rack, puis faites la glisser jusqu'à ce qu'elle émette un clic.
Retrait de l'AirStation
Insérez la clé d'éjection pour soulever les clips de verrouillage, puis faites glisser l'AirStation dans la direction indiquée.
S'il vous est difficile de retirer l'AirStation, tournez la clé d'éjection de 45 degrés pour soulever davantage les clips de verrouillage, puis faites glisser l'AirStation hors du rack.
Principaux paramètres par défaut
Contenuto della confezione• Punto di accesso LAN wireless .......................................................................1• Antenne (dual-band, 2.4 GHz e 5 GHz) .......................................................2• Copriantenna (già inseriti sulle antenne)...................................................2• Adattatore CA.......................................................................................................1• Cavo elettrico ................................................................................................1 o 2• Staffa........................................................................................................................1• Viti per il montaggio a soffitto (grandi) ......................................................4• Viti per il montaggio a parete (medie) ........................................................4• Ancoraggio per il montaggio a parete (per viti di media dimensione)..4• Viti (piccole, 5 mm *)..........................................................................................2• Viti (piccole, 4 mm *)..........................................................................................2• Distanziatori (parte in metallo a forma di anello) ...................................2• Eiettore (parte a forma di L) ............................................................................1• Adesivi con numero di serie................................. un foglio con 2 adesivi• Guida rapida all'installazione..........................................................................1• Garanzia..................................................................................................................1
InstallazionePosizionamento dell'antenna
Togliere i copriantenna e collegare le antenne fornite. Durante l'installazione, evitare il contatto con le parti conduttive dei connettori dell'antenna poiché potrebbero subire facilmente danni.
Nota: Queste antenne supportano 2.4 GHz e 5 GHz.
Collegare l'Adattatore CASe il PoE non è disponibile, collegare l'adattatore CA all'AirStation come indicato di seguito.
1 Servirsi dell'adattatore CA fornito per collegare l'apparecchiatura ad un UPS, presa multipla o a parete.
2 Accendere la AirStation.
3 Verificare che il LED alimentazione sul pannello anteriore della AirStation sia acceso.
Collegarsi al dispositivo PoESe il PoE (Power over Ethernet) è disponibile sulla rete, potrebbe non essere necessario usare l'alimentazione CA inclusa. Collegare la porta 1 LAN ad una connessione Ethernet con PoE come indicato di seguito. Non collegare l'alimentazione CA se si utilizza il PoE.
1 Usare un cavo Ethernet per collegare la porta 1 LAN della AirStation ad un PoE switch o ad altro dispositivo che supporta PoE.
Note: • La porta 2 LAN non supporta PoE. Non collegare il dispositivo PoE alla porta 2 LAN.
• È possibile alimentare la AirStation con il PoE o l'adattatore CA. Non collegarli contemporaneamente!
2 Accendere la AirStation.
3 Verificare che il LED Alimentazione sul pannello anteriore sia acceso.
Installazione del SoftwareScaricare “AirStation Configuration Tool” dal sito web di Buffalo, e installarlo.
WAPS-APG600H: http://d.buffalo.jp/waps-apg600h/
WAPS-AG300H: http://d.buffalo.jp/waps-ag300h/
InstallazioneConfigurare l'Indirizzo IP della AirStation1 Avviare AirStation Configuration Tool. Per iniziare, selezionare [Start (start)] > [All Programs (Tutti i
programmi)] > [BUFFALO] > [AirStation Utility] > [AirStation Configuration Tool].
2 Cliccare su [Next (Avanti)].
3 Selezionare la AirStation da configurare, e cliccare su [Next (Avanti)].
4 Cliccare su [Change IP Address (Modifica indirizzo IP)].
5 Inserire l'indirizzo IP della AirStation e cliccare su [Next (Avanti)].
6 Inserire la password admin della AirStation (il valore predefinito è “password”) e cliccare su [Next (Avanti)].
7 Fare clic su [Finish (Fine)].
Wireless Radio (Radio wireless)SSID 1
Multiple SSIDs (Più SSID)Wireless Channel (Canale wireless)Security Mode (Modalità di protezione)Broadcast SSID (SSID di trasmissione)IP Address (Indirizzo IP)Default Gateway (Gateway predefinito)DNS Servers (Server DNS)LAN Ports (Porte LAN)AirStation Name (Nome AirStation)Administrator Name (Nome amministratore)Administrator Password (Password amministratore)Username (Nome utente)Password
Disabilitata
BUFFALO-XXXXXX (le ultime 6 cifre dell'Indirizzo MAC LAN cablata della AirStation) + “_A” o “_G”.
Disabilitata
Configurazione automatica
Nessuna autenticazione
Abilitato
Ottieni automaticamente dal server DHCP
Ottieni automaticamente dal server DHCP
Ottieni automaticamente dal server DHCP
AbilitatoAP + Indirizzo MAC LAN cablata di AirStation
admin
password
userpassword
Accedere all'Interfaccia Admin1 Avviare AirStation Configuration Tool.
2 Cliccare su [Next (Avanti)].
3 Selezionare la AirStation da configurare, e cliccare su [Next (Avanti)].
4 Fare clic su [Go to Settings (Vai alle impostazioni)].
5 Fare clic su [OK].
6 Per accedere all'interfaccia admin, inserire “admin” nel campo nome utente, e “password” nel campo password. Fare clic su [OK].
Wireless e crittografiaPer impostazione predefinita, la LAN wireless della AirStation è disabilitata. Per configurarla, attenersi alla procedura seguente.
1 Fare clic su [Encryption (Crittografia)].
2 Per il WAPS-APG600H, selezionare [11a and 11g (11a e 11g)]. Per il WAPS-AG300H, selezionare [11g] o [11a].
3 Selezionare Security Mode (Modalità di protezione) (esempio: [WPA-PSK]).
4 Selezionare [WPA2 Only (Solo WPA2)] per il WPA Type (Tipo WPA), e selezionare [AES] per il Encryption Type (Tipo di crittografia), impostare Pre-Shared Key (Chiave pre-condivisa), e cliccare su [Apply (Applica)].
Questa operazione completa la procedura di installazione.
Montaggio a soffitto o a pareteLa AirStation può essere montata a soffitto o a parete.
1 Servirsi delle quattro viti per fissare la staffa.
2 Premere la AirStation sulla staffa, quindi spingerla finché non scatta in posizione.
Rimuovere la AirStation
Inserire la chiave dell'eiettore per sollevare le fascette di bloccaggio, quindi far scorrere la AirStation nella direzione indicata di seguito.
Se la rimozione della AirStation risulta complessa, svitare di 45 gradi la chiave dell'eiettore per sollevare ancora le fascette di bloccaggio, quindi far scorrere la AirStation dalla staffa.
Impostazioni predefinite principali
* La « longueur » correspond à la longueur de la section indiquée sur le schéma.
* Con il termine “lunghezza” qui si fa riferimento alla lunghezza della sezione mostrata nella figura.
Ordinateur administrateur
Bouton d'alimentation
Adaptateur secteur
Câble Ethernet
Ordinateur administrateur
Bouton d'alimentation
PoE SwitchCâble Ethernet
Serrez les vis
Serrez les vis
En cas d'installation sur un mur, installez-le de manière à ce que cette section se trouve en bas.
Vue arrière (côté mur)
Vue avant
Computer amministratore
Pulsante di alimentazione
Adattatore CA Cavo Ethernet
Computer amministratore
Pulsante di alimentazione
PoE SwitchCavo Ethernet
Fissare le viti
Fissare le viti
Per il montaggio a parete, fissarle in modo che questa sezione si trovi nella parte bassa.
Retro (lato parete)
Parte anteriore
FR
Guide de configuration rapide de l'AirStation ProWAPS-APG600H / WAPS-AG300H
IT
Guida rapida all'installazione di AirStation ProWAPS-APG600H / WAPS-AG300H