GRADE 3 MANUAL final revision - Zukunftsstiftung Entwicklungshilfe
109
WALDORF GRADE 3 MANUAL WRITTEN FOR THE EAST AFRICAN WALDORF TEACHER DEVELOPMENT PROGRAM BY CATHERINE VAN ALPHEN & PETER VAN ALPHEN
Transcript of GRADE 3 MANUAL final revision - Zukunftsstiftung Entwicklungshilfe
WALDORF GRADE 3 MANUAL
WRITTEN FOR
THE EAST AFRICAN WALDORF TEACHER DEVELOPMENT PROGRAM
BY
CATHERINE VAN ALPHEN & PETER VAN ALPHEN
2
Source: www.entwicklungshilfe3.de Open Source: Creative Commons Attribution-Non-Commercial-Share Alike 3.0 International Licence; see www.creativecommons.org
Open Source This series of manuals has been commissioned by Zukunfsstiftung Entwicklungshilfe, to support teacher development in East Africa. The manuals can be used in other training programs, individual or group study, anywhere in the world, provided every page shows the source and the Open Source registration, as it appears at the bottom of each page in the original. The open source licence under Creative Commons (see www.creativecommons.org) allows the manuals to be downloaded and redistributed only for non-commercial purposes [that means these manuals may never be sold]. In addition, the licence permits the remixing, tweaking, translating or producing new work based on the manuals, provided that all new work based on these manuals will acknowledge the authors and source and carry the same license. This ensures that any derivatives will also be non-commercial in nature. The manuals can be downloaded from www.entwicklungshilfe3.de Zukunftsstiftung Entwicklungshilfe Christstrasse 9 D-44789 Bochum Germany Tel. +49-234-5797-224/ -124 Fax +49-234-5797-188
Authors
Catherine van Alphen (pages 5 – 70, 95 – 106) Peter van Alphen (pages 71 – 94)
Illustrations Catherine van Alphen

3
Source: www.entwicklungshilfe3.de Open Source: Creative Commons Attribution-Non-Commercial-Share Alike 3.0 International Licence; see www.creativecommons.org
Acknowledgements Whilst every effort is made to acknowledge the work of others included in this manual, in some cases it has not been possible to trace the authors of poems or other material, handed down from teacher to teacher. I ask that any information regarding authorship is passed on to me, on [email protected], so that authors may be acknowledged for their work in subsequent editions/printings. This manual is indebted to the Waldorf tradition of teaching according to the principles of Rudolf Steiner (1861 – 1925), as developed by many generations of teachers. Peter van Alphen
The East African Waldorf/Steiner Teacher Development Programme
The East African teacher development programme was started by the late Adeline Mlai, a Tanzanian, in Dar-es-Salaam in 1997. Adeline recognised the developmental value of Waldorf education and invited Peter van Alphen and Ann Sharfman, teacher educators with experience working in African settings in Cape Town, South Africa, to start a teacher development programme in Dar-es-Salaam. This programme was set up for teachers from Tanzania, Uganda and Kenya. After the first year, difficulties securing the funds for continuing the programme were experienced, and in 1999 the programme was relocated to Nairobi, Kenya, as a more central venue for the three countries. The Rudolf Steiner School in Mbagathi was able to secure funding for its continuation, and in the eleven years that followed an ever-increasing number of teachers from East African countries joined the programme. Our grateful thanks go to Zukunfsstiftung Entwicklungshilfe (Bochum, Germany) and Freunde der Erziehungskunst Rudolf Steiners (Berlin, Germany) for their continued support of the programme from 1999. We also wish to thank Sanduko a Ndege (Vejle, Denmark), Internationaal Hulpfonds (Amsterdam, Netherlands), Acacia (Basel, Switserland), Stichting Helias (Netherlands) and the Iona Stichting (Amsterdam, Netherlands) for their additional support.
4
Source: www.entwicklungshilfe3.de Open Source: Creative Commons Attribution-Non-Commercial-Share Alike 3.0 International Licence; see www.creativecommons.org
About this Manual This manual answers the need for teachers (or student-teachers) to have notes on the modules they attend. This manual is written for Primary School teachers doing the module on the integrated curriculum of Waldorf Grade 3, which follows as Module 5 on the second module of the program in which a detailed study of Rudolf Steiner’s concept of child development was given. The second module included details of curriculum, to show how all teaching needs to grow out of an understanding of the developmental stages of the children at each age. Although there is a brief section on the developmental changes that take place in children around the year they turn 9 years, teachers wishing to use this manual are asked to first study the manual on Child Development, so that everything written here can be seen in the light of a broader understanding. This manual is intended to guide teachers through the teaching of the Grade 3 curriculum. It is written to assist teachers new to Waldorf Education to see examples of how the educational principles given by Rudolf Steiner can be applied in daily teaching. Everything written here needs to be seen as possible examples, rather than “this is the way we teach the Grade 3 curriculum in Waldorf Schools.” Every teacher needs to adapt the suggestions given here according to the children in his or her class, their cultural background, the local environment, etc., so that the needs of the children are served, rather than following an imported curriculum. This manual is intended to be handed out at the end of the module for revision and further study. The suggestion is that participants study together in groups in their respective schools. We trust that the material provided will be useful in Waldorf training programmes in many countries around the world. Comments and suggestions are welcomed, and can be sent to Peter van Alphen on [email protected].
5
Source: www.entwicklungshilfe3.de Open Source: Creative Commons Attribution-Non-Commercial-Share Alike 3.0 International Licence; see www.creativecommons.org
Creation Story and Old Testament Paintings
Day 1
Day 2
Day 3
Day 3
Day 4
Day 4 1
Day 5

6
Source: www.entwicklungshilfe3.de Open Source: Creative Commons Attribution-Non-Commercial-Share Alike 3.0 International Licence; see www.creativecommons.org
Day 5
Noah
Joseph in the pit
Moses and Burning Bush
Day 3 optional
Garden of Paradise 1
7
Source: www.entwicklungshilfe3.de Open Source: Creative Commons Attribution-Non-Commercial-Share Alike 3.0 International Licence; see www.creativecommons.org
WALDORF GRADE 3 MANUAL
INDEX
Authors ............................................................................................................ 2
The East African Waldorf/Steiner Teacher Development
Programme ....................................................................................................... 3
About this Manual ......................................................................................... 4
Grade 3 Manual for Teachers ....................................... 8
Child Development in Grade 3 ....................................... 9
How to Use Stories Creatively .................................... 13
The Creation Main Lesson ......................................... 15
The Grammar Main Lesson ........................................ 23
Handcraft Main Lesson ............................................ 33
House-Building ..................................................... 50
Gardening ........................................................... 59
Farming ............................................................. 63
The Four Operations ............................................... 74
Money Main Lesson ................................................ 81
Measurement Main Lesson Block .................................. 83
Time Main Lesson .................................................. 87
Poems for Grade 3 ................................................. 98
Songs for Grade 3 ................................................ 105
8
Source: www.entwicklungshilfe3.de Open Source: Creative Commons Attribution-Non-Commercial-Share Alike 3.0 International Licence; see www.creativecommons.org
Grade 3 Manual for Teachers
The Waldorf curriculum for Grade 3 offers the children turning nine years of age a fascinating year filled with very practical Main Lessons. Themes such as Time, Measurement and Money, as well as Farming, House Building and Crafts become exciting adventures for the children to learn “hands on” about the world around them. Leaving the humorous and inspiring stories of the animal fables and the legends of the saints behind them, the Grade 3 children enter a new phase and the curriculum is designed to meet the needs of their development at this stage. This manual outlines the following division of the Grade 3 year into 12 main lesson blocks (not to be taken in this order: to be distributed through the year by the teacher): Language Creation (Old Testament)1 Old Testament Stories Old Testament Stories Grammar (Old Testament) Crafts Housebuilding Handcrafts Gardening Farming Mathematics Four Operations Money Measurement Time
1 The choice of stories needs to be determined according to the culture, religions and environment of the
children. Here the Old Testament stories are described, as examples of ‘separation’ and ‘authority’ stories
suitable for the 9-year-old age group.

9
Source: www.entwicklungshilfe3.de Open Source: Creative Commons Attribution-Non-Commercial-Share Alike 3.0 International Licence; see www.creativecommons.org
Child Development in Grade 3
What has changed in the growth of Grade 3 children? Physically they are taller and broader; filling out, becoming more muscular and stronger. But inwardly a complete transformation of their feeling life is taking place. No longer at ease in the security of their oneness with the class and their special teacher, they are experiencing a separation between themselves and the rest of the world. Brothers, sisters, even parents and friends seem strange and distant. These children between ages of eight and a half to ten years may feel alone and misunderstood. Fears of the dark, and imminent death for themselves or a parent rise up in them and they become withdrawn and critical or argumentative and aggressive. Eventually they will find their inner resources to help them to adjust to their new situation, but the old fairy tale world of “happily ever after” is lost forever.
The Story of Creation
Grade 3 children often feel quite misplaced and long to belong somewhere. Thus it is very appropriate to tell them the Story of Creation; how human beings were created by God and placed on earth where they could make a home for themselves. The Old Testament, from the ancient Hebrew tradition, begins with God creating light in the darkness through the sound and power of His voice. Then He separates heaven and earth. In the same way, Grade 3 children are awakening to the duality of life on earth: they begin to notice the amazing world around them – not only what is beautiful, but also what is ugly, and they become aware of what they like and do not like. Through the Creation Story the children unconsciously sense how they fit into the family of creation: how human beings are made in the likeness of God, with consciousness, intelligence, speech, love and creativity. It is important for the teacher to infuse these stories with reverence so that the children are filled with the wonder of creation. They must become aware of the power of creativity present in the human being enabling him or her to adapt the gifts of the earth in order to fulfil the human needs for food, clothing and shelter. The teacher makes the children conscious of and grateful for the abundance of the earth, not by telling them what to think or feel, but by asking questions in the recall of the story, and leading them into deeper discussions. Children
10
Source: www.entwicklungshilfe3.de Open Source: Creative Commons Attribution-Non-Commercial-Share Alike 3.0 International Licence; see www.creativecommons.org
are naturally full of wonder and respond instinctively. The teacher should also use many opportunities to express the children’s creativity in drawing and painting from these stories.
Separation Stories Rudolf Steiner chose the Old Testament stories of the Hebrew tradition to illustrate the sense of separation that the children experience as they go through the crisis of the ninth year. Thus the children identify with the feelings of loss, fear, bewilderment and struggle that the various Hebrew heroes and heroines went through. Many of them experienced being completely uprooted and forced to leave their homes and to establish a new life in a strange country. This can be seen in the story of Adam and Eve. Once they have eaten the apple of the Knowledge of Good and Evil, forbidden to them by God, they can no longer remain in the Garden of Paradise where everything is given to them. Adam and Eve must come to earth and learn to build a home, to hunt for food, to tend sheep, to grow vegetables and to make their clothes. The Garden of Paradise represents children in the phase under nine years of age, when they are still at one with the world. In this new phase, however, children want to learn how to live in the world around them. The experience of feeling separate causes them to question what is right and what is wrong and they are no longer satisfied with fairy tales. Noah is warned by God of the forthcoming flood to destroy mankind and he is told to build an ark. Eventually this ark floats Noah, his family and two of every kind of animal to safety on Mount Ararat. These stories indicate to the children that all will turn out well; a new place and new perspective will be found. However, at no time are these stories told in order to promote a particular religion. On the contrary, they illustrate the challenges that every human being has to go through in his or her development. Thus the stories speak for themselves and demonstrate the ability of each hero to hear and follow the guidance from within. This shows the children the need for self-reliance. When Joseph is thrown in a pit, he experiences the hatred and jealousy of his brothers at being the ‘favourite’ son of Isaac. When he is sold as a slave in Egypt, he finds himself in a strange country. He is misunderstood and wrongly accused. But Joseph proves his honesty and worth wherever he goes: even in prison he is put in charge and eventually he becomes advisor to the Pharaoh. Joseph’s story shows that the worst situation may be turned into the
11
Source: www.entwicklungshilfe3.de Open Source: Creative Commons Attribution-Non-Commercial-Share Alike 3.0 International Licence; see www.creativecommons.org
best for everyone at the end. His forgiveness of his brothers is a wonderful example of the ability to rise above petty responses and to rather return evil with good. All these stories illustrate a sense of separation, whether physical or emotional, and they illustrate how each hero overcame his/her trials and created a new life situation.
Stories of Authority
Children in Grade 3 need to have a strong leader as a role model and they look to the teacher for this. Especially when they are critical of parents and siblings, they should find their need for authority in the teacher. Often children expect the teacher to know everything and the teacher must prove him/herself as being truthful, considerate and fair in all situations. Similarly the stories of the Hebrews show God or Yahweh as a strong authoritative figure who demands obedience from his followers. The sons of Adam and Eve are Cain and Abel. When Cain slays Abel in a fit of anger and jealousy, he must wander the earth as a punishment. But in time, Cain’s own descendants: Jabal, Jubal and Thubal-Cain bring blessings to the people on earth through their ability to transform their situations. Jabal tames the horse, cow and other animals; Jubal brings heavenly music for humankind and Thubal-Cain learns to work with metal, especially bronze and he creates many tools. These stories show the development of humankind as it evolves and the many opportunities for creativity. This guiding presence of God is a reassuring factor in the stories of the Hebrews. No matter where they go, they are assisted and protected provided they obey His commands. Abraham demonstrates his strong connection to God when he and his family leave their home in Ur to create a new home in the desert. When he is asked to sacrifice his son, Isaac, Abraham is willing to obey God’s will and only when he proves this is Isaac saved. When Jonah disobeys God’s command to go to the cities of Sodom and Gomorrah, and goes by ship to another country, he is thrown overboard in a storm and is swallowed by a whale. His prayer to God brings him home again and this time he does as he is told. This story represents the inner turmoil the children can experience at this age and the importance of that authoritative figure in their lives. The story of David and Goliath shows how inner faith and conviction are more powerful than size and physical strength. This encourages the children by reassuring them that they will find the courage to deal with all situations.

12
Source: www.entwicklungshilfe3.de Open Source: Creative Commons Attribution-Non-Commercial-Share Alike 3.0 International Licence; see www.creativecommons.org
Stories from Other Cultures
However, the teacher should not feel that the stories of the Hebrews are the only separation stories that may be told during the Grade 3 year. Every race and culture has many kinds of stories: myths and legends, fables, folk and fairy tales. It is important that the children live into the soul of their own culture especially if their stories are not specifically chosen for the Waldorf curriculum. The teacher needs to research the different stories to see where they fit in best between Grade 1 – 7 so that the children can enjoy the beauty, wisdom and humour of their own culture. Fairy tales belong to the world of the Grade 1 child and should have happy endings. Some fairy tales are quite complex or dark in mood and are better when the children are older. Animal fables and stories are for Grade 2, especially where the animals talk to one another. Most cultures have their own Creation Myths with imaginative and magical pictures to describe the beginnings of life on earth. These creation stories create a bridge between the ancient oral cultures and modern science which the children would not understand at this stage. They give the children a reverence for their place in creation and particularly the human race. Some stories are quite dark and gruesome and should be left to a later stage, perhaps Grade 4, 5 or 6. Flood stories are found all round the world and in the case of nine year old children they represent the end of the time of early childhood and the onset of a new phase. Many ‘hero’ stories show the young person having to leave home in order to fulfil a specific task and only returning when they have overcome the danger and achieved the goal. Some of these stories are more ‘fairy-tale’ in style, whereas others are more realistic and mentally challenging. These stories can easily complement the Hebrew stories from the Old Testament and can be told during main lessons such as Mathematics or House-Building, etc. Rudolf Steiner’s suggestions are meant to demonstrate how the stories should suit the needs of the children at each age. Children like to hear many stories and it is good if the teacher has a special time once or twice a week for stories from their own culture even if they do not fall exactly into the category of “separation stories”. However it is best if stories are not merely told for their own sake but used in other ways so that the children live into the experience and meaning of the story.
13
Source: www.entwicklungshilfe3.de Open Source: Creative Commons Attribution-Non-Commercial-Share Alike 3.0 International Licence; see www.creativecommons.org
How to Use Stories Creatively
All good stories carry innate wisdom and meaning and if the teacher understands this and uses themes from these stories for educational material and creative activities, the children will benefit in many ways.
Bringing out the Feelings in each Story In Steiner’s understanding of child development, he stresses the importance of the child between about 7 and 14 years as being a child of feeling. During these years we have the best opportunity to develop the child’s feeling life, to the good for the rest of his or her life. The stories we tell need to be filled with feeling. This the teacher conveys through his or her voice and gesture. The teacher needs to tell the story not merely as a series of things that happen, but as the heights and depths of human emotions, from sadness, loneliness, suffering and struggle to joy, happiness and fulfilment; from anger, jealousy, greed to love, forgiveness and compassion; from rudeness to reverence. A story well told, where the teacher uses rich description of scenes and character as well as lively dialogue and gestures, becomes an experience that the children will always remember. Children live into the story, picturing every happening and identifying with each character. Their imaginations are stimulated and thus they will remember the story in great detail which improves their memory as well as the ability to listen and focus. The teacher must choose her words well, using sensory description of smells and tastes, sounds, textures and colours as well as light and dark moods. The sensory stimulation in these stories will increase the children’s awareness of the world around them when they go outside, as well as improving their vocabulary and use of language. When preparing to tell a story, the teacher can focus on the moods of the different parts of the story, telling some slowly, others excitedly or triumphantly, others again full of action. Depth of feeling can be created by adding your own descriptions of each situation in the story, giving more details with each feeling expressed. Unlike fairy tales, the stories of the Bible in the Old Testament are written in a simple and repetitive style that often does not do justice to the power of the story. So it is vital that the teacher stretches his/her imagination to be able to
14
Source: www.entwicklungshilfe3.de Open Source: Creative Commons Attribution-Non-Commercial-Share Alike 3.0 International Licence; see www.creativecommons.org
describe both the visual images and the feelings of the characters e.g. how lonely, bewildered and rejected Adam and Eve felt when they left the Garden of Paradise and first came to earth. There are many books where the Bible stories are retold for children, but the teacher should select one that describes the feeling element to assist him/her to transform the story. Even so, the teacher should tell the story directly to the children. A teacher may feel that the words written in the book are so beautiful that s/he could not do as well, but in this they are mistaken. The children love to hear the story from their special teacher and to experience each part of it through the feelings and imagination of that teacher. The love between the teacher and the children enhances the story and the teacher will become a better story-teller as s/he shares the experiences and struggles of the Hebrews with the children. If a story is long, it is good to stop at a suitable place and tell the rest of the story on the next day. It is better to describe a scene with more detail, allowing the children to really live into the feeling experience rather than to rush from one action to another.

15
Source: www.entwicklungshilfe3.de Open Source: Creative Commons Attribution-Non-Commercial-Share Alike 3.0 International Licence; see www.creativecommons.org
The Creation Main Lesson
The Creation main lesson involves telling the creation stories and writing them down in a main lesson book. It is best if the teacher can expand the Creation Story, doing one day of Creation each morning. But how can the teacher work creatively to ensure that the children really experience the power and wonder of each day? As the sections are short, the teacher can work in the following way: Day 1 Tell the story of the first day of Creation. Decorate the front page of the main lesson book, by writing ‘The Creation’ at the top of the page and leaving space for a picture. If the teacher wishes, the page may also contain a short verse from the Bible or some other meaningful text. A painting of the first day may be done either in the main lesson or later in the day. Day 2 The children may experience the darkness and light of Creation in movement through an exercise in contraction and expansion. They begin, huddled together in the centre of the room with arms crossed over their hearts to experience the darkness. Then they move backwards, slowly opening and stretching their arms outwards to experience the light. Repeat exercise several times. The children learn the first verse of the poem ‘The Song of Creation”.2 The children recall the story with as much detail as possible. The teacher tells the story of the second day of Creation. The second page of the main lesson book has a picture from the story of the first day with the writing on the opposite page. Day 3 The children may repeat the movement exercise from the day before. The teacher may create new movement exercises for each day. The children repeat the verse of the poem and learn the second verse. The children recall the story of the third day of Creation. The next page of the main lesson book has a picture from the story of the second day with the writing on the opposite page. A painting of the second day of Creation may be done later in the day. 2 See back of manual
16
Source: www.entwicklungshilfe3.de Open Source: Creative Commons Attribution-Non-Commercial-Share Alike 3.0 International Licence; see www.creativecommons.org
This pattern continues throughout the book. The main lesson book has a drawing on the front page with a short verse. The teacher can select a text from the Bible or the religion practised in the class community, or a verse of no particular religion in mixed situations. The next page shows a drawing of the first day with the writing on the opposite page. This pattern continues throughout the days of Creation. The “Song of Creation” poem can be learnt one verse per day.
Recalling the Story
The children need to recall the story on the next day. This is a very important part of learning the language and the teacher needs to set aside at least 20 minutes for this task, especially if there are many second language children in the class. The teacher leads the children into describing a scene at the beginning so that they find the thread of the story. They need to work out the sequence of the story together, not allowing one bright, enthusiastic child to hold the stage and tell the whole story. Then the teacher needs to choose suitable questions about the feelings of different characters, or what they looked like, or how the child felt about a particular situation. Simpler questions could be presented to children who are a bit shy or slow, to encourage them to speak. It is also good to have at least one question that the children discuss with their neighbour, so that they get used to talking together in this way. It is easy for the teacher to give the answers to the children, but it is more important that children be encouraged to talk and express themselves on their own. It becomes an opportunity not only for language usage but for children to learn from each other. Take for example the story of Cain and Abel. What discussion can arise out of this story? The children enjoy recognising and experiencing different emotions and if the teacher can hold back from pronouncing judgement on Cain, the children will learn to express their own sense of right and wrong.
Poetry
If the teacher can find a poem that relates to the story that is being told that week, it is very good if the children can learn it. Not only does it deepen the experience of the story, it builds vocabulary through the daily repetition of the poem. The children enjoy the rhythmical quality of the poem and learn
17
Source: www.entwicklungshilfe3.de Open Source: Creative Commons Attribution-Non-Commercial-Share Alike 3.0 International Licence; see www.creativecommons.org
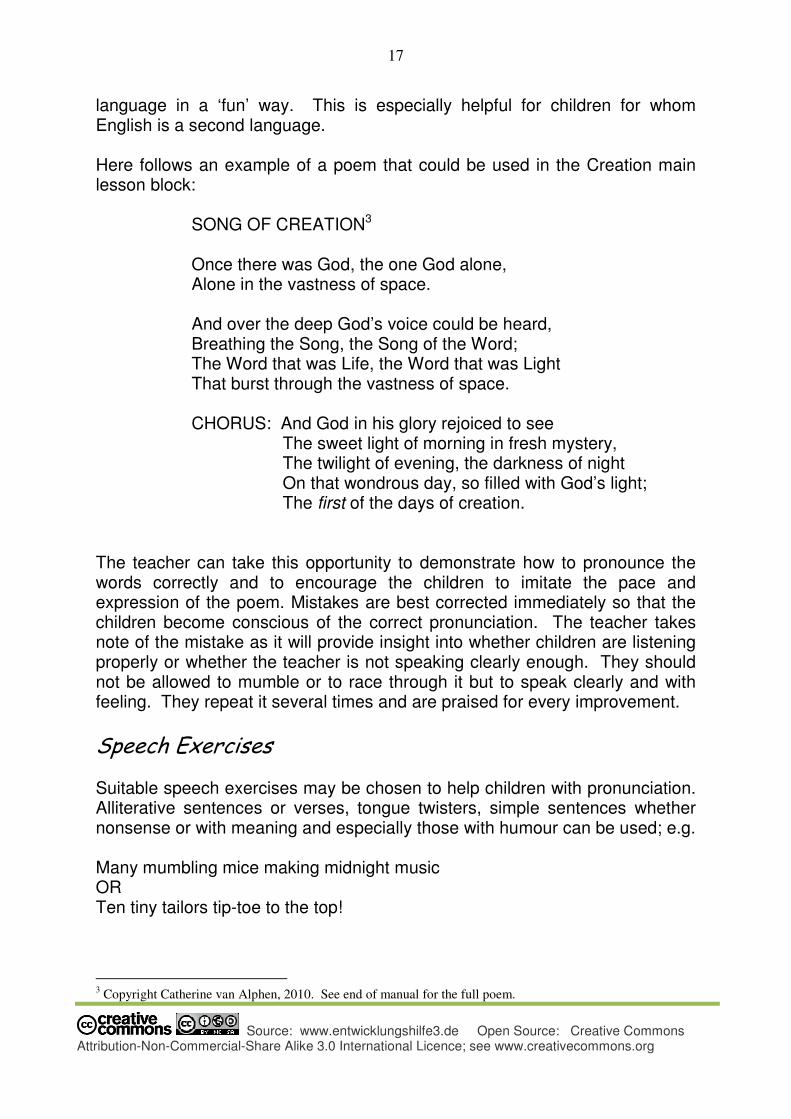
language in a ‘fun’ way. This is especially helpful for children for whom English is a second language. Here follows an example of a poem that could be used in the Creation main lesson block:
SONG OF CREATION3 Once there was God, the one God alone, Alone in the vastness of space. And over the deep God’s voice could be heard, Breathing the Song, the Song of the Word; The Word that was Life, the Word that was Light That burst through the vastness of space. CHORUS: And God in his glory rejoiced to see The sweet light of morning in fresh mystery, The twilight of evening, the darkness of night On that wondrous day, so filled with God’s light; The first of the days of creation.
The teacher can take this opportunity to demonstrate how to pronounce the words correctly and to encourage the children to imitate the pace and expression of the poem. Mistakes are best corrected immediately so that the children become conscious of the correct pronunciation. The teacher takes note of the mistake as it will provide insight into whether children are listening properly or whether the teacher is not speaking clearly enough. They should not be allowed to mumble or to race through it but to speak clearly and with feeling. They repeat it several times and are praised for every improvement.
Speech Exercises
Suitable speech exercises may be chosen to help children with pronunciation. Alliterative sentences or verses, tongue twisters, simple sentences whether nonsense or with meaning and especially those with humour can be used; e.g. Many mumbling mice making midnight music OR Ten tiny tailors tip-toe to the top!
3 Copyright Catherine van Alphen, 2010. See end of manual for the full poem.
18
Source: www.entwicklungshilfe3.de Open Source: Creative Commons Attribution-Non-Commercial-Share Alike 3.0 International Licence; see www.creativecommons.org
Speech exercises can be spoken in different moods, not just loud or soft, fast or slow. So often speaking ‘fast’ means that children race wildly through the verse. But, get them to say it sternly, sadly, sweetly or mischievously and they will enjoy the humour of it without losing control.
Acting out the Story
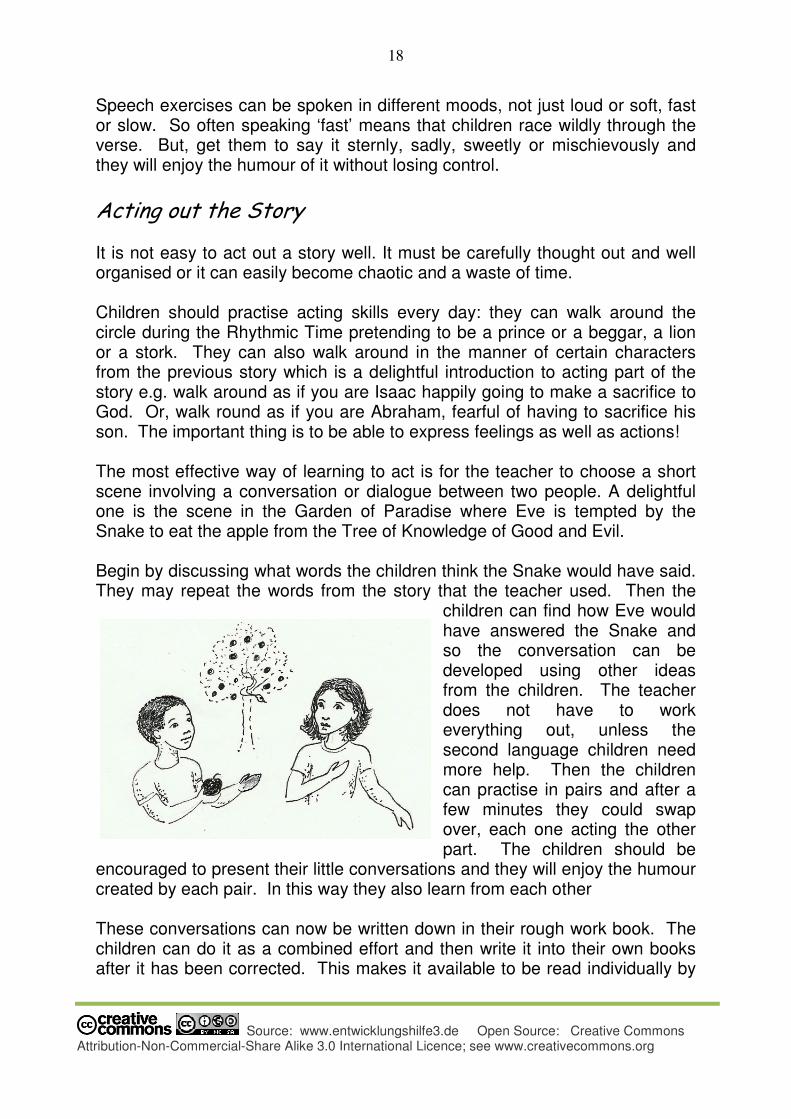
It is not easy to act out a story well. It must be carefully thought out and well organised or it can easily become chaotic and a waste of time. Children should practise acting skills every day: they can walk around the circle during the Rhythmic Time pretending to be a prince or a beggar, a lion or a stork. They can also walk around in the manner of certain characters from the previous story which is a delightful introduction to acting part of the story e.g. walk around as if you are Isaac happily going to make a sacrifice to God. Or, walk round as if you are Abraham, fearful of having to sacrifice his son. The important thing is to be able to express feelings as well as actions! The most effective way of learning to act is for the teacher to choose a short scene involving a conversation or dialogue between two people. A delightful one is the scene in the Garden of Paradise where Eve is tempted by the Snake to eat the apple from the Tree of Knowledge of Good and Evil. Begin by discussing what words the children think the Snake would have said. They may repeat the words from the story that the teacher used. Then the
children can find how Eve would have answered the Snake and so the conversation can be developed using other ideas from the children. The teacher does not have to work everything out, unless the second language children need more help. Then the children can practise in pairs and after a few minutes they could swap over, each one acting the other part. The children should be
encouraged to present their little conversations and they will enjoy the humour created by each pair. In this way they also learn from each other These conversations can now be written down in their rough work book. The children can do it as a combined effort and then write it into their own books after it has been corrected. This makes it available to be read individually by
19
Source: www.entwicklungshilfe3.de Open Source: Creative Commons Attribution-Non-Commercial-Share Alike 3.0 International Licence; see www.creativecommons.org
each child which is all the more effective and enjoyable after the fun of acting out the conversation.
Reading
The writing of the stories must be simple enough for the children to use as their material for reading. Children will then be reading from words they have already connected to through the experience of writing. The teacher will have gone through the words on the board to make sure that the children understand them and this gives them confidence and encouragement in their reading. It does not matter if the slower children are reading what they know off by heart for it helps them to learn the words for decoding the sentences. Many children will already be reading confidently but it is important to keep finding ways to assist the slower children so that they do not feel left behind. The teacher should organise regular reading sessions with the children using graded reading books from the class library. The teacher can ask parents to come and read with some children so that they get sufficient help and practice. Advanced readers could be allowed to read their own books once they have used up the class resources.
Phonics
Phonic work is taken from the stories: sound combinations that the children know are practised daily and any new words are written down in a special little book for vocabulary and phonics. Children should practise making up sentences using as many words belonging to a certain sound as possible. They can also make up sentences to show the meaning of words. These may also be written down. The children may need help with breaking words into syllables so that they can read and write them more easily. A simple game is to go round the circle and each child says a word and claps the syllables. No words may be repeated. a) Words of one syllable e.g. man, pot. b) Words of two syllables e.g. table, pencil, running. c) Words of three syllables, e.g. beautiful, merrily, etc. Flash cards of different syllables may be used to show how they can be joined up to make a longer word and to practise reading in syllables.
20
Source: www.entwicklungshilfe3.de Open Source: Creative Commons Attribution-Non-Commercial-Share Alike 3.0 International Licence; see www.creativecommons.org
Own Writing
The children write down the conversations they have acted and the teacher should correct them. The mistakes in spelling and grammar arising from the dialogue will become material for future lessons. This is a very effective way of preparing children for their own writing. The children can also write short sections of a story in their own words, especially if they have retold it that day or the day before. The teacher should remind them of the part to be written down, leading them into the picture and making it clear what they have to describe. This is a time when the bright, able readers shoot ahead, revelling in the opportunity to express everything in their imaginations. However the slower ones struggle to keep up, so the teacher needs to find ways of handling this situation. It is vital that all the children’s own writing must be prepared thoroughly, especially with second language children. Some children are so overwhelmed by such a task that at the end of the lesson they have nothing on their paper. These children could also work in pairs, helping each other to find the words to be written down. They need all the encouragement possible so that making up their own sentences becomes easy and fun to do. Simple greeting cards for birthdays can be made. ‘Thank you’ letters to parents and adults who are helping the class can be written by the children. A letter of sympathy can be written to a classmate who is sick. Other situations that arise spontaneously for communicating by letter are also fun for children to do. The children could also have a little book for writing down ‘news’ once a week. The teacher should endeavour that children do their own writing at least once or twice a week.
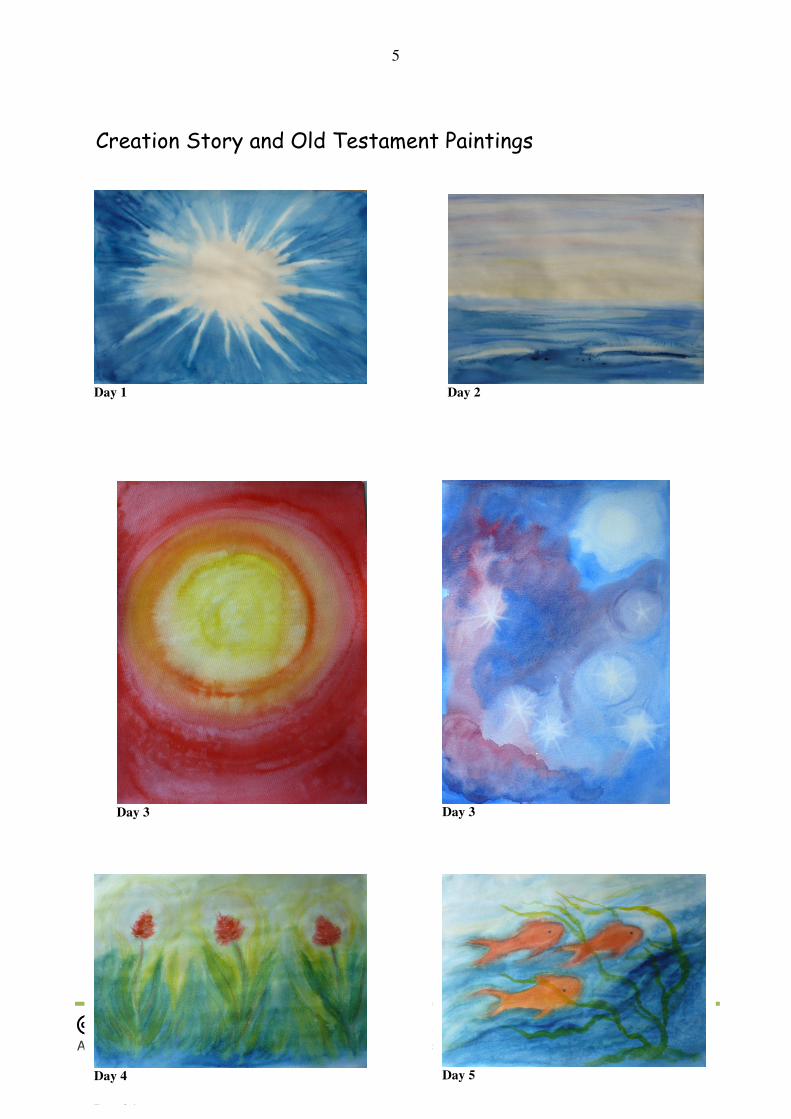
Art and the Seven Days of Creation
The first five days of Creation lend themselves effectively to the medium of painting4. In addition to the drawings and writing the children do in their main lesson books, it would be very good if the teacher painted regularly to illustrate the first five days of Creation. If the teacher can give up certain lessons and allow the class to paint three times per week in a lesson after the main lesson for the first two weeks, this would help the children to integrate the experience of the Creation story. The following themes are suggested:
4 Illustrations at front of the manual.
21
Source: www.entwicklungshilfe3.de Open Source: Creative Commons Attribution-Non-Commercial-Share Alike 3.0 International Licence; see www.creativecommons.org
Day 1: “Let there be Light!” Dark Prussian blue is painted inwards from the edge of the paper (from all sides), while leaving a space in the centre and creating a burst of white light that radiates outwards. Day 2: “Sea and Sky” Soft Ultramarine blue for the sky and deep Prussian blue for the sea, with a touch of Lemon yellow and pink in the clouds. The sky is darkest at the top of the page and fades as it moves down to the sea. Day 3: “Lights in the Firmament” This can best be done in two paintings. In the first painting the sun is painted in Lemon yellow, radiating out and fading to white. Ultramarine or Prussian blue is used for the sky painted from dark at the edges of the paper fading to meet the white around the yellow. In the second painting the moon and stars are painted with blue and red or purple, leaving space for the moon and points of light, not 5 pointed stars. This is not as easy as one might expect. Day 4: “The Green Earth Appears”; Use Prussian blue water below, Lemon yellow sunlight above, creating green grass and plants where they meet. Add red or orange flowers. This theme may be done in many ways. Day 5: Two paintings: “Fishes in the Sea”; Wavy flowing shapes using Prussian blue and Lemon yellow, allowing fishes to emerge between the waves. Leave the fishes white or colour them yellow. Red can be used if paper is not too wet. “Birds of the Air”. Using a combination of Prussian and Ultramarine blues , create a sky that is dark at the left and lower sides of the paper, moving lighter towards a spherical sun which is left white. Leave white spaces for birds: larger in the darker areas and small closer to the sun. The birds further away can be painted very small in blue when the paper is dry. (N.B. Birds and fishes were created on the same day). Day 6: is best expressed by drawing rather than painting. I let the children draw a large mural with the whole of Creation on it and let everyone draw different sections including trees, flowers, fishes and birds, many animals and even Adam and Eve!
If the teacher wishes to tell the Creation Story with musical accompaniments, he or she can collect whatever musical instruments can be found for this activity.
22
Source: www.entwicklungshilfe3.de Open Source: Creative Commons Attribution-Non-Commercial-Share Alike 3.0 International Licence; see www.creativecommons.org
Suggestions are: a gong for the sun and moon, a couple of triangles for stars and a lyre for sea and sky. A glockenspiel, small marimba, a drum, shakers, recorders, even tapping glasses with water can be used. The teacher decides (perhaps together with the class) which instruments could work best for each aspect of Creation. Then he or she distributes the instruments and retells the story, allowing the children to improvise the different elements of Creation when it is their turn. Needless to say the story will need to be repeated several times so that everyone can have a turn to play an instrument. It is great fun!
23
Source: www.entwicklungshilfe3.de Open Source: Creative Commons Attribution-Non-Commercial-Share Alike 3.0 International Licence; see www.creativecommons.org
The Grammar Main Lesson
In Grades 1 and 2, the focus was on learning to write and read the letters. This led on to sound combinations and the beginning of reading. In Grade 3, however, the children are in a new phase of awakening, of developing their egos and learning to assert them consciously. The children must become aware of the power of language: how to use words and understand the structure of sentences in order to express ideas clearly and accurately. For language is like a house; children need to learn the techniques of building to construct that house of language for themselves. Every main lesson must be inspiring both for the teacher and the child. The important thing is to link the main lesson theme to the human being. The human being has a threefold consciousness: the head is linked to thinking, the heart and lungs are connected to feeling and the limbs and hands to moving and doing. We seek to express these three aspects of the soul in language. We become conscious of everything we see and we think about everything; analysing and organising all the facts. The words for these facts are called nouns; therefore nouns are connected to the thinking part of the human being. Everything that we do is expressed by means of verbs in our language and we describe the world around us through the many adjectives we use and these words express our feelings. There are other parts of speech that are part of our language, but in this main lesson, we begin with the first three: nouns, verbs and adjectives.
Nouns, Verbs and Adjectives
The Grammar main lesson aims to teach the children about the three main parts of speech: verbs, nouns and adjectives. But such abstract names are not appropriate at this age, so verbs are called ‘Doing Words’, nouns are called ‘Naming Words’ and adjectives are called ‘Painting or Describing Words’. In this way the children will understand the concepts easily. The main lesson takes three weeks. The first week is all about ‘Doing words’. The second week is about ‘Naming Words’ but develops the connection between ‘Naming Words’ and ‘Doing Words’ because they always work together. The third week is about ‘Describing Words’ showing how they are connected to ‘Naming Words’ and ‘Doing Words’. Why do we begin with ‘Doing Words’ and not ‘Naming Words’? The children in the early years of their life learn everything through active experience. For them life is movement, activity, doing. A verb can stand on its own when we
24
Source: www.entwicklungshilfe3.de Open Source: Creative Commons Attribution-Non-Commercial-Share Alike 3.0 International Licence; see www.creativecommons.org
say “Run!” “Play!” “Eat!” “Sleep!” But how do we create a whole week all about Doing Words?
Doing Words
In the stories of the Garden of Paradise, Adam and Eve did many things. The teacher can describe what it was like in that Garden. Let the children imagine all the things they could do because they were free to do everything they wanted. Each child can say one or two of the different things that Adam and Eve might have done in the Garden e.g. Adam climbed a tree and Eve picked flowers. They ate honey from a bee-hive. Eve danced across the grass and Adam drank water from a stream. They slept under the stars. Adam called the eagle to fly down to him. Eve stroked a deer’s nose. Everyone can act out the different things that Adam and Eve might have done in the Garden, both individually and together. OR Noah had to build an ark and so he got his family to help him. Choose someone to be Noah and everyone else can be helping him to saw wood, drag logs, nail them together and paint it with pitch to make it watertight. They can work in groups or on their own also gathering and preparing food to take on the journey. After a little while, the teacher gets everyone to say what they were doing to help Noah build the ark. The different words can be written on the board and the children can read them. Then the teacher can say that these kinds of words are called ‘Doing Words’ The teacher gets the children to make up short sentences with each of the words and s/he writes them on the board in the correct sequence. Each of the Doing Words is written in the colour RED because it is an active colour, very suited for lively Doing Words. The children write them down in their main lesson books under the heading: Doing Words. The first page is left blank and will be filled in at a later stage when all three kinds of words have been introduced. During the rhythmic time of each day, many games involving Doing Words should be played. They should all involve acting and miming and guessing what the words are. It is a golden opportunity for increasing vocabulary for everyone, especially second language speakers. Here are some games to be played but the teacher can make up others.
1. ‘What are you doing?’ Children stand in a circle with one child in the middle. They all sing or say: What are you doing? What are you doing?
25
Source: www.entwicklungshilfe3.de Open Source: Creative Commons Attribution-Non-Commercial-Share Alike 3.0 International Licence; see www.creativecommons.org
What are you doing today? The child in the centre mimes some action e.g. brushing teeth, digging in the garden and answers: I am digging, I am digging, I am digging today. The whole class imitates the action and sings: We are digging, we are digging today. Another child takes a turn to be in the centre and the activity is repeated.
2. Children sit in a circle and the teacher goes round with a packet in which are folded pieces of paper with doing words written on them. Each child chooses one, reads it quietly and then they in turn act out the words. The children have to guess what the word is from the actions of the child. (The teacher must check that everyone can read and understand the word on the paper before starting the game.)
3. The children are in a circle and each one has a turn to act out a doing word related to doing things in a specific place e.g. the classroom or the kitchen or camping, etc.
4. Adam and Eve walked in the Garden of Paradise. One by one, each
child moves across the room in a different way, i.e. not walking. No repeats are allowed. The words for each kind of movement are guessed and written up on the board e.g. marching, skipping, stamping, shuffling, swimming, dancing, riding, etc. Sentences can be made up and written in the main lesson book.
5. Mime the different animals going into the ark. The tortoises plodded.
The monkeys scampered. The lions stalked. Write down what the animals did.
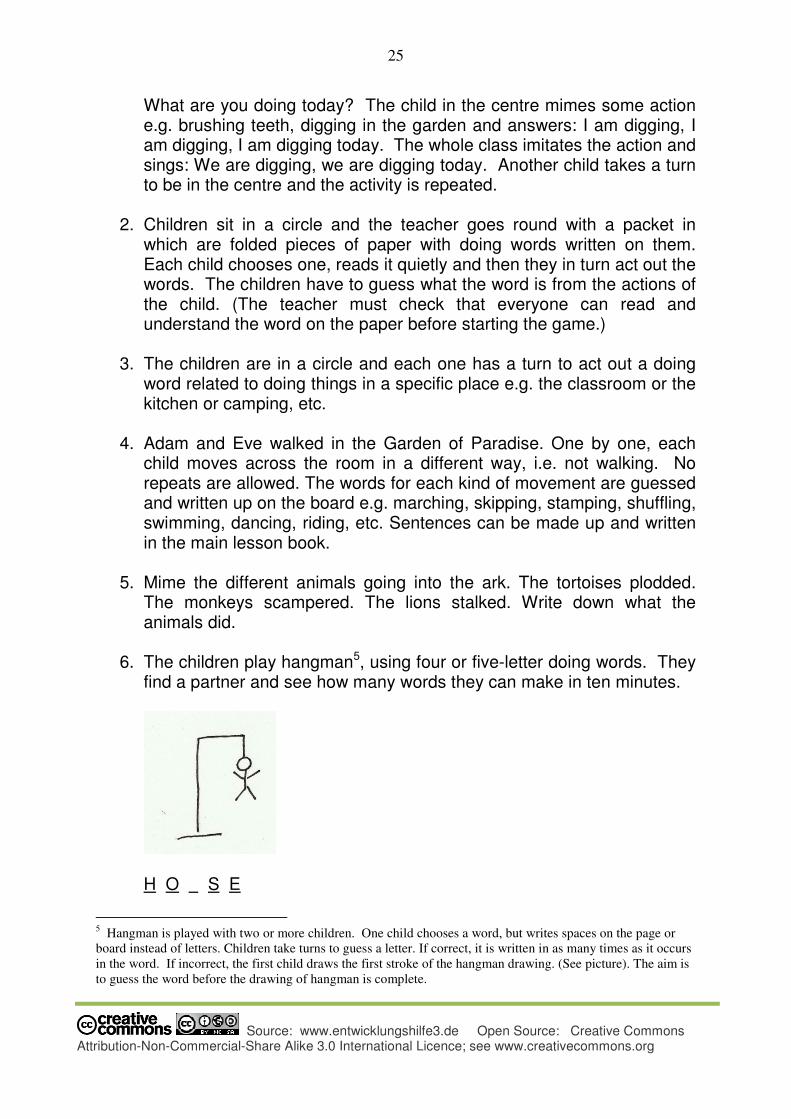
6. The children play hangman5, using four or five-letter doing words. They
find a partner and see how many words they can make in ten minutes.
H O S E
5 Hangman is played with two or more children. One child chooses a word, but writes spaces on the page or
board instead of letters. Children take turns to guess a letter. If correct, it is written in as many times as it occurs
in the word. If incorrect, the first child draws the first stroke of the hangman drawing. (See picture). The aim is
to guess the word before the drawing of hangman is complete.
26
Source: www.entwicklungshilfe3.de Open Source: Creative Commons Attribution-Non-Commercial-Share Alike 3.0 International Licence; see www.creativecommons.org
7. The children are given a theme like ‘baking a cake’. Working in pairs,
they act it out together and take turns to show the others. Together they find out how many doing words are being used in the activity.
8. Go round the class with each child saying one doing word. However, make sure that this is not too difficult for the second language learners. These are the very children who need the practice of finding words. If they are struggling, let someone help them by miming an action.
9. A variation of the above game. Choose a letter from the alphabet. Let
each child in turn find a doing word beginning with that letter. If someone cannot find a word, choose another letter. Avoid letting children be “out” when they cannot find a word. They can miss one turn and try again next time.
Every morning, the teacher can repeat the games, using different examples or creating new games. The important thing is to do the game and the actions first and then write up the words. The teacher should try to introduce new words and situations with a little scene or story so that the children do not merely repeat the same examples from the day before. Only one of the exercises will be written into their books. Children should also reread the work from the previous day. New words should be practised daily until the children know them well. The difficulty lies in the various forms of doing words. Children should be able to recognise a doing word whether it is sit, sat, was sitting, will be sitting, etc. Learning to distinguish between the tenses and participles will be done in the following year. Another way of recognising a doing word is for the children to do a specific movement when they hear it. Perhaps they can stamp a foot every time they hear a doing word. The teacher can read out sentences or phrases and the children must stamp whenever they hear a doing word. The children soon learn the game and enjoy playing it.
Naming Words
Adam and Eve were in the Garden of Paradise. “Oh, Adam”, said Eve, Please get me that thing over there.” “What thing?” asked Adam. But Eve did not know what it was called. She tried to show him with her hands and eventually took him along and showed him a little tortoise hidden in the grass. Then Adam wanted something to eat. “Let’s get some little things from that big thing over there,” he said. “What things are you talking about?” asked Eve. “I can’t see them at all” So Adam went over and showed Eve the juicy berries on
27
Source: www.entwicklungshilfe3.de Open Source: Creative Commons Attribution-Non-Commercial-Share Alike 3.0 International Licence; see www.creativecommons.org
the bush. “What are they called?” she asked. “I don’t know”, he answered. “I had better ask God. After all, He made them. So Adam went along to God and asked him to tell him the names of everything in the Garden. “Ah!” said God. “I think that could be your job. Would you like to choose a name for everything in the Garden?” “Oh yes,” said Adam. And so off he went and everything he saw, he looked at it carefully and felt what it was like inwardly and outwardly and then gave it a name. He sensed the liveliness of the monkey with its cute and comical face. He sensed the gentleness and timidity of the deer and the soaring power of the broad-winged eagle. He named the mountains and the trees and the rivers and stones and the flowers and birds and more things than you and I can possibly think of. So children, can you think of some of the things that Adam named in the Garden of Paradise? The names of everyday things are common Naming Words e.g. horse, flower and cloud; but the names of people and places, titles of books, etc are called proper Naming Words and have capital letters at the front of each name e.g. Tom, Mary, Kenya, etc. The children need to be familiar with both these kinds of Naming Words. Collective nouns and abstract nouns are learnt in Grade 4. Many games can be played to explore the wonderful world of Naming Words:
1. Choose a theme e.g. Garden of Paradise, underwater, space, cars, sports, food, school, etc. Go round the class with each child naming some object found under that theme.
2. Alphabetical Animals. Beginning with A, go round the class naming any creature whose name begins with that letter. When a child cannot think of an animal, help them or get someone else to name another animal before moving on to the next letter.
3. Names of boys and girls can be found using the Alphabet Game.
Another variation of this could be names of important places, streets, suburbs, towns, countries and titles of books, etc.
4. Animal Guessing Game. Noah had many animals on the ark and every
night before he went to sleep he would go round and check that they were alright. But it was dark in the ark and so he could not always see them by the light of his candle. So each animal had to make a noise to show that they were fine. Choose one child to be Noah and blindfold him/her. Give him a stick. Each of the other children chooses the name of an animal from a packet and they have to make the noise of that
28
Source: www.entwicklungshilfe3.de Open Source: Creative Commons Attribution-Non-Commercial-Share Alike 3.0 International Licence; see www.creativecommons.org
animal so that Noah can guess who they are. Great fun. Some children are very good at imitating animals, while others have to learn what the sounds are. They should also learn the doing word related to the sound e.g. A donkey brays. A cow moos.6
5. The teacher has two packets: one containing Naming Words and the
other containing a Doing Word associated with the Naming Words in the first packet. Each child gets a word from each packet. They read them and everyone goes round the room to find the Doing Word connected to their Naming Word. They give away the Doing Word to whoever needs it and they sit down as soon as they have two words that belong to each other. When everyone is sitting, one by one they read out their words.
6. The class is divided into two groups. Everyone stands. Someone from
the first group has to call out a Naming Word e.g. cat and someone from the second group puts up their hand and gives a Doing Word and shows how they are connected to the Naming Word e.g. the cat purrs. If the Naming Word is inanimate e.g. cup, the Doing Word could be ‘drink’ or ‘drop’ because you can drink from a cup or you can drop the cup. Then the two children sit down. The game finishes when everyone is sitting in their seats.
7. Choose a Naming Word and see how many Doing Words can be found
to go with it. Living creatures or human beings make the most suitable themes for this game.
8. Memory Game. The teacher takes a tray around with a number of small
objects on it. The children see the objects briefly before the teacher covers the tray with a cloth. Then the children write down as many objects as they can remember.
Recognising the Naming Words in a sentence is also fun! The movement for the Naming Words could be nodding your head, touching your head or standing up. The teacher must decide whatever movement they like best. When the teacher reads out sentences, the children now have two movements to make, one for all the Doing Words and one for all the naming Words. When the children write Naming Words in sentences or phrases, they should write them in BLUE as it is a quiet, thoughtful colour. What a contrast from the lively RED Doing Words!
6 See list at end of manual.
29
Source: www.entwicklungshilfe3.de Open Source: Creative Commons Attribution-Non-Commercial-Share Alike 3.0 International Licence; see www.creativecommons.org
Male and Female
All the animals went in pairs into the ark. The lion and lioness, dog and bitch, stallion and mare, bull and cow, etc7
Diminutives
Several babies were born in the ark during the forty days afloat. The mare had a foal, the cat had kittens and the hen had chickens.8
Plurals
Lion – lions, cat - cats, horse – horses, etc9 The teacher selects appropriate examples from the above three categories.
Painting Words or Describing Words
In the third week the children learn about the words that describe the Naming Words: the words that show how we feel about things. Adam and Eve were very happy in the beautiful Garden of Paradise. They loved the golden sunrise in the early morning and the fleecy white clouds that drifted across the clear blue sky. They ate sweet juicy fruits whenever they felt hungry and watched the coloured butterflies dancing over the lush green grass. The animals were quite tame and the mighty lion shook his shaggy mane peacefully and allowed the fluffy rabbits to hop playfully around him, while the gentle lamb frolicked away with the naughty, cheeky monkey, etc. But oh!! All that changed when they had to leave and go to earth! Adam and Eve felt sad and lonely when they left the Garden. Often there were dark, heavy clouds hanging in the sky and the cold rain felt miserable after the warm sunshine. They had to search for food and sometimes the berries were hard and sour. The animals were now wild and frightened of each other. The little lamb bleated pathetically and the lion’s tremendous roar terrified the timid deer, etc. The Describing Words may include both adjectives and adverbs but at this stage the children do not need to distinguish between them; they must only be able to recognise these words that describe or paint pictures. This is a time of increasing the children’s vocabulary to include many adjectives, not just colours. Much practise will be needed, especially with second language children, who need to step beyond the basic describing words which are ‘big, small, good, bad, fat, thin and nice’.
7 See list at the end of the manual.
8 See list at the end of the manual.
9 See list at the end of the manual.
30
Source: www.entwicklungshilfe3.de Open Source: Creative Commons Attribution-Non-Commercial-Share Alike 3.0 International Licence; see www.creativecommons.org
It is best when the teacher prepares a passage like the scene above where there are many Describing Words. Then discuss the feelings of Adam and Eve and ask the children to see if they can tell some of the words that described the Garden of Paradise and what it was like on the earth. The sentences can be written on the board and when the children have read the passage, they can write it into their main lesson book. It would be good to draw a picture of the two scenes. The Describing Words should be written in YELLOW or ORANGE to distinguish them from the Doing and Naming Words. Another morning the teacher could retell the story of Cain and Abel, contrasting them in different ways. Cain was tall and strong, with curly brown hair and powerful muscles. He was rough and wild, speaking in a loud deep voice. Abel was peaceful and friendly, with soft grey eyes and gentle hands. He sang sweetly to his woolly sheep and brought them into the sturdy wooden pen each evening where they could be safe and warm for the night. The children can collect the Describing Words and write them down. Later they can write a paragraph into their books and draw a picture to illustrate it. Describing Words are good for everyone to act out in the rhythmic time. Here are some games for Describing Words:
1. Choose a Naming Word and let children find as many describing words as possible e.g. horse: black, swift, strong, galloping, snorting, wild, tame, gentle, powerful, patient, obedient, shining, friendly, etc.
2. How did Adam and Eve feel when they came to earth? Sad, ashamed, lonely, curious, excited, tired, anxious, determined? How many more words can the children find?
3. The teacher has two packets with Naming Words in one and Describing
words in the other. The children get one word from each packet and have to find the correct Describing Word to match their naming Word.
4. ‘Mary’s cat’. This is an Alphabet game. The children sit in a circle and
the teacher says: Mary’s cat is an angry cat. The next child must say the same sentence but find a new Describing Word beginning with A. e.g. Mary’s cat is an agile cat or an aweful cat, an attractive cat, etc. As in the other games, when the children cannot find any more words with that letter, they go on to the next letter. It does not matter if the Describing Word makes sense, this just adds to the fun. They learn many Describing Words from each other this way!
31
Source: www.entwicklungshilfe3.de Open Source: Creative Commons Attribution-Non-Commercial-Share Alike 3.0 International Licence; see www.creativecommons.org
5. Opposites. The teacher writes a number of Describing Words on the board that are scrambled. The children must sort them into pairs of opposites.10
6. The children each have a piece of paper pinned to their back with a
Describing Word on it (4 -7 letters) which they do not see. They have paper and pencil in their hands and they go around and ask each other one question at a time. The other child can only answer ‘yes’ or ’no’. The aim is to find out what letters are in the word and then for each child to unscramble the letters and find the correct Describing Word. If a letter is repeated e.g. the ‘t’ in pretty, the child may answer ‘Yes, there are two.’
7. Alliterative Describing Words. Take each child’s name in turn and try to
create a sentence with many Describing Words beginning with the same letter as the child’s name e.g. Merry, magical, marvellous masterful, moody, mean, mischievous Marion or Bright, brown, brainy, beautiful, bullying, boastful, beastly, brilliant, bungling, bubbly, brave Bobby.
8. Children can describe the child sitting next to them: their clothes, face, hair etc, using as many different describing words as possible. New words should be written on the board and later into the children’s vocabulary book.
9. Children close their eyes and choose a small object from a tray and
hide it under the desk. One by one they describe their object to the class for the others to guess what it is.
They can now write complete sentences with colours to distinguish the three different kinds of words. Many games and exercises can be played each day to show how these three kinds of words can work together. Some words may be difficult for slower children to read, but they can memorise them if the teacher repeats them often. The movement for Describing Words could be wave of the hand as if painting. Now the children are able to do movements for all three types of words while the teacher speaks a sentence slowly. A fun challenge!
Language Development
Language development is not just about the children gaining confidence and skill in expressing their thoughts and feelings. It is a time of increasing their vocabulary as far as possible because every new word opens a door to
10
See list at end of manual.
32
Source: www.entwicklungshilfe3.de Open Source: Creative Commons Attribution-Non-Commercial-Share Alike 3.0 International Licence; see www.creativecommons.org
increased understanding. Every new word excites the curiosity of the children and sharpens their observation of the world around them. So we see that language awakens the children in many ways; it is like the sun rising and touching every object, bringing to life its shape, colour and essential quality. What knowledge can be discovered in this way! What a joy for the children to experience!!
33
Source: www.entwicklungshilfe3.de Open Source: Creative Commons Attribution-Non-Commercial-Share Alike 3.0 International Licence; see www.creativecommons.org
Handcraft Main Lesson
LIFE ON EARTH11 When Adam and Eve came to earth They sorrowed and wept: The beauty and joy of Paradise They could not forget. The many gifts of the earth They struggled to use: To spin and weave their clothes; To make their shoes. They made bricks from clay and straw; They thatched the roof with reed; They made pots and baskets and knives For many tools they did need. Things tore and broke and got lost And had to be mended again; It was hard to finish each task In the wind and rain. But every time it was done How happy they were: The beauty and joy of their work Was everywhere. Children love making all kinds of objects and are keen to explore every material that is available. In the handcraft lesson they learn to make things that are both beautiful and useful. In Waldorf schools the emphasis is placed on the experience of natural materials like pure wool, string, wood and clay where the various textures and qualities of each material offer different creative possibilities. In Grade 3, however, the children participate in a main lesson in which they learn about and experience the earliest crafts of humankind. The teacher plans the three-week main lesson so that three or four types of handcrafts can be experienced. Important ones to be studied are pottery, simple basket weaving, spinning and weaving of wool, and blacksmithing. The aim is to describe how each craft arose out of the needs of primitive people and to let the children experience each craft for themselves in a simple manner, not using the machinery of today. Each handcraft can
11
©Copyright Catherine van Alphen 2010
34
Source: www.entwicklungshilfe3.de Open Source: Creative Commons Attribution-Non-Commercial-Share Alike 3.0 International Licence; see www.creativecommons.org
occupy the children for several days or even a week if they are allowed to make simple examples from each type of craft. If there are other crafts within the area of the school, these could be included or done later in the year as a second handcraft main lesson e.g. felting, leather craft, beading, wire work, etc. If the teacher is not able to do some of these crafts, they should call on other people who can, e.g. the handcraft teacher, a local potter or weaver. The exception is the visit to the blacksmith which is an example of a “hard craft” and where the teacher will not be able to bring the experience into the classroom. The children should as far as possible be taken on outings to see these crafts people at work. Through the experiences in craft and also in house building and farming, the children come to respect the skill, creativity and dignity of each trade. They discover a sense of achievement through working to transform each different material into something that is both beautiful and useful. They come to recognise how much effort is required in the process of transformation. In many cases the experience leads on to creative ideas beyond the original expectations of the children.
Pottery
How Early People began to make Pottery
Adam and Eve came to earth and for the first time had to find food and water in order to survive. No longer was every fruit tree and vegetable freely available to them. They had to wander through the forest and grassland looking for berries, fruits, leaves, grains and roots to eat. Like all early people, they had to live in a place that was close to water. As they were walking along, Adam said to Eve, “Let’s go down to the river, I am very thirsty.” So they climbed down the bank and came to the river that rippled and gurgled over the rocks and into the swirling pools. Adam knelt down and cupped his hands to catch the water as he drank. As he stood up, his feet seemed to stick in the reddish earth at the brink of the river and Eve laughed to see the shape of his footprint. “Look at the shape of your foot! I can see where you have been.” “Yes,” said Adam, “And I can see the prints of many other animals that have drunk here.” Eve knelt down as well and drank some of the fresh clear water. It was a bit reddish just where Adam had been standing and she touched the earth and found that it was smooth and slippery. She reached into the water and pulled
35
Source: www.entwicklungshilfe3.de Open Source: Creative Commons Attribution-Non-Commercial-Share Alike 3.0 International Licence; see www.creativecommons.org
up some of the reddish earth. It seemed to stick together and she rolled it around in her hands. “Adam, this is quite different from the brown earth at the top of the hill where the grass is growing. What kind of earth is this?” Adam looked at the ball in Eve’s hands. He took it from her and rolled it round as she had done. “This is clay,” he said, and gave it back to her. “What are you going to do with it?” “I am going to play with it, “said Eve. Eve began by rolling the ball and then she dipped it in the water and smoothed away all the cracks. Suddenly she stuck her thumb into the middle of the ball. It looked so funny stuck to the end of her thumb that she burst out laughing. Then she began to widen the hole made by her thumb and slowly she opened the ball out into a curved shape that resembled her cupped hands, except that there were no holes through which the water could escape. Carefully Eve smoothed the curved shape on the inside and then on the outside. She even took a little stick and made some squiggly patterns running down the outside. “Look at what I have made, Adam,” she said, smiling at her achievement. “That is a bowl!” said Adam. “What will you do with it?” “I want it to hold water like your hands held the water. But it is all floppy, it might break as soon as I try to use it,” said Eve. “Just put it on the rock over there and let it dry out,” said Adam. As the sun grew hotter, the clay dried out. Some parts cracked while other parts held firm. “Oh dear,” said Eve, “This bowl is not working. What can I do about it, Adam?” “Look at the broken bit along the edge,” said Adam,” It is too dry. But the bottom part is strong and thick.” “So I must make the sides more even,” said Eve. “Yes, and perhaps it got too hot in the sun. I wonder if it would be better to let it dry in the shade, even if it takes longer,” said Adam. The second bowl was much more successful and held enough water for them both to drink from. And when a bowl fell and was broken, Eve just smiled and said, “Well, I can easily make another with clay from the river bank.” One evening they placed their bowls for food near the fire while they were cooking the meat. When they cut strips off and put them in the bowls, Eve said “Adam, look at this bowl. It has got so hot on the one side, I can hardly touch it. Look at the colour too. It is much darker from the fire.” “There is a stripe down one side,” said Adam. “That must have been some of the blood from the meat,” said Eve. “There are even fingerprints over here.” From each experience, Adam and Eve and all the early peoples learnt more and more about making pottery from clay. They made bowls and plates to hold food; cups for drinking and jars in which to store food or to carry water from the river. They also discovered how to use fire to harden the pottery and
36
Source: www.entwicklungshilfe3.de Open Source: Creative Commons Attribution-Non-Commercial-Share Alike 3.0 International Licence; see www.creativecommons.org
make it more durable. They made different designs on their pots and bowls using colours from crushed rocks, and plants. They even modelled the shapes of the animals that lived in the surrounding woods and grasslands. However, not everything was discovered at once and it took many centuries to develop step by step to where we are today.
Pottery Firing among Early People
The early peoples began to experiment with heating the bowls in a fire and pit-fires were developed for firing pots. They first prepared the pots and decorated them in various ways. They also had to dry them out very slowly and carefully. Then they dug a pit about 1.5 m long X 1 m wide and 1.2m deep. The bottom was filled with sand or sawdust. They buried their pots in the sand and covered them with more sand or sawdust. Then they built a huge bonfire over it. The fire became extremely hot and burnt all night. The sand kept the temperature high for a long time and it took a long time to cool down even after the fire was out. The pit kept the pots evenly heated which meant that the pots were stronger. When the sand was cool, they dug up the pots and were amazed at the interesting patterns and colours that were caused by the firing. The designs and colours are not as even as modern kilns that are heated by wood or electric, but they have a charm of their own.
Visiting a Potter
It is best for the children to be taken to a potter and shown around the pottery. The potter may give them a lesson on how to make coil pots. They can make a bowl or vase as well as experimenting with various other shapes. The children can be shown the potter’s wheel and how the potter can turn a lump of clay, moulding it into the finest bowls and jars. These pots will be perfectly symmetrical and the sides will have an even thickness! The children can see the huge drying racks where the clay pots are dried before being bisque fired. They will also see the large kiln where the clay is fired. Bisque is the first firing where the fire is not as hot as the second firing. Bisque is a ceramic material and gives the pot a terracotta or pinkish colour. When the children’s clay objects are dry and bisque-fired, they will need to paint them with glaze. There are many coloured glazes with which to paint the pots. The teacher may bring the children back to the pottery to do this unless the pottery is far away. Otherwise the potter can give the objects and the glaze to the teacher for the children to paint at school. When the glaze is dry, the teacher returns the clay objects to the potter for the second firing in the kiln.
37
Source: www.entwicklungshilfe3.de Open Source: Creative Commons Attribution-Non-Commercial-Share Alike 3.0 International Licence; see www.creativecommons.org
The potter will only do a firing when the kiln is completely full as it is a long and difficult process. The kiln has to be carefully prepared and preheated and this cannot be done by the children. It can be a wood or coal burning kiln or an electric kiln. Once the kiln is filled, it is sealed and heated to a high temperature. It takes a long time, perhaps 18 hours to heat up the kiln to a temperature of 1700 to 2500 degrees. After firing, it will take some time for the kiln to cool down. Eventually the potter will send the pottery back to the children who will be amazed how different they look now that the pottery has been properly fired! Even the glazes look different from when they were painted on! Sometimes the children may not recognise their own work and will have to look at their names or initials to decide on the owners. It is possible for the teacher to build a sawdust pottery kiln12 with the class (as described above) but only if he or she has the knowledge and experience to handle such a project with the class.
Making Clay Pots
The children will have experienced modelling with beeswax or plasticine in Kindergarten and Grades 1 & 2. They may have played with clay on certain occasions but Rudolf Steiner does not encourage regular clay modelling before age 9/10 as clay tends to sap one’s energy and this can drain sensitive children. One has only to see how dry one’s hands get when working with clay to realise that it takes the moisture out of them. The teacher will need to buy special clay that is suitable for making pots to be fired in a kiln. There are several types from rough to smooth pottery clay. If they order from a proper source of pottery clay, they can be advised which clay from that area is most suitable. It is also possible for the teacher to take the children on a ‘clay dig’ where they bring spades and dig up the clay out of the ground. They will need plastic packets in which to put the clay so that it does not dry out before they have used it. The clay will need to be washed and the stones and grit removed. It must be kept in a cool place and in a container with damp cloths over it to keep the clay moist. The clay will need to be broken into balls and the children will work the clay thoroughly to make sure it is smooth and even before modelling into clay objects. Where parts have become too dry, the children can add water and work it into the clay. When the clay is ready, the children can make whatever they or the teacher decide. 12
Google: building a primitive sawdust pit-fired pottery kiln
38
Source: www.entwicklungshilfe3.de Open Source: Creative Commons Attribution-Non-Commercial-Share Alike 3.0 International Licence; see www.creativecommons.org
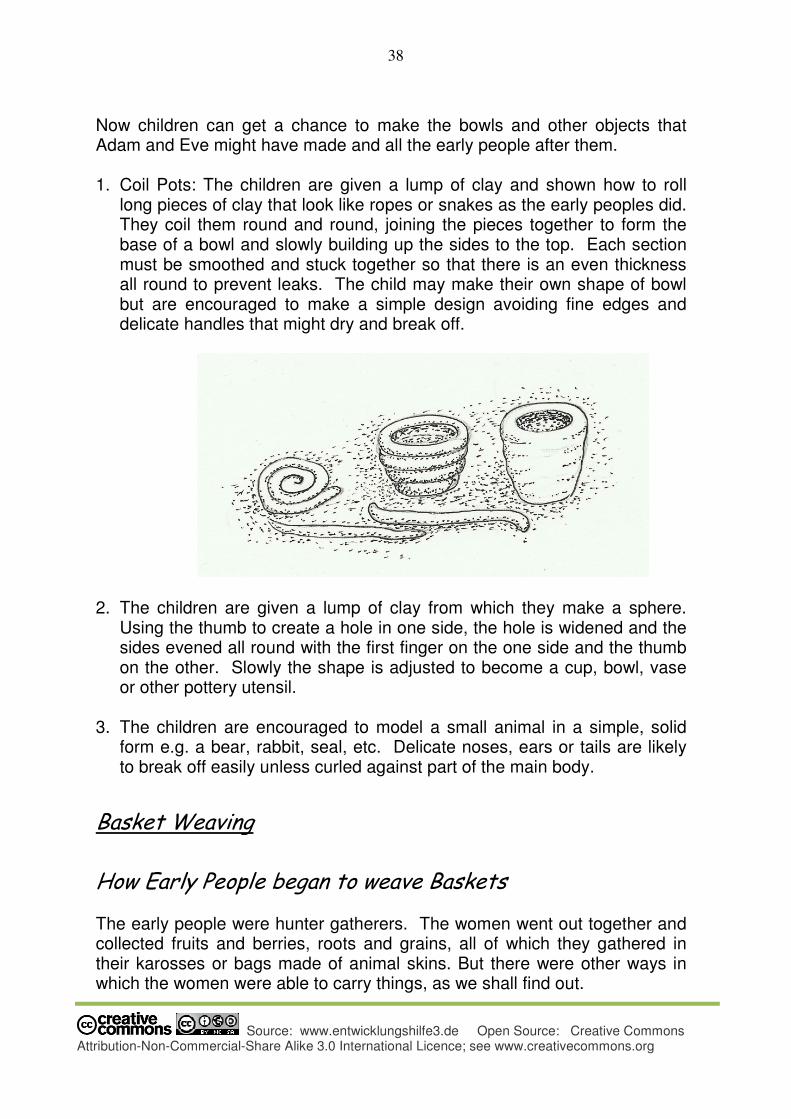
Now children can get a chance to make the bowls and other objects that Adam and Eve might have made and all the early people after them. 1. Coil Pots: The children are given a lump of clay and shown how to roll
long pieces of clay that look like ropes or snakes as the early peoples did. They coil them round and round, joining the pieces together to form the base of a bowl and slowly building up the sides to the top. Each section must be smoothed and stuck together so that there is an even thickness all round to prevent leaks. The child may make their own shape of bowl but are encouraged to make a simple design avoiding fine edges and delicate handles that might dry and break off.
2. The children are given a lump of clay from which they make a sphere. Using the thumb to create a hole in one side, the hole is widened and the sides evened all round with the first finger on the one side and the thumb on the other. Slowly the shape is adjusted to become a cup, bowl, vase or other pottery utensil.
3. The children are encouraged to model a small animal in a simple, solid
form e.g. a bear, rabbit, seal, etc. Delicate noses, ears or tails are likely to break off easily unless curled against part of the main body.
Basket Weaving How Early People began to weave Baskets
The early people were hunter gatherers. The women went out together and collected fruits and berries, roots and grains, all of which they gathered in their karosses or bags made of animal skins. But there were other ways in which the women were able to carry things, as we shall find out.

39
Source: www.entwicklungshilfe3.de Open Source: Creative Commons Attribution-Non-Commercial-Share Alike 3.0 International Licence; see www.creativecommons.org
Adam and Eve loved to go down to the river. On hot days, Eve liked to lie in the cool water and enjoy the ripples flowing over her body. She and Adam learned to swim. Adam swam in the deep pools and soon noticed fish swimming there too, their shiny scales flashing in the sunlight as they swam close to the surface of the water. “I wonder if I could catch a fish,” Adam said, “They swim so swiftly through the water. But when I am swimming, they are frightened and dart away. I can never catch them then.” So Adam crouched on a rock in the middle of the stream and let his fingers trail playfully in the water close to the rock. Some fish became interested and swam close, trying to nibble at his fingers. He tried to grab them. Sometimes he touched one, but mostly they got away. Then one day he brought some little pieces of food from the previous meal and suddenly many fish were eager to taste what he had. In a flash, he grabbed two little fishes and shouted to Eve, “I caught them! We will have fish to eat today!” They built a fire on the bank of the river and had a delicious meal, though Eve was sorry that they had to kill the little fish. After that there were many meals from fish caught in the river. Later, Adam and Eve took their two sons, Cain and Abel, even when they were quite young, and taught them how to catch fish. Eve would sit on the river bank and look after the fish that had been caught until there were enough for a meal. She used to pick some leaves from the reeds by the river and place the fish on top of them so that they would not get sandy and need to be washed all over again. The leaves from the reeds were long and narrow and Eve found that if she placed some more leaves across the first layer, it made a stronger base on which to put the fish. One day Eve had to wait quite a while for Adam and the two boys to catch the fish. She had picked her leaves and began playing with them, laying them this way and that while she was waiting. Then she had an idea. She laid five leaves down in one direction and instead of placing the next layer crosswise on top as she had often done she began to weave them in and out of each other. In no time she had made a little mat. She had to fold over the bits at the end and tuck them in on the other side to make sure they did not come undone. She did not notice that Abel had come back with a fish clutched in his little hand, and he was standing and watching her in amazement. “Mummy! What’s that? Can I put my fish on it?” “Yes, Abel, as soon as I have finished making it,” said Eve, proudly putting her mat down. Adam and Cain were also excited to see the mat and Abel wanted to rush over and pick some more leaves so that they could each have a mat for their fishes.
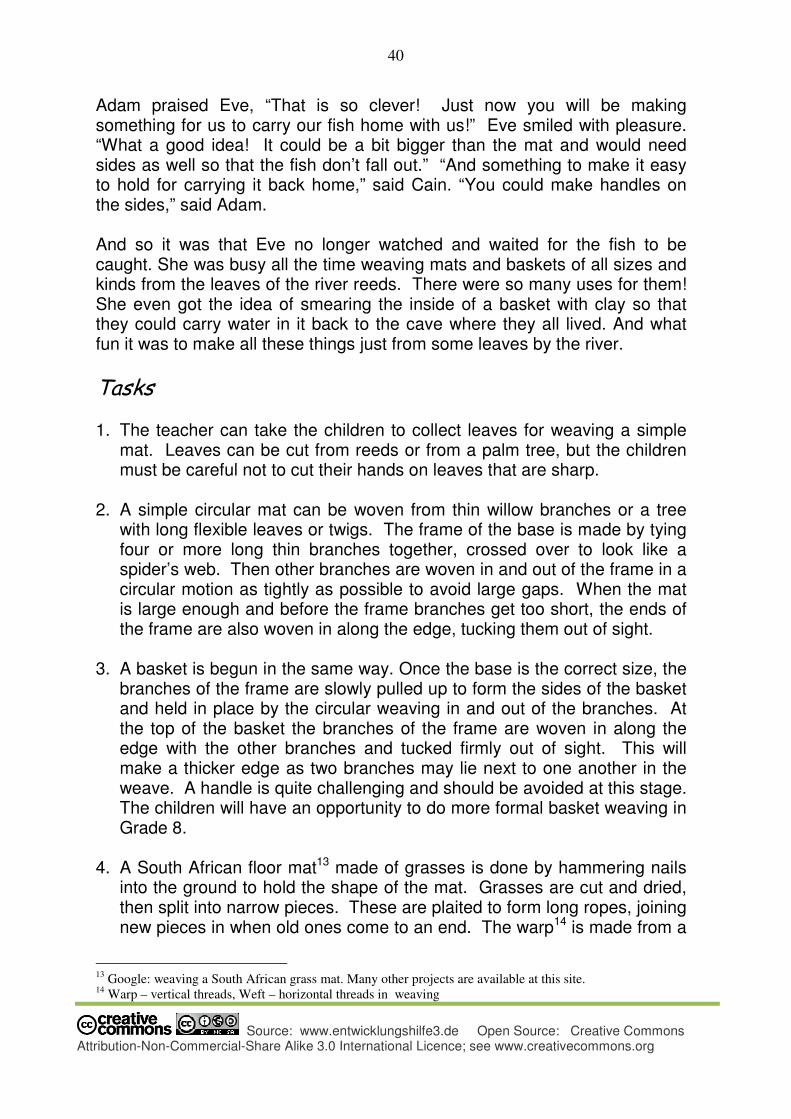
40
Source: www.entwicklungshilfe3.de Open Source: Creative Commons Attribution-Non-Commercial-Share Alike 3.0 International Licence; see www.creativecommons.org
Adam praised Eve, “That is so clever! Just now you will be making something for us to carry our fish home with us!” Eve smiled with pleasure. “What a good idea! It could be a bit bigger than the mat and would need sides as well so that the fish don’t fall out.” “And something to make it easy to hold for carrying it back home,” said Cain. “You could make handles on the sides,” said Adam. And so it was that Eve no longer watched and waited for the fish to be caught. She was busy all the time weaving mats and baskets of all sizes and kinds from the leaves of the river reeds. There were so many uses for them! She even got the idea of smearing the inside of a basket with clay so that they could carry water in it back to the cave where they all lived. And what fun it was to make all these things just from some leaves by the river.
Tasks
1. The teacher can take the children to collect leaves for weaving a simple mat. Leaves can be cut from reeds or from a palm tree, but the children must be careful not to cut their hands on leaves that are sharp.
2. A simple circular mat can be woven from thin willow branches or a tree
with long flexible leaves or twigs. The frame of the base is made by tying four or more long thin branches together, crossed over to look like a spider’s web. Then other branches are woven in and out of the frame in a circular motion as tightly as possible to avoid large gaps. When the mat is large enough and before the frame branches get too short, the ends of the frame are also woven in along the edge, tucking them out of sight.
3. A basket is begun in the same way. Once the base is the correct size, the
branches of the frame are slowly pulled up to form the sides of the basket and held in place by the circular weaving in and out of the branches. At the top of the basket the branches of the frame are woven in along the edge with the other branches and tucked firmly out of sight. This will make a thicker edge as two branches may lie next to one another in the weave. A handle is quite challenging and should be avoided at this stage. The children will have an opportunity to do more formal basket weaving in Grade 8.
4. A South African floor mat13 made of grasses is done by hammering nails
into the ground to hold the shape of the mat. Grasses are cut and dried, then split into narrow pieces. These are plaited to form long ropes, joining new pieces in when old ones come to an end. The warp14 is made from a
13
Google: weaving a South African grass mat. Many other projects are available at this site. 14
Warp – vertical threads, Weft – horizontal threads in weaving
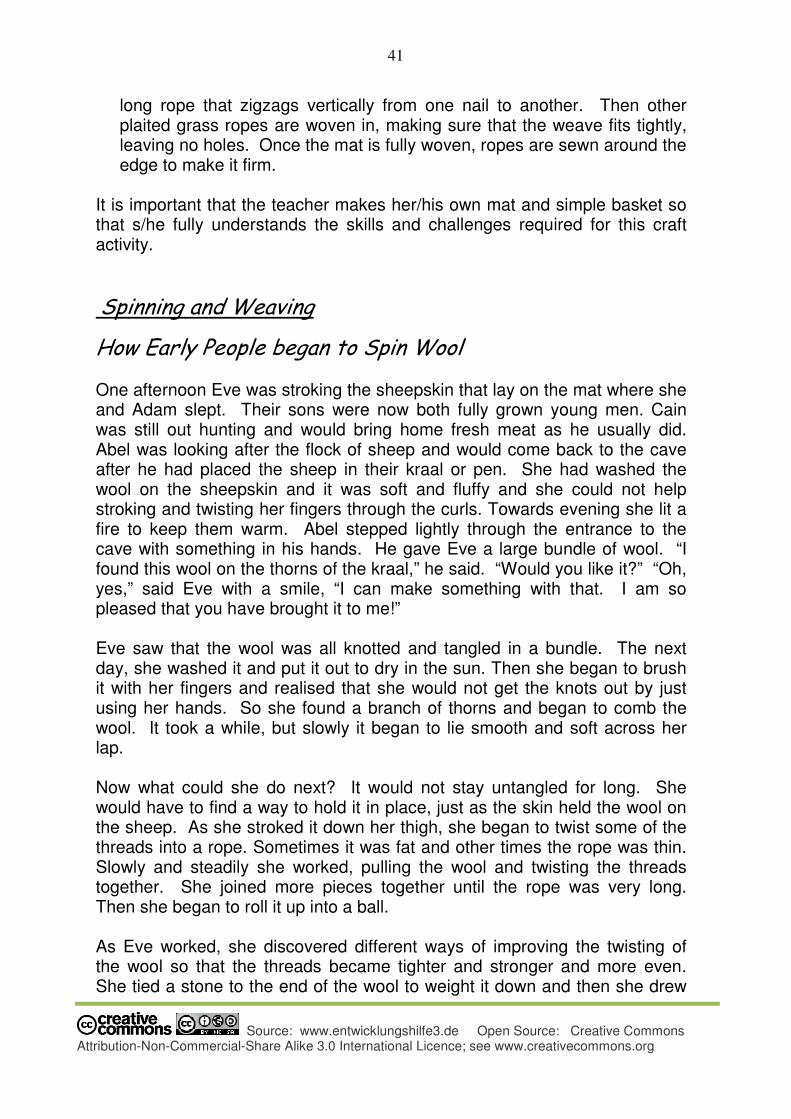
41
Source: www.entwicklungshilfe3.de Open Source: Creative Commons Attribution-Non-Commercial-Share Alike 3.0 International Licence; see www.creativecommons.org
long rope that zigzags vertically from one nail to another. Then other plaited grass ropes are woven in, making sure that the weave fits tightly, leaving no holes. Once the mat is fully woven, ropes are sewn around the edge to make it firm.
It is important that the teacher makes her/his own mat and simple basket so that s/he fully understands the skills and challenges required for this craft activity.
Spinning and Weaving
How Early People began to Spin Wool
One afternoon Eve was stroking the sheepskin that lay on the mat where she and Adam slept. Their sons were now both fully grown young men. Cain was still out hunting and would bring home fresh meat as he usually did. Abel was looking after the flock of sheep and would come back to the cave after he had placed the sheep in their kraal or pen. She had washed the wool on the sheepskin and it was soft and fluffy and she could not help stroking and twisting her fingers through the curls. Towards evening she lit a fire to keep them warm. Abel stepped lightly through the entrance to the cave with something in his hands. He gave Eve a large bundle of wool. “I found this wool on the thorns of the kraal,” he said. “Would you like it?” “Oh, yes,” said Eve with a smile, “I can make something with that. I am so pleased that you have brought it to me!” Eve saw that the wool was all knotted and tangled in a bundle. The next day, she washed it and put it out to dry in the sun. Then she began to brush it with her fingers and realised that she would not get the knots out by just using her hands. So she found a branch of thorns and began to comb the wool. It took a while, but slowly it began to lie smooth and soft across her lap. Now what could she do next? It would not stay untangled for long. She would have to find a way to hold it in place, just as the skin held the wool on the sheep. As she stroked it down her thigh, she began to twist some of the threads into a rope. Sometimes it was fat and other times the rope was thin. Slowly and steadily she worked, pulling the wool and twisting the threads together. She joined more pieces together until the rope was very long. Then she began to roll it up into a ball. As Eve worked, she discovered different ways of improving the twisting of the wool so that the threads became tighter and stronger and more even. She tied a stone to the end of the wool to weight it down and then she drew
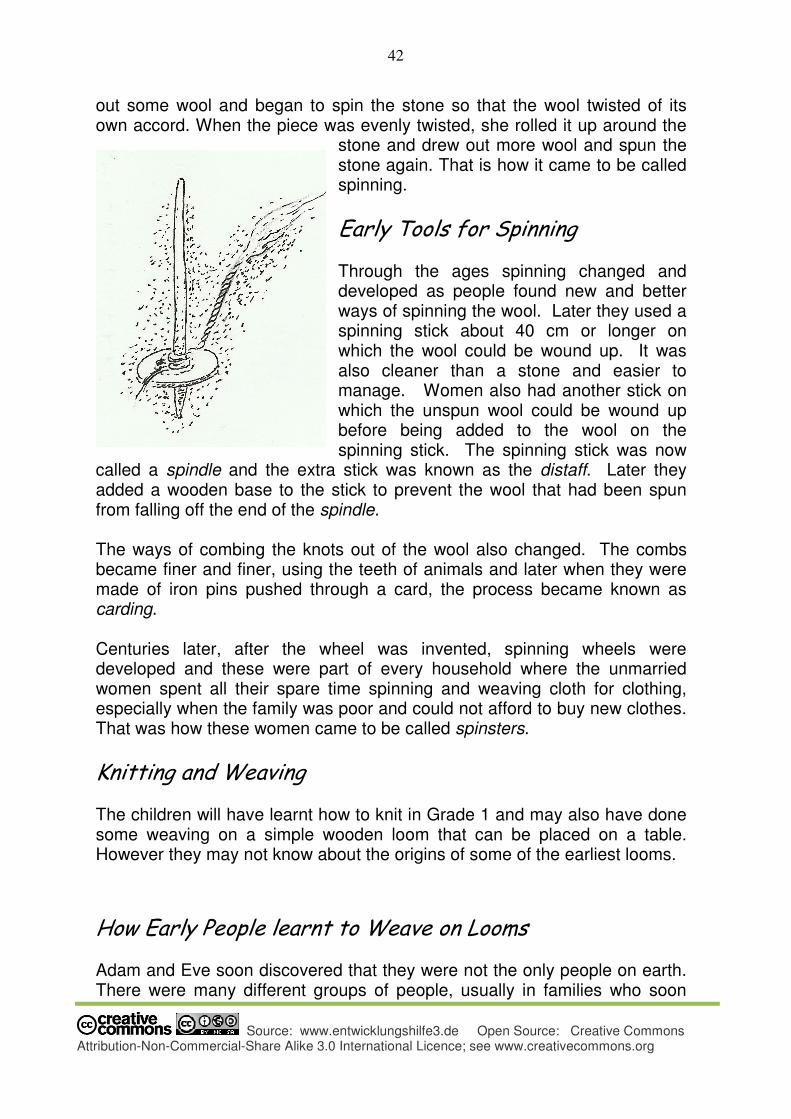
42
Source: www.entwicklungshilfe3.de Open Source: Creative Commons Attribution-Non-Commercial-Share Alike 3.0 International Licence; see www.creativecommons.org
out some wool and began to spin the stone so that the wool twisted of its own accord. When the piece was evenly twisted, she rolled it up around the
stone and drew out more wool and spun the stone again. That is how it came to be called spinning.
Early Tools for Spinning
Through the ages spinning changed and developed as people found new and better ways of spinning the wool. Later they used a spinning stick about 40 cm or longer on which the wool could be wound up. It was also cleaner than a stone and easier to manage. Women also had another stick on which the unspun wool could be wound up before being added to the wool on the spinning stick. The spinning stick was now
called a spindle and the extra stick was known as the distaff. Later they added a wooden base to the stick to prevent the wool that had been spun from falling off the end of the spindle. The ways of combing the knots out of the wool also changed. The combs became finer and finer, using the teeth of animals and later when they were made of iron pins pushed through a card, the process became known as carding. Centuries later, after the wheel was invented, spinning wheels were developed and these were part of every household where the unmarried women spent all their spare time spinning and weaving cloth for clothing, especially when the family was poor and could not afford to buy new clothes. That was how these women came to be called spinsters.
Knitting and Weaving
The children will have learnt how to knit in Grade 1 and may also have done some weaving on a simple wooden loom that can be placed on a table. However they may not know about the origins of some of the earliest looms.
How Early People learnt to Weave on Looms
Adam and Eve soon discovered that they were not the only people on earth. There were many different groups of people, usually in families who soon
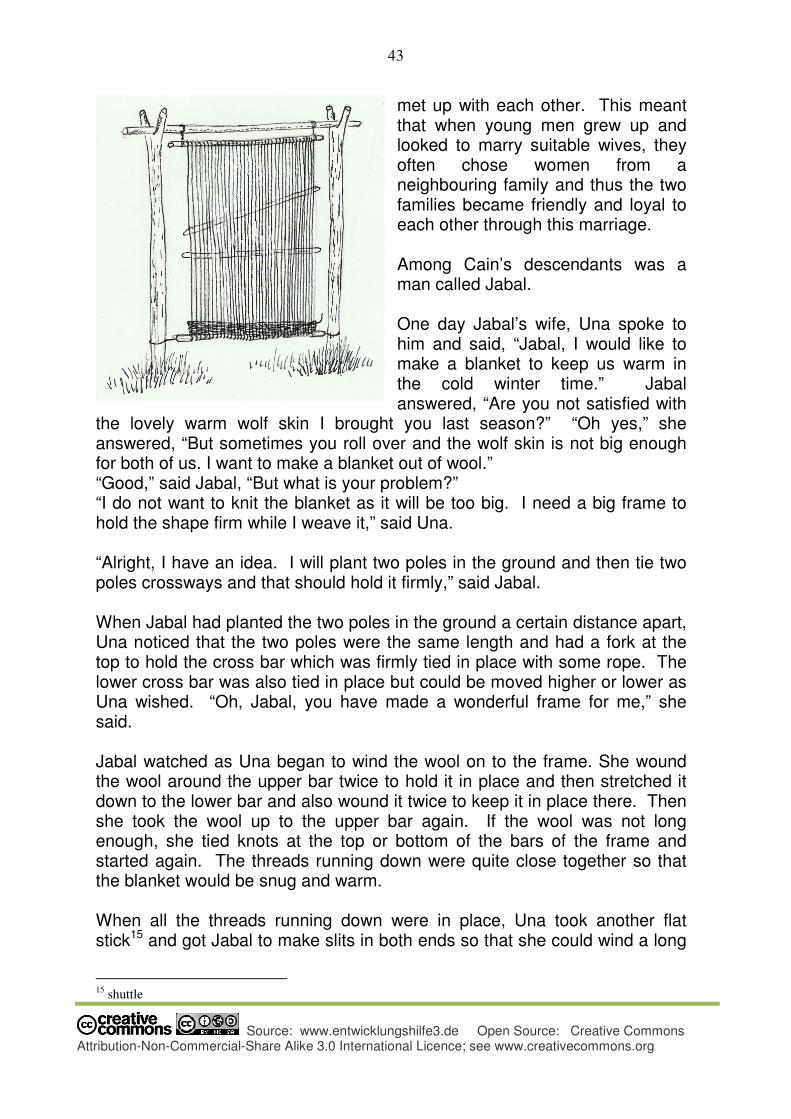
43
Source: www.entwicklungshilfe3.de Open Source: Creative Commons Attribution-Non-Commercial-Share Alike 3.0 International Licence; see www.creativecommons.org
met up with each other. This meant that when young men grew up and looked to marry suitable wives, they often chose women from a neighbouring family and thus the two families became friendly and loyal to each other through this marriage. Among Cain’s descendants was a man called Jabal. One day Jabal’s wife, Una spoke to him and said, “Jabal, I would like to make a blanket to keep us warm in the cold winter time.” Jabal answered, “Are you not satisfied with
the lovely warm wolf skin I brought you last season?” “Oh yes,” she answered, “But sometimes you roll over and the wolf skin is not big enough for both of us. I want to make a blanket out of wool.” “Good,” said Jabal, “But what is your problem?” “I do not want to knit the blanket as it will be too big. I need a big frame to hold the shape firm while I weave it,” said Una. “Alright, I have an idea. I will plant two poles in the ground and then tie two poles crossways and that should hold it firmly,” said Jabal. When Jabal had planted the two poles in the ground a certain distance apart, Una noticed that the two poles were the same length and had a fork at the top to hold the cross bar which was firmly tied in place with some rope. The lower cross bar was also tied in place but could be moved higher or lower as Una wished. “Oh, Jabal, you have made a wonderful frame for me,” she said. Jabal watched as Una began to wind the wool on to the frame. She wound the wool around the upper bar twice to hold it in place and then stretched it down to the lower bar and also wound it twice to keep it in place there. Then she took the wool up to the upper bar again. If the wool was not long enough, she tied knots at the top or bottom of the bars of the frame and started again. The threads running down were quite close together so that the blanket would be snug and warm. When all the threads running down were in place, Una took another flat stick15 and got Jabal to make slits in both ends so that she could wind a long
15
shuttle
44
Source: www.entwicklungshilfe3.de Open Source: Creative Commons Attribution-Non-Commercial-Share Alike 3.0 International Licence; see www.creativecommons.org
piece of wool around the length of the flat stick. Using this stick, she slid the stick in and out across the downways threads like a long fish swimming through the ripples of the river and slowly wove the woollen threads into the blanket. She even made a pattern by changing the spacing of the threads as she worked. She had to take care that she did not pull the threads too tightly so that the blanket kept the correct size. Jabal watched her working steadily and marvelled how every day the blanket grew longer and longer until one day it was finished. Una took the blanket off the frame and sewed some wool around the edges to keep it firm. That night they slept very warmly under the blanket.
Visiting a Weaver
The teacher should try to take the children to visit a weaver who works at home using simple methods. She will show them how to card the wool to make it soft and smooth. If possible, the children should be allowed to card some wool themselves. The weaver should also show the children a spinning wheel and demonstrate how it works. They will see that the wool is spun into different thicknesses and weights: fine wool and heavier wool; some thread is fairly even and some that is more uneven. Machine-spun wool is always more even than home-spun wool. Usually the wool is then put into large tanks and dyed different colours. After this, the wool is dried and then can be knitted or woven into cloth. The children may see various knitted and woven garments: jerseys, caps, shawls and perhaps jackets that have been made from woollen cloth.
Tasks for the children to do
1. Spinning: The teacher (or the school craft teacher) gets a bag of un-spun wool for the children to learn how to spin by hand. Each child is given a dowel stick about 15 cm long that will become the spinning stick. They are also given a small bundle of wool.
The child teases the wool into long pieces about the same thickness and ties the one end to the stick. By twisting the stick, the wool becomes thinner and tighter. The child keeps pulling the wool out and twisting it until the wool forms an even thickness. When that section of the wool is spun properly, it is wound up on the stick. New pieces of wool are joined into the ends of the first section and the new piece is spun in the same way, taking care that the join is strong and does not easily come apart. The children will need to practise in order to
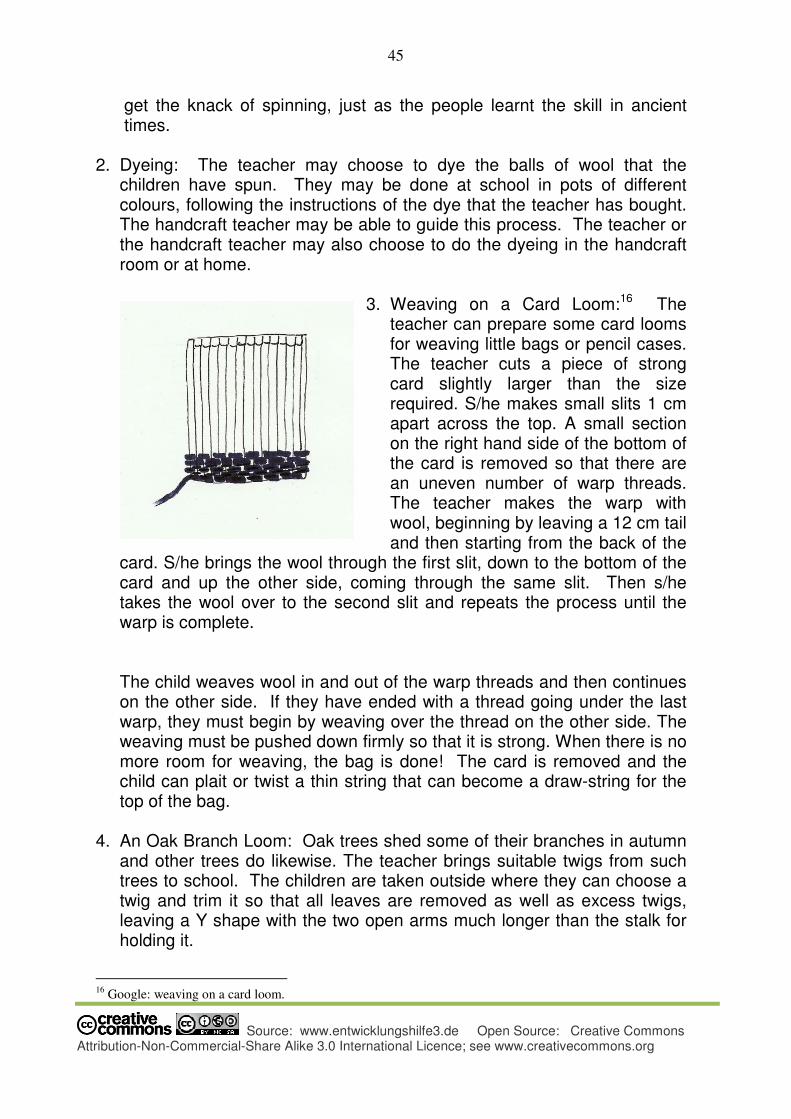
45
Source: www.entwicklungshilfe3.de Open Source: Creative Commons Attribution-Non-Commercial-Share Alike 3.0 International Licence; see www.creativecommons.org
get the knack of spinning, just as the people learnt the skill in ancient times.
2. Dyeing: The teacher may choose to dye the balls of wool that the
children have spun. They may be done at school in pots of different colours, following the instructions of the dye that the teacher has bought. The handcraft teacher may be able to guide this process. The teacher or the handcraft teacher may also choose to do the dyeing in the handcraft room or at home.
3. Weaving on a Card Loom:16 The
teacher can prepare some card looms for weaving little bags or pencil cases. The teacher cuts a piece of strong card slightly larger than the size required. S/he makes small slits 1 cm apart across the top. A small section on the right hand side of the bottom of the card is removed so that there are an uneven number of warp threads. The teacher makes the warp with wool, beginning by leaving a 12 cm tail and then starting from the back of the
card. S/he brings the wool through the first slit, down to the bottom of the card and up the other side, coming through the same slit. Then s/he takes the wool over to the second slit and repeats the process until the warp is complete.
The child weaves wool in and out of the warp threads and then continues on the other side. If they have ended with a thread going under the last warp, they must begin by weaving over the thread on the other side. The weaving must be pushed down firmly so that it is strong. When there is no more room for weaving, the bag is done! The card is removed and the child can plait or twist a thin string that can become a draw-string for the top of the bag.
4. An Oak Branch Loom: Oak trees shed some of their branches in autumn and other trees do likewise. The teacher brings suitable twigs from such trees to school. The children are taken outside where they can choose a twig and trim it so that all leaves are removed as well as excess twigs, leaving a Y shape with the two open arms much longer than the stalk for holding it.
16
Google: weaving on a card loom.
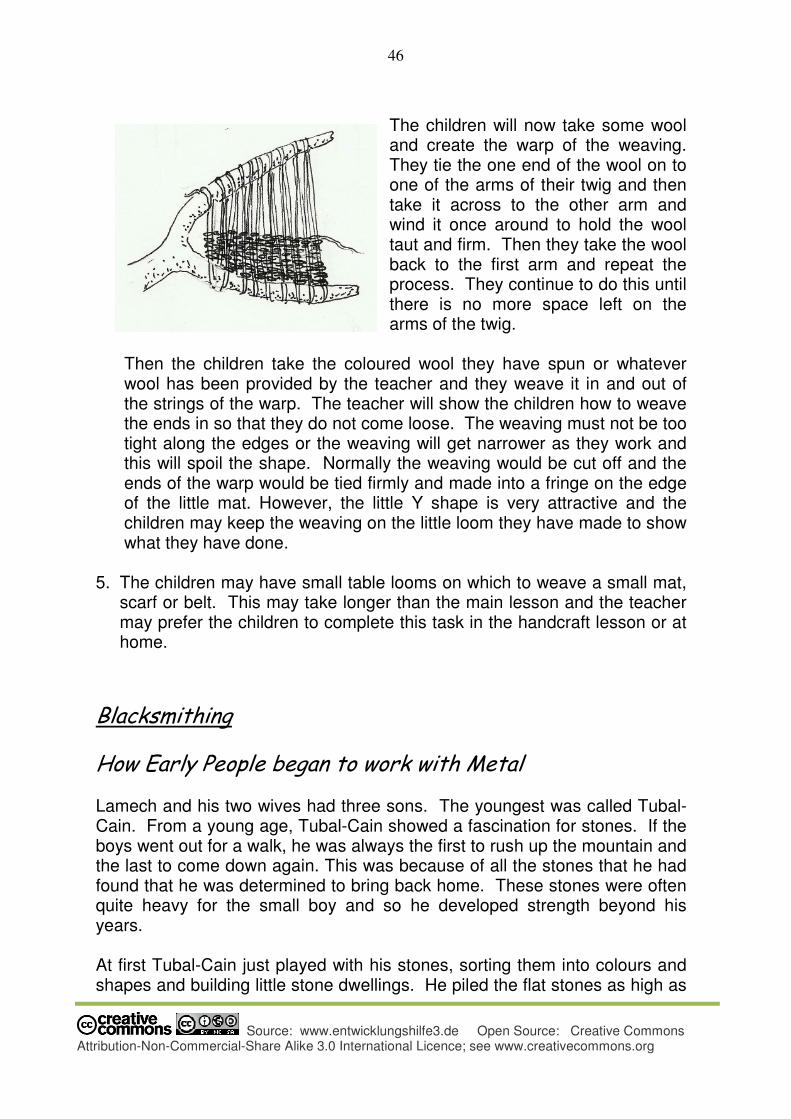
46
Source: www.entwicklungshilfe3.de Open Source: Creative Commons Attribution-Non-Commercial-Share Alike 3.0 International Licence; see www.creativecommons.org
The children will now take some wool and create the warp of the weaving. They tie the one end of the wool on to one of the arms of their twig and then take it across to the other arm and wind it once around to hold the wool taut and firm. Then they take the wool back to the first arm and repeat the process. They continue to do this until there is no more space left on the arms of the twig.
Then the children take the coloured wool they have spun or whatever wool has been provided by the teacher and they weave it in and out of the strings of the warp. The teacher will show the children how to weave the ends in so that they do not come loose. The weaving must not be too tight along the edges or the weaving will get narrower as they work and this will spoil the shape. Normally the weaving would be cut off and the ends of the warp would be tied firmly and made into a fringe on the edge of the little mat. However, the little Y shape is very attractive and the children may keep the weaving on the little loom they have made to show what they have done.
5. The children may have small table looms on which to weave a small mat,
scarf or belt. This may take longer than the main lesson and the teacher may prefer the children to complete this task in the handcraft lesson or at home.
Blacksmithing
How Early People began to work with Metal
Lamech and his two wives had three sons. The youngest was called Tubal-Cain. From a young age, Tubal-Cain showed a fascination for stones. If the boys went out for a walk, he was always the first to rush up the mountain and the last to come down again. This was because of all the stones that he had found that he was determined to bring back home. These stones were often quite heavy for the small boy and so he developed strength beyond his years. At first Tubal-Cain just played with his stones, sorting them into colours and shapes and building little stone dwellings. He piled the flat stones as high as

47
Source: www.entwicklungshilfe3.de Open Source: Creative Commons Attribution-Non-Commercial-Share Alike 3.0 International Licence; see www.creativecommons.org
possible until they fell over with a crash. One day a soft one broke open and inside he found a tiny shell on one half and its imprint on the other half. Tubal-Cain proudly rushed to show his find to his parents. They smiled and patted him on the shoulder and thought he was a bit strange, but this did not stop him. As Tubal-Cain grew older his interest in rocks and stones increased. He liked to test which stones were the strongest and which would break easily. He found some stones that chipped off into long hard flakes when he struck them with a hard stone. The flakes were easy to grasp but the edges were quite sharp and sometimes cut his fingers. They were incredibly strong too, so he began to use them to cut meat and branches and also for scraping animal skins. He tried wrapping a piece of animal skin around the part of the stone he was holding but the skin soon wore away. Then he took a piece of wood and made a slit at one end. He pushed the larger end of the stone into the slit and tied it in place with a strip of animal skin. Now he could hold it firmly with the piece of wood and not get cut by the sharp flake. This became the first knife! Tubal-Cain showed his father and brothers what he had made and they were amazed! After that they all helped him to make tools: digging sticks, an axe with a wooden handle and a stone head, a spear with a stone tip and more. On one occasion Tubal-Cain struck one of these stones against another to see which was strongest and there was a sudden flash! Excitedly, he searched for more of the same kind of stone and saw that more flashes occurred when they were struck against each other, especially when they were of a reddish colour. Eventually he managed to start a fire using two stones. Later they were called flint stones. This was something new as previously people had made fire by rubbing two sticks together until the friction caused dry leaves to burst into flame. Sometimes Tubal-Cain and his brothers would go off hunting for several days if the game was some distance away. One night, as Tubal-Cain was gathering stones to build a fire-place for the night, he noticed some stones with unusual pinkish-orange flecks on them. The brothers snuggled down into their animal skins and slept solidly. In the morning Tubal-Cain looked around and found many more of these stones. He decided to take them home after the hunt. When he arrived back home, he decided to crush them and see what was inside each stone. It took a lot of hammering with his largest stone hammer but at last he had a lot of dust in a pile on the ground. He was tired after all that work! And how was he going to separate all the bits and pieces?
48
Source: www.entwicklungshilfe3.de Open Source: Creative Commons Attribution-Non-Commercial-Share Alike 3.0 International Licence; see www.creativecommons.org
Suddenly he got an idea. He took a small pottery bowl and filled it with water. Then he put a handful of the dust in the water and watched as the heaviest particles sank to the bottom while the orange flecks floated to the top. It took a long time and much experimenting before he was satisfied that he had got all the orange flecks together. And this was how Tubal-Cain discovered the metal copper. As he collected more and more copper and learnt to melt it down, he found that he could mould it into different shapes. He could also beat it with a stone hammer, making many little dents in the metal as he changed the shape. So he began to make copper tips for spears and arrows. He even made a little twisted bangle for his mother and when he got married, he made one for his new wife. He even made her a flat piece of copper that was so smooth she could see her face in it! This was the first mirror! Word got round among the neighbouring families and soon he was making many tools for everyone. One day a group of hunters from another part of the country came to visit, bringing gifts as a sign of friendship. Among the gifts was a bow and arrow. Tubal-Cain immediately looked at the arrow head which was also made of metal and noticed that it was a different colour. He could also feel that the metal was stronger. This metal was tin. He asked them where they had found it and how they worked with it. “We dug it up close to the surface of the ground,” they answered. Tubal-Cain showed them the copper-tipped arrows and offered to show them how he worked. In return they agreed to show him what they knew about the tin. So Tubal-Cain visited them, bringing gifts of copper. On his return, he brought back supplies of tin. He experimented, adding small amounts of tin to the copper. A completely new metal was created; the strongest metal they had found so far. Bronze! It could not be beaten, like copper, but it could be cast into shapes by melting it at a high temperature and pouring it into a mould. The mould was made out of sand which was packed so tightly and baked so that it became as hard as stone. From now on axe-heads, spear tips, plough shares and other tools were made from this new metal. It was a rich brownish colour and was so strong that tools could not easily be bent or broken. A new era had begun: it was known as the Bronze Age and it would change the world entirely!
49
Source: www.entwicklungshilfe3.de Open Source: Creative Commons Attribution-Non-Commercial-Share Alike 3.0 International Licence; see www.creativecommons.org
Visit to a Blacksmith
The children will love to visit a blacksmith and watch him at work. He uses bellows to heat up the flames of his fire and then he sticks the iron bars or rods into the fire and waits until they are red hot. The blacksmith is very strong and using tongs, he pulls out a rod and places it on his iron anvil. Still holding the rod in the tongs, he hammers it or twists it into the shape that he requires. The blacksmith may be willing to let the children make something themselves e.g. a twisted rod or a chain. It is very exciting if they can experience this for themselves. Blacksmiths make iron shoes for horses. Some of them are also able to put the shoes on to the horses’ hooves, nailing them into place. Blacksmiths also make wrought iron gates although much of this work is made by machinery these days.
Task
Let the children write about their visit and illustrate it in their Handcraft Main Lesson books.
50
Source: www.entwicklungshilfe3.de Open Source: Creative Commons Attribution-Non-Commercial-Share Alike 3.0 International Licence; see www.creativecommons.org
House-Building
How Early People created the first Shelters
When Adam and Eve came to earth, they needed to find somewhere to live. During the warm summer months they slept under the stars and if it was rainy, they found a bush for shelter. As winter approached, they found caves in the mountains where they were safe from the cold and stormy weather. But all the creatures from the Paradise Garden also came to earth and each one of them began to make a home for shelter. Not only did they need to be safe from the wind and rain, they needed to protect themselves from other creatures because now every creature had to find food and not everyone ate grass! So each creature found unique ways to create their own homes.
The Spider’s Web
One bright sunny morning, a long-legged spider swung down on a silver thread from a bushy twig. She was looking for a special place to build her web. Luckily for her, she did not have to find leaves and sticks for a nest as the birds did. She carried all she needed inside her fat body. At the tip of her abdomen or the point at the end of her large body, she had little spinnerets which spun out long sticky streamers of silk. So Mother Spider slid down her silken thread to view the area. She wanted to build her web where it would be safe, but also where it could attract other insects for these were her food. She must have decided that this was a good place to live because she landed on another branch below and immediately glued her thread on to it. Then she scrambled up the thread again. This time she ran along the branch to another place and dropped a second thread. She slid down this one too and glued it on to the branch below. Now she began to create a framework for her web by making a number of threads that stretched from one side to another. All the threads met in the centre and radiated outwards, being glued to the branches or each other. Then Mother Spider began to spin a spiral web from the centre of the framework outwards. These first threads were not sticky. When she reached the outside, she started a new spiral of sticky threads going back inwards until she came to the centre again. To attract the insects, she spun a few threads of silk across the path and they glistened in the sunlight. Mother Spider retired to the centre of her beautiful web and waited for a visitor.
51
Source: www.entwicklungshilfe3.de Open Source: Creative Commons Attribution-Non-Commercial-Share Alike 3.0 International Licence; see www.creativecommons.org
She did not have to wait long. Quite soon a cheeky fly came whizzing overhead and saw the web. “Oh, goodness!” he cried, “Someone new in the neighbourhood!” He flew around in a lively fashion, darting here and there. “Who are you?” he asked. “How kind of you to visit me,” said Mother Spider, carefully not mentioning her name, “Yes, I have only just set up house. I am pleased with my web. It looks very lovely in the sunshine, do you think?” “Did you make this web?” asked Fly, “It looks quite delicate.” “Oh, yes,” said Mother Spider, “I make everything myself. But my web is strong enough to hold your weight. Would you care to join me? You can easily climb up the winding stairs until you reach the centre where I am sitting.” “But I do not need to climb,” said Fly, “I have wings to fly wherever I wish. My legs are just for standing while I am eating.” And Fly darted around to look at the web from another angle. “Oh, really, and what do you eat, Fly?” asked Mother Spider. “I usually eat sweet things like juice from plants and blood from dead animals. But I can also find sugar and crumbs in people’s kitchens to taste as well,” said Fly. “I also like variety in my diet. But I don’t fly around,” said Mother Spider, “I like to stay at home. I also lay my eggs here and wrap them in a silken blanket until they are ready to hatch.” “Yes, I too was born from an egg which hatched into a larva. You know, it looks like a tiny worm. Then I became a pupa and finally I came out as a fly! I enjoy all the changes in my life-style!” said Fly proudly, zooming around in circles. “And what do you eat?” “I cannot eat solid food, but I have a special juice in my mouth that dissolves my food. If you come a little closer, I can show you what I mean,” said Mother Spider. “No, no,” said Fly quickly, “I have a feeling that I might just change into food for you. So I’ll be off right away.” And with that, Fly flapped his wings and shot off out of sight through the fresh morning air. “Oh, dear,” sighed Mother Spider, “Better luck next time.”
Hairy scary spider Sitting and knitting her silvery scarf.
By Pumla
52
Source: www.entwicklungshilfe3.de Open Source: Creative Commons Attribution-Non-Commercial-Share Alike 3.0 International Licence; see www.creativecommons.org
The Weaverbird
It was spring time and the willow trees were full of green and yellow birds, chirping loudly as they hopped from branch to branch. Others flew here and there over the pool below, bringing little streamers of grass in their beaks. Half-built nests swung from the branches, bouncing up and down as the weaverbirds thrust little grey beaks in and out, weaving the nest until it filled out and curved around, leaving a small entrance just big enough for a little bird to slip inside. Father Weaverbird had been working very hard making a nest for Mother Weaverbird to lay her eggs in. He was almost finished and kept making appreciative chirps, “That looks good. It just needs one more piece of grass to fill in that hole. Now you can see right across the pool from the entrance. What a lovely view!” However, Mother Weaverbird was looking downcast, her head drooping to one side. “It doesn’t seem quite right. It is so close to that other nest. The babies won’t have any peace at all.” “But the babies make so much noise shouting for their food, it won’t even matter,” said Father Weaverbird. “But the other nest is bigger than ours,” she complained. “We’ll feel cramped in there.” “You know how nice it is when we are all snug and warm together,” said Father Weaverbird. “Now stop making such a fuss! It’s a beautiful nest!” “No! I won’t stop. It’s not right, I know it isn’t and I won’t be happy in that nest, no matter what you say. I’m not going to lay my eggs in that nest. And that is my last word!” And Mother Weaverbird flew off and sulked on another willow branch. “Oh, dear,” sighed Father Weaverbird, “Alright I give in. I’ll make you another nest. Now which branch do you want me to use. You had better be quite sure this time as it is getting time for you to lay your eggs and I’ll have to work quickly.” Mother Weaverbird cheered up visibly. “Oh, thank you dear Father Weaverbird. Let’s have our nest in the tree next door. There’s more room there; less crowded. I know you will make a lovely nest for our eggs.” So Father Weaverbird set to work and very soon a beautiful new woven nest was swinging over the pool from the next tree. Mother Weaverbird moved in
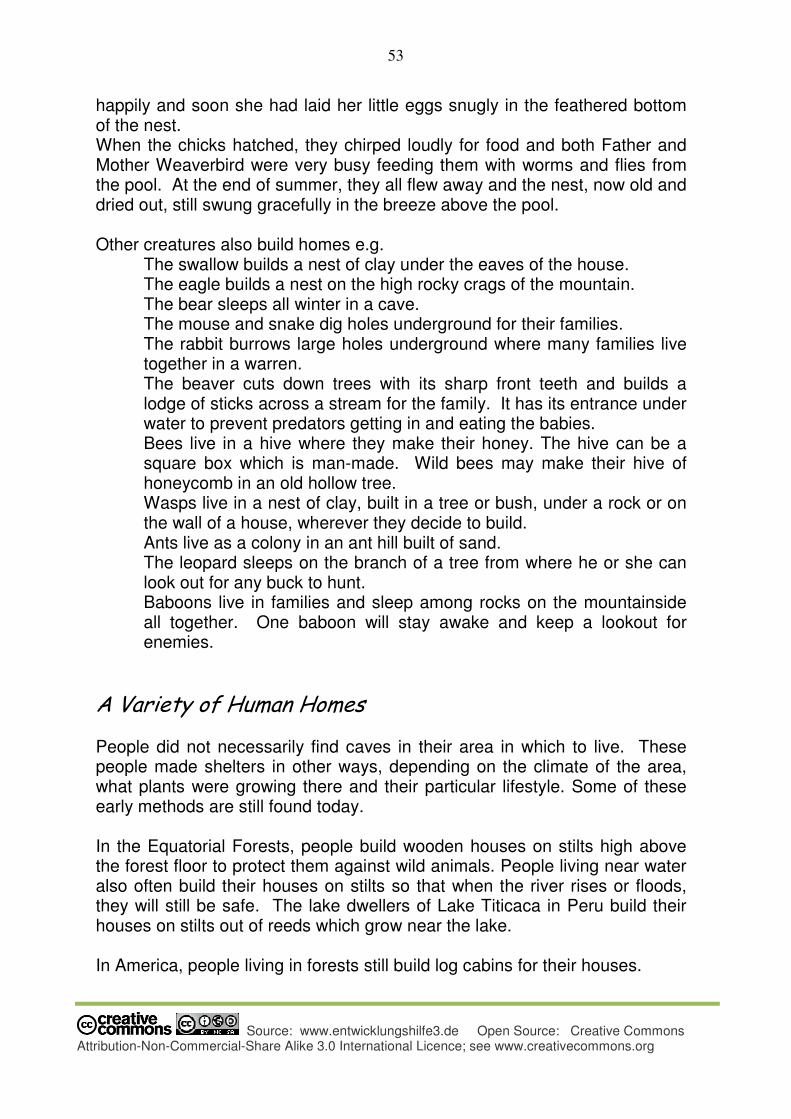
53
Source: www.entwicklungshilfe3.de Open Source: Creative Commons Attribution-Non-Commercial-Share Alike 3.0 International Licence; see www.creativecommons.org
happily and soon she had laid her little eggs snugly in the feathered bottom of the nest. When the chicks hatched, they chirped loudly for food and both Father and Mother Weaverbird were very busy feeding them with worms and flies from the pool. At the end of summer, they all flew away and the nest, now old and dried out, still swung gracefully in the breeze above the pool. Other creatures also build homes e.g.
The swallow builds a nest of clay under the eaves of the house. The eagle builds a nest on the high rocky crags of the mountain. The bear sleeps all winter in a cave. The mouse and snake dig holes underground for their families. The rabbit burrows large holes underground where many families live together in a warren. The beaver cuts down trees with its sharp front teeth and builds a lodge of sticks across a stream for the family. It has its entrance under water to prevent predators getting in and eating the babies. Bees live in a hive where they make their honey. The hive can be a square box which is man-made. Wild bees may make their hive of honeycomb in an old hollow tree. Wasps live in a nest of clay, built in a tree or bush, under a rock or on the wall of a house, wherever they decide to build. Ants live as a colony in an ant hill built of sand. The leopard sleeps on the branch of a tree from where he or she can look out for any buck to hunt. Baboons live in families and sleep among rocks on the mountainside all together. One baboon will stay awake and keep a lookout for enemies.
A Variety of Human Homes
People did not necessarily find caves in their area in which to live. These people made shelters in other ways, depending on the climate of the area, what plants were growing there and their particular lifestyle. Some of these early methods are still found today. In the Equatorial Forests, people build wooden houses on stilts high above the forest floor to protect them against wild animals. People living near water also often build their houses on stilts so that when the river rises or floods, they will still be safe. The lake dwellers of Lake Titicaca in Peru build their houses on stilts out of reeds which grow near the lake. In America, people living in forests still build log cabins for their houses.
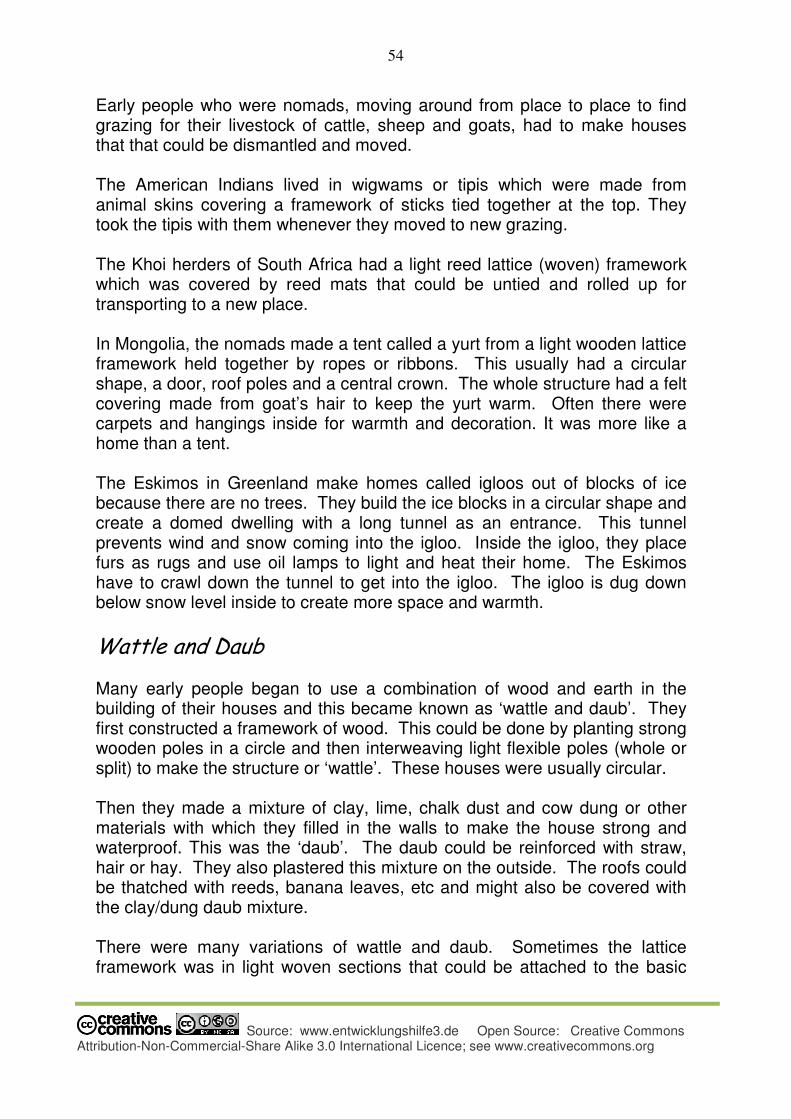
54
Source: www.entwicklungshilfe3.de Open Source: Creative Commons Attribution-Non-Commercial-Share Alike 3.0 International Licence; see www.creativecommons.org
Early people who were nomads, moving around from place to place to find grazing for their livestock of cattle, sheep and goats, had to make houses that that could be dismantled and moved. The American Indians lived in wigwams or tipis which were made from animal skins covering a framework of sticks tied together at the top. They took the tipis with them whenever they moved to new grazing. The Khoi herders of South Africa had a light reed lattice (woven) framework which was covered by reed mats that could be untied and rolled up for transporting to a new place. In Mongolia, the nomads made a tent called a yurt from a light wooden lattice framework held together by ropes or ribbons. This usually had a circular shape, a door, roof poles and a central crown. The whole structure had a felt covering made from goat’s hair to keep the yurt warm. Often there were carpets and hangings inside for warmth and decoration. It was more like a home than a tent. The Eskimos in Greenland make homes called igloos out of blocks of ice because there are no trees. They build the ice blocks in a circular shape and create a domed dwelling with a long tunnel as an entrance. This tunnel prevents wind and snow coming into the igloo. Inside the igloo, they place furs as rugs and use oil lamps to light and heat their home. The Eskimos have to crawl down the tunnel to get into the igloo. The igloo is dug down below snow level inside to create more space and warmth.
Wattle and Daub
Many early people began to use a combination of wood and earth in the building of their houses and this became known as ‘wattle and daub’. They first constructed a framework of wood. This could be done by planting strong wooden poles in a circle and then interweaving light flexible poles (whole or split) to make the structure or ‘wattle’. These houses were usually circular. Then they made a mixture of clay, lime, chalk dust and cow dung or other materials with which they filled in the walls to make the house strong and waterproof. This was the ‘daub’. The daub could be reinforced with straw, hair or hay. They also plastered this mixture on the outside. The roofs could be thatched with reeds, banana leaves, etc and might also be covered with the clay/dung daub mixture. There were many variations of wattle and daub. Sometimes the lattice framework was in light woven sections that could be attached to the basic
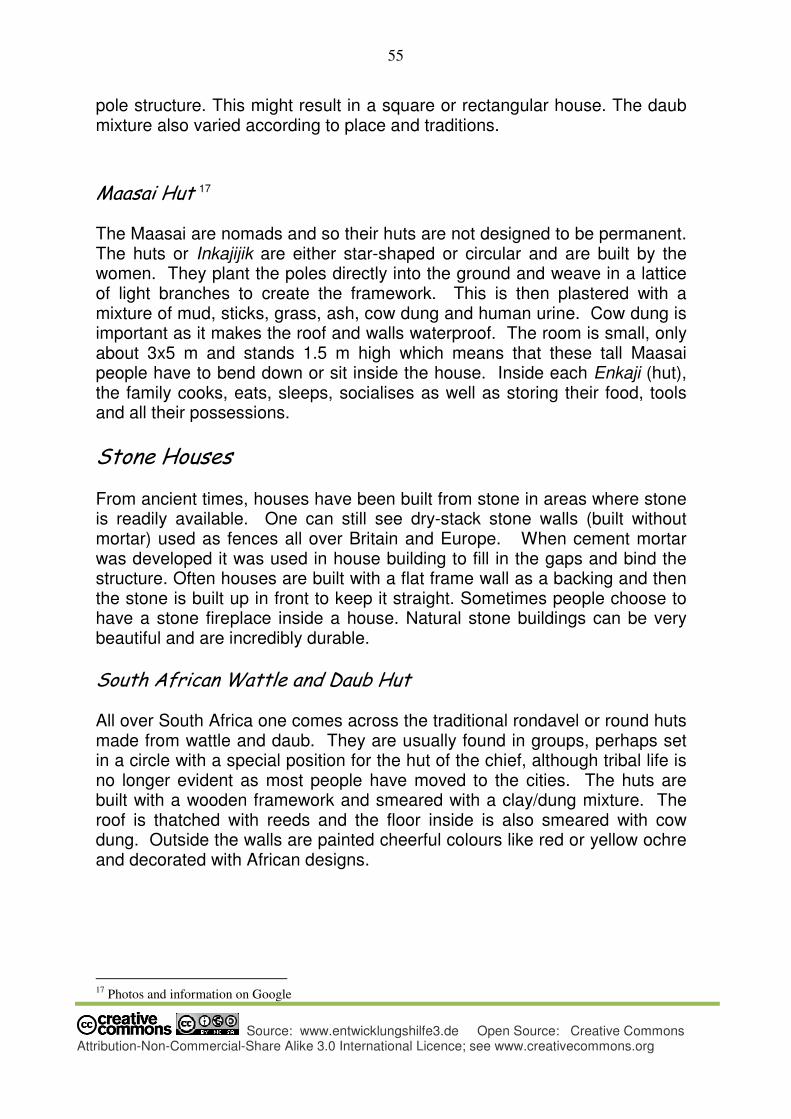
55
Source: www.entwicklungshilfe3.de Open Source: Creative Commons Attribution-Non-Commercial-Share Alike 3.0 International Licence; see www.creativecommons.org
pole structure. This might result in a square or rectangular house. The daub mixture also varied according to place and traditions.
Maasai Hut 17
The Maasai are nomads and so their huts are not designed to be permanent. The huts or Inkajijik are either star-shaped or circular and are built by the women. They plant the poles directly into the ground and weave in a lattice of light branches to create the framework. This is then plastered with a mixture of mud, sticks, grass, ash, cow dung and human urine. Cow dung is important as it makes the roof and walls waterproof. The room is small, only about 3x5 m and stands 1.5 m high which means that these tall Maasai people have to bend down or sit inside the house. Inside each Enkaji (hut), the family cooks, eats, sleeps, socialises as well as storing their food, tools and all their possessions.
Stone Houses
From ancient times, houses have been built from stone in areas where stone is readily available. One can still see dry-stack stone walls (built without mortar) used as fences all over Britain and Europe. When cement mortar was developed it was used in house building to fill in the gaps and bind the structure. Often houses are built with a flat frame wall as a backing and then the stone is built up in front to keep it straight. Sometimes people choose to have a stone fireplace inside a house. Natural stone buildings can be very beautiful and are incredibly durable.
South African Wattle and Daub Hut
All over South Africa one comes across the traditional rondavel or round huts made from wattle and daub. They are usually found in groups, perhaps set in a circle with a special position for the hut of the chief, although tribal life is no longer evident as most people have moved to the cities. The huts are built with a wooden framework and smeared with a clay/dung mixture. The roof is thatched with reeds and the floor inside is also smeared with cow dung. Outside the walls are painted cheerful colours like red or yellow ochre and decorated with African designs.
17
Photos and information on Google
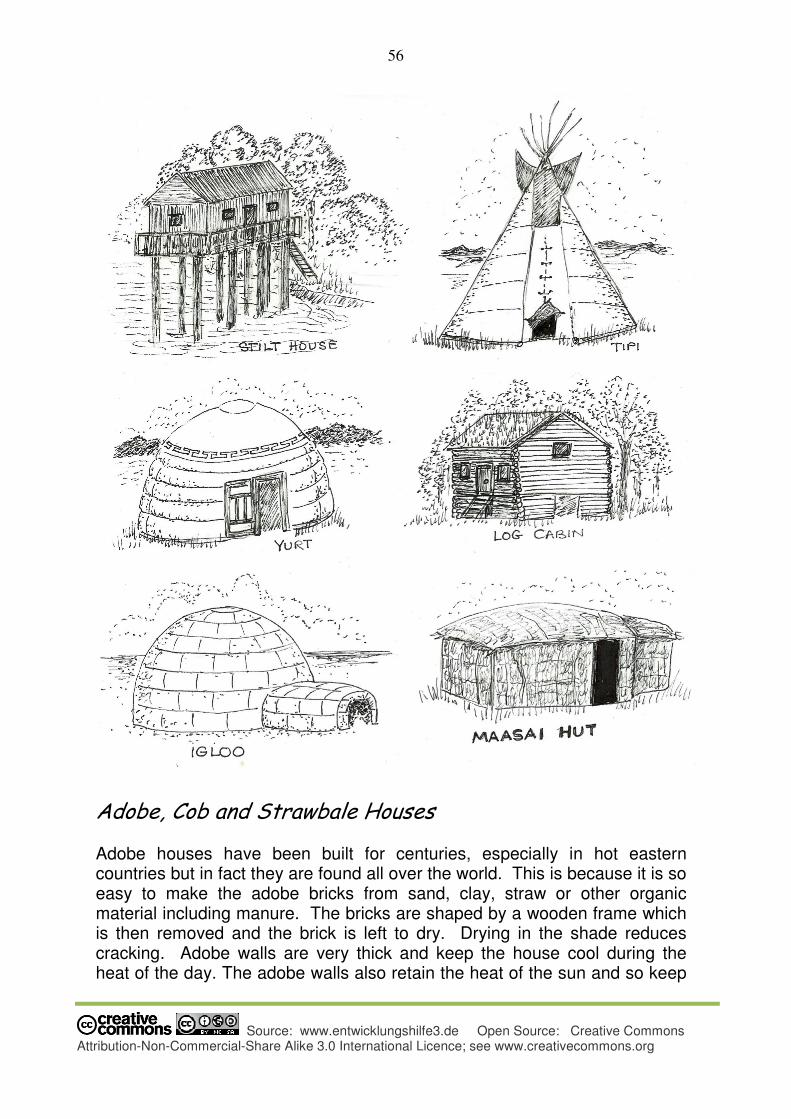
56
Source: www.entwicklungshilfe3.de Open Source: Creative Commons Attribution-Non-Commercial-Share Alike 3.0 International Licence; see www.creativecommons.org
Adobe, Cob and Strawbale Houses
Adobe houses have been built for centuries, especially in hot eastern countries but in fact they are found all over the world. This is because it is so easy to make the adobe bricks from sand, clay, straw or other organic material including manure. The bricks are shaped by a wooden frame which is then removed and the brick is left to dry. Drying in the shade reduces cracking. Adobe walls are very thick and keep the house cool during the heat of the day. The adobe walls also retain the heat of the sun and so keep

57
Source: www.entwicklungshilfe3.de Open Source: Creative Commons Attribution-Non-Commercial-Share Alike 3.0 International Licence; see www.creativecommons.org
the house warm at night. This is very useful in extreme desert temperatures. The bricks are heavy, so houses can only be built two storeys high to avoid cracking and sinking of the walls. Adobe is very susceptible to earthquake damage. Cob Housing is a more flexible variation on adobe building. The building of cob houses becomes a sensible option in areas of the country where clay and other natural materials are readily available. Local stone is used as a base on top of the foundations. Bricks are made from sand, clay and straw and are built on top of the stones. Cob allows the walls to be sculpted into curves and flowing shapes as well as building conventional rectangular buildings. This gives scope for free designs and decorations! The thick walls give good insulation and often gum and other poles grown in the area are used as roof beams. The house has a charming rustic look and is far cheaper to build than using commercial materials. Strawbale houses are built in wattle and daub style using the straw bales for the walls. These are secured with chicken wire netting and then plastered with a clay mixture. Sometimes a framework of timber is built for extra strength, with the strawbales used as filling. The strawbale house is quick to build, gives good insulation and is also fire resistant. The roof may be thatched or tiled as desired.
Building a House of One’s Own
A house means so much more to each one of us than merely a shelter. It is a sacred space, an expression of oneself and how one stands in the world. A child may have their own room or they may have to share that room with one or more siblings, even the whole family! So it is important for the child to experience what it means to create one’s own house, even in the imagination! Let the children discuss what kind of house they might like. What features would they like to see in a house? What is the function of each room? What would make each room useful, comfortable and attractive? Would they like a fire place, a bath or shower, large or small windows and a flat or pitched roof? Has the house got one or two storeys? Is there a garage or carport? Draw attention to the relationship between the house and the landscape. Is there a view? Which is the sunny side? From which direction is the wind or the rain, or does it not matter? Is there a garden in front of the house, at the back of the house or on both sides? All these questions are what the architect asks the owners when he has to draw up a plan. Many people like to draw up their own plans which they give
58
Source: www.entwicklungshilfe3.de Open Source: Creative Commons Attribution-Non-Commercial-Share Alike 3.0 International Licence; see www.creativecommons.org
to the architect who will try to incorporate their ideas and improve them in his plan. He will also give them a price for building the house so the people have to know how much they can afford. Often people’s ideas are bigger than their budget! The teacher will then tell a story or discuss how a house is built; what happens at each stage from the foundations to the roof. Then they can discuss what still has to happen to complete the inside of the house: the plumbing, electricity, painting, etc. Eventually the children get a picture of the whole process of building a house. They can learn a building song to remind them of everything that happens.
Visiting a House that is being Built
It is important that children get taken to see a house that is being built so that they can experience the different stages. Contact the owner and the builder to arrange your visit and ensure that the children are well prepared. The teacher should have discussed the whole process from planning to completion beforehand. It would be good if the house is in their area so that they can possibly walk round and visit it more than once to see the progress.
Project: Building a Model House
It is a lovely project to let the children build a model house:
1. They could each build one of the houses described above e.g. the igloo, tipi, wattle and daub hut, wooden log cabin.
2. The teacher could let the whole class work in groups to make an igloo or African hut out of clay in a craft lesson.
3. Each child could make their ‘dream house’ using a variety of materials.
They can bring equipment to school and make it there, or work at home. It is best to do it at school where the siblings and parents are not tempted to ‘take over’ and do the whole project for the child.
4. The teacher can suggest different materials e.g. matches or sticks for
a log cabin; clay, sticks and reeds for a hut; mosaic tiles, cardboard or corrugated cardboard for the walls or roof, etc. The child can paint and decorate the house afterwards, as well as create a garden around their house.
5. An exhibition of the children’s ‘dream houses’ can be displayed for the
school and parents to see.
59
Source: www.entwicklungshilfe3.de Open Source: Creative Commons Attribution-Non-Commercial-Share Alike 3.0 International Licence; see www.creativecommons.org
Gardening
In Grade 3 there are two main lesson blocks to do with the earth: Gardening and Farming. The purpose of these main lessons is to create a relationship between the children and the earth at this time when they feel disconnected from people and the world around them. Just as Adam and Eve had to come to earth and find their own food and shelter, so young children of around nine years of age have to discover the practical skills required for life on earth. In the process of learning to care for the plants and animals that help human beings survive on earth, these children find their place in the whole scheme of life.
The Compost Heap
In the beginning, the teacher creates a story about a compost heap and how all the layers of waste vegetable matter, grass cuttings, cow dung, soil, water and other organic matter work together. This organic waste undergoes a remarkable transformation: it changes into rich, beautiful compost, the most valuable item for supporting seeds and plants to grow! The children need to collect bread crusts, apple cores and other vegetable waste to put on their own compost heap, which must be situated in a convenient place next to their own garden area. It is a good idea if this area is fenced off or protected in some way to ensure that it is properly tended and nobody gets into it accidentally. The class should start developing the compost heap about 6-8 weeks before they begin to prepare the garden so that they have ready compost to use on the garden when they start planting. For the compost heap, it is a good idea to dig two shallow pits18 next to each other. Build each pit up on three sides with chicken wire or recycled planks to the height of about 1.5 m. Do not cover the top. In the first pit, put a layer of green organic waste about 10 cm high. This can include kitchen waste, grass cuttings, green garden waste, flower clippings, egg shells, tea bags, coffee grounds, corks, even newspaper and old egg boxes, but everything should be broken into smallish pieces.
18
In countries with a lot of rain, it is better to create a heap on top of the ground, to prevent the compost from
rotting.

60
Source: www.entwicklungshilfe3.de Open Source: Creative Commons Attribution-Non-Commercial-Share Alike 3.0 International Licence; see www.creativecommons.org
Next put a thin layer of good garden soil. Then another layer of green waste followed by brown waste which can be dry leaves or soil. Alternate green and brown waste and add a layer of cow manure if you have it. The heap needs to be damp but not wet. In hot dry months, a grass mat or sheet of plastic will help to keep it moist. AVOID animal waste, meat, oil, diseased plant or plants treated with weed killer. After 1 week, turn the compost heap over into the second pit. Instead of throwing new organic waste on the top of the heap, collect it during the week and throw it on the floor of the other pit, before turning the compost heap over on top of it, so it does not dry out. Continue to turn it weekly. It takes about 2 months for compost to form. When you turn it over into the second pit, you can begin to use the compost if you cannot recognise the ingredients. Use the compost from the bottom as this will be the best. Half decomposed matter can be placed on top of the soil as mulch.19 Build up the pit that is empty. In this way you will have one compost heap/pit with humus20 that is ready to be used on the garden and the other that is gathering matter to be decomposed. Then there needs to be a story about an earthworm and how essential it is to have earthworms in the garden and especially in the compost heap! This little poem about the earthworm21 will help the teacher to make up the story! THE EARTHWORM (or The Farmer’s Friend) I lifted a brick and there you lay Shyly squirming to hide away; Pinky-brown earthworm, long and thin, I don’t quite know which end you begin. No eyes have you, no head do I see And the other end seems the same to me. You’ve a darkish saddle on your back And like elastic you stretch - and snap back. Dear friend, I need no eyes underground, I feel my way in the earth around;
19
Vegetable matter, straw, etc placed around the plant on top of the soil, keeping the soil moist 20
Humus = mature compost 21
See end of manual
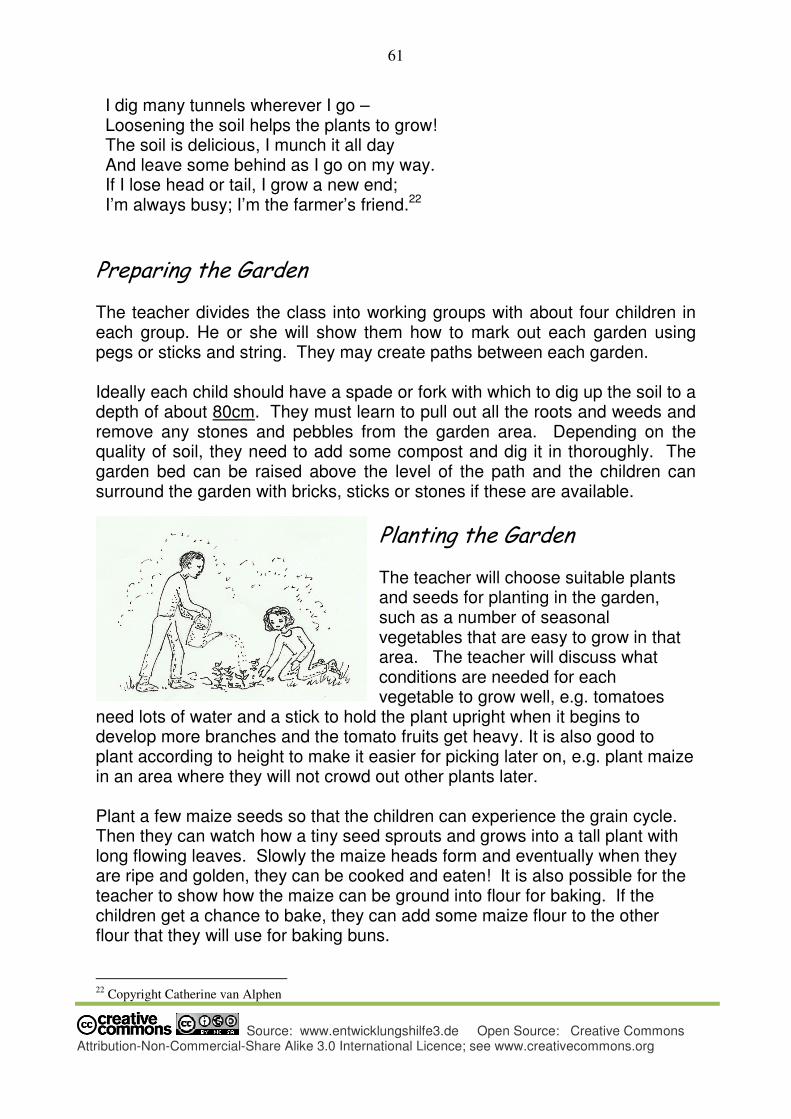
61
Source: www.entwicklungshilfe3.de Open Source: Creative Commons Attribution-Non-Commercial-Share Alike 3.0 International Licence; see www.creativecommons.org
I dig many tunnels wherever I go – Loosening the soil helps the plants to grow! The soil is delicious, I munch it all day And leave some behind as I go on my way. If I lose head or tail, I grow a new end; I’m always busy; I’m the farmer’s friend.22
Preparing the Garden
The teacher divides the class into working groups with about four children in each group. He or she will show them how to mark out each garden using pegs or sticks and string. They may create paths between each garden. Ideally each child should have a spade or fork with which to dig up the soil to a depth of about 80cm. They must learn to pull out all the roots and weeds and remove any stones and pebbles from the garden area. Depending on the quality of soil, they need to add some compost and dig it in thoroughly. The garden bed can be raised above the level of the path and the children can surround the garden with bricks, sticks or stones if these are available.
Planting the Garden
The teacher will choose suitable plants and seeds for planting in the garden, such as a number of seasonal vegetables that are easy to grow in that area. The teacher will discuss what conditions are needed for each vegetable to grow well, e.g. tomatoes
need lots of water and a stick to hold the plant upright when it begins to develop more branches and the tomato fruits get heavy. It is also good to plant according to height to make it easier for picking later on, e.g. plant maize in an area where they will not crowd out other plants later. Plant a few maize seeds so that the children can experience the grain cycle. Then they can watch how a tiny seed sprouts and grows into a tall plant with long flowing leaves. Slowly the maize heads form and eventually when they are ripe and golden, they can be cooked and eaten! It is also possible for the teacher to show how the maize can be ground into flour for baking. If the children get a chance to bake, they can add some maize flour to the other flour that they will use for baking buns.
22
Copyright Catherine van Alphen
62
Source: www.entwicklungshilfe3.de Open Source: Creative Commons Attribution-Non-Commercial-Share Alike 3.0 International Licence; see www.creativecommons.org
Plant some herbs as well, as these are easy to grow and add taste to salads and vegetable dishes e.g. coriander, mint, thyme, marjoram, rocket and chives. The children will want to plant some flowers as well, so space for these must be part of the planning of the garden. Nasturtium seeds grow easily and other seeds or seedlings can be chosen to make the garden attractive. The teacher needs to find out which plants grow well together because plants are like friends; they actually support each other to grow better. Some of them give shade to others while some protect other plants from certain insects by giving off a certain scent. They are called ‘companion plants’. Every day after working in their gardens, the children return to the classroom and work in their main lesson book, writing and illustrating what they have learnt about gardening. This book should include a poem about the beauty of plants in the garden and maybe some of the children’s own writing about their garden. The Gardening main lesson block can be organised in various ways. The teacher may find that the children do not need a full three weeks for preparing their gardens. A shorter main lesson may be appropriate, especially if the children continue to have time during the school day to work in their gardens. However, the children need to be involved in actively working in the garden over much longer than three weeks. So a weekly Gardening lesson will need to be included in the timetable, as well as regular watering of plants for a long time after the main lesson block is over. Whenever humans relate to the soil and work with the earth to enrich it, in return the earth gives of itself abundantly to humans. Once the children are involved in gardening it becomes such a magical process that unfolds before their eyes in hardly any time at all! After about three months of caring for their plants, the garden should be growing nicely and the children can begin to pick items for making a special class meal. If there are vegetables that need cooking, perhaps the teacher can supervise small groups of children to carry out the various duties to create the special meal. If there is a school kitchen, the food may be able to be cooked there. The children should be taught to prepare the meal well so that it becomes a festive occasion. The whole room can be set out for the meal with candles and flowers on the table.
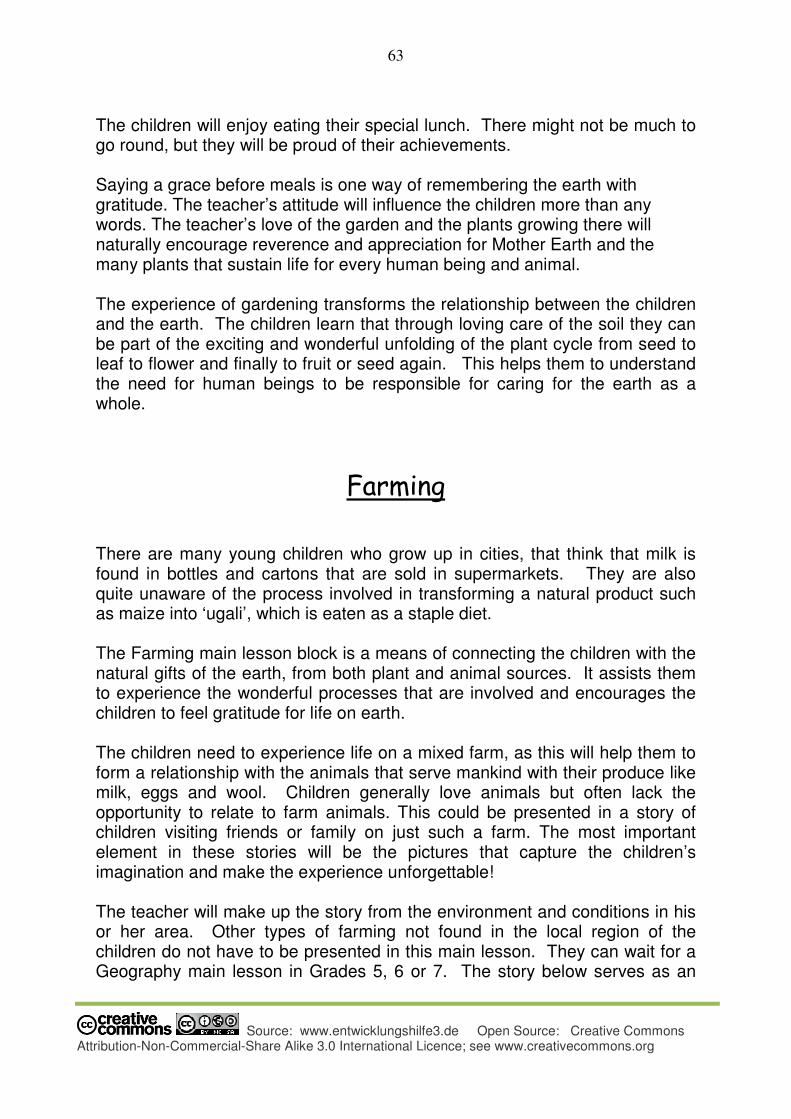
63
Source: www.entwicklungshilfe3.de Open Source: Creative Commons Attribution-Non-Commercial-Share Alike 3.0 International Licence; see www.creativecommons.org
The children will enjoy eating their special lunch. There might not be much to go round, but they will be proud of their achievements. Saying a grace before meals is one way of remembering the earth with gratitude. The teacher’s attitude will influence the children more than any words. The teacher’s love of the garden and the plants growing there will naturally encourage reverence and appreciation for Mother Earth and the many plants that sustain life for every human being and animal. The experience of gardening transforms the relationship between the children and the earth. The children learn that through loving care of the soil they can be part of the exciting and wonderful unfolding of the plant cycle from seed to leaf to flower and finally to fruit or seed again. This helps them to understand the need for human beings to be responsible for caring for the earth as a whole.
Farming
There are many young children who grow up in cities, that think that milk is found in bottles and cartons that are sold in supermarkets. They are also quite unaware of the process involved in transforming a natural product such as maize into ‘ugali’, which is eaten as a staple diet. The Farming main lesson block is a means of connecting the children with the natural gifts of the earth, from both plant and animal sources. It assists them to experience the wonderful processes that are involved and encourages the children to feel gratitude for life on earth. The children need to experience life on a mixed farm, as this will help them to form a relationship with the animals that serve mankind with their produce like milk, eggs and wool. Children generally love animals but often lack the opportunity to relate to farm animals. This could be presented in a story of children visiting friends or family on just such a farm. The most important element in these stories will be the pictures that capture the children’s imagination and make the experience unforgettable! The teacher will make up the story from the environment and conditions in his or her area. Other types of farming not found in the local region of the children do not have to be presented in this main lesson. They can wait for a Geography main lesson in Grades 5, 6 or 7. The story below serves as an
64
Source: www.entwicklungshilfe3.de Open Source: Creative Commons Attribution-Non-Commercial-Share Alike 3.0 International Licence; see www.creativecommons.org
example of a farm in South Africa, to give an idea how such a story can be created:
Visit to the Farm
Early in the morning Billy’s alarm went off. He yawned and rolled over to look at it. 4:30 am! It was time for them to get up if he and Mandy were going to join George in the cowshed. He could hardly believe that only yesterday they had arrived for their holiday on the farm and here they were already getting involved in the work! He ran across to Mandy’s room and shook her shoulder. “Wake up!” She opened one eye and then jumped out of bed. Soon they were dressed and they tip-toed down the corridor to the front door. George was waiting for them, putting on his jacket. “It’s chilly before dawn, but it should get warmer later,” he said. Out in the misty air the children stumbled across to the cowshed. The shadowy shapes of the cows were just visible as they meandered slowly into the cowshed, each one moving instinctively to their own stall. Barry the dairyman was there, putting hay into each cow’s trough. “Morning everyone,” he greeted and handed the bundle of hay to George. “You can carry on with this.” “Come on, my beauty,” Barry said to the nearest cow as he tied up her halter to a ring in the stall and then proceeded to tie a strap around her two hind legs. He placed a bucket underneath her udder and dragged up a low stool and sat down on it. Barry began by greasing the udder with ointment and then stroked two of the teats. Suddenly the children heard the sound of the milk spurting into the bottom of the bucket with a steady rhythm – one, two, one, two. The creamy white milk bubbled up in foam as he worked. When the bucket was almost full, they could hear that the rhythm was slowing down. Barry stopped, patted the cow and took the bucket along to have it weighed so that they could write up how much milk she had given. Barry rinsed the bucket and then moved to sit under another cow. He patted her side affectionately and began to milk her. “Why did you tie up the other cow and not this one?” asked Mandy. Without looking up or pausing, Barry answered, “That other cow – Camilla – she’s moody. One kick and she’ll have the whole bucket of milk on the floor. Cows kick sideways. I don’t take chances with her. But this one, Dana, she’s very gentle.” By now, George was also milking a cow. Billy watched his strong hands admiringly as he worked. Later Barry said that he would teach both Billy and
65
Source: www.entwicklungshilfe3.de Open Source: Creative Commons Attribution-Non-Commercial-Share Alike 3.0 International Licence; see www.creativecommons.org
Mandy to milk cows on the evening shift. “Don’t expect to get it right first time,” he smiled. There were several other dairymen all milking cows and Billy and Mandy could see that it would take quite a long time to milk them all. “Why don’t you use machines for milking the cows?” asked Billy. “Lots of other dairies use them,” answered Barry. “It’s very convenient when a farmer has a huge herd. We have a fair number of cows but we prefer to milk them all by hand. We just reckon that the cow is happier with the human contact.” “Why is no-one milking that cow?” asked Mandy. “Oh, that’s Candyfloss. She is expecting a calf any time now, so she comes for her feed but she is allowed to build up her milk supply especially for the new baby when it arrives,” said Barry. “If you are lucky, you might even get to see her calving.” “What about those other calves in the pen outside?” asked Billy. “They are waiting for their share,” answered Barry. “In the beginning the mother cow only gives her milk to the new calf. Later we separate her from the calf so that it doesn’t drink too much. The mother is milked with all the other cows but the baby calf gets its milk in a bucket. Soon it will learn to eat grass as well.”. After breakfast they visited the part of the dairy where the butter and cheese were made. They saw the huge machine for separating the cream from the milk. Some of the cream went to another machine to be churned into butter while the rest was put into small cardboard tubs and sealed for sale at shops. They had huge fridges to store all the milk, butter and cream. They also saw the cheese rooms and spoke to Mary who was in charge of the cheese-making. “Every cheese has a special recipe. Some have herbs added. With others it is the temperature they are processed at. Here, have a taste.” And she broke off a small piece from one of the cheeses for each of them. Now, try this one, you’ll see it is quite different,” said Mary. “Yummy!” said Mandy. “I’d love to make cheese.” “It takes a long time to learn to do it properly.” Mary said: “One can’t afford to make mistakes. If it doesn’t taste right, you can’t sell it.” And so the day went on, full of exciting and interesting activities. “Wow!” said Billy. What a lot of work there is to be done on a farm. Just as well you have people to help you.” “Yes,” said George, “But it is good to be able to do things oneself as well. Then they really respect you. Come, let’s go for a ride on the horses before supper.” “Oh, yes,” said Mandy, “Please can I ride Smoky? She’s so gentle. She’s my favourite!”
66
Source: www.entwicklungshilfe3.de Open Source: Creative Commons Attribution-Non-Commercial-Share Alike 3.0 International Licence; see www.creativecommons.org
The Story Continues
On the next day, the teacher continues the story to allow the children to experience a visit to the chickens. Then there are the pigs with the huge mother sows and their many piglets. The teacher can continue the story each day, exploring different aspects of a mixed farm: care of each of the different kinds of animals, vegetable farming and fruit farming e.g. apples, pears, strawberries or whatever is available in the surrounding farms.
Organic versus Commercial Farming
We do not focus on commercial farming in this main lesson. We teach the children about organic farming as it embodies the natural methods taught to the children in the gardening main lesson. Organic farming uses mulching and compost and thus continually enriches the soil to create a healthy environment in which healthy plants will be produced. In this way it is concerned with the welfare of the earth as a whole. NB: It is important to present imaginative pictures to the children rather than a great deal of factual information. The Farming main lesson is a wonderful opportunity for the teacher to describe the birth of a baby animal e.g. a calf, lamb or kid as part of the story. The children need to know about birth in the animal world and not every child will have seen puppies or kittens being born. It introduces them to the process of new life in a very natural way especially if the teacher encourages discussion without embarrassment.
Care of Farm Animals
The following information is meant as useful background for the teacher. The teacher may research it further if necessary and then transform it into part of the story.
Chickens
Chickens are bred for their eggs and also for white meat. The cock or rooster wakes the barnyard in the morning with his crowing and the hens lay eggs in nests in small cages called hen coops. The eggs are collected daily and sold in boxes of six eggs or trays of 24 - 36 eggs. From time to time a hen gets broody and the farmer will allow her to sit on a clutch of 6 – 10 eggs until they hatch into little fluffy yellow chickens.
67
Source: www.entwicklungshilfe3.de Open Source: Creative Commons Attribution-Non-Commercial-Share Alike 3.0 International Licence; see www.creativecommons.org
There are many different breeds of chickens. There is the usual red hen and the cock with striking black and green tail feathers and a gaudy red comb on top of his head. Then there are the tiny bantams with their pretty speckled markings. The Silkies have long white feathers and black feet with a black patch on their heads. Every country has their special breed of chickens. Battery chickens are kept in cages with lights on permanently and are fed high protein food to force the chickens to lay more eggs as this means greater profits for the farmer. Free-range chickens roam in large grassy chicken runs or freely around the farm. It is well known that contented free-range chickens produce eggs and meat that are far superior in taste to that from battery chickens. Other kinds of poultry are ducks, geese and turkeys. They also lay eggs but are generally bred for their meat.
Pigs
Pigs are bred for their meat. Adult pigs grow very large with a long solid body with very little hair on it. They are usually pink, grey, black or with patches of different colours. Pigs have a flat nose on the end of their snout and a thin curly tail at the back. Like cows they have split hooves. Pigs are useful because they eat up all the scraps of leftover food or vegetable waste. The father is called a boar and the mother is called a sow. She produces 9 – 12 piglets that lie in a long row to suckle milk from her. Pigs are quite intelligent and are often able to get out of their pens to roam around. They have occasionally been used as pets for children until they get too big or too naughty to keep at home.
Horses
The teacher may well choose to study the horse in detail in the Man and Animal main lesson in Grade 4 and if so should not spend too much time here. The horse is a noble animal that has long been a loyal companion to man, along with the dog. The horse was the main means of transport in olden times and horses were kept on a farm for the farmer to ride out and oversee the different farm activities. Huge plough horses with their shaggy hooves would be used for ploughing the fields and drawing wagons with produce to market. Nowadays, however, the farmer uses a tractor to pull the plough or harvesting machines and so horses are kept mainly for pleasure and entertainment of the farmer’s family. Nevertheless, the relationship between the horse and its owner is still a bond of love and trust.
68
Source: www.entwicklungshilfe3.de Open Source: Creative Commons Attribution-Non-Commercial-Share Alike 3.0 International Licence; see www.creativecommons.org
Today horse farms are stud farms where horses are bred specifically for horse-racing, jumping or dressage which is a specialised training to perform certain exercises while being ridden in a horse show. These sensitive horses require a special feeding programme including oats and hay. They need daily grooming to keep their coats clean and shiny. The groom who looks after them will clean any mud or small stones out of their hooves to prevent them going lame. The mare will produce one foal in a year during spring time. It is delightful to watch a young foal following its mother around on long wobbly legs when new-born and how freely it races around the paddock only a few months later! When the foal is fully grown at three years old, it will be trained carefully and sold for a high price!
Sheep and Goats
A mixed farm may well have a few sheep and goats for wool and goat hair. Goat’s milk is also used for making cheese and has quite a strong taste. Goats are known to climb trees and fences in search of food. They will even chew clothing that is drying on the washing line, so the farmer has to make sure that they are grazing in areas that will not be destroyed through the adventurous nature of the goat!
Sheep Farming
Sheep farming is done on a large scale in areas that are dry because sheep can happily feed on scrub bushes whereas cows need lush grassy pastures and extra hay or lucerne for producing milk. The sheep farmer will often have a large farm with hundreds of sheep grazing on vast acres of land. The teacher can easily introduce sheep farming as part of the story about Billy and Mandy.
A Sheep-Shearing Competition
George called out to Billy and Mandy, “Hey! Do you know what’s happening on Saturday?” “No!” they answered. “Tell us!” “We’re going off to the Roux’s farm. They are having a sheep-shearing competition!” “Where is the Roux’s farm?” asked Billy. “Oh, it’s about an hour away in the 4x4. We leave early in the morning,” answered George. “Farmers send their best shearers and they see who wins.”
69
Source: www.entwicklungshilfe3.de Open Source: Creative Commons Attribution-Non-Commercial-Share Alike 3.0 International Licence; see www.creativecommons.org
“How does the competition work?” asked Mandy. “Well,” said George, “Each shearer is given a sheep and they are timed from start to finish. The one who does the neatest job in the shortest time without any bleeding of cuts from the sheep will win. Also if their fleece is in one piece without any mistakes in the shearing, that will count in their favour.” “Is the fleece in one piece?” exclaimed Mandy. How is that possible?” “You’ll see,” answered George proudly, “It’s very exciting.” The next day the children found themselves in a large shed with many other people, mostly farming folk. Three men were shearing at one time but they didn’t necessarily start together as each one was timed individually. Each one had an electric shearer like a shaver. A sheep was brought in and immediately the shearer turned the sheep on its back and began by cutting down the middle of the sheep’s stomach, carefully pealing back the wool or fleece as he worked towards the legs. He also shaved down the inside of the legs, working steadily and amazingly quickly towards the back of the sheep. This part was easier and in almost no time the white naked sheep was scrambling its way back to the pen, guided by one of the workers. The shearer rolled up the fleece into a bundle and took it next door to where there was a huge table. He flung the fleece down and it unrolled right to the edge of the table. Mandy and Billy gasped in amazement. The outside of the fleece had been a brownish colour but the inside was snowy white with soft waves like cotton wool but even more beautiful! And how did one sheep have so much wool on it? George whispered behind them. “Look, there is one of the judges.” They saw a large man with a notebook and pen in his hands. Another man came up and gave him the time that the shearer had taken. “This competition takes most of the day. Do you want something to drink? There are some delicious cookies at the house.” Billy and Mandy spent the day watching the shearers at work but they also wandered around the farm. They got a ride on a tractor and trailer to go and see some sheep dipping. The sheep had already been sheared and were waiting in a pen. At one end of the pen was a narrow corridor leading to the dipping tank. The dipping tank was about a metre deep in a foul smelling yellowish liquid and when the sheep came to the end of the corridor and saw the tank, it tried to go back. Of course it couldn’t and there was a sheep hand driving it on. So the sheep was forced to jump into the tank of dip. The sheep hand had a long stick and forced the sheep under the water to make sure that even their head was dipped. The sheep scrambled out the other side, dripping wet and escaped gratefully to the flock of sheep that had already been dipped.
70
Source: www.entwicklungshilfe3.de Open Source: Creative Commons Attribution-Non-Commercial-Share Alike 3.0 International Licence; see www.creativecommons.org
“What is in there?” asked Mandy. “Mostly disinfectant to keep the sheep from catching diseases,” said George. “Once they get something serious, the whole flock of sheep is likely to get sick as well. The farmer can lose a lot of sheep that way.” They went back to the shed and watched some more shearers at work. One man was so fast they could hardly believe their eyes. “He has won several years in succession. No one seems to be able to catch up with him,” said George. And true enough, he won the competition again! Billy and Mandy were really tired when they arrived back home that night. They could hardly keep their eyes open after supper and just tumbled into bed.
Spring Time on the Sheep Farm
Sheep farming has its busiest time around sheep shearing time in the early spring. After shearing, the wool is washed and put into large bales and sent to markets where it is sold. Every bale is carefully checked to make sure it is of a high standard and good quality wool gives the farmer a good name. Spring time is also when all the lambs are born. The farmer and his shepherds have to check the ewes regularly. Some of them give birth very easily, but others have complications. The ewes sometimes give birth in places on the farm that are difficult for the new-born lamb to get out of like a gully and then they both need help to get back to the safety of the barn. Young lambs are prey to predators like eagles and jackals and so the farmer has to be on the lookout to protect them. Children love animals, especially baby animals and spring time is a wonderful place for the children to experience the various animal babies on the farm. Visiting a farm also enables children to experience the working relationship between human beings and animals and the many ways in which animals support human life. They also observe how each of the different farm animals needs to be cared for in order to produce its best. It is important that the children experience a farm where the well-being of the animals is considered as essential to the success of the farm. This is known as ‘moral’ farming.
Fruit Farming
In areas where the climate is suitable, certain fruit is grown exclusively, although mixed farms will also have a small orchard growing fruit for the use of the farm. On these fruit farms huge orchards are planted with fruit trees. They are especially beautiful in spring time when the trees are flowering and
71
Source: www.entwicklungshilfe3.de Open Source: Creative Commons Attribution-Non-Commercial-Share Alike 3.0 International Licence; see www.creativecommons.org
they are covered in buzzing bees that come to get nectar and to pollinate the flowers. The fruit trees will be sprayed at different times to prevent disease, beginning in spring when moths and other insects attack the young fruit. The fruit trees have to be fed with compost and watered regularly to make sure that the fruit grows well. The farmer is on the lookout for pests that attack and spoil the fruit as only the best quality fruit can be sold. At harvesting time, many workers go out with baskets to pick the fruit. A tractor pulling a long trailer is driven into the orchard to collect the baskets of fruit. Then the fruit is sorted. Size, shape and colour are all important, not only the taste. Some farms have such good quality fruit that it is packed in boxes or cardboard trays and sold to expensive shops and restaurants or exported to other countries. Many different types of fruit may be grown: deciduous fruit like apples, pears, peaches and apricots; grapes from which wine and juice are made and sub-tropical fruit like pawpaw, mango and pineapples. Every country has its special fruit and these must be researched by the teacher and presented in a creative story.
Grain Farming
Grain farming is usually done on a large scale with vast fields ploughed up for the growing of wheat, maize, barley, rye, millet, sorgum, oats and rice. These farms usually choose one type of grain. At the beginning of the growing season for grain, the farmer will plough the large fields. Then he will sow the seeds of corn. In olden times, the farmer or his labourers would each walk out with a large bag full of seed slung across their shoulders. All day they would walk up and down the rows flinging the seed into the furrows left by the plough. Then they would come and cover the soil over the seed and wait for the rain to germinate the seed. Today there are machines that sow the seed and cover it up immediately, making the whole process much faster. When farmers have many acres of land, these machines are very useful. Soon the grain sprouts and little blades of what looks like grass appear in the soil. As it grows taller, the whole field begins to look like a great sea of emerald green grass. As the season progresses the grain produces a head like a crown that turns golden as it ripens!. When the corn is ripe, the farmer gets everyone to help with the harvesting of the grain. In olden times, men would cut the corn with a large scythe, which is
72
Source: www.entwicklungshilfe3.de Open Source: Creative Commons Attribution-Non-Commercial-Share Alike 3.0 International Licence; see www.creativecommons.org
a wooden handle that has a long blade on the end. With wide sweeping movements they cut the corn and everyone followed them and collected up the corn and bound it together in sheaves. Later the corn would br threshed which a process of beating it until the stalk is separated from the head of grain. Today the farmer has a harvesting machine that cuts the corn, separates the head from the long stalk and binds the stalks into bales of straw. The corn is gathered into huge sacks and taken to be stored in a place called a granary There it is kept safe from mice and rats or any other pests and damp that would damage it. The grain must now be ground into flour before it can be sold or used for baking bread. This process is called milling or grinding. In olden times there were millers who ground the corn using two heavy round flat stones. The miller usually had a mill where the flowing river water turned the mill wheel which turned the stones. The corn was placed between the two stones which were turned round and round until the grain was ground into flour. Sometimes the flour was very fine and at other times it was left rough. Today the milling is done by machine and you can buy fine cake flour or rough whole wheat bread flour in the shops. Each country has its own special grain that forms the staple diet of the people. The whole process of the growing of grain and preparing it for bread or food has been considered a sacred gift from God. There are many wonderful folk stories illustrating the sacrifice of the grain in allowing it to be used for feeding the people. Therefore harvesting time is more than merely gathering and storing the grain. It is a thanksgiving for the food that will ensure life for the people through the many months of the year ahead. Rudolf Steiner has said that the qualities in the grain bring light and energy to people, inspiring them in their work and connecting them in gratitude to the God-given abundance of the earth The teacher can teach them the Song of the Corn which illustrates the whole process of growing the grain and preparing it to be made into bread.
Class Activities for the Farming Main Lesson
The teacher could bring some cream in a bottle and let the children take turns in shaking it until it turns into butter. Bread rolls or buns could be made by the class and spread with the butter that has already been made. These could be part of the special meal with salad from the children’s vegetable garden.
73
Source: www.entwicklungshilfe3.de Open Source: Creative Commons Attribution-Non-Commercial-Share Alike 3.0 International Licence; see www.creativecommons.org
A Visit to a Mixed Farm
The teacher must try to arrange that the children experience a mixed farm and they will enjoy it all the more after having heard the stories about farming. It is best if they can go for two or three days so that they can observe the different activities like milking cows, collecting eggs, weeding vegetables, baking bread, churning butter, and feeding pigs. If you have a sympathetic farmer who is willing to allow the children to take part in some of the above mentioned activities, it will be an unforgettable experience for the children.
74
Source: www.entwicklungshilfe3.de Open Source: Creative Commons Attribution-Non-Commercial-Share Alike 3.0 International Licence; see www.creativecommons.org
The Four Operations In Grade 3, a thorough understanding of the four operations needs to be established. The children are now old enough to understand things more consciously, due to the ‘I’ awakening in the soul life of the child. The interrelationship of the four operations In Grade 1, the children were introduced to the four operations as ‘brothers’, ‘sisters’, ‘helpers’, the chief’s ‘elders’ or the king’s ‘councillors’, showing in an imaginative way that they are related. After reminding the children of how they learnt about the operations in Grade 1 (it brings wholeness to what we teach them, by linking back to what they learnt before), we now lead them to see these interrelationships in a more definite way.
Firstly, subtraction and addition are very close ‘brothers’, as they are doing the same thing, but just in an opposite way: 2 + 3 = 5 5 – 3 = 2 10 + 5 = 15 15 – 5 = 10
30 + 20 = 50 50 – 20 = 30 75 + 25 = 100 100 – 25 = 75
The same close relationship can be seen between the other two ‘brothers’, multiplication and division: 3 x 2 = 6 6 ÷ 2 = 3 4 x 5 = 20 20 ÷ 5 = 4
10 x 6 = 60 60 ÷ 6 = 10 20 x 4 = 80 80 ÷ 4 = 20
Practise these close relationships for some time, to make sure everyone understands. Give the quick children more difficult examples to work on, to keep them challenged.
Then, we can look at how the ‘brothers’ also relate in a different way. We can see how they really belong to one family when we look at the following:
Multiplication is really a fast form of addition, as long as we keep adding the same numbers:
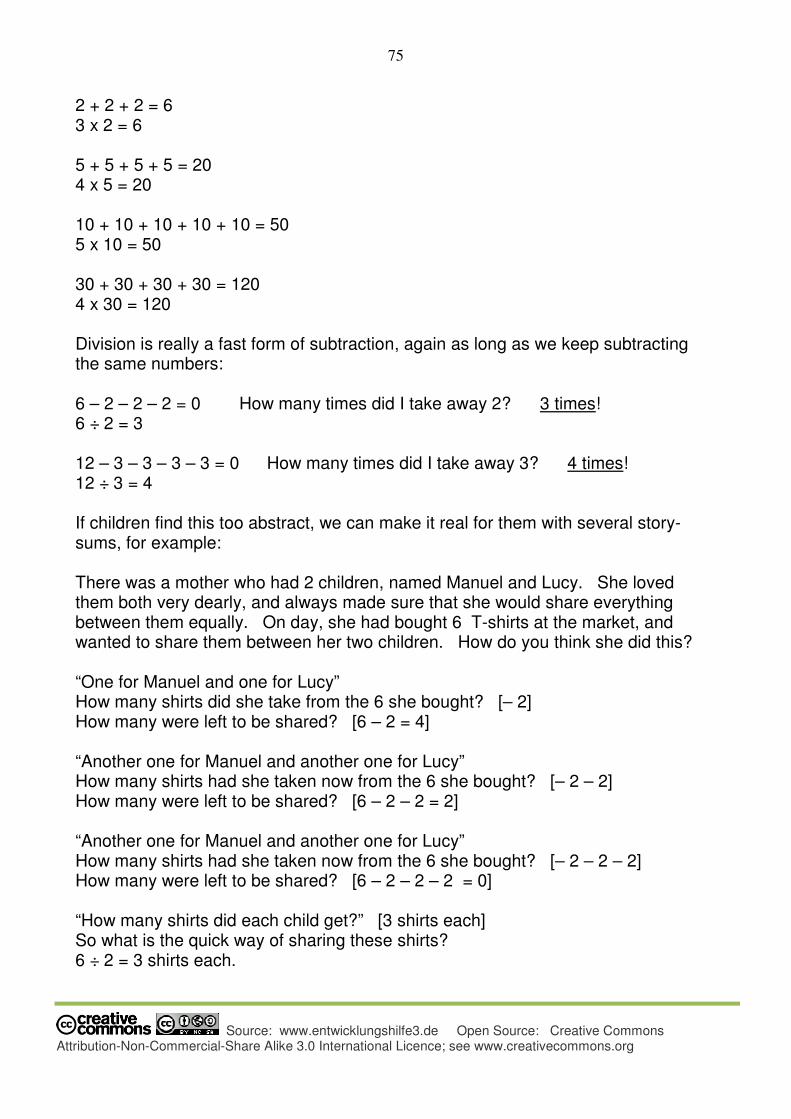
75
Source: www.entwicklungshilfe3.de Open Source: Creative Commons Attribution-Non-Commercial-Share Alike 3.0 International Licence; see www.creativecommons.org
2 + 2 + 2 = 6 3 x 2 = 6 5 + 5 + 5 + 5 = 20 4 x 5 = 20 10 + 10 + 10 + 10 + 10 = 50 5 x 10 = 50 30 + 30 + 30 + 30 = 120 4 x 30 = 120 Division is really a fast form of subtraction, again as long as we keep subtracting the same numbers: 6 – 2 – 2 – 2 = 0 How many times did I take away 2? 3 times! 6 ÷ 2 = 3 12 – 3 – 3 – 3 – 3 = 0 How many times did I take away 3? 4 times! 12 ÷ 3 = 4 If children find this too abstract, we can make it real for them with several story-sums, for example: There was a mother who had 2 children, named Manuel and Lucy. She loved them both very dearly, and always made sure that she would share everything between them equally. On day, she had bought 6 T-shirts at the market, and wanted to share them between her two children. How do you think she did this? “One for Manuel and one for Lucy” How many shirts did she take from the 6 she bought? [– 2] How many were left to be shared? [6 – 2 = 4] “Another one for Manuel and another one for Lucy” How many shirts had she taken now from the 6 she bought? [– 2 – 2] How many were left to be shared? [6 – 2 – 2 = 2] “Another one for Manuel and another one for Lucy” How many shirts had she taken now from the 6 she bought? [– 2 – 2 – 2] How many were left to be shared? [6 – 2 – 2 – 2 = 0] “How many shirts did each child get?” [3 shirts each] So what is the quick way of sharing these shirts? 6 ÷ 2 = 3 shirts each.
76
Source: www.entwicklungshilfe3.de Open Source: Creative Commons Attribution-Non-Commercial-Share Alike 3.0 International Licence; see www.creativecommons.org
So we can see that instead of taking away 2 shirts every time [6 – 2 – 2 – 2], division is a quicker way of subtracting [6 ÷ 2]
It may be necessary to do many exercises using story-sums to firmly establish the relationship between division and subtraction. The four operations What to teach in Grade 3 will depend on the progress made in Grade 2. The work outlined in the Grade 2 manual will need to be revised before it can be extended. Very important is to realise that the teacher continually creates story-sums for working with the four operations. This brings interest and enthusiasm to the children, bringing meaning to what they are doing in maths, rather than it being only a mechanical process. The themes of the Grade 3 curriculum provide many opportunities for creating story-sums that relate to what the children are learning in the main lesson blocks. The practical themes, such as housebuilding, farming and the various crafts are especially useful here in adding, subtracting, multiplying and dividing the materials needed. The creativity of the teacher can inspire the children to love the mathematics lessons, even if at times some struggle is needed. Another very important principle to remember, is that we need to develop flexibility of thinking in the children. This means that they need to be able to do things in different ways, rather than be limited to only one way of doing a particular kind of sum. It also means that it is our duty as teachers to get them to think for themselves, and be able to find their own way in finding solutions in the maths work they do. This is why some work in extended notation (see Grade 2 manual) is recommended; it stimulates the children to think in other ways, rather than only learning one, mechanical way of doing sums. It will be seen below, that extended notation helps the children to understand what they are doing, especially when it comes to vertical sums. We will focus on multiplication and division here, assuming that the work described in the Grade 2 manual has been revised and consolidated as far as addition and subtraction are concerned. Multiplication When we multiply small numbers (single digit x single digit), we simply use our tables to work out the answer! But when we multiply a bigger number (single digit x double digit), we have to make two sums out of it:
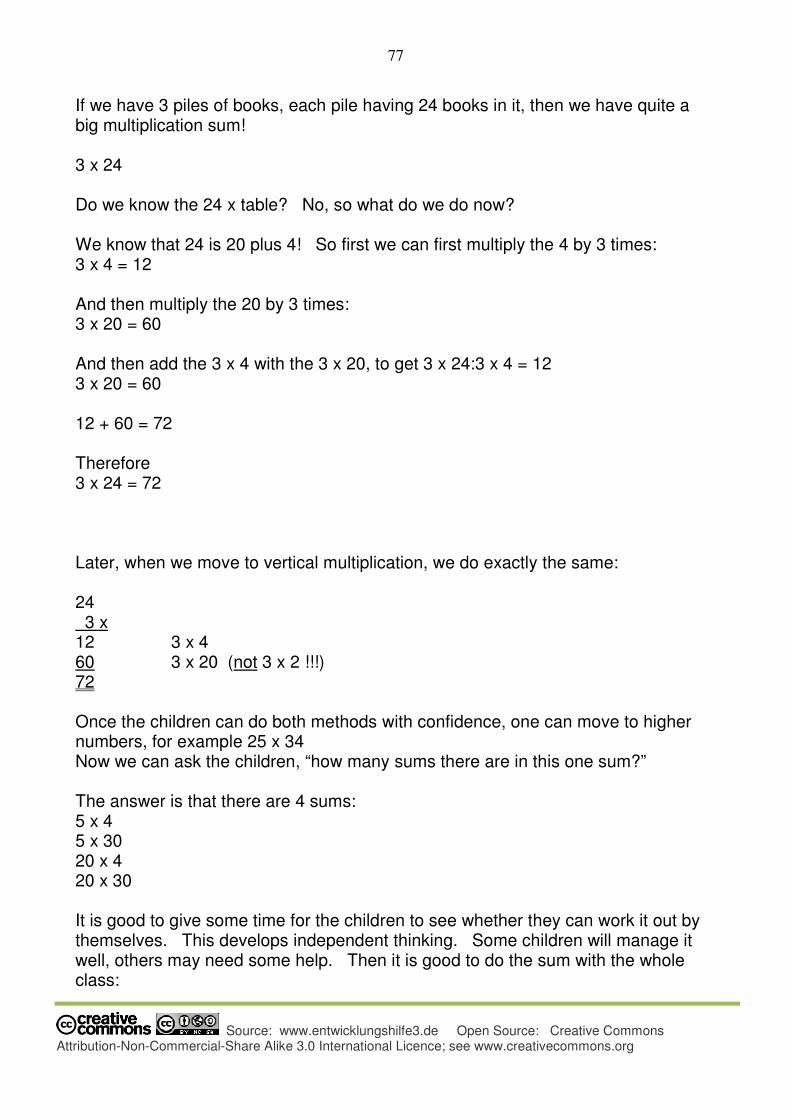
77
Source: www.entwicklungshilfe3.de Open Source: Creative Commons Attribution-Non-Commercial-Share Alike 3.0 International Licence; see www.creativecommons.org
If we have 3 piles of books, each pile having 24 books in it, then we have quite a big multiplication sum! 3 x 24 Do we know the 24 x table? No, so what do we do now? We know that 24 is 20 plus 4! So first we can first multiply the 4 by 3 times: 3 x 4 = 12 And then multiply the 20 by 3 times: 3 x 20 = 60 And then add the 3 x 4 with the 3 x 20, to get 3 x 24:3 x 4 = 12 3 x 20 = 60 12 + 60 = 72 Therefore 3 x 24 = 72 Later, when we move to vertical multiplication, we do exactly the same: 24 3 x 12 3 x 4 60 3 x 20 (not 3 x 2 !!!) 72 Once the children can do both methods with confidence, one can move to higher numbers, for example 25 x 34 Now we can ask the children, “how many sums there are in this one sum?” The answer is that there are 4 sums: 5 x 4 5 x 30 20 x 4 20 x 30 It is good to give some time for the children to see whether they can work it out by themselves. This develops independent thinking. Some children will manage it well, others may need some help. Then it is good to do the sum with the whole class:
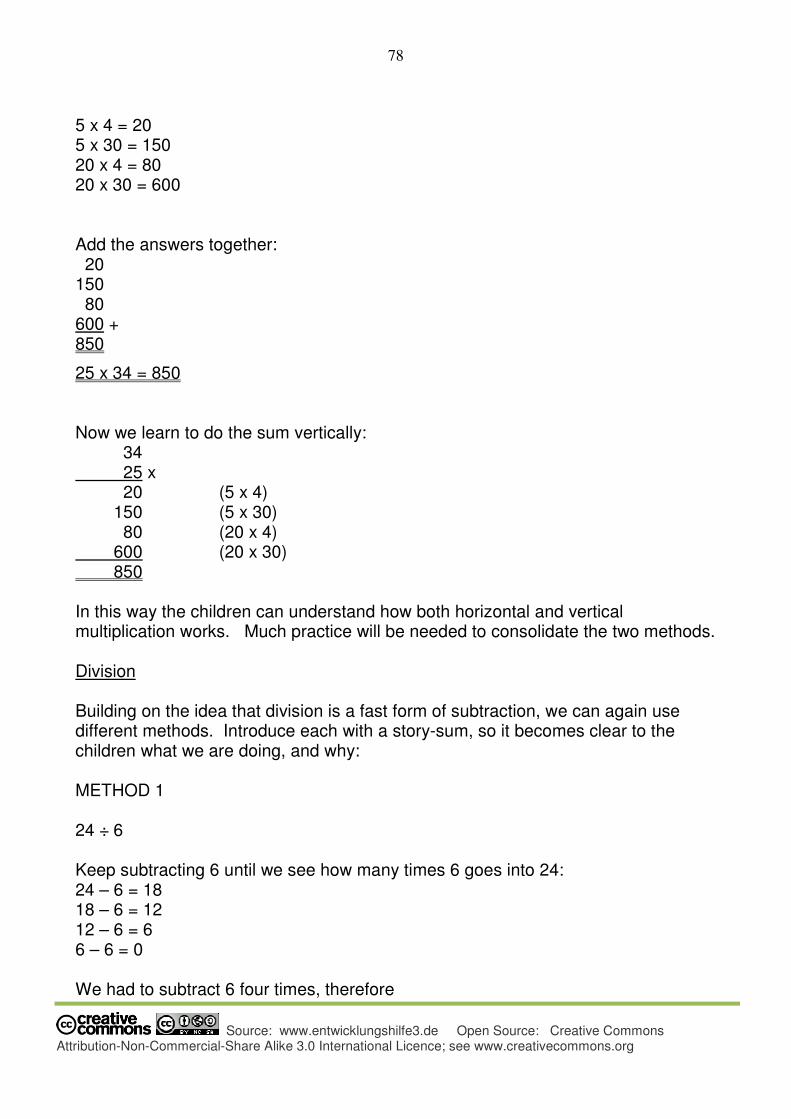
78
Source: www.entwicklungshilfe3.de Open Source: Creative Commons Attribution-Non-Commercial-Share Alike 3.0 International Licence; see www.creativecommons.org
5 x 4 = 20 5 x 30 = 150 20 x 4 = 80 20 x 30 = 600 Add the answers together: 20 150 80 600 + 850
25 x 34 = 850 Now we learn to do the sum vertically:
34 25 x 20 (5 x 4) 150 (5 x 30) 80 (20 x 4) 600 (20 x 30) 850 In this way the children can understand how both horizontal and vertical multiplication works. Much practice will be needed to consolidate the two methods. Division Building on the idea that division is a fast form of subtraction, we can again use different methods. Introduce each with a story-sum, so it becomes clear to the children what we are doing, and why: METHOD 1 24 ÷ 6 Keep subtracting 6 until we see how many times 6 goes into 24: 24 – 6 = 18 18 – 6 = 12 12 – 6 = 6 6 – 6 = 0 We had to subtract 6 four times, therefore
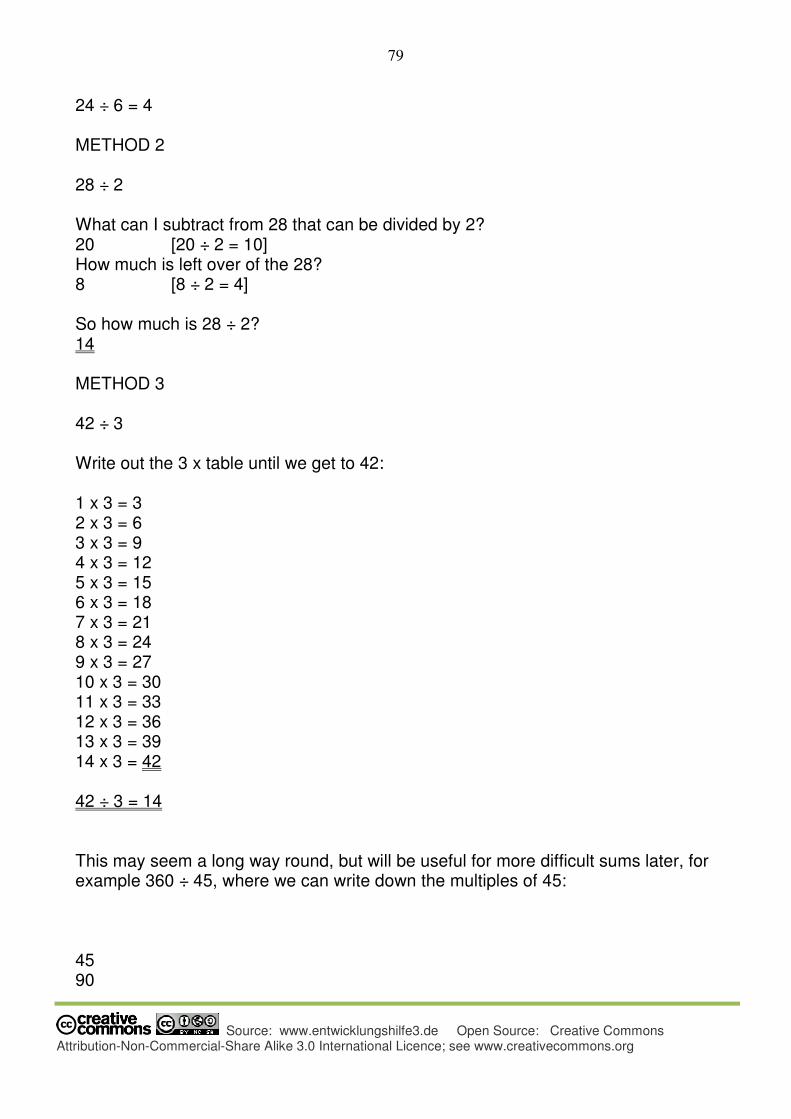
79
Source: www.entwicklungshilfe3.de Open Source: Creative Commons Attribution-Non-Commercial-Share Alike 3.0 International Licence; see www.creativecommons.org
24 ÷ 6 = 4 METHOD 2 28 ÷ 2 What can I subtract from 28 that can be divided by 2? 20 [20 ÷ 2 = 10] How much is left over of the 28? 8 [8 ÷ 2 = 4] So how much is 28 ÷ 2? 14 METHOD 3 42 ÷ 3 Write out the 3 x table until we get to 42: 1 x 3 = 3 2 x 3 = 6 3 x 3 = 9 4 x 3 = 12 5 x 3 = 15 6 x 3 = 18 7 x 3 = 21 8 x 3 = 24 9 x 3 = 27 10 x 3 = 30 11 x 3 = 33 12 x 3 = 36 13 x 3 = 39 14 x 3 = 42 42 ÷ 3 = 14 This may seem a long way round, but will be useful for more difficult sums later, for example 360 ÷ 45, where we can write down the multiples of 45: 45 90
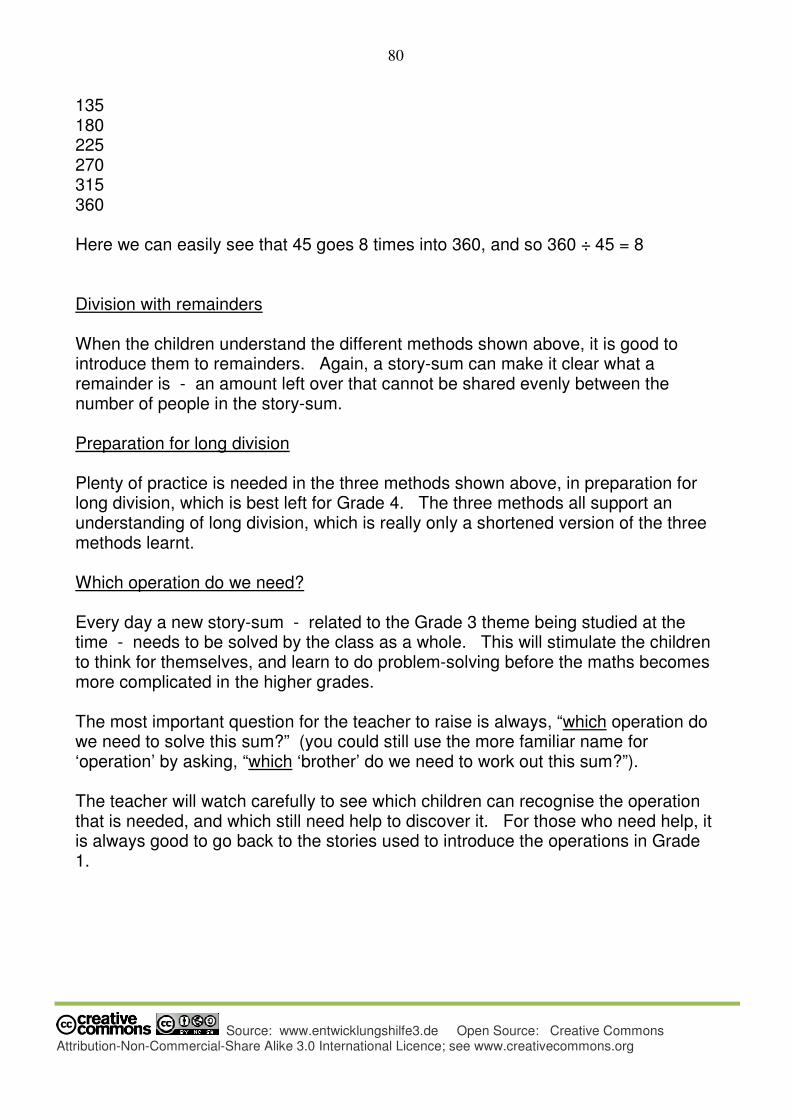
80
Source: www.entwicklungshilfe3.de Open Source: Creative Commons Attribution-Non-Commercial-Share Alike 3.0 International Licence; see www.creativecommons.org
135 180 225 270 315 360 Here we can easily see that 45 goes 8 times into 360, and so 360 ÷ 45 = 8 Division with remainders When the children understand the different methods shown above, it is good to introduce them to remainders. Again, a story-sum can make it clear what a remainder is - an amount left over that cannot be shared evenly between the number of people in the story-sum. Preparation for long division Plenty of practice is needed in the three methods shown above, in preparation for long division, which is best left for Grade 4. The three methods all support an understanding of long division, which is really only a shortened version of the three methods learnt. Which operation do we need? Every day a new story-sum - related to the Grade 3 theme being studied at the time - needs to be solved by the class as a whole. This will stimulate the children to think for themselves, and learn to do problem-solving before the maths becomes more complicated in the higher grades. The most important question for the teacher to raise is always, “which operation do we need to solve this sum?” (you could still use the more familiar name for ‘operation’ by asking, “which ‘brother’ do we need to work out this sum?”). The teacher will watch carefully to see which children can recognise the operation that is needed, and which still need help to discover it. For those who need help, it is always good to go back to the stories used to introduce the operations in Grade 1.

81
Source: www.entwicklungshilfe3.de Open Source: Creative Commons Attribution-Non-Commercial-Share Alike 3.0 International Licence; see www.creativecommons.org
Money Main Lesson This main lesson block flows very well from the Four Operations main lesson block, as the children can put what they have learnt into practice. The whole classroom becomes a market place, in which children practise buying and selling, making all kinds of calculations in their books. To prepare for this, various activities have to be undertaken:
1. The children need to make their own ‘money’ with which they can do their
trading. Please note it is illegal to photocopy real money. In any case it is
much better for the children to create their own ‘play’ money. The teacher
can specify which denominations each child needs to make, and how many
of each. Keep the prices and amounts as realistic to the children’s situations
as possible. It’s all about basic needs, not fancy or expensive things.
2. Together with the children, make a list of basic needs that are needed for
living, and therefore the different types of ‘shops’ or ‘stalls’ the market needs
to have. Distributed these between the different groups of children. Try to
diversify as much as possible, for example, separate fruit sellers from
vegetable sellers, meat sellers from bakers, sellers of maize, etc.
3. Allow the children to create signs for advertising the kind of shop they are;
find a way of displaying these signs above their shop or stall.
4. Ask each group to write down prices for their wares, and check these prices
are reasonable.
Then trading can begin:
5. Each day one child is a seller of the shop/stall, the others in the group going
out to buy.
6. Every child needs to buy from every shop or stall, writing down what they
bought there and calculating how much they have to pay. The seller double-
checks the calculation, writes down everything sold on that day and works
out the total amount.
82
Source: www.entwicklungshilfe3.de Open Source: Creative Commons Attribution-Non-Commercial-Share Alike 3.0 International Licence; see www.creativecommons.org
7. Gradually the teacher could make more complicated rules, for example,
asking for multiplication by saying that children need to buy more than one of
each item. They then need to calculate, for example, 5 x the price for one
item.
8. Later, each child can be asked to keep subtracting from the amount of money
they have, every time they buy something, so they keep on record how much
money they still have after visiting each shop/stall.
9. Finally, the sellers can be asked to make ‘special offers’, for example, 3 items
cost only ..... Then the buyers need to work out how much they will actually
pay for each item, by doing division sums.
At the end of each main lesson, redistribute the money that everyone has, so the next day everyone starts with the same amount again.
83
Source: www.entwicklungshilfe3.de Open Source: Creative Commons Attribution-Non-Commercial-Share Alike 3.0 International Licence; see www.creativecommons.org
Measurement Main Lesson Block Part of the Grade 3 children’s journey to wake up within themselves, is to master the world they live in. The Weights and Measures main lesson block supports this process, by stimulating the children to think in more structural ways. We only give a relatively simple introduction to measurement in mass, length and volume, in line with their gradual awakening to thinking in a more structured way:
Length: millimetres / centimetres and metres Mass: grams and kilograms Volume: millilitres and litres
In Grade 6, the children will learn in detail about the decimal system, and so explanations are left till that time, when the children can understand the decimal system without difficulty. Also important, is for the children to experience the historical development of measurements, not as intellectual concepts, but as feeling-understanding experiences provided by the teacher. The creativity of the teacher is again called upon to imaginatively present the development of measurements in this way. The historical development shows how the human body was the unit of measurement to begin with, the important idea being that every development comes from the human being, and gradually becomes more external.
Length The first measurements human beings made, were taken from the body, using hands, arms and feet. Long, long ago, people would say, “Please could you give me two arms’ length of material, so I can make myself some clothes?” Or they might say, “My bow is ten hands long, and that is a very big bow!” Again, the ruler of a tribe or clan could have said, “Dig a trench that is twenty feet wide, and fill it with water, so that the enemy cannot get to our walls!” The teacher introduces the many different ways of measuring things, using the body, and sets the class tasks to measure things - from small to big - in and outside of the classroom; for example: Digits (the length from knuckle to knuckle of the thumb’s last digit): how many digits (“inches”) is the length of a new pencil? Hands (holding the hand on its side): how many hands (or “palms”) high is your desk? Your chair? Your legs? Cubits (from the elbow to the tops of the fingers): how many cubits wide are the windows/doors/chalkboards? How many cubits high are they? Arm’s lengths (from one shoulder to the tip of the outstretched, opposite arm): how many arm’s lengths wide are the curtains in the room?
84
Source: www.entwicklungshilfe3.de Open Source: Creative Commons Attribution-Non-Commercial-Share Alike 3.0 International Licence; see www.creativecommons.org
Feet (place heel against toe for one foot): how many feet wide is the classroom? How many feet long? Strides (large steps of a full-grown man): how many strides (or “yards”) is the playing field long? Wide? These activities will bring home how people used to measure length long, long ago. Everyday’s story, discussion and practical activities will lead to some writing in the children’s main lesson books, so that by the end of the measurement block there is a complete record of what they have learnt. And then, one day the arguments started. “Your arm’s length is shorter than mine. I am not going to pay you so much for that material, because it is shorter than my two arms’ lengths!” Or, “but my bow is also ten hands long, and look, it’s bigger than yours; your hands are smaller than mine!” And again, “I said twenty feet wide! And this is not twenty feet wide! Your feet are too small !!!” The king of the country could not bear all the arguments about different lengths, and so one day, when he was really fed up, he commanded: “the sizes of everything in the kingdom will be exactly according to my body, and nobody else’s!” And so measures were made from the size of the king’s digit, hand, cubit, arm’s length, foot and stride. This brought peace inside his country, because everyone in his country now measured according to his measurements! However, not all was well on the borders of the kingdom. When the merchants sold their wares from a neighbouring kingdom, their king’s measurements were different from this king’s! And to make matters worse, when this king died, and his son took over the throne, he wanted his own measurements to be used, and not those of his father! Now everyone had to change the measures that they had, and the prices of everything became the source of new arguments! Scenes like these could be acted out by the children in the class, in their groups. The children could make their own measures as they might have been made long ago. Again, writing in the main lesson books will follow every stage of learning about the development of measurement. As more and more people all over the world were trading with each other, the need for having one measurement for the whole world became more and more important. And so it happened, not so long ago, that the METRE became the standard measurement through the whole world. When people today measure larger things, such as lengths of material, we use metres. “Please can you cut me 3 metres of this material,” is all one needs to say today, and you will get exactly 3 metres of material. Demonstrate measuring larger items in metres, writing down on the chalkboard each measurement (1m; 2m; 5m; etc.) Set the children tasks to measure large items, and to write down their measurements in their books.
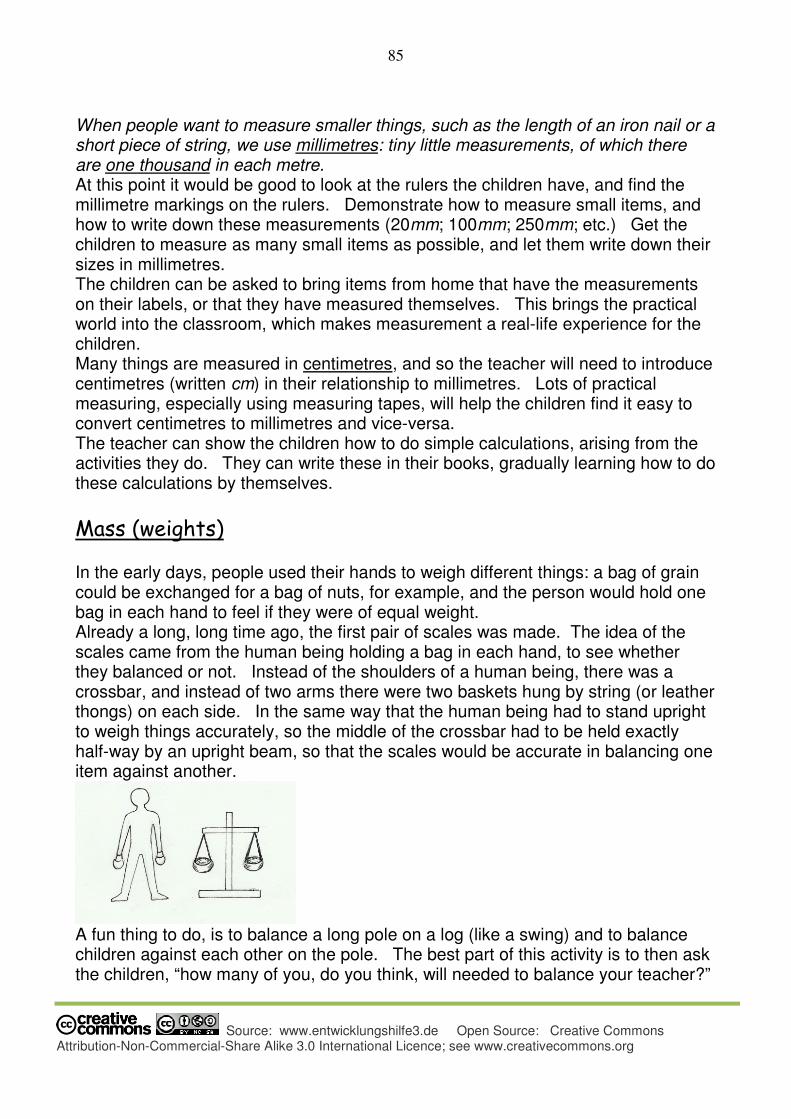
85
Source: www.entwicklungshilfe3.de Open Source: Creative Commons Attribution-Non-Commercial-Share Alike 3.0 International Licence; see www.creativecommons.org
When people want to measure smaller things, such as the length of an iron nail or a short piece of string, we use millimetres: tiny little measurements, of which there are one thousand in each metre. At this point it would be good to look at the rulers the children have, and find the millimetre markings on the rulers. Demonstrate how to measure small items, and how to write down these measurements (20mm; 100mm; 250mm; etc.) Get the children to measure as many small items as possible, and let them write down their sizes in millimetres. The children can be asked to bring items from home that have the measurements on their labels, or that they have measured themselves. This brings the practical world into the classroom, which makes measurement a real-life experience for the children. Many things are measured in centimetres, and so the teacher will need to introduce centimetres (written cm) in their relationship to millimetres. Lots of practical measuring, especially using measuring tapes, will help the children find it easy to convert centimetres to millimetres and vice-versa. The teacher can show the children how to do simple calculations, arising from the activities they do. They can write these in their books, gradually learning how to do these calculations by themselves.
Mass (weights) In the early days, people used their hands to weigh different things: a bag of grain could be exchanged for a bag of nuts, for example, and the person would hold one bag in each hand to feel if they were of equal weight. Already a long, long time ago, the first pair of scales was made. The idea of the scales came from the human being holding a bag in each hand, to see whether they balanced or not. Instead of the shoulders of a human being, there was a crossbar, and instead of two arms there were two baskets hung by string (or leather thongs) on each side. In the same way that the human being had to stand upright to weigh things accurately, so the middle of the crossbar had to be held exactly half-way by an upright beam, so that the scales would be accurate in balancing one item against another.
A fun thing to do, is to balance a long pole on a log (like a swing) and to balance children against each other on the pole. The best part of this activity is to then ask the children, “how many of you, do you think, will needed to balance your teacher?”
86
Source: www.entwicklungshilfe3.de Open Source: Creative Commons Attribution-Non-Commercial-Share Alike 3.0 International Licence; see www.creativecommons.org
They will be very amazed and amused to see how many children are needed to balance the weight of the teacher! Later in time, weights were made for things that had to be weighed again and again. These weights could be made of stones, for example “1 stone”; “2 stone”, etc., or of pieces of metal which later became the standard weights used. It is good to bring items of different weights into the classroom, for children to use their arms to sense their relative weights. If the teacher can find a pair of scales, with the weights that go with it, then these items can be weighed in the way they were done long ago. And, of course, the modern scale needs to be there to do the same. A similar story as that of length can be created by the teacher to show how the need for standard measures of weight had to be invented, so that everyone over the whole world could weigh things in the same way. This could lead to the present day, where the gram (10g; 200g, etc.) and the kilogram (1kg; 2kg; 10kg; etc.) are now in use. As in the section on length above, the teacher will devise many activities for the children to get used to working with grams and kilograms. Many calculations can arise from the activities, which they can write and work out in their books.
Volume Finally, we come to the measurement of liquids. We can ask the children, “how do you think people in ancient times used to measure liquids?” “How do you think they used their bodies?” [they could ‘cup’ their hands] “What could they have used?” [clay pots, animal skins sewn together]. When we ‘cup’ our hands, we make a container; for liquids we always need a container; and so, once glass blowers learned how to make bottles, certain standard sizes of containers were made. Today we have machines that make standard sizes of jars, bottles, tins, cooking pots and glasses from which to drink, etc., which we use all the time. The teacher can ask the children to find as many containers at home, and bring them to the class. The teacher will bring his or her own selection also, and arrange for enough water to transfer liquids from containers whose volume we know, into containers where we need to work out how much they can contain. We introduce the concept of litres (1 l; 5 l; etc) and millilitres (100 ml; 500 ml; etc) to the children, showing them how to do simple calculations arising from the activities they do.
87
Source: www.entwicklungshilfe3.de Open Source: Creative Commons Attribution-Non-Commercial-Share Alike 3.0 International Licence; see www.creativecommons.org
Time Main Lesson
An Imaginative Picture every day
One of the most important aspects of Waldorf education is to understand that children need to be inspired every day at school. In every new topic that children need to learn, the teacher needs to find a way of bringing something of a spiritual quality into it. This can be done by preparing an imaginative picture - whether in the form of a story, an image or a rich description that brings out the qualities of the topic - for each day’s main lesson. The children need ‘soul food’ every day. If we only focus on the facts or the mechanics of a topic, the children may have learnt everything they are supposed to learn, but we leave their souls starved of the pictures, the feelings and the stirring of their will they need to ‘digest’ and be ‘fed’ by. Only when we present a topic by using the imagination, or one of the arts, will they feel satisfied that they have learnt something full of meaning and deeply enriching. For every topic we present, we can find an imaginative picture that will ‘light up’ the souls of the children, as well as our own. Below are some examples of how the teacher could do this. Please read these examples, and then create your own imaginative pictures for every aspect of your teaching!
Seven Days of Creation
The children will have heard the story of the creation earlier in the year. It is good to make a connection again with this wonderful story when the main lesson block on Time begins. One can discuss with the children the seven days of creation, remembering what happened each day. These were God’s days, rather than our days, and so each of God’s days was really many, many years. It must have taken thousands upon thousands of years for everything to be created. This prepares them in an imaginative way for later, when they come across science that explains to us how many millions of millions of years it takes for a star to form; and the millions of years for life to develop on our earth. God’s time is everlasting time ... It is good to let them sense what is beyond our thinking abilities, beyond what we can imagine.
88
Source: www.entwicklungshilfe3.de Open Source: Creative Commons Attribution-Non-Commercial-Share Alike 3.0 International Licence; see www.creativecommons.org
Time
It is good for us as teachers to relate the subject - in this case time - to every aspect of life, so that children get used to seeing everything as a whole. We can relate time to the mineral, plant, animal and human kingdoms. Here follows some suggestions, which could help you as a teacher to develop your own presentation: The earth on which we walk, the stones, the sand, the rocks and mountains are there all the time. They hold us always, patiently and caringly. No matter whether it rains, or the wind howls, or the sun’s rays heats them till they are too hot, the stones, sand, rocks and mountains are always there to serve us. They do not worry whether it is day or night, cold or warm, wet or dry, they live in endless time. It is different for the plants; they always grow according to time. They need the rainy seasons, the dry seasons, the times of heat and the times of cold, so they can grow, producing beautiful green leaves; so they can flower, giving us their beautiful colours and special scents; so they can produce their seeds, to be able to grow again; and so they have time to rest before they start growing again. The animals also live according to time. Who is it that wakes us in the mornings? The birds! They have a long day, starting by singing early in the morning, then looking for their food the whole day long, and then singing in the evening again. Other animals also live according to their time. The giraffe also starts early in the morning, looking for juicy leaves in the tops of the trees; he rests in the middle of the day, when it is hot, and as soon as it cools again, he carries on nibbling his leaves. Every animal lives its time in a different way, according to how it was created. This would probably be enough to take in for one day, if the teacher presents time in a way similar to this, adding to the picture so that the children gain a deep experience of time for earth, plants and animals. Rich class discussion can follow the teacher’s presentation, not by the teacher asking questions, but allowing the class to tell their observations of earth, plant and animal life. The next day the teacher will lead the children into doing a recall of the content discussed yesterday. Here the teacher needs to prepare questions around the important thoughts expressed yesterday to guide the children’s recall, as may be necessary. After a thorough recall, during which yesterday’s topic comes alive again, the teacher can continue with the human relationship to time. Here are some suggestions: The time we as human beings have is different from the earth, the plants and the animals. I wonder what time is like before we are born, when we are still in heaven ... maybe you can say something about that ... When we are born, we do not understand time. Everything is done for us by those who welcome us into the world. Gradually, as we get older, we see there is a time for each thing in life. Perhaps you can tell us ...

89
Source: www.entwicklungshilfe3.de Open Source: Creative Commons Attribution-Non-Commercial-Share Alike 3.0 International Licence; see www.creativecommons.org
The older we get, the more organised our lives become. Now we need to measure time - now we need clocks - to fit everything into our busy days!
The Year
We like to know how many years old we are! We find it very important how old we are! A birthday is always a big celebration, not only to think about the day we arrived on the earth, but also to celebrate how old we are now. Long, long ago, before people started counting the years, they lived by the seasons of the year. [Here the teacher can provide a rich description how early people lived according to the seasons of the year.] And what about our year? What happens every year in our lives? How long is a year - it feels very long! Many, many days! How many days in a year?
The Months \
Our year is divided into twelve months ... what do we do in each month of the year? Do all the children know the months of the year? Can they spell them? Learn the poem:
30 days hath September, April, June and November. All the rest have 31 days clear Excepting February which has 28 And 29 days each leap year.
The Week
In preparing to speak about the week, the teacher could bring a qualitative image of each day of the week. How is Monday different from Tuesday? What mood does each day have?
Day and Night Again, the teacher will prepare a presentation on the qualities of day and night. By day, we live according to the sun, by night according to the moon and stars (describe the qualitative differences of day and night; for example, busy day, quiet night; ‘the light of day’ and ‘the darkness of night’). The rising of the sun brings its particular quality and mood to the day. As the morning moves on, this starts to
90
Source: www.entwicklungshilfe3.de Open Source: Creative Commons Attribution-Non-Commercial-Share Alike 3.0 International Licence; see www.creativecommons.org
change (how?) When the sun reaches the middle of the day (we call it ‘mid-day’, or ‘noon’), late afternoon and sunset, how different is each quality and mood? And then comes the night. What qualities does the night have? What mood do we feel in the evening, and then later at night? What about the stars, the moon? What about midnight (practise saying the word ‘midnight’) and the time before dawn? And who signals to us that the new day is about to begin? How do we wake up in the morning? This is all rich material for discussion and finally writing. One could include the names of the meals of the day, as well as all the terms we use for different times of the day and night. Spelling of words such as midday, noon, afternoon, midnight, dawn, dusk.
Hours, Minutes and Seconds
For the teacher, it is important to understand time in a deeper way, so that when you teach you have a deeper feeling about this topic. What is explained here is not for the teacher to tell the children, but enriches the understanding of the subject taught. The children sense that the teacher has greater depth, which although it cannot be communicated, instils in them the feeling that life is full of meaning, as well as them looking up to teachers who radiate being in touch with a deeper wisdom. As teachers, we can imagine that hours have to do with the will. When we work, it takes hours of effort to accomplish something. We know that those things that are valuable in life require hours of working on. The will can take us through a whole day of intensive activity! We can imagine that minutes have to do with feelings. Feelings do come and go, just like minutes come and go. Our feelings continually move between sympathy and antipathy, between outgoing and ingoing, between connecting and distancing ourselves. Lastly, thoughts come in a flash! They also come and go, but one after the next as quickly as seconds. When we think, we grasp things quickly (or not at all!). In the examples that follow, you can see how this idea is woven into the story of the clock. The way we tell this story is influenced by this idea - but we do not speak to the children about will, feeling and thinking as reflected in hours, minutes and seconds. They are still in the imaginative / feeling stage of their lives, and will experience these truths in a dreamlike way. This will bring depth to their learning, which in later life, when they are conscious adults, will come to flower as creative and compassionate thinking.
91
Source: www.entwicklungshilfe3.de Open Source: Creative Commons Attribution-Non-Commercial-Share Alike 3.0 International Licence; see www.creativecommons.org
You can also see that the three brothers, hour-hand, minute-hand and second-hand, can be seen in three different temperaments. Again, the teacher’s understanding of this will influence the way she or he presents each of these brothers in turn.
The Clock
N.B. Good planning: revise the 5 x table during the rhythmic part of the lessons every day in preparation for teaching the minutes when we come to them. Again, here follow some suggestions for creating imaginative ‘pictures’ so that everything the children learn is full of meaning, bringing out the qualities and moods of each aspect. Rich descriptions will engage them, developing their feelings and their ability to think creatively. Children, you have all seen many, many clocks everywhere, telling people what time it is. You have seen many people wearing watches, which are really just small clocks. Well, the story about clocks is a long, exciting story! You may have seen clocks that have three ‘hands’, which are pointing to the numbers on the clock all day long. These hands are like three brothers. The shortest brother is very slow. He takes his time to do things slowly and carefully, never hurrying. He has all the time in the day to do each thing that needs doing. He moves so slowly, you wonder how he can get anything done. But, by the end of the day, he has done everything that he intended to do! The longer brother likes to move more quickly. He likes to get things done well, but in a short time. “Get a move on!” “Don’t waste any time!” Every task needs to be done by working very hard, so that it takes only a short time of the day. You can imagine how many, many things he has to do in a day! The third brother is the longest, but also the thinnest. He is always moving as fast as he can, hurrying from one thing to the next. Because he is in such a hurry, you may wonder how he is able to finish each thing properly! You can always see him moving round and round, never stopping to think what to do next. “First I do this, then I do that!” “I have so many things to delight me every moment of the day!” [The children will, of course, be telling the teacher what each of these hands show us: hours, minutes and seconds]. ..................................................................................................................................... But long, long ago, there were no such things as clocks yet. In earliest days people simply lived by the rhythms of the day and the night. The sun brought its light and warmth at the beginning of each day. People rejoiced every morning to see the sun rising, spreading its colours across the sky. They went about their daily tasks according to the journey of the sun across the sky. [Describe what they did in the cool of the morning, in the heat of the midday sun, in the later afternoon as the day came to its close].

92
Source: www.entwicklungshilfe3.de Open Source: Creative Commons Attribution-Non-Commercial-Share Alike 3.0 International Licence; see www.creativecommons.org
The sun left the sky with its beautiful evening colours. [Describe]. As darkness set in, the evening activities began. The singing and telling of stories around the fire, in the quiet cool of the evening. The sounds of the night [describe]. And then the closing of eyes as everyone fell asleep till the next morning. In those early days, the sun was their clock by day and the stars, and moon, by night. ..................................................................................................................................... People also noticed the shadows that the sun cast on the ground, and how these shadows changed as the sun moved on its path across the sky. [The teacher can ask the children what they have noticed about how the shadows change from early morning to the middle of the day and then again in the evening]. These shadows always did exactly the opposite of what the sun was doing! If the sun is doing its best to give as much light as possible, the shadow makes as dark a shadow as it possibly can. When the sun is moving this way, the shadow insists on moving the other way. Just like a naughty child who, when someone says, “talk softly” starts speaking loudly, the shadow must do the opposite. Where the sun creates light, the shadow creates darkness! From this came the first clock that we as humans made! A stick, like a pointing finger, was planted in the ground, so that the sun would cast its shadow from early morning to the end of the day, and as the shadow moved they could tell the time of the day.23 Now it would be good to plant a stick in a suitable place and visit it every now and then to mark the times of the school day: the beginning of school, the first break, the lunch break, etc. Ask the children: what do they think will happen to the shadow after they have left school? Please note that in Grade 4 the children will make an accurate sundial, marking the exact hours of the day. This should not be done in this year, only the idea of the sundial is given. One can visit the sundial many times, to see the changes in the shadows. ..................................................................................................................................... A long time later, when towns and cities became larger and more and more people worked as carpenters, as shoemakers, tailors, iron smiths, gold smiths and silver smiths, it became very busy. The traders from far away countries came in and out of the towns and cities to sell their wares and to look for things they could buy to take back to their countries. And now it was not good enough any longer to just arrive at any time to meet some-one, because you might find him or her already busy talking to some-one else: now you had to make appointments!
23
I thank Joyce Mwihaki for this idea
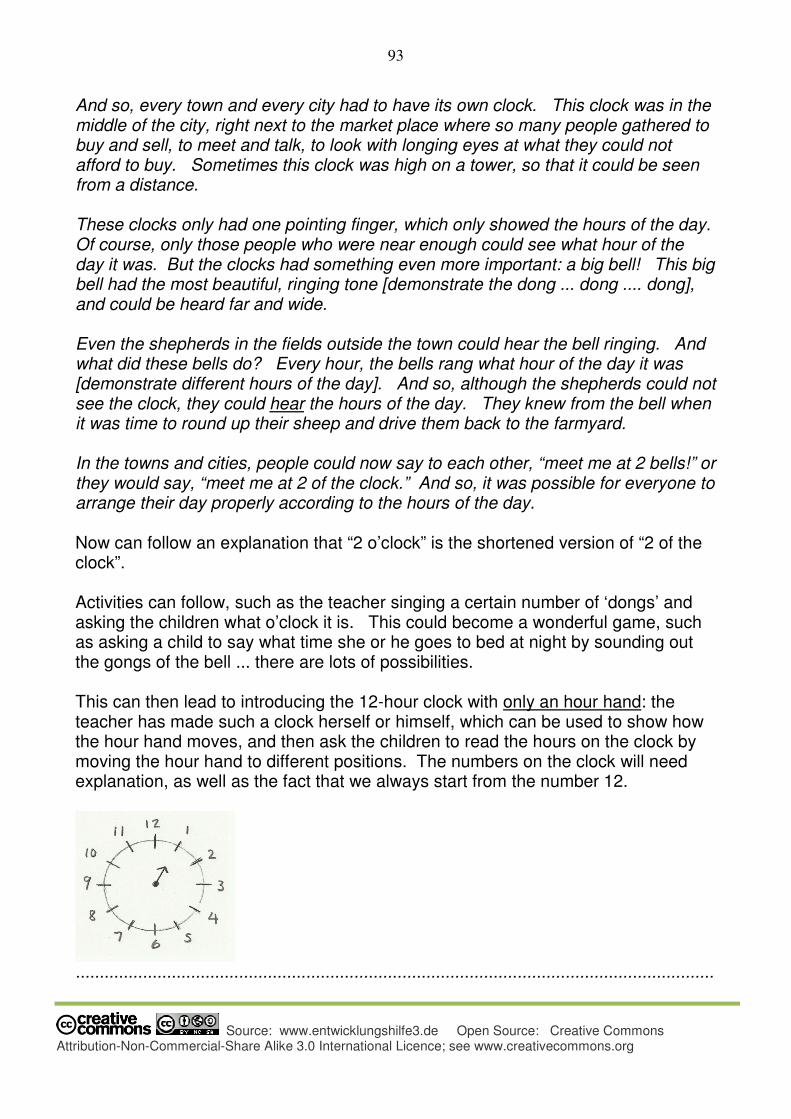
93
Source: www.entwicklungshilfe3.de Open Source: Creative Commons Attribution-Non-Commercial-Share Alike 3.0 International Licence; see www.creativecommons.org
And so, every town and every city had to have its own clock. This clock was in the middle of the city, right next to the market place where so many people gathered to buy and sell, to meet and talk, to look with longing eyes at what they could not afford to buy. Sometimes this clock was high on a tower, so that it could be seen from a distance. These clocks only had one pointing finger, which only showed the hours of the day. Of course, only those people who were near enough could see what hour of the day it was. But the clocks had something even more important: a big bell! This big bell had the most beautiful, ringing tone [demonstrate the dong ... dong .... dong], and could be heard far and wide. Even the shepherds in the fields outside the town could hear the bell ringing. And what did these bells do? Every hour, the bells rang what hour of the day it was [demonstrate different hours of the day]. And so, although the shepherds could not see the clock, they could hear the hours of the day. They knew from the bell when it was time to round up their sheep and drive them back to the farmyard. In the towns and cities, people could now say to each other, “meet me at 2 bells!” or they would say, “meet me at 2 of the clock.” And so, it was possible for everyone to arrange their day properly according to the hours of the day. Now can follow an explanation that “2 o’clock” is the shortened version of “2 of the clock”. Activities can follow, such as the teacher singing a certain number of ‘dongs’ and asking the children what o’clock it is. This could become a wonderful game, such as asking a child to say what time she or he goes to bed at night by sounding out the gongs of the bell ... there are lots of possibilities. This can then lead to introducing the 12-hour clock with only an hour hand: the teacher has made such a clock herself or himself, which can be used to show how the hour hand moves, and then ask the children to read the hours on the clock by moving the hour hand to different positions. The numbers on the clock will need explanation, as well as the fact that we always start from the number 12.
.....................................................................................................................................

94
Source: www.entwicklungshilfe3.de Open Source: Creative Commons Attribution-Non-Commercial-Share Alike 3.0 International Licence; see www.creativecommons.org
However, years later the cities became as busy as bee-hives. People were working very hard, and had less time to talk with each other. Now buses and trains started to connect the different parts of the city, and trains now travelled from one city to the next. Life became quite complicated. And so, people could not wait for things to happen every hour, they needed to know whether it was just after 3 o’clock, or longer after three o’clock, or closer to 4 o’clock. [Demonstrate this with the hour hand pointing just after 3, half-way between 3 and 4, and close to 4 o’clock. This needs lots of practice! Just after 3, nearly 4 o’clock, etc. The children need to understand the hour-hand is constantly moving from one hour to the next, and we can see more-or-less where we are in each hour. This is important for later]. But this was not good enough! They needed to divide each and every hour exactly, so that they could make definite arrangements in their busy lives, and not be kept waiting. And so they divided the hour into 60 minutes. This is where the hard-working brother, who was taller than the short, slow brother, now became part of the clock. And he moves round the clock quite a bit quicker than his ever-so-slow brother. Now that life had become so busy, everybody had to be on time. And so, more and more people had clocks in their houses. You were seen as a good citizen if your house had a clock in the main room of your house. Everyone in the house would keep on looking at the clock to see how much time they still had before they had to go out to do their daily work. At work, everyone kept an eye on the clock, to make sure everything happens at exactly the right time of the day. Now, everyone had to learn to tell the time, of course. People were used to reading the hours of the day, but because the minute-hand moved more quickly around the clock, everyone had to understand how to read the number of minutes. Now show a hand-made clock that has been divided into 60 minutes, every 5 minutes having a longer marking; this clock should only have a minute-hand (no hour-hand, so as to avoid confusion). As you move the minute-hand, the children can count the minutes up to 60. Get them to count the minutes in 5s: 1, 2, 3, 4, 5! 6, 7, 8, 9, 10! etc.... as you move the minute-hand round the clock. Now you can ask them: what do you notice about the longer markings around the clock? (The 5 x table). What do the numbers of the clock tell us? (1 = 5 minutes, 2 = 10 minutes, 3 = 15 minutes, etc ....)
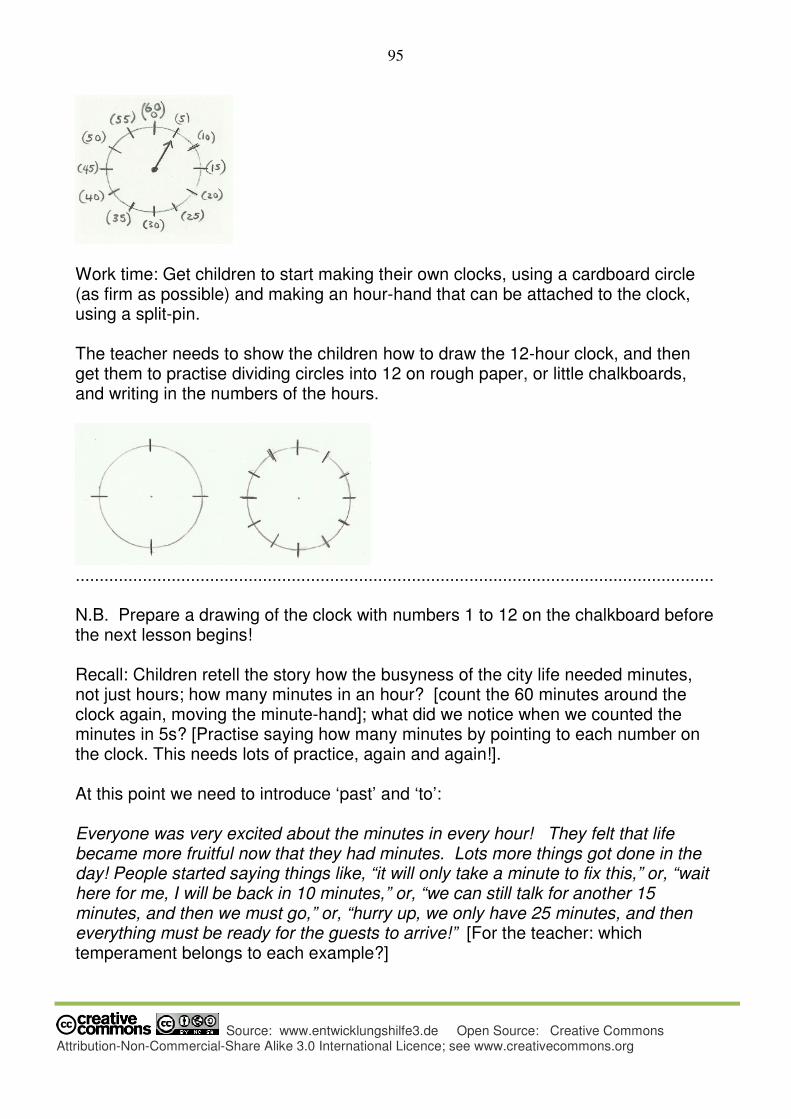
95
Source: www.entwicklungshilfe3.de Open Source: Creative Commons Attribution-Non-Commercial-Share Alike 3.0 International Licence; see www.creativecommons.org
Work time: Get children to start making their own clocks, using a cardboard circle (as firm as possible) and making an hour-hand that can be attached to the clock, using a split-pin. The teacher needs to show the children how to draw the 12-hour clock, and then get them to practise dividing circles into 12 on rough paper, or little chalkboards, and writing in the numbers of the hours.
..................................................................................................................................... N.B. Prepare a drawing of the clock with numbers 1 to 12 on the chalkboard before the next lesson begins! Recall: Children retell the story how the busyness of the city life needed minutes, not just hours; how many minutes in an hour? [count the 60 minutes around the clock again, moving the minute-hand]; what did we notice when we counted the minutes in 5s? [Practise saying how many minutes by pointing to each number on the clock. This needs lots of practice, again and again!]. At this point we need to introduce ‘past’ and ‘to’: Everyone was very excited about the minutes in every hour! They felt that life became more fruitful now that they had minutes. Lots more things got done in the day! People started saying things like, “it will only take a minute to fix this,” or, “wait here for me, I will be back in 10 minutes,” or, “we can still talk for another 15 minutes, and then we must go,” or, “hurry up, we only have 25 minutes, and then everything must be ready for the guests to arrive!” [For the teacher: which temperament belongs to each example?]
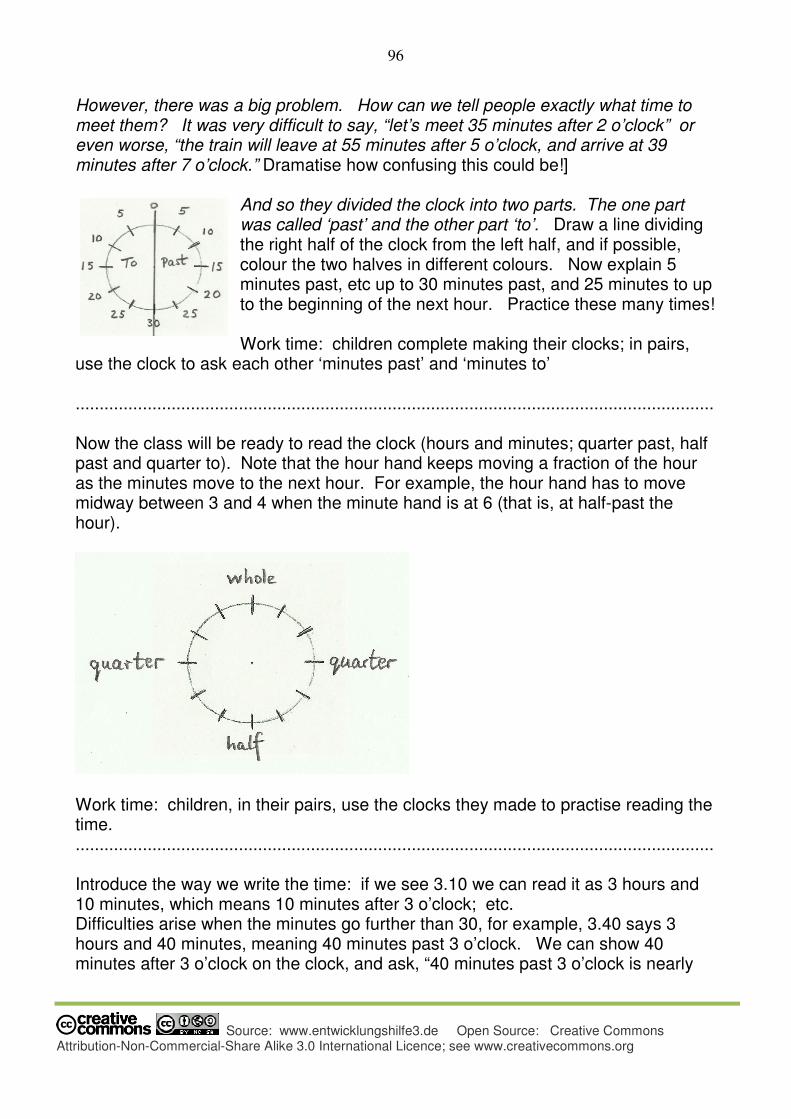
96
Source: www.entwicklungshilfe3.de Open Source: Creative Commons Attribution-Non-Commercial-Share Alike 3.0 International Licence; see www.creativecommons.org
However, there was a big problem. How can we tell people exactly what time to meet them? It was very difficult to say, “let’s meet 35 minutes after 2 o’clock” or even worse, “the train will leave at 55 minutes after 5 o’clock, and arrive at 39 minutes after 7 o’clock.” Dramatise how confusing this could be!]
And so they divided the clock into two parts. The one part was called ‘past’ and the other part ‘to’. Draw a line dividing the right half of the clock from the left half, and if possible, colour the two halves in different colours. Now explain 5 minutes past, etc up to 30 minutes past, and 25 minutes to up to the beginning of the next hour. Practice these many times! Work time: children complete making their clocks; in pairs,
use the clock to ask each other ‘minutes past’ and ‘minutes to’ ..................................................................................................................................... Now the class will be ready to read the clock (hours and minutes; quarter past, half past and quarter to). Note that the hour hand keeps moving a fraction of the hour as the minutes move to the next hour. For example, the hour hand has to move midway between 3 and 4 when the minute hand is at 6 (that is, at half-past the hour).
Work time: children, in their pairs, use the clocks they made to practise reading the time. ..................................................................................................................................... Introduce the way we write the time: if we see 3.10 we can read it as 3 hours and 10 minutes, which means 10 minutes after 3 o’clock; etc. Difficulties arise when the minutes go further than 30, for example, 3.40 says 3 hours and 40 minutes, meaning 40 minutes past 3 o’clock. We can show 40 minutes after 3 o’clock on the clock, and ask, “40 minutes past 3 o’clock is nearly
97
Source: www.entwicklungshilfe3.de Open Source: Creative Commons Attribution-Non-Commercial-Share Alike 3.0 International Licence; see www.creativecommons.org
what time?” Here it is important that the hour hand has moved closer to the 4 on the clock - here they can see it is nearly 4 o’clock. This requires lots of practising! ..................................................................................................................................... Introduce a.m. and p.m.; ‘a.m.’ is an abbreviation from Latin ‘ante’, which means ‘before’ and ‘meridiem’ which means ‘midday’ (the middle of the day, when the sun has reached its highest point above us) whereas p.m. stands for ‘post’, meaning ‘after’ and ‘meridiem’ meaning ‘midday’, hence we say ‘after noon’. Now we can practise how to write the time using a.m. and p.m. ..................................................................................................................................... Introduce seconds - the thinnest and quickest brother. How many seconds in a minute? What do we use seconds for? .................................................................................................................................... N.B. Keep practising reading the time on a daily basis, also after the main lesson block is over. Revision and extension in Grade 4: Exercises in reading and writing the time How many minutes from the number 12 on the clock to the number 2 on the clock? etc.. How many hours from 2 o’clock to 6 o’clock? etc...
98
Source: www.entwicklungshilfe3.de Open Source: Creative Commons Attribution-Non-Commercial-Share Alike 3.0 International Licence; see www.creativecommons.org
Poems for Grade 3
Old Testament Main Lessons - all poems © Catherine van Alphen, 2010 SONG OF CREATION Once there was God, the one God alone, Alone in the vastness of space. And over the deep God’s voice could be heard, Breathing the Song, the Song of the Word; The Word that was Life, the Word that was Light That burst through the vastness of space. CHORUS: And God in his glory rejoiced to see The sweet light of morning in fresh mystery, The twilight of evening, the darkness of night On that wondrous day, so filled with God’s light; The first of the days of creation. God sang forth a Heaven, a Heaven of blue sky And over it clouds, soft clouds floated by; While under it rolled deep waters below That tossed wild waves to and fro. CHORUS: (Second day) God sang to the Seas, and the Seas made a space And the dry land of Earth appeared in one place; And the Earth grew lush with grass, herb and tree That sprang forth abundantly. CHORUS: (Third day) Then high in the Heaven, God sang forth two lights: The sun ruled the day while the moon shone at night And twinkling stars shot down their spears For signs and seasons and years CHORUS: (Fourth day) Bring forth much life! God sang to the Sea And great whales and fishes swam fast and free While over the Earth and swift through the sky The winged birds flew by. CHORUS: (Fifth day) God sang to the waiting, beautiful Earth
99
Source: www.entwicklungshilfe3.de Open Source: Creative Commons Attribution-Non-Commercial-Share Alike 3.0 International Licence; see www.creativecommons.org
And all the creatures came to birth: The slithery snake, the squirrel spry, The mighty lion, the deer so shy. And then God sang forth Humankind With upright spine and thoughtful mind; With loving heart and voice to speak; And hands to work and play and make. CHORUS: (Sixth day) And now God rested, no longer alone For all of creation echoed his song; Each made its own sound, the song of the Word; The Word that is life; The Word that is God; And God knew that the Word was good. CHORUS: (Last day) JABAL, TAMER OF ANIMALS Jabal dreamed that he could ride A wild white horse; so he sprang on and tried, As it galloped away he clung to its side. And when that wild white horse was tame, Jabal caught the cow that gentle became; To bull, sheep and goat he did the same. For every animal he had in mind A way for each to serve mankind And man and beast in friendship bind. JUBAL THE MUSIC-MAKER Jubal was a dreamer, all night long He heard the glorious angel song. But every day he could not remember Each sweet song, like a dying ember Had faded fast away Then Jubal drank from the heavenly cup And from his soul such songs rose up, He began to play with wondrous sound And everyone just gathered round To share his music sad and gay. TUBAL – CAIN: WORKER OF METALS
100
Source: www.entwicklungshilfe3.de Open Source: Creative Commons Attribution-Non-Commercial-Share Alike 3.0 International Licence; see www.creativecommons.org
With mighty strength did Tubal-Cain Crush to dust the mountain rock And, melting it upon his fire, Its store of treasure did unlock: Gold for glory, silver fine, Beauteous copper and heavy iron. He did not use his strength and power Against other men to hurt and slay But made, with careful thought and skill Tools to help them every day: A golden ring, an iron spade, A knife, a plough and more he made.
ABRAHAM Out in the night old Abram stood And gazed at the firmament of God Where stars upon stars shone forth so clear Like tiny lamps in the darkness there. Then spoke the Voice he longed to hear: How many stars light up the sky? How much dust on the earth does lie? How many sands on the shore of the sea? These descendants shall come to thee; Now I shall call thee Abraham For father of nations shall thou become. But years went by and no son came To aged Sara and Abraham Till one hot day three strangers stood At the door of the tent to ask for food. Abraham gave them of his best And humbly served each unknown guest; With milk and cheese, fresh bread to eat And water to cleanse both hands and feet. We bring good news, said the oldest one, Your wife, named Sara, shall bear a son. But Sara laughed in the back of the tent For she was old, how could it be meant? Why does she laugh, she heard them say As they bade farewell and went their way, All will come true within a year,
101
Source: www.entwicklungshilfe3.de Open Source: Creative Commons Attribution-Non-Commercial-Share Alike 3.0 International Licence; see www.creativecommons.org
So keep thy faith and do not fear. Then Abraham bowed, his heart made wise For these were angels in disguise. And so at last the laughing boy, Isaac, was born, their child of joy, With curly hair and keen dark eyes, A smile like sunlight in the skies. And Abraham gave thanks to heaven For all the blessings he’d been given: The land of Canaan, his to keep; For all his camels, goats and sheep; Sara his wife and, most of all, Isaac growing strong and tall. One night at prayer the tent grew bright; No moon or stars gave forth such light; With waiting heart, God’s voice he heard, Clear as a bell rang every word: Abraham, give thou to me The son which is so dear to thee. He shall be the altar lamb, My sacrifice shall he become. Then Abraham’s heart burned with the cry: Oh, why must Isaac have to die? If only I could go instead! Yet that was not what God had said. How could he lead a nation great If this was now poor Isaac’s fate? This surely was the hardest task That god had ever come to ask. In deep acceptance Abraham knew He had no choice as what to do For all his life he would fulfil In every way God’s mighty will And so he humbly bowed his head, I will obey, my Lord, he said. So, when the first light touched the skies He said to Sara: I must arise And sacrifice unto our God For all his blessings great and good. There below the morning star Stands the Mount of Moria; There will we ride across the plain And in three days return again.
102
Source: www.entwicklungshilfe3.de Open Source: Creative Commons Attribution-Non-Commercial-Share Alike 3.0 International Licence; see www.creativecommons.org
Isaac shall help me, as my son For he is old enough to come. So Isaac proudly rode all day Upon his donkey small and grey; He watched the birds in twittering flight, The rabbits scampering out of sight; He laughed and sang so joyfully While Abraham rode silently, His heart too sad, too full of dread, Knowing that Isaac would soon be dead. Then Abraham spoke out at last: Dismount and tie your donkey fast And quickly go to look around For kindling wood must still be found. Then Isaac asked: But where’s the lamb? God will provide, said Abraham. And with the sticks on Isaac’s back They climbed the stony mountain track Until they came upon the place Where Abraham must sacrifice. Together they sought out the stone And built the altar all alone Without an animal in sight; Nor goat, nor sheep, nor buck in fright And Abraham prayed with all his might For strength that he could now fulfil This deed of God’s almighty will. They laid the sticks on one by one, And then he bound his only son And placed him on the altar stone. Abraham raised his sharpened knife To slay at last this tender life When suddenly a Voice rang clear Like lightning flashing through the air: Stop Abraham! You need not slay Isaac your son for me today For you have proved yourself to be Obedient, faithful, true to me! Then in a bush he saw at last Caught by the horns, a ram held fast. With tears of joy and gratitude Abraham gave thanks to God And with this sacrifice he knew That God’s great promise would come true.
103
Source: www.entwicklungshilfe3.de Open Source: Creative Commons Attribution-Non-Commercial-Share Alike 3.0 International Licence; see www.creativecommons.org
How many stars light up the sky? How much dust on the earth does lie? How many sands on the shore of the sea? These descendants will come to thee.
.
MOSES Who will carry the baby? I, said the river deep, He will float in his cradle boat And I shall rock him to sleep. Who will hide the baby? We, said the rushes tall, Safely we’ll hide the baby inside That nobody sees him at all. Who will watch o’er the baby? Miriam whispers, I, Hiding near, I’ll surely hear His first little gentle cry. Who would want such a baby? I, said the Princess true, From the river he came, so Moses his name And I shall care for him too.
RUTH Said Ruth to Naomi: I shall go with you; I am young and strong and can care for you too; I shall work in the field all day Doing my best, neither shirk nor stray; It matters not that I stand alone And glean the corn when the reapers are gone For God in His mercy will care for me In the same measure as I for thee. DAVID Said Saul to David: You’d lose your life Against Goliath, that giant of strife; You are unskilled, too young, too small, My armour does not fit you at all. I fear him not, said David true,
104
Source: www.entwicklungshilfe3.de Open Source: Creative Commons Attribution-Non-Commercial-Share Alike 3.0 International Licence; see www.creativecommons.org
The Lord is my helper in all I do, I listen to Him through the day, I sing His praise and nightly pray; His is the strength within my hand And I shall follow His command. You will see Goliath fall For my God is Lord of all! SOLOMON’S TEMPLE
Solomon built a temple Raised in honour of God; The roof was a dome of gold, The pillars of cedar wood. Carefully and without haste He worked on every stage For Solomon knew that this temple Would last for many an age. God then spoke to Solomon: What gift would you ask of me? Wealth or fame or power Or a long, long life to see? Solomon thought and answered: For Wisdom I would ask To rule your people wisely For this is my daily task. Well have you chosen, said God Wisest of all shall you be And a long life, wealth and fame I shall also give to thee.
BIRD HOMES The mighty eagle builds his nest On craggy mountain height The owl sleeps in his nest all day And flies about at night The swallow builds a house of clay Like workmen laying bricks The long-legged stork finds somewhere high To hold his house of sticks
105
Source: www.entwicklungshilfe3.de Open Source: Creative Commons Attribution-Non-Commercial-Share Alike 3.0 International Licence; see www.creativecommons.org
The hanging nests of weaverbirds Are beautiful to see The woodpecker works very hard To carve his nest in a trunk of a tree. THE EARTHWORM (or The Farmer’s Friend) I lifted a brick and there you lay Shyly squirming to hide away; Pinky-brown earthworm, long and thin, I don’t quite know which end you begin. No eyes have you, no head do I see And the other end seems the same to me. You’ve a darkish saddle on your back And like elastic you stretch - and snap back. Dear friend, I need no eyes underground, I feel my way in the earth around; I dig many tunnels wherever I go – Loosening the soil helps the plants to grow! The soil is delicious, I munch it all day And leave some behind as I go on my way. If I lose head or tail, I grow a new end; I’m always busy; I’m the farmer’s friend.
Songs for Grade 3
The following songs are particularly suited to the Grade 3 curriculum. The teacher is encouraged to find local songs that portray the themes of the year.
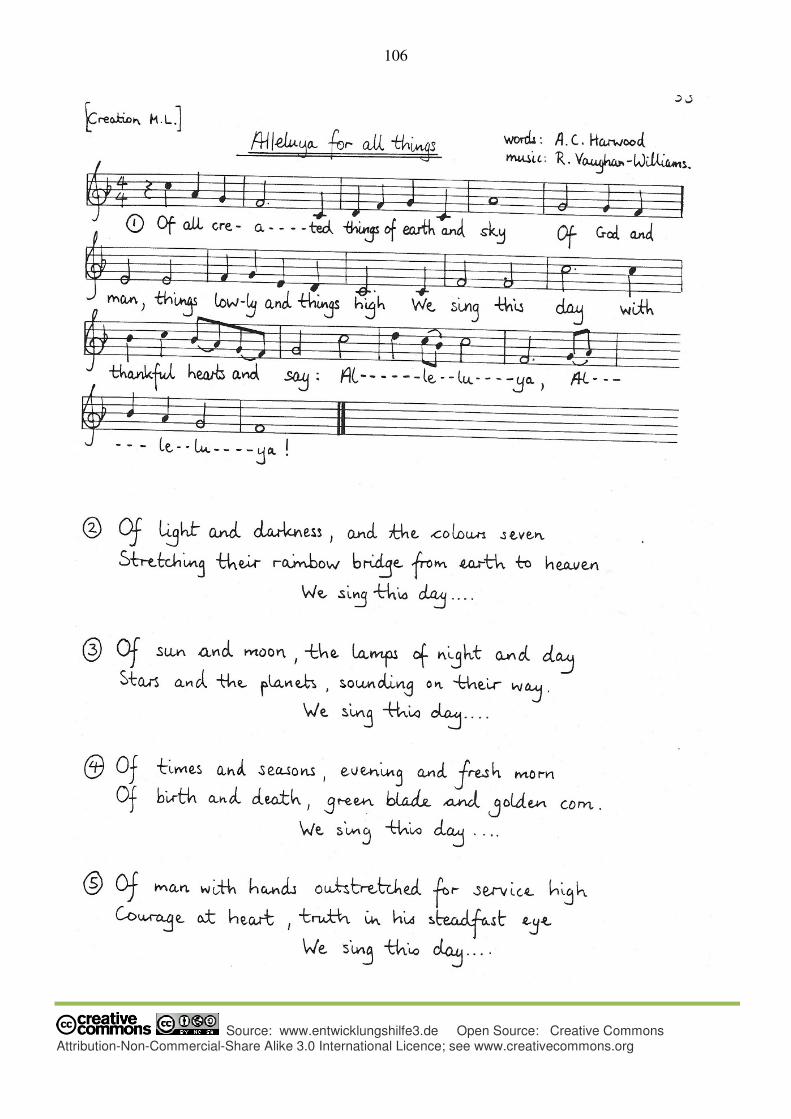
106
Source: www.entwicklungshilfe3.de Open Source: Creative Commons Attribution-Non-Commercial-Share Alike 3.0 International Licence; see www.creativecommons.org
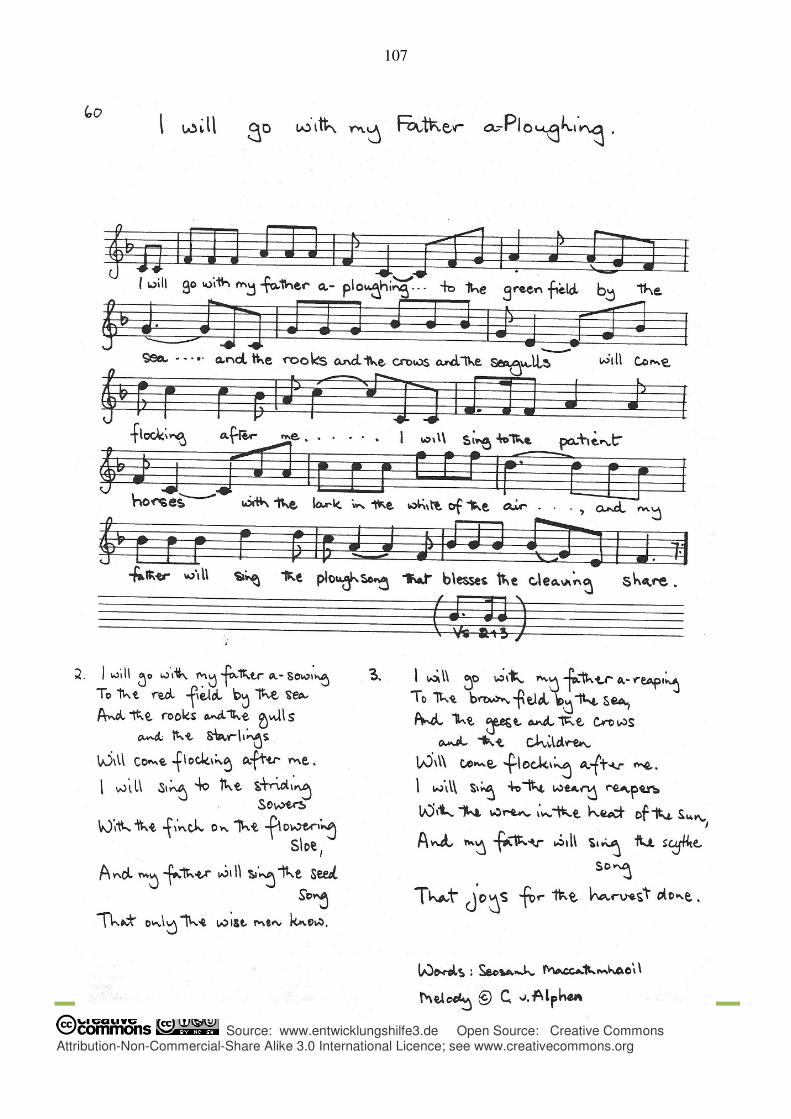
107
Source: www.entwicklungshilfe3.de Open Source: Creative Commons Attribution-Non-Commercial-Share Alike 3.0 International Licence; see www.creativecommons.org
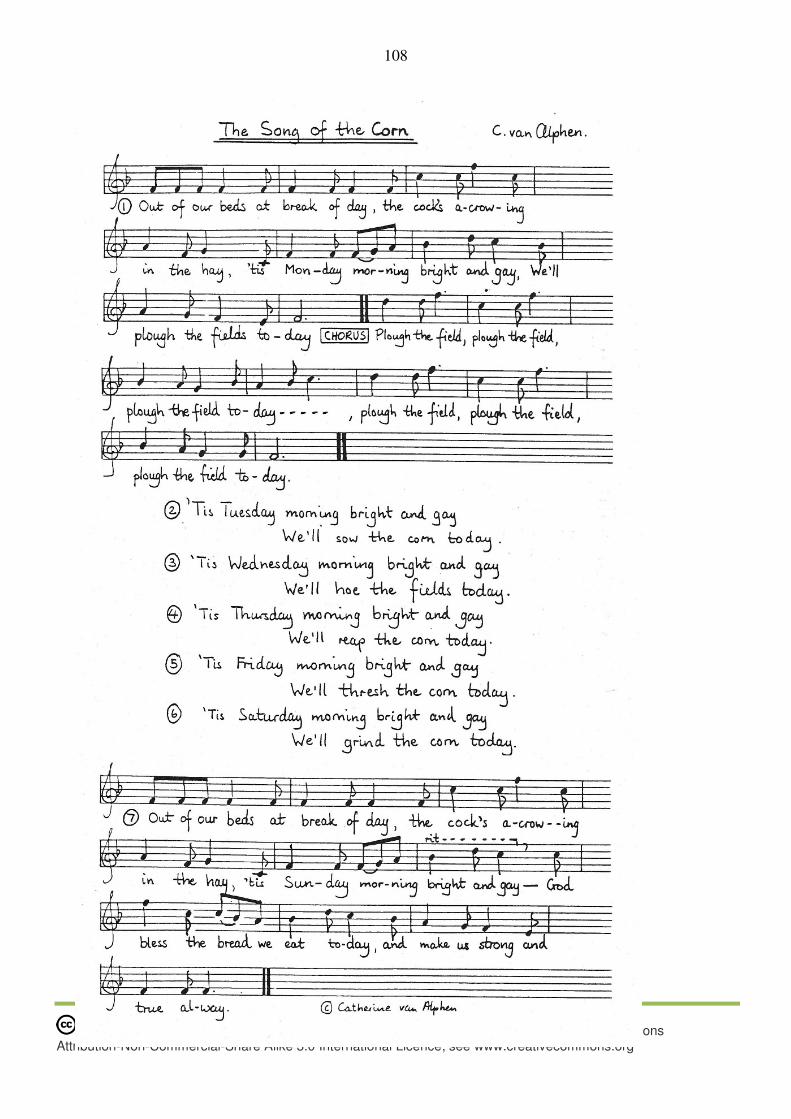
108
Source: www.entwicklungshilfe3.de Open Source: Creative Commons Attribution-Non-Commercial-Share Alike 3.0 International Licence; see www.creativecommons.org

109
Source: www.entwicklungshilfe3.de Open Source: Creative Commons Attribution-Non-Commercial-Share Alike 3.0 International Licence; see www.creativecommons.org