Ground Zero Iridium Amplifier 2130HPX
48
Verstärker Bedienungsanleitung IRIDIUM GZIA 2130HPX GZIA 2235HPX GZIA 4115HPX 2 Bitte sorgfältig lesen Vielen Dank, dass Sie sich für eine Endstufe der Marke Ground Zero entschieden haben. Unsere Kunden sind es gewöhnt, von Ground Zero die beste und modernste Technologie zu erhalten. Viel Spaß mit diesen Produkten. Ausstattungsmerkmale • 4 Ohm / 2 Ohm stabil Stereo • Einschalt- und Schutzanzeige • Hochpass regelbar • Tiefpass regelbar • Auto-On @ High Level Input • Weiß beleuchtetes Logo • Regelbare Eingangsempfindlichkeit • Einschaltverzögerung • Bass Lautstärkeregler (GZIA 2130HPX / 2235HPX) • Temperatur / Kurzschluss / Überlast-Schutz Benötigte Materialien und Werkzeuge zur Installation • Kreuzschlitz Schraubendreher • Bohrmaschine, 3 mm Metallbohrer • Befestigungsschrauben • Stromkabel min. 10 mm² • Massekabel min 10 mm² • Lautsprecherkabel min. 2 x 1,5 mm²
-
Upload
dejan-ribic -
Category
Documents
-
view
41 -
download
3
description
Ground Zero Iridium Amplifier 2130HPX manual
Transcript of Ground Zero Iridium Amplifier 2130HPX
Verstärker Bedienungsanleitung
IRIDIUM
GZIA 2130HPX
GZIA 2235HPX
GZIA 4115HPX
2
Bitte sorgfältig lesen
Vielen Dank, dass Sie sich für eine Endstufe der Marke Ground Zero entschieden haben.
Unsere Kunden sind es gewöhnt, von Ground Zero die beste und modernste Technologie zu
erhalten. Viel Spaß mit diesen Produkten.
Ausstattungsmerkmale
• 4 Ohm / 2 Ohm stabil Stereo
• Einschalt- und Schutzanzeige
• Hochpass regelbar
• Tiefpass regelbar
• Auto-On @ High Level Input
• Weiß beleuchtetes Logo
• Regelbare Eingangsempfindlichkeit
• Einschaltverzögerung
• Bass Lautstärkeregler (GZIA 2130HPX / 2235HPX)
• Temperatur / Kurzschluss / Überlast-Schutz
Benötigte Materialien und Werkzeuge zur Installation
• Kreuzschlitz Schraubendreher
• Bohrmaschine, 3 mm Metallbohrer
• Befestigungsschrauben
• Stromkabel min. 10 mm²
• Massekabel min 10 mm²
• Lautsprecherkabel min. 2 x 1,5 mm²
3
Bitte unbedingt beachten!
• Fahrzeugbatterie vor der Installation abklemmen! (Hinweise in der Betriebsanleitung des KFZ beachten!)
• Keine Löcher in den Tank, die Bremsleitung, Kabel oder andere wichtige Fahrzeugteile bohren!
• Kabel niemals über scharfe Kanten führen. Es ist empfehlenswert, die Stromversorgung der Endstufe mit einem
Kondensator (Powercap) min. 1 F zu puffern, um eine stabile Betriebsspannung zu gewährleisten.
WARNUNG !
Hochleistungsaudiosysteme in Fahrzeugen können den Schallpegel eines „Live“ Konzertes erzeugen. Dauerhaft extrem lauter Musik
ausgesetzt zu sein, kann den Verlust des Hörvermögens oder Hörschäden zur Folge haben. Das Hören von lauter Musik beim
Autofahren kann auch die Wahrnehmung (Warnsignale) beeinträchtigen. Im Interesse der allgemeinen Sicherheit empfehlen wir,
beim Autofahren die Musik auf geringer Lautstärke zu hören.
Planung
Vor der Installation sollten Sie folgende Punkte berücksichtigen:
a) Bitte beachten Sie bei der Wahl des Einbauortes, daß eine ausreichende Luftzirkulation zur Kühlung des Gerätes
gewährleistet ist.
b) Wenn Ihr Radio mit Vorverstärkerausgängen ausgerüstet (RCA) ist, ist es ratsam, diese zu nutzen.
Einbau des Verstärkers
a) Den passenden Einbauplatz auswählen, zu dem die Leitungen leicht verlegt werden können und an dem es genügend
Platz für die Luftzirkulation und Kühlung gibt.
b) Den Verstärker als Schablone benutzen, um die Einbaustellen zu markieren. Den Verstärker entfernen und 4 Löcher
bohren. Den Verstärker mit den vorgesehenen Schrauben befestigen.
Warnung
Bitte diese Systeme so einbauen, daß Elektroanbindungen vor Beschädigungen geschützt sind.
+12 Volt DC Elektrokabel müssen auf der Batterieseite abgesichert sein. Bitte sicherstellen, daß das Radio und andere Geräte
ausgeschaltet sind, wenn Sie die Geräte anschliessen.
Wenn es notwendig ist, eine Gerätesicherung zu erneuern, verwenden Sie nur eine gleichwertige Sicherung. Wenn eine
minderwertigere Sicherung benutzt wird, kann sie Schaden an dem ganzen System verursachen Dieser ist von der Garantie
ausgeschlossen.
4
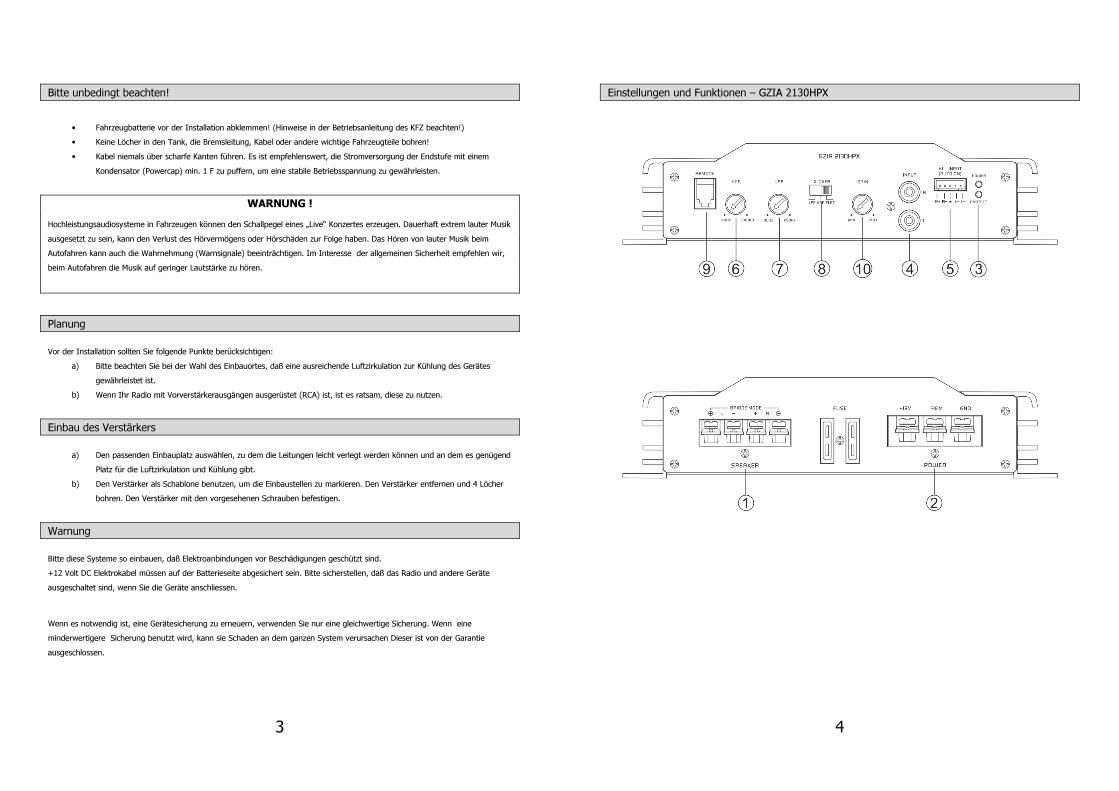
Einstellungen und Funktionen – GZIA 2130HPX
5
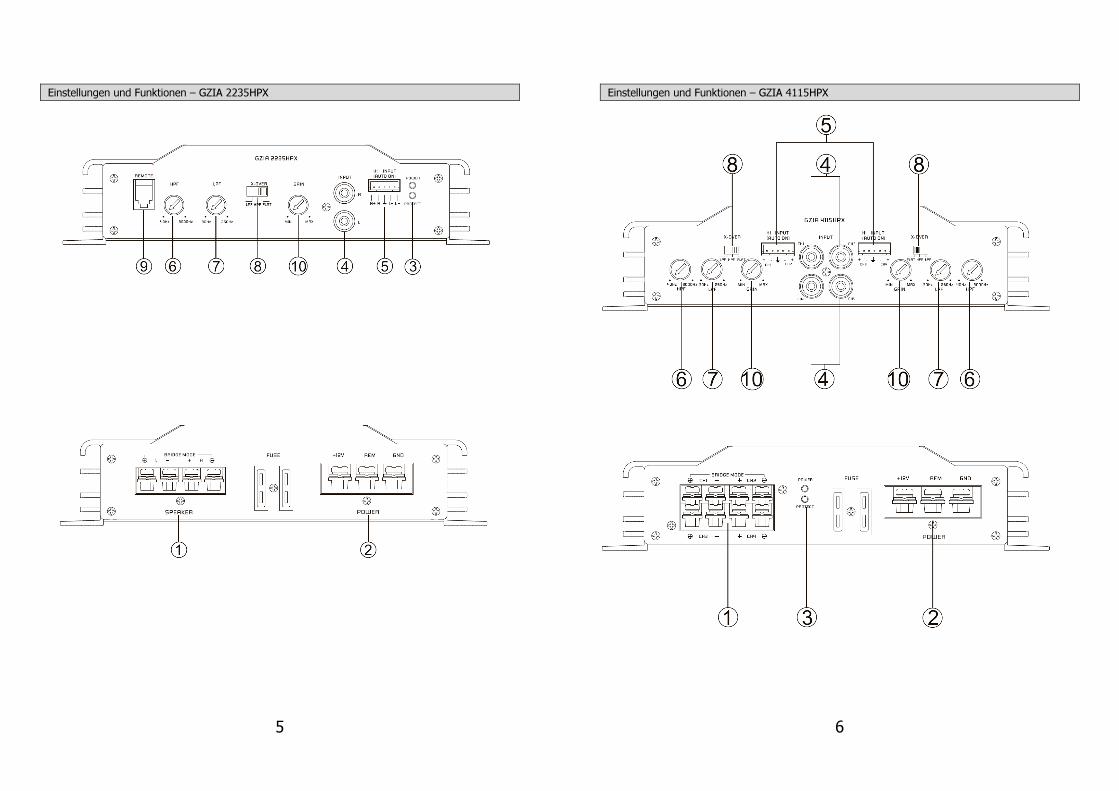
Einstellungen und Funktionen – GZIA 2235HPX
6
Einstellungen und Funktionen – GZIA 4115HPX
7
Einstellungen und Funktionen
1 Lautsprecheranschlüsse Zum Anschluss der Lautsprecher
2 Stromanschluss
GND -> Masse Anschluss REM -> Remote Antennenanschluss [nicht bei Nutzung der High Level Eingänge (5)] BATT -> +12 Volt
3 Zustandsanzeige GRÜN – OK ROT – Fehler
4 Cinch Eingänge
An diesen Anschlüssen schließen Sie die Cinchleitungen an. Um Störungen zu vermeiden, verwenden Sie bitte hochwertige Cinchkabel. WICHTIG:
Betreiben Sie niemals die High Level und die Cincheingänge
parallel. Dies kann zu Schäden am Gerät führen.
Nutzen Sie entweder die Cinch ODER die High Level Eingänge
5 High Level Eingänge
Diese Eingänge müssen genutzt werden, falls Ihre Steuereinheit nicht über einen Low Level Cinchausgang verfügt. Verbinden Sie diesen Eingang mit den Lautsprecherausgängen der Steuereinheit. Die Endstufe schaltet automatisch ein, sobald ein Signal anliegt (Auto-On). Der Remote Anschluss des Strom-Terminals (2) bleibt frei. WICHTIG:
Betreiben Sie niemals die High Level und die Cincheingänge
parallel. Dies kann zu Schäden am Gerät führen.
Nutzen Sie entweder die Cinch ODER die High Level Eingänge
6 High Pass Regler
Setzen Sie den Filter - Schalter auf “HIGH”. Justieren Sie die variable HPF Übergangsfrequenz mit dem Regler auf die gewünschte Frequenz. Es werden alle Frequenzen unterhalb 40 - 3000 Hz gefiltert.
7 Low Pass Regler
Es werden nur noch Frequenzen unterhalb von 30 – 250 Hz wiedergegeben (abhängig von der Reglerstellung des LPF Filters). Setzen Sie den Filter - Schalter auf “LOW”. Justieren Sie die variable LPF Frequenz mit dem Regler auf die gewünschte Frequenz.
8 Mode Schalter
Stellen Sie die Weiche für die ausgewählte Anwendung ein. LPF - Nur Bassfrequenzen (unter 30 – 250 Hz) werden wiedergegeben. FULL - Alle Frequenzen werden übertragen. HPF - Nur mittlere und hohe Frequenzen (über 40 – 3000 Hz) werden übertragen.
9 Remote Control Eingang Zum Anschluss des Bass Lautstärkereglers. (GZIA 2130HPX/2235HPX) 10 Gain Level Regler Hier justieren Sie die Eingangsempfindlichkeit des Verstärkers
High Level Input
Bei Benutzung der High Level Eingänge kann es je nach Anlagen und Fahrzeug-Konfiguration zu
Störgeräuschen kommen.
Bitte nutzen Sie den mittleren zusätzlichen Masse-Anschluss dieses Eingangs, um diese Geräusche
zu verringern, ggf. sogar komplett zu unterbinden.
Die Auto-On Funktion erlaubt Ihnen, den Verstärker ohne zusätzlichen Remote-Anschluss zu
betreiben. Dies ermöglicht u.a. den Betrieb an OEM Headunits und OEM Aktivsystemen, welche
weder über Cinchausgänge, noch über einen geschaltete Remote-Ausgang verfügen.
8
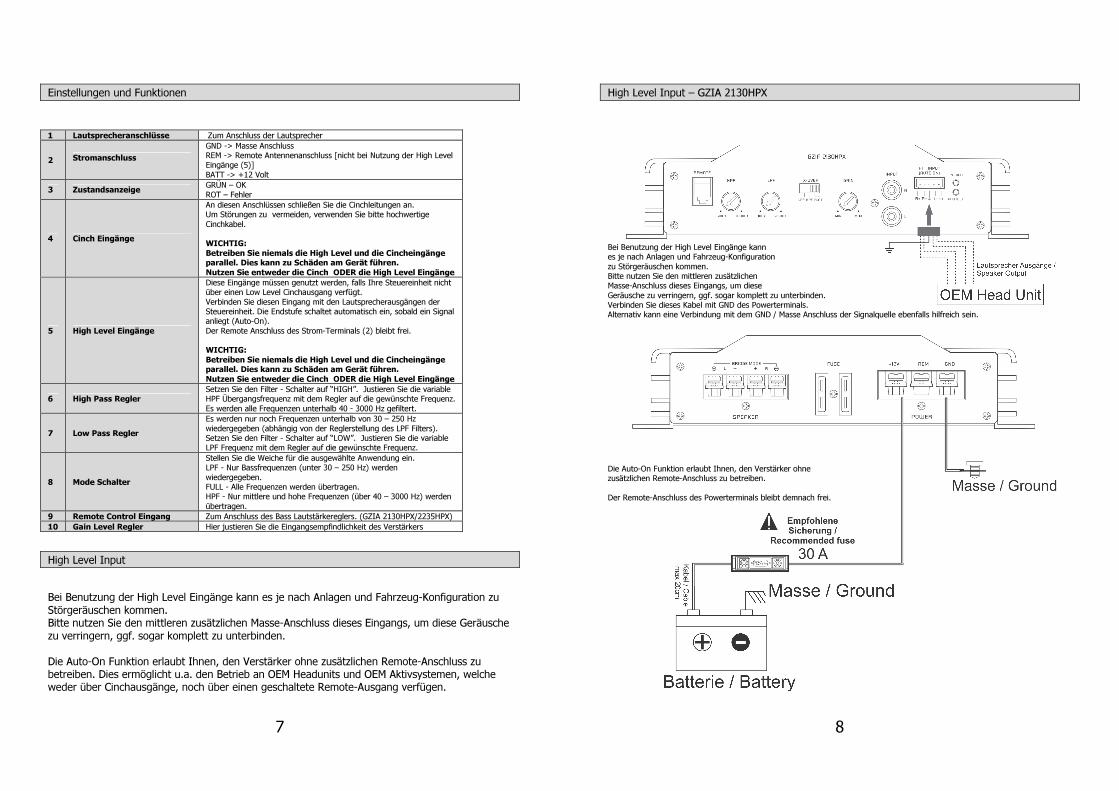
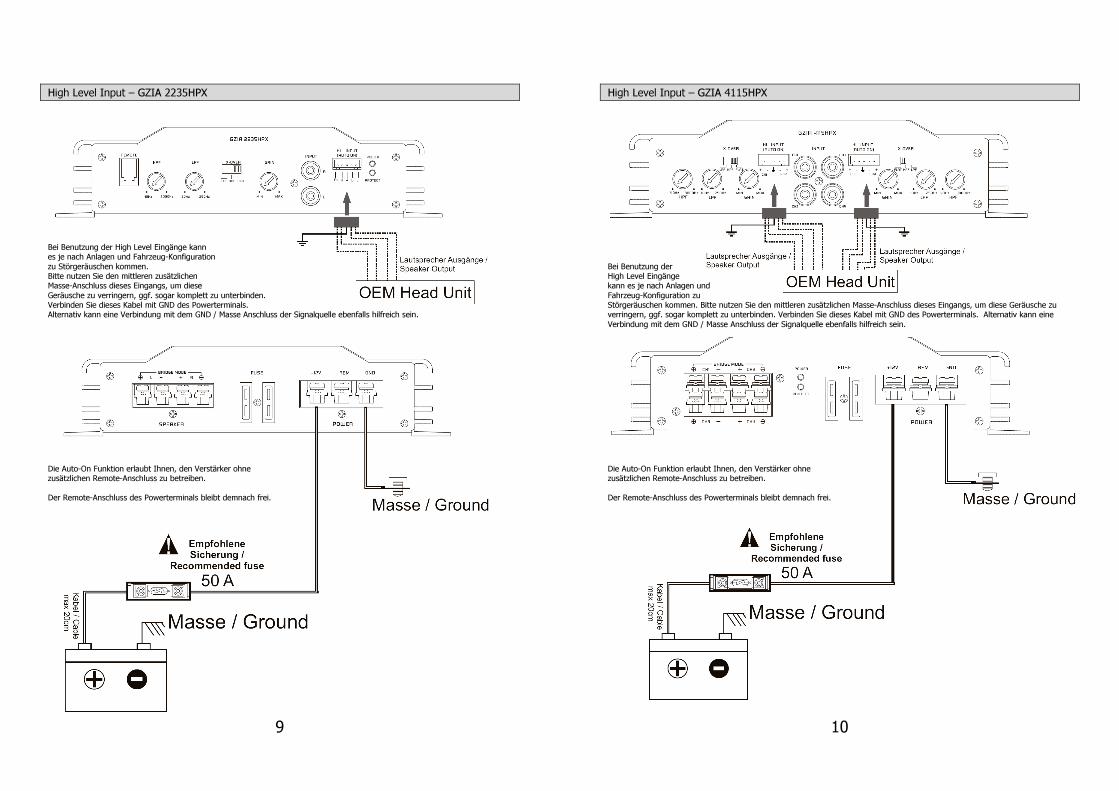
High Level Input – GZIA 2130HPX
Bei Benutzung der High Level Eingänge kann
es je nach Anlagen und Fahrzeug-Konfiguration
zu Störgeräuschen kommen.
Bitte nutzen Sie den mittleren zusätzlichen
Masse-Anschluss dieses Eingangs, um diese
Geräusche zu verringern, ggf. sogar komplett zu unterbinden.
Verbinden Sie dieses Kabel mit GND des Powerterminals.
Alternativ kann eine Verbindung mit dem GND / Masse Anschluss der Signalquelle ebenfalls hilfreich sein.
Die Auto-On Funktion erlaubt Ihnen, den Verstärker ohne
zusätzlichen Remote-Anschluss zu betreiben.
Der Remote-Anschluss des Powerterminals bleibt demnach frei.
9
High Level Input – GZIA 2235HPX
Bei Benutzung der High Level Eingänge kann es je nach Anlagen und Fahrzeug-Konfiguration zu Störgeräuschen kommen. Bitte nutzen Sie den mittleren zusätzlichen Masse-Anschluss dieses Eingangs, um diese Geräusche zu verringern, ggf. sogar komplett zu unterbinden. Verbinden Sie dieses Kabel mit GND des Powerterminals. Alternativ kann eine Verbindung mit dem GND / Masse Anschluss der Signalquelle ebenfalls hilfreich sein. Die Auto-On Funktion erlaubt Ihnen, den Verstärker ohne zusätzlichen Remote-Anschluss zu betreiben. Der Remote-Anschluss des Powerterminals bleibt demnach frei.
10
High Level Input – GZIA 4115HPX
Bei Benutzung der
High Level Eingänge
kann es je nach Anlagen und
Fahrzeug-Konfiguration zu
Störgeräuschen kommen. Bitte nutzen Sie den mittleren zusätzlichen Masse-Anschluss dieses Eingangs, um diese Geräusche zu
verringern, ggf. sogar komplett zu unterbinden. Verbinden Sie dieses Kabel mit GND des Powerterminals. Alternativ kann eine
Verbindung mit dem GND / Masse Anschluss der Signalquelle ebenfalls hilfreich sein.
Die Auto-On Funktion erlaubt Ihnen, den Verstärker ohne
zusätzlichen Remote-Anschluss zu betreiben.
Der Remote-Anschluss des Powerterminals bleibt demnach frei.
11
Einschalten des Verstärkers Der Verstärker schaltet sich automatisch einige Sekunden nach dem Einschalten des Radios ein.
Achtung: Ihr Verstärker schaltet sich zeitweise aus, wenn er überhitzt ist, schaltet sich jedoch nach der Abkühlung automatisch
wieder ein (ca. 80° C).
Einstellung des Audiopegels 1. LEVEL (MIN/MAX): mit Linksdrehung ganz auf MIN drehen
2. Drehen Sie die Lautstärke am Radio auf ungefähr 1/3 der Höchstlautstärke
3. Stellen Sie am LEVEL- Regler eine angenehme Lautstärke ein
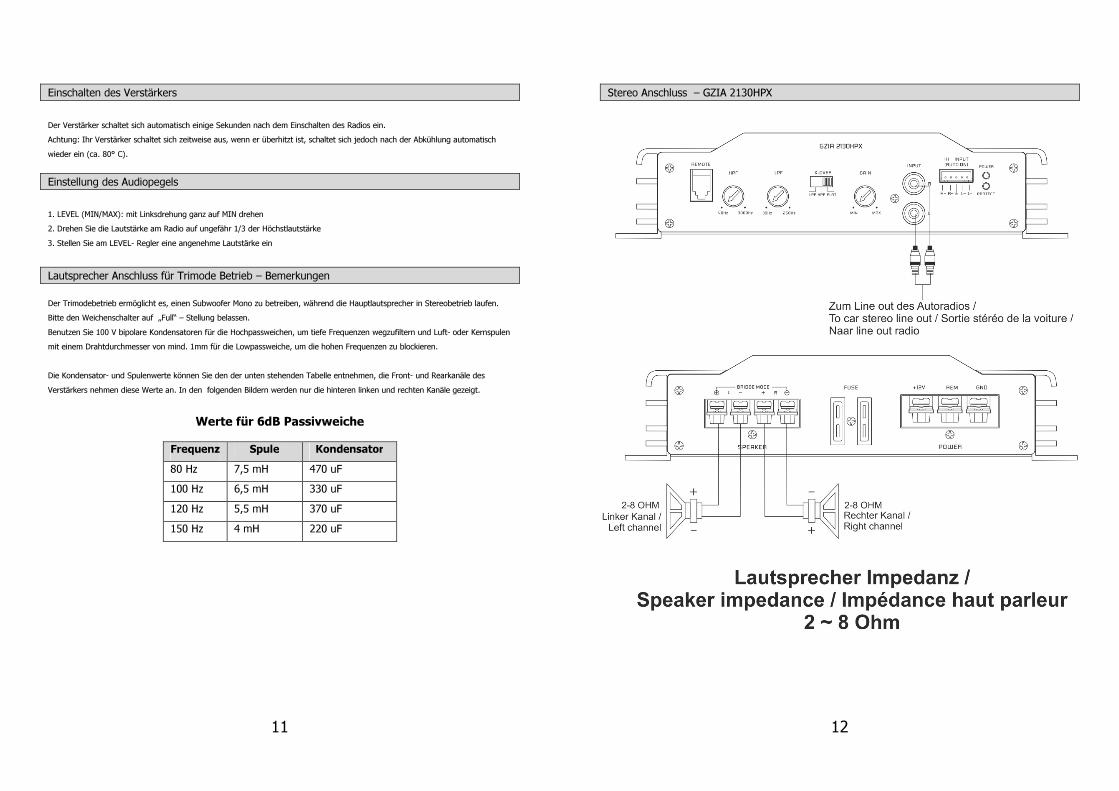
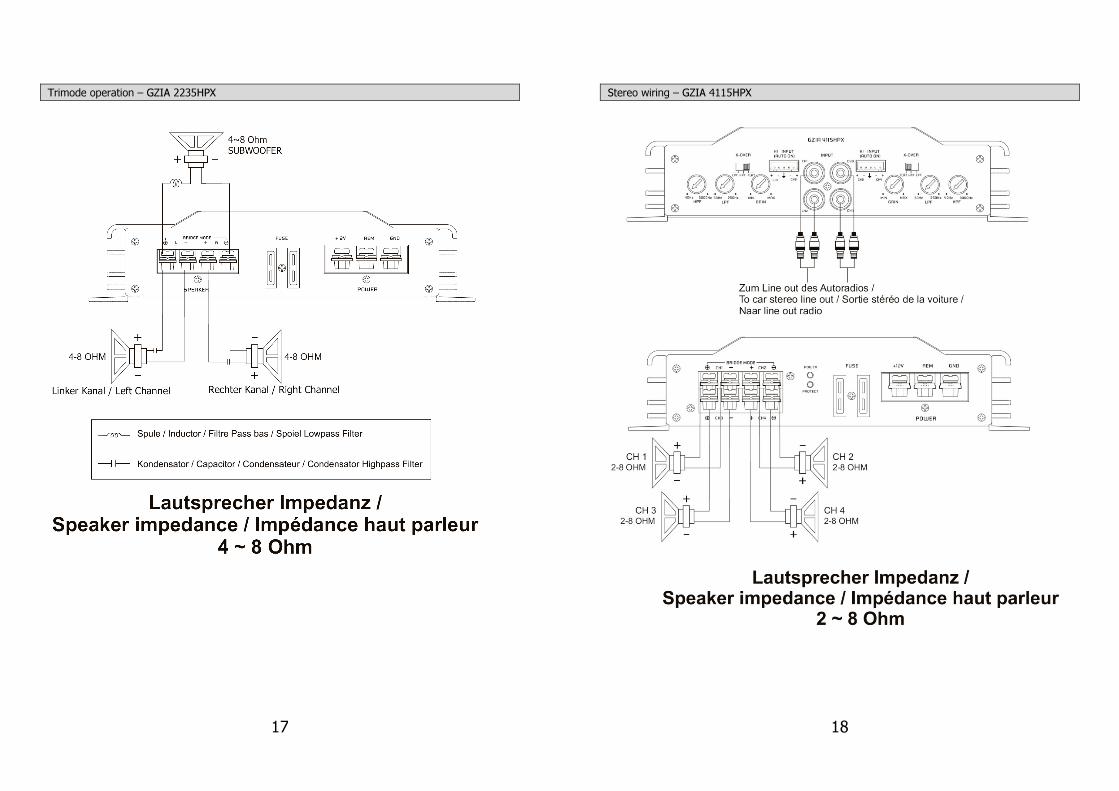
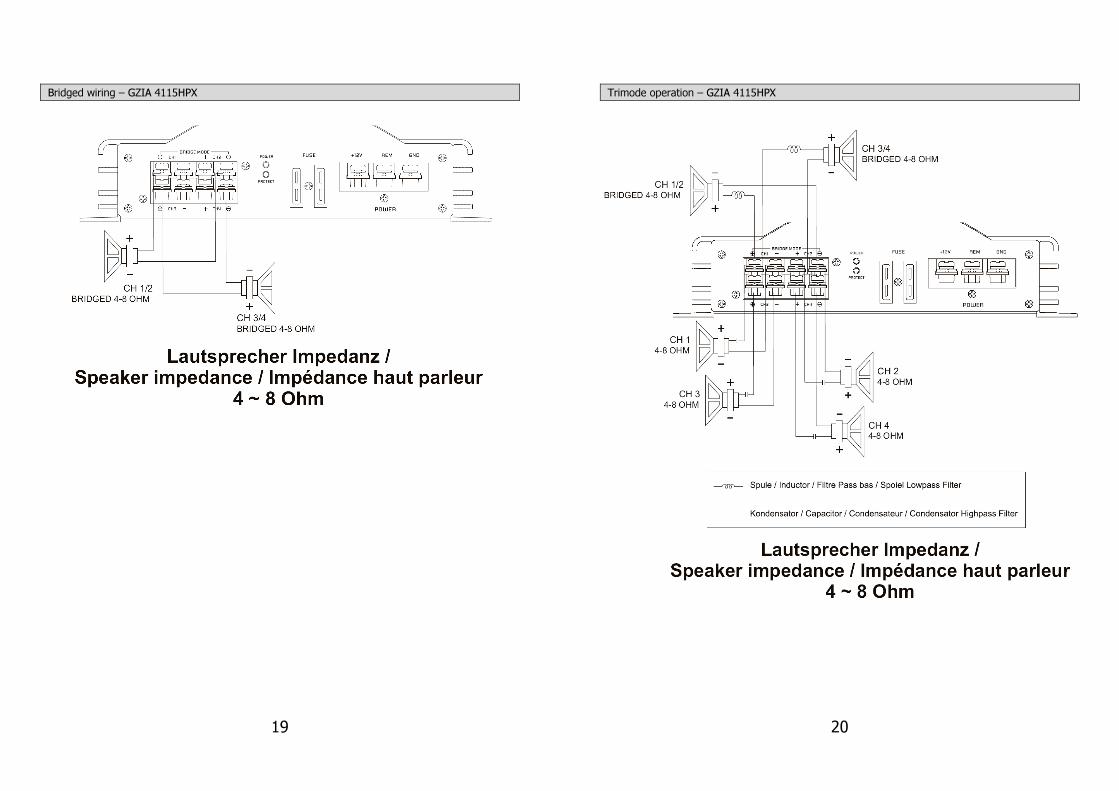
Lautsprecher Anschluss für Trimode Betrieb – Bemerkungen
Der Trimodebetrieb ermöglicht es, einen Subwoofer Mono zu betreiben, während die Hauptlautsprecher in Stereobetrieb laufen.
Bitte den Weichenschalter auf „Full“ – Stellung belassen.
Benutzen Sie 100 V bipolare Kondensatoren für die Hochpassweichen, um tiefe Frequenzen wegzufiltern und Luft- oder Kernspulen
mit einem Drahtdurchmesser von mind. 1mm für die Lowpassweiche, um die hohen Frequenzen zu blockieren.
Die Kondensator- und Spulenwerte können Sie den der unten stehenden Tabelle entnehmen, die Front- und Rearkanäle des
Verstärkers nehmen diese Werte an. In den folgenden Bildern werden nur die hinteren linken und rechten Kanäle gezeigt.
Werte für 6dB Passivweiche
Frequenz Spule Kondensator
80 Hz 7,5 mH 470 uF
100 Hz 6,5 mH 330 uF
120 Hz 5,5 mH 370 uF
150 Hz 4 mH 220 uF
12
Stereo Anschluss – GZIA 2130HPX
13
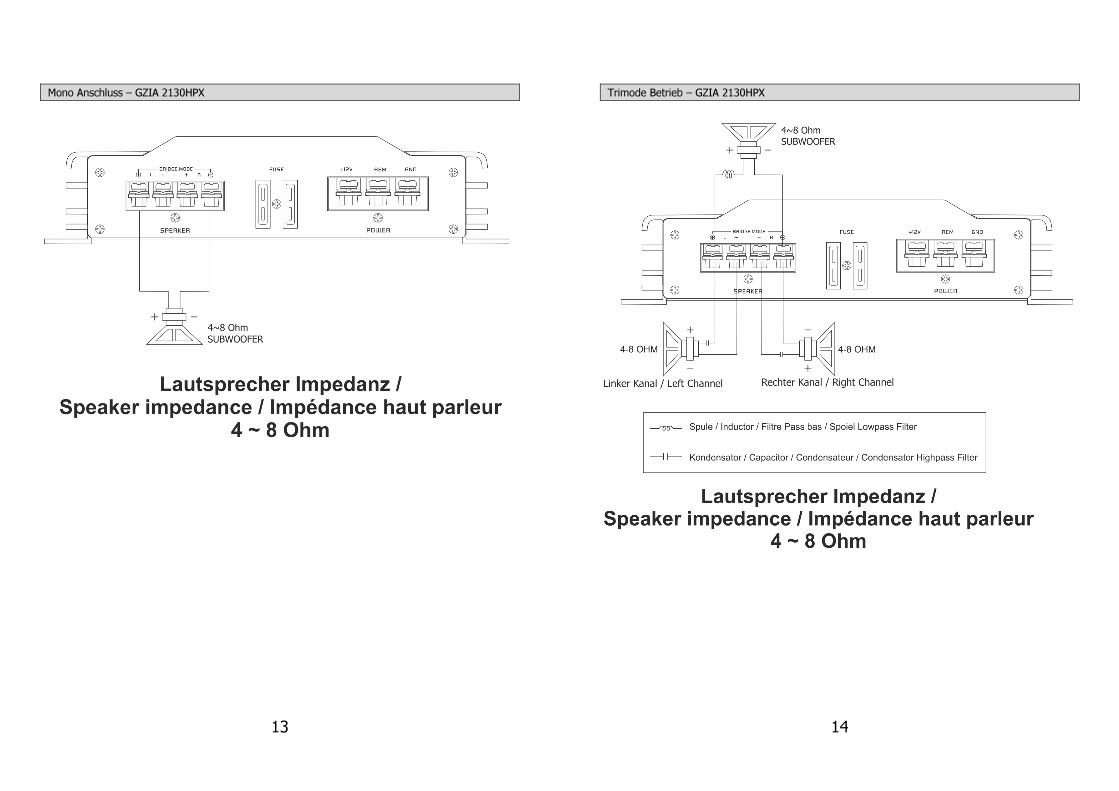
Mono Anschluss – GZIA 2130HPX
14
Trimode Betrieb – GZIA 2130HPX
15
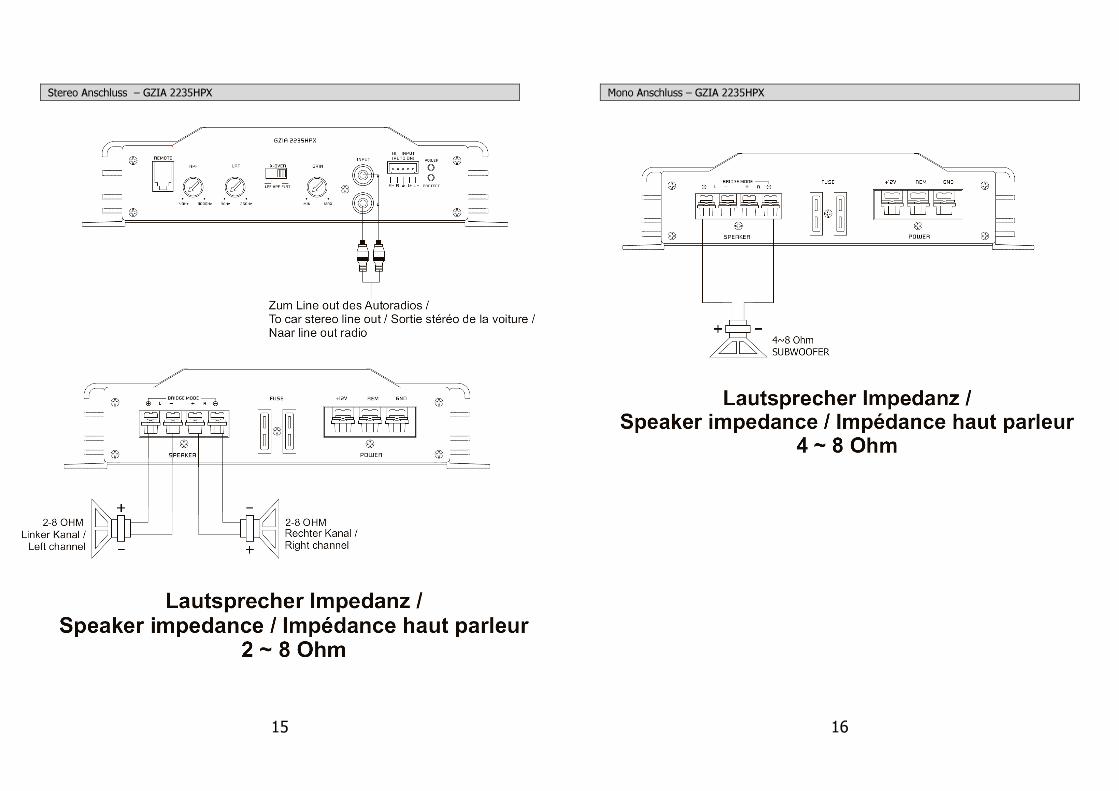
Stereo Anschluss – GZIA 2235HPX
16
Mono Anschluss – GZIA 2235HPX
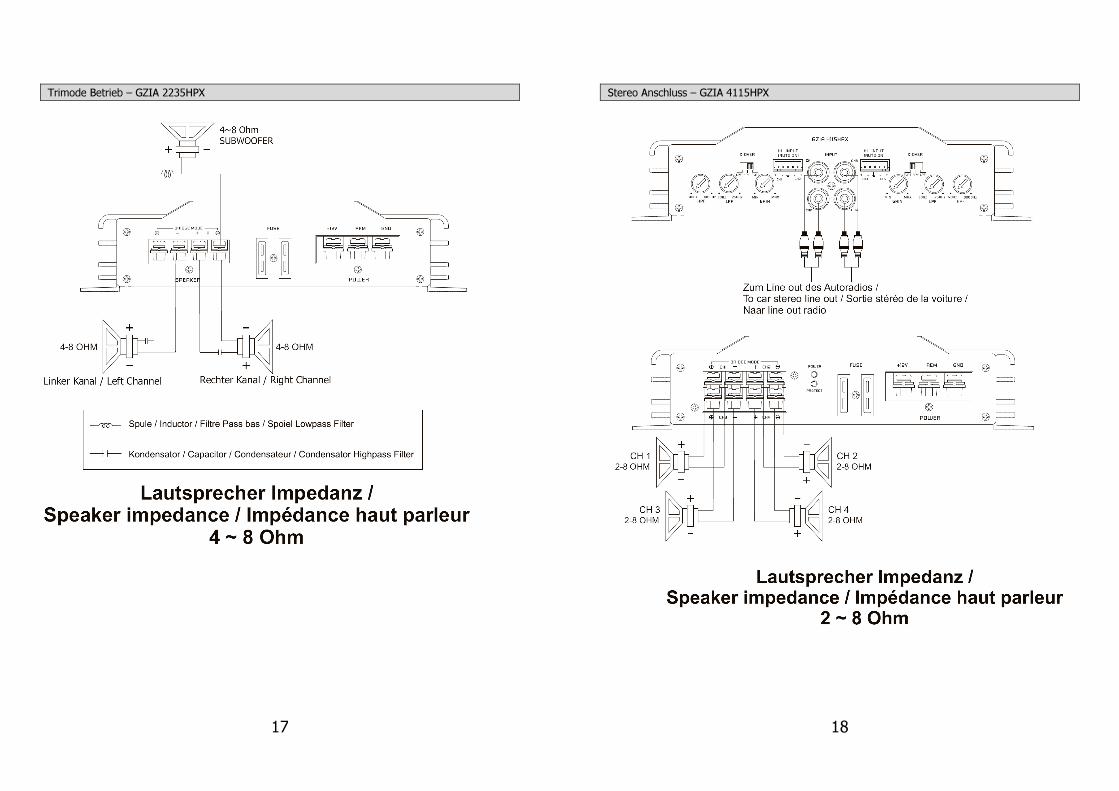
17
Trimode Betrieb – GZIA 2235HPX
18
Stereo Anschluss – GZIA 4115HPX
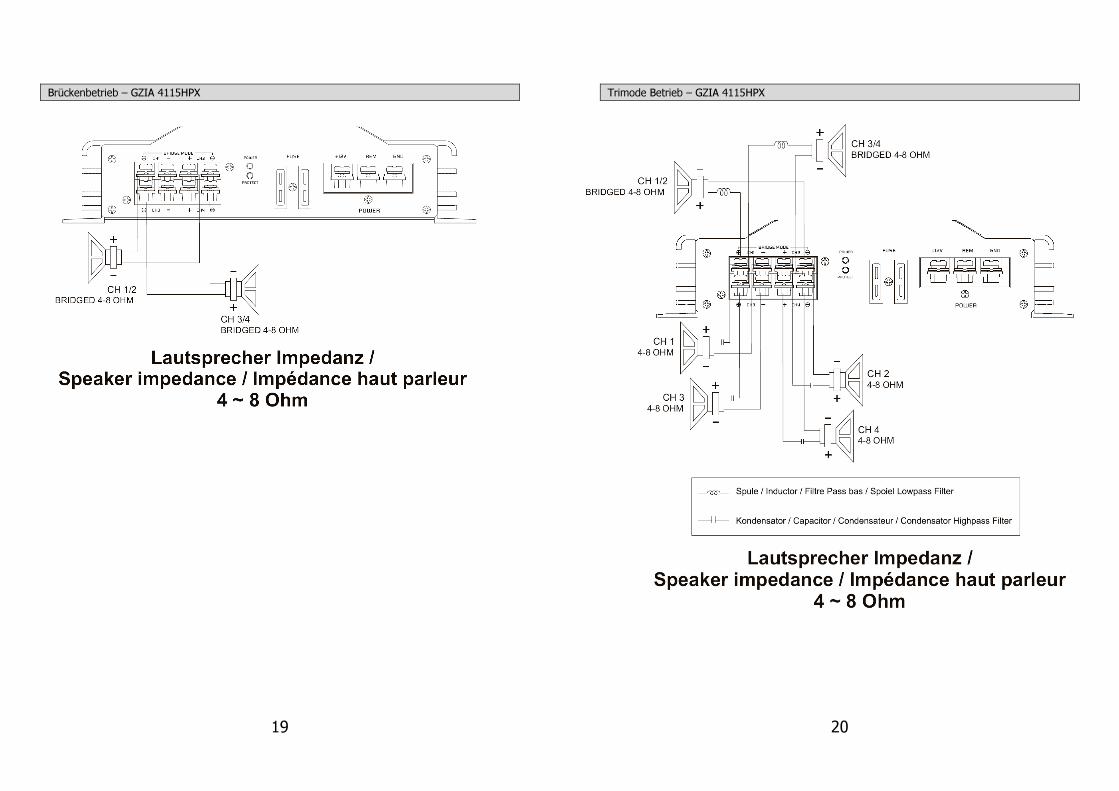
19
Brückenbetrieb – GZIA 4115HPX
20
Trimode Betrieb – GZIA 4115HPX
21
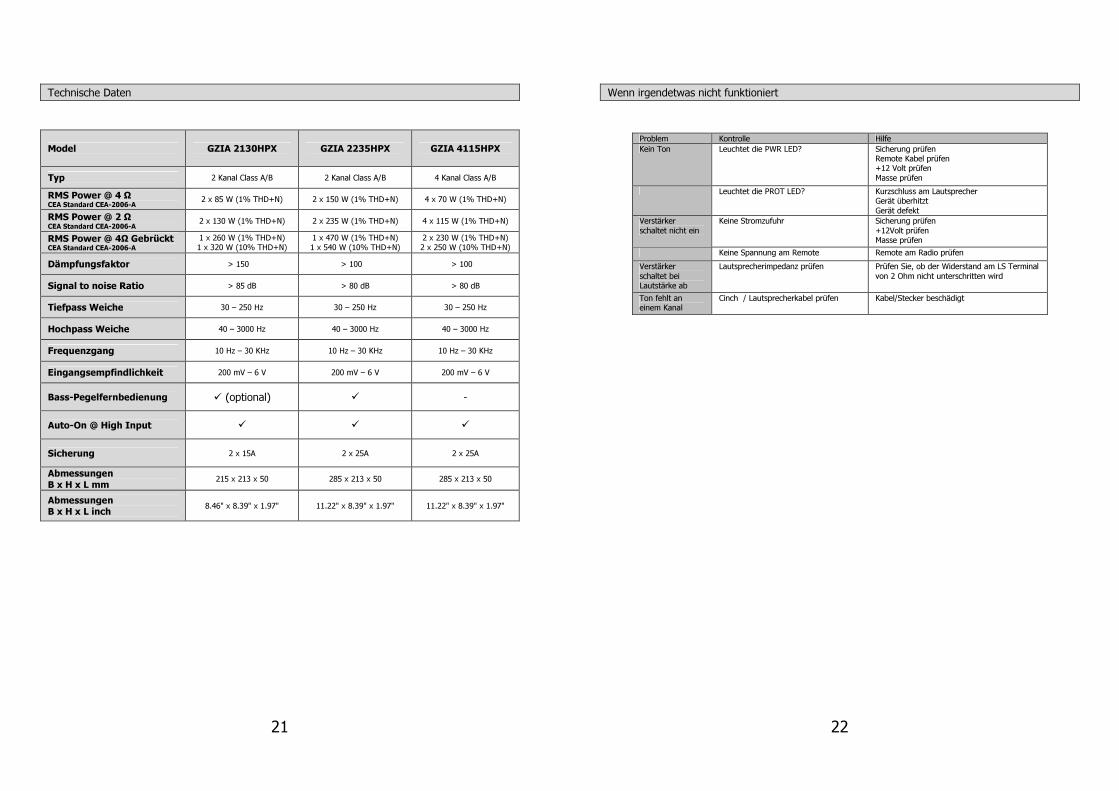
Technische Daten
Model GZIA 2130HPX GZIA 2235HPX GZIA 4115HPX
Typ 2 Kanal Class A/B 2 Kanal Class A/B 4 Kanal Class A/B
RMS Power @ 4 Ω CEA Standard CEA-2006-A
2 x 85 W (1% THD+N) 2 x 150 W (1% THD+N) 4 x 70 W (1% THD+N)
RMS Power @ 2 Ω CEA Standard CEA-2006-A
2 x 130 W (1% THD+N) 2 x 235 W (1% THD+N) 4 x 115 W (1% THD+N)
RMS Power @ 4Ω Gebrückt CEA Standard CEA-2006-A
1 x 260 W (1% THD+N) 1 x 320 W (10% THD+N)
1 x 470 W (1% THD+N) 1 x 540 W (10% THD+N)
2 x 230 W (1% THD+N) 2 x 250 W (10% THD+N)
Dämpfungsfaktor > 150 > 100 > 100
Signal to noise Ratio > 85 dB > 80 dB > 80 dB
Tiefpass Weiche 30 – 250 Hz 30 – 250 Hz 30 – 250 Hz
Hochpass Weiche 40 – 3000 Hz 40 – 3000 Hz 40 – 3000 Hz
Frequenzgang 10 Hz – 30 KHz 10 Hz – 30 KHz 10 Hz – 30 KHz
Eingangsempfindlichkeit 200 mV – 6 V 200 mV – 6 V 200 mV – 6 V
Bass-Pegelfernbedienung (optional) -
Auto-On @ High Input
Sicherung 2 x 15A 2 x 25A 2 x 25A
Abmessungen B x H x L mm
215 x 213 x 50 285 x 213 x 50 285 x 213 x 50
Abmessungen B x H x L inch
8.46" x 8.39" x 1.97" 11.22" x 8.39" x 1.97" 11.22" x 8.39" x 1.97"
22
Wenn irgendetwas nicht funktioniert
Problem Kontrolle Hilfe
Kein Ton Leuchtet die PWR LED? Sicherung prüfen
Remote Kabel prüfen
+12 Volt prüfen
Masse prüfen
Leuchtet die PROT LED? Kurzschluss am Lautsprecher
Gerät überhitzt
Gerät defekt
Verstärker
schaltet nicht ein
Keine Stromzufuhr Sicherung prüfen
+12Volt prüfen
Masse prüfen
Keine Spannung am Remote Remote am Radio prüfen
Verstärker
schaltet bei
Lautstärke ab
Lautsprecherimpedanz prüfen Prüfen Sie, ob der Widerstand am LS Terminal
von 2 Ohm nicht unterschritten wird
Ton fehlt an
einem Kanal
Cinch / Lautsprecherkabel prüfen Kabel/Stecker beschädigt
23
Die Gewährleistung entspricht der gesetzlichen Regelung. Eine Rücksendung kann nur nach vorheriger Absprache und in der Originalverpackung erfolgen. Bitte
unbedingt einen maschinell erstellten Kaufbeleg und eine Fehlerbeschreibung beilegen. Von der Gewährleistung ausgeschlossen sind Defekte, die durch Überlastung, unsachgemäße
Behandlung oder bei Teilnahme an Wettbewerben entstanden sind.
Limited warranty - defective products must be returned in original packaging - please add a copy of the original purchasing invoice showing the purchasing date and a detailed description of the failure. Failure caused by
overload, misuse or by using the product for competition purpose are not covered by the warranty.
De Garantie bepalingen van alle door ground zero geleverde producten is volgens wettelijke bepalingen geregeld, Een retourzending kan alleen na duidelijke afspraak en in de originele
verpakking plaatsvinden.SVP een aankoopbon en een duidelijke storingsomschrijving bijvoegen.Van garantie uitgesloten zijn defecten door overbelasting, onkundig gebruik, of door deelname aan wedstrijden (SPL)
ontstaan zijn.
La garantie est conforme aux droits légaux. Un retour du produit défectueux doit être dans son emballage d'origine sur présentation du reçu ou de la facture indiquant la description du defaut.La présente Garantie n'est pas applicable lorsque le produit a été endommagé en raison: Mauvaise alimentation, Trop de puissance (HP,Subwoofer) Accident, Installation ou Utilisation non conforme aux normes Technique (Concours
SPL etc).
GROUND ZERO GmbH
Erlenweg 25; D - 85658 Egmating, Germany
Tel. +49 (0)8095/873 830 Fax -8310
www.ground-zero-audio.com
Wir behalten uns das Recht vor, zukünftig nötige Änderungen oder Verbesserungen an dem Produkt vorzunehmen ohne den Kunden darüber zu informieren.
We reserve the right to make needed change or improvement to the product without informing customer about
this in advance.
Wij behouden ons het recht om de nodige veranderingen of verbeteringen aan het product door te voeren zonder de klant hierover te informeren.
Nous nous réservons le droit d'entreprendre à l'avenir nécessairement des modifications ou des
améliorations au produit sans informer le client.
Amplifier Owner’s Manual
IRIDIUM
GZIA 2130HPX
GZIA 2235HPX
GZIA 4115HPX
2
PLEASE READ BEFORE INSTALLATION
Thank you for selecting a Ground Zero amplifier.
We are providing a helpful hints list which should keep you from experiencing
unnecessary shut down. Have fun with this high quality Titanium product.
Features
• 4 Ohm / 2 Ohm stable Stereo
• Power & Protection indicator
• Variable highpass
• Variable lowpass
• Auto-On @ High Level Input
• White illuminated logo
• Adjustable input sensitivity
• Soft delayed remote turn- on
• Bass remote control (GZIA 2130HPX / 2235HPX)
• Thermal / Short / Overload protection
Tools and materials you need
• Screwdriver
• Electric drill, 3 mm / 0.12” carbide drill bit
• Mounting screws
• Power wire min. 10 mm²
• Ground wire min. 10 mm²
• Speaker wire min. 2 x 1,5 mm²
3
Please note!
• As a precaution it is advisable to disconnect the vehicle’s battery before making connection
to the +12 Volts supply wiring (see owner’s manual of your car for further information).
• Please use great caution drilling your trunk. Your gas tank and brake lines can be damaged by
puncturing with your drill bit – this could cause damage or failure of your cars operating systems.
• Never pass wires over sharp angles. It is recommended to buffer the power supply of the amplifier
with a capacitor min. 1 Farad to guarantee a stable operation voltage.
WARNING !
High powered audio systems in a vehicle are capable of generating "Live Concert" levels of sound pressure.
Continued exposure to excessively high volume sound levels may cause hearing loss or damage. Also, operation
of a motor vehicle while listening to audio equipment at high volume levels may impair your ability to hear
external sounds such as; horns, warning signals, or emergency vehicles, thus constituting to a potential traffic
hazard. In the interest of safety, Consumer Electronics recommends listening at lower volume levels while driving.
Planning your system
Before beginning the installation, consider the following:
a. If you plan to expand your system by adding other components sometime in the future, ensure
adequate space is left, and cooling requirements are met.
b. If your radio / source is equipped with pre-amp outputs, it is possible to utilize them to drive the
amplifier and connecting (amplifier) to the 2 rear speakers.
Mounting your amplifier
a. Select a suitable location that is convenient for mounting, is accessible for wiring
and has ample room for air circulation and cooling.
b. Use the amplifier as a template to mark the mounting holes, remove the amplifier.
Warning
Chose a mounting position where all eclectic wires are protected from being damaged by sharp edges, heat or
other conditions. +12Volt DC electrical connections must be fused on the battery side. Make sure your radio and
all other devices will be turned off while connection your system.
If you need to replace the power fuse, replace it only with a fuse identical to that supplied with the system. Using
a fuse of different type or rating may result in damage to this system which isn’t covered by the warranty.
4
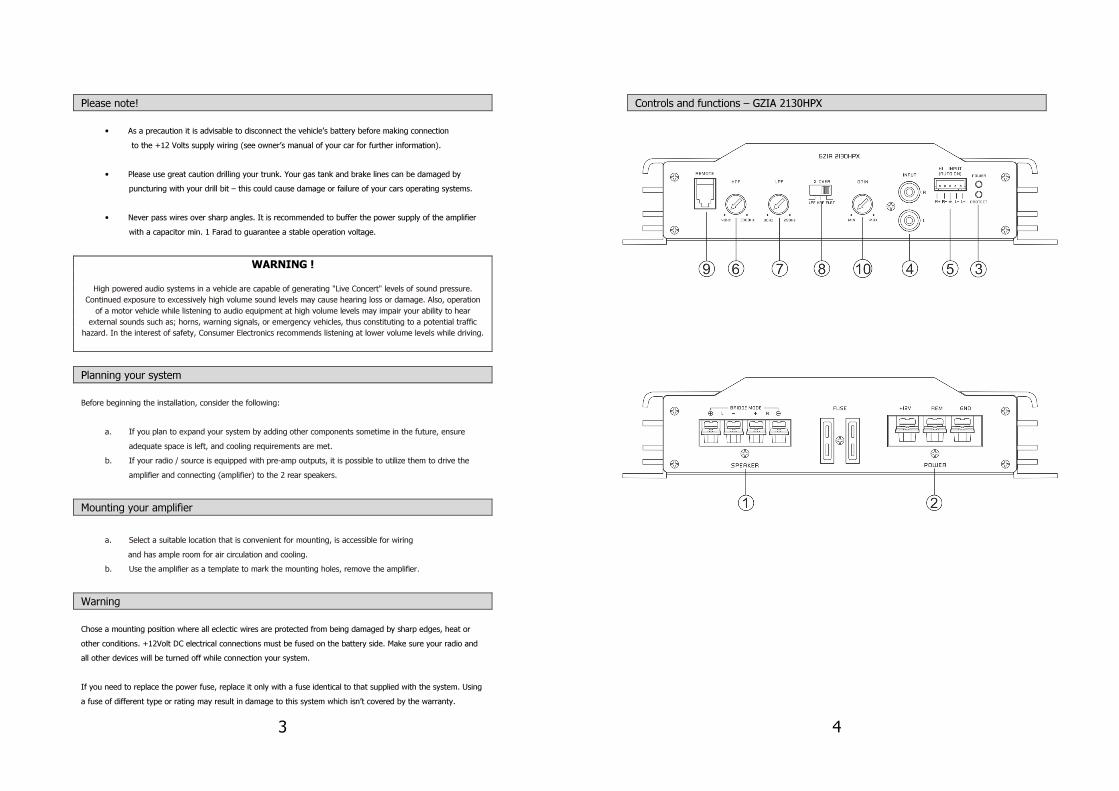
Controls and functions – GZIA 2130HPX

5
Controls and functions – GZIA 2235HPX
6
Controls and functions – GZIA 4115HPX
7
Einstellungen und Funktionen
1 Speaker terminals For connection of the speakers
2 Power terminals
GND -> Ground connection
REM -> Remote antenna terminal [Not for use with High level inputs (5)]
BATT -> +12 Volt
3 Satus indication GREEN – OK
RED – Error
4 Cinch inputs
Terminal for connection of the RCA wires.
To avoid failure, please use high quality RCA wires.
IMPORTANT!
Do not use the High level inputs and the Cinch inputs parallel, this
can damage the amplifier. Use either the Cinch OR the High Level
inputs.
5 High Level inputs
These inputs must be used if your head unit is not equipped with a Low
Level Cinch ouput.
Connect this input to the speaker outputs of your head unit. The amplifier
automatically turns on as soon as a signal is received (Auto On). The
remote connection of the Power- Terminal (2) won’t be used.
IMPORTANT!
Do not use the High level inputs and the Cinch inputs parallel, this
can damage the amplifier. Use either the Cinch OR the High Level
inputs.
6 High Pass controller
Set the filter switch to „HIGH“ position.
Adjust the variable HPF crossover frequency to the desired frequency using
the controller. All frequency between 40 and 3000 Hz will be reproduced.
7 Low Pass controller
Only frequencies from 30Hz to 250Hz will be reproduced (depending on
the LPF filter controller position). Set the filter switch to „LOW“ position.
Adjust the variable LPF frequency to the desired frequency using the
controller.
8 Mode switch
Adjust the crossover for the chosen utilization.
LPF – Only bass frequencies (below 30Hz - 250Hz) will be reproduced.
FULL – All frequencies will be reproduced.
HPF – Only middle and high frequencies (over 40Hz – 3000Hz) will be
reproduced.
9 Remote control input For connection of the bass remote control (GZIA 2130HPX/2235HPX)
10 Input level controller With this controller you can adjust the input sensitivity.
High Level Input
Depending on the configuration of your car and sound system, error noises may
appear when using the high level inputs. Please use the additional middle ground-
connection of this input to reduce these noises.
The Auto-On function allows you to use the amplifier without an additional remote
connection. This makes it possible to operate it with an OEM headunit and OEM
active systems, which are not equipped with cinch ouputs or switched remote-
outputs.
8
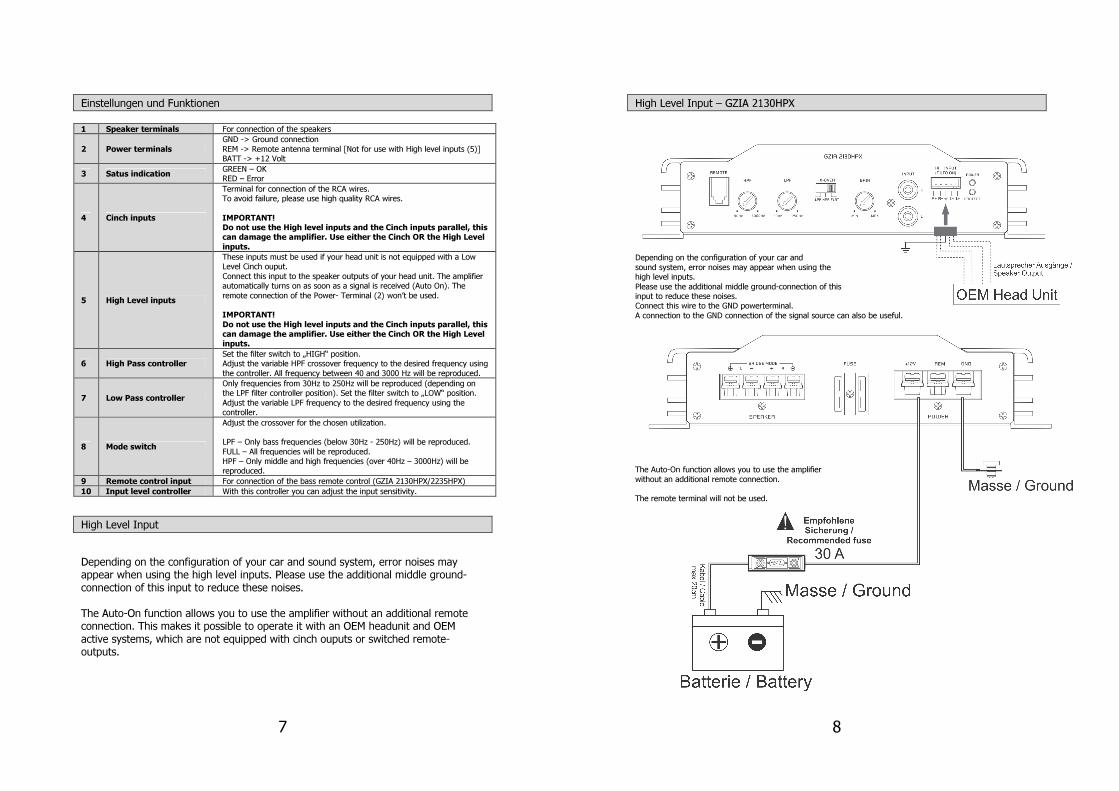
High Level Input – GZIA 2130HPX
Depending on the configuration of your car and
sound system, error noises may appear when using the
high level inputs.
Please use the additional middle ground-connection of this
input to reduce these noises.
Connect this wire to the GND powerterminal.
A connection to the GND connection of the signal source can also be useful.
The Auto-On function allows you to use the amplifier
without an additional remote connection.
The remote terminal will not be used.
9
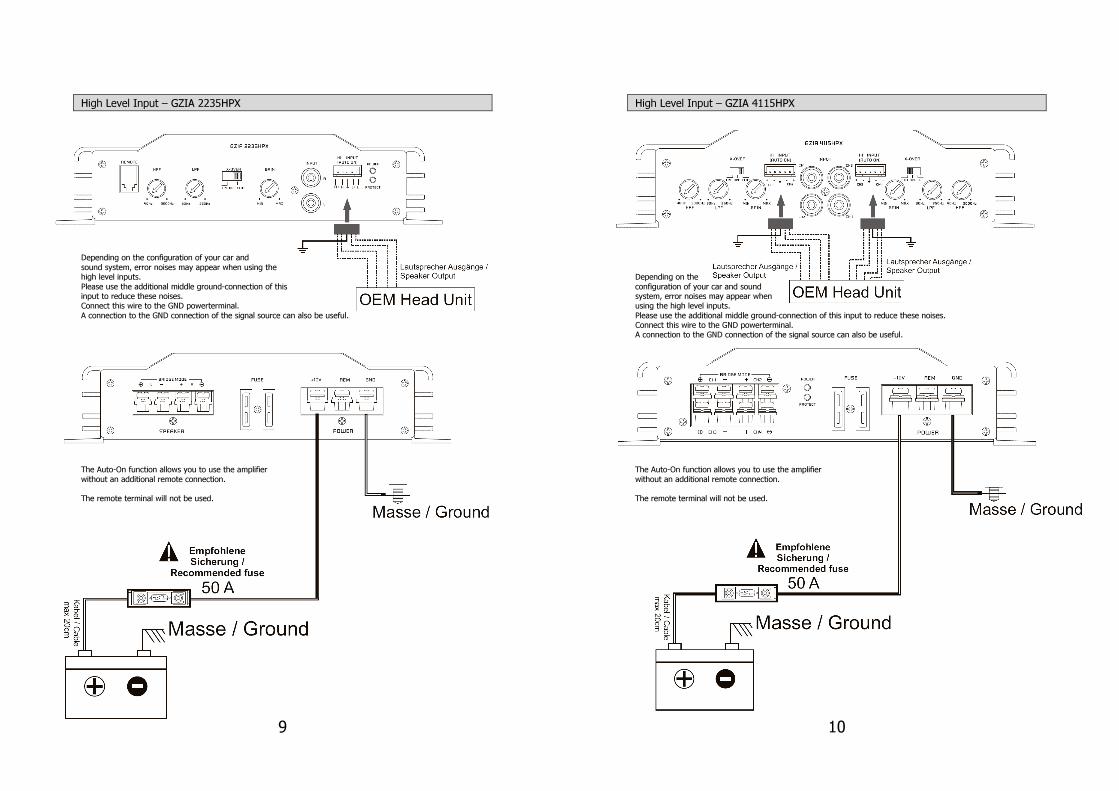
High Level Input – GZIA 2235HPX
Depending on the configuration of your car and
sound system, error noises may appear when using the
high level inputs.
Please use the additional middle ground-connection of this
input to reduce these noises.
Connect this wire to the GND powerterminal.
A connection to the GND connection of the signal source can also be useful.
The Auto-On function allows you to use the amplifier
without an additional remote connection.
The remote terminal will not be used.
10
High Level Input – GZIA 4115HPX
Depending on the
configuration of your car and sound
system, error noises may appear when
using the high level inputs.
Please use the additional middle ground-connection of this input to reduce these noises.
Connect this wire to the GND powerterminal.
A connection to the GND connection of the signal source can also be useful.
The Auto-On function allows you to use the amplifier
without an additional remote connection.
The remote terminal will not be used.
11
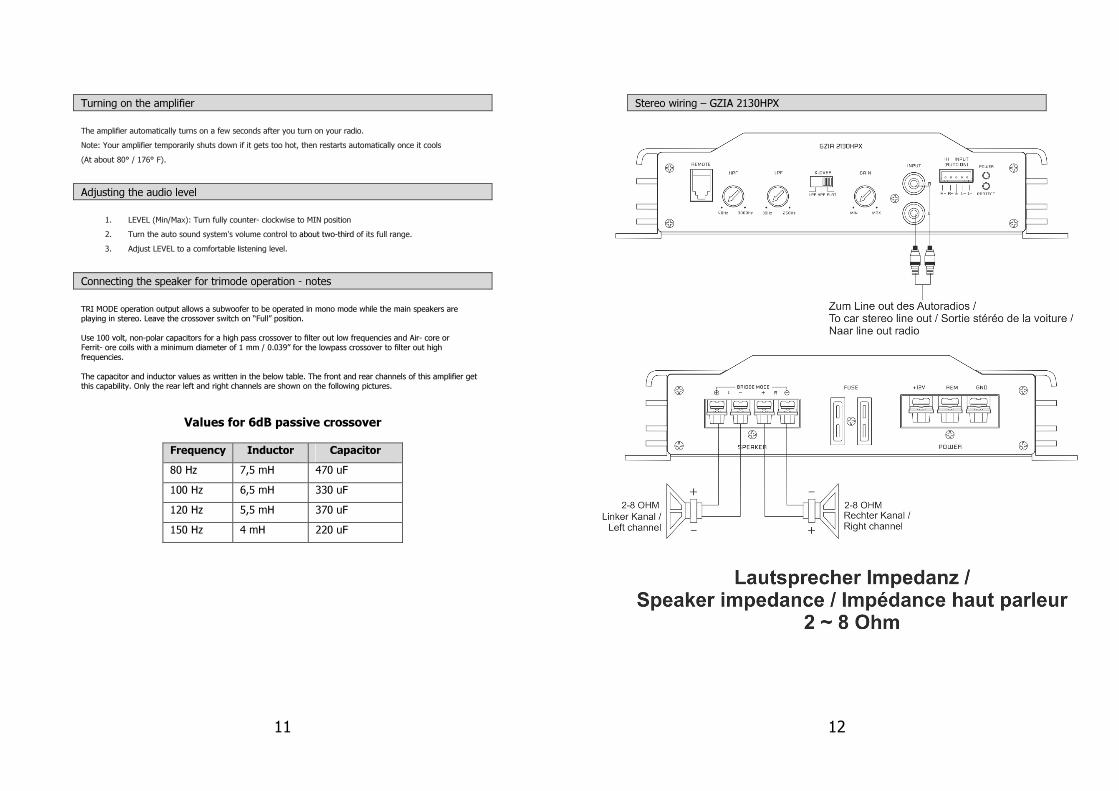
Turning on the amplifier
The amplifier automatically turns on a few seconds after you turn on your radio.
Note: Your amplifier temporarily shuts down if it gets too hot, then restarts automatically once it cools
(At about 80° / 176° F).
Adjusting the audio level
1. LEVEL (Min/Max): Turn fully counter- clockwise to MIN position
2. Turn the auto sound system's volume control to about two-third of its full range.
3. Adjust LEVEL to a comfortable listening level.
Connecting the speaker for trimode operation - notes
TRI MODE operation output allows a subwoofer to be operated in mono mode while the main speakers are
playing in stereo. Leave the crossover switch on “Full” position.
Use 100 volt, non-polar capacitors for a high pass crossover to filter out low frequencies and Air- core or
Ferrit- ore coils with a minimum diameter of 1 mm / 0.039” for the lowpass crossover to filter out high
frequencies.
The capacitor and inductor values as written in the below table. The front and rear channels of this amplifier get
this capability. Only the rear left and right channels are shown on the following pictures.
Values for 6dB passive crossover
Frequency Inductor Capacitor
80 Hz 7,5 mH 470 uF
100 Hz 6,5 mH 330 uF
120 Hz 5,5 mH 370 uF
150 Hz 4 mH 220 uF
12
Stereo wiring – GZIA 2130HPX
13
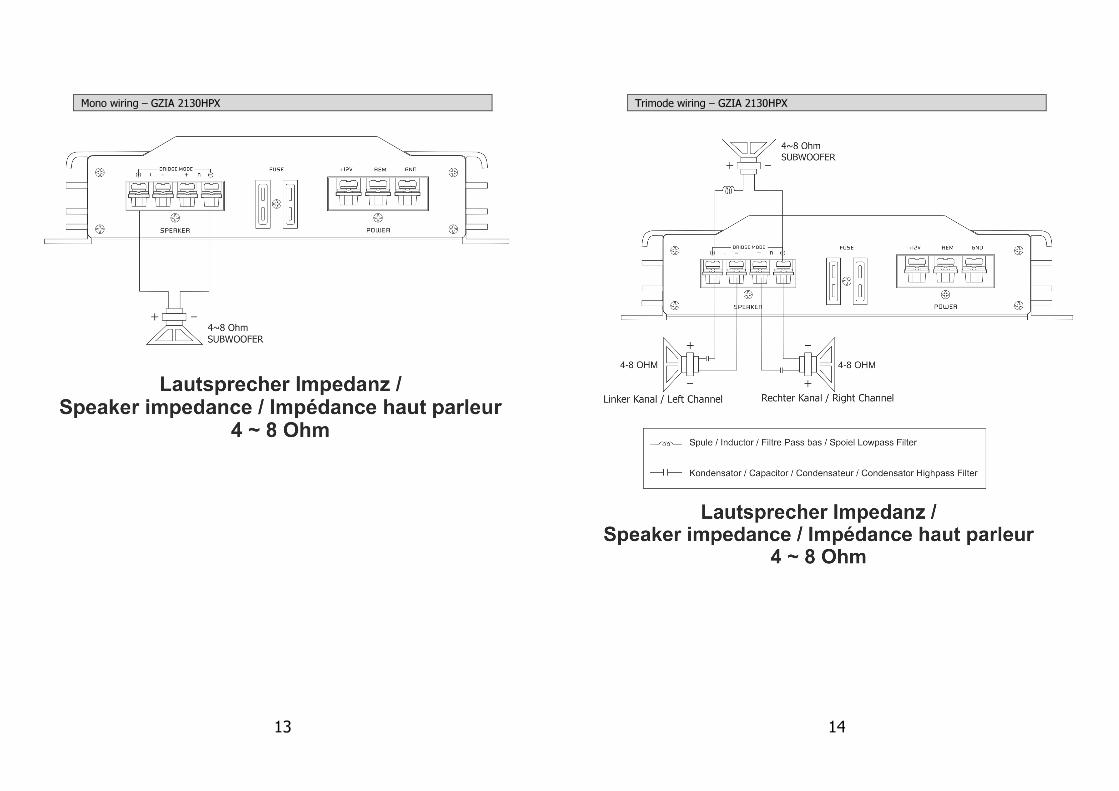
Mono wiring – GZIA 2130HPX
14
Trimode wiring – GZIA 2130HPX
15
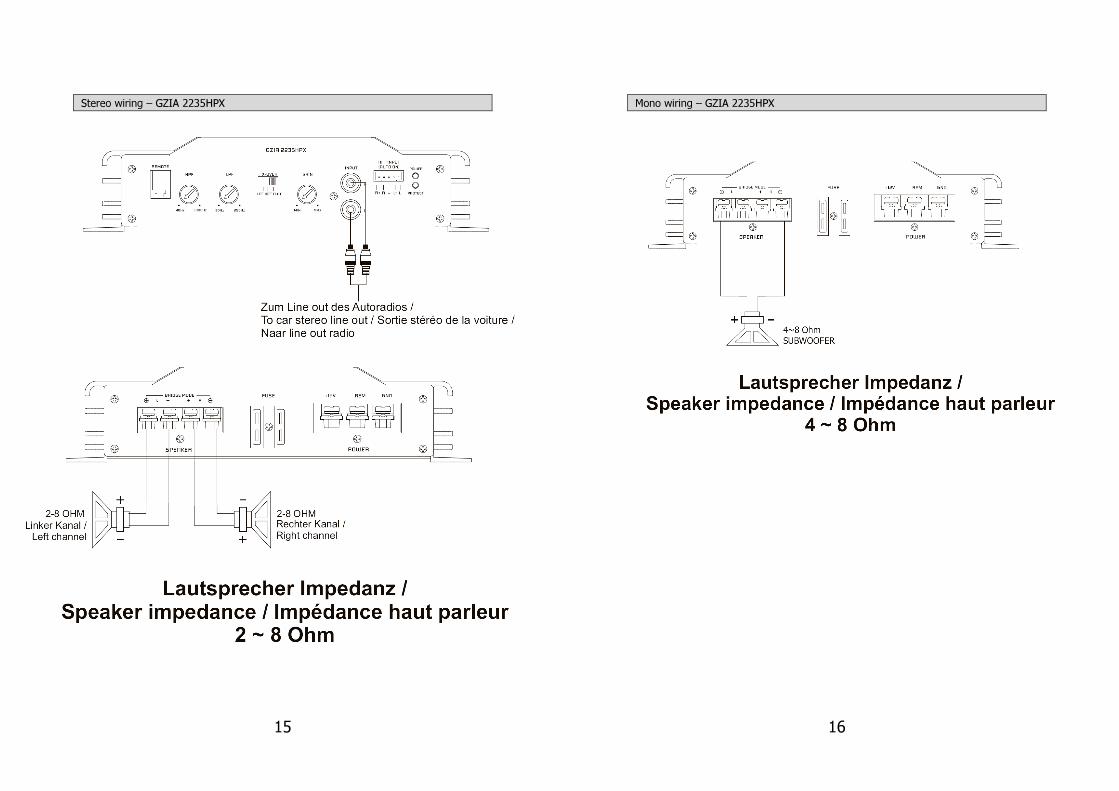
Stereo wiring – GZIA 2235HPX
16
Mono wiring – GZIA 2235HPX

17
Trimode operation – GZIA 2235HPX
18
Stereo wiring – GZIA 4115HPX

19
Bridged wiring – GZIA 4115HPX
20
Trimode operation – GZIA 4115HPX
21
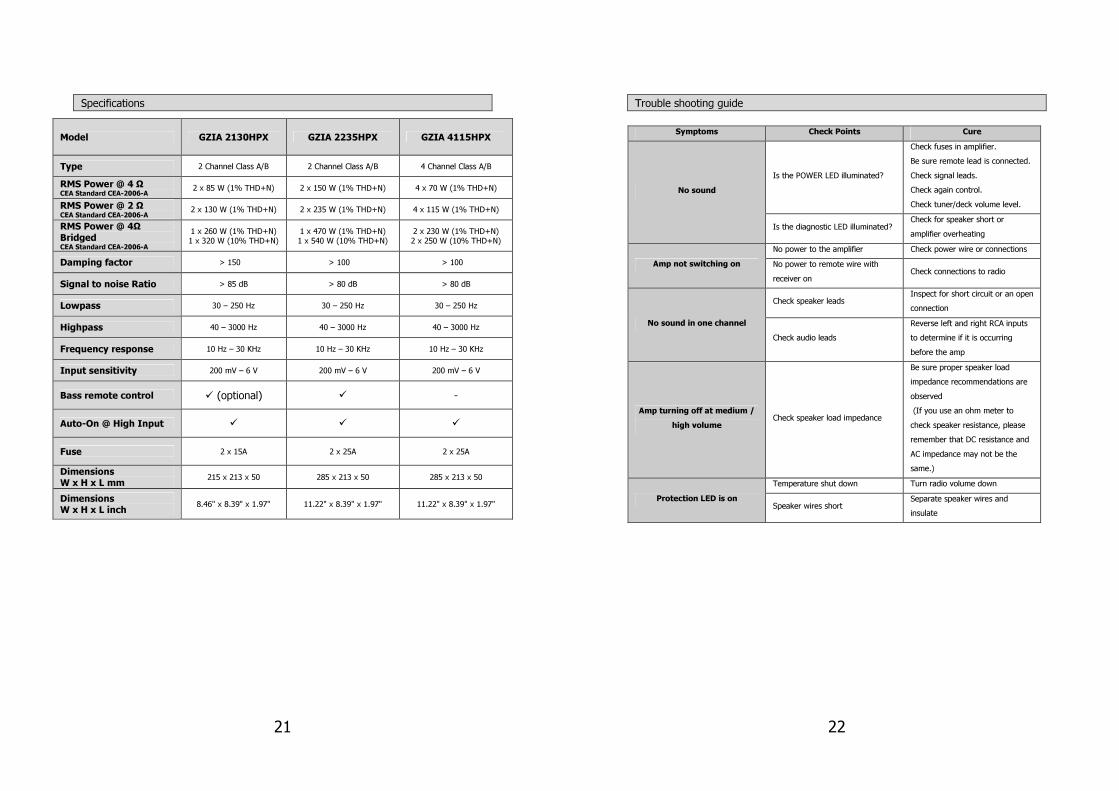
Specifications
Model GZIA 2130HPX GZIA 2235HPX GZIA 4115HPX
Type 2 Channel Class A/B 2 Channel Class A/B 4 Channel Class A/B
RMS Power @ 4 Ω CEA Standard CEA-2006-A
2 x 85 W (1% THD+N) 2 x 150 W (1% THD+N) 4 x 70 W (1% THD+N)
RMS Power @ 2 Ω CEA Standard CEA-2006-A
2 x 130 W (1% THD+N) 2 x 235 W (1% THD+N) 4 x 115 W (1% THD+N)
RMS Power @ 4Ω Bridged CEA Standard CEA-2006-A
1 x 260 W (1% THD+N)
1 x 320 W (10% THD+N)
1 x 470 W (1% THD+N)
1 x 540 W (10% THD+N)
2 x 230 W (1% THD+N)
2 x 250 W (10% THD+N)
Damping factor > 150 > 100 > 100
Signal to noise Ratio > 85 dB > 80 dB > 80 dB
Lowpass 30 – 250 Hz 30 – 250 Hz 30 – 250 Hz
Highpass 40 – 3000 Hz 40 – 3000 Hz 40 – 3000 Hz
Frequency response 10 Hz – 30 KHz 10 Hz – 30 KHz 10 Hz – 30 KHz
Input sensitivity 200 mV – 6 V 200 mV – 6 V 200 mV – 6 V
Bass remote control (optional) -
Auto-On @ High Input
Fuse 2 x 15A 2 x 25A 2 x 25A
Dimensions W x H x L mm
215 x 213 x 50 285 x 213 x 50 285 x 213 x 50
Dimensions W x H x L inch
8.46" x 8.39" x 1.97" 11.22" x 8.39" x 1.97" 11.22" x 8.39" x 1.97"
22
Trouble shooting guide
Symptoms Check Points Cure
No sound
Is the POWER LED illuminated?
Check fuses in amplifier.
Be sure remote lead is connected.
Check signal leads.
Check again control.
Check tuner/deck volume level.
Is the diagnostic LED illuminated? Check for speaker short or
amplifier overheating
Amp not switching on
No power to the amplifier Check power wire or connections
No power to remote wire with
receiver on Check connections to radio
No sound in one channel
Check speaker leads Inspect for short circuit or an open
connection
Check audio leads
Reverse left and right RCA inputs
to determine if it is occurring
before the amp
Amp turning off at medium /
high volume Check speaker load impedance
Be sure proper speaker load
impedance recommendations are
observed
(If you use an ohm meter to
check speaker resistance, please
remember that DC resistance and
AC impedance may not be the
same.)
Protection LED is on
Temperature shut down Turn radio volume down
Speaker wires short Separate speaker wires and
insulate
23
Die Gewährleistung entspricht der gesetzlichen Regelung. Eine Rücksendung kann Nur nach vorheriger Absprache und in der Originalverpackung erfolgen. Bitte unbedingt einen maschinell erstellten Kaufbeleg und eine Fehlerbeschreibung beilegen. Von der Gewährleistung ausgeschlossen sind Defekte, die durch Überlastung, unsachgemäße Behandlung oder bei Teilnahme an Wettbewerben entstanden sind.
Limited warranty - defective products must be returned in original packaging - please add a copy of the original purchasing invoice showing the purchasing date and a detailed description of the failure. Failure caused by overload, misuse or by using the product for competition purpose are
not covered by the warranty.
De Garantie bepalingen van alle door ground zero geleverde producten is volgens wettelijke bepalingen geregeld, Een retourzending kan alleen na duidelijke afspraak en in de originele
verpakking plaatsvinden.SVP een aankoopbon en een duidelijke storingsomschrijving bijvoegen.Van garantie uitgesloten zijn defecten door overbelasting, onkundig gebruik, of door
deelname aan wedstrijden (SPL) ontstaan zijn.
La garantie est conforme aux droits légaux. Un retour du produit défectueux doit être dans son emballage d'origine sur présentation du reçu ou de la facture indiquant la description du
defaut.La présente Garantie n'est pas applicable lorsque le produit a été endommagé en raison: Mauvaise alimentation, Trop de puissance (HP,Subwoofer) Accident, Installation ou Utilisation non
conforme aux normes Technique (Concours SPL etc).
GROUND ZERO GmbH
Erlenweg 25; D - 85658 Egmating, Germany
Tel. +49 (0)8095/873 830 Fax -8310
www.ground-zero-audio.com
Wir behalten uns das Recht vor, zukünftig nötige Änderungen oder Verbesserungen an dem Produkt vorzunehmen ohne den Kunden darüber zu informieren.
We reserve the right to make needed change or improvement to the product without informing
customer about this in advance.
Wij behouden ons het recht om de nodige veranderingen of verbeteringen aan het product door te voeren zonder de klant hierover te informeren.
Nous nous réservons le droit d'entreprendre à l'avenir nécessairement des modifications ou des
améliorations au produit sans informer le client.
Amplificador Manual de usuario
IRIDIUM
GZIA 2130HPX
GZIA 2235HPX
GZIA 4115HPX
2
POR FAVOR LEA ANTES DE LA INSTALACIÓN
Gracias por elegir un amplificador Ground Zero .
Estamos proporcionando una lista de consejos útiles que debe mantenerse de experimentar
innecesario cerrar. Diviértete con este producto de titanium de alta calidad.
Features
• 4 Ohm / 2 Ohm stable Stereo
• Power & Indicador de proteccion
• Variable highpass
• Variable lowpass
• Auto encendido por entrada de alta (hi level in)
• Logo iluminado de blanco
• Sensibilidad de entrada ajustable
• Soft delayed remote turn- on
• Potenciómetro externo de sub (GZIA 2130HPX / 2235HPX)
• Protección : térmica, de corte y de sobrecarga
Herramientas y material necesario
• Destornillador
• Taladro eléctrico, 3 mm / 0.12” carbide drill bit
• Tornillos
• Cable de alimentación min. 10 mm²
• Cable de masa min. 10 mm²
• Cable altavoz min. 2 x 1,5 mm²
3
Aviso!
• Como medida de precaución es recomendable desconectar la batería del vehículo antes de realizar la conexión a las +
12 voltios (véase el manual de su coche para más información de) cableado de alimentación.
• Utilice precaución el tronco de perforación. Sus líneas de freno y el tanque de gas pueden ser dañados por perforar
con su broca, esto podría ocasionar daños o el fracaso de los sistemas operativos de coches.
• Nunca pasar cables ángulos agudos. Se recomienda a la fuente de alimentación del amplificador con un mínimo de
condensador de 1 faradio para garantizar un voltaje de funcionamiento estable.
WARNING !
Sistemas audio de alta potencia en un vehículo son capaces de generar los niveles de presión acústica "Live Concert". La continua
exposición a niveles de sonido excesivamente alto volumen puede causar pérdida de la audición o daños. También, la operación de
un vehículo de motor mientras escucha a equipos de audio en los niveles de volumen alto puede afectar su capacidad de escuchar
sonidos externos tales como ;bocinas, señales de advertencia o vehículos de emergencia, constituyendo así un potencial riesgo de
tráfico. En interés de la seguridad, electrónica de consumo recomienda escuchar a niveles más bajos de volumen durante la
conducción.
Planificando el sistema
Antes de comenzar la instalación, considere lo siguiente:
a. Si va a ampliar el sistema mediante la adición de otros componentes en el futuro, garantizar quedo espacio
adecuado, y cumplen con los requisitos de ventilación.
b. Si el aparato de radio / origen está equipado con salidas pre-amp, es posible utilizarlas para impulsar el amplificador y
conexión (amplificador) a los altavoces traseros 2.
Montando el amplificador
a- Seleccione una ubicación adecuada que es conveniente para el montaje, es accesible para el cableado y tiene amplio
espacio para la circulación de aire y refrigeración.
a. Utilice el amplificador como una plantilla para marcar los agujeros de montaje, quitar el amplificador.
Aviso
A – Elegir una posición de montaje donde están protegidos todos los cables eléctricos se dañe por bordes nítidos, calor u otras condiciones. + Conexiones
eléctricas de 12 voltios DC deben tener fusibles en el lado de la batería. Asegúrese de que su radio y todos los demás dispositivos se desactivará mientras la
conexión de su sistema.
b- Si necesita reemplazar el fusible de potencia cámbielo sólo con un fusible idéntico a la acompaña al sistema.
Utilizando un fusible de tipo diferente o calificación puede ocasionar daños a este sistema que no está cubierto por la
garantía.
4
Controles y functiones – GZIA 2130HPX
5
Controles y functiones – GZIA 2235HPX
6
Controles and functiones – GZIA 4115HPX
7
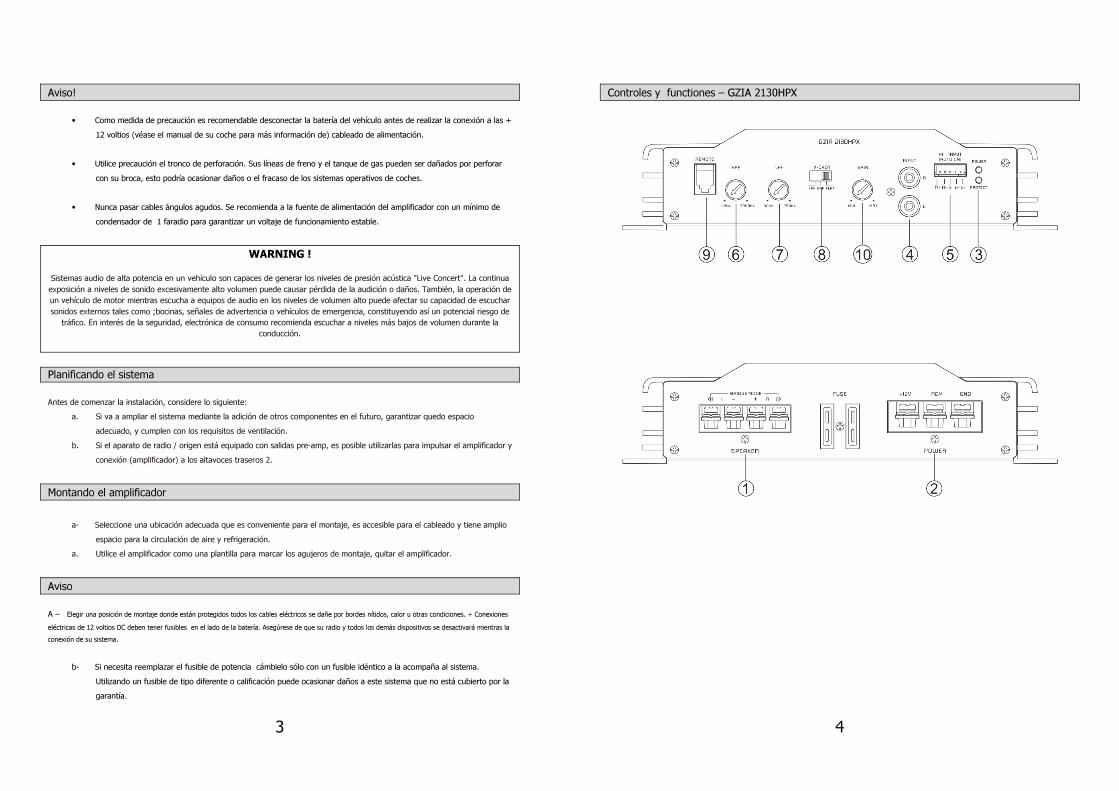
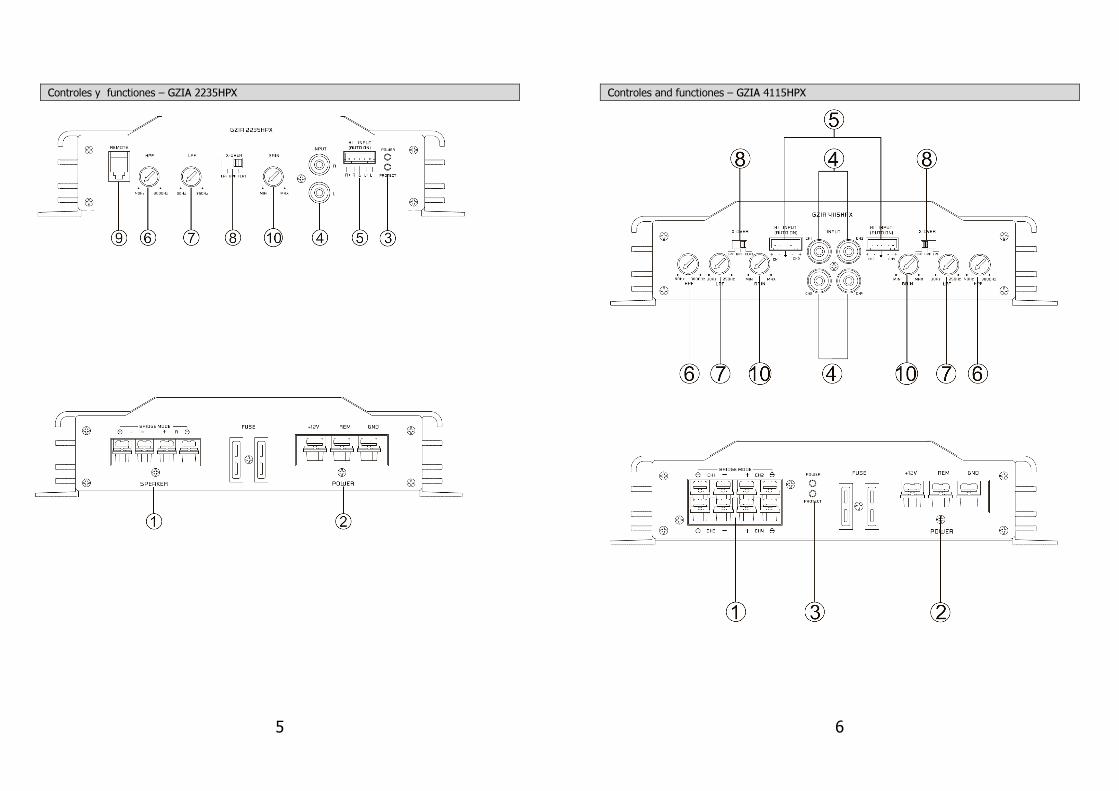
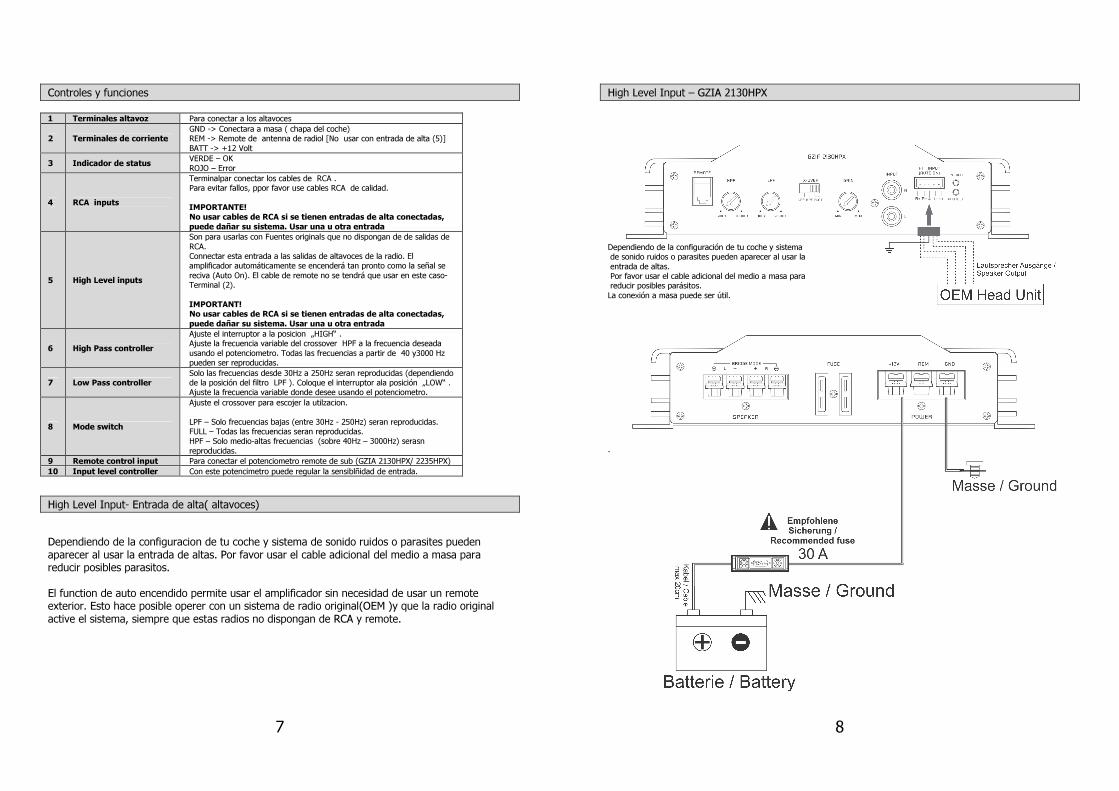
Controles y funciones
1 Terminales altavoz Para conectar a los altavoces
2 Terminales de corriente GND -> Conectara a masa ( chapa del coche) REM -> Remote de antenna de radiol [No usar con entrada de alta (5)] BATT -> +12 Volt
3 Indicador de status VERDE – OK ROJO – Error
4 RCA inputs
Terminalpar conectar los cables de RCA . Para evitar fallos, ppor favor use cables RCA de calidad. IMPORTANTE! No usar cables de RCA si se tienen entradas de alta conectadas, puede dañar su sistema. Usar una u otra entrada
5 High Level inputs
Son para usarlas con Fuentes originals que no dispongan de de salidas de RCA. Connectar esta entrada a las salidas de altavoces de la radio. El amplificador automáticamente se encenderá tan pronto como la señal se reciva (Auto On). El cable de remote no se tendrá que usar en este caso- Terminal (2). IMPORTANT! No usar cables de RCA si se tienen entradas de alta conectadas, puede dañar su sistema. Usar una u otra entrada
6 High Pass controller
Ajuste el interruptor a la posicion „HIGH“ . Ajuste la frecuencia variable del crossover HPF a la frecuencia deseada usando el potenciometro. Todas las frecuencias a partir de 40 y3000 Hz pueden ser reproducidas.
7 Low Pass controller Solo las frecuencias desde 30Hz a 250Hz seran reproducidas (dependiendo de la posición del filtro LPF ). Coloque el interruptor ala posición „LOW“ . Ajuste la frecuencia variable donde desee usando el potenciometro.
8 Mode switch
Ajuste el crossover para escojer la utilzacion. LPF – Solo frecuencias bajas (entre 30Hz - 250Hz) seran reproducidas. FULL – Todas las frecuencias seran reproducidas. HPF – Solo medio-altas frecuencias (sobre 40Hz – 3000Hz) serasn reproducidas.
9 Remote control input Para conectar el potenciometro remote de sub (GZIA 2130HPX/ 2235HPX)
10 Input level controller Con este potencimetro puede regular la sensiblñidad de entrada.
High Level Input- Entrada de alta( altavoces)
Dependiendo de la configuracion de tu coche y sistema de sonido ruidos o parasites pueden
aparecer al usar la entrada de altas. Por favor usar el cable adicional del medio a masa para
reducir posibles parasitos.
El function de auto encendido permite usar el amplificador sin necesidad de usar un remote
exterior. Esto hace posible operer con un sistema de radio original(OEM )y que la radio original
active el sistema, siempre que estas radios no dispongan de RCA y remote.
8
High Level Input – GZIA 2130HPX
Dependiendo de la configuración de tu coche y sistema de sonido ruidos o parasites pueden aparecer al usar la entrada de altas. Por favor usar el cable adicional del medio a masa para reducir posibles parásitos. La conexión a masa puede ser útil. .
9
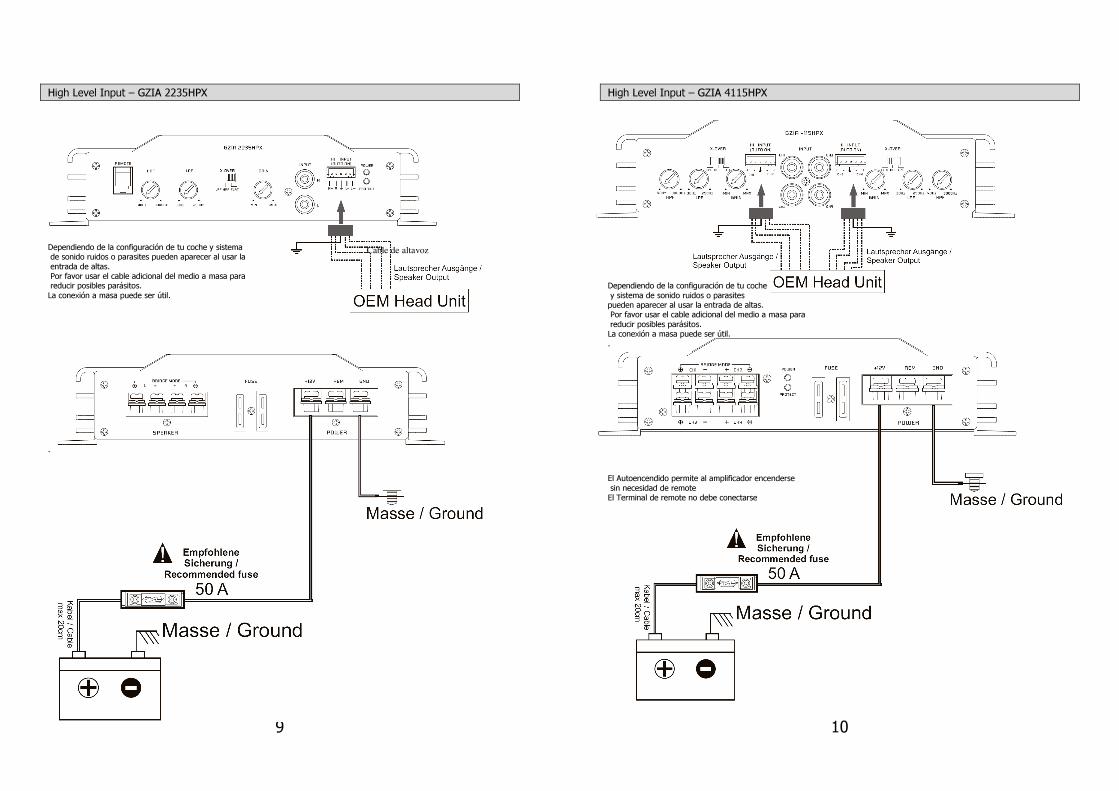
High Level Input – GZIA 2235HPX
Dependiendo de la configuración de tu coche y sistema de sonido ruidos o parasites pueden aparecer al usar la entrada de altas. Por favor usar el cable adicional del medio a masa para reducir posibles parásitos. La conexión a masa puede ser útil. .
Cable de altavoz
10
High Level Input – GZIA 4115HPX
Dependiendo de la configuración de tu coche y sistema de sonido ruidos o parasites pueden aparecer al usar la entrada de altas. Por favor usar el cable adicional del medio a masa para reducir posibles parásitos. La conexión a masa puede ser útil. . El Autoencendido permite al amplificador encenderse sin necesidad de remote El Terminal de remote no debe conectarse
11
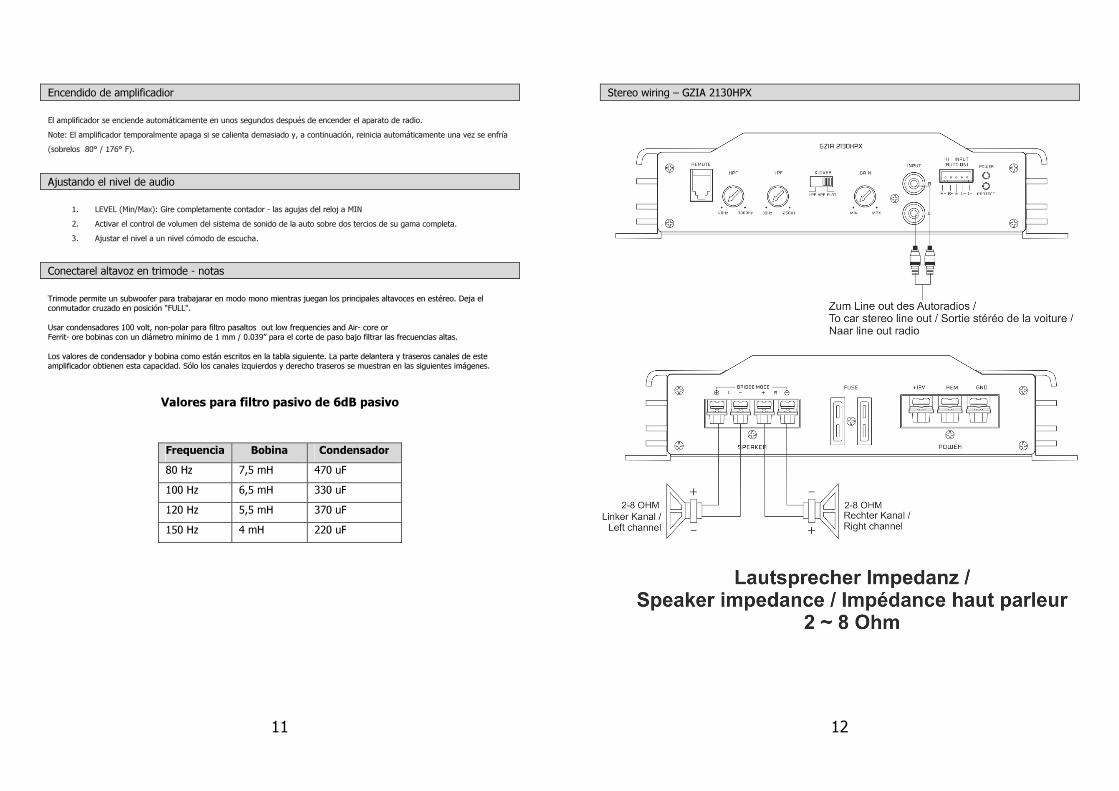
Encendido de amplificadior
El amplificador se enciende automáticamente en unos segundos después de encender el aparato de radio.
Note: El amplificador temporalmente apaga si se calienta demasiado y, a continuación, reinicia automáticamente una vez se enfría
(sobrelos 80° / 176° F).
Ajustando el nivel de audio
1. LEVEL (Min/Max): Gire completamente contador - las agujas del reloj a MIN
2. Activar el control de volumen del sistema de sonido de la auto sobre dos tercios de su gama completa.
3. Ajustar el nivel a un nivel cómodo de escucha.
Conectarel altavoz en trimode - notas
Trimode permite un subwoofer para trabajarar en modo mono mientras juegan los principales altavoces en estéreo. Deja el conmutador cruzado en posición "FULL". Usar condensadores 100 volt, non-polar para filtro pasaltos out low frequencies and Air- core or Ferrit- ore bobinas con un diámetro mínimo de 1 mm / 0.039” para el corte de paso bajo filtrar las frecuencias altas. Los valores de condensador y bobina como están escritos en la tabla siguiente. La parte delantera y traseros canales de este amplificador obtienen esta capacidad. Sólo los canales izquierdos y derecho traseros se muestran en las siguientes imágenes.
Valores para filtro pasivo de 6dB pasivo
Frequencia Bobina Condensador
80 Hz 7,5 mH 470 uF
100 Hz 6,5 mH 330 uF
120 Hz 5,5 mH 370 uF
150 Hz 4 mH 220 uF
12
Stereo wiring – GZIA 2130HPX

13
Cableado en modo MONO – GZIA 2130HPX
14
Trimode operation – GZIA 2130HPX
15
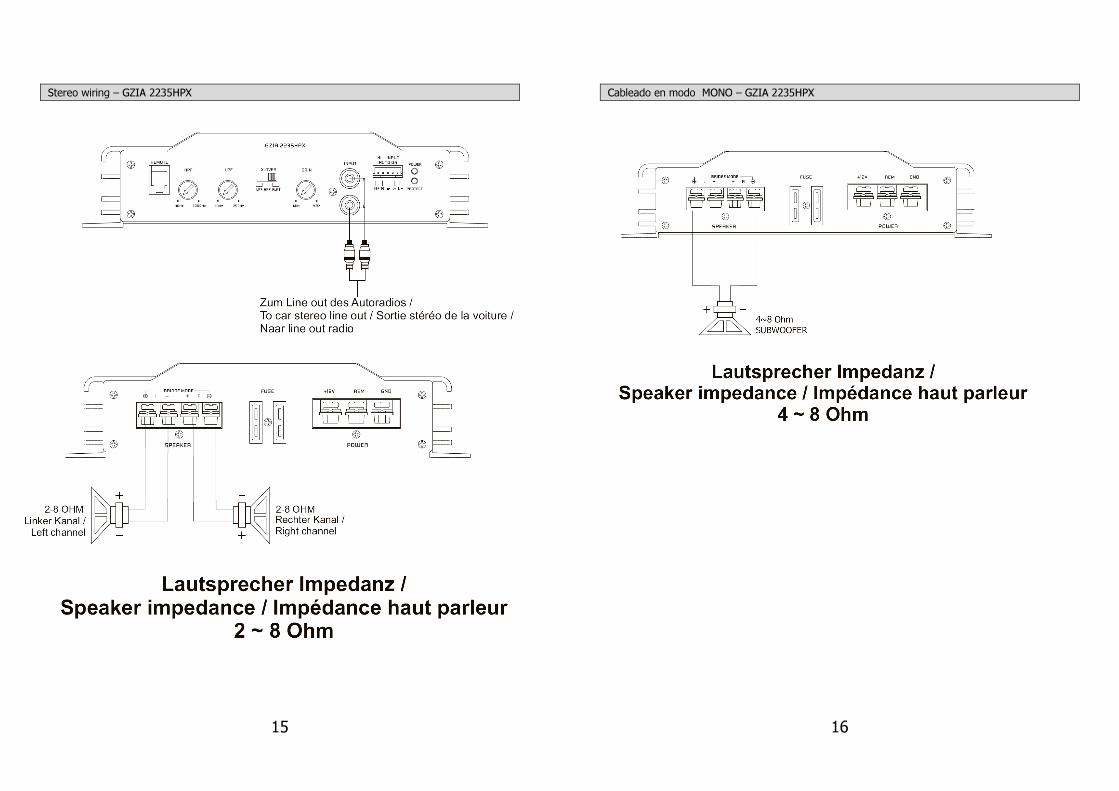
Stereo wiring – GZIA 2235HPX
16
Cableado en modo MONO – GZIA 2235HPX
17
Trimode operation – GZIA 2235HPX
18
Stereo wiring – GZIA 4115HPX
19
Bridged wiring – GZIA 4115HPX
20
Trimode operation – GZIA 4115HPX
21
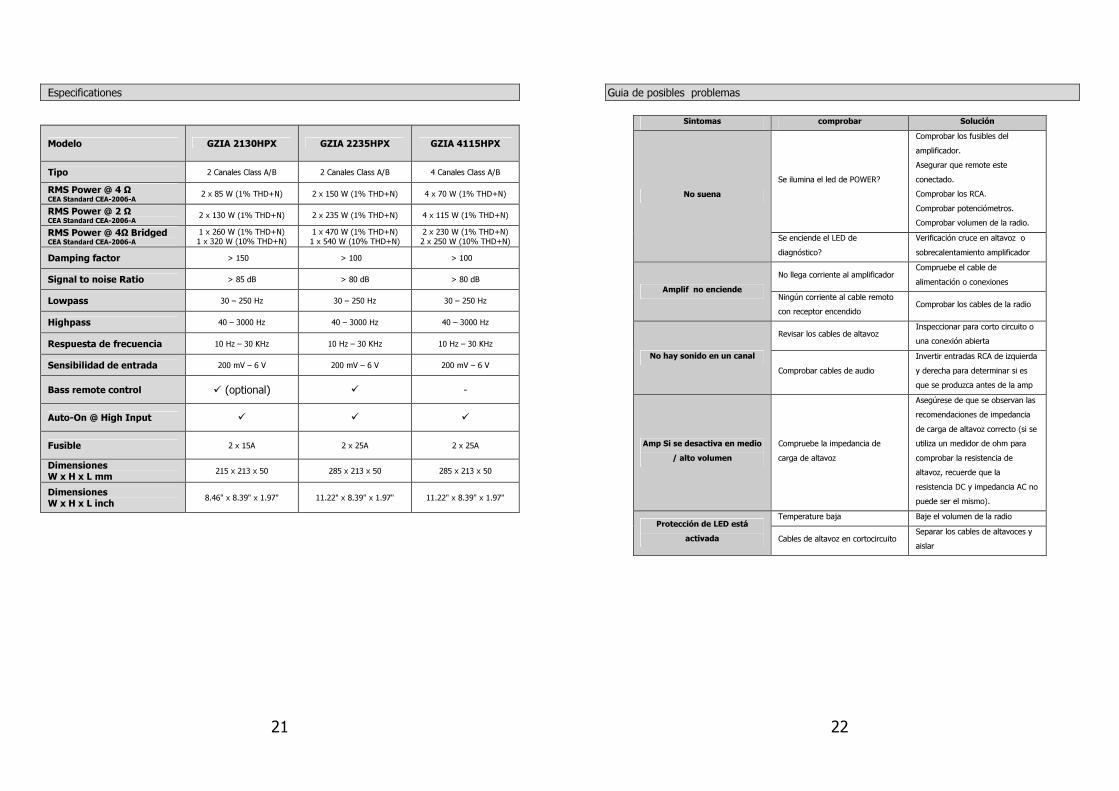
Especificationes
Modelo GZIA 2130HPX GZIA 2235HPX GZIA 4115HPX
Tipo 2 Canales Class A/B 2 Canales Class A/B 4 Canales Class A/B
RMS Power @ 4 Ω CEA Standard CEA-2006-A
2 x 85 W (1% THD+N) 2 x 150 W (1% THD+N) 4 x 70 W (1% THD+N)
RMS Power @ 2 Ω CEA Standard CEA-2006-A
2 x 130 W (1% THD+N) 2 x 235 W (1% THD+N) 4 x 115 W (1% THD+N)
RMS Power @ 4Ω Bridged CEA Standard CEA-2006-A
1 x 260 W (1% THD+N) 1 x 320 W (10% THD+N)
1 x 470 W (1% THD+N) 1 x 540 W (10% THD+N)
2 x 230 W (1% THD+N) 2 x 250 W (10% THD+N)
Damping factor > 150 > 100 > 100
Signal to noise Ratio > 85 dB > 80 dB > 80 dB
Lowpass 30 – 250 Hz 30 – 250 Hz 30 – 250 Hz
Highpass 40 – 3000 Hz 40 – 3000 Hz 40 – 3000 Hz
Respuesta de frecuencia 10 Hz – 30 KHz 10 Hz – 30 KHz 10 Hz – 30 KHz
Sensibilidad de entrada 200 mV – 6 V 200 mV – 6 V 200 mV – 6 V
Bass remote control (optional) -
Auto-On @ High Input
Fusible 2 x 15A 2 x 25A 2 x 25A
Dimensiones W x H x L mm
215 x 213 x 50 285 x 213 x 50 285 x 213 x 50
Dimensiones W x H x L inch
8.46" x 8.39" x 1.97" 11.22" x 8.39" x 1.97" 11.22" x 8.39" x 1.97"
22
Guia de posibles problemas
Sintomas comprobar Solución
No suena
Se ilumina el led de POWER?
Comprobar los fusibles del
amplificador.
Asegurar que remote este
conectado.
Comprobar los RCA.
Comprobar potenciómetros.
Comprobar volumen de la radio.
Se enciende el LED de
diagnóstico?
Verificación cruce en altavoz o
sobrecalentamiento amplificador
Amplif no enciende
No llega corriente al amplificador Compruebe el cable de
alimentación o conexiones
Ningún corriente al cable remoto
con receptor encendido Comprobar los cables de la radio
No hay sonido en un canal
Revisar los cables de altavoz Inspeccionar para corto circuito o
una conexión abierta
Comprobar cables de audio
Invertir entradas RCA de izquierda
y derecha para determinar si es
que se produzca antes de la amp
Amp Si se desactiva en medio
/ alto volumen
Compruebe la impedancia de
carga de altavoz
Asegúrese de que se observan las
recomendaciones de impedancia
de carga de altavoz correcto (si se
utiliza un medidor de ohm para
comprobar la resistencia de
altavoz, recuerde que la
resistencia DC y impedancia AC no
puede ser el mismo).
Protección de LED está
activada
Temperature baja Baje el volumen de la radio
Cables de altavoz en cortocircuito Separar los cables de altavoces y
aislar
23
La garantía cumple con la disposición legal. El retorno se puede hacer sólo después de la consulta y en su embalaje original. Por favor, asegúrese de incluir un
recibo generado por ordenador y una descripción del error. Excluidos de la garantía son los defectos causados por la sobrecarga, el tratamiento inadecuado o participar en concursos.
Limited warranty - defective products must be returned in original packaging - please add a copy of the original
purchasing invoice showing the purchasing date and a detailed description of the failure. Failure caused by overload, misuse or by using the product for competition purpose are not covered by the warranty.
De Garantie bepalingen van alle door ground zero geleverde producten is volgens wettelijke bepalingen geregeld, Een retourzending kan alleen na duidelijke afspraak en in de originele
verpakking plaatsvinden.SVP een aankoopbon en een duidelijke storingsomschrijving bijvoegen.Van garantie uitgesloten zijn defecten door overbelasting, onkundig gebruik, of door deelname aan wedstrijden (SPL)
ontstaan zijn.
La garantie est conforme aux droits légaux. Un retour du produit défectueux doit être dans son emballage d'origine sur présentation du reçu ou de la facture indiquant la description du defaut.La présente Garantie n'est pas applicable lorsque le produit a été endommagé en raison: Mauvaise alimentation, Trop de puissance (HP,Subwoofer) Accident, Installation ou Utilisation non conforme aux normes Technique (Concours
SPL etc).
GROUND ZERO GmbH
Erlenweg 25; D - 85658 Egmating, Germany
Tel. +49 (0)8095/873 830 Fax -8310
www.ground-zero-audio.com
Nos reservamos el derecho de hacer cambios o mejoras futuras necesarias para el producto sin que el cliente para informarle.
Wij behouden ons het recht om de nodige veranderingen of verbeteringen aan het product door te voeren
zonder de klant hierover te informeren.
Nous nous réservons le droit d'entreprendre à l'avenir nécessairement des modifications ou des améliorations au produit sans informer le client.
Vahvistimen Käyttöohje
IRIDIUM
GZIA 2130HPX
GZIA 2235HPX
GZIA 4115HPX
2
Ole hyvä ja lue tämä käyttöohje ennen
asennusta!
Kiitoksia että valitsit Ground Zero vahvistimen.
Lukemalla tämän käyttöohjeen varmistat että saat vahvistimesta kaiken sen
tarjoaman suorituskyvyn lisäksi pitkiä nautinnollisia hetkiä musiikin parissa.
Ominaisuudet
• 4 Ohm / 2 Ohm vakaa stereo
• Virta & suojaus merkkivalo
• Säädettävä ylipäästösuodin
• Säädettävä alipäästösuodin
• Auto-On @ High Level sisääntulosta
• Valkoinen valaistu logo
• Säädettävä sisääntuloherkkyys
• Käynnistyksen viivepiiri
• Bassonkaukosäädin (GZIA 2130HPX / 2235HPX)
• Lämpö / oikosulku / ylikuormitus suoja
Työkalut ja tarvikkeet mitä tarvitset vahvistimen asennukseen
• Ruuvimeisseli
• Porakone, 3 mm / 0.12” poranterä
• Kiinnitysruuvit
• Virtajohto min. 10 mm²
• Maajohto min. 10 mm²
• Kaiutinjohto min. 2 x 1,5 mm²
3
HUOM!
• Varmuuden vuoksi on hyvä irroittaa auton akun maakaapeli ennen vahvistimen virtaliittimien
kytkentöjä. (Katso auton käyttöoppaasta tarkemmat tiedot).
• Käytä varovaisuutta poratessasi mahdollisia reikiä auton tavaratilassa. Polttoaine- ja jarruputket
saattavat vaurioitua reikää poratessasi – tämä voi aiheuttaa vakavia turvallisuusriskejä.
• Älä koskaan vedä johtoja terävien kulmien ja reunojen yli. On suositeltavaa käyttää min. 1 faradin
kondensaattoria takaamaan vahvistimen vakaamman jännitteen saannin.
VAROITUS!
Tehokkaat autohifijärjestelmät ovat kykeneviä tuottamaan Live-konserttitasoisia äänenpaineita. Jatkuva
altistuminen korkeille äänenpaineille saattaa vaurioittaa kuuloasi pysyvästi. Myöskin korkea kuunteluvoimakkuus
saattaa estää sinua kuulemasta ajoneuvon ulkopuolisia ääniä kuten; torvien ja hälytysajoneuvojen sireeniä.
Järjestelmän suunnittelu
Ennen asennuksen aloittamista, harkitse seuraavaa:
Jos harkitset järjestelmän laajentamista tulevaisuudessa, varmista että tilaa on riittävästi, ja vaatimukset
jäähdytykselle täyttyvät myös tulevaisuudessa laitteiden määrän lisääntyessä.
Vahvistimen asentamisesta
a. Valitse sopiva asennuspaikka, johon saat johdotuksen ja jossa on riittävästi tilaa ilmankierrolle sekä
jäähdytykselle.
b. Käytä vahvistinta mallina kun merkkaat kiinnitysreiät.
Varoitus
Valitse asennuspaikka siten että kaikki johdot ovat suojassa teräviltä kulmilta, lämmöltä tai muilta vauriollisilta
olosuhteilta. Virtakaapeli tulee suojata päävirtasulakkeella mahdollisimman läheltä akkua. Varmista että
ohjelmalähteesi ja kaikki muut järjestelmän laitteet ovat pois päältä kytkentöjä tehdessäsi.
Jos sinun täytyy vaihtaa sulake, korvaa se ainoastaan alkuperäisen kokoisella sulakkeella. Eri kokoisen tai
tyyppisen sulakkeen käyttö voi vahingoittaa laitteistoasi, mikä ei kuulu takuun piiriin.
4
Kytkimet ja toiminnot – GZIA 2130HPX
5
Kytkimet ja toiminnot – GZIA 2235HPX
6
Kytkimet ja toiminnot – GZIA 4115HPX
7
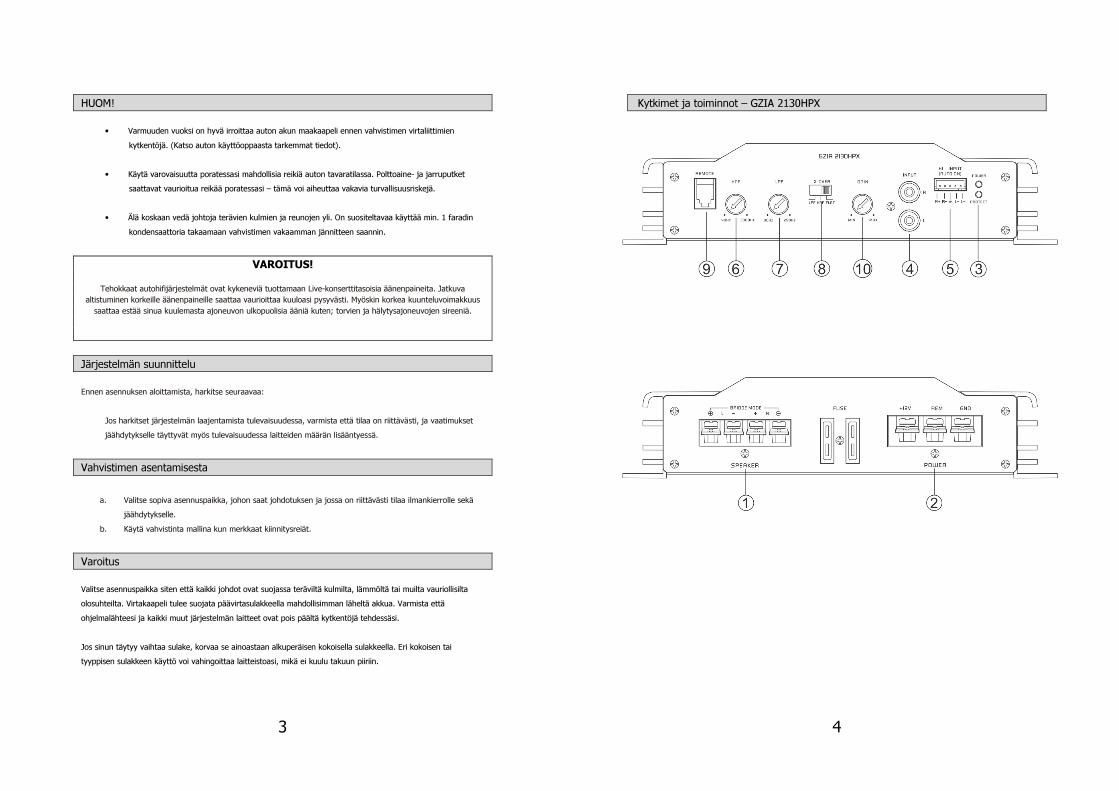
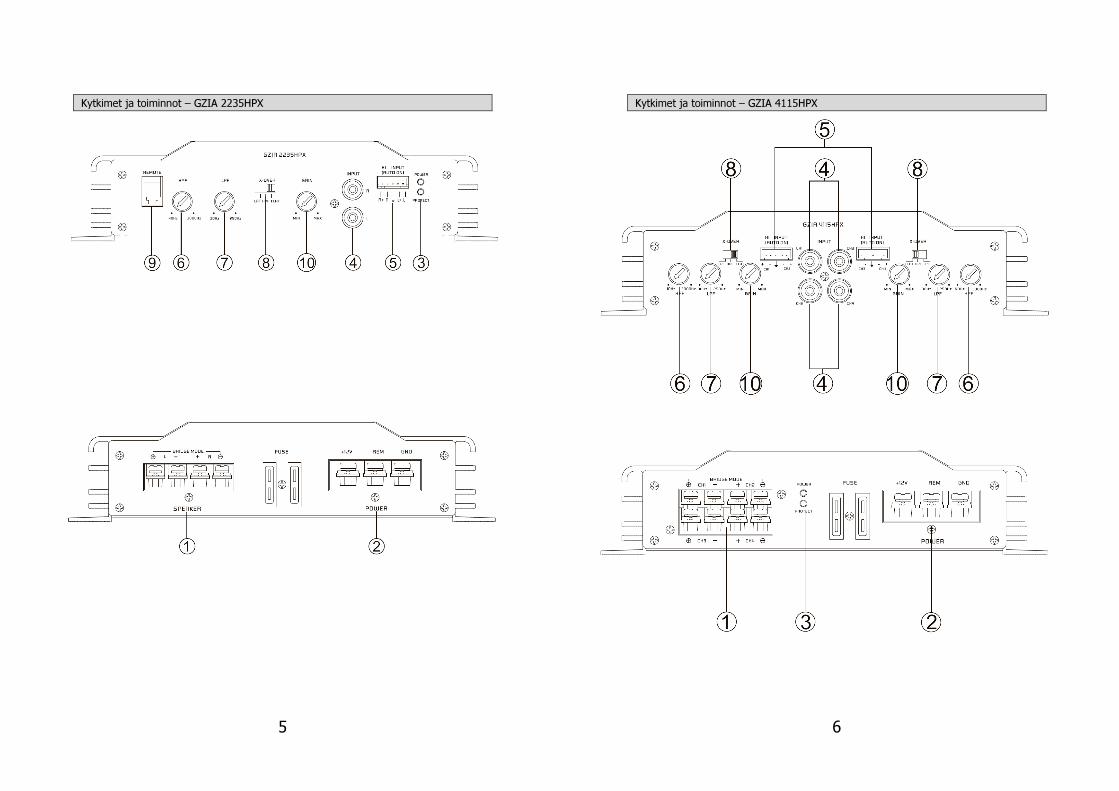
Kytkimet ja toiminnot
1 Kaiutinliittimet Kaiutinjohdot
2 Virtaliittimet GND -> Maadoitusjohto REM -> Herätevirta BATT -> +12 Volttia
3 Tilan merkkivalo VIHREÄ – OK PUNAINEN – VIRHE
4 RCA sisääntulo
Signaalikaapelit. Häiriöiden välttämiseksi, käytä hyvälaatuisia RCA-johtoja. TÄRKEÄÄ! Älä käytä High level sisääntuloa ja RCA-sisääntuloa rinnakkain, tämä voi vahingoittaa vahvistinta.
5 High Level (kaiutintasoinen) sisääntulo
Käytä tätä sisääntuloa mikäli soittimessasi ei ole RCA-ulostuloja. Kytke kaiutintasoinen signaali tähän liittimeen. Vahvistin käynnistyy automaattisesti tunnistettuaan signaalin (Auto On). Remote-sisääntuloa vahvistimen virtaterminaalissa ei täten tarvitse kytkeä. TÄRKEÄÄ! Älä käytä High level sisääntuloa ja RCA-sisääntuloa rinnakkain, tämä voi vahingoittaa vahvistinta.
6 Ylipäästösuodin Aseta kytkin „HIGH“ asentoon. Säädä portaaton ylipäästön jakotaajuus halutulle taajuudelle. Kaikki taajuudet väliltä 40 ja 3000 Hz toistuvat.
7 Alipäästösäädin Ainoastaan taajuudet 30 Hz - 250 Hz toistuvat (riippuen LPF suotimen säätimen asennosta). Aseta kytkin asentoon „LOW“ ja säädä haluttu jakotaajuus.
8 Mode- kytkin
Säädä jakosuotimen kytkin haluttuun asentoon. LPF – Ainoastaan bassotaajuudet (alle 30Hz - 250Hz) toistuvat. FULL – Kaikki taajuudet toistuvat. HPF – Ainoastaan keski-ja korkeat taajuudet (yli 40 Hz – 3000 Hz) toistuvat.
9 Kaukosäätimen liitäntä Liitin bassontasonkaukosäädölle. 10 Sisääntulotason säätö Tällä säätimellä säädät sisääntulotason sopivaksi.
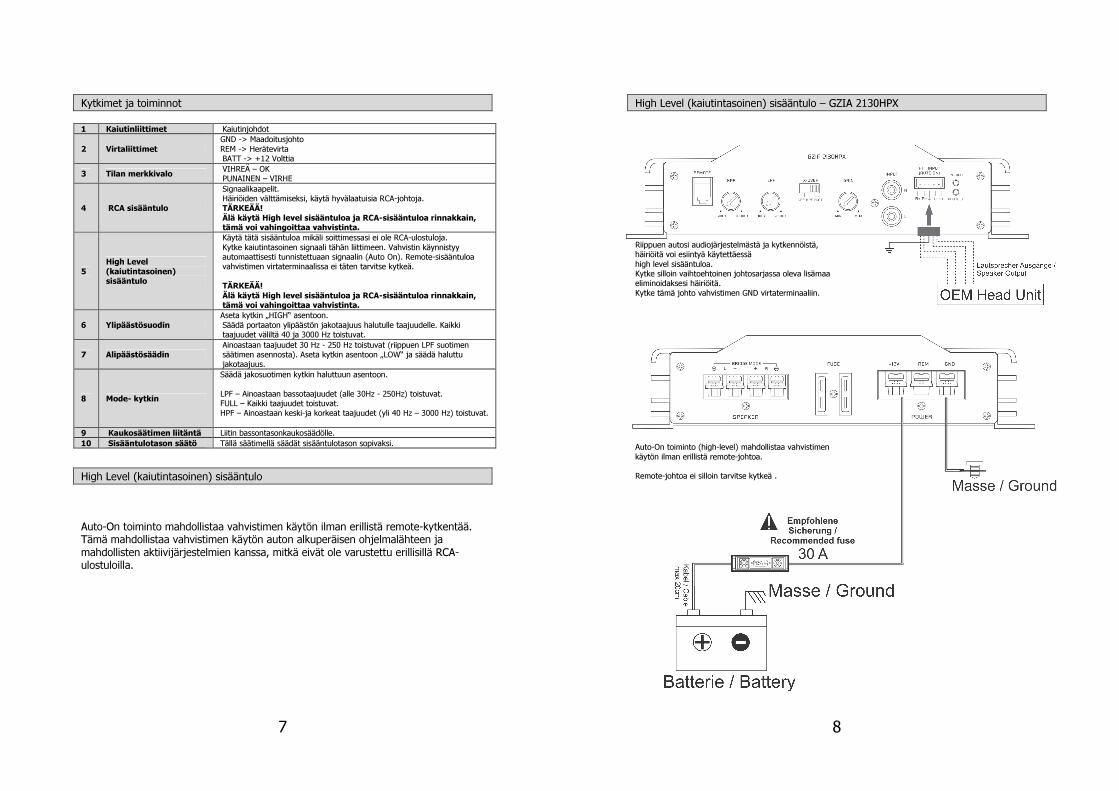
High Level (kaiutintasoinen) sisääntulo
Auto-On toiminto mahdollistaa vahvistimen käytön ilman erillistä remote-kytkentää.
Tämä mahdollistaa vahvistimen käytön auton alkuperäisen ohjelmalähteen ja
mahdollisten aktiivijärjestelmien kanssa, mitkä eivät ole varustettu erillisillä RCA-
ulostuloilla.
8
High Level (kaiutintasoinen) sisääntulo – GZIA 2130HPX
Riippuen autosi audiojärjestelmästä ja kytkennöistä,
häiriöitä voi esiintyä käytettäessä
high level sisääntuloa.
Kytke silloin vaihtoehtoinen johtosarjassa oleva lisämaa
eliminoidaksesi häiriöitä.
Kytke tämä johto vahvistimen GND virtaterminaaliin.
Auto-On toiminto (high-level) mahdollistaa vahvistimen
käytön ilman erillistä remote-johtoa.
Remote-johtoa ei silloin tarvitse kytkeä .
9
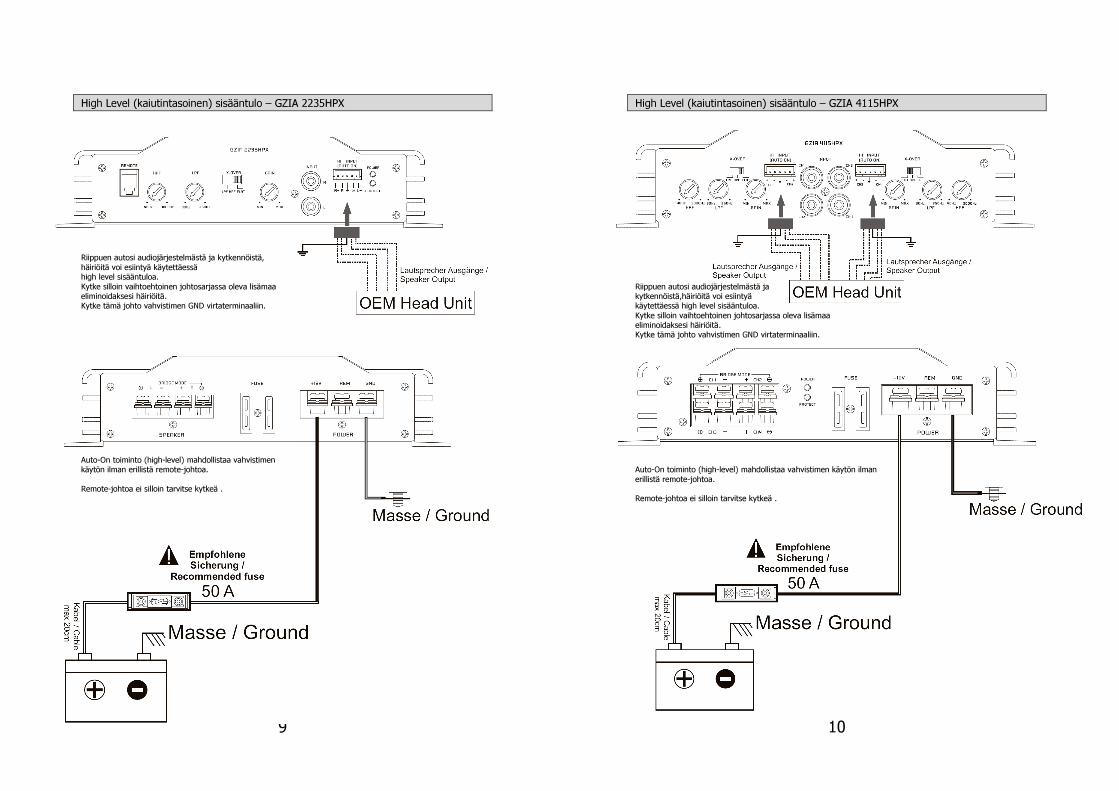
High Level (kaiutintasoinen) sisääntulo – GZIA 2235HPX
Riippuen autosi audiojärjestelmästä ja kytkennöistä, häiriöitä voi esiintyä käytettäessä high level sisääntuloa. Kytke silloin vaihtoehtoinen johtosarjassa oleva lisämaa eliminoidaksesi häiriöitä. Kytke tämä johto vahvistimen GND virtaterminaaliin. Auto-On toiminto (high-level) mahdollistaa vahvistimen käytön ilman erillistä remote-johtoa. Remote-johtoa ei silloin tarvitse kytkeä .
10
High Level (kaiutintasoinen) sisääntulo – GZIA 4115HPX
Riippuen autosi audiojärjestelmästä ja
kytkennöistä,häiriöitä voi esiintyä
käytettäessä high level sisääntuloa.
Kytke silloin vaihtoehtoinen johtosarjassa oleva lisämaa
eliminoidaksesi häiriöitä.
Kytke tämä johto vahvistimen GND virtaterminaaliin.
Auto-On toiminto (high-level) mahdollistaa vahvistimen käytön ilman
erillistä remote-johtoa.
Remote-johtoa ei silloin tarvitse kytkeä .

11
Vahvistimen käynnistys
Kun laitat ohjelmalähteen päälle vahvistin käynnistyy automaattisesti.
Huomaa: Vahvistin kytkeytyy tilapäisesti pois päältä, mikäli sen lämpötila nousee liian kuumaksi. Lämpötilan
laskettua normaaliksi vahvistin käynnistyy jälleen automaattisesti. (noin 80°).
Sisääntulon säätö
1. LEVEL (Min/Max): Käännä säädin täysin MIN asentoon
2. Käännä äänenvoimakkuussäädin asentoon kaksi kolmasosaa maksimivoimakkuudesta.
3. Säädä LEVEL-säätimestä tasoa lisää siihen saakka kunnes ääni kuulostaa vielä puhtaalle.
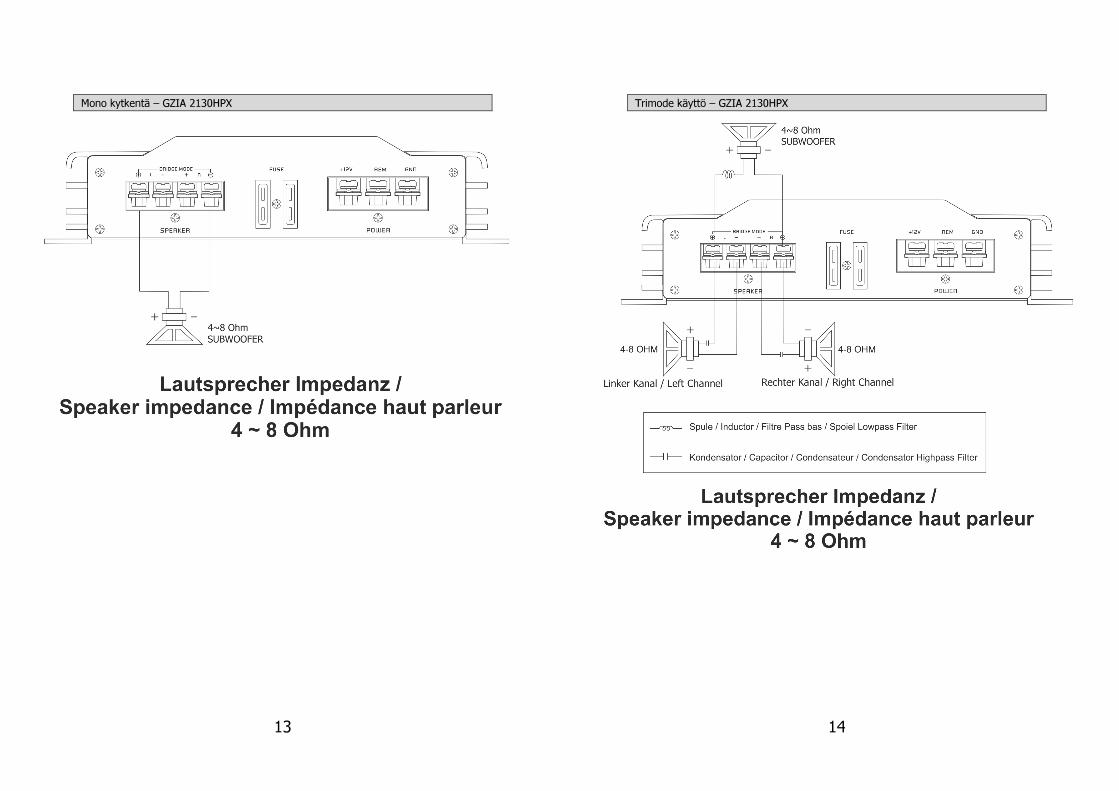
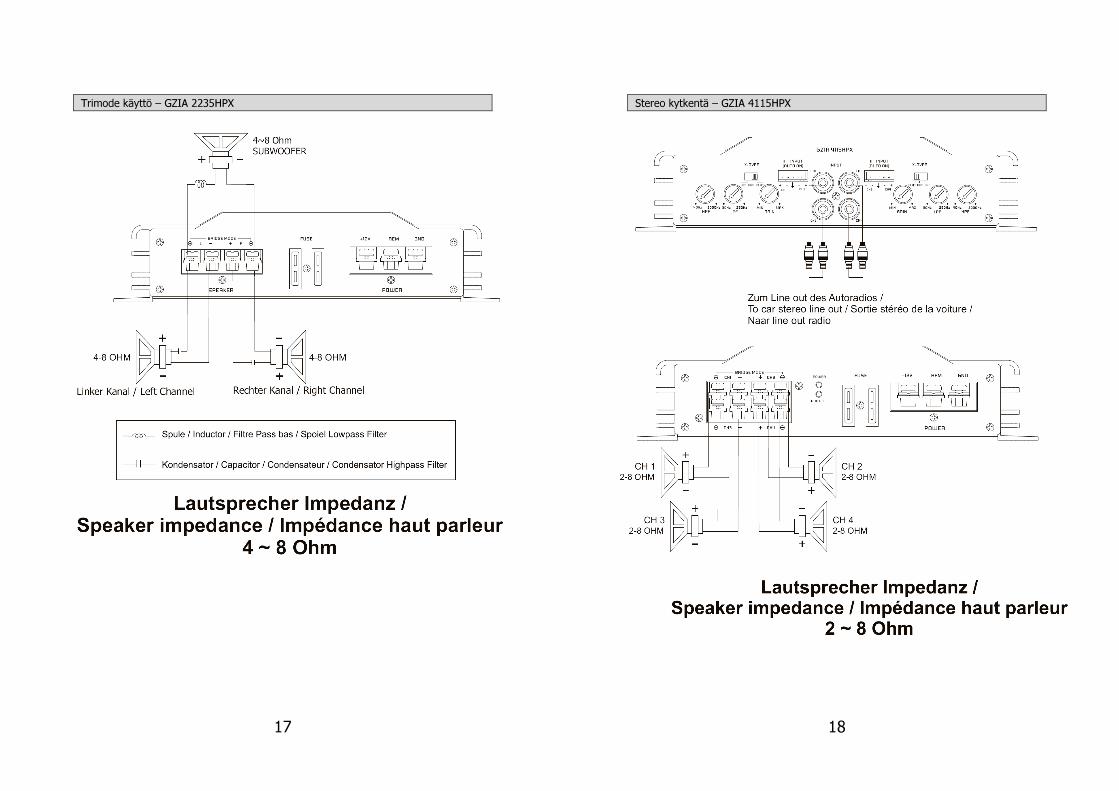
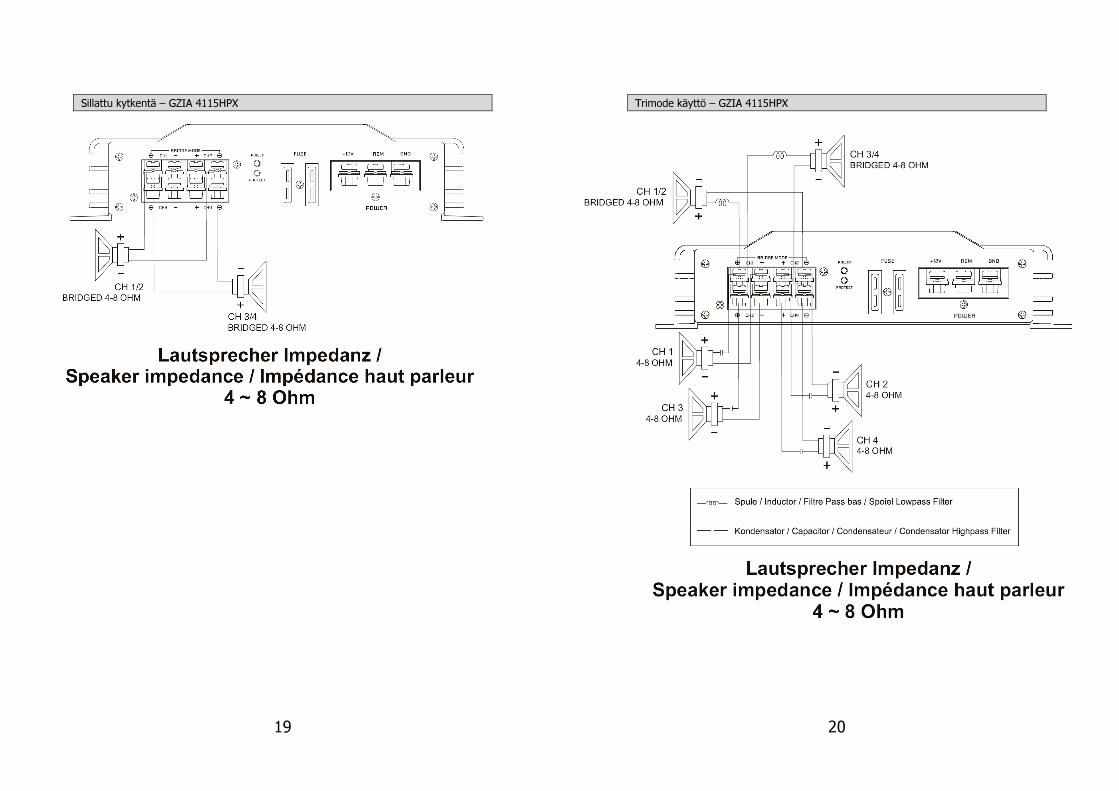
Käyttö Trimode-tilassa - huomioita
TRI MODE käyttö mahdollistaa subwooferin monokäytön, pääkanavien toistaessa stereona. Jätä jakosuotimen kytkin asentoon “Full”. Käytä 100 voltin, non-polar kondensaattoria ylipäästösuotimena suodattaaksesi pois matalat taajuudet ja ilma- tai rautasydänkeloja alipäästösuotimelle suodattaaksesi pois korkeat taajuudet. Kondensaattoreiden ja kelojen arvot löydät alla olevasta taulukosta. Tässä vahvistimessa on etu ja takakanavissa tämä kytkentä mahdollisuus. Ainoastaan vasen ja oikea takakanava on näytetty oheisessa esimerkki kuvassa.
Arvot 6dB passiivijakosuotimelle
Taajuus Kela Kondensaattori
80 Hz 7,5 mH 470 uF
100 Hz 6,5 mH 330 uF
120 Hz 5,5 mH 370 uF
150 Hz 4 mH 220 uF
12
Stereo kytkentä – GZIA 2130HPX
13
Mono kytkentä – GZIA 2130HPX
14
Trimode käyttö – GZIA 2130HPX

15
Stereo kytkentä – GZIA 2235HPX
16
Mono kytkentä – GZIA 2235HPX
17
Trimode käyttö – GZIA 2235HPX
18
Stereo kytkentä – GZIA 4115HPX
19
Sillattu kytkentä – GZIA 4115HPX
20
Trimode käyttö – GZIA 4115HPX

21
Tekniset tiedot
Malli GZIA 2130HPX GZIA 2235HPX GZIA 4115HPX
Tyyppi 2 kanava luokka A/B 2 kanava luokka A/B 4 kanava luokka A/B
RMS teho @ 4 Ω CEA Standard CEA-2006-A
2 x 85 W (1% THD+N) 2 x 150 W (1% THD+N) 4 x 70 W (1% THD+N)
RMS teho @ 2 Ω CEA Standard CEA-2006-A
2 x 130 W (1% THD+N) 2 x 235 W (1% THD+N) 4 x 115 W (1% THD+N)
RMS teho @ 4Ω Bridged CEA Standard CEA-2006-A
1 x 260 W (1% THD+N) 1 x 320 W (10% THD+N)
1 x 470 W (1% THD+N) 1 x 540 W (10% THD+N)
2 x 230 W (1% THD+N) 2 x 250 W (10% THD+N)
Vaimennuskerroin > 150 > 100 > 100
Häiriöetäisyys > 85 dB > 80 dB > 80 dB
Alipäästösuodin 30 – 250 Hz 30 – 250 Hz 30 – 250 Hz
Ylipäästösuodin 40 – 3000 Hz 40 – 3000 Hz 40 – 3000 Hz
Taajuusvaste 10 Hz – 30 KHz 10 Hz – 30 KHz 10 Hz – 30 KHz
Sisääntulonherkkyys 200 mV – 6 V 200 mV – 6 V 200 mV – 6 V
Bassonkaukosäädin (optional) -
Auto-On @ High level
Sulake 2 x 15A 2 x 25A 2 x 25A
Mitat W x H x L mm
215 x 213 x 50 285 x 213 x 50 285 x 213 x 50
Mitat W x H x L tuumaa
8.46" x 8.39" x 1.97" 11.22" x 8.39" x 1.97" 11.22" x 8.39" x 1.97"
22
Ongelman esiintyessä
Ongelman kuvaus Tarkasta Toimenpide
Ei ääntä
Palaako POWER LED valo?
Tarkasta vahvistimen sulakkeet.
Tarkasta onko herätevirtajohto
kytketty.
Tarkista signaalikaapelit.
Tarkasta kytkimen asennot.
Tarkasta ohjelmalähteen
äänenvoimakkuussäätimen asento.
Palaako diaknostiikka LED valo?
Tarkasta etteivät kaiutinjohdot ole
oikosulussa tai vahvistin
ylikuumentunut.
Vahvistin ei käynnisty
Tuleeko vahvistimelle virta? Tarkasta virtajohdotus
Tuleeko vahvistimelle herätevirta? Tarkasta ohjelmalähteen
kytkennät.
Ei ääntä yksittäisestä
kaiutinlähdöstä
Onko vikaa kaiutinjohdotuksessa?
Tarkasta että kaiutinjohdot ovat
kytketty ja että ne eivät ole
oikosulussa.
Onko vikaa signaalikaapeleissa?
Käännä vasen ja oikea RCA johto
selvittääksesi onko vika ennen
vahvistinta.
Vahvistin kytkeytyy pois
päältä keskimääräisellä /
kovalla voimakkuudella
Onko väärä kaiutinkuorman
impedanssi?
Varmistu että kaiutinkuorman
impedanssi on suositellun
kaltainen.
Protection LED palaa
Onko vahvistin ylikuumentunut? Vähennä äänenvoimakkuutta
Onko kaiutinjohdot oikosulussa? Tarkasta kaiutinjohtojen kytkennät
ja eristeet
23
Die Gewährleistung entspricht der gesetzlichen Regelung. Eine Rücksendung kann nur nach vorheriger Absprache und in der Originalverpackung erfolgen. Bitte unbedingt einen maschinell erstellten Kaufbeleg und eine Fehlerbeschreibung beilegen. Von der Gewährleistung ausgeschlossen sind Defekte, die durch Überlastung, unsachgemäße Behandlung oder bei Teilnahme an Wettbewerben entstanden sind.
Limited warranty - defective products must be returned in original packaging - please add a copy of the original purchasing invoice showing the purchasing date and a detailed description of the failure. Failure caused by overload, misuse or by using the product for competition purpose are
not covered by the warranty.
Rajoitettu takuu. Viallinen tuote täytyy palauttaa alkuperäisessä pakkauksessaan. Ole hyvä ja liitä kopio alkuperäisestä ostokuitista sekä yksityiskohtainen vikakuvaus. Ylikuormituksesta ja tuotteen
väärinkäytöstä (oikosulut, yms.) aiheutuneet viat eivät kuulu takuun piiriin.
La garantie est conforme aux droits légaux. Un retour du produit défectueux doit être dans son emballage d'origine sur présentation du reçu ou de la facture indiquant la description du
defaut.La présente Garantie n'est pas applicable lorsque le produit a été endommagé en raison: Mauvaise alimentation, Trop de puissance (HP,Subwoofer) Accident, Installation ou Utilisation non
conforme aux normes Technique (Concours SPL etc).
GROUND ZERO GmbH
Erlenweg 25; D - 85658 Egmating, Germany
Tel. +49 (0)8095/873 830 Fax -8310
www.ground-zero-audio.com
Wir behalten uns das Recht vor, zukünftig nötige Änderungen oder Verbesserungen an dem Produkt vorzunehmen ohne den Kunden darüber zu informieren.
We reserve the right to make needed change or improvement to the product without informing
customer about this in advance.
Pidätämme oikeuden tehdä tarvittavia muutoksia tai parannuksia tuotteeseen ilman ennakkoilmoitusta asiakkaalle.
Nous nous réservons le droit d'entreprendre à l'avenir nécessairement des modifications ou des
améliorations au produit sans informer le client.