HP LaserJet 2200 MK Installation
21
DIY Manual – HP LaserJet 2200 Printer Roller Kit Installation Created by Laser Jet4You - 1 - Installation Instructions Fo r HP Laser Jet 2200 Maintenance Roller Kit Prepared By LaserJet4You Feb 4, 2004
Transcript of HP LaserJet 2200 MK Installation
8/4/2019 HP LaserJet 2200 MK Installation
http://slidepdf.com/reader/full/hp-laserjet-2200-mk-installation 1/21
DIY Manual – HP LaserJet 2200 Printer Roller Kit Installation
Created by LaserJet4You - 1 -
Installation Instru ctions
For
HP Laser Jet 2200 Maintenance Roller Kit
PreparedBy
LaserJet4You
Feb 4, 2004
8/4/2019 HP LaserJet 2200 MK Installation
http://slidepdf.com/reader/full/hp-laserjet-2200-mk-installation 2/21
DIY Manual – HP LaserJet 2200 Printer Roller Kit Installation
Created by LaserJet4You - 2 -
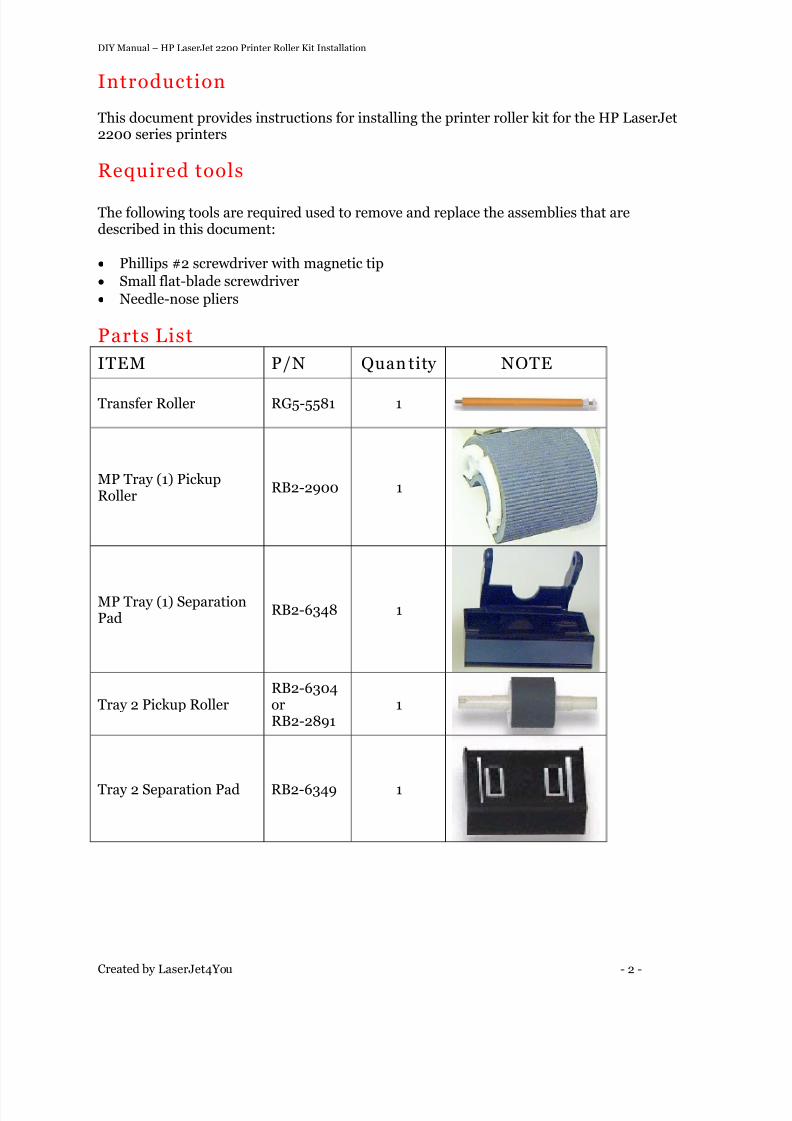
Introduction
This document provides instructions for installing the printer roller kit for the HP LaserJet2200 series printers
Required tools
The following tools are required used to remove and replace the assemblies that aredescribed in this document:
• Phillips #2 screwdriver with magnetic tip
• Small flat-blade screwdriver
• Needle-nose pliers
Parts List
ITEM P/N Quan tity NOTE
Transfer Roller RG5-5581 1
MP Tray (1) PickupRoller
RB2-2900 1
MP Tray (1) SeparationPad
RB2-6348 1
Tray 2 Pickup RollerRB2-6304orRB2-2891
1
Tray 2 Separation Pad RB2-6349 1
8/4/2019 HP LaserJet 2200 MK Installation
http://slidepdf.com/reader/full/hp-laserjet-2200-mk-installation 3/21
DIY Manual – HP LaserJet 2200 Printer Roller Kit Installation
Created by LaserJet4You - 3 -
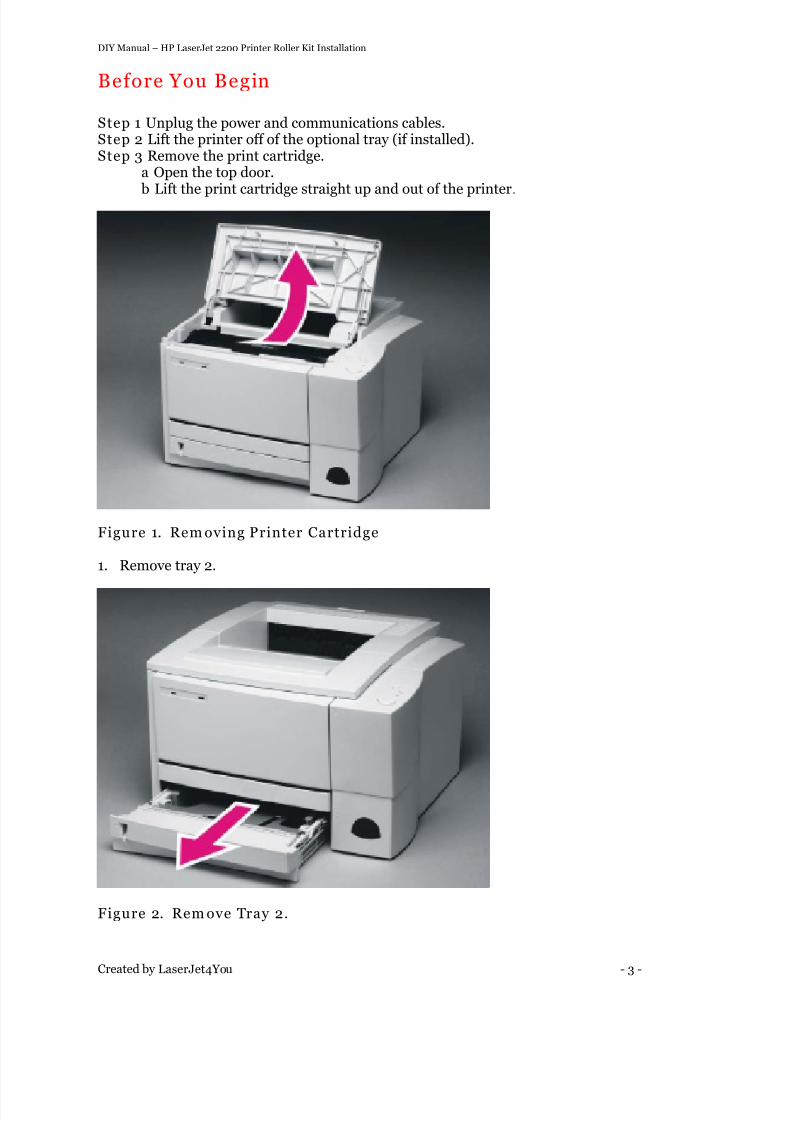
Before You Begin
Step 1 Unplug the power and communications cables.Step 2 Lift the printer off of the optional tray (if installed).Step 3 Remove the print cartridge.
a Open the top door.
b Lift the print cartridge straight up and out of the printer.
Figure 1. Rem oving Printer Cartridge
1. Remove tray 2.
Figure 2. Rem ove Tray 2.
8/4/2019 HP LaserJet 2200 MK Installation
http://slidepdf.com/reader/full/hp-laserjet-2200-mk-installation 4/21
DIY Manual – HP LaserJet 2200 Printer Roller Kit Installation
Created by LaserJet4You - 4 -
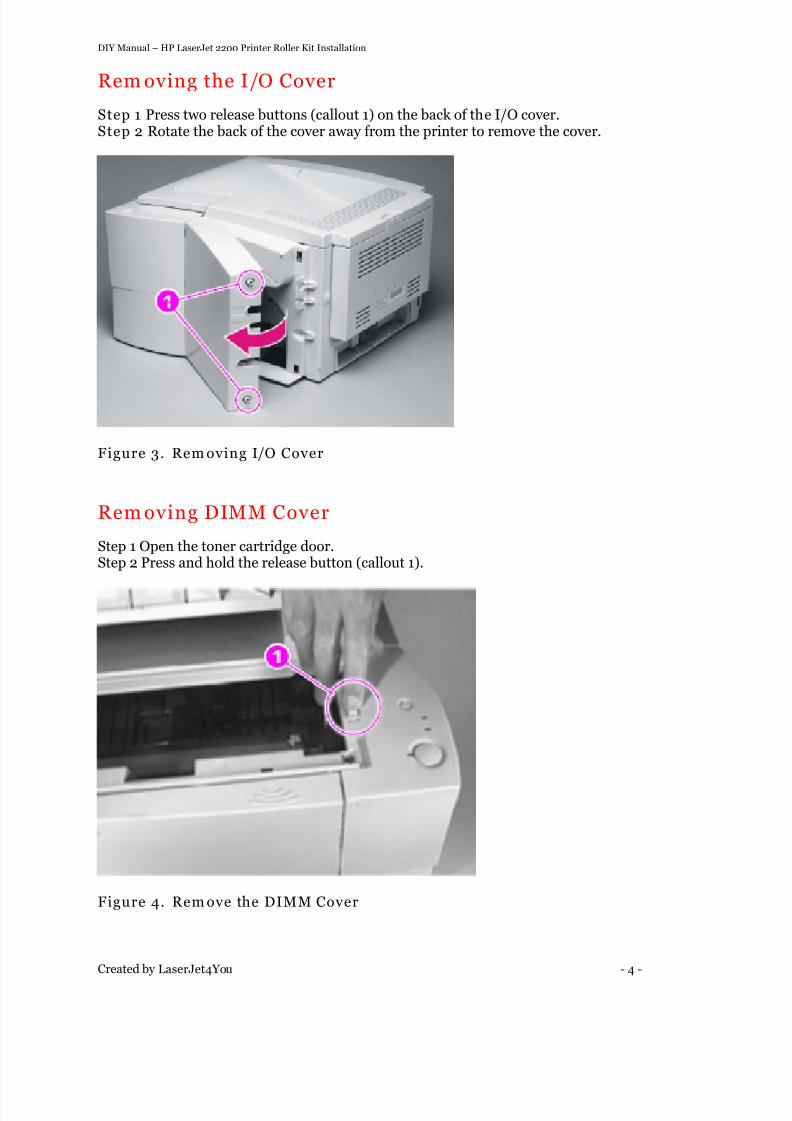
Rem oving the I/O Cover
Step 1 Press two release buttons (callout 1) on the back of the I/O cover.Step 2 Rotate the back of the cover away from the printer to remove the cover.
Figure 3. Rem oving I/O Cover
Rem oving DIMM Cover
Step 1 Open the toner cartridge door.Step 2 Press and hold the release button (callout 1).
Figure 4. Rem ove the DIMM Cover
8/4/2019 HP LaserJet 2200 MK Installation
http://slidepdf.com/reader/full/hp-laserjet-2200-mk-installation 5/21
DIY Manual – HP LaserJet 2200 Printer Roller Kit Installation
Created by LaserJet4You - 5 -
Step 3. Pull the cover toward the front of the printer to release the cover from the frame, andthen lift the cover away from the printer.
Removing Rear Cover
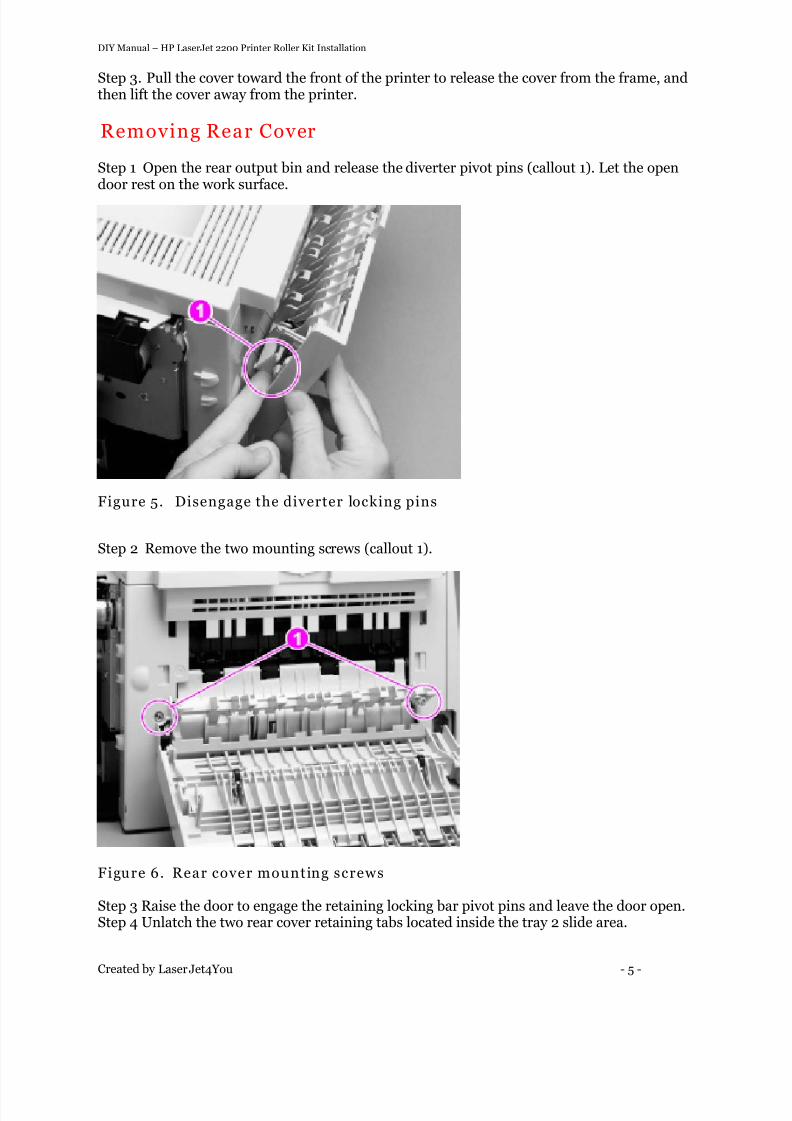
Step 1 Open the rear output bin and release the diverter pivot pins (callout 1). Let the opendoor rest on the work surface.
Figure 5. Disengage the diverter locking pins
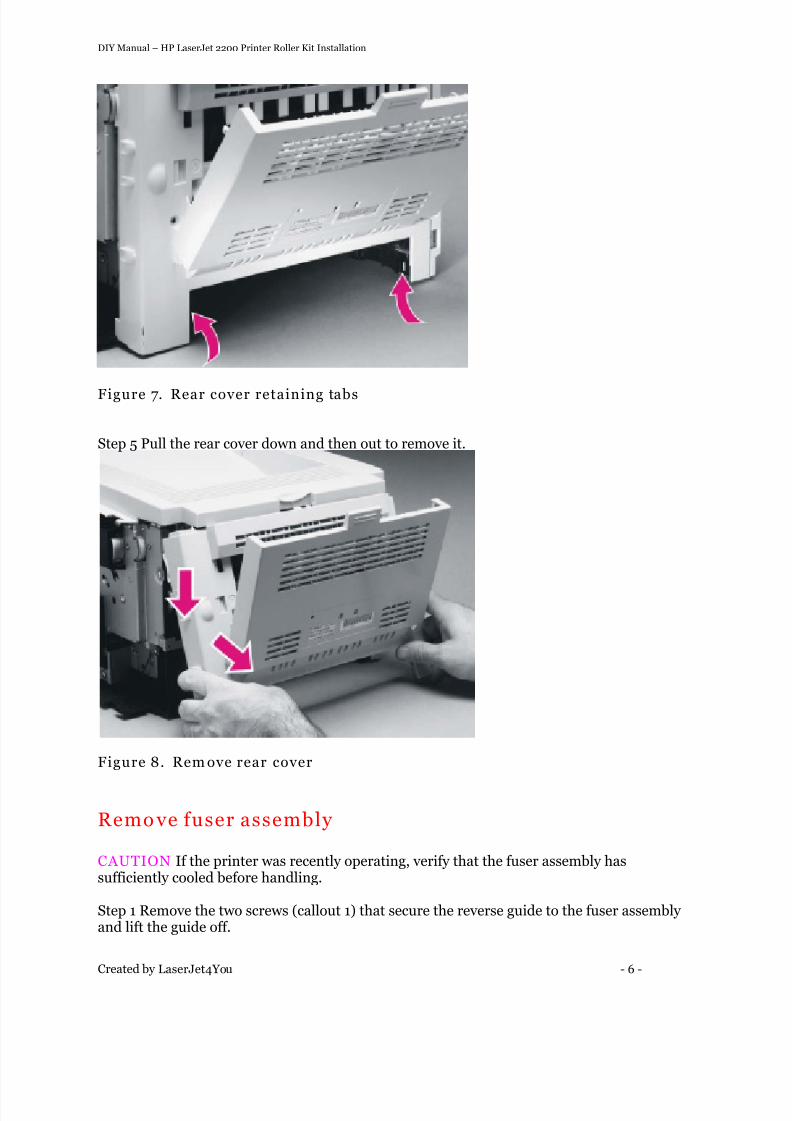
Step 2 Remove the two mounting screws (callout 1).
Figure 6. Rear cover mounting screws
Step 3 Raise the door to engage the retaining locking bar pivot pins and leave the door open.Step 4 Unlatch the two rear cover retaining tabs located inside the tray 2 slide area.
8/4/2019 HP LaserJet 2200 MK Installation
http://slidepdf.com/reader/full/hp-laserjet-2200-mk-installation 6/21
DIY Manual – HP LaserJet 2200 Printer Roller Kit Installation
Created by LaserJet4You - 6 -
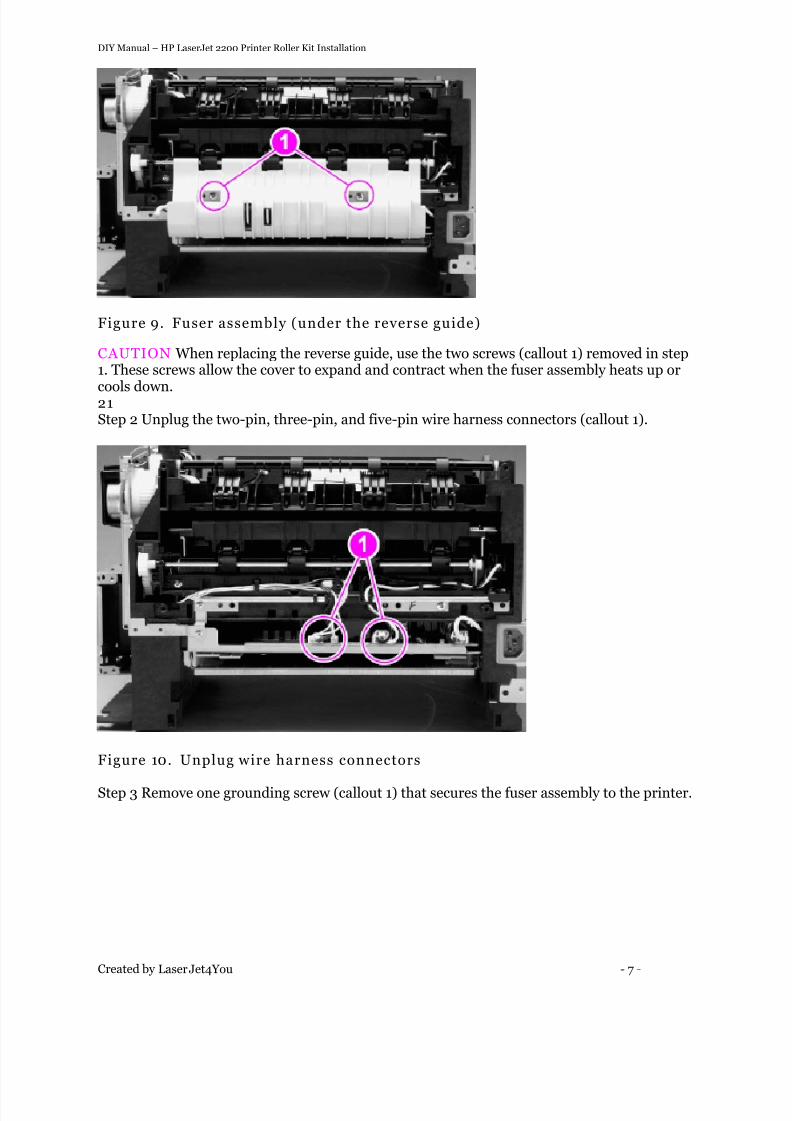
Figure 7. Rear cover retaining tabs
Step 5 Pull the rear cover down and then out to remove it.
Figure 8. Rem ove rear cover
Remo ve fuser assembly
CAUTION If the printer was recently operating, verify that the fuser assembly hassufficiently cooled before handling.
Step 1 Remove the two screws (callout 1) that secure the reverse guide to the fuser assembly and lift the guide off.
8/4/2019 HP LaserJet 2200 MK Installation
http://slidepdf.com/reader/full/hp-laserjet-2200-mk-installation 7/21
DIY Manual – HP LaserJet 2200 Printer Roller Kit Installation
Created by LaserJet4You - 7 -
Figure 9. Fuser assembly (under the reverse guide)
CAUTION When replacing the reverse guide, use the two screws (callout 1) removed in step1. These screws allow the cover to expand and contract when the fuser assembly heats up or
cools down.21 Step 2 Unplug the two-pin, three-pin, and five-pin wire harness connectors (callout 1).
Figure 10. Unplug wire harness connectors
Step 3 Remove one grounding screw (callout 1) that secures the fuser assembly to the printer.
8/4/2019 HP LaserJet 2200 MK Installation
http://slidepdf.com/reader/full/hp-laserjet-2200-mk-installation 8/21
DIY Manual – HP LaserJet 2200 Printer Roller Kit Installation
Created by LaserJet4You - 8 -
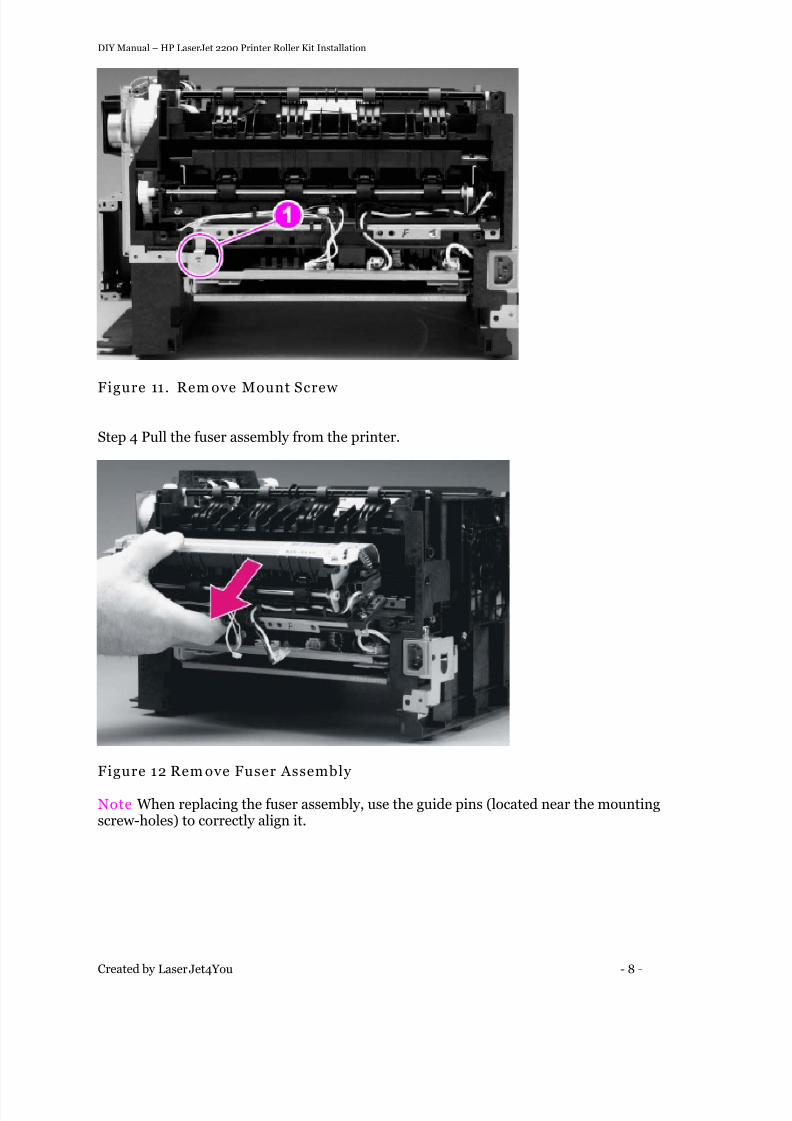
Figure 11. Rem ove Mount Screw
Step 4 Pull the fuser assembly from the printer.
Figure 12 Rem ove Fuser Assembly
Note When replacing the fuser assembly, use the guide pins (located near the mountingscrew-holes) to correctly align it.
8/4/2019 HP LaserJet 2200 MK Installation
http://slidepdf.com/reader/full/hp-laserjet-2200-mk-installation 9/21
DIY Manual – HP LaserJet 2200 Printer Roller Kit Installation
Created by LaserJet4You - 9 -
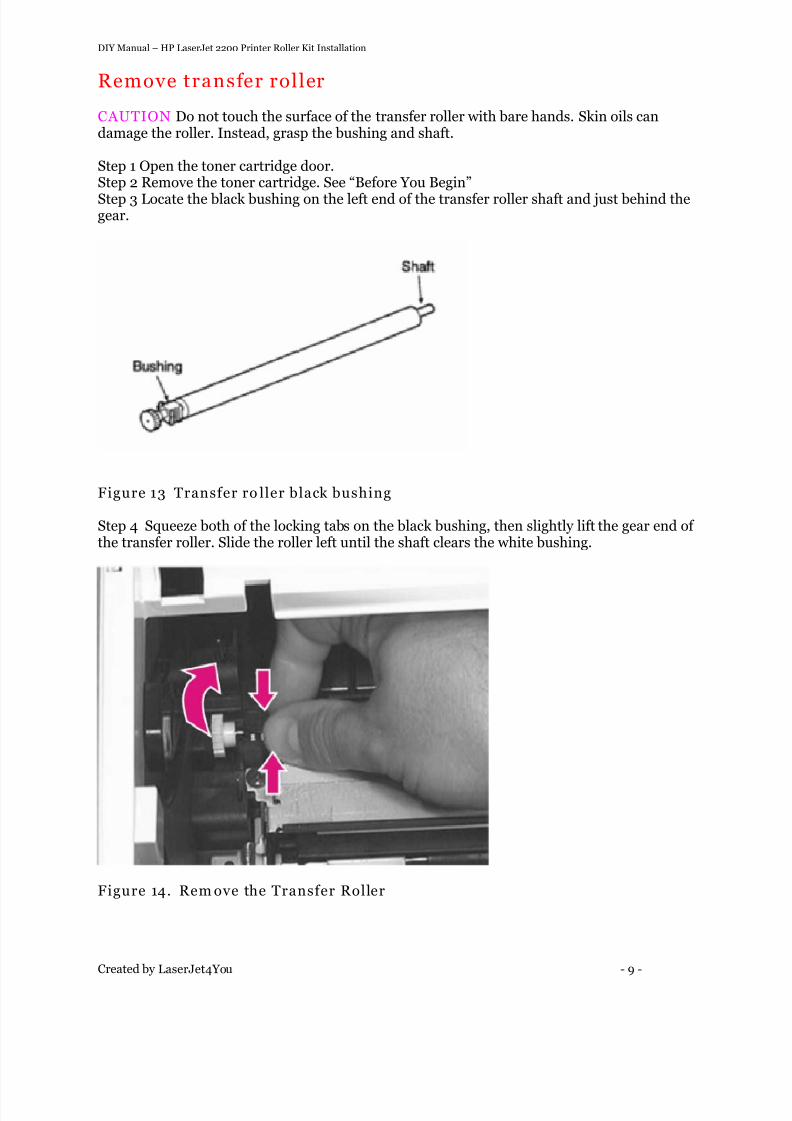
Remove transfer roller
CAUTION Do not touch the surface of the transfer roller with bare hands. Skin oils candamage the roller. Instead, grasp the bushing and shaft.
Step 1 Open the toner cartridge door.Step 2 Remove the toner cartridge. See “Before You Begin”
Step 3 Locate the black bushing on the left end of the transfer roller shaft and just behind thegear.
Figure 13 Transfer ro ller black bushing
Step 4 Squeeze both of the locking tabs on the black bushing, then slightly lift the gear end of the transfer roller. Slide the roller left until the shaft clears the white bushing.
Figure 14. Rem ove the Transfer Roller
8/4/2019 HP LaserJet 2200 MK Installation
http://slidepdf.com/reader/full/hp-laserjet-2200-mk-installation 10/21
DIY Manual – HP LaserJet 2200 Printer Roller Kit Installation
Created by LaserJet4You - 10 -
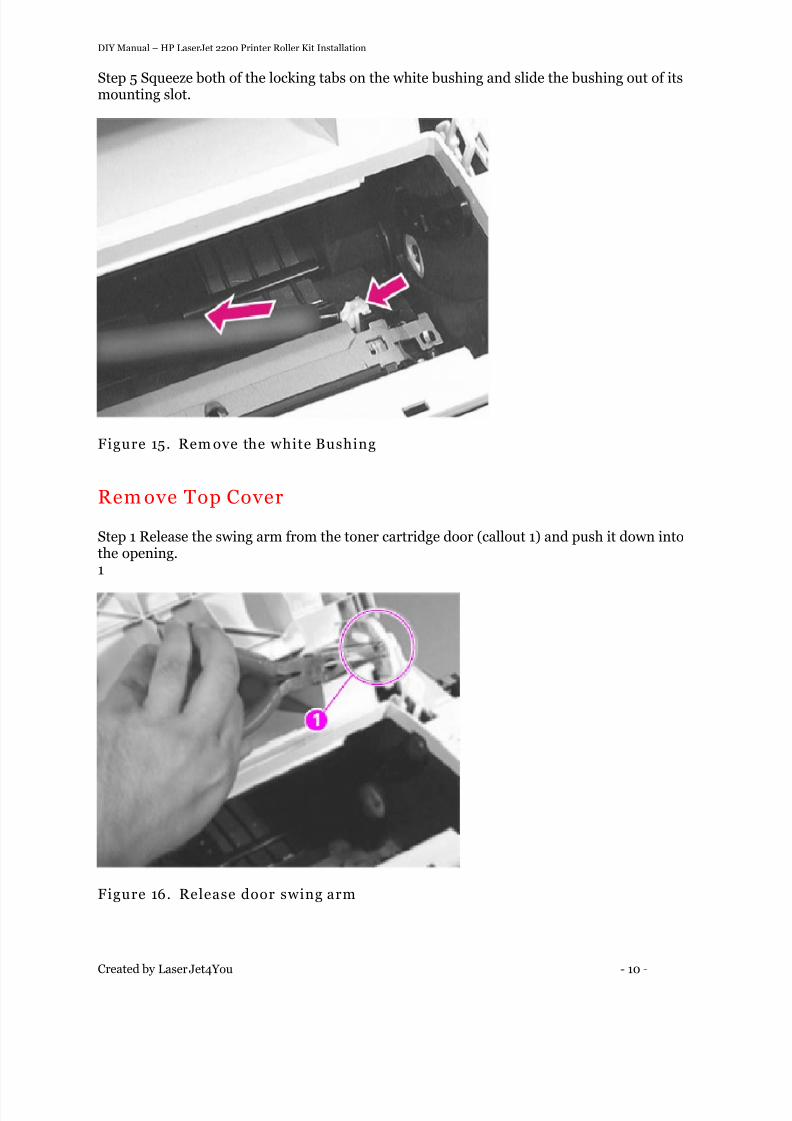
Step 5 Squeeze both of the locking tabs on the white bushing and slide the bushing out of itsmounting slot.
Figure 15. Rem ove the white Bushing
Rem ove Top Cover
Step 1 Release the swing arm from the toner cartridge door (callout 1) and push it down intothe opening.1
Figure 16. Release door swing arm
8/4/2019 HP LaserJet 2200 MK Installation
http://slidepdf.com/reader/full/hp-laserjet-2200-mk-installation 11/21
DIY Manual – HP LaserJet 2200 Printer Roller Kit Installation
Created by LaserJet4You - 11 -
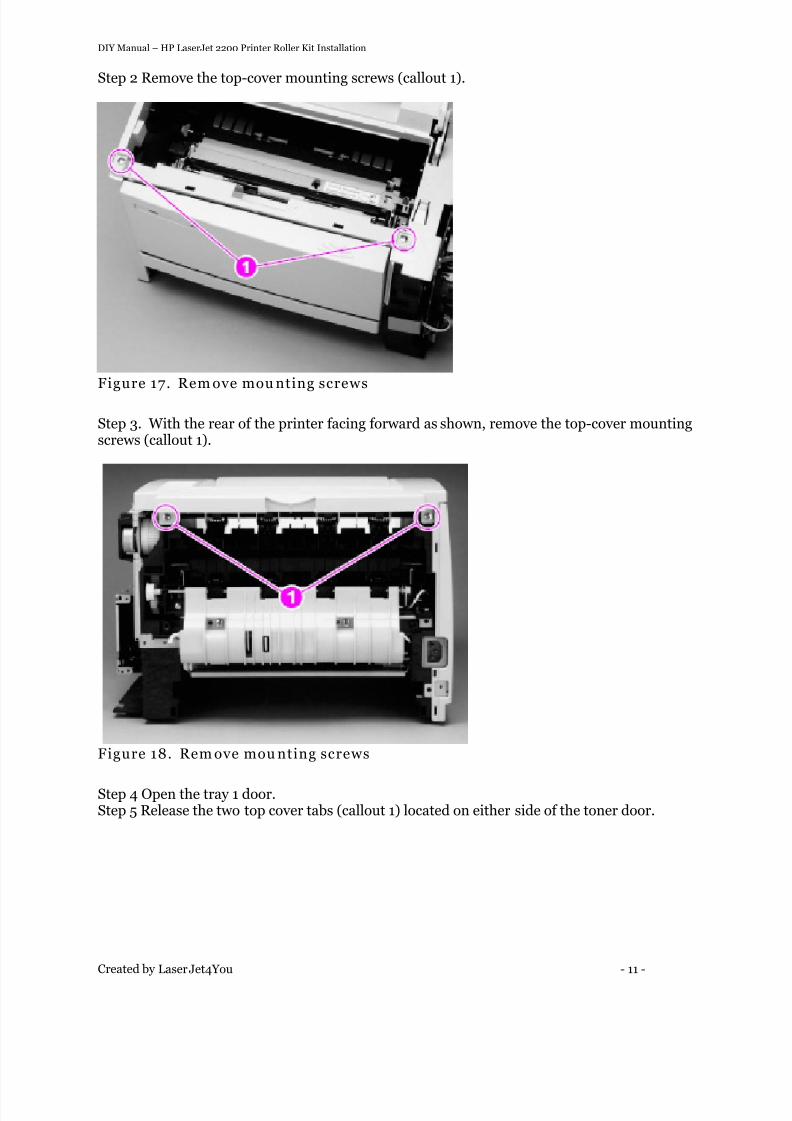
Step 2 Remove the top-cover mounting screws (callout 1).
Figure 17. Rem ove mou nting screws
Step 3. With the rear of the printer facing forward as shown, remove the top-cover mountingscrews (callout 1).
Figure 18. Rem ove mou nting screws
Step 4 Open the tray 1 door.Step 5 Release the two top cover tabs (callout 1) located on either side of the toner door.
8/4/2019 HP LaserJet 2200 MK Installation
http://slidepdf.com/reader/full/hp-laserjet-2200-mk-installation 12/21
DIY Manual – HP LaserJet 2200 Printer Roller Kit Installation
Created by LaserJet4You - 12 -
Figure 19. Release top cover tabs (left tab shown)
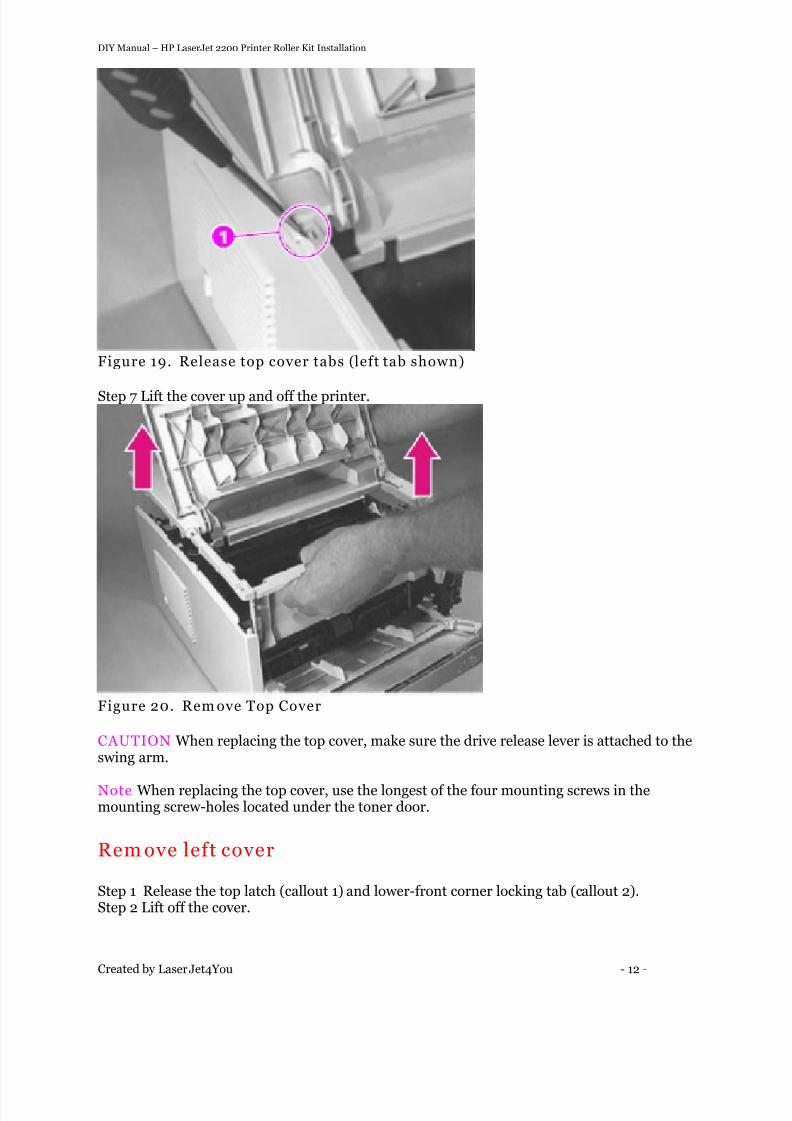
Step 7 Lift the cover up and off the printer.
Figure 20. Rem ove Top Cover
CAUTION When replacing the top cover, make sure the drive release lever is attached to theswing arm.
Note When replacing the top cover, use the longest of the four mounting screws in themounting screw-holes located under the toner door.
Rem ove left cover
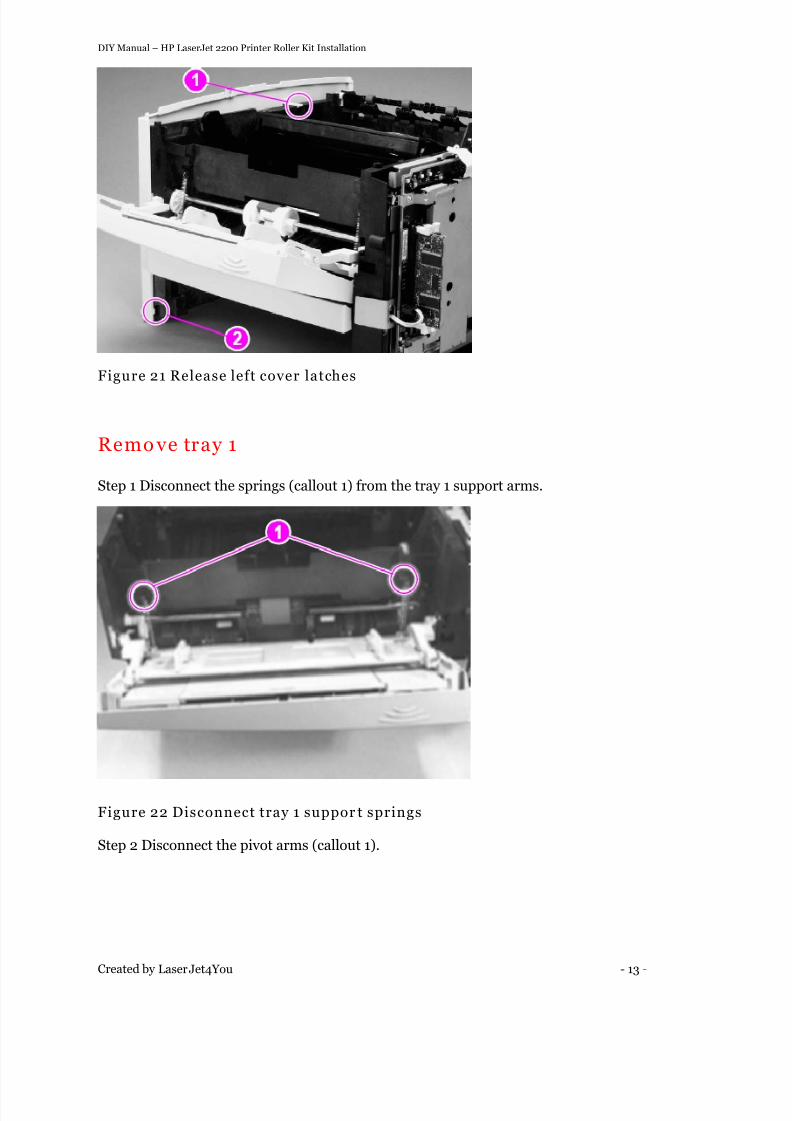
Step 1 Release the top latch (callout 1) and lower-front corner locking tab (callout 2).Step 2 Lift off the cover.
8/4/2019 HP LaserJet 2200 MK Installation
http://slidepdf.com/reader/full/hp-laserjet-2200-mk-installation 13/21
DIY Manual – HP LaserJet 2200 Printer Roller Kit Installation
Created by LaserJet4You - 13 -
Figure 21 Release left cover latches
Remo ve tray 1
Step 1 Disconnect the springs (callout 1) from the tray 1 support arms.
Figure 22 Disconnect tray 1 suppor t springs
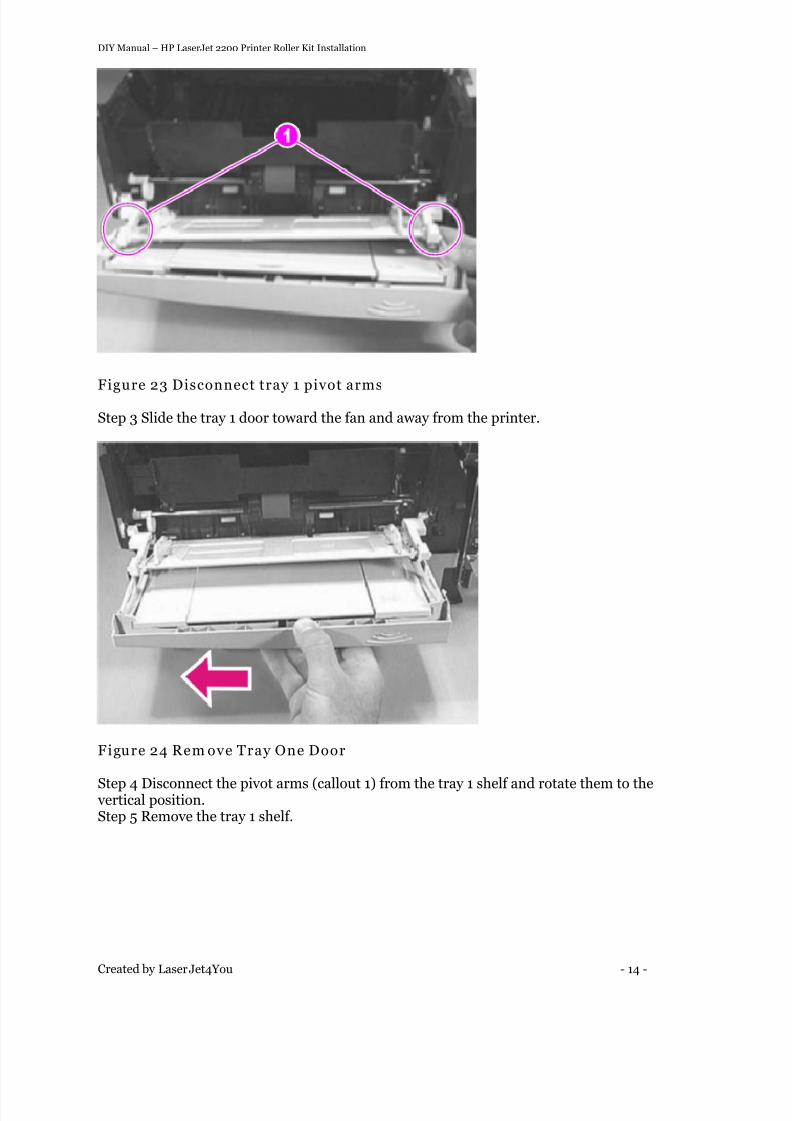
Step 2 Disconnect the pivot arms (callout 1).
8/4/2019 HP LaserJet 2200 MK Installation
http://slidepdf.com/reader/full/hp-laserjet-2200-mk-installation 14/21
DIY Manual – HP LaserJet 2200 Printer Roller Kit Installation
Created by LaserJet4You - 14 -
Figure 23 Disconnect tray 1 pivot arms
Step 3 Slide the tray 1 door toward the fan and away from the printer.
Figure 24 Rem ove Tray One Door
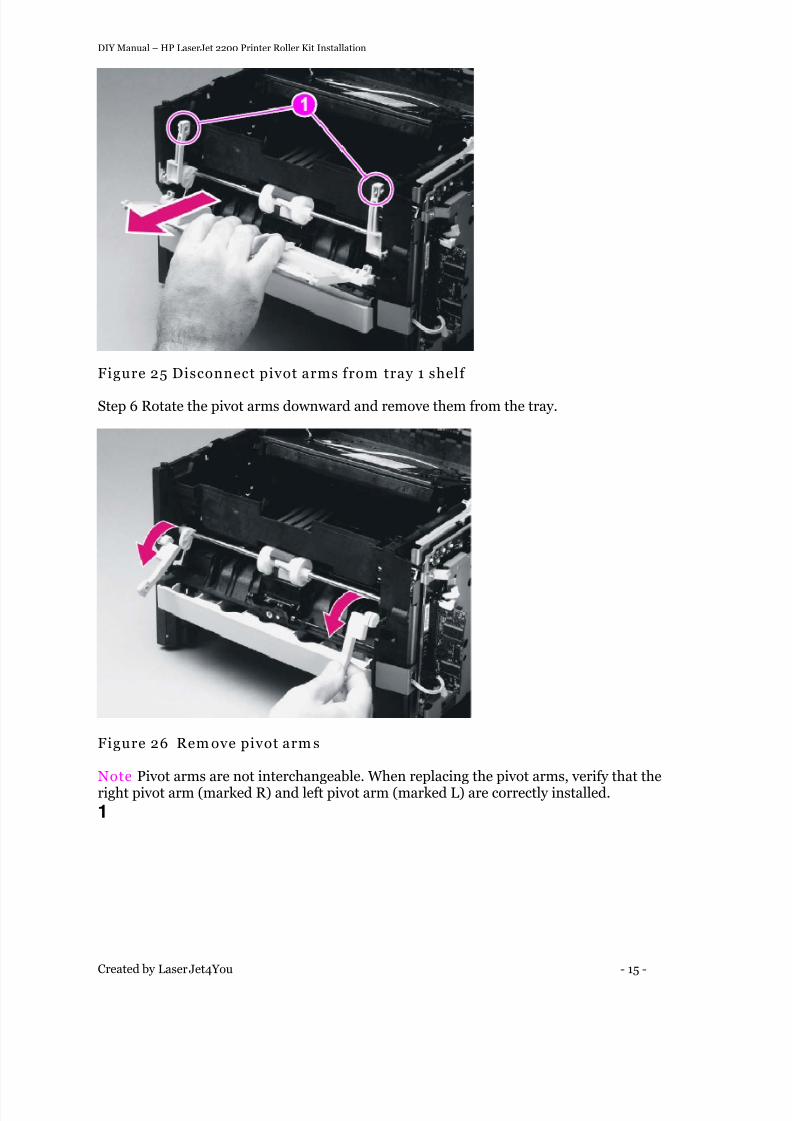
Step 4 Disconnect the pivot arms (callout 1) from the tray 1 shelf and rotate them to the vertical position.Step 5 Remove the tray 1 shelf.
8/4/2019 HP LaserJet 2200 MK Installation
http://slidepdf.com/reader/full/hp-laserjet-2200-mk-installation 15/21
DIY Manual – HP LaserJet 2200 Printer Roller Kit Installation
Created by LaserJet4You - 15 -
Figure 25 Disconnect pivot arms from tray 1 shelf
Step 6 Rotate the pivot arms downward and remove them from the tray.
Figure 26 Rem ove pivot arm s
Note Pivot arms are not interchangeable. When replacing the pivot arms, verify that theright pivot arm (marked R) and left pivot arm (marked L) are correctly installed.
1
8/4/2019 HP LaserJet 2200 MK Installation
http://slidepdf.com/reader/full/hp-laserjet-2200-mk-installation 16/21
DIY Manual – HP LaserJet 2200 Printer Roller Kit Installation
Created by LaserJet4You - 16 -
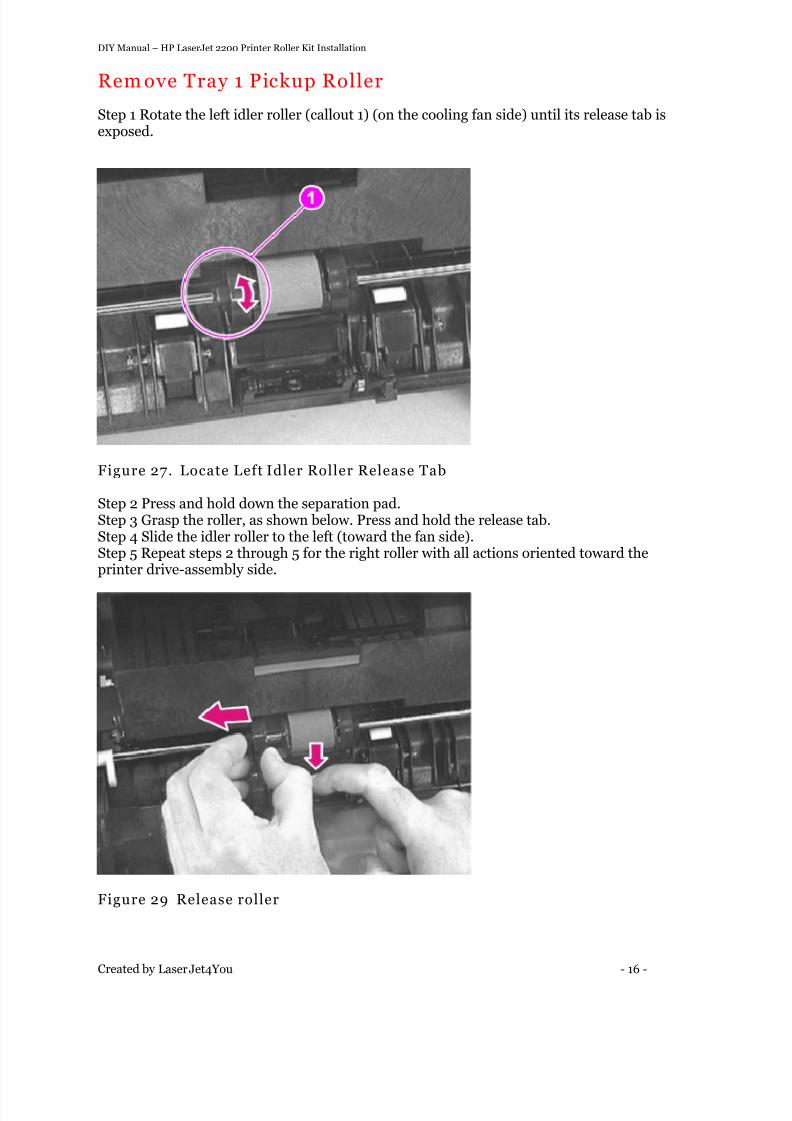
Rem ove Tray 1 Pickup Roller
Step 1 Rotate the left idler roller (callout 1) (on the cooling fan side) until its release tab isexposed.
Figure 27. Locate Left Idler Roller Release Tab
Step 2 Press and hold down the separation pad.Step 3 Grasp the roller, as shown below. Press and hold the release tab.Step 4 Slide the idler roller to the left (toward the fan side).Step 5 Repeat steps 2 through 5 for the right roller with all actions oriented toward theprinter drive-assembly side.
Figure 29 Release roller
8/4/2019 HP LaserJet 2200 MK Installation
http://slidepdf.com/reader/full/hp-laserjet-2200-mk-installation 17/21
DIY Manual – HP LaserJet 2200 Printer Roller Kit Installation
Created by LaserJet4You - 17 -
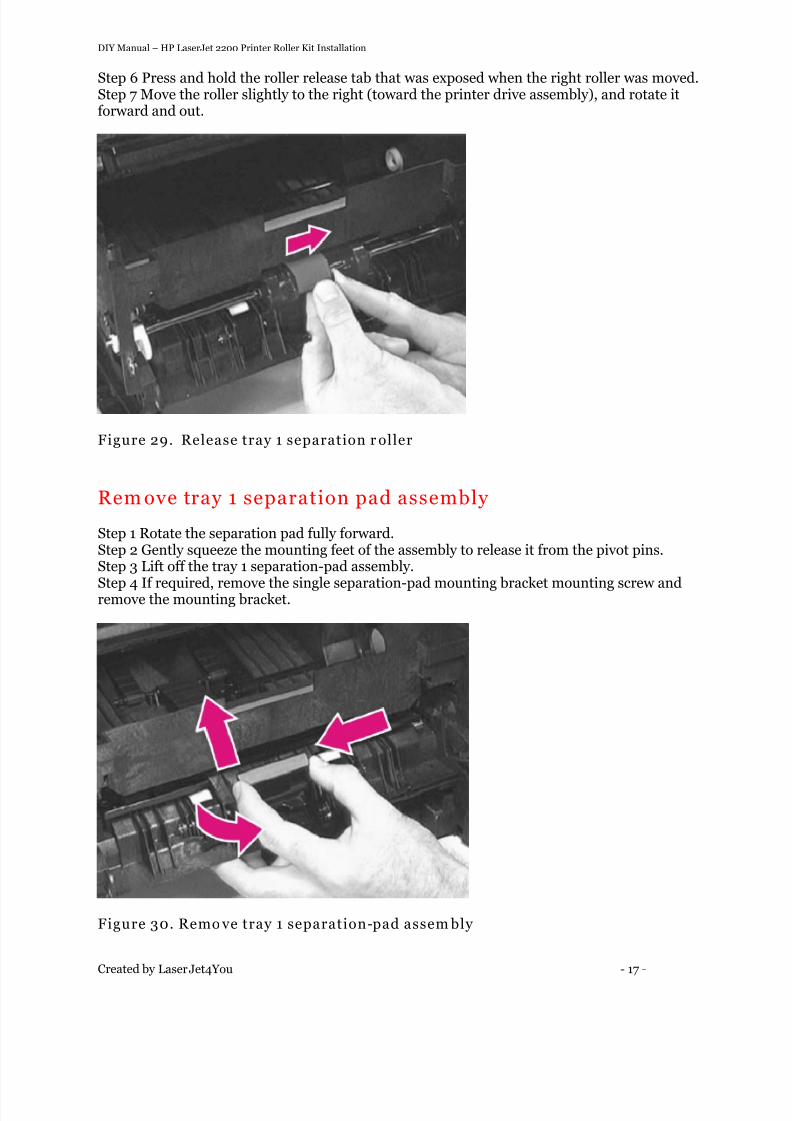
Step 6 Press and hold the roller release tab that was exposed when the right roller was moved.Step 7 Move the roller slightly to the right (toward the printer drive assembly), and rotate itforward and out.
Figure 29. Release tray 1 separation r oller
Rem ove tray 1 separation pad assembly
Step 1 Rotate the separation pad fully forward.Step 2 Gently squeeze the mounting feet of the assembly to release it from the pivot pins.Step 3 Lift off the tray 1 separation-pad assembly.
Step 4 If required, remove the single separation-pad mounting bracket mounting screw andremove the mounting bracket.
Figure 30. Remo ve tray 1 separation-pad assem bly
8/4/2019 HP LaserJet 2200 MK Installation
http://slidepdf.com/reader/full/hp-laserjet-2200-mk-installation 18/21
DIY Manual – HP LaserJet 2200 Printer Roller Kit Installation
Created by LaserJet4You - 18 -
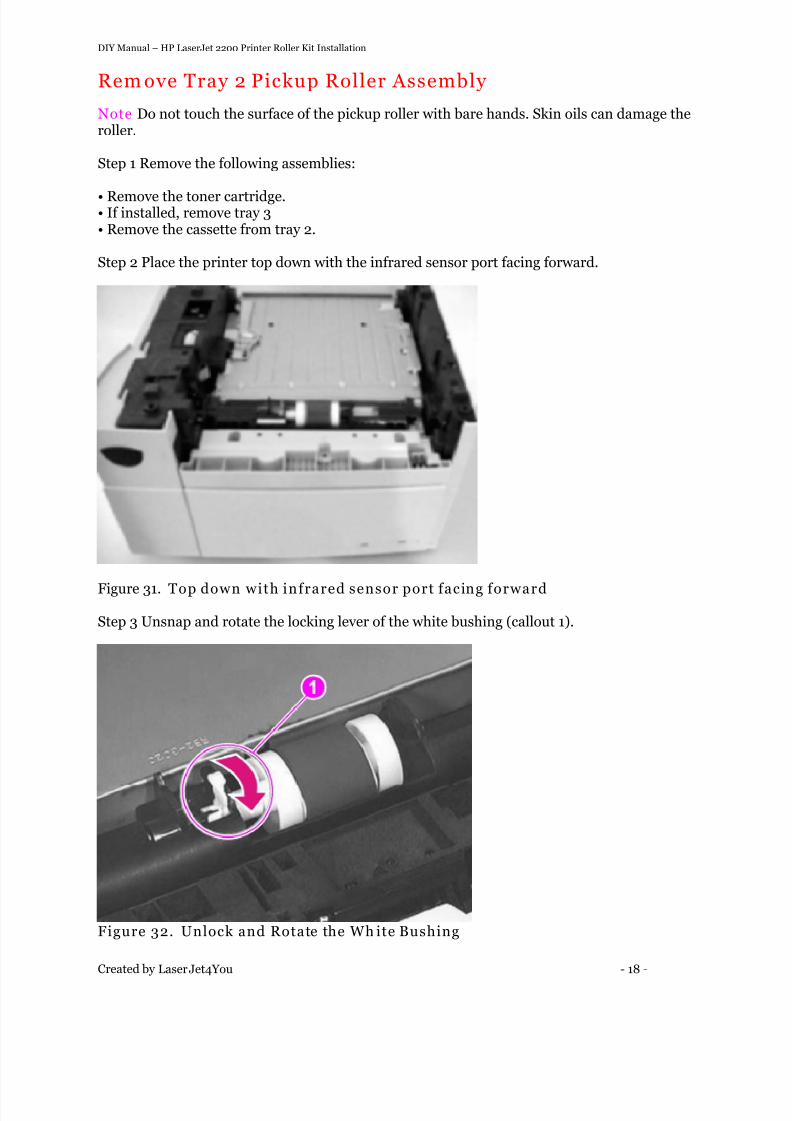
Rem ove Tray 2 Pickup Roller Assembly
Note Do not touch the surface of the pickup roller with bare hands. Skin oils can damage theroller.
Step 1 Remove the following assemblies:
• Remove the toner cartridge.• If installed, remove tray 3• Remove the cassette from tray 2.
Step 2 Place the printer top down with the infrared sensor port facing forward.
Figure 31. Top down with infrared sensor port facing forward
Step 3 Unsnap and rotate the locking lever of the white bushing (callout 1).
Figure 32. Unlock and Rotate the Wh ite Bushing
8/4/2019 HP LaserJet 2200 MK Installation
http://slidepdf.com/reader/full/hp-laserjet-2200-mk-installation 19/21
DIY Manual – HP LaserJet 2200 Printer Roller Kit Installation
Created by LaserJet4You - 19 -
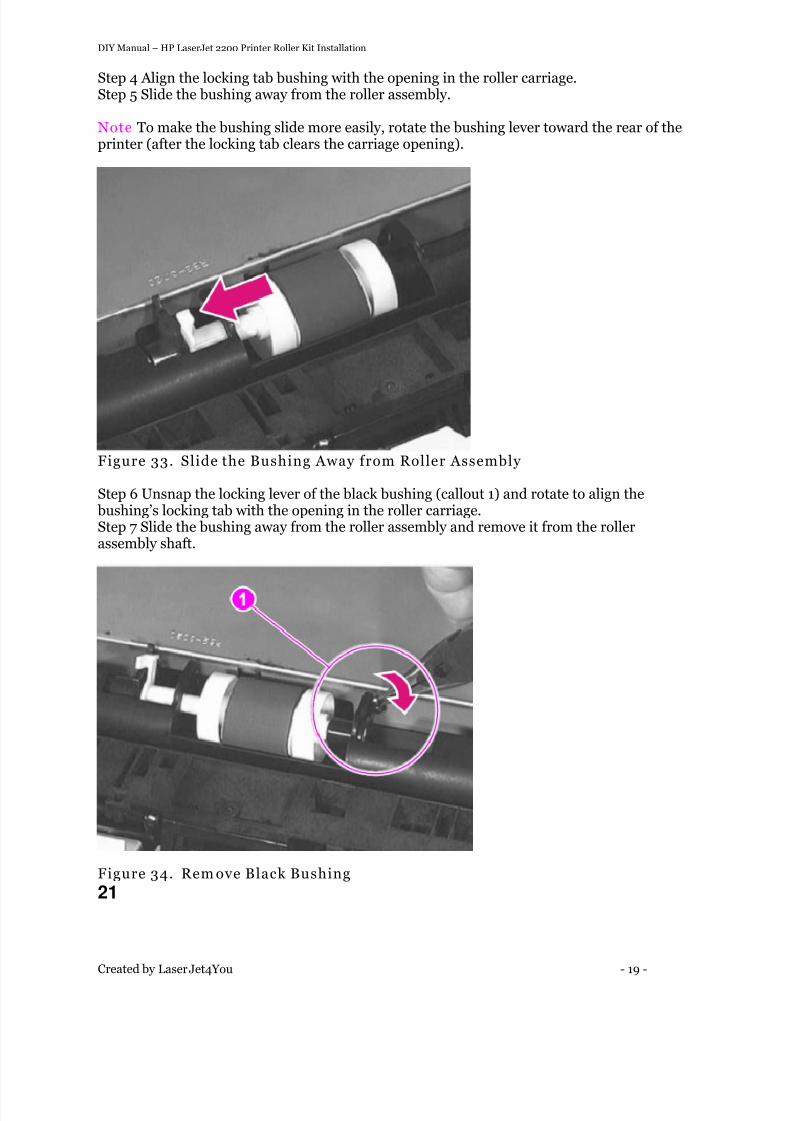
Step 4 Align the locking tab bushing with the opening in the roller carriage.Step 5 Slide the bushing away from the roller assembly.
Note To make the bushing slide more easily, rotate the bushing lever toward the rear of theprinter (after the locking tab clears the carriage opening).
Figure 33. Slide the Bushing Away from Roller Assembly
Step 6 Unsnap the locking lever of the black bushing (callout 1) and rotate to align the bushing’s locking tab with the opening in the roller carriage.Step 7 Slide the bushing away from the roller assembly and remove it from the rollerassembly shaft.
Figure 34. Rem ove Black Bushing
21
8/4/2019 HP LaserJet 2200 MK Installation
http://slidepdf.com/reader/full/hp-laserjet-2200-mk-installation 20/21
DIY Manual – HP LaserJet 2200 Printer Roller Kit Installation
Created by LaserJet4You - 20 -
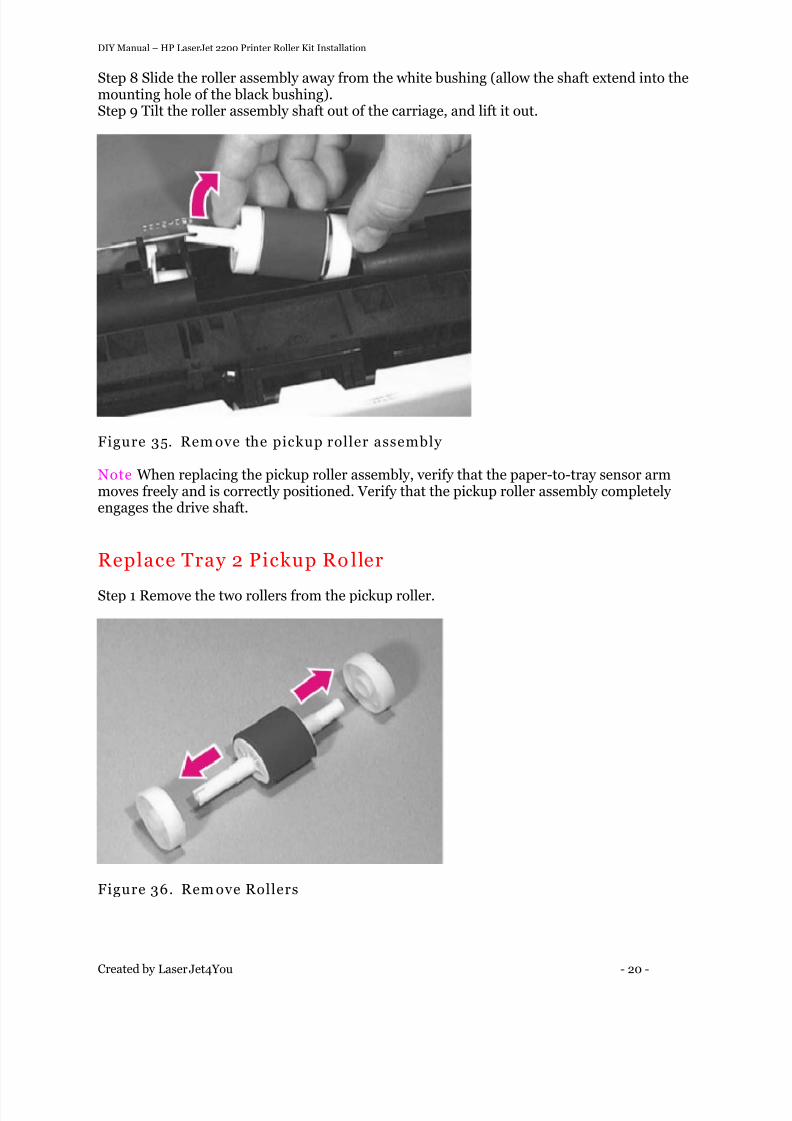
Step 8 Slide the roller assembly away from the white bushing (allow the shaft extend into themounting hole of the black bushing).Step 9 Tilt the roller assembly shaft out of the carriage, and lift it out.
Figure 35. Rem ove the pickup roller assembly
Note When replacing the pickup roller assembly, verify that the paper-to-tray sensor armmoves freely and is correctly positioned. Verify that the pickup roller assembly completely engages the drive shaft.
Replace Tray 2 Pickup Ro ller
Step 1 Remove the two rollers from the pickup roller.
Figure 36. Rem ove Rollers
8/4/2019 HP LaserJet 2200 MK Installation
http://slidepdf.com/reader/full/hp-laserjet-2200-mk-installation 21/21
DIY Manual – HP LaserJet 2200 Printer Roller Kit Installation
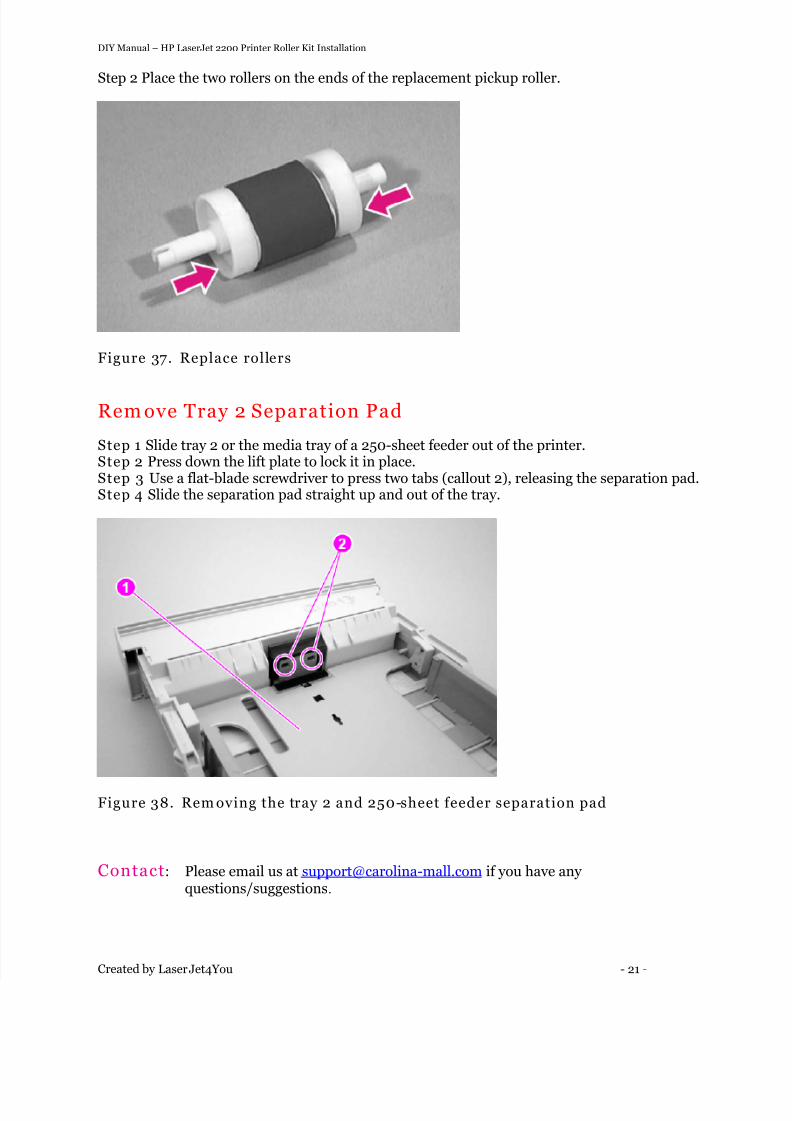
Step 2 Place the two rollers on the ends of the replacement pickup roller.
Figure 37. Replace rollers
Rem ove Tray 2 Separation Pad
Step 1 Slide tray 2 or the media tray of a 250-sheet feeder out of the printer.Step 2 Press down the lift plate to lock it in place.Step 3 Use a flat-blade screwdriver to press two tabs (callout 2), releasing the separation pad.Step 4 Slide the separation pad straight up and out of the tray.
Figure 38. Rem oving the tray 2 and 250-sheet feeder separation pad
Contact: Please email us at [email protected] if you have any questions/suggestions.