Messerschmitt 262A-1a - simMarketonline.simmarket.com/.../Messerschmitt_262A-1a_SM.pdf ·...
7
1 Messerschmitt 262A-1a For Microsoft Flight Simulator 2004 Thank you for your purchase of this FS2004 aircraft. It aims to give you a precise and detailed visual feeling for this unique aircraft, the worlds first fully operational jet fighter. Happy flying! Models included: 1. Standard 2. R4M Rocket Launcher equipped 3. Long-Range Standard (Drop Tanks)
Transcript of Messerschmitt 262A-1a - simMarketonline.simmarket.com/.../Messerschmitt_262A-1a_SM.pdf ·...
1
Messerschmitt 262A-1a For Microsoft Flight Simulator 2004
Thank you for your purchase of this FS2004 aircraft. It aims to give you a precise and detailed visual feeling for this unique aircraft, the world�s first fully operational jet fighter. Happy flying! Models included: 1. Standard 2. R4M Rocket Launcher equipped 3. Long-Range Standard (Drop Tanks)
2
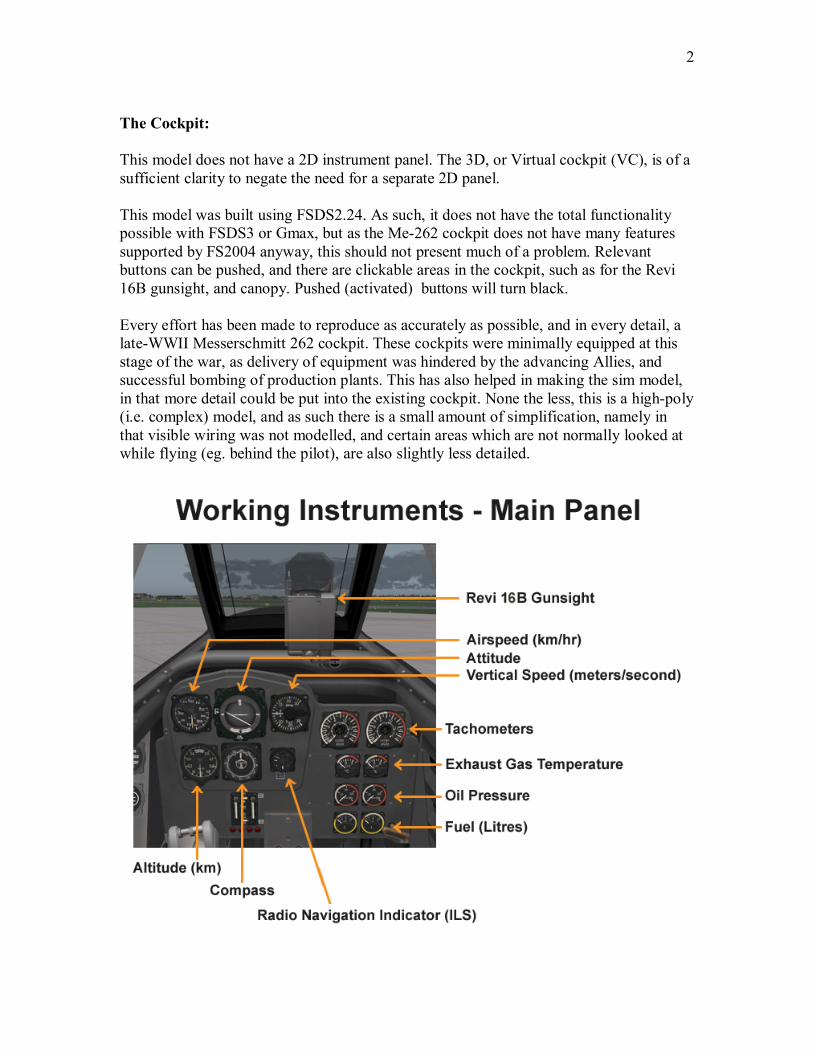
The Cockpit: This model does not have a 2D instrument panel. The 3D, or Virtual cockpit (VC), is of a sufficient clarity to negate the need for a separate 2D panel. This model was built using FSDS2.24. As such, it does not have the total functionality possible with FSDS3 or Gmax, but as the Me-262 cockpit does not have many features supported by FS2004 anyway, this should not present much of a problem. Relevant buttons can be pushed, and there are clickable areas in the cockpit, such as for the Revi 16B gunsight, and canopy. Pushed (activated) buttons will turn black. Every effort has been made to reproduce as accurately as possible, and in every detail, a late-WWII Messerschmitt 262 cockpit. These cockpits were minimally equipped at this stage of the war, as delivery of equipment was hindered by the advancing Allies, and successful bombing of production plants. This has also helped in making the sim model, in that more detail could be put into the existing cockpit. None the less, this is a high-poly (i.e. complex) model, and as such there is a small amount of simplification, namely in that visible wiring was not modelled, and certain areas which are not normally looked at while flying (eg. behind the pilot), are also slightly less detailed.
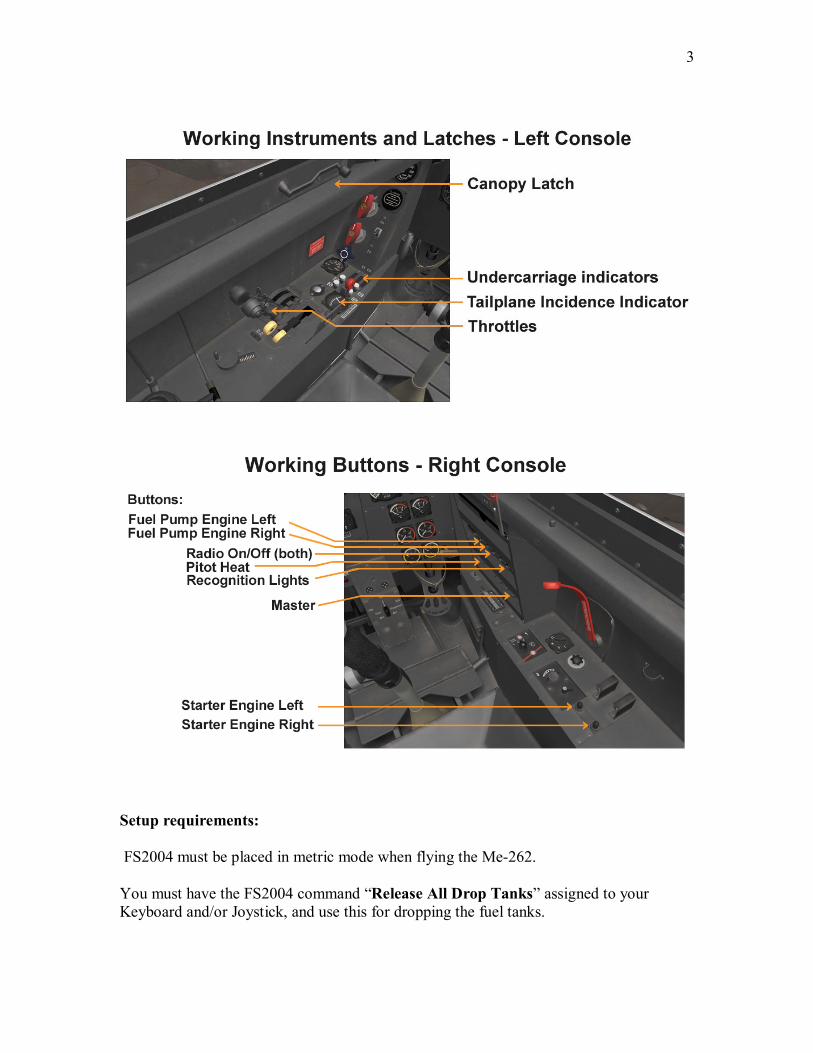
3
Setup requirements:
FS2004 must be placed in metric mode when flying the Me-262. You must have the FS2004 command �Release All Drop Tanks� assigned to your Keyboard and/or Joystick, and use this for dropping the fuel tanks.
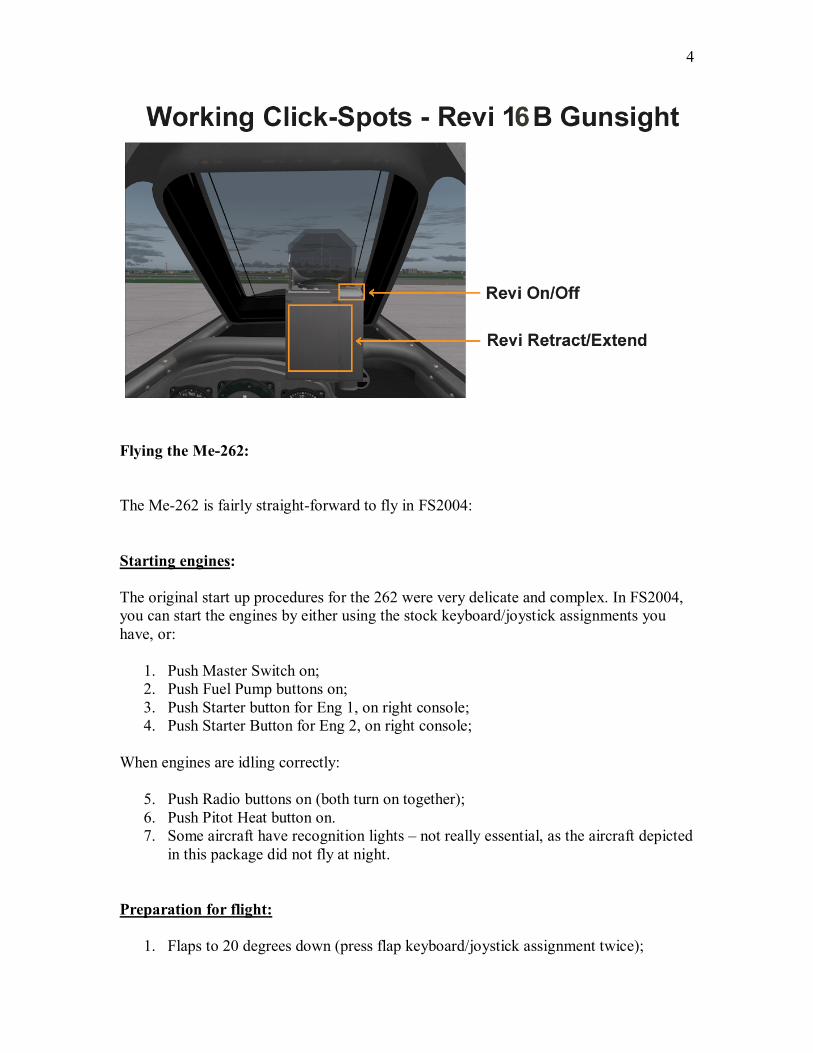
4
Flying the Me-262: The Me-262 is fairly straight-forward to fly in FS2004: Starting engines: The original start up procedures for the 262 were very delicate and complex. In FS2004, you can start the engines by either using the stock keyboard/joystick assignments you have, or:
1. Push Master Switch on; 2. Push Fuel Pump buttons on; 3. Push Starter button for Eng 1, on right console; 4. Push Starter Button for Eng 2, on right console;
When engines are idling correctly:
5. Push Radio buttons on (both turn on together); 6. Push Pitot Heat button on. 7. Some aircraft have recognition lights � not really essential, as the aircraft depicted
in this package did not fly at night. Preparation for flight:
1. Flaps to 20 degrees down (press flap keyboard/joystick assignment twice);
5
2. Fold Revi 16B gunsight out of the way; 3. For Standard and R4M Launcher equipped aircraft: Tailplane Incidence (stabilizer
trim) to +2/+3 degrees (nose down). The needle on the stabilizer trim gauge should move down 2 or 3 markings; Use your Elevator Trim assignments for this.
4. For Drop Tank equipped aircraft: Tailplane Incidence (stabilizer trim) at 0 degrees. Use your Elevator Trim assignments for this.
Taxiing: Taxi with RPMs between 4000 and 6000 only. Take Off:
1. Apply Brakes; 2. Bring RPMs slowly up to 7000 max; 3. When ready to go, apply full throttle, release brakes. It will take a while for full
RPMs, but they will get there! It is essential not to exceed 8900 RPM. 4. For Standard and R4M Launcher equipped aircraft: Rotate at 190-200 km/hr; 5. For Drop Tank equipped aircraft: Rotate at 200-220 km/hr;
When airborne:
6. Immediately retract undercarriage; 7. Maintain fairly flat climb attitude until speed builds up; 8. Remember to not keep full throttle for more than 5 minutes, maximum; 9. Flaps up at 350 km/hr 10. Trim 11. Bring Revi 16B gunsight to up position, and turn on; 12. Below 4 km altitude (approx 10,000�), bring throttles back to climb at between
475-500 km/hr, at a climb rate of 20 m/sec (this will be approx 7200 RPM); Adjust throttle to maintain this climb rate as altitude increases.
Cruise:
1. Normal cruise speed: 750 km.hr; 2. Maximum cruise speed: 830 km/hr;
6
Approach:
1. RPMs must be kept at between 6000 and 7000, due to slow spool up rate in case of go-around or missed approach; Do not go lower than 6000 RPM; 7000 is best;
2. Turn off and retract Revi 16B gunsight, for visibility; 3. Flaps as required; 10-20 degrees create the most drag in the sim, less after that; be
at 50 degrees on final approach; 4. Undercarriage down; it takes a long time on the 262, so do not wait until the last
moment; 5. Adjust approach to be able to maintain 6000-7000 RPM; 6. Keep a look out for attacking Allied fighters; you are very vulnerable at this point;
Landing;
1. If your approach has been well planned, you should touch-down at approx. 175 km/hr;
2. Do not apply brakes. Keep the nose wheel off the runway for approx 20 seconds, or until the nose comes down by itself;
3. When nose wheel is down, and only then, apply brakes; 4. Flaps up. 5. Avoid bomb craters.
A note on Fuel: The Me-262 had four fuel tanks, not including drop tanks. This consisted of two ahead of the cockpit, and two behind it. Ahead of the cockpit were one main tank, and one small holding tank. Behind the cockpit were one main tank, and one large auxiliary tank. The cockpit instrument panel has only two fuel gauges, as did the original aircraft. The left gauge reads the forward main tank, and the right gauge the rear main tank. I don�t know how real 262 pilots knew how much fuel they had on board, until the levels on the main tanks started dropping! The sim will drain the rear auxiliary tank first, as was done on the real aircraft, which was done to maintain the CofG.

7
If you do not wish to use the rear auxiliary tank, you will need to change the entry in the aircraft.cfg file manually. You will also not need to use the nose-down trim at take off. Drop Tanks: It is a little-known fact that in February to April 1945, JG 7 and JV44 were using drop tanks on daylight sorties. Either one or two 300 litre tanks were loaded , and Allied Intelligence were noting much lengthened sortie times (COPC Summaries). This is why drop tanks are included in this package To drop the tanks, you must have the FS2004 command �Release All Drop Tanks� assigned to your Keyboard and/or Joystick. Hitting this button once will arm the tank dropping system, hitting it a second time will release the tanks. You will see the green message tapes at the top of your screen. Unfortunately, these were not able to be removed. The aircraft�s .cfg file is automatically re-written (temporarily), to reflect the change in weight and fuel quantity on board. You will not be able to re-load the drop tanks until you re-start the flight. The drop tanks will also drop automatically once they are empty.
Credit: A big �thank you!� to Wozza, who provided much of the xml used in the 262, and an equally big �Thank you!� to Robert Sanderson, who is a truly outstanding teacher of FSDS and a very patient person.