.s::: · interieur 9465. Degager la carrosserie au niveau du bogie central. Apres soufever er...
4
Transcript of .s::: · interieur 9465. Degager la carrosserie au niveau du bogie central. Apres soufever er...
s::::0~~.s::::(.)'"'t:.s::::(IJ
:2
"<!:
l1l:I....<!Jon r--"t:'" tI:I'"E
<1 ....t: In",",g'".a'"
IZIu.">.t:'"
!CE"Cj,!; =-"'"'" .:E
0 .N<tr-.N Zr-.0.....
;; .-.--c-.nn0-0""

--- ---- --
Öffnen:Nur zum Motorwechsel (50 7420) oder zumEinbau der Innen beleuchtung 9465 erforderlich.Das Gehäuse zuerst am mittleren Drehgestell aufspreizen,dieses löst sich vom Wagenboden und kann abgezogenwerden.
To open: Only for the changing of the motor (50 7420) orto install the Interior lighting unit 9465. Firstly prise offthe body from the center bogie, releasing it from thechassis and lift it off.
Demontage: Ne se justifie que pour le remplacement demoteur (50 7420), ou pour le montage du set d'eclairageinterieur 9465. Degager la carrosserie au niveau du bogiecentral. Apres soufever er carrosserie.
Drehgestelleinbau / Haftreifenwechselbogie assembly / traction tyre exchangebogie montage / echangement bandages
de rechange54 7006
--- TRAIN-NAVIGATION 6832 9427Schaltmagnet:An der markierten Stelle kann derSchaltmagnet 9427 angebracht werden.
Switching Magnet: The switching magnet 9427can be placed !nto the securing place indicated.
Aimant de commande: Cet aimant 9427peut se placer a I'endroit designe a cet usage.
Achse/axle/axe
.-~' ~ - vorne/fronVavant
Drehgestellblende/bogie frame/chassis bogie
Beim Zusammenbau aul richtige Lage der Kontaktfedern yachten.Radsätze von Drehgestellmitte aus über die Kontaktfedern einsetzen.
Gleis und Räder stets sauber halten Keep tracks and wheels clean at all times
Einbau eines DECODERS: An der Stelle A kann ein Decoder mit 6-poliger Schnittstelle angebracht werden. Bitte Betriebsanleitung des jeweiligenDecoders beachten! Brückenstecker der Schnittstelle abziehen und Stecker desDecoders einstecken. Dabei aul die Gleichlage der mit" 1" gekennzeichnetenAnschlusskabel achten.Installation 01 a DECODER: At the iocation A shown an decoder with 6-pole interface can be mounted. Reler to the respective operating instuctions 01 thedecoder lor details. To install the decoder, remove the jumper plug lrem the loco'sinterface and plug n the decoders connector. Here, take care that the lines marked "1"are on the same side.Montage d'un decoder avec interface a 6-pöles: Pour le montage, se relerer au moded'emploi du decoder. A I'endreit "A" I1 laut monter un decoder. Extraire la fiche
. . ,.,,-- - ~ _A'_. "'"rferNi",An veilland ace que les
I .. -". -,~=~ ....-- rfenne"..nn7pir.hnAten Laoerstellen. I
iLes voies et roues doivent etre tenues I'
toujours propres
Betriebsspannung 4-14 V =Normal voltage 4-14 V =Tension de service 4-14 V!
needie is loca:ted in the cap of the oil'bottle for your use.Graissage: II fa~t huiler les paliers et les engrenages unlquement aux endroitsindiques. N'utilisez que I'huile recommandee FLEISCH MANN 6599. Une seulegoutte par point a lubrifier(--»afin d'eviter taut exces. L'aiguille montee dans lebouchan du petit flacon convient parfaitement a cet usage.
. ~n appllcaror
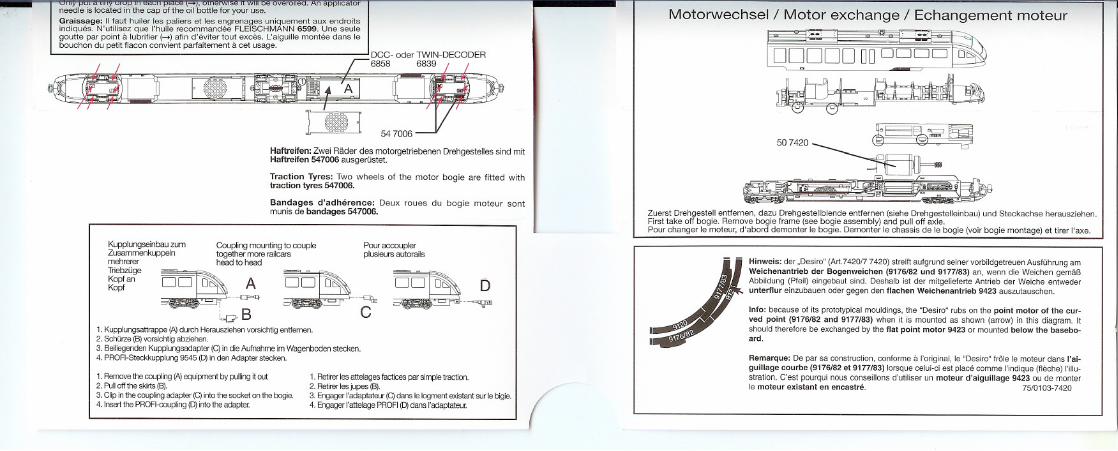
Bandages d'adherence: Deux raues du bogie moteur sontmunis de bandages 547006.
Haftreifen: Zwei Räder des motorgetriebenen Drehgestelles sind mitHaftreifen 547006 ausgerüstet.
Traction Tyres: Two wheels of the motor bogie are fitted withtraction tyres 547006.
Zuerst Drehgestell entfernen, dazu Drehgestellblende entfernen (siehe Drehgestelleinbau) und Steckachse herausziehen.First take off bogie. Remave bogie frame (see bogie assembly) and pull off axle.Pour chan ger le moteur, d'abord demonter le bogie. Demonter le chassis de le bogie (voir bogie montage) et tirer I'axe.
KupplungseinbauzumZusammenkuppelnmehrererTriebzügeKopfanKopf
Coupling mounting to coupletagether more railcarshead to head
~.~~B
Pour accouplerplusieurs autorails
~~c ~ö .~ :/Hinweis: der "Desiro" (Art.7420/7 7420) streift aufgrund seiner vorbildgetreuen Ausführung amWeichenantrieb der Bogenweichen (9176/82 und 9177/83) an, wenn die Weichen gemäßAbbildung (Pfeil) eingebaut sind. Deshalb ist der mitgelieferte Antrieb der Weiche entwederuntertlur einzubauen oder gegen den flachen Weichen antrieb 9423 auszutauschen.
1. Kupplungsattrappe (A) durch Herausziehen vorsichtig entfernen.
2. Schürze (B) vorsichtig abziehen.
3. Beiliegenden Kupplungsadapter (C) in die Aufnahme im Wagenboden stecken.4. PROFI-Steckkupplung 9545 (D) in den Adapter stecken.
Info: because of its prototypical mouldings, the "Desiro" rubs on the point motor of the cur-ved point (9176/82 and 9177/83) when it is mounted as shown (arrow) in this diagram. Itshould therefore be exchanged by the flat point motor 9423 or mounted below the basebo-ard.
-- - -- --- -- (Remarque: De par Solconstruction, conforme a I'original, le "Desiro" fröle le moteur dans I'ai-guillage courbe (9176/82 et 9177/83) lorsque celui-ci est place comme I'indique (fleche) I'illu-stration. C'est pourqui nous conseil Ions d'utiliser un moteur d'aiguillage 9423 ou de monterle moteur existant en encastr.;. 75/0103-7420
1. Remave the coupling (A)equipment by pulling it out2. Pull off the skirts (B).
3. Clip in the coupling adapter (C) into the socket on the bogie.
4. Insert the PROFI-coupling (D) into the adapter.
1. Retirer les attelages factices par simple traction.
2. Retirer les jupes (B).3. Engager I'adaptateur (C) dans le logment existant sur le bigie.
4. Engager I'attelage PROFI(D)dans I'adaptateur.