Samsung LCD TV Eng Rom
92
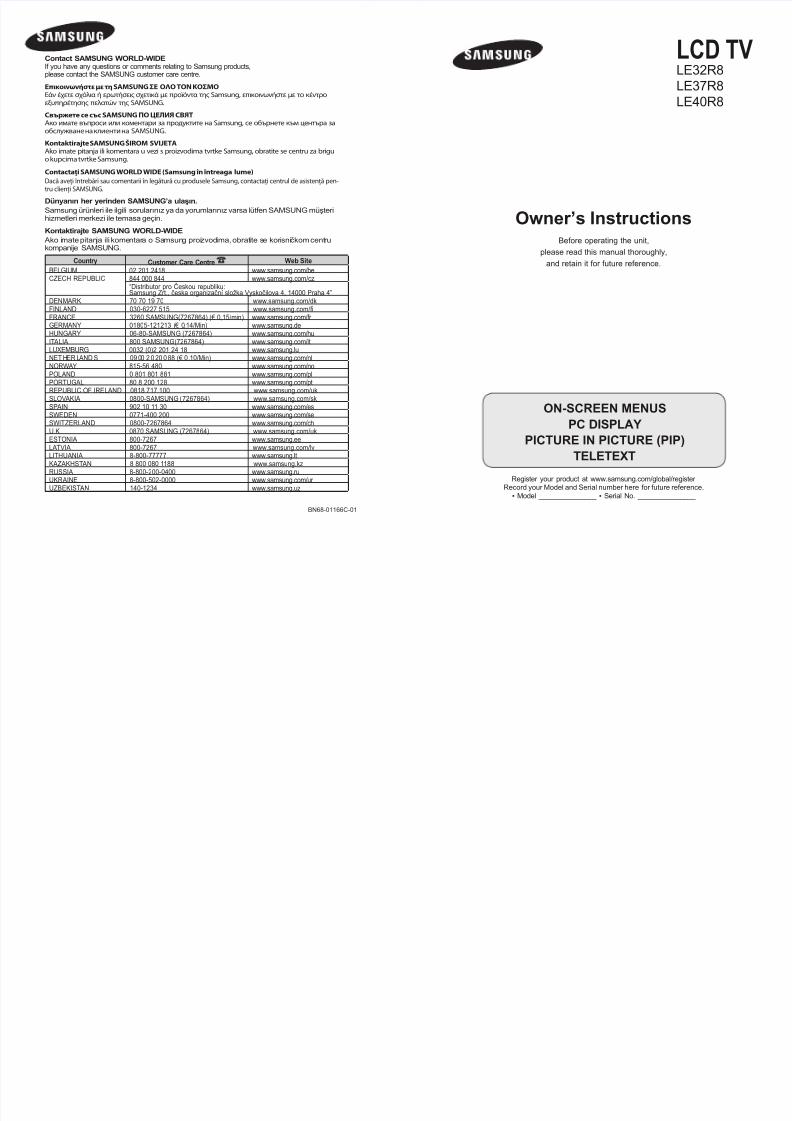
LCD TV LE32R8 LE37R8 LE40R8 Owner’s Instructions Before operating the unit, please read this manual thoroughly, and retain it for future reference. ON-SCREEN MENUS PC DISPLAY PICTURE IN PICTURE (PIP) TELETEXT Register your product at www.samsung.com/global/register Record your Model and Serial number here for future reference. ▪ Model _______________ ▪ Serial No. _______________ BN68-01166C-01 Country Customer Care Centre Web Site BELGIUM 02 201 2418 www.samsung.com/be CZECH REPUBLIC 844 000 844 www.samsung.com/cz “Distributor pro Českou republiku: Samsung Zrt., česka organizační složka Vyskočilova 4, 14000 Praha 4” DENMARK 70 70 19 70 www.samsung.com/dk FINLAND 030-6227 515 www.samsung.com/f FRANCE 3260 SAMSUNG(7267864) (€ 0,15/min) www.samsung.com/fr GERMANY 01805-121213 ( € 0 ,14/Min) www.samsung.de HUNGARY 06-80-SAMSUNG (7267864) www.samsung.com/hu ITALIA 800 SAMSUNG(7267864) www.samsung.com/it LUXEMBURG 0032 (0)2 201 24 18 www.samsung.lu NETH ER L AND S 090 0 20 200 88 (€ 0, 10/Min) www.samsung.com/nl NORWAY 815-56 480 www.samsung.com/no POLAND 0 801 801 881 www.samsung.com/pl PORTUGAL 80 8 200 128 www.samsung.com/pt REPUBLIC OF IRELAND 0818 717 100 www.samsung.com/uk SLOVAKIA 0800-SAMSUNG ( 7267864) www.samsung.com/sk SPAIN 902 10 11 30 www.samsung.com/es SWEDEN 0771-400 200 www.samsung.com/se SWITZERLAND 0800-7267864 www.samsung.com/ch U.K 0870 SAMSUNG (7267864) www.samsung.com/uk ESTONIA 800-7267 www.samsung.ee LATVIA 800-7267 www.samsung.com/lv LITHUANIA 8-800-77777 www.samsung.lt KAZAKHSTAN 8 800 080 1188 www.samsung.kz RUSSIA 8-800-200-0400 www.samsung.ru UKRAINE 8-800-502-0000 www.samsung.com/ur UZBEKISTAN 140-1234 www.samsung.uz Contact SAMSUNG WORLD-WIDE If you have any questions or comments relating to Samsung products, please contact the SAMSUNG customer care centre. Επικοινωνήστε με τη SAMSUNG ΣΕ ΟΛΟΤΟΝΚΟΣΜΟ Εάν έχετε σχόλια ή ερωτήσεις σχετικά με προϊόντα της Samsung, επικοινωνήστε με το κέντρο εξυπηρέτησης πελατών της SAMSUNG. Свържете се със SAMSUNG ПО ЦЕЛИЯ СВЯТ Ако имате въпроси или коментари за продуктите на Samsung, се обърнете към центъра за обслужваненаклиентина SAMSUNG. Kontaktirajte SAMSUNG ŠIROM SVIJETA Ako imate pitanja ili komentara u vezi s proizvodima tvrtke Samsung, obratite se centru za brigu o kupcima tvrtke Samsung. Contactaţi SAMSUNG WORLD WIDE (Samsung în întreaga lume) Dacă aveţi întrebări sau comentarii în legătură cu produsele Samsung, contactaţi centrul de asistenţă pen- tru clienţi SAMSUNG. Dünyanın her yerinden SAMSUNG’a ulaşın. Samsung ürünleri ile ilgili sorularınız ya da yorumlarınız varsa lütfen SAMSUNG müşteri hizmetleri merkezi ile temasa geçin. Kontaktirajte SAMSUNG WORLD-WIDE Ako i mate pitan ja ili kome ntar a o Sa msun g proi zvod ima, obrat ite s e kor isni čkom cent ru kompanije SAMSUNG.
-
Upload
alcatalinadrian -
Category
Documents
-
view
247 -
download
0
Transcript of Samsung LCD TV Eng Rom
7/30/2019 Samsung LCD TV Eng Rom
http://slidepdf.com/reader/full/samsung-lcd-tv-eng-rom 1/92
LCD TVLE32R8
LE37R8
LE40R8
Owner’s InstructionsBefore operating the unit,
please read this manual thoroughly,
and retain it for future reference.
ON-SCREEN MENUS
PC DISPLAY
PICTURE IN PICTURE (PIP)
TELETEXT
Register your product at www.samsung.com/global/register Record your Model and Serial number here for future reference.
▪ Model _______________ ▪ Serial No. _______________
BN68-01166C-01
Country Customer Care Centre Web Site
BELGIUM 02 201 2418 www.samsung.com/beCZECH REPUBLIC 844 000 844 www.samsung.com/cz
“Distributor pro Českou republiku: Samsung Zrt., česka organizační složka Vyskočilova 4, 14000 Praha 4”
DENMARK 70 70 19 70 www.samsung.com/dkFINLAND 030-6227 515 www.samsung.com/fFRANCE 3260 SAMSUNG(7267864) (€ 0,15/min) www.samsung.com/fr GERMANY 01805-121213 (€ 0,14/Min) www.samsung.deHUNGARY 06-80-SAMSUNG (7267864) www.samsung.com/huITALIA 800 SAMSUNG(7267864) www.samsung.com/itLUXEMBURG 0032 (0)2 201 24 18 www.samsung.luNET HER LAND S 09 00 2 0 20 0 88 (€ 0 ,10/Min) www.samsung.com/nlNORWAY 815-56 480 www.samsung.com/noPOLAND 0 801 801 881 www.samsung.com/plPORTUGAL 80 8 200 128 www.samsung.com/pt
REPUBLIC OF IRELAND 0818 717 100 www.samsung.com/ukSLOVAKIA 0800-SAMSUNG (7267864) www.samsung.com/skSPAIN 902 10 11 30 www.samsung.com/esSWEDEN 0771-400 200 www.samsung.com/seSWITZERLAND 0800-7267864 www.samsung.com/chU.K 0870 SAMSUNG (7267864) www.samsung.com/ukESTONIA 800-7267 www.samsung.eeLATVIA 800-7267 www.samsung.com/lvLITHUANIA 8-800-77777 www.samsung.ltKAZAKHSTAN 8 800 080 1188 www.samsung.kzRUSSIA 8-800-200-0400 www.samsung.ruUKRAINE 8-800-502-0000 www.samsung.com/ur UZBEKISTAN 140-1234 www.samsung.uz
Contact SAMSUNG WORLD-WIDE If you have any questions or comments relating to Samsung products,please contact the SAMSUNG customer care centre.
Επικοινωνήστε με τη SAMSUNG ΣΕ ΟΛΟ ΤΟΝ ΚΟΣΜΟ Εάν έχετε σχόλια ή ερωτήσεις σχετικά με προϊόντα της Samsung, επικοινωνήστε με το κέντροεξυπηρέτησης πελατών της SAMSUNG.
Свържете се със SAMSUNG ПО ЦЕЛИЯ СВЯТ Ако имате въпроси или коментари за продуктите на Samsung, се обърнете към центъра заобслужване на клиенти на SAMSUNG.
Kontaktirajte SAMSUNG ŠIROM SVIJETA Ako imate pitanja ili komentara u vezi s proizvodima tvrtke Samsung, obratite se centru za briguo kupcima tvrtke Samsung.
Contactaţi SAMSUNG WORLD WIDE (Samsung în întreaga lume)Dacă aveţi întrebări sau comentarii în legătură cu produsele Samsung, contactaţi centrul de asistenţă pen-tru clienţi SAMSUNG.
Dünyanın her yerinden SAMSUNG’a ulaşın.
Samsung ürünleri ile ilgili sorularınız ya da yorumlarınız varsa lütfen SAMSUNG müşterihizmetleri merkezi ile temasa geçin.
Kontaktirajte SAMSUNG WORLD-WIDE
Ako imate pitanja ili komentara o Samsung proizvodima, obratite se korisničkom centrukompanije SAMSUNG.

7/30/2019 Samsung LCD TV Eng Rom
http://slidepdf.com/reader/full/samsung-lcd-tv-eng-rom 2/92
© 2007 Samsung Electronics Co., Ltd. All rights reserved.
Pcis W Dispyi Si I
A still image may cause permanent damage to the TV screen.
• Do not display a still image on the LCD panel for more than 2 hours as it can cause screen image retention.
This image retention is also known as "screen burn".
To avoid such image retention, reduce the degree of brightness and contrast of the screen when displaying a still image.
• Watching the LCD TV in 4:3 format for a long period of time may leave traces of borders displayed on the left, right and center of
the screen caused by the difference of light emission on the screen. Playing a DVD or a game console may cause a similar effectto the screen. Damages caused by the above effect are not covered by the Warranty.
• Displaying still images from Video games and PC for longer than a certain period of time may produce partial after-images.
To prevent this effect, reduce the ‘brightness’ and ‘contrast’ when displaying still images.
7/30/2019 Samsung LCD TV Eng Rom
http://slidepdf.com/reader/full/samsung-lcd-tv-eng-rom 3/92
Cs
ConneCtIng anD PreParIng Your tV
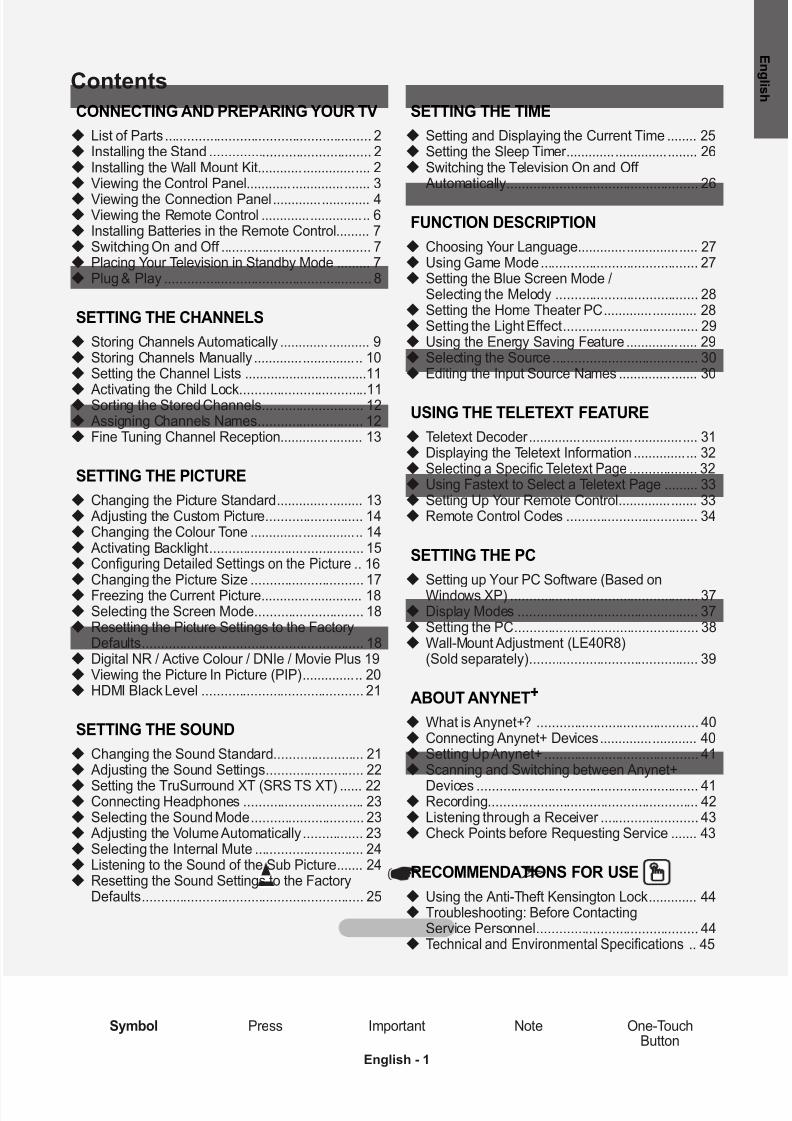
List of Parts ....................................................... 2Installing the Stand ........................................... 2Installing the Wall Mount Kit .............................. 2Viewing the Control Panel ................................. 3
Viewing the Connection Panel .......................... 4Viewing the Remote Control ............................. 6Installing Batteries in the Remote Control ......... 7Switching On and Off ........................................ 7Placing Your Television in Standby Mode ......... 7Plug & Play ....................................................... 8
SettIng the ChannelS
Storing Channels Automatically ........................ 9Storing Channels Manually ............................. 10Setting the Channel Lists .................................11
Activating the Child Lock ..................................11Sorting the Stored Channels ........................... 12 Assigning Channels Names ............................ 12Fine Tuning Channel Reception ...................... 13
SettIng the PICture
Changing the Picture Standard ....................... 13 Adjusting the Custom Picture .......................... 14Changing the Colour Tone .............................. 14 Activating Backlight ......................................... 15Conguring Detailed Settings on the Picture .. 16Changing the Picture Size .............................. 17Freezing the Current Picture ........................... 18Selecting the Screen Mode ............................. 18Resetting the Picture Settings to the FactoryDefaults ........................................................... 18Digital NR / Active Colour / DNIe / Movie Plus 19Viewing the Picture In Picture (PIP) ................ 20HDMI Black Level ........................................... 21
SettIng the SounD
Changing the Sound Standard ........................ 21 Adjusting the Sound Settings .......................... 22
Setting the TruSurround XT (SRS TS XT) ...... 22Connecting Headphones ................................ 23Selecting the Sound Mode .............................. 23 Adjusting the Volume Automatically ................ 23Selecting the Internal Mute ............................. 24Listening to the Sound of the Sub Picture ....... 24Resetting the Sound Settings to the FactoryDefaults ........................................................... 25
SettIng the tIme
Setting and Displaying the Current Time ........ 25Setting the Sleep Timer ................................... 26Switching the Television On and Off Automatically ................................................... 26
FunCtIon DeSCrIPtIon
Choosing Your Language ................................ 27Using Game Mode .......................................... 27Setting the Blue Screen Mode /Selecting the Melody ...................................... 28Setting the Home Theater PC ......................... 28Setting the Light Effect .................................... 29Using the Energy Saving Feature ................... 29Selecting the Source ....................................... 30Editing the Input Source Names ..................... 30
uSIng the teletext Feature
Teletext Decoder ............................................. 31Displaying the Teletext Information ................. 32Selecting a Specic Teletext Page .................. 32Using Fastext to Select a Teletext Page ......... 33Setting Up Your Remote Control ..................... 33Remote Control Codes ................................... 34
SettIng the PC
Setting up Your PC Software (Based onWindows XP) .................................................. 37Display Modes ................................................ 37Setting the PC ................................................. 38Wall-Mount Adjustment (LE40R8)(Sold separately) ............................................. 39
about anYnet+
What is Anynet+? ........................................... 40Connecting Anynet+ Devices .......................... 40Setting Up Anynet+ ......................................... 41Scanning and Switching between Anynet+
Devices ........................................................... 41Recording ........................................................ 42Listening through a Receiver .......................... 43Check Points before Requesting Service ....... 43
reCommenDatIonS For uSe
Using the Anti-Theft Kensington Lock ............. 44Troubleshooting: Before ContactingService Personnel ........................................... 44Technical and Environmental Specications .. 45
eglis - 1
Sy Press Important Note One-TouchButton
e n gl i sh
7/30/2019 Samsung LCD TV Eng Rom
http://slidepdf.com/reader/full/samsung-lcd-tv-eng-rom 4/92
eglis -
lis f Ps
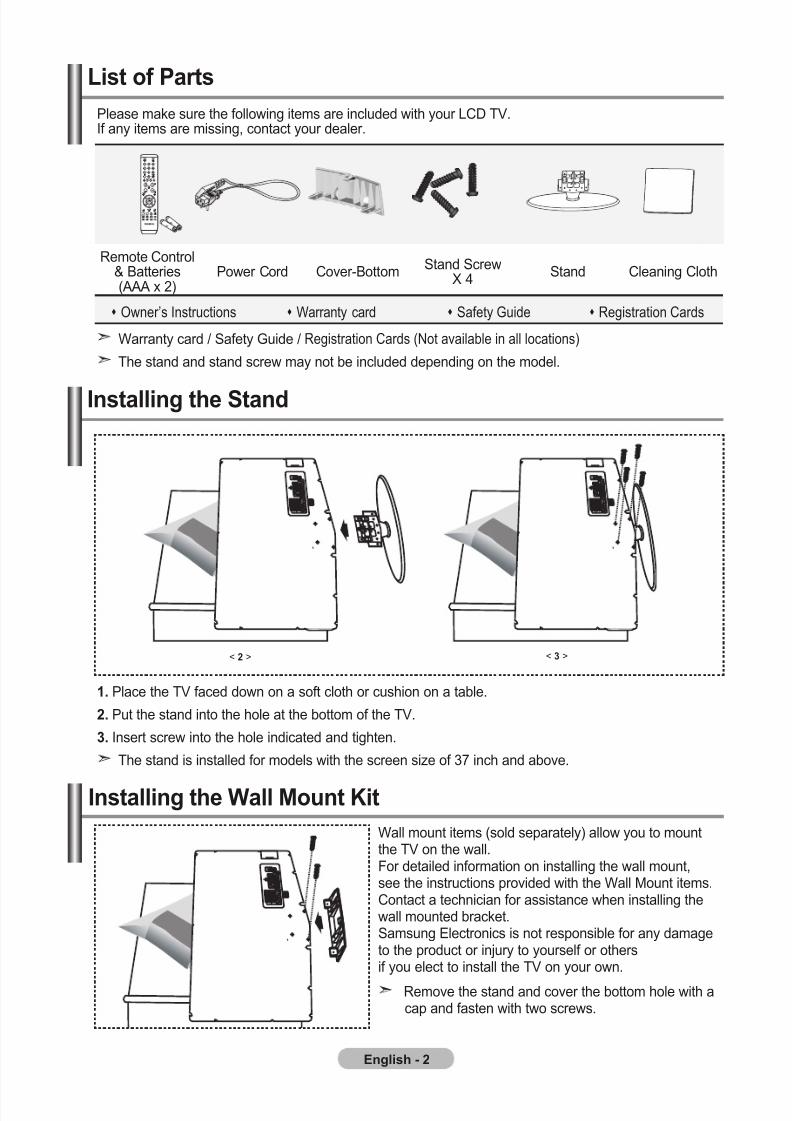
Please make sure the following items are included with your LCD TV.If any items are missing, contact your dealer.
M4 X L16
Remote Control& Batteries(AAA x 2)
Power Cord Cover-BottomStand Screw
X 4Stand Cleaning Cloth
Owner’s Instructions Warranty card Safety Guide Registration Cards
< > < 3 >
1. Place the TV faced down on a soft cloth or cushion on a table.
. Put the stand into the hole at the bottom of the TV.
3. Insert screw into the hole indicated and tighten.
The stand is installed for models with the screen size of 37 inch and above.
Isi Sd
Warranty card / Safety Guide / Registration Cards (Not available in all locations)
The stand and stand screw may not be included depending on the model.
Wall mount items (sold separately) allow you to mountthe TV on the wall.For detailed information on installing the wall mount,see the instructions provided with the Wall Mount items.Contact a technician for assistance when installing thewall mounted bracket.Samsung Electronics is not responsible for any damageto the product or injury to yourself or othersif you elect to install the TV on your own.
Remove the stand and cover the bottom hole with acap and fasten with two screws.
Isi W m Ki
7/30/2019 Samsung LCD TV Eng Rom
http://slidepdf.com/reader/full/samsung-lcd-tv-eng-rom 5/92
eglis - 3
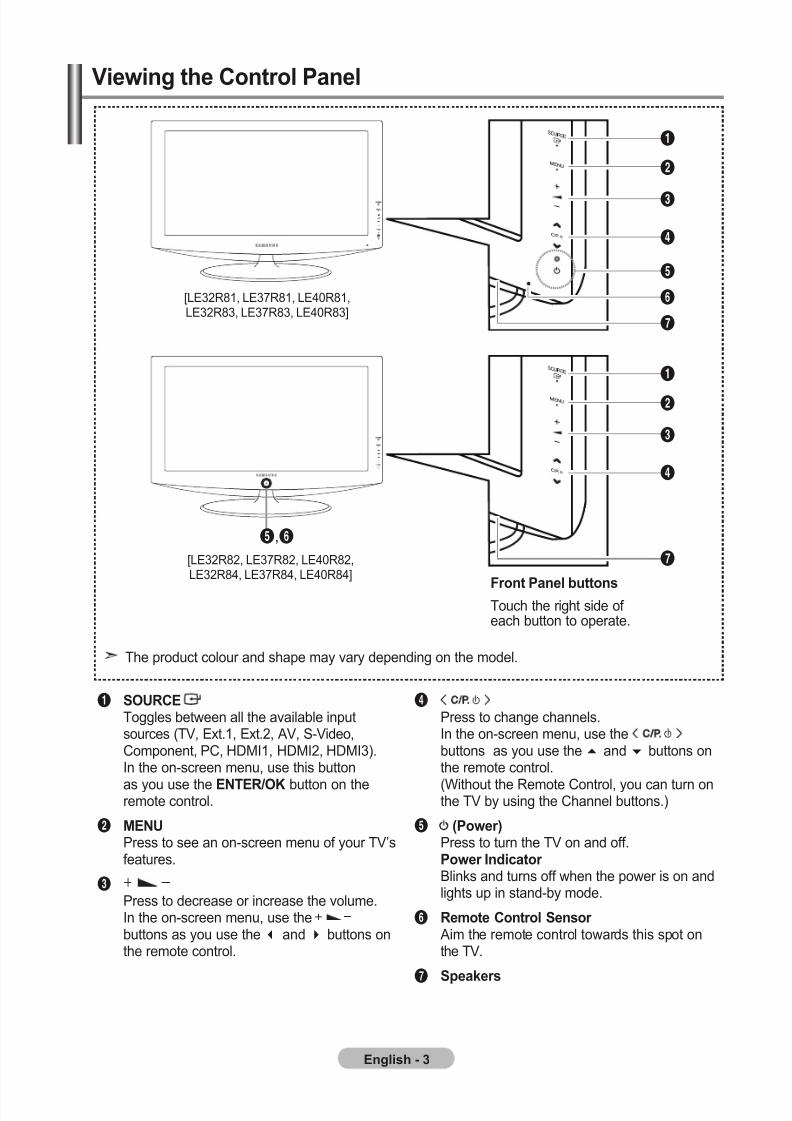
Viwi C P
1 SourCeToggles between all the available inputsources (TV, Ext.1, Ext.2, AV, S-Video,Component, PC, HDMI1, HDMI2, HDMI3).In the on-screen menu, use this button
as you use the enter/oK button on theremote control.
2 menu Press to see an on-screen menu of your TV’sfeatures.
3 Press to decrease or increase the volume.In the on-screen menu, use thebuttons as you use the and buttons onthe remote control.
4 Press to change channels.In the on-screen menu, use thebuttons as you use the5 and6 buttons onthe remote control.
(Without the Remote Control, you can turn onthe TV by using the Channel buttons.)
5 (Pw) Press to turn the TV on and off.Pw Idic Blinks and turns off when the power is on andlights up in stand-by mode.
6 r C Ss Aim the remote control towards this spot onthe TV.
7 Spks
The product colour and shape may vary depending on the model.
F P sTouch the right side of each button to operate.
1
2
3
4
5
6
7
[LE32R81, LE37R81, LE40R81,LE32R83, LE37R83, LE40R83]
1
2
3
4
5,6
7[LE32R82, LE37R82, LE40R82,LE32R84, LE37R84, LE40R84]
7/30/2019 Samsung LCD TV Eng Rom
http://slidepdf.com/reader/full/samsung-lcd-tv-eng-rom 6/92
eglis -
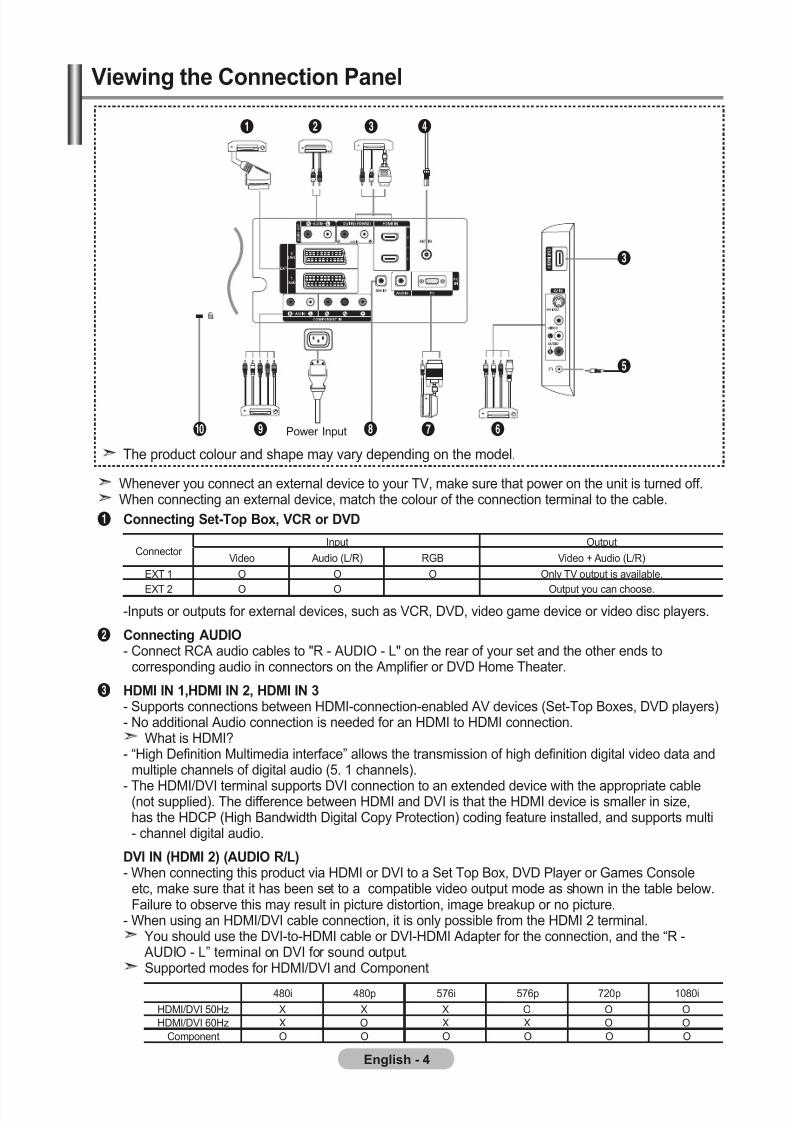
Viwi Cci P
Whenever you connect an external device to your TV, make sure that power on the unit is turned off.When connecting an external device, match the colour of the connection terminal to the cable.
1 Cci S-tp b, VCr DVD
Connector Input Output
Video Audio (L/R) RGB Video + Audio (L/R)
EXT 1 O O O Only TV output is available.
EXT 2 O O Output you can choose.
-Inputs or outputs for external devices, such as VCR, DVD, video game device or video disc players.
2 Cci auDIo - Connect RCA audio cables to "R - AUDIO - L" on the rear of your set and the other ends to
corresponding audio in connectors on the Amplifier or DVD Home Theater.
3 hDmI In 1,hDmI In , hDmI In 3 - Supports connections between HDMI-connection-enabled AV devices (Set-Top Boxes, DVD players)- No additional Audio connection is needed for an HDMI to HDMI connection.
What is HDMI?- “High Definition Multimedia interface” allows the transmission of high definition digital video data and
multiple channels of digital audio (5. 1 channels).
- The HDMI/DVI terminal supports DVI connection to an extended device with the appropriate cable(not supplied). The difference between HDMI and DVI is that the HDMI device is smaller in size,has the HDCP (High Bandwidth Digital Copy Protection) coding feature installed, and supports multi- channel digital audio.
DVI In (hDmI ) (auDIo r/l)- When connecting this product via HDMI or DVI to a Set Top Box, DVD Player or Games Console
etc, make sure that it has been set to a compatible video output mode as shown in the table below.Failure to observe this may result in picture distortion, image breakup or no picture.
- When using an HDMI/DVI cable connection, it is only possible from the HDMI 2 terminal.You should use the DVI-to-HDMI cable or DVI-HDMI Adapter for the connection, and the “R -
AUDIO - L” terminal on DVI for sound output.Supported modes for HDMI/DVI and Component
480i 480p 576i 576p 720p 1080i
HDMI/DVI 50Hz X X X O O O
HDMI/DVI 60Hz X O X X O O
Component O O O O O O
Power Input
1 2 3 4
3
5
67890
The product colour and shape may vary depending on the model.
7/30/2019 Samsung LCD TV Eng Rom
http://slidepdf.com/reader/full/samsung-lcd-tv-eng-rom 7/92
eglis -
4Cci ai C tvisi nwk To view television channels correctly, a signal must be received by the set from one of the followingsources:- An outdoor aerial / A cable television network / A satellite network
6 Cci e a/V Dvics - Connect RCA or S-VIDEO cable to an appropriate external A/V device such as VCR, DVD or
Camcorder.
- Connect RCA audio cables to "R - AUDIO - L" on the rear of your set and the other ends to corresponding audio out connectors on the A/V device.
- Headphone may be connected to the headphone output (5) on the rear of your set. While thehead phone is connected, the sound from the built-in speakers will be disabled.
7 Cci Cp - Connect the D- Sub cable (optional) to "PC (PC IN)" on the rear of your set and the other end to
the Video Card of your computer.- Connect the stereo audio cable (optional) to "AUDIO (PC IN)" on the rear of your set and the other
end to "Audio Out" of the sound card on your computer.
8SerVICe - Service connection for qualified service engineer.
9Cci Cp Dvics (DtV/DVD) - Connect component video cables (optional) to component connector ("PR", "PB", "Y") on the rear of
your set and the other ends to corresponding component video out connectors on the DTV or DVD.- If you wish to connect both the Set-Top Box and DTV (or DVD), you should connect the Set-Top Box
to the DTV (or DVD) and connect the DTV (or DVD) to component connector ("PR", "PB", "Y") on your set.- The PR, PB and Y connectors on your component devices (DTV or DVD) are sometimes labeled Y,
B-Y and R-Y or Y, Cb and Cr.- Connect RCA audio cables (optional) to "R - AUDIO - L" on the rear of your set and the other ends
to corresponding audio out connectors on the DTV or DVD.- This LCD TV displays its optimum picture resolution in 720p mode.- This LCD TV displays its maximum picture resolution in 1080i mode.
0 Ksi lck - The Kensington lock (optional) is a device used to physically fix the system when used in a public
place.- If you want to use a locking device, contact the dealer where you purchased the TV.- The place of the Kensington Lock may be different depending on its model.

7/30/2019 Samsung LCD TV Eng Rom
http://slidepdf.com/reader/full/samsung-lcd-tv-eng-rom 8/92
eglis -
1Selects a target device to becontrolled by the Samsungremote control (TV, DVD,STB, CABLE, VCR)(Refer to page 34~36)
2Television Standby button
3Number buttons for directchannel access
4One/Two-digit channelselection
5It display "Channel List"on the screen.
6Selects the TV mode directly
7VCR/DVD FunctionsRewind, Stop, Play/Pause,
Fast/Forward
8 Volume increaseVolume decrease
9Temporary sound switch-off
0Menu display andchange confirmation
! Sound mode selection
@Returns to the previousmenu
#Picture effect selection
%Sound effect selection
^SRS TS XT selection
& Adjusts 5 separate devices- TV, DVD, STB, CABLE, or VCR.
*When pressing this button, anumber of buttons on theremote control (e.g. Selectsa target device, volume,channel buttons) light upfor a few seconds and then
turn off to save power. Thisfunction is to convenientlyuse the remote control atnight or when dark.
( Available source selection
)Previous channel
a Automatic Power-off
b Records for Live(Anynet+ function only)(Refer to page 40)
cP : Next channelP : Previous channel
dExit the OSD
eControl the cursor in the
menu
fUse to see information onthe current broadcast
gPicture freeze
hRuns the Anynet viewfunctions and sets up Anynetdevices.
iPicture size selection
jPIP:Picture-In-Picture On/Off SOURCE: Input source
selectionPOSITION: PIP positionselection P : Next channelP : Previous channel
kWhen your remote does notwork, change the batteriesand press the "RESET"button for 2-3 secondsbefore use.
t Fcis
6Exit from the teletext display
0Teletext index
$ Alternately select Teletext,Double, or Mix.
(Teletext mode selection(LIST/FLOF)
)Teletext sub page
cP : Teletext next pageP : Teletext previous page
dTeletext cancel
fTeletext reveal
!#gi Fastext topic selection
jPIP:Teletext Hold
jSOURCE: Teletext Store
jPOSITION: Teletext sizeselection
The performance of the remote control may be affected by bright light.
This is a special remote control for the visually impaired, and has Braille points on the Power,Channel, STOP, PLAY/PAUSE and Volume buttons.
Viwi r C
7/30/2019 Samsung LCD TV Eng Rom
http://slidepdf.com/reader/full/samsung-lcd-tv-eng-rom 9/92
eglis -
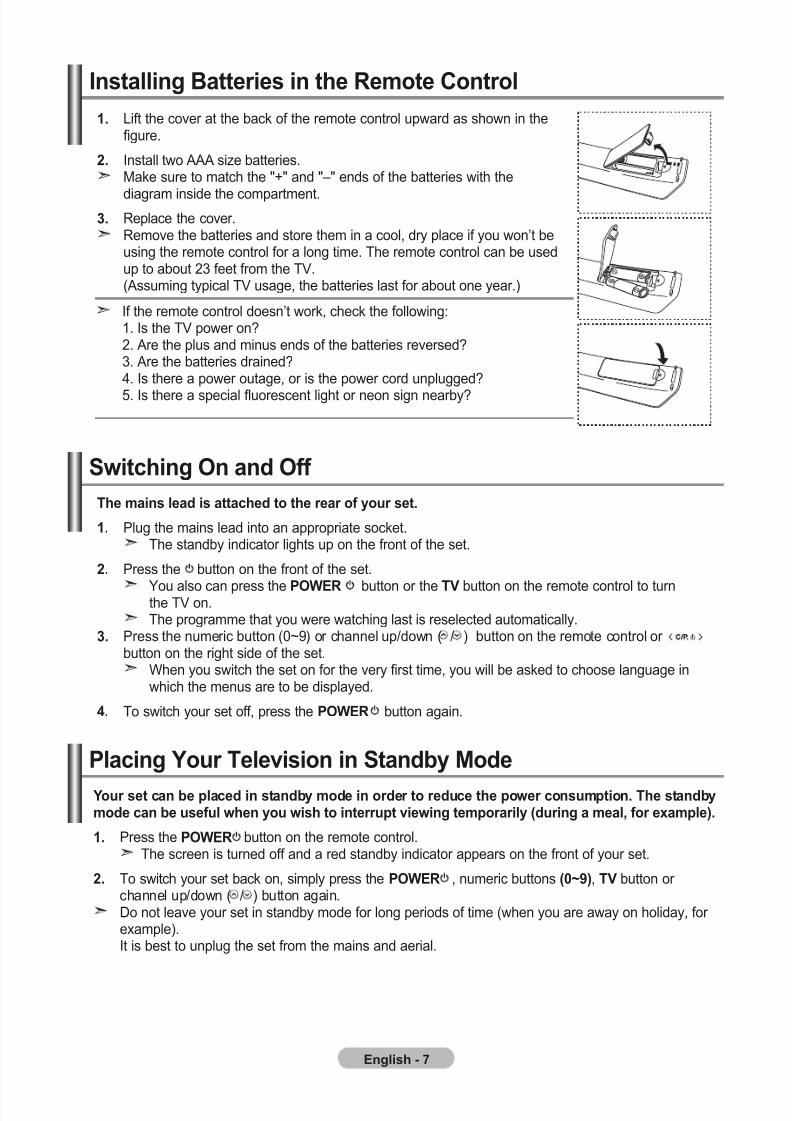
1. Lift the cover at the back of the remote control upward as shown in thefigure.
. Install two AAA size batteries.Make sure to match the "+" and "–" ends of the batteries with the
diagram inside the compartment.3. Replace the cover.
Remove the batteries and store them in a cool, dry place if you won’t beusing the remote control for a long time. The remote control can be usedup to about 23 feet from the TV.(Assuming typical TV usage, the batteries last for about one year.)
If the remote control doesn’t work, check the following:1. Is the TV power on?2. Are the plus and minus ends of the batteries reversed?3. Are the batteries drained?4. Is there a power outage, or is the power cord unplugged?
5. Is there a special fluorescent light or neon sign nearby?
Isi bis i r C
Swici o d off
t is d is cd f y s.
1. Plug the mains lead into an appropriate socket.The standby indicator lights up on the front of the set.
. Press the button on the front of the set.
You also can press the PoWer button or the tV button on the remote control to turnthe TV on.The programme that you were watching last is reselected automatically.
3. Press the numeric button (0~9) or channel up/down ( / ) button on the remote control or button on the right side of the set.
When you switch the set on for the very first time, you will be asked to choose language inwhich the menus are to be displayed.
. To switch your set off, press the PoWer button again.
Y s c pcd i sdy d i d dc pw cspi. t sdyd c sf w y wis ip viwi piy (di , f p).
1. Press the PoWer button on the remote control.The screen is turned off and a red standby indicator appears on the front of your set.
. To switch your set back on, simply press the PoWer , numeric buttons (0~9), tV button or channel up/down ( / ) button again.Do not leave your set in standby mode for long periods of time (when you are away on holiday, for example).It is best to unplug the set from the mains and aerial.
Pci Y tvisi i Sdy md
7/30/2019 Samsung LCD TV Eng Rom
http://slidepdf.com/reader/full/samsung-lcd-tv-eng-rom 10/92
eglis -
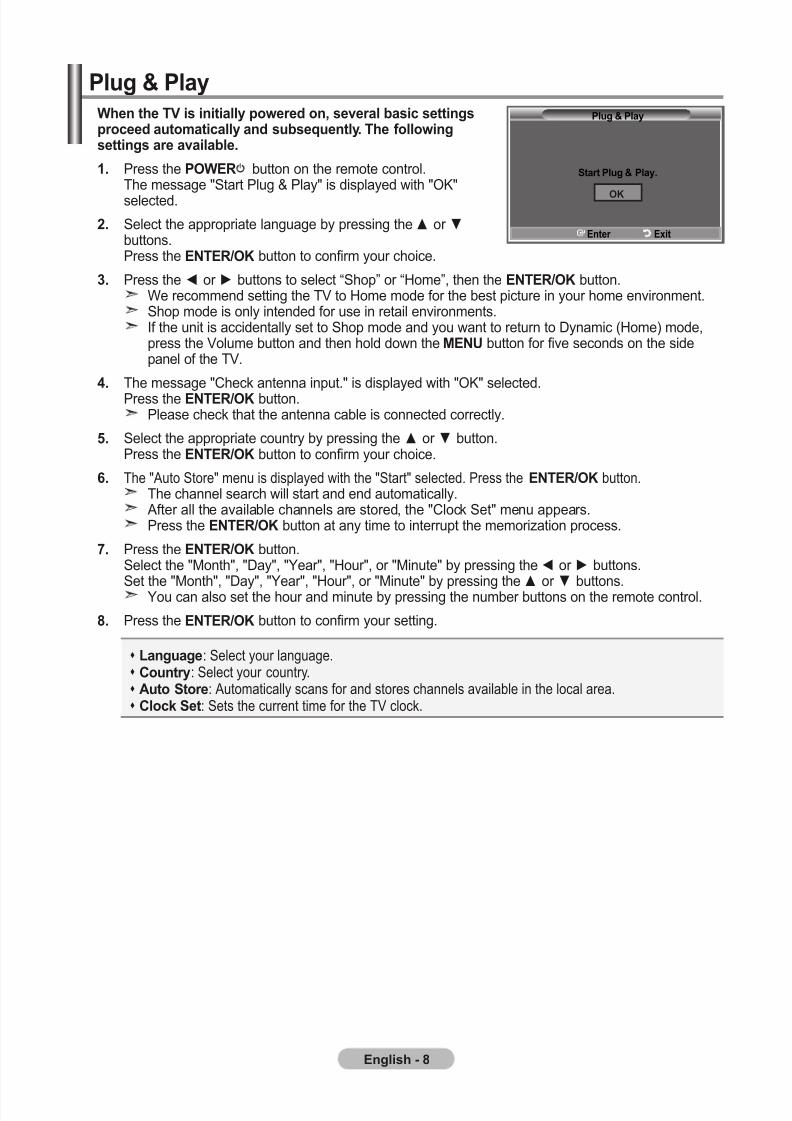
W tV is iiiy pwd , sv sic sispcd icy d ssqy. t fwisis vi.
1. Press the PoWer button on the remote control.The message "Start Plug & Play" is displayed with "OK"selected.
. Select the appropriate language by pressing the ▲ or ▼buttons.Press the enter/oK button to confirm your choice.
3. Press the ◄ or ► buttons to select “Shop” or “Home”, then the enter/oK button.We recommend setting the TV to Home mode for the best picture in your home environment.Shop mode is only intended for use in retail environments.If the unit is accidentally set to Shop mode and you want to return to Dynamic (Home) mode,press the Volume button and then hold down the menu button for five seconds on the sidepanel of the TV.
. The message "Check antenna input." is displayed with "OK" selected.Press the enter/oK button.
Please check that the antenna cable is connected correctly.
. Select the appropriate country by pressing the ▲ or ▼ button.Press the enter/oK button to confirm your choice.
. The "Auto Store" menu is displayed with the "Start" selected. Press the enter/oK button. The channel search will start and end automatically. After all the available channels are stored, the "Clock Set" menu appears.Press the enter/oK button at any time to interrupt the memorization process.
. Press the enter/oK button.Select the "Month", "Day", "Year", "Hour", or "Minute" by pressing the ◄ or ► buttons.
Set the "Month", "Day", "Year", "Hour", or "Minute" by pressing the ▲ or ▼ buttons.You can also set the hour and minute by pressing the number buttons on the remote control.
. Press the enter/oK button to confirm your setting.
P & Py
l: Select your language. Cy: Select your country. a S: Automatically scans for and stores channels available in the local area. Cck S: Sets the current time for the TV clock.
P & Py
S P & Py.
e exi
oK
7/30/2019 Samsung LCD TV Eng Rom
http://slidepdf.com/reader/full/samsung-lcd-tv-eng-rom 11/92
eglis - 9
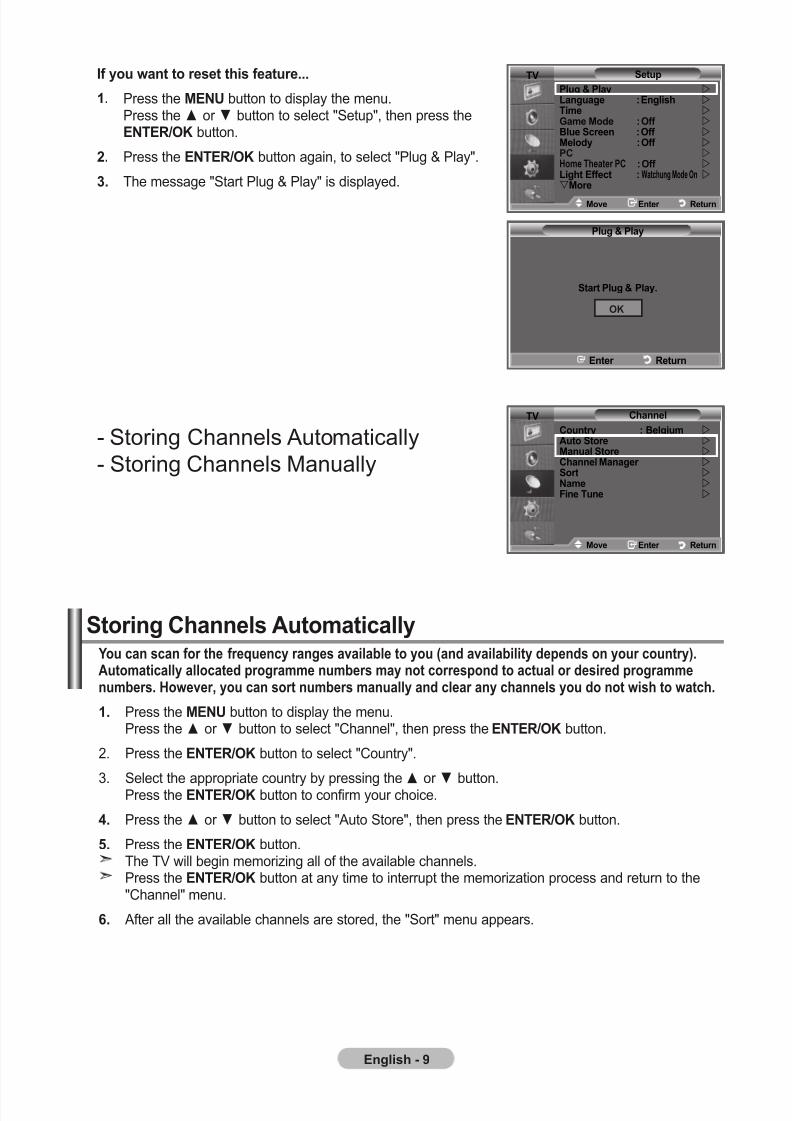
If y w s is f...
1. Press the menu button to display the menu.Press the ▲ or ▼ button to select "Setup", then press theenter/oK button.
. Press the enter/oK button again, to select "Plug & Play".
3. The message "Start Plug & Play" is displayed.
- Storing Channels Automatically
- Storing Channels Manually
Y c sc f fqcy gs vi y (d viiiy dpds y cy).aicy cd pg s y cspd c dsid pgs. hwv, y c s s y d c y cs y d wis wc.
1. Press the menu button to display the menu.Press the ▲ or ▼ button to select "Channel", then press the enter/oK button.
2. Press the enter/oK button to select "Country".
3. Select the appropriate country by pressing the ▲ or ▼ button.Press the enter/oK button to confirm your choice.
. Press the ▲ or ▼ button to select "Auto Store", then press the enter/oK button.
. Press the enter/oK button.The TV will begin memorizing all of the available channels.Press the enter/oK button at any time to interrupt the memorization process and return to the"Channel" menu.
. After all the available channels are stored, the "Sort" menu appears.
Si Cs aicy
tV C
Cy : bi a S m S C m S n Fi t
tV Sp
P & Py l : eis ti g md : off b Sc : off mdy : off PC hom tar PC : off li effc : Watchung mde on m
mv e r
mv e r
P & Py
S P & Py.
e r
oK
7/30/2019 Samsung LCD TV Eng Rom
http://slidepdf.com/reader/full/samsung-lcd-tv-eng-rom 12/92
eglis - 10
P: Selects a program number for the channel.
C Sys: Sets the colour supporting system.
Sd Sys: Sets the sound supporting system.
C: Selects a channel.
Sc: Scans for the frequency value for the channel.
S: Saves your settings.
Si Cs my
Y c s p 100 cs, icdi s civd vi c wks.W si cs y, y c cs:W s c f cs fd.t p f c sd c wic y wis idify.
1. Press the menu button to display the menu.Press the ▲ or ▼ button to select "Channel", then press the enter/oK button.
. Press the ▲ or ▼ button to select "Manual Store", then press the enter/oK button.
3. Press the enter/oK button to select "Programme".
. To assign a programme number to a channel, find the correct number by pressing the ▲ or ▼button and then press the enter/oK button.
You can also set a programme number by pressing number buttons on the remote control.
. Press the ▲ or ▼ button to select "Colour System", then press the enter/oK button.
. Select the colour standard required by pressing the ▲ or ▼ button then, press the enter/oK button.
. Press the ▲ or ▼ button to select "Sound System", then press the enter/oK button.
. Select the sound standard required by pressing the ▲ or ▼ button, then press the enter/oK button. If there is an abnormal sound or no sound, re-select the sound system required.
9. If you know the number of the channel to be stored, press the ▲ or ▼ button to select "Channel".Press the enter/oK button. Select C (Air channel) or S (Cable channel) by pressing the5 or 6 button. Press the button to select channel.Select the required number by pressing the ▲ or ▼ button and then press the enter/oK button.
Channel mode: P (Programme mode), C (Air channel mode), S (Cable channel mode)You can also set a channel number by pressing number buttons on the remote control.
10. If you do not know the channel numbers, press the ▲ or ▼ button to select "Search".
Press the enter/oK button. Search by pressing the ▲ or ▼ button and then press the enter/oK button.11. Press the ▲ or ▼ button to select "Store". Press the enter/oK button to select "OK".
1. Repeat steps 3 to 11 for each channel to be stored.
7/30/2019 Samsung LCD TV Eng Rom
http://slidepdf.com/reader/full/samsung-lcd-tv-eng-rom 13/92
eglis - 11
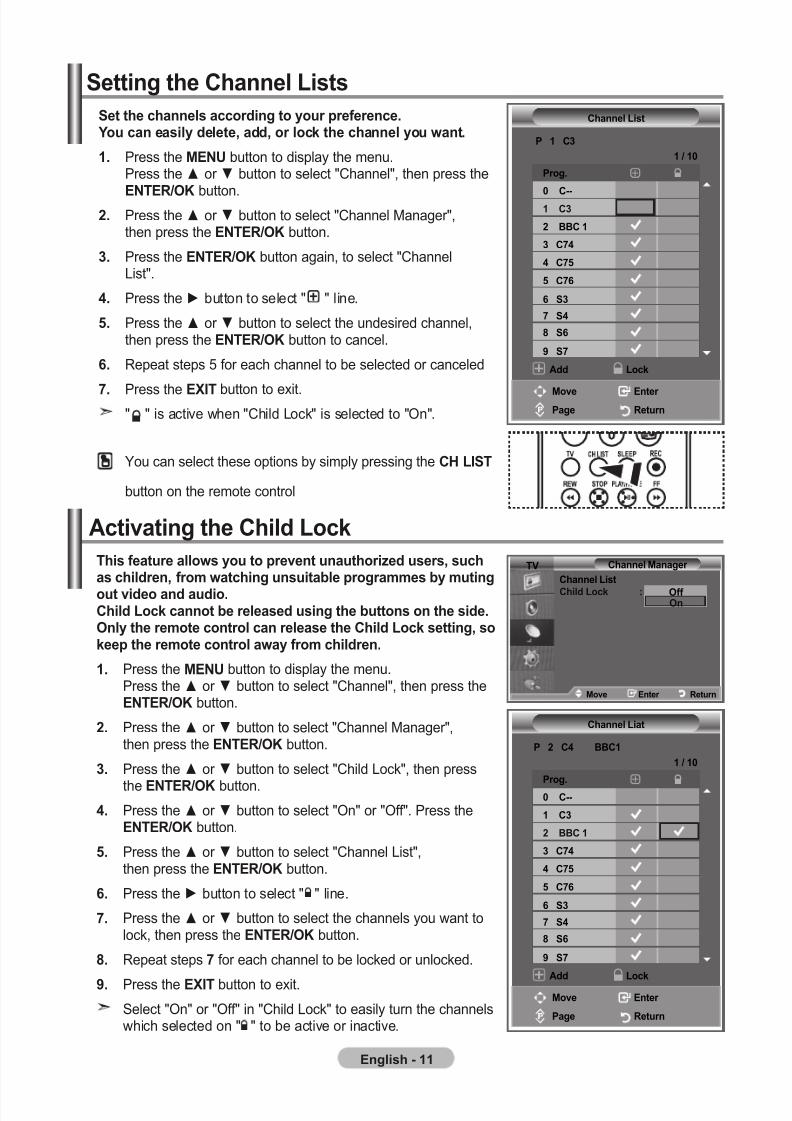
S cs ccdi y pfc. Y c siy d, dd, ck c y w.
1. Press the menu button to display the menu.Press the ▲ or ▼ button to select "Channel", then press the
enter/oK button.. Press the ▲ or ▼ button to select "Channel Manager",
then press the enter/oK button.
3. Press the enter/oK button again, to select "ChannelList".
. Press the ► button to select " " line.
. Press the ▲ or ▼ button to select the undesired channel,then press the enter/oK button to cancel.
. Repeat steps 5 for each channel to be selected or canceled
. Press the exIt button to exit." " is active when "Child Lock" is selected to "On".
You can select these options by simply pressing the Ch lISt
button on the remote control
Si C liss
tis f ws y pv izd ss, scs cid, f wci si ps y i vid d di.Cid lck c sd si s sid.oy c c s Cid lck si, skp c wy f cid.
1. Press the menu button to display the menu.Press the ▲ or ▼ button to select "Channel", then press theenter/oK button.
. Press the ▲ or ▼ button to select "Channel Manager",then press the enter/oK button.
3. Press the ▲ or ▼ button to select "Child Lock", then press
the enter/oK button.
. Press the ▲ or ▼ button to select "On" or "Off". Press theenter/oK button.
. Press the ▲ or ▼ button to select "Channel List",then press the enter/oK button.
. Press the ► button to select " " line.
. Press the ▲ or ▼ button to select the channels you want tolock, then press the enter/oK button.
. Repeat steps for each channel to be locked or unlocked.
9. Press the exIt button to exit.
Select "On" or "Off" in "Child Lock" to easily turn the channelswhich selected on " " to be active or inactive.
acivi Cid lck
P 1 C3
C lis
mv e
P r
add lck
1 / 10
P.
0 C--1 C3
bbC 1
3 C
C
C
S3
S
S
9 S
tV C m
C lis
Cid lck : off o
P C bbC1
C li
mv e
P r
add lck
1 / 10
P.0 C--
1 C3
bbC 1
3 C
C
C
S3
S
S
9 S
mv e r
7/30/2019 Samsung LCD TV Eng Rom
http://slidepdf.com/reader/full/samsung-lcd-tv-eng-rom 14/92
eglis - 1
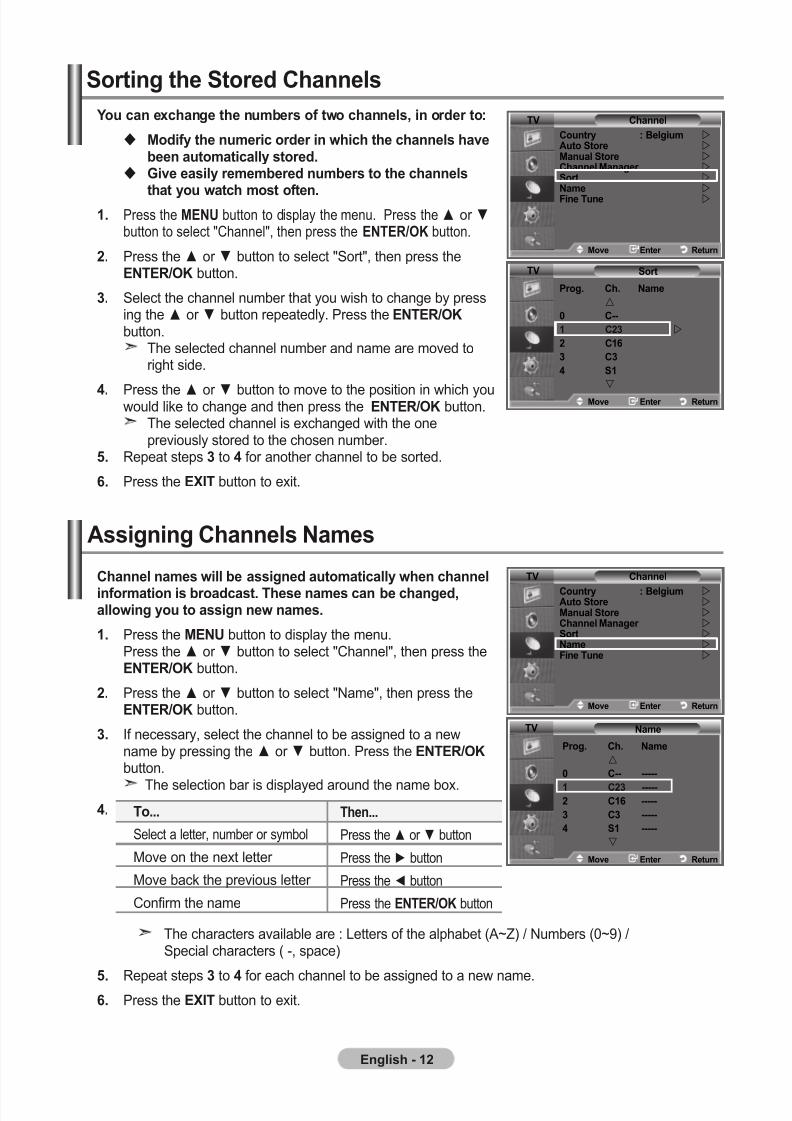
Y c c s f w cs, i d :
mdify ic d i wic cs v icy sd.
giv siy d s cs
y wc s f.1. Press the menu button to display the menu. Press the ▲ or ▼
button to select "Channel", then press the enter/oK button.
. Press the ▲ or ▼ button to select "Sort", then press theenter/oK button.
3. Select the channel number that you wish to change by pressing the ▲ or ▼ button repeatedly. Press the enter/oK button.
The selected channel number and name are moved toright side.
. Press the ▲ or ▼ button to move to the position in which youwould like to change and then press the enter/oK button.
The selected channel is exchanged with the onepreviously stored to the chosen number.
. Repeat steps 3 to for another channel to be sorted.
. Press the exIt button to exit.
Si Sd Cs
assii Cs ns
C s wi ssid icy w c
ifi is dcs. ts s c cd,wi y ssi w s.
1. Press the menu button to display the menu.Press the ▲ or ▼ button to select "Channel", then press theenter/oK button.
. Press the ▲ or ▼ button to select "Name", then press theenter/oK button.
3. If necessary, select the channel to be assigned to a newname by pressing the ▲ or ▼ button. Press the enter/oK button.
The selection bar is displayed around the name box.
.
The characters available are : Letters of the alphabet (A~Z) / Numbers (0~9) /Special characters ( -, space)
. Repeat steps 3 to for each channel to be assigned to a new name.. Press the exIt button to exit.
t...
Select a letter, number or symbol
Move on the next letter
Move back the previous letter
Confirm the name
t...
Press the ▲ or ▼ button
Press the ► button
Press the ◄ button
Press the enter/oK button
n
mv e r
P. C. n
0 C-- -----
1 C3 -----
C1 -----
3 C3 -----
S1 -----
tV
C
Cy : bi a S m S C m S n Fi t
mv e r
tV
S
P. C. n
0 C--
1 C3
C1
3 C3
S1
tV
mv e r
C
Cy : bi a S m S C m S n
Fi t
tV
mv e r
7/30/2019 Samsung LCD TV Eng Rom
http://slidepdf.com/reader/full/samsung-lcd-tv-eng-rom 15/92
eglis - 13
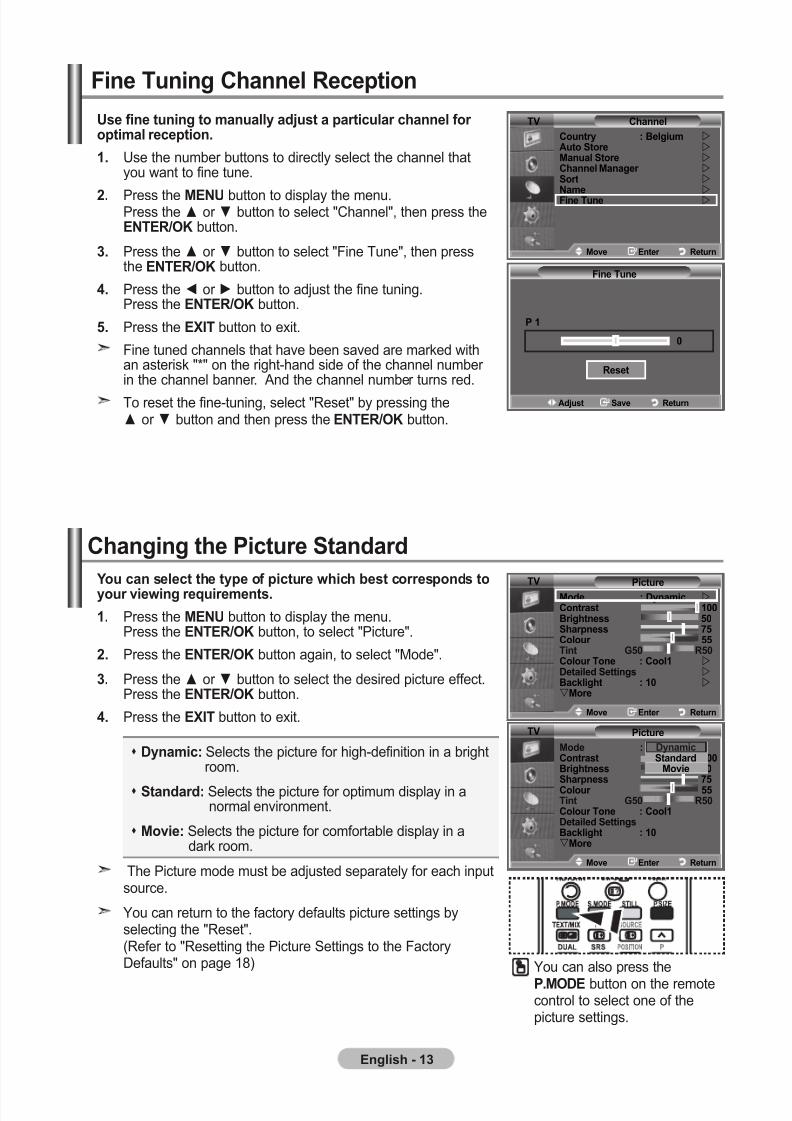
us fi i y djs pic c f pi cpi.
1. Use the number buttons to directly select the channel thatyou want to fine tune.
. Press the menu button to display the menu.Press the ▲ or ▼ button to select "Channel", then press theenter/oK button.
3. Press the ▲ or ▼ button to select "Fine Tune", then pressthe enter/oK button.
. Press the ◄ or ► button to adjust the fine tuning.Press the enter/oK button.
. Press the exIt button to exit.
Fine tuned channels that have been saved are marked withan asterisk "*" on the right-hand side of the channel number in the channel banner. And the channel number turns red.
To reset the fine-tuning, select "Reset" by pressing the▲ or ▼ button and then press the enter/oK button.
Fi ti C rcpi
C
Cy : bi a S m S C m S n Fi t
Fi t
P 1
0
rs
tV
mv e r
adjs Sv r
Y c sc yp f pic wic s cspds y viwi qis.
1. Press the menu button to display the menu.Press the enter/oK button, to select "Picture".
. Press the enter/oK button again, to select "Mode".
3. Press the ▲ or ▼ button to select the desired picture effect.Press the enter/oK button.
. Press the exIt button to exit.
Dyic: Selects the picture for high-definition in a brightroom.
Sdd: Selects the picture for optimum display in anormal environment.
mvi: Selects the picture for comfortable display in adark room.
The Picture mode must be adjusted separately for each inputsource.
You can return to the factory defaults picture settings byselecting the "Reset".(Refer to "Resetting the Picture Settings to the FactoryDefaults" on page 18)
Ci Pic Sdd
You can also press the
P.moDe button on the remotecontrol to select one of thepicture settings.
Pic
md : DyicCs 100biss 0
Spss C ti g0 r0C t : C1Did Sisbcki : 10m
tV
mv e r
DyicSdd
mvi
Pic
md : Dyic Cs 100biss 0Spss C ti g0 r0C t : C1 Did Sis bcki : 10 m
tV
mv e r
7/30/2019 Samsung LCD TV Eng Rom
http://slidepdf.com/reader/full/samsung-lcd-tv-eng-rom 16/92
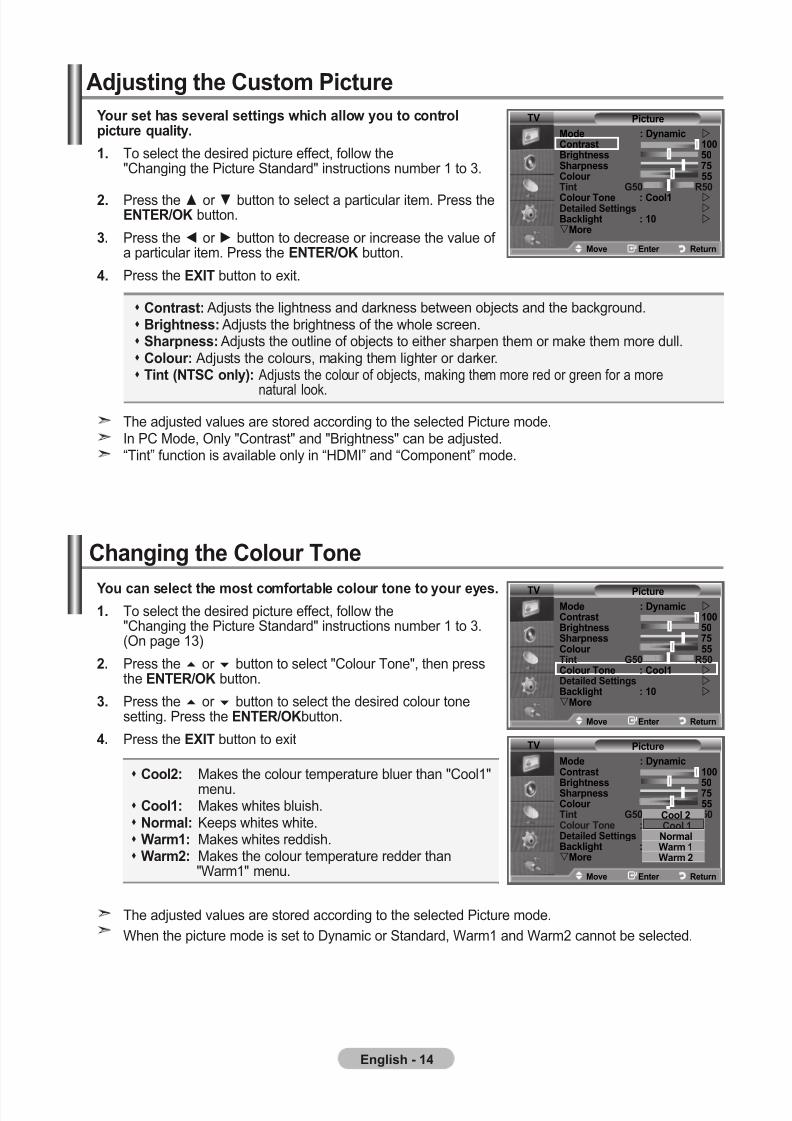
eglis - 1
Cs: Adjusts the lightness and darkness between objects and the background. biss: Adjusts the brightness of the whole screen. Spss: Adjusts the outline of objects to either sharpen them or make them more dull. C: Adjusts the colours, making them lighter or darker. ti (ntSC y): Adjusts the colour of objects, making them more red or green for a more
natural look.
Y s s sv sis wic w y cpic qiy.
1. To select the desired picture effect, follow the"Changing the Picture Standard" instructions number 1 to 3.
. Press the ▲ or ▼ button to select a particular item. Press theenter/oK button.
3. Press the ◄ or ► button to decrease or increase the value of a particular item. Press the enter/oK button.
. Press the exIt button to exit.
adjsi Cs Pic
The adjusted values are stored according to the selected Picture mode.In PC Mode, Only "Contrast" and "Brightness" can be adjusted.“Tint” function is available only in “HDMI” and “Component” mode.
Pic
md : Dyic Cs 100biss 0Spss C ti g0 r0
C t : C1 Did Sis bcki : 10 m
tV
mv e r
Ci C t
Y c sc s cf c y ys.
1. To select the desired picture effect, follow the"Changing the Picture Standard" instructions number 1 to 3.(On page 13)
. Press the5 or 6 button to select "Colour Tone", then pressthe enter/oK button.
3. Press the5 or 6 button to select the desired colour tonesetting. Press the enter/oKbutton.
. Press the exIt button to exit
C: Makes the colour temperature bluer than "Cool1"menu.
C1: Makes whites bluish. n: Keeps whites white. W1: Makes whites reddish. W: Makes the colour temperature redder than
"Warm1" menu.
The adjusted values are stored according to the selected Picture mode.
When the picture mode is set to Dynamic or Standard, Warm1 and Warm2 cannot be selected.
Pic
md : DyicCs 100
biss 0Spss C ti g0 r0C t : C1Did Sisbcki : 10m
tV
mv e r
C C 1
nW 1W
Pic
md : Dyic Cs 100biss 0Spss C ti g0 r0C t : C1 Did Sis bcki : 10 m
tV
mv e r

7/30/2019 Samsung LCD TV Eng Rom
http://slidepdf.com/reader/full/samsung-lcd-tv-eng-rom 17/92
eglis - 1
Pic
md : Dyic Cs 100biss 0Spss C ti g0 r0C t : C1 Did Sis bcki : 10 m
tV
mv e r
10bcki
adjs r
Y c djs sc iss y djsi lCDcki iss. (0~10)
acivi bcki
1. To select the desired picture effect, follow the"Changing the Picture Standard" instructions number 1 to 3.(On page 13)
. Press the ▲ or ▼ button to select “Backlight”, then press theenter/oK button.
3. Press the ◄ or ► button to decrease or increase the value of a particular item.
. Press the enter/oK button.
Press the exIt button to exit.
7/30/2019 Samsung LCD TV Eng Rom
http://slidepdf.com/reader/full/samsung-lcd-tv-eng-rom 18/92
eglis - 1
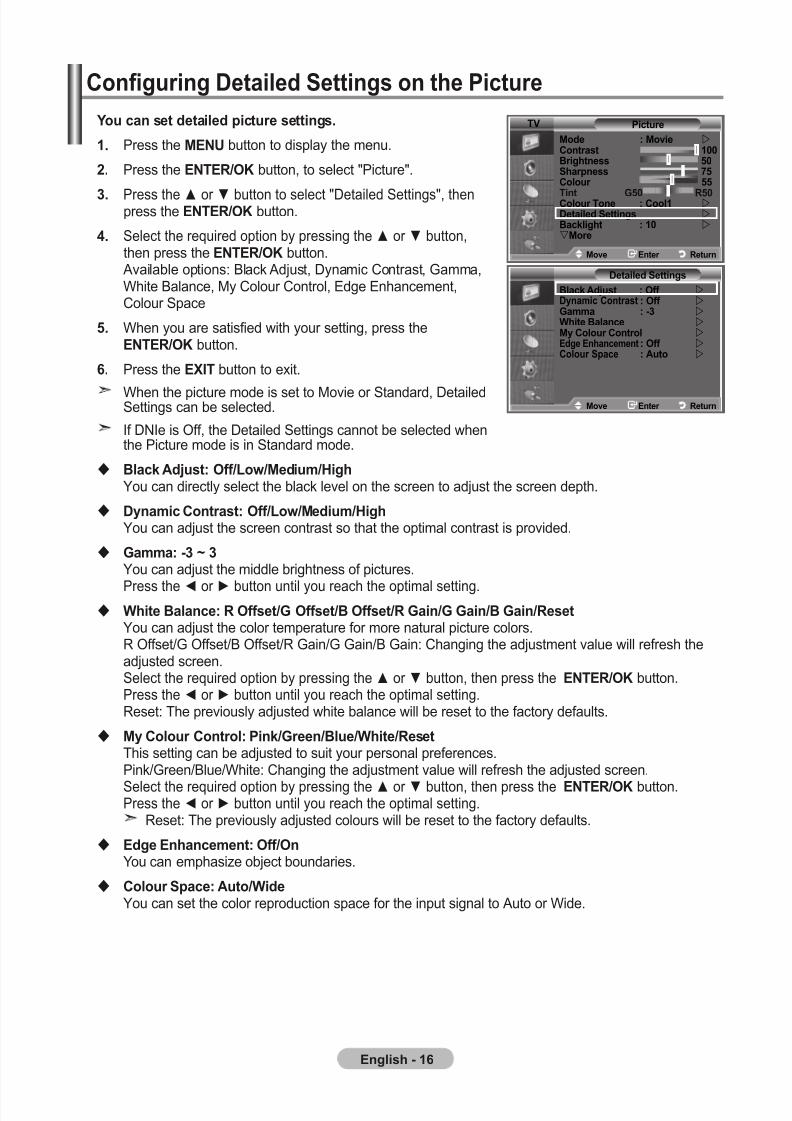
Y c s did pic sis.
1. Press the menu button to display the menu.
. Press the enter/oK button, to select "Picture".
3. Press the ▲ or ▼ button to select "Detailed Settings", thenpress the enter/oK button.
. Select the required option by pressing the ▲ or ▼ button,then press the enter/oK button.
Available options: Black Adjust, Dynamic Contrast, Gamma,White Balance, My Colour Control, Edge Enhancement,Colour Space
. When you are satisfied with your setting, press theenter/oK button.
. Press the exIt button to exit.
When the picture mode is set to Movie or Standard, DetailedSettings can be selected.
If DNIe is Off, the Detailed Settings cannot be selected whenthe Picture mode is in Standard mode.
bck adjs: off/lw/mdi/hi You can directly select the black level on the screen to adjust the screen depth.
Dyic Cs: off/lw/mdi/hi You can adjust the screen contrast so that the optimal contrast is provided.
g: -3 ~ 3 You can adjust the middle brightness of pictures.
Press the ◄ or ► button until you reach the optimal setting. Wi bc: r offs/g offs/b offs/r gi/g gi/b gi/rs
You can adjust the color temperature for more natural picture colors.R Offset/G Offset/B Offset/R Gain/G Gain/B Gain: Changing the adjustment value will refresh theadjusted screen.Select the required option by pressing the ▲ or ▼ button, then press the enter/oK button.Press the ◄ or ► button until you reach the optimal setting. Reset: The previously adjusted white balance will be reset to the factory defaults.
my C C: Pik/g/b/Wi/rs This setting can be adjusted to suit your personal preferences.Pink/Green/Blue/White: Changing the adjustment value will refresh the adjusted screen.
Select the required option by pressing the ▲ or ▼ button, then press the enter/oK button.Press the ◄ or ► button until you reach the optimal setting.
Reset: The previously adjusted colours will be reset to the factory defaults.
ed ec: off/o You can emphasize object boundaries.
C Spc: a/Wid You can set the color reproduction space for the input signal to Auto or Wide.
Confguring Detailed Settings on the Picture
Pic
md : mvi Cs 100biss 0Spss C
ti g0 r0C t : C1 Did Sis bcki : 10 m
tV
mv e r
Did Sis
bck adjs : off Dyic Cs : off g : -3 Wi bc my C C edg ec : off C Spc : a
mv e r
7/30/2019 Samsung LCD TV Eng Rom
http://slidepdf.com/reader/full/samsung-lcd-tv-eng-rom 19/92
eglis - 1
a Wid: Automatically adjusts the picture size to the "16:9"aspect ratio.
1:9: Adjusts the picture size to 16:9 appropriate for DVDs or wide broadcasting.
Wid Z: Magnify the size of the picture more than 4:3.
Z: Magnifies the 16:9 wide picture (in the vertical direction)to fit the screen size.
:3: This is the default setting for a video movie or normalbroadcasting.
Js Sc: Displays the input scenes as they are without anycutoff when HDMI 720p,1080i signals are input.
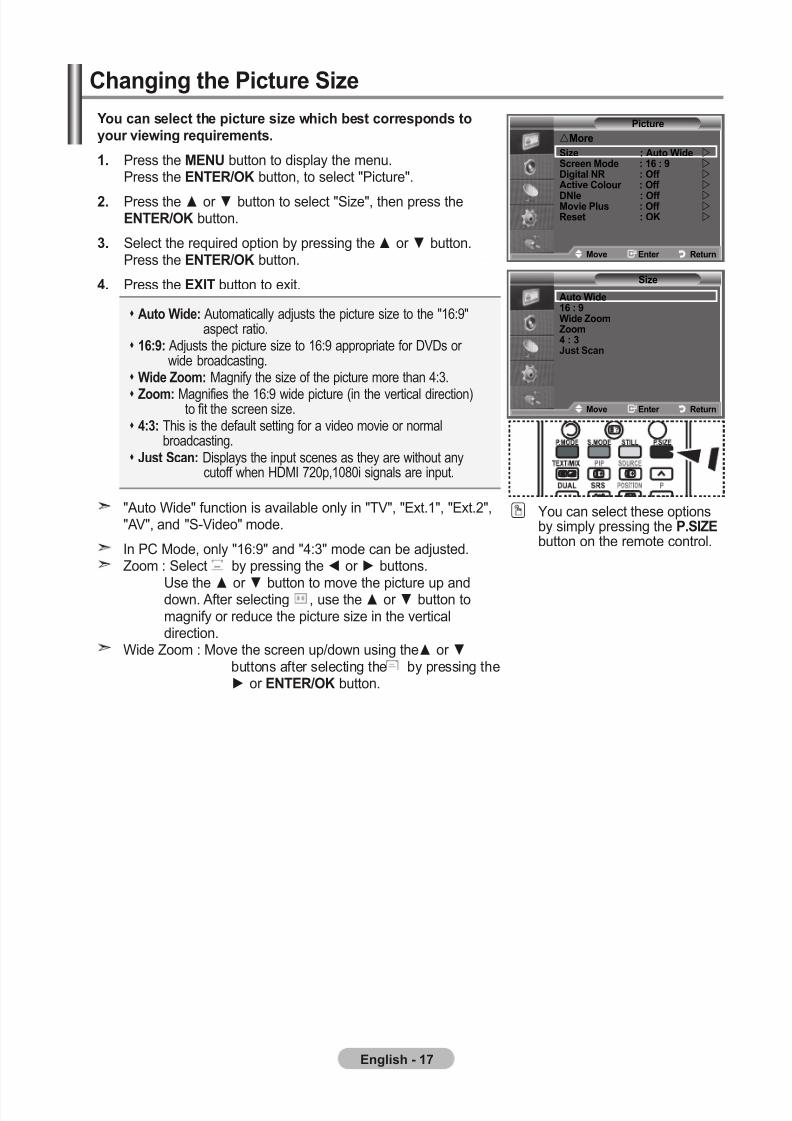
Y c sc pic siz wic s cspds y viwi qis.
1. Press the menu button to display the menu.Press the enter/oK button, to select "Picture".
. Press the ▲ or ▼ button to select "Size", then press theenter/oK button.
3. Select the required option by pressing the ▲ or ▼ button.Press the enter/oK button.
. Press the exIt button to exit.
"Auto Wide" function is available only in "TV", "Ext.1", "Ext.2","AV", and "S-Video" mode.
In PC Mode, only "16:9" and "4:3" mode can be adjusted.Zoom : Select by pressing the ◄ or ► buttons.
Use the ▲ or ▼ button to move the picture up anddown. After selecting , use the ▲ or ▼ button tomagnify or reduce the picture size in the verticaldirection.
Wide Zoom : Move the screen up/down using the▲ or ▼ buttons after selecting the by pressing the► or enter/oK button.
Ci Pic Siz
You can select these optionsby simply pressing the P.SIZe button on the remote control.
Siz
a Wid1 : 9Wid ZZ : 3Js Sc
Pic
Siz : a Wid Sc md : 1 : 9 Dii nr : off aciv C : off
Dn : off mvi Ps : off rs : oK
m
mv e r
mv e r
7/30/2019 Samsung LCD TV Eng Rom
http://slidepdf.com/reader/full/samsung-lcd-tv-eng-rom 20/92
English - 18
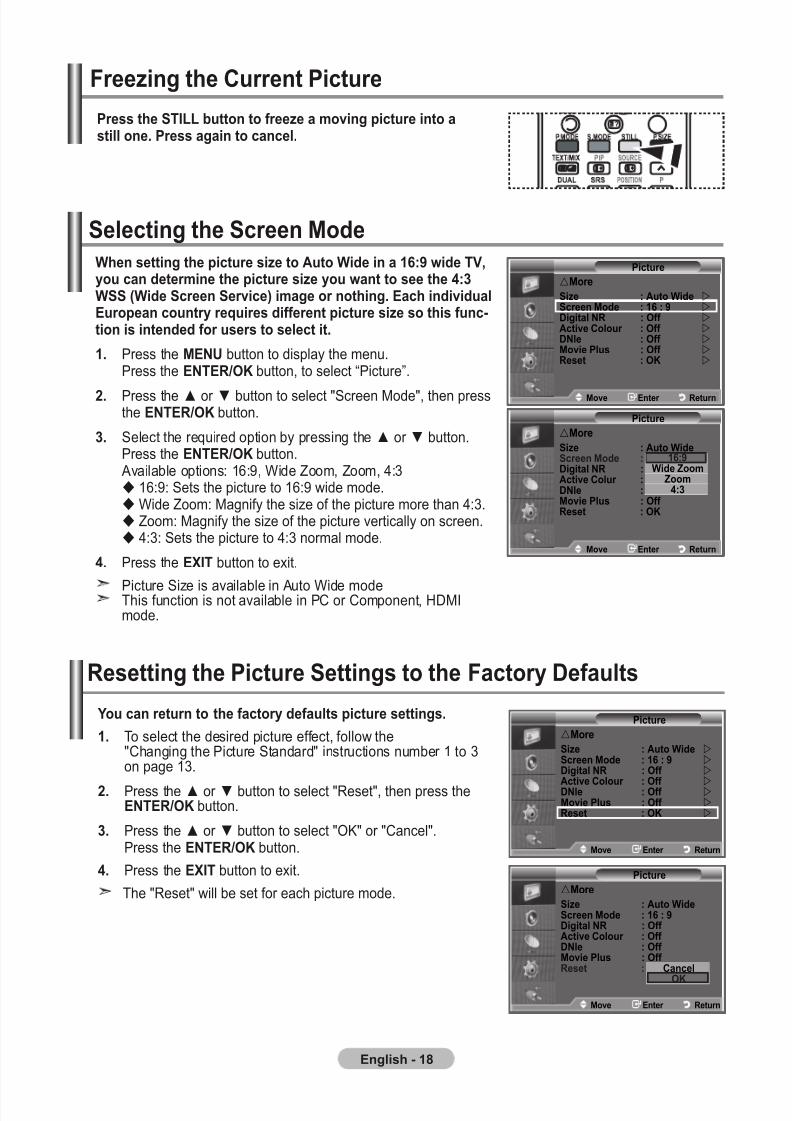
When setting the picture size to Auto Wide in a 16:9 wide TV,you can determine the picture size you want to see the 4:3WSS (Wide Screen Service) image or nothing. Each individualEuropean country requires different picture size so this func-tion is intended for users to select it.
1. PresstheMENUbuttontodisplaythemenu. PresstheENTER/OKbutton,toselect“Picture”.
2. Pressthe▲or▼buttontoselect"ScreenMode",thenpress theENTER/OKbutton.
3. Selecttherequiredoptionbypressingthe▲or▼button. PresstheENTER/OKbutton. Availableoptions:16:9,WideZoom,Zoom,4:3 16:9:Setsthepictureto16:9widemode. WideZoom:Magnifythesizeofthepicturemorethan4:3. Zoom:Magnifythesizeofthepictureverticallyonscreen. 4:3:Setsthepictureto4:3normalmode.
4. PresstheEXITbuttontoexit.
PictureSizeisavailableinAutoWidemode ThisfunctionisnotavailableinPCorComponent,HDMI mode.
Selecting the Screen Mode
Press the STILL button to freeze a moving picture into astill one. Press again to cancel.
Freezing the Current Picture
Resetting the Picture Settings to the Factory Defaults
You can return to the factory defaults picture settings.
1. Toselectthedesiredpictureeffect,followthe "ChangingthePictureStandard"instructionsnumber1to3 onpage13.
2. Pressthe▲or▼buttontoselect"Reset",thenpressthe ENTER/OKbutton.
3. Pressthe▲or▼buttontoselect"OK"or"Cancel". PresstheENTER/OKbutton.
4. PresstheEXITbuttontoexit.
The"Reset"willbesetforeachpicturemode.
Picture
Size : Auto Wide Screen Mode : 16 : 9 Digital NR : Off
Active Colour : Off DNle : Off Movie Plus : Off Reset : OK
rMore
Move Enter Return
Picture
Size : Auto WideScreen Mode : 16 : 9Digital NR : Off Active Colour : Off DNle : Off Movie Plus : Off Reset : OK
rMore
Move Enter Return
Cancel
OK
Picture
Size : Auto WideScreen Mode : 16 : 9Digital NR : Off Active Colur : Off DNle : Off Movie Plus : Off Reset : OK
rMore
16:9Wide Zoom
Zoom4:3
Move Enter Return
Picture
Size : Auto Wide Screen Mode : 16 : 9 Digital NR : Off Active Colour : Off DNle : Off Movie Plus : Off Reset : OK
rMore
Move Enter Return
Move Enter Return
7/30/2019 Samsung LCD TV Eng Rom
http://slidepdf.com/reader/full/samsung-lcd-tv-eng-rom 21/92
eglis - 19
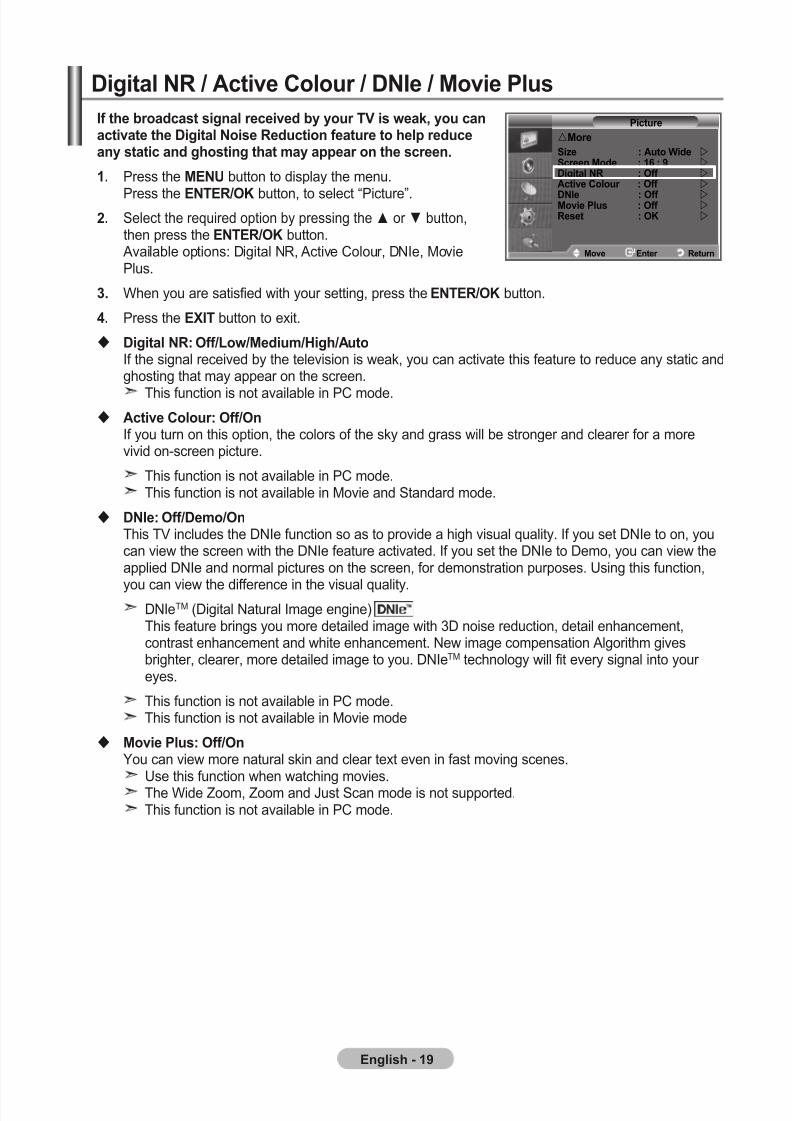
If dcs si civd y y tV is wk, y cciv Dii nis rdci f p dcy sic d si y pp sc.
1. Press the menu button to display the menu.
Press the enter/oK button, to select “Picture”.. Select the required option by pressing the ▲ or ▼ button,
then press the enter/oK button. Available options: Digital NR, Active Colour, DNIe, MoviePlus.
3. When you are satisfied with your setting, press the enter/oK button.
. Press the exIt button to exit.
Dii nr: off/lw/mdi/hi/a If the signal received by the television is weak, you can activate this feature to reduce any static andghosting that may appear on the screen.
This function is not available in PC mode.
aciv C: off/o If you turn on this option, the colors of the sky and grass will be stronger and clearer for a morevivid on-screen picture.
This function is not available in PC mode.This function is not available in Movie and Standard mode.
DnI: off/D/o This TV includes the DNIe function so as to provide a high visual quality. If you set DNIe to on, youcan view the screen with the DNIe feature activated. If you set the DNIe to Demo, you can view theapplied DNIe and normal pictures on the screen, for demonstration purposes. Using this function,
you can view the difference in the visual quality.DNIeTM (Digital Natural Image engine)This feature brings you more detailed image with 3D noise reduction, detail enhancement,contrast enhancement and white enhancement. New image compensation Algorithm givesbrighter, clearer, more detailed image to you. DNIeTM technology will fit every signal into your eyes.
This function is not available in PC mode.This function is not available in Movie mode
mvi Ps: off/o You can view more natural skin and clear text even in fast moving scenes.
Use this function when watching movies.The Wide Zoom, Zoom and Just Scan mode is not supported.This function is not available in PC mode.
Dii nr / aciv C / DnI / mvi Ps
Pic
Siz : a Wid Sc md : 1 : 9 Dii nr : off aciv C : off
Dn : off mvi Ps : off rs : oK
m
mv e r
7/30/2019 Samsung LCD TV Eng Rom
http://slidepdf.com/reader/full/samsung-lcd-tv-eng-rom 22/92
eglis - 0
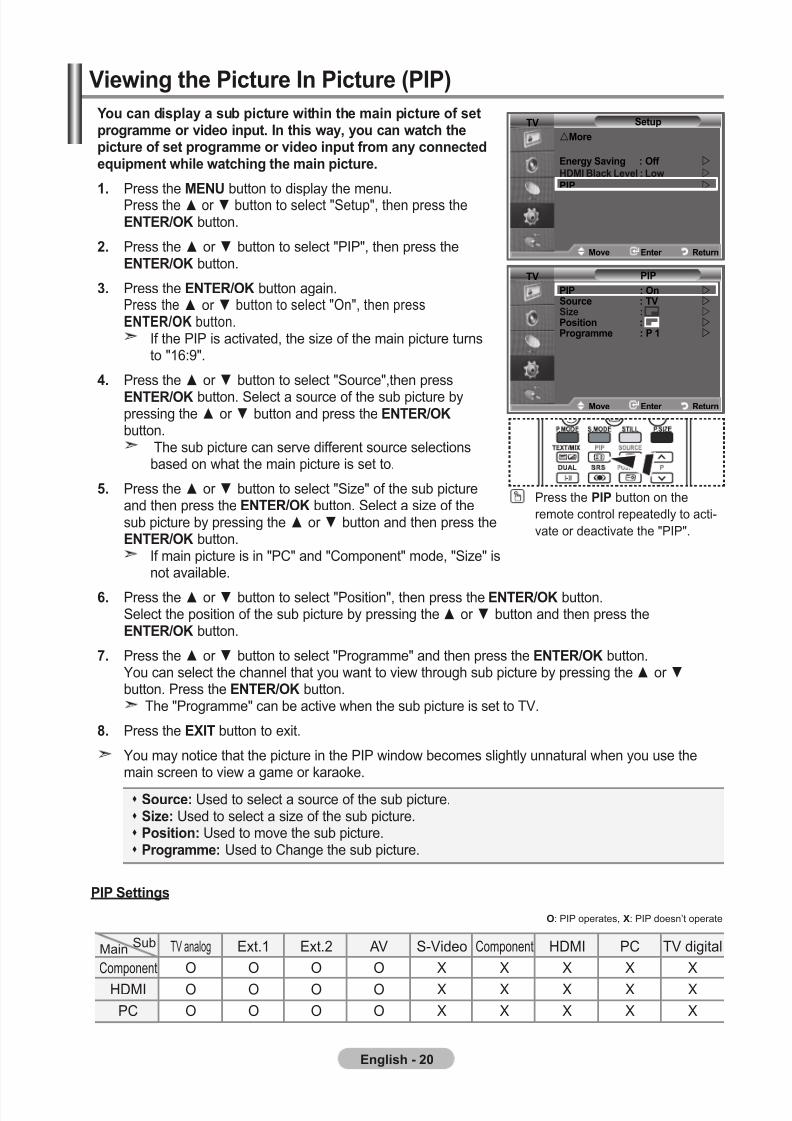
Y c dispy s pic wii i pic f sp vid ip. I is wy, y c wc pic f s p vid ip f y ccdqip wi wci i pic.
1. Press the menu button to display the menu.Press the ▲ or ▼ button to select "Setup", then press theenter/oK button.
. Press the ▲ or ▼ button to select "PIP", then press theenter/oK button.
3. Press the enter/oK button again.Press the ▲ or ▼ button to select "On", then pressenter/oK button.
If the PIP is activated, the size of the main picture turnsto "16:9".
. Press the ▲ or ▼ button to select "Source",then press
enter/oK button. Select a source of the sub picture bypressing the ▲ or ▼ button and press the enter/oK button.
The sub picture can serve different source selectionsbased on what the main picture is set to.
. Press the ▲ or ▼ button to select "Size" of the sub pictureand then press the enter/oK button. Select a size of thesub picture by pressing the ▲ or ▼ button and then press theenter/oK button.
If main picture is in "PC" and "Component" mode, "Size" isnot available.
. Press the ▲ or ▼ button to select "Position", then press the enter/oK button.Select the position of the sub picture by pressing the ▲ or ▼ button and then press theenter/oK button.
. Press the ▲ or ▼ button to select "Programme" and then press the enter/oK button.You can select the channel that you want to view through sub picture by pressing the ▲ or ▼ button. Press the enter/oK button.
The "Programme" can be active when the sub picture is set to TV.
. Press the exIt button to exit.
You may notice that the picture in the PIP window becomes slightly unnatural when you use themain screen to view a game or karaoke.
Viwi Pic I Pic (PIP)
Sc: Used to select a source of the sub picture. Siz: Used to select a size of the sub picture. Psii: Used to move the sub picture. P: Used to Change the sub picture.
Press the PIP button on the
remote control repeatedly to acti-
vate or deactivate the "PIP".
md : Cs
eqiz
SrS tS xt : off
a V : off
I m : off
rs
mv e r
tV Sp
m
ey Svi : off
hDmI bck lv : lw
PIP
mv e r
md : Cs
eqiz
SrS tS xt : off
a V : off
I m : off
rs
mv e r
tV PIP
PIP : o Sc : tV Siz : Psii : P : P 1
mv e r
o: PIP operates, x: PIP doesn’t operate
Component
HDMI
PC
TV analog
O
O
O
Ext.1
O
O
O
Ext.2
O
O
O
AV
O
O
O
S-Video
X
X
X
Component
X
X
X
HDMI
X
X
X
PC
X
X
X
TV digital
X
X
X
SubMain
PIP Sis
7/30/2019 Samsung LCD TV Eng Rom
http://slidepdf.com/reader/full/samsung-lcd-tv-eng-rom 23/92
English - 21
HDMI Black Level
You can directly select the black level on the screen to adjustthe screen depth.
1. PresstheMENUbuttontodisplaythemenu. Pressthe▲or▼buttontoselect"Setup",thenpressthe
ENTER/OKbutton.
2. Pressthe▲or▼buttontoselect"HDMIBlackLevel",then presstheENTER/OKbutton.
3. Pressthe▲or▼buttontoselect"Normal"or"Low",then presstheENTER/OKbutton.
4. PresstheEXITbuttontoexit.ThisFunctionisactiveonlywhentheexternelinputconnects
HDMI(RGBsiginal).
Mode : Custom
Equalizer
SRS TS XT : Off
Auto Volume : Off
Internal Mute : Off
Reset
Move Enter Return
TV Setup
More
Energy Saving : Off
HDMI Black Level : Low
PIP
Move Enter Return
Mode : Custom
Equalizer
SRS TS XT : Off
Auto Volume : Off
Internal Mute : Off
Reset
Move Enter Return
TV Setup
More Energy Saving : Off HDMI Black Level : LowPIP : Off
Move Enter Return
NormalLow
You can select the type of the special sound effect to be used
when watching a given broadcast.
1. PresstheMENUbuttontodisplaythemenu. Pressthe▲or▼buttontoselect"Sound",thenpressthe ENTER/OKbutton.
2. PresstheENTER/OKbuttonagain,toselect"Mode".
3. Selecttherequiredsoundeffectbypressingthe▲or▼ buttonrepeatedlyandthenpresstheENTER/OKbutton.
4. PresstheEXITbuttontoexit.
Standard:Selectsthenormalsoundmode.
Music:Emphasizesmusicovervoices.Movie:Providesliveandfullsoundformovies.Speech:Emphasizesvoicesoverothersounds.Custom:Selectsyourcustomsoundsettings. (Referto"AdjustingtheSoundSettings")
Changing the Sound Standard
Sound
Mode : Custom
Equalizer
SRS TS XT : Off
Auto Volume : Off
Internal Mute : Off
Sound Select : Main
Reset
Move Enter Return
Sound
Mode : CustomEqualizer SRS TS XT : Off
Auto Volume : Off Internal Mute : Off Sound Select : MainReset
StandardMusicMovie
SpeechCustom
Move Enter Return
TV
TV
Normal: Thescreengetsbrighter.
Low: Thescreengetsdarker.
7/30/2019 Samsung LCD TV Eng Rom
http://slidepdf.com/reader/full/samsung-lcd-tv-eng-rom 24/92
eglis -
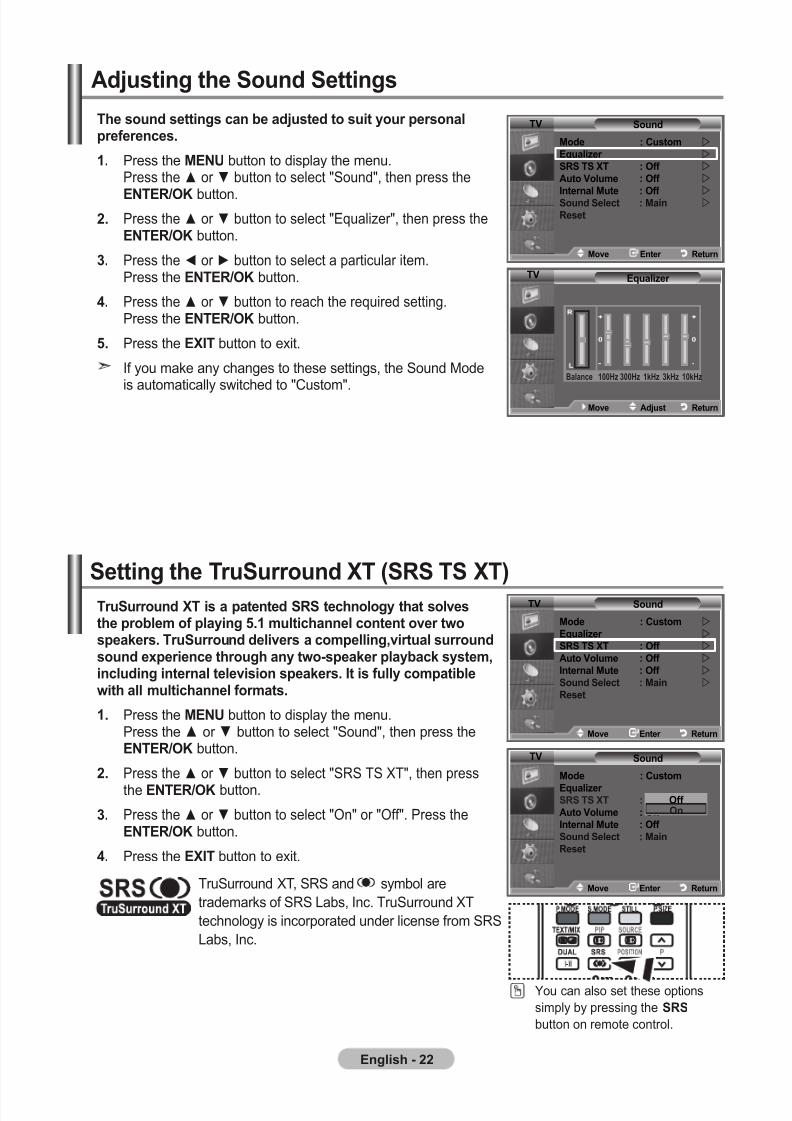
t sd sis c djsd si y pspfcs.
1. Press the menu button to display the menu.Press the ▲ or ▼ button to select "Sound", then press the
enter/oK button.
. Press the ▲ or ▼ button to select "Equalizer", then press theenter/oK button.
3. Press the ◄ or ► button to select a particular item. Press the enter/oK button.
. Press the ▲ or ▼ button to reach the required setting.Press the enter/oK button.
. Press the exIt button to exit.
If you make any changes to these settings, the Sound Mode
is automatically switched to "Custom".
adjsi Sd Sis
Sd
md : Cs
eqiz
SrS tS xt : off
a V : off
I m : off
Sd Sc : mi
rs
mv e r
eqiz
balanc 100hz 300hz 1khz 3khz 10khz
mv adjs r
tV
tV
tSd xt is pd SrS cy svs p f pyi .1 ic c v wspks. tSd divs cpi,vi sdsd pic y w-spk pyck sys,icdi i visi spks. I is fy cpiwi ic fs.
1. Press the menu button to display the menu.Press the ▲ or ▼ button to select "Sound", then press theenter/oK button.
. Press the ▲ or ▼ button to select "SRS TS XT", then pressthe enter/oK button.
3. Press the ▲ or ▼ button to select "On" or "Off". Press theenter/oK button.
. Press the exIt button to exit.
Si tSd xt (SrS tS xt)
TruSurround XT, SRS and symbol are
trademarks of SRS Labs, Inc. TruSurround XT
technology is incorporated under license from SRS
Labs, Inc.
Sd
md : Cs
eqiz SrS tS xt : off
a V : off
I m : off
Sd Sc : mi
rs
off o
mv e r
Sd
md : Cs
eqiz
SrS tS xt : off
a V : off
I m : off
Sd Sc : mi
rs
mv e r
tV
tV
You can also set these options
simply by pressing the SrS
button on remote control.
7/30/2019 Samsung LCD TV Eng Rom
http://slidepdf.com/reader/full/samsung-lcd-tv-eng-rom 25/92
eglis - 3
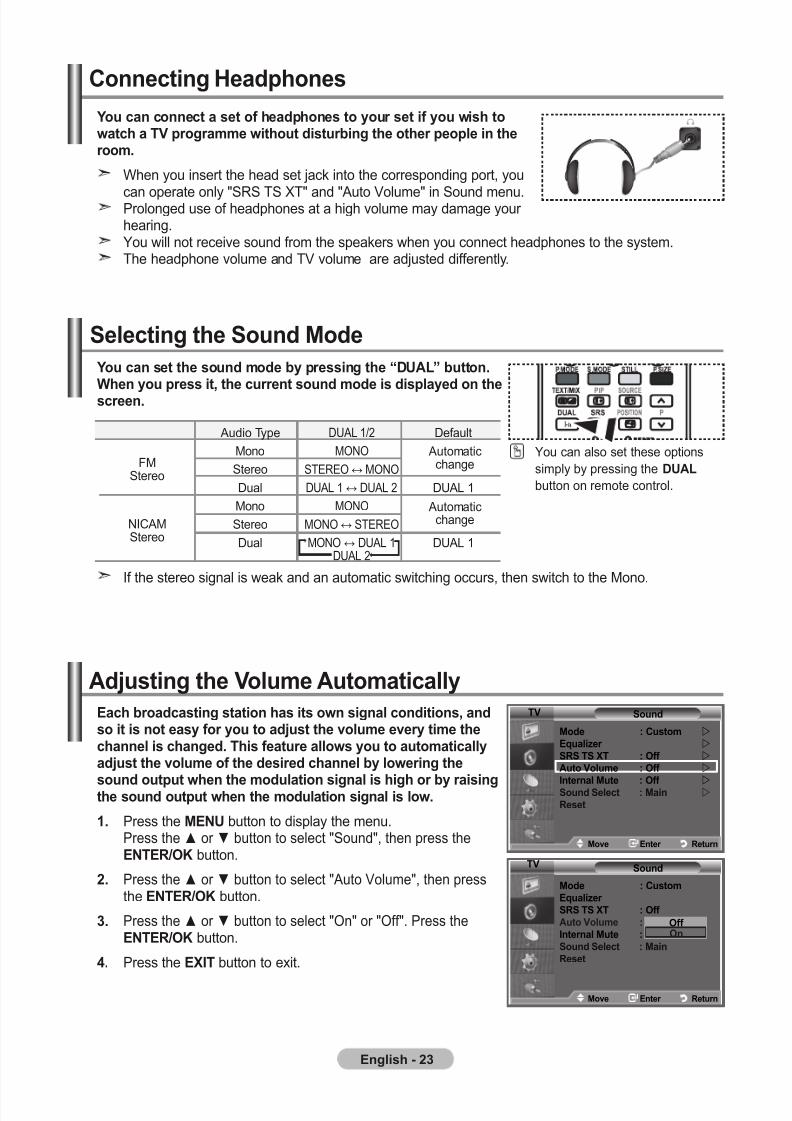
Y c s sd d y pssi “Dual” .
W y pss i, c sd d is dispyd sc.
Y c cc s f dps y s if y wis wc tV p wi disi pp i .
When you insert the head set jack into the corresponding port, you
can operate only "SRS TS XT" and "Auto Volume" in Sound menu.Prolonged use of headphones at a high volume may damage your hearing.You will not receive sound from the speakers when you connect headphones to the system.The headphone volume and TV volume are adjusted differently.
Cci hdps
Audio Type
Mono
Stereo
Dual
Mono
Stereo
Dual
DUAL 1/2
MONO
STEREO ↔ MONO
DUAL 1 ↔ DUAL 2
MONO
MONO ↔ STEREO
MONO ↔ DUAL 1 DUAL 2
Default
DUAL 1
DUAL 1
Automaticchange
Automaticchange
FMStereo
NICAMStereo
Sci Sd md
You can also set these options
simply by pressing the Dual
button on remote control.
If the stereo signal is weak and an automatic switching occurs, then switch to the Mono.
adjsi V aicy
ec dcsi si s is w si cdiis, ds i is sy f y djs v vy i c is cd. tis f ws y icydjs v f dsid c y wi
sd p w di si is i y isi sd p w di si is w.
1. Press the menu button to display the menu.Press the ▲ or ▼ button to select "Sound", then press theenter/oK button.
. Press the ▲ or ▼ button to select "Auto Volume", then pressthe enter/oK button.
3. Press the ▲ or ▼ button to select "On" or "Off". Press theenter/oK button.
. Press the exIt button to exit.
Sd
md : Cs
eqiz
SrS tS xt : off
a V : off
I m : off
Sd Sc : mi
rs
off o
mv e r
Sd
md : Cs
eqiz
SrS tS xt : off
a V : off
I m : off Sd Sc : mi
rs
mv e r
tV
tV
7/30/2019 Samsung LCD TV Eng Rom
http://slidepdf.com/reader/full/samsung-lcd-tv-eng-rom 26/92
eglis -
Sci I m
If y w sd sp spks,cc i pifi.
1. Press the menu button to display the menu.Press the ▲ or ▼ button to select "Sound", then press the
enter/oK button.. Press the ▲ or ▼ button to select "Internal Mute", then press
the enter/oK button.
3. Press the ▲ or ▼ button to select "On" or "Off". Press theenter/oK button.
. Press the exIt button to exit.
When "Internal Mute" is set to "On", the Sound menus exceptfor "Sound Select" (in PIP mode) cannot be adjusted.
Sd
md : Cs
eqiz
SrS tS xt : off
a V : off
I m : off
Sd Sc :
rs
off o
mv e r
Sd
md : Cs
eqiz
SrS tS xt : off
a V : off
I m : off
Sd Sc : mi rs
mv e r
tV
tV
Di PIP fs civi, y c is sdf s pic.
1. Press the menu button to display the menu.Press the ▲ or ▼ button to select "Sound", then press theenter/oK button.
. Press the ▲ or ▼ button to select "Sound Select", then pressthe enter/oK button.
3. Press the ▲ or ▼ button to select "Sub". Press the enter/oK button.
. Press the exIt button to exit.
You can select this option when the “PIP” is set to “On”.
mi : Used to listen to the sound of the main picture. S : Used to listen to the sound of the sub picture.
lisi Sd f S Pic
Sd
md : Cs
eqiz
SrS tS xt : off
a V : off
I m : off
Sd Sc : mi
rs
mv e r
miS
Sd
md : Cs
eqiz
SrS tS xt : off
a V : off
I m : off
Sd Sc : mi
rs
mv e r
tV
tV
7/30/2019 Samsung LCD TV Eng Rom
http://slidepdf.com/reader/full/samsung-lcd-tv-eng-rom 27/92
eglis -
rsi Sd Sis Fcy Dfs
If g md is o, rs Sd fci is civd.Sci rs fci f si qiz ss qiz si fcy dfs.
1. Press the menu button to display the menu.
Press the ▲ or ▼ button to select "Sound", then press theenter/oK button.
. Press the ▲ or ▼ button to select "Reset", then press theenter/oK button.
3. Press the exIt button to exit.
You can select this option when the "Game Mode" is set to "On".
Y c s tV’s cck s c i is dis-
pyd w y pss InFo . Y s s s i if y wis s ic o/off is.
1. Press the menu button to display the menu.Press the ▲ or ▼ button to select "Setup", then press theenter/oK button.
. Press the ▲ or ▼ button to select "Time", then press theenter/oK button.
3. Press the enter/oK button to select "Clock Set".
.
. Press the exIt button to exit.
If you disconnect the power cord, you have to set the clock again.You can also set Year, Month, Day, Hour and Minute by pressing the number buttons on theremote control.
Si d Dispyi C ti
t...
Move to Month, Day, Year, Hour or Minute
Set the Month, Day, Year, Hour or Minute
Press the enter/oK button.
Pss ...
or button.
5 or 6 button.
md : Cs
eqiz
SrS tS xt : off a V : off
I m : off
rs
mv e r
tV Cck S
m
01
Dyp
q
01 00
Y
00
h
00
mi
mv adjs r
tV Sp
P & Py l : eis ti g md : off b Sc : off mdy : off PC hom tar PC : off li effc : Watching mde on m
mv e r
Sd
md : Cs
eqiz
SrS tS xt : off
a V : off
I m : off
Sd Sc : mi
rs
mv e r
tV
7/30/2019 Samsung LCD TV Eng Rom
http://slidepdf.com/reader/full/samsung-lcd-tv-eng-rom 28/92
eglis -
Y c sc i pid f w 30 d 10 isf wic visi icy swics sdyd.
1. Press the menu button to display the menu.
Press the ▲ or ▼ button to select "Setup", then press theenter/oK button.
. Press the ▲ or ▼ button to select "Time", then press theenter/oK button.
3. Press the ▲ or ▼ button to select "Sleep Timer", then pressthe enter/oK button.
. Press the ▲ or ▼ button repeatedly until the desired timeappears (Off, 30, 60, 90, 120, 150, 180).Press the enter/oK button.
. Press the exIt button to exit.
The TV automatically switches to standby mode when thetimer reaches 0.
Si Sp ti
1. Press the menu button to display the menu.Press the ▲ or ▼ button to select "Setup", then press theenter/oK button.
. Press the ▲ or ▼ button to select "Time", then press theenter/oK button.
3. Press the ▲ or ▼ button to select "Timer 1", "Timer 2", "Timer 3", then press the enter/oK button.
. Press the ▲ or ▼ buttons to adjust “Hour”, then press the ►button to move to the next step. Set other items using the same method as above.
Yes/ No Press the ▲or▼ button
Repeat Select a Once, Everyday,Mon-Fri, Mon-Sat, Sat-Sun
Press the ▲or▼ button
Volume Adjust a 0~100 Press the ▲or▼ button
Programme Adjust a Programme Press the ▲or▼ button
When finished, press the return button to return.
• The current time will appear every time you press the InFo button.• You can set the hour, minute, directly by pressing the number
buttons on the remote control.
. Press the exIt button to exit.
Swici tvisi o d off aicy
md : Cs
eqiz
SrS tS xt : off a V : off
I m : off
rs
mv e r
tV Sp
P & Py
l : eis ti g md : off b Sc : off mdy : off PC hom tar PC : off li effc : Watching mde on m
mv e r
tV ti 1
o ti
rp
oc
V
10
01
Programm
005
6
00 n:
off ti
00 00 n:
► mv adjs r
md : Cs
eqiz
SrS tS xt : off
a V : off
I m : off
rs
mv e r
tV Sp
P & Py l : eis ti g md : off b Sc : off
mdy : off PC hom tar PC : off li effc : Watching mde on m
mv e r
ti
Cck S :
Sp ti :
ti 1 :
ti :
ti 3 :
off 30090101010
mv e r
tV
7/30/2019 Samsung LCD TV Eng Rom
http://slidepdf.com/reader/full/samsung-lcd-tv-eng-rom 29/92
eglis -
W y s si y s f fis i, y ssc wic wi sd f dispyi sd idicis.
1. Press the menu button to display the on-screen menu.
Press the ▲ or ▼ button to select "Setup", then press theenter/oK button.
. Press the ▲ or ▼ button to select "Language", then pressthe enter/oK button.
3. Select a particular language by pressing the ▲ or ▼ buttonrepeatedly.Press the enter/oK button.
You can choose one of 21 languages.
. Press the exIt button to exit.
Csi Y l
W cci cs sc s PySitm xtm, y c jy isic i pic ysci .
1. Press the menu button to display the menu.Press the ▲ or ▼ button to select "Setup", then press the
enter/oK button.
. Press the ▲ or ▼ button to select "Game Mode", then pressthe enter/oK button.
3. Press the ▲ or ▼ button to select "On" or "Off". Press theenter/oK button.
. Press the exIt button to exit.
To disconnect the game console and connect another external device, cancel game mode in the setup menu.If you display the TV menu in Game mode, the screenshakes slightly.
Game Mode is not available in TV mode.If Game Mode is On:• Picture Mode changes to Standard and Sound Mode changes to Custom automatically.
The user cannot change these to other modes.• Sound Mode in the Sound menu is deactivated. Adjust the sound using the equalizer.• The Reset Sound function is activated. Selecting the Reset function after setting the equalizer
resets the equalizer setting to the factory defaults.
usi g md
md : Cs
eqiz
SrS tS xt : off
a V : off
I m : off
rs
md : Cs
eqiz
SrS tS xt : off
a V : off
I m : off
rs
mv e r
tV Sp
P & Pyl : eistig md : off b Sc : off mdy : off PChom tar PC : off li effc : Watching mde onm
off o
mv e r
mv e r
tV Sp
P & Py l : eis ti g md : off b Sc : off mdy : off PC
hom tar PC : off li effc : Watching mde on m
mv e r
md : Cs
eqiz
SrS tS xt : off
a V : off
I m : off
rs
md : Cs
eqiz
SrS tS xt : off
a V : off
I m : off
rs
mv e r
tV Sp
P & Pyl : eistig md : off b Sc : off mdy : off PChom tar PC : off li effc : Watching mde on
m
eisDscFçisIiespñ
nddsq
mv e r
mv e r
tV Sp
P & Py l : eis ti g md : off b Sc : off
mdy : off PC hom tar PC : off li effc : Watching mde on m
mv e r
7/30/2019 Samsung LCD TV Eng Rom
http://slidepdf.com/reader/full/samsung-lcd-tv-eng-rom 30/92
eglis -
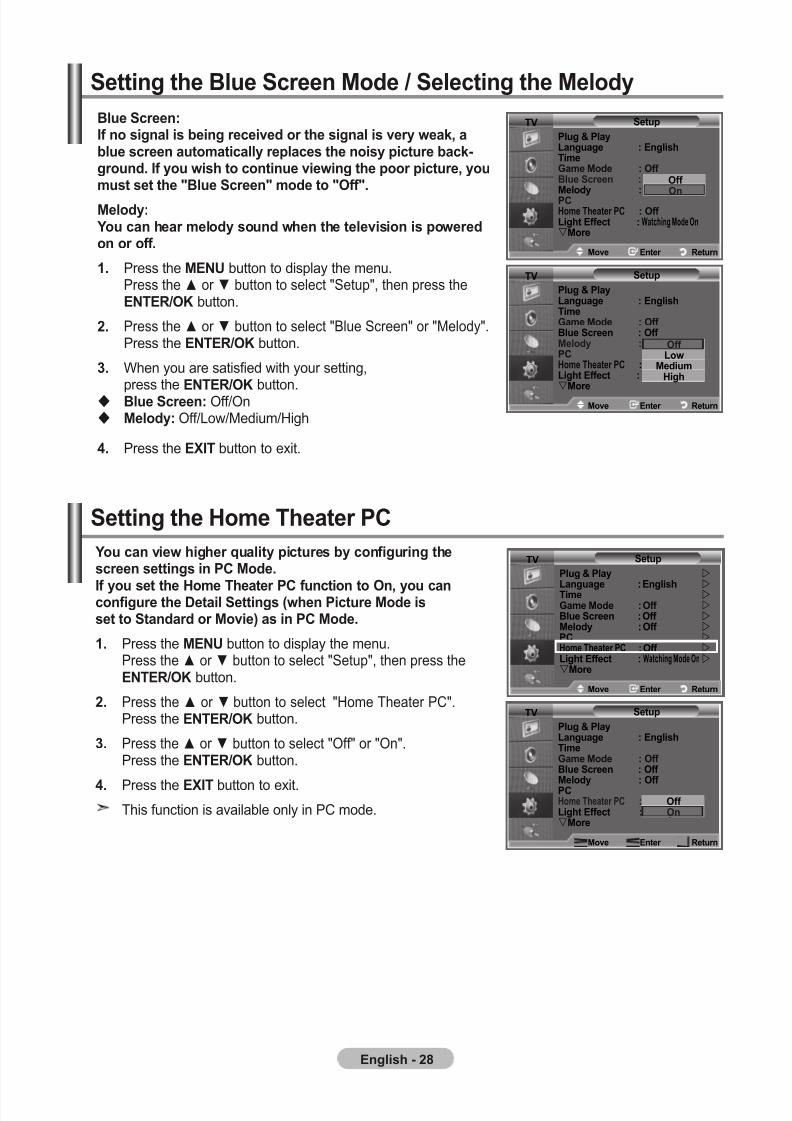
Si b Sc md / Sci mdy
Y c viw i qiy pics y cfii sc sis i PC md.
If y s h t PC fci o, y ccfi Di Sis (w Pic md iss Sdd mvi) s i PC md.
1. Press the menu button to display the menu.Press the ▲ or ▼ button to select "Setup", then press theenter/oK button.
. Press the ▲ or ▼ button to select "Home Theater PC".Press the enter/oK button.
3. Press the ▲ or ▼ button to select "Off" or "On".Press the enter/oK button.
. Press the exIt button to exit.
This function is available only in PC mode.
Si h t PC
b Sc:If si is i civd si is vy wk, sc icy pcs isy pic ck-d. If y wis ci viwi p pic, ys s "b Sc" d "off".
mdy: Y c dy sd w visi is pwd ff.
1. Press the menu button to display the menu.Press the ▲ or ▼ button to select "Setup", then press theenter/oK button.
. Press the ▲ or ▼ button to select "Blue Screen" or "Melody".Press the enter/oK button.
3. When you are satisfied with your setting,
press the enter/oK button. b Sc: Off/On mdy: Off/Low/Medium/High
. Press the exIt button to exit.
md : Cs
eqiz
SrS tS xt : off
a V : off I m : off
rs
md : Cs
eqiz
SrS tS xt : off
a V : off
I m : off
rs
mv e r
tV Sp
P & Pyl : eistig md : off b Sc : off
mdy : off PChom tar PC : off li effc :Watching mde onm
off o
mv e r
mv e r
tV Sp
P & Py
l : eis ti g md : off b Sc : off mdy : off PC hom tar PC : off li effc : Watching mde on m
mv e r
md : Cs
eqiz
SrS tS xt : off
a V : off
I m : off
rs
mv e r
tV Sp
P & Pyl : eistig md : off b Sc : off mdy : off PChom tar PC : off li effc : Watching mde onm
off
o
mv e r
md : Cs
eqiz
SrS tS xt : off
a V : off
I m : off
rs
mv e r
tV Sp
P & Pyl : eistig md : off b Sc : off mdy : off PChom tar PC : off li effc : Watching mde onm
mv e r
off lw
mdihi
7/30/2019 Samsung LCD TV Eng Rom
http://slidepdf.com/reader/full/samsung-lcd-tv-eng-rom 31/92
eglis - 9
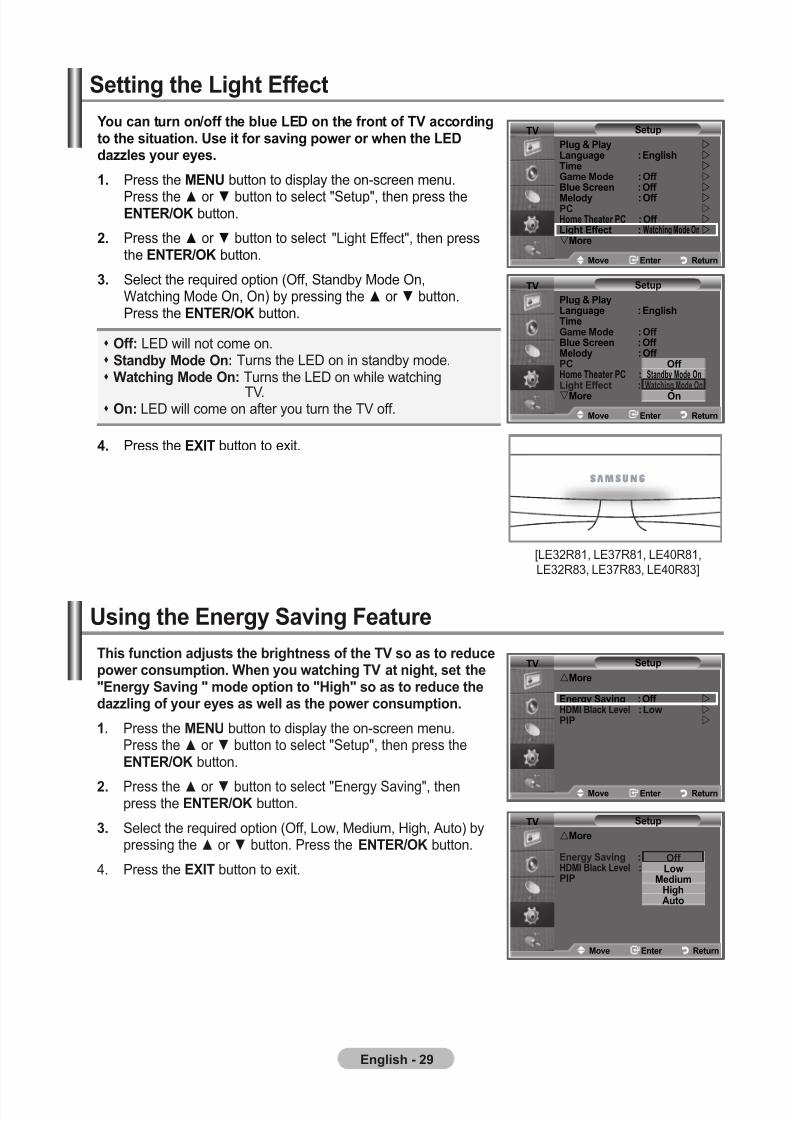
tis fci djss iss f tV s s dcpw cspi. W y wci tV i, s "ey Svi " d pi "hi" s s dc dzzi f y ys s w s pw cspi.
1. Press the menu button to display the on-screen menu.Press the ▲ or ▼ button to select "Setup", then press theenter/oK button.
. Press the ▲ or ▼ button to select "Energy Saving", thenpress the enter/oK button.
3. Select the required option (Off, Low, Medium, High, Auto) bypressing the ▲ or ▼ button. Press the enter/oK button.
4. Press the exIt button to exit.
usi ey Svi F
Y c /ff leD f f tV ccdi sii. us i f svi pw w leDdzzs y ys.
1. Press the menu button to display the on-screen menu.
Press the ▲ or ▼ button to select "Setup", then press theenter/oK button.
. Press the ▲ or ▼ button to select "Light Effect", then pressthe enter/oK button.
3. Select the required option (Off, Standby Mode On,Watching Mode On, On) by pressing the ▲ or ▼ button.Press the enter/oK button.
. Press the exIt button to exit.
Si li effc
md : Cs
eqiz
SrS tS xt : off
a V : off
I m : off
rs
mv e r
tV Sp
P & Py l : eis ti g md : off b Sc : off
mdy : off PC hom tar PC : off li effc : Watching mde on m
mv e r
md : Cs
eqiz
SrS tS xt : off
a V : off
I m : off
rs
mv e r
tV Sp
m ey Svi : off hDmI bck lv : lw PIP
mv e r
tV Sp
m ey Svi : off hDmI bck lv : lwPIP
off lw
mdihia
mv e r
off: LED will not come on. Sdy md o: Turns the LED on in standby mode. Wci md o: Turns the LED on while watching
TV. o: LED will come on after you turn the TV off.
md : Cs
eqiz
SrS tS xt : off
a V : off
I m : off
rs
mv e r
tV Sp
P & Pyl : eistig md : off b Sc : off mdy : off PChom tar PC : off li effc : Watching mde onm
mv e r
off Standby mde on
Watching mde ono
[LE32R81, LE37R81, LE40R81,LE32R83, LE37R83, LE40R83]
7/30/2019 Samsung LCD TV Eng Rom
http://slidepdf.com/reader/full/samsung-lcd-tv-eng-rom 32/92
eglis - 30
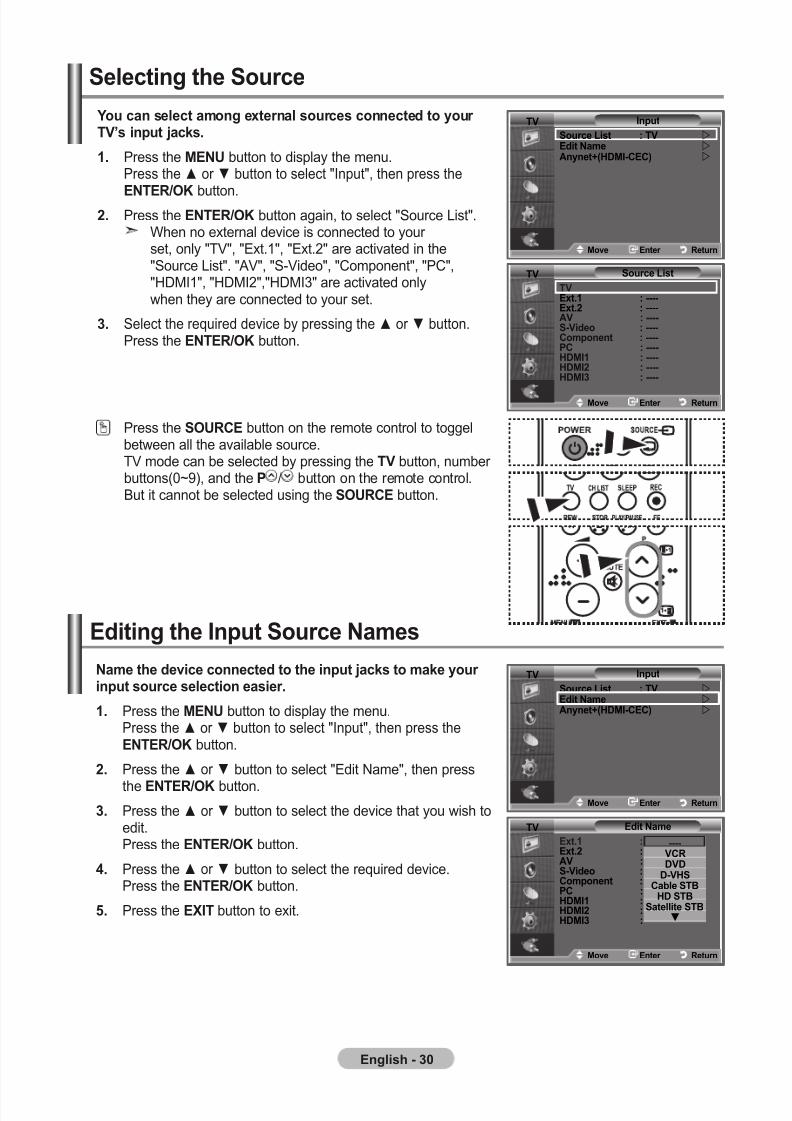
n dvic ccd ip jcks k y ip sc sci si.
1. Press the menu button to display the menu.Press the ▲ or ▼ button to select "Input", then press theenter/oK button.
. Press the ▲ or ▼ button to select "Edit Name", then press
the enter/oK button.
3. Press the ▲ or ▼ button to select the device that you wish toedit.Press the enter/oK button.
. Press the ▲ or ▼ button to select the required device.Press the enter/oK button.
. Press the exIt button to exit.
edii Ip Sc ns
Y c sc scs ccd y tV’s ip jcks.
1. Press the menu button to display the menu.Press the ▲ or ▼ button to select "Input", then press the
enter/oK button.. Press the enter/oK button again, to select "Source List".
When no external device is connected to your set, only "TV", "Ext.1", "Ext.2" are activated in the"Source List". "AV", "S-Video", "Component", "PC","HDMI1", "HDMI2","HDMI3" are activated onlywhen they are connected to your set.
3. Select the required device by pressing the ▲ or ▼ button.Press the enter/oK button.
Press the SourCe button on the remote control to toggelbetween all the available source.TV mode can be selected by pressing the tV button, number buttons(0~9), and the P / button on the remote control.But it cannot be selected using the SourCe button.
Sci Sc
md : Cs
eqiz
SrS tS xt : off
a V : off
I m : off
rs
md : Cs
eqiz
SrS tS xt : off
a V : off
I m : off
rs
mv e r
tV edi n
e.1 : ----e. : ----aV : ----S-Vid : ----Cp : ----PC : ----hDmI1 : ----hDmI : ----hDmI3 : ----
----VCrDVD
D-VhSC Stb
hD StbSi Stb
q
mv e r
mv e r
tV Ip
Sc lis : tV edi n ay+(hDmI-CeC)
mv e r
md : Cs
eqiz
SrS tS xt : off
a V : off
I m : off
rs
md : Cs
eqiz
SrS tS xt : off
a V : off
I m : off
rs
mv e r
tV Sc lis
tV e.1 : ----e. : ----aV : ----S-Vid : ----Cp : ----PC : ----hDmI1 : ----hDmI : ----hDmI3 : ----
mv e r
mv e r
tV Ip
Sc lis : tV edi n ay+(hDmI-CeC)
mv e r
7/30/2019 Samsung LCD TV Eng Rom
http://slidepdf.com/reader/full/samsung-lcd-tv-eng-rom 33/92
eglis - 31
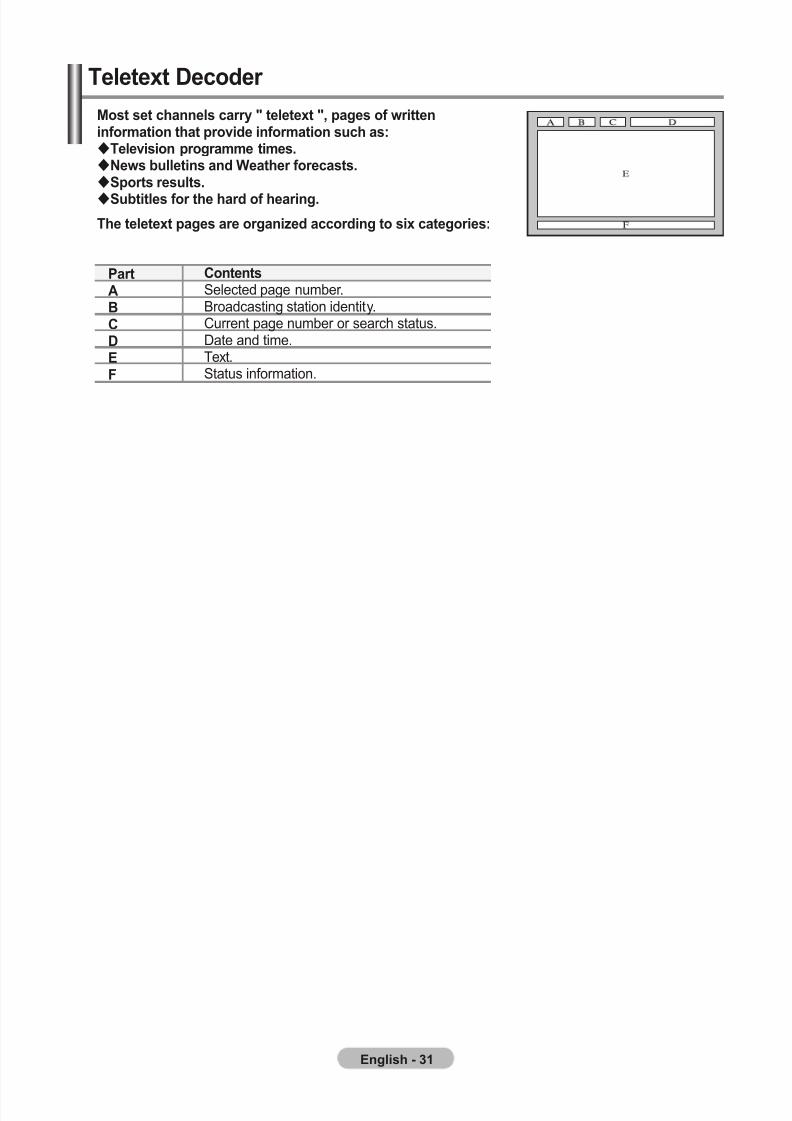
t Dcd
ms s cs cy " ", ps f wiifi pvid ifi sc s:tvisi p is.nws is d W fcss.Sps ss.
Sis f d f i.
t ps izd ccdi si cis:
PabCDeF
Cs Selected page number.Broadcasting station identity.Current page number or search status.Date and time.Text.Status information.
7/30/2019 Samsung LCD TV Eng Rom
http://slidepdf.com/reader/full/samsung-lcd-tv-eng-rom 34/92
eglis - 3
Y c dispy ifi y i, si cpis d. owis:
Ifi y issi.
S ps y dispyd.
t civ d d dispy cs p:
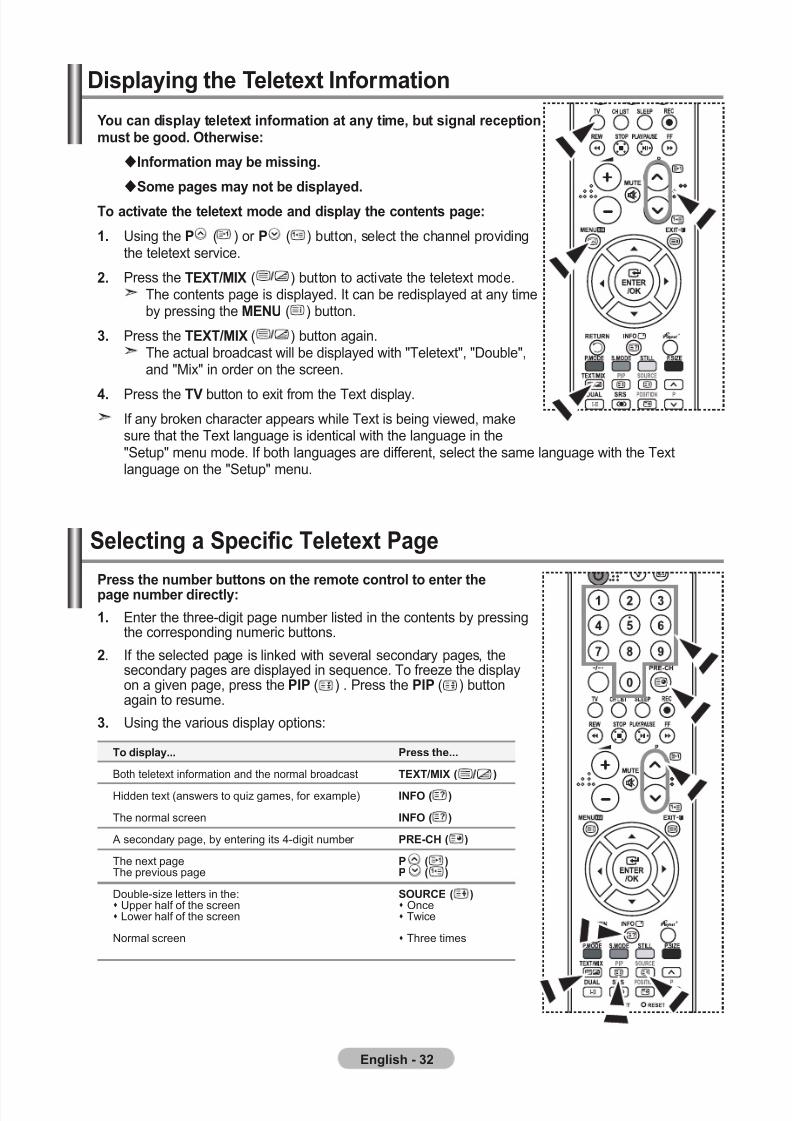
1. Using the P ( ) or P ( ) button, select the channel providingthe teletext service.
. Press the text/mIx ( ) button to activate the teletext mode.The contents page is displayed. It can be redisplayed at any timeby pressing the menu ( ) button.
3. Press the text/mIx ( ) button again.The actual broadcast will be displayed with "Teletext", "Double",and "Mix" in order on the screen.
. Press the tV button to exit from the Text display.
If any broken character appears while Text is being viewed, makesure that the Text language is identical with the language in the"Setup" menu mode. If both languages are different, select the same language with the Textlanguage on the "Setup" menu.
Dispyi t Ifi
Selecting a Specifc Teletext Page
Pss s c p dicy:
1. Enter the three-digit page number listed in the contents by pressingthe corresponding numeric buttons.
. If the selected page is linked with several secondary pages, thesecondary pages are displayed in sequence. To freeze the displayon a given page, press the PIP ( ) . Press the PIP ( ) buttonagain to resume.
3. Using the various display options:
t display...
Both teletext information and the normal broadcast
Hidden text (answers to quiz games, for example)
The normal screen
A secondary page, by entering its 4-digit number
The next pageThe previous page
Double-size letters in the: Upper half of the screen Lower half of the screen
Normal screen
Pss ...
text/mIx ( )
InFo ( )
InFo ( )
Pre-Ch ( )
P ( )P ( )
SourCe ( ) Once Twice
Three times
7/30/2019 Samsung LCD TV Eng Rom
http://slidepdf.com/reader/full/samsung-lcd-tv-eng-rom 35/92
eglis - 33
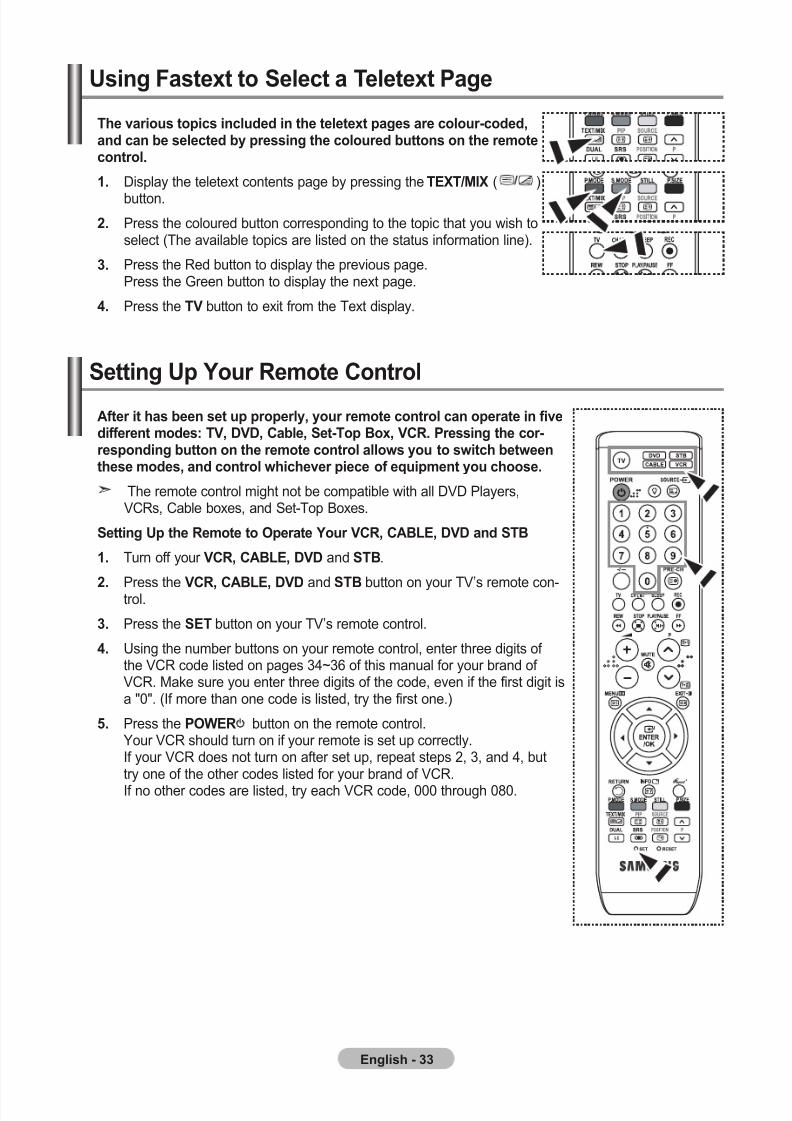
usi Fs Sc t P
t vis pics icdd i ps c-cdd,d c scd y pssi cd s c.
1. Display the teletext contents page by pressing the text/mIx ( )
button.
. Press the coloured button corresponding to the topic that you wish toselect (The available topics are listed on the status information line).
3. Press the Red button to display the previous page.Press the Green button to display the next page.
. Press the tV button to exit from the Text display.
af i s s p ppy, y c c p i fivdiff ds: tV, DVD, C, S-tp b, VCr. Pssi c-spdi c ws y swic ws ds, d c wicv pic f qip y cs.
The remote control might not be compatible with all DVD Players,VCRs, Cable boxes, and Set-Top Boxes.
Si up r op Y VCr, Cable, DVD d Stb
1. Turn off your VCr, Cable, DVD and Stb.
. Press the VCr, Cable, DVD and Stb button on your TV’s remote con-trol.
3. Press the Set button on your TV’s remote control.
. Using the number buttons on your remote control, enter three digits of the VCR code listed on pages 34~36 of this manual for your brand of VCR. Make sure you enter three digits of the code, even if the first digit isa "0". (If more than one code is listed, try the first one.)
. Press the PoWer button on the remote control.Your VCR should turn on if your remote is set up correctly.If your VCR does not turn on after set up, repeat steps 2, 3, and 4, buttry one of the other codes listed for your brand of VCR.If no other codes are listed, try each VCR code, 000 through 080.
Si up Y r C
7/30/2019 Samsung LCD TV Eng Rom
http://slidepdf.com/reader/full/samsung-lcd-tv-eng-rom 36/92
eglis - 3
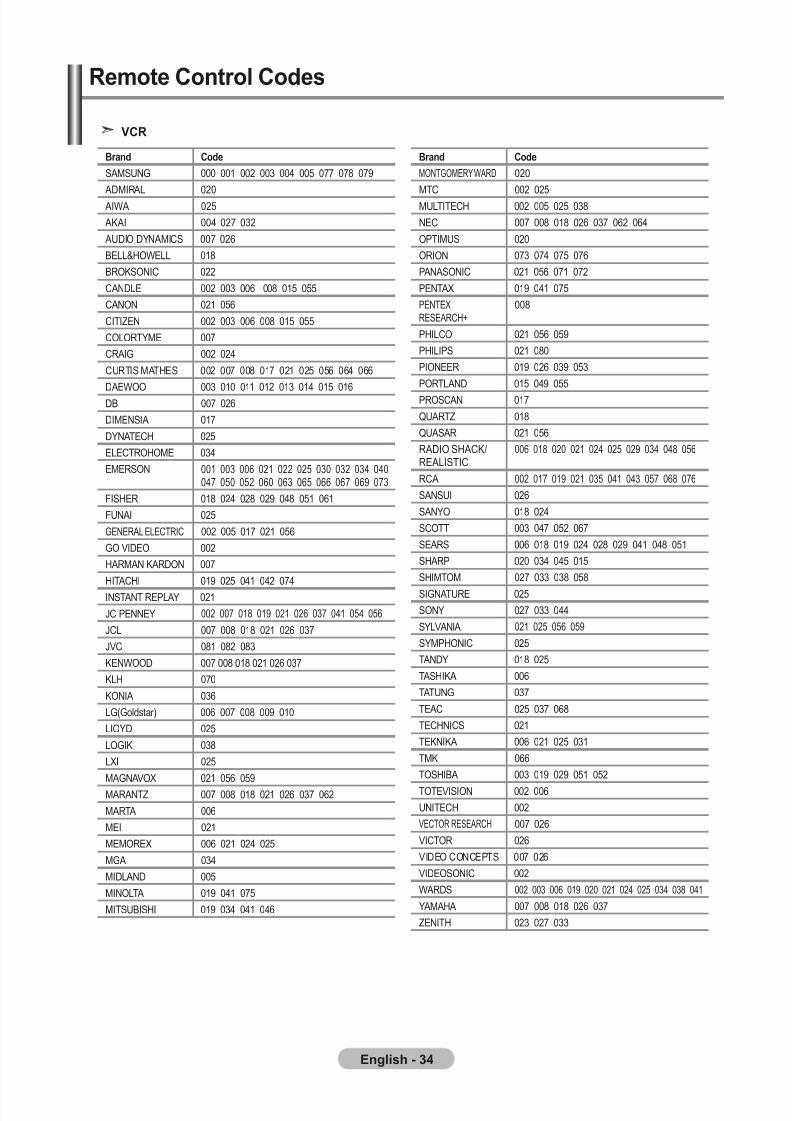
VCr
bd Cd
SAMSUNG 000 001 002 003 004 005 077 078 079
ADMIRAL 020
AIWA 025
AKAI 004 027 032
AUDIO DYNAMICS 007 026
BELL&HOWELL 018
BROKSONIC 022
CANDLE 002 003 006 008 015 055
CANON 021 056
CITIZEN 002 003 006 008 015 055
COLORTYME 007
CRAIG 002 024
CURTIS MATHES 002 007 008 017 021 025 056 064 066
DAEWOO 003 010 011 012 013 014 015 016DB 007 026
DIMENSIA 017
DYNATECH 025
ELECTROHOME 034
EMERSON 001 003 006 021 022 025 030 032 034 040047 050 052 060 063 065 066 067 069 073
FISHER 018 024 028 029 048 051 061
FUNAI 025
GENERAL ELECTRIC 002 005 017 021 056
GO VIDEO 002
HARMAN KARDON 007
HITACHI 019 025 041 042 074
INSTANT REPLAY 021
JC PENNEY 002 007 018 019 021 026 037 041 054 056
JCL 007 008 018 021 026 037
JVC 081 082 083
KENWOOD 007 008 018 021 026 037
KLH 070
KONIA 036
LG(Goldstar) 006 007 008 009 010
LIOYD 025
LOGIK 038
LXI 025
MAGNAVOX 021 056 059MARANTZ 007 008 018 021 026 037 062
MARTA 006
MEI 021
MEMOREX 006 021 024 025
MGA 034
MIDLAND 005
MINOLTA 019 041 075
MITSUBISHI 019 034 041 046
bd Cd
MONTGOMERY WARD 020
MTC 002 025
MULTITECH 002 005 025 038
NEC 007 008 018 026 037 062 064
OPTIMUS 020
ORION 073 074 075 076
PANASONIC 021 056 071 072
PENTAX 019 041 075
PENTEX
RESEARCH+
008
PHILCO 021 056 059
PHILIPS 021 080
PIONEER 019 026 039 053
PORTLAND 015 049 055
PROSCAN 017
QUARTZ 018
QUASAR 021 056
RADIO SHACK/REALISTIC
006 018 020 021 024 025 029 034 048 056
RCA 002 017 019 021 035 041 043 057 068 076
SANSUI 026
SANYO 018 024
SCOTT 003 047 052 067
SEARS 006 018 019 024 028 029 041 048 051
SHARP 020 034 045 015
SHIMTOM 027 033 038 058
SIGNATURE 025
SONY 027 033 044
SYLVANIA 021 025 056 059
SYMPHONIC 025
TANDY 018 025
TASHIKA 006
TATUNG 037
TEAC 025 037 068
TECHNICS 021
TEKNIKA 006 021 025 031
TMK 066
TOSHIBA 003 019 029 051 052
TOTEVISION 002 006
UNITECH 002
VECTOR RESEARCH 007 026
VICTOR 026
VIDEO CONCEPTS 007 026
VIDEOSONIC 002
WARDS 002 003 006 019 020 021 024 025 034 038 041
YAMAHA 007 008 018 026 037
ZENITH 023 027 033
r C Cds
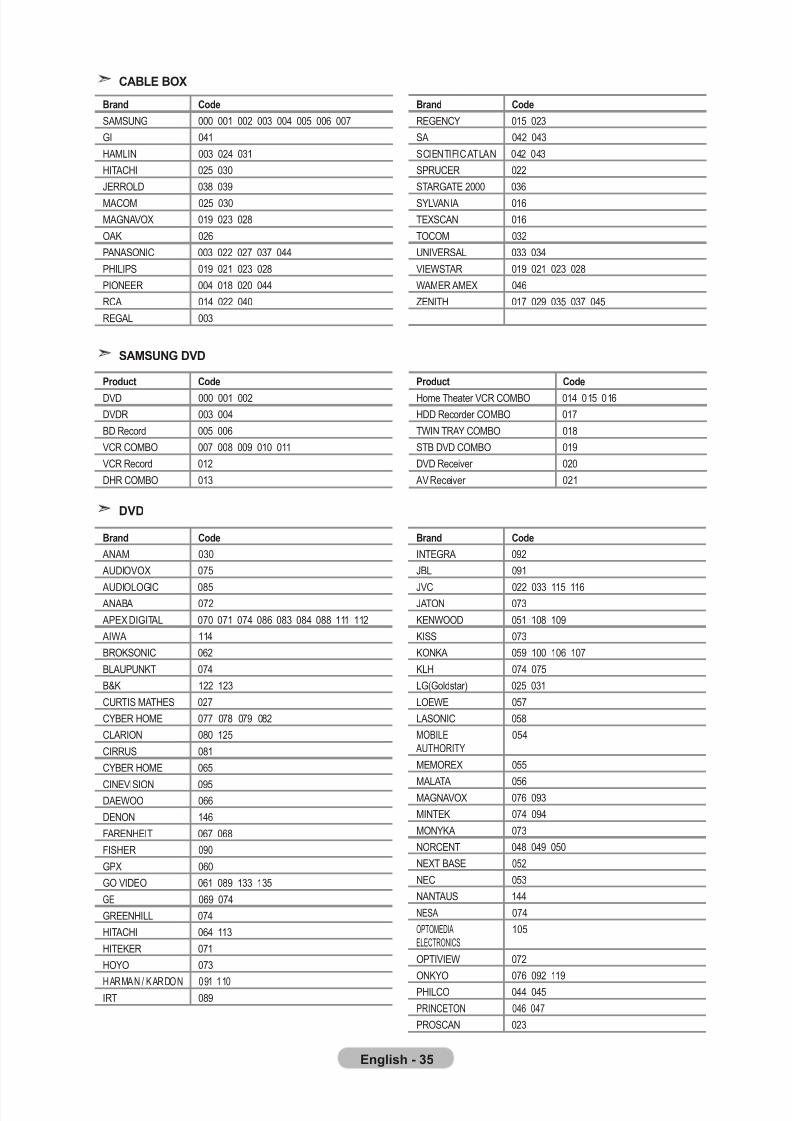
7/30/2019 Samsung LCD TV Eng Rom
http://slidepdf.com/reader/full/samsung-lcd-tv-eng-rom 37/92
eglis - 3
Cable box
bd Cd
SAMSUNG 000 001 002 003 004 005 006 007
GI 041
HAMLIN 003 024 031
HITACHI 025 030
JERROLD 038 039
MACOM 025 030
MAGNAVOX 019 023 028
OAK 026
PANASONIC 003 022 027 037 044
PHILIPS 019 021 023 028
PIONEER 004 018 020 044
RCA 014 022 040
REGAL 003
bd Cd
REGENCY 015 023
SA 042 043
SCIENTIFIC ATLAN 042 043
SPRUCER 022
STARGATE 2000 036
SYLVANIA 016
TEXSCAN 016
TOCOM 032
UNIVERSAL 033 034
VIEWSTAR 019 021 023 028
WAMER AMEX 046
ZENITH 017 029 035 037 045
SamSung DVD
Pdc Cd
DVD 000 001 002
DVDR 003 004
BD Record 005 006
VCR COMBO 007 008 009 010 011
VCR Record 012
DHR COMBO 013
Pdc Cd
Home Theater VCR COMBO 014 015 016
HDD Recorder COMBO 017
TWIN TRAY COMBO 018
STB DVD COMBO 019
DVD Receiver 020
AV Receiver 021
DVD
bd Cd
ANAM 030
AUDIOVOX 075
AUDIOLOGIC 085 ANABA 072
APEX DIGITAL 070 071 074 086 083 084 088 111 112
AIWA 114
BROKSONIC 062
BLAUPUNKT 074
B&K 122 123
CURTIS MATHES 027
CYBER HOME 077 078 079 082
CLARION 080 125
CIRRUS 081
CYBER HOME 065
CINEVISION 095DAEWOO 066
DENON 146
FARENHEIT 067 068
FISHER 090
GPX 060
GO VIDEO 061 089 133 135
GE 069 074
GREENHILL 074
HITACHI 064 113
HITEKER 071
HOYO 073
HARMAN / KARDON 091 110
IRT 089
bd Cd
INTEGRA 092
JBL 091
JVC 022 033 115 116JATON 073
KENWOOD 051 108 109
KISS 073
KONKA 059 100 106 107
KLH 074 075
LG(Goldstar) 025 031
LOEWE 057
LASONIC 058
MOBILE
AUTHORITY
054
MEMOREX 055
MALATA 056MAGNAVOX 076 093
MINTEK 074 094
MONYKA 073
NORCENT 048 049 050
NEXT BASE 052
NEC 053
NANTAUS 144
NESA 074
OPTOMEDIA
ELECTRONICS
105
OPTIVIEW 072
ONKYO 076 092 119PHILCO 044 045
PRINCETON 046 047
PROSCAN 023
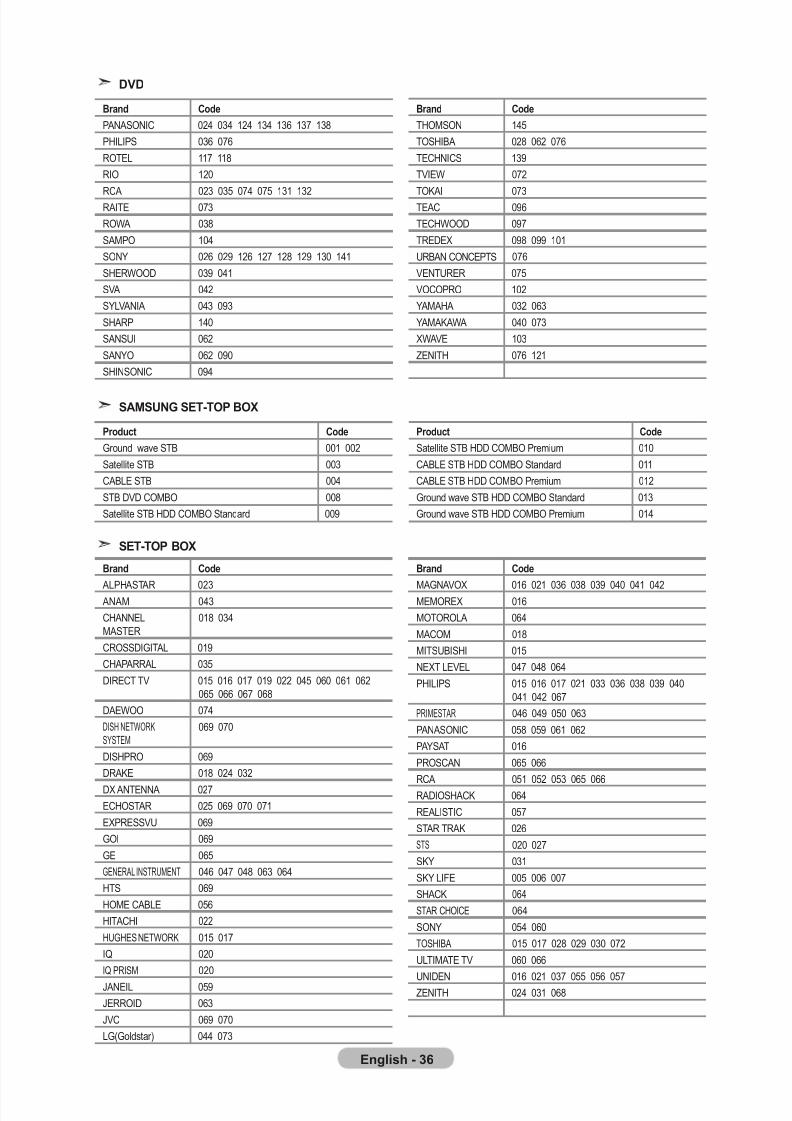
7/30/2019 Samsung LCD TV Eng Rom
http://slidepdf.com/reader/full/samsung-lcd-tv-eng-rom 38/92
eglis - 3
DVD
bd Cd
PANASONIC 024 034 124 134 136 137 138
PHILIPS 036 076
ROTEL 117 118
RIO 120
RCA 023 035 074 075 131 132RAITE 073
ROWA 038
SAMPO 104
SONY 026 029 126 127 128 129 130 141
SHERWOOD 039 041
SVA 042
SYLVANIA 043 093
SHARP 140
SANSUI 062
SANYO 062 090
SHINSONIC 094
bd Cd
THOMSON 145
TOSHIBA 028 062 076
TECHNICS 139
TVIEW 072
TOKAI 073TEAC 096
TECHWOOD 097
TREDEX 098 099 101
URBAN CONCEPTS 076
VENTURER 075
VOCOPRO 102
YAMAHA 032 063
YAMAKAWA 040 073
XWAVE 103
ZENITH 076 121
SamSung Set-toP box
Pdc Cd
Satellite STB HDD COMBO Premium 010
CABLE STB HDD COMBO Standard 011
CABLE STB HDD COMBO Premium 012
Ground wave STB HDD COMBO Standard 013
Ground wave STB HDD COMBO Premium 014
Pdc Cd
Ground wave STB 001 002
Satellite STB 003
CABLE STB 004
STB DVD COMBO 008
Satellite STB HDD COMBO Standard 009
Set-toP box
bd Cd
ALPHASTAR 023 ANAM 043
CHANNEL
MASTER
018 034
CROSSDIGITAL 019
CHAPARRAL 035
DIRECT TV 015 016 017 019 022 045 060 061 062
065 066 067 068
DAEWOO 074
DISH NETWORK
SYSTEM069 070
DISHPRO 069
DRAKE 018 024 032
DX ANTENNA 027
ECHOSTAR 025 069 070 071
EXPRESSVU 069
GOI 069
GE 065
GENERAL INSTRUMENT 046 047 048 063 064
HTS 069
HOME CABLE 056
HITACHI 022
HUGHES NETWORK 015 017
IQ 020
IQ PRISM 020
JANEIL 059
JERROID 063
JVC 069 070
LG(Goldstar) 044 073
bd Cd
MAGNAVOX 016 021 036 038 039 040 041 042MEMOREX 016
MOTOROLA 064
MACOM 018
MITSUBISHI 015
NEXT LEVEL 047 048 064
PHILIPS 015 016 017 021 033 036 038 039 040
041 042 067
PRIMESTAR 046 049 050 063
PANASONIC 058 059 061 062
PAYSAT 016
PROSCAN 065 066
RCA 051 052 053 065 066RADIOSHACK 064
REALISTIC 057
STAR TRAK 026
STS 020 027
SKY 031
SKY LIFE 005 006 007
SHACK 064
STAR CHOICE 064
SONY 054 060
TOSHIBA 015 017 028 029 030 072
ULTIMATE TV 060 066
UNIDEN 016 021 037 055 056 057ZENITH 024 031 068
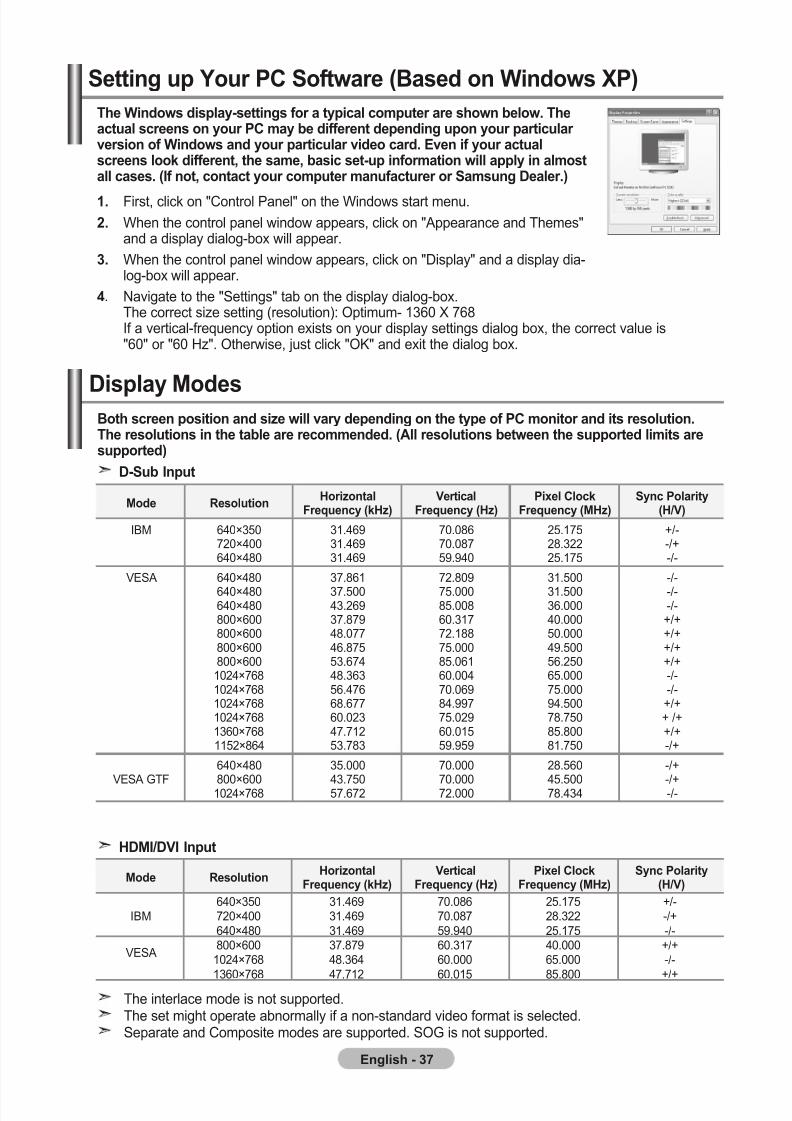
7/30/2019 Samsung LCD TV Eng Rom
http://slidepdf.com/reader/full/samsung-lcd-tv-eng-rom 39/92
eglis - 3
t Widws dispy-sis f ypic cp sw w. tc scs y PC y diff dpdi p y pic vsi f Widws d y pic vid cd. ev if y cscs k diff, s, sic s-p ifi wi ppy i s css. (If , cc y cp fc Ss D.)
1. First, click on "Control Panel" on the Windows start menu.
. When the control panel window appears, click on "Appearance and Themes"and a display dialog-box will appear.
3. When the control panel window appears, click on "Display" and a display dia-log-box will appear.
. Navigate to the "Settings" tab on the display dialog-box.The correct size setting (resolution): Optimum- 1360 X 768If a vertical-frequency option exists on your display settings dialog box, the correct value is"60" or "60 Hz". Otherwise, just click "OK" and exit the dialog box.
Si p Y PC Sfw (bsd Widws xP)
The interlace mode is not supported.The set might operate abnormally if a non-standard video format is selected.Separate and Composite modes are supported. SOG is not supported.
Dispy mdsb sc psii d siz wi vy dpdi yp f PC i d is si.t sis i cdd. (a sis w sppd iis sppd)
md rsihiz
Fqcy (khz)Vic
Fqcy (hz)Pi Cck
Fqcy (mhz)Syc Piy
(h/V)
IBM640×350 31.469 70.086 25.175 +/-720×400 31.469 70.087 28.322 -/+
640×480 31.469 59.940 25.175 -/-
VESA800×600 37.879 60.317 40.000 +/+
1024×768 48.364 60.000 65.000 -/-
1360×768 47.712 60.015 85.800 +/+
D-S Ip
hDmI/DVI Ip
md rsihiz
Fqcy (khz)Vic
Fqcy (hz)Pi Cck
Fqcy (mhz)Syc Piy
(h/V)
IBM 640×350720×400640×480
31.46931.46931.469
70.08670.08759.940
25.17528.32225.175
+/--/+-/-
VESA 640×480
640×480640×480800×600800×600800×600800×6001024×7681024×7681024×7681024×7681360×7681152×864
37.861
37.50043.26937.87948.07746.87553.67448.36356.47668.67760.02347.71253.783
72.809
75.00085.00860.31772.18875.00085.06160.00470.06984.99775.02960.01559.959
31.500
31.50036.00040.00050.00049.50056.25065.00075.00094.50078.75085.80081.750
-/-
-/--/-+/++/++/++/+-/--/-+/++ /++/+-/+
VESA GTF
640×480
800×6001024×768
35.000
43.75057.672
70.000
70.00072.000
28.560
45.50078.434
-/+
-/+-/-
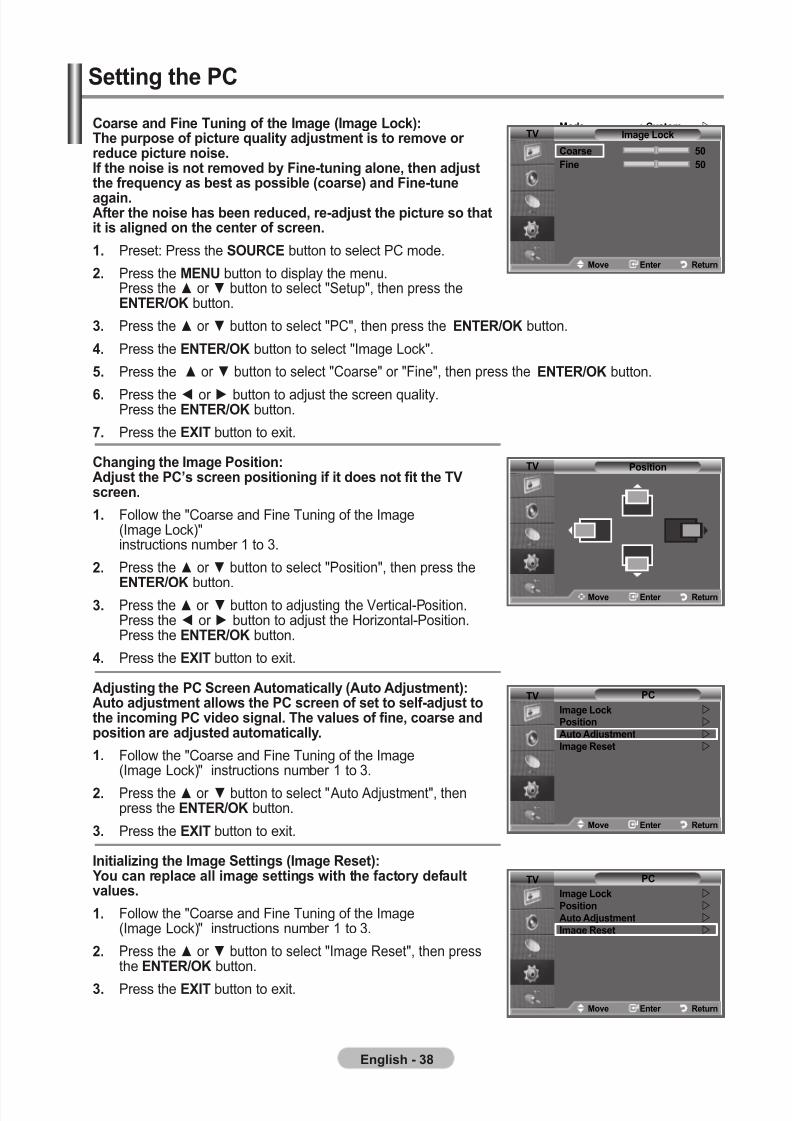
7/30/2019 Samsung LCD TV Eng Rom
http://slidepdf.com/reader/full/samsung-lcd-tv-eng-rom 40/92
eglis - 3
Si PC
Cs d Fi ti f I (I lck):t pps f pic qiy djs is v dc pic is.If is is vd y Fi-i , djs fqcy s s s pssi (cs) d Fi-
i.af is s dcd, -djs pic s i is id c f sc.
1. Preset: Press the SourCe button to select PC mode.
. Press the menu button to display the menu.Press the ▲ or ▼ button to select "Setup", then press theenter/oK button.
3. Press the ▲ or ▼ button to select "PC", then press the enter/oK button.
. Press the enter/oK button to select "Image Lock".
. Press the ▲ or ▼ button to select "Coarse" or "Fine", then press the enter/oK button.
. Press the ◄ or ► button to adjust the screen quality.Press the enter/oK button.
. Press the exIt button to exit.
Ci I Psii:adjs PC’s sc psiii if i ds fi tVsc.
1. Follow the "Coarse and Fine Tuning of the Image(Image Lock)"instructions number 1 to 3.
. Press the ▲ or ▼ button to select "Position", then press the
enter/oK button.3. Press the ▲ or ▼ button to adjusting the Vertical-Position.
Press the ◄ or ► button to adjust the Horizontal-Position.Press the enter/oK button.
. Press the exIt button to exit.
adjsi PC Sc aicy (a adjs):a djs ws PC sc f s sf-djs ici PC vid si. t vs f fi, cs dpsii djsd icy.
1. Follow the "Coarse and Fine Tuning of the Image(Image Lock)" instructions number 1 to 3.
. Press the ▲ or ▼ button to select "Auto Adjustment", thenpress the enter/oK button.
3. Press the exIt button to exit.
Iiiizi I Sis (I rs): Y c pc i sis wi fcy dfvs.
1. Follow the "Coarse and Fine Tuning of the Image(Image Lock)" instructions number 1 to 3.
. Press the ▲ or ▼ button to select "Image Reset", then pressthe enter/oK button.
3. Press the exIt button to exit.
tV PC
I lck
Psii
a adjs
I rs
mv e r
tV PC
I lck
Psii
a adjs
I rs
mv e r
tV Psii
mv e r
md : Cs
eqiz
SrS tS xt : off
a V : off
I m : off
rs
mv e r
tV I lck
Cs 0
Fi 0
mv e r
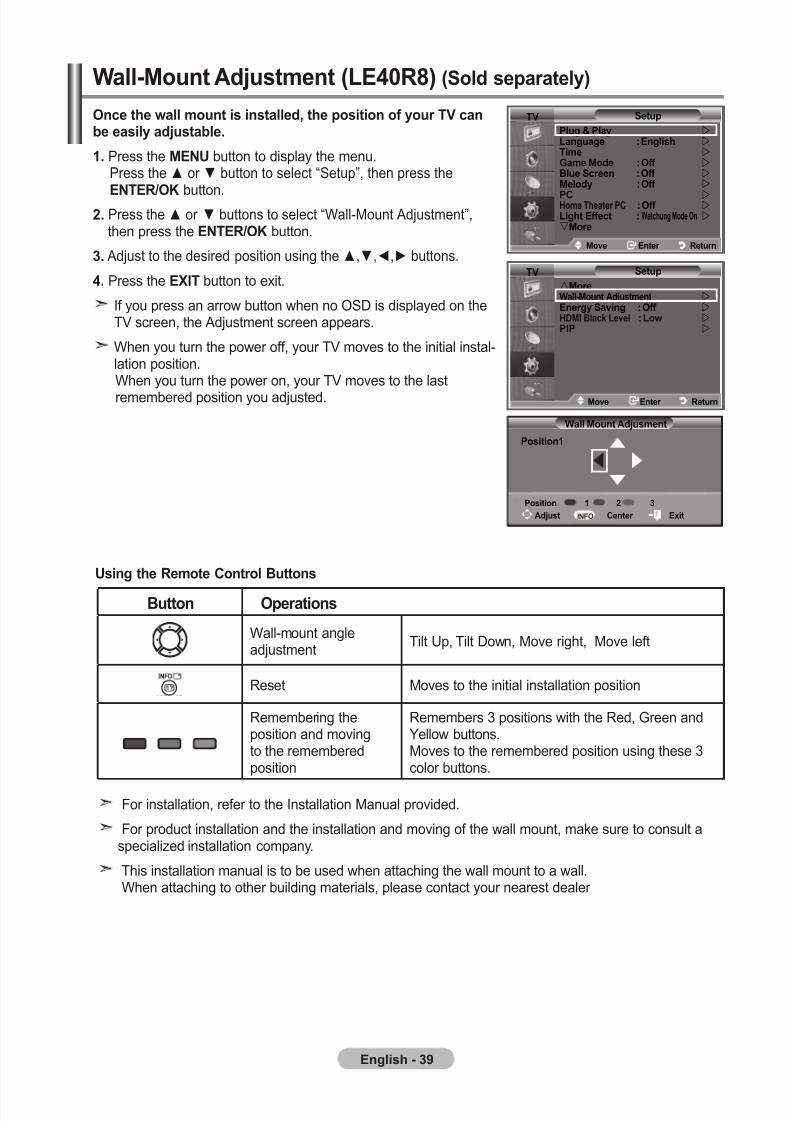
7/30/2019 Samsung LCD TV Eng Rom
http://slidepdf.com/reader/full/samsung-lcd-tv-eng-rom 41/92
eglis - 39
oc w is isd, psii f y tV c siy djs.
1. Press the menu button to display the menu.Press the ▲ or ▼ button to select “Setup”, then press the
enter/oK button.. Press the ▲ or ▼ buttons to select “Wall-Mount Adjustment”,
then press the enter/oK button.
3. Adjust to the desired position using the ▲,▼,◄,► buttons.
. Press the exIt button to exit.
If you press an arrow button when no OSD is displayed on theTV screen, the Adjustment screen appears.
When you turn the power off, your TV moves to the initial instal-lation position.When you turn the power on, your TV moves to the lastremembered position you adjusted.
usi r C bs
For installation, refer to the Installation Manual provided.
For product installation and the installation and moving of the wall mount, make sure to consult aspecialized installation company.
This installation manual is to be used when attaching the wall mount to a wall.When attaching to other building materials, please contact your nearest dealer
b opis
Wall-mount angleadjustment
Tilt Up, Tilt Down, Move right, Move left
Reset Moves to the initial installation position
Remembering theposition and movingto the rememberedposition
Remembers 3 positions with the Red, Green andYellow buttons.Moves to the remembered position using these 3color buttons.
W-m adjs (le0r) (Sd spy)
md : Cs
eqiz
SrS tS xt : off
a V : off
I m : off
rs
mv e r
W m adjs
Psii1
adjs C eiInFo
Psii 1 3
tV Sp
mW-m adjs ey Svi : off hDmI bck lv : lw PIP
mv e r
tV Sp
P & Py l : eis ti g md : off b Sc : off mdy : off
PC hom tar PC : off li effc : Watchung mde on m
mv e r
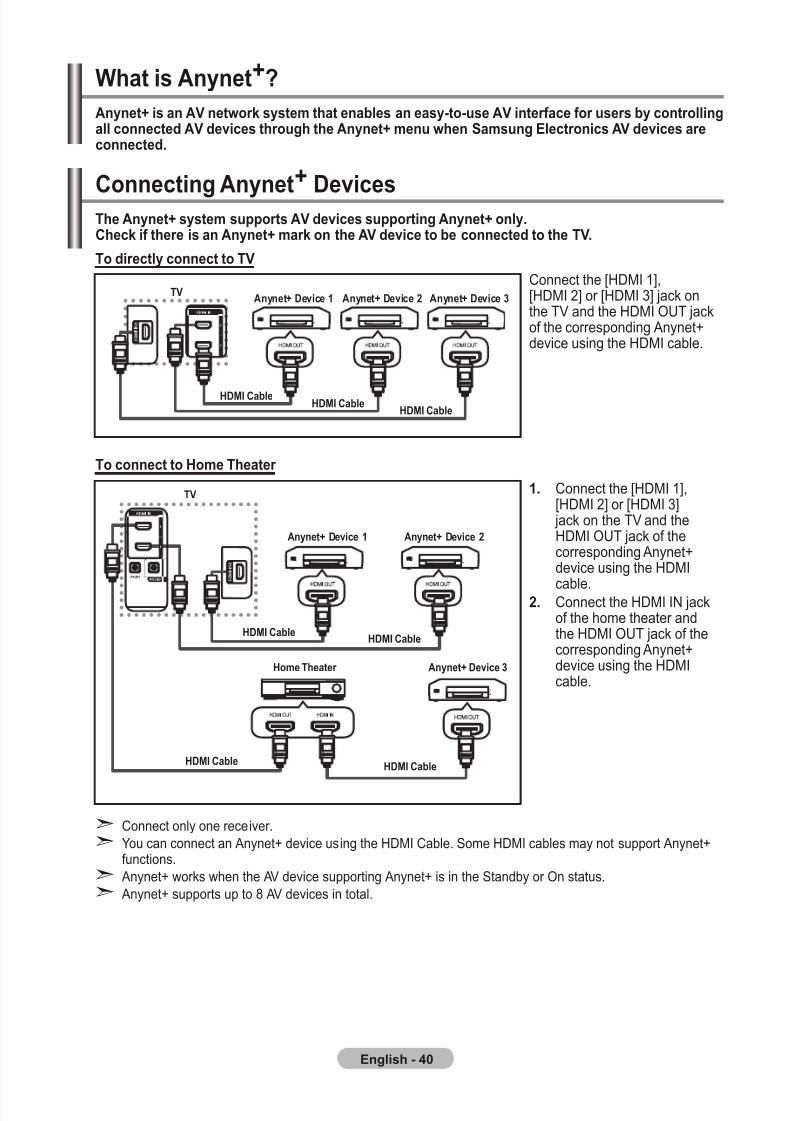
7/30/2019 Samsung LCD TV Eng Rom
http://slidepdf.com/reader/full/samsung-lcd-tv-eng-rom 42/92
English - 40
What is Anynet+?
Anynet+ is an AV network system that enables an easy-to-use AV interface for users by controllingall connected AV devices through the Anynet+ menu when Samsung Electronics AV devices areconnected.
Connecting Anynet
+
DevicesThe Anynet+ system supports AV devices supporting Anynet+ only.Check if there is an Anynet+ mark on the AV device to be connected to the TV.
To directly connect to TV
Connect the [HDMI 1],[HDMI 2] or [HDMI 3] jack onthe TV and the HDMI OUT jackof the corresponding Anynet+device using the HDMI cable.
To connect to Home Theater
1. Connect the [HDMI 1],[HDMI 2] or [HDMI 3]
jack on the TV and theHDMI OUT jack of thecorresponding Anynet+device using the HDMI
cable.2. Connect the HDMI IN jack
of the home theater andthe HDMI OUT jack of thecorresponding Anynet+device using the HDMIcable.
Connect only one receiver.
You can connect an Anynet+ device using the HDMI Cable. Some HDMI cables may not support Anynet+functions.
Anynet+ works when the AV device supporting Anynet+ is in the Standby or On status.
Anynet+ supports up to 8 AV devices in total.
➣
➣
➣
➣
Anynet+ Device 1 Anynet+ Device 2 Anynet+ Device 3TV
HDMI CableHDMI Cable
HDMI Cable
TV
Anynet+ Device 1 Anynet+ Device 2
Anynet+ Device 3
HDMI CableHDMI Cable
HDMI CableHDMI Cable
Home Theater
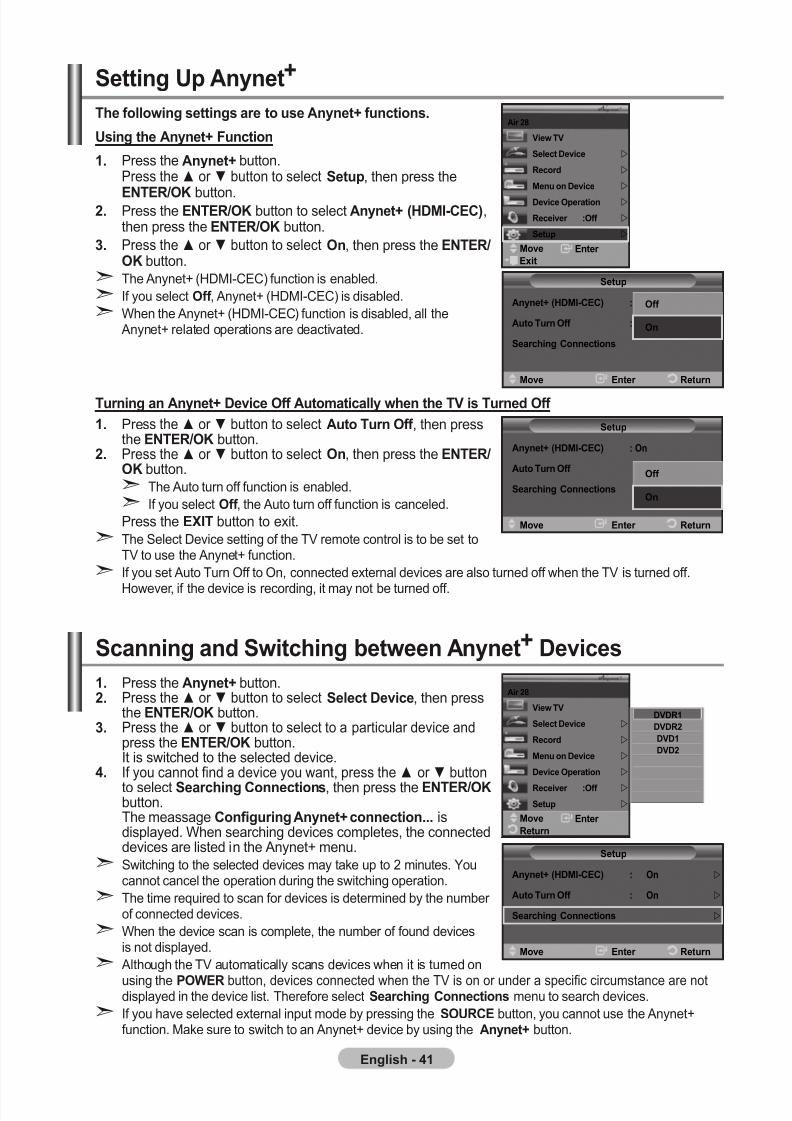
7/30/2019 Samsung LCD TV Eng Rom
http://slidepdf.com/reader/full/samsung-lcd-tv-eng-rom 43/92
eglis - 1
Si up ay+
t fwi sis s ay+ fcis.
usi ay+ Fci
1. Press the ay+ button.Press the ▲ or ▼ button to select Sp, then press the
enter/oK button.. Press the enter/oK button to select ay+ (hDmI-CeC),
then press the enter/oK button.
3. Press the ▲ or ▼ button to select o, then press the enter/oK button.
The Anynet+ (HDMI-CEC) function is enabled.
If you select off , Anynet+ (HDMI-CEC) is disabled.
When the Anynet+ (HDMI-CEC) function is disabled, all the Anynet+ related operations are deactivated.
ti ay+ Dvic off aicy w tV is td off
1. Press the ▲ or ▼ button to select a t off , then pressthe enter/oK button.
. Press the ▲ or ▼ button to select o, then press the enter/oK button.
The Auto turn off function is enabled.
If you select off , the Auto turn off function is canceled.
Press the exIt button to exit.
The Select Device setting of the TV remote control is to be set toTV to use the Anynet+ function.
If you set Auto Turn Off to On, connected external devices are also turned off when the TV is turned off.
However, if the device is recording, it may not be turned off.
➣
➣
➣
➣
➣
➣
➣
Sci d Swici w ay+ Dvics
1. Press the ay+ button.. Press the ▲ or ▼ button to select Sc Dvic, then press
the enter/oK button.3. Press the ▲ or ▼ button to select to a particular device and
press the enter/oK button.It is switched to the selected device.
. If you cannot find a device you want, press the ▲ or ▼ buttonto select Sci Ccis, then press the enter/oK button.The meassage Cfii ay+ cci... isdisplayed. When searching devices completes, the connecteddevices are listed in the Anynet+ menu.
Switching to the selected devices may take up to 2 minutes. Youcannot cancel the operation during the switching operation.
The time required to scan for devices is determined by the number of connected devices.
When the device scan is complete, the number of found devicesis not displayed.
Although the TV automatically scans devices when it is turned on
using the PoWer button, devices connected when the TV is on or under a specic circumstance are notdisplayed in the device list. Therefore select Sci Ccis menu to search devices.
If you have selected external input mode by pressing the SourCe button, you cannot use the Anynet+function. Make sure to switch to an Anynet+ device by using the ay+ button.
➣
➣
➣
➣
➣
e mv
Viw tV
Sc Dvic
rcd
m Dvic
Dvic opi
rciv :off
Sp
ai
ei
Sp
ay+ (hDmI-CeC) : off
a t off : off
Sci Ccis
e rmv
off
o
Sp
ay+ (hDmI-CeC) : o
a t off : off
Sci Ccis
e rmv
off
o
Sp
ay+ (hDmI-CeC) : o
a t off : o
Sci Ccis
e rmv
e mv
Viw tV
Sc Dvic
rcd
m Dvic
Dvic opi
rciv :off
Sp
ai
r
DVDr1
DVDr
DVD1
DVD
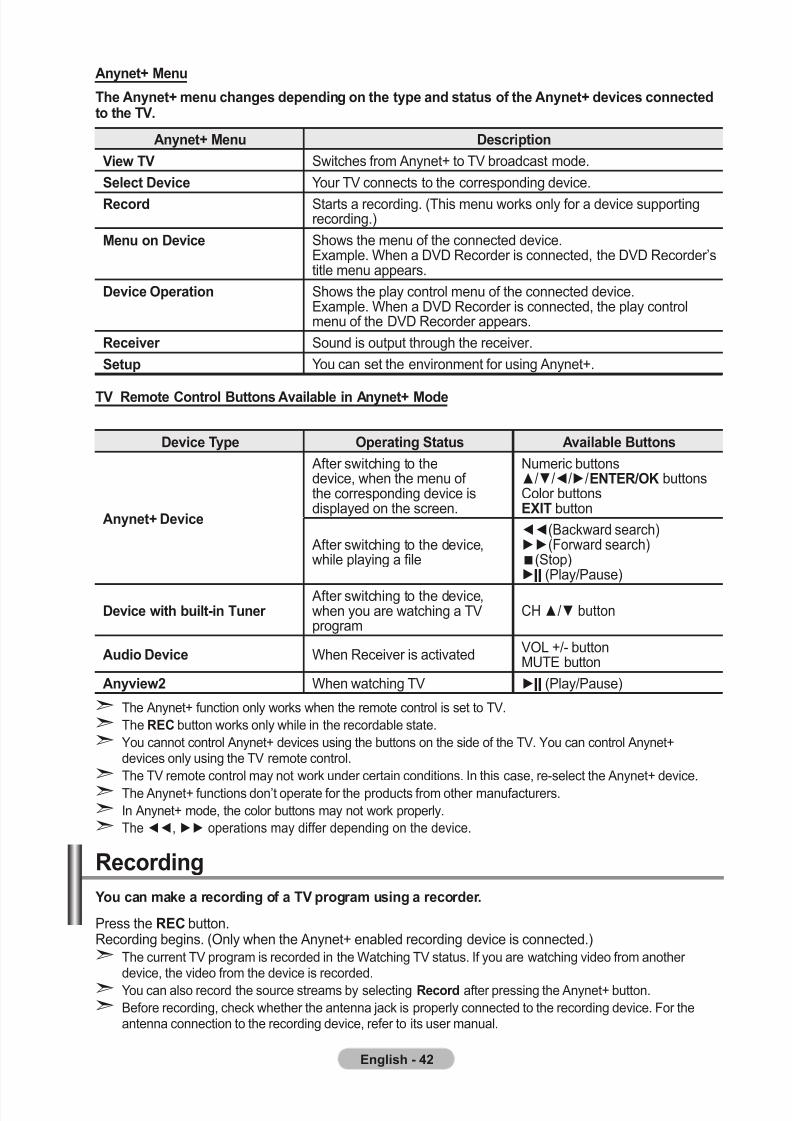
7/30/2019 Samsung LCD TV Eng Rom
http://slidepdf.com/reader/full/samsung-lcd-tv-eng-rom 44/92
eglis -
ay+ m
t ay+ cs dpdi yp d ss f ay+ dvics ccd tV.
ay+ m Dscipi
Viw tV Switches from Anynet+ to TV broadcast mode.
Sc Dvic Your TV connects to the corresponding device.
rcd Starts a recording. (This menu works only for a device supportingrecording.)
m Dvic Shows the menu of the connected device.Example. When a DVD Recorder is connected, the DVD Recorder’stitle menu appears.
Dvic opi Shows the play control menu of the connected device.Example. When a DVD Recorder is connected, the play controlmenu of the DVD Recorder appears.
rciv Sound is output through the receiver.
Sp You can set the environment for using Anynet+.
tV r C bs avi i ay+ md
Dvic typ opi Ss avi bs
ay+ Dvic
After switching to thedevice, when the menu of the corresponding device isdisplayed on the screen.
Numeric buttons▲/▼/◄/►/enter/oK buttonsColor buttonsexIt button
After switching to the device,while playing a file
◄◄(Backward search)►►(Forward search)(Stop)► (Play/Pause)
Dvic wi i-i t After switching to the device,when you are watching a TVprogram
CH ▲/▼ button
adi Dvic When Receiver is activatedVOL +/- buttonMUTE button
ayviw When watching TV ► (Play/Pause)
The Anynet+ function only works when the remote control is set to TV.
The reC button works only while in the recordable state.
You cannot control Anynet+ devices using the buttons on the side of the TV. You can control Anynet+devices only using the TV remote control.
The TV remote control may not work under certain conditions. In this case, re-select the Anynet+ device.
The Anynet+ functions don’t operate for the products from other manufacturers.
In Anynet+ mode, the color buttons may not work properly.
The ◄◄, ►► operations may differ depending on the device.
➣
➣
➣
➣
➣
➣
➣
rcdi
Y c k cdi f tV p si cd.
Press the reC button.Recording begins. (Only when the Anynet+ enabled recording device is connected.)
The current TV program is recorded in the Watching TV status. If you are watching video from another
device, the video from the device is recorded.You can also record the source streams by selecting rcd after pressing the Anynet+ button.
Before recording, check whether the antenna jack is properly connected to the recording device. For theantenna connection to the recording device, refer to its user manual.
➣
➣
➣
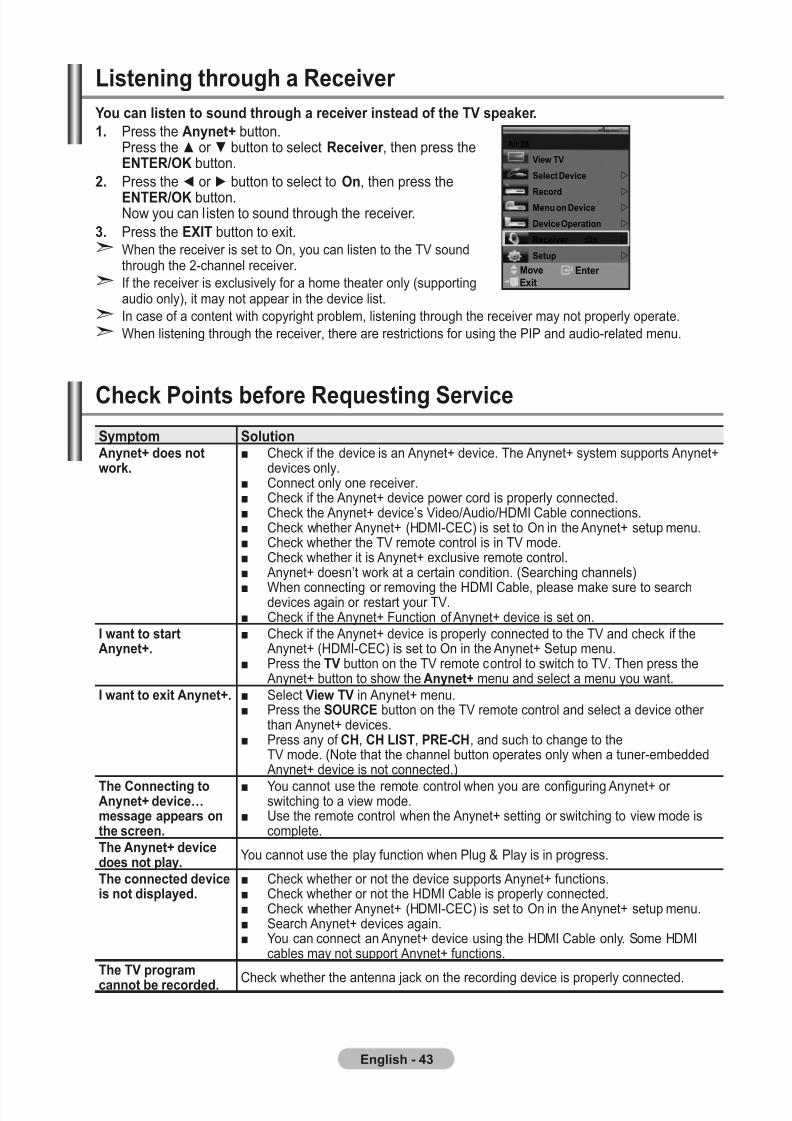
7/30/2019 Samsung LCD TV Eng Rom
http://slidepdf.com/reader/full/samsung-lcd-tv-eng-rom 45/92
English - 43
Listening through a Receiver
You can listen to sound through a receiver instead of the TV speaker.
1. PresstheAnynet+button.Press the ▲ or ▼ button to select Receiver ,thenpresstheENTER/OKbutton.
2. Press the ◄ or ► button to select to On,thenpressthe
ENTER/OKbutton.Now you can listen to sound through the receiver.
3. PresstheEXIT button to exit.When the receiver is set to On, you can listen to the TV soundthrough the 2-channel receiver.
If the receiver is exclusively for a home theater only (supportingaudio only), it may not appear in the device list.
In case of a content with copyright problem, listening through the receiver may not properly operate.
When listening through the receiver, there are restrictions for using the PIP and audio-related menu.
➣
➣
➣
➣
Check Points before Requesting Service
Symptom SolutionAnynet+ does notwork.
■ Check if the device is an Anynet+ device. The Anynet+ system supports Anynet+devices only.
■ Connect only one receiver.■ Check if the Anynet+ device power cord is properly connected.■ Check the Anynet+ device’s Video/Audio/HDMI Cable connections.■ Check whether Anynet+ (HDMI-CEC) is set to On in the Anynet+ setup menu.■ Check whether the TV remote control is in TV mode.■ Check whether it is Anynet+ exclusive remote control.■ Anynet+ doesn’t work at a certain condition. (Searching channels)
■ When connecting or removing the HDMI Cable, please make sure to searchdevices again or restart your TV.
■ Check if the Anynet+ Function of Anynet+ device is set on.
I want to startAnynet+.
■ Check if the Anynet+ device is properly connected to the TV and check if the Anynet+ (HDMI-CEC) is set to On in the Anynet+ Setup menu.
■ Press the TV button on the TV remote control to switch to TV. Then press the Anynet+ button to show the Anynet+ menu and select a menu you want.
I want to exit Anynet+. ■ Select View TV in Anynet+ menu.■ Press the SOURCE button on the TV remote control and select a device other
than Anynet+ devices.■ Press any of CH,CH LIST,PRE-CH, and such to change to the
TV mode. (Note that the channel button operates only when a tuner-embedded Anynet+ device is not connected.)
The Connecting toAnynet+ device…message appears onthe screen.
■ You cannot use the remote control when you are configuring Anynet+ or switching to a view mode.
■ Use the remote control when the Anynet+ setting or switching to view mode iscomplete.
The Anynet+ devicedoes not play.
You cannot use the play function when Plug & Play is in progress.
The connected deviceis not displayed.
■ Check whether or not the device supports Anynet+ functions.■ Check whether or not the HDMI Cable is properly connected.■ Check whether Anynet+ (HDMI-CEC) is set to On in the Anynet+ setup menu.■ Search Anynet+ devices again.■ You can connect an Anynet+ device using the HDMI Cable only. Some HDMI
cables may not support Anynet+ functions.
The TV programcannot be recorded. Check whether the antenna jack on the recording device is properly connected.
Enter Move
View TV
Select Device
Record
Menu on Device
Device Operation
Receiver :On
Setup
Air 28
Exit
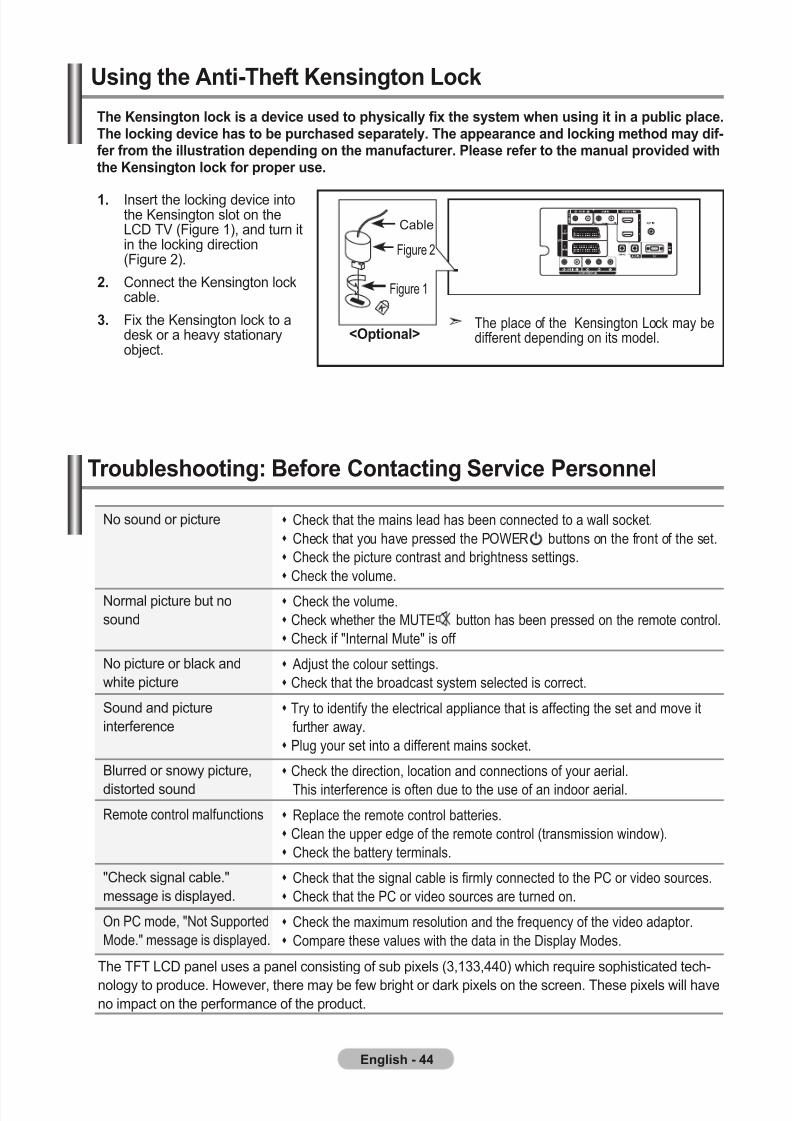
7/30/2019 Samsung LCD TV Eng Rom
http://slidepdf.com/reader/full/samsung-lcd-tv-eng-rom 46/92
eglis -
tsi: bf Cci Svic Ps
No sound or picture
Normal picture but no
sound
No picture or black and
white picture
Sound and picture
interference
Blurred or snowy picture,
distorted sound
Remote control malfunctions
"Check signal cable."
message is displayed.
On PC mode, "Not Supported
Mode." message is displayed.
The TFT LCD panel uses a panel consisting of sub pixels (3,133,440) which require sophisticated tech-
nology to produce. However, there may be few bright or dark pixels on the screen. These pixels will have
no impact on the performance of the product.
Check that the mains lead has been connected to a wall socket.
Check that you have pressed the POWER buttons on the front of the set.
Check the picture contrast and brightness settings.
Check the volume.
Check the volume.
Check whether the MUTE button has been pressed on the remote control.
Check if "Internal Mute" is off
Adjust the colour settings.
Check that the broadcast system selected is correct.
Try to identify the electrical appliance that is affecting the set and move it
further away.
Plug your set into a different mains socket.
Check the direction, location and connections of your aerial.
This interference is often due to the use of an indoor aerial.
Replace the remote control batteries.
Clean the upper edge of the remote control (transmission window).
Check the battery terminals.
Check that the signal cable is firmly connected to the PC or video sources.
Check that the PC or video sources are turned on.
Check the maximum resolution and the frequency of the video adaptor.
Compare these values with the data in the Display Modes.
usi ai-tf Ksi lck
t Ksi ck is dvic sd pysicy fi sys w si i i pic pc.t cki dvic s pcsd spy. t ppc d cki d y dif-f f isi dpdi fc. Ps f pvidd wi Ksi ck f pp s.
1. Insert the locking device intothe Kensington slot on theLCD TV (Figure 1), and turn itin the locking direction(Figure 2).
. Connect the Kensington lockcable.
3. Fix the Kensington lock to adesk or a heavy stationaryobject.
Cable
Figure 1
Figure 2
<opi> The place of the Kensington Lock may be
different depending on its model.
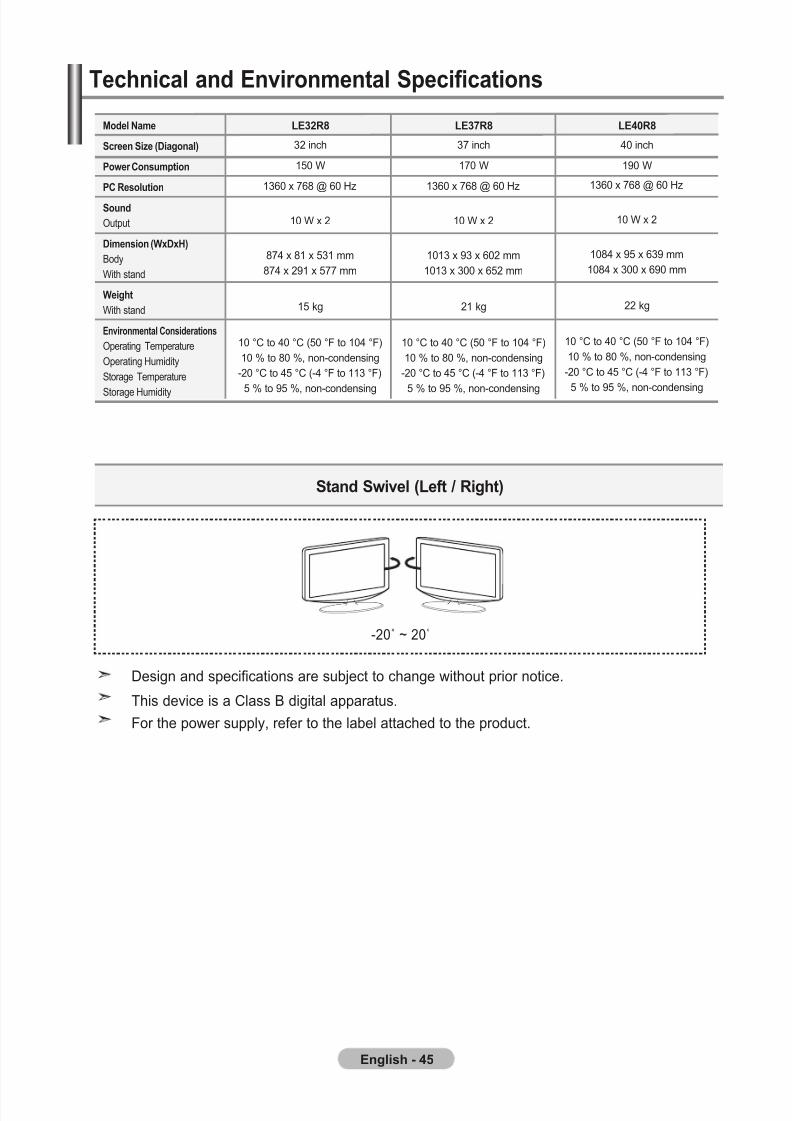
7/30/2019 Samsung LCD TV Eng Rom
http://slidepdf.com/reader/full/samsung-lcd-tv-eng-rom 47/92
eglis -
Technical and Environmental Specifcations
md n
Sc Siz (Dig)
Pw Cspi
PC rsi
Sd
Output
Disi (WxDxh)
Body
With stand
Wig
With stand
environmnal Considraions
Operating Temperature
Operating Humidity
Storage Temperature
Storage Humidity
le3r
32 inch
150 W
1360 x 768 @ 60 Hz
10 W x 2
874 x 81 x 531 mm
874 x 291 x 577 mm
15 kg
10 °C to 40 °C (50 °F to 104 °F)
10 % to 80 %, non-condensing
-20 °C to 45 °C (-4 °F to 113 °F)
5 % to 95 %, non-condensing
le3r
37 inch
170 W
1360 x 768 @ 60 Hz
10 W x 2
1013 x 93 x 602 mm
1013 x 300 x 652 mm
21 kg
10 °C to 40 °C (50 °F to 104 °F)
10 % to 80 %, non-condensing
-20 °C to 45 °C (-4 °F to 113 °F)
5 % to 95 %, non-condensing
le0r
40 inch
190 W
1360 x 768 @ 60 Hz
10 W x 2
1084 x 95 x 639 mm
1084 x 300 x 690 mm
22 kg
10 °C to 40 °C (50 °F to 104 °F)
10 % to 80 %, non-condensing
-20 °C to 45 °C (-4 °F to 113 °F)
5 % to 95 %, non-condensing
Design and specifications are subject to change without prior notice.
This device is a Class B digital apparatus.
For the power supply, refer to the label attached to the product.
-20˚ ~ 20˚
Sd Swiv (lf / ri)
7/30/2019 Samsung LCD TV Eng Rom
http://slidepdf.com/reader/full/samsung-lcd-tv-eng-rom 48/92
Simbol Apăsaţi Important Notă Buton
multifuncţionall
Română -
CuprinsCONECTAREA ŞI PREGĂTIREA TELEVIZORULUI DVS.
Lista componentelor .................................................2Instalarea stativului ..................................................2Instalarea kitului de montare pe perete....................2Vizualizarea panoului de control .............................. 3Vizualizarea panoului de conectare ......................... 4Vizualizarea telecomenzii .......................................6Montarea bateriilor în telecomandă ........................7Pornirea şi oprirea....................................................7Trecerea televizorului în modul Standby ..................7Plug & Play .............................................................8
SETAREA CANALELORMemorarea automată a canalelor ............................9Memorarea manuală a canalelor ...........................10Setarea listelor de canale ...................................... 11 Activarea funcţiei Child Lock (Blocare -
acces copii) ........................................................... 11Sortarea canalelor memorate ................................12 Atribuirea numelor de canale .................................12 Acordul n al recepţiei canalului ............................1 3
SETAREA IMAGINIIModicarea standardului de imagine .....................13Reglarea imaginii personalizate.............................1 4Modicarea tonului de culoare ...............................1 4 Activarea iluminării din spate .................................15Congurarea setărilor detaliate pentru imagine .....16Modicarea dimensiunii imaginii ............................17
Stop cadru cu imaginea curentă ............................18Selectarea opţiunii Screen Mode (Mod Ecran) ......18Resetarea setărilor de imagine lavalorile prestabilite din fabrică................................18Digital NR / Culori active / DNIe / Movie Plus ........19Vizualizarea Picture In Picture (PIP) ......................20Negru HDMI ...........................................................21
SETAREA SUNETULUISchimbarea standardului de sunet ........................21Reglarea setărilor pentru sunet..............................22
Setarea TruSurround XT (SRS TS XT) .................22Conectarea căştilor ................................................2 3Selectarea modului Sound (Sunet) ........................2 3Reglarea automată a volumului .............................2 3Selectarea opţiunii Fara Sonor ..............................2 4 Ascultarea sunetului în modul Sub Picture(Sub-imagine) ........................................................2 4Resetarea setărilor sunetului la valorileprestabilite din fabrică ............................................25
SETAREA OREI Setarea şi aşarea orei curente ............................25Setarea temporizatorului de oprire.........................26Pornirea şi oprirea automată a televizorului...........26
DESCRIEREA FUNCŢIILOR
Selectarea limbii....................................................27Utilizarea caracteristicii Game Mode (Mod Joc) ....27Setarea modului Blue Screen (Ecran albastru)/Selectarea melodiei ...............................................28Setarea modului PC Home Theater .......................28Setarea efectului de lumină ...................................29Utilizarea caracteristicii Energy Saving(Econ. energie) .....................................................29Selectarea sursei ...................................................30Editarea numelor surselor de intrare ......................30
FOLOSIREA TELETEXTULUIDecodor teletext..................................................... 31 Aşarea informaţiilor de pe teletext........................32Selectarea unei pagini de teletext..........................32Utilizarea funcţiei Fastext pentru a selecta opagină de teletext .................................................. 33Congurarea telecomenzii ..................................... 33Codurile pentru telecomandă................................. 34
CONFIGURAREA PC-ULUICongurarea aplicaţiei software pentru PC(pentru Windows)................................................... 37
Moduri de aşare ................................................... 37Congurarea PC-ului ............................................. 38 Ajustarea suportului de perete (LE40R8)(Vândut separat) .................................................... 39
anynet+
Ce este Anynet+?................................................... 40Conectarea dispozitivelor Anynet+ ........................40Congurarea sistemului Anynet+ ........................... 41Scanarea şi comutarea între dispozitivele Anynet+.................................................................. 41
Înregistrare ............................................................. 42 Ascultarea printr-un receptor ................................. 43Elemente de vericat înainte de a solicitaasistenţă tehnică .................................................... 43
RECOMANDĂRI DE UTILIZAREUtilizarea blocării Kensington împotriva furtului ....44Depanare: Înainte de a contacta personalul deservice ....................................................................44Specicaţii tehnice şi de mediu.............................. 45
R om â n ă
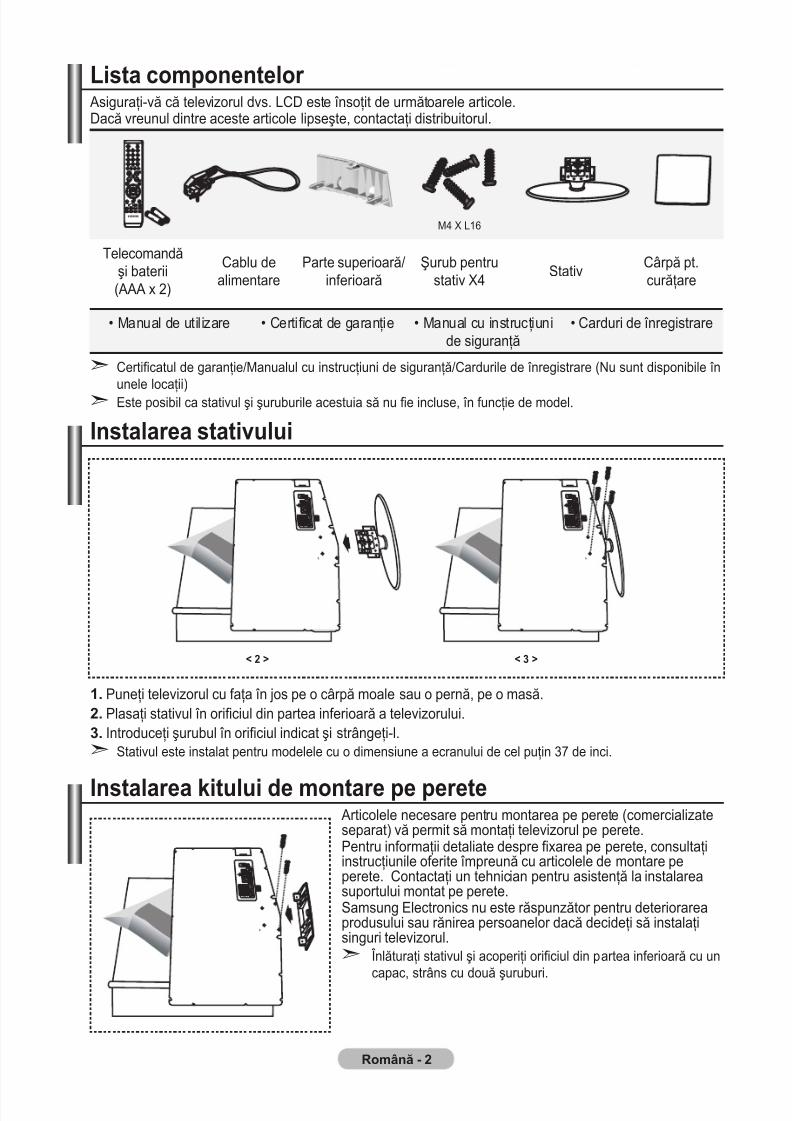
7/30/2019 Samsung LCD TV Eng Rom
http://slidepdf.com/reader/full/samsung-lcd-tv-eng-rom 49/92
Română -
Lista componentelor Asiguraţi-vă că televizorul dvs. LCD este însoţit de următoarele articole.Dacă vreunul dintre aceste articole lipseşte, contactaţi distribuitorul.
M4 X L16
Telecomandăşi baterii(AAA x 2)
Cablu dealimentare
Parte superioară/inferioară
Şurub pentrustativ X4
StativCârpă pt.curăţare
• Manual de utilizare • Certicat de garanţie • Manual cu instrucţiunide siguranţă
• Carduri de înregistrare
Certicatul de garanţie/Manualul cu instrucţiuni de siguranţă/Cardurile de înregistrare (Nu sunt disponibile în
unele locaţii)Este posibil ca stativul şi şuruburile acestuia să nu e incluse, în funcţie de model.
Instalarea stativului
Puneţi televizorul cu faţa în jos pe o cârpă moale sau o pernă, pe o masă.Plasaţi stativul în oriciul din partea inferioară a televizorului.Introduceţi şurubul în oriciul indicat şi strângeţi-l.
Stativul este instalat pentru modelele cu o dimensiune a ecranului de cel puţin 37 de inci.
Instalarea kitului de montare pe perete Articolele necesare pentru montarea pe perete (comercializateseparat) vă permit să montaţi televizorul pe perete.Pentru informaţii detaliate despre xarea pe perete, consultaţiinstrucţiunile oferite împreună cu articolele de montare peperete. Contactaţi un tehnician pentru asistenţă la instalareasuportului montat pe perete.Samsung Electronics nu este răspunzător pentru deteriorareaprodusului sau rănirea persoanelor dacă decideţi să instalaţisinguri televizorul.
Înlăturaţi stativul şi acoperiţi oriciul din partea inferioară cu un
capac, strâns cu două şuruburi.
➣
➣
.
.
3.
➣
➣
< > < 3 >
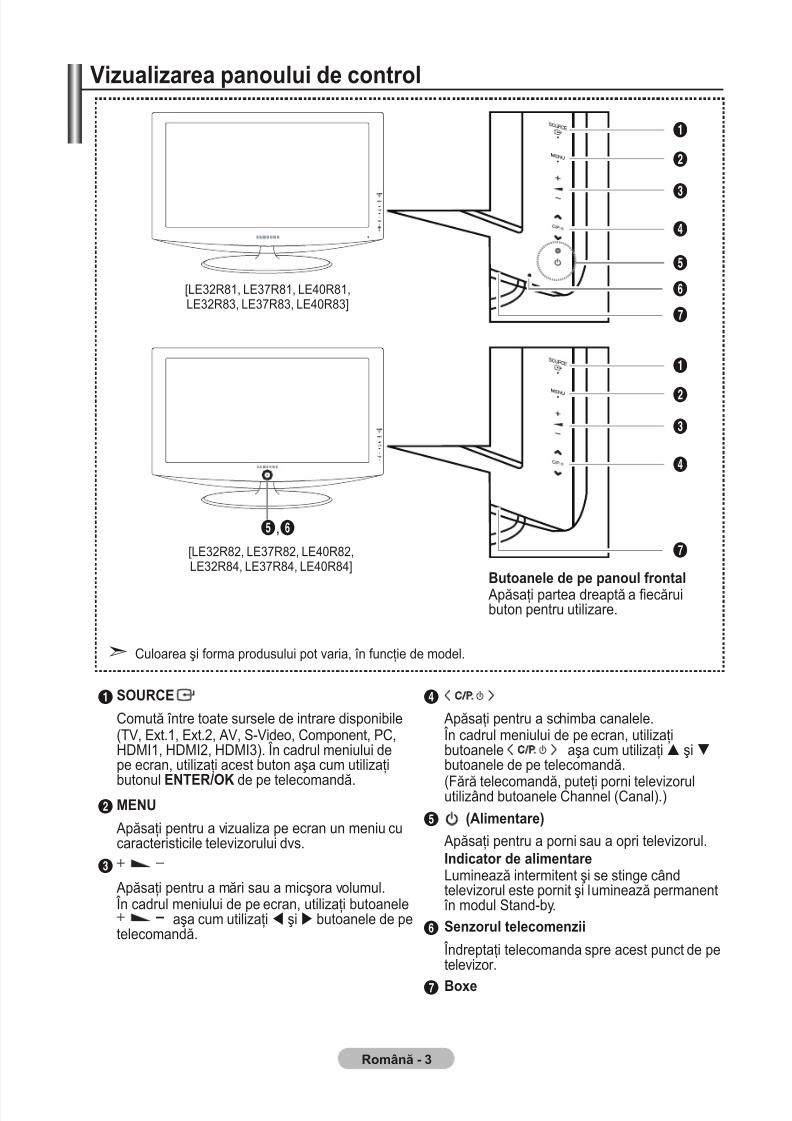
7/30/2019 Samsung LCD TV Eng Rom
http://slidepdf.com/reader/full/samsung-lcd-tv-eng-rom 50/92
Română - 3
Vizualizarea panoului de control
1 SOURCE 4
Apăsaţi pentru a schimba canalele. În cadrul meniului de pe ecran, utilizaţibutoanele aşa cum utilizaţi şi butoanele de pe telecomandă.
(Fără telecomandă, puteţi porni televizorulutilizând butoanele Channel (Canal).)
5 (Alimentare) Apăsaţi pentru a porni sau a opri televizorul.Indicator de alimentareLuminează intermitent şi se stinge cândtelevizorul este pornit şi luminează permanent
în modul Stand-by.
6 Senzorul telecomenzii
Îndreptaţi telecomanda spre acest punct de petelevizor.
7 Boxe
Comută între toate sursele de intrare disponibile(TV, Ext.1, Ext.2, AV, S-Video, Component, PC,HDMI1, HDMI2, HDMI3). În cadrul meniului depe ecran, utilizaţi acest buton aşa cum utilizaţi
butonul enteR/OK de pe telecomandă. 2MENU
Apăsaţi pentru a vizualiza pe ecran un meniu cucaracteristicile televizorului dvs.
3
Apăsaţi pentru a mări sau a micşora volumul. În cadrul meniului de pe ecran, utilizaţi butoanele
aşa cum utilizaţi şi butoanele de petelecomandă.
Culoarea şi forma produsului pot varia, în funcţie de model.➣
Butoanele de pe panoul frontal Apăsaţi partea dreaptă a ecăruibuton pentru utilizare.
1
2
3
4
5
6
7
[LE32R81, LE37R81, LE40R81,LE32R83, LE37R83, LE40R83]
1
2
3
4
5,6
7[LE32R82, LE37R82, LE40R82, LE32R84, LE37R84, LE40R84]

7/30/2019 Samsung LCD TV Eng Rom
http://slidepdf.com/reader/full/samsung-lcd-tv-eng-rom 51/92
Română -
Vizualizarea panoului de conectare
Când conectaţi un dispozitiv extern la televizor, asiguraţi-vă că televizorul nu este alimentat cu curent. Atunci când conectaţi un dispozitiv extern, aveţi grijă să respectaţi culorile conectorilor.
1 Conectarea la un Set-Top Box, VCR sau DVD
Conector Intrare Ieşire
Video Audio (L/R) RGB Video + Audio (L/R)EXT 1 O O O Este disponibilă numai ieşirea TV.
EXT 2 O O Puteţi alege ieşirea.
Intrări şi ieşiri pentru dispozitive externe, ca videorecordere, DVD playere, videoplayere sau console de jocuri video.2 Conectarea unui echipament AUDIO
Conectaţi cablurile audio RCA între conectorul “R - AUDIO - L” din partea posterioară a televizorului dvs. şi conectoriide intrare audio ai amplicatorului sau ai sistemului DVD Home Theater.
3 HDMI IN ,HDMI IN , HDMI IN 3 Acceptă conexiuni între dispozitive AV cu tehnologie HDMI (set-top box, playere DVD). În cazul unei conexiuni HDMI - HDMI nu este necesară nicio conexiune audio suplimentară.
Ce este HDMI?“ High Denition Multimedia interface - Interfaţa multimedia de înaltă deniţie” permite transmiterea datelor videodigitale de înaltă deniţie şi a datelor audio digitale pe mai multe canale (5,1 canale).Conectorul HDMI/DVI acceptă conectarea DVI la un dispozitiv extern prin intermediul unui cablu corespunzător (neinclus). Diferenţa dintre HDMI şi DVI este aceea că dispozitivele HDMI sunt mai mici, au instalatăcaracteristica de codicare HDCP (High Bandwidth Digital Copy Protection) şi acceptă semnal audio digitalmulticanal.
DVI IN (HDMI ) (AUDIO R/L)La conectarea acestui produs prin HDMI sau DVI la un set-top box, un player DVD sau o consolă pentru jocurietc., asiguraţi-vă că este setat la un mod de ieşire video compatibil, conform tabelului de mai jos. Nerespectareaacestei compatibilităţi poate genera distorsiuni sau întreruperi ale imaginii sau absenţa completă a imaginii.Utilizarea unei conexiuni prin cablu HDMI/DVI este posibilă numai prin intermediul conectorului HDMI 2.
Trebuie să utilizaţi cablul DVI - HDMI sau adaptorul DVI-HDMI pentru conectare şi conectorul“R - AUDIO - L” de la DVI pentru ieşirea sunetului.Moduri acceptate pentru HDMI/DVI şi Component
480i 480p 576i 576p 720p 1080i
HDMI/DVI 50 Hz X X X O O OHDMI/DVI 60 Hz X O X X O OComponent O O O O O O
➣➣
-
-
-
-
➣
-
-
-
-
➣
➣
1 2 3 4
5
3
67890
Culoarea şi forma produsului pot varia, în funcţie de model.➣
Alimentare de intrare
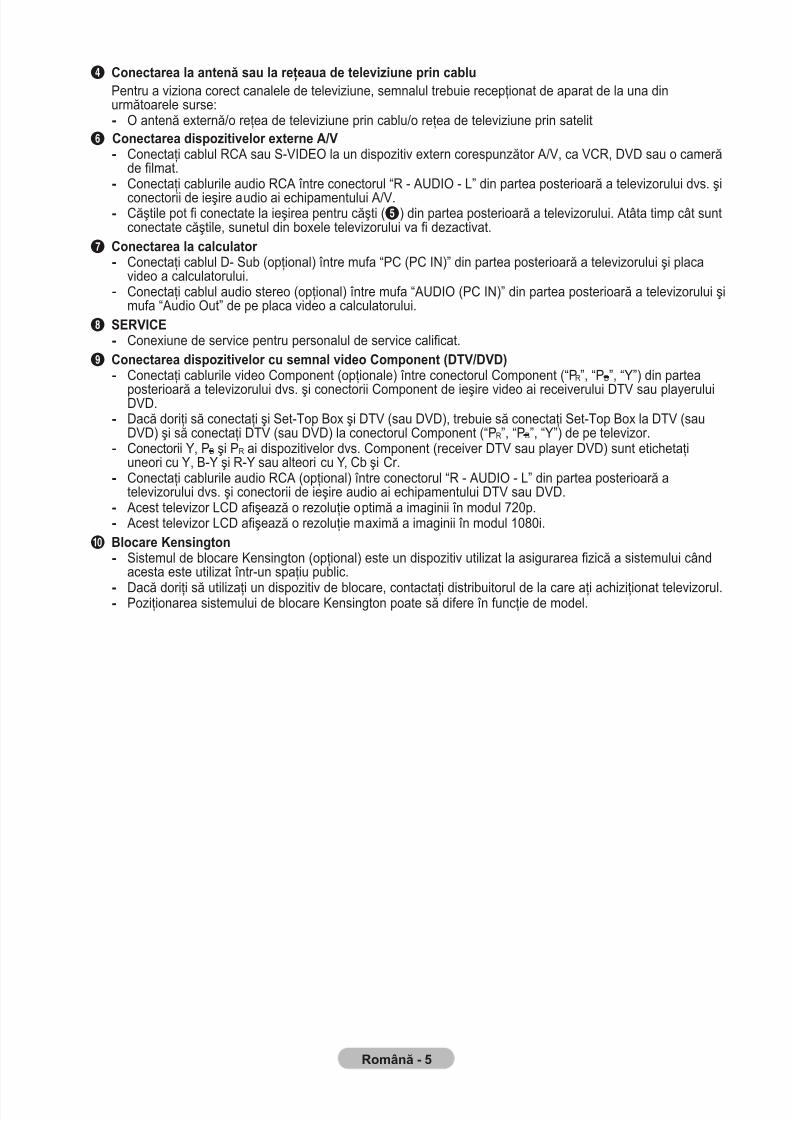
7/30/2019 Samsung LCD TV Eng Rom
http://slidepdf.com/reader/full/samsung-lcd-tv-eng-rom 52/92
Română -
4 Conectarea la antenă sau la reţeaua de televiziune prin cabluPentru a viziona corect canalele de televiziune, semnalul trebuie recepţionat de aparat de la una dinurmătoarele surse:
O antenă externă/o reţea de televiziune prin cablu/o reţea de televiziune prin satelit6Conectarea dispozitivelor externe A/V
Conectaţi cablul RCA sau S-VIDEO la un dispozitiv extern corespunzător A/V, ca VCR, DVD sau o camerăde lmat.Conectaţi cablurile audio RCA între conectorul “R - AUDIO - L” din partea posterioară a televizorului dvs. şiconectorii de ieşire audio ai echipamentului A/V.Căştile pot conectate la ieşirea pentru căşti (5) din partea posterioară a televizorului. Atâta timp cât suntconectate căştile, sunetul din boxele televizorului va dezactivat.
7 Conectarea la calculator Conectaţi cablul D- Sub (opţional) între mufa “PC (PC IN)” din partea posterioară a televizorului şi placavideo a calculatorului.Conectaţi cablul audio stereo (opţional) între mufa “AUDIO (PC IN)” din partea posterioară a televizorului şimufa “Audio Out” de pe placa video a calculatorului.
8 SERVICEConexiune de service pentru personalul de service calicat.
9 Conectarea dispozitivelor cu semnal video Component (DTV/DVD)Conectaţi cablurile video Component (opţionale) între conectorul Component (“PR”, “PB”, “Y”) din partea
posterioară a televizorului dvs. şi conectorii Component de ieşire video ai receiverului DTV sau playeruluiDVD.Dacă doriţi să conectaţi şi Set-Top Box şi DTV (sau DVD), trebuie să conectaţi Set-Top Box la DTV (sauDVD) şi să conectaţi DTV (sau DVD) la conectorul Component (“P R”, “PB”, “Y”) de pe televizor.Conectorii Y, PB şi PR ai dispozitivelor dvs. Component (receiver DTV sau player DVD) sunt etichetaţiuneori cu Y, B-Y şi R-Y sau alteori cu Y, Cb şi Cr.Conectaţi cablurile audio RCA (opţional) între conectorul “R - AUDIO - L” din partea posterioară atelevizorului dvs. şi conectorii de ieşire audio ai echipamentului DTV sau DVD. Acest televizor LCD aşează o rezoluţie optimă a imaginii în modul 720p. Acest televizor LCD aşează o rezoluţie maximă a imaginii în modul 1080i.
0 Blocare KensingtonSistemul de blocare Kensington (opţional) este un dispozitiv utilizat la asigurarea zică a sistemului cândacesta este utilizat într-un spaţiu public.
Dacă doriţi să utilizaţi un dispozitiv de blocare, contactaţi distribuitorul de la care aţi achiziţionat televizorul.Poziţionarea sistemului de blocare Kensington poate să difere în funcţie de model.
-
-
-
-
-
-
-
-
-
-
-
-
-
-
--
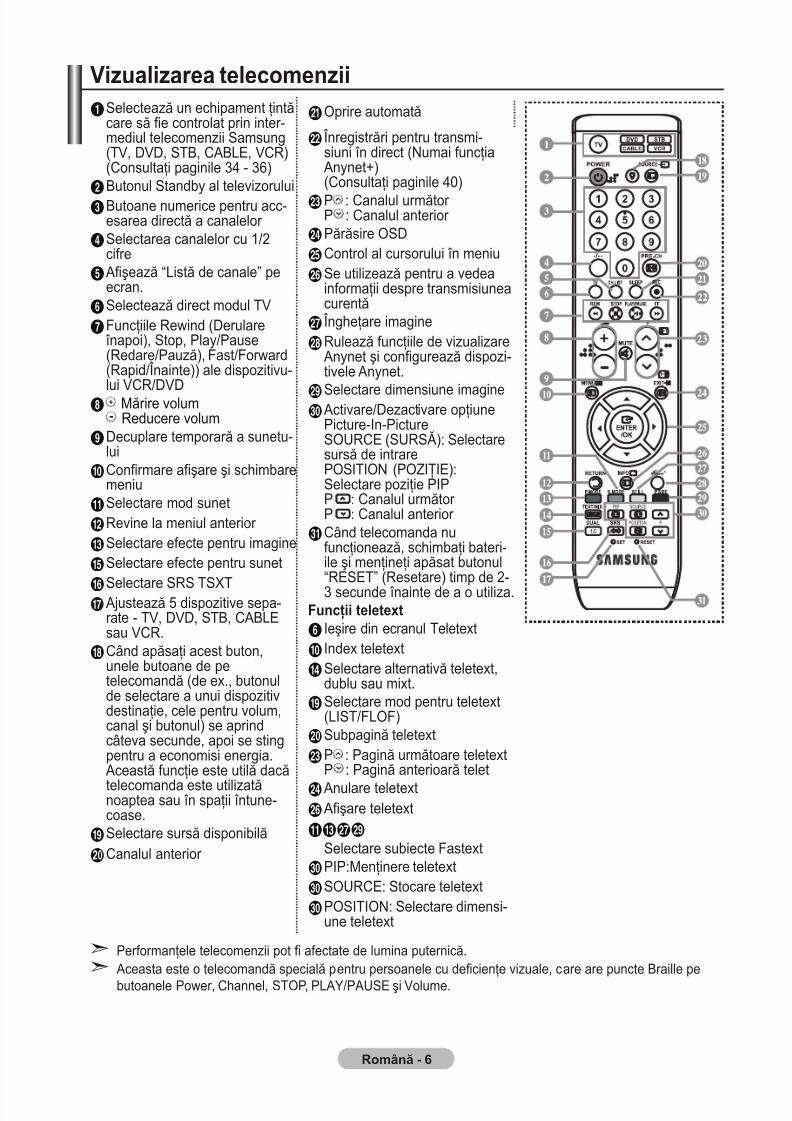
7/30/2019 Samsung LCD TV Eng Rom
http://slidepdf.com/reader/full/samsung-lcd-tv-eng-rom 53/92
Română -
Vizualizarea telecomenzii1Selectează un echipament ţintă
care să fie controlat prin inter-mediul telecomenzii Samsung(TV, DVD, STB, CABLE, VCR)(Consultaţi paginile 34 - 36)
a Oprire automată
b Înregistrări pentru transmi-siuni în direct (Numai funcţia
Anynet+) (Consultaţi paginile 40)
c P : Canalul următor P : Canalul anterior
d Părăsire OSDe Control al cursorului în meniuf Se utilizează pentru a vedea
informaţii despre transmisiuneacurentă
g Îngheţare imagineh Rulează funcţiile de vizualizare
Anynet şi configurează dispozi-tivele Anynet.
i Selectare dimensiune imaginej Activare/Dezactivare opţiune
Picture-In-Picture SOURCE (SURSĂ): Selectaresursă de intrare POSITION (POZIŢIE):Selectare poziţie PIP P : Canalul următor P : Canalul anterior
k Când telecomanda nufuncţionează, schimbaţi bateri-ile şi menţineţi apăsat butonul“RESET” (Resetare) timp de 2-3 secunde înainte de a o utiliza.
Funcţii teletext6 Ieşire din ecranul Teletext0 Index teletext$ Selectare alternativă teletext,
dublu sau mixt.( Selectare mod pentru teletext
(LIST/FLOF)) Subpagină teletextc P : Pagină următoare teletext
P : Pagină anterioară teletd Anulare teletextf Afişare teletext!#gi
Selectare subiecte Fastextj PIP:Menţinere teletextj SOURCE: Stocare teletextj POSITION: Selectare dimensi-
une teletext
2Butonul Standby al televizorului3Butoane numerice pentru acc-
esarea directă a canalelor 4Selectarea canalelor cu 1/2
cifre5 Afişează “Listă de canale” pe
ecran.6Selectează direct modul TV7Funcţiile Rewind (Derulare
înapoi), Stop, Play/Pause(Redare/Pauză), Fast/Forward(Rapid/Înainte)) ale dispozitivu-
lui VCR/DVD8 Mărire volumReducere volum
9Decuplare temporară a sunetu-lui
0Confirmare afişare şi schimbaremeniu
!Selectare mod sunet
@Revine la meniul anterior #Selectare efecte pentru imagine%Selectare efecte pentru sunet
^Selectare SRS TSXT& Ajustează 5 dispozitive sepa-
rate - TV, DVD, STB, CABLEsau VCR.
*Când apăsaţi acest buton,unele butoane de petelecomandă (de ex., butonulde selectare a unui dispozitivdestinaţie, cele pentru volum,canal şi butonul) se aprindcâteva secunde, apoi se stingpentru a economisi energia.
Această funcţie este utilă dacătelecomanda este utilizatănoaptea sau în spaţii întune-coase.
(Selectare sursă disponibilă
)Canalul anterior
Performanţele telecomenzii pot afectate de lumina puternică. Aceasta este o telecomandă specială pentru persoanele cu decienţe vizuale, care are puncte Braille pebutoanele Power, Channel, STOP, PLAY/PAUSE şi Volume.
➣
➣
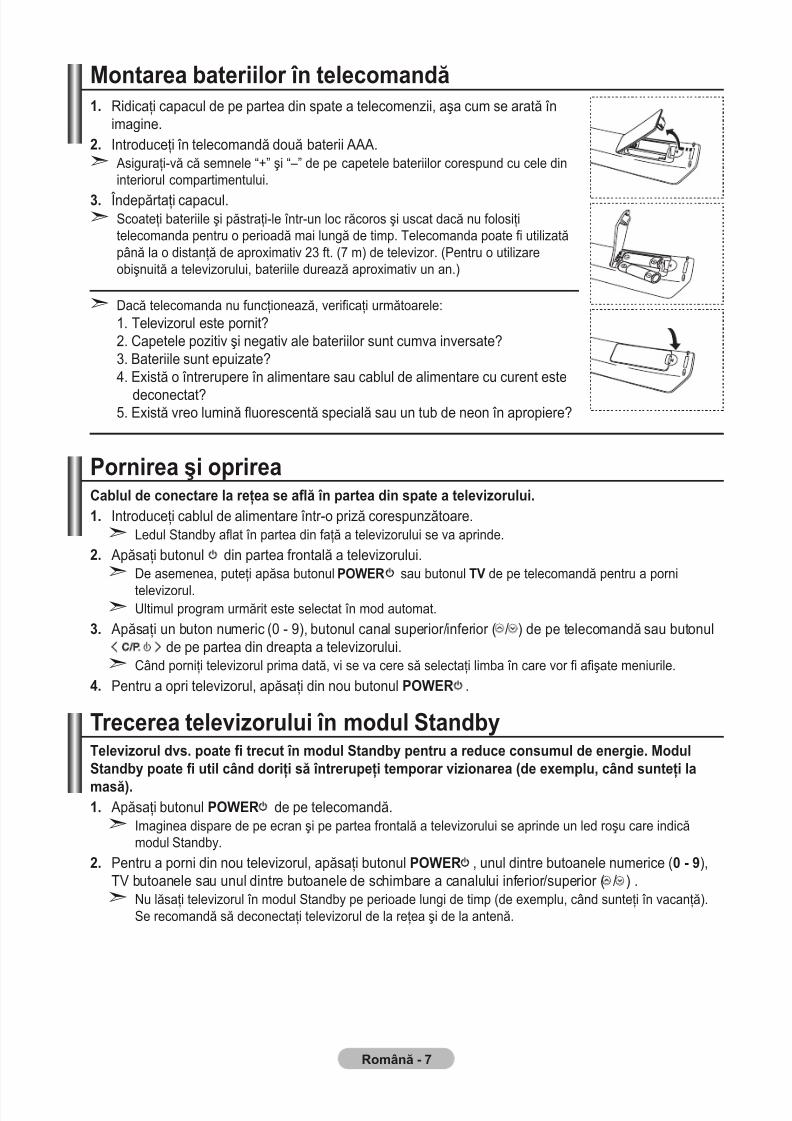
7/30/2019 Samsung LCD TV Eng Rom
http://slidepdf.com/reader/full/samsung-lcd-tv-eng-rom 54/92
Română -
Montarea bateriilor în telecomandă. Ridicaţi capacul de pe partea din spate a telecomenzii, aşa cum se arată în
imagine.. Introduceţi în telecomandă două baterii AAA.
Asiguraţi-vă că semnele “+” şi “–” de pe capetele bateriilor corespund cu cele dininteriorul compartimentului.
3. Îndepărtaţi capacul.Scoateţi bateriile şi păstraţi-le într-un loc răcoros şi uscat dacă nu folosiţitelecomanda pentru o perioadă mai lungă de timp. Telecomanda poate utilizatăpână la o distanţă de aproximativ 23 ft. (7 m) de televizor. (Pentru o utilizareobişnuită a televizorului, bateriile durează aproximativ un an.)
Dacă telecomanda nu funcţionează, vericaţi următoarele:1. Televizorul este pornit?2. Capetele pozitiv şi negativ ale bateriilor sunt cumva inversate?3. Bateriile sunt epuizate?4. Există o întrerupere în alimentare sau cablul de alimentare cu curent este
deconectat?5. Există vreo lumină uorescentă specială sau un tub de neon în apropiere?
Pornirea şi oprireaCablul de conectare la reţea se aă în partea din spate a televizorului.. Introduceţi cablul de alimentare într-o priză corespunzătoare.
Ledul Standby aat în partea din faţă a televizorului se va aprinde.. Apăsaţi butonul din partea frontală a televizorului.
De asemenea, puteţi apăsa butonul POWeR sau butonul TV de pe telecomandă pentru a porni
televizorul.Ultimul program urmărit este selectat în mod automat.
3. Apăsaţi un buton numeric (0 - 9), butonul canal superior/inferior ( / ) de pe telecomandă sau butonulde pe partea din dreapta a televizorului.
Când porniţi televizorul prima dată, vi se va cere să selectaţi limba în care vor aşate meniurile.
. Pentru a opri televizorul, apăsaţi din nou butonul POWeR .
Trecerea televizorului în modul StandbyTelevizorul dvs. poate trecut în modul Standby pentru a reduce consumul de energie. ModulStandby poate util când doriţi să întrerupeţi temporar vizionarea (de exemplu, când sunteţi la
masă).. Apăsaţi butonul POWeR de pe telecomandă.
Imaginea dispare de pe ecran şi pe partea frontală a televizorului se aprinde un led roşu care indicămodul Standby.
. Pentru a porni din nou televizorul, apăsaţi butonul POWeR , unul dintre butoanele numerice (0 - 9),TV butoanele sau unul dintre butoanele de schimbare a canalului inferior/superior ( / ) .
Nu lăsaţi televizorul în modul Standby pe perioade lungi de timp (de exemplu, când sunteţi în vacanţă).Se recomandă să deconectaţi televizorul de la reţea şi de la antenă.
➣
➣
➣
➣
➣
➣
➣
➣
➣
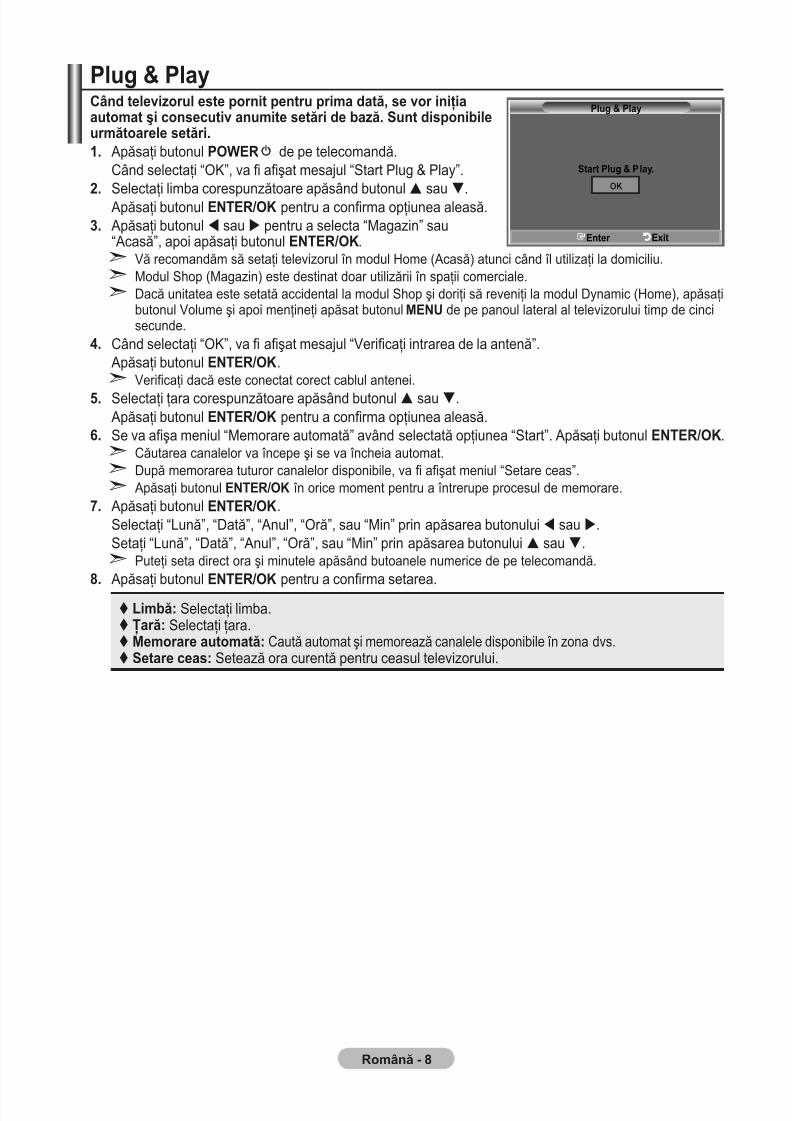
7/30/2019 Samsung LCD TV Eng Rom
http://slidepdf.com/reader/full/samsung-lcd-tv-eng-rom 55/92
Română -
Plug & PlayCând televizorul este pornit pentru prima dată, se vor iniţiaautomat şi consecutiv anumite setări de bază. Sunt disponibileurmătoarele setări.. Apăsaţi butonul POWER de pe telecomandă.
Când selectaţi “OK”, va aşat mesajul “Start Plug & Play”.
. Selectaţi limba corespunzătoare apăsând butonul
sau
.Apăsaţi butonul enteR/OK pentru a conrma opţiunea aleasă.3. Apăsaţi butonul sau pentru a selecta “Magazin” sau
“Acasă”, apoi apăsaţi butonul enteR/OK.Vă recomandăm să setaţi televizorul în modul Home (Acasă) atunci când îl utilizaţi la domiciliu.Modul Shop (Magazin) este destinat doar utilizării în spaţii comerciale.Dacă unitatea este setată accidental la modul Shop şi doriţi să reveniţi la modul Dynamic (Home), apăsaţibutonul Volume şi apoi menţineţi apăsat butonul MENU de pe panoul lateral al televizorului timp de cincisecunde.
. Când selectaţi “OK”, va aşat mesajul “Vericaţi intrarea de la antenă”.Apăsaţi butonul enteR/OK.
Vericaţi dacă este conectat corect cablul antenei.
. Selectaţi ţara corespunzătoare apăsând butonul sau.Apăsaţi butonul enteR/OK pentru a conrma opţiunea aleasă.
. Se va aşa meniul “Memorare automată” având selectată opţiunea “Start”. Apăsaţi butonul enteR/OK.Căutarea canalelor va începe şi se va încheia automat.După memorarea tuturor canalelor disponibile, va aşat meniul “Setare ceas”. Apăsaţi butonul enteR/OK în orice moment pentru a întrerupe procesul de memorare.
. Apăsaţi butonul enteR/OK.Selectaţi “Lună”, “Dată”, “Anul”, “Oră”, sau “Min” prin apăsarea butonului sau .Setaţi “Lună”, “Dată”, “Anul”, “Oră”, sau “Min” prin apăsarea butonului sau.
Puteţi seta direct ora şi minutele apăsând butoanele numerice de pe telecomandă.
. Apăsaţi butonulenteR/OK
pentru a conrma setarea. Limbă: Selectaţi limba. Ţară: Selectaţi ţara. Memorare automată: Caută automat şi memorează canalele disponibile în zona dvs. Setare ceas: Setează ora curentă pentru ceasul televizorului.
➣
➣
➣
➣
➣
➣
➣
➣
OK
Plug & Play
Enter Exit
Start Plug & Play.
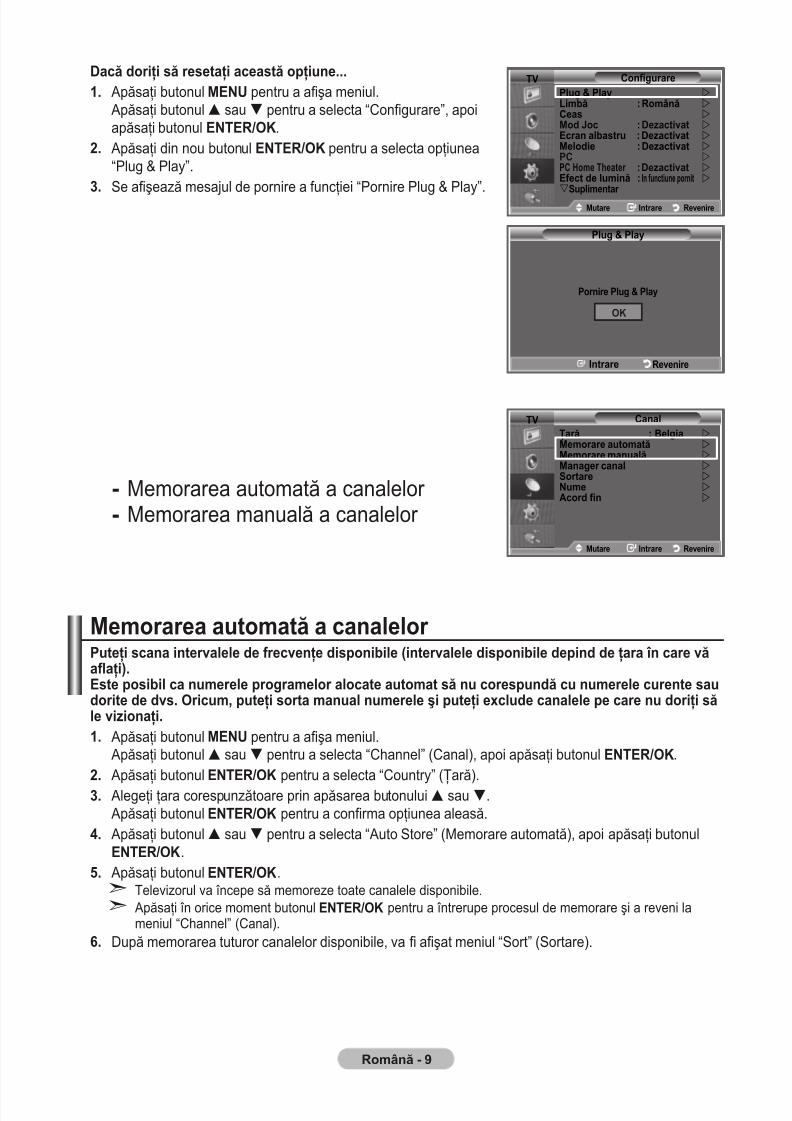
7/30/2019 Samsung LCD TV Eng Rom
http://slidepdf.com/reader/full/samsung-lcd-tv-eng-rom 56/92
Română - 9
Dacă doriţi să resetaţi această opţiune.... Apăsaţi butonul MENU pentru a aşa meniul.
Apăsaţi butonul sau pentru a selecta “Congurare”, apoiapăsaţi butonul enteR/OK.
. Apăsaţi din nou butonul enteR/OK pentru a selecta opţiunea“Plug & Play”.
3. Se aşează mesajul de pornire a funcţiei “Pornire Plug & Play”.
Memorarea automată a canalelor Memorarea manuală a canalelor
Memorarea automată a canalelor Puteţi scana intervalele de frecvenţe disponibile (intervalele disponibile depind de ţara în care văaaţi).Este posibil ca numerele programelor alocate automat să nu corespundă cu numerele curente saudorite de dvs. Oricum, puteţi sorta manual numerele şi puteţi exclude canalele pe care nu doriţi săle vizionaţi.. Apăsaţi butonul MENU pentru a aşa meniul.
Apăsaţi butonul sau pentru a selecta “Channel” (Canal), apoi apăsaţi butonul enteR/OK.
. Apăsaţi butonulenteR/OK
pentru a selecta “Country” (Ţară).3. Alegeţi ţara corespunzătoare prin apăsarea butonului sau. Apăsaţi butonul enteR/OK pentru a conrma opţiunea aleasă.
. Apăsaţi butonul sau pentru a selecta “Auto Store” (Memorare automată), apoi apăsaţi butonulenteR/OK.
. Apăsaţi butonul enteR/OK.Televizorul va începe să memoreze toate canalele disponibile. Apăsaţi în orice moment butonul enteR/OK pentru a întrerupe procesul de memorare şi a reveni lameniul “Channel” (Canal).
. După memorarea tuturor canalelor disponibile, va aşat meniul “Sort” (Sortare).
-
-
➣
➣
TV ConfigurarePlug & Play Limbă : Română Ceas Mod Joc : Dezactivat Ecran albastru : Dezactivat Melodie : Dezactivat PC PC Home Theater : Dezactivat Efect de lumină : In functiune pornit Suplimentar
Mutare Intrare Revenire
TV CanalŢară : Belgia Memorare automată Memorare manuală Manager canal Sortare Nume Acord fin
Mutare Intrare Revenire
Plug & Play
Pornire Plug & Play
Intrare Revenire
OK
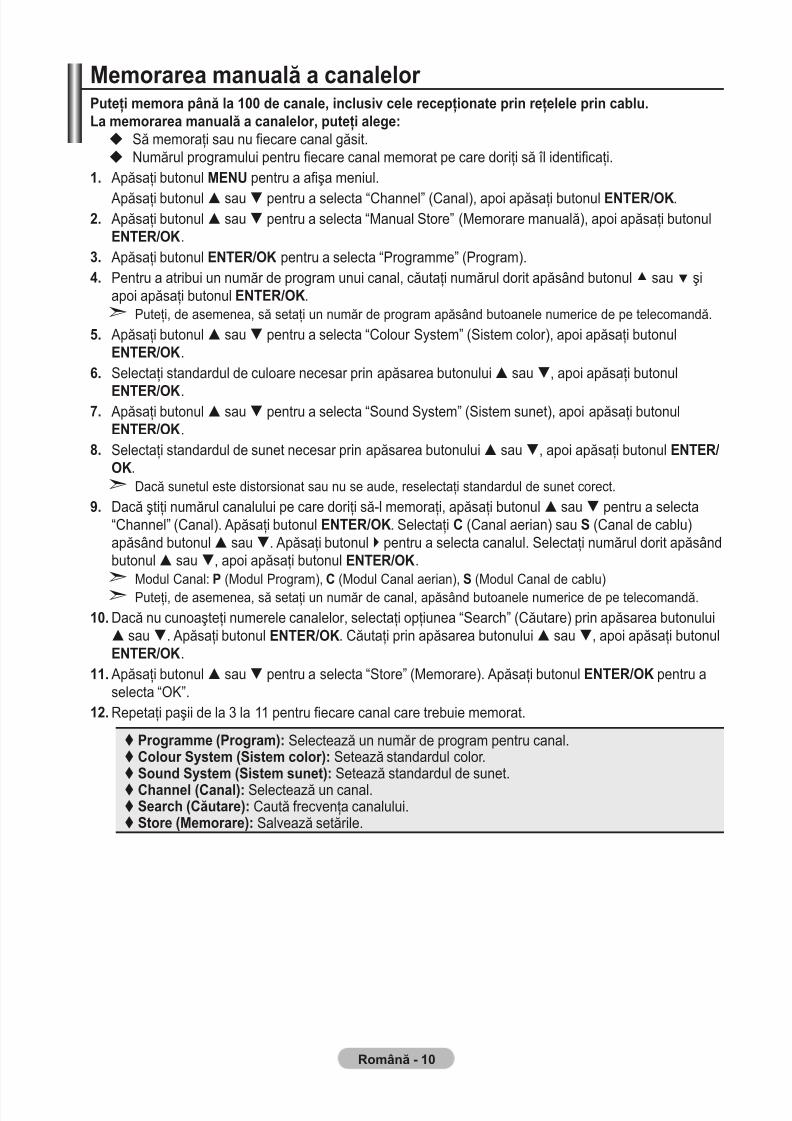
7/30/2019 Samsung LCD TV Eng Rom
http://slidepdf.com/reader/full/samsung-lcd-tv-eng-rom 57/92
Română - 0
Memorarea manuală a canalelor Puteţi memora până la 00 de canale, inclusiv cele recepţionate prin reţelele prin cablu.La memorarea manuală a canalelor, puteţi alege:
Să memoraţi sau nu ecare canal găsit.Numărul programului pentru ecare canal memorat pe care doriţi să îl identicaţi.
. Apăsaţi butonul MENU pentru a aşa meniul.
Apăsaţi butonul sau pentru a selecta “Channel” (Canal), apoi apăsaţi butonul enteR/OK.. Apăsaţi butonul sau pentru a selecta “Manual Store” (Memorare manuală), apoi apăsaţi butonul
enteR/OK.3. Apăsaţi butonul enteR/OK pentru a selecta “Programme” (Program).. Pentru a atribui un număr de program unui canal, căutaţi numărul dorit apăsând butonul sau şi
apoi apăsaţi butonul enteR/OK.Puteţi, de asemenea, să setaţi un număr de program apăsând butoanele numerice de pe telecomandă.
. Apăsaţi butonul sau pentru a selecta “Colour System” (Sistem color), apoi apăsaţi butonulenteR/OK.
. Selectaţi standardul de culoare necesar prin apăsarea butonului sau, apoi apăsaţi butonul
enteR/OK.. Apăsaţi butonul sau pentru a selecta “Sound System” (Sistem sunet), apoi apăsaţi butonul
enteR/OK.. Selectaţi standardul de sunet necesar prin apăsarea butonului sau, apoi apăsaţi butonul enteR/
OK.Dacă sunetul este distorsionat sau nu se aude, reselectaţi standardul de sunet corect.
9. Dacă ştiţi numărul canalului pe care doriţi să-l memoraţi, apăsaţi butonul sau pentru a selecta“Channel” (Canal). Apăsaţi butonul enteR/OK. Selectaţi C (Canal aerian) sau S (Canal de cablu)apăsând butonul sau. Apăsaţi butonul pentru a selecta canalul. Selectaţi numărul dorit apăsândbutonul sau, apoi apăsaţi butonul enteR/OK.
Modul Canal: P (Modul Program), C (Modul Canal aerian), S (Modul Canal de cablu)Puteţi, de asemenea, să setaţi un număr de canal, apăsând butoanele numerice de pe telecomandă.
0. Dacă nu cunoaşteţi numerele canalelor, selectaţi opţiunea “Search” (Căutare) prin apăsarea butonului sau. Apăsaţi butonul enteR/OK. Căutaţi prin apăsarea butonului sau, apoi apăsaţi butonulenteR/OK.
. Apăsaţi butonul sau pentru a selecta “Store” (Memorare). Apăsaţi butonul enteR/OK pentru aselecta “OK”.
. Repetaţi paşii de la 3 la 11 pentru ecare canal care trebuie memorat.
Programme (Program): Selectează un număr de program pentru canal. Colour System (Sistem color): Setează standardul color. Sound System (Sistem sunet): Setează standardul de sunet. Channel (Canal): Selectează un canal. Search (Căutare): Caută frecvenţa canalului. Store (Memorare): Salvează setările.
➣
➣
➣
➣
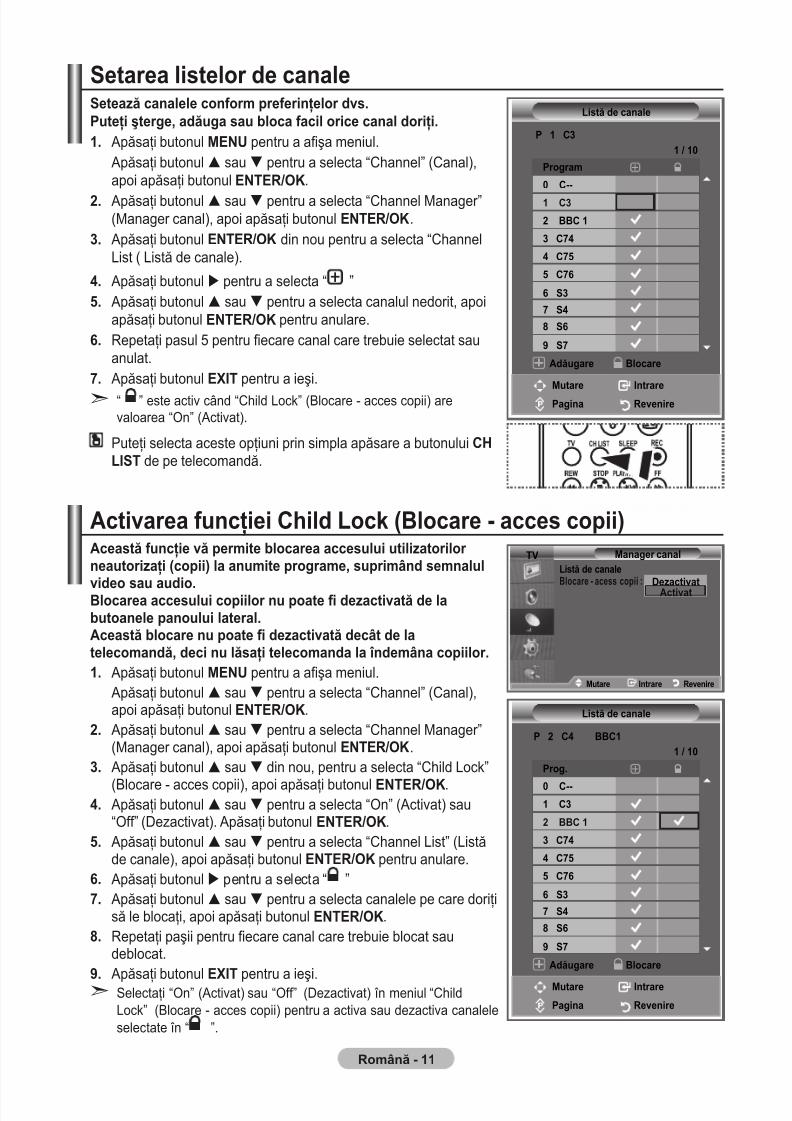
7/30/2019 Samsung LCD TV Eng Rom
http://slidepdf.com/reader/full/samsung-lcd-tv-eng-rom 58/92
Română -
Setarea listelor de canaleSetează canalele conform preferinţelor dvs.Puteţi şterge, adăuga sau bloca facil orice canal doriţi.. Apăsaţi butonul MENU pentru a aşa meniul.
Apăsaţi butonul sau pentru a selecta “Channel” (Canal),apoi apăsaţi butonul enteR/OK.
. Apăsaţi butonul sau pentru a selecta “Channel Manager”(Manager canal), apoi apăsaţi butonul enteR/OK.
3. Apăsaţi butonul enteR/OK din nou pentru a selecta “ChannelList ( Listă de canale).
. Apăsaţi butonul pentru a selecta “ ”. Apăsaţi butonul sau pentru a selecta canalul nedorit, apoi
apăsaţi butonul enteR/OK pentru anulare.. Repetaţi pasul 5 pentru ecare canal care trebuie selectat sau
anulat.
. Apăsaţi butonul EXIT pentru a ieşi.“ ” este activ când “Child Lock” (Blocare - acces copii) arevaloarea “On” (Activat).
Puteţi selecta aceste opţiuni prin simpla apăsare a butonului CHLIST de pe telecomandă.
Activarea funcţiei Child Lock (Blocare - acces copii)Această funcţie vă permite blocarea accesului utilizatorilor neautorizaţi (copii) la anumite programe, suprimând semnalul
video sau audio.Blocarea accesului copiilor nu poate dezactivată de labutoanele panoului lateral.Această blocare nu poate dezactivată decât de latelecomandă, deci nu lăsaţi telecomanda la îndemâna copiilor.. Apăsaţi butonul MENU pentru a aşa meniul.
Apăsaţi butonul sau pentru a selecta “Channel” (Canal),apoi apăsaţi butonul enteR/OK.
. Apăsaţi butonul sau pentru a selecta “Channel Manager”(Manager canal), apoi apăsaţi butonul enteR/OK.
3. Apăsaţi butonul sau din nou, pentru a selecta “Child Lock”
(Blocare - acces copii), apoi apăsaţi butonul enteR/OK.. Apăsaţi butonul sau pentru a selecta “On” (Activat) sau
“Off” (Dezactivat). Apăsaţi butonul enteR/OK.. Apăsaţi butonul sau pentru a selecta “Channel List” (Listă
de canale), apoi apăsaţi butonul enteR/OK pentru anulare.. Apăsaţi butonul pentru a selecta “ ”. Apăsaţi butonul sau pentru a selecta canalele pe care doriţi
să le blocaţi, apoi apăsaţi butonul enteR/OK.. Repetaţi paşii pentru ecare canal care trebuie blocat sau
deblocat.
9. Apăsaţi butonul EXIT pentru a ieşi.Selectaţi “On” (Activat) sau “Off” (Dezactivat) în meniul “ChildLock” (Blocare - acces copii) pentru a activa sau dezactiva canaleleselectate în “ ”.
➣
➣
P C3
Listă de canale
Mutare IntrarePagina Revenire
Adăugare Blocare
/ 0
Program
0 C--
C3
BBC
3 C
C
C
S3
S
S
9 S
P C BBC
Listă de canale
Mutare Intrare
Pagina Revenire
Adăugare Blocare
/ 0
Prog.
0 C-- C3
BBC
3 C
C
C
S3
S
S
9 S
TV Manager canalListă de canaleBlocare - acess copii :
DezactivatActivat
Mutare Intrare Revenire
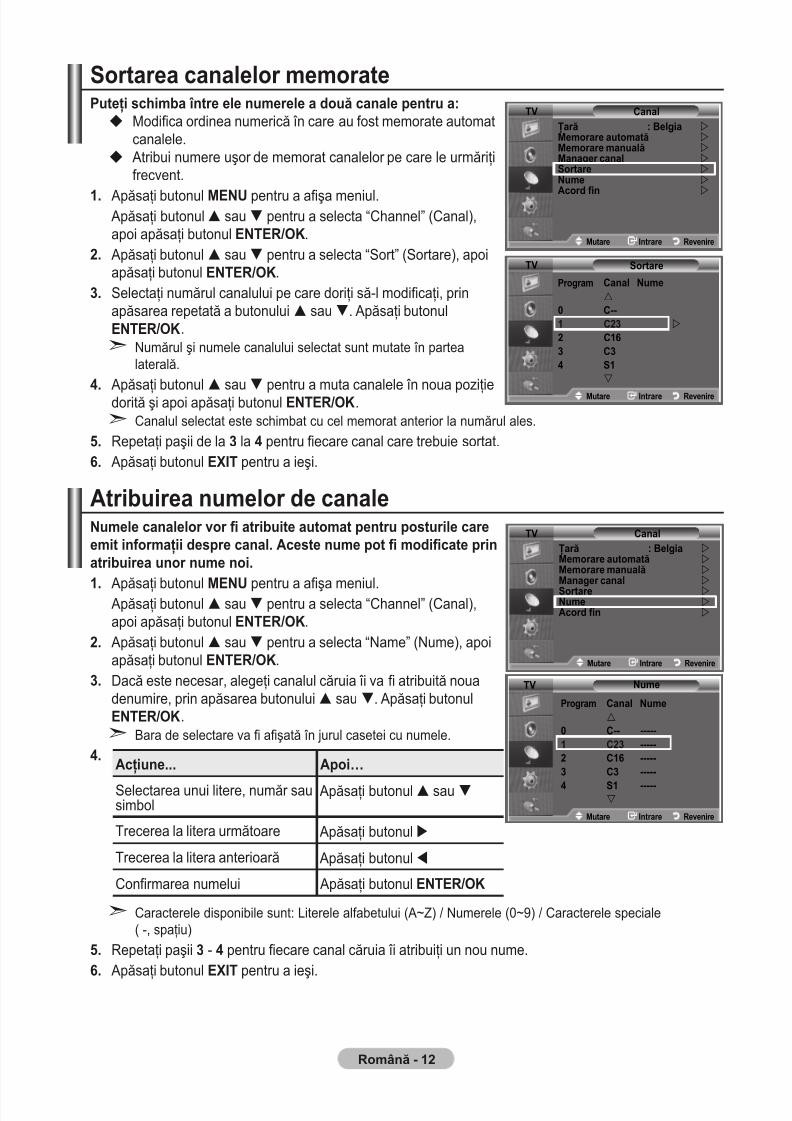
7/30/2019 Samsung LCD TV Eng Rom
http://slidepdf.com/reader/full/samsung-lcd-tv-eng-rom 59/92
Română -
Sortarea canalelor memoratePuteţi schimba între ele numerele a două canale pentru a:
Modica ordinea numerică în care au fost memorate automatcanalele.
Atribui numere uşor de memorat canalelor pe care le urmăriţifrecvent.
. Apăsaţi butonul MENU pentru a aşa meniul. Apăsaţi butonul sau pentru a selecta “Channel” (Canal),apoi apăsaţi butonul enteR/OK.
. Apăsaţi butonul sau pentru a selecta “Sort” (Sortare), apoiapăsaţi butonul enteR/OK.
3. Selectaţi numărul canalului pe care doriţi să-l modicaţi, prinapăsarea repetată a butonului sau. Apăsaţi butonulenteR/OK.
Numărul şi numele canalului selectat sunt mutate în partealaterală.
. Apăsaţi butonul
sau
pentru a muta canalele în noua poziţiedorită şi apoi apăsaţi butonul enteR/OK.Canalul selectat este schimbat cu cel memorat anterior la numărul ales.
. Repetaţi paşii de la 3 la pentru ecare canal care trebuie sortat.. Apăsaţi butonul EXIT pentru a ieşi.
Atribuirea numelor de canaleNumele canalelor vor atribuite automat pentru posturile careemit informaţii despre canal. Aceste nume pot modicate prinatribuirea unor nume noi.
. Apăsaţi butonul MENU pentru a aşa meniul.Apăsaţi butonul sau pentru a selecta “Channel” (Canal),apoi apăsaţi butonul enteR/OK.
. Apăsaţi butonul sau pentru a selecta “Name” (Nume), apoiapăsaţi butonul enteR/OK.
3. Dacă este necesar, alegeţi canalul căruia îi va atribuită nouadenumire, prin apăsarea butonului sau. Apăsaţi butonulenteR/OK.
Bara de selectare va aşată în jurul casetei cu numele..
Caracterele disponibile sunt: Literele alfabetului (A~Z) / Numerele (0~9) / Caracterele speciale( -, spaţiu)
. Repetaţi paşii 3 - pentru ecare canal căruia îi atribuiţi un nou nume.
.Apăsaţi butonul
EXITpentru a ieşi.
➣
➣
➣
➣
Acţiune... Apoi…
Selectarea unui litere, număr sausimbol
Apăsaţi butonul sau
Trecerea la litera următoare Apăsaţi butonul
Trecerea la litera anterioară Apăsaţi butonul
Conrmarea numelui Apăsaţi butonul enteR/OK
Sortare
Program Canal Nume
0 C-- C3
C3 C3 S
TV
Mutare Intrare Revenire
CanalŢară : Belgia Memorare automată Memorare manuală Manager canal Sortare Nume
Acord fin
TV
Mutare Intrare Revenire
CanalŢară : Belgia Memorare automată Memorare manuală Manager canal
Sortare Nume Acord fin
Mutare Intrare Revenire
TV
Nume
Mutare Intrare Revenire
Program Canal Nume
0 C-- ----- C3 ----- C -----3 C3 -----
S -----
TV
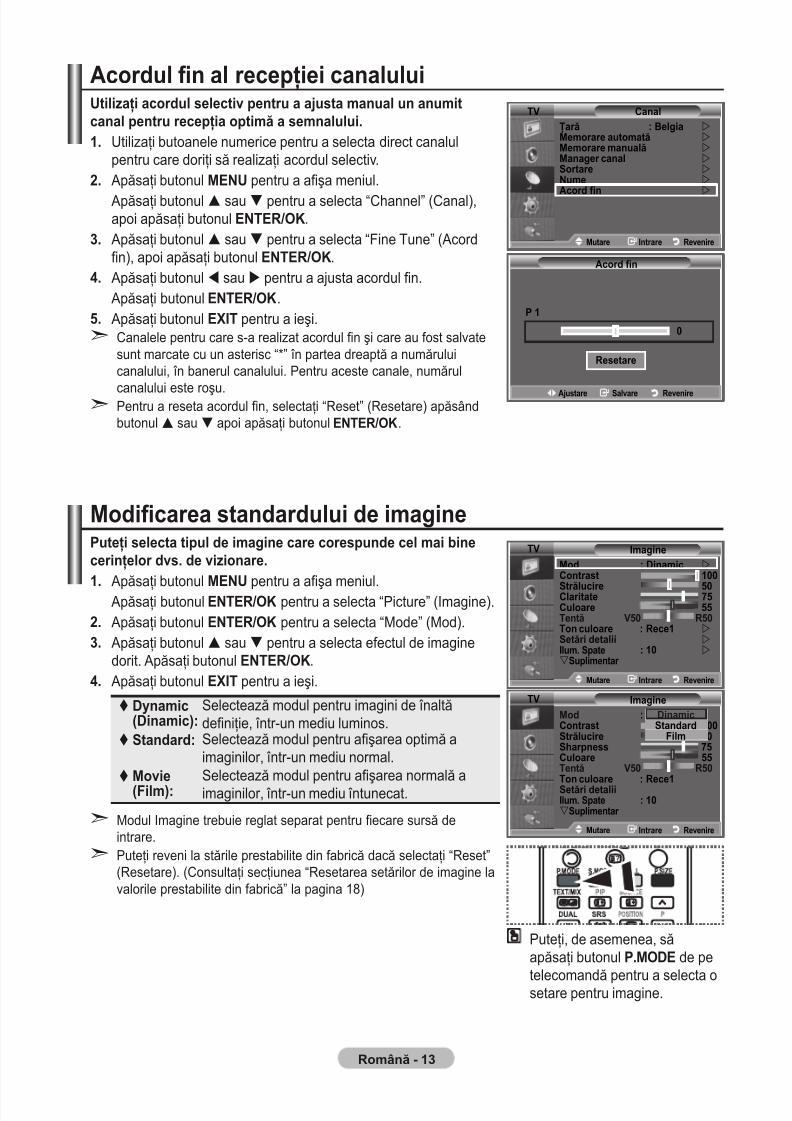
7/30/2019 Samsung LCD TV Eng Rom
http://slidepdf.com/reader/full/samsung-lcd-tv-eng-rom 60/92
Română - 3
Acordul n al recepţiei canaluluiUtilizaţi acordul selectiv pentru a ajusta manual un anumitcanal pentru recepţia optimă a semnalului.. Utilizaţi butoanele numerice pentru a selecta direct canalul
pentru care doriţi să realizaţi acordul selectiv.. Apăsaţi butonul MENU pentru a aşa meniul.
Apăsaţi butonul sau pentru a selecta “Channel” (Canal),apoi apăsaţi butonul enteR/OK.
3. Apăsaţi butonul sau pentru a selecta “Fine Tune” (Acordn), apoi apăsaţi butonul enteR/OK.
. Apăsaţi butonul sau pentru a ajusta acordul n. Apăsaţi butonul enteR/OK.
. Apăsaţi butonul EXIT pentru a ieşi.Canalele pentru care s-a realizat acordul n şi care au fost salvatesunt marcate cu un asterisc “*” în partea dreaptă a număruluicanalului, în banerul canalului. Pentru aceste canale, numărul
canalului este roşu.Pentru a reseta acordul n, selectaţi “Reset” (Resetare) apăsândbutonul sau apoi apăsaţi butonul enteR/OK.
Modicarea standardului de imaginePuteţi selecta tipul de imagine care corespunde cel mai binecerinţelor dvs. de vizionare.
. Apăsaţi butonul MENU pentru a aşa meniul. Apăsaţi butonul enteR/OK pentru a selecta “Picture” (Imagine).. Apăsaţi butonul enteR/OK pentru a selecta “Mode” (Mod).3. Apăsaţi butonul sau pentru a selecta efectul de imagine
dorit. Apăsaţi butonul enteR/OK.. Apăsaţi butonul EXIT pentru a ieşi.
Dynamic(Dinamic):
Selectează modul pentru imagini de înaltădeniţie, într-un mediu luminos.
Standard: Selectează modul pentru aşarea optimă aimaginilor, într-un mediu normal.
Movie(Film): Selectează modul pentru aşarea normală aimaginilor, într-un mediu întunecat.
Modul Imagine trebuie reglat separat pentru ecare sursă deintrare.Puteţi reveni la stările prestabilite din fabrică dacă selectaţi “Reset”(Resetare). (Consultaţi secţiunea “Resetarea setărilor de imagine lavalorile prestabilite din fabrică” la pagina 18)
➣
➣
➣
➣
Puteţi, de asemenea, săapăsaţi butonul P.MODE de pe
telecomandă pentru a selecta osetare pentru imagine.
ImagineMod : Dinamic Contrast 00
Strălucire 0Claritate Culoare Tentă V0 R0Ton culoare : Rece Setări detalii Ilum. Spate : 0 Suplimentar
TV
Mutare Intrare Revenire
ImagineMod : DynamicContrast 00Strălucire 0Sharpness Culoare Tentă V0 R0
Ton culoare : ReceSetări detaliiIlum. Spate : 0Suplimentar
TV
Mutare Intrare Revenire
DinamicStandard
Film
Acord fin
P
0
Resetare
Ajustare Salvare Revenire
CanalŢară : Belgia Memorare automată Memorare manuală Manager canal Sortare Nume
Acord fin
TV
Mutare Intrare Revenire

7/30/2019 Samsung LCD TV Eng Rom
http://slidepdf.com/reader/full/samsung-lcd-tv-eng-rom 61/92
Română -
Reglarea imaginii personalizateTelevizorul dvs. are diferite setări care vă permit controlulcalităţii imaginii.. Pentru a selecta efectul de imagine dorit, urmaţi instrucţiunile 1-3
din secţiunea “Modicarea standardului de imagine”.. Apăsaţi butonul sau pentru a selecta un anumit element.
Apăsaţi butonul enteR/OK.3. Apăsaţi butonul sau pentru a creşte sau micşora valoarea
unui anumit element. Apăsaţi butonul enteR/OK.. Apăsaţi butonul EXIT pentru a ieşi.
Contrast: Reglează raportul lumină - întuneric între obiecte şi fundal. Brightness (Strălucire): Reglează luminozitatea întregului ecran. Sharpness (Claritate): Oferă marginii obiectelor o claritate mai ridicată sau mai redusă. Colour (Culoare): Reglează culorile, făcându-le mai închise sau mai deschise. Tint (Tentă) (numai NTSC sau DTV): Reglează culoarea obiectelor, intensicând roşul sau
verdele, pentru a le oferi un aspect mai natural.
Valorile ajustate vor stocate conform modului de imagine selectat. În modul PC, pot ajustate numai setările pentru “Contrast”, “Strălucire” şi culoareFuncţia “Tentă” este disponibilă doar în modurile “HDMI” şi “Component”.
Modicarea tonului de culoarePuteţi selecta tonul de culoare cel mai potrivit pentru ochi.. Pentru a selecta efectul de imagine dorit, urmaţi instrucţiunile 1-3
din secţiunea “Modicarea standardului de imagine”
(La pagina 13).. Apăsaţi butonul sau pentru a selecta “Colour Tone” (Ton
culoare), apoi apăsaţi butonul enteR/OK.
3. Apăsaţi butonul sau pentru a selecta setarea dorită pentrutonul culorii. Apăsaţi butonul enteR/OK.
. Apăsaţi butonul EXIT pentru a ieşi.
Cool(Rece):
Face temperatura imaginii mai albastră decâtsetarea din meniul “Cool1” (Rece1).
Cool(Rece):
Face albul mai albastru.
Normal: Păstrează nuanţa de alb. Warm
(Cald):Face albul mai roşu.
Warm(Cald):
Face temperatura culorii mai roşie decât setareadin meniul “Warm1” (Cald1).
Valorile ajustate vor memorate conform modului de imagine selectat.Când modul de imagine este setat la Dynamic (Dinamic) sau Standard, nu puteţi selecta opţiunile Warm1(Cald1) şi Warm2 (Cald2).
➣
➣
➣
➣
➣
ImagineMod : Dinamic Contrast 00Strălucire 0Claritate Culoare Tentă V0 R0Ton culoare : Rece Setări detalii Ilum. Spate : 0 Suplimentar
TV
Mutare Intrare Revenire
ImagineMod : DinamicContrast 00Strălucire 0Sharpness Culoare Tentă V0 R0
Ton culoare : ReceSetări detaliiIlum. Spate: 0Suplimentar
TV
Mutare Intrare Revenire
Rece
ReceNormalCaldCald
ImagineMod : Dinamic Contrast 00
Strălucire 0Claritate Culoare Tentă V0 R0Ton culoare : Rece Setări detalii Ilum. Spate : 0 Suplimentar
TV
Mutare Intrare Revenire

7/30/2019 Samsung LCD TV Eng Rom
http://slidepdf.com/reader/full/samsung-lcd-tv-eng-rom 62/92
Română -
Activarea iluminării din spatePuteţi ajusta luminozitatea ecranului prin ajustarea iluminăriidin spate a LCD-ului. (0~0). Pentru a selecta efectul de imagine dorit, urmaţi instrucţiunile 1-3
din secţiunea “Modicarea standardului de imagine” (La pagina 13).
. Apăsaţi butonul sau pentru a selecta “Backlight” (Ilum.Spate), apoi apăsaţi butonul enteR/OK.
3. Apăsaţi butonul sau pentru a creşte sau micşora valoareaunui anumit element.
. Apăsaţi butonul enteR/OK.Apăsaţi butonul EXIT pentru a ieşi.
0Ilum. Spate
Ajustare Revenire
ImagineMod : Dinamic Contrast 00Strălucire 0Claritate Culoare Tentă V0 R0Ton culoare : Rece
Setări detalii Ilum. Spate : 0 Suplimentar
TV
Mutare Intrare Revenire
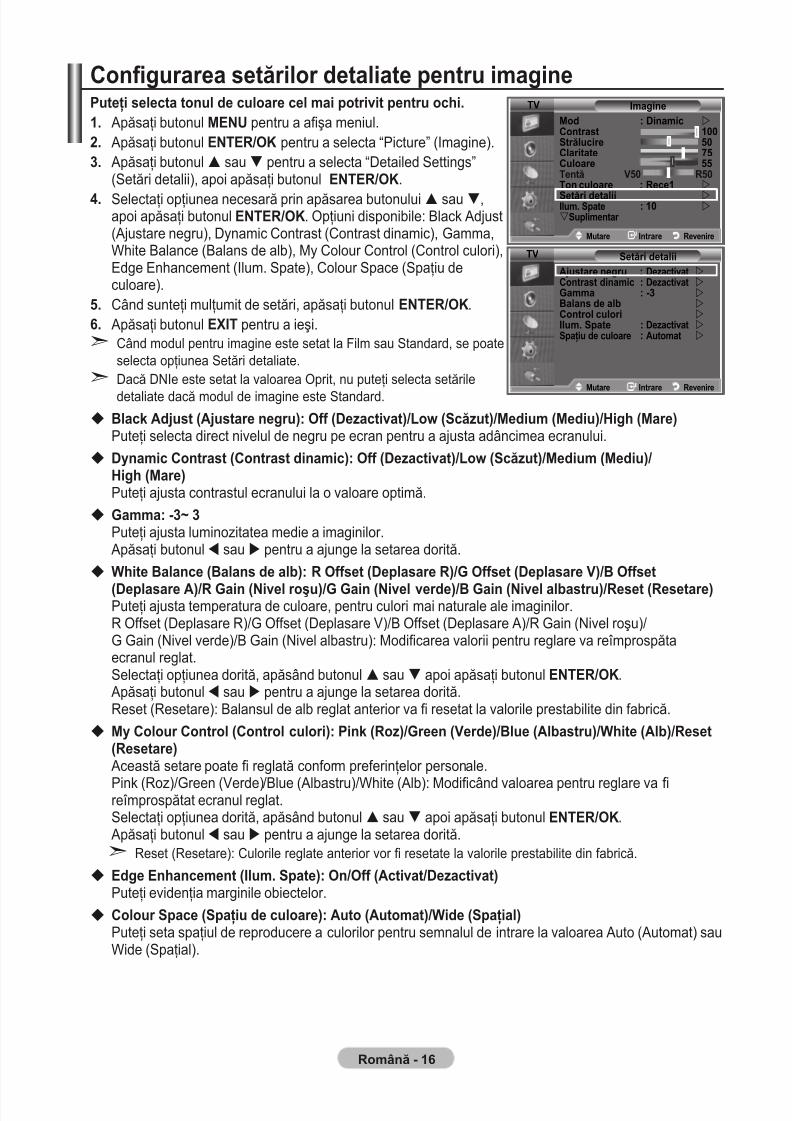
7/30/2019 Samsung LCD TV Eng Rom
http://slidepdf.com/reader/full/samsung-lcd-tv-eng-rom 63/92
Română -
Congurarea setărilor detaliate pentru imaginePuteţi selecta tonul de culoare cel mai potrivit pentru ochi.. Apăsaţi butonul MENU pentru a aşa meniul.. Apăsaţi butonul enteR/OK pentru a selecta “Picture” (Imagine).3. Apăsaţi butonul sau pentru a selecta “Detailed Settings”
(Setări detalii), apoi apăsaţi butonul ENTER/OK.
. Selectaţi opţiunea necesară prin apăsarea butonului sau,apoi apăsaţi butonul enteR/OK. Opţiuni disponibile: Black Adjust(Ajustare negru), Dynamic Contrast (Contrast dinamic), Gamma,White Balance (Balans de alb), My Colour Control (Control culori),Edge Enhancement (Ilum. Spate), Colour Space (Spaţiu deculoare).
. Când sunteţi mulţumit de setări, apăsaţi butonul enteR/OK.. Apăsaţi butonul EXIT pentru a ieşi.
Când modul pentru imagine este setat la Film sau Standard, se poateselecta opţiunea Setări detaliate.Dacă DNIe este setat la valoarea Oprit, nu puteţi selecta setăriledetaliate dacă modul de imagine este Standard.
Black Adjust (Ajustare negru): Off (Dezactivat)/Low (Scăzut)/Medium (Mediu)/High (Mare)Puteţi selecta direct nivelul de negru pe ecran pentru a ajusta adâncimea ecranului.
Dynamic Contrast (Contrast dinamic): Off (Dezactivat)/Low (Scăzut)/Medium (Mediu)/High (Mare)Puteţi ajusta contrastul ecranului la o valoare optimă.
Gamma: -3~ 3Puteţi ajusta luminozitatea medie a imaginilor.
Apăsaţi butonul sau pentru a ajunge la setarea dorită.
White Balance (Balans de alb): R Offset (Deplasare R)/G Offset (Deplasare V)/B Offset
(Deplasare A)/R Gain (Nivel roşu)/G Gain (Nivel verde)/B Gain (Nivel albastru)/Reset (Resetare)Puteţi ajusta temperatura de culoare, pentru culori mai naturale ale imaginilor.R Offset (Deplasare R)/G Offset (Deplasare V)/B Offset (Deplasare A)/R Gain (Nivel roşu)/ G Gain (Nivel verde)/B Gain (Nivel albastru): Modicarea valorii pentru reglare va reîmprospătaecranul reglat.Selectaţi opţiunea dorită, apăsând butonul sau apoi apăsaţi butonul enteR/OK.
Apăsaţi butonul sau pentru a ajunge la setarea dorită.Reset (Resetare): Balansul de alb reglat anterior va resetat la valorile prestabilite din fabrică.
My Colour Control (Control culori): Pink (Roz)/Green (Verde)/Blue (Albastru)/White (Alb)/Reset(Resetare)
Această setare poate reglată conform preferinţelor personale.
Pink (Roz)/Green (Verde)/Blue (Albastru)/White (Alb): Modicând valoarea pentru reglare va reîmprospătat ecranul reglat.Selectaţi opţiunea dorită, apăsând butonul sau apoi apăsaţi butonul enteR/OK.
Apăsaţi butonul sau pentru a ajunge la setarea dorită.Reset (Resetare): Culorile reglate anterior vor resetate la valorile prestabilite din fabrică.
Edge Enhancement (Ilum. Spate): On/Off (Activat/Dezactivat)Puteţi evidenţia marginile obiectelor.
Colour Space (Spaţiu de culoare): Auto (Automat)/Wide (Spaţial)Puteţi seta spaţiul de reproducere a culorilor pentru semnalul de intrare la valoarea Auto (Automat) sauWide (Spaţial).
➣
➣
➣
Setări detaliiAjustare negru : Dezactivat Contrast dinamic : Dezactivat Gamma : -3 Balans de alb Control culori Ilum. Spate : Dezactivat Spaţiu de culoare : Automat
Mutare Intrare Revenire
ImagineMod : Dinamic Contrast 00Strălucire 0Claritate Culoare Tentă V0 R0Ton culoare : Rece
Setări detalii Ilum. Spate : 0 Suplimentar
TV
Mutare Intrare Revenire
TV
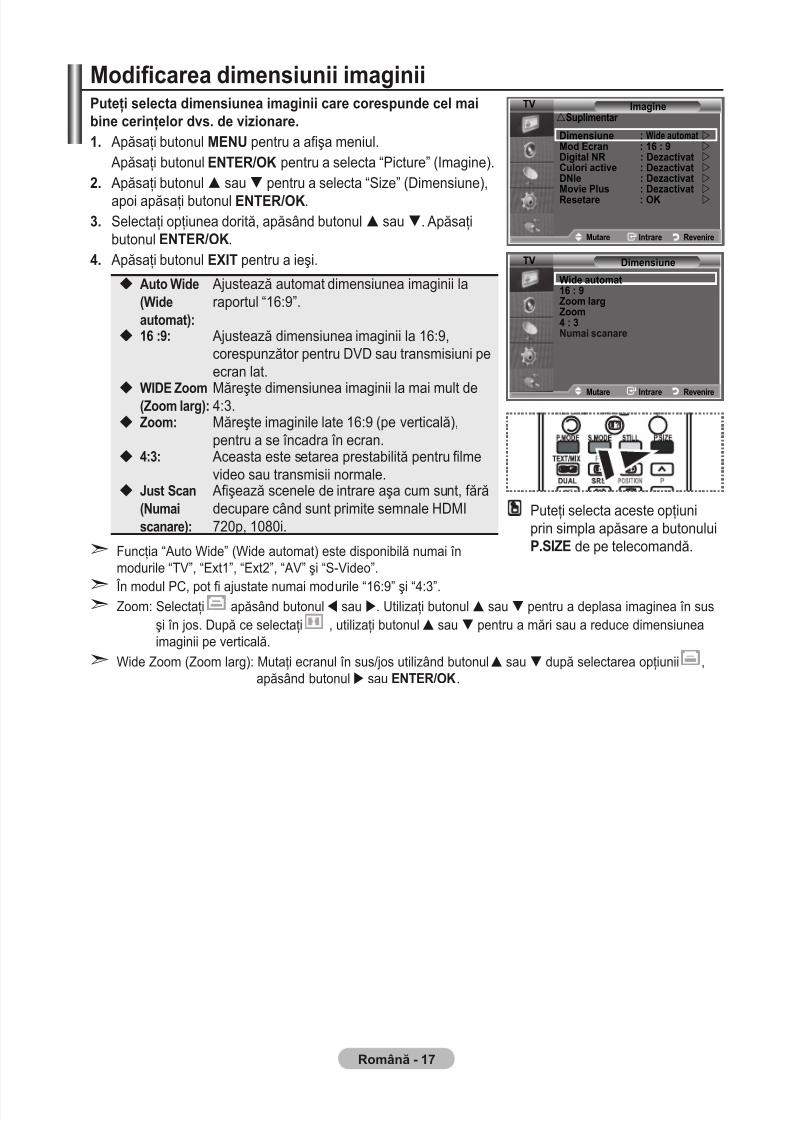
7/30/2019 Samsung LCD TV Eng Rom
http://slidepdf.com/reader/full/samsung-lcd-tv-eng-rom 64/92
Română -
Modicarea dimensiunii imaginiiPuteţi selecta dimensiunea imaginii care corespunde cel maibine cerinţelor dvs. de vizionare.. Apăsaţi butonul MENU pentru a aşa meniul.
Apăsaţi butonul enteR/OK pentru a selecta “Picture” (Imagine).. Apăsaţi butonul sau pentru a selecta “Size” (Dimensiune),
apoi apăsaţi butonul enteR/OK.3. Selectaţi opţiunea dorită, apăsând butonul sau. Apăsaţi
butonul enteR/OK.
. Apăsaţi butonul EXIT pentru a ieşi.
Auto Wide(Wideautomat):
Ajustează automat dimensiunea imaginii laraportul “16:9”.
:9: Ajustează dimensiunea imaginii la 16:9,corespunzător pentru DVD sau transmisiuni peecran lat.
WIDE Zoom(Zoom larg): Măreşte dimensiunea imaginii la mai mult de4:3.Zoom: Măreşte imaginile late 16:9 (pe verticală),
pentru a se încadra în ecran.:3: Aceasta este setarea prestabilită pentru lme
video sau transmisii normale.Just Scan(Numaiscanare):
Aşează scenele de intrare aşa cum sunt, fărădecupare când sunt primite semnale HDMI720p, 1080i.
Funcţia “Auto Wide” (Wide automat) este disponibilă numai înmodurile “TV”, “Ext1”, “Ext2”, “AV” şi “S-Video”.
În modul PC, pot ajustate numai modurile “16:9” şi “4:3”.Zoom: Selectaţi apăsând butonul sau . Utilizaţi butonul sau pentru a deplasa imaginea în sus
şi în jos. După ce selectaţi , utilizaţi butonul sau pentru a mări sau a reduce dimensiuneaimaginii pe verticală.
Wide Zoom (Zoom larg): Mutaţi ecranul în sus/jos utilizând butonul sau după selectarea opţiunii ,apăsând butonul sau enteR/OK.
➣
➣➣
➣
Puteţi selecta aceste opţiuniprin simpla apăsare a butonuluiP.SIZE de pe telecomandă.
Imagine
Dimensiune : Wide automat Mod Ecran : : 9 Digital NR : Dezactivat Culori active : Dezactivat DNle : Dezactivat Movie Plus : Dezactivat Resetare : OK
Suplimentar
Mutare Intrare Revenire
Dimensiune
Wide automat : 9Zoom largZoom : 3Numai scanare
Mutare Intrare Revenire
TV
TV
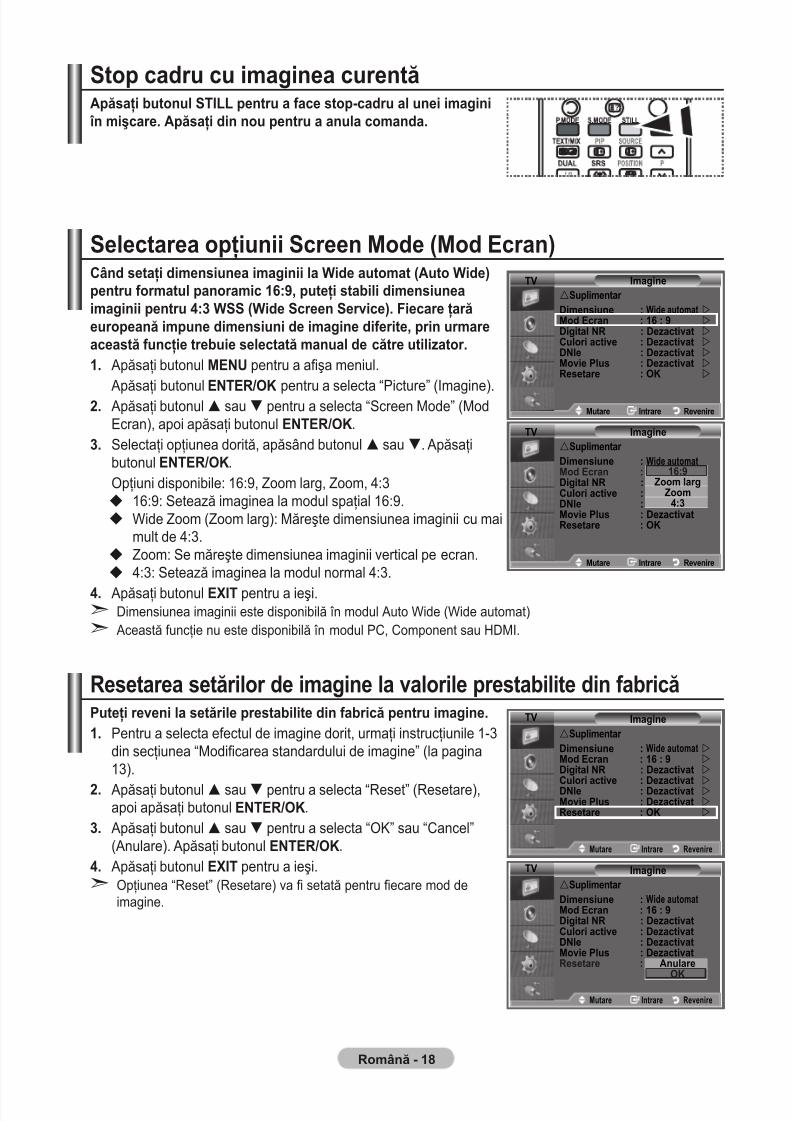
7/30/2019 Samsung LCD TV Eng Rom
http://slidepdf.com/reader/full/samsung-lcd-tv-eng-rom 65/92
Română -
Stop cadru cu imaginea curentăApăsaţi butonul STILL pentru a face stop-cadru al unei imagini în mişcare. Apăsaţi din nou pentru a anula comanda.
Selectarea opţiunii Screen Mode (Mod Ecran)Când setaţi dimensiunea imaginii la Wide automat (Auto Wide)pentru formatul panoramic :9, puteţi stabili dimensiuneaimaginii pentru :3 WSS (Wide Screen Service). Fiecare ţarăeuropeană impune dimensiuni de imagine diferite, prin urmareaceastă funcţie trebuie selectată manual de către utilizator.. Apăsaţi butonul MENU pentru a aşa meniul.
Apăsaţi butonulenteR/OK
pentru a selecta “Picture” (Imagine).. Apăsaţi butonul sau pentru a selecta “Screen Mode” (ModEcran), apoi apăsaţi butonul enteR/OK.
3. Selectaţi opţiunea dorită, apăsând butonul sau. Apăsaţibutonul enteR/OK.Opţiuni disponibile: 16:9, Zoom larg, Zoom, 4:3
16:9: Setează imaginea la modul spaţial 16:9.Wide Zoom (Zoom larg): Măreşte dimensiunea imaginii cu maimult de 4:3.Zoom: Se măreşte dimensiunea imaginii vertical pe ecran.4:3: Setează imaginea la modul normal 4:3.
. Apăsaţi butonul EXIT pentru a ieşi.Dimensiunea imaginii este disponibilă în modul Auto Wide (Wide automat) Această funcţie nu este disponibilă în modul PC, Component sau HDMI.
Resetarea setărilor de imagine la valorile prestabilite din fabricăPuteţi reveni la setările prestabilite din fabrică pentru imagine.. Pentru a selecta efectul de imagine dorit, urmaţi instrucţiunile 1-3
din secţiunea “Modicarea standardului de imagine” (la pagina13).
. Apăsaţi butonul sau pentru a selecta “Reset” (Resetare),apoi apăsaţi butonul enteR/OK.
3. Apăsaţi butonul sau pentru a selecta “OK” sau “Cancel”(Anulare). Apăsaţi butonul enteR/OK.
. Apăsaţi butonul EXIT pentru a ieşi.Opţiunea “Reset” (Resetare) va setată pentru ecare mod deimagine.
➣
➣
➣
Imagine
Dimensiune : Wide automat Mod Ecran : : 9Digital NR : OnCulori active : Off DNle : Off Movie Plus : DezactivatResetare : OK
Suplimentar
:9Zoom larg
Zoom:3
Mutare Intrare Revenire
Move Enter Return
Imagine
Dimensiune : Wide automat Mod Ecran : : 9 Digital NR : Dezactivat Culori active : Dezactivat DNle : Dezactivat Movie Plus : Dezactivat Resetare : OK
Suplimentar
Mutare Intrare Revenire
Imagine
Dimensiune : Wide automat Mod Ecran : : 9Digital NR : DezactivatCulori active : DezactivatDNle : DezactivatMovie Plus : DezactivatResetare : OK
Suplimentar
Mutare Intrare Revenire
AnulareOK
Imagine
Dimensiune : Wide automat Mod Ecran : : 9 Digital NR : Dezactivat
Culori active : Dezactivat DNle : Dezactivat Movie Plus : Dezactivat Resetare : OK
Suplimentar
Mutare Intrare Revenire
TV
TV
TV
TV
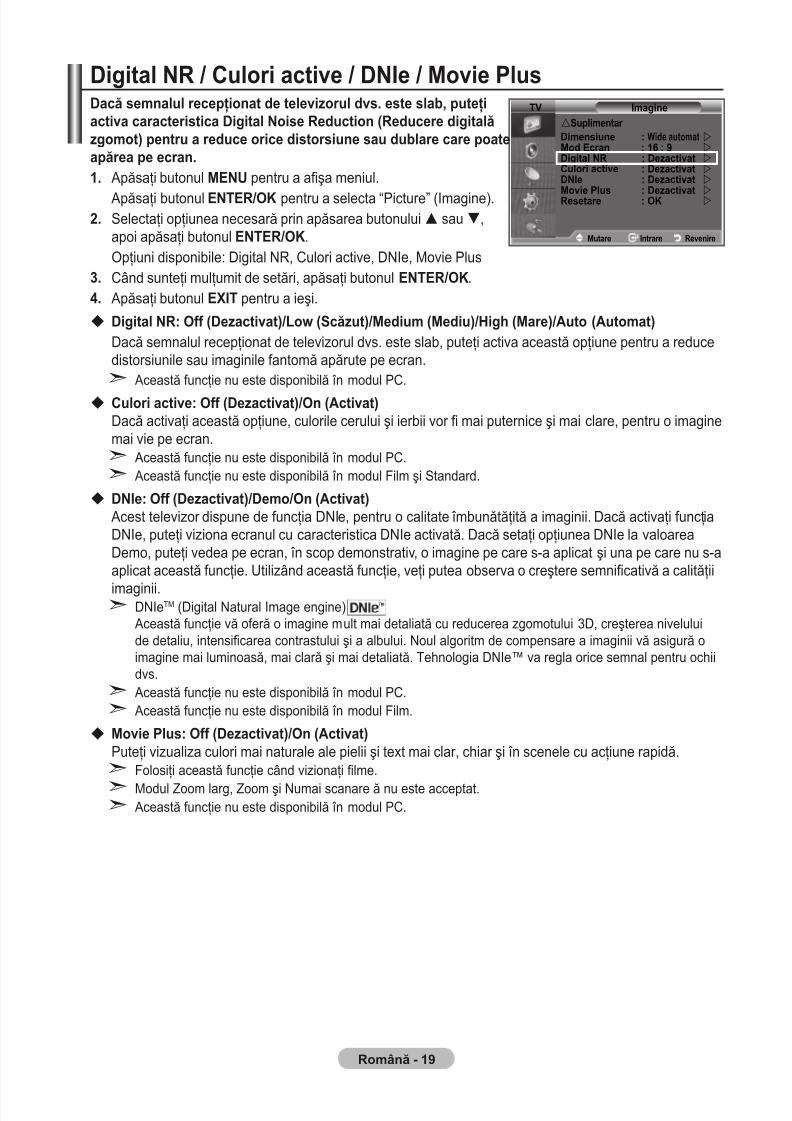
7/30/2019 Samsung LCD TV Eng Rom
http://slidepdf.com/reader/full/samsung-lcd-tv-eng-rom 66/92
Română - 9
Digital NR / Culori active / DNIe / Movie PlusDacă semnalul recepţionat de televizorul dvs. este slab, puteţiactiva caracteristica Digital Noise Reduction (Reducere digitalăzgomot) pentru a reduce orice distorsiune sau dublare care poateapărea pe ecran.. Apăsaţi butonul MENU pentru a aşa meniul.
Apăsaţi butonul enteR/OK pentru a selecta “Picture” (Imagine).. Selectaţi opţiunea necesară prin apăsarea butonului sau,
apoi apăsaţi butonul enteR/OK.Opţiuni disponibile: Digital NR, Culori active, DNIe, Movie Plus
3. Când sunteţi mulţumit de setări, apăsaţi butonul enteR/OK.. Apăsaţi butonul EXIT pentru a ieşi.
Digital NR: Off (Dezactivat)/Low (Scăzut)/Medium (Mediu)/High (Mare)/Auto (Automat)Dacă semnalul recepţionat de televizorul dvs. este slab, puteţi activa această opţiune pentru a reducedistorsiunile sau imaginile fantomă apărute pe ecran.
Această funcţie nu este disponibilă în modul PC.
Culori active: Off (Dezactivat)/On (Activat)Dacă activaţi această opţiune, culorile cerului şi ierbii vor mai puternice şi mai clare, pentru o imaginemai vie pe ecran.
Această funcţie nu este disponibilă în modul PC. Această funcţie nu este disponibilă în modul Film şi Standard.
DNIe: Off (Dezactivat)/Demo/On (Activat) Acest televizor dispune de funcţia DNIe, pentru o calitate îmbunătăţită a imaginii. Dacă activaţi funcţiaDNIe, puteţi viziona ecranul cu caracteristica DNIe activată. Dacă setaţi opţiunea DNIe la valoareaDemo, puteţi vedea pe ecran, în scop demonstrativ, o imagine pe care s-a aplicat şi una pe care nu s-aaplicat această funcţie. Utilizând această funcţie, veţi putea observa o creştere semnicativă a calităţii
imaginii.DNIeTM (Digital Natural Image engine) Această funcţie vă oferă o imagine mult mai detaliată cu reducerea zgomotului 3D, creşterea niveluluide detaliu, intensicarea contrastului şi a albului. Noul algoritm de compensare a imaginii vă asigură oimagine mai luminoasă, mai clară şi mai detaliată. Tehnologia DNIe™ va regla orice semnal pentru ochiidvs. Această funcţie nu este disponibilă în modul PC. Această funcţie nu este disponibilă în modul Film.
Movie Plus: Off (Dezactivat)/On (Activat)Puteţi vizualiza culori mai naturale ale pielii şi text mai clar, chiar şi în scenele cu acţiune rapidă.
Folosiţi această funcţie când vizionaţi lme.
Modul Zoom larg, Zoom şi Numai scanare ă nu este acceptat. Această funcţie nu este disponibilă în modul PC.
➣
➣
➣
➣
➣
➣
➣
➣
➣
Imagine
Dimensiune : Wide automat Mod Ecran : : 9 Digital NR : Dezactivat Culori active : Dezactivat DNle : Dezactivat
Movie Plus : Dezactivat
Resetare : OK
Mutare Intrare Revenire
Suplimentar TV
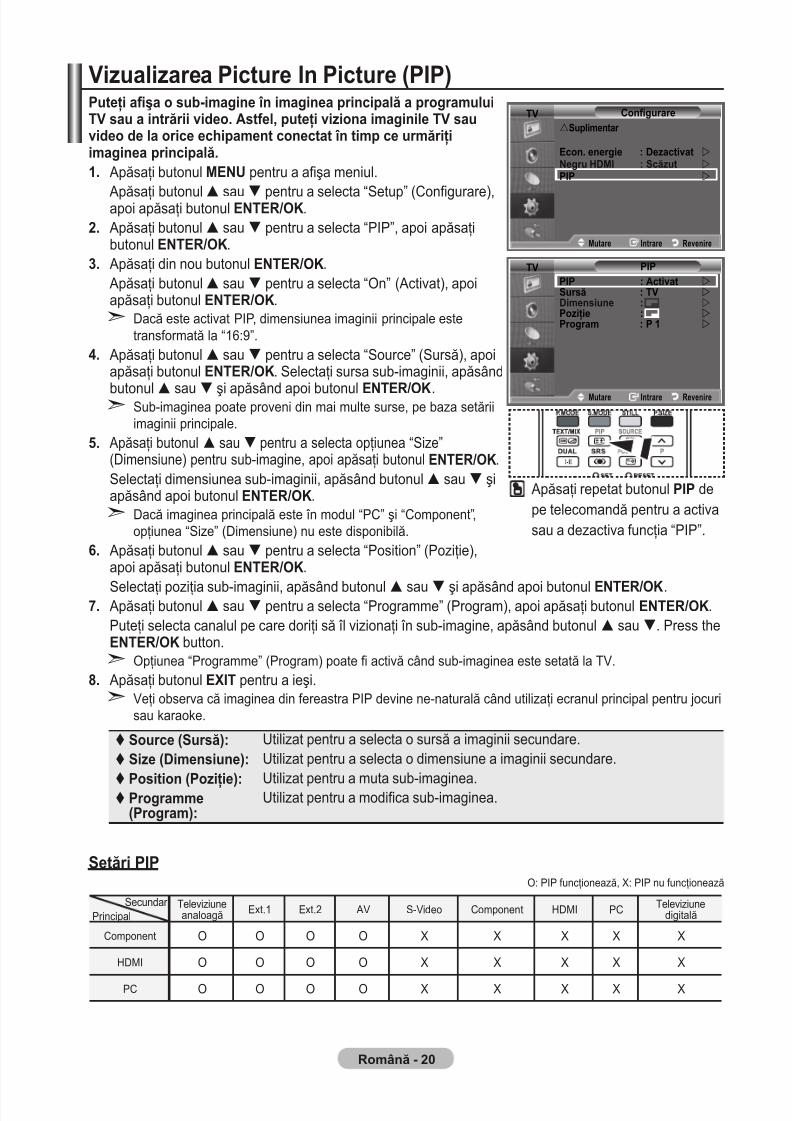
7/30/2019 Samsung LCD TV Eng Rom
http://slidepdf.com/reader/full/samsung-lcd-tv-eng-rom 67/92
Română - 0
Vizualizarea Picture In Picture (PIP)Puteţi aşa o sub-imagine în imaginea principală a programuluiTV sau a intrării video. Astfel, puteţi viziona imaginile TV sauvideo de la orice echipament conectat în timp ce urmăriţiimaginea principală.. Apăsaţi butonul MENU pentru a aşa meniul.
Apăsaţi butonul sau pentru a selecta “Setup” (Congurare),apoi apăsaţi butonul enteR/OK.. Apăsaţi butonul sau pentru a selecta “PIP”, apoi apăsaţi
butonul enteR/OK.3. Apăsaţi din nou butonul enteR/OK.
Apăsaţi butonul sau pentru a selecta “On” (Activat), apoiapăsaţi butonul enteR/OK.
Dacă este activat PIP, dimensiunea imaginii principale estetransformată la “16:9”.
. Apăsaţi butonul sau pentru a selecta “Source” (Sursă), apoiapăsaţi butonul enteR/OK. Selectaţi sursa sub-imaginii, apăsând
butonul sau şi apăsând apoi butonul enteR/OK.Sub-imaginea poate proveni din mai multe surse, pe baza setăriiimaginii principale.
. Apăsaţi butonul sau pentru a selecta opţiunea “Size”(Dimensiune) pentru sub-imagine, apoi apăsaţi butonul enteR/OK.
Selectaţi dimensiunea sub-imaginii, apăsând butonul sau şiapăsând apoi butonul enteR/OK.
Dacă imaginea principală este în modul “PC” şi “Component”,opţiunea “Size” (Dimensiune) nu este disponibilă.
. Apăsaţi butonul sau pentru a selecta “Position” (Poziţie),apoi apăsaţi butonul enteR/OK.
Selectaţi poziţia sub-imaginii, apăsând butonul sau şi apăsând apoi butonul enteR/OK.. Apăsaţi butonul sau pentru a selecta “Programme” (Program), apoi apăsaţi butonul enteR/OK.
Puteţi selecta canalul pe care doriţi să îl vizionaţi în sub-imagine, apăsând butonul sau. Press theenteR/OK button.
Opţiunea “Programme” (Program) poate activă când sub-imaginea este setată la TV.. Apăsaţi butonul EXIT pentru a ieşi.
Veţi observa că imaginea din fereastra PIP devine ne-naturală când utilizaţi ecranul principal pentru jocurisau karaoke.
Source (Sursă): Utilizat pentru a selecta o sursă a imaginii secundare. Size (Dimensiune): Utilizat pentru a selecta o dimensiune a imaginii secundare.
Position (Poziţie): Utilizat pentru a muta sub-imaginea. Programme(Program):
Utilizat pentru a modica sub-imaginea.
Setări PIPO: PIP funcţionează, X: PIP nu funcţionează
Televiziuneanaloagă Ext.1 Ext.2 AV S-Video Component HDMI PC Televiziune
digitală
Component O O O O X X X X X
HDMI O O O O X X X X X
PC O O O O X X X X X
➣
➣
➣
➣
➣
Apăsaţi repetat butonul PIP depe telecomandă pentru a activasau a dezactiva funcţia “PIP”.
Secundar Principal
Mode : Custom
Equalizer
SRS TS XT : Off
Auto Volume : Off
Internal Mute : Off
Reset
Move Enter Return
TV ConfigurareSuplimentar
Econ. energie : Dezactivat Negru HDMI : Scăzut
PIP
Mutare Intrare Revenire
Mode : Custom
Equalizer
SRS TS XT : Off
Auto Volume : Off
Internal Mute : Off
Reset
Move Enter Return
TV PIPPIP : Activat Sursă : TV Dimensiune : Poziţie : Program : P
Mutare Intrare Revenire
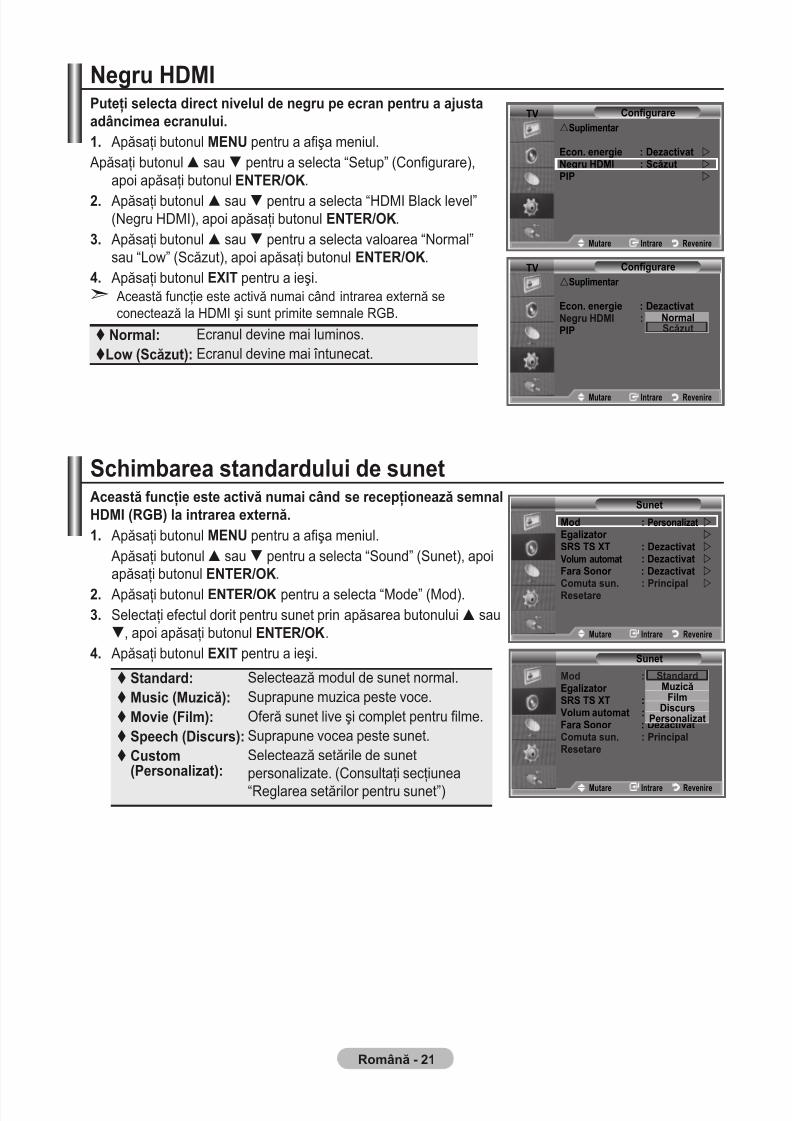
7/30/2019 Samsung LCD TV Eng Rom
http://slidepdf.com/reader/full/samsung-lcd-tv-eng-rom 68/92
Română -
Negru HDMIPuteţi selecta direct nivelul de negru pe ecran pentru a ajustaadâncimea ecranului.. Apăsaţi butonul MENU pentru a aşa meniul.
Apăsaţi butonul sau pentru a selecta “Setup” (Congurare),apoi apăsaţi butonul enteR/OK.
. Apăsaţi butonul sau pentru a selecta “HDMI Black level”(Negru HDMI), apoi apăsaţi butonul enteR/OK.
3. Apăsaţi butonul sau pentru a selecta valoarea “Normal”sau “Low” (Scăzut), apoi apăsaţi butonul enteR/OK.
. Apăsaţi butonul EXIT pentru a ieşi. Această funcţie este activă numai când intrarea externă seconectează la HDMI şi sunt primite semnale RGB.
Normal: Ecranul devine mai luminos. Low (Scăzut): Ecranul devine mai întunecat.
Schimbarea standardului de sunetAceastă funcţie este activă numai când se recepţionează semnalHDMI (RGB) la intrarea externă.. Apăsaţi butonul MENU pentru a aşa meniul.
Apăsaţi butonul sau pentru a selecta “Sound” (Sunet), apoiapăsaţi butonul enteR/OK.
. Apăsaţi butonul enteR/OK pentru a selecta “Mode” (Mod).3. Selectaţi efectul dorit pentru sunet prin apăsarea butonului sau, apoi apăsaţi butonul enteR/OK.
. Apăsaţi butonul EXIT pentru a ieşi.
Standard: Selectează modul de sunet normal. Music (Muzică): Suprapune muzica peste voce. Movie (Film): Oferă sunet live şi complet pentru lme. Speech (Discurs): Suprapune vocea peste sunet. Custom
(Personalizat):Selectează setările de sunetpersonalizate. (Consultaţi secţiunea“Reglarea setărilor pentru sunet”)
➣
Mode : Custom
Equalizer
SRS TS XT : Off
Auto Volume : Off
Internal Mute : Off
Reset
Move Enter Return
TV ConfigurareSuplimentar
Econ. energie : Dezactivat Negru HDMI : Scăzut
PIP
Mutare Intrare Revenire
Mode : Custom
Equalizer
SRS TS XT : Off
Auto Volume : Off
Internal Mute : Off
Reset
Move Enter Return
TV ConfigurareSuplimentar Econ. energie : DezactivatNegru HDMI : LowPIP
Mutare Intrare Revenire
NormalScăzut
Sunet
Mod : CustomEgalizator SRS TS XT : Off Volum automat : Off Fara Sonor : DezactivatComuta sun. : PrincipalResetare
StandardMuzică
FilmDiscurs
Personalizat
Mutare Intrare Revenire
Sunet
Mod : Personalizat Egalizator
SRS TS XT : Dezactivat Volum automat : Dezactivat Fara Sonor : Dezactivat
Comuta sun. : Principal
Resetare
Mutare Intrare Revenire
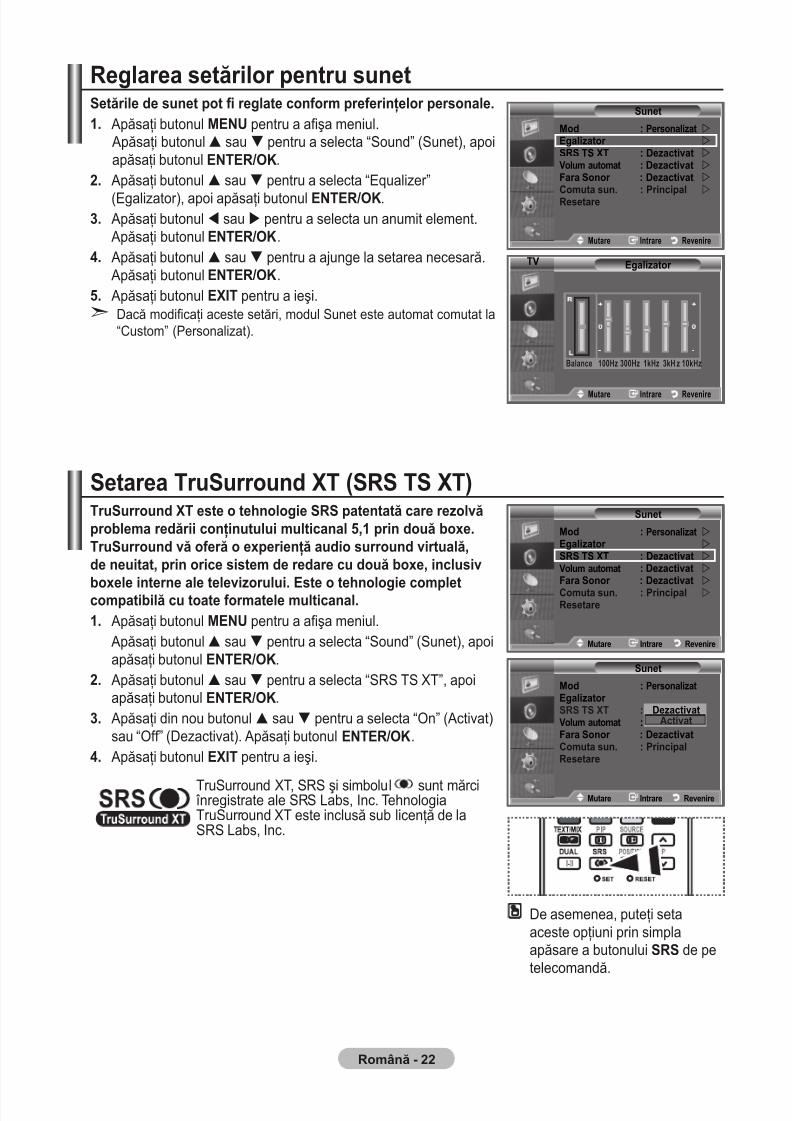
7/30/2019 Samsung LCD TV Eng Rom
http://slidepdf.com/reader/full/samsung-lcd-tv-eng-rom 69/92
Română -
Reglarea setărilor pentru sunetSetările de sunet pot reglate conform preferinţelor personale.. Apăsaţi butonul MENU pentru a aşa meniul.
Apăsaţi butonul sau pentru a selecta “Sound” (Sunet), apoiapăsaţi butonul enteR/OK.
. Apăsaţi butonul sau pentru a selecta “Equalizer”
(Egalizator), apoi apăsaţi butonul enteR/OK.3. Apăsaţi butonul sau pentru a selecta un anumit element.
Apăsaţi butonul enteR/OK.. Apăsaţi butonul sau pentru a ajunge la setarea necesară.
Apăsaţi butonul enteR/OK.. Apăsaţi butonul EXIT pentru a ieşi.
Dacă modicaţi aceste setări, modul Sunet este automat comutat la“Custom” (Personalizat).
Setarea TruSurround XT (SRS TS XT)TruSurround XT este o tehnologie SRS patentată care rezolvăproblema redării conţinutului multicanal , prin două boxe.TruSurround vă oferă o experienţă audio surround virtuală,de neuitat, prin orice sistem de redare cu două boxe, inclusiv
boxele interne ale televizorului. Este o tehnologie completcompatibilă cu toate formatele multicanal.. Apăsaţi butonul MENU pentru a aşa meniul.
Apăsaţi butonul sau pentru a selecta “Sound” (Sunet), apoiapăsaţi butonul enteR/OK.
. Apăsaţi butonul sau pentru a selecta “SRS TS XT”, apoiapăsaţi butonul enteR/OK.
3. Apăsaţi din nou butonul sau pentru a selecta “On” (Activat)sau “Off” (Dezactivat). Apăsaţi butonul enteR/OK.
. Apăsaţi butonul EXIT pentru a ieşi.
TruSurround XT, SRS şi simbolul sunt mărci înregistrate ale SRS Labs, Inc. TehnologiaTruSurround XT este inclusă sub licenţă de laSRS Labs, Inc.
➣
Sunet
Mod : Personalizat Egalizator
SRS TS XT : Dezactivat Volum automat : Dezactivat
Fara Sonor : Dezactivat
Comuta sun. : Principal
Resetare
Mutare Intrare Revenire
Egalizator
Balance 00Hz 300Hz kHz 3kH z 0kHz
Mutare Intrare Revenire
TV
Sunet
Mod : Personalizat Egalizator SRS TS XT : Off Volum automat : Off Fara Sonor : DezactivatComuta sun. : PrincipalResetare
DezactivatActivat
Mutare Intrare Revenire
Sunet
Mod : Personalizat Egalizator
SRS TS XT : Dezactivat Volum automat : Dezactivat
Fara Sonor : Dezactivat Comuta sun. : Principal
Resetare
Mutare Intrare Revenire
De asemenea, puteţi setaaceste opţiuni prin simplaapăsare a butonului SRS de petelecomandă.
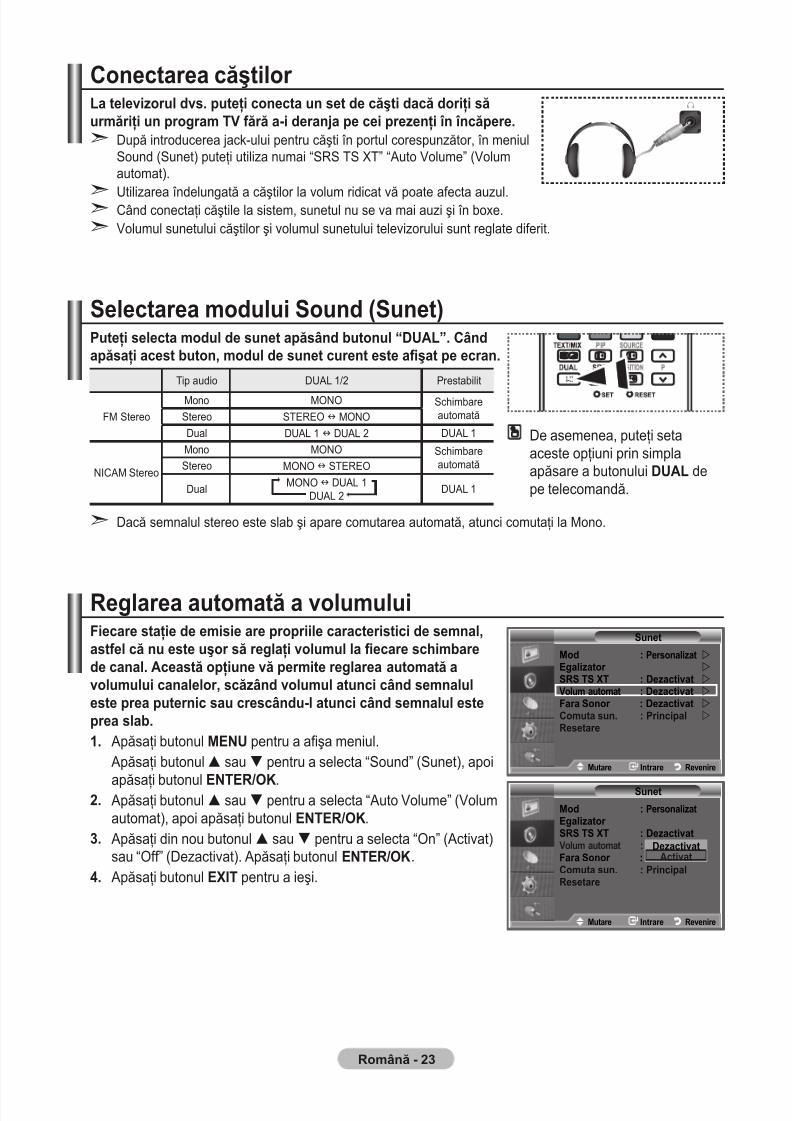
7/30/2019 Samsung LCD TV Eng Rom
http://slidepdf.com/reader/full/samsung-lcd-tv-eng-rom 70/92
Română - 3
Conectarea căştilor La televizorul dvs. puteţi conecta un set de căşti dacă doriţi săurmăriţi un program TV fără a-i deranja pe cei prezenţi în încăpere.
După introducerea jack-ului pentru căşti în portul corespunzător, în meniulSound (Sunet) puteţi utiliza numai “SRS TS XT” “Auto Volume” (Volumautomat).
Utilizarea îndelungată a căştilor la volum ridicat vă poate afecta auzul.Când conectaţi căştile la sistem, sunetul nu se va mai auzi şi în boxe.Volumul sunetului căştilor şi volumul sunetului televizorului sunt reglate diferit.
Selectarea modului Sound (Sunet)Puteţi selecta modul de sunet apăsând butonul “DUAL”. Cândapăsaţi acest buton, modul de sunet curent este aşat pe ecran.
Tip audio DUAL 1/2 Prestabilit
FM Stereo
Mono MONO SchimbareautomatăStereo STEREO MONO
Dual DUAL 1 DUAL 2 DUAL 1
NICAM Stereo
Mono MONO SchimbareautomatăStereo MONO STEREO
Dual MONO DUAL 1 DUAL 2
DUAL 1
Dacă semnalul stereo este slab şi apare comutarea automată, atunci comutaţi la Mono.
Reglarea automată a volumuluiFiecare staţie de emisie are propriile caracteristici de semnal,astfel că nu este uşor să reglaţi volumul la ecare schimbarede canal. Această opţiune vă permite reglarea automată avolumului canalelor, scăzând volumul atunci când semnaluleste prea puternic sau crescându-l atunci când semnalul esteprea slab.. Apăsaţi butonul MENU pentru a aşa meniul.
Apăsaţi butonul sau pentru a selecta “Sound” (Sunet), apoi
apăsaţi butonul enteR/OK.. Apăsaţi butonul sau pentru a selecta “Auto Volume” (Volumautomat), apoi apăsaţi butonul enteR/OK.
3. Apăsaţi din nou butonul sau pentru a selecta “On” (Activat)sau “Off” (Dezactivat). Apăsaţi butonul enteR/OK.
. Apăsaţi butonul EXIT pentru a ieşi.
➣
➣
➣
➣
➣
De asemenea, puteţi setaaceste opţiuni prin simplaapăsare a butonului DUAL depe telecomandă.
Sunet
Mod : Personalizat Egalizator SRS TS XT : Dezactivat Volum automat : Off Fara Sonor : DezactivatComuta sun. : PrincipalResetare
DezactivatActivat
Mutare Intrare Revenire
Sunet
Mod : Personalizat Egalizator
SRS TS XT : Dezactivat Volum automat : Dezactivat
Fara Sonor : Dezactivat Comuta sun. : Principal
Resetare
Mutare Intrare Revenire

7/30/2019 Samsung LCD TV Eng Rom
http://slidepdf.com/reader/full/samsung-lcd-tv-eng-rom 71/92
Română -
Sunet
Mod : Personalizat Egalizator SRS TS XT : Dezactivat Volum automat : Dezactivat Fara Sonor : DezactivatComuta sun. : PrincipalResetare
DezactivatActivat
Mutare Intrare Revenire
TV
Sunet
Mod : Personalizat Egalizator
SRS TS XT : Dezactivat Volum automat : Dezactivat
Fara Sonor : Dezactivat
Comuta sun. : Principal
Resetare
Mutare Intrare Revenire
Selectarea opţiunii Fara Sonor Dacă doriţi să auziţi sunetul prin boxe separate, anulaţiamplicatorul intern.. Apăsaţi butonul MENU pentru a aşa meniul.
Apăsaţi butonul sau pentru a selecta “Sound” (Sunet), apoiapăsaţi butonul enteR/OK.
. Apăsaţi butonul sau pentru a selecta opţiunea “InternalMute” (Fara Sonor), apoi apăsaţi butonul enteR/OK.
3. Apăsaţi din nou butonul sau pentru a selecta “On” (Activat)sau “Off” (Dezactivat). Apăsaţi butonul enteR/OK.
. Apăsaţi butonul EXIT pentru a ieşi. Atunci când opţiunea “Internal Mute” (Fara Sonor) este setată la“On” (Activat), niciuna dintre opţiunile din meniul Sound (Sunet) nuse poate ajusta, cu excepţia opţiunii “Sound Select” (Comuta sun.)(în modul PIP).
Ascultarea sunetului în modul Sub Picture (Sub-imagine)Cât timp este activată funcţia PIP, puteţi asculta sunetulsub-imaginii.. Apăsaţi butonul MENU pentru a aşa meniul.
Apăsaţi butonul sau pentru a selecta opţiunea “Sound”
(Sunet), apoi apăsaţi butonul enteR/OK.. Apăsaţi butonul sau pentru a selecta opţiunea “SoundSelect” (Comuta sun.), apoi apăsaţi butonul enteR/OK.
3. Apăsaţi butonul sau pentru a selecta “Sub” (Secundar). Apăsaţi butonul enteR/OK.
. Apăsaţi butonul EXIT pentru a ieşi.
Main(Principal):
Utilizat pentru a asculta sunetul asociatimaginii principale.
Sub(Secundar):
Utilizat pentru a asculta sunetul asociat sub-imaginii.
Puteţi selecta această opţiune când opţiunea “PIP” estesetată la “On” (Activat).
➣
➣
Sunet
Mod : Personalizat Egalizator SRS TS XT : Dezactivat Volum automat : DezactivatFara Sonor : DezactivatComuta sun. : PrincipalResetare
PrincipalSecundar
TV
Mutare Intrare Revenire
Sunet
Mod : Personalizat Egalizator
SRS TS XT : Dezactivat Volum automat : Dezactivat
Fara Sonor : Dezactivat Comuta sun. : Principal
Resetare
TV
Mutare Intrare Revenire
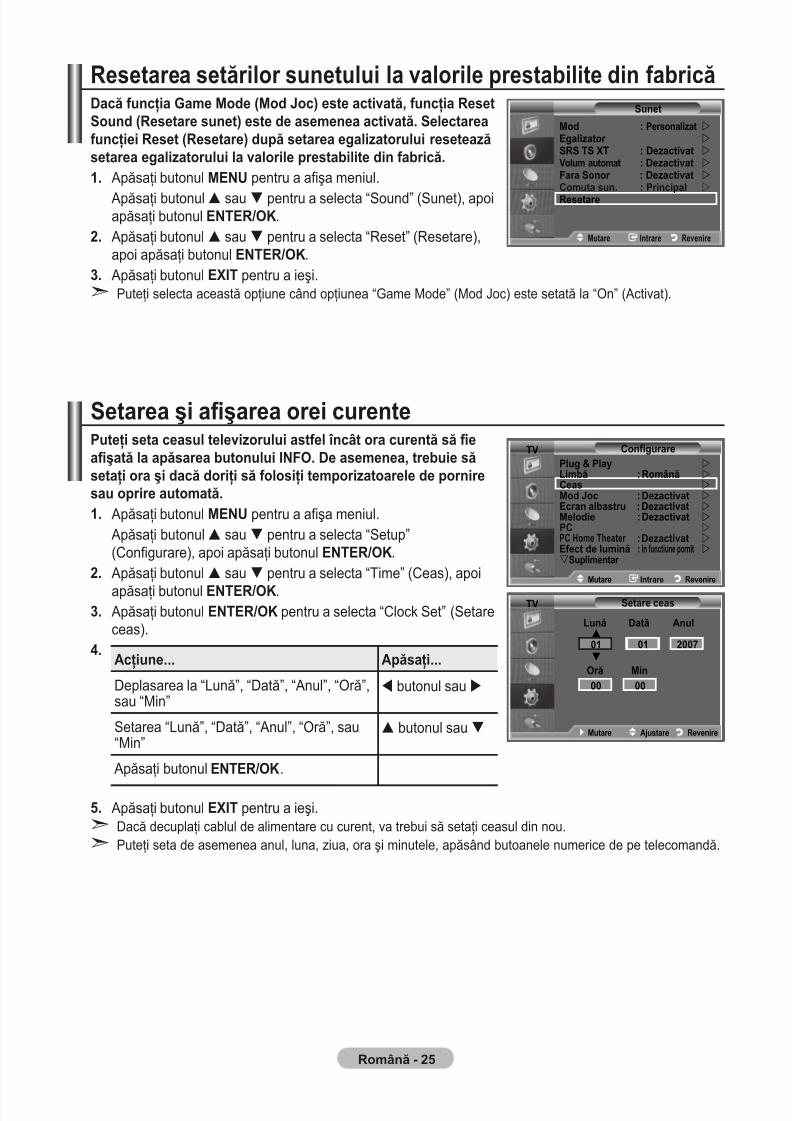
7/30/2019 Samsung LCD TV Eng Rom
http://slidepdf.com/reader/full/samsung-lcd-tv-eng-rom 72/92
Română -
Resetarea setărilor sunetului la valorile prestabilite din fabricăDacă funcţia Game Mode (Mod Joc) este activată, funcţia ResetSound (Resetare sunet) este de asemenea activată. Selectareafuncţiei Reset (Resetare) după setarea egalizatorului reseteazăsetarea egalizatorului la valorile prestabilite din fabrică.. Apăsaţi butonul MENU pentru a aşa meniul.
Apăsaţi butonul sau pentru a selecta “Sound” (Sunet), apoiapăsaţi butonul enteR/OK.
. Apăsaţi butonul sau pentru a selecta “Reset” (Resetare),apoi apăsaţi butonul enteR/OK.
3. Apăsaţi butonul EXIT pentru a ieşi.Puteţi selecta această opţiune când opţiunea “Game Mode” (Mod Joc) este setată la “On” (Activat).
Setarea şi aşarea orei curentePuteţi seta ceasul televizorului astfel încât ora curentă să eaşată la apăsarea butonului INFO. De asemenea, trebuie săsetaţi ora şi dacă doriţi să folosiţi temporizatoarele de porniresau oprire automată.. Apăsaţi butonul MENU pentru a aşa meniul.
Apăsaţi butonul sau pentru a selecta “Setup”(Congurare), apoi apăsaţi butonul enteR/OK.
. Apăsaţi butonul sau pentru a selecta “Time” (Ceas), apoi
apăsaţi butonul enteR/OK.3. Apăsaţi butonul enteR/OK pentru a selecta “Clock Set” (Setare
ceas)..
. Apăsaţi butonul EXIT pentru a ieşi.Dacă decuplaţi cablul de alimentare cu curent, va trebui să setaţi ceasul din nou.Puteţi seta de asemenea anul, luna, ziua, ora şi minutele, apăsând butoanele numerice de pe telecomandă.
➣
➣
➣
Acţiune... Apăsaţi...
Deplasarea la “Lună”, “Dată”, “Anul”, “Oră”,sau “Min”
butonul sau
Setarea “Lună”, “Dată”, “Anul”, “Oră”, sau“Min”
butonul sau
Apăsaţi butonul enteR/OK.
Sunet
Mod : Personalizat Egalizator
SRS TS XT : Dezactivat Volum automat : Dezactivat
Fara Sonor : Dezactivat Comuta sun. : Principal
Resetare
Mutare Intrare Revenire
Mode : Custom
Equalizer
SRS TS XT : Off
Auto Volume : Off
Internal Mute : Off
Reset
Move Enter Return
TV ConfigurarePlug & Play Limbă : Română Ceas Mod Joc : Dezactivat Ecran albastru : Dezactivat Melodie : Dezactivat PC PC Home Theater : Dezactivat Efect de lumină : In functiune pornit Suplimentar
Mutare Intrare Revenire
TV Setare ceas
Lună
0
Dată
0 00
Anul
00
Oră00
Min
Mutare Ajustare Revenire
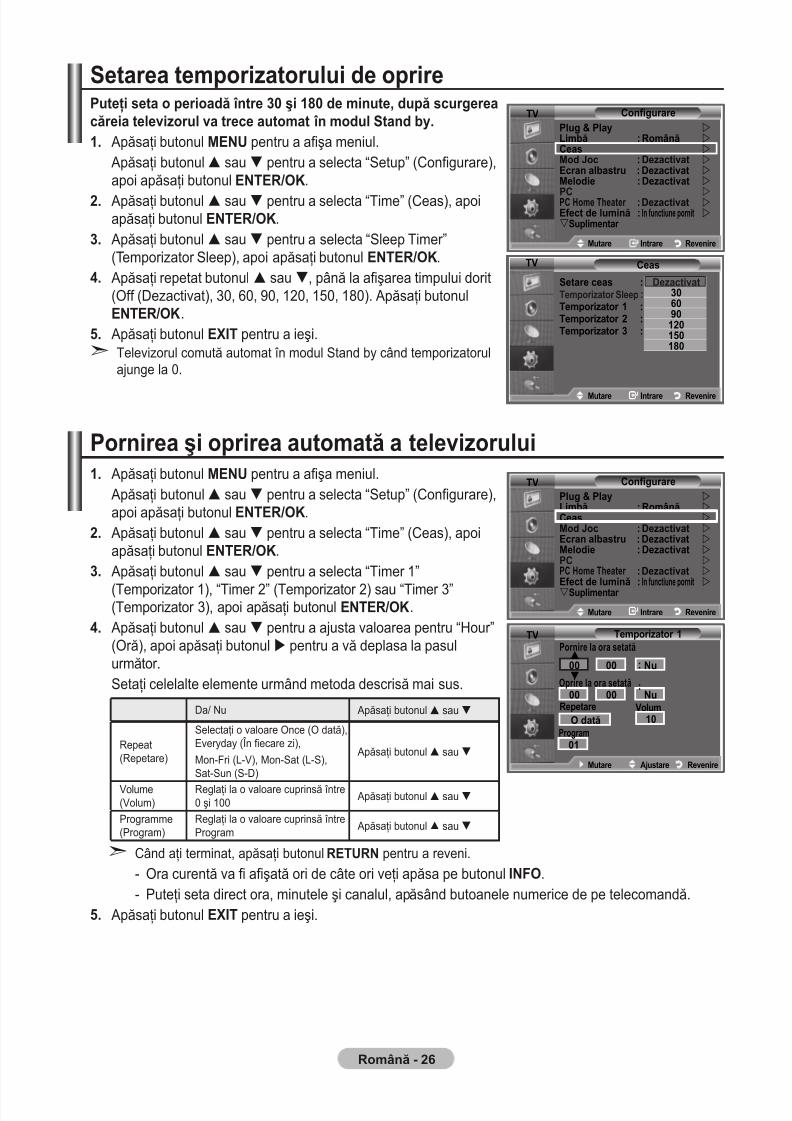
7/30/2019 Samsung LCD TV Eng Rom
http://slidepdf.com/reader/full/samsung-lcd-tv-eng-rom 73/92
Română -
Setarea temporizatorului de oprirePuteţi seta o perioadă între 30 şi 0 de minute, după scurgereacăreia televizorul va trece automat în modul Stand by.. Apăsaţi butonul MENU pentru a aşa meniul.
Apăsaţi butonul sau pentru a selecta “Setup” (Congurare),apoi apăsaţi butonul enteR/OK.
. Apăsaţi butonul sau pentru a selecta “Time” (Ceas), apoiapăsaţi butonul enteR/OK.
3. Apăsaţi butonul sau pentru a selecta “Sleep Timer”(Temporizator Sleep), apoi apăsaţi butonul enteR/OK.
. Apăsaţi repetat butonul sau, până la aşarea timpului dorit(Off (Dezactivat), 30, 60, 90, 120, 150, 180). Apăsaţi butonulenteR/OK.
. Apăsaţi butonul EXIT pentru a ieşi.Televizorul comută automat în modul Stand by când temporizatorulajunge la 0.
Pornirea şi oprirea automată a televizorului. Apăsaţi butonul MENU pentru a aşa meniul.
Apăsaţi butonul sau pentru a selecta “Setup” (Congurare),apoi apăsaţi butonul enteR/OK.
. Apăsaţi butonul sau pentru a selecta “Time” (Ceas), apoiapăsaţi butonul enteR/OK.
3. Apăsaţi butonul sau pentru a selecta “Timer 1”
(Temporizator 1), “Timer 2” (Temporizator 2) sau “Timer 3”(Temporizator 3), apoi apăsaţi butonul enteR/OK.
. Apăsaţi butonul sau pentru a ajusta valoarea pentru “Hour”(Oră), apoi apăsaţi butonul pentru a vă deplasa la pasulurmător.Setaţi celelalte elemente urmând metoda descrisă mai sus.
Da/ Nu Apăsaţi butonul sau
Repeat(Repetare)
Selectaţi o valoare Once (O dată),Everyday (În ecare zi),
Mon-Fri (L-V), Mon-Sat (L-S),Sat-Sun (S-D)
Apăsaţi butonul sau
Volume(Volum)
Reglaţi la o valoare cuprinsă între0 şi 100
Apăsaţi butonul sau
Programme(Program)
Reglaţi la o valoare cuprinsă întreProgram
Apăsaţi butonul sau
Când aţi terminat, apăsaţi butonul RETURN pentru a reveni.
- Ora curentă va aşată ori de câte ori veţi apăsa pe butonul INFO.- Puteţi seta direct ora, minutele şi canalul, apăsând butoanele numerice de pe telecomandă.
. Apăsaţi butonul EXIT pentru a ieşi.
➣
➣
Ceas
Setare ceas :Temporizator Sleep :Temporizator :Temporizator :Temporizator 3 :
Dezactivat30
090000
Mutare Intrare Revenire
TV
Mode : Custom
Equalizer
SRS TS XT : Off
Auto Volume : Off
Internal Mute : Off
Reset
Move Enter Return
TV ConfigurarePlug & Play Limbă : Română Ceas Mod Joc : Dezactivat Ecran albastru : Dezactivat Melodie : Dezactivat
PC
PC Home Theater : Dezactivat Efect de lumină : In functiune pornit Suplimentar
Mutare Intrare Revenire
TV Temporizator Pornire la ora setată
00
00 nu
RepetareO dată
Volum0
0Program
:
00 00 nu:
Mutare Ajustare Revenire
Oprire la ora setată
Mode : Custom
Equalizer
SRS TS XT : Off
Auto Volume : Off
Internal Mute : Off
Reset
Move Enter Return
TV ConfigurarePlug & Play Limbă : Română Ceas Mod Joc : Dezactivat Ecran albastru : Dezactivat Melodie : Dezactivat PC PC Home Theater : Dezactivat
Efect de lumină :In functiune pornit
Suplimentar
Mutare Intrare Revenire
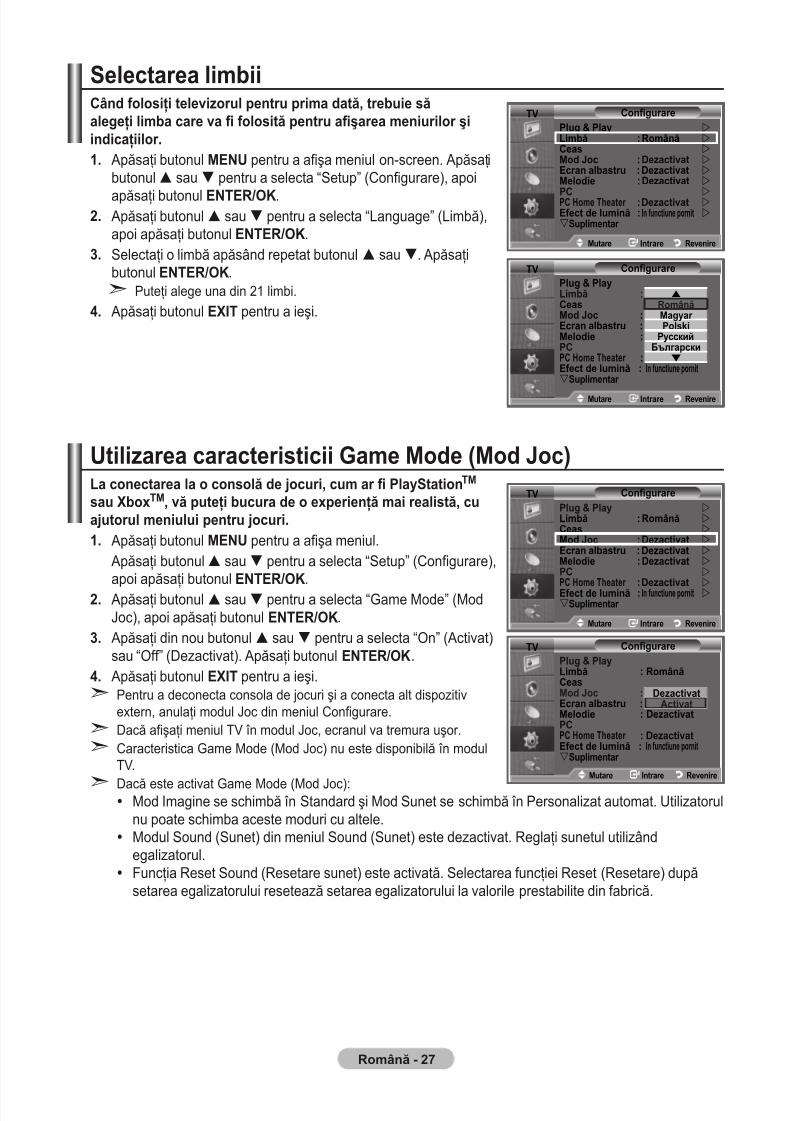
7/30/2019 Samsung LCD TV Eng Rom
http://slidepdf.com/reader/full/samsung-lcd-tv-eng-rom 74/92
Română -
Selectarea limbiiCând folosiţi televizorul pentru prima dată, trebuie săalegeţi limba care va folosită pentru aşarea meniurilor şiindicaţiilor.. Apăsaţi butonul MENU pentru a aşa meniul on-screen. Apăsaţi
butonul sau pentru a selecta “Setup” (Congurare), apoi
apăsaţi butonul enteR/OK.. Apăsaţi butonul sau pentru a selecta “Language” (Limbă),
apoi apăsaţi butonul enteR/OK.3. Selectaţi o limbă apăsând repetat butonul sau. Apăsaţi
butonul enteR/OK.Puteţi alege una din 21 limbi.
. Apăsaţi butonul EXIT pentru a ieşi.
Utilizarea caracteristicii Game Mode (Mod Joc)La conectarea la o consolă de jocuri, cum ar PlayStationTM sau XboxTM, vă puteţi bucura de o experienţă mai realistă, cuajutorul meniului pentru jocuri.. Apăsaţi butonul MENU pentru a aşa meniul.
Apăsaţi butonul sau pentru a selecta “Setup” (Congurare),
apoi apăsaţi butonulenteR/OK.
. Apăsaţi butonul sau pentru a selecta “Game Mode” (ModJoc), apoi apăsaţi butonul enteR/OK.
3. Apăsaţi din nou butonul sau pentru a selecta “On” (Activat)sau “Off” (Dezactivat). Apăsaţi butonul enteR/OK.
. Apăsaţi butonul EXIT pentru a ieşi.Pentru a deconecta consola de jocuri şi a conecta alt dispozitivextern, anulaţi modul Joc din meniul Congurare.Dacă aşaţi meniul TV în modul Joc, ecranul va tremura uşor.Caracteristica Game Mode (Mod Joc) nu este disponibilă în modulTV.
Dacă este activat Game Mode (Mod Joc): Mod Imagine se schimbă în Standard şi Mod Sunet se schimbă în Personalizat automat. Utilizatorul
nu poate schimba aceste moduri cu altele. Modul Sound (Sunet) din meniul Sound (Sunet) este dezactivat. Reglaţi sunetul utilizând
egalizatorul. Funcţia Reset Sound (Resetare sunet) este activată. Selectarea funcţiei Reset (Resetare) după
setarea egalizatorului resetează setarea egalizatorului la valorile prestabilite din fabrică.
➣
➣
➣
➣
➣
Mode : Custom
Equalizer
SRS TS XT : Off
Auto Volume : Off
Internal Mute : Off
Reset
Move Enter Return
TV ConfigurarePlug & Play Limbă : Română Ceas Mod Joc : Dezactivat Ecran albastru : Dezactivat Melodie : Dezactivat
PC
PC Home Theater : Dezactivat Efect de lumină : In functiune pornit Suplimentar
Mutare Intrare Revenire
Mode : Custom
Equalizer
SRS TS XT : Off
Auto Volume : Off
Internal Mute : Off
Reset
Move Enter Return
TV ConfigurarePlug & PlayLimbă : RomânăCeasMod Joc : Off Ecran albastru : Off Melodie : DezactivatPCPC Home Theater : DezactivatEfect de lumină : In functiune pornitSuplimentar
DezactivatActivat
Mutare Intrare Revenire
Mode : Custom
Equalizer
SRS TS XT : Off
Auto Volume : Off
Internal Mute : Off
Reset
Move Enter Return
TV ConfigurarePlug & Play Limbă : Română Ceas Mod Joc : Dezactivat Ecran albastru : Dezactivat Melodie : Dezactivat PC
PC Home Theater : Dezactivat
Efect de lumină : In functiune pornit Suplimentar
Mutare Intrare Revenire
Mode : Custom
Equalizer
SRS TS XT : Off
Auto Volume : Off
Internal Mute : Off
Reset
Move Enter Return
TV ConfigurarePlug & PlayLimbă : EnglishCeasMod Joc : Off Ecran albastru : Off Melodie : Off PCPC Home Theater : Off Efect de lumină : In functiune pornitSuplimentar
Mutare Intrare Revenire
▲
RomânăMagyar Polski
РусскийБългарски▼
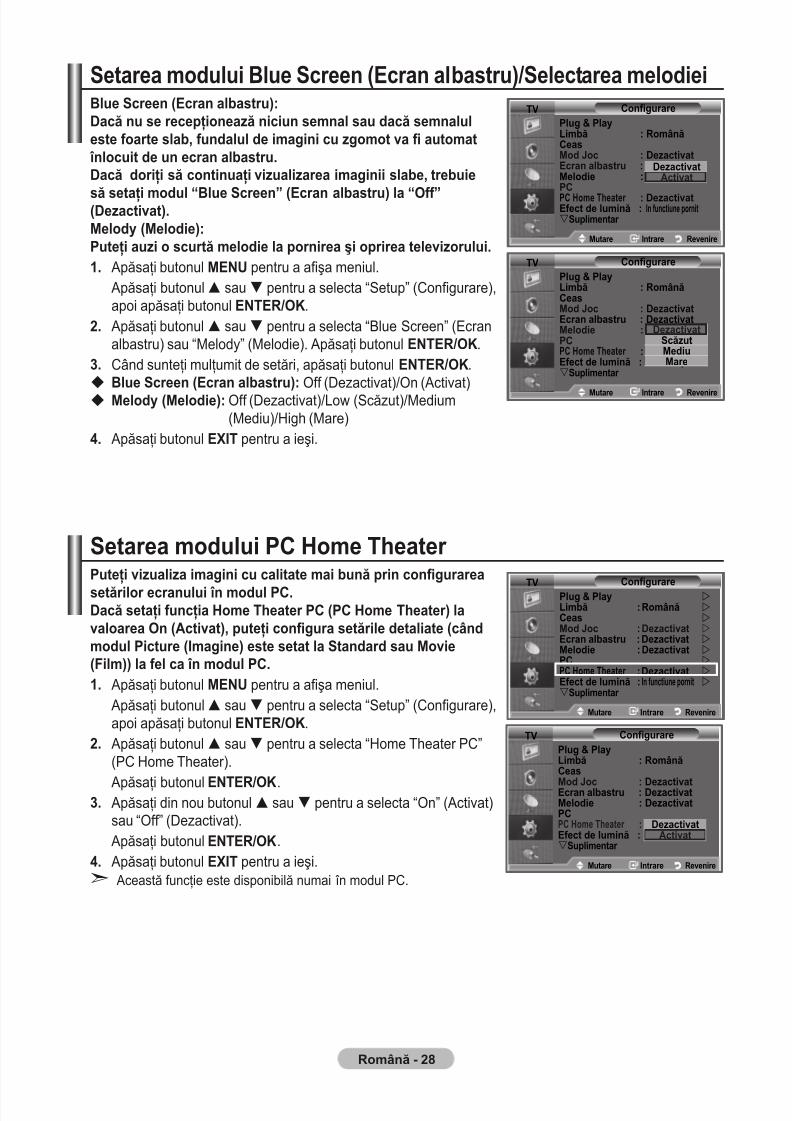
7/30/2019 Samsung LCD TV Eng Rom
http://slidepdf.com/reader/full/samsung-lcd-tv-eng-rom 75/92
Română -
Setarea modului Blue Screen (Ecran albastru)/Selectarea melodieiBlue Screen (Ecran albastru):Dacă nu se recepţionează niciun semnal sau dacă semnaluleste foarte slab, fundalul de imagini cu zgomot va automat înlocuit de un ecran albastru.Dacă doriţi să continuaţi vizualizarea imaginii slabe, trebuie
să setaţi modul “Blue Screen” (Ecran albastru) la “Off”(Dezactivat).Melody (Melodie):Puteţi auzi o scurtă melodie la pornirea şi oprirea televizorului.. Apăsaţi butonul MENU pentru a aşa meniul.
Apăsaţi butonul sau pentru a selecta “Setup” (Congurare),apoi apăsaţi butonul enteR/OK.
. Apăsaţi butonul sau pentru a selecta “Blue Screen” (Ecranalbastru) sau “Melody” (Melodie). Apăsaţi butonul enteR/OK.
3. Când sunteţi mulţumit de setări, apăsaţi butonul enteR/OK.
Blue Screen (Ecran albastru):Off (Dezactivat)/On (Activat)
Melody (Melodie): Off (Dezactivat)/Low (Scăzut)/Medium(Mediu)/High (Mare)
. Apăsaţi butonul EXIT pentru a ieşi.
Setarea modului PC Home Theater Puteţi vizualiza imagini cu calitate mai bună prin congurareasetărilor ecranului în modul PC.Dacă setaţi funcţia Home Theater PC (PC Home Theater) lavaloarea On (Activat), puteţi congura setările detaliate (cândmodul Picture (Imagine) este setat la Standard sau Movie(Film)) la fel ca în modul PC.. Apăsaţi butonul MENU pentru a aşa meniul.
Apăsaţi butonul sau pentru a selecta “Setup” (Congurare),apoi apăsaţi butonul enteR/OK.
. Apăsaţi butonul sau pentru a selecta “Home Theater PC”(PC Home Theater).
Apăsaţi butonul enteR/OK.3. Apăsaţi din nou butonul sau pentru a selecta “On” (Activat)
sau “Off” (Dezactivat). Apăsaţi butonul enteR/OK.
. Apăsaţi butonul EXIT pentru a ieşi. Această funcţie este disponibilă numai în modul PC.
➣
Mode : Custom
Equalizer
SRS TS XT : Off
Auto Volume : Off
Internal Mute : Off
Reset
Move Enter Return
TV ConfigurarePlug & PlayLimbă : RomânăCeasMod Joc : DezactivatEcran albastru : Dezactivat Melodie : DezactivatPCPC Home Theater : DezactivatEfect de lumină : In functiune pornitSuplimentar
DezactivatScăzutMediuMare
Mutare Intrare Revenire
Mode : Custom
Equalizer
SRS TS XT : Off
Auto Volume : Off
Internal Mute : Off
Reset
Move Enter Return
TV ConfigurarePlug & PlayLimbă : RomânăCeasMod Joc : DezactivatEcran albastru : Off Melodie : DezactivatPCPC Home Theater : DezactivatEfect de lumină : In functiune pornitSuplimentar
DezactivatActivat
Mutare Intrare Revenire
Mode : Custom
Equalizer
SRS TS XT : Off
Auto Volume : Off
Internal Mute : Off
Reset
Move Enter Return
TV ConfigurarePlug & PlayLimbă : RomânăCeas
Mod Joc : DezactivatEcran albastru : Dezactivat Melodie : DezactivatPCPC Home Theater : DezactivatEfect de lumină : In functiune pornitSuplimentar
DezactivatActivat
Mutare Intrare Revenire
Mode : Custom
Equalizer SRS TS XT : Off
Auto Volume : Off
Internal Mute : Off
Reset
Move Enter Return
TV ConfigurarePlug & Play Limbă : Română Ceas Mod Joc : Dezactivat Ecran albastru : Dezactivat Melodie : Dezactivat PC PC Home Theater : Dezactivat Efect de lumină : In functiune pornit Suplimentar
Mutare Intrare Revenire
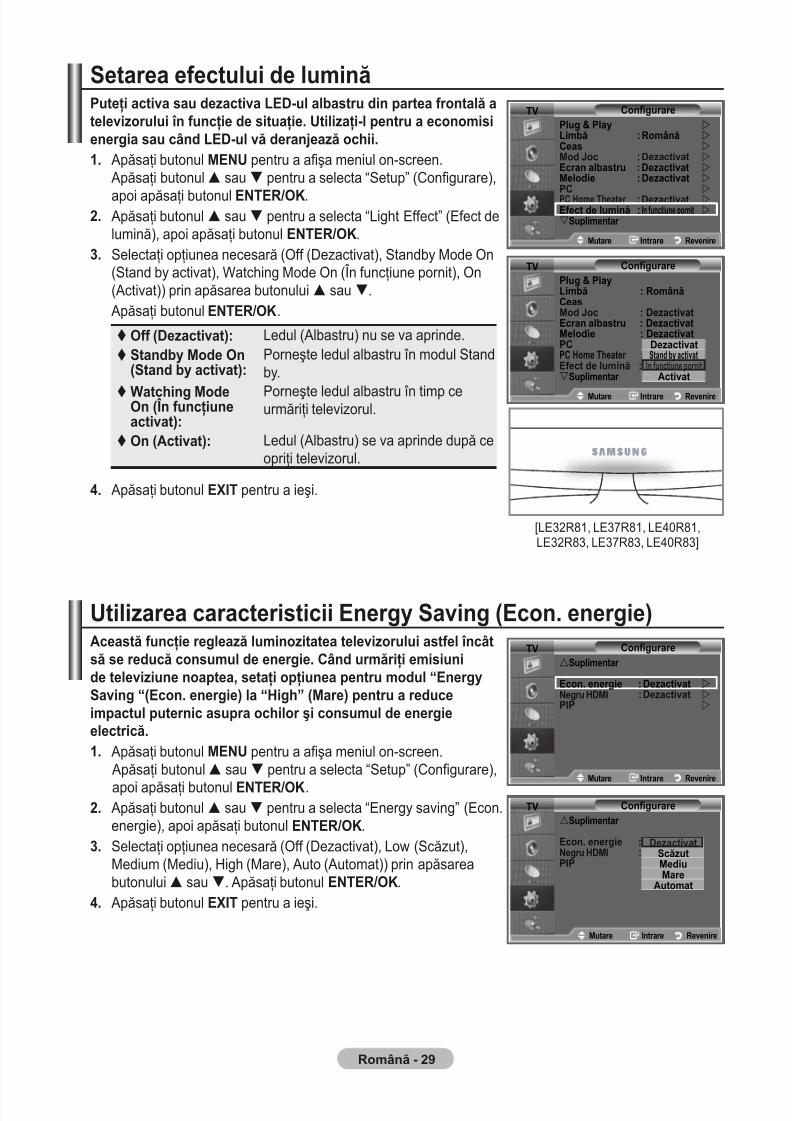
7/30/2019 Samsung LCD TV Eng Rom
http://slidepdf.com/reader/full/samsung-lcd-tv-eng-rom 76/92
Română - 9
Setarea efectului de luminăPuteţi activa sau dezactiva LED-ul albastru din partea frontală atelevizorului în funcţie de situaţie. Utilizaţi-l pentru a economisienergia sau când LED-ul vă deranjează ochii.. Apăsaţi butonul MENU pentru a aşa meniul on-screen.
Apăsaţi butonul sau pentru a selecta “Setup” (Congurare),
apoi apăsaţi butonul enteR/OK.. Apăsaţi butonul sau pentru a selecta “Light Effect” (Efect de
lumină), apoi apăsaţi butonul enteR/OK.3. Selectaţi opţiunea necesară (Off (Dezactivat), Standby Mode On
(Stand by activat), Watching Mode On (În funcţiune pornit), On(Activat)) prin apăsarea butonului sau.
Apăsaţi butonul enteR/OK.
Off (Dezactivat): Ledul (Albastru) nu se va aprinde. Standby Mode On
(Stand by activat):Porneşte ledul albastru în modul Standby.
Watching ModeOn (În funcţiuneactivat):
Porneşte ledul albastru în timp ceurmăriţi televizorul.
On (Activat): Ledul (Albastru) se va aprinde după ceopriţi televizorul.
. Apăsaţi butonul EXIT pentru a ieşi.
Utilizarea caracteristicii Energy Saving (Econ. energie)Această funcţie reglează luminozitatea televizorului astfel încâtsă se reducă consumul de energie. Când urmăriţi emisiunide televiziune noaptea, setaţi opţiunea pentru modul “EnergySaving “(Econ. energie) la “High” (Mare) pentru a reduceimpactul puternic asupra ochilor şi consumul de energieelectrică.. Apăsaţi butonul MENU pentru a aşa meniul on-screen.
Apăsaţi butonul sau pentru a selecta “Setup” (Congurare),
apoi apăsaţi butonul enteR/OK.. Apăsaţi butonul sau pentru a selecta “Energy saving” (Econ.
energie), apoi apăsaţi butonul enteR/OK.
3. Selectaţi opţiunea necesară (Off (Dezactivat), Low (Scăzut),Medium (Mediu), High (Mare), Auto (Automat)) prin apăsareabutonului sau. Apăsaţi butonul enteR/OK.
. Apăsaţi butonul EXIT pentru a ieşi.
Mode : Custom
Equalizer
SRS TS XT : Off
Auto Volume : Off
Internal Mute : Off
Reset
Move Enter Return
TV ConfigurarePlug & PlayLimbă : RomânăCeasMod Joc : DezactivatEcran albastru : Dezactivat Melodie : DezactivatPCPC Home Theater : DezactivatEfect de lumină : In functiune pornitSuplimentar
Mutare Intrare Revenire
DezactivatStand by activat
In functiune pornitActivat
Mode : Custom
Equalizer
SRS TS XT : Off
Auto Volume : Off
Internal Mute : Off
Reset
Move Enter Return
TV ConfigurarePlug & Play Limbă : Română Ceas Mod Joc : Dezactivat Ecran albastru : Dezactivat Melodie : Dezactivat PC
PC Home Theater : Dezactivat Efect de lumină : In functiune pornit Suplimentar
Mutare Intrare Revenire
TV ConfigurareSuplimentar
Econ. energie : DezactivatNegru HDMI :PIP
DezactivatScăzutMediuMare
Automat
Mutare Intrare Revenire
Mode : Custom
Equalizer
SRS TS XT : Off
Auto Volume : Off
Internal Mute : Off
Reset
Move Enter Return
TV ConfigurareSuplimentar
Econ. energie : Dezactivat Negru HDMI : Dezactivat PIP
Mutare
Intrare
Revenire
[LE32R81, LE37R81, LE40R81,LE32R83, LE37R83, LE40R83]

7/30/2019 Samsung LCD TV Eng Rom
http://slidepdf.com/reader/full/samsung-lcd-tv-eng-rom 77/92
Română - 30
Selectarea surseiPuteţi alege între mai multe surse externe conectate la mufelede intrare ale televizorului.. Apăsaţi butonul MENU pentru a aşa meniul.
Apăsaţi butonul sau pentru a selecta “Input” (Intrare), apoiapăsaţi butonul enteR/OK.
. Apăsaţi butonul enteR/OK pentru a selecta “Source List” (Listăsurse).
Când la televizor nu este conectat niciun dispozitiv extern, în listade surse sunt activate numai opţiunile “TV”, “Ext.1”, “Ext.2”. “AV”,“S-Video”, “Component”, “PC”, “HDMI1” , “HDMI2”, ”HDMI3”sunt activate numai când la televizor sunt conectate surselecorespunzătoare.
3. Selectaţi dispozitivul necesar, apăsând butonul sau. Apăsaţi butonul enteR/OK.
Editarea numelor surselor de intrareDenumiţi dispozitivul conectat la mufa de intrare pentru a faceselectarea sursei de intrare mai facilă.. Apăsaţi butonul MENU pentru a aşa meniul.
Apăsaţi butonul enteR/OK pentru a selecta “Input” (Intrare).. Apăsaţi butonul sau pentru a selecta “Edit Name” (Editare
nume), apoi apăsaţi butonul enteR/OK.3. Apăsaţi butonul sau pentru a selecta dispozitivul pe care
doriţi să-l editaţi. Apăsaţi butonul enteR/OK.. Apăsaţi butonul sau pentru a selecta dispozitivul necesar.
Apăsaţi butonul enteR/OK.. Apăsaţi butonul EXIT pentru a ieşi.
➣
Apăsaţi butonul SOURCE de pe telecomandă pentru a comuta între toate sursele disponibile. Modul TV poate selectatprin apăsarea butonului TV, a butoanelor numerice (0~9) şi abutonului P / de pe telecomandă. Selectarea nu poate realizată cu ajutorul butonului SOURCE.
Mode : Custom
Equalizer
SRS TS XT : Off
Auto Volume : Off
Internal Mute : Off
Reset
Move Enter Return
TV Listă surseTV Ext. : ----Ext. : ----AV : ----S-Video : ----Component : ----PC : ----HDMI : ----HDMI : ----HDMI3 : ----
Mutare Intrare Revenire
Mode : Custom
Equalizer
SRS TS XT : Off
Auto Volume : Off
Internal Mute : Off
Reset
Move Enter Return
TV IntrareListă surse : TV Editare nume Anynet+(HDMI-CEC)
Mutare Intrare Revenire
Mode : Custom
Equalizer
SRS TS XT : Off
Auto Volume : Off
Internal Mute : Off
Reset
Move Enter Return
TV Editare numeExt. : ----Ext. : ----AV : ----S-Video : ----Component : ----PC : ----HDMI : ----HDMI : ----HDMI3 : ----
----VCRDVD
D-VHSSTB cablu
HD STBSTB satelit
Mutare Intrare Revenire
Mode : Custom
Equalizer
SRS TS XT : Off
Auto Volume : Off
Internal Mute : Off
Reset
Move Enter Return
TV IntrareListă surse : TV Editare nume Anynet+(HDMI-CEC)
Mutare Intrare Revenire

7/30/2019 Samsung LCD TV Eng Rom
http://slidepdf.com/reader/full/samsung-lcd-tv-eng-rom 78/92
Română - 3
Decodor teletextMajoritatea programelor TV au pagini “teletext”, cu informaţiiscrise, cum ar :
Ora programelor de televiziune
Buletine de ştiri şi previziuni meteorologice
Rezultate sportiveSubtitrări pentru utilizatorii cu probleme de auz
Paginile de teletext sunt organizate după şase categorii:
Partea Cuprinsa Numărul paginii selectate.B Identitatea staţiei de emisie.C Numărul curent al paginii sau starea de căutare.D Data şi ora.e Text.
F Informaţii privind starea.
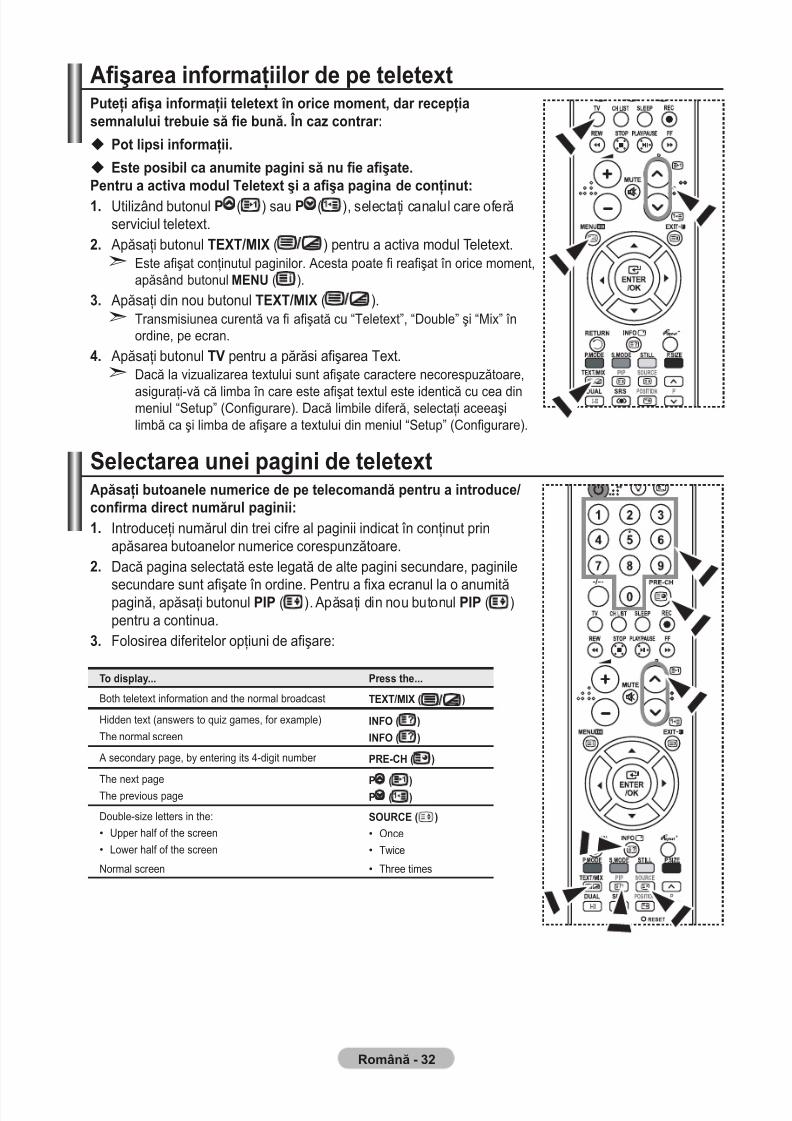
7/30/2019 Samsung LCD TV Eng Rom
http://slidepdf.com/reader/full/samsung-lcd-tv-eng-rom 79/92
Română - 3
Aşarea informaţiilor de pe teletextPuteţi aşa informaţii teletext în orice moment, dar recepţiasemnalului trebuie să e bună. În caz contrar:
Pot lipsi informaţii.
Este posibil ca anumite pagini să nu e aşate.Pentru a activa modul Teletext şi a aşa pagina de conţinut:. Utilizând butonul P ( ) sau P ( ), selectaţi canalul care oferă
serviciul teletext.. Apăsaţi butonul TEXT/MIX ( ) pentru a activa modul Teletext.
Este aşat conţinutul paginilor. Acesta poate reaşat în orice moment,apăsând butonul MENU ( ).
3. Apăsaţi din nou butonul TEXT/MIX ( ).Transmisiunea curentă va aşată cu “Teletext”, “Double” şi “Mix” înordine, pe ecran.
. Apăsaţi butonul TV pentru a părăsi aşarea Text.Dacă la vizualizarea textului sunt aşate caractere necorespuzătoare,
asiguraţi-vă că limba în care este aşat textul este identică cu cea dinmeniul “Setup” (Congurare). Dacă limbile diferă, selectaţi aceeaşilimbă ca şi limba de aşare a textului din meniul “Setup” (Congurare).
Selectarea unei pagini de teletextApăsaţi butoanele numerice de pe telecomandă pentru a introduce/conrma direct numărul paginii:. Introduceţi numărul din trei cifre al paginii indicat în conţinut prin
apăsarea butoanelor numerice corespunzătoare.. Dacă pagina selectată este legată de alte pagini secundare, paginile
secundare sunt aşate în ordine. Pentru a xa ecranul la o anumităpagină, apăsaţi butonul PIP ( ). Apăsaţi din nou butonul PIP ( )pentru a continua.
3. Folosirea diferitelor opţiuni de aşare:
➣
➣
➣
To display... Press the...
Both teletext information and the normal broadcast TEXT/MIX ( )
Hidden text (answers to quiz games, for example)
The normal screenINFO ( )INFO ( )
A secondary page, by entering its 4-digit number PRE-CH ( )
The next pageThe previous pageP ( )P ( )
Double-size letters in the:
Upper half of the screen
Lower half of the screen
•
•
SOURCE ( )Once
Twice
•
•
Normal screen Three times•
7/30/2019 Samsung LCD TV Eng Rom
http://slidepdf.com/reader/full/samsung-lcd-tv-eng-rom 80/92
Română - 33
Utilizarea funcţiei Fastext pentru a selecta o pagină de teletextDiferitele subiecte incluse în paginile teletextului sunt codate princulori şi pot selectate prin apăsarea butoanelor colorate de petelecomandă.. Aşează conţinutul paginilor de teletext prin apăsarea butonului
TEXT/MIX ( ).
. Apăsaţi butonul colorat care corespunde subiectului pe care doriţi să îlselectaţi (subiectele disponibile sunt menţionate pe linia cu informaţii destare).
3. Apăsaţi butonul roşu pentru a aşa pagina anterioară. Apăsaţi butonul verde pentru a aşa pagina următoare.
. Apăsaţi butonul TV pentru a părăsi aşarea Text.
Congurarea telecomenziiDupă congurarea corespunzătoare, telecomanda dvs. poate
funcţiona în cinci moduri diferite: TV, DVD, Cable, Set-Top Box, VCR.Apăsarea butonului corespunzător de pe telecomandă vă permite săcomutaţi între aceste moduri şi să controlaţi echipamentul dorit.
Este posibil ca telecomanda să nu e compatibilă cu toate tipurile deDVD player, VCR, Cable box şi Set-top-box.
Congurarea telecomenzii pentru operarea VCR, CABLE, DVD şiStB
. Opriţi VCR, CABLE, DVD şi STB-ul.. Apăsaţi butonul VCR, CABLE, DVD şi STB de pe telecomanda
televizorului.
3. Apăsaţi butonul Set de pe telecomanda televizorului.. Utilizând butoanele numerice de pe telecomandă, introduceţi trei cifre
din codul VCR listat la pagina 34~36 a acestui manual, pentru marcadvs. de VCR. Asiguraţi-vă că introduceţi un cod din trei cifre, chiar dacă prima cifră este “0” (dacă sunt listate mai multe coduri, încercaţi-l pe primul).
. Apăsaţi butonul POWER de pe telecomandă. Dacă telecomandaeste congurată corect, VCR-ul trebuie să pornească. Dacă VCR-ulnu porneşte după congurare, reluaţi paşii 2, 3 şi 4, dar încercaţi unuldin celelalte coduri listate pentru marca dvs. de VCR. Dacă nu este
listat niciun alt cod, încercaţi toate codurile VCR, de la 000 la 080.
➣
7/30/2019 Samsung LCD TV Eng Rom
http://slidepdf.com/reader/full/samsung-lcd-tv-eng-rom 81/92
Română - 3
Codurile pentru telecomandă
Marcă CodSAMSUNG 000 001 002 003 004 005 077 078 079
ADMIRAL 020
AIWA 025
AKAI 004 027 032 AUDIO DYNAMICS 007 026
BELL&HOWELL 018
BROKSONIC 022
CANDLE 002 003 006 008 015 055
CANON 021 056
CITIZEN 002 003 006 008 015 055
COLORTYME 007
CRAIG 002 024
CURTIS MATHES 002 007 008 017 021 025 056 064 066
DAEWOO 003 010 011 012 013 014 015 016
DB 007 026
DIMENSIA 017
DYNATECH 025
ELECTROHOME 034
EMERSON 001 003 006 021 022 025 030 032 034 040
047 050 052 060 063 065 066 067 069 073
FISHER 018 024 028 029 048 051 061
FUNAI 025
GENERAL ELECTRIC 002 005 017 021 056
GO VIDEO 002
HARMAN KARDON 007
HITACHI 019 025 041 042 074
INSTANT REPLAY 021
JC PENNEY 002 007 018 019 021 026 037 041 054 056
JCL 007 008 018 021 026 037
JVC 081 082 083
KENWOOD 007 008 018 021 026 037
KLH 070
KONIA 036
LG(Goldstar) 006 007 008 009 010
LIOYD 025
LOGIK 038
LXI 025
MAGNAVOX 021 056 059
MARANTZ 007 008 018 021 026 037 062
MARTA 006
MEI 021
MEMOREX 006 021 024 025
MGA 034
MIDLAND 005
MINOLTA 019 041 075
MITSUBISHI 019 034 041 046
Marcă CodMONTGOMERY WARD 020
MTC 002 025
MULTITECH 002 005 025 038
NEC 007 008 018 026 037 062 064OPTIMUS 020
ORION 073 074 075 076
PANASONIC 021 056 071 072
PENTAX 019 041 075
PENTEX RESEARCH+ 008
PHILCO 021 056 059
PHILIPS 021 080
PIONEER 019 026 039 053
PORTLAND 015 049 055
PROSCAN 017
QUARTZ 018
QUASAR 021 056
RADIO SHACK/REALISTIC
006 018 020 021 024 025 029 034
048 056
RCA 002 017 019 021 035 041 043 057
068 076
SANSUI 026
SANYO 018 024
SCOTT 003 047 052 067
SEARS 006 018 019 024 028 029 041048 051
SHARP 020 034 045 015
SHIMTOM 027 033 038 058
SIGNATURE025
SONY 027 033 044
SYLVANIA 021 025 056 059
SYMPHONIC 025
TANDY 018 025
TASHIKA 006
TATUNG 037
TEAC 025 037 068
TECHNICS 021
TEKNIKA 006 021 025 031
TMK 066
TOSHIBA 003 019 029 051 052
TOTEVISION 002 006UNITECH 002
VECTOR RESEARCH 007 026
VICTOR 026
VIDEO CONCEPTS 007 026
VIDEOSONIC 002
WARDS 002 003 006 019 020 021 024 025 034
038 041
YAMAHA 007 008 018 026 037
ZENITH 023 027 033
VCR
7/30/2019 Samsung LCD TV Eng Rom
http://slidepdf.com/reader/full/samsung-lcd-tv-eng-rom 82/92
Română - 3
CABLE BOX
Marcă CodSAMSUNG 000 001 002 003 004 005 006 007
GI 041
HAMLIN 003 024 031
HITACHI 025 030
JERROLD 038 039
MACOM 025 030MAGNAVOX 019 023 028
OAK 026
PANASONIC 003 022 027 037 044
PHILIPS 019 021 023 028
PIONEER 004 018 020 044
RCA 014 022 040
REGAL 003
Marcă CodREGENCY 015 023
SA 042 043
SCIENTIFIC ATLAN 042 043
SPRUCER 022
STARGATE 2000 036
SYLVANIA 016TEXSCAN 016
TOCOM 032
UNIVERSAL 033 034
VIEWSTAR 019 021 023 028
WAMER AMEX 046
ZENITH 017 029 035 037 045
SAMSUNG DVD
Marcă Cod
DVD 000 001 002DVDR 003 004
BD Record 005 006
VCR COMBO 007 008 009 010 011
VCR Record 012
DHR COMBO 013
Marcă Cod
Home Theater VCRCOMBO 014 015 016
HDD Recorder COMBO 017
TWIN TRAY COMBO 018
STB DVD COMBO 019
DVD Receiver 020
AV Receiver 021
DVD
Marcă Cod ANAM 030
AUDIOVOX 075
AUDIOLOGIC 085
ANABA 072
APEX DIGITAL 070 071 074 086 083 084 088 111 112
AIWA 114
BROKSONIC 062
BLAUPUNKT 074
B&K 122 123
CURTIS MATHES 027
CYBER HOME 077 078 079 082
CLARION 080 125
CIRRUS 081
CYBER HOME 065
CINEVISION 095
DAEWOO 066
DENON 146
FARENHEIT 067 068
FISHER 090
GPX 060
GO VIDEO 061 089 133 135
GE 069 074
GREENHILL 074
HITACHI 064 113
HITEKER 071
HOYO 073
HARMAN / KARDON 091 110
IRT 089
Marcă CodINTEGRA 092
JBL 091
JVC 022 033 115 116
JATON 073
KENWOOD 051 108 109
KISS 073
KONKA 059 100 106 107
KLH 074 075
LG(Goldstar) 025 031
LOEWE 057
LASONIC 058
MOBILE AUTHORITY 054
MEMOREX 055
MALATA 056
MAGNAVOX 076 093
MINTEK 074 094
MONYKA 073
NORCENT 048 049 050
NEXT BASE 052
NEC 053
NANTAUS 144
NESA 074
OPTOMEDIA ELECTRONICS 105
OPTIVIEW 072
ONKYO 076 092 119
PHILCO 044 045
PRINCETON 046 047
PROSCAN 023
7/30/2019 Samsung LCD TV Eng Rom
http://slidepdf.com/reader/full/samsung-lcd-tv-eng-rom 83/92
Română - 3
DVD
Marcă CodPANASONIC 024 034 124 134 136 137 138
PHILIPS 036 076
ROTEL 117 118
RIO 120
RCA 023 035 074 075 131 132
RAITE 073ROWA 038
SAMPO 104
SONY 026 029 126 127 128 129 130 141
SHERWOOD 039 041
SVA 042
SYLVANIA 043 093
SHARP 140
SANSUI 062
SANYO 062 090
SHINSONIC 094
Marcă CodTHOMSON 145
TOSHIBA 028 062 076
TECHNICS 139
TVIEW 072
TOKAI 073
TEAC 096
TECHWOOD 097
TREDEX 098 099 101
URBAN CONCEPTS 076
VENTURER 075
VOCOPRO 102
YAMAHA 032 063
YAMAKAWA 040 073
XWAVE 103
ZENITH 076 121
SAMSUNG SET-TOP BOX
Marcă CodSatellite STB HDD COMBO Premium 010
CABLE STB HDD COMBO Standard 011
CABLE STB HDD COMBO Premium 012
Ground wave STB HDD COMBO Standard 013
Ground wave STB HDD COMBO Premium 014
Marcă CodGround wave STB 001 002
Satellite STB 003
CABLE STB 004
STB DVD COMBO 008
Satellite STB HDD COMBO Standard 009
SET-TOP BOX
Marcă Cod ALPHASTAR 023
ANAM 043CHANNEL MASTER 018 034
CROSSDIGITAL 019
CHAPARRAL 035
DIRECT TV 015 016 017 019 022 045 060 061 062065 066 067 068
DAEWOO 074
DISH NETWORK SYSTEM 069 070
DISHPRO 069
DRAKE 018 024 032
DX ANTENNA 027
ECHOSTAR 025 069 070 071
EXPRESSVU 069
GOI 069
GE 065
GENERAL INSTRUMENT 046 047 048 063 064
HTS 069
HOME CABLE 056
HITACHI 022
HUGHES NETWORK 015 017
IQ 020
IQ PRISM 020
JANEIL 059
JERROID 063
JVC 069 070
LG(Goldstar) 044 073
Marcă CodMAGNAVOX 016 021 036 038 039 040 041 042
MEMOREX 016
MOTOROLA 064
MACOM 018
MITSUBISHI 015
NEXT LEVEL 047 048 064
PHILIPS 015 016 017 021 033 036 038 039040 041 042 067
PRIMESTAR 046 049 050 063
PANASONIC 058 059 061 062
PAYSAT 016
PROSCAN 065 066
RCA 051 052 053 065 066
RADIOSHACK 064REALISTIC 057
STAR TRAK 026
STS 020 027
SKY 031
SKY LIFE 005 006 007
SHACK 064
STAR CHOICE 064
SONY 054 060
TOSHIBA 015 017 028 029 030 072
ULTIMATE TV 060 066
UNIDEN 016 021 037 055 056 057
ZENITH 024 031 068
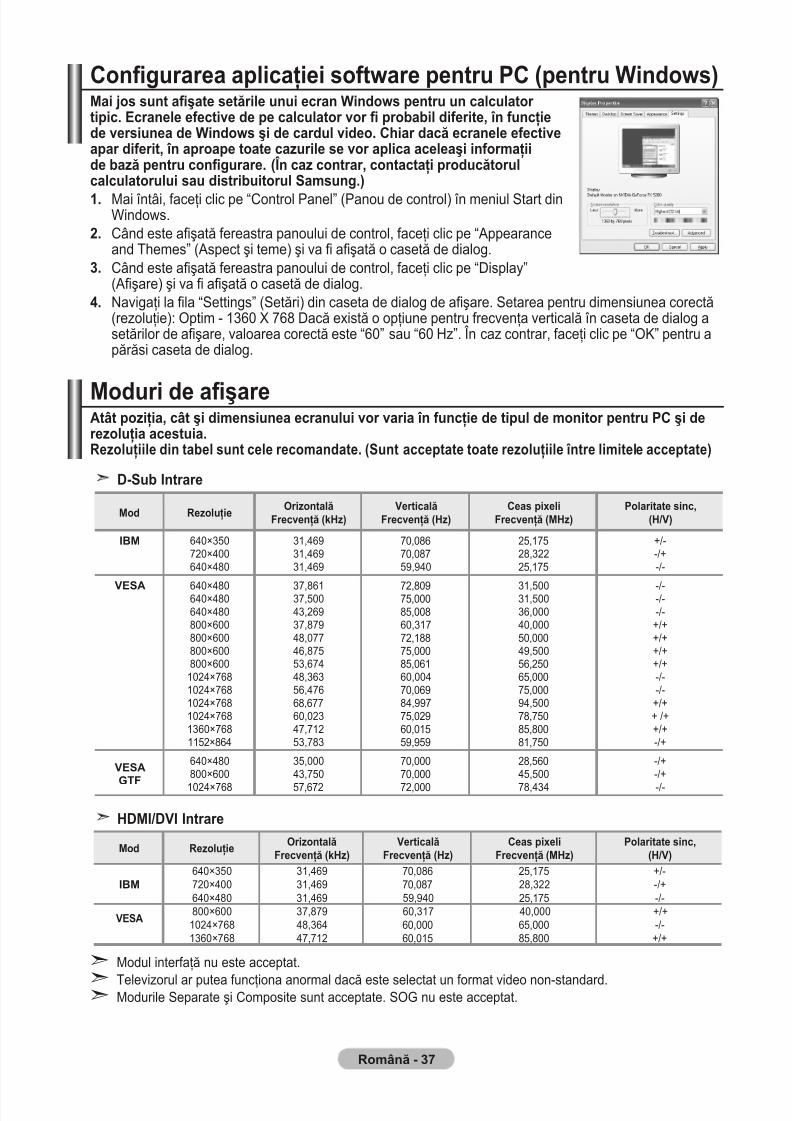
7/30/2019 Samsung LCD TV Eng Rom
http://slidepdf.com/reader/full/samsung-lcd-tv-eng-rom 84/92
Română - 3
Congurarea aplicaţiei software pentru PC (pentru Windows)Mai jos sunt aşate setările unui ecran Windows pentru un calculator tipic. Ecranele efective de pe calculator vor probabil diferite, în funcţiede versiunea de Windows şi de cardul video. Chiar dacă ecranele efectiveapar diferit, în aproape toate cazurile se vor aplica aceleaşi informaţiide bază pentru congurare. (În caz contrar, contactaţi producătorulcalculatorului sau distribuitorul Samsung.)
. Mai întâi, faceţi clic pe “Control Panel” (Panou de control) în meniul Start dinWindows.
. Când este aşată fereastra panoului de control, faceţi clic pe “Appearanceand Themes” (Aspect şi teme) şi va aşată o casetă de dialog.
3. Când este aşată fereastra panoului de control, faceţi clic pe “Display”(Aşare) şi va aşată o casetă de dialog.
. Navigaţi la la “Settings” (Setări) din caseta de dialog de aşare. Setarea pentru dimensiunea corectă(rezoluţie): Optim - 1360 X 768 Dacă există o opţiune pentru frecvenţa verticală în caseta de dialog asetărilor de aşare, valoarea corectă este “60” sau “60 Hz”. În caz contrar, faceţi clic pe “OK” pentru apărăsi caseta de dialog.
Moduri de aşareAtât poziţia, cât şi dimensiunea ecranului vor varia în funcţie de tipul de monitor pentru PC şi derezoluţia acestuia.Rezoluţiile din tabel sunt cele recomandate. (Sunt acceptate toate rezoluţiile între limitele acceptate)
Modul interfaţă nu este acceptat.
Televizorul ar putea funcţiona anormal dacă este selectat un format video non-standard.Modurile Separate şi Composite sunt acceptate. SOG nu este acceptat.
➣
➣➣
Mod Rezoluţie OrizontalăFrecvenţă (kHz)
VerticalăFrecvenţă (Hz)
Ceas pixeliFrecvenţă (MHz)
Polaritate sinc,(H/V)
IBM
640×350 31,469 70,086 25,175 +/-720×400 31,469 70,087 28,322 -/+640×480 31,469 59,940 25,175 -/-
VESA 800×600 37,879 60,317 40,000 +/+1024×768 48,364 60,000 65,000 -/-1360×768 47,712 60,015 85,800 +/+
HDMI/DVI Intrare
D-Sub Intrare
Mod Rezoluţie OrizontalăFrecvenţă (kHz)
VerticalăFrecvenţă (Hz)
Ceas pixeliFrecvenţă (MHz)
Polaritate sinc,(H/V)
IBM 640×350 720×400 640×480
31,469 31,469 31,469
70,08670,08759,940
25,17528,322 25,175
+/- -/+ -/-
VESA 640×480640×480640×480800×600800×600800×600800×6001024×7681024×7681024×7681024×7681360×7681152×864
37,86137,50043,26937,87948,07746,87553,67448,36356,47668,67760,02347,71253,783
72,80975,00085,00860,31772,18875,00085,06160,00470,06984,99775,02960,01559,959
31,50031,50036,00040,00050,00049,50056,25065,00075,00094,50078,75085,80081,750
-/--/--/-+/++/++/++/+-/--/-+/++ /++/+-/+
VESA
GTF
640×480800×6001024×768
35,00043,75057,672
70,00070,000
72,000
28,56045,50078,434
-/+-/+-/-
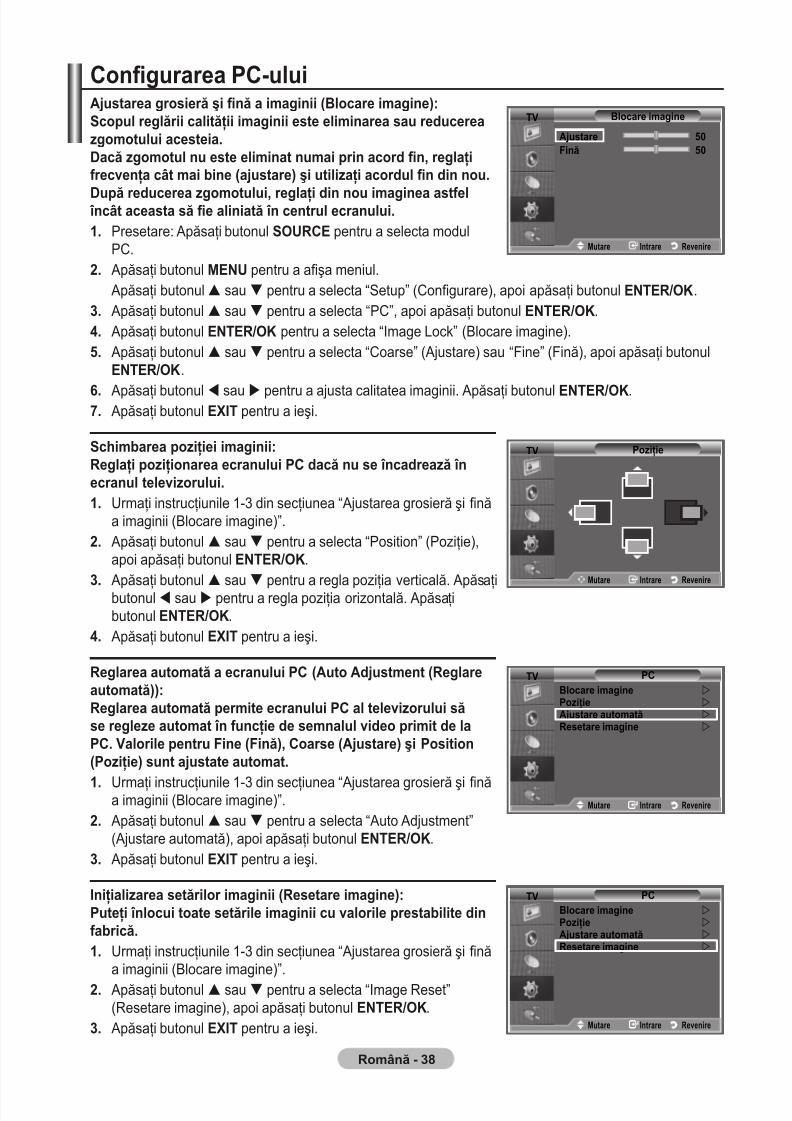
7/30/2019 Samsung LCD TV Eng Rom
http://slidepdf.com/reader/full/samsung-lcd-tv-eng-rom 85/92
Română - 3
Congurarea PC-uluiAjustarea grosieră şi nă a imaginii (Blocare imagine):Scopul reglării calităţii imaginii este eliminarea sau reducereazgomotului acesteia.Dacă zgomotul nu este eliminat numai prin acord n, reglaţifrecvenţa cât mai bine (ajustare) şi utilizaţi acordul n din nou.
După reducerea zgomotului, reglaţi din nou imaginea astfel încât aceasta să e aliniată în centrul ecranului.. Presetare: Apăsaţi butonul SOURCE pentru a selecta modul
PC.
. Apăsaţi butonul MENU pentru a aşa meniul. Apăsaţi butonul sau pentru a selecta “Setup” (Congurare), apoi apăsaţi butonul enteR/OK.
3. Apăsaţi butonul sau pentru a selecta “PC”, apoi apăsaţi butonul enteR/OK.
. Apăsaţi butonul enteR/OK pentru a selecta “Image Lock” (Blocare imagine).. Apăsaţi butonul sau pentru a selecta “Coarse” (Ajustare) sau “Fine” (Fină), apoi apăsaţi butonul
enteR/OK.
. Apăsaţi butonul sau pentru a ajusta calitatea imaginii. Apăsaţi butonul enteR/OK.. Apăsaţi butonul EXIT pentru a ieşi. Schimbarea poziţiei imaginii:Reglaţi poziţionarea ecranului PC dacă nu se încadrează înecranul televizorului.. Urmaţi instrucţiunile 1-3 din secţiunea “Ajustarea grosieră şi nă
a imaginii (Blocare imagine)”.. Apăsaţi butonul sau pentru a selecta “Position” (Poziţie),
apoi apăsaţi butonul enteR/OK.
3. Apăsaţi butonul
sau
pentru a regla poziţia verticală. Apăsaţibutonul sau pentru a regla poziţia orizontală. Apăsaţibutonul enteR/OK.
. Apăsaţi butonul EXIT pentru a ieşi.
Reglarea automată a ecranului PC (Auto Adjustment (Reglareautomată)):Reglarea automată permite ecranului PC al televizorului săse regleze automat în funcţie de semnalul video primit de laPC. Valorile pentru Fine (Fină), Coarse (Ajustare) şi Position(Poziţie) sunt ajustate automat.
. Urmaţi instrucţiunile 1-3 din secţiunea “Ajustarea grosieră şi năa imaginii (Blocare imagine)”.. Apăsaţi butonul sau pentru a selecta “Auto Adjustment”
(Ajustare automată), apoi apăsaţi butonul enteR/OK.
3. Apăsaţi butonul EXIT pentru a ieşi.
Iniţializarea setărilor imaginii (Resetare imagine):Puteţi înlocui toate setările imaginii cu valorile prestabilite dinfabrică.. Urmaţi instrucţiunile 1-3 din secţiunea “Ajustarea grosieră şi nă
a imaginii (Blocare imagine)”.. Apăsaţi butonul sau pentru a selecta “Image Reset”
(Resetare imagine), apoi apăsaţi butonul enteR/OK.
3. Apăsaţi butonul EXIT pentru a ieşi.
Mode : Custom
Equalizer
SRS TS XT : Off
Auto Volume : Off
Internal Mute : Off
Reset
Move Enter Return
TV Blocare imagine
Ajustare 0Fină 0
Mutare Intrare Revenire
TV Poziţie
Mutare Intrare Revenire
TV PC
Blocare imagine
Poziţie
Ajustare automată
Resetare imagine
Mutare Intrare Revenire
TV PC
Blocare imagine
Poziţie
Ajustare automată
Resetare imagine
Mutare Intrare Revenire
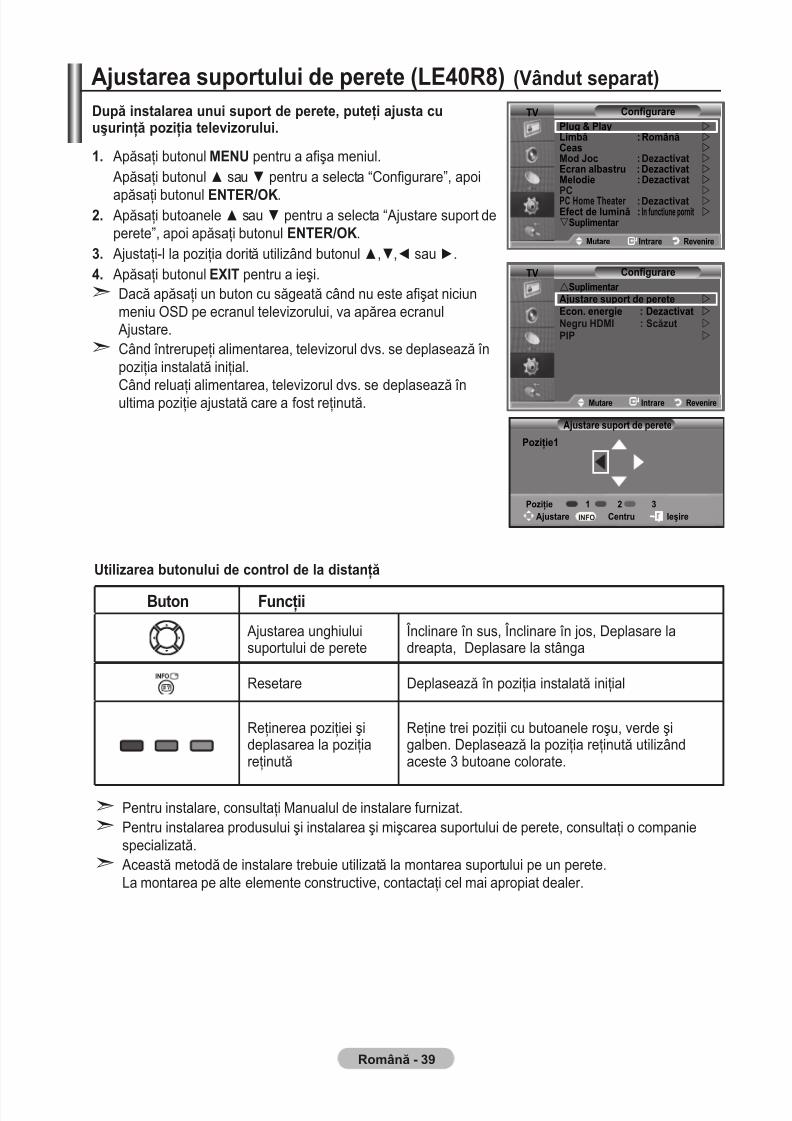
7/30/2019 Samsung LCD TV Eng Rom
http://slidepdf.com/reader/full/samsung-lcd-tv-eng-rom 86/92
Română - 39
După instalarea unui suport de perete, puteţi ajusta cuuşurinţă poziţia televizorului.
. Apăsaţi butonul MENU pentru a aşa meniul. Apăsaţi butonul ▲ sau ▼ pentru a selecta “Congurare”, apoi
apăsaţi butonul enteR/OK.. Apăsaţi butoanele ▲ sau ▼ pentru a selecta “Ajustare suport de
perete”, apoi apăsaţi butonul enteR/OK.
3. Ajustaţi-l la poziţia dorită utilizând butonul ▲,▼,◄ sau ►.. Apăsaţi butonul EXIT pentru a ieşi.
Dacă apăsaţi un buton cu săgeată când nu este aşat niciunmeniu OSD pe ecranul televizorului, va apărea ecranul
Ajustare.Când întrerupeţi alimentarea, televizorul dvs. se deplasează înpoziţia instalată iniţial.
Când reluaţi alimentarea, televizorul dvs. se deplasează înultima poziţie ajustată care a fost reţinută.
➣
➣
Utilizarea butonului de control de la distanţă
Pentru instalare, consultaţi Manualul de instalare furnizat.Pentru instalarea produsului şi instalarea şi mişcarea suportului de perete, consultaţi o companiespecializată.
Această metodă de instalare trebuie utilizată la montarea suportului pe un perete. La montarea pe alte elemente constructive, contactaţi cel mai apropiat dealer.
➣
➣
➣
Buton Funcţii
Ajustarea unghiuluisuportului de perete
Înclinare în sus, Înclinare în jos, Deplasare ladreapta, Deplasare la stânga
Resetare Deplasează în poziţia instalată iniţial
Reţinerea poziţiei şideplasarea la poziţiareţinută
Reţine trei poziţii cu butoanele roşu, verde şigalben. Deplasează la poziţia reţinută utilizândaceste 3 butoane colorate.
Ajustarea suportului de perete (LE0R) (Vândut separat)
Ajustare suport de perete
Poziţie
Ajustare Centru IeşireINFO
Poziţie 3
Mode : Custom
Equalizer
SRS TS XT : Off
Auto Volume : Off
Internal Mute : Off
Reset
Move Enter Return
TV ConfigurareSuplimentar Ajustare suport de perete
Econ. energie : Dezactivat Negru HDMI : Scăzut
PIP
Mutare Intrare Revenire
TV ConfigurarePlug & Play Limbă : Română Ceas Mod Joc : Dezactivat Ecran albastru : Dezactivat Melodie : Dezactivat
PC
PC Home Theater : Dezactivat Efect de lumină : In functiune pornit Suplimentar
Mutare Intrare Revenire
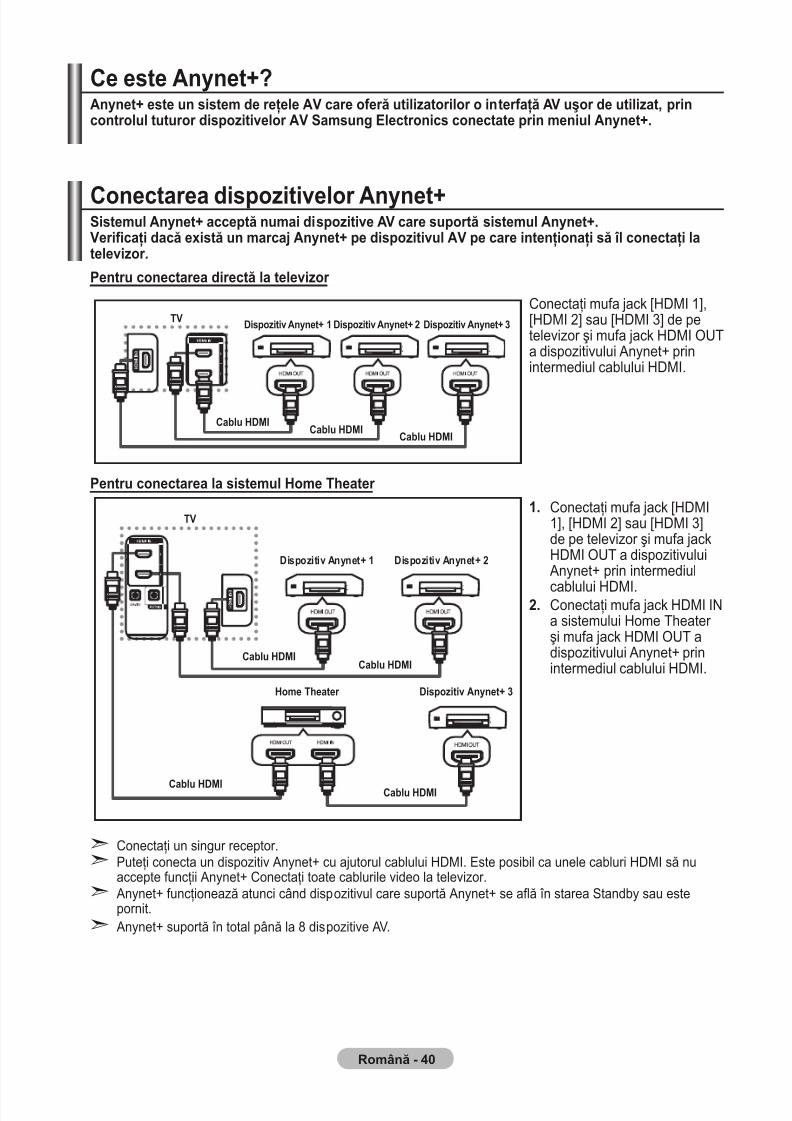
7/30/2019 Samsung LCD TV Eng Rom
http://slidepdf.com/reader/full/samsung-lcd-tv-eng-rom 87/92
Română - 0
Conectarea dispozitivelor Anynet+Sistemul Anynet+ acceptă numai dispozitive AV care suportă sistemul Anynet+.Verificaţi dacă există un marcaj Anynet+ pe dispozitivul AV pe care intenţionaţi să îl conectaţi latelevizor.
Pentru conectarea directă la televizor
Conectaţi mufa jack [HDMI 1],[HDMI 2] sau [HDMI 3] de petelevizor şi mufa jack HDMI OUTa dispozitivului Anynet+ prinintermediul cablului HDMI.
Pentru conectarea la sistemul Home Theater
. Conectaţi mufa jack [HDMI1], [HDMI 2] sau [HDMI 3]de pe televizor şi mufa jackHDMI OUT a dispozitivului
Anynet+ prin intermediul
cablului HDMI.. Conectaţi mufa jack HDMI INa sistemului Home Theater şi mufa jack HDMI OUT adispozitivului Anynet+ prinintermediul cablului HDMI.
Conectaţi un singur receptor.Puteţi conecta un dispozitiv Anynet+ cu ajutorul cablului HDMI. Este posibil ca unele cabluri HDMI să nuaccepte funcţii Anynet+ Conectaţi toate cablurile video la televizor. Anynet+ funcţionează atunci când dispozitivul care suportă Anynet+ se aă în starea Standby sau estepornit. Anynet+ suportă în total până la 8 dispozitive AV.
➣
➣
➣
➣
Ce este Anynet+?Anynet+ este un sistem de reţele AV care oferă utilizatorilor o interfaţă AV uşor de utilizat, princontrolul tuturor dispozitivelor AV Samsung Electronics conectate prin meniul Anynet+.
Dispozitiv Anynet+ Dispozitiv Anynet+ Dispozitiv Anynet+ 3
Cablu HDMICablu HDMI
Cablu HDMI
TV
Dispozitiv Anynet+ Dispozitiv Anynet+
Dispozitiv Anynet+ 3
Cablu HDMICablu HDMI
Cablu HDMICablu HDMI
Home Theater
TV
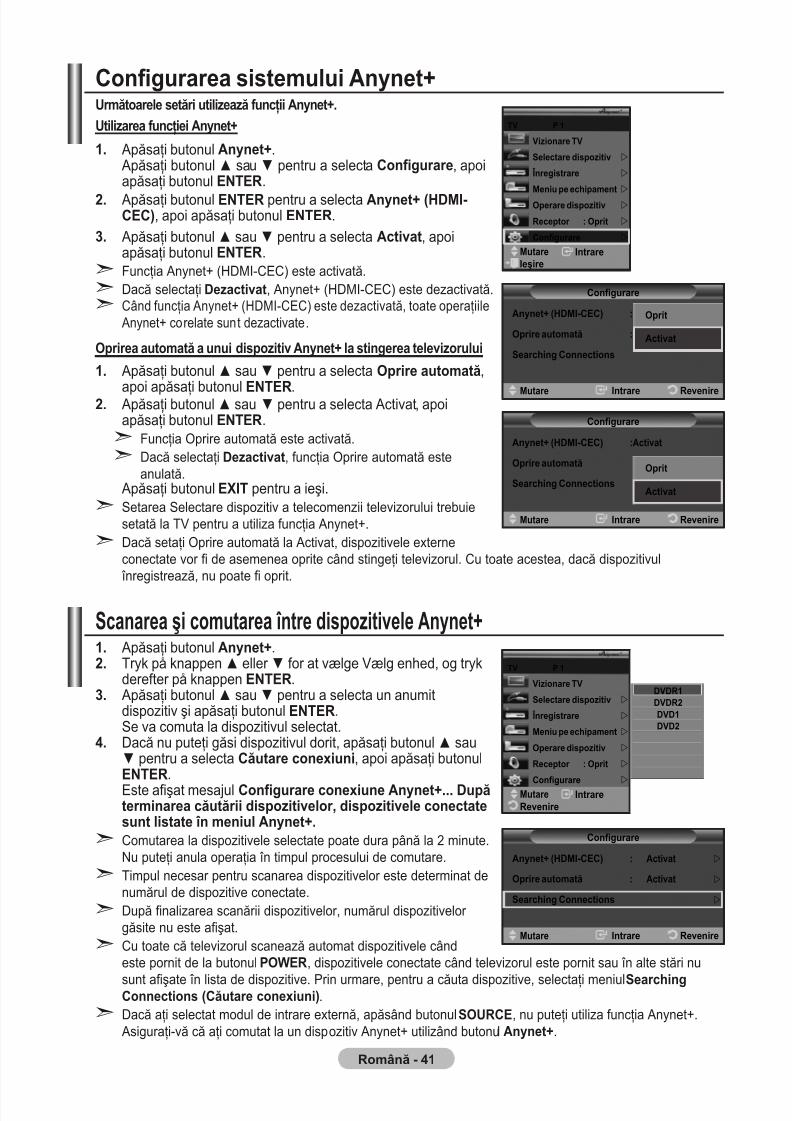
7/30/2019 Samsung LCD TV Eng Rom
http://slidepdf.com/reader/full/samsung-lcd-tv-eng-rom 88/92
Română -
Congurarea sistemului Anynet+Următoarele setări utilizează funcţii Anynet+.Utilizarea funcţiei Anynet+
. Apăsaţi butonul Anynet+. Apăsaţi butonul ▲ sau ▼ pentru a selecta Configurare, apoiapăsaţi butonul enteR.
. Apăsaţi butonul enteR pentru a selecta Anynet+ (HDMI-CEC), apoi apăsaţi butonul enteR.
3. Apăsaţi butonul ▲ sau ▼ pentru a selecta Activat, apoiapăsaţi butonul enteR.Funcţia Anynet+ (HDMI-CEC) este activată.Dacă selectaţi Dezactivat, Anynet+ (HDMI-CEC) este dezactivată.Când funcţia Anynet+ (HDMI-CEC) este dezactivată, toate operaţiile Anynet+ corelate sunt dezactivate.
Oprirea automată a unui dispozitiv Anynet+ la stingerea televizorului
. Apăsaţi butonul ▲ sau ▼ pentru a selecta Oprire automată,
apoi apăsaţi butonulenteR
.. Apăsaţi butonul ▲ sau ▼ pentru a selecta Activat, apoiapăsaţi butonul enteR.
Funcţia Oprire automată este activată.Dacă selectaţi Dezactivat, funcţia Oprire automată esteanulată.
Apăsaţi butonul EXIT pentru a ieşi.Setarea Selectare dispozitiv a telecomenzii televizorului trebuiesetată la TV pentru a utiliza funcţia Anynet+.Dacă setaţi Oprire automată la Activat, dispozitivele externeconectate vor de asemenea oprite când stingeţi televizorul. Cu toate acestea, dacă dispozitivul înregistrează, nu poate oprit.
➣
➣
➣
➣
➣
➣
➣
Scanarea şi comutarea între dispozitivele Anynet+. Apăsaţi butonul Anynet+.. Tryk på knappen ▲ eller ▼ for at vælge Vælg enhed, og tryk
derefter på knappen ENTER.3. Apăsaţi butonul ▲ sau ▼ pentru a selecta un anumit
dispozitiv şi apăsaţi butonul enteR.Se va comuta la dispozitivul selectat.
. Dacă nu puteţi găsi dispozitivul dorit, apăsaţi butonul ▲ sau▼ pentru a selecta Căutare conexiuni, apoi apăsaţi butonulenteR.Este afişat mesajul Configurare conexiune Anynet+... Dupăterminarea căutării dispozitivelor, dispozitivele conectatesunt listate în meniul Anynet+.Comutarea la dispozitivele selectate poate dura până la 2 minute.Nu puteţi anula operaţia în timpul procesului de comutare.Timpul necesar pentru scanarea dispozitivelor este determinat denumărul de dispozitive conectate.După nalizarea scanării dispozitivelor, numărul dispozitivelor găsite nu este aşat.Cu toate că televizorul scanează automat dispozitivele cândeste pornit de la butonul POWeR, dispozitivele conectate când televizorul este pornit sau în alte stări nu
sunt aşate în lista de dispozitive. Prin urmare, pentru a căuta dispozitive, selectaţi meniul SearchingConnections (Căutare conexiuni).Dacă aţi selectat modul de intrare externă, apăsând butonul SOURCE, nu puteţi utiliza funcţia Anynet+. Asiguraţi-vă că aţi comutat la un dispozitiv Anynet+ utilizând butonul Anynet+.
➣
➣
➣
➣
➣
Configurare
Anynet+ (HDMI-CEC) : Off
Oprire automată : Off
Searching Connections
Intrare RevenireMutare
Oprit
Activat
Configurare
Anynet+ (HDMI-CEC) :Activat
Oprire automată : Off
Searching Connections
Intrare RevenireMutare
Oprit
Activat
IntrareMutare
Vizionare TV
Selectare dispozitiv
Înregistrare
Meniu pe echipament
Operare dispozitiv
Receptor : Oprit
Configurare
TV P
Ieşire
Configurare
Anynet+ (HDMI-CEC) : Activat
Oprire automată : Activat
Searching Connections
Intrare RevenireMutare
IntrareMutare
Vizionare TV
Selectare dispozitiv
Înregistrare
Meniu pe echipament
Operare dispozitiv
Receptor : Oprit
Configurare
TV P
Revenire
DVDRDVDRDVDDVD
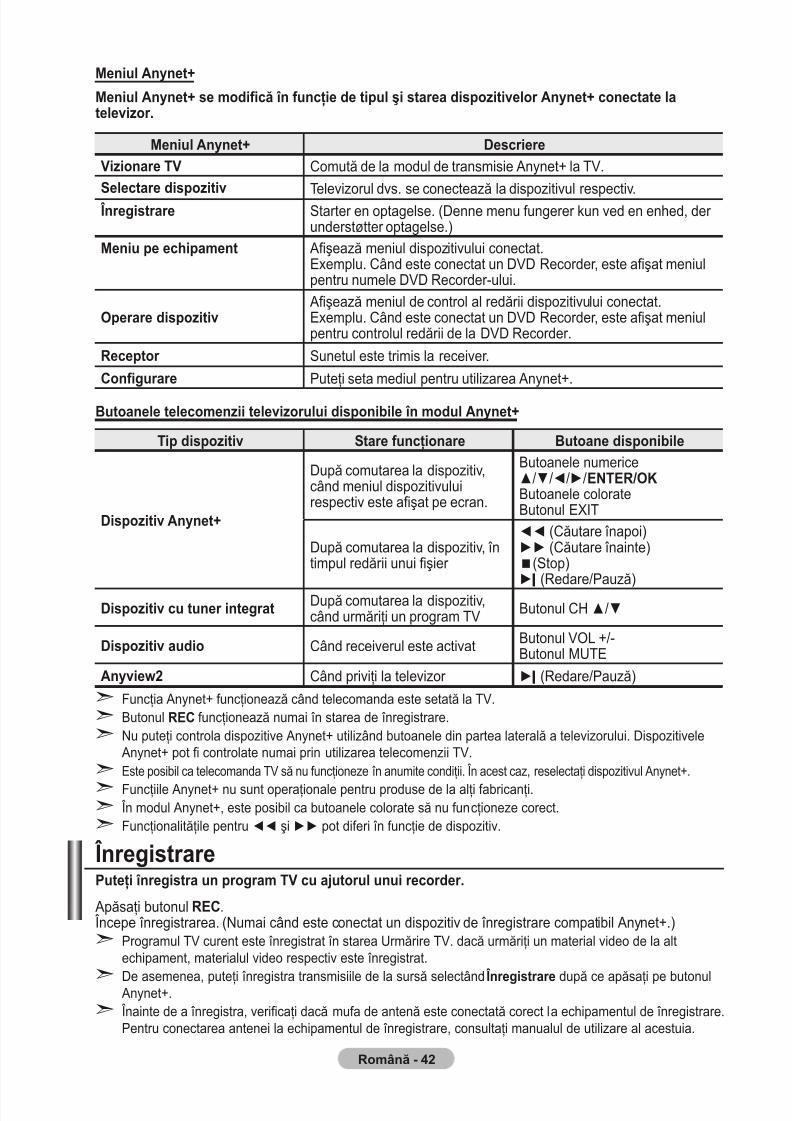
7/30/2019 Samsung LCD TV Eng Rom
http://slidepdf.com/reader/full/samsung-lcd-tv-eng-rom 89/92
Română -
Meniul Anynet+
Meniul Anynet+ se modifică în funcţie de tipul şi starea dispozitivelor Anynet+ conectate latelevizor.
Meniul Anynet+ DescriereVizionare TV Comută de la modul de transmisie Anynet+ la TV.
Selectare dispozitiv Televizorul dvs. se conectează la dispozitivul respectiv. Înregistrare Starter en optagelse. (Denne menu fungerer kun ved en enhed, der understøtter optagelse.)
Meniu pe echipament Afişează meniul dispozitivului conectat.Exemplu. Când este conectat un DVD Recorder, este afişat meniulpentru numele DVD Recorder-ului.
Operare dispozitiv Afişează meniul de control al redării dispozitivului conectat.Exemplu. Când este conectat un DVD Recorder, este afişat meniulpentru controlul redării de la DVD Recorder.
Receptor Sunetul este trimis la receiver.
Configurare Puteţi seta mediul pentru utilizarea Anynet+.
Butoanele telecomenzii televizorului disponibile în modul Anynet+
Tip dispozitiv Stare funcţionare Butoane disponibile
Dispozitiv Anynet+
După comutarea la dispozitiv,când meniul dispozitivuluirespectiv este afişat pe ecran.
Butoanele numerice▲/▼/◄/►/enteR/OK
Butoanele colorateButonul EXIT
După comutarea la dispozitiv, întimpul redării unui fişier
◄◄ (Căutare înapoi)►► (Căutare înainte)(Stop)
►
(Redare/Pauză)Dispozitiv cu tuner integrat După comutarea la dispozitiv,
când urmăriţi un program TV Butonul CH ▲/▼
Dispozitiv audio Când receiverul este activat Butonul VOL +/-Butonul MUTE
Anyview Când priviţi la televizor ► (Redare/Pauză)
Funcţia Anynet+ funcţionează când telecomanda este setată la TV.Butonul ReC funcţionează numai în starea de înregistrare.Nu puteţi controla dispozitive Anynet+ utilizând butoanele din partea laterală a televizorului. Dispozitivele Anynet+ pot controlate numai prin utilizarea telecomenzii TV.Este posibil ca telecomanda TV să nu funcţioneze în anumite condiţii. În acest caz, reselectaţi dispozitivul Anynet+.
Funcţiile Anynet+ nu sunt operaţionale pentru produse de la alţi fabricanţi. În modul Anynet+, este posibil ca butoanele colorate să nu funcţioneze corect.Funcţionalităţile pentru ◄◄ şi ►► pot diferi în funcţie de dispozitiv.
➣
➣
➣
➣
➣
➣
➣
ÎnregistrarePuteţi înregistra un program TV cu ajutorul unui recorder.
Apăsaţi butonul ReC. Începe înregistrarea. (Numai când este conectat un dispozitiv de înregistrare compatibil Anynet+.)
Programul TV curent este înregistrat în starea Urmărire TV. dacă urmăriţi un material video de la altechipament, materialul video respectiv este înregistrat.
De asemenea, puteţi înregistra transmisiile de la sursă selectând Înregistrare după ce apăsaţi pe butonul Anynet+. Înainte de a înregistra, vericaţi dacă mufa de antenă este conectată corect la echipamentul de înregistrare.Pentru conectarea antenei la echipamentul de înregistrare, consultaţi manualul de utilizare al acestuia.
➣
➣
➣
7/30/2019 Samsung LCD TV Eng Rom
http://slidepdf.com/reader/full/samsung-lcd-tv-eng-rom 90/92
Română - 3
Elemente de vericat înainte de a solicita asistenţă tehnicăSimptom SoluţieAnynet+ nufuncţionează.
■ Verificaţi dacă dispozitivul este compatibil Anynet+. Sistemul Anynet+ acceptă numaidispozitive AV compatibile Anynet+.
■ Conectaţi un singur receptor.■ verificaţi dacă cablul de alimentare al dispozitivului Anynet+ este conectat corect.■ Verificaţi conexiunile cablurilor Video/Audio/HDMI ale dispozitivului Anynet+.■ Verificaţi dacă funcţia Anynet+ (HDMI-CEC) este setată la Activat (On) în meniul de
configurare Anynet+.■ Verificaţi dacă telecomanda televizorului se află în modul TV.■ Verificaţi dacă este o telecomandă destinată exclusiv sistemului Anynet+.■ Anynet+ nu funcţionează în anumite condiţii. (Căutare canale)■ La conectarea sau deconectarea cablului HDMI, trebuie să căutaţi echipamentele din
nou sau să reporniţi televizorul.■ Verificaţi dacă funcţia Anynet+ a echipamentului compatibil Anynet+ este activată.
Vreau să activezAnynet+.
■ Verificaţi dacă dispozitivul Anynet+ este conectat corect la televizor şi verificaţidacă opţiunea Anynet+ (HDMI-CEC) este setată la Activat în meniul Anynet+ Setup(Configurare Anynet+).
■ Apăsaţi butonul TV de pe telecomanda televizorului pentru a comuta la televizor. Apoiapăsaţi butonul Anynet+ pentru a afişa meniul Anynet+ şi selectaţi meniul dorit.
Vreau să ies dinAnynet+.
■ Selectaţi Urmărire TV din meniul Anynet+.■ Apăsaţi butonul SOURCE de pe telecomanda televizorului şi selectaţi un dispozitiv
diferit de dispozitivele Anynet+.■ Apăsaţi oricare din butoanele CH, CH LIST, PRE-CH, şi altele similare pentru a
comuta la modul TV. (Reţineţi că butonul pentru canal funcţionează numai dacă este
conectat un dispozitiv Anynet+ cu tuner integrat.)Mesajul Conectare ladispozitiv Anynet+…apare pe ecran.
■ Nu puteţi utiliza telecomanda în timpul configurării Anynet+ sau în timpul comutăriila un mod de vizionare.
■ Utilizaţi telecomanda după finalizarea configurării Anynet+ sau a comutării lamodul de vizionare.
Dispozitivul Anynet+nu redă. Nu puteţi utiliza funcţia de redare în timpul stabilirii unei conexiuni Plug & Play.
Dispozitivul conectatnu este afişat.
■ Verificaţi dacă dispozitivul acceptă sau nu funcţii Anynet+.■ Verificaţi dacă cablul HDMI este conectat corect.■ Verificaţi dacă funcţia <Anynet+ (HDMI-CEC)> este setată la <Activat> în meniul
de configurare Anynet+.■ Căutaţi din nou dispozitive Anynet+.■ Puteţi conecta un dispozitiv Anynet+ numai dacă utilizaţi cablul HDMI. Este posibil
ca unele cabluri HDMI să nu accepte funcţii Anynet+.Programul TV nupoate fi înregistrat.
Nu puteţi utiliza funcţia de redare în timpul desfăşurării unei scanări automate acanalelor. Întrerupeţi funcţia care rulează în prezent.
Ascultarea printr-un receptor Puteţi asculta sunetul printr-un receptor în locul boxelor televizorului.. Apăsaţi butonul Anynet+.
Apăsaţi butonul ▲ sau ▼ pentru a selecta Receiver , apoiapăsaţi butonul enteR.
. Apăsaţi butonul ◄ sau ► pentru a selecta Activat, apoiapăsaţi butonul enteR.
Acum puteţi asculta sunetul prin receptor.3. Apăsaţi butonul EXIT pentru a părăsi meniul.
Când receiverul este setat la Activat, puteţi asculta sunetul de latelevizor prin receptorul cu 2 canale.Dacă receptorul este destinat exclusiv funcţionării cu un sistemHome Theater (suportă numai semnal audio), este posibil să nuapară în lista de dispozitive.
În cazul unui conţinut cu probleme de copyright, este posibil ca ascultarea prin receptor să nu funcţioneze bine.Când ascultaţi prin receiver, există restricţii în privinţa utilizării PIP şi a meniului pentru sunet.
➣
➣
➣
➣
IntrareMutare
Vizionare TV
Selectare dispozitiv
Înregistrare
Meniu pe echipament
Operare dispozitiv
Receptor : Activat
Configurare
TV P
Ieşire
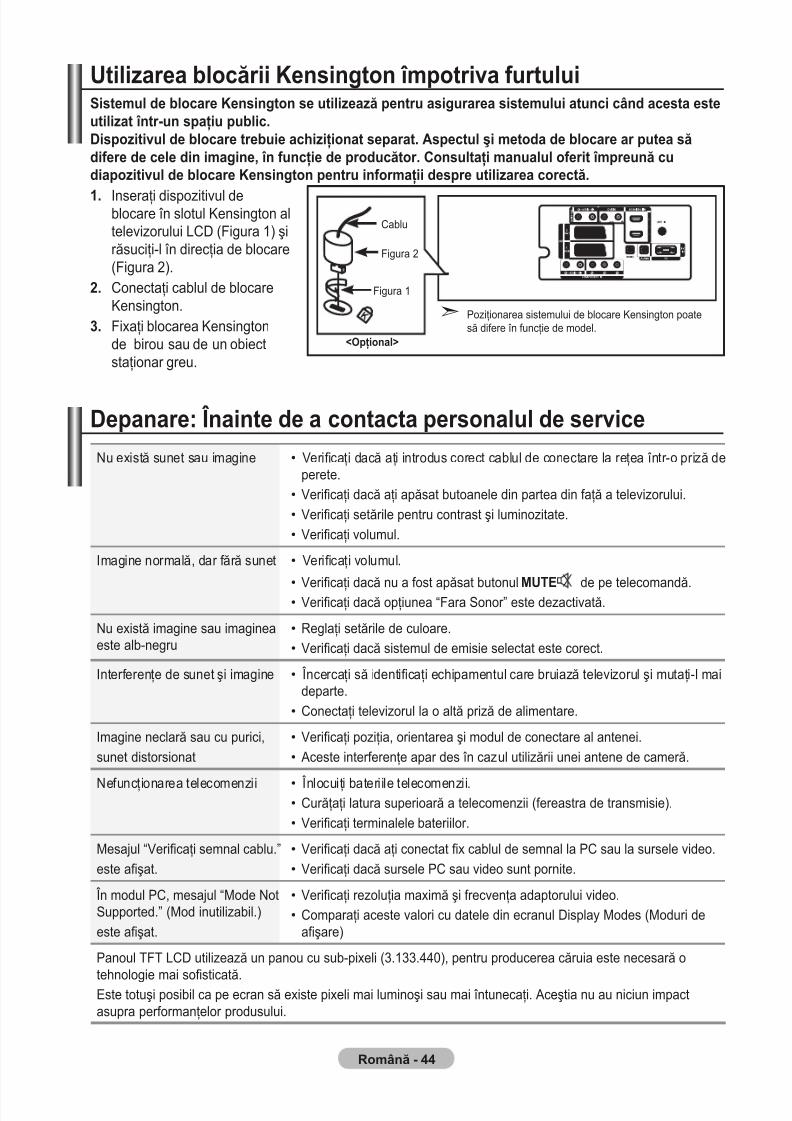
7/30/2019 Samsung LCD TV Eng Rom
http://slidepdf.com/reader/full/samsung-lcd-tv-eng-rom 91/92
Română -
Utilizarea blocării Kensington împotriva furtuluiSistemul de blocare Kensington se utilizează pentru asigurarea sistemului atunci când acesta esteutilizat într-un spaţiu public.Dispozitivul de blocare trebuie achiziţionat separat. Aspectul şi metoda de blocare ar putea sădifere de cele din imagine, în funcţie de producător. Consultaţi manualul oferit împreună cudiapozitivul de blocare Kensington pentru informaţii despre utilizarea corectă.
. Inseraţi dispozitivul deblocare în slotul Kensington altelevizorului LCD (Figura 1) şirăsuciţi-l în direcţia de blocare(Figura 2).
. Conectaţi cablul de blocareKensington.
3. Fixaţi blocarea Kensingtonde birou sau de un obiectstaţionar greu.
Depanare: Înainte de a contacta personalul de serviceNu există sunet sau imagine Vericaţi dacă aţi introdus corect cablul de conectare la reţea într-o priză de
perete.Vericaţi dacă aţi apăsat butoanele din partea din faţă a televizorului.Vericaţi setările pentru contrast şi luminozitate.Vericaţi volumul.
•
•
•
•
Imagine normală, dar fără sunet Vericaţi volumul.
Vericaţi dacă nu a fost apăsat butonul MUTE de pe telecomandă.Vericaţi dacă opţiunea “Fara Sonor” este dezactivată.
•
•
•
Nu există imagine sau imagineaeste alb-negru
Reglaţi setările de culoare.Vericaţi dacă sistemul de emisie selectat este corect.
•
•
Interferenţe de sunet şi imagine Încercaţi să identicaţi echipamentul care bruiază televizorul şi mutaţi-l maideparte.Conectaţi televizorul la o altă priză de alimentare.
•
•
Imagine neclară sau cu purici,sunet distorsionat
Vericaţi poziţia, orientarea şi modul de conectare al antenei. Aceste interferenţe apar des în cazul utilizării unei antene de cameră.
•
•
Nefuncţionarea telecomenzii Înlocuiţi bateriile telecomenzii.Curăţaţi latura superioară a telecomenzii (fereastra de transmisie).Vericaţi terminalele bateriilor.
•
•
•
Mesajul “Vericaţi semnal cablu.”este aşat.
Vericaţi dacă aţi conectat x cablul de semnal la PC sau la sursele video.Vericaţi dacă sursele PC sau video sunt pornite.
•
•
În modul PC, mesajul “Mode NotSupported.” (Mod inutilizabil.)este aşat.
Vericaţi rezoluţia maximă şi frecvenţa adaptorului video.Comparaţi aceste valori cu datele din ecranul Display Modes (Moduri deaşare)
•
•
Panoul TFT LCD utilizează un panou cu sub-pixeli (3.133.440), pentru producerea căruia este necesară o
tehnologie mai sosticată.Este totuşi posibil ca pe ecran să existe pixeli mai luminoşi sau mai întunecaţi. Aceştia nu au niciun impactasupra performanţelor produsului.
Cablu
Figura 2
Figura 1
<Opţional>
Poziţionarea sistemului de blocare Kensington poatesă difere în funcţie de model.
➣
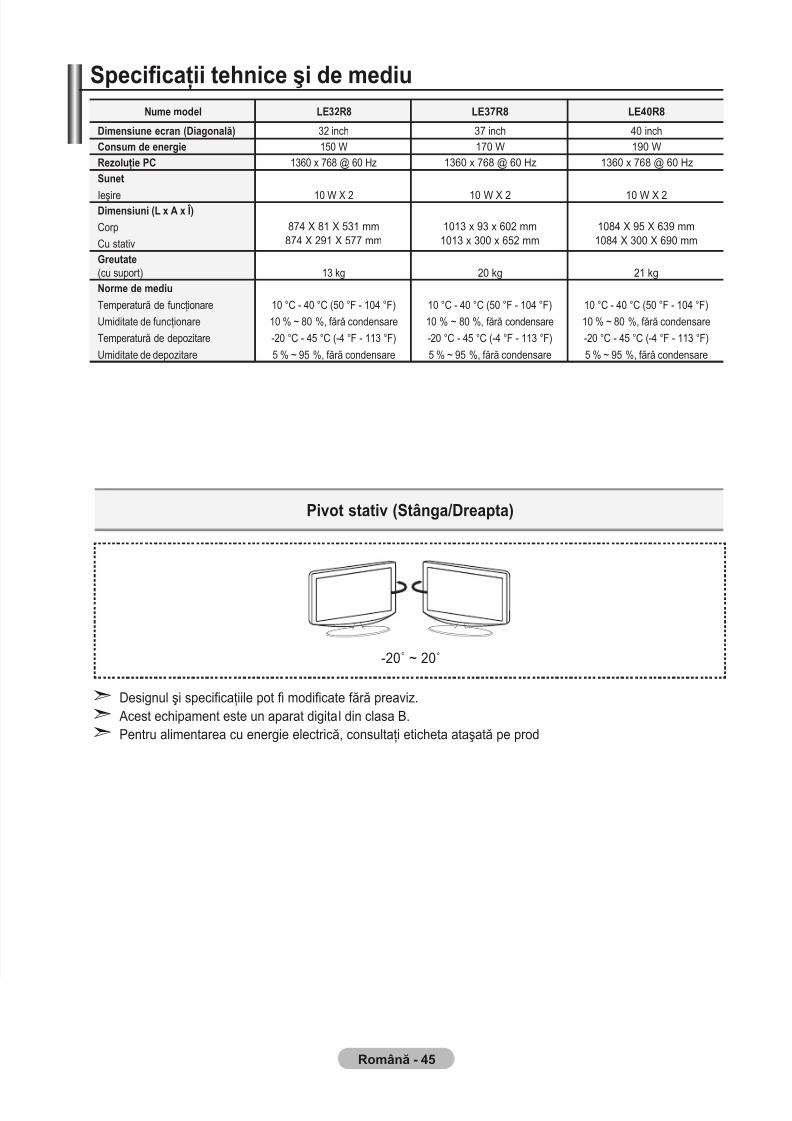
7/30/2019 Samsung LCD TV Eng Rom
http://slidepdf.com/reader/full/samsung-lcd-tv-eng-rom 92/92
Specicaţii tehnice şi de mediuNume model LE3R LE3R LE0R
Dimensiune ecran (Diagonală) 32 inch 37 inch 40 inch
Consum de energie 150 W 170 W 190 WRezoluţie PC 1360 x 768 @ 60 Hz 1360 x 768 @ 60 Hz 1360 x 768 @ 60 HzSunet
Ieşire 10 W X 2 10 W X 2 10 W X 2Dimensiuni (L x A x Î)Corp
Cu stativ
874 X 81 X 531 mm 874 X 291 X 577 mm
1013 x 93 x 602 mm 1013 x 300 x 652 mm
1084 X 95 X 639 mm 1084 X 300 X 690 mm
Greutate(cu suport) 13 kg 20 kg 21 kgNorme de mediuTemperatură de funcţionare
Umiditate de funcţionare
Temperatură de depozitare
Umiditate de depozitare
10 °C - 40 °C (50 °F - 104 °F)
10 % ~ 80 %, fără condensare
-20 °C - 45 °C (-4 °F - 113 °F)
5 % ~ 95 %, fără condensare
10 °C - 40 °C (50 °F - 104 °F)
10 % ~ 80 %, fără condensare
-20 °C - 45 °C (-4 °F - 113 °F)
5 % ~ 95 %, fără condensare
10 °C - 40 °C (50 °F - 104 °F)
10 % ~ 80 %, fără condensare
-20 °C - 45 °C (-4 °F - 113 °F)
5 % ~ 95 %, fără condensare
Pivot stativ (Stânga/Dreapta)
Designul şi specicaţiile pot modicate fără preaviz. Acest echipament este un aparat digital din clasa B.Pentru alimentarea cu energie electrică, consultaţi eticheta ataşată pe prod
➣
➣
➣
-20˚ ~ 20˚


![Samsung Electronics Bedienungsanleitung f¼r Samsung Apps [auf dem PC]](https://static.fdokument.com/doc/165x107/613d74dd736caf36b75d8c6a/samsung-electronics-bedienungsanleitung-fr-samsung-apps-auf-dem-pc.jpg)