STAUBSAUGER ZIEHEN · 2018-10-31 · Nunca lave el filtro en una lavadora. Secar el filtro a fondo...
10
MANUAL DE USUARIO Y LETRA DE GARANTÍA STAUBSAUGER ZIEHEN Aspiradora arrastre
Transcript of STAUBSAUGER ZIEHEN · 2018-10-31 · Nunca lave el filtro en una lavadora. Secar el filtro a fondo...

M A N U A L D E U S U A R I O Y L E T R A D E G A R A N T Í A
STAUBSAUGER ZIEHENAspiradora arrastre
Manual de Instrucciones
STAUBSAUGER ZIEHENUT-SILENT1402220V-240V AC, 50/60 HZ, 1400W
SEGURIDAD ELECTRICA
Desconecte y desenchufe cuando no esté en uso y antes de vaciar o limpiar el aparato.- Mantenga el aparato y su cable fuera del alcance de los niños menores de 8 años.- No permita que los niños utilicen el aparato sin supervisión.- Este aparato puede ser utilizado por niños de 8 años o más y personas con capacidades físicas, sensoriales o mentales reducidas o por la falta de experiencia y conocimiento si han recibido supervisión o instrucciones sobre el uso del aparato de forma segura y entienden el Peligros involucrados. Los niños no deben jugar con el aparato. La limpieza y el mantenimiento del usuario no deben ser realizados por niños a menos que sean mayores de 8 años y supervisados.- Mantenga el aparato, el cable y el enchufe alejados de las áreas donde es probable que se salpicen. Nunca sumerja en agua.- No tire del cable para desconectarlo de la red eléctrica.- No opere la aspiradora si está dañada o después de que funcione mal. En caso de que el cable de alimentación esté dañado, sólo debe ser reemplazado por un técnico cualificado con una pieza aprobada.- Este aparato debe colocarse de forma que el enchufe sea accesible y la toma de corriente esté a poca distancia del cable de alimentación.
PELIGRO!
- No utilice el aparato para recoger objetos ardientes o calientes (por ejemplo, carbón, cenizas, cigarrillos, etc.) de cualquier tipo. - No haga funcionar el aparato por el cable de alimentación.- No utilice el aparato para recoger líquidos ni para su uso en superficies mojadas.- No cubra el aparato ni restrinja las ventilas.- No utilice el aparato para recoger objetos cortantes (por ejemplo, clavos, tachuelas, grapas, etc.) o cuerdas.
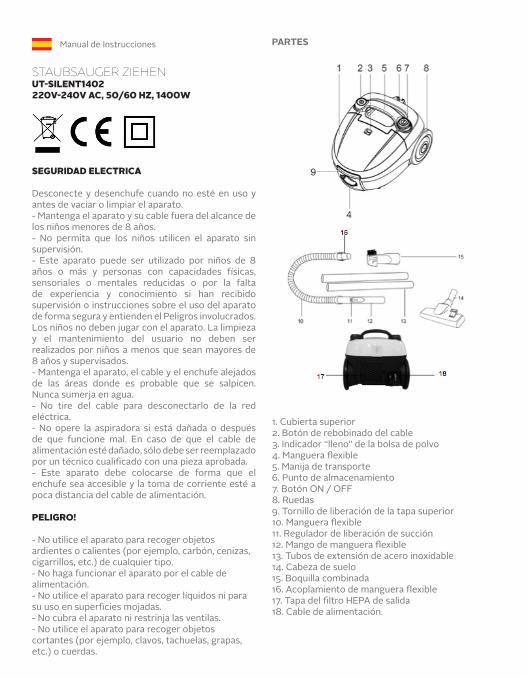
PARTES
1. Cubierta superior2. Botón de rebobinado del cable3. Indicador “lleno” de la bolsa de polvo4. Manguera flexible5. Manija de transporte6. Punto de almacenamiento7. Botón ON / OFF8. Ruedas9. Tornillo de liberación de la tapa superior10. Manguera flexible11. Regulador de liberación de succión12. Mango de manguera flexible13. Tubos de extensión de acero inoxidable14. Cabeza de suelo15. Boquilla combinada16. Acoplamiento de manguera flexible17. Tapa del filtro HEPA de salida18. Cable de alimentación.
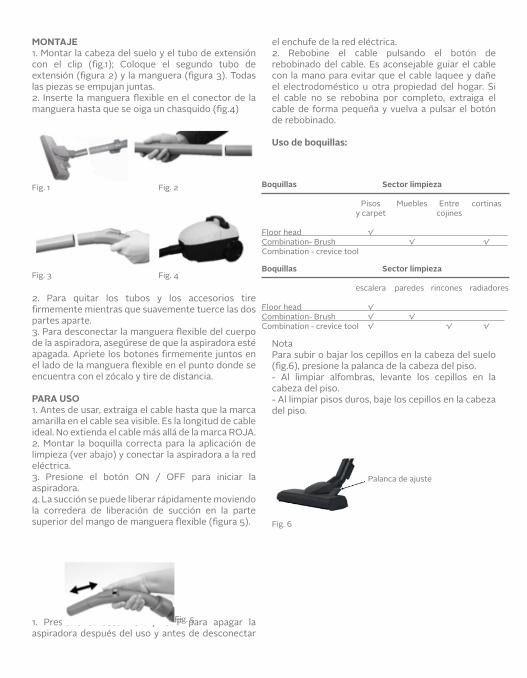
MONTAJE1. Montar la cabeza del suelo y el tubo de extensión con el clip (fig.1); Coloque el segundo tubo de extensión (figura 2) y la manguera (figura 3). Todas las piezas se empujan juntas.2. Inserte la manguera flexible en el conector de la manguera hasta que se oiga un chasquido (fig.4)
2. Para quitar los tubos y los accesorios tire firmemente mientras que suavemente tuerce las dos partes aparte.3. Para desconectar la manguera flexible del cuerpo de la aspiradora, asegúrese de que la aspiradora esté apagada. Apriete los botones firmemente juntos en el lado de la manguera flexible en el punto donde se encuentra con el zócalo y tire de distancia.
PARA USO1. Antes de usar, extraiga el cable hasta que la marca amarilla en el cable sea visible. Es la longitud de cable ideal. No extienda el cable más allá de la marca ROJA.2. Montar la boquilla correcta para la aplicación de limpieza (ver abajo) y conectar la aspiradora a la red eléctrica.3. Presione el botón ON / OFF para iniciar la aspiradora.4. La succión se puede liberar rápidamente moviendo la corredera de liberación de succión en la parte superior del mango de manguera flexible (figura 5).
1. Presione el botón ON / OFF para apagar la aspiradora después del uso y antes de desconectar
el enchufe de la red eléctrica.2. Rebobine el cable pulsando el botón de rebobinado del cable. Es aconsejable guiar el cable con la mano para evitar que el cable laquee y dañe el electrodoméstico u otra propiedad del hogar. Si el cable no se rebobina por completo, extraiga el cable de forma pequeña y vuelva a pulsar el botón de rebobinado.
Uso de boquillas:
NotaPara subir o bajar los cepillos en la cabeza del suelo (fig.6), presione la palanca de la cabeza del piso.- Al limpiar alfombras, levante los cepillos en la cabeza del piso.- Al limpiar pisos duros, baje los cepillos en la cabeza del piso.
Boquillas Sector limpieza
Pisos Muebles Entre cortinas y carpet cojines
Floor head √ Combination- Brush √ √ Combination - crevice tool
Boquillas Sector limpieza
escalera paredes rincones radiadores
Floor head √ Combination- Brush √ √ Combination - crevice tool √ √ √
Fig. 6
Palanca de ajuste
Fig. 5
Fig. 3
Fig. 1
Fig. 4
Fig. 2
MANTENIMIENTO
Para garantizar que la aspiradora funcione a la máxima eficiencia, asegúrese de que la bolsa de polvo se vacíe y los filtros de aire se laven con regularidad. Desconecte y desconecte la red eléctrica antes de realizar el mantenimiento.
Cambiar y vaciar la bolsa1. El indicador de “polvo lleno” se pondrá rojo cuando haya llegado el momento de vaciar la bolsa de polvo, apagarlo de la red eléctrica, soltar el seguro y levantar la tapa superior (figura 7).2. Desenganche la bolsa de polvo y levante la bolsa de polvo del soporte (figura 8). Deslice el clip de la bolsa de polvo(Figura 9) y vaciar el contenido de la bolsa en un cubo de basura. Si la bolsa de polvo se obstruye, tómela afuera y tóquela suavemente para liberar el taponamiento.3. Cierre la bolsa, vuelva a colocar el clip y vuelva a colocar la bolsa en el soporte
Limpiar filtros1. La frecuencia de limpieza de los filtros dependerá del uso de los aparatos. Como guía deben ser limpiados después de 2-3 meses. Apague la aspiradora y desconéctela de la red eléctrica.2. Para limpiar el filtro del motor, levante la cubierta superior, extraiga la bolsa de polvo (figs. 7 y 8) y deslice el filtro.3. Lavar en agua tibia hasta que el agua se aclare. Nunca lave el filtro en una lavadora. Secar el filtro a fondo antes de volver a montar.4. Vuelva a colocar la bolsa de polvo y cierre la cubierta.
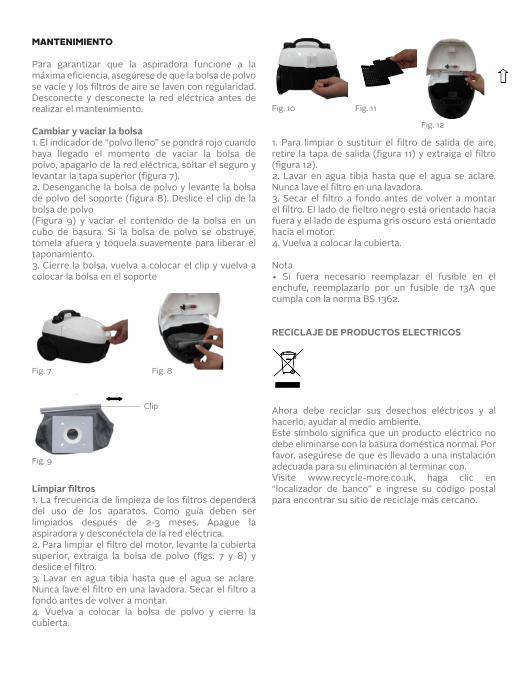
1. Para limpiar o sustituir el filtro de salida de aire, retire la tapa de salida (figura 11) y extraiga el filtro (figura 12).2. Lavar en agua tibia hasta que el agua se aclare. Nunca lave el filtro en una lavadora.3. Secar el filtro a fondo antes de volver a montar el filtro. El lado de fieltro negro está orientado hacia fuera y el lado de espuma gris oscuro está orientado hacia el motor.4. Vuelva a colocar la cubierta.
Nota• Si fuera necesario reemplazar el fusible en el enchufe, reemplazarlo por un fusible de 13A que cumpla con la norma BS 1362.
RECICLAJE DE PRODUCTOS ELECTRICOS
Ahora debe reciclar sus desechos eléctricos y al hacerlo, ayudar al medio ambiente.Este símbolo significa que un producto eléctrico no debe eliminarse con la basura doméstica normal. Por favor, asegúrese de que es llevado a una instalación adecuada para su eliminación al terminar con.Visite www.recycle-more.co.uk, haga clic en “localizador de banco” e ingrese su código postal para encontrar su sitio de reciclaje más cercano.
Fig. 7 Fig. 8
Clip
Fig. 9
Fig. 12
Fig. 10 Fig. 11
Instruction Manual
STAUBSAUGER ZIEHENUT-SILENT1402220V-240V AC, 50/60 HZ, 1400W
ELECTRICAL SAFETY
- Switch off and unplug when not in use and before emptying or cleaning the appliance.- Keep the appliance and its cord out of reach of children less than 8 years.- Do not allow children to use the appliance without supervision.- This appliance can be used by children aged from 8 years and above and persons with reduced physical, sensory or mental capabilities or lack of experience and knowledge if they have been given supervision or instruction concerning use of the appliance in a safe way and understand the hazards involved. Children shall not play with the appliance. Cleaning and user maintenance shall not be made by children unless they are older than 8 and supervised.- Keep appliance, cable and plug away from areas where it is likely to get splashed. Never immerse in water.- Do not pull on cable to disconnect from mains supply.- Do not operate the vacuum cleaner if damaged or after it malfunctions. In the event the supply cord is damaged, it must only be replaced by a qualified service engineer, with a suitably approved part.- This appliance must be positioned so that the plug is accessible and the plug socket is within easy reach of the power cord.
WARNING!
- Do not run the appliance over the power cable.- Do not use the appliance to pick up burning or hot objects (e.g. coal, ash, cigarettes etc.) of any kind.- Do not use the appliance to pick up any liquids or use on wet surfaces.- Do not cover the appliance or restrict air vents.- Do not use the appliance to pick up sharp objects (e.g. pins, nails, tacks, staples etc.) or string.from areas where it is likely to get splashed. Never immerse in water.approved part.
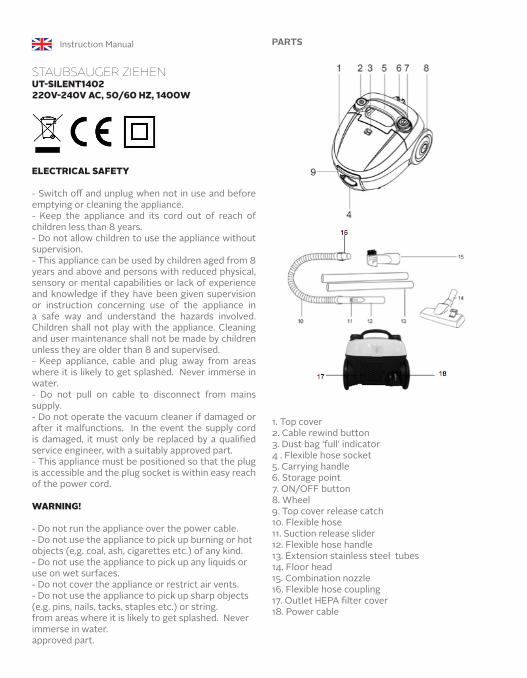
PARTS
1. Top cover2. Cable rewind button3. Dust bag ‘full’ indicator4 . Flexible hose socket5. Carrying handle6. Storage point7. ON/OFF button8. Wheel9. Top cover release catch10. Flexible hose11. Suction release slider12. Flexible hose handle13. Extension stainless steel tubes14. Floor head15. Combination nozzle16. Flexible hose coupling17. Outlet HEPA filter cover18. Power cable

ASSEMBLY1. Assemble the floor head and the extension tube with the clip (fig. 1); fit the second extension tube (fig. 2) and the hose (fig. 3). All parts push together.2. Insert the flexible hose into the hose socket until a click is heard (fig. 4).
3. To remove the tubes and accessories firmly pull whilst gently twisting the two parts apart.4. To disconnect the flexible hose from the body of the cleaner ensure that vacuum cleaner is switched off. Squeeze the buttons firmly together at the side of the flexible hose at the point where it meets the socket and pull apart.
TO USE1. Before use, pull out the cable until the yellow mark on the cable is visible. This is the ideal cable length. Do not extend the cable beyond the RED mark.2. Fit the correct nozzle for the cleaning application (see below) and plug the vacuum cleaner into the mains supply.3. Press the ON/OFF button to start the vacuum cleaner.4. The suction can be released quickly by moving the suction release slider on the top of the flexible hose handle (fig. 5).
5. Press the ON/OFF button to switch the vacuum cleaner off after use and before disconnecting the plug from the mains supply.
6. Rewind the cable by pressing the cable rewind button. It is advisable to guide the cable with your hand to prevent the cable whipping and damaging the appliance or other household property. If the cable does not rewind completely, pull the cable out a small way and press the rewind button again.
Nozzle use:
NotaPara subir o bajar los cepillos en la cabeza del suelo (fig.6), presione la palanca de la cabeza del piso.- Al limpiar alfombras, levante los cepillos en la cabeza del piso.- Al limpiar pisos duros, baje los cepillos en la cabeza del piso.
Nozzle Cleaning area
Floor & Furniture Between curtains carpet cushions
Floor head √ Combination- Brush √ √ Combination - crevice tool
Boquillas Sector limpieza
stairs walls skirting radiators edges
Floor head √ Combination- Brush √ √ Combination - crevice tool √ √ √
Fig. 6
Adjustment lever
Fig. 3
Fig. 1
Fig. 4
Fig.2
Fig. 5
MAINTENANCE
To ensure the vacuum cleaner works at optimum efficiency ensure that the dust bag is emptied and the air filters are washed regularly. Switch off and disconnect from the mains supply before carrying out maintenance.
Changing and emptying the bag1. The ‘dust full’ indicator will turn red when it is time to empty the dust bag, switch off from the mains supply, release the catch and lift up the top cover (fig. 7).2. Unclip the dust bag and lift the full dust bag out of the holder (fig. 8). Slide off the dust bag clip (fig. 9) and empty the contents of the bag into a dustbin. If the dust bag gets clogged, take it outside and tap it gently to release the clogging.3. Close the bag, replace the clip and refit the bag into the holder.4. Should a replacement bag be required, a pack of disposable Universal Microfibre Bags (item code 121988051) can be purchased from selected stores or via click and collect from the Sainsbury’s website www.sainsburys.co.uk
Cleaning the filters1. The frequency that the filters should be cleaned will depend on appliance usage. As a guide they should be cleaned after 2-3 months. Switch off the vacuum cleaner and disconnect from the mains supply.2. To clean the motor filter, lift the top cover, remove the dust bag (figs 7 & 8) and slide out the filter fig. 10).3. Wash in warm water until the water runs clear. Never wash the filter in a washing machine. Dry the
filter thoroughly before refitting.4. Refit the dust bag and close the cover.
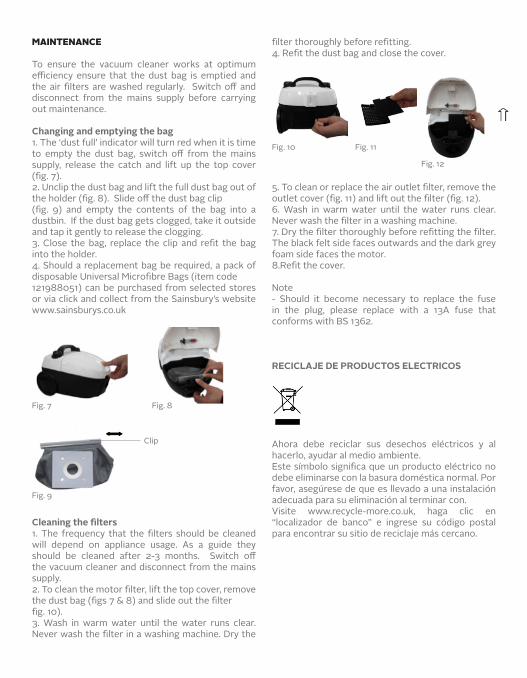
5. To clean or replace the air outlet filter, remove the outlet cover (fig. 11) and lift out the filter (fig. 12).6. Wash in warm water until the water runs clear. Never wash the filter in a washing machine.7. Dry the filter thoroughly before refitting the filter. The black felt side faces outwards and the dark grey foam side faces the motor.8.Refit the cover.
Note- Should it become necessary to replace the fuse in the plug, please replace with a 13A fuse that conforms with BS 1362.
RECICLAJE DE PRODUCTOS ELECTRICOS
Ahora debe reciclar sus desechos eléctricos y al hacerlo, ayudar al medio ambiente.Este símbolo significa que un producto eléctrico no debe eliminarse con la basura doméstica normal. Por favor, asegúrese de que es llevado a una instalación adecuada para su eliminación al terminar con.Visite www.recycle-more.co.uk, haga clic en “localizador de banco” e ingrese su código postal para encontrar su sitio de reciclaje más cercano.
Fig. 7 Fig. 8
Clip
Fig. 9
Fig. 12
Fig. 10 Fig. 11

POLIZA GARANTIA 24 MESES 2014 CR.ai 1 07-03-14 14:59
URSUS TROTTER SMALL APPLIANCES S.A.Una empresa Chilena con precisión Alemana que da confianza
San Pablo 3770- Tel.:28383000 - Fax.: 28383005Casilla 3234- Santiago - Chile
[email protected] - www.ursustrotter.clSujeto a alteración sin previo aviso.
POLIZA GARANTIA 24 MESES 2014 CR.ai 2 07-03-14 14:59

ursustrotter.cl