2018-04 TH Manuel 1 filaire V8 · El Termostato Netatmo se debe instalar en conformidad con la...
17
EN – Replacing a wall-mounted thermostat | Smart Thermostat FR – Vous remplacez un thermostat filaire | Thermostat Connecté IT – Sostituire un termostato a parete | Termostato Intelligente ES – Sustitución de un termostato montado en la pared | Termostato Inteligente DE – Ersetzen eines wand-montierten Thermostat | Smart Thermostat NL – Een wandthermostaat vervangen | Intelligente Thermostaat 1 smart thermostat
-
Upload
nguyenxuyen -
Category
Documents
-
view
216 -
download
0
Transcript of 2018-04 TH Manuel 1 filaire V8 · El Termostato Netatmo se debe instalar en conformidad con la...
EN – Replacing a wall-mounted thermostat | Smart ThermostatFR – Vous remplacez un thermostat filaire | Thermostat Connecté IT – Sostituire un termostato a parete | Termostato Intelligente ES – Sustitución de un termostato montado en la pared | Termostato InteligenteDE – Ersetzen eines wand-montierten Thermostat | Smart ThermostatNL – Een wandthermostaat vervangen | Intelligente Thermostaat
1
smart thermostat
2 3
Read these instructions carefully before starting the installation. The Netatmo Thermostat must be installed according to applicable standards. Before any intervention, make sure power is turned off. The Netatmo Thermostat cannot control electric converters.
Lea estas instrucciones detenidamente antes de comenzar la instalación.El Termostato Netatmo se debe instalar en conformidad con la normativa vigente.Antes de realizar cualquier intervención, compruebe que la alimentación está desconectada.El Termostato Netatmo no puede controlar transformadores eléctricos.
EN ES
Lire attentivement cette notice avant installation.Le Thermostat Netatmo doit être installé selon les normes en vigueur. Avant toute intervention, assurez-vous d’avoir coupé le courant.Le Thermostat Netatmo n’est pas compatible pour le pilotage de convecteurs électriques.
Lesen Sie diese Anweisungen sorgfältig durch, bevor Sie mit der Installation beginnen.Der Netatmo Thermostat muss gemäß den geltenden Normen installiert werden. Vor der Durchführung aller Arbeiten muss die Stromversorgung ausgeschaltet werden.Das Netatmo Thermostat kann keine elektrischen Konverter steuern.
FR DE
IT NLLeggere attentamente queste istruzioni prima di iniziare l’installazione.Il Termostato Netatmo deve essere installato in base agli standard applicabili.Prima di effettuare qualsiasi intervento, assicurarsi che la corrente elettrica sia assente.Il Termostato Netatmo non può controllare convertitori elettrici.
Lees deze instructies zorgvuldig door alvorens te installeren.De Netatmo-thermostaat moet worden geïnstalleerd volgens de geldende normen.Zorg vóór elke ingreep dat de stroomtoevoer wordt uitgeschakeld.De thermostaat van Netatmo kan geen elektrische converters controleren.

4 5
To replace a wall-mounted thermostat, you can watch an installation tutorial video online at the following address:
EN
Pour remplacer un thermostat filaire, une vidéo d’aide à l’installation est disponible à l’adresse ci-dessous :
FR
IT
ES Puedes ver en línea un tutorial de sustitución de un ter-mostato montado en la pared en la siguiente dirección:
DE Für den Austausch eines wand-montierten Thermostats können Sie sich eine Video-Installationshilfe unter folgender Adresse anschauen:
NL Om een muurthermostaat te vervangen, kunt u een online installatievideo bekijken op het volgende adres:
Puoi guardare online un video tutorial sulla sostituzione di un termostato a parete al seguente indirizzo:
https://netatmo.com/video1 https://netatmo.com/video1
6 7
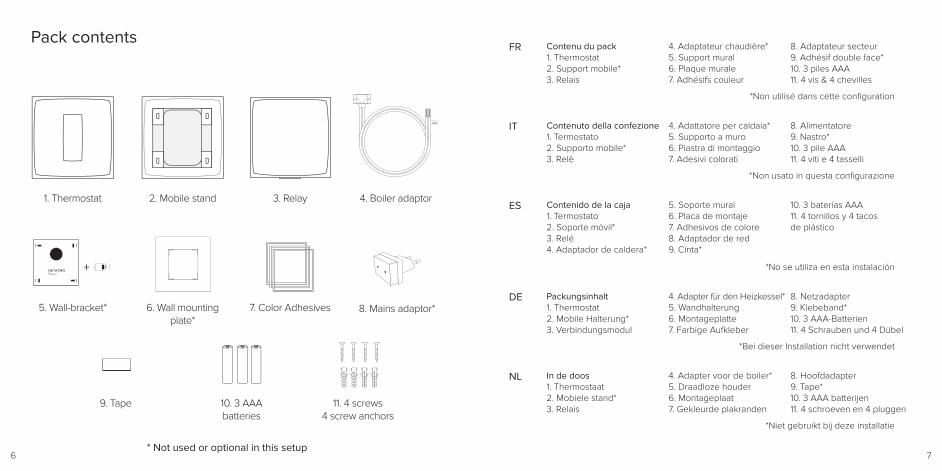
Pack contentsContenu du pack1. Thermostat2. Support mobile*3. Relais
4. Adaptateur chaudière*5. Support mural6. Plaque murale7. Adhésifs couleur
8. Adaptateur secteur9. Adhésif double face*10. 3 piles AAA 11. 4 vis & 4 chevilles
Packungsinhalt1. Thermostat2. Mobile Halterung*3. Verbindungsmodul
4. Adapter für den Heizkessel*5. Wandhalterung6. Montageplatte7. Farbige Aufkleber
8. Netzadapter9. Klebeband*10. 3 AAA-Batterien11. 4 Schrauben und 4 Dübel
In de doos1. Thermostaat2. Mobiele stand*3. Relais
4. Adapter voor de boiler*5. Draadloze houder6. Montageplaat7. Gekleurde plakranden
8. Hoofdadapter9. Tape*10. 3 AAA batterijen11. 4 schroeven en 4 pluggen
Contenido de la caja1. Termostato2. Soporte móvil*3. Relé4. Adaptador de caldera*
5. Soporte mural6. Placa de montaje7. Adhesivos de colore8. Adaptador de red9. Cinta*
10. 3 baterías AAA11. 4 tornillos y 4 tacos de plástico
Contenuto della confezione1. Termostato2. Supporto mobile*3. Relè
4. Adattatore per caldaia*5. Supporto a muro6. Piastra di montaggio7. Adesivi colorati
8. Alimentatore9. Nastro*10. 3 pile AAA11. 4 viti e 4 tasselli
FR
IT
ES
DE
NL
*Niet gebruikt bij deze installatie
*Bei dieser Installation nicht verwendet
*No se utiliza en esta instalación
*Non usato in questa configurazione
*Non utilisé dans cette configuration
+
7. Color Adhesives 8. Mains adaptor*
1. Thermostat 3. Relay 4. Boiler adaptor2. Mobile stand
10. 3 AAA batteries
* Not used or optional in this setup
5. Wall-bracket*
11. 4 screws4 screw anchors
9. Tape
6. Wall mounting plate*
++ +++++
8 9
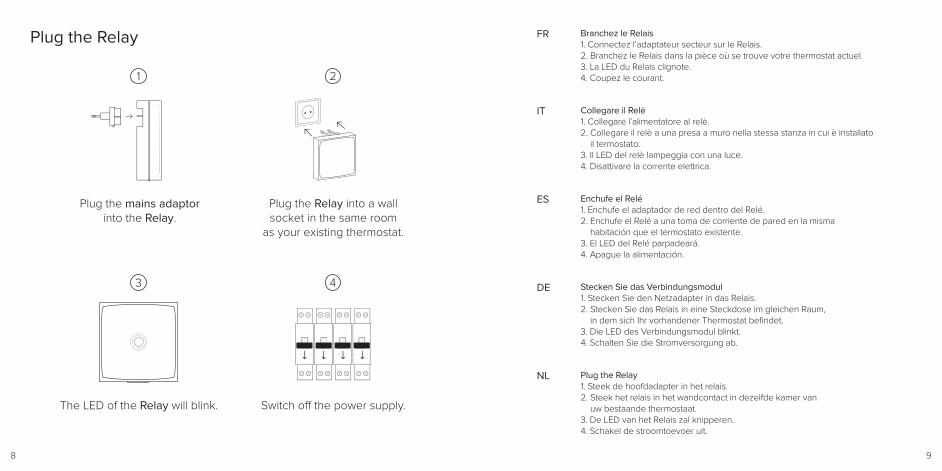
Plug the Relay
Plug the mains adaptor into the Relay.
Plug the Relay into a wallsocket in the same room
as your existing thermostat.
The LED of the Relay will blink. Switch off the power supply.
1
3
2
4
Branchez le Relais1. Connectez l’adaptateur secteur sur le Relais.2. Branchez le Relais dans la pièce où se trouve votre thermostat actuel.3. La LED du Relais clignote.4. Coupez le courant.
FR
Collegare il Relè1. Collegare l’alimentatore al relè.2. Collegare il relè a una presa a muro nella stessa stanza in cui è installato
il termostato.3. Il LED del relè lampeggia con una luce.4. Disattivare la corrente elettrica.
IT
ES
DE Stecken Sie das Verbindungsmodul1. Stecken Sie den Netzadapter in das Relais.2. Stecken Sie das Relais in eine Steckdose im gleichen Raum,
in dem sich Ihr vorhandener Thermostat befindet. 3. Die LED des Verbindungsmodul blinkt. 4. Schalten Sie die Stromversorgung ab.
NL Plug the Relay1. Steek de hoofdadapter in het relais.2. Steek het relais in het wandcontact in dezelfde kamer van
uw bestaande thermostaat. 3. De LED van het Relais zal knipperen.4. Schakel de stroomtoevoer uit.
Enchufe el Relé 1. Enchufe el adaptador de red dentro del Relé.2. Enchufe el Relé a una toma de corriente de pared en la misma
habitación que el termostato existente.3. El LED del Relé parpadeará.4. Apague la alimentación.
10 11
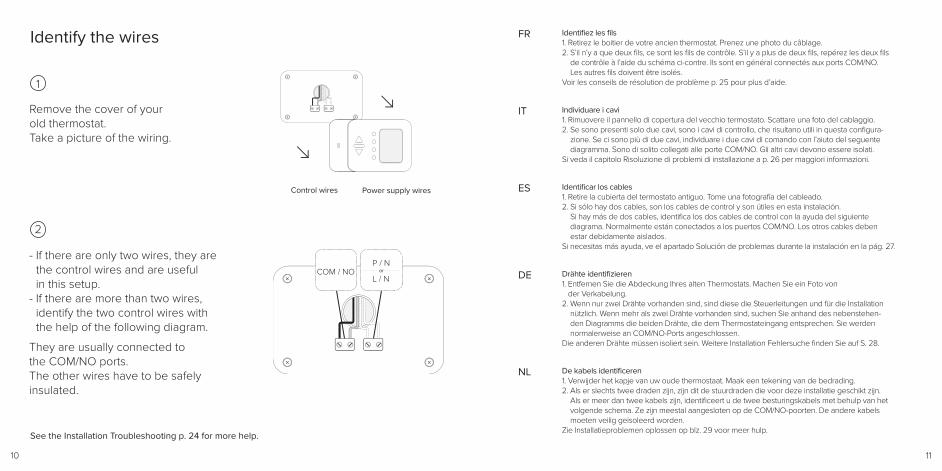
Identify the wires
Remove the cover of your old thermostat.Take a picture of the wiring.
- If there are only two wires, they are the control wires and are useful in this setup.
- If there are more than two wires, identify the two control wires with the help of the following diagram.
They are usually connected to the COM/NO ports. The other wires have to be safely insulated.
1
2
See the Installation Troubleshooting p. 24 for more help.
Identifiez les fils 1. Retirez le boitier de votre ancien thermostat. Prenez une photo du câblage.2. S’il n’y a que deux fils, ce sont les fils de contrôle. S’il y a plus de deux fils, repérez les deux fils
de contrôle à l’aide du schéma ci-contre. Ils sont en général connectés aux ports COM/NO. Les autres fils doivent être isolés.
Voir les conseils de résolution de problème p. 25 pour plus d’aide.
FR
Individuare i cavi1. Rimuovere il pannello di copertura del vecchio termostato. Scattare una foto del cablaggio.2. Se sono presenti solo due cavi, sono i cavi di controllo, che risultano utili in questa configura-
zione. Se ci sono più di due cavi, individuare i due cavi di comando con l’aiuto del seguente diagramma. Sono di solito collegati alle porte COM/NO. Gli altri cavi devono essere isolati.
Si veda il capitolo Risoluzione di problemi di installazione a p. 26 per maggiori informazioni.
IT
ES
DE Drähte identifizieren1. Entfernen Sie die Abdeckung Ihres alten Thermostats. Machen Sie ein Foto von
der Verkabelung.2. Wenn nur zwei Drähte vorhanden sind, sind diese die Steuerleitungen und für die Installation
nützlich. Wenn mehr als zwei Drähte vorhanden sind, suchen Sie anhand des nebenstehen-den Diagramms die beiden Drähte, die dem Thermostateingang entsprechen. Sie werden normalerweise an COM/NO-Ports angeschlossen.
Die anderen Drähte müssen isoliert sein. Weitere Installation Fehlersuche finden Sie auf S. 28.
NL De kabels identificeren1. Verwijder het kapje van uw oude thermostaat. Maak een tekening van de bedrading.2. Als er slechts twee draden zijn, zijn dit de stuurdraden die voor deze installatie geschikt zijn.
Als er meer dan twee kabels zijn, identificeert u de twee besturingskabels met behulp van het volgende schema. Ze zijn meestal aangesloten op de COM/NO-poorten. De andere kabels moeten veilig geïsoleerd worden.
Zie Installatieproblemen oplossen op blz. 29 voor meer hulp.
Identificar los cables1. Retire la cubierta del termostato antiguo. Tome una fotografía del cableado.2. Si sólo hay dos cables, son los cables de control y son útiles en esta instalación.
Si hay más de dos cables, identifica los dos cables de control con la ayuda del siguiente diagrama. Normalmente están conectados a los puertos COM/NO. Los otros cables deben estar debidamente aislados.
Si necesitas más ayuda, ve el apartado Solución de problemas durante la instalación en la pág. 27.
Power supply wiresControl wires
P / N
L / NorCOM / NO
12 13
Replace
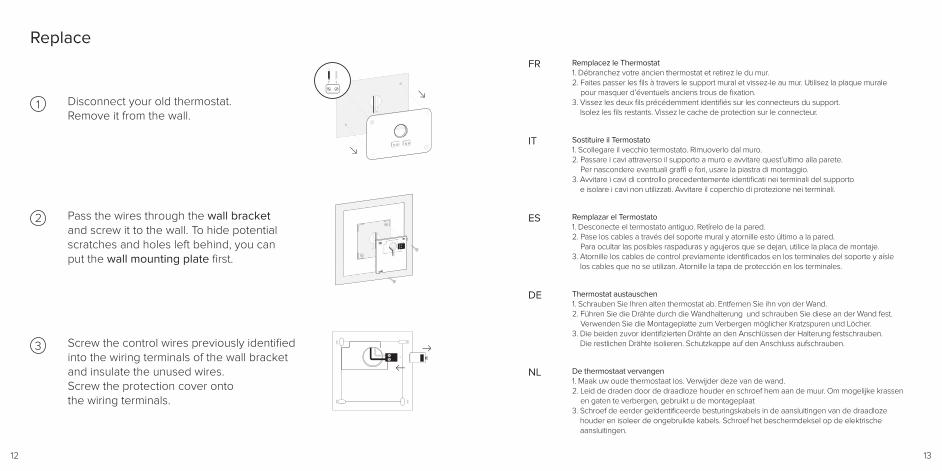
Disconnect your old thermostat.Remove it from the wall.
Pass the wires through the wall bracket and screw it to the wall. To hide potential scratches and holes left behind, you can put the wall mounting plate first.
Screw the control wires previously identified into the wiring terminals of the wall bracket and insulate the unused wires.Screw the protection cover onto the wiring terminals.
1
2
3
Remplacez le Thermostat1. Débranchez votre ancien thermostat et retirez le du mur.2. Faites passer les fils à travers le support mural et vissez-le au mur. Utilisez la plaque murale
pour masquer d’éventuels anciens trous de fixation.3. Vissez les deux fils précédemment identifiés sur les connecteurs du support.
Isolez les fils restants. Vissez le cache de protection sur le connecteur.
FR
Sostituire il Termostato1. Scollegare il vecchio termostato. Rimuoverlo dal muro.2. Passare i cavi attraverso il supporto a muro e avvitare quest’ultimo alla parete.
Per nascondere eventuali graffi e fori, usare la piastra di montaggio.3. Avvitare i cavi di controllo precedentemente identificati nei terminali del supporto
e isolare i cavi non utilizzati. Avvitare il coperchio di protezione nei terminali.
IT
ES
DE Thermostat austauschen1. Schrauben Sie Ihren alten thermostat ab. Entfernen Sie ihn von der Wand.2. Führen Sie die Drähte durch die Wandhalterung und schrauben Sie diese an der Wand fest.
Verwenden Sie die Montageplatte zum Verbergen möglicher Kratzspuren und Löcher.3. Die beiden zuvor identifizierten Drähte an den Anschlüssen der Halterung festschrauben.
Die restlichen Drähte isolieren. Schutzkappe auf den Anschluss aufschrauben.
NL De thermostaat vervangen1. Maak uw oude thermostaat los. Verwijder deze van de wand. 2. Leid de draden door de draadloze houder en schroef hem aan de muur. Om mogelijke krassen
en gaten te verbergen, gebruikt u de montageplaat3. Schroef de eerder geïdentificeerde besturingskabels in de aansluitingen van de draadloze
houder en isoleer de ongebruikte kabels. Schroef het beschermdeksel op de elektrische aansluitingen.
Remplazar el Termostato1. Desconecte el termostato antiguo. Retírelo de la pared.2. Pase los cables a través del soporte mural y atornille esto último a la pared.
Para ocultar las posibles raspaduras y agujeros que se dejan, utilice la placa de montaje.3. Atornille los cables de control previamente identificados en los terminales del soporte y aísle
los cables que no se utilizan. Atornille la tapa de protección en los terminales.
14 15
Customise your Thermostat
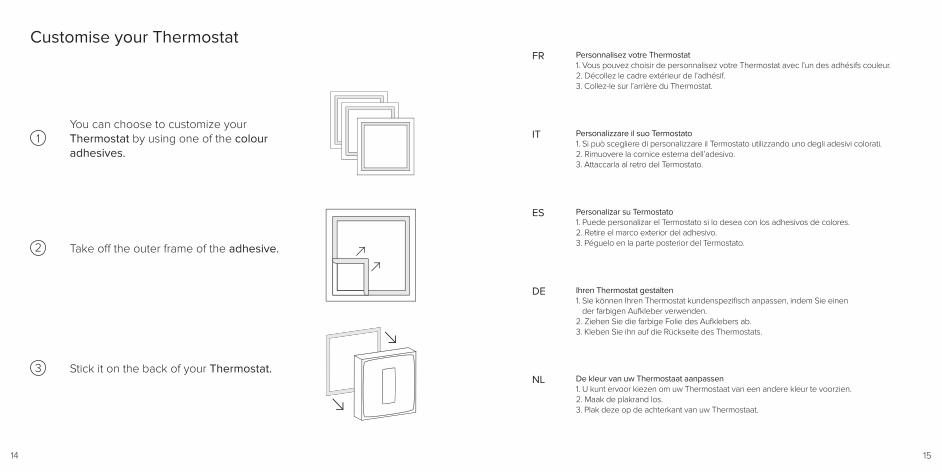
You can choose to customize your Thermostat by using one of the colour adhesives.
Take off the outer frame of the adhesive.
Stick it on the back of your Thermostat.
1
2
3
Personnalisez votre Thermostat1. Vous pouvez choisir de personnalisez votre Thermostat avec l’un des adhésifs couleur.2. Décollez le cadre extérieur de l’adhésif.3. Collez-le sur l’arrière du Thermostat.
FR
Personalizzare il suo Termostato1. Si può scegliere di personalizzare il Termostato utilizzando uno degli adesivi colorati. 2. Rimuovere la cornice esterna dell’adesivo.3. Attaccarla al retro del Termostato.
IT
ES
DE Ihren Thermostat gestalten1. Sie können Ihren Thermostat kundenspezifisch anpassen, indem Sie einen
der farbigen Aufkleber verwenden.2. Ziehen Sie die farbige Folie des Aufklebers ab.3. Kleben Sie ihn auf die Rückseite des Thermostats.
NL De kleur van uw Thermostaat aanpassen1. U kunt ervoor kiezen om uw Thermostaat van een andere kleur te voorzien.2. Maak de plakrand los.3. Plak deze op de achterkant van uw Thermostaat.
Personalizar su Termostato1. Puede personalizar el Termostato si lo desea con los adhesivos de colores.2. Retire el marco exterior del adhesivo.3. Péguelo en la parte posterior del Termostato.
16 17
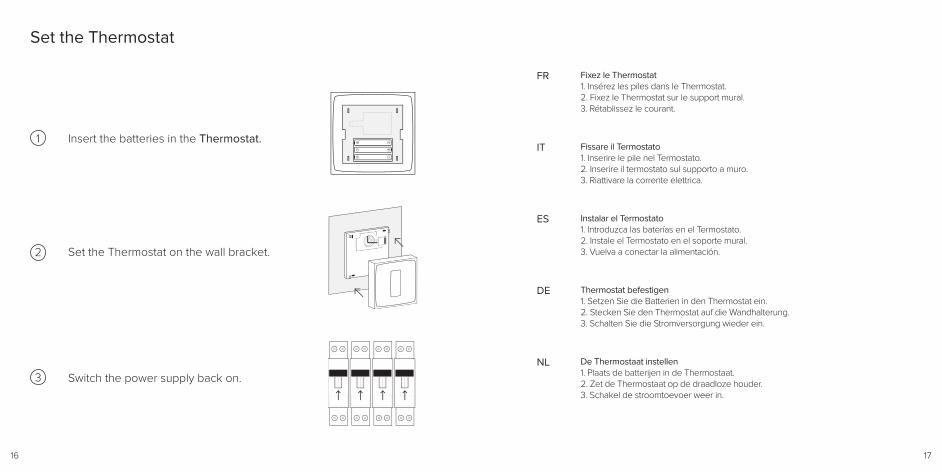
Insert the batteries in the Thermostat.
Set the Thermostat on the wall bracket.
Switch the power supply back on.
Set the Thermostat
1
2
3
Fixez le Thermostat1. Insérez les piles dans le Thermostat.2. Fixez le Thermostat sur le support mural.3. Rétablissez le courant.
FR
Fissare il Termostato1. Inserire le pile nel Termostato.2. Inserire il termostato sul supporto a muro.3. Riattivare la corrente elettrica.
IT
ES
DE Thermostat befestigen1. Setzen Sie die Batterien in den Thermostat ein.2. Stecken Sie den Thermostat auf die Wandhalterung.3. Schalten Sie die Stromversorgung wieder ein.
NL De Thermostaat instellen1. Plaats de batterijen in de Thermostaat.2. Zet de Thermostaat op de draadloze houder.3. Schakel de stroomtoevoer weer in.
Instalar el Termostato1. Introduzca las baterías en el Termostato.2. Instale el Termostato en el soporte mural.3. Vuelva a conectar la alimentación.
18 19
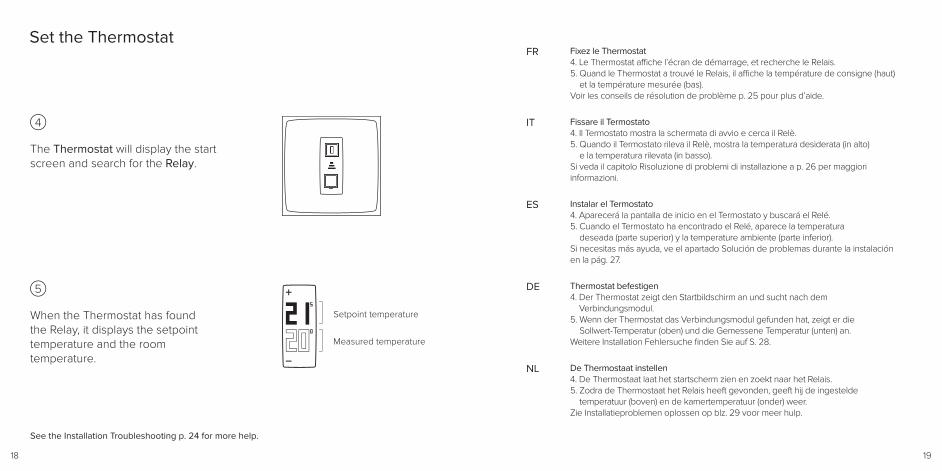
The Thermostat will display the start screen and search for the Relay.
When the Thermostat has found the Relay, it displays the setpoint temperature and the room temperature.
Set the Thermostat
Measured temperature
Setpoint temperature
Fixez le Thermostat4. Le Thermostat affi che l’écran de démarrage, et recherche le Relais.5. Quand le Thermostat a trouvé le Relais, il affi che la température de consigne (haut)
et la température mesurée (bas).Voir les conseils de résolution de problème p. 25 pour plus d’aide.
FR
Fissare il Termostato4. Il Termostato mostra la schermata di avvio e cerca il Relè.5. Quando il Termostato rileva il Relè, mostra la temperatura desiderata (in alto)
e la temperatura rilevata (in basso).Si veda il capitolo Risoluzione di problemi di installazione a p. 26 per maggiori informazioni.
IT
ES
DE Thermostat befestigen4. Der Thermostat zeigt den Startbildschirm an und sucht nach dem
Verbindungsmodul.5. Wenn der Thermostat das Verbindungsmodul gefunden hat, zeigt er die
Sollwert-Temperatur (oben) und die Gemessene Temperatur (unten) an.Weitere Installation Fehlersuche fi nden Sie auf S. 28.
NL De Thermostaat instellen4. De Thermostaat laat het startscherm zien en zoekt naar het Relais.5. Zodra de Thermostaat het Relais heeft gevonden, geeft hij de ingestelde
temperatuur (boven) en de kamertemperatuur (onder) weer.Zie Installatieproblemen oplossen op blz. 29 voor meer hulp.
Instalar el Termostato4. Aparecerá la pantalla de inicio en el Termostato y buscará el Relé.5. Cuando el Termostato ha encontrado el Relé, aparece la temperatura
deseada (parte superior) y la temperature ambiente (parte inferior). Si necesitas más ayuda, ve el apartado Solución de problemas durante la instalación en la pág. 27.
4
5
See the Installation Troubleshooting p. 24 for more help.
2021
5
0
+
20 21
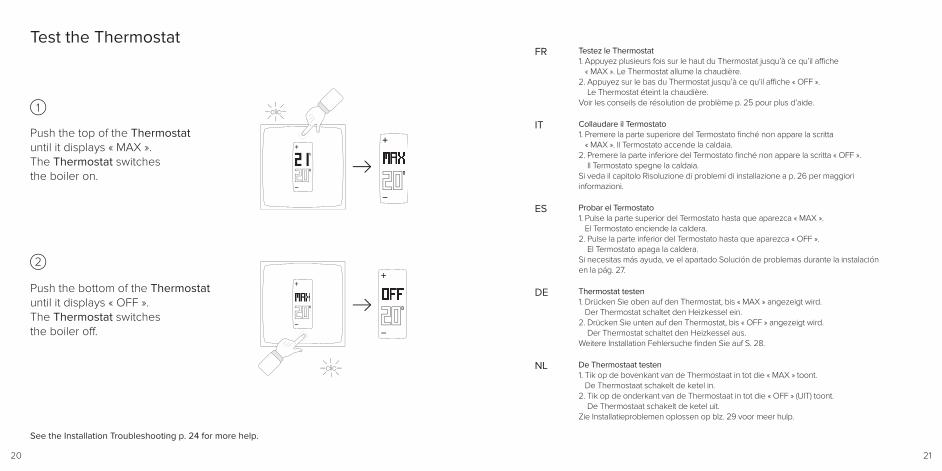
Test the Thermostat
Push the top of the Thermostat until it displays « MAX ».The Thermostat switches the boiler on.
Push the bottom of the Thermostatuntil it displays « OFF ».The Thermostat switches the boiler off .
1
2
See the Installation Troubleshooting p. 24 for more help.
Testez le Thermostat1. Appuyez plusieurs fois sur le haut du Thermostat jusqu’à ce qu’il affi che
« MAX ». Le Thermostat allume la chaudière.2. Appuyez sur le bas du Thermostat jusqu’à ce qu’il affi che « OFF ».
Le Thermostat éteint la chaudière.Voir les conseils de résolution de problème p. 25 pour plus d’aide.
FR
Collaudare il Termostato1. Premere la parte superiore del Termostato fi nché non appare la scritta
« MAX ». Il Termostato accende la caldaia.2. Premere la parte inferiore del Termostato fi nché non appare la scritta « OFF ».
Il Termostato spegne la caldaia.Si veda il capitolo Risoluzione di problemi di installazione a p. 26 per maggiori informazioni.
IT
ES
DE Thermostat testen1. Drücken Sie oben auf den Thermostat, bis « MAX » angezeigt wird.
Der Thermostat schaltet den Heizkessel ein.2. Drücken Sie unten auf den Thermostat, bis « OFF » angezeigt wird.
Der Thermostat schaltet den Heizkessel aus.Weitere Installation Fehlersuche fi nden Sie auf S. 28.
NL De Thermostaat testen1. Tik op de bovenkant van de Thermostaat in tot die « MAX » toont.
De Thermostaat schakelt de ketel in.2. Tik op de onderkant van de Thermostaat in tot die « OFF » (UIT) toont.
De Thermostaat schakelt de ketel uit.Zie Installatieproblemen oplossen op blz. 29 voor meer hulp.
Probar el Termostato1. Pulse la parte superior del Termostato hasta que aparezca « MAX ».
El Termostato enciende la caldera.2. Pulse la parte inferior del Termostato hasta que aparezca « OFF ».
El Termostato apaga la caldera.Si necesitas más ayuda, ve el apartado Solución de problemas durante la instalación en la pág. 27.
2021
5
0
+
200
+
clic
200
+
200
+
clic
22 23
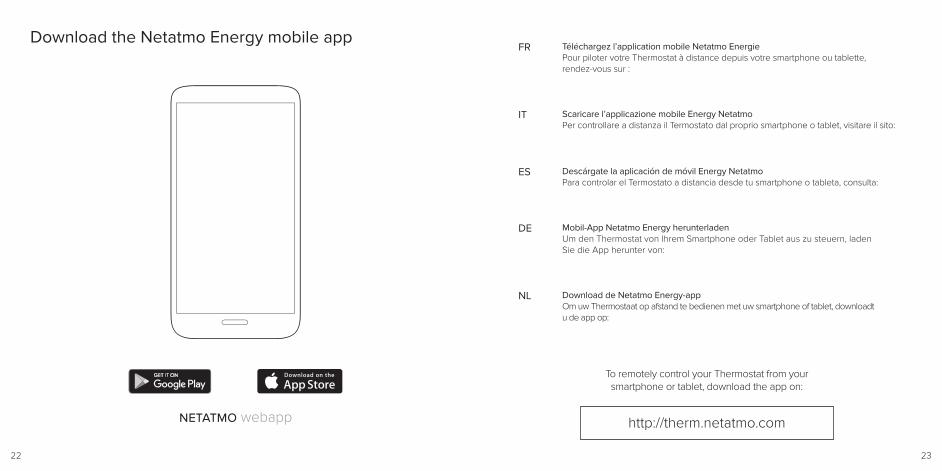
Download the Netatmo Energy mobile app
To remotely control your Thermostat from your smartphone or tablet, download the app on:
Téléchargez l’application mobile Netatmo EnergiePour piloter votre Thermostat à distance depuis votre smartphone ou tablette, rendez-vous sur :
FR
Scaricare l’applicazione mobile Energy NetatmoPer controllare a distanza il Termostato dal proprio smartphone o tablet, visitare il sito:
IT
ES
DE Mobil-App Netatmo Energy herunterladenUm den Thermostat von Ihrem Smartphone oder Tablet aus zu steuern, laden Sie die App herunter von:
NL Download de Netatmo Energy-appOm uw Thermostaat op afstand te bedienen met uw smartphone of tablet, downloadt u de app op:
Descárgate la aplicación de móvil Energy NetatmoPara controlar el Termostato a distancia desde tu smartphone o tableta, consulta:
http://therm.netatmo.com
24 25
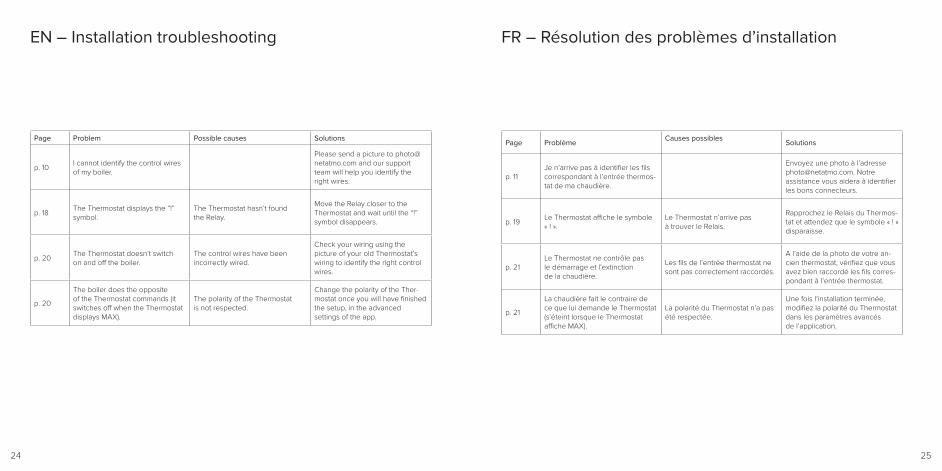
EN – Installation troubleshooting FR – Résolution des problèmes d’installation
Page Problem Possible causes Solutions
p. 10I cannot identify the control wires of my boiler.
Please send a picture to [email protected] and our support team will help you identify the right wires.
p. 18The Thermostat displays the “!” symbol.
The Thermostat hasn’t found the Relay.
Move the Relay closer to the Thermostat and wait until the “!” symbol disappears.
p. 20The Thermostat doesn’t switch on and off the boiler.
The control wires have been incorrectly wired.
Check your wiring using the picture of your old Thermostat’s wiring to identify the right control wires.
p. 20
The boiler does the opposite of the Thermostat commands (it switches off when the Thermostat displays MAX).
The polarity of the Thermostat is not respected.
Change the polarity of the Ther-mostat once you will have finished the setup, in the advanced settings of the app.
Page Problème Causes possibles Solutions
p. 11Je n’arrive pas à identifier les fils correspondant à l’entrée thermos-tat de ma chaudière.
Envoyez une photo à l’adresse [email protected]. Notre assistance vous aidera à identifier les bons connecteurs.
p. 19Le Thermostat affiche le symbole « ! ».
Le Thermostat n’arrive pas à trouver le Relais.
Rapprochez le Relais du Thermos-tat et attendez que le symbole « ! » disparaisse.
p. 21Le Thermostat ne contrôle pas le démarrage et l’extinction de la chaudière.
Les fils de l’entrée thermostat ne sont pas correctement raccordés.
A l’aide de la photo de votre an-cien thermostat, vérifiez que vous avez bien raccordé les fils corres-pondant à l’entrée thermostat.
p. 21
La chaudière fait le contraire de ce que lui demande le Thermostat (s’éteint lorsque le Thermostat affiche MAX).
La polarité du Thermostat n’a pas été respectée.
Une fois l’installation terminée, modifiez la polarité du Thermostat dans les paramètres avancés de l’application.
26 27
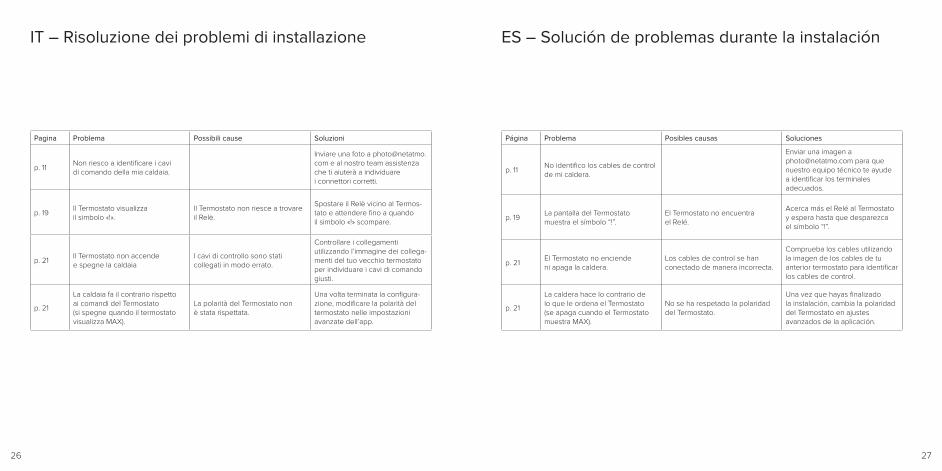
IT – Risoluzione dei problemi di installazione ES – Solución de problemas durante la instalación
Pagina Problema Possibili cause Soluzioni
p. 11Non riesco a identificare i cavi di comando della mia caldaia.
Inviare una foto a [email protected] e al nostro team assistenza che ti aiuterà a individuare i connettori corretti.
p. 19Il Termostato visualizza il simbolo «!».
Il Termostato non riesce a trovare il Relè.
Spostare il Relè vicino al Termos-tato e attendere fino a quando il simbolo «!» scompare.
p. 21Il Termostato non accende e spegne la caldaia
I cavi di controllo sono stati collegati in modo errato.
Controllare i collegamenti utilizzando l’immagine dei collega-menti del tuo vecchio termostato per individuare i cavi di comando giusti.
p. 21
La caldaia fa il contrario rispetto ai comandi del Termostato (si spegne quando il termostato visualizza MAX).
La polarità del Termostato non è stata rispettata.
Una volta terminata la configura-zione, modificare la polarità del termostato nelle impostazioni avanzate dell’app.
Página Problema Posibles causas Soluciones
p. 11No identifico los cables de control de mi caldera.
Enviar una imagen a [email protected] para que nuestro equipo técnico te ayude a identificar los terminales adecuados.
p. 19La pantalla del Termostato muestra el símbolo “!”.
El Termostato no encuentra el Relé.
Acerca más el Relé al Termostato y espera hasta que desparezca el símbolo “!”.
p. 21El Termostato no enciende ni apaga la caldera.
Los cables de control se han conectado de manera incorrecta.
Comprueba los cables utilizando la imagen de los cables de tu anterior termostato para identificar los cables de control.
p. 21
La caldera hace lo contrario de lo que le ordena el Termostato (se apaga cuando el Termostato muestra MAX).
No se ha respetado la polaridad del Termostato.
Una vez que hayas finalizado la instalación, cambia la polaridad del Termostato en ajustes avanzados de la aplicación.
28 29
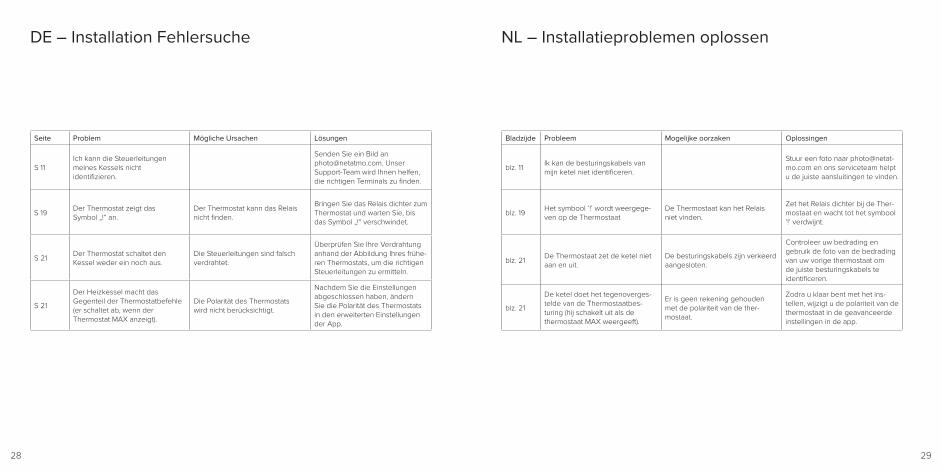
DE – Installation Fehlersuche NL – Installatieproblemen oplossen
Seite Problem Mögliche Ursachen Lösungen
S 11Ich kann die Steuerleitungen meines Kessels nicht identifizieren.
Senden Sie ein Bild an [email protected]. Unser Support-Team wird Ihnen helfen, die richtigen Terminals zu finden.
S 19Der Thermostat zeigt das Symbol „!“ an.
Der Thermostat kann das Relais nicht finden.
Bringen Sie das Relais dichter zum Thermostat und warten Sie, bis das Symbol „!“ verschwindet.
S 21Der Thermostat schaltet den Kessel weder ein noch aus.
Die Steuerleitungen sind falsch verdrahtet.
Überprüfen Sie Ihre Verdrahtung anhand der Abbildung Ihres frühe-ren Thermostats, um die richtigen Steuerleitungen zu ermitteln.
S 21
Der Heizkessel macht das Gegenteil der Thermostatbefehle (er schaltet ab, wenn der Thermostat MAX anzeigt).
Die Polarität des Thermostats wird nicht berücksichtigt.
Nachdem Sie die Einstellungen abgeschlossen haben, ändern Sie die Polarität des Thermostats in den erweiterten Einstellungen der App.
Bladzijde Probleem Mogelijke oorzaken Oplossingen
blz. 11Ik kan de besturingskabels van mijn ketel niet identificeren.
Stuur een foto naar [email protected] en ons serviceteam helpt u de juiste aansluitingen te vinden.
blz. 19Het symbool ‘!’ wordt weergege-ven op de Thermostaat
De Thermostaat kan het Relais niet vinden.
Zet het Relais dichter bij de Ther-mostaat en wacht tot het symbool ‘!’ verdwijnt.
blz. 21De Thermostaat zet de ketel niet aan en uit.
De besturingskabels zijn verkeerd aangesloten.
Controleer uw bedrading en gebruik de foto van de bedrading van uw vorige thermostaat om de juiste besturingskabels te identificeren.
blz. 21
De ketel doet het tegenoverges-telde van de Thermostaatbes-turing (hij schakelt uit als de thermostaat MAX weergeeft).
Er is geen rekening gehouden met de polariteit van de ther-mostaat.
Zodra u klaar bent met het ins-tellen, wijzigt u de polariteit van de thermostaat in de geavanceerde instellingen in de app.
30 31
Notes
Copyright Netatmo © 2018 All rights reserved. Reproduction and distribution prohibited without written authorization from Netatmo Apple and the Apple logo are trademarks of Apple Inc., registered in the U.S. and other countries. App Store is a service mark of Apple Inc., registered in the U.S. and other countries. Google Play and the Google Play logo are trademarks of Google Inc
V8