88-Tasten E-Piano - media.elektronik-star.demedia.elektronik-star.de/bda/10006325.pdf · So...
32
88-Tasten E-Piano 10006325
Transcript of 88-Tasten E-Piano - media.elektronik-star.demedia.elektronik-star.de/bda/10006325.pdf · So...

88-Tasten E-Piano
10006325

Bedienelemente und Anschlüsse
Bedienelemente
1. Gesamtlautstärke
2. Geschwindigkeit 3. Lautstärke Begleitung
4. Intro / Ende, Synchronisieren, Einfügen 1,
Einfügen 2, Start / Stopp 5. Metronom, Einzelakkord, Fingerakkord,
Gesamtbereichsakkord, geschlossener Akkord
6. Aufnahme, Audio Titel 1, Audio Titel 2,
Begleitungstitel, Wiedergabe, Transposition-, Transposition+
7. Funktionsmenü
8. LCD-Anzeige 9. Demo, Stil, Instrumentenstimme
10. Titel, Lernen 1, Lernen 2, Lernen 3
11. Digitalregler 12. Keyboard teilen, Dual, Berührung, Hall, Chor
13. Speicherbänke M1, M2, M3 14. Ein-/Ausschalter
LCD-Anzeige
1. Nummernanzeige
2. Buchstabenanzeige
3. Lautstärke
4. Instrumentenstimme
5. Stil
6. Lied
7. Geschwindigkeit
8. Hall
9. Chor
10. Dual
11. Teilen
12. Akkordanzeige
13. Metronom
14. Einfülen 1 &2
15. Aufnahme/Wiedergabe
16. Berührung
17. Speicherstatus
18. Noten

Vor dem Gebrauch
Stromversorgung
1. Prüfen Sie ob das Keyboard ausgeschaltet ist. Falls nicht stellen Sie den Schalter auf „Aus (Off)“.
2. Stecken Sie das eine Ende des Stromkabels in das Gerät und das andere in eine geeignete
Steckdose.
Keyboard-Abdeckung
Öffnen der Abdeckung
Halten Sie die Abdeckung und schieben Sie diese leicht nach innen. Nun können Sie die Abdeckung
öffnen.
Schließen der Abdeckung
Ziehen Sie die Abdeckung zu sich und drücken Sie diese dann herunter. So schließen Sie die
Abdeckung.
Notenständer
Aufbau
Ziehen den Notenständer aufrecht nach oben bis dieser steht. Die Feder springt nun nach außen.
Stecken Sie nun den Federbügel auf den oberen Holzdeckel des Pianos. Der Notenständer befindet
sich nun an der richtigen Stelle.
Abbau
1. Ziehen Sie den Notenständer nach oben bis dieser senkrecht ist.
2. Klappen Sie den Federbügel ein. Notiz: Sie müssen zum Vermeiden von Schäden ein Stück
Kunststoff dazwischen legen.
3. Legen Sie den Notenständer nun nach unten bis dieser auf den oberen Holzdeckel des
Pianos liegt.
Einschalten
Drücken Sie zum Einschalten „Power“.
Lautstärke einstellen
Sie können die Lautstärke und Lautstärke der Begleitung über diesen Drehregler
regulieren.

Anschlüsse
Kopfhörer
Schließen Sie die Kopfhörer an den Anschluss auf der Rückseite des Gerätes an. Sobald Kopfhörer
angeschlossen wurden, erfolgt die Wiedergabe nur über diese. Die internen Lautsprecher sind solange
deaktivieren. Benutzen Sie Kopfhörer falls Sie niemanden durch Ihr Üben stören möchten z.B. nachts.
Audio-Ein-/Ausgang
Das Gerät verfügt über interne Lautsprecher. Alternativ können Sie auch einen externen Verstärker oder
andere Hifi-Geräte anschließen. Schalten Sie zuerst alle Geräte ab, verbinden Sie die Geräte über den Line-
Ausgang und Eingang.
MIDI
1. MIDI-Eingang: Verbinden Sie diesen Anschluss mit einem MIDI-Ausgang eines anderes Geräts. Das
Piano kann externe Daten über MIDI empfangen.
2. MIDI-Ausgang: Schließen an diesen Anschluss einen MIDI-Ausgang eines anderen Gerätes an. Das
MIDI-Signal des Pianos wird an dieses Gerät gesendet. Notiz: Es werden nur die Daten des Pianos
übertragen.
Notiz: Sämtliche Zusatzgeräte und Kabel sind nicht im Lieferumfang enthalten.

Kurzanleitung
Instrumentenstimme wählen
Sie können zwischen 138 Stimmen wählen. Eine Übersicht dieser Instrumente befindet sich im Anhang.
1. Drücken Sie „Voice“.
2. Drücken Sie zum Wählen entweder „+/-“ oder geben Sie die Nummer der gewünschten Stimme
direkt ein.
3. Beispiel für Stimme Nr.59:
Drücken Sie zuerst Taste „5“ und dann Taste „9“.
Dual
1. Drücken Sie „Dual“ und folgendes Symbol erscheint auf der Anzeige . Wählen Sie in diesem
Modus eine Stimme und danach eine Zweite. Beide Stimmen werden gleichzeitig wiedergegeben.
2. Sie können den Dual-Effekt mit „+/-“ einstellen.
3. Drücken Sie „Sound Console“ um zwischen „VOICER1V“ oder „VOICER2V“ zu wechseln. Sie können
die beiden verschiedenen Lautstärken mittels „+/-“ regulieren.
Effekte & Einstellungen
Keyboard teilen
In diesem Modus könne Sie die beiden Hälften des Keyboards mit verschiedenen Instrumentenstimmen
belegen.
1. Drücken Sie „Keyboard Split“ und das
entsprechende Symbol wird angezeigt.
2. Wählen die den Teilungspunkt. Drücken Sie „Function Menu“, die Anzeige zeigt nun 25
Teilungspunkte an. Wählen Sie mit „+/-“ den gewünschten Punkt.
3. Drücken Sie „Sound Console“ um die Lautstärke der linken Seite zu regeln. Auf
der Anzeige wird „VoiceLV“ angezeigt.

Berührungsempfindlichkeit
Durch aktivieren dieser Funktion ist die Wiedergabe druckempfindlich. Drücken Sie stark wird der Ton lauter
wiedergegeben. So entsteht eine dynamische Wiedergabe.
1. Drücken Sie „Touch“ und das entsprechende
Symbol wird angezeigt.
2. Drücken Sie „Touch“ erneut um zwischen den
verschiedenen Stati in folgender Reihenfolge zu
wechseln: 001/002/003/OFF(Aus)
Hall
Drücken Sie „Reverb“ um den Hall-Effekt zu aktivieren.
Das entsprechende Symbol wird auf dem Display
angezeigt.
Chor
Drücken Sie „Chorus“ um den Hall-Effekt zu aktivieren.
Das entsprechende Symbol wird auf dem Display
angezeigt.
Metronom
1. Drücken Sie zum Aktivieren „Metronom“.
2. Drücken Sie zum Einstellen des Takts „Function
Menu“ und danach entweder „+/-“ oder die
entsprechende Nummerntaste.
3. Dieser Bereich liegt von 0~9.
4. Um das Metronom abzuschalten, drücken Sie erneut „Metronom“.
Transposition
Drücken Sie „Transpose +/-“ und die
entsprechenden Töne werden angehoben
bzw. abgesenkt (max. 12). Drücken Sie „+/-“
gleichzeitig um den Standardwert 0 zu
wählen.
Funktionsmenü
Drücken Sie „Function Menu“ und anschließend mittels „+/-“ die gewünschte Funktion.
Bezeichnung Einstellmöglichkeit LCD-Anzeige Einstellbereich
Metronome Takt Metronom 04 Taktnummern 0,2…9
Keyboard split Teilungspunkt 25 Teilungspunkte 1…61
Reverb type Hall-Typ 04 Hall-Typen 0-7
Reverb level Hall-Stärke 60 Hall-Stärken 0-127
Chorus type Chor-Typ 02 Chor-Typen 0-7
Chorus level Chor-Stärke 60 Chor-Stärken 0-127

Klangeinstellungen
Drücken Sie „Sound Console“ um diese Einstellungen aufzurufen. Drücken mehrfach diese Taste um
zwischen den Einstellungen zu wechseln und „+/-“ um die Einstellungen vorzunehmen.
Einstellmöglichkeit LCD-Anzeige Einstellbereich Standardwert
Lautstärke oberer Bereich rechte Hand VOICER1V 0…31 30
Lautstärke unterer Bereich rechte Hand VOICER2V 0…31 25
Lautstärke oberer Bereich linke Hand VOICELV 0…31 12
Lautstärke Trommeln DRUM VOL 0…31 25
Lautstärke Bass BASS VOL 0…31 28
Lautstärke Akkord CHORDVOL 0…31 28
Stil & Funktionen
Stil wählen
Sie können zwischen 118 Stimmen wählen. Eine Übersicht dieser Stile befindet sich im Anhang.
1. Drücken Sie „Style“.
2. Drücken Sie zum Wählen entweder „+/-“ oder geben Sie die Nummer des gewünschten Stils direkt
ein.
Intro/Ende
Drücken Sie vor Beginn die Taste wird ein Intro gespielt. Drücken
Sie die Taste während des Spiels, wird ein Ende wiedergegeben.
Synchronisieren
Drücken Sie „Sync“ um die synchronisierte Begleitung zu starten.
Drücken Sie eine der 19 Tasten auf der linken Seite um den
Rhythmus zu synchronisieren. Wird ein Rhythmus wiedergegeben
drücken Sie „Sync“ um die Wiedergabe zu stoppen.
Einfügen 1/Einfügen 2
Hiermit können einen Übergang einfügen. So wird der Effekt
verbessert, danach wird der original Rhythmus wiederhergestellt.
Drücken Sie zuerst „Fill in 1“, es blinkt „NOR“, drücken Sie nun
„Fill in 2“, es blinkt „VAR“ und der Stil wechselt zum Original.
Start/Stopp
Hiermit starten/beenden Sie den Stil.

Geschwindigkeit
Drücken Sie „Tempo +/-“ um die Geschwindigkeit/
Begleitungsgeschwindigkeit im Bereich 30-280 einzustellen.
Begleitungslautstärke
Drücken Sie „Accompaniment +/-“ um die Begleitungslautstärket im
Bereich 0-31 einzustellen.
Akkord
Einzelfingerakkord
Bei diesem Gerät können Sie sich von Ein- oder Zweifingerakkorden
begleiten lassen. Sie können kleine / große Akkorde und große /
kleine sieben Akkord auswählen.
Die Bedienung erfolgt wie hier beschrieben (z.B. C-Akkord):
C Großer Akkord, spielt Hauptton.
Cm Kleiner Akkord, spielt Hauptton und je eine schwarze Taste links
und rechts gleichzeitig.
C7 Sieben Akkord, spielt Hauptton und je eine weiße Taste links
gleichzeitig.
Cm7 Kleiner Sieben Akkord, spielt den Hauptton und eine schwarze und
eine weiße Taste links gleichzeitig.
Fingerakkord
Bei diesem Gerät können Sie für die linke Seite des Geräts mit einem anderen Akkord und Begleitung
belegen. Falls Ihre Hand nicht groß genug ist, sollten Sie sollte Sie den Teilungspunkt neu festlegen.

Gesamtbereichakkord
Drücken Sie zum Aktivieren „Full Range Chord“.
Akkordbegleitung beenden
Drücken Sie zum Beenden „Chord Close“.
Akkordübersicht

Aufnahme
Das Gerät verfügt über eine Aufnahmefunktion.
Folgende Daten werden aufgenommen:
Noten des Keyboards Begleitung
Vibrato Halten
Stil Keyboard-Trommel
Auto-Akkord Begleitungslautstärke
Pianissimo Geschwindigkeit
Instumentenstimme
Audiotitel 1/2
Drücken Sie „Recording“, das entsprechende Symbol wird nun
angezeigt und das Gerät befindet sich im Aufnahmemodus.
Wählen Sie nun „Audio Track 1“ oder „Audio Track 2“. Der
Taktpunkt wird angezeigt und die Indikatorlampe leuchtet.
Drücke Sie zum Starten der Aufnahme eine beliebige Taste.
Begleitungstitel
Drücken Sie „Recording“, das entsprechende Symbol wird nun
angezeigt und das Gerät befindet sich im Aufnahmemodus.
Drücken Sie nun „Accompaniment Track“. Der Taktpunkt wird
angezeigt und die Indikatorlampe leuchtet. Drücke Sie zum
Starten der Aufnahme eine beliebige Taste.
Wiedergabe
Drücken Sie „Recording“ um den Aufnahmemodus zu
verlassen. Drücken Sie dann „Play“ um die Aufnahme
wiederzugeben.
Intelligentes Lernen
Lied
Drücken Sie „Song“, geben Sie die Liednummer über die Nummerntasten ein und erneut „Song“ um die
Wiedergabe zu starten. Zum Beenden der Wiedergabe drücken Sie „Stop“.

Lernen 1
Drücken Sie zum Starten des Lernprogramms 1 „Teaching 1“, danach „Song“
und wählen Sie mit „+/-“ das Lernlied. Die Hauptmelodie wird wiedergegeben
falls Tasten regelmäßig gedrückt werden. Die Hintergrundmelodie wird ununter-
brochen wiedergegeben. Es hört nicht auf bis die nächste Untersektion erreicht
wurde. Drücken Sie „Start/Stop“ um das Lernprogramm 1 zu verlassen.
Lernen 2
Drücken Sie zum Starten des Lernprogramms 2 „Teaching 2“, danach „Song“ und
wählen Sie mit „+/-“ das Lernlied. Die Hauptmelodie wird nicht wiedergegeben.Sie
müssen die Hauptmelodie selber spielen. Die Hintergrundmelodie wird für die
Dauer des Liedes wiedergegeben. Drücken Sie „Start/Stop“ um das Lernprogramm
2 zu verlassen.
Lernen 3
Drücken Sie zum Starten des Lernprogramms 2 „Teaching 2“, danach „Song“ und
wählen Sie mit „+/-“ das Lernlied. Die Hauptmelodie wird nicht wiedergegeben.Sie
müssen die Hauptmelodie anhand der angezeigten Noten selber spielen. Die
Hintergrundmelodie wird für die Dauer des Liedes wiedergegeben.
Statusspeicher
Sie können Ihre beliebstesten Instrumenten-Einstellungen speichern, um diese leichter wieder aufzurufen.
Folgende Daten werden gespeichert:
Begleitungseinstellungen
Stil, Akkord, Einfügen, Metronom,
Begleitungseinstellung, Geschwindigkeit
Instrumentenstimme
Hauptstimme, Dual, Teilen
Effekte
Chor, Hall, Berührung, Stillautstärke
1. Stellen Sie das Gerät nach ihren Vorstellungen ein.
2. Drücken Sie „Memory Bank“ und wählen Sie eine der
gruppierten Speicherbänke B1,B2,B3,B4.
3. Drücken und halten Sie „Store“ und drücken nun
gleichzeitig zum Speichern der Parameter eine der
Tasten M1~M3.
Gespeicherte Daten aufrufen
1. Drücken Sie „Memory Bank“ und wählen die
entsprechende Speicherbank mittels „+/-“.
2. Drücken Sie nun die entsprechende Taste M1~M3.

Demo-Titel wiedergeben
Drücken Sie „Demo“ und anschließend „Start/Stop“ um die Wiedergabe zu
Starten und zu Beenden.
Benutzen der Pedale
Die Pedale am Gerät haben die gleiche Funktion wie bei einem richtigen
Piano.
Pianissimo - linkes Pedal
Sobald Sie dieses Pedal benutzen, wird die Lautstärke reduziert, die Qualität
der Wiedergabe ändert sich etwas. Wenn erst nach dem Spielen der Note
das Pedal bedienen, ändert sich die Lautstärke und Qualität nicht.
Halten - rechtes Pedal
Beim Treten dieses Pedals wird der aktuelle Ton gehalten. Beim Loslassen hört Ton sofort auf.
Aufbau des Standfußes
1. Wie auf den folgenden Bildern zu sehen befestigen Sie zuerst den Fuß und befestigen Sie diesen mit
M4.5x59 Schrauben.
2. Befestigen Sie nun den rechten und linken Fuß an der rechten und linken Halteplatte und diese dann
an den mittleren Pedal- und Stützplatten mittels M6x60 Schrauben.
3. Platzieren Sie nun das Piano auf der Unterkonstruktion und fixieren Sie es mit vier M6x20
Schrauben.
4. Befestigen Sie nun die hintere Platte mit M4.5x59 Schrauben.
5. Stecken Sie nun das Kabel der Pedale in den Anschluss am Piano.
Teileliste
(1)
M4.5x59 Schraube 8 Stück
(2)
M6x60 Schraube 4 Stück
(3)
M6x20 Schraube 4 Stück
(4) Schraubenabdeckung 8 Stück


Anhang
Instrumentenstimmen

Stile

Demo-Lieder
Fehlerbehebung
Fehler Mögliche Ursache/Lösung
Leiser Störton beim Ein-/Ausschalten. Normales Phänomen. Nicht zu beachten.
Nach dem Einschalten hört man bei Tastendruck
keinen Ton.
Prüfen Sie die Lautstärkeeinstellung oder ob ein
Kopfhörer bzw. ein anderes Gerät angeschlossen ist.
Tonstörung, Ton wird unterbrochen oder Gerät geht
aus.
Falsche Netzgerät angeschlossen oder Batterien zu
schwach.
Die Note und der Klang weichen leicht voneinander
ab.
Normales Phänomen. Klangunterschiede bei
Beispieltönen.
Bei der Funktion Halten. Wird jeder Ton
unterschiedlich lange gehalten.
Normales Phänomen. Die Haltedauer wird an den
Ton angepasst.
Fehlfunktion der Lautstärke bzw.
Begleitungslautstärke.
Prüfen Sie die Lautstärkeeinstellungen.
Während der Synchronisation funktioniert die
automatische Begleitung nicht.
Prüfen Sie ob Einzel- oder Fingerakkord aktiviert
sind, drücken Sie nun eine der 19 linken Tasten.
In der Nähe von Mobiltelefonen erzeugt das Gerät
Töne.
Mobiltelefone erzeugen Störungen. Halten Sie
Mobiltelefone fern bzw. schalten diese ab.
Keine Reaktion bei Benutzung der Pedale. Prüfen Sie die Verbindung zwischen Pedal und
Piano.

SICHERHEITSHINWEISE UND GEWÄHRLEISTUNG
Diese Bedienungsanleitung dient dazu, Sie mit der Funktionsweise dieses Produktes vertraut zu
machen. Bewahren Sie diese Anleitung daher stets gut auf, damit Sie jederzeit darauf zugreifen
können. Sie erhalten bei Kauf dieses Produktes zwei Jahre Gewährleistung auf Defekt bei sachgemäßem
Gebrauch.
Bitte verwenden Sie das Produkt nur in seiner bestimmungsgemäßen Art und Weise. Eine
anderweitige Verwendung führt eventuell zu Beschädigungen am Produkt oder in der Umgebung des Produktes.
Ein Umbauen oder Verändern des Produktes beeinträchtigt die Produktsicherheit. Achtung
Verletzungsgefahr!
Öffnen Sie das Produkt niemals eigenmächtig und führen Sie Reparaturen nie selber aus!
Behandeln Sie das Produkt sorgfältig. Es kann durch Stöße, Schläge oder den Fall aus bereits
geringer Höhe beschädigt werden. Halten Sie das Produkt fern von Feuchtigkeit und extremer Hitze.
ACHTUNG:
Es wird keine Haftung für Folgeschäden übernommen. Technische Änderungen und Irrtümer vorbehalten!
Wichtige Hinweise zur Entsorgung
Dieses Elektrogerät gehört NICHT in den Hausmüll. Für die fachgerechte Entsorgung wenden Sie sich bitte an die öffentlichen Sammelstellen in Ihrer Gemeinde.
Einzelheiten zum Standort einer solchen Sammelstelle und über ggf. vorhandene Mengenbeschränkungen
pro Tag/ Monat/ Jahr sowie über etwa anfallende Kosten bei Abholung entnehmen Sie bitte den Informationen der jeweiligen Gemeinde.
Hinweise zur Batterieentsorgung
Batterien dürfen nicht in den Hausmüll gegeben werden. Als Endverbraucher sind
Sie zur Rückgabe gebrauchter Batterien gesetzlich verpflichtet. Sie können
Batterien nach Gebrauch in der Verkaufsstelle oder deren unmittelbarer Nähe (z.B. in kommunalen Sammelstellen oder im Handel) unentgeltlich zurückgeben.
Sie können Batterien auch per Post an uns zurücksenden.
Batterien oder Akkus, die Schadstoffe enthalten, sind mit dem Symbol einer
durchgekreuzten Mülltonne gekennzeichnet, wie das oben stehende Symbol.
In der Nähe zum Mülltonnensymbol befindet sich die chemische Bezeichnung des Schadstoffes. »Cd« steht
für Cadmium, »Pb« für Blei und »Hg« für Quecksilber.
Viel Spaß mit unserem Produkt.
Warnhinweise
Reparaturen am Gerät sollten nur von einer autorisierten Fachwerkstatt durchgeführt werden.
Öffnen Sie in keinem Fall das Gerät.
Falscher Zusammenbau führt möglicherweise zu Fehlfunktionen oder dem Totalausfall.
Das Gerät sollte vor jeglichen Feuchtigkeit und direkter Sonneneinstrahlung geschützt werden.
Das Gerät bitte nicht mit Reinigungsmitteln reinigen.
Verwenden Sie zur Reinigung nur ein trockenes (Mikrofaser) Tuch.
Schließen Sie das Gerät nur an die dafür vorgesehene Netzspannung.
Schließen Sie das Gerät in keinem Fall an andere Spannungen als vorgesehen an.
Die Gewährleistung verfällt bei Fremdeingriffen in das Gerät.

Panel Control and External Function
Panel Control
1. Main volume
2. Tempo 3. Accompaniment Volume
4. Intro/Ending, Sync, Fill-In 1,Fill-In 2, Start/Stop
5. Metronome, Single Finger, Fingered,Full Range
Chord, Chord Close 6. Recording,Audio Track 1,Audio Track 2,
Accompaniment Track, Play,Transpose -,Transpose+
7. Function Menu,Sound Console Button
8. LCD Display Screen 9. Demo, Style, Voice, Button
10. Song,Teaching1,Teaching2,Teaching3 11. .Digit Control button
12. .Keyboard Split, Dual, Touch, Reverb, Chorus
13. Store,M1,M2,M3,Memory Bank Button 14. Power Switch Button
LCD Display Screen
1. Digital Display Area
2. Characters Display Area
3. Volume
4. Voice Selection
5. Style Selection
6. Song
7. Tempo
8. Reverb
9. Chorus
10. Dual
11. Keyboard Split
12. Chord Display Area
13. Metronome
14. Fil l- in1/Fil l- in2
15. REC/Play
16. Touch
17. Memory State
18. Staff

Preparation before performance
Power
1. 1.First make sure whether the power switch of electric grand piano is at OFF position. If not, poke
the switch to OFF position.
2. Connect the power cord; insert one end of power cord, In AC jack of the electric grand piano and
the other end in power socket.
Keyboard lid
Open keyboard lid
Hold up the keyboard l id of the piano gently and push it inside, it will slide inside as well, the lid will
be opened.
Close keyboard lid
Slide the keyboard l id of the piano towards the direction of your body and put down the lid over the
keyboard.
Music stand
Raise music stand
Pull the music stand up untill it was upright. Now the spring bounces outside. put the spring bracket
on the top wooden cover of the piano, the music stand will stand on the top wooden cover of the
piano in a slant way.
Put down the music stand
1. Pull the music stand up untill it was upright.
2. Fold the spring bracket inside, Notice: you need to lay EPE slice as to avoid the bruise.
3. Put down the music stand gently untill it layed on the top wooden cover of the piano.
Turn on power switch
Press [POWER ] button to turn on the piano.
Volume Adjustment
You can setup the high or low volume by rotating the volume rotary button .The volume
rotary button can control the keyboard volume and accompaniment volume at the same
time.

Auxiliary Jack
Use of Headphone
When you exercise performance at night or do not want to disturb others, you can use headphone jack
which lies in the rear of the under parts of the electric grand piano. After you inserted the PHONES jack, the
speaker system inside the electric headphone in grand piano will cut off automatically.
Use of audio input/output
This electric grand piano has built-in speaker system, It can amplify the external signal through the audio
LINE IN It can be used on other amplifier or speaker . through audio LINE OUT system. Insert one end of
audio LINE OUT in LINE IN or AUX IN jack of other hi-fi equipment ,Insert another end of audio LINE OUT
in LINE OUT jack in the reverse of the electric grand piano.
MIDI
1. MIDI input: connect MIDI input jack with MIDI output jack of another electronic equipment which is
compatible with MIDI through the MIDI connection line, the electric grand piano can receive the
data of external MIDI equipment though the MIDI input.
2. MIDI output: connect the MIDI output jack with MIDI input jack of another electronic equipment
which is compatible with MIDI though the MIDI connection line. When a note was played, the
corresponding MIDI signal will be transfered out, moreover,it can control other MIDI equipment
through the changed information of the transfer program (Note:MIDI ouput can transfer keyboard
data only)
Notice: The above external facilities was not equipped with this piano.

Quick Guide
Selecting Voice
The electric grand piano can provide 138 kinds of voice, including 128 kinds of GM voices.
1. Press [VOICE].
2. You can select the voice that you want by pressing +/- and digit buttons.
3. Example of selecting No.59 voice:
Press [5] Firstly, then ,press[9] by the digit Buttons ,the voice [59] was selected.
Dual
1. By pressing [DUAL] button, LCD will display the symbol. In this function, you can choose one
voice,then,choose another voice ,After that,you can play the two voice together.
2. In one voice layer, two different voice sounded together you can select dual voice that you wan t by
pressing +/ - buttons.
3. Press the [Sound Console] button to select VOICER1V or VOICER2V,It can adjust the volume size of
the dual voice if you press the digit+/- buttons.
Effect & Control
Keyboard Split
In the model of keyboard split, you can play different voice at left side and right side of “split point”.The
setting of split point can be changed based on your requirement.
1. Press the [KEYBOARD SPLIT] button, LCD displays
the symbol and the whole keyboard was divided
into left and right individual areas to use for
performance.
2. Selecting split point. Press the [FUNCTION MENU] button , it enters the function of keyboard split
point, The LCD displays 25Split pt,Select required keyboard split point by pressing +/- buttons,this
point will be the new keyboard split point.
3. Press[SOUND CONSOLE] button,select the volume of upper layer voice in left
hand,The LCD displays VOICELV,You can adjust the volume size of voice of left
hand keyboard.

Touch
By the function of touch response, you can control the
touch of fingers of playing the keyboard to allow
dynamic variation of volume.
Press [TOUCH] button to switch touch function of the keyboard. There are three touch types for choice
altogether.
1. Press [TOUCH] button to open touch response and LCD displays the symbol.
2. Press [TOUCH] button, do the loop operation in this four status: 001/002/003/OFF.
Reverb
Press the [REVERB] button, the reverb effect closed,
there was no symbol that displayed on the LCD, Press
this button again, The LCD displayed the symbol was
opened.
Chorus
Press [CHORUS] button to open default chorus effect
and CHORUS LCD displays the symbol. Press [CHORUS]
button again, the chord symbol fade from the LCD, the
chord function close.
Metronome
1. Press the [METRONOME] button to start the metronome sound of the metronome.
2. Press the [FUNCTION MENU ]button to select
(04 Beat Num.),then adjust the metronome
number by the +/- button
3. You can specify the metronome number of every subsection in the range 0,2,3....9
4. The metronome function closed if you press the [METRONOME] button again.
Transposition
Press TRANPOSE"+/-"button, the corresponding
musical scale goes up or goes down for one note
when you play the black and white keys, you can
adjust the musical scale for +12 levels upwards and
downwards. The transpose was effect only in the normal performance status ,the system will restore to the
default value if you press the transpose+/- buttons at the same time.
Function Menu
Press [FUNCTION MENU] button, the piano enters the menu choice state. You can choose the function items
by pressing [digit+/-] buttons.
Name Adjustment content LCD display Adjustment range
Metronome Beat 04 Beat Num. 0,2…9
Keyboard split Split Point 25 Split Pt. 1…61
Reverb type Reverb type 04 Reverb Ty 0-7
Reverb level Reverb level 60 Reverb Lv 0-127
Chorus type Chorus type 02 Chorus Ty 0-7
Chorus level Chorus level 60 Chorus Lv 0-127

Sound Console
Press [SOUND CONSOLE] button, the piano enters the selection state of the sound console Menu. You can
choose your required function by the loop choice or exit the sound console status if you press the SOUND
[CONSOLE] button continuously. You can adjust your required parameter by the DIGIT+/-] Buttons after the
piano has entered into one certain status of the sound console. The adjustment parameter as follows.
Adjustment content LCD display Adjustment range Default value
The Volume of upper layer voice in right hand. VOICER1V 0…31 30
The Volume of lower layer voice in right hand. VOICER2V 0…31 25
The Volume of upper layer voice in left hand. VOICELV 0…31 12
The volume of the drums. DRUM VOL 0…31 25
The volume of the bass. BASS VOL 0…31 28
The volume of the chord. CHORDVOL 0…31 28
Style & Function of style
Selecting Style
This electric grand piano provides dynamic style and accompaniment model that suitable for many popular
voice, there are 118 kinds of style altogether. (Please refer the table of style in the appendix).
1. Press [STYLE] button to enter the status of selecting style.
2. Select the style you require by pressing +/- and digit buttons.
Intro/Ending
In default setting, press the button to play rhythm. Press
“START/STOP” button to exit other functions.
Sync
Press “SYNC” button to start sync accompaniment function and press any key of 19 keys in left hand to start
rhythm synchronously. If chord function is started, press any key
of19 keys in chord area to start auto chord synchronously. If a
rhythm is being played. Press “SYNC” button to stop rhythm and
start sync accompaniment function. If sync function has been
started, press “SYNC” button to exit sync function.
Fill-In 1/ Fill-In 2
Each accompaniment has its own variation to enhance
performance effect. During the process of the style playing, press
[Fi l l- In 1] button, the LCD displays NOR flashing or press [Fill
In 2] button ,the LCD displays the VAR flashing , insert a
interlude in playing style ,then, return to original main Section
style to continue playing.
Start/Stop
In default setting, press the button to play rhythm. Press
“START/STOP” button to exit other functions.

Tempo Adjustment
Press [TEMPO+/-] buttons,It can adjust the accompaniment
tempo, the adjustment range is 30-280.
Accompaniment Volume Adjustment
Press [ACCOMPANIMENT+/- ] buttons, it can adjust the
accompaniment volume, the adjustment range is 0-31.
Chord Function
Single Finger
In this model, you can decide accompanying chord with one or two
fingers, including large/small chord and large/small 7 chord, to
produce the accompaniment effect of a whole band.
The fingering as follows (take C chord for instance):
C Large chord, play root sound.
Cm Small chord, play root sound and a black key on its left side at the
same time.
C7 7 chord, play root sound and a white key on its left side at the
same time.
Cm7 Small 7 chord, play root round and a black and white key on its
left side at the same time.
Fingered
In this model, the notes you play at left hand area of keyboard (split point is the default No.25 key in auto
accompaniment) decide chord that has different accompaniment style, and the following kinds of chord can
be identified (taking C for instance, the note inside parentheses may be omitted). If you feel the left hand
area is not large enough, you can reset the left hand area through the [KEYBOARD SPLIT] function of
[FUNCTION MENU] and press+/-buttons. For detailed information, please see the function of [FUNCTION
MENU].

Full Range Chord
Press the [FULL RANGE CHORD] but ton after the
chord was started, you can play the chord sound on
the full keyboard, the fingering is the same as that of
the fingered.
Chord Close
Press the [CHORD CLOSE] button after the chord was started, the chord accompaniment sound stops, the
style continues to play.
Table of Chord

Recording Function
You can record your performance in the electric grand piano.
Audio Track 1/2
Press the [RECORDING] but ton, LCD displays the symbol
and the piano enters the status of recording waiting.Select the
[Audio Track 1] or [Audio Track 2], The LCD displays the
corresponding symbol,indicating this track enters the recording
preparation. The Beat point displays as per current tempo while
the indicator light shines. Press any key of keyboard to begin to record.
Accompaniment Track
Press the [RECORDING] but ton, LCD displays the symbol of
and the piano enters into the status of recording waiting. Then,
press the [ACCOMPANIMENT TRACK] button, the piano enters
the record preparation. The beat point displays as per current
tempo while the indicator Light shines. Press any key of keyboard
to begin to record.
Play
Press the [RECORDING] button firstly to exited the recording
state, Then, press the [PLAY] button, It can play the recorded
notes.
Intelligent Teaching
Song
Press the [SONG] button, select the song no. by the digit buttons, then, press the [SONG] button, the song
plays, Press the [STOP] button to exit the play function.

Teaching 1
Press [TEACHING 1] button to enter the teaching 1 model,then,press the [SONG]
button,the song plays,after that,press the [DIGIT+/-] button to select the
teaching song,The medoly will be the main medoly if the consumers press the
keys casually.The background sound will play this subsection repeatedly,it won't
stop untill the song was over if the main melody hasn’t arrive to the next
subsection.Press [START/STOP]button to exit the teaching 1 model.
Teaching 2
Press [TEACHING 2] button to enter the teaching 2 model,Then,press the [SONG]
button,the song plays,after that,press [DIGIT+/-] button to select the teaching
song.The main melody doesn’t play,The consumers can play the main melody by
themsevels.The background sound will play completely,It won't stop untill the song
was over.Press [ START/STOP] but ton to exi t the teaching 2 model.
Teaching 3
Press [TEACHING 3 ]button to enter the teaching 3 model,then,press [SONG]
button,the song plays,after that press the [DIGIT +/-] button to select the teaching
song,the main melody doesn’t play,The consumers press the corresponding keys depends on the notes that
displayed on the LCD,then,the next note can play.The background sound will play this subsection repeatedly,
It won’t stop untill the song was over.
State Memory
This instrument has the registry memory function that you can save your favorite setting and tune it out.
1. set panel control (voice, accompaniment etc.) based on
the requirement.
2. Press [MEMORY BANK] button and select required music
sound bank circularly. The music sound bank has 4
groups together,B1,B2,B3,B4.
3. When you press [STORE ] button and not release it, then
press any key of M1-M3 to save current panel parameters
in the memory of M1-M3.
Tune out the stored panel setting
1. Press [MEMORY BANK] button and select the set music sound bank that you want to tune out by [DIGIT]+/-
2. Press the setting button (M1-M3) to tune out (Registry memory) and panel setting will has the
corresponding change.
Playback of the Demo
Press the [DEMO] button, one demo can play circularly. Press
[START/STOP] button, the playback of the demo song stops.
Use of pedal
The electric grand piano has two pedals, they have the same function as
traditional piano which can enrich music expression.
Pianissimo - left pedal
When you step on pianissimo pedal, the played volume will be weaken, the
sound quality has the slight change. If you step on pianissimo pedal after
played a note, the volume and quality will not change.
Sustain - right pedal
Controllable Sustain Pedal has the same function as that of the traditional piano. Step down the Sustain
Pedal, the playing has a prolonged effect, release the pedal, the prolonged sound will stop immediately.
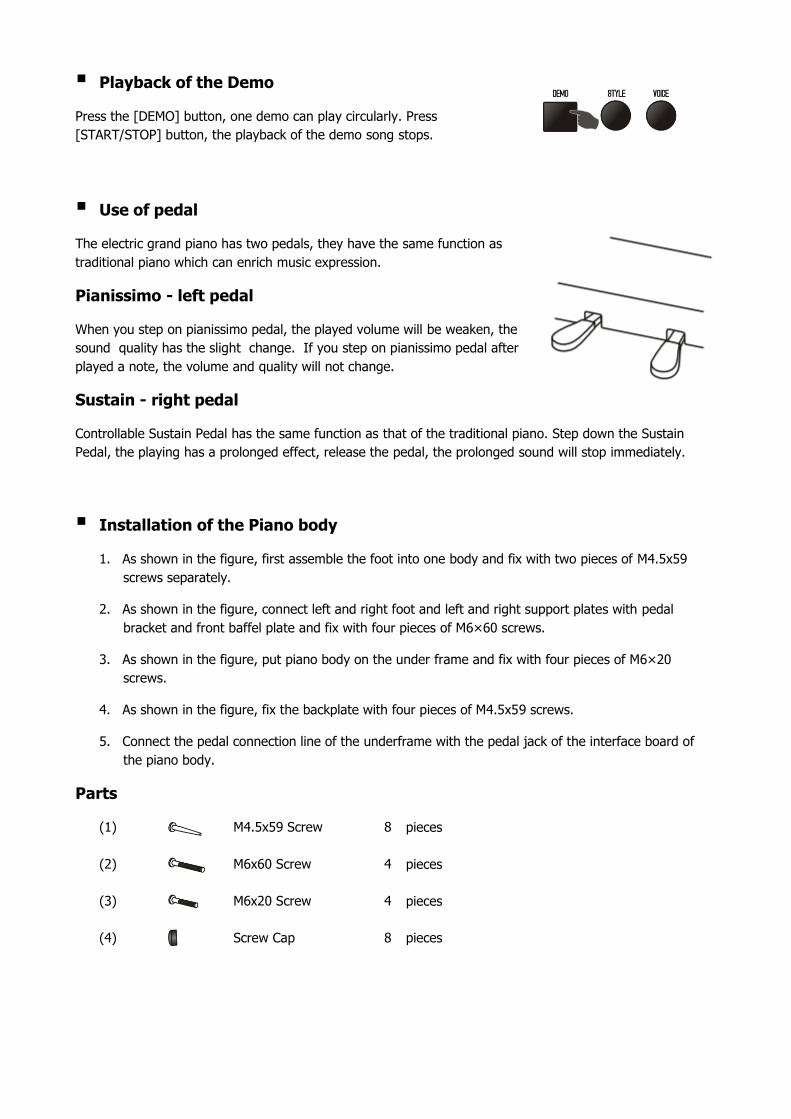
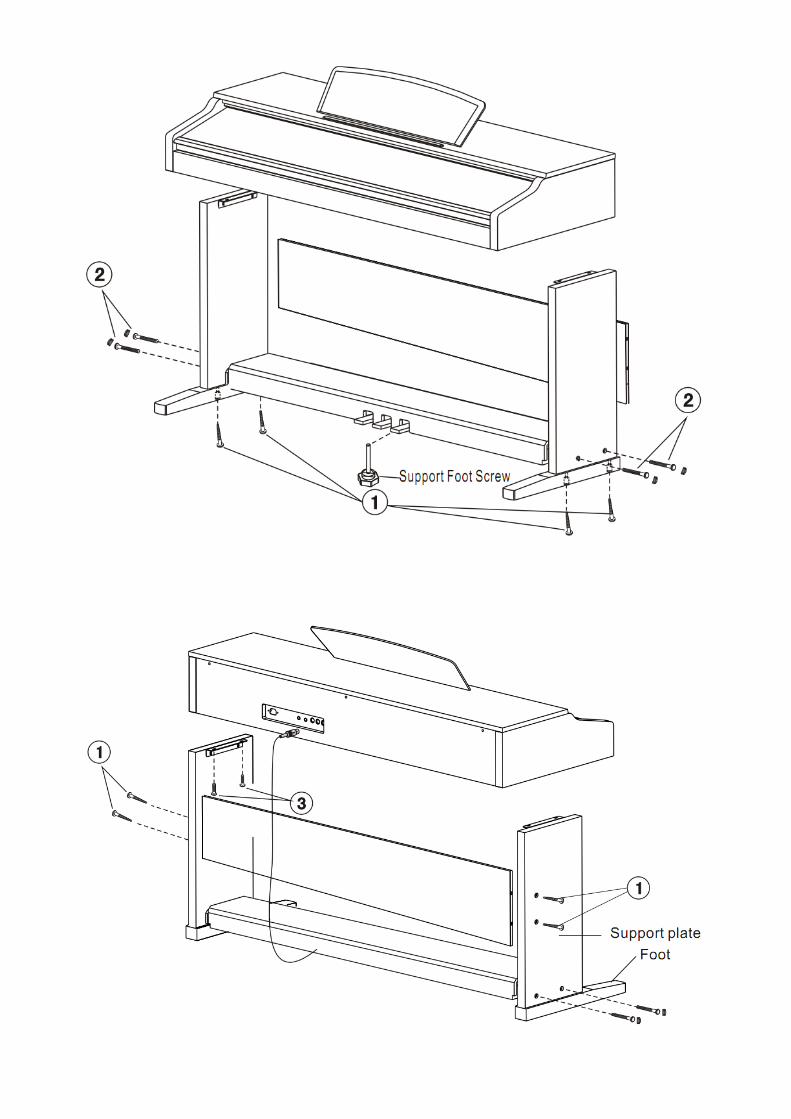
Installation of the Piano body
1. As shown in the figure, first assemble the foot into one body and fix with two pieces of M4.5x59
screws separately.
2. As shown in the figure, connect left and right foot and left and right support plates with pedal
bracket and front baffel plate and fix with four pieces of M6×60 screws.
3. As shown in the figure, put piano body on the under frame and fix with four pieces of M6×20
screws.
4. As shown in the figure, fix the backplate with four pieces of M4.5x59 screws.
5. Connect the pedal connection line of the underframe with the pedal jack of the interface board of
the piano body.
Parts
(1)
M4.5x59 Screw 8 pieces
(2)
M6x60 Screw 4 pieces
(3)
M6x20 Screw 4 pieces
(4) Screw Cap 8 pieces
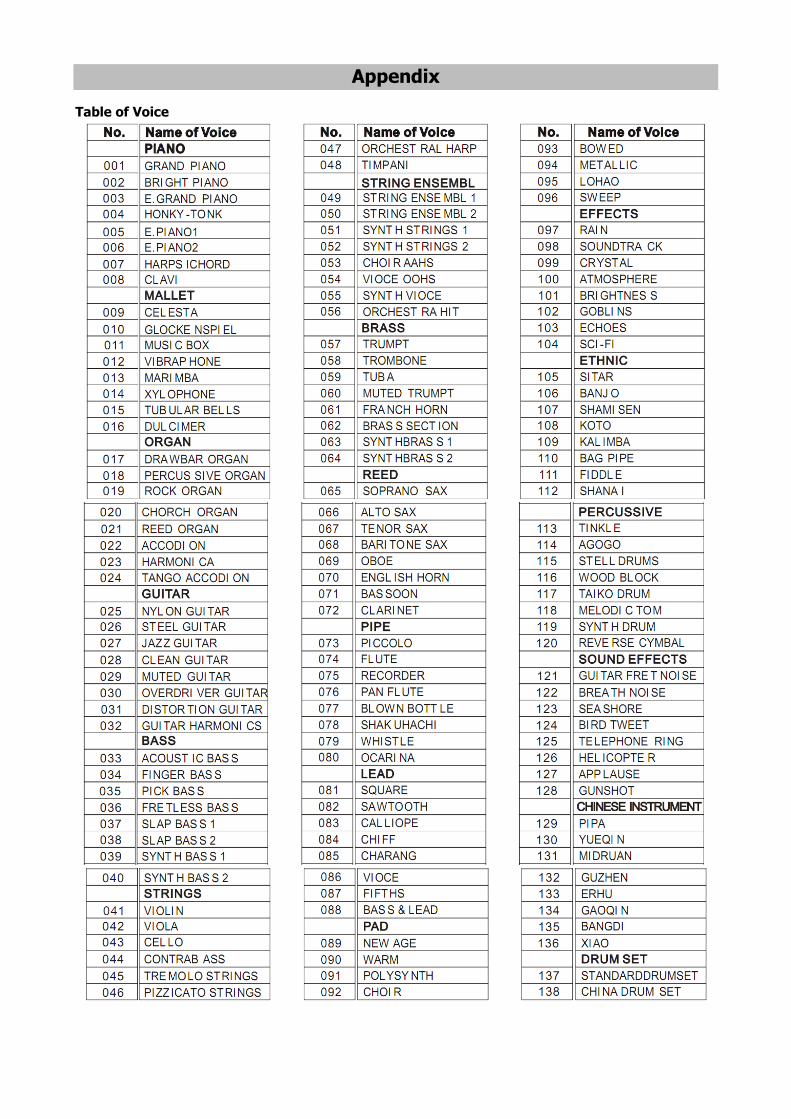
Appendix
Table of Voice

Table of Style

Table of Demo
Troubleshooting
![PSR-S910/S710 Reference Manual - Yamaha - Deutschland · Auswählen der Akkordgrifftechnik – Chord Fingering ... KEYBOARD/PANEL 2 Drücken Sie die Taste [A], um „1 INITIAL TOUCH“](https://static.fdokument.com/doc/165x107/5b154ae37f8b9a8b288b5c19/psr-s910s710-reference-manual-yamaha-deutschland-auswaehlen-der-akkordgrifftechnik.jpg)