
after total laryngectomy - Atos Medical · 2016-07-05 · The Provox2 Voice Rehabilitation System...
84
Voice Prosthesis for rehabilitation after total laryngectomy Clinician’s manual Region 7 Unregistered copy
Transcript of after total laryngectomy - Atos Medical · 2016-07-05 · The Provox2 Voice Rehabilitation System...
Voice Prosthesis for rehabilitation after total laryngectomy
Clinician’s manual
Region 7
Unregis
tered
copy

1
4
5
6
A B
13
1 2
3 4
5
6
7
8 9
11
12
10
Unregis
tered
copy
1
4
5
6
A B
13
1 2
3 4
5
6
7
8 9
11
12
10
Unregis
tered
copy
Figures
1
23
4
5
6
7
8
Fig. 1
1
2
3
5
6
7
8
4
Unregis
tered
copy
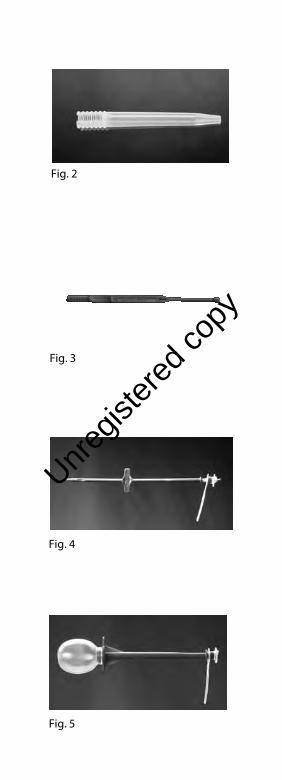
Fig. 5
Fig. 4
Fig. 3
Fig. 2
Unregis
tered
copy
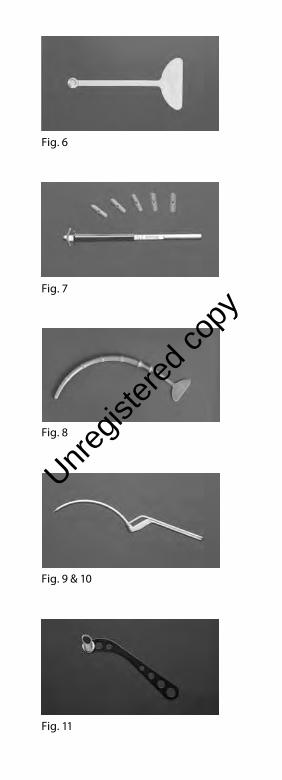
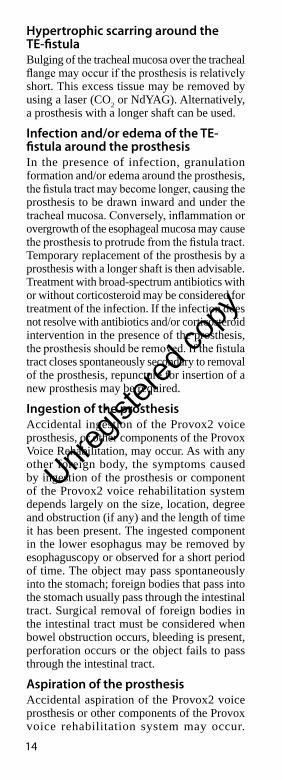
Fig. 9 & 10
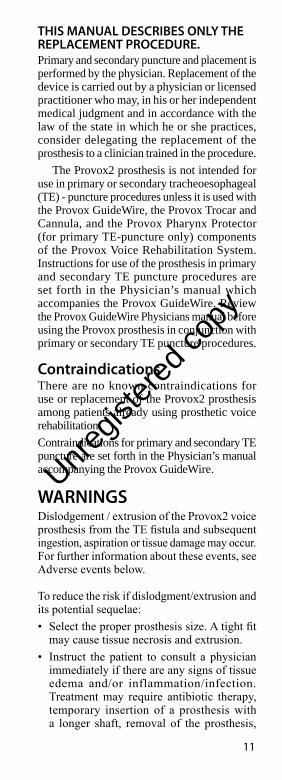
Fig. 8
Fig. 7
Fig. 6
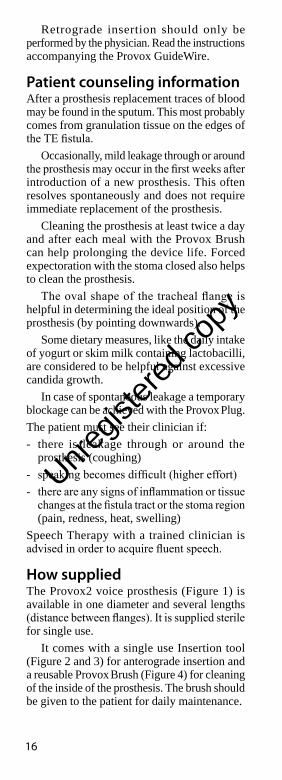
Fig. 11
Unregis
tered
copy

Fig. 14
Fig. 13
Fig. 12
Fig. 16
Fig. 15
Unregis
tered
copy

Prescription informationCAUTION: United States Federal law restricts this device to sale, distribution and use by or on order of a physician or a licensed practitioner. The availability of this product without prescription outside the United States may vary from country to country.
DisclaimerAtos Medical offers no warranty - neither expressed nor implied - to the purchaser hereunder as to the lifetime of the product delivered, which may vary with individual use and biological conditions. Furthermore, Atos Medical offers no warranty of merchantability or fitness of the product for any particular purpose.
Patents and trademarksProvox is a registered trademark of Atos Medical AB. Provox2 is protected by US patent no 5.976.151, JP 4.122.058 and other patents.
Unregis
tered
copy

Contents
ENGLISH ........................................ 10
日本語 .............................................. 27
한글 .................................................. 46
........................................ 63
oRdERING INFoRmatIoN ...... 78
Unregis
tered
copy

10
The manual, which accompanies this product, may be revised from time to time and must therefore be reviewed prior to each procedure in which the product is used.
ContentsIntended use / Indications ..............10Contraindications ...............................11WaRNINGS ............................................11PRECaUtIoNS ......................................12adverse events ....................................12directions for use ...............................20trouble shooting ................................23
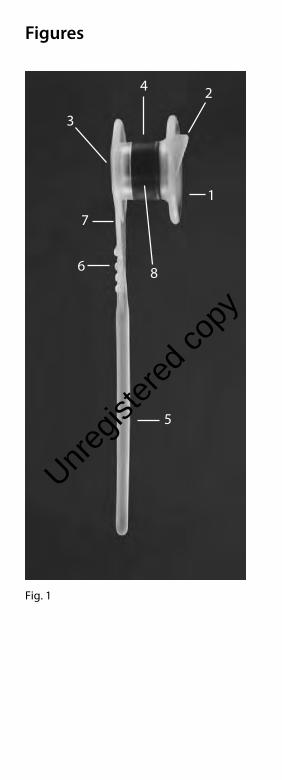
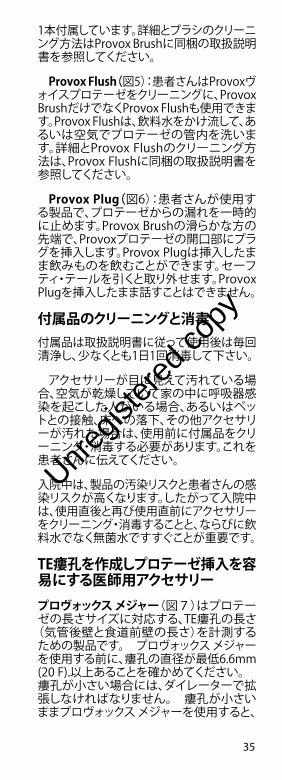
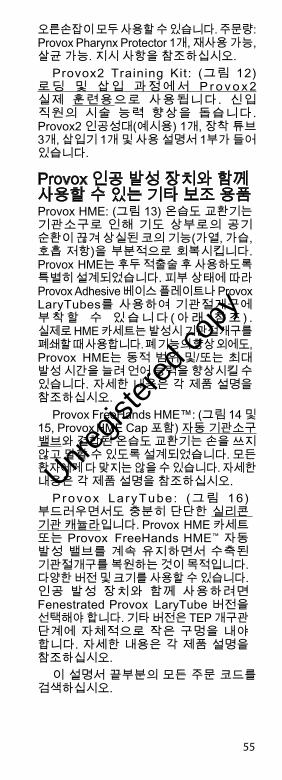
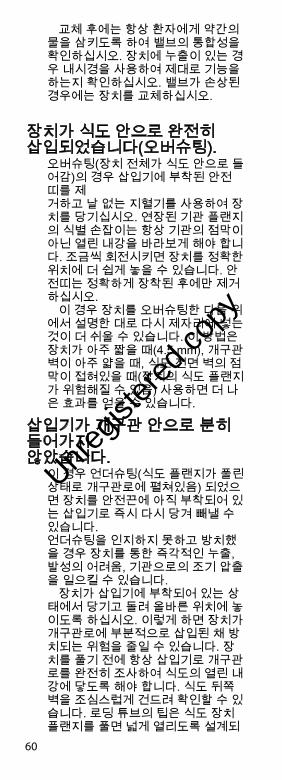
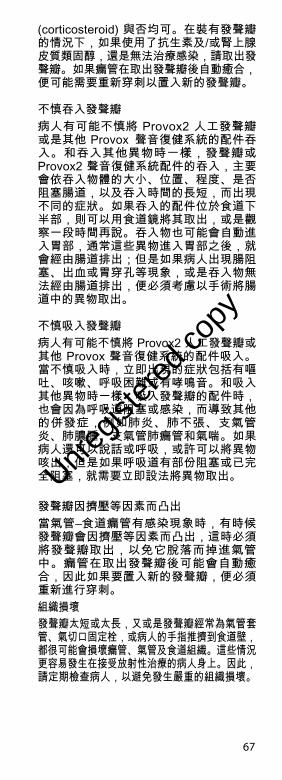
Device descriptionFigure 1: Provox2 Voice Prosthesis1. Valve. Molded in one part with the body of
the prosthesis.2. Esophageal flange.3. Tracheal flange.4. Radio-opaque, candida resistant valve seat.5. Safety strap. Serves also as introduction string
for retrograde insertion.6. Direction identification knobs. When pulling the prosthesis through the fistula in case of retrograde insertion or overshooting, they must face the open lumen of the trachea and not the mucosa.7. Size information (length between flanges).
Available: 4.5, 6, 8, 10, 12.5, 15 mm.8. Outer Diameter: 7.5 mm (22.5 F).Figure 2: Loading TubeFigure 3: InserterMaterials: Medical grade silicone rubber and plastic.
Intended use / IndicationsThe Provox2 Voice Rehabilitation System is intended for use in surgical, prosthetic voice restoration after total laryngectomy.
The prosthesis may be inserted by the physician at the time of the total laryngectomy (primary puncture), or at a later date (secondary puncture), or may be used to replace the present prosthesis.
ENGLISH
Unregis
tered
copy
11
THIS MANUAL DESCRIBES ONLY THE REPLACEMENT PROCEDURE.Primary and secondary puncture and placement is performed by the physician. Replacement of the device is carried out by a physician or licensed practitioner who may, in his or her independent medical judgment and in accordance with the law of the state in which he or she practices, consider delegating the replacement of the prosthesis to a clinician trained in the procedure.
The Provox2 prosthesis is not intended for use in primary or secondary tracheoesophageal (TE) - puncture procedures unless it is used with the Provox GuideWire, the Provox Trocar and Cannula, and the Provox Pharynx Protector (for primary TE-puncture only) components of the Provox Voice Rehabilitation System. Instructions for use of the prosthesis in primary and secondary TE puncture procedures are set forth in the Physician’s manual which accompanies the Provox GuideWire. Review the Provox GuideWire Physicians manual before using the Provox prosthesis in conjunction with primary or secondary TE puncture procedures.
ContraindicationsThere are no known contraindications for use or replacement of the Provox2 prosthesis among patients already using prosthetic voice rehabilitation. Contraindications for primary and secondary TE puncture are set forth in the Physician’s manual accompanying the Provox GuideWire.
WARNINGSDislodgement / extrusion of the Provox2 voice prosthesis from the TE fistula and subsequent ingestion, aspiration or tissue damage may occur. For further information about these events, see Adverse events below.
To reduce the risk if dislodgment/extrusion and its potential sequelae:• Select the proper prosthesis size. A tight fit
may cause tissue necrosis and extrusion.• Instruct the patient to consult a physician
immediately if there are any signs of tissue edema and/or inflammation/infection. Treatment may require antibiotic therapy, temporary insertion of a prosthesis with a longer shaft, removal of the prosthesis,
Unregis
tered
copy

12
surgical closure of the fistula tract, and/or repuncture.
• Instruct the patient to use only the original Provox accessories (Brush, Flush, Plug) for cleaning of the prosthesis or temporary occlusion and to avoid all other kinds of manipulation.
• If tracheal cannula or stoma studs are used, choose a shape that does not push on the prosthesis or hook the tracheal flange of the prosthesis during insertion and removal of the cannula. For example a perforated cannula (for speech) should have several small perforations instead of one large opening.
Re-use and re-processing may cause cross-contamination and damage to the device, which could cause patient harm.
PRECAUTIONSLoad the prosthesis with the esophageal flange bent forward - into the insertion tool device before placement. Incorrect loading can cause immediate valve failure and fluid aspiration.
Carefully assess any patient undergoing anticoagulant treatment for the risk of bleeding or hemorrhage prior to placement or replacement of the prosthesis.
Aseptic technique should be employed in the management of the voice prosthesis to avoid introducing contaminants into the stoma, TE-fistula or esophagus.
Adverse eventsLeakage through the prosthesisLeakage through the prosthesis may occur in association with candida overgrowth or dislodgement of the radiopaque ring (valve seat). It may also occur, if the esophageal flange of the prosthesis is not fully developed in the lumen of the esophagus or if the prosthesis is too short. Endoscopic examination should be performed to determine whether any of these phenomena has occurred. Dislodgement of the radio-opaque ring is an indication for replacement of the prosthesis and for thorough examination of the patient to determine that the ring has not been aspirated. If the radiopaque ring has not been dislodged, the prosthesis is in the correct position and of the right length, and if cleaning of the prosthesis does not resolve
Unregis
tered
copy

13
leakage through the prosthesis, replacement of the prosthesis is indicated.
Candida overgrowthCandida overgrowth of the prosthesis occurs in almost all patients. Radiotherapy, salivary content and dietary habit may influence how rapidly candida can affect the silicone material. Treatment with antifungal agents may be considered if candida overgrowth causes leakage through the prosthesis or other incompetence of the valve. Possible treatments include: Nystatin oral solution: 2-3 times daily 5-10 ml (500.000 B 1.000.000 E) orally with simultaneous brushing of the prosthesis with the Provox Brush dipped in the Nystatin oral solution to coat the inside of the prosthesis; Diflucan suspension: once daily 5 ml (50 mg) orally with simultaneous brushing of the voice prosthesis with the Provox Brush dipped in Diflucan suspension to coat the inside of the prosthesis.
Leakage around the prosthesisTransient leakage around the prosthesis may occur and may improve spontaneously. If leakage does not improve spontaneously, temporary removal of the prosthesis and the insertion of a cuffed tracheal cannula and/or nasogastric feeding tube to permit shrinkage of the fistula may be considered. Alternatively, a purse string suture with 3x0 absorbable material could be submucosally applied around the TE-fistula after removal of the prosthesis. The new prosthesis should be inserted and the suture should be tightened gently, enclosing the fistula wall around the prosthesis. If leakage around the prosthesis is intractable to more conservative measures, surgical closure of the fistula and subsequent repuncture may be necessary.
HemorrhageSlight bleeding from the edges of the TE-fistula may occur during replacement of the prosthesis and generally resolves spontaneously. Patients on anticoagulant therapy, however, should be carefully evaluated for the risk of hemorrhage prior to placement or replacement of the prosthesis.
Granulation around the fistulaFormation of granulation tissue around the TE-fistula has been reported at an incidence of approximately 5%. Electrical, chemical, or laser cauterization of the area of granulation may be considered.
Unregis
tered
copy
14
Hypertrophic scarring around the TE-fistulaBulging of the tracheal mucosa over the tracheal flange may occur if the prosthesis is relatively short. This excess tissue may be removed by using a laser (CO2 or NdYAG). Alternatively, a prosthesis with a longer shaft can be used.
Infection and/or edema of the TE-fistula around the prosthesisIn the presence of infection, granulation formation and/or edema around the prosthesis, the fistula tract may become longer, causing the prosthesis to be drawn inward and under the tracheal mucosa. Conversely, inflammation or overgrowth of the esophageal mucosa may cause the prosthesis to protrude from the fistula tract. Temporary replacement of the prosthesis by a prosthesis with a longer shaft is then advisable. Treatment with broad-spectrum antibiotics with or without corticosteroid may be considered for treatment of the infection. If the infection does not resolve with antibiotics and/or corticosteroid intervention in the presence of the prosthesis, the prosthesis should be removed. If the fistula tract closes spontaneously secondary to removal of the prosthesis, repuncture for insertion of a new prosthesis may be required.
Ingestion of the prosthesisAccidental ingestion of the Provox2 voice prosthesis, or other components of the Provox Voice Rehabilitation, may occur. As with any other foreign body, the symptoms caused by ingestion of the prosthesis or component of the Provox2 voice rehabilitation system depends largely on the size, location, degree and obstruction (if any) and the length of time it has been present. The ingested component in the lower esophagus may be removed by esophaguscopy or observed for a short period of time. The object may pass spontaneously into the stomach; foreign bodies that pass into the stomach usually pass through the intestinal tract. Surgical removal of foreign bodies in the intestinal tract must be considered when bowel obstruction occurs, bleeding is present, perforation occurs or the object fails to pass through the intestinal tract.
Aspiration of the prosthesisAccidental aspiration of the Provox2 voice prosthesis or other components of the Provox
voice rehabilitation system may occur.
Unregis
tered
copy

15
Immediate symptoms may include gagging, coughing, choking or wheezing. As with any other foreign body, complications from aspiration of a component may be caused by obstruction or infection. Complications may include pneumonia, atelectasis, bronchitis, lung abscess, bronchopulmonary fistula and asthma. If the patient can speak or breathe, coughing may dislodge the foreign body. Partial airway obstruction or complete airway obstruction requires immediate intervention for removal of the object.
Protrusion / extrusion of the prosthesisProtrusion of the prosthesis and subsequent spontaneous extrusion is sometimes observed during infection of the TE-fistula. Removal of the prosthesis is required to avoid dislodgement into the trachea. The fistula tract may close spontaneously secondary to the removal of the prosthesis. Repuncture may be necessary for insertion of a new prosthesis.
Tissue damageIf the prosthesis is too short, too long or is pushed frequently against the esophageal wall by a tracheal cannula, stoma stud or a finger of the patient, damage of the fistula, tracheal and esophageal tissues may occur. In patients undergoing radiotherapy this may happen more easily. Inspect the conditions regularly to avoid severe damage.
Individualization of treatmentAnterograde vs. retrograde insertionIf the Provox2 prosthesis cannot be inserted in an anterograde manner, retrograde insertion by use of the Provox GuideWire REF 7215 may be performed. This method should be used for placements directly after TE puncture procedure (primary or secondary), and in cases where it is difficult to reach and probe the fistula tract with the Provox2 inserter from the stoma.
In cases of a thinned/atrophic fistula wall (very short fistula tract, often combined with leakage around the prosthesis), mucosal folds overlapping the posterior part of the prosthesis or if the esophageal flange is difficult to develop within the esophagus, retrograde insertion can help to protect the fistula tract and to completely develop the esophageal flange of the prosthesis.
Unregis
tered
copy
16
Retrograde insertion should only be performed by the physician. Read the instructions accompanying the Provox GuideWire.
Patient counseling informationAfter a prosthesis replacement traces of blood may be found in the sputum. This most probably comes from granulation tissue on the edges of the TE fistula.
Occasionally, mild leakage through or around the prosthesis may occur in the first weeks after introduction of a new prosthesis. This often resolves spontaneously and does not require immediate replacement of the prosthesis.
Cleaning the prosthesis at least twice a day and after each meal with the Provox Brush can help prolonging the device life. Forced expectoration with the stoma closed also helps to clean the prosthesis.
The oval shape of the tracheal flange is helpful in determining the ideal position of the prosthesis (by pointing downwards).
Some dietary measures, like the daily intake of yogurt or skim milk containing lactobacilli, are considered to be helpful against excessive candida growth.
In case of spontaneous leakage a temporary blockage can be achieved with the Provox Plug.The patient must see their clinician if: - there is leakage through or around the
prosthesis (coughing)- speaking becomes difficult (higher effort) - there are any signs of inflammation or tissue
changes at the fistula tract or the stoma region (pain, redness, heat, swelling)
Speech Therapy with a trained clinician is advised in order to acquire fluent speech.
How suppliedThe Provox2 voice prosthesis (Figure 1) is available in one diameter and several lengths (distance between flanges). It is supplied sterile for single use.
It comes with a single use Insertion tool (Figure 2 and 3) for anterograde insertion and a reusable Provox Brush (Figure 4) for cleaning of the inside of the prosthesis. The brush should be given to the patient for daily maintenance.
Unregis
tered
copy
17
Accessories to maintain the device function (for patient’s use)Caution: Only use genuine Provox accessories that are intended for use with Provox2 for the handling and cleaning of your prosthesis.Instruct your patient on how to clean the device and to avoid all other kinds of manipulation of the prosthesis than the cleaning and maintenance described below.
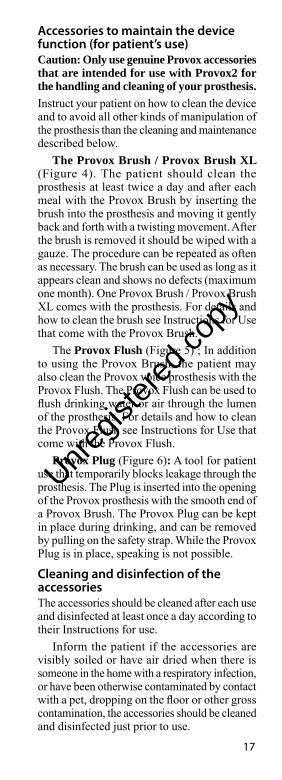
The Provox Brush / Provox Brush XL (Figure 4). The patient should clean the prosthesis at least twice a day and after each meal with the Provox Brush by inserting the brush into the prosthesis and moving it gently back and forth with a twisting movement. After the brush is removed it should be wiped with a gauze. The procedure can be repeated as often as necessary. The brush can be used as long as it appears clean and shows no defects (maximum one month). One Provox Brush / Provox Brush XL comes with the prosthesis. For details and how to clean the brush see Instructions for Use that come with the Provox Brush.
The Provox Flush (Figure 5) ; In addition to using the Provox Brush, the patient may also clean the Provox voice prosthesis with the Provox Flush. The Provox Flush can be used to flush drinking water or air through the lumen of the prosthesis. For details and how to clean the Provox Flush see Instructions for Use that come with the Provox Flush.
Provox Plug (Figure 6): A tool for patient use that temporarily blocks leakage through the prosthesis. The Plug is inserted into the opening of the Provox prosthesis with the smooth end of a Provox Brush. The Provox Plug can be kept in place during drinking, and can be removed by pulling on the safety strap. While the Provox Plug is in place, speaking is not possible.
Cleaning and disinfection of the accessoriesThe accessories should be cleaned after each use and disinfected at least once a day according to their Instructions for use.
Inform the patient if the accessories are visibly soiled or have air dried when there is someone in the home with a respiratory infection, or have been otherwise contaminated by contact with a pet, dropping on the floor or other gross contamination, the accessories should be cleaned and disinfected just prior to use.
Unregis
tered
copy

18
During hospitalization there is an increased risk of device contamination and patient infection. Therefore it is important to clean and disinfect the accessories immediately after use and again just before use during hospitalization, and rinse using sterile water, rather than drinking water.
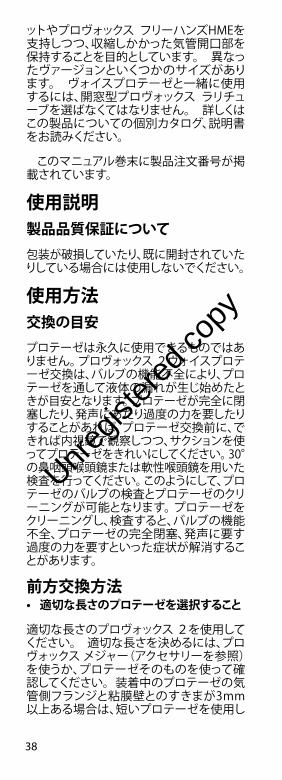
Accessories to facilitate insertion of the prosthesis and to create a TEP fistula (for clinician’s use)Provox Measure: (Figure 7) Measures the length (corresponding to prosthesis size) of the existing TE fistula. Note: Before using the Provox Measure, make sure the fistula diameter has at least a diameter of 6.6 mm (20 F). Smaller fistulas should be dilated first, because, if the fistula is too small, it may be difficult to remove the instrument. Order size: 1 Provox Measure, non-sterile, sterilizable, reusable, and 5 Provox
Measure Flanges, non-sterile, sterilizable, single use. Read instructions.
Provox Dilator: (Figure 8) Helps to convert from a prosthesis with a smaller shaft diameter to a Provox voice prostheses. The Provox Dilator is a silicone rubber instrument for stepwise dilation of the TEP fistula, beginning from 15 F at the tip and ending at 24 F. Each step section (e.g. 18, 20, 22 F) has a small retention collar to help reduce the risk of the instrument slipping out of the fistula. The Provox Dilator can also be used to temporarily block the fistula when the prosthesis has been removed, or to upsize a fistula that has shrunk after removal or loss of a Provox voice prosthesis. Order size: 1 Provox
Dilator, non-sterile, sterilizable, reusable. Read instructions.
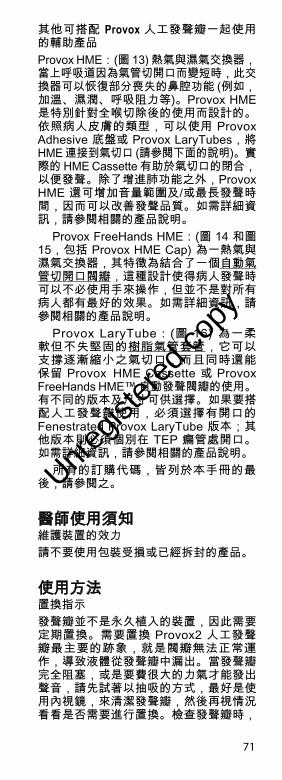
Provox Trocar and Cannula: (Figures 9 and 10) Stainless steel instruments for performing a primary or secondary TE puncture. The Provox Trocar creates a small, rounded puncture. After puncturing, the inner Trocar is removed and the Provox GuideWire is then pushed through the outer sleeve (Cannula) into the pharyngeal opening, which remains after removal of the larynx, to allow the Provox or Provox 2 prosthesis to be attached and pulled into the fistula. Order size: 1 Provox Trocar and 1 Provox
Cannula, reusable, sterilizable. Read instructions.Provox Pharynx Protector: (Figure 11)
For protection of the pharyngeal wall during primary TE only. Stainless steel instrument. Interchangeable for left- or right-handed use.
Unregis
tered
copy
19
Order size: 1 Provox Pharynx Protector, reusable, sterilizable. Read instructions.
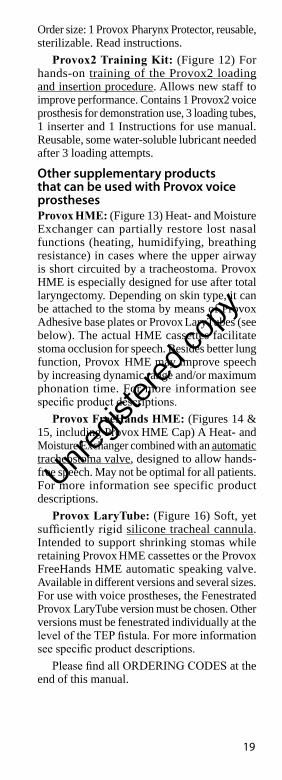
Provox2 Training Kit: (Figure 12) For hands-on training of the Provox2 loading and insertion procedure. Allows new staff to improve performance. Contains 1 Provox2 voice prosthesis for demonstration use, 3 loading tubes, 1 inserter and 1 Instructions for use manual. Reusable, some water-soluble lubricant needed after 3 loading attempts.
Other supplementary products that can be used with Provox voice prosthesesProvox HME: (Figure 13) Heat- and Moisture Exchanger can partially restore lost nasal functions (heating, humidifying, breathing resistance) in cases where the upper airway is short circuited by a tracheostoma. Provox
HME is especially designed for use after total laryngectomy. Depending on skin type, it can be attached to the stoma by means of Provox
Adhesive base plates or Provox LaryTubes (see below). The actual HME cassettes facilitate stoma occlusion for speech. Besides better lung function, Provox HME may improve speech by increasing dynamic range and/or maximum phonation time. For more information see specific product descriptions.
Provox FreeHands HME: (Figures 14 & 15, including Provox HME Cap) A Heat- and Moisture Exchanger combined with an automatic tracheostoma valve, designed to allow hands-free speech. May not be optimal for all patients. For more information see specific product descriptions.
Provox LaryTube: (Figure 16) Soft, yet sufficiently rigid silicone tracheal cannula. Intended to support shrinking stomas while retaining Provox HME cassettes or the Provox
FreeHands HME automatic speaking valve. Available in different versions and several sizes. For use with voice prostheses, the Fenestrated Provox LaryTube version must be chosen. Other versions must be fenestrated individually at the level of the TEP fistula. For more information see specific product descriptions.
Please find all ORDERING CODES at the end of this manual.
Unregis
tered
copy
20
Instructions for the clinicianMaintaining device effectivenessDo not use the product if the package is damaged or opened.
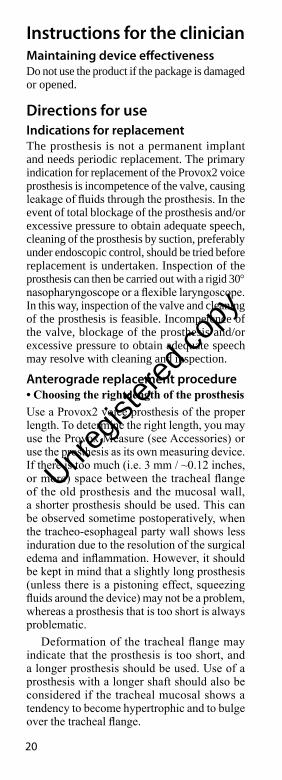
Directions for useIndications for replacementThe prosthesis is not a permanent implant and needs periodic replacement. The primary indication for replacement of the Provox2 voice prosthesis is incompetence of the valve, causing leakage of fluids through the prosthesis. In the event of total blockage of the prosthesis and/or excessive pressure to obtain adequate speech, cleaning of the prosthesis by suction, preferably under endoscopic control, should be tried before replacement is undertaken. Inspection of the prosthesis can then be carried out with a rigid 30° nasopharyngoscope or a flexible laryngoscope. In this way, inspection of the valve and cleaning of the prosthesis is feasible. Incompetence of the valve, blockage of the prosthesis and/or excessive pressure to obtain adequate speech may resolve with cleaning and inspection.
Anterograde replacement procedure• Choosing the right length of the prosthesisUse a Provox2 voice prosthesis of the proper length. To determine the right length, you may use the Provox Measure (see Accessories) or use the prosthesis as its own measuring device. If there is too much (i.e. 3 mm / ~0.12 inches, or more) space between the tracheal flange of the old prosthesis and the mucosal wall, a shorter prosthesis should be used. This can be observed sometime postoperatively, when the tracheo-esophageal party wall shows less induration due to the resolution of the surgical edema and inflammation. However, it should be kept in mind that a slightly long prosthesis (unless there is a pistoning effect, squeezing fluids around the device) may not be a problem, whereas a prosthesis that is too short is always problematic.
Deformation of the tracheal flange may indicate that the prosthesis is too short, and a longer prosthesis should be used. Use of a prosthesis with a longer shaft should also be considered if the tracheal mucosal shows a tendency to become hypertrophic and to bulge over the tracheal flange.
Unregis
tered
copy
21
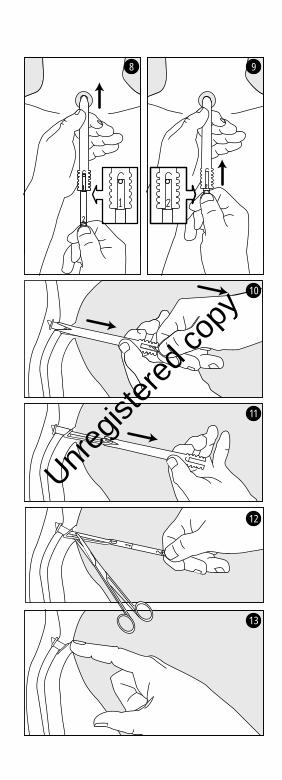
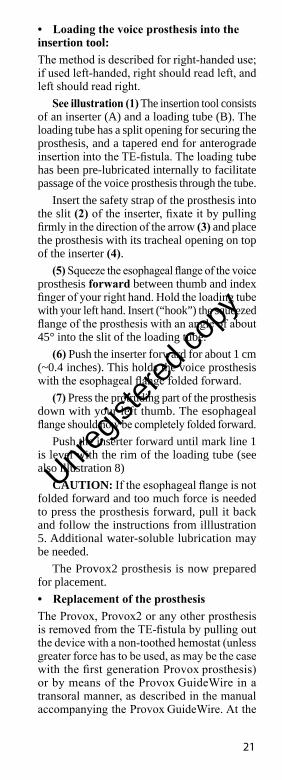
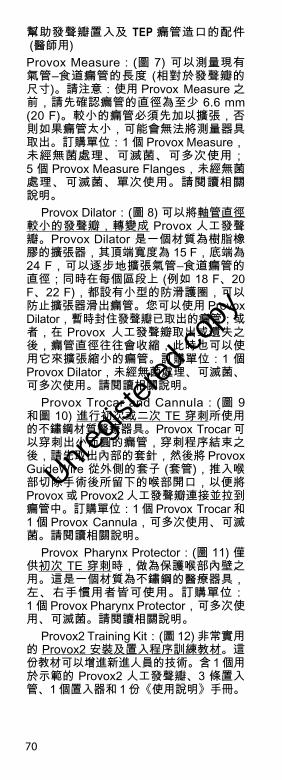
• Loading the voice prosthesis into the insertion tool:The method is described for right-handed use; if used left-handed, right should read left, and left should read right.
See illustration (1) The insertion tool consists of an inserter (A) and a loading tube (B). The loading tube has a split opening for securing the prosthesis, and a tapered end for anterograde insertion into the TE-fistula. The loading tube has been pre-lubricated internally to facilitate passage of the voice prosthesis through the tube.
Insert the safety strap of the prosthesis into the slit (2) of the inserter, fixate it by pulling firmly in the direction of the arrow (3) and place the prosthesis with its tracheal opening on top of the inserter (4).
(5) Squeeze the esophageal flange of the voice prosthesis forward between thumb and index finger of your right hand. Hold the loading tube with your left hand. Insert (“hook”) the squeezed flange of the prosthesis with an angle of about 45° into the slit of the loading tube.
(6) Push the inserter forward for about 1 cm (~0.4 inches). This holds the voice prosthesis with the esophageal flange folded forward.
(7) Press the protruding part of the prosthesis down with your left thumb. The esophageal flange should now be completely folded forward.
Push the inserter forward until mark line 1 is level with the rim of the loading tube (see also illustration 8)
CAUTION: If the esophageal flange is not folded forward and too much force is needed to press the prosthesis forward, pull it back and follow the instructions from illlustration 5. Additional water-soluble lubrication may be needed.
The Provox2 prosthesis is now prepared for placement.• Replacement of the prosthesisThe Provox, Provox2 or any other prosthesis is removed from the TE-fistula by pulling out the device with a non-toothed hemostat (unless greater force has to be used, as may be the case with the first generation Provox prosthesis) or by means of the Provox GuideWire in a transoral manner, as described in the manual accompanying the Provox GuideWire. At the
Unregis
tered
copy
22
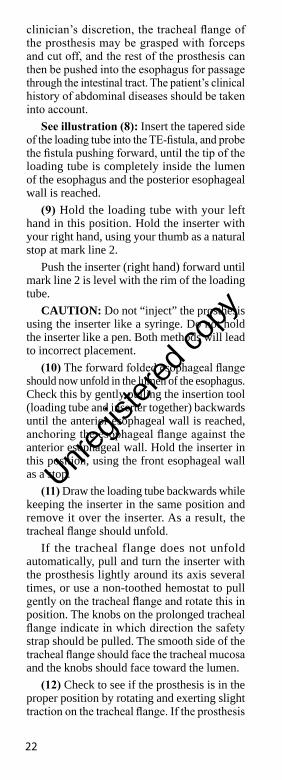
clinician’s discretion, the tracheal flange of the prosthesis may be grasped with forceps and cut off, and the rest of the prosthesis can then be pushed into the esophagus for passage through the intestinal tract. The patient’s clinical history of abdominal diseases should be taken into account.
See illustration (8): Insert the tapered side of the loading tube into the TE-fistula, and probe the fistula pushing forward, until the tip of the loading tube is completely inside the lumen of the esophagus and the posterior esophageal wall is reached.
(9) Hold the loading tube with your left hand in this position. Hold the inserter with your right hand, using your thumb as a natural stop at mark line 2.
Push the inserter (right hand) forward until mark line 2 is level with the rim of the loading tube.
CAUTION: Do not “inject” the prosthesis using the inserter like a syringe. Do not hold the inserter like a pen. Both methods will lead to incorrect placement.
(10) The forward folded esophageal flange should now unfold in the lumen of the esophagus. Check this by gently pulling the insertion tool (loading tube and inserter together) backwards until the anterior esophageal wall is reached, anchoring the esophageal flange against the anterior esophageal wall. Hold the inserter in this position, using the front esophageal wall as a stop.
(11) Draw the loading tube backwards while keeping the inserter in the same position and remove it over the inserter. As a result, the tracheal flange should unfold.
If the tracheal flange does not unfold automatically, pull and turn the inserter with the prosthesis lightly around its axis several times, or use a non-toothed hemostat to pull gently on the tracheal flange and rotate this in position. The knobs on the prolonged tracheal flange indicate in which direction the safety strap should be pulled. The smooth side of the tracheal flange should face the tracheal mucosa and the knobs should face toward the lumen.
(12) Check to see if the prosthesis is in the proper position by rotating and exerting slight traction on the tracheal flange. If the prosthesis
Unregis
tered
copy

23
is safely in place, cut off the safety strap on the outer edge of the tracheal flange.
(13) The Provox2 voice prosthesis is ready for use. The end of the tracheal flange should point downwards into the trachea.
Remarks- If you have little experience with the Provox2
replacement procedure, read the Trouble Shooting section below and practice with the Provox2 Training kit (REF 7222) and Artificial Fistula model (REF 8201).
- If the insertion is not successful, it can be repeated with the same tools and devices. If, however, the procedure has to be repeated more than twice, additional water-soluble lubrication of the loading tube is advisable.
- If replacement of the voice prosthesis by anterograde method is not successful, the retrograde replacement method with the Provox GuideWire may be used, using the safety strap as introduction string. See Individualization of treatment section above.
Trouble shootingSafety strap forgottenIf you do not attach the safety strap of the prosthesis, it may be lost during insertion, either in esophagus, fistula or trachea. There is a risk of aspiration or ingestion.
If this happens, interrupt insertion if appropriate, secure the prosthesis with a non-toothed hemostat and pull it out by using another hemostat. Reload the prosthesis into the insertion tool and repeat the procedure. If the prosthesis is already lost, see Adverse events section for more information.
The esophageal flange is not completely folded forward into the loading tube. (1) If this happens and it is hard to push the prosthesis forward within the tube, interrupt the insertion and pull the prosthesis backwards out of the loading tube. Reload and repeat the procedure.
The esophageal flange is not completely folded forward into the loading tube. (2) If this happens and the valve is damaged (i.e. dislodging the blue valve seat or tearing off the valve flap), there is a risk of aspiration.
Unregis
tered
copy

24
Always check the integrity of the valve after replacement by letting the patient swallow some water. If the prosthesis leaks, check the function endoscopically. Replace the prosthesis if the valve is damaged.
Inserting the prosthesis completely into the esophagus (overshooting).In case of overshooting (the whole prosthesis is developed in the esophagus) results, leave the safety strap attached to the inserter; use a non-toothed hemostat to pull the prosthesis into position. The identification knobs on the prolonged tracheal flange must always face the open lumen of the trachea, never the mucosal membrane. Slight rotation might be helpful to fully position the prosthesis. Cut the safety strap only after the correct fit is obtained.
In some cases it might be easier to overshoot the prosthesis and position it as described above. Conditions which may favor this approach include: Use of very short prostheses (4.5 mm), very thin fistula walls, mucosal fold in the esophageal front wall which may otherwise entrap the esophageal flange of the prosthesis.
Inserter is not placed far enough into the fistula. If this happens and undershooting (the esophageal flange is released and unfolds still in the fistula tract) results, the prosthesis may be immediately pulled out again with the inserter, still attached by the safety strap. Alternatively, if undershooting is not recognized, it may lead to immediate leakage through the prosthesis and / or difficult voicing and / or early extrusion towards the trachea.
Confirm the correct position by pulling and rotating the prosthesis while it is still attached to the inserter. This reduces the risk of leaving the prosthesis partially inserted in the fistula tract.
Always fully probe the fistula tract with the inserter and reach the free lumen of the esophagus before releasing the prosthesis. You may carefully touch the esophageal back wall for confirmation. The tip of the loading tube is designed to open widely when releasing the esophageal prosthesis flange. This is meant to happen within the esophageal lumen, not within the fistula tract.
Unregis
tered
copy

25
Forgotten to stop at mark “2”If this happens, see the section above on “overshooting”.
Instead of the whole insertion tool, only the loading tube is pulled back initiallyIf this happens, the result may be ‘overshooting’: see the section above on “overshooting”.
Replacement of other voice prosthesesThe Provox2 voice prosthesis may be used for replacement of other voice prostheses designed to be used in a TE-fistula, if the length and the diameter of the TE-fistula are comparable with the dimensions of the TE-fistula created for the Provox voice prosthesis.1. Other indwelling voice prostheses (e.g.
Indwelling Blom-Singer and Groningen): if the TE-fistula is in the correct position, no special measures have to be taken for replacement. However, the position of the TE-fistula is important (see Position of the TE-fistula section below).
2. Non-indwelling voice prostheses (i.e. Blom-Singer): Because these prostheses often have a smaller diameter, dilatation of the TE-fistula with the Provox Dilator after removal of the prosthesis may be needed. First introduction of the Provox2 prosthesis may be more easily accomplished under local anesthesia using a guide wire. The position of the TE-fistula is important (see Position of the TE-fistula section below). In some instances, a higher position of the prosthesis onto the mucocutaneous junction can be observed with these prostheses. Closure of the fistula and secondary puncture at a later date is recommended if the Provox2 voice prosthesis is chosen as the replacement prosthesis.
Position of the TE-fistulaThe correct position of the TE-fistula is important. The center of the fistula (during puncture, later the rim of the fistula) should be approximately 5 mm (~0.2 inches) below the mucocutaneous junction of the trachea. A much lower position can create problems in cleaning of the prosthesis, make replacement more cumbersome and cause leakage of fluids through the prosthesis. If any of these problems interferes with optimal function of the prosthetic
Unregis
tered
copy
26
voice rehabilitation, closure of the fistula and secondary puncture at a later date could be beneficial.
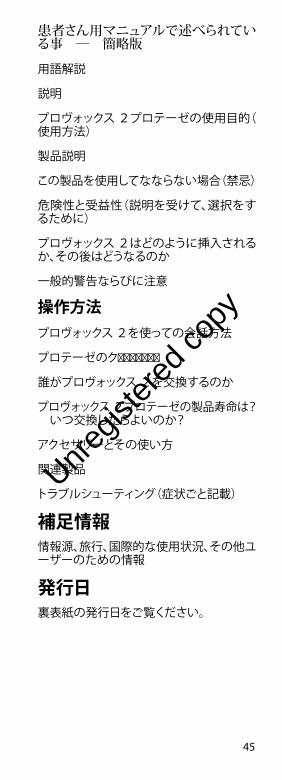
Patients manual - brief descriptionEvery Provox2 voice prosthesis comes with a separate Patient’s manual, which should be given to the patient. The Provox2 Patients manual is not intended to replace the discussion between patient and clinician.
Topics addressed in the patients manual: (Simplified contents)Glossary Descriptive information: Purpose of the Provox2 prosthesis (Indications for use) Product descriptionWhen the device should not be used (Contraindications) Risks and benefits (To make an informed choice) How to get a Provox2 inserted and what comes thereafter General WARNINGS and PRECAUTIONS
Operating information:How to use Provox2 for speaking How to clean the prosthesis Who replaces the Provox2 if needed? How long does a Provox2 prosthesis last and when should it be replaced?Accessories exist and how they are used Related productsTroubleshooting information (listed by symptoms)
Additional information Information resources, travel or international use, user assistance information.
Date of printingSee version number on the back cover.
Unregis
tered
copy

27
日本語
本製品に同梱されている取扱説明書は時折改訂されることがありますので、本製品を使用した各手順を行う前に、必ずご一読ください。
目次使用目的/使用方法 ................................27禁忌 ..............................................................28警告 ..............................................................28注意 ..............................................................29有害事象 .....................................................30使用方法 .....................................................38トラブルシューティング ............................42
製品説明図1:プロヴォックス®2ヴォイスプロテーゼ1. プロテーゼ本体と一体成型されたバルブ2. 食道側フランジ3. 気管側フランジ4. X線不透過性、抗カンジタバルブ・シート.5. 後方挿入時、導入用ストリングとして役立
つセーフティ・テール。6. プロテーゼの向き 後方挿入や、停止位
置を越えての押し込みすぎの場合、プロテーゼを瘻孔から引っぱり出すとき、セーフティ・テールの凹凸がある面が気管壁でなく気管腔側に向くようにして引いてください。
7. サイズ(フランジ間の長さ) 4.5mm, 6mm, 8mm, 10mm, 12.5mm, 15mmがある。
8. 外径: 7.5mm(22.5Fr)図2: 装填チューブ図3: 挿入子素材: メディカルグレードのシリコーンゴムとプラスティック
使用目的ならびに適応プロヴォックス 2 音声再建システム は手術時に使用し、喉頭全摘出術後にヴォイスプロテーゼを用いて音声再建することを目的としています。
喉頭全摘出術(一次的瘻孔作成)時、後日(二
Unregis
tered
copy

28
次的瘻孔作成時)、または他のプロテーゼから交換するときに、プロヴォックス 2プロテーゼを挿入するができます。
このマニュアルでは交換方法についてのみ説明されています。一次的瘻孔作成と二次的瘻孔作成は医師が行います。 医師または資格を有する医療従事者が、独自の医学的判断をして 、法律に従ってプロテーゼの交換を行います。 この手技の訓練を積んだ医療従事者にプロテーゼ交換を任せることも考えられるかもしれません。
プロヴォックス 2 音声再建システムを構成する、プロヴォックスガイドワイヤー、プロヴォックストロッカー、プロヴォックス 咽頭プロテクター(一次的TE瘻孔作成時のみ)を使用しない限り 、一時的瘻孔作成であれ、二次的瘻孔作成であれ、プロヴォックス 2プロテーゼを、使用することは望ましくありません。 一次的瘻孔作成、二次的TE瘻孔作成時、プロテーゼをどのように使用するかについてはプロヴォックスガイドワイヤーに付いている医師用マニュアルに説明されています。 一次的瘻孔作成、二次的TE瘻孔作成時にプロヴォックス プロテーゼを使用する前に必ずプロヴォックスガイドワイヤー医師用マニュアルをお読みください。
禁忌すでにヴォイスプロテーゼを使用して音声再建をした患者さんでは、プロヴォックス
2プロテーゼを使用、交換することについての禁忌はありません。
一次的瘻孔作成、二次的TE瘻孔作成時の禁忌については、プロヴォックスガイドワイヤーに付いている医師用マニュアルに述べられています。
警告プロヴォックス 2 ヴォイスプロテーゼのTE瘻孔からのずれ、脱落により、誤飲、吸引または組織損傷を起こすことがあります。 詳しくは以下の有害事象を参照してください。
プロテーゼのずれ、脱落、その続発症の危
Unregis
tered
copy

29
険性を低くするには
• 適切なサイズのプロテーゼを選択してくだい。 きつすぎる場合、組織壊死を生じることがありますし脱落の原因ともなります。
• 組織に浮腫、炎症、感染の兆候が現れたなら直ちに医師に相談するよう患者さんを指導してください。 抗生物質を使用した治療、長いプロテーゼの一時的挿入、プロテーゼの抜去、瘻孔の閉鎖、再度の瘻孔作成といった処置が必要となることがあります。
• プロテーゼのクリーニング、一時的な閉鎖をする場合、必ずプロヴォックス 専用のブラシ、フラッシュ、プラグだけを使用し、他は使用しないよう指導してください。
• 気管カニューレまたは開口部レティナを使用する場合は、挿入 、抜去時にプロテーゼを押し込んだり、プロテーゼのフランジを引っかけたりしない形状のものを選んでください。 例えば側孔つきのカニューレの場合、側孔がひとつ大きく開いた製品よりも小さな孔がいくつも開いた製品の使用をお勧めします。
再使用や再処理は二次汚染および製品の破損を招くおそれがあり、患者さんに害の及ぶことがあります。
注意食道側フランジを前に曲げて挿入器にプロテーゼを装填します。間違った装填をすると、バルブが壊れ液体を吸引する原因となります。
抗凝固薬を処方されている患者さんは、プロテーゼ挿入したり交換したりする前に、出血の危険がないか特に注意して観察してください。
気管孔、TE瘻孔、食道に汚染菌をもたらすことのないように、ヴォイスプロテーゼの取扱いは無菌的に行ってください。
Unregis
tered
copy

30
有害事象プロテーゼを通しての漏れプロテーゼ通しての漏れはカンジタの増殖またはプロテーゼの青いリング部分(バルブ・シート)がずれたために起こることがあります。食道側フランジが食道内で十分拡がっていなかったり、プロテーゼのサイズが短すぎたりする場合にも起こることがあります。これらの現象が実際に生じているのかどうか確かめるには、内視鏡検査をする必要があります。 プロテーゼのリング部分が外れている場合は、プロテーゼ交換が必要であるとともに、患者さんがリングを吸引していないか調べる必要があります。 リングが外れていず、プロテーゼも正しい位置にあって、適切なサイズで、プロテーゼをクリーニングしても漏れが解消しない場合はプロテーゼの交換が必要となります。
カンジタの増殖プロテーゼにカンジタが増殖することはほとんど全ての患者さんに起こります。 カンジタがシリコーン素材にどれほど早く影響を与えるかは、主として、放 射線療法、唾液量、食習慣に左右されます。 カンジタ増殖がプロテーゼを通しての漏れまたはバルブの機能不全の原因となっている場合は、抗真菌剤の使用も考えられます。 治療方法として、ナイスタチンの経口溶液5-10 ml (500.000BB 1.000.000E)を一日2,3回服用するとともに、ナイスタチン溶液にプロヴォックス ブラシをつけて、プロテーゼの内側に塗布する方法、ダイフルカン懸濁液では、ダイフルカン5 ml (50 mg)を一日1回服用するとともにダイフルカン懸濁液にプロヴォックスブラシをつけて、プロテーゼの内側に塗布する方法とがあります。
プロテーゼ周囲からの漏れプロテーゼ周囲から一時的に漏れることがありますが、自然に解消されます。 漏れが自然に解消しない場合は、プロテーゼを抜去、カフ付カニューレまたは経鼻栄養チューブを挿入して、瘻孔を縮小することが考えられます。 その他、プロテーゼを抜去した後、TE瘻孔粘膜下を3x0の吸収性縫合糸で巾着縫合する方法もあります。 新しいプロテーゼを挿入し、プロテーゼに沿って瘻孔周囲を縫縮することもできます。 プロテーゼ周囲の漏れが、保存的療法で難しい場合
Unregis
tered
copy
31
は、瘻孔を外科的に閉鎖して、その後再度瘻孔作成することもでます。
出血プロテーゼを交換する間、TE瘻孔縁から少々出血することがありますが、通常自然に解消します。 抗凝固療法中の患者さんはプロテーゼを挿入したり交換したりする前に、注意深く出血の可能性を確かめなければなりません。
瘻孔周囲の肉芽形成約5%例で、TE瘻孔周囲に肉芽組織が形成されることが報告されています。 肉芽は電気メス、薬品焼灼、レーザー焼灼することができます。
TE瘻孔周囲の肥厚性瘢痕プロテーゼが比較的短い場合には、気 管側フランジを越えて気管粘膜が隆起することがあります。 この余分な組織はCO2 またはNdYAGレーザーを使用して切離することができます。 他の方法としては、より長いプロテーゼを使用する方法があります。
プロテーゼ周囲、TE瘻孔の感染または浮腫プロテーゼ周囲に感染、肉芽形成を生じると、瘻孔が長くなり、気管粘膜内側にプロテーゼが引き込まれる原因となります。 反対に、炎症または食道粘膜の増殖を生じると、瘻孔からプロテーゼが押し出される原因となります。 この場合 、使用中のプロテーゼよりも長いプロテーゼに交換することが勧められます。 炎症の治療には、広域抗菌スペクトルの抗生物質、コルチコイドステロイド投与を検討します。 抗生物質、コルチコイドステロイドを使用しても炎症が消退しない場合、プロテーゼを抜去してください。 プロテーゼ抜去後、瘻孔が自然に閉鎖した場合は、新たにプロテーゼを挿入するための瘻孔を作成する必要があります。
プロテーゼ誤飲プロヴォックス 2 ヴォイスプロテーゼやプロヴォックス 2 音声再建システムの部品を、誤って飲み込む可能性があります。 いかなる異物とも同様に、プロヴォックス 2 ヴォイスプロテーゼやプロヴォックス 2 音声再建システムの部品の誤飲による症状は、それら
Unregis
tered
copy

32
の大きさ、位置、その症状の程度、閉塞(症状があるのなら)、異物が存在した期間によります。 誤飲して、腹部食道胃にある異物は内視鏡で除去できることもありますし、しばらく経過観察することもあります。 異物はそのまま胃に至るかもしれません。 通常、胃を通過すると、腸管も通過します。 腸閉塞を起こし、出血、穿孔が生じて、異物が腸管を通過しない場合は、腸管内の異物を外科的に除去することを検討しなければなりません。
プロテーゼ吸引プロヴォックス 2 ヴォイスプロテーゼやプロヴォックス 2 音声再建システムの部品を誤って吸引する可能性があります。 吐気、咳き込み、窒息または喘鳴といった症状がただちに現れます。 いかなる異物とも同様に、部品の吸引は気道閉塞または感染を生じる可能性があります。 合併症には、肺炎、無気肺、気管支炎、肺膿瘍、気管支肺のフィステル、喘息が含まれます。 患者さんが話すことまたは呼吸ができるのであれば、異物が飛び出ることがあります。 部分的気道閉塞や完全気道閉塞の場合は直ちに異物を除去する措置が必要です。
プロテーゼの突出、脱落TE瘻孔に感染を生じた場合、プロテーゼが突出したり、自然脱落したりすることがあります。 気管にプロテーゼが落ち込まないように、プロテーゼを抜去する必要があります。 プロテーゼ抜去後に瘻孔が自然に閉鎖する可能性があります。 その場合、新しいプロテーゼを挿入するためには、新たな瘻孔作成が必要となります。
組織損傷プロテーゼが短すぎたり、長すぎたり、気管カニューレ、開口部レティナまたは患者さんの手で押されて、プロテーゼが食道壁に頻繁に当たると、瘻孔、気管、食道に組織損傷が生じることがあります。 放射線療法中の患者さんは、組織損傷を起こしやすいので注意が必要です。 大きな損傷を生じることのないように定期的に状態を確認してください。
Unregis
tered
copy

33
個人個人に会わせた治療方法前方対後方挿入プロヴォックス 2プロテーゼを前方挿入できない場合は、プロヴォックス 2ガイドワイヤー(製品番号7215を使用して、後方からの挿入することができます。この方法は、プロヴォックス 2挿入器を使って開口部から瘻孔に達し探ることが困難である場合、一次的または二次的であれ、TE瘻孔作成した直後に行ってください。
瘻孔壁が薄く萎縮していたり(瘻孔が短くなり、プロテーゼ周囲から漏れることが多い)、プロテーゼ後部が粘膜のひだで覆われていたりする場合、あるいは食道側フランジが食道内で展開することが困難である場合には、後方から挿入することで瘻孔が保護され、プロテーゼの食道側フランジが完全に展開できるようになります。
後方挿入は必ず医師が行ってください。プロヴォックス ガイドワイヤーに付いている説明書を必ず読んでください。
患者さんカウンセル情報プロテーゼを留置してしばらくは、少し痰に血が混じることがあります。 これは主にTE瘻孔縁の肉芽組織からくるものです。
新しくプロテーゼを留置した後、数週間は、プロテーゼを通してあるいは周囲から、軽い漏れが生じることがあります。 この漏れは通常自然に消退するので直ちに新しいプロテーゼに交換する必要はありません。
少なくとも1日2回ならびに毎食後にProvox Brushでプロテーゼをクリーニングすれば、デバイスの寿命を延ばすことができます。気管開口部を塞ぎ、喀出し、プロテーゼをきれいにすることもできます。
気管側フランジは(下方を示す)楕円形をしていて、プロテーゼの理想的位置がわかりやすくなっています。
食事療法ではたとえば、乳酸杆菌属を含むヨーグルトまたは脱脂粉乳を毎日摂取することで、カンジタの過度の増殖を抑えることができると考えられています。
Unregis
tered
copy
34
自然に起こる漏れは、プロヴォックス プラグを使って、一次的に止めることができます。
患者さんが医師にかからなければならない場合とは
― プロテーゼを通してまたは周囲から漏れがある(咳き込む)
― 会話が困難になった(非常な努力を要す)
― 瘻孔または気管開口部の炎症、あるいは組織変化(痛み、発赤、発熱、腫脹)の兆候がある
よどみなく話せるようになるために、訓練を積んだ専門家から言語療法を受けることが勧められます。
製品内容プロヴォックス 2 ヴォイスプロテーゼ直径は1種、長さ(両フランジ間)が数種あります。 すべて滅菌済、使い捨て製品です。
前方挿入用の使い捨ての挿入器、再利用可能なプロテーゼ内側をクリーニングするためのプロヴォックス ブラシがついています。ブラシは日々の手入れ用として、患者さんに差し上げてください。
患者さん用メンテナンス・アクセサリー
注意:プロテーゼの取扱いとクリーニングには、Provox2専用の正規のProvoxアクセサリーのみを使用してください。
製品のクリーニング方法について、ならびに以下に記載のクリーニングと手入れ以外の操作をプロテーゼに行わないよう、患者さんに指導してください。
Provox BrushまたはProvox Brush XL (図4)。患者さんは少なくとも1日2回なら
びに毎食後、Provox Brushをプロテーゼに挿入し、回転させながらやさしく前後に動かして、プロテーゼをクリーニングする必要があります。ブラシを取り出し、ガーゼでふきます。この手順は必要なだけ繰り返してかまいません。ブラシは見た目が清潔で不具合のない限り、最長1ヶ月使用できます。プロテーゼにはProvox BrushまたはProvox Brush XLが
Unregis
tered
copy
35
1本付属しています。詳細とブラシのクリーニング方法はProvox Brushに同梱の取扱説明書を参照してください。
Provox Flush(図5):患者さんはProvoxヴォイスプロテーゼをクリーニングに、Provox BrushだけでなくProvox Flushも使用できます。Provox Flushは、飲料水をかけ流して、あるいは空気でプロテーゼの管内を洗います。詳細とProvox Flushのクリーニング方法は、Provox Flushに同梱の取扱説明書を参照してください。
Provox Plug(図6):患者さんが使用する製品で、プロテーゼからの漏れを一時的に止めます。Provox Brushの滑らかな方の先端で、Provoxプロテーゼの開口部にプラグを挿入します。Provox Plugは挿入したまま飲みものを飲むことができます。セーフティ・テールを引くと取り外せます。Provox Plugを挿入したまま話すことはできません。
付属品のクリーニングと消毒付属品は取扱説明書に従って使用後は毎回清浄し、少なくとも1日1回消毒して下さい。
アクセサリーが目に見えて汚れている場合、空気が乾燥していて家の中に呼吸器感染を起こした人がいる場合、あるいはペットとの接触、床への落下、その他アクセサリーが汚れた場合は、使用前に付属品をクリーニング・消毒する必要があります。これを患者さんに伝えてください。
入院中は、製品の汚染リスクと患者さんの感染リスクが高くなります。したがって入院中は、使用直後と再び使用直前にアクセサリーをクリーニング・消毒することと、ならびに飲料水でなく無菌水ですすぐことが重要です。
TE瘻孔を作成しプロテーゼ挿入を容易にする医師用アクセサリープロヴォックス メジャー(図7)はプロテーゼの長さサイズに対応する、TE瘻孔の長さ
(気管後壁と食道前壁の長さ)を計測するための製品です。 プロヴォックス メジャーを使用する前に、瘻孔の直径が最低6.6mm (20 F).以上あることを確かめてください。 瘻孔が小さい場合には、ダイレーターで拡張しなければなりません。 瘻孔が小さいままプロヴォックス メジャーを使用すると、
Unregis
tered
copy
36
メジャーを取り外せなくなることがあります。 プロヴォックス メジャーは1個入りで、未滅菌、再使用、オートクレーブ滅菌可能です。 未滅菌、オートクレーブ可能な使い捨て製品、プロヴォックス メジャー・フランジ5個がついています。 詳しくは説明書をお読みください。
プロヴォックス ダイレーター(図8)は直径が小さなプロテーゼから、プロヴォックス ヴォイスプロテーゼに変更する際に使用します。 プロヴォックス ダイレーターはシリコーン製の製品で、 TE瘻孔直径を、先端の15Frで始まって24Frまで段階的に拡張します。 各サイズ段階(18, 20, 22Fr)に保持用の環があるため、径が小さくなっている方に滑るおそれがありません。 プロヴォックス ダイレーターはプロテーゼの抜去後、一次的に瘻孔を塞ぐ目的で使用できます。 また、プロヴォックス ヴォイスプロテーゼを抜去したり、紛失したりして、瘻孔が収縮した場合に拡大するためにも使用します。 プロヴォックス ダイレーターは1本入りで、未滅菌、再使用、オートクレーブ滅菌可能です。 詳しくは説明書をお読みください。
プロヴォックス トロッカー(図9,10)は一次的または二次的にTE瘻孔を作成することを目的としたステンレス製の器具です。 プロヴォックス トロッカーを使用すると小さく、円形をした瘻孔を作成することができます。 トロッカーで穿刺した後、外套を残したままトロッカーを抜去し、 プロヴォックス ガイドワイヤーを外套に通して咽頭口まで挿入します。 ガイドワイヤーは喉頭を摘出した後もそのまま残しておき、プロヴォックス またはプロヴォックス 2プロテーゼを接続して瘻孔に引き込むために使用します。 プロヴォックス トロッカーは1組入りで、再使用、オートクレーブ滅菌可能です。 詳しくは説明書をお読みください。
プロヴォックス 咽頭プロテクター(図11)は一次的TE瘻孔を作成する時にのみ使用します。 ステンレス製製品です。 右利き左利きどちらの術者でも使えるように向きを変えられます。 プロヴォックス 咽頭プロテクターは1組入りで、再使用、オートクレーブ滅菌可能です。 詳しくは説明書をお読みください。
Unregis
tered
copy

37
プロヴォックス 2訓練キット(図12)は、実際にプロヴォックス 2を装填し、挿入する方法を練習するための製品です。初めて使う方の技術を向上させることができます。製品にはデモンストレーション用Provox2ヴォイスプロテーゼ1個、挿入器3本、挿入子1本、取扱説明書1冊が含まれています。再使用可能ですが、プロテーゼ装填の練習を3度行った後使用するには、挿入器に水溶性の潤滑剤を塗ってお使いください。
プロヴォックス 2と一緒に使えるその他の製品プロヴォックス HME(図13)気管開口部から上気道まで短絡した場合、加温加湿フィルター(HME)で、加温、加湿、呼吸抵抗といった、失われた鼻機能を部分的に回復させることができます。 は喉頭全摘出後に使用することを目的としています。 皮膚の状態によっては、プロヴォックス アドヒーシブ・ベース・プレートまたはプロヴォックス ラリチューブ
(下記参照)につけて使用します。 HMEカセットそのもので、話をするため、気管開口部を簡単に塞ぐことができます。 呼吸機能を向上させる他に、ダイナミック・レンジ、発声持続時間が向上することにより、音声が改善されます。 詳しくはこの製品についての個別カタログ、説明書をお読みください。
プロヴォックス フリーハンズHME(図14, 15,プロヴォックス HMEキャップを含む)は自己加温加湿フィルター(HME)に気管開口部の自動バルブ機能が加わった製品で、手を使わずに発声できるよう設計されています。 全ての患者さんに適しているわけではありません。
喉頭摘出後、効果的に呼吸機能を回復することを目的とする、アトスメディカルの中核となる製品ラインです。 このカセットは吸気を加温加湿し、呼吸抵抗を大幅に回復させます。 咳や痰の問題がほとんどなくなります。 睡眠とクォリティ・オブ・ライフが改善されます。 プロヴォックスHMEは、安全で衛生的であることが証明されている、単純な仕組みに基づいています。 詳しくはこの製品についての個別カタログ、説明書をお読みください。
プロヴォックス ラリチューブ(図16)は、柔らかでかつ、適度の硬さを有したシリコーン製の製品です。 プロヴォックス カセ
Unregis
tered
copy
38
ットやプロヴォックス フリーハンズHMEを支持しつつ、収縮しかかった気管開口部を保持することを目的としています。 異なったヴァージョンといくつかのサイズがあります。 ヴォイスプロテーゼと一緒に使用するには、開窓型プロヴォックス ラリチューブを選ばなくてはなりません。 詳しくはこの製品についての個別カタログ、説明書をお読みください。
このマニュアル巻末に製品注文番号が掲載されています。
使用説明製品品質保証について包装が破損していたり、既に開封されていたりしている場合には使用しないでください。
使用方法交換の目安プロテーゼは永久に使用できるものではありません。 プロヴォックス 2ヴォイスプロテーゼ交換は、バルブの機能不全により、プロテーゼを通して液体の漏れが生じ始めたときが目安となります。 プロテーゼが完全に閉塞したり、発声にあたり過度の力を要したりすることがあれば、プロテーゼ交換前に、できれば内視鏡で観察しつつ、サクションを使ってプロテーゼをきれいにしてください。 30°の鼻咽頭喉頭鏡または軟性喉頭鏡を用いた検査を行ってください。 このようにして、プロテーゼのバルブの検査とプロテーゼのクリーニングが可能となります。 プロテーゼをクリーニングし、検査すると、バルブの機能不全、プロテーゼの完全閉塞、発声に要す過度の力を要すといった症状が解消することがあります。
前方交換方法• 適切な長さのプロテーゼを選択すること
適切な長さのプロヴォックス 2を使用してください。 適切な長さを決めるには、プロヴォックス メジャー(アクセサリーを参照)を使うか、プロテーゼそのものを使って確認してください。 装着中のプロテーゼの気管側フランジと粘膜壁とのすきまが3mm以上ある場合は、短いプロテーゼを使用し
Unregis
tered
copy

39
てください。 こういった現象は、手術による浮腫、炎症が消退して気管食道壁の硬結が減じた、手術後に多く見受けられます。 しかしながら、少々長めのプロテーゼの方は(プロテーゼが前後して体液を絞り出す、ピストン効果が認められない限り)問題なることが少ない一方で、短すぎるプロテーゼは常に問題となります。
プロテーゼのフランジが歪んでいる場合は、プロテーゼが短すぎることを表しており、より長いプロテーゼを用いるべきです。 気管粘膜に肥厚の傾向が認められたり、気管側フランジが持ち上がったりしている場合もまた、より長いプロテーゼの使用を検討しなければなりません。
• ヴォイスプロテーゼを挿入器に装填する
右利きの方を想定して説明されています。 左利きの方は、右を左としてお読みください。
図(1)をご覧ください。 挿入器は挿入子(A)と装填チューブ(B)とから構成されています。 装填チューブの一端は、プロテーゼを確実に入れるために裂け目が設けられており、もう一方にはTE瘻孔に前方から挿入するためにテイパーとなっています。 装填チューブ内部にはあらかじめ潤滑剤が塗布されており、ヴォイスプロテーゼがチューブ内を通過しやすくています。
挿入子(2)の裂け目(3)にプロテーゼのセーフティ・テールを通し、矢印の方向(3)に引っ張りしっかりと固定し、プロテーゼの気管側を挿入子に向けた状態(4)にします。
(5)ヴォイスプロテーゼの気管側フランジを右手の親指と人差し指とで押しつぶします。 装填用チューブを左手でつかみます。 プロテーゼを押しつぶしたままの状態で、装填用チューブの裂け目に対しおよそ45°の角度で押し込みます。
(6)挿入子をおよそ1cm前に進めます。 プロテーゼの食道側フランジは前方に折り曲がったままの状態です。
(7)プロテーゼの突出部分を左手の親指で押し込みます。 食道側フランジは前方向に完全に折り曲げられました。
Unregis
tered
copy

40
挿入子の「1」と印された位置が装填チューブ端にくるまで押し進めます。(図8参照)
注意:食道側フランジが前方に折れ曲がらないで、プロテーゼを押し込むのに過分な力を要す場合は、一度引き戻して図Ⅱからの使用説明に従ってください。 水溶性の潤滑剤が必要となることがあり。
プロヴォックス 2挿入準備が整いました。
• プロテーゼの交換
プロヴォックス 、プロヴォックス 2または他のプロテーゼを無鈎鉗子でTE瘻孔から抜去するか、(この方法では、抜去するのに非常な力が必要とされる場合)、プロヴォックス ガイドワイヤーについているマニュアルの説明に従って、プロヴォックス ガイドワイヤーを使用して、経口的に抜去するかしてください。 医師の判断で、鑷子でプロテーゼ把持して気管側フランジを切り離した後、プロテーゼの他の部分をそのまま食道に落とし消化管を通して排泄させることもあります。 その際には、患者さんの腹部病歴を考慮しなければなりません。
図(8)を参照のこと。 装填チューブのテイパー部分をTE瘻孔に差込み、装填チューブ先端が食道内に完全に入り込み、食道後壁に達するまで、瘻孔を探りながら押し進めてください。
(9)左手で装填チューブをこの位置で持ってください。 挿入子を右手で持つと、親指は印「2」の位置で自然に止まります。
(右手)挿入子の「2」の印が装填チューブ端にくるまで押し進めます。
注意:注射器を扱うように、挿入子を使ってプロテーゼを「押し込む」ようなことはしないでください。 挿入子は鉛筆を持つようにして持たないでください。 いずれの方法もプロテーゼの不適切な留置につながります。
(10)前方に折り曲げられていた食道側フランジが食道内で展開します。 挿入器(挿入子と装填チューブ)を手前に静かに引
Unregis
tered
copy

41
いて、食道側フランジが食道前壁で止まることを確かめてください。 食道前壁をストッパーとして使った状態で、このままの位置で挿入器を保持してください。
(11)挿入子をそのままにした状態で装填チューブを挿入子に沿って引いてください。 気管側フランジが展開します。
気管側フランジが自動的に展開しない場合は、プロテーゼがついたままの挿入子をまっすぐにしたまま、軽く何度か回すか、または無鈎鉗子で気管側フランジを軽くつまんで回してみてください。 セーフティ・テイルがついて、長い気管側フランジ上の凸凹はどちらの方向にテイルを引けばよいのか示しています。表面がスムースな面が気管粘膜側に対し、凸凹のある面が気管腔側を向いていなければなりません。
(12)プロテーゼが適切な位置にあることを回転したり気管側フランジを少々引いたりして確かめてください。 正確な位置にプロテーゼが留置されたのを確認してから、セーフティ・テイルを切り取ってください。
(13)プロヴォックス 2ヴォイスプロテーゼは使用可能となりました。 気管側フランジ端は気管腔下方向を向いています。
注意― Provox2を交換した経験がほとんどな
い場合、下記のトラブルシューティングの項を読み、Provox2 Training Kit(REF 7222)およびArtificial Fistula Model
(REF 8201)を使って練習してください。- 挿入がうまくゆかなかった場合でも、同じ
器具とプロテーゼを使い繰り返し試みることができます。 しかし、2度試してもうゆかないときには、水溶性の潤滑剤を装填チューブに塗布してから使用することをお勧めします。
― 前方からヴォイスプロテーゼを交換することがどうしてもうまくゆかない場合は、セーフティ・テイルを導入用ストリングとして用い、プロヴォックス ガイドワイヤーを使って後方からの交換ができます。 上述の「個人個人に合わせた治療方法」の欄をお読みください。
Unregis
tered
copy
42
トラブルシューティングセーフティテイルのかけ忘れプロテーゼのセーフティ・テイルをかけ忘れると、挿入中に食道、瘻孔または気管のいずれかでプロテーゼを失うことがあります。 誤飲、吸引の危険があります。
セーフティ・テイルをかけ忘れた場合、挿入を中止し、無鈎鉗子でプロテーゼを把持して、別の無鈎鉗子を使ってプロテーゼを抜去してください。 もしプロテーゼが無くなっていたなら、有害事象の項を参照してください。
食道側フランジが前方に折り曲げて装填チューブに完全に入らない(1)フランジが完全に入りきらないと、装填チューブのプロテーゼを入れるのが難しくなります。 挿入を中止して、プロテーゼを後方に引き装填チューブを取り出してください。 プロテーゼを装填し直し、正しい手順を繰り返してください。
食道側フランジが前方に折り曲げて装填チューブに完全に入らない(2)フランジが完全に入らず、バルブが壊れてしまったなら(バルブ・シートが動いたり、バルブ自体がちぎれたりしたら)吸引の危険があります。
プロテーゼを交換した後、患者さんに水を飲ませ、バルブ機能が正常であることを必ず確かめてください。 プロテーゼの中から漏れがある場合は、内視鏡を使って機能を調べてください。 万が一、バルブが破損していたなら、プロテーゼを交換してください。
プロテーゼ全体を食道に押し込んでしまった(行き過ぎ)行き過ぎ(プロテーゼ全体が食道にはいりこんでしまった)た場合、セーフティ・テイルを挿入子に取り付け、無鈎鉗子を用いて
Unregis
tered
copy
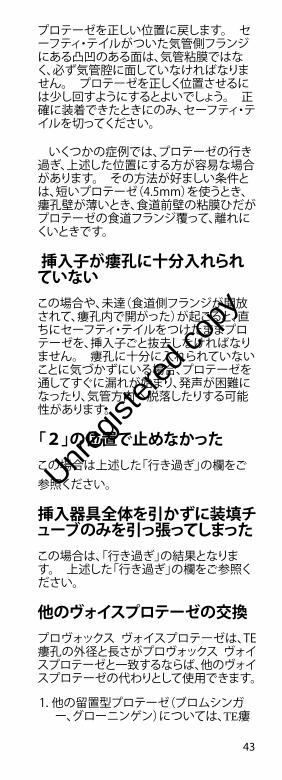
43
プロテーゼを正しい位置に戻します。 セーフティ・テイルがついた気管側フランジにある凸凹のある面は、気管粘膜ではなく、必ず気管腔に面していなければなりません。 プロテーゼを正しく位置させるには少し回すようにするとよいでしょう。 正確に装着できたときにのみ、セーフティ・テイルを切ってください。
いくつかの症例では、プロテーゼの行き過ぎ、上述した位置にする方が容易な場合があります。 その方法が好ましい条件とは、短いプロテーゼ(4.5mm)を使うとき、瘻孔壁が薄いとき、食道前壁の粘膜ひだがプロテーゼの食道フランジ覆って、離れにくいときです。
挿入子が瘻孔に十分入れられていないこの場合や、未達(食道側フランジが開放されて、瘻孔内で開がった)が起こると、直ちにセーフティ・テイルをつけたままプロテーゼを、挿入子ごと抜去しなければなりません。 瘻孔に十分に入れられていないことに気づかずにいる場合、プロテーゼを通してすぐに漏れが始まり、発声が困難になったり、気管方向へ脱落したりする可能性があります。
「2」の位置で止めなかったこの場合は上述した「行き過ぎ」の欄をご参照ください。
挿入器具全体を引かずに装填チューブのみを引っ張ってしまったこの場合は、「行き過ぎ」の結果となります。 上述した「行き過ぎ」の欄をご参照ください。
他のヴォイスプロテーゼの交換プロヴォックス ヴォイスプロテーゼは、TE瘻孔の外径と長さがプロヴォックス ヴォイスプロテーゼと一致するならば、他のヴォイスプロテーゼの代わりとして使用できます。
1.他の留置型プロテーゼ(ブロムシンガー、グローニンゲン)については、TE瘻
Unregis
tered
copy

44
孔が正確な位置に設けられている限り、プロヴォックス ヴォイスプロテーゼに交換するために、特別な方法を必要とはしません。 しかし、TE瘻孔の位置がもっとも重要です。 TE瘻孔の位置の欄をご参照ください。
2.他の留置型プロテーゼ(ブロムシンガー、グローニンゲン)について。 これらの留置型プロテーゼの外径は往々にして直径が小さいので、プロテーゼを抜去した後、プロヴォックス ダイレーターを用いてTE瘻孔を拡大する必要があります。 プロヴォックス 2プロテーゼを初めて挿入するには、局所麻酔下にガイドワイヤーを用いて行うのがより簡単かもしれません。 TE瘻孔の位置がもっとも重要となります 。(下記のTE瘻孔の位置の欄をご参照ください。) これらのプロテーゼを使用した例では、粘膜皮膚結合部の上にプロテーゼが位置していることがよく見受けらます。 プロヴォックス 2プロテーゼを代わりに使用するには、一度、瘻孔を閉じて、後日、瘻孔を二次的に作成することをお勧めします。
TE瘻孔の位置TE瘻孔は正確な位置に作成することがもっとも重要です。 瘻孔の中心は気管の粘膜皮膚結合部の下、およそ5mmに位置するようにしてください。 それより下にするとプロテーゼのクリーニング、交換が難しくなり、プロテーゼを通して液体の漏れが生じる原因となります。 これらの問題により、ヴォイスプロテーゼによる音声再建機能が阻害されている場合は、瘻孔を閉鎖し、後日、二次的瘻孔作成を行うのがよいかもしれません。
患者さん用マニュアル―簡略版プロヴォックス 2プロテーゼには患者さん用マニュアルがついてきますので、患者さんにお渡しください。 プロヴォックス 2患者さん用マニュアルは、医師による患者さんへの説明の代用とはなりません。
Unregis
tered
copy
45
患者さん用マニュアルで述べられている事 ― 簡略版
用語解説
説明
プロヴォックス 2プロテーゼの使用目的(使用方法)
製品説明
この製品を使用してなならない場合(禁忌)
危険性と受益性(説明を受けて、選択をするために)
プロヴォックス 2はどのように挿入されるか、その後はどうなるのか
一般的警告ならびに注意
操作方法プロヴォックス 2を使っての会話方法
プロテーゼのクーーーーーーー
誰がプロヴォックス 2を交換するのか
プロヴォックス 2プロテーゼの製品寿命は? いつ交換したらよいのか?
アクセサリーとその使い方
関連製品
トラブルシューティング(症状ごと記載)
補足情報情報源、旅行、国際的な使用状況、その他ユーザーのための情報
発行日裏表紙の発行日をご覧ください。
Unregis
tered
copy

46
한글
본 제품과 함께 제공되는 설명서는 때때로 개정될 수 있으며 따라서 제품이 사용되는 각 절차 전에 반드시 검토해야 합니다.
목차용도 / 지시 사항 ....................................47금기사항 ...................................................47경고 .............................................................47주의사항 ...................................................48부작용 ........................................................48사용 안내 ..................................................56문제점 해결 .............................................59
장치 설명그림 1: Provox 2 인공 발성 장치
1. 밸브. 장치 본체와 하나로 되어 있습니다.2. 식도 플랜지3. 기관 플랜지4. 방사선을 투과하지 않고 칸디다균에
저항력이 있는 밸브 시트5. 안전끈. 후방 삽입을 위한 안내선의
역할도 합니다.6. 방향 지시 손잡이후방 삽입이나 오버슈팅의 경우 장치를
개구관을 통해 당길 때에는 점막 쪽이 아닌 기관의 열린 내강 쪽을 향하도록 해야 합니다.
7. 크기 정보(플랜지 사이의 길이). 사용 가능: 4.5, 6, 8, 10, 12.5, 15 mm
8. 바깥쪽 지름: 7.5 mm(22.5 F)
그림 2: 로딩 튜브
그림 3: 삽입기
재료: 의료용 실리콘 고무 및 플라스틱
Unregis
tered
copy
47
용도 / 지시 사항Provox 2 인공 재활 시스템은 후두 적출술 후에 인공 발성 재활을 위해 외과적으로 사용됩니다.
장치는 후두 적출술(1차 천자)시 또는 후일(2차 천자)에 의사에 의해 삽입되거나 기존 장치를 교체하는 데 사용될 수 있습니다.
이 설명서는 교체 과정에 관한 내용만을 다룹니다.1차 및 2차 천자 및 장착은 의사가 수행합니다. 장치 교체는 의료행위에 대한 주의 법에 따라 독자적으로 의료 판단을 내릴 수 있는 의사 또는 면허가 있는 개업의에 의해 행해지며 과정을 훈련받은 임상의에게 장치 교체 권한 위임을 고려할 수 있습니다.
Provox 2 장치는 1차 또는 2차 기관 식도 (TE) 천자 과정 중에는 사용되지 않습니다. 단, Provox 음성 재활 시스템의 구성 요소인 Provox GuideWire, Provox Trocar with Cannula, Provox Pharynx Protector(1)차 TE 천자 전용)와 함께 사용될 때에는 예외입니다. 1차 및 2차 기관 식도 천자 과정 중 장치 사용 안내는 Provox GuideWire와 함께 제공되는 의사용 설명서에 설명되어 있습니다. 1차 및 2차 기관 식도 천자 과정 중 Provox 장치를 사용하려면 먼저 Provox GuideWire 의사용 설명서를 잘 읽어보십시오.
금기사항이미 인공 발성 재활 장치를 사용하고 있는 환자에게는 Provox 2 장치의 사용이나 교체에 관해 알려진 금기사항이 없습니다. 1차 및 2차 기관 식도 천자 과정에 대한 금기 사항은 Provox GuideWire와 함께 제공되는 의사용 설명서에 설명되어 있습니다.
경고TE 개구관으로부터의 Provox2 인공 발성 장치의 탈락/압출 및 그에 따른 장치 삼킴, 흡인 또는 조직 손상 등이 발생할 수 있습니다. 이 사례에 대한 자세한 내용은 다음의 부작용을 참조하십시오.
탈락/압출 및 잠재적 후유증을 줄이려면 다음을 수행하십시오.
Unregis
tered
copy
48
• 적당한 크기의 장치를 선택하십시오. 너무 꽉 조이면 조직 괴사 및 압출의 원인이 될 수 있습니다.
• 조직 괴사 및/또는 염증/감염 징후가 있으면 환자에게 즉시 의사와 상담할 것을 지시하십시오. 치료에는 항생제 투여, 더 긴 자루를 가진 장치의 임시 삽입, 장치 제거, 수술을 통한 개구관 부분의 봉합 및/또는 재천자가 필요할 수 있습니다.
• 환자에게 Provox 정품인 보조 용품(Brush, Flush, Plug)만을 사용하여 장치 청소 또는 일시적 폐쇄를 하도록 지시하고 모든 기타 종류의 조작을 금지하십시오.
• 기관 캐뉼라 또는 기관절개구 스터드를 사용한 경우 캐뉼라 삽입 및 제거 중 장치를 밀거나 장치의 기관 플랜지에 걸리지 않는 형태를 고르십시오. 예를 들어 구멍이 나 있는 캐뉼라(발성용)에는 큰 구멍 하나가 아닌 여러 개의 작은 구멍이 있어야 합니다.
재사용 및 재처리하면 장치의 교차 오염 및 손상을 초래할 수 있으며 이로 인해 환자에게 해를 끼칠 수 있습니다.
주의사항식도 플랜지를 앞으로 즉, 설치 전 삽입 도구 장치 안 쪽으로 구부려 장치를 로드하십시오. 로딩이 잘못되면 즉각적인 밸브 파손 및 체액 흡인의 원인이 될 수 있습니다.
항응고 치료 중인 환자는 장치의 설치 또는 교체 전에 출혈 위험에 대해 신중하게 판단하십시오.
기관절개구, TE 개구관 또는 식도가 오염되는 것을 방지하기 위해 인공 발성 장치 관리에는 무균적 처치술을 사용해야 합니다.
부작용장치를 통한 누출칸디다균의 과도한 증식이나 방사선을 투과시키지 않는 링(밸브 시트)의 탈락으로 인하여 장치를 통한 누출이 생길 수 있습니다. 장치의 식도 플랜지가 식도 내강에 완전히 들어가지 않았거나 장치가 너무 짧은 경우에도 이러한 현상이 일어날 수 있습니다. 내시경 검사로 이러한 현상 중 어느 것이 발생했는지 판단해야 합니다. 방사선을 투과시키지 않는 링의 탈락은 장치 교체 시기가 되었다는 징후이며 정밀한 검사를
Unregis
tered
copy
49
통해 링의 흡인 여부를 판단하십시오. 방사선을 투과시키지 않는 링이 탈락되지 않았고 장치가 올바른 위치에 있으며 올바른 길이이고 장치를 청소해도 장치를 통한 누출이 계속 일어난다면, 장치를 교체해야 합니다.
칸디다균의 과도한 증식장치에서 칸디다균이 과도하게 증식하는 것은 거의 모든 환자에게 일어나는 현상입니다. 칸디다균이 실리콘 물질에 얼마나 빠르게 영향을 미치는 지는 방사선 치료, 타액의 구성 성분 및 식사 습관에 영향을 받을 수 있습니다. 칸디다균의 과도한 증식이 장치를 통한 누출이나 기타 밸브 기능 상실을 일으키면 항진균제 치료를 고려할 수 있습니다. 가능한 치료 방법에는 다음이 포함됩니다. 니스타틴 구강 솔루션: 매일 2-3회 5-10ml (500.000 B 1.000.000 E)씩 내복하시고 니스타틴 구강 솔루션에 담근 Provox Brush로 장치를 닦아 장치 내에도 막을 입혀 주십시오.디푸루칸 현탁액: 매일 5 ml(50 mg)씩 내복하시고 이와 함께 디푸루칸 현탁액에 담근 Provox Brush로 인공 발성 장치를 닦아 장치 내에도 막을 입혀 주십시오.
장치 주위의 누출장치 주위에 일시적인 누출이 일어날 수 있고 자연적으로 개선될 수 있습니다. 누출이 자연적으로 개선되지 않으면 장치를 잠시 제거하고 커프가 있는 기관 캐뉼라 및/또는 비강영양 튜브를 사용하여 개구관을 수축시킬 수 있습니다. 이 외에도 장치 제거 후 TE 개구관 주위에 3x0의 흡수성 물질로 쌈지 봉합법을 사용할 수 있습니다. 새 장치를 삽입하고 나면 봉합을 살짝 조여 장치 주변의 개구관 벽을 좁혀야 합니다. 이런 일반적 조치 후에도 장치 누출이 계속된다면 수술을 통해 개구관을 폐쇄한 후 재천자를 시행해야 합니다.
출혈장치를 교체할 때 TE 개구관 주변에서 약간의 출혈이 발생할 수 있으며 이는 자연적으로 해결됩니다. 하지만 항응고 치료 중인 환자의 경우 장치의 설치 또는 교체 전에 출혈 위험에 대해 신중하게 판단해야 합니다.
Unregis
tered
copy

50
개구관 주위의 육아조직TE 개구관 주변에 육아조직이 생기는 경우는 약 5%로 보고되고 있습니다. 육아 제거 방법으로는 전기적, 화학적, 또는 레이저 소작을 고려할 수 있습니다.
TE 개구관 주위의 비대성 흉터장치가 상대적으로 짧으면 기관 플랜지 위로 기관 점막이 부풀어 오를 수 있습니다. 이 잔여 조직은 레이저(CO2 또는 NdYAG)로 제거할 수 있습니다. 이 외에도 자루가 더 긴 장치를 사용할 수도 있습니다.
장치 주위 TE 개구관의 감염 및/또는 부종장치 주위의 감염, 육아 형성 및/또는 부종이 생기면 개구관로가 길어져 장치가 안쪽의 기관 점막 아래로 당겨질 수 있습니다. 이와 반대로 염증 또는 식도 점막의 비대는 개구관로에서 장치가 튀어나오게 하는 원인이 될 수 있습니다. 이럴 때에는 장치를 자루가 더 긴 장치로 임시 교체하는 것이 좋습니다. 감염 치료에는 코르티코스테로이드를 포함하거나 포함하지 않는 넓은 범위의 항생제를 사용할 수 있습니다. 장치 사용 중 감염이 항생제 및/또는 코르티코스테로이드를 사용했는데도 나아지지 않으면 장치를 제거해야 합니다. 장치를 제거해서 개구관로가 자연적으로 닫힌 경우 새 장치를 삽입하려면 재천자가 필요할 수 있습니다.
장치를 삼켰을 때실수로 Provox2 인공 발성 장치 또는 Provox 음성 재활의 기타 구성 요소를 삼킬 수 있습니다. 다른 이물질을 삼켰을 때와 마찬가지로 장치나 Provox 2 음성 재활 시스템의 구성 요소를 삼켰을 때 일어나는 증상은 크기, 위치, 각도, 폐색(존재했을 경우) 및 이물질이 존재한 시간에 따라 달라질 수 있습니다. 삼킨 구성 요소가 식도 하부에 위치하면 식도 내시경을 사용하여 제거하거나 단 기 간 동 안 관 찰 될 수 있 습 니 다 . 물체가 자연적으로 위로 내려갈 수 있으며 위로 내려간 이물질은 대부분의 경우 장관을 통과합니다. 창자 폐색, 출혈, 천공 또는 이물질이 장관을 통과하지 못했을 때에는 수술을 통해 장관에 있는 이물질 제거를 고려해야 합니다.
Unregis
tered
copy
51
장치의 흡인Provox 2 인공 발성 장치 또는 Provox 음 성 재 활 시 스 템 의 기 타 구 성 요소에서 흡인이 일어날 수 있습니다. 즉 각 적 인 증 상 으 로 컥 컥 거 림 , 기침, 질식 또는 헐떡거림이 나타날 수 있습니다. 다른 이물질과 마찬가지로 구성 요소 흡인으로 인한 합병증은 폐색이나 감염에 의한 것일 수 있습니다. 합병증에는 폐렴, 무기폐, 기관지염, 폐 농양, 기관지루 및 천식이 포함됩니다. 환자가 말을 하거나 숨쉴 수 있다면 기침으로 이물질을 제거할 수 있습니다. 부분적인 기도 폐색 또는 전체적 폐색의 경우 물질 제거를 위한 즉각적인 조치를 취해야 합니다.
장치의 돌출/압출때로 TE 개구관의 감염 중 장치 돌출 및 그에 따른 자연적 압출이 관찰됩니다. 장치를 제거하여 기관 내로의 탈락을 피해야 합니다. 장치를 제거하면 개구관로가 자연적으로 닫힐 수 있습니다. 새 장치를 삽입하기 위해 재천자가 필요할 수도 있습니다.
조직 손상장치가 너무 짧거나 너무 긴 경우, 기관 캐뉼라, 기관절개구 스터드 또는 환자의 손가락으로 식도벽을 계속 압박하는 경우 개구관, 기관 및 식도 조직이 손상될 수 있습니다. 이 현상은 방사선 치료를 받고 있는 환자에게 더욱 발생하기 쉽습니다. 심한 손상을 피하기 위해서는 상태를 정기적으로 점검해 주십시오.
치료의 개별화전방 대 후방 삽입Provox2 장치를 전방으로 삽입할 수 없는 경우 Provox GuideWire REF 7215를 사용하여 후방 삽입할 수 있습니다. 이 방법은 TE 천자(1차 또는 2차) 과정 직후 장착할 때 및 Provox 2 삽입기를 사용하여 기관절개구에서 개구관로를 찾거나 닿기 힘들 때 사용됩니다.
개구관 벽이 얇아지거나 위축되는 경우(매우 짧은 개구관로, 장치 주위의 누출과 함께 자주 발생) 또는 점막 주름이 장치의 뒤쪽을 덮거나 식도 플랜지가 식도 내에서 전개되기 힘든 경우, 후방 삽입을 시행하면 개구관로를 보호하고 장치의 식도 플랜지를 완전히 전개시키는 데 도움이 될 수 있습니다.
Unregis
tered
copy

52
후방 삽입은 의사만 시행해야 합니다. Provox GuideWire와 함께 제공되는 설명서를 읽으십시오.
환자 상담 정보장치 교체 후 타액에 피가 묻어나올 수 있습니다. 대부분의 경우 TE 개구관 주변의 육아 조직에서 발생합니다.
새 장치를 받은 첫 주에는 가끔 장치나 장치 주변에서 가벼운 누출이 일어날 수 있습니다. 이것은 자연스럽게 해결되며 장치를 즉시 대체할 필요는 없습니다.
최소한 하루에 두 번 그리고 매 식후에 Provox Brush로 인공성대를 세척하면 장치 수명을 연장하는 데 도움이 될 수 있습니다. 기관절개구를 닫고 타액을 뱉어 장치를 청소할 수도 있습니다.
기관 플랜지가 타원형으로 아래를 가리키므로 장치의 가장 적당한 위치를 정하는 데 도움이 됩니다.
매일 요구르트와 젖산균을 함유한 탈지유를 섭취하는 등의 식이요법으로 과도한 칸디다균 증식을 막을 수도 있습니다.
자연적인 누출이 일어날 경우에는 Provox Plug를 이용하여 임시적으로 봉쇄할 수 있습니다.다음의 경우 환자는 의사와 상담해야 합니다. – 장치나 주변부에서 누출이 있을 때(기침
증상)– 말하는 것이 어려울 때(힘이 더 많이 듦)– 개구관 또는 기관절개구 부분에 염증이나
조직 변화 징후가 있을 때(통증, 붉어짐, 열, 부어 오름)
유창하게 말을 하려면 훈련받은 임상의에게 언어 치료를 받는 것이 좋습니다.
공급 방법Provox2 인공 발성 장치(그림 1)의 지름은 모두 동일하며 길이(플랜지 사이의 길이)는 다양합니다. 이것은 일회용으로 살균되어 공급됩니다.
이것은 전방 삽입을 위한 일회용 삽입 기구(그림 2와 3) 및 장치 내부를 청소하는 재사용이 가능한 Provox Brush/Provox Brush XL(그림 4)와 함께 공급됩니다. 매일 관리를 위해 솔은 환자에게 주어야 합니다.
Unregis
tered
copy
53
장치 기능을 유지하기 위한 보조 용품 (환자용)주의: 인공성대 취급 및 세척 시 Provox2와 함께 사용하도록 고안된 Provox 부속 장치 순정품만 사용하십시오. 아래에서 설명된 장치 세척 및 유지 관리 이외에는 어떠한 유형이라도 인공성대를 조작하지 않도록 장치 세척 방법을 환자에게 설명해 주십시오.
Provox Brush / Provox Brush XL (그림 4). 환자는 적어도 하루에 두 번 그리고 매 식사 후 Provox Brush를 인공성대 안에 넣어 비트는 동작으로 부드럽게 앞뒤로 움직이면서 인공성대를 세척해야 합니다. 솔을 꺼낸 후 거즈로 닦아내야 합니다. 이 절차는 필요한 만큼 자주 반복할 수 있습니다. 솔은 깨끗해 보이고 결함이 보이지 않는 한 사용할 수 있습니다(최대 1개월). 인공성대에는 1개의 Provox Brush / Provox Brush XL이 함께 제공됩니다. 자세한 정보와 솔 세척 방법은 Provox Brush와 함께 제공되는 사용 지침서를 참고하십시오.
Provox Flush(세정기)(그림 5): Provox Brush 사용과 더불어, 환자는 또한 Provox Flush(세정기)를 사용하여 Provox 인공성대를 세척할 수 있습니다. Provox Flush(세정기)를 사용하여 인공성대의 내강을 통해 식수용 물이나 공기를 흘려보낼 수 있습니다. 자세한 정보와 Provox Flush (세정기) 세척 방법은 Provox Flush (세정기) 와 함께 제공되는 사용 지침서를 참고하십시오.
Provox Plug (그림 6): 인공성대를 통한 누출을 임시로 막는 데 환자가 사용하는 도구. Provox Brush의 부드러운 쪽 끝으로 Provox 인공성대의 개구부에 플러그를 삽입합니다. 음료를 마실 때는 Provox Plug는 삽입한 채로 둘 수 있으며, 안전 스트랩을 잡아당겨 제거할 수 있습니다. Provox Plug가 삽입된 상태에서는 말을 할 수 없습니다.
부속 장치 세척 및 소독부속 장치는 매 사용 후 세척하고 적어도 하루에 한 번 사용 지침에 따라 소독해야 합니다.
부속 장치가 지저분해 보이거나 가정에 호흡기 감염이 있는 사람이 있을 때 자연 건조한 경우, 애완동물에 닿았거나, 바닥에 떨어진 경우 또는 기타 전반적으로 오염된 경우, 사용 직전에 부속 장치를 세척하고 소독해야 함을 환자에게 알리십시오.
Unregis
tered
copy
54
입원 중에는 장치 오염 및 환자 감염의 위험이 증가합니다. 따라서, 입원 중에는 사용 후 즉시 부속 장치를 세척 및 소독하고, 사용하기 직전에 다시 식수용 물이 아닌 멸균수로 헹구는 것이 중요합니다.
장치 삽입 및 TEP 개구관 제작을 유용한 보조 용품 (의사용)Provox Measure: (그림 7) 기존 TE 개구관의 길이를 측정한다(장치 크기에 해당). 주의: Provox Measure를 사용하기 전에 먼저 개구관의 지름이 적어도 6.6mm(20 F) 이상인지 확인하십시오. 개구관이 너무 작으면 기구를 제거하기 힘들기 때문에 이보다 작은 개구관은 먼저 확장해야 합니다. 주문량: Provox Measure 1개, 살균되지 않음, 살균 가능, 재사용 가능, Provox Measure Flanges 5개, 살균되지 않음, 살균 가능, 일회용. 지시 사항을 참조하십시오.
Provox Dilator: (그림 8) 자루 지름이 더 작은 장치에서 Provox 인공 발성 장치로 교체할 수 있도록 돕습니다. Provox Dilator는 실리콘 고무 기구로 TEP 개구관의 한쪽 끝은 15 F로 시작해 다른 쪽 끝은 24 F로 끝나며 단계적으로 확장이 가능합니다. 각 단계 섹션(예를 들어 18, 20, 22 F)에는 작은 고정 고리가 있어 개구관 밖으로 장치가 미끄러져 빠질 위험을 줄입니다. Provox Dilator는 장치를 제거하고 일시적으로 개구관을 막을 때 또는 Provox 인공 발성 장치를 제거하거나 잃은 후 줄어든 개구관을 늘릴 때 사용할 수도 있습니다. 주문량: Provox Dilator 1개, 살균하지 않음, 살균 가능, 재사용 가능. 지시 사항을 참조하십시오.
Provox Trocar with Cannula: (그림 9 및 10) 1차 또는 2차 TE 천자를 시행하기 위한 스테인리스 기구. Provox Trocar는 작고 둥근 천자를 만듭니다. 천자를 만든 후 내부의 투관침을 제거하고 Provox GuideWire를 외부 슬리브(캐뉼라)를 관통해서 후두의 제거 후 남아있는 인두의 입구에 밀어 넣어 Provox 또는 Provox2 장치가 부착되고 개구관 내로 당겨지도록 합니다. 주문량: Provox Trocar 1개 및 1 Provox Cannula 1개, 재사용 가능, 살균 가능. 지시 사항을 참조하십시오.
Provox Pharynx Protector: (그림 11) 1차 TE 중에만 사용되는 인두벽 보호용. 스테인리스 스틸 기구. 왼손잡이나
Unregis
tered
copy
55
오른손잡이 모두 사용할 수 있습니다. 주문량: Provox Pharynx Protector 1개, 재사용 가능, 살균 가능. 지시 사항을 참조하십시오.
Provox2 Training Kit: (그림 12) 로 딩 및 삽 입 과 정 에 서 P r o v o x 2 실제 훈련용으로 사용됩니다. 신입 직원의 시술 능력 향상을 돕습니다. Provox2 인공성대(예시용) 1개, 장착 튜브 3개, 삽입기 1개 및 사용 설명서 1부가 들어 있습니다.
Provox 인공 발성 장치와 함께 사용할 수 있는 기타 보조 용품Provox HME: (그림 13) 온습도 교환기는 기관소구로 인해 기도 상부로의 공기 순환이 끊겨 상실된 코의 기능(가열, 가습, 호흡 저항)을 부분적으로 회복시킵니다. Provox HME는 후두 적출술 후 사용하도록 특별히 설계되었습니다. 피부 상태에 따라 Provox Adhesive 베이스 플레이트나 Provox LaryTubes를 사용하여 기관절개구에 부 착 할 수 있 습 니 다 ( 아 래 참 조 ) . 실제로 HME 카세트는 발성시 기관절개구를 폐쇄할 때 사용합니다. 폐 기능의 향상 외에도, Provox HME는 동적 범위 및/또는 최대 발성 시간을 늘려 언어 능력을 향상시킬 수 있습니다. 자세한 내용은 각 제품 설명을 참조하십시오.
Provox FreeHands HME™: (그림 14 및 15, Provox HME Cap 포함) 자동 기관소구 밸브와 결합된 온습도 교환기는 손을 쓰지 않고 말할 수 있도록 설계되었습니다. 모든 환자에게 다 맞지는 않을 수 있습니다. 자세한 내용은 각 제품 설명을 참조하십시오.
Provox La ryTube : (그림 16) 부드러우면서도 충분히 단단한 실리콘 기관 캐뉼라입니다. Provox HME 카세트 또는 Provox FreeHands HME™ 자동 발성 밸브를 계속 유지하면서 수축된 기관절개구를 복원하는 것이 목적입니다. 다양한 버전 및 크기를 사용할 수 있습니다. 인공 발성 장치와 함께 사용하려면 Fenestrated Provox LaryTube 버전을 선택해야 합니다. 기타 버전은 TEP 개구관 단계에 자체적으로 작은 구멍을 내야 합니다. 자세한 내용은 각 제품 설명을 참조하십시오.
이 설명서 끝부분의 모든 주문 코드를 검색하십시오.
Unregis
tered
copy
56
임상의용 지시사항장치 유효성 유지포장이 손상되거나 개봉되었을 경우에는 제품을 사용하지 마십시오.
사용 안내교체 지시 사항이 장치는 영구 이식물이 아니며 주기적으로 대체해야 합니다. Provox2 인공 발성 장치의 교체 시기를 알리는 첫 번째 징조는 밸브의 기능 상실로 이것은 장치를 통한 액체의 누출을 일으킵니다. 장치가 완전하게 막히거나 적절한 발성을 하는 데 지나치게 강한 압력이 들어가는 경우 교체하기 전에 먼저 내시경 검사와 함께 흡인력을 이용하여 장치를 청소하는 것이 좋습니다. 30°로 고정된 비인두경이나 굴곡성 후두경을 사용하여 장치를 검사할 수 있습니다. 이 방법을 이용하면 밸브 검사 및 장치 청소가 수월해집니다. 밸브의 기능 상실, 장치의 막힘 및/또는 적절한 발성에 대한 지나친 압력은 청소와 검사를 통해 나아질 수 있습니다. 전방 교체 과정• 적절한 길이의 장치 선택
적절한 길이의 Provox2 인공 발성 장치를 사용하십시오. 적절한 길이를 측정하려면 Provox Measure(보조 용품 참조)를 사용하거나 전용 기구 측정 장치를 사용하십시오. 오래된 장치의 기관 플랜지와 점막벽 사이에 너무 많은 공간(예를 들어 3mm/~0.12 인치 또는 그 이상)이 남는다면 더 짧은 장치를 사용해야 합니다. 이는 수술 후 외과상 부종 및 염증 치료로 인해 기관 식도 경계벽 경화 수준이 떨어질 때 관찰될 수 있습니다. 그러나 너무 짧은 장치는 항상 문제를 유발시키지만 약간 긴 장치를 사용하면 장치 주위로 액체를 압착시키는 피스톤 효과 발생을 제외하고는 문제가 생기지 않을 것입니다.
기관 플랜지가 변형되면 장치가 너무 짧아 더 긴 장치를 사용해야 한다는 표시일 수 있습니다. 기관 점막이 비대해져 기관 플랜지 위로 부풀어 나올 때에도 자루가 더 긴 장치 사용을 고려해야 합니다.
Unregis
tered
copy
57
• 삽입 도구 안으로 인공 발성 장치 로딩이 방법은 오른손잡이용으로 설명되었기 때문에 왼손잡이는 오른쪽은 왼쪽으로 왼쪽은 오른쪽으로 바꿔 읽어야 합니다.
과정 설명 (1) 삽입 도구는 삽입기(A)와 로딩 튜브(B)로 구성되어 있습니다. 로딩 튜브 입구는 장치의 고정을 위해 갈라져 있으며 TE 개구관으로 전방 삽입할 수 있도록 끝이 뾰족합니다. 튜브로 인공 발성 장치의 관통을 용이하게 하기 위해 로딩 튜브의 내부에는 미리 윤활제가 발라져 있습니다.
장치의 안전끈을 삽입기의 슬릿(2) 안으로 삽입하고 화살표 방향으로 강하게 당겨 고정시키고(3) 장치의 기관 입구를 삽입기 위에 오도록 하십시오(4).
(5) 인공 발성 장치의 식도 플랜지를 오른손의 엄지와 검지 사이에 끼우고 꽉 누르십시오. 왼손으로 로딩 튜브를 잡으십시오. 누르고 있는 장치의 플랜지를 약 45°의 각도로 로딩 튜브의 슬릿에 삽입(“걸어”)하십시오.
(6) 삽입기를 약 1 cm(~0.4 인치)정도 앞으로 밀어주십시오. 이렇게 함으로써 앞으로 접혀있는 식도 플랜지에 인공 발성 장치가 고정됩니다.
(7) 장치의 튀어나온 부분을 왼쪽 엄지로 눌러 주십시오. 이제 식도 플랜지는 완전히 앞으로 접혀 있어야 합니다.
표시선 1이 로딩 튜브의 높이와 같아질 때까지 삽입기를 앞으로 눌러주십시오(설명 8도 참조).
주의 사항: 식도 플랜지가 앞으로 접혀있지 않고 장치를 앞으로 누를 때 너무 많은 힘이 든다면 다시 뒤로 당겨 설명 5의 지시 사항부터 따라 하십시오. 여분의 수용성 윤활제가 필요할 수도 있습니다.
이제 Provox2 장치 준비가 끝났습니다.
• 장치 교체Provox, Provox2 또는 기타 다른 장치는 날 없는 지혈기로 장치를 끌어당기거나(1세대 Provox 장치의 경우처럼 너무 많은 힘이 필요한 경우가 아니라면) Provox GuideWire와 함께 제공되는 설명서에서 언급한 경구법으
Unregis
tered
copy
58
로 Provox GuideWire를 사용하여 TE 개구관에서 제거합니다. 임상의의 판단으로 장치의 기관 플랜지를 핀셋으로 집어 잘라낸 다음 장치의 나머지를 식도 안으로 밀어 넣어 장관을 통해 빠져나가도록 할 수 있습니다. 환자의 복부 병력을 고려해야 합니다.
과정 설명 (8) TE 개구관으로 로딩 튜브의 뾰족한 쪽을 삽입하고 전방으로 개구관로를 통해 밀어 넣어 로딩 튜브의 팁이 식도 내강에 완전히 들어가 식도 뒤쪽 벽에 닿도록 합니다.
(9) 이 위치에서 왼손으로 로딩 튜브를 잡으십시오. 오른손으로 삽입기를 잡고 엄지 손가락을 사용하여 표시선 2에서 자연스럽게 멈추십시오.
표시선 2가 로딩 튜브의 높이와 같아질 때까지 삽입기를 앞으로 눌러주십시오(오른손).
주의 사항: 주사기와 같은 삽입기로 장치를 “주입”하지 마십시오. 삽입기를 펜을 잡는 방법으로 잡지 마십시오. 두 방법 모두 장치가 잘못된 위치에 들어가게 할 수 있습니다.
(10) 이제 앞으로 접혀 있던 식도 플랜지가 식도 내강에서 펼쳐집니다. 삽입 도구(로딩 튜브와 삽입기 모두)를 식도벽 앞에 닿을 때까지 부드럽게 당겨 이것을 확인하고 식도 플랜지를 식도벽 전면에 부착하십시오. 이 위치에서 삽입기를 잡고 식도벽 전면을 정지점으로 사용합니다.
(11) 로딩 튜브를 뒤로 끌어 삽입기는 같은 자리에 그대로 남고 로딩 튜브가 삽입기에서 제거되도록 합니다. 이렇게 하면 기관 플랜지가 펴집니다.
기관 플랜지가 자동으로 펴지지 않으면 장치와 함께 삽입기를 축 주위로 여러 번 가볍게 당기고 돌리거나, 날 없는 지혈기를 사용하여 기관 플랜지를 부드럽게 당겨 제자리로 돌려놓으십시오. 연장된 기관 플랜지에 있는 손잡이에는 안전끈을 당길 방향이 표시되어 있습니다. 기관 플랜지의 부드러운 면이 기관의 점막을 바라보고 손잡이가 내강쪽을 향해 있어야 합니다.
(12) 기관 플랜지를 약하게 회전시키고 눌러 당겨서 장치가 올바른 위치에 놓였는지 확인하십시오. 장치가 안전하게 제자리에 놓이면 기관 플랜지의 바깥쪽 면에 있는 안전끈을 제거하십시오.
Unregis
tered
copy

59
(13) Provox2 인공 발성 장치의 사용 준비가 모두 완료되었습니다. 기관 플랜지 끝부분이 기관 안쪽 아래를 향해야 합니다.
주의– Provox2 교체 절차 경험이 미숙한
경우, 아래 문제 해결 절을 읽고 Provox2 교육용 키트(REF 7222) 및 인공 누공 모델(REF 8201)을 사용하여 연습하십시오.
– 삽입에 실패한 경우 동일한 도구와 장치로 다시 반복할 수 있습니다. 하지만 과정을 두 번 이상 반복해야 한다면 로딩 튜브에 수용성 윤활제를 더 바르는 것이 좋습니다.
– 전방 방법을 사용한 인공 발성 장치 교체에 실패한 경우 Provox GuideWire로 후방 교체 방법을 사용할 수 있으며 이 경우 안내선 역할을 하는 안전끈을 사용하십시오. 위의 치료의 개별화 섹션을 참조하십시오.
문제점 해결안전끈을 잊었습니다.장치의 안전끈을 부착하지 않으면 삽입 도중 장치가 식도, 개구관 또는 기관 내에서 손실될 수 있습니다. 흡인 또는 삼킬 위험이 있습니다.
이 경우 가능하면 삽입을 중단하고 날 없는 지혈기로 장치를 보호한 뒤 다른 지혈기를 사용하여 끌어내십시오. 삽입기에 장치를 다시 로드한 후 해당 과정을 반복하십시오. 장치를 이미 잃어버린 경우 자세한 내용은 부작용 섹션을 참조하십시오.
식도 플랜지가 로딩 튜브 안에서 완전히 앞으로 접혀있지 않습니다. (1) 이 경우 장치를 튜브 안으로 밀기 어려우면 삽입을 중단하고 장치를 로딩 튜브 밖으로 끌어당기십시오. 다시 로드한 후 해당 과정을 반복하십시오.
식도 플랜지가 로딩 튜브 안에서 완전히 앞으로 접혀있지 않습니다. (2) 이 경우 밸브가 손상되어 있으면(즉 파란 밸브 시트가 이동되었거나 밸브 플랩이 찢어진 경우), 흡인의 위험이 있습니다.
Unregis
tered
copy
60
교체 후에는 항상 환자에게 약간의 물을 삼키도록 하여 밸브의 통합성을 확인하십시오. 장치에 누출이 있는 경우 내시경을 사용하여 제대로 기능을 하는지 확인하십시오. 밸브가 손상된 경우에는 장치를 교체하십시오.
장치가 식도 안으로 완전히 삽입되었습니다(오버슈팅).
오버슈팅(장치 전체가 식도 안으로 들어감)의 경우 삽입기에 부착된 안전띠를 제 거하고 날 없는 지혈기를 사용하여 장치를 당기십시오. 연장된 기관 플랜지의 식별 손잡이는 항상 기관의 점막이 아닌 열린 내강을 바라보게 해야 합니다. 조금씩 회전시키면 장치를 정확한 위치에 더 쉽게 놓을 수 있습니다. 안전띠는 정확하게 장착된 후에만 제거하십시오.
이 경우 장치를 오버슈팅한 다음 위에서 설명한 대로 다시 제자리에 넣는 것이 더 쉬울 수 있습니다. 이 방법은 장치가 아주 짧을 때(4.5 mm), 개구관 벽이 아주 얇을 때, 식도 전면 벽의 점막이 접혀있을 때(장치의 식도 플랜지가 위험해질 수 있음) 사용하면 더 나은 효과를 얻을 수 있습니다.
삽입기가 개구관 안으로 분히 들어가지 않았습니다.
이 경우 언더슈팅(식도 플랜지가 풀린 상태로 개구관로에 펼쳐있음) 되었으면 장치를 안전끈에 아직 부착되어 있는 삽입기로 즉시 다시 당겨 빼낼 수 있습니다. 언더슈팅을 인지하지 못하고 방치했을 경우 장치를 통한 즉각적인 누출, 발성의 어려움, 기관으로의 조기 압출을 일으킬 수 있습니다.
장치가 삽입기에 부착되어 있는 상태에서 당기고 돌려 올바른 위치에 놓이도록 하십시오. 이렇게 하면 장치가 개구관로에 부분적으로 삽입된 채 방치되는 위험을 줄일 수 있습니다. 장치를 풀기 전에 항상 삽입기로 개구관로를 완전히 조사하여 식도의 열린 내강에 닿도록 해야 합니다. 식도 뒤쪽 벽을 조심스럽게 건드려 확인할 수 있습니다. 로딩 튜브의 팁은 식도 장치 플랜지를 풀면 넓게 열리도록 설계되
Unregis
tered
copy
61
어 있습니다. 즉 개구관로가 아닌 식도 내강에서 열려야 한다는 것을 의미합니다.
표시선 “2”에서 멈추는 것을 잊었습니다.이 경우는 위의 “오버슈팅” 섹션을 참조하십시오.
처음에 전체 삽입 도구가 아닌 로딩 튜브만 당겨져 나옵니다.이 경우 ‘오버슈팅’이 일어날 수 있습니다. 위의 “오버슈팅” 섹션을 참조하십시오.
다른 인공 발성 장치 대체TE 개구관의 길이 및 직경을 Provox 인공 발성 장치가 만드는 TE 개구관의 수치와 비교하여 사용이 가능한 경우, Provox 2 인공 발성 장치를 TE 개구관에 사용하도록 설계된 다른 인공 발성 장치의 대체용으로 사용할 수 있습니다.
1. 다른 내재식 인공 발성 장치(예: Indwelling Blom-Singer 및 Groningen): TE 개구관의 위치가 올바르면 대체에 특별한 조치가 필요하지 않습니다. 하지만 TE 개구관 위치가 중요합니다. (아래의 TE 개구관 위치 섹션을 참조하십시오.)
2. 비내재식 인공 발성 장치(예: Blom-Singer ): 이런 장치는 직경이 더 작은 경우가 많기 때문에 장치를 제거한 다음 Provox Dilator를 사용하여 TE 개구관을 확장해야 교체할 수 있습니다. 처음 Provox2 장치를 사용하는 경우에는 guide wire를 사용하여 국소 마취만으로 더 쉽게 장착할 수 있습니다. TE 개구관 위치가 중요합니다. (아래의 TE 개구관 위치 섹션을 참조하십시오.) 일부 경우에는 점막 피부 접합부 위쪽의 장치 윗부분이 이 장치를 통해 보일 수 있습니다. Provox2 인공 발성 장치를 대체 장치로 선택하는 경우 개구관을 막고 후일 다시 2차 천자를 하는 것이 좋습니다.
TE 개구관의 위치TE 개구관의 위치를 정확하게 하는 것이 중요합니다. 개구관 중앙(천자하는 동안, 이후 개구관 테두리)은 기관의 점막 피부 접합부에서 아래로 약 5mm(~0.2인치)가량 떨어져 있어야 합니다. 위치가 더 낮아지면 장치 청소에 문제가 생길 수 있고 교체가 더 어려워지며 장치를 통해 액체가 누출될 수 있습니다. 인공 음성 재활
Unregis
tered
copy

62
장치의 기능 최적화를 방해하는 단 하나의 문제라도 있으면 개구관을 막고 후일 다시 2차 천자하는 것이 나을 수 있습니다.
환자용 설명서 - 간략한 설명모든 Provox 2 인공 발성 장치에는 환자에게 제공되어야 하는 별도의 환자용 설명서가 포함되어 있습니다. Provox2 환자용 설명서는 환자와 임상의 사이의 상담을 대체하는 용도로 사용할 수 없습니다.
환자용 설명서에 언급된 항목: (간략한 목차)용어기술 정보:
Provox2 장치 목적(사용법)제품 설명장치를 사용하지 말아야 하는 경우(금기사항)위험 및 장점(선택에 도움이 되는 정보)Provox 2 삽입 방법 및 이후 동작일반 경고 및 주의사항
작동 정보말할 때의 Provox2 사용 방법장치의 청소 방법필요할 경우 Provox2를 대체할 수 있는 사람은? Provox2 장치 지속 기간 및 대체 시기 판단 방법은?보조 용품 및 사용 방법관련 제품
문제점 해결 정보(증상별로 나열)
추가 정보정보 자원, 여행 및 국제적 사용, 사용자 도움 정보
인쇄 날짜뒤 표지의 버전 숫자를 참조하십시오.
Unregis
tered
copy

63
本產品隨附的手冊可能隨時修訂,因此每次手術使用產品前必須檢閱手冊。
目錄用途/指示.........................................63禁忌症...............................................64警告....................................................64預防措施..........................................65不良情況..........................................65使用方法..........................................71疑難排解..........................................74
裝置說明圖 1:Provox2 人工發聲瓣1. 閥瓣。經過精心設計,已與發聲瓣一體
成型。2. 食道固定邊。3. 氣管固定邊。4. 不透射線並可抗念珠菌之閥瓣座。5. 安全束帶。在逆向置入時,亦可做為導
引線使用。6. 方向辨識鈕。
在進行逆向置入或是插入過深等情況 下,需要將發聲瓣從瘺管中拉出,此時它們的方向必須朝向氣管內腔,而不是黏膜。
7. 尺寸資訊 (固定邊之間的長度 )。 尺寸種類:4.5 mm、6 mm、8 mm、 10 mm、12.5 mm、15 mm。
8. 外徑:7.5 mm (22.5 F)。
圖 2:裝填管 (Loading Tube)
圖 3:置入器 (Inserter)
材質:醫療用的樹脂橡膠和塑膠。
用途/指示Provox2 聲音復健系統,是給經過全喉切除手術的病人,進行人工聲音復健之用。
發聲瓣的置入,可以由醫師在全喉切除時便置入 (初次穿刺),也可以稍後再置入 (二次穿刺),或是用來置換目前的發聲瓣。
繁體中文
Unregis
tered
copy
64
請注意,本手冊中的說明,僅針對置換 程序。初次穿刺、二次穿刺以及置入,都必須由醫師進行操作。發聲瓣的置換,必須由醫師或領有執業執照的開業醫師進行;或 者,他們也可以根據各自的專業醫療判 斷,以及開業當地之法律規定,委派受過專業訓練的臨床醫師進行發聲瓣的置換。
除非是搭配 Provox GuideWire、Provox Trocar and Cannula 和 Provox Pharynx Protector (僅能用於初次 TE 穿刺) 等 Provox 聲音復健系統配件一起使用,否則請不要在初次或二次氣管食道 (TE) 穿刺程序中,使用 Provox 2 人工發聲瓣。有關初次和二次 TE 穿刺程序中,發聲瓣的使用須知,已詳列於 Provox GuideWire 所附的《醫師手冊》中,在初次或二次 TE 穿刺程序中使用 Provox 人工發聲瓣之前,請務必先仔細閱讀 Provox GuideWire 的 《醫師手冊》。
禁忌症在已經使用過人工聲音復健系統的病人當中,目前並沒有發現任何關於使用或置換 Provox2 人工發聲瓣的禁忌症。至於初次和二次 TE 穿刺的禁忌症,則已詳列於 Provox GuideWire 所附的《醫師手冊》中。
警告Provox2 人工發聲瓣有可能自氣管–食道瘺管中脫落或凸出,並導致發生吞入、吸入或組織損壞等情況。關於這些情況的詳細資訊,請參閱下面的〈不良情況〉。
若要減少因發聲瓣脫落或凸出而產生的風險,以及可能的併發症,請注意下列事項:
• 請選取適當的發聲瓣尺寸,因為太緊可能會導致組織壞死,以及發聲瓣的凸出。
• 請指示病人,如果出現任何組織水腫、發炎或感染等症狀時,要立即就醫。可能的治療方式包括:抗生素治療、暫時置入軸管較長的發聲瓣、取出發聲瓣、手術封閉瘺管開口,以及重新穿刺。
• 請指示病人,只能使用 Provox 原廠配件 (Brush、Flush、Plug) 來清潔發聲瓣或暫時閉合,並要避免進行其他任何的處理。
Unregis
tered
copy

65
• 如果要使用氣管套管或氣切口固定栓,請選擇適當的形狀,以免在置入或取出套管時,擠壓到發聲瓣或勾住發聲瓣氣管固定邊。例如,選擇穿有孔洞的套管 (發聲用) 時,應選擇其上有多個小孔的套管,而不要選擇只有一個大開口的套管。
重複使用和重新處理可能會導致裝置的交叉污染和損壞,這可能對患者造成傷害。
預防措施安裝發聲瓣時,請將食道固定邊向前彎曲–先裝入置入工具中,然後再置入。如果安裝方式不正確,可能會立即導致閥瓣故障,以及吸入液體。
對 於 正 在 接 受 抗 凝 血 劑 治 療 的病 人 , 在 為 其 置 入 或 置 換 發 聲 瓣 之 前,應特別留意是否有流血或出血的危險。
在處理人工發聲瓣時,必須使用無菌技術,以避免污染氣切口、氣管–食道瘺管或食道。
不良情況發聲瓣內發生漏氣現象發聲瓣內會發生漏氣現象,可能與念珠菌過度增生或不透射線環 (閥瓣座) 的脫落有關。如果發聲瓣的食道固定邊沒有與食道內部密合,或是發聲瓣太短,也可能會導致漏氣現象的發生。若要確定是否有任何上述現象的發生,請進行內視鏡檢查。若有不透射線環脫落的情形,即表示需要置換發聲瓣,同時還要進行徹底的檢查,以確定病人沒有吸入環圈。如果不透射線環並沒有脫落,發聲瓣仍然在正確的位置上而且長度適中,同時清潔發聲瓣依舊無法解決發聲瓣漏氣的問題,就表示需要置換新的發聲瓣了。
念珠菌過度增生在使用發聲瓣時,幾乎所有的病人都會發生念珠菌過度增生的現象。放射性治療、唾液成分和飲食習慣等,都會影響念珠菌感染樹脂材質的速度。如果因為念珠菌的過度增生,而導致發聲瓣內發生漏氣, 或是閥瓣無法正常運作,您可以考慮使用抗黴菌劑進行治療。可能的治療方式如下。Nystatin 抗黴菌口服液:每天服用 2-3 次,每次 5-10 ml (500.000 B 1.000.000 E),並使用浸泡過 Nystatin 抗黴菌口服液的
Unregis
tered
copy
66
Provox Brush,塗抹 Nystatin 抗黴菌口服液於發聲瓣的內側;Diflucan 懸浮劑:每天服用 1 次,每次 5 ml (50 mg),並使用浸泡過 Diflucan 懸浮劑的 Provox Brush,塗抹 Diflucan 懸浮劑於發聲瓣的內側。
發聲瓣周圍發生漏氣現象發聲瓣周圍可能會發生短暫的漏氣現象,但可能可以自動改善。如果漏氣現象沒有自動改善,可以考慮暫時取出發聲瓣,並置入反摺的氣管套管及/或鼻胃灌食管,讓瘺管稍微收縮。或者,也可以在取出發聲瓣之後,使用荷包口狀縫合法 (purse string suture),將 3x0 的可吸收材質,填入氣管–食道瘺管周圍的黏膜層下,然後置入新的發聲瓣,再輕輕地將縫合口拉緊,將瘺管壁包住發聲瓣的周圍。如果發聲瓣周圍的漏氣現象,無法使用比較保守的方式處理,則可能必須以手術將瘺管封閉,然後再重新穿刺。
出血在置換發聲瓣時,氣管–食道瘺管的邊緣可能會有輕微的出血現象,不過此現象通常會自行痊癒。但是,對於正在接受抗凝血劑治療的病人,在為其置入或置換發聲瓣之前,應特別留意是否有出血的危險。
瘺管周圍長出肉芽根據報告,大約有 5% 的病人,其氣管– 食道瘺管周圍會長出肉芽組織,您可以考慮對長出肉芽的部位,進行電流、化學或雷射燒灼治療。
氣管–食道瘺管周圍之疤痕增生如果發聲瓣太短,氣管固定邊附近的氣管黏膜便可能腫大凸起,您可以使用雷射 (CO2 或 NdYAG) 除去這些多餘的組織; 或者,可以改而使用軸管較長的發聲瓣。發聲瓣周圍的氣管–食道瘺管出現感染 或水腫現象當發聲瓣周圍出現感染、肉芽生長,或水腫現象時,瘺管可能會變長,導致發聲瓣內縮到氣管黏膜的下方;相反地,當食道黏膜發炎或分泌過多時,則可能會導致發聲瓣自瘺管口凸出。如有上述情況發生,建議您暫時將目前的發聲瓣置換為軸管較長的發聲瓣。如果要治療感染,可以考慮使用廣效性抗生素,含腎上腺皮質類固醇
Unregis
tered
copy
67
(corticosteroid) 與否均可。在裝有發聲瓣的情況下,如果使用了抗生素及/或腎上腺皮質類固醇,還是無法治療感染,請取出發聲瓣。如果瘺管在取出發聲瓣後自動癒合,便可能需要重新穿刺以置入新的發聲瓣。
不慎吞入發聲瓣病人有可能不慎將 Provox2 人工發聲瓣或是其他 Provox 聲音復健系統的配件吞入。和吞入其他異物時一樣,發聲瓣或 Provox2 聲音復健系統配件的吞入,主要會依吞入物體的大小、位置、程度、是否阻塞腸道,以及吞入時間的長短,而出現不同的症狀。如果吞入的配件位於食道下半部,則可以用食道鏡將其取出,或是觀察一段時間再說。吞入物也可能會自動進入胃部,通常這些異物進入胃部之後,就會經由腸道排出;但是如果病人出現腸阻塞、出血或胃穿孔等現象,或是吞入物無法經由腸道排出,便必須考慮以手術將腸道中的異物取出。
不慎吸入發聲瓣病人有可能不慎將 Provox2 人工發聲瓣或其他 Provox 聲音復健系統的配件吸入。當不慎吸入時,立即出現的症狀包括有嘔吐、咳嗽、呼吸困難或有哮鳴音。和吸入其他異物時一樣,吸入發聲瓣的配件時,也會因為呼吸道阻塞或感染,而導致其他的併發症,例如肺炎、肺不張、支氣管 炎、肺膿腫、支氣管肺瘺管和氣喘。如果病人還可以說話或呼吸,或許可以將異物咳出;但是如果呼吸道有部份阻塞或已完全阻塞,就需要立即設法將異物取出。
發聲瓣因擠壓等因素而凸出當氣管–食道瘺管有感染現象時,有時候發聲瓣會因擠壓等因素而凸出,這時必須將發聲瓣取出,以免它脫落而掉進氣管 中。瘺管在取出發聲瓣後可能會自動癒 合,因此如果要置入新的發聲瓣,便必須重新進行穿刺。組織損壞發聲瓣太短或太長,又或是發聲瓣經常為氣管套管、氣切口固定栓,或病人的手指推擠到食道壁,都很可能會損壞瘺管、氣管及食道組織。這些情況更容易發生在接受放射性治療的病人身上。因此,請定期檢查病人,以避免發生嚴重的組織損壞。
Unregis
tered
copy

68
特殊情況之處置順向置入與逆向置入如果無法順向置入 Provox2 人工發聲瓣,您可以使用 Provox GuideWire REF 7215 進行逆向置入。在 TE 穿刺程序 (初次或二次) 完成後,可以直接使用這種置入方法,置入發聲瓣;另外,若無法使用 Provox2 Inserter (置入器) 從氣切口接觸或深入瘺管時,也可以使用這種方法。
當瘺管壁變薄或萎縮 (瘺管太短,通常會導致發聲瓣周圍漏氣)、發聲瓣的後方為黏膜皺摺所包圍,或是食道固定邊無法完全與食道內部密合時,使用逆向置入,不但有助於保護瘺管,也有助於發聲瓣的食道固定邊與食道密合。
只有醫生才能進行逆向置入的操作,請詳閱 Provox GuideWire 所附的相關說明。
病人諮詢資訊置換發聲瓣之後,病人的痰中可能會帶有一點血絲,這多半是從氣管–食道瘺管邊緣的肉芽組織產生的。
在置入發聲瓣後的第一週內,偶爾會出現發聲瓣內或周圍輕微的漏氣現象,這種現象通常會自動改善,因此不需要立即置換發聲瓣。
每天最少兩次以及每次用餐後,用 Provox Brush清潔人工發聲瓣,有助延長裝置壽命。將氣切口封住,然後用力咳痰,也有助於發聲瓣的清潔。
氣管固定邊的形狀為橢圓形,可以協助您判斷發聲瓣的最佳位置 (亦即橢圓為指向下方)。
有些飲食控制方式可以抑制念珠菌的快速成長,例如,每天飲用酸乳酪或含有乳酸桿菌的脫脂牛奶。
如果出現自發性漏氣現象,可以使用 Provox Plug 暫時將漏氣處封住。如果出現下列情況,病人必須立即就診: – 發聲瓣內或周圍出現漏氣現象 (咳嗽)– 發聲變困難 (比較費力) – 在瘺管或氣切口周圍部位,出現任何發炎症狀
或組織產生變化的現象 (例如,疼痛、紅腫、發熱、腫大)。
您可以建議病人接受專業臨床醫師的語言治療,以便能夠流暢地說話。
裝置內容Provox 2 人工發聲瓣 (圖 1) 的直徑大小只有一種,但是有數種不同長度 (固定邊之間的距離) 可供選擇。另外,本裝置已經過無菌處理,只限單次使用。
本裝置隨附有限單次使用的置入工具 (圖 2 和圖 3),供順向置入使用;另外還附
Unregis
tered
copy

69
有一個可多次使用的 Provox Brush/Provox Brush XL (圖 4),做為清潔發聲瓣內部之用。請提供此清潔刷給病人,以便其每天護理之用。
維護裝置功能的配件 (病人用)注意:處理及清潔人工發聲瓣時,只限使用適合與 Provox2產品搭配使用的Provox原廠配件。指導患者如何清潔裝置,除下述清潔和保養以外,避免其他種類的人工發聲瓣操作。
Provox Brush / Provox Brush XL (圖4):每天最少兩次以及每次用餐後,患者應使用 Provox Brush 清潔人工發聲瓣,將刷子插入人工發聲瓣,以扭轉動作,輕輕地來回移動進行清潔。取出刷子後,應用紗布擦拭。此程序可視需要重複多次。只要刷子看起來乾淨沒有瑕疵,便可以使用(最多可用一個月)。人工發聲瓣附有一支 Provox Brush / Provox Brush XL。請參閱 Provox Brush 隨附的《使用說明》,暸解詳細資訊和清潔刷子的方式。
Provox Flush(圖5):除了使用Provox Brush 以外,患者也可以用 Provox Flush 清潔 Provox 人工發聲瓣。Provox Flush 可用來將飲用水或空氣沖過人工發聲瓣管腔。請參閱 Provox Flush 隨附的《使用說明》,暸解詳細資訊和清潔 Provox Flush 的方式。
Provox Plug(圖6):可供患者用來暫時阻隔人工發聲瓣漏氣的工具。用 Provox Brush 的平滑端將 Provox Plug 插入Provox 人工發聲瓣的開口。Provox Plug 可在喝水時維持於原處,拉動安全帶即可將之取出。Provox Plug 置於原處時,便不能說話。
配件的清潔和消毒應按照相關《使用說明》,每次使用後清潔配件,且每天最少消毒一次。
請告知患者,如果配件有明顯的髒污,或風乾配件時家中某人患有呼吸道感染,或因接觸寵物、掉落在地板上或其他嚴重污染而使配件受到污染,要使用配件前應該先加以清潔與消毒。住院期間,裝置遭污染和患者受到感染的風險會增加。因此,住院期間請務必在使用後立即清潔和消毒配件,並在即將使用前再次清潔和消毒,並以無菌水(而非飲用水)來沖洗。
Unregis
tered
copy
70
幫助發聲瓣置入及 TEP 瘺管造口的配件 (醫師用)Provox Measure:(圖 7) 可以測量現有 氣管–食道瘺管的長度 (相對於發聲瓣的 尺寸)。請注意:使用 Provox Measure 之前,請先確認瘺管的直徑為至少 6.6 mm (20 F)。較小的瘺管必須先加以擴張,否則如果瘺管太小,可能會無法將測量器具取出。訂購單位:1 個 Provox Measure,未經無菌處理、可滅菌、可多次使用; 5 個 Provox Measure Flanges,未經無菌 處理、可滅菌、單次使用。請閱讀相關 說明。
Provox Dilator:(圖 8) 可以將軸管直徑較小的發聲瓣,轉變成 Provox 人工發聲瓣。Provox Dilator 是一個材質為樹脂橡膠的擴張器,其頂端寬度為 15 F,底端為 24 F,可以逐步地擴張氣管–食道瘺管的直徑;同時在每個區段上 (例如 18 F、20 F、22 F),都設有小型的防滑護圈,可以防止擴張器滑出瘺管。您可以使用 Provox Dilator,暫時封住發聲瓣已取出的瘺管;或者,在 Provox 人工發聲瓣取出或遺失之後,瘺管直徑往往會收縮,此時也可以使用它來擴張縮小的瘺管。訂購單位:1 個 Provox Dilator,未經無菌處理、可滅菌、可多次使用。請閱讀相關說明。
Provox Trocar and Cannula:(圖 9 和圖 10) 進行初次或二次 TE 穿刺所使用的不鏽鋼材質醫療器具。Provox Trocar 可以穿刺出小而圓的瘺管,穿刺程序結束之後,請先取出內部的套針,然後將 Provox GuideWire 從外側的套子 (套管),推入喉部切除手術後所留下的喉部開口,以便將 Provox 或 Provox2 人工發聲瓣連接並拉到瘺管中。訂購單位:1 個 Provox Trocar 和 1 個 Provox Cannula,可多次使用、可滅菌。請閱讀相關說明。
Provox Pharynx Protector:(圖 11) 僅供初次 TE 穿刺時,做為保護喉部內壁之用。這是一個材質為不鏽鋼的醫療器具,左、右手慣用者皆可使用。訂購單位: 1 個 Provox Pharynx Protector,可多次使用、可滅菌。請閱讀相關說明。
Provox2 Training Kit:(圖 12) 非常實用的 Provox2 安裝及置入程序訓練教材。這份教材可以增進新進人員的技術。含 1 個用於示範的 Provox2 人工發聲瓣、3 條置入管、1 個置入器和 1 份《使用說明》手冊。
Unregis
tered
copy
71
其他可搭配 Provox 人工發聲瓣一起使用的輔助產品Provox HME:(圖 13) 熱氣與濕氣交換器,當上呼吸道因為氣管切開口而變短時,此交換器可以恢復部分喪失的鼻腔功能 (例如,加溫、濕潤、呼吸阻力等)。Provox HME 是特別針對全喉切除後的使用而設計的。依照病人皮膚的類型,可以使用 Provox Adhesive 底盤或 Provox LaryTubes,將 HME 連接到氣切口 (請參閱下面的說明)。實際的 HME Cassette 有助於氣切口的閉合,以便發聲。除了增進肺功能之外,Provox HME 還可增加音量範圍及/或最長發聲時間,因而可以改善發聲品質。如需詳細資訊,請參閱相關的產品說明。
Provox FreeHands HME:(圖 14 和圖 15,包括 Provox HME Cap) 為一熱氣與濕氣交換器,其特徵為結合了一個自動氣管切開口閥瓣,這種設計使得病人發聲時可以不必使用手來操作,但並不是對所有病人都有最好的效果。如需詳細資訊,請參閱相關的產品說明。
Provox LaryTube:(圖 16) 為一柔軟但不失堅固的樹脂氣管套管,它可以支撐逐漸縮小之氣切口,而且同時還能保留 Provox HME Cassette 或 Provox FreeHands HME™ 自動發聲閥瓣的使用。 有不同的版本及尺寸可供選擇。如果要搭配人工發聲瓣使用,必須選擇有開口的 Fenestrated Provox LaryTube 版本;其他版本則必須個別在 TEP 瘺管處開口。如需詳細資訊,請參閱相關的產品說明。
所有的訂購代碼,皆列於本手冊的最 後,請參閱之。
醫師使用須知維護裝置的效力請不要使用包裝受損或已經拆封的產品。
使用方法置換指示發聲瓣並不是永久植入的裝置,因此需要定期置換。需要置換 Provox2 人工發聲瓣最主要的跡象,就是閥瓣無法正常運 作,導致液體從發聲瓣中漏出。當發聲瓣完全阻塞,或是要費很大的力氣才能發出聲音,請先試著以抽吸的方式,最好是使用內視鏡,來清潔發聲瓣,然後再視情況看看是否需要進行置換。檢查發聲瓣時,
Unregis
tered
copy

72
可以使用 30° 的鼻咽鏡,或有彈性的喉 鏡,如此一來,就可以同時檢查閥瓣,並且清潔發聲瓣。藉由清潔及檢查發聲瓣的方式,或許便可以解決閥瓣無法正常運 作、發聲瓣阻塞,或是要費很大的力氣才能發出聲音等情形。
順向置換程序• 選擇長度適中的發聲瓣
請使用長度適中的 Provox2 人工發聲瓣。如果要決定合適的長度為何,您可以使用 Provox Measure (請參閱〈配件〉),或是使用發聲瓣本身進行測量。如果舊發聲瓣的氣管固定邊與黏膜壁之間的距離太大,亦即超過 3 mm (約 0.12 英吋),請改用較短的發聲瓣。您可以在手術後隔一段時間進行觀察,也就是等到手術的水腫及發炎現象消退,氣管與食道共用的內壁沒有那麼堅硬之後,再進行測量。不過請記住,發聲瓣稍微長一點沒有關係 (除非會產生活塞效應,亦即在裝置周圍擠壓出液體),但是如果發聲瓣太短,就一定會有問題。
如果氣管固定邊變形,便表示發聲瓣可能太短,應該改用較長的發聲 瓣。如果氣管黏膜有變肥厚的現象,甚至會因腫脹而覆蓋到氣管固定邊的上方,此時也請考慮改用軸管較長的發聲瓣。
• 將人工發聲瓣裝入置入工具:本手冊所描述的使用方法,是針對慣用右手者所寫的;慣用左手的使用 者,請將文中的左右手互換。
請參閱圖解 (1) 置入工具包括了一個置入器 (A) 和一個裝填管 (B)。裝填管有一個叉開的開口,可以用來固定發聲瓣,而較尖細的另一端,則是為了順向置入氣管–食道瘺管中所設計的。裝填管的內部已經預先塗有潤滑劑,有助於人工發聲瓣順利地穿過裝填管。
將發聲瓣的安全束帶插入置入器的夾縫中 (2),依箭頭方向 (3) 牢牢拉住將它固定,然後將發聲瓣的氣管開口放在置入器的上方 (4)。
(5) 用右手的拇指和食指,將人工發聲瓣的食道固定邊向前緊壓。接著用左手握住裝填管,將向前緊壓的發聲瓣固定邊,以大約 45° 的方向,插入 (勾住) 裝填管的夾縫中。
Unregis
tered
copy

73
(6) 將置入器向前推大約 1 cm (約 0.4 英吋),如此一來,人工發聲瓣的食道固定邊便會向前摺。
(7) 用左手的拇指,將發聲瓣凸出的部份往下壓,這時食道固定邊應該就會完全向前摺。
請將置入器往前推,直到標示線 1 與裝填管的邊緣對齊 (請參閱圖 解 8)。
注意:如果食道固定邊沒有往前 摺,而且必須費很大的力氣才能將發聲瓣向前壓,請先將它拉回來,然後再次依照圖解 5 中的指示進行,需要的話,可以塗抹一點水溶性潤滑劑。
此時便已做好置入 Provox 2 人工發聲瓣的準備工作了。
• 置換發聲瓣請使用無齒邊的止血鉗,將氣管–食道瘺管中的 Provox、Provox2 或其他任何發聲瓣取出 (如果是第一代 Provox 人工發聲瓣,可能需要較大的力氣);或者,請依照 Provox GuideWire 所附手冊中描述的方式,使用 Provox GuideWire 將發聲瓣從口腔拉出。醫師可自行斟酌,使用鉗子夾住發聲瓣的氣管固定邊並將其剪掉,然後再將殘餘的發聲瓣推入食道中,讓它經由腸道排出,但是,使用此方法時,請務必考慮病人過往的腹部疾病病史。
請參閱圖解 (8):將裝填管較尖細的一端插入氣管–食道瘺管中,然後往瘺管內推,直到裝填管的前端完全進入食道內部空腔,並碰到後面的食道壁為止。
(9) 用左手將裝填管保持在這個位置,再用右手握住置入器,並將拇指放在標示線 2 的置放處上。
將置入器 (右手) 向前推,直到標示線 2 與裝填管的邊緣對齊為止。
注意:請不要把置入器當成注射器一般,「注射」發聲瓣,也不要以握筆的方式握住置入器,這兩種方式都會導致不正確的置入。
(10) 現在,原本向前摺的食道固定邊,應該已經在食道內部空腔中展開了。如果要檢查置入情況是否正確,請輕輕將置入工具 (裝填管與置入器) 向後拉,直到碰到前面的食道壁為 止,並將食道固定邊靠在前面的食道壁上。以前面的食道壁當作停靠點,將置入器保持在這個位置上。
Unregis
tered
copy
74
(11) 將裝填管向後拉,同時將置入器保持在原來的位置上,然後將裝填管從置入器上方取出。這時,氣管固定邊應該就會展開了。
如果氣管固定邊沒有自行展開,請將置入器與發聲瓣一起稍微向後拉,並輕輕地繞著軸心轉動幾次;或者,也可以使用無齒邊的止血鉗,輕輕拉住氣管固定邊並原地轉動。在橢圓形之氣管固定邊的長軸上,設有方向辨識鈕,可以指示安全束帶應該朝哪個方向拉動。氣管固定邊較平滑的一邊應朝向氣管黏膜,而辨識鈕則應朝向氣管內腔。
(12) 旋轉並輕拉氣管固定邊,檢查發聲瓣的位置是否正確。如果發聲瓣已放置妥當,請將氣管固定邊外緣的安全束帶剪掉。
(13) 接著就可以開始使用 Provox2 人工發聲瓣了。氣管固定邊的另一 端,應該朝下指向氣管的下方。
注意事項– 如果您對 Provox2 的更換程序不太有
經驗,請閱讀以下的「疑難排解」部份,並以 Provox2 Training Kit (REF 7222) 和人工廔管模型 (REF 8201) 練習。
– 如果置入不成功,可以使用相同的工具和裝置再次進行置入。但是,如果這個程序重複超過兩次以上,建議您再在裝填管中塗抹一點水溶性潤滑劑。
– 如果無法以順向方式成功地置換人工發聲瓣,您還可以使用 Provox GuideWire 進行逆向置換,並以安全束帶當作導引線使用。請參閱上面的〈特殊情況之處置〉一節。
疑難排解忘記使用安全束帶如果您沒有接上發聲瓣的安全束帶,便可能在置入的過程中遺失發聲瓣,它可能會掉進食道、瘺管或氣管,而有不慎吸入或吞入的危險。
如果發生這種情況,請視情形中斷置入程序,先用無齒邊的止血鉗夾住並固定發聲瓣,然後再用另一個止血鉗將它拉出來。接著,重新將發聲瓣裝入置入工具中,然後重複置入程 序。如果發聲瓣已經遺失不見了,請
Unregis
tered
copy
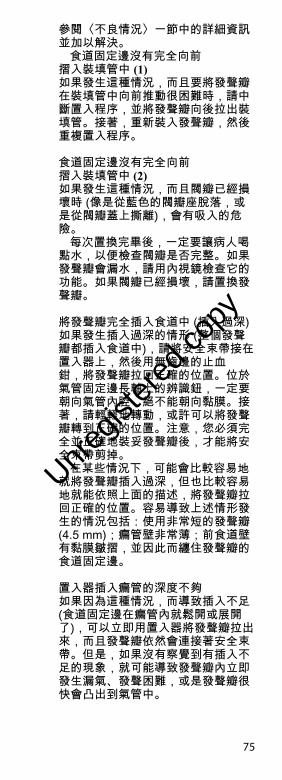
75
參閱〈不良情況〉一節中的詳細資訊並加以解決。
食道固定邊沒有完全向前 摺入裝填管中 (1) 如果發生這種情況,而且要將發聲瓣在裝填管中向前推動很困難時,請中斷置入程序,並將發聲瓣向後拉出裝填管。接著,重新裝入發聲瓣,然後重複置入程序。
食道固定邊沒有完全向前 摺入裝填管中 (2)如果發生這種情況,而且閥瓣已經損壞時 (像是從藍色的閥瓣座脫落,或是從閥瓣蓋上撕離),會有吸入的危險。
每次置換完畢後,一定要讓病人喝點水,以便檢查閥瓣是否完整。如果發聲瓣會漏水,請用內視鏡檢查它的功能。如果閥瓣已經損壞,請置換發聲瓣。
將發聲瓣完全插入食道中 (插入過深)如果發生插入過深的情形 (整個發聲瓣都插入食道中),請將安全束帶接在置入器上,然後用無齒邊的止血 鉗,將發聲瓣拉回正確的位置。位於氣管固定邊長軸上的辨識鈕,一定要朝向氣管內腔,絕不能朝向黏膜。接著,請輕輕地轉動,或許可以將發聲瓣轉到正確的位置。注意,您必須完全並正確地裝妥發聲瓣後,才能將安全束帶剪掉。
在某些情況下,可能會比較容易地就將發聲瓣插入過深,但也比較容易地就能依照上面的描述,將發聲瓣拉回正確的位置。容易導致上述情形發生的情況包括:使用非常短的發聲瓣 (4.5 mm);瘺管壁非常薄;前食道壁有黏膜皺摺,並因此而纏住發聲瓣的食道固定邊。
置入器插入瘺管的深度不夠如果因為這種情況,而導致插入不足 (食道固定邊在瘺管內就鬆開或展開了),可以立即用置入器將發聲瓣拉出來,而且發聲瓣依然會連接著安全束帶。但是,如果沒有察覺到有插入不足的現象,就可能導致發聲瓣內立即發生漏氣、發聲困難,或是發聲瓣很快會凸出到氣管中。
Unregis
tered
copy

76
請在發聲瓣仍然與置入器連接的情況下,拉住並轉動發聲瓣,確認它的位置是否正確。這麼做可以減少發聲瓣部份插入瘺管的危險。一定要用置入器完全伸入瘺管,而且要到達食道內腔之後,才可以鬆開發聲瓣。您可以小心地觸碰後食道壁,加以確認。裝填管前端的設計,是要在鬆開發聲瓣的食道固定邊時,可以完全打開來。但是,應該要在食道內腔中打開,而不是在瘺管內打開。
忘記在標示線 2 的位置停止如果發生這種情況,請參閱上面的 「插入過深」。
剛開始時,只有將裝填管拉回來,而不是整個置入工具如果發生這種情況,可能就是因為 「插入過深」所導致,請參閱上面的「插入過深」。
置換掉其他的人工發聲瓣如果病人氣管–食道瘺管的長度和直 徑,與專為 Provox 人工發聲瓣所造氣管–食道瘺管的長度和直徑差不多,就可以使用 Provox2 人工發聲瓣,置換掉其他設計用於氣管–食道瘺管的人工發聲瓣。
1 . 其 他 內 置 式 人 工 發 聲 瓣 ( 例如,Indwelling Blom-Singer 和 Groningen): 如果氣管–食道瘺管的位置正確,在置換時,不需要採取任何特殊的處置,但是 請記住,氣管–食道瘺管的位置是非常重要的 (請參閱下面的「氣管–食道瘺管的 位置」)。
2. 非內置式人工發聲瓣 (例如,Blom-Singer ):由於這類發聲瓣的直徑通常 都 比 較 小 , 因 此 在 取 出 發 聲 瓣 之 後,可能必須使用 Provox Dilator 將氣管–食道瘺管擴張。第一次導入 Provox2 人工發聲瓣時,最好是在局部麻醉的情況下使用 Guidewire,這樣會比較容易成功。不過也請記住,氣管–食道瘺管的位置是非常重要的 (請參閱下面的「氣管–食道瘺管的位置」)。在某些情況下,使用這類發聲瓣時,發聲瓣與黏膜皮膚接合的位置會比較高。如果選擇要置換為 Provox 2 人工發聲瓣,建議您先將瘺管閉合,隔一段時間之後,再進行二次穿刺,重造新的瘺管。
Unregis
tered
copy

77
氣管–食道瘺管的位置氣管–食道瘺管的位置是否正確,是非常重要的。瘺管的中心 (這是指穿刺時,之後則是指瘺管的邊緣),應該在氣管黏膜與皮膚接合處的下方,大約 5 mm (約 0.2 英吋) 的位置上。如果位置太低,不但清潔發聲瓣時可能會有問題,置換也會比較困難,而且會導致發聲瓣內漏水。如果有任何這些問題影響到人工聲音復健,導致病人無法有最佳的功能,建議您先將瘺管閉合,隔一段時間之後,再進行二次穿刺重造瘺管。
病人手冊–摘要描述每一套 Provox2 人工發聲瓣都附有一本 《病人手冊》,請務必提供給病人閱讀。不過,雖然有 Provox2《病人手冊》, 病人與醫師之間的溝通,仍然是非常重 要的。病人手冊中所討論的主題:(摘要內容)
名詞解釋 說明性資訊:Provox2 人工發聲瓣的目的 (使用指示)產品說明不適合使用裝置的時機 (禁忌症)風險及優點 (充分了解情況後 再作決定)Provox2 的置入方式及後續處理一般警告及預防措施
操作資訊:如何使用 Provox2 發聲如何清潔發聲瓣必要時,應由誰來置換 Provox2?Provox2 人工發聲瓣的使用壽命有 多長,以及如何判斷是否需要置換?配件種類及使用方式相關產品疑難排解資訊 (依症狀編列)
其他資訊資訊資源、旅行或出國時的使用須 知、使用者協助資訊
出版日期請參閱本手冊封底的版本號碼。
Unregis
tered
copy

78
Ordering information REF Rx
Provox2 4.5 mm 7216 Rx
Provox2 6 mm 7217 Rx
Provox2 8 mm 7218 Rx
Provox2 10 mm 7219 Rx
Provox2 12.5 mm 7221 Rx
Provox2 15 mm 7224 Rx
Provox Guidewire 7215 Rx
Provox trocar 7203 Rx
Provox Pharynx Protector 7210 Rx
Provox measure 7270 Rx
Provox measure Flanges, 5 pcs 7271 Rx
Provox dilator 7211 Rx
Provox Brush, 6 pcs 7204
Provox Brush XL, 6 pcs (for 12.5 mm & 15 mm)
7225
Provox Flush 8109
Provox Plug 7205
CautionUnited States Federal law restricts the sale, distribution and use by, or by order of a physician or a licensed practitioner of devices identified herein with the symbol “Rx”. the prescription-free availability of these products outside the United States may vary from country to country.
Unregis
tered
copy

Unregis
tered
copy

Unregis
tered
copy

Unregis
tered
copy

Unregis
tered
copy

Unregis
tered
copy

atos medical aB, Kraftgatan 8, P.o. Box 183, SE-242 22 Hörby, Sweden
Tel: +46 (0)415 198 00 • Fax: +46 (0)415 198 98 www.atosmedical.com • [email protected]
© atos medical aB, Sweden. 201111a, REF 90776
Unregis
tered
copy