
CaldoCLICK Muffen Step 2 - KE KELIT · Sicherheitshinweise DE Lesen Sie diese Montageanleitung...
10
Muffensystem Einfach schnell sicher. MONTAGEANLEITUNG
-
Upload
truongkhuong -
Category
Documents
-
view
213 -
download
0
Transcript of CaldoCLICK Muffen Step 2 - KE KELIT · Sicherheitshinweise DE Lesen Sie diese Montageanleitung...
Muffensystem Einfach schnellsicher.
MONTAGEANLEITUNG

Sicherheitshinweise
DE Lesen Sie diese Montageanleitung aufmerksam, bevor Sie mit dem Arbeiten beginnenEN Read these installation instructions carefully before start working
DE Wichtige Hinweise für die sichere und korrekte Handhabung dieses Produkts!
EN Important information on how to handle this product safely and correctly!
1.DE Schaum und Schale niemals der Sonne oder Wärmequellen aussetzen!EN Never expose the foam and shell to sunlight or heat sources!
2.DE Dichtringe immer vor Fittings montieren! (Ist später nur mit Schrumpfmanschette abdichtbar!)EN Always install sealing rings before fittings! (Afterwards it is only sealable with a shrink sleeve!)
3.DE Sorgen Sie immer für saubere Rohrenden an den Schalenöffnungen.EN Always make sure pipes are clean on all openings of the shells.
4.DE Tragen Sie Schutzbrille und Handschuhe beim Arbeiten mit Schaum.EN Wear safety goggles and gloves when working with foam.
2
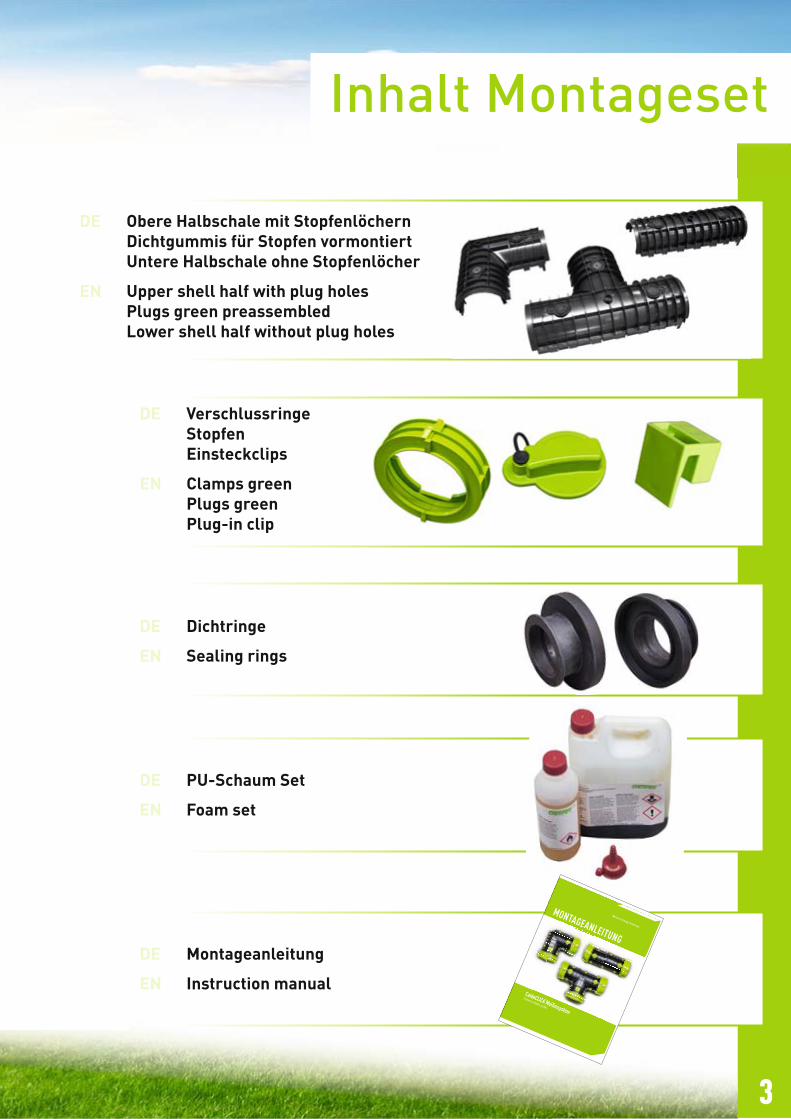
Inhalt Montageset
DE Obere Halbschale mit Stopfenlöchern Dichtgummis für Stopfen vormontiertUntere Halbschale ohne Stopfenlöcher
EN Upper shell half with plug holesPlugs green preassembledLower shell half without plug holes
DE Montageanleitung
EN Instruction manual
DE VerschlussringeStopfenEinsteckclips
EN Clamps greenPlugs greenPlug-in clip
DE PU-Schaum Set
EN Foam set
DE Dichtringe
EN Sealing rings
CaldoCLICK Muffensystem
Einfach schnell sicher.
MONTAGEANLEITUNG
3

Montageablauf
3.DE Schaum mit Hammerfinne abschlagen.
Achtung: Mediumrohr darf beim Abisolieren nicht beschädigt werden.
EN Removal of the foam with a peen. Attention: Do not demage carrier pipe while shipping off insulation.
1.DE Das Rohr mit einer Fuchsschwanzsäge
(50 cm Blatt) gerade abschneiden. Rohrmantel ringsum einschneiden.Abisolierlänge Mediumrohr AußendurchmesserAD 20 - 40 = 100 mmAD 50 = 125 mmAD 63 - 160 = 150 mm
Achtung: Die Rohre sind auf Spannung und kön-nen nach dem Durchsägen rückfedern.
EN Cut the pipe straightly with a foxtail saw. Carve around the outside material of pipe.Stripping length of medium pipe outer diameterAD 20 - 40 = 100 mmAD 50 - 110 = 125 mmAD 125 - 160 = 150 mmAttention: The pipes are under tension and they can spring back when cutting.
2.DE Mantel längs mit Messer oder Säge auftrennen. Mantel ablösen.
Achtung: Verletzungsgefahrbeim Arbeiten mit scharfen Werkzeugen.
EN Separate and remove the shell from the pipe with a knife or saw.Attention: Risk of injury when workingwith sharp tools.
4
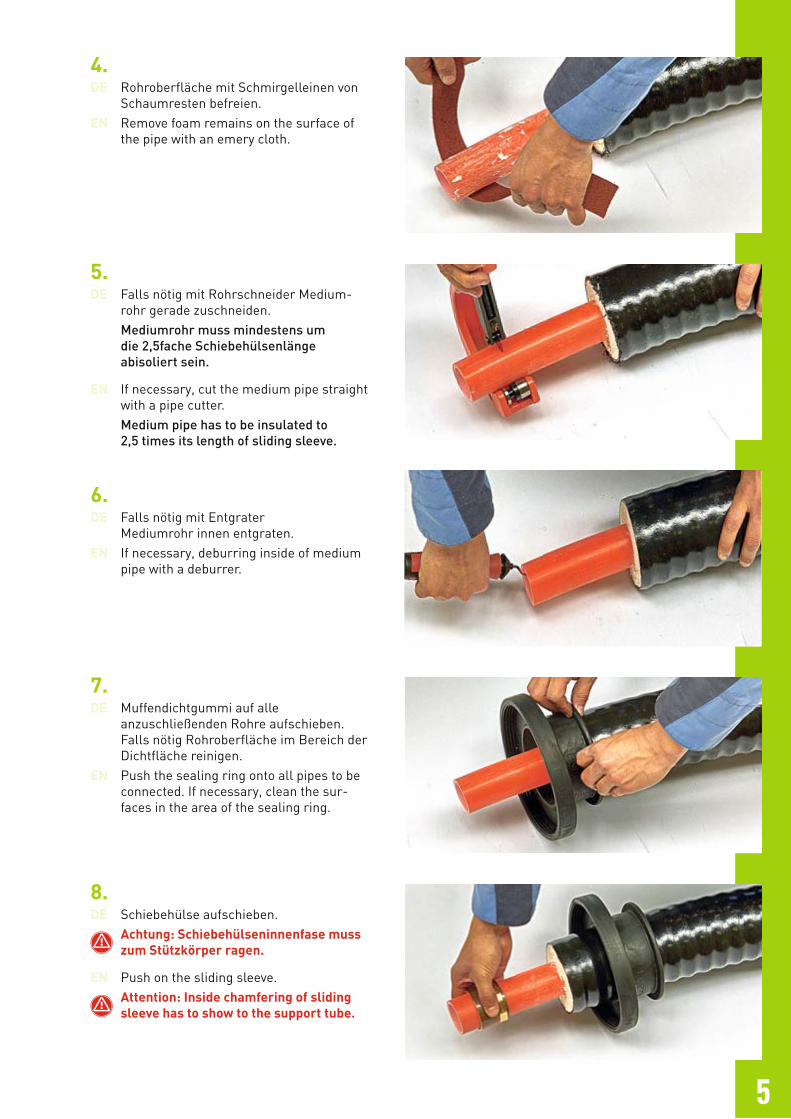
5.DE Falls nötig mit Rohrschneider Medium-
rohr gerade zuschneiden. Mediumrohr muss mindestens um
die 2,5fache Schiebehülsenlängeabisoliert sein.
EN If necessary, cut the medium pipe straight with a pipe cutter.
Medium pipe has to be insulated to 2,5 times its length of sliding sleeve.
4.DE Rohroberfläche mit Schmirgelleinen von
Schaumresten befreien.EN Remove foam remains on the surface of
the pipe with an emery cloth.
6.DE Falls nötig mit Entgrater
Mediumrohr innen entgraten.EN If necessary, deburring inside of medium
pipe with a deburrer.
7.DE Muffendichtgummi auf alle
anzuschließenden Rohre aufschieben.Falls nötig Rohroberfläche im Bereich der Dichtfläche reinigen.
EN Push the sealing ring onto all pipes to be connected. If necessary, clean the sur-faces in the area of the sealing ring.
8.DE Schiebehülse aufschieben. Achtung: Schiebehülseninnenfase muss
zum Stützkörper ragen.
EN Push on the sliding sleeve. Attention: Inside chamfering of sliding
sleeve has to show to the support tube.
5

10.DE Stützkörper bis zum letzten
Steg einstecken.EN Plug in the support tube up to the last bar.
9.DE Mit Aufweitwerkzeug Mediumrohr aufwei-
ten. Danach Aufweitwerkzeug um 30 Grad drehen und das Aufweiten wiederholen.
EN Expand the medium pipe with suitable ex-panding tool. Then turn the expanding tool to 30 degrees and repeat the expanding as before.
11.DE Schiebehülse über Stützkörper ziehen. Die Ver-
bindung ist in Ordnung, wenn das Mediumrohr den letzten Steg am Stützkörper überdeckt.
EN Push the sliding sleeve onto the support tube. The connection is okay, when the medium pipe covers the last bar at the support tube.
12.DE Untermuffenformteil unter dem Schiebe-
hülsenformteil positionieren.EN The moulded part of the bottom shroud
should be positioned under the moulded part of the sliding sleeve.
13.DE Oberes Muffenformteil über das untere
Formteil legen und über die längeren Schnapper positionieren (siehe Markierung).
EN The moulded part of the upper shroud should be placed over the bottom moul-ded part and then positioned over the longer catches (see marking).
6
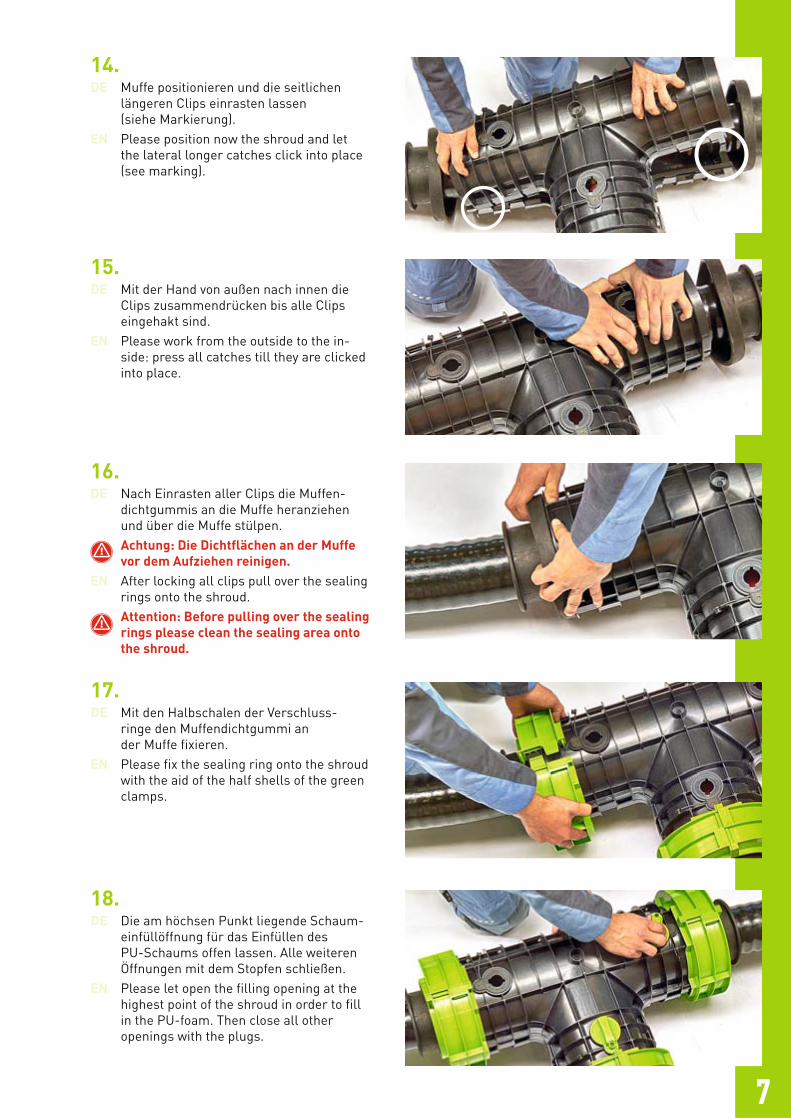
14.DE Muffe positionieren und die seitlichen
längeren Clips einrasten lassen (siehe Markierung).
EN Please position now the shroud and let the lateral longer catches click into place (see marking).
15.DE Mit der Hand von außen nach innen die
Clips zusammendrücken bis alle Clips eingehakt sind.
EN Please work from the outside to the in-side: press all catches till they are clicked into place.
17.DE Mit den Halbschalen der Verschluss-
ringe den Muffendichtgummi an der Muffe fixieren.
EN Please fix the sealing ring onto the shroud with the aid of the half shells of the green clamps.
16.DE Nach Einrasten aller Clips die Muffen-
dichtgummis an die Muffe heranziehen und über die Muffe stülpen. Achtung: Die Dichtflächen an der Muffe vor dem Aufziehen reinigen.
EN After locking all clips pull over the sealing rings onto the shroud.Attention: Before pulling over the sealing rings please clean the sealing area onto the shroud.
18.DE Die am höchsen Punkt liegende Schaum-
einfüllöffnung für das Einfüllen des PU-Schaums offen lassen. Alle weiteren Öffnungen mit dem Stopfen schließen.
EN Please let open the filling opening at the highest point of the shroud in order to fill in the PU-foam. Then close all other openings with the plugs.
7

8
21.DE PU-Schaum gemäß Bedienungsanleitung
vorbereiten und in die Muffe einfüllen.Achtung: Beim Vorbereiten des Schaums geschlossene Kleidung, Arbeitshand-schuhe und Schutzbrille tragen.
EN Please prepare the PU-foam according to the operating instruction and then fill the foam into the shroud.Attention: When preparing the foam please wear closed clothes, working gloves and protective goggles.
19.DE Clips anbringen.EN Put on the small green plug-in clips.
35°C
25°C
20°C
0°C
MON
TAGE
LAGE
R | ST
ORAG
E
DE PU-Schaum Lager- und Montagetemperatur.EN PU-foam storage and installation temperature.

9
24.DE Fertige Muffe!EN Completed shroud!
23.DE Ca. 10 Minuten den PU-Schaum aushär-
ten lassen, danach müssen die Gummi-stopfen in die Entlüftungsöffnung ge-steckt werden.
EN Leave the PU-foam to cure for 10 minutes, then the rubber plug has to be plugged in the filling opening.
22.DE Schaumeinfüllöffnung mit dem Stopfen
schließen. Gummistopfen in die Entlüf-tungsöffnung noch nicht einstecken.
EN Now close the filling opening with the plug. Do not plug in the rubber plug into the ventilation opening.

________________________________________________________________________________________________________________________________________________________________________________________________________________________________________________________________________________________________________________________________________________________________________________________________________________________________________________________________________________________________________________________________________________________________________________________________________________________________________________________________________________________________________________________________________________________________________________________________________________________________________________________________________________________________________________________________________________________________________________________________________________________________________________________________________________________________________________________________________________________________________________________________________________________________________________________________________________________________________________________________________________________________________________________________________________________________________________________________________________________________________________________________________________________________________________________________________________________________________________________________________________________
NotizenNotes
10


![EDHO] - COLIN SWISS AGdocuments.colinswiss.ch/datenblaetter/Apparate_Behaelter/... · 2019-07-01 · • Alle Stutzen und Muffen grundsätzlich gem. AD2000 lastfrei anbinden. •](https://static.fdokument.com/doc/165x107/5e3166920cd8061fd61c7186/edho-colin-swiss-2019-07-01-a-alle-stutzen-und-muffen-grundstzlich-gem.jpg)
![Aracus advanced esp.pptx [Read-Only] - membrapure.de](https://static.fdokument.com/doc/165x107/62c4eac6cefe741ecd2ee142/aracus-advanced-esppptx-read-only-.jpg)