
Drei Module für das Praktikum...
55
Drei Module für das Praktikum Computernetzwerke Projektarbeit der Philosophisch-naturwissenschaftlichen Fakultät der Universität Bern Vorgelegt von: Marco Studer Leiter der Arbeit: Prof. Dr. Torsten Braun Betreuer der Arbeit: Marc-Alain Steinemann Forschungsgruppe Rechnernetze und Verteilte Systeme (RVS) Institut für Informatik und angewandte Mathematik 2001
Transcript of Drei Module für das Praktikum...
Drei Module für das Praktikum Computernetzwerke
Projektarbeit der Philosophisch-naturwissenschaftlichen Fakultät
der Universität Bern
Vorgelegt von:
Marco Studer
Leiter der Arbeit: Prof. Dr. Torsten Braun
Betreuer der Arbeit:
Marc-Alain Steinemann
Forschungsgruppe Rechnernetze und Verteilte Systeme (RVS) Institut für Informatik und angewandte Mathematik
2001

1
Table of Contents 0 Table of Contents 1 1 Abstract 3 2 Introduction 3 3 Didactical Concept 4
3.1 Goals ..................................................................................... 4 3.1.1 Goals of Module 4 ......................................................... 4 3.1.2 Goals of Module 5 ......................................................... 4 3.1.3 Goals of Module 6 ......................................................... 4
3.2 Qualification ......................................................................... 4 3.3 Required Equipment ............................................................ 4
4 Module 4 5
4.1 Comments ............................................................................. 6 4.2 Pre Lab Work ....................................................................... 7
4.2.1 Recommended Reading ................................................. 7 4.2.2 Must Reading ................................................................. 7 4.2.3 Exercises ........................................................................ 8
4.3 Lab Work .............................................................................. 9 4.4 Post Lab Work ...................................................................... 12 4.5 Solutions ............................................................................... 13
4.5.1 Pre Lab Work ................................................................. 13 4.5.2 Lab Work ....................................................................... 14 4.5.3 Post Lab Work ............................................................... 14
4.6 Feed Back Form for Lab 4 ................................................... 19 A 4 Appendix .............................................................................. 20
A 4.1 A Short BIND8 Configuration File Guide .................... 20 5 Module 5 22
5.1 Comments ............................................................................. 23 5.2 Pre Lab Work ....................................................................... 24
5.2.1 Recommended Reading ................................................. 24 5.2.2 Must Reading ................................................................. 24 5.2.3 Exercises ........................................................................ 25
5.3 Lab Work .............................................................................. 26 5.4 Post Lab Work ...................................................................... 39

2
5.5 Solutions ............................................................................... 30 5.5.1 Pre Lab Work ................................................................. 30 5.5.2 Lab Work ....................................................................... 31 5.5.3 Post Lab Work ............................................................... 31
5.6 Feed Back Form for Lab 5 ................................................... 34 6 Module 6 35
6.1 Comments ............................................................................. 36 6.2 Pre Lab Work ....................................................................... 37
6.2.1 Recommended Reading ................................................. 37 6.2.2 Must Reading ................................................................. 37 6.2.3 Exercises ........................................................................ 38
6.3 Lab Work .............................................................................. 39 6.4 Post Lab Work ...................................................................... 42 6.5 Solutions ............................................................................... 43
6.5.1 Pre Lab Work ................................................................. 43 6.5.2 Lab Work ....................................................................... 44 6.5.3 Post Lab Work ............................................................... 44
6.6 Feed Back Form for Lab 6 ................................................... 47 A 6 Appendix .............................................................................. 48
A 6.1 The M4 Macroprocessor ................................................ 48 A 6.2 Mounting Remote Filesystems with Linux ................... 49 A 6.3 Article ............................................................................. 50
3
1. Abstract This report has been made in the context of the “Praktikum Computernetzwerke” which is a practical training at the University of Berne. The laboratory is grouped into seven modules in which students learn to install and configure IP based networks. A lot of topics in computer networking can’t be learned just by reading a book. Therefore it is important that students practice their learned stuff. This report contains three modules which students help to understand the application layer: module 4, “Configuring Domain Name Service”, module 5 “Configuring a Web Server and a Proxy Server” and module 6 “Configuring a Mail Transfer Agent”.
2. Introduction Each module of the laboratory consists of three parts. The Pre Lab Work is an introduction to every new area. Students need to read and make themselves familiar with the problems they are going to encounter in the Lab Work. In addition, students need to solve exercises. The main part of each module is the Lab Work. In this section, students transfer their theoretical knowledge into practical work. This is either done by programming basic network applications, configuring or analysing network services. To increase the understanding of the treated stuff, the participants will have to analyse their work and answer context questions in the Post Lab Work. In module 4 students learn the principles of the Domain Name System. In the Pre Lab students read about the structure of the DNS. In the Lab Work they have to configure a primary and a secondary DNS server for a little domain. Nslookup has to be used to test and analyse the created domain. In module 5 the participants configure an Apache web server with two sites on the same host. Therefore they have to set up a name based virtual host. In addition a proxy server has to be configured with a given access specification. At the end of the Lab Work students have to access the created sites with a web browser through the proxy server. Module 6 deals with the Mail Transfer Agent Sendmail. First students read about the principles of email in the Internet. In the Lab Work they have to configure Sendmail so it acts as a mail server for a small domain with two clients and three users. Anti-spam features have to be activated and properly configured. The stuff which students learn in module 4 is used in the next two modules. Module 5 and 6 are totally independent of each other and can be solved separately.

4
3. Didactical Concept 3.1 Goals 3.1.1 Goals of Module 4 - Students know how domain names are resolved into IP addresses (and vice versa) in the
Internet
- Students know the most important BIND resource records
- Students can configure a DNS server for a given domain
- Students can analyse DNS related problems with the utility Nslookup
3.1.2 Goals of Module 5 - Students know the most important directives of the Apache web server
- Students can configure Apache for a simple site
- Students can configure a name based virtual host
- Students can set up a proxy server so it responds on a given port to HTML-requests
3.1.3 Goals of Module 6 - Students know how email is transferred in the Internet
- Students know the most important SMTP and POP commands
- Students can configure Sendmail as a mail server for a small domain
- Students can control relaying with Sendmail
3.2 Qualification Students must have a basic understanding in computer networking. They have to know the services and tasks of the transport and application layer. As all work is done on Linux machines, students have to know the basics of the Linux operating system. Knowledge of a text editor as vi or emacs is helpful. 3.3 Required Equipment - At least 3 Debian Linux workstations connected with a switch or a repeater
- Required Debian packages:
Module 4: bind, dnsutils
Module 5: bind, dnsutils, lynx, apache, squid
Module 6: sendmail, mutt, , nfs-kernel-server, nfs-common-server
5
Laboratory 4
Configuring Domain Name Service
What you will learn in this lab:
• Principles of the domain name service • The utility nslookup • How to configure BIND on Linux

6
4.1 Comments - 2 groups can work per time slot. - BIND is the name system package. It is obviously necessary to be able to set up name
services. In the lab session we will use version 8.
7
4.2 Pre Lab Work
4.2.1 Recommended Reading 1) DNS Resources Directory http://www.dns.net/dnsrd/ 2) Visualisation of the DNS: http://fsck.ch/projects/dns/ 3) DNS HOWTO: http://www.linuxdoc.org/HOWTO/DNS-HOWTO.html 4) DNS und BIND, O’Reilly, 1997 5) Computer Networks, Andrew S. Tannenbaum, 3rd Edition, Chapter 7.2 6) ISC BIND http://www.isc.org/products/BIND/ 7) Tool to retrieve DNS information from DNS servers: http://www.netliner.com/dig.html 8) TCP/IP Network Administration, O´Reilly, 1998, Configuring DNS, chapter 8, page 202
– 225 9) RFC 1034 DOMAIN NAMES - CONCEPTS AND FACILITIES 10) RFC 1035 DOMAIN NAMES - IMPLEMENTATION AND SPECIFICATION 11) RFC 974 MAIL ROUTING AND THE DOMAIN SYSTEM
4.2.2 Must Reading 1) Network Laboratory, Chapter 4 2) Appendix A 4.1 3) DNS und BIND, O’Reilly, 1997, nslookup, chapter 2, chapter 4, chapter 11. 4) ISC BIND http://www.isc.org/products/BIND/, BIND 8.2 Documentation
8
4.2.3 Exercises 1) Make a rough draw of the DNS hierarchy in the Internet. 2) A BIND8 DNS server includes DNS database files (db-files) where the resource records
are stored. Describe the following resource records: SOA, NS, A, PTR, MX. 3) What are the functions of primary and a secondary DNS server? 4) Use the tool nslookup on a host in the IAM- or EXWI-pool to answer these questions:
a) Which is the FQDN for 198.182.196.56? b) Which is the IP of the web server www.unibe.ch? c) Write down the IP of a DNS server for the domain unibe.ch. d) Write down the FQDN of two other DNS servers for the domain unibe.ch
5) In DNS configuration files you find “IN” as command prefixes. Why? Are there others?
9
4.3 Lab Work In this lab session you are installing a DNS server for the domain cnl.unibe.ch. Remarks: • Make sure that you kill the named process before you restart the server. The PID is
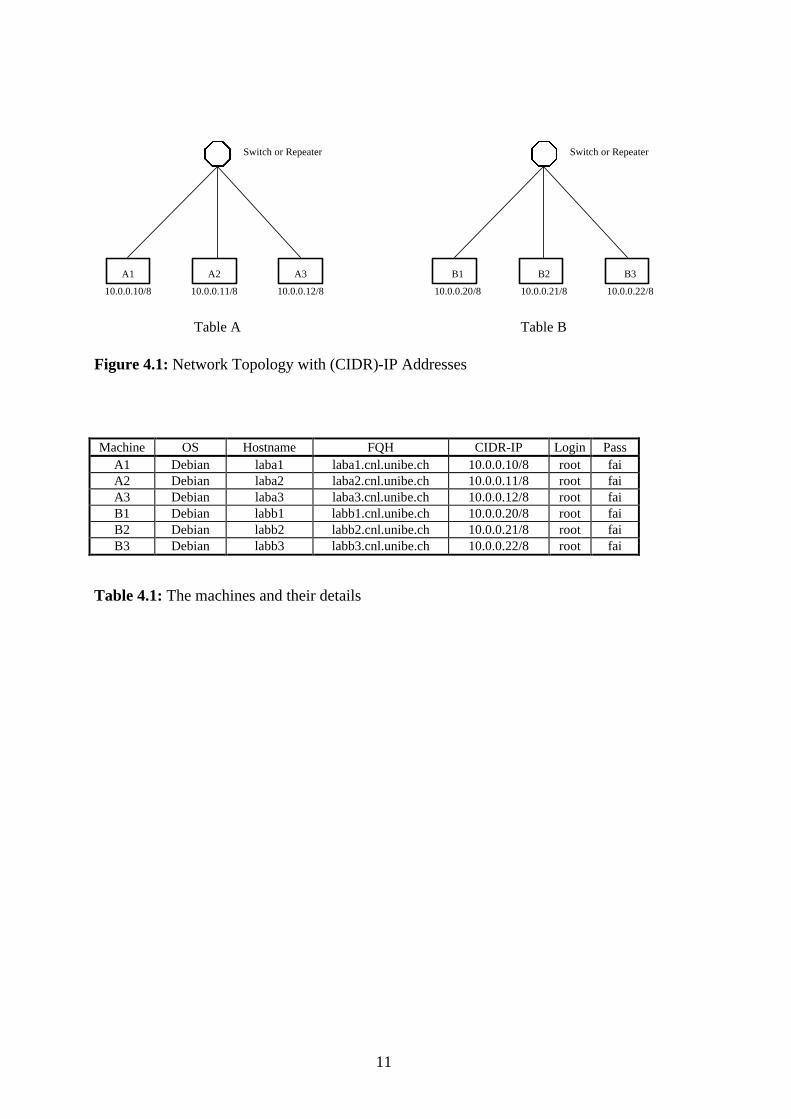
stored in the file /var/run/bind.pid (ex: kill `cat /var/run/bind.pid`) • BIND reports errors and messages in the file /var/log/syslog (s.o. man syslog) 1) Set up the machines as described in “Boot Procedure”. 2) Build a network following Figure 4.2 3) The BIND8 package is installed on your hosts. In /etc/bind/ there are already standard
files for the configuration of your DNS server. Create a new db-file for the zone cnl.unibe.ch. Make the SOA and NS records. Then make one A-entry for every host of your group to resolve host names to IP.
4) Add the zone cnl.unibe.ch to the boot file named.conf. Restart BIND. Test your
configuration with nslookup. Note: nslookup uses the local host for DNS queries, if a DNS server is running on this host.
5) Create a new zone file to resolve IP to host names. Add the zone to the file named.conf
and test the DNS with nslookup queries. 6) Configure each client of your group that they use your DNS server. Ping their
neighbours to test your changes. Now install a secondary DNS server: 7) Choose a host where you want to set up the secondary DNS server and configure it. This
server has the role of a slave for the zones you created in exercise 2 and 3. 8) Restart BIND and verify the messages in the syslog and the new files in the BIND
directory. 9) Change the clients so they use the secondary server too. If the primary DNS server
doesn’t respond the clients get the data from the secondary DNS server. To simulate this, disconnect your primary DNS server from the net. Now the secondary nameserver should answer to client requests.
10) Make mail exchanger entries for your hosts.

10
11) Start nslookup. a) List the resource records of the domain cnl.unibe.ch.
b) List the MX-records.
c) List all entries of your domain. Write down your queries for the post lab work.
12) Save the files you have created in exercise 2 and 4, the named.conf from the primary and the named.conf from the secondary server on disk.
11
Figure 4.1: Network Topology with (CIDR)-IP Addresses
Machine OS Hostname FQH CIDR-IP Login Pass
A1 Debian laba1 laba1.cnl.unibe.ch 10.0.0.10/8 root fai A2 Debian laba2 laba2.cnl.unibe.ch 10.0.0.11/8 root fai A3 Debian laba3 laba3.cnl.unibe.ch 10.0.0.12/8 root fai B1 Debian labb1 labb1.cnl.unibe.ch 10.0.0.20/8 root fai B2 Debian labb2 labb2.cnl.unibe.ch 10.0.0.21/8 root fai B3 Debian labb3 labb3.cnl.unibe.ch 10.0.0.22/8 root fai
Table 4.1: The machines and their details
Switch or Repeater
A1
10.0.0.10/8
A2
10.0.0.11/8
A3
10.0.0.12/8
Table A Table B
Switch or Repeater
B1
10.0.0.20/8
B2
10.0.0.21/8
B3
10.0.0.22/8
12
4.4 Post Lab Work 1) Print the four files from the lab work and comment them. Write down your queries from
exercise 11. 2) Your nameserver is down but IP addresses are equally resolved. What can be a reason
for this? 3) Is DNS traffic sent with TCP or with UDP? Why? 4) What is the reason for adding mail exchange entries in your DNS? 5) How do you configure your DNS so that it performs round robin? 6) In the named.conf file of your secondary DNS server you added two slave zones. Why
is it recommended to specify the file option for each slave zone?
13
4.5 Solutions
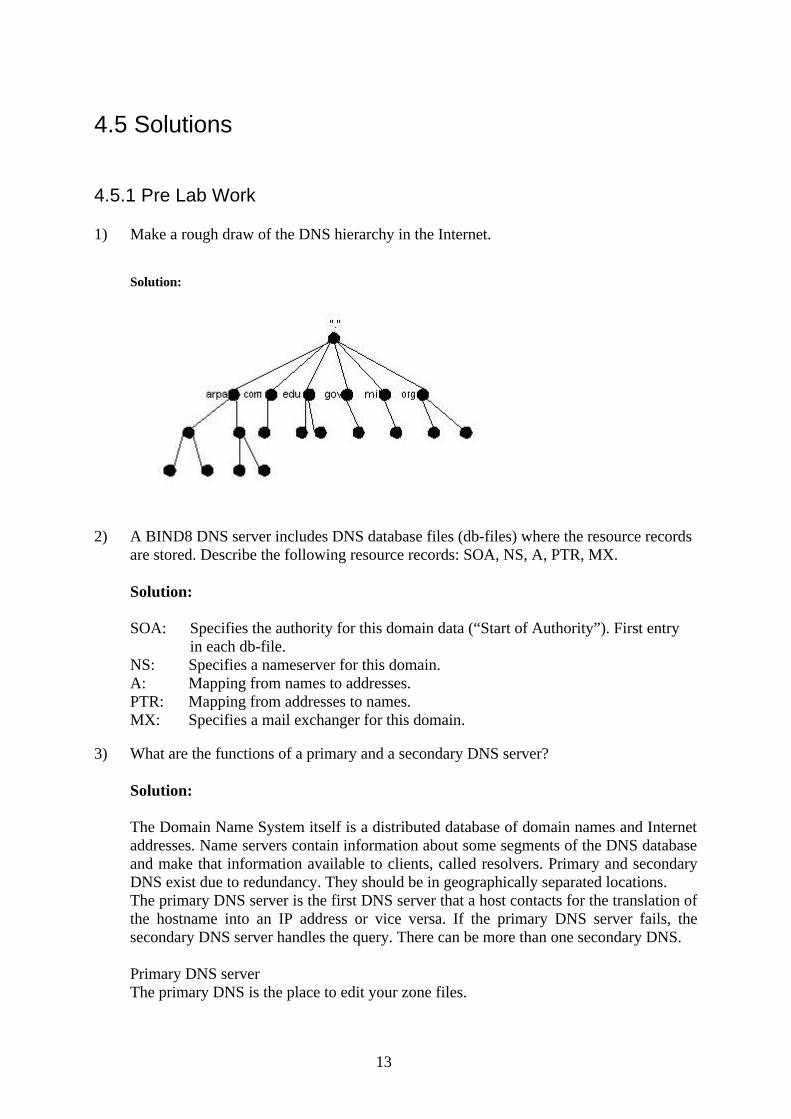
4.5.1 Pre Lab Work 1) Make a rough draw of the DNS hierarchy in the Internet.
Solution:
2) A BIND8 DNS server includes DNS database files (db-files) where the resource records
are stored. Describe the following resource records: SOA, NS, A, PTR, MX.
Solution: SOA: Specifies the authority for this domain data (“Start of Authority”). First entry
in each db-file. NS: Specifies a nameserver for this domain. A: Mapping from names to addresses. PTR: Mapping from addresses to names. MX: Specifies a mail exchanger for this domain.
3) What are the functions of a primary and a secondary DNS server?
Solution: The Domain Name System itself is a distributed database of domain names and Internet addresses. Name servers contain information about some segments of the DNS database and make that information available to clients, called resolvers. Primary and secondary DNS exist due to redundancy. They should be in geographically separated locations. The primary DNS server is the first DNS server that a host contacts for the translation of the hostname into an IP address or vice versa. If the primary DNS server fails, the secondary DNS server handles the query. There can be more than one secondary DNS. Primary DNS server The primary DNS is the place to edit your zone files.
14
Secondary DNS server The secondary DNS holds copies of the zone files of the primary DNS. The only thing you have to do is to add the zones to the named.conf file and to add the secondary DNS in the primary DNS.
4) Exercises with nslookup
Solution:
a) www.linux.org b) 130.92.9.60 c) asterix.unibe.ch 130.92.84.4 d) Other DNS servers for unibe.ch: elrond.unibe.ch, elwig.unibe.ch, aragorn.unibe.ch,
mailhub.unibe.ch. (Use the debug mode and query asterix.unibe.ch to get these results.)
4.5.2 Lab Work 10) Queries with nslookup:
a) List the resource records of the domain cnl.unibe.ch. Solution: ls cnl.unibe.ch b) List the MX-records. Solution: ls –t cnl.unibe.ch c) List all entries of your domain. Solution: ls –t any cnl.unibe.ch
4.5.3 Post Lab Work 1) Print the four files from the lab work and comment them. Write down your queries from
exercise 11. Solution:
//This is the boot file for the primary BIND DNS server options { directory "/var/cache/bind"; }; logging { category lame-servers { null; };

15
category cname { null;}; }; zone "." { type hint; file "/etc/bind/db.root"; }; zone "0.0.127.in-addr.arpa" { type master; file "/etc/bind/db.127"; }; zone "0.0.10.in-addr.arpa" { type master; file "/etc/bind/db.10.0.0"; }; zone "cnl.unibe.ch" { type master; file "/etc/bind/db.cnl"; }; /////////////////////////////////////////////////////////////////////////////////////////////////////////////////// //This is the boot file for the secondary BIND DNS server options { directory "/var/cache/bind"; }; logging { category lame-servers { null; }; category cname { null;}; }; zone "." { type hint; file "/etc/bind/db.root"; }; zone "0.0.127.in-addr.arpa" { type master; file "/etc/bind/db.127"; }; zone "0.0.10.in-addr.arpa" { type slave; file "/etc/bind/db.10.0.0"; masters {10.0.0.6;}; }; zone "cnl.unibe.ch" { type slave; file "/etc/bind/db.cnl"; masters {10.0.0.6;}; };
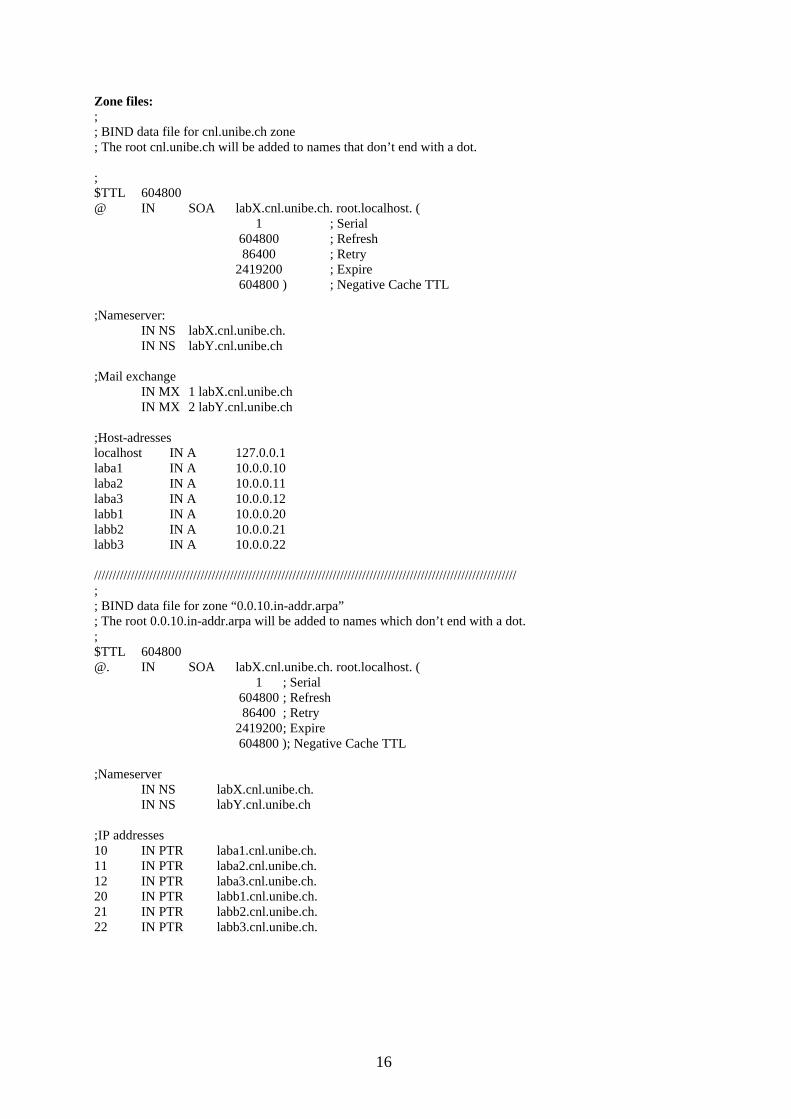
16
Zone files: ; ; BIND data file for cnl.unibe.ch zone ; The root cnl.unibe.ch will be added to names that don’t end with a dot. ; $TTL 604800 @ IN SOA labX.cnl.unibe.ch. root.localhost. ( 1 ; Serial 604800 ; Refresh 86400 ; Retry 2419200 ; Expire 604800 ) ; Negative Cache TTL ;Nameserver: IN NS labX.cnl.unibe.ch. IN NS labY.cnl.unibe.ch ;Mail exchange IN MX 1 labX.cnl.unibe.ch IN MX 2 labY.cnl.unibe.ch ;Host-adresses localhost IN A 127.0.0.1 laba1 IN A 10.0.0.10 laba2 IN A 10.0.0.11 laba3 IN A 10.0.0.12 labb1 IN A 10.0.0.20 labb2 IN A 10.0.0.21 labb3 IN A 10.0.0.22 /////////////////////////////////////////////////////////////////////////////////////////////////////////////////// ; ; BIND data file for zone “0.0.10.in-addr.arpa” ; The root 0.0.10.in-addr.arpa will be added to names which don’t end with a dot. ; $TTL 604800 @. IN SOA labX.cnl.unibe.ch. root.localhost. ( 1 ; Serial 604800 ; Refresh 86400 ; Retry 2419200 ; Expire 604800 ); Negative Cache TTL ;Nameserver IN NS labX.cnl.unibe.ch. IN NS labY.cnl.unibe.ch ;IP addresses 10 IN PTR laba1.cnl.unibe.ch. 11 IN PTR laba2.cnl.unibe.ch. 12 IN PTR laba3.cnl.unibe.ch. 20 IN PTR labb1.cnl.unibe.ch. 21 IN PTR labb2.cnl.unibe.ch. 22 IN PTR labb3.cnl.unibe.ch.
17
2) Your nameserver is down but IP addresses are equally resolved. What can be a reason for this?
Solution: One possibility are secondary DNS, especially if they are geographically distributed. Another could be, that other servers have cached the information you are requesting.
3) Is DNS traffic sent with TCP or with UDP? Why?
Solution: DNS traffic is sent with UDP. If there is a congestion, UDP passes through whenever possible, whereas TCP has a congestion control mechanism and would slow down to 0 in the worst case. Another reason is that DNS queries are small and should be fast.
4) What is the reason for adding mail exchange entries in your DNS?
Solution: If your default mail server is down, MX entries point to fallback mailers that can receive mails for your default system and transfer them back later. It is a good idea to have at least two fallback hosts per host. With a MX entry you can specify a default mailer for your domain.
5) How do you configure your DNS so that it performs round robin?
Solution: If you wanted to set up servers so that DNS requests by clients are round robin rotated, we can do so by placing multiple A records in the authoritative name server files. Let’s assume, we want all clients to access the site by using www.test.org, but for these requests to be shared between three servers using DNS round robin. To do so, we need to place the following A records in the name server:
www.test.org. 60 IN A 1.1.1.1 www.test.rog. 60 IN A 1.1.1.2 www.test.org. 60 IN A 1.1.1.3
There are limitations with this architecture and they should be noted. The first is that DNS round robin is actually not a load balancing mechanism; instead it is a load sharing mechanism. How does DNS operate if one of the servers crashes or is down for maintenance? Simply enough, requests from clients will still go to this IP address when it is its turn in the round robin pool. Existing client sessions will still be sent to this address. The result is that all of these requests will go to hosts that will not operate correctly. This is a serious limitation of the DNS round robin feature.

18
6) In the named.conf file of your secondary DNS server you added two slave zones. Why is it recommended to specify the file option for each slave zone?
Solution: By specifying the file option, the db-file for this zone will be written to this file whenever the zone changed. It often speeds up server startup and eliminates a needless waste of bandwidth.

19
4.6 Feed Back Form for Lab 4
• Complete the form after finishing the whole lab and hand it to an assistant at the beginning of the next lab.
• You do not need to write your name on the form. • You can answer in English or in German. 1. Please rate the following: 4=Strongly Agree 3=Agree 2=Disagree 1=Strongly Disagree 4 3 2 1 The learn effect of this module was high. ¨ ¨ ¨ ¨
The knowledge/skills learned will be useful to me.
¨ ¨ ¨ ¨
The module came up to my expectations. ¨ ¨ ¨ ¨
The formulation of the tasks was clear. ¨ ¨ ¨ ¨
There were enough resources available to solve the lab work.
¨ ¨ ¨ ¨
The exercises in the pre lab work helped me to work on the lab work.
¨ ¨ ¨ ¨
2. Please answer the following questions: How might this module be improved? ________________________________________________________________________________________________________________________________________________________________________________________________________________________________________________________________________________ How much time did you spend for the whole module? ______________ Additional comments: ____________________________________________________________________________________________________________________________________________________________________________________________________________
20
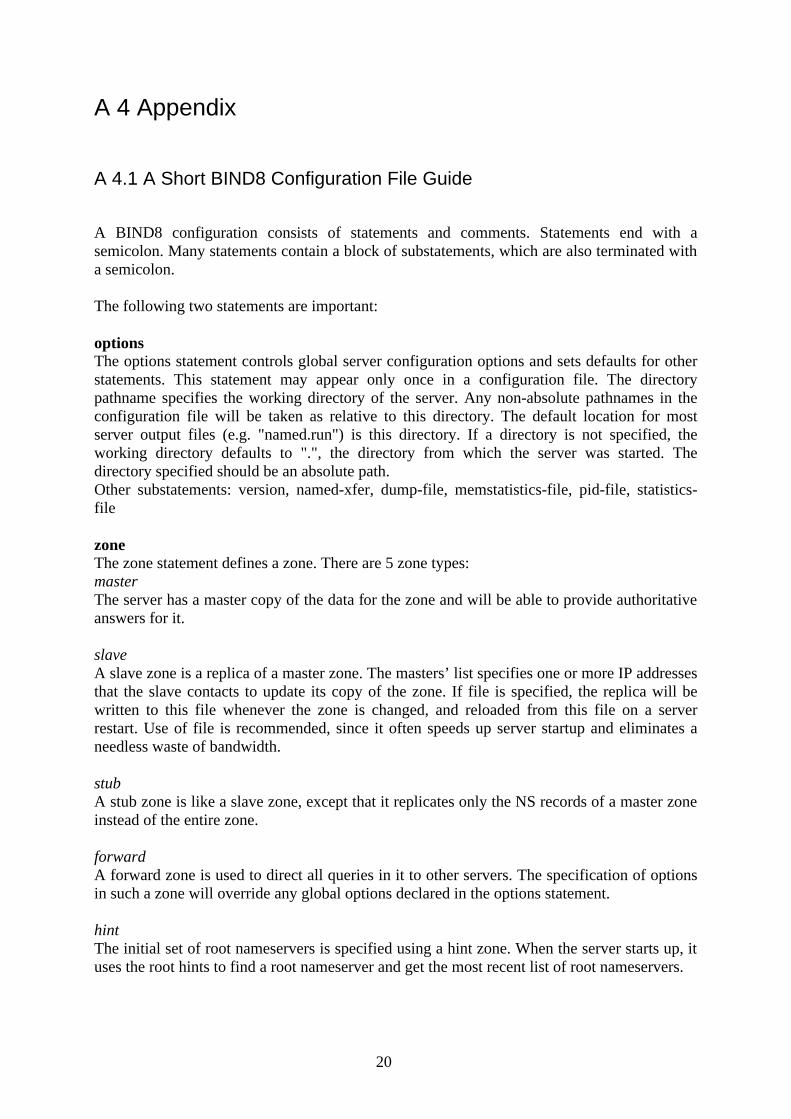
A 4 Appendix
A 4.1 A Short BIND8 Configuration File Guide A BIND8 configuration consists of statements and comments. Statements end with a semicolon. Many statements contain a block of substatements, which are also terminated with a semicolon. The following two statements are important: options The options statement controls global server configuration options and sets defaults for other statements. This statement may appear only once in a configuration file. The directory pathname specifies the working directory of the server. Any non-absolute pathnames in the configuration file will be taken as relative to this directory. The default location for most server output files (e.g. "named.run") is this directory. If a directory is not specified, the working directory defaults to ".", the directory from which the server was started. The directory specified should be an absolute path. Other substatements: version, named-xfer, dump-file, memstatistics-file, pid-file, statistics-file zone The zone statement defines a zone. There are 5 zone types: master The server has a master copy of the data for the zone and will be able to provide authoritative answers for it. slave A slave zone is a replica of a master zone. The masters’ list specifies one or more IP addresses that the slave contacts to update its copy of the zone. If file is specified, the replica will be written to this file whenever the zone is changed, and reloaded from this file on a server restart. Use of file is recommended, since it often speeds up server startup and eliminates a needless waste of bandwidth. stub A stub zone is like a slave zone, except that it replicates only the NS records of a master zone instead of the entire zone. forward A forward zone is used to direct all queries in it to other servers. The specification of options in such a zone will override any global options declared in the options statement. hint The initial set of root nameservers is specified using a hint zone. When the server starts up, it uses the root hints to find a root nameserver and get the most recent list of root nameservers.
21
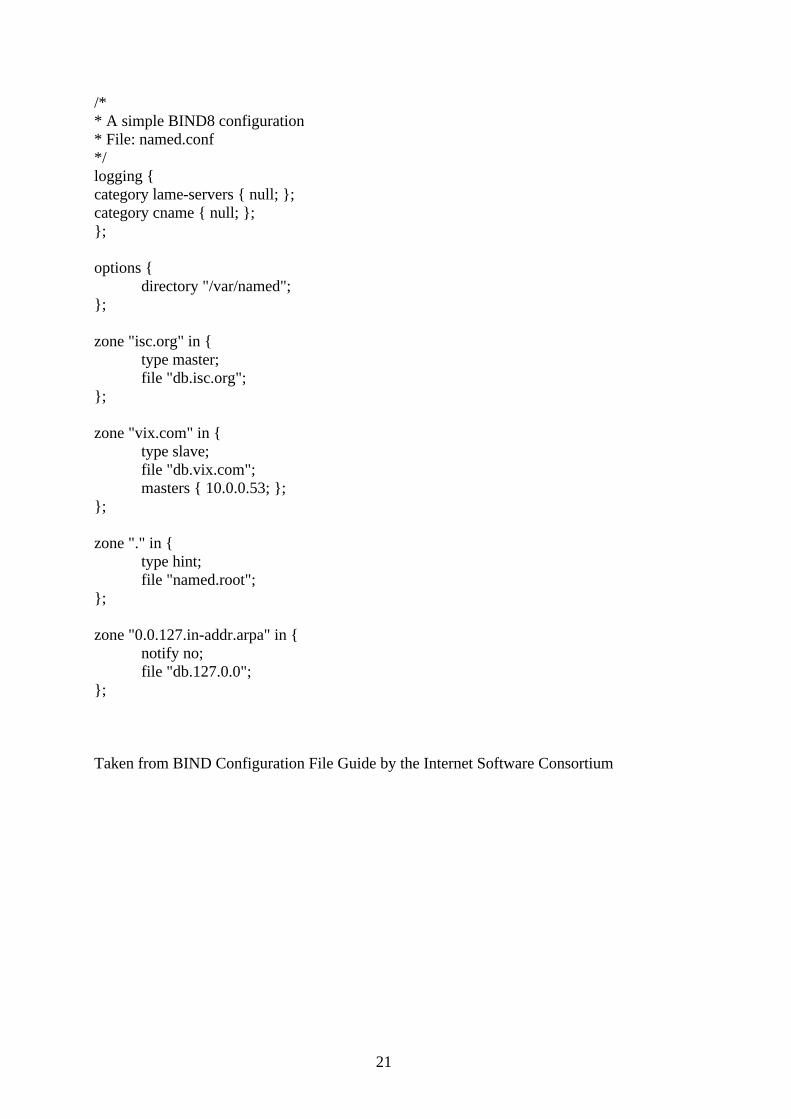
/* * A simple BIND8 configuration * File: named.conf */ logging { category lame-servers { null; }; category cname { null; }; }; options { directory "/var/named"; }; zone "isc.org" in { type master; file "db.isc.org"; }; zone "vix.com" in { type slave; file "db.vix.com"; masters { 10.0.0.53; }; }; zone "." in { type hint; file "named.root"; }; zone "0.0.127.in-addr.arpa" in { notify no; file "db.127.0.0"; }; Taken from BIND Configuration File Guide by the Internet Software Consortium
22
Laboratory 5
Configuring a Web Server and a Proxy Server
What you will learn in this lab: • Principles of Web Servers • How to configure Apache • How to configure Squid

23
5.1 Comments - 2 groups can work per time slot. - Apache is currently the most used web server. It may not be the best but it is enough for
most sites. The standard configuration of apache is not very difficult but one has to remind some details.
- Squid is an http and ftp proxy. It can also be used for caching pages of the web server.

24
5.2 Pre Lab Work
5.2.1 Recommended Reading 1) Apache: The definitive Guide, O´Reilly 2) The Netcraft Web Server Survey http://www.netcraft.com/survey 3) A Practical Guide to Writing Clients and Servers http://www.jmarshall.com/easy/http 4) The Apache HTTP Server Project http://httpd.apache.org 5) Apache Week: http://www.apacheweek.com 6) Apache Server Survival Guide (1996; Sams.net Publishing; Manuel Alberto Ricart)
http://62.2.69.39/books/network/web/apache_server_survival_guide/httoc.htm 7) Web Servers of 103 Prominent Companies/Organisations:
http://unix-vs-nt.org/webservers.html 8) Squid Web Proxy http://www.squid-cache.org FAQ 9) The Apache Software Foundation http://www.apache.org/ 10) Server-Side Includes: http://apache-server.com/SSI/Appendix-C.html
5.2.2 Must Reading 1) Network Laboratory, Chapter 5 2) Apache: The definitive Guide, O’Reilly page 26-39, 61-64 OR: 3) Apache HTTP Server configuration files: http://httpd.apache.org/docs/configuring.html
Apache Virtual host documentation: http://httpd.apache.org/docs/vhosts/index.html
4) Squid Web Proxy http://www.squid-cache.org. Programming Guide chapter 4.
25
5.2.3 Exercises 1) What are the main functions a web server has to provide? 2) Why is Windows NT probably not a good choice for running Internet servers? 3) Apache is one among many other web servers. What are the advantages of apache? 4) A web site directory contains typically four subdirectories: conf, htdocs, logs, CGI-
bin. Which files do these directories contain? 5) What are the main purposes of a proxy server? 6) What are the main configuration files from apache and squid?
26
5.3 Lab Work In this lab session you will install a web server that serves a main page at http://cnl.unibe.ch. Further you will set up a virtual server and a proxy server. Remarks: • Use the text-based webbrowser lynx to test your web server by typing the following
command: lynx URL (ex. lynx http://www.unibe.ch)
• Make sure that you kill the apache respectively the squid processes before you restart the servers. The parent PID’s are stored in the files /var/run/apache.pid and /var/run/squid.pid. (ex: kill `cat /var/run/apache.pid`)
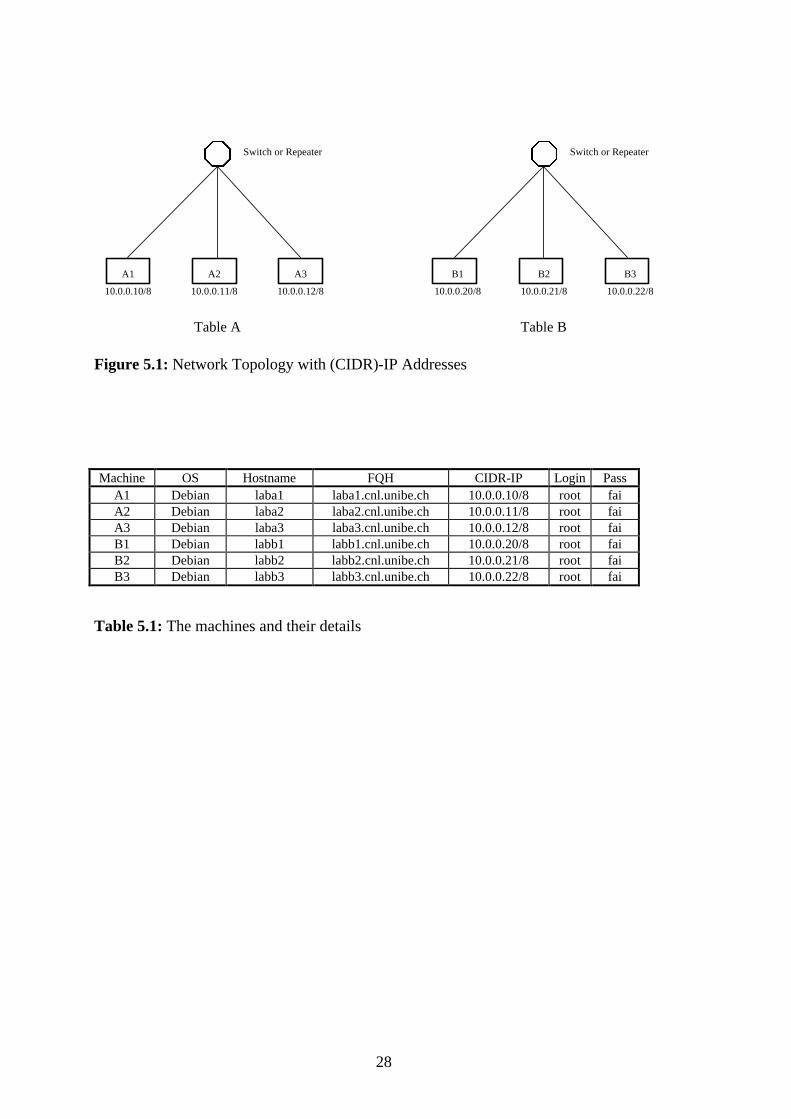
1) Set up the machines as described in “Boot Procedure”. 2) Install a network following figure 5.1. 3) On every machine runs a preconfigured DNS server for your domain (cnl.unibe.ch).
Choose a machine for the DNS and web server. Complete the configuration. Add the two aliases www.cnl.unibe.ch and virtual.cnl.unibe.ch to the db.cnl-file. Both aliases should point to the hostname of your web server. Make also a nameserver entry in the /etc/resolv.conf of every host of your group.
4) Create the directories /usr/www/lab-session/htdocs and copy the file
/usr/local/module5/index.html in it. 5) Copy the template file /usr/local/module5/httpd.conf in the directory /etc/apache.
Configure the server so it responds with the homepage at http://www.cnl.unibe.ch.. Save the httpd.conf file on disk if everything is running.
6) Establish a telnet connection to the web server (Port: 80) and try to receive the
index.html source code. 7) Extend your apache that you can access a subpage at http://www.cnl.unibe.ch/subpage. 8) Now we add a virtual host to our web server. The server has to respond at
http://virtual.cnl.unibe.ch with another homepage (/usr/local/module5/virtual/index.html). For this add a name-based virtual host to the config-file (see directive <VirtualHost>).
Save the httpd.conf on disk (don't replace the previous file).
27
Now install a proxy server that caches the requested pages of our apache server. 9) Choose a machine where you want to install the proxy server. The file squid.conf is the
main config-file of squid. Configure squid so the proxy runs on port 4343. Further the proxy server should only be accessed from our net. You can do this with the “access deny” and “access allow” directives.
10) Start squid as follows:
% squid –z (Swap directories will be created) % squid –NCd1 (Debug mode) Verify the onscreen messages.
11) The file lynx.cfg is lynx’s config-file. Configure lynx on a host so it uses your proxy
server. 12) Test your proxy with lynx. Also change the hosts IP to test the access control of your
proxy server. Save the squid.conf on disk. Professionals work (little HTML knowledge required): 13) Change the config-file so the server uses Server Side Includes (SSI). Extend your
homepage that it shows the following information:
a) date and time on the server
a) installed server software
b) name of the used web browser
Save the resulting shtml-file on disk.
28
Figure 5.1: Network Topology with (CIDR)-IP Addresses
Machine OS Hostname FQH CIDR-IP Login Pass
A1 Debian laba1 laba1.cnl.unibe.ch 10.0.0.10/8 root fai A2 Debian laba2 laba2.cnl.unibe.ch 10.0.0.11/8 root fai A3 Debian laba3 laba3.cnl.unibe.ch 10.0.0.12/8 root fai B1 Debian labb1 labb1.cnl.unibe.ch 10.0.0.20/8 root fai B2 Debian labb2 labb2.cnl.unibe.ch 10.0.0.21/8 root fai B3 Debian labb3 labb3.cnl.unibe.ch 10.0.0.22/8 root fai
Table 5.1: The machines and their details
Switch or Repeater
A1
10.0.0.10/8
A2
10.0.0.11/8
A3
10.0.0.12/8
Table A Table B
Switch or Repeater
B1
10.0.0.20/8
B2
10.0.0.21/8
B3
10.0.0.22/8
29
5.4 Post Lab Work 1) Print the three config-files from your lab work. If you did exercise 13 print the shtml-file
too. 2) In practice you should not put too many different services on one machine. Why? 3) Make an example where a proxy server makes sense. 4) In the lab work you realised a name based virtual host. Is there another possibility for
adding virtual hosts? Explain shortly how it can be implemented.

30
5.5 Solutions
5.5.1 Pre Lab Work 1) What are the main functions a web server has to provide?
Solution: The whole business of a web server is to translate a URL either into a filename and send that file back over the Internet, or into a program name, and then run that program and send its output back. Other things a web server does: - Offer different formats. A user might want JPEG image files rather then GIF. - Respond to errors in the messages it gets with answers that make sense in the context
of what is going on. - Authenticate inquirers
2) Why is Windows NT probably not a good choice for running Internet servers?
Solution: The main problem with Windows NT lies in its security. Windows NT has a large number of security features, but they are poorly documented, hard to understand, and have not been subjected to the decades of discussion, testing, and hacking that have forged Unix security into a fortress that can pretty well be relied upon.
3) Apache is one among many other web servers. What are the advantages of Apache?
Solution: Apache has been shown to be substantially faster, more stable, and more feature-full than many other web servers. The webmaster has about 150 directives to configure the server. A big element of Apache's draw is that it's free.
4) A web site directory contains typically four subdirectories: conf, htdocs, logs, CGI-bin.
Which files do these directories contain?
Solution:
conf: Contains the config file, which tells Apache to respond to different kinds of requests. htdocs: Contains the documents, images, data, and so forth you want to serve up to your clients. logs: Contains the log files that record what happened. CGI-bin: Contains the CGI scripts. These are programs that can be executed by Apache on behalf of its clients.
31
5) What are the main purposes of a proxy server?
Solution:
a) Improve performance: Proxy servers can dramatically improve performance for groups of users. This is because it stores the results of requests for a certain amount of time.
b) Filter requests: A proxy server can also be used to filter requests. For example a company can deny several web sites for their employees.
6) What are the main configuration files from apache and squid?
Solution:
apache: httpd.conf squid: squid.conf
5.5.2 Lab Work 13) Necessary HTML tags in the html-file:
a) <p>Date and time on the server: <!--#echo var="DATE_LOCAL"--></p> b) <p>Installed server software: <!--#echo var="SERVER_SOFTWARE"--></p> c) <p>Name of the used web browser: <!--#echo var="HTTP_USER_AGENT"--></p>
5.5.3 Post Lab Work 1) Print the three config-files from your lab work. If you did exercise 9 print the shtml-file
too.
Solution: Config-files of the lab work: #Configuration file for the apache web server #Path of the log files PidFile /var/run/apache.pid ErrorLog /var/log/apache/error.log #Necessary modules LoadModule mime_module /usr/lib/apache/1.3/mod_mime.so LoadModule dir_module /usr/lib/apache/1.3/mod_dir.so #module for SSI LoadModule includes_module /usr/lib/apache/1.3/mod_include.so ClearModuleList AddModule mod_mime.c AddModule mod_dir.c AddModule mod_so.c
32
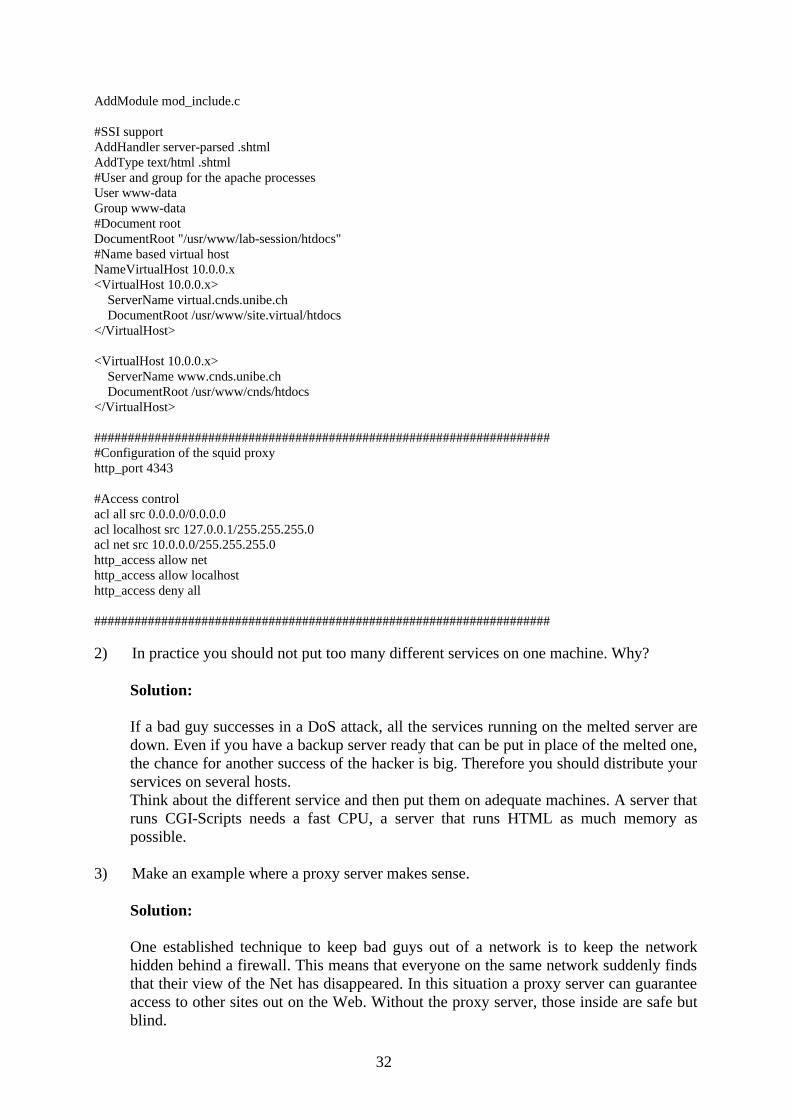
AddModule mod_include.c #SSI support AddHandler server-parsed .shtml AddType text/html .shtml #User and group for the apache processes User www-data Group www-data #Document root DocumentRoot "/usr/www/lab-session/htdocs" #Name based virtual host NameVirtualHost 10.0.0.x <VirtualHost 10.0.0.x> ServerName virtual.cnds.unibe.ch DocumentRoot /usr/www/site.virtual/htdocs </VirtualHost> <VirtualHost 10.0.0.x> ServerName www.cnds.unibe.ch DocumentRoot /usr/www/cnds/htdocs </VirtualHost> #################################################################### #Configuration of the squid proxy http_port 4343 #Access control acl all src 0.0.0.0/0.0.0.0 acl localhost src 127.0.0.1/255.255.255.0 acl net src 10.0.0.0/255.255.255.0 http_access allow net http_access allow localhost http_access deny all #################################################################### 2) In practice you should not put too many different services on one machine. Why?
Solution: If a bad guy successes in a DoS attack, all the services running on the melted server are down. Even if you have a backup server ready that can be put in place of the melted one, the chance for another success of the hacker is big. Therefore you should distribute your services on several hosts. Think about the different service and then put them on adequate machines. A server that runs CGI-Scripts needs a fast CPU, a server that runs HTML as much memory as possible.
3) Make an example where a proxy server makes sense. Solution:
One established technique to keep bad guys out of a network is to keep the network hidden behind a firewall. This means that everyone on the same network suddenly finds that their view of the Net has disappeared. In this situation a proxy server can guarantee access to other sites out on the Web. Without the proxy server, those inside are safe but blind.

33
4) In the lab work you realised a name based virtual host. Is there another possibility for
adding virtual hosts? Explain shortly how it can be implemented. Solution:
You can use an IP-based virtual host. Add an additional (virtual) IP address to your network interface. This feature is supported by most modern operating systems. Then you have to update the DNS server. In the config-file delete the “Name VirtualHost”-directive and replace the VirtualHost-directives with these entries: <VirtualHost 10.0.0.x> ServerName virtual.cnds.unibe.ch DocumentRoot /usr/www/site.virtual/htdocs </VirtualHost> <VirtualHost 10.0.0.y> ServerName cnds.unibe.ch DocumentRoot /usr/www/cnds/htdocs </VirtualHost>
34
5.6 Feed Back Form for Lab 5
• Complete the form after finishing the whole lab and hand it to an assistant at the beginning of the next lab.
• You do not need to write your name on the form. • You can answer in English or in German. 1. Please rate the following: 4=Strongly Agree 3=Agree 2=Disagree 1=Strongly Disagree 4 3 2 1 The learn effect of this module was high. ¨ ¨ ¨ ¨
The knowledge/skills learned will be useful to me.
¨ ¨ ¨ ¨
The module came up to my expectations. ¨ ¨ ¨ ¨
The formulation of the tasks was clear. ¨ ¨ ¨ ¨
There were enough resources available to solve the lab work.
¨ ¨ ¨ ¨
The exercises in the pre lab work helped me to work on the lab work.
¨ ¨ ¨ ¨
2. Please answer the following questions: How might this module be improved? ________________________________________________________________________________________________________________________________________________________________________________________________________________________________________________________________________________ How much time did you spend for the whole module? ______________ Additional comments: ____________________________________________________________________________________________________________________________________________________________________________________________________________
35
Laboratory 6
Configuring a Mail Transfer Agent
What you will learn in this lab: • Principles of mail transfer in the Internet • How to receive and send email with SMTP and POP3 commands • How to configure sendmail with m4 macros

36
6.1 Comments - 2 groups can work at the same time. - Sendmail is the most used Mail Transfer Agent (MTA). Its configuration is very complex.
With the m4 macroprocessor V8 sendmail provides an easy way to create a custom configuration file for your site.
- Mutt is a Mail User Agent (MUA). Its handling is self explaining.
37
6.2 Pre Lab Work
6.2.1 Recommended Reading 1) SENDMAIL, O'Reilly, chapter 1, 16 and 19 2) Computer Networking, J. Kurose, K. Ross, Addison Wesley, 2000, Electronic Mail in
the Internet, chapter 2 3) TCP/IP Illustrated Volume 1, Addison-Wesley, Chapter 28 4) TCP/IP Network Administration, O´Reilly, 1998, chapter 10 and chapter 9 5) Sendmail ressources http://www.sendmail.net/ 6) Sendmail Consortium http://www.sendmail.org/ 7) Onepager http://www.j-mulders.demon.nl/sendmail/sendmail-onepager.html 8) RFC 2554:SMTP Authentication 9) RFC 974 MAIL ROUTING AND THE DOMAIN SYSTEM
6.2.2 Must Reading 1) Network Laboratory, Chapter 6 2) http://www.sendmail.org/m4/readme.html 3) Appendix A 6.1, A 6.2 and A 6.3
38
6.2.3 Exercises 1) Why do SMTP, POP3 and IMAP run on top of TCP rather than UDP? 2) Suppose Alice with a Web-based e-mail account (such as GMX) sends a message to
Bob, who accesses his mail from his mail server using POP3. Make a drawing that describes how the message gets from Alice’s host to Bob’s host. Be sure to list the series of application-layer protocols that are used to move the message between the two hosts.
3) List the minimal commands that any SMTP implementation needs and the function they
have. 4) Write down the required SMTP and POP3 commands to do the following exercises:
a. Telnet asterix.unibe.ch to the SMTP port and send to you an email. b. Telnet asterix.unibe.ch to the POP3 port and receive the mail you’ve sent in
exercise a.
39
6.3 Lab Work In this lab session you install a mail server for the domain cnl.unibe.ch. Remarks: • There are template mc-files in /usr/share/sendmail/sendmail.cf/cf • The file sendmail.cw is named local-host-names 1) Set up the machines as described in “Boot Procedure”. 2) Build a network following figure 6.1. 3) On each machine runs a preconfigured DNS server. Choose a machine for the DNS
server. Complete the configuration and restart BIND. Make also a nameserver entry in each host’s /etc/resolv.conf of your group.
4) Add the users keith and eric to every host. Configuring the mail server: 5) Choose a machine where you want to set up the mail server. Open the file tcpproto.mc
and configure it till sendmail provides the following features:
a. Operatingsystem is Debian b. emails to [email protected] should be delivered to this user c. sendmail acts as an SMTP server and delivers local mails
6) Generate the file sendmail.cf with m4 and copy it in the directory /etc/mail. (see Appendix A)
7) Telnet your mail exchanger on port 25 and send an email to yourself. Use mutt to send
emails to other users. 8) Add two aliases to the aliases file. Emails to [email protected] should be delivered to
keith and emails to [email protected] to eric.

40
Configuring the mail client: 9) Choose a machine where you want to set up the mail client. 10) Open the file clientproto.mc and configure it that sendmail provides the following
features:
a. Operatingsystem is Debian b. sendmail delivers emails to your mail exchanger (see ‘null-client’-feature)
11) Start sendmail and send various emails to several users with mutt. 12) For now all mails are stored in /var/spool/mail on your mail server. To read the emails
on the client you have to mount this directory. (see Appendix A 6.2) Extending the server: 13) Extend your mc file that sendmail provides the following new features:
a. sendmail uses a virtual user table (see ‘virtusertable’-feature) b. sendmail uses an access table to control relaying c. outgoing mail are labeled as coming from the domain cnl.unibe.ch (not from
mailserver.cnl.unibe.ch) 14) Generate the access table and the virtusertable that sendmail acts as follows:
a. mails addressed to [email protected] should be delivered to this user
b. Mails from your client and the domain microsoft.com should be rejected with a message
15) Restart sendmail with your new configuration and test your changes. 16) Save the two mc-files and all other sendmail files who you changed on disk. If you
changed the sendmail.cf file directly write down these changes.

41
Figure 6.1: Network Topology with (CIDR)-IP Addresses
Machine OS Hostname FQH CIDR-IP Login Pass
A1 Debian laba1 laba1.cnl.unibe.ch 10.0.0.10/8 root fai A2 Debian laba2 laba2.cnl.unibe.ch 10.0.0.11/8 root fsi A3 Debian laba3 laba3.cnl.unibe.ch 10.0.0.12/8 root fai B1 Debian labb1 labb1.cnl.unibe.ch 10.0.0.20/8 root fai B2 Debian labb2 labb2.cnl.unibe.ch 10.0.0.21/8 root fai B3 Debian labb3 labb3.cnl.unibe.ch 10.0.0.22/8 root fai
Table 6.1: The machines and their details
Switch or Repeater
A1
10.0.0.10/8
A2
10.0.0.11/8
A3
10.0.0.12/8
Table A Table B
Switch or Repeater
B1
10.0.0.20/8
B2
10.0.0.21/8
B3
10.0.0.22/8

42
6.4 Post Lab Work 1) Add comments to the config-files from your lab work and print them. 2) a) What is email "spamming" and email "bombing"?
b) How can you prevent spamming with sendmail?
3) What is a MTU and a MUA? Assign the following programs to these concepts:
sendmail, mutt, pine, outlook. 4) In the lab work you have used a virtual user table to map virtual names to real users.
How can you realise the reverse-map for outgoing mail?
43
6.5 Solutions
6.5.1 Pre Lab Work 1) Why do SMTP, POP3 and IMAP run on top of TCP rather than UDP?
Solution: The applications that use these protocols require that all application data is received in the correct order and without gaps. TCP provides this service whereas UDP does not.
2) Suppose Alice with a Web-based e-mail account (such as Hotmail) sends a message to
Bob, who accesses his mail from his mail server using POP3. Discuss how the message gets from Alice’s host to Bob’s host. Be sure to list the series of application-layer protocols that are used to move the message between the two hosts.
Solution:
The messages sent from Alice’s host to her mails server over HTTP. Alice’s mail server then sends the message to Bob’s mail server over SMTP. Bob then transfers the message from his mail server to his host over POP3.
3) List the minimal commands that any SMTP implementation needs and the function they
have.
Solution: HELO client identification with FQH MAIL identifies the originator of the message RCPT identifies the recipient(s) DATA used to send the content of the mail message QUIT terminates the mail exchange RSET aborts the current mail transaction and causes both ends to reset VRFY let’s the client ask the sender to verify a recipient address NOOP forces server to reply with an OK
4) a) Telnet asterix.unibe.ch to the SMTP port and send an email to a friend.
Solution:
telnet asterix.unbe.ch 25 HELO hostname MAIL FROM: Wilson RCPT TO: Wilson DATA Email for you This is a test.
44
QUIT b) Telnet asterix.unibe.ch to the POP3 port and receive the mail you’ve sent in exercise a. Solution: telnet asterix.unbe.ch 110 USER: Wilson PASS: password LIST QUIT
6.5.2 Lab Work
6.5.3 Post Lab Work 1) Add comments to config-files from your lab work and print them. Entries in mailserver.mc: VERSIONID(`@(#)sendmail.mc 8.9.3-21 (Debian) 20000309') OSTYPE(debian)dnl #Masquerading outgoing mail MASQUERADE_AS(cnl.unibe.ch)dnl FEATURE(masquerade_envelope)dnl #UUCP is not needed FEATURE(nouucp)dnl FEATURE(virtusertable)dnl FEATURE(access_db, hash -o /etc/mail/access)dnl MAILER(local)dnl MAILER(smtp)dnl entries in client.mc: VERSIONID(`@(#)clientproto.mc 8.12 (Berkeley) 5/19/1998') OSTYPE(debian) #Mails will be delivered to labX.cnl.unibe.ch FEATURE(nullclient, labX.cnl.unibe.ch)dnl ################################################################## # Access table localhost RELAY 127.0.0.1 RELAY cnl.unibe.ch RELAY

45
labX.cnl.unibe.ch 550 no mails from you accepted microsoft.com 550 no mails from you accepted ################################################################## # Mail aliases # You must run newaliases(1) after making changes to this file. # Required aliases postmaster: root MAILER-DAEMON: postmaster # Common aliases abuse: postmaster spam: postmaster # Other aliases support eric info keith ################################################################## # Virtual user table # Other solutions to get the same result: adding aliases, using sendmails user database, # changing the rewriting rules in sendmail.cf [email protected] eric [email protected] keith [email protected] carlos 2) a) What is email "spamming" and email "bombing"?
Solution: Email "bombing" is characterised by abusers repeatedly sending an identical email message to a particular address. Email bombs can be launched in many different attack scenarios, which easily flood and shut down chains of SMTP mail servers with devastating consequences on the organisation's network. The heart of an email bomb lies in the simplicity of the SMTP protocol which can be combined with the robustness of a MTA program and misused in numerous ways Email spamming is a variant of "bombing". It refers to sending email to hundreds or thousands of users (or to lists that expand to that many users).
b) How can you prevent spamming with sendmail? Solution: One of the most effective ways of making it hard for spammers to operate is to stop them from using your mail server to relay their spam. Traditionally, sendmail would accept any incoming email and relay it to its destination. Starting with 8.9, sendmail will not relay mail unless it is specifically configured to do so for a given destination.

46
3) What is a MTU and a MUA? Assign the following programs to these concepts: sendmail, Mutt, Pine, Outlook. Solution: A Mail Transport Agent (MTA) accepts mail from Mail User Agents (MUAs), mail users (humans), and other MTAs. It then delivers that mail to Mail Delivery Agents (MDAs) on the local machine, or transports that mail to another MTA at another machine. MTA: sendmail MUA: Mutt,
Pine, Outlook (with MTA features) 4) You used a virtual user table to map virtual names to real users. How can you realise the
reverse-map for outgoing mail? Solution: The genericstable masquarades outgoing mails. For this you have to activate the genericstable feature. Add the following line to the mc-file: FEATURE(genericstable, hash –o /etc/mail/genericstable) In the file genericstable you can define the reverse-map for local users. An entry for our lab work example could look like this: eric: eric.clapton keith: keith.Richards carlos: carlos.Santana

47
6.6 Feed Back Form for Lab 6
• Complete the form after finishing the whole lab and hand it to an assistant at the beginning of the next lab.
• You do not need to write your name on the form. • You can answer in English or in German. 1. Please rate the following: 4=Strongly Agree 3=Agree 2=Disagree 1=Strongly Disagree 4 3 2 1 The learn effect of this module was high. ¨ ¨ ¨ ¨
The knowledge/skills learned will be useful to me.
¨ ¨ ¨ ¨
The module came up to my expectations. ¨ ¨ ¨ ¨
The formulation of the tasks was clear. ¨ ¨ ¨ ¨
There were enough resources available to solve the lab work.
¨ ¨ ¨ ¨
The exercises in the pre lab work helped me to work on the lab work.
¨ ¨ ¨ ¨
2. Please answer the following questions: How might this module be improved? ________________________________________________________________________________________________________________________________________________________________________________________________________________________________________________________________________________ How much time did you spend for the whole module? ______________ Additional comments: ____________________________________________________________________________________________________________________________________________________________________________________________________________
48
A 6 Appendix
A 6.1 The M4 Macroprocessor The m4 macroprocessor generates a sendmail configuration file from a m4 source file (e.g., one named source.mc). The command under debian looks like this: % m4 /usr/share/sendmail/sendmail.cf/m4/cf.m4 source.mc > sendmail.cf The source.mc may contain the following lines (in this order): OSTYPE(os) FEATURE(feature) ß can be several MAILER(agent) ß can be several ß local rule set declarations here In some cases you may see lines terminated with dnl, which means "delete to new line." Its use prevents extra blank lines from appearing in the output. OSTYPE Causes support to be included from one of the files in the cf/ostype directory. OSTYPE(os) This sets defaults for your operating system from the file cf/ostype/os.m4 (as for example, debian.m4). FEATURE Supplies simple solutions to special needs. MAILER Causes support for delivery agents to be included. It must follow local parameter declarations because some of them change how a MAILER macro will be interpreted. All available macros are described in chapter 19.6 of SENDMAIL O’REILLY.

49
A 6.2 Mounting Remote Filesystems with Linux Before you can mount a directory from a server you have to export it. The file /etc/exports on the server lists the directories that it exports and the conditions applied to their exports. An example exports file looks like this: /usr/local/mail pluto (rw), picasso (ro) /root (rw, no_root_squash) The first directory can be mounted from the host pluto with read-write permissions and from picasso with read-only permissions. The second directory can be mounted from all hosts with read-write permissions. The parameter no_root_squash passes root permissions to the local directory Important: After every changes to the exports file you have the restart the nsf-kernel-server. The command is: %/etc/init.d/nsf-kernel-server restart The mount command A client must mount a shared directory before using it. NFS directories are mounted using the mount command. The general structure of the mount command is: mount hostname:remote-directory local-directory Once the mount is completed, files located in the remote directory can be accessed through the local directory exactly as if they were local files. Taken from TCP/IP Network Administration, O’REILLY 1998.
50
A 6.3 Article Ralf Hildebrandt
You’ve got mail Bases of the sendmail configuration On its way through the Internet, almost every email comes into contact with the mail server sendmail. On most Unix and Linux computers, sendmail takes care of the correct mail dispatch. And no matter whether you operate a mail server for thousands of users or run a dial-up host under Linux at home: sendmail can optimally be adapted to each situation. Unix providers and Linux distributors already deliver their systems with a standard pre-configured sendmail. But if the administrator must modify or wants to optimise the mail system, he encounters very fast the, even for Unix conditions, cryptical configuration file /etc/sendmail.cf. Is it really necessary to edit this file by hand? Where is the necessary documentation? Or does one have to go through the almost 1000 pages of the sendmail Bible [ 1 ]? More than a mail box Sendmail [ 2 ] is a so-called Mail transfer agent (MTA). The job of a MTA consists of bringing email from the sender’s system to the recipient’s system. Sendmail is not a program that final users use to create email or to send it away with (this completes a mail user agent; MUA) – usually a user never comes into direct contact with sendmail [ 3 ]. An MTA is always involved nevertheless be it on the mail server of a provider or the own Linux computer at home. Sendmail belongs to the ‘subservient ghosts’ of Unix, the daemon-programs, which run in the background and perform their work without user interaction. If the user sends mail, sendmail takes care of the selection of the transmission path and stores the email in a queue if disturbances occur. Additionally, an MTA receives emails from the outside: On a computer that doesn’t run an MTA, no mail can be delivered directly. Internet wide sendmail is responsible for approximately 70 % of the entire
mail traffic; nevertheless its configuration is a book with seven seals for most system administrators. Not in vain the sendmail standard work [ 1 ] calls this program as ‘one of the most difficult utilities which can be learned’. If one uses sendmail one should select version 8.9.x or higher, as it has efficient measures against spam and an improved error logging; current version is 8.9.3. Also the programmers detected sendmails cryptical configuration over /etc/sendmail.cf as weak point. With introduction of version 8 they implemented the possibility, to produce the configuration file with help of the macro processor m4 [ 4 ], which copies the input file into the output file and in process expands the macros of the input file. These macros are either built into the macro processor or user-defined; the source distribution of sendmail brings along the necessary macros. […] Postal zip codes The configuration files from sendmail are located in the subdirectory cf/ of the sendmail distribution [ 2 ] and have the ending .mc (for ‘macro’). A typical config.mc for a single workstation computer with permanent network binding contains the following entries: divert(1) sendmail configuration for a single workstation computer divert(0) The macro processor ignores everything between divert(1) and divert(0). In this
type longer comments can be embedded into the macro file, without them showing up in the output file. OSTYPE(`hpux10´) The specification of the operating system is necessary, in order to set operating system dependent adjustments like the paths to help and status files or to set the flags for the local mailer correctly. If this definition is missing, the production of the .cf-file aborts. A view into the subdirectory ostype/ of the sendmail distribution shows the supported operating systems. In the example it concerns Hewlett-Packards HP-UX 10.x. Note that the specification in the brackets is enclosed in two different quotes: First is a backquote (`), second a ‘normal’ quote symbol(´). DOMAIN(`generic´) For large networks it can be an advantage, if the administrator summarises the configuration adjustments that are identical for all hosts of this domain, in only one file. The directory domain/ contains such files. The use of DOMAIN() is not mandatory, but recommended; the used pre-defined domain `generic´ contains the following useful standard adjustments: define(`confFORWARD_PATH´, `$z/.forward.$w:$z/.forward´) FEATURE(`redirect´) FEATURE(`use_cw_file´) The `define´-line defines the permitted names for the .forward-files. If sendmail delivers mail to a local user, it looks for such files, in which the user can determine mail forwarding - for example on another

51
mail address. ‘$w’ stands for the host name, `$z´ stands for the home directory of the user. The first ‘FEATURE’-line permits the production of redirect bounces, which forward emails to a new recipients address; the second line instructs sendmail to take up alternative names for the local host from the file / etc/sendmail.cw. MAILER(`local´) MAILER(`smtp´) ‘MAILER’ specifies sendmails mode of operation as Mail Transfer Agent (MTA) that sends and receives emails, and as Mail Delivery Agent (MDA) that delivers the mail to the user – that is to a certain extent the postman. (sendmail just calls both ‘mailer’.) In order to send (as MTA) mail away over Internet, sendmail has to speak the Simple Mail Transfer Protocol (smtp). Sendmail should deliver mails locally, which are addressed to local users – also it takes over the function of an MDA. In the simplest case sendmail attaches the emails simply to the mailbox of the recipient or passes it on (adjustable over the .forward-file in the users home directory) to programs as vacation or procmail. Other mailers with a mailhub forward mails for example to a POP server. The MAILER declarations should always be at the end of the .mc-file. Magic transformation The macro processor m4 produces a sendmail suited .cf-configuration-file from the macro file config.mc. In addition it is important that the file m4/cf.m4 of the sendmail distribution is processed as well: m4 m4/cf.m4 config.mc > config.cf After copying the new generated config.cf to /etc/sendmail.cf one must terminate sendmail with kill and also restart it with /usr/sbin/sendmail - bd - q30m so it will read in the new configuration-file. The option ‘-bd’ starts sendmail as a daemon (background process) – it is only then that it accepts incoming SMTP-connections on port 25 and can
receive mail. If emails get stuck in the mail queue because of network problems the option ‘-q30m’ causes sendmail to make a new transmitting attempt every 30 minutes. This whole procedure can be automated by a makefile in the directory cf/. To check if sendmail works properly, you first take a look at the log-file, which however is located in different places depending on the system. For an easier search take a look at /etc/syslog.conf, where you can find an entry ‘mail.*’ which determines the file for email related messages – with Linux most often /var/log/mail. Tail –f /var/log/mail shows what sendmail has to say. If you build a connection with telnet localhost 25 to port 25 – the SMTP-port where sendmail listens – sendmail should answer. With ‘QUIT’ you terminate the SMTP-dialogue; in the log-file a message like ‘NOQUEUE: Null connection’ appears. Finally you send a mail to yourself with mail root < /dev/null and you look whether it arrives. Here as well a message in the log-file should confirm the successful transmission – and of course the email has to arrive. Application to forward mail At this point however a warning right away: During normal operation root should never read its email itself! An according entry in /etc/aliases ensures instead, that mail to root ends up with another user, that then reads the mail with accordingly low privileges. It is easy to imagine what happens if a malicious mail is allowed to execute arbitrary instructions by a so called ‘buffer overrun’ in the mailreader… Such aliases are useful in other regard, too. Like the RFCs 822 and 1648 [8] require a mail address ‘postmaster’ for each host. It is easier to produce an according alias than to create an according user and check his mailbox regularly. Every user knows the automatic response mails which the mail server returns if one accidently indicates an incorrect email address (a so called ‘bounce’). Since such a bounce always has MAILER-DAEMON as sender address, there has to be an alias for MAILER-DAEMON, too, for someone could answer a bounce. /etc/aliases records those aliases:
# aliases for the mailer daemon MAILER-DAEMON: root # RFC 822 requires that every #host has a postmaster: postmaster : root # local aliases root: root : user1, [email protected] # user george has moved george : [email protected] A mail to postmaster reaches the users user1 and [email protected]: postmaster is an alias on root, root is an alias on user1 and [email protected]. email to george is redirected by sendmail to the new email address of george; the sender receives the new address with the hint ‘551 User not local; please try <[email protected]>’. After each change of /etc/aliases one has to call the instruction newaliases. Mail storage In a bigger network, where a central mail server receives the mail from the Internet and takes care of the dispatch, it looks somewhat different: The clients in the net pass on emails to the mail server, instead of sending them to the recipients themselves. This causes the so called ‘null-client’-feature: OSTYPE(`linux´) DOMAIN(`generic´) FEATURE(`nullclient´, `mail.provider.com´) This example passes email on to the server mail.provider.com. Since there are no mailers defined, sendmail doesn’t make a local notification with this configuration and it doesn’t react on incoming SMTP-connections either. You can start sendmail in this case with the operation ‘-q30m’ as well, so sendmail tries a regular new transmission of the mails in case the mail server breaks down – otherwise mail which sendmail couldn’t send because of problems with the mail server, wouldn’t be sent until the next sendmail-call. The option ‘-bd’ is missing, though, since sendmail doesn’t have to receive mail – the mail server takes care of that. Such a mail server or mailhub, which is online permanently is not substantially different from a single workstation computer with constant Internet binding. The only two differences are, that the mailhub also has to accept emails for its
52
clients and that the clients can pass on their email to further processing to the mailhub (relaying). Postoffice In order that mail that is directed to the clients goes to the mailhub, the MX-entries of the clients have to refer to the mail server [3]. However, sendmail with the standard adjustments accepts only email for local recipients. Since the host name in the email address doesn’t correspond with the host name of the mailhub, sendmail refuses acceptance. The entry FEATURE(`use_cw_file´) in domain/generic.m4 – integrated by the instruction DOMAIN(`generic´) – solves this problem: sendmail now extracts alternative names from the file /etc/sendmail.cw for the host, on which it runs. Into this file you only have to enter the names for the hosts, for whom the mailhub is to accept emails. Now sendmail has to be persuaded to relay emails from the clients of the mailhub. This function is deactivated as default since version 8.9.0, because relaying can be abused by spammers [9]. Therefore you have to explicitly allow to the mailhub to forward email from the mailhubs clients. There are different possibilities to do this: With FEATURE(`relay_based_on_MX´) each host for whom the mailhub is defined as MX-host, can use the mailhub as relay, as well. Thereby external users can still use the mailhub as relay for their domain by producing an according MX-entry on their name server. For most of the spammers this is already too troublesome, though; and since one has to create the MX-entries of the clients of the mailhost anyway, it is comfortable to use them for relay-control, as well. FEATURE(`relay_entire_domain´) passes on mail only from computers of the domain of the mailhub and is therefore the better choice against relaying by spammers. Mail distribution
FEATURE(`access_db´) instructs sendmail to read the authorisation to relay from a database. Both hosts, that are allowed to send their mail by the mailhub and blocked hosts, whose mails are not passed on by the mailhub, can be enlisted there. So known spammers can be stopped quickly. This feature allows an additional second argument, which indicates type and path of the database, for example FEATURE(`access_db´, `hash –o /etc/mail/access´) Here the database /etc/mail/access has the type ‘hash’; the option ‘-o’ makes the existence of the database optional. The command makemap hash /etc/mail/access < /etc/mail/access.txt produces this database of type hash from the text file /etc/mail/access.txt; the resulting file automatically gets the extension .db. Further possible types are btree or dbm; the usable types depend on the database support sendmail was compiled with. Usually the Berkeley db database engine [10] is used, it supports hash and btree; but it can also be the ndbm database engine, which uses the dbm-format. That is why it is advisable to compile sendmail yourself – so you can be sure that sendmail supports the desired database types. The database contains email addresses, domains and IP addresses as key values with the information, whether sendmail is relay or refuse emails from these addresses. The text file access.txt, which the makemap command produces the database from, could look like this for example: [email protected] REJECT cyberspam.com REJECT 192.168.212 REJECT Client1.net.com RELAY With this database sendmail would return all emails from [email protected] to all users and computers from the domain cyberspam.com and to every host in the subnet 192.168.212.* together with a standard response. The host client1.net.com, though, is allowed explicitly to use the mailhub.
Further possible values are: OK: email is also accepted if other restrictions would prevent this – for example sendmail doesn’t usually accept mail from hosts without a valid DNS-entry. nnn ‘any text’: Sends the indicated response text together with the error code nnn to the MTA, which sent the mail. Nnn is one of the error codes out of the RFC 821 [8] (§ 4.2.1). To get rid of spammers that haven’t been in action on one’s mailhub so far, one can since sendmail version 8.9.x. use the Realtime Blackhole List (RBL) of the Abuse Prevention System [11]. This list contains the IP addresses of known spammers and is constantly updated. FEATURE(`rbl´) causes sendmail to refuse every email, whose sender occurs on the RBL. The database can still be necessary, though, for example if the RBL blocks a whole domain but you still want to receive mail from certain computers of this domain: An according ‘OK’-entry for this host in /etc/mail/access.db is enough. It is advisable to explicitly enter the mail server, you preferably receive your mail from, into the access.db. It happened to me for example, that the mail server of my provider got into the RBL and my own mail server worked with FEATURE(`rbl´) – accordingly sendmail refused all the mail from this mail server. Further information to spamming and according extensions for sendmail can be found on [5] and in [9]. [...] Literature [1] The sendmail bible: Bryan Costales with Eric Allman, sendmail, 2nd Edition. O´Reilly, ISBN 1-56592-222-0 [2] Sendmail-Homepage: http://www.sendmail.org [3] email-Grundlagen: Harald Bögeholz, Wirbelwind, Elektronische Post im Internet. c't 8/99, S. 152 [4] m4 macro processor: http://ftp.gnu.org/pub/gnu/m4 [5] Help against spamming: http://www.unix-ag.uni-hannover.de/soft/check_local/
53
[6] Jürgen Schmidt, Gekonnt austeilen, WWW, News und Mail unter Linux optimieren. c't 7/98, S. 144 [7] IMAP4: http://www.imap.org/ [8] Important RFCs (822, 1648, 821): ftp://ftp.informatik.uni-dortmund.de/pub/RFCs/ [9] Spamming: Jan Krüger, Werbung ade, Sendmail als Spam-Filter. c't 21/98, S. 272 [10] Berkeley db database engine: http://www.sleepycat.com [11] Realtime Blackhole List: http://maps.vix.com/rbl [12] Postfix: http://www.postfix.org Article c’t issue 09/1999, "Die Post ist da, Grundlagen der Sendmail-Konfiguration" translated by Marco Studer

54