Erste Schritte zur Inbetriebnahme der Steuerung AST10 … · Erstinbetriebnahme AST10 mit 320E…...
24
012736 Erste Schritte zur Inbetriebnahme der Steuerung AST10 mit 320E.... Schrauber Quick-Start Instructions for the Operation of AST10 Controller with 320E... Screwdriver První kroky pro uvedení do provozu řízení AST 10 s 320E... šroubovákem
Transcript of Erste Schritte zur Inbetriebnahme der Steuerung AST10 … · Erstinbetriebnahme AST10 mit 320E…...

012736
Erste Schritte zur Inbetriebnahme der Steuerung AST10 mit 320E.... Schrauber
Quick-Start Instructions for the Operation of AST10 Controller with 320E... Screwdriver
První kroky pro uvedení do provozu řízení AST 10 s 320E... šroubovákem

Erstinbetriebnahme AST10 mit 320E… Handschrauber ohne SPS
Benötigte Komponenten (im Lieferumfang enthalten) 1 Erstellen eines
Standardprogrammes 4 Steuerung
AST10 Schrauber Motorkabel
Netzkabel Steckbrücke Patchkabel
Die Steuerung wird bereits mit einem für den mitgelieferten Schrauber erstelltem Standardprogramm ausgeliefert. Zur Erstellung von Standardprogrammen sind folgende Schritte nötig:
• Steuerung einschalten • Taste „m“ an der Steuerung drücken • Ins Menü Schraubablauf wechseln (Pfeil nach
unten bis der Cursor vor dem Menü Schraubablauf steht, dann � )
• Standardprogramme auswählen (Pfeil nach unten, dann � )
• Linke Funktionstaste (JA) drücken, unterhalb des Displays
• Standardprogramme wurden erstellt • Menü verlassen (ESC drücken bis wieder der
Hauptbildschirm erscheint) Es können nun erste Verschraubungen durchgeführt werden.
Anschluss der Komponenten 2 Standardprogrammablauf 5
Bei Handschraubern erfolgt der Start je nach Schraubertyp durch Andruck oder durch betätigen einer Starttaste. Es wird jeweils das im Menü Programmwahl vorgegebene Programm gestartet. Wird die Programmumschaltung (Taste oder Umschalthebel) betätigt, so wird immer Programm 16 gestartet.
ACHTUNG 3 Verbindung zum Rechner herstellen 6
Mindestbiegeradien für Schrauber-Anschlusskabel beachten.
Nichtbeachtung kann zu Schäden führen!
Bei ständiger Bewegung:
• Mindestbiegeradius 90 mm
Bei einmaliger Biegung:
• Mindestbiegeradius 45 mm
Es muss sichergestellt werden, dass während des Betriebes keine mechanischen Belastungen auf die Kabel einwirken.
Zudem muss sichergestellt werden, dass das Kabel fest mit der Steuerung bzw. dem Schrauber verbunden ist, um einen sicheren Kontakt zu gewährleisten.
Die Web-Oberfläche kann unter jedem gängigen Betriebssystem benutzt werden, wie z. B. Windows, Linux, OS X ..., sie funktioniert mit allen gebräuchlichen, aktuellen Browsern. Der Rechner, zur Darstellung der Weboberfläche, kann entweder direkt mit der Steuerung verbunden werden, oder über ein gemeinsames Netz. Bei der direkten Verbindung können sowohl gekreuzte als auch ungekreuzte Kabel verwendet werden; die Steuerung erkennt dies selbstständig und richtet die Verbindung entsprechend ein. Um die Weboberfläche zu benutzen, müssen sowohl die Steuerung als auch der Browser so eingerichtet werden, dass eine TCP/IP-Verbindung zwischen beiden aufgebaut werden kann. Insbesondere brauchen sowohl die Steuerung als auch der Rechner eine feste IP-Adresse und keine automatisch vergebene (DHCP muss am PC deaktiviert sein). Beide Adressen müssen im selben Netzsegment (Subnet) liegen.

Erstinbetriebnahme AST10 mit 320E… Handschrauber ohne SPS
Einrichten der Steuerung 7 Einstellen der IP-Adresse (am Beispiel von Windows) 9
An der Steuerung muss die richtige IP-Adresse eingestellt werden. Sie wird normalerweise vom Verwalter des lokalen Netzes vergeben. Im Auslieferungszustand ist folgende Adresse eingestellt: IP-Adresse: 10.10.25.100 Netzmaske: 255.255.0.0 Gateway: 10.10.25.1
Die IP-Adresse wird im Menü Setup -> Zusatzparameter -> Geräteadressen -> Ethernet geändert. Zum Ändern der IP-Adresse • die linke Funktionstaste „Aendern?“ betätigen. • die vier Teilnummern der Adresse jeweils einzeln
eingeben und mit der � -Taste bestätigen. • die vier Teilnummern der Netzmaske jeweils
einzeln eingeben und mit der � -Taste bestätigen.
• Mit der rechten Funktionstaste werden die Eingaben übernommen.
Im Anschluss wird das System automatisch neu gestartet, im Display erscheint die Meldung „AST10 reboot system ...“.
• Öffnen Sie die Systemsteuerung.
• Öffnen Sie dort die „Netzwerk- und DFÜ-Verbindungen“.
• Klicken Sie „LAN-Verbindung“ an oder erstellen Sie eine neue Verbindung.
• Wählen Sie den Punkt „Internetprotokoll (TCP/IP)“ aus und klicken Sie auf den Knopf Eigenschaften.
• Aktivieren Sie die Auswahl „Folgende IP-Adresse verwenden“ und tragen die IP-Adresse ,die Netzmaske und die restlichen Angaben so ein wie sie für Ihr Netz gelten. Die Adresse muss eindeutig sein, auch Steuerung und Rechner müssen unterschiedliche Adressen haben.
Gegebenenfalls klicken Sie auf den Knopf „Erweitert“, um eine weitere IP-Adresse einzugeben (z. B. wenn der Netz-Zugang des Rechners in einem anderen Netz oder Netzsegment liegt als die Steuerung).
Einrichten von Laptop und Browser 8
Browser-Einstellungen für den Proxyserver (am Beispiel des Internet Explorers)
10
Der Browser muss Zugriff auf die Steuerung haben, d.h. • die IP-Adresse der Steuerung muss erreichbar
sein. • das HTTP-Protokoll darf nicht deaktiviert sein. • ein eventueller Proxy muss für die IP-Adresse
der Steuerung (oder lokale Adressen allgemein) deaktiviert sein.
Ausserdem muss der Browser Cookies von der Steuerung annehmen und Javascript aktiviert sein. Welche Adressen im konkreten Fall richtig sind, muss von der jeweiligen EDV-Verwaltung festgelegt werden. Bei Unklarheiten zu obigen Einstellungen wenden Sie sich an ihren EDV-Verantwortlichen.
Öffnen Sie das Menü Extras -> Internetoptionen -> Verbindungen Klicken Sie auf den Knopf LAN-Einstellungen -> Einstellungen Wenn „Proxyserver für LAN verwenden“ angekreuzt ist, aktivieren Sie auch den Punkt „Proxyserver für lokale Adressen umgehen“, oder klicken Sie auf den Knopf „Erweitert“ und tragen Sie die Adresse der Steuerung in die Liste der Ausnahmen ein. Sonstige Browser-Einstellungen: Falls Sie die Annahme von Cookies deaktiviert haben, können Sie sie unter Extras -> Internetoptionen -> Datenschutz -> Websites -> Bearbeiten für die Steuerung selektiv aktivieren. Es kann nun durch Eingabe der IP-Adresse der Steuerung in die Adressleiste des Browsers das Web-Interface gestartet werden.

Erstinbetriebnahme AST10 mit 320E… Handschrauber mit SPS
Benötigte Komponenten (im Lieferumfang enthalten) 1 Standard-Anschlussschema
SPS 4 Steuerung
AST10 Schrauber Motorkabel
Netzkabel Patchkabel
Anschluss der Komponenten 2 Standardprogrammablauf 5
Grundvoraussetzungen: • Signal high auf Eingang NOT-Stop – Pin 23
• Setzen des Bitmusters für Programmvorwahl – Pins 3 - 6 (kann dauerhaft anliegen, wird nur bei Anlegen des Startsignals ausgewertet)
Bei Handschraubern erfolgt der Start je nach Schraubertyp durch Andruck oder durch betätigen einer Starttaste. Wird über die Eingänge der SPS-Schnittstelle ein Programm vorgegeben, so wird dieses gestartet. Liegt an der SPS-Schnittstelle kein Programm an, so wird jeweils das im Menü Programmwahl vorgegebene Programm gestartet. Wird die Programmumschaltung (Taste oder Umschalthebel) betätigt, so wird immer Programm 16 gestartet.
ACHTUNG 3 Erstellen eines Standardprogrammes 6
Mindestbiegeradien für Schrauber-Anschlusskabel beachten.
Nichtbeachtung kann zu Schäden führen!
Bei ständiger Bewegung:
• Mindestbiegeradius 90 mm
Bei einmaliger Biegung:
• Mindestbiegeradius 45 mm
Es muss sichergestellt werden, dass während des Betriebes keine mechanischen Belastungen auf die Kabel einwirken.
Zudem muss sichergestellt werden, dass das Kabel fest mit der Steuerung bzw. dem Schrauber verbunden ist, um einen sicheren Kontakt zu gewährleisten.
Die Steuerung wird bereits mit einem für den mitgelieferten Schrauber erstelltem Standardprogramm ausgeliefert. Zur Erstellung von Standardprogrammen sind folgende Schritte nötig:
• Steuerung einschalten • Taste „m“ an der Steuerung drücken • Ins Menü Schraubablauf wechseln (Pfeil nach
unten bis der Cursor vor dem Menü Schraubablauf steht, dann � )
• Standardprogramme auswählen (Pfeil nach unten, dann � )
• Linke Funktionstaste (JA) drücken, unterhalb des Displays
• Standardprogramme wurden erstellt • Menü verlassen (ESC drücken bis wieder der
Hauptbildschirm erscheint) Es können nun erste Verschraubungen durchgeführt werden.

Erstinbetriebnahme AST10 mit 320E… Handschrauber mit SPS
Verbindung zum Rechner herstellen 7 Einrichten von Laptop und
Browser 9 Die Web-Oberfläche kann unter jedem gängigen Betriebssystem benutzt werden, wie z. B. Windows, Linux, OS X ..., sie funktioniert mit allen gebräuchlichen, aktuellen Browsern. Der Rechner, zur Darstellung der Weboberfläche, kann entweder direkt mit der Steuerung verbunden werden, oder über ein gemeinsames Netz. Bei der direkten Verbindung können sowohl gekreuzte als auch ungekreuzte Kabel verwendet werden; die Steuerung erkennt dies selbstständig und richtet die Verbindung entsprechend ein. Um die Weboberfläche zu benutzen, müssen sowohl die Steuerung als auch der Browser so eingerichtet werden, dass eine TCP/IP-Verbindung zwischen beiden aufgebaut werden kann. Insbesondere brauchen sowohl die Steuerung als auch der Rechner eine feste IP-Adresse und keine automatisch vergebene (DHCP muss am PC deaktiviert sein). Beide Adressen müssen im selben Netzsegment (Subnet) liegen.
Der Browser muss Zugriff auf die Steuerung haben, d.h. • die IP-Adresse der Steuerung muss erreichbar
sein. • das HTTP-Protokoll darf nicht deaktiviert sein. • ein eventueller Proxy muss für die IP-Adresse der
Steuerung (oder lokale Adressen allgemein) deaktiviert sein.
Ausserdem muss der Browser Cookies von der Steuerung annehmen und Javascript aktiviert sein. Welche Adressen im konkreten Fall richtig sind, muss von der jeweiligen EDV-Verwaltung festgelegt werden. Bei Unklarheiten zu obigen Einstellungen wenden Sie sich an ihren EDV-Verantwortlichen.
Einrichten der Steuerung 8 Einstellen der IP-Adresse (am Beispiel von Windows) 10 • Öffnen Sie die Systemsteuerung. • Öffnen Sie dort die „Netzwerk- und DFÜ-
Verbindungen“. • Klicken Sie „LAN-Verbindung“ an oder erstellen
Sie eine neue Verbindung. • Wählen Sie den Punkt „Internetprotokoll (TCP/IP)“
aus und klicken Sie auf den Knopf Eigenschaften. • Aktivieren Sie die Auswahl „Folgende IP-Adresse
verwenden“ und tragen die IP-Adresse ,die Netzmaske und die restlichen Angaben so ein wie sie für Ihr Netz gelten. Die Adresse muss eindeutig sein, auch Steuerung und Rechner müssen unterschiedliche Adressen haben.
Gegebenenfalls klicken Sie auf den Knopf „Erweitert“, um eine weitere IP-Adresse einzugeben (z. B. wenn der Netz-Zugang des Rechners in einem anderen Netz oder Netzsegment liegt als die Steuerung). Browser-Einstellungen für den Proxyserver (am Beispiel des Internet Explorers)
11
An der Steuerung muss die richtige IP-Adresse eingestellt werden. Sie wird normalerweise vom Verwalter des lokalen Netzes vergeben. Im Auslieferungszustand ist folgende Adresse eingestellt: IP-Adresse: 10.10.25.100 Netzmaske: 255.255.0.0 Gateway: 10.10.25.1
Die IP-Adresse wird im Menü Setup -> Zusatzparameter -> Geräteadressen -> Ethernet geändert. Zum Ändern der IP-Adresse
• die linke Funktionstaste „Aendern?“ betätigen. • die vier Teilnummern der Adresse jeweils einzeln
eingeben und mit der � -Taste bestätigen. • die vier Teilnummern der Netzmaske jeweils
einzeln eingeben und mit der � -Taste bestätigen.
• Mit der rechten Funktionstaste werden die Eingaben übernommen.
Im Anschluss wird das System automatisch neu gestartet, im Display erscheint die Meldung „AST10 reboot system ...“.
Öffnen Sie das Menü Extras -> Internetoptionen -> Verbindungen
Klicken Sie auf den Knopf LAN-Einstellungen -> Einstellungen Wenn „Proxyserver für LAN verwenden“ angekreuzt ist, aktivieren Sie auch den Punkt „Proxyserver für lokale Adressen umgehen“, oder klicken Sie auf den Knopf „Erweitert“ und tragen Sie die Adresse der Steuerung in die Liste der Ausnahmen ein.
Sonstige Browser-Einstellungen: Falls Sie die Annahme von Cookies deaktiviert haben, können Sie sie unter Extras -> Internetoptionen -> Datenschutz -> Websites -> Bearbeiten für die Steuerung selektiv aktivieren.
Es kann nun durch Eingabe der IP-Adresse der Steuerung in die Adressleiste des Browsers das Web-Interface gestartet werden.

Erstinbetriebnahme AST10 mit 320E… Einbauschrauber mit SPS
Benötigte Komponenten (im Lieferumfang enthalten) 1 Standard-Anschlussschema
SPS 4 Steuerung
AST10 Schrauber Motorkabel
Netzkabel Patchkabel
Anschluss der Komponenten 2 Standardprogrammablauf 5
Grundvoraussetzungen: • Signal high auf Eingang NOT-Stop – Pin 23 • Setzen des Bitmusters für Programmvorwahl –
Pins 3 - 6 (kann dauerhaft anliegen, wird nur bei Anlegen des Startsignals ausgewertet)
Kommunikation: 1. Abfrage von Ready – Pin 15 high? 2. Signal high auf Eingang Programmstart – Pin 1 3. Abfrage von IO und NIO – Pins 13 und 14 4. Warten auf Ready – Pin 15 high 5. Signal low auf Eingang Programmstart, ggf.
Bitmuster für Programmvorwahl ändern 6. Fortsetzen lt. Punkt 1 – neuer Schraubzyklus
Mit dem Programmstart wird das Signal Ready sowie IO/NIO auf LOW-Pegel gesetzt. Der folgende high-Pegel von IO bzw. NIO signalisiert das Ende des Schraubzyklus.
ACHTUNG 3 Erstellen eines Standardprogrammes 6
Mindestbiegeradien für Schrauber-Anschlusskabel beachten.
Nichtbeachtung kann zu Schäden führen!
Bei ständiger Bewegung:
• Mindestbiegeradius 90 mm
Bei einmaliger Biegung:
• Mindestbiegeradius 45 mm
Es muss sichergestellt werden, dass während des Betriebes keine mechanischen Belastungen auf die Kabel einwirken. Zudem muss sichergestellt werden, dass das Kabel fest mit der Steuerung bzw. dem Schrauber verbunden ist, um einen sicheren Kontakt zu gewährleisten.
Die Steuerung wird bereits mit einem für den mitgelieferten Schrauber erstelltem Standardprogramm ausgeliefert. Zur Erstellung von Standardprogrammen sind folgende Schritte nötig:
• Steuerung einschalten • Taste „m“ an der Steuerung drücken • Ins Menü Schraubablauf wechseln (Pfeil nach
unten bis der Cursor vor dem Menü Schraubablauf steht, dann � )
• Standardprogramme auswählen (Pfeil nach unten, dann � )
• Linke Funktionstaste (JA) drücken, unterhalb des Displays
• Standardprogramme wurden erstellt • Menü verlassen (ESC drücken bis wieder der
Hauptbildschirm erscheint) Es können nun erste Verschraubungen durchgeführt werden.

Erstinbetriebnahme AST10 mit 320E… Einbauschrauber mit SPS
Verbindung zum Rechner herstellen 7 Einrichten von Laptop und
Browser 9 Die Web-Oberfläche kann unter jedem gängigen Betriebssystem benutzt werden, wie z. B. Windows, Linux, OS X ..., sie funktioniert mit allen gebräuchlichen, aktuellen Browsern. Der Rechner, zur Darstellung der Weboberfläche, kann entweder direkt mit der Steuerung verbunden werden, oder über ein gemeinsames Netz. Bei der direkten Verbindung können sowohl gekreuzte als auch ungekreuzte Kabel verwendet werden; die Steuerung erkennt dies selbstständig und richtet die Verbindung entsprechend ein. Um die Weboberfläche zu benutzen, müssen sowohl die Steuerung als auch der Browser so eingerichtet werden, dass eine TCP/IP-Verbindung zwischen beiden aufgebaut werden kann. Insbesondere brauchen sowohl die Steuerung als auch der Rechner eine feste IP-Adresse und keine automatisch vergebene (DHCP muss am PC deaktiviert sein). Beide Adressen müssen im selben Netzsegment (Subnet) liegen.
Der Browser muss Zugriff auf die Steuerung haben, d.h. • die IP-Adresse der Steuerung muss erreichbar
sein. • das HTTP-Protokoll darf nicht deaktiviert sein. • ein eventueller Proxy muss für die IP-Adresse der
Steuerung (oder lokale Adressen allgemein) deaktiviert sein.
Ausserdem muss der Browser Cookies von der Steuerung annehmen und Javascript aktiviert sein. Welche Adressen im konkreten Fall richtig sind, muss von der jeweiligen EDV-Verwaltung festgelegt werden. Bei Unklarheiten zu obigen Einstellungen wenden Sie sich an ihren EDV-Verantwortlichen.
Einrichten der Steuerung 8 Einstellen der IP-Adresse (am Beispiel von Windows) 10 • Öffnen Sie die Systemsteuerung. • Öffnen Sie dort die „Netzwerk- und DFÜ-
Verbindungen“. • Klicken Sie „LAN-Verbindung“ an oder erstellen
Sie eine neue Verbindung. • Wählen Sie den Punkt „Internetprotokoll (TCP/IP)“
aus und klicken Sie auf den Knopf Eigenschaften. • Aktivieren Sie die Auswahl „Folgende IP-Adresse
verwenden“ und tragen die IP-Adresse ,die Netzmaske und die restlichen Angaben so ein wie sie für Ihr Netz gelten. Die Adresse muss eindeutig sein, auch Steuerung und Rechner müssen unterschiedliche Adressen haben.
Gegebenenfalls klicken Sie auf den Knopf „Erweitert“, um eine weitere IP-Adresse einzugeben (z. B. wenn der Netz-Zugang des Rechners in einem anderen Netz oder Netzsegment liegt als die Steuerung). Browser-Einstellungen für den Proxyserver (am Beispiel des Internet Explorers)
11
An der Steuerung muss die richtige IP-Adresse eingestellt werden. Sie wird normalerweise vom Verwalter des lokalen Netzes vergeben. Im Auslieferungszustand ist folgende Adresse eingestellt: IP-Adresse: 10.10.25.100 Netzmaske: 255.255.0.0 Gateway: 10.10.25.1
Die IP-Adresse wird im Menü Setup -> Zusatzparameter -> Geräteadressen -> Ethernet geändert. Zum Ändern der IP-Adresse
• die linke Funktionstaste „Aendern?“ betätigen. • die vier Teilnummern der Adresse jeweils einzeln
eingeben und mit der � -Taste bestätigen. • die vier Teilnummern der Netzmaske jeweils
einzeln eingeben und mit der � -Taste bestätigen.
• Mit der rechten Funktionstaste werden die Eingaben übernommen.
Im Anschluss wird das System automatisch neu gestartet, im Display erscheint die Meldung „AST10 reboot system ...“.
Öffnen Sie das Menü Extras -> Internetoptionen -> Verbindungen
Klicken Sie auf den Knopf LAN-Einstellungen -> Einstellungen Wenn „Proxyserver für LAN verwenden“ angekreuzt ist, aktivieren Sie auch den Punkt „Proxyserver für lokale Adressen umgehen“, oder klicken Sie auf den Knopf „Erweitert“ und tragen Sie die Adresse der Steuerung in die Liste der Ausnahmen ein.
Sonstige Browser-Einstellungen Falls Sie die Annahme von Cookies deaktiviert haben, können Sie sie unter Extras -> Internetoptionen -> Datenschutz -> Websites -> Bearbeiten für die Steuerung selektiv aktivieren.
Es kann nun durch Eingabe der IP-Adresse der Steuerung in die Adressleiste des Browsers das Web-Interface gestartet werden.

Initial Operation of AST10 with Model 320E… Handheld Screwdriver without PLC
Required Components (part of your order) 1 Generate a Standard Program 4 Controller
AST10 Screwdriver Motor cable
Power cable
Jumper Patch cable
The controller is supplied with one standard program, which is suitable for the supplied screwdriver.
To generate a standard program, take the following steps:
• Turn-On the controller • Press the key „m“ on the controller • Select the Menu Screwdriving Program (arrow
down until the cursor highlights the Menu Item „Screwdriving Program“, then press � )
• Select standard program (arrow down, then � ) • Press the left function key (YES), located be-
neath the display • Standard programs were established • Exit Menu (press ESC key, until main screen
appears) The system is now ready for the first assemblies.
Connect the Components 2 Sequence of Standard Program 5
The handheld screwdriver starts either through push-to-start or trigger start (depends on screwdriver mod-el). The program shown in the Menu Item Program Se-lection will be started. If the reverse (button or lever) is activated, then pro-gram 16 will always start.
ATTENTION 3 Establish Connection to PC 6 Observe minimum bending
radius of screwdriver cable.
Non-observance will cause damage!
At constant motion:
• Minimum bending radius 90 mm
At singular motion:
• Minimum bending radius 45 mm
Please make sure that there is no mechanical load on the cables during operation.
To assure best possible contact, the connections of the cable to the controller and the screwdriver must be solid.
The web-interface can be operated using any readily available operating system, such as Windows, Linux, OS X ..., and functions with all known and current browser. To display the web-interface, the PC can be con-nected directly to the controller or through a joint network. For the direct connection, both crossover or standard cables may be used; the controller recog-nizes the cable type and establishes the correspond-ing connection. In order to use the web-interface, both the controller as well as the browser must be prepared in such a way, that a TCP/IP-connection can be built between them. In particular, both the controller as well as the PC, need a fixed IP-address and not an automatically selected address (DHCP must be disabled on the PC). Both addresses must be located in the same net-segment (Subnet).

Initial Operation of AST10 with Model 320E… Handheld Screwdriver without PLC
Preparing the Controller 7 Input an IP-Address (Example based on Windows) 9
Input a correct IP-address into the controller. Your IT-personnel generally supply such an IP-address. At delivery, the following address is input: IP-Address: 10.10.25.100 Net Mask: 255.255.0.0 Gateway: 10.10.25.1 To change the IP-address, go to the Menu Item Se-tup -> Opt. Parameters -> Device Addresses -> Ethernet. To change the IP-address, proceed as follows: • activate the left function key = „Change?“ • input the four address segments individually and
confirm with � -key • input the four net mask segments individually and
confirm with � -key • save the input information by activating the right
function key The system automatically restarts and the display indicates „AST10 reboot system ...“.
• Click on your control panel.
• Open the „Network Connections“.
• Click on „LAN-Connection“ or „Make a new Con-nection”.
• Select the box „Internet Protocol (TCP/IP)” and click on „Properties”.
• Activate „use the following IP-address“ and input the IP-address, the network mask and any other data as needed for your network. The address must be fixed and both controller and PC must have a different IP-address.
If needed, click on the Button „Advanced“ and then „Add...“ to input an additional IP-address (for example: if the net access of the computer is in a different net or net segment as the controller).
Preparing the Laptop and Browser 8
Browser-Adjustment for the Proxy Server (Example based on Internet Explorer)
10
The browser needs to be able to correspond with the controller, which means • the IP-address of the controller has to be acces-
sible. • the HTTP-protocol may not be deactivated. • the proxy settings for the IP-address (or local
addresses altogether) of the controller must be deactivated.
The browser must be able to accept cookies from the controller and Java script must be activated. The IT-department has to determine the validity of any used IP-address. If unclear, please contact your IP-department.
Open the Menu Item Tools -> Internet Options -> Connections Click on the Button LAN-settings -> Settings If the item „Use a proxy server for your LAN” is se-lected, then also activate the box „Bypass proxy serv-er for local addresses“, or click the button „Advanced“ and add the IP-address of the controller to the area „Exceptions“. Additional browser-adjustments: If your system is adjusted to NOT allow cookies, then select Control Panel -> Internet Options -> Privacy -> Advanced Privacy Settings -> Per Site Privacy Action and click the “allow”-button. Now, it is possible to start the web-interface by typing the IP-address of the controller into the “address” area on the browser.

Initial Operation of AST10 with Model 320E... Handheld Screwdriver with PLC
Required Components (part of your order) 1 Standard Connection Layout
PLC 4 Controller
AST10 Screwdriver Motor cable
Power cable
Patch cable
Connect the Components 2 Sequence of Standard Program 5
Basic conditions: • Signal high on input EMERGENCY-Stop – Pin 23
• Set the bit sample for program pre-selection – Pins 3 - 6 (this may be a continued signal since it will only be accessed by the start signal)
The handheld screwdriver starts either through push-to-start or trigger-start (depends on screwdriver model). If a program is selected through an input on the PLC-port, then that particular program starts. If NO program is selected through an input on the PLC-port, then a pre-determined program – as se-lected in the Menu Item program-selection – starts. If the reverse (button or lever) is activated, then pro-gram 16 will always start.
ATTENTION 3 Generate a Standard Program 6 Observe minimum bending
radius of screwdriver cable.
Non-observance will cause damage!
At constant motion:
• Minimum bending radius 90 mm
At singular motion:
• Minimum bending radius 45 mm
Please make sure that there is no mechanical load on the cables during operation.
To assure best possible contact, the connections of the cable to the controller and the screwdriver must be solid.
The controller is supplied with one standard program, which is suitable for the supplied screwdriver.
To generate a standard program, take the following steps:
• Turn-On the controller • Press the key „m“ on the controller • Select the Menu Screwdriving Program (arrow
down until the cursor highlights the Menu Item „Screwdriving Program“, then press � )
• Select standard program (arrow down, then � ) • Press the left function key (YES), located beneath
the display • Standard programs were established • Exit Menu (press ESC key, until main screen ap-
pears) The system is now ready for the first assemblies.

Initial Operation of AST10 with Model 320E... Handheld Screwdriver with PLC
Establish Connection to PC 7 Preparing the Laptop and Browser 9
The web-interface can be operated using any readily available operating system, such as Windows, Linux, OS X ..., and functions with all known and current browser. To display the web-interface, the PC can be con-nected directly to the controller or through a joint network. For the direct connection, both crossover or standard cables may be used; the controller recog-nizes the cable type and establishes the correspond-ing connection. In order to use the web-interface, both the controller as well as the browser must be prepared in such a way, that a TCP/IP-connection can be built between them. In particular, both the controller as well as the PC, need a fixed IP-address and not an automatically selected address (DHCP must be disabled on the PC). Both addresses must be located in the same net-segment (Subnet).
The browser needs to be able to correspond with the controller, which means • the IP-address of the controller has to be accessi-
ble. • the HTTP-protocol may not be deactivated. • the proxy settings for the IP-address (or local
addresses altogether) of the controller must be deactivated.
The browser must be able to accept cookies from the controller and Java script must be activated. The IT-department has to determine the validity of any used IP-address. If unclear, please contact your IP-department.
Preparing the Controller 8 Input an IP-Address (Example based on Windows) 10 • Click on your control panel. • Open the „Network Connections“. • Click on „LAN-Connection“ or „Make a new Con-
nection”. • Select the box „Internet Protocol (TCP/IP)” and
click on „Properties”. • Activate „use the following IP-address“ and input
the IP-address, the network mask and any other data as needed for your network. The address must be fixed and both controller and PC must have a different IP-address.
If needed, click on the Button „Advanced“ and then „Add...“ to input an additional IP-address (for example: if the net access of the computer is in a different net or net segment as the controller).
Browser-Adjustment for the Proxy Server (Example based on Internet Explorer)
11
Input a correct IP-address into the controller. Your IT-personnel generally supply such an IP-address. At delivery, the following address is input: IP-Address: 10.10.25.100 Net Mask: 255.255.0.0 Gateway: 10.10.25.1 To change the IP-address, go to the Menu Item Se-tup -> Opt. Parameters -> Device Addresses -> Ethernet. To change the IP-address, proceed as follows: • activate the left function key = „Change?“ • input the four address segments individually and
confirm with � -key • input the four net mask segments individually and
confirm with � -key • save the input information by activating the right
function key The system automatically restarts and the display indicates „AST10 reboot system ...“.
Open the Menu Item Tools -> Internet Options -> Connections
Click on the Button LAN-settings -> Settings
If the item „Use a proxy server for your LAN” is se-lected, then also activate the box „Bypass proxy serv-er for local addresses“, or click the button „Advanced“ and add the IP-address of the controller to the area „Exceptions“.
Additional browser-adjustments: If your system is adjusted to NOT allow cookies, then select Control Panel -> Internet Options -> Privacy -> Advanced Privacy Settings -> Per Site Privacy Action and click the “allow”-button.
Now, it is possible to start the web-interface by typing the IP-address of the controller into the “address” area on the browser.

Initial Operation of AST10 with Model 320E… Stationary Screwdriver with PLC
Required Components (part of your order) 1 Standard Connection Layout
PLC 4 Controller
AST10 Screwdriver Motor cable
Power cable
Patch cable
Connect the Components 2 Sequence of Standard Program 5
Basic conditions: • Signal high on input EMERGENCY-Stop – Pin 23 • Set the bit sample for program pre-selection – Pins
3 - 6 (this may be a continued signal since it will only be accessed by the start signal)
Communication: 1. Inquiry: Ready – Pin 15 high? 2. Signal high on input START – Pin 1 3. Inquiry: OK and NOT OK – Pins 13 and 14 4. Wait for: Ready – Pin 15 high 5. Signal low on input START; if needed, change bit
sample for program pre-selection 6. Continue with Item 1 – new screwdriving cycle
With the START, the READY signal, as well as the OK or NOT OK signal is set to LOW-level. The subsequent high-level of OK or NOT OK signalizes the end of the screwdriving cycle.
ATTENTION 3 Generate a Standard Program 6 Observe minimum bending
radius of screwdriver cable.
Non-observance will cause damage!
At constant motion:
• Minimum bending radius 90 mm
At singular motion:
• Minimum bending radius 45 mm
Please make sure that there is no mechanical load on the cables during operation.
To assure best possible contact, the connections of the cable to the controller and the screwdriver must be solid.
The controller is supplied with one standard program, which is suitable for the supplied screwdriver.
To generate a standard program, take the following steps:
• Turn-On the controller • Press the key „m“ on the controller • Select the Menu Screwdriving Program (arrow
down until the cursor highlights the Menu Item „Screwdriving Program“, then press � )
• Select standard program (arrow down, then � ) • Press the left function key (YES), located beneath
the display • Standard programs were established • Exit Menu (press ESC key, until main screen
appears) The system is now ready for the first assemblies.

Initial Operation of AST10 with Model 320E… Stationary Screwdriver with PLC
Establish Connection to PC 7 Preparing the Laptop and Browser 9
The web-interface can be operated using any readily available operating system, such as Windows, Linux, OS X ..., and functions with all known and current browser. To display the web-interface, the PC can be con-nected directly to the controller or through a joint network. For the direct connection, both crossover or standard cables may be used; the controller recog-nizes the cable type and establishes the correspond-ing connection. In order to use the web-interface, both the controller as well as the browser must be prepared in such a way, that a TCP/IP-connection can be built between them. In particular, both the controller as well as the PC, need a fixed IP-address and not an automatically selected address (DHCP must be disabled on the PC). Both addresses must be located in the same net-segment (Subnet).
The browser needs to be able to correspond with the controller, which means • the IP-address of the controller has to be
accessible. • the HTTP-protocol may not be deactivated. • the proxy settings for the IP-address (or local ad-
dresses altogether) of the controller must be de-activated.
The browser must be able to accept cookies from the controller and Java script must be activated. The IT-department has to determine the validity of any used IP-address. If unclear, please contact your IP-department.
Preparing the Controller 8 Input an IP-Address (Example based on Windows) 10 • Click on your control panel. • Open the „Network Connections“. • Click on „LAN-Connection“ or „Make a new Con-
nection”. • Select the box „Internet Protocol (TCP/IP)” and
click on „Properties”. • Activate „use the following IP-address“ and input
the IP-address, the network mask and any other data as needed for your network. The address must be fixed and both controller and PC must have a different IP-address.
If needed, click on the Button „Advanced“ and then „Add...“ to input an additional IP-address (for example: if the net access of the computer is in a different net or net segment as the controller). Browser-Adjustment for the Proxy Server (Example based on Internet Explorer)
11
Input a correct IP-address into the controller. Your IT-personnel generally supply such an IP-address. At delivery, the following address is input: IP-Address: 10.10.25.100 Net Mask: 255.255.0.0 Gateway: 10.10.25.1 To change the IP-address, go to the Menu Item Se-tup -> Opt. Parameters -> Device Addresses -> Ethernet. To change the IP-address, proceed as follows: • activate the left function key = „Change?“ • input the four address segments individually and
confirm with � -key • input the four net mask segments individually and
confirm with � -key • save the input information by activating the right
function key The system automatically restarts and the display indicates „AST10 reboot system ...“.
Open the Menu Item Tools -> Internet Options -> Connections
Click on the Button LAN-settings -> Settings
If the item „Use a proxy server for your LAN” is se-lected, then also activate the box „Bypass proxy serv-er for local addresses“, or click the button „Advanced“ and add the IP-address of the controller to the area „Exceptions“.
Additional browser-adjustments: If your system is adjusted to NOT allow cookies, then select Control Panel -> Internet Options -> Privacy -> Advanced Privacy Settings -> Per Site Privacy Action and click the “allow”-button.
Now, it is possible to start the web-interface by typing the IP-address of the controller into the “address” area on the browser.

První uvedení do provozu AST10 s 320E ručním šroubovákem bez SPS
Potřebné komponenty (součástí dodávky) 1 Vytvoření standardního
programu 4 Řízení AST10
Šroubovák Kabel motoru
Kabel síťový
Konektor Datový (patch) kabel
Řízení je dodáváno společně se standardním programem vytvořeným pro vybraný šroubovák. Pro vytvoření standardních programů:
• spusťte řízení • stiskněte klávesu „m“ na řízení • přejděte do menu průběh šroubování
(Schraubablauf) (šipkou jeďte směrem dolů dokud nebude kurzor stát před menu průběh šroubování (Schraubablauf), poté stiskněte � )
• zvolte standardní programy (Standardprogramme) (šipkou směrem dolů, poté � )
• stiskněte levé funkční tlačítko (JA/ANO), pod displejem
• vytvoření standardních programů • opusťte menu (stiskněte ESC a držte stisknuté
do doby, dokud se neobjeví hlavní obrazovka) Nyní je možné provést první sešroubování.
Připojení komponentů 2 Standardní průběh programu 5
U ručních šroubováků dochází vždy podle typu šroubováku ke spuštění buď přítlakem nebo stisknutím tlačítka spouštění. Při spuštění se vždy zobrazí program, který byl přednastaven v menu volba programu. Při aktivaci reverzace (tlačítkem nebo přepínací páčkou), se vždy spustí program 16.
POZOR 3 Vytvoření spojení s počítačem 6 Dbejte na minimální poloměr
ohybu připojovacího kabelu šroubováku. Nedodržení může vést k poškození!
Při stálém pohybu:
• minimální poloměr ohybu 90 mm
Při jednorázovém ohnutí:
• minimální poloměr ohybu 45 mm
Musí být zajištěno, aby během provozu na kabel nepůsobila žádná mechanická zatížení.
Pro zajištění bezpečného kontaktu, musí být navíc zajištěno, aby byl kabel pevně spojen s řízením resp. se šroubovákem.
Webové rozhraní je možné použít na jakémkoliv běžném provozním systému, jako např. Windows, Linux, OS X ..., funguje se všemi běžnými aktuálními prohlížeči. Počítač určený k zobrazení webového rozhraní může být s řízením spojen buď přímo a nebo přes společnou síť. Při přímém spojení je možné použít jak křížený tak standardní kabel; řízení samo rozpozná typ kabelu a spojení přizpůsobí. Aby bylo možné používat webové rozhraní, musí být řízení, jakož i prohlížeč nastaveny tak, aby mezi nimi mohlo být vytvořeno TCP/IP-spojení. Řízení, jakož i počítač musí mít pevnou IP-adresu (DHCP musí být na PC deaktivováno). Obě adresy se musí nacházet ve stejné podsíti(Subnet).
První uvedení do provozu AST10 s 320E ručním šroubovákem bez SPS
Nastavení řízení 7 Nastavení IP-adresy (na příkladu Windows) 9
Na řízení musí být nastavena správná IP-adresa. Standardně bývá zadávána správcem lokální sítě. Od výrobce je při dodání nastavena následující adresa: Adresa IP: 10.10.25.100 Maska podsítě: 255.255.0.0 Výchozí brána: 10.10.25.1
Změna IP-adresy se provádí v menu Setup -> doplňkové parametry (Zusatzparameter) -> adresy zařízení (Geräteadressen) -> Ethernet. Změna IP-adresy • stiskněte levé funkční tlačítko „Změnit?“
(„Aendern?“). • zadejte jednotlivě čtyři oddělená čísla adresy
a potvrďte klávesou � -. • zadejte jednotlivě čtyři oddělená čísla masky
podsítě a potvrďte klávesou � . • Stisknutím pravého funkčního tlačítko dojde k
potvrzení zadání. V souvislosti s touto úpravou dojde automaticky k novému spuštění systému, na displeji se objeví hlášení „AST10 reboot system ...“.
• Otevřete ovládací panel řízení.
• Zde otevřete „Síťová spojení“ ( „Netzwerk- und DFÜ-Verbindungen“).
• Klikněte na „LAN-spojení“ ( „LAN-Verbindung“) nebo vytvořte nové spojení.
• Vyberte bod „internetový protokol (TCP/IP)“ ( „Internetprotokoll (TCP/IP)“) a klikněte do hlavičky vlastnosti (Eigenschaften).
• Aktivujte výběr „použít následující IP-adresu“ ( „Folgende IP-Adresse verwenden“) a zapište IP-adresu, masku podsítě jakož i zbylé údaje platné pro Vaši síť. Adresa musí být jednoznačná, také řízení a počítač musí mít rozdílné adresy.
Pro případné zadání další IP-adresy klikněte na hlavičku „rozšířeno“ („Erweitert“), (např. je-li přístup počítače v jiné síti než řízení).
Nastavení notebooku a prohlížeče 8
Nastavení prohlížeče pro Proxyserver (na příkladu Internet Exploreru)
10
Prohlížeč musí mít přístup k řízení, tzn.: • musí být dosažitelná IP-adresa řízení, • nesmí být deaktivován HTTP-protokol, • event. nastavení proxy musí být pro IP-adresu
řízení (nebo lokální adresy obecně) deaktivováno.
Kromě toho musí být řízením povoleny v prohlížeči cookies a musí být aktivován javascript. Které adresy jsou v konkrétním případě správné, musí být určeno příslušným IT oddělením. V případě nejasností k výše uvedeným nastavením se obraťte na Vašeho správce sítě.
Otevřete Menu Nástroje -> Možnosti internetu -> Spojení Klikněte do hlavičky Nastavení místní sítě -> Nastavení Je-li křížkem označeno „Použít proxyserver pro LAN“ aktivujte také bod „Nepoužívat proxyserver pro lokální adresy“, nebo klikněte v hlavičce na „Rozšířené“ a zapište adresu řízení do seznamu výjimek. Ostatní nastavení prohlížeče: Jestliže jste deaktivovali příjem cookies, potom zvolte Nástroje -> Možnosti internetu ->Zabezpečení -> Internet -> Vlastní úroveň -> Povolit privátní webový přístup. Nyní již lze zadáním IP-adresy řízení do adresového řádku prohlížeče spustit webové rozhraní.

První uvedení do provozu AST10 s 320E… ručním sroubovákem s SPS
Potřebné komponenty (součástí dodávky) 1 Standardní schéma připojení
SPS 4 Řízení AST10
Šroubovák Kabel motoru
Kabel síťový
Datový (patch) kabel
Připojení komponentů 2 Standardní průběh programu 5
Základní předpoklady: • Signal high na vstup NOT-Stop – Pin 23
• Dosaďte bitový vzorek pro předvolbu programu– piny 3 - 6 (může být trvale nastaveno, je vyhodnocováno pouze při zadávání signalu pro spuštění)
U ručních šroubováků dochází vždy podle typu šroubováku ke spuštění buď přítlakem nebo stisknutím tlačítka spouštění. Je-li přes vstupy SPS-rozhraní přednastaven program, dojde k jeho spuštění. Nenáchází-li se v SPS-rozhranní žádný program, spustí se vždy v menu volba programu přednastavený program. Při aktivaci reverzace (tlačítkem nebo přepínací páčkou), se vždy spustí program 16
POZOR 3 Vytvoření standardního programu 6
Dbejte na minimální poloměr ohybu připojovacího kabelu šroubováku. Nedodržení může vést k poškození!!
Při stálém pohybu:
• minimální poloměr ohybu 90 mm
Při jednorázovém ohnutí:
• minimální poloměr ohybu 45 mm
Musí být zajištěno, aby během provozu na kabel nepůsobila žádná mechanická zatížení.
Pro zajištění bezpečného kontaktu, musí být navíc zajištěno, aby byl kabel pevně spojen s řízením resp. se šroubovákem.
Řízení je dodáváno společně se standardním programem vytvořeným pro vybraný šroubovák. Pro vytvoření standardních programů:
• spusťte řízení • stiskněte klávesu „m“ na řízení • přejděte do menu průběh šroubování
(Schraubablauf) (šipkou jeďte směrem dolů dokud nebude kurzor stát před menu průběh šroubování (Schraubablauf), poté stiskněte � )
• zvolte standardní programy (Standardprogramme) (šipkou směrem dolů, poté � )
• stiskněte levé funkční tlačítko (JA/ANO), pod displejem
• vytvoření standardních programů • opusťte menu (stiskněte ESC a držte stisknuté do
doby, dokud se neobjeví hlavní obrazovka) Nyní je možné provést první sešroubování.

První uvedení do provozu AST10 s 320E… ručním sroubovákem s SPS
Vytvoření spojení s počítačem 7 Nastavení notebooku a prohlížeče 9
Webové rozhraní je možné použít na jakémkoliv běžném provozním systému, jako např. Windows, Linux, OS X ..., funguje se všemi běžnými aktuálními prohlížeči. Počítač určený k zobrazení webového rozhraní může být s řízením spojen buď přímo a nebo přes společnou síť. Při přímém spojení je možné použít jak křížený tak standardní kabel; řízení samo rozpozná typ kabelu a spojení přizpůsobí. Aby bylo možné používat webové rozhraní, musí být řízení, jakož i prohlížeč nastaveny tak, aby mezi nimi mohlo být vytvořeno TCP/IP-spojení. Řízení, jakož i počítač musí mít pevnou IP-adresu (DHCP musí být na PC deaktivováno). Obě adresy se musí nacházet ve stejné podsíti(Subnet).
Prohlížeč musí mít přístup k řízení, tzn.: • musí být dosažitelná IP-adresa řízení, • nesmí být deaktivován HTTP-protokol, • event. nastavení proxy musí být pro IP-adresu
řízení (nebo lokální adresy obecně) deaktivováno. Kromě toho musí být řízením povoleny v prohlížeči cookies a musí být aktivován javascript. Které adresy jsou v konkrétním případě správné, musí být určeno příslušným IT oddělením. V případě nejasností k výše uvedeným nastavením se obraťte na Vašeho správce sítě.
Nastavení řízení 8 Nastavení IP-adresy (na příkladu Windows) 10 • Otevřete ovládací panel řízení.
• Zde otevřete „Síťová spojení“ ( „Netzwerk- und DFÜ-Verbindungen“).
• Klikněte na „LAN-spojení“ ( „LAN-Verbindung“) nebo vytvořte nové spojení.
• Vyberte bod „internetový protokol (TCP/IP)“ ( „Internetprotokoll (TCP/IP)“) a klikněte do hlavičky vlastnosti (Eigenschaften).
• Aktivujte výběr „použít následující IP-adresu“ ( „Folgende IP-Adresse verwenden“) a zapište IP-adresu, masku podsítě jakož i zbylé údaje platné pro Vaši síť. Adresa musí být jednoznačná, také řízení a počítač musí mít rozdílné adresy.
Pro případné zadání další IP-adresy klikněte na hlavičku „rozšířeno“ („Erweitert“), (např. je-li přístup počítače v jiné síti než řízení).
Nastavení prohlížeče pro Proxyserver (na příkladu Internet Exploreru)
11
Na řízení musí být nastavena správná IP-adresa. Standardně bývá zadávána správcem lokální sítě. Od výrobce je při dodání nastavena následující adresa: Adresa IP: 10.10.25.100 Maska podsítě: 255.255.0.0 Výchozí brána: 10.10.25.1
Změna IP-adresy se provádí v menu Setup -> doplňkové parametry (Zusatzparameter) -> adresy zařízení (Geräteadressen) -> Ethernet. Změna IP-adresy • stiskněte levé funkční tlačítko „Změnit?“
(„Aendern?“). • zadejte jednotlivě čtyři oddělená čísla adresy
a potvrďte klávesou � -. • zadejte jednotlivě čtyři oddělená čísla masky
podsítě a potvrďte klávesou � . • Stisknutím pravého funkčního tlačítko dojde k
potvrzení zadání. V souvislosti s touto úpravou dojde automaticky k novému spuštění systému, na displeji se objeví hlášení „AST10 reboot system ...“.
Otevřete Menu Nástroje -> Možnosti internetu -> Spojení
Klikněte do hlavičky Nastavení místní sítě -> Nastavení Je-li křížkem označeno „Použít proxyserver pro LAN“ aktivujte také bod „Nepoužívat proxyserver pro lokální adresy“, nebo klikněte v hlavičce na „Rozšířené“ a zapište adresu řízení do seznamu výjimek.
Ostatní nastavení prohlížeče: Jestliže jste deaktivovali příjem cookies, potom zvolte Nástroje -> Možnosti internetu ->Zabezpečení -> Internet -> Vlastní úroveň -> Povolit privátní webový přístup.
Nyní již lze zadáním IP-adresy řízení do adresového řádku prohlížeče spustit webové rozhraní.

První uvedení do provozu AST10 s 320E… vestavným šroubovákem s SPS
Potřebné komponenty (součástí dodávky) 1 Standardní schéma připojení
SPS 4 Řízení AST10
Šroubovák Kabel motoru
Kabel síťový
Datový (patch) kabel
Připojení komponentů 2 Standardní průběh programu 5
Základní předpoklady: • Signal high na vstup NOT-Stop – Pin 23
• Dosaďte bitový vzorek pro předvolbu programu– piny 3 - 6 (může být trvale nastaveno, je vyhodnocováno pouze při zadávání signalu pro spuštění)
Komunikace: 1. Dotaz Ready – Pin 15 high? 2. Signal high na vstup Programmstart – Pin 1 3. Dotaz OK( IO) a NOK(NIO) – Piny 13 a 14 4. Čekat na Ready – Pin 15 high 5. Signál low auf Eingang Programmstart, event.
změnit bitovou strukturu předvolby programu 6. Pokračovat podle bodu 1 – nový cyklus šroubování
Spuštěním programu se signál Ready jakož i OK (IO)/NOK (NIO) na LOW-úroveň. Následující high-úroveň OK (IO) resp. NOK (NIO) signalizuje konec cyklu šroubování.
POZOR 3 Vytvoření standardního programu 6
Dbejte na minimální poloměr ohybu připojovacího kabelu šroubováku. Nedodržení může vést k poškození!
Při stálém pohybu:
• minimální poloměr ohybu 90 mm
Při jednorázovém ohnutí:
• minimální poloměr ohybu 45 mm
Musí být zajištěno, aby během provozu na kabel nepůsobila žádná mechanická zatížení.
Pro zajištění bezpečného kontaktu, musí být navíc zajištěno, aby byl kabel pevně spojen s řízením resp. se šroubovákem.
Řízení je dodáváno společně se standardním programem vytvořeným pro vybraný šroubovák. Pro vytvoření standardních programů:
• spusťte řízení • stiskněte klávesu „m“ na řízení • přejděte do menu průběh šroubování
(Schraubablauf) (šipkou jeďte směrem dolů dokud nebude kurzor stát před menu průběh šroubování (Schraubablauf), poté stiskněte � )
• zvolte standardní programy (Standardprogramme) (šipkou směrem dolů, poté � )
• stiskněte levé funkční tlačítko (JA/ANO), pod displejem
• vytvoření standardních programů • opusťte menu (stiskněte ESC a držte stisknuté do
doby, dokud se neobjeví hlavní obrazovka) Nyní je možné provést první sešroubování.

První uvedení do provozu AST10 s 320E… vestavným šroubovákem s SPS
Vytvoření spojení s počítačem 7 Nastavení notebooku a prohlížeče 9
Webové rozhraní je možné použít na jakémkoliv běžném provozním systému, jako např. Windows, Linux, OS X ..., funguje se všemi běžnými aktuálními prohlížeči. Počítač určený k zobrazení webového rozhraní může být s řízením spojen buď přímo a nebo přes společnou síť. Při přímém spojení je možné použít jak křížený tak standardní kabel; řízení samo rozpozná typ kabelu a spojení přizpůsobí. Aby bylo možné používat webové rozhraní, musí být řízení, jakož i prohlížeč nastaveny tak, aby mezi nimi mohlo být vytvořeno TCP/IP-spojení. Řízení, jakož i počítač musí mít pevnou IP-adresu (DHCP musí být na PC deaktivováno). Obě adresy se musí nacházet ve stejné podsíti(Subnet).
Prohlížeč musí mít přístup k řízení, tzn.: • musí být dosažitelná IP-adresa řízení, • nesmí být deaktivován HTTP-protokol, • event. nastavení proxy musí být pro IP-adresu
řízení (nebo lokální adresy obecně) deaktivováno. Kromě toho musí být řízením povoleny v prohlížeči cookies a musí být aktivován javascript. Které adresy jsou v konkrétním případě správné, musí být určeno příslušným IT oddělením. V případě nejasností k výše uvedeným nastavením se obraťte na Vašeho správce sítě.
Nastavení řízení 8 Nastavení IP-adresy (na příkladu Windows) 10 • Otevřete ovládací panel řízení.
• Zde otevřete „Síťová spojení“ ( „Netzwerk- und DFÜ-Verbindungen“).
• Klikněte na „LAN-spojení“ ( „LAN-Verbindung“) nebo vytvořte nové spojení.
• Vyberte bod „internetový protokol (TCP/IP)“ ( „Internetprotokoll (TCP/IP)“) a klikněte do hlavičky vlastnosti (Eigenschaften).
• Aktivujte výběr „použít následující IP-adresu“ ( „Folgende IP-Adresse verwenden“) a zapište IP-adresu, masku podsítě jakož i zbylé údaje platné pro Vaši síť. Adresa musí být jednoznačná, také řízení a počítač musí mít rozdílné adresy.
Pro případné zadání další IP-adresy klikněte na hlavičku „rozšířeno“ („Erweitert“), (např. je-li přístup počítače v jiné síti než řízení). Nastavení prohlížeče pro Proxyserver (na příkladu Internet Exploreru)
11
Na řízení musí být nastavena správná IP-adresa. Standardně bývá zadávána správcem lokální sítě. Od výrobce je při dodání nastavena následující adresa: Adresa IP: 10.10.25.100 Maska podsítě: 255.255.0.0 Výchozí brána: 10.10.25.1
Změna IP-adresy se provádí v menu Setup -> doplňkové parametry (Zusatzparameter) -> adresy zařízení (Geräteadressen) -> Ethernet. Změna IP-adresy • stiskněte levé funkční tlačítko „Změnit?“
(„Aendern?“). • zadejte jednotlivě čtyři oddělená čísla adresy
a potvrďte klávesou � -. • zadejte jednotlivě čtyři oddělená čísla masky
podsítě a potvrďte klávesou � . • Stisknutím pravého funkčního tlačítko dojde k
potvrzení zadání. V souvislosti s touto úpravou dojde automaticky k novému spuštění systému, na displeji se objeví hlášení „AST10 reboot system ...“.
Otevřete Menu Nástroje -> Možnosti internetu -> Spojení
Klikněte do hlavičky Nastavení místní sítě -> Nastavení Je-li křížkem označeno „Použít proxy server pro LAN“ aktivujte také bod „Nepoužívat proxy server pro lokální adresy“, nebo klikněte v hlavičce na „Rozšířené“ a zapište adresu řízení do seznamu výjimek.
Ostatní nastavení prohlížeče: Jestliže jste deaktivovali příjem cookies, potom zvolte Nástroje -> Možnosti internetu ->Zabezpečení -> Internet -> Vlastní úroveň -> Povolit privátní webový přístup.
Nyní již lze zadáním IP-adresy řízení do adresového řádku prohlížeče spustit webové rozhraní.

Die vollständige Anleitung kann über die Web-Oberfläche in der Steuerung eingesehen werden. The complete instructions are available via the controller’s web-interface. Kompletní návod naleznete na webovém rozhranní řízení.
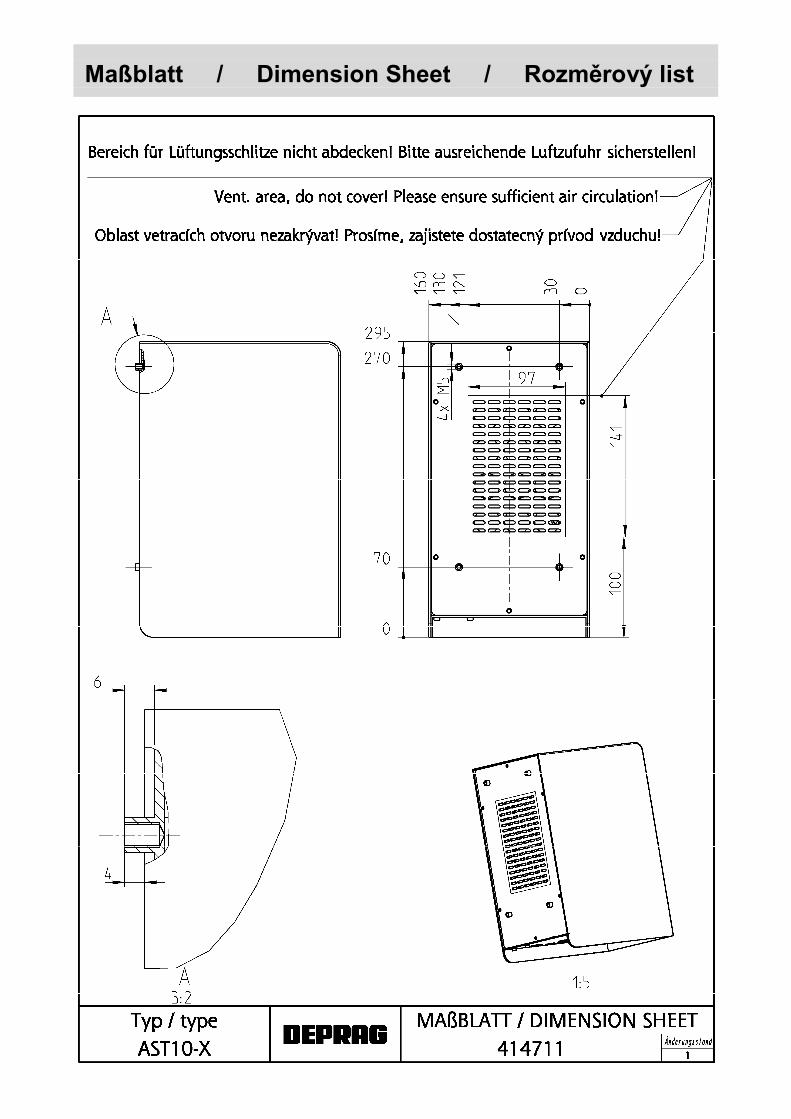
Maßblatt / Dimension Sheet / Rozměrový list


DEPRAG SCHULZ GMBH u. CO. Postfach 1352, D-92203 Amberg Kurfürstenring 12-18, D-92224 Amberg � (09621) 371-0 Fax (09621) 371-120 Internet: http://www.deprag.com e-mail: [email protected]
Okt
-10
Ände
rung
en
und I
rrtü
mer
vorb
eh
alte
n /
Tech
nic
al a
ltera
tions
and e
rrors
re
serv
ed /
Zm
ěn
y vy
hra
zeny