Installation INDUSBADPETH (Ethernet-Modul) INDUSBADPRS232 ... · Installation INDUSBADPETH...
34
Installation INDUSBADPETH (Ethernet-Modul) INDUSBADPRS232 (Serielles-Modul) © QUANCOM Informationssysteme GmbH
Transcript of Installation INDUSBADPETH (Ethernet-Modul) INDUSBADPRS232 ... · Installation INDUSBADPETH...

InstallationINDUSBADPETH(Ethernet-Modul)
INDUSBADPRS232(Serielles-Modul)
© QUANCOM Informationssysteme GmbH

Copyright © QUANCOM Informationssysteme GmbHAlle Angaben in diesem Handbuch sind nach sorgfältiger Prüfung zusammengestellt worden, gelten jedoch nichtals Zusicherung von Produkteigenschaften. QUANCOM haftet ausschließlich in dem Umfang, der in denVerkaufs- und Lieferbedingungen festgelegt ist. Weitergabe und Vervielfältigung dieses Handbuches und dieVerwertung seines Inhaltes sowie der zum Produkt gehörenden Software sind nur mit schriftlicher Erlaubnis vonQUANCOM gestattet. Änderungen, die dem technischen Fortschritt dienen, bleiben vorbehalten.
Wesseling, April 2009 Version 4.1.0

Installation INDUSBADPETH (Ethernet-Modul) INDUSBADPRS232 (Serielles-Modul)
© QUANCOM Informationssysteme GmbH
InhaltsverzeichnisKapitel I Overview 1
....................................................................................................................................11 Introduction
....................................................................................................................................12 Our experience is your profit
....................................................................................................................................13 Customer Communication
....................................................................................................................................24 Changes in this manual and software updates
....................................................................................................................................25 Extend of Delivery
Kapitel II Technische Hardware Beschreibung 3
....................................................................................................................................31 Board Overview
....................................................................................................................................42 System requirements
....................................................................................................................................43 Safety precautions
....................................................................................................................................54 Installation of the Ethernet Measuring module
Kapitel III Including of the Ethernet Module 6
....................................................................................................................................61 Installation of the Ethernet Communication software
...........................................................................................................................................................6Installation of QLIB
...........................................................................................................................................................6Installation of the drivers for the Ethernet Module
....................................................................................................................................92 Configuration of the Module
...........................................................................................................................................................10Perepare the Module for Configuration
...........................................................................................................................................................12Network attitudes
...........................................................................................................................................................12Important Communication attitudes
....................................................................................................................................133 Configuration of the virtuell COM Pots
...........................................................................................................................................................13The VSP Manager
...........................................................................................................................................................14Configuration per VSP Manager
...........................................................................................................................................................15IP-Address for the virtuell COM-Port
....................................................................................................................................164 Including the Ethernet-Module in the QLIB
...........................................................................................................................................................16Including the Ethernet-Module in the QLIB
Kapitel IV Including the Serial-Modules in QLIB 18
....................................................................................................................................181 Installation of the serials Measuring module
....................................................................................................................................192 Serial Interface
....................................................................................................................................193 Including the Serial-Module in QLIB
Kapitel V Annex 21
....................................................................................................................................211 Frequently asked questions (FAQ)
...........................................................................................................................................................21General informations
...........................................................................................................................................................22Problems with boards running under Windows Me/98/95 and Windows XP/2000/NT
....................................................................................................................................242 Customer Communication and Help
....................................................................................................................................273 Technical support form
....................................................................................................................................284 Hardware and software configuration form
....................................................................................................................................295 Documentation comment form
....................................................................................................................................306 Trademarks

Inhalt
© QUANCOM Informationssysteme GmbH

Installation INDUSBADPETH (Ethernet-Modul) INDUSBADPRS232 (Serielles-Modul) 1
© QUANCOM Informationssysteme GmbH
1. Overview
1.1 Introduction
We congratulate you on buying the QUANCOM high quality measurement and automation
board. You have chosen a product which attributes and functions show the latest updates of
technology.
The following special attributes are included:
Features of the board:
· Various sample programs in different programming languages
· Driver support under Windows Vista/XP/2000/NT4 and ME/98/95 with QLIB (QUANCOM
Driver Library)
1.2 Our experience is your profit
QUANCOM is specialised in development of hard- and software. QUANCOM has become
one of the leading suppliers of measuring and automation technology in industry. At its
design centres QUANCOM has developed an impressive range of products.
1.3 Customer Communication
QUANCOM wants to receive your comments on our products and manuals. We are
interested in the applications you develop with our products, and we want to help you if you
have problems with them. For easy contacting, this manual contains comment and
configuration forms for you to complete, which are in chapter ”Customer Communication
and Help” at the end of this manual.

Overview 2
© QUANCOM Informationssysteme GmbH
1.4 Changes in this manual and software updates
QUANCOM - products are marked out by their constant further development. You can watch
all the actual information of the changes in the README-file on the installation disk or CD.
You can always get more information and free software updates from our internet website.
www.quancom.de
1.5 Extend of Delivery
• Ethernet- / Serial -Module
• User's manual on CD
• QUANCOM CD
If a component is missing please contact your dealer. QUANCOM reserves the right to
change the extent of delivery without a preliminary announcement.

Installation INDUSBADPETH (Ethernet-Modul) INDUSBADPRS232 (Serielles-Modul) 3
© QUANCOM Informationssysteme GmbH
2. Technische Hardware Beschreibung
2.1 Board Overview
INDUSBADPETH INDUSBADPRS232
Technische Hardware Beschreibung 4
© QUANCOM Informationssysteme GmbH
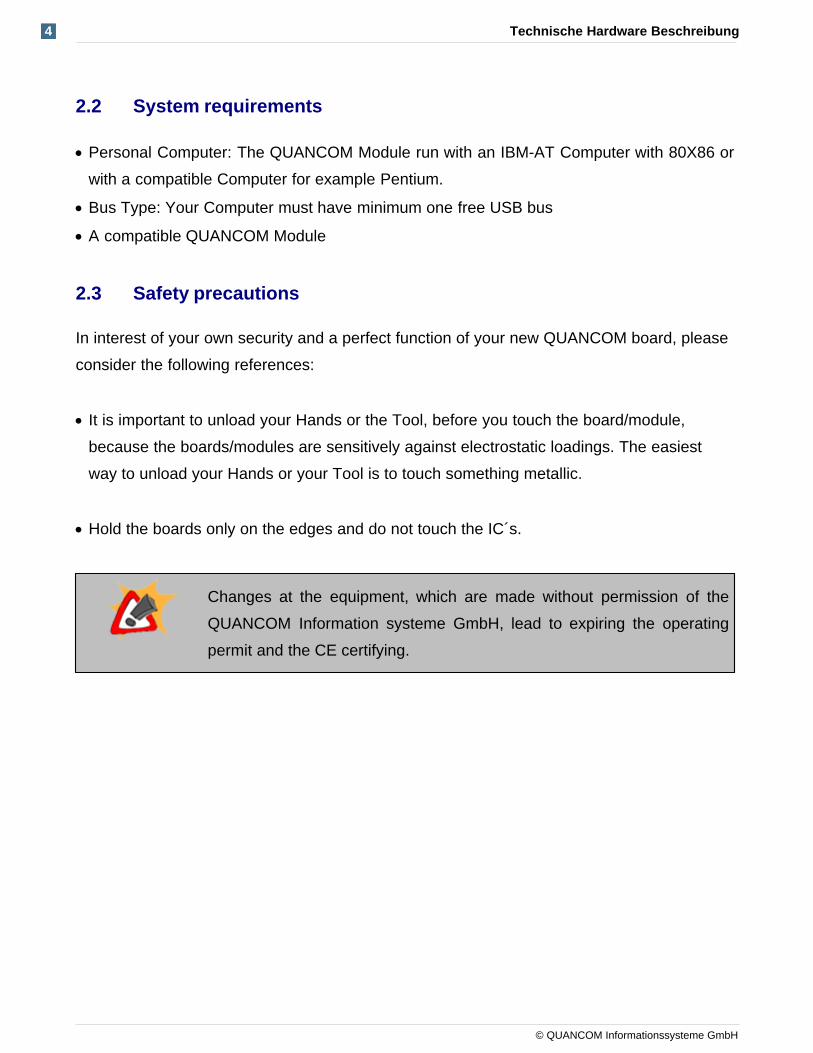
2.2 System requirements
· Personal Computer: The QUANCOM Module run with an IBM-AT Computer with 80X86 or
with a compatible Computer for example Pentium.
· Bus Type: Your Computer must have minimum one free USB bus
· A compatible QUANCOM Module
2.3 Safety precautions
In interest of your own security and a perfect function of your new QUANCOM board, please
consider the following references:
· It is important to unload your Hands or the Tool, before you touch the board/module,
because the boards/modules are sensitively against electrostatic loadings. The easiest
way to unload your Hands or your Tool is to touch something metallic.
· Hold the boards only on the edges and do not touch the IC´s.
Changes at the equipment, which are made without permission of the
QUANCOM Information systeme GmbH, lead to expiring the operating
permit and the CE certifying.

Installation INDUSBADPETH (Ethernet-Modul) INDUSBADPRS232 (Serielles-Modul) 5
© QUANCOM Informationssysteme GmbH
2.4 Installation of the Ethernet Measuring module
a
a
Connect the Ethernet / Serial module with your USB-Measuring module.
Pay attention to, that the 8 pole plug connector must set without larger pressure on the
properly matching socket.
After engaging the Ethernet / Serial module is firmly connected with the USB-Measuring
module.
Technische Hardware Beschreibung 6
© QUANCOM Informationssysteme GmbH
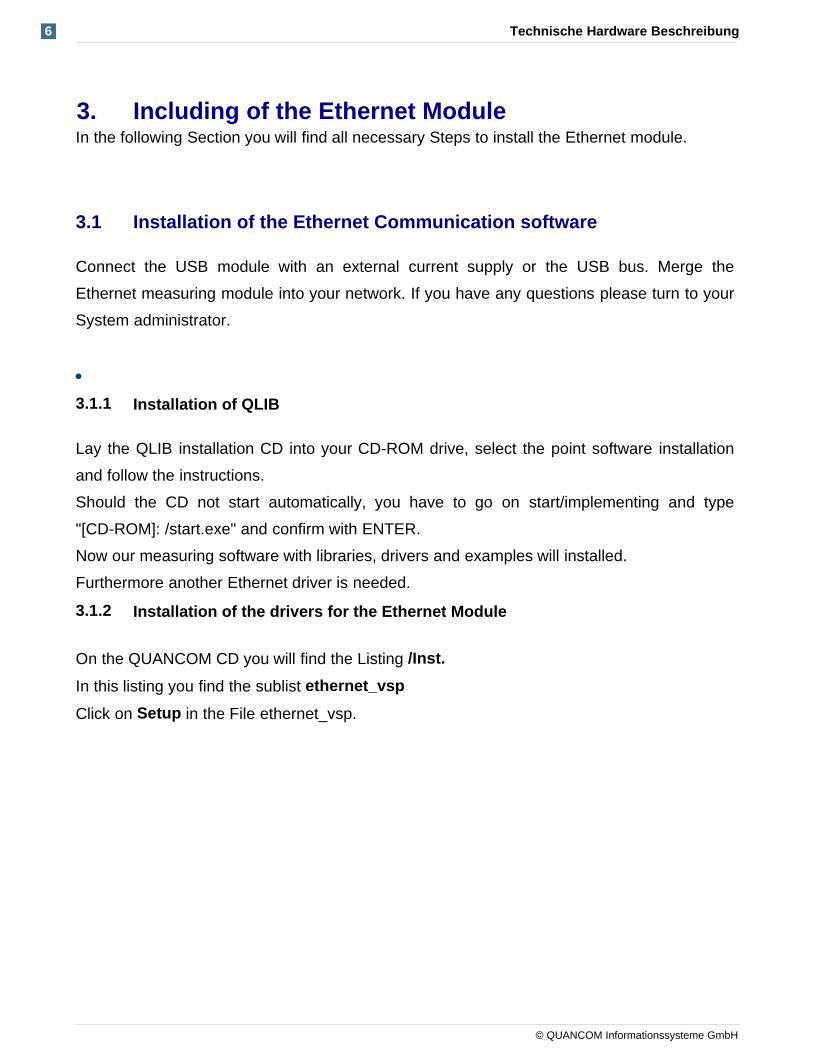
3. Including of the Ethernet ModuleIn the following Section you will find all necessary Steps to install the Ethernet module.
3.1 Installation of the Ethernet Communication software
Connect the USB module with an external current supply or the USB bus. Merge the
Ethernet measuring module into your network. If you have any questions please turn to your
System administrator.
·
3.1.1 Installation of QLIB
Lay the QLIB installation CD into your CD-ROM drive, select the point software installation
and follow the instructions.
Should the CD not start automatically, you have to go on start/implementing and type
"[CD-ROM]: /start.exe" and confirm with ENTER.
Now our measuring software with libraries, drivers and examples will installed.
Furthermore another Ethernet driver is needed.
3.1.2 Installation of the drivers for the Ethernet Module
a
On the QUANCOM CD you will find the Listing /Inst.
In this listing you find the sublist ethernet_vsp
Click on Setup in the File ethernet_vsp.
Installation INDUSBADPETH (Ethernet-Modul) INDUSBADPRS232 (Serielles-Modul) 7
© QUANCOM Informationssysteme GmbH
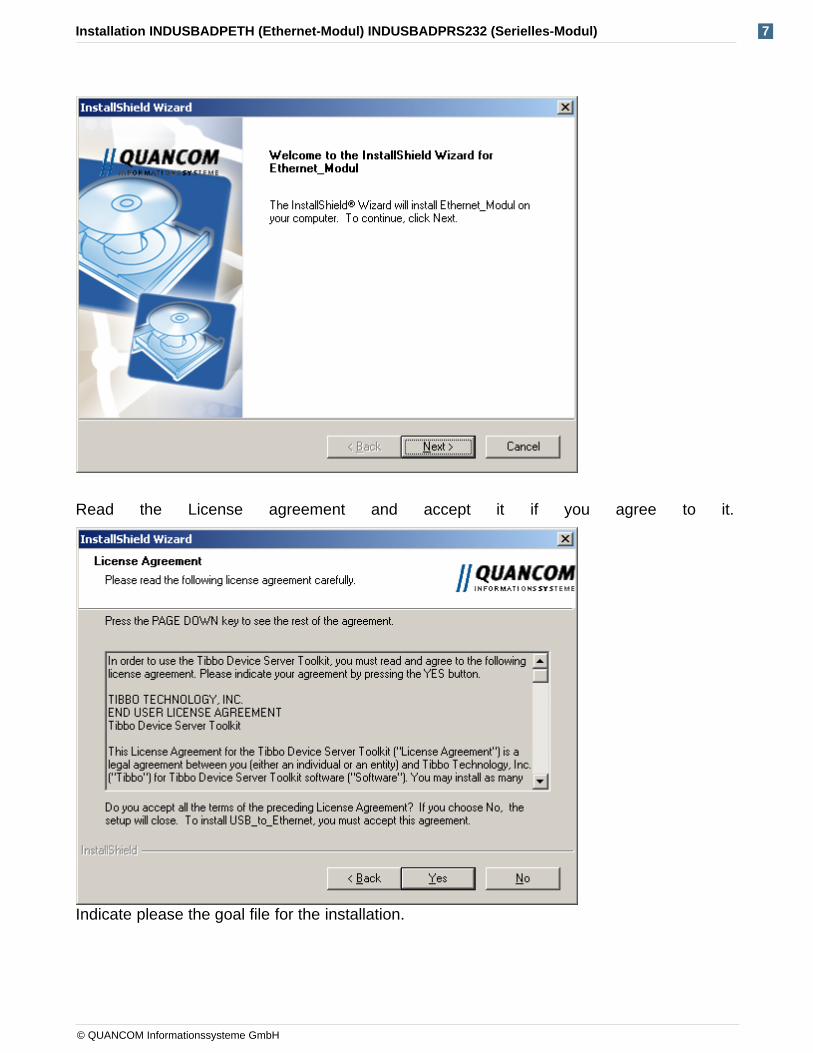
Read the License agreement and accept it if you agree to it.
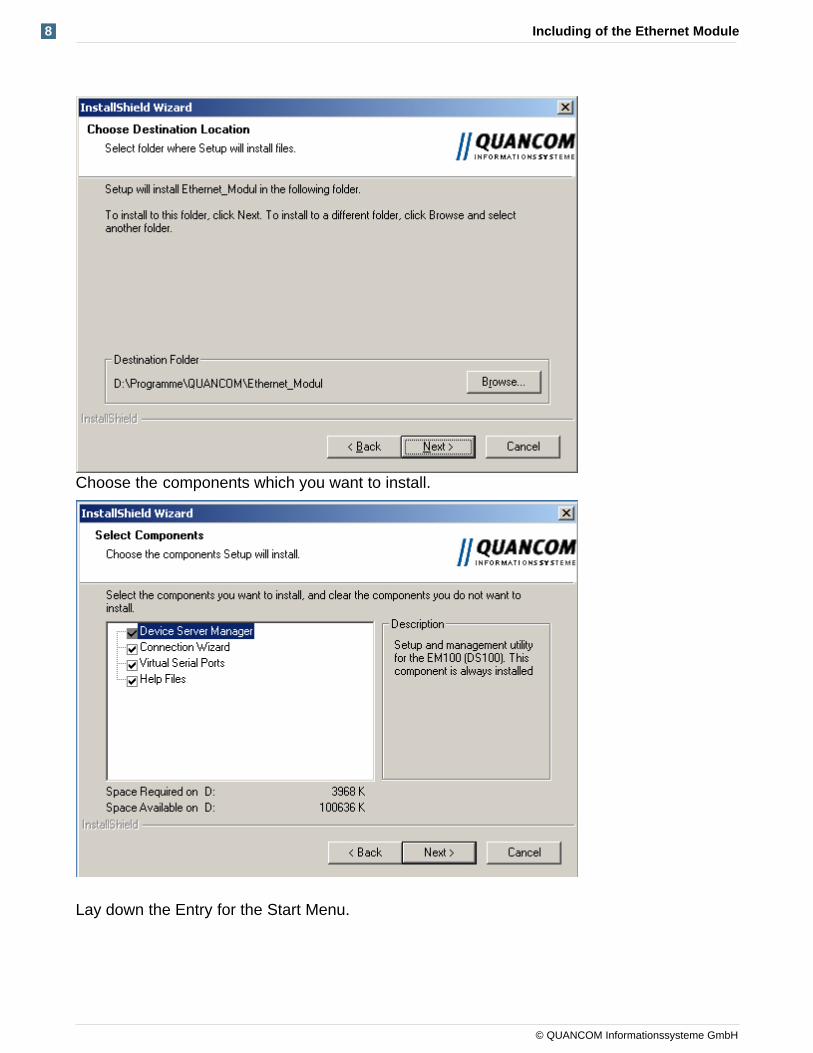
Indicate please the goal file for the installation.
Including of the Ethernet Module 8
© QUANCOM Informationssysteme GmbH
Choose the components which you want to install.
Lay down the Entry for the Start Menu.

Installation INDUSBADPETH (Ethernet-Modul) INDUSBADPRS232 (Serielles-Modul) 9
© QUANCOM Informationssysteme GmbH
Finish the Installation.
3.2 Configuration of the Module
With this, the module will be configured with the Network interface of the PC.

Including of the Ethernet Module 10
© QUANCOM Informationssysteme GmbH
3.2.1 Perepare the Module for Configuration
Start now the DS manager, over the entry in the starting menu.
With the DS Manager the Ethernet-Measuring module will be searched.

Installation INDUSBADPETH (Ethernet-Modul) INDUSBADPRS232 (Serielles-Modul) 11
© QUANCOM Informationssysteme GmbH
In the DS Manager you can search the module when you click on the Refresh Button.
Is the module found, you get with Settings Button in the Configuration Mode.
Including of the Ethernet Module 12
© QUANCOM Informationssysteme GmbH
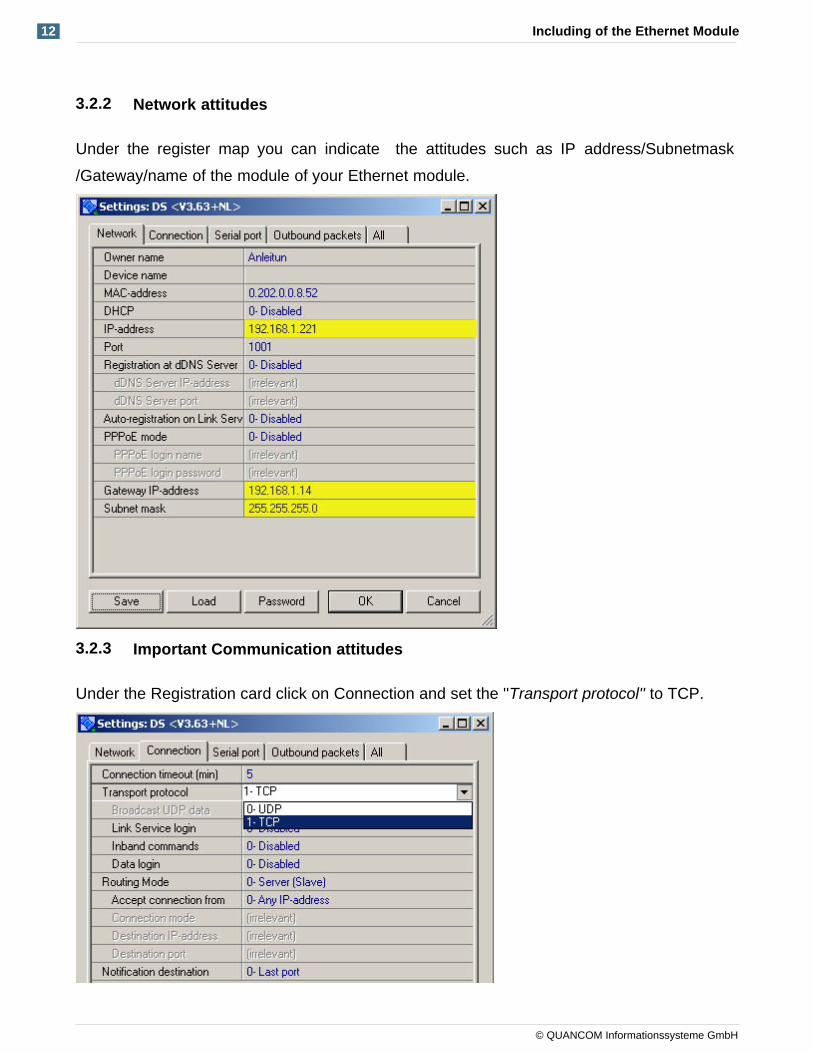
3.2.2 Network attitudes
Under the register map you can indicate the attitudes such as IP address/Subnetmask
/Gateway/name of the module of your Ethernet module.
3.2.3 Important Communication attitudes
Under the Registration card click on Connection and set the ''Transport protocol'' to TCP.
Installation INDUSBADPETH (Ethernet-Modul) INDUSBADPRS232 (Serielles-Modul) 13
© QUANCOM Informationssysteme GmbH
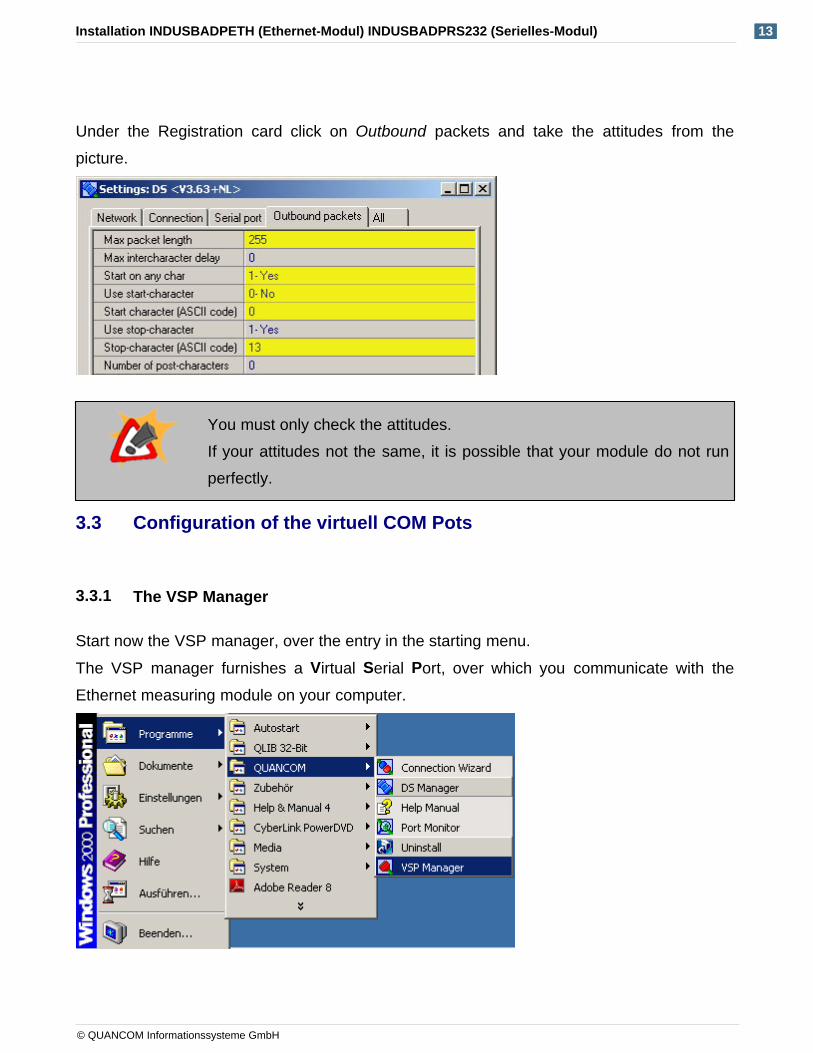
Under the Registration card click on Outbound packets and take the attitudes from the
picture.
You must only check the attitudes.
If your attitudes not the same, it is possible that your module do not run
perfectly.
3.3 Configuration of the virtuell COM Pots
3.3.1 The VSP Manager
Start now the VSP manager, over the entry in the starting menu.
The VSP manager furnishes a Virtual Serial Port, over which you communicate with the
Ethernet measuring module on your computer.
Including of the Ethernet Module 14
© QUANCOM Informationssysteme GmbH
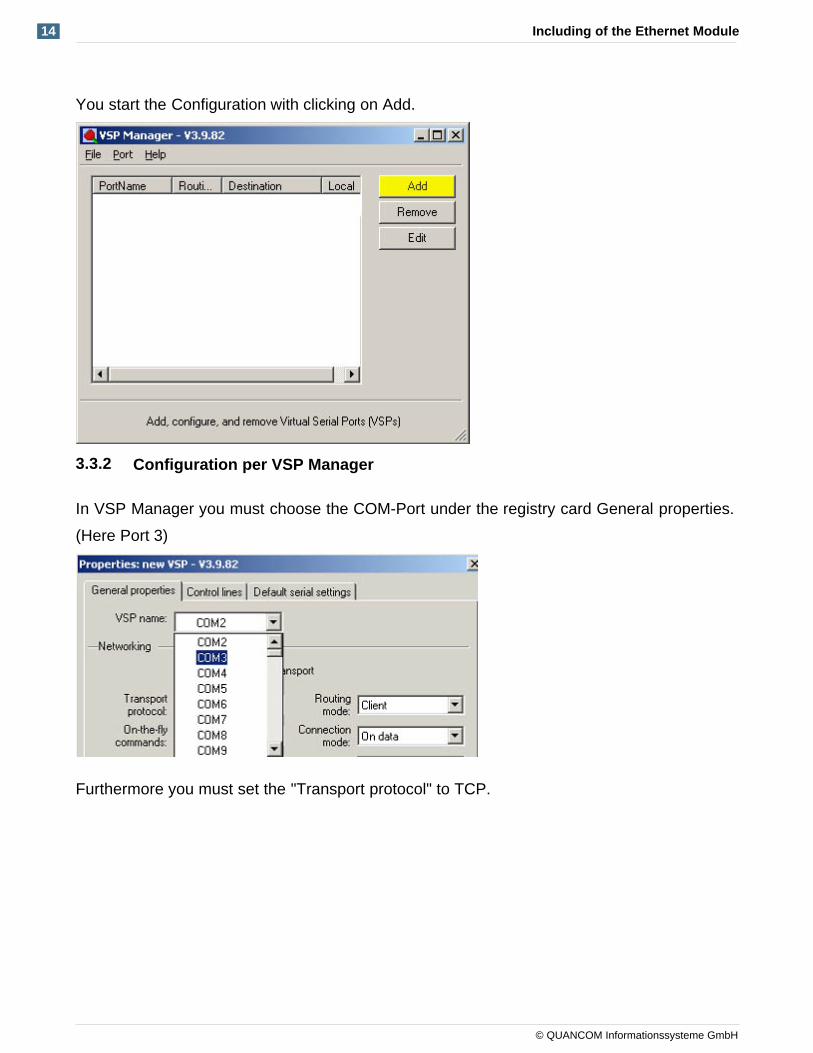
You start the Configuration with clicking on Add.
3.3.2 Configuration per VSP Manager
In VSP Manager you must choose the COM-Port under the registry card General properties.
(Here Port 3)
Furthermore you must set the "Transport protocol" to TCP.

Installation INDUSBADPETH (Ethernet-Modul) INDUSBADPRS232 (Serielles-Modul) 15
© QUANCOM Informationssysteme GmbH
3.3.3 IP-Address for the virtuell COM-Port
In the lower part of General properties you must type in your IP of your Ethernet module.
The equipment should be able to be merged in your local network you can select it over the
Button “Select Device server from the list.”
The Ethernet module should have to be in another network you have to enter the IP of the
module by hand.
At the end the module is shown in the VSP Manager.

Including of the Ethernet Module 16
© QUANCOM Informationssysteme GmbH
3.4 Including the Ethernet-Module in the QLIB
3.4.1 Including the Ethernet-Module in the QLIB
Start the QLIB 32-Bit Configurations utility, over the entry in the starting menu.
You need this step to connect the virtual serial port with the QLIB.
Register under the registry map board manager you Ethernet module.

Installation INDUSBADPETH (Ethernet-Modul) INDUSBADPRS232 (Serielles-Modul) 17
© QUANCOM Informationssysteme GmbH
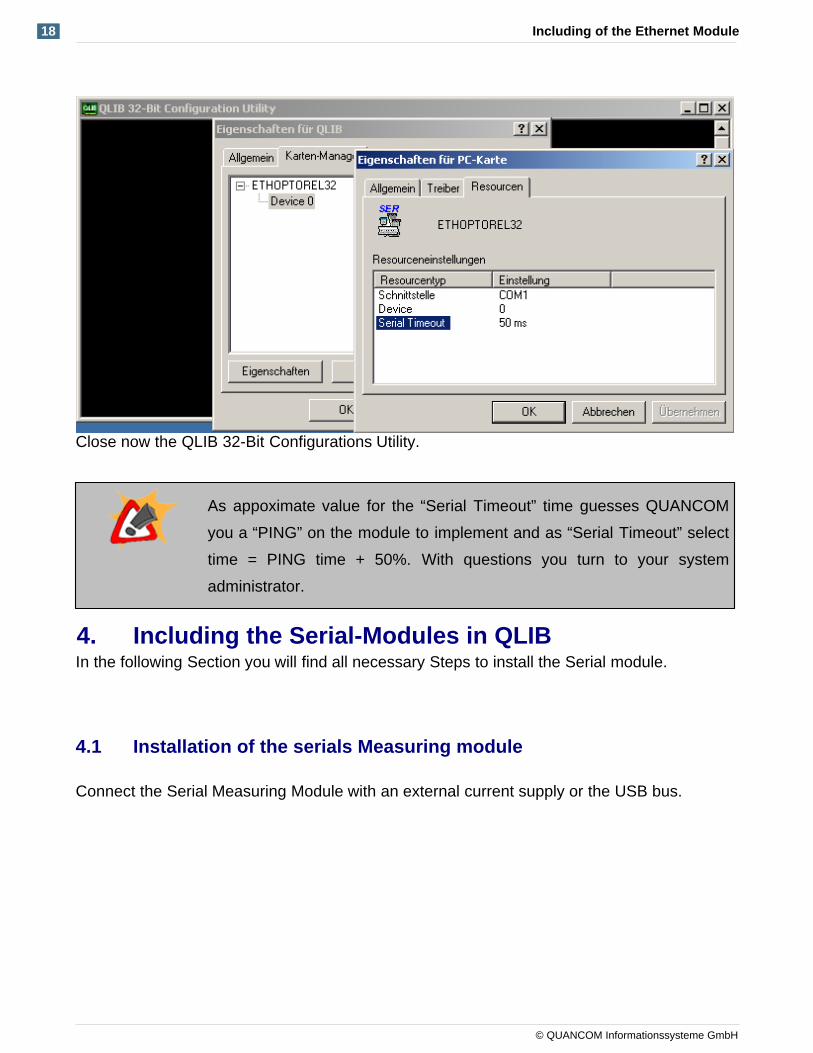
After this you must choose the Interface from VSP manager.
Adjust the desired “Serial Timeout” time. The “Serial Timeout” time indicates the time, which
may offense between sending an instruction and the receipt by the module maximally.
Including of the Ethernet Module 18
© QUANCOM Informationssysteme GmbH
Close now the QLIB 32-Bit Configurations Utility.
As appoximate value for the “Serial Timeout” time guesses QUANCOM
you a “PING” on the module to implement and as “Serial Timeout” select
time = PING time + 50%. With questions you turn to your system
administrator.
4. Including the Serial-Modules in QLIBIn the following Section you will find all necessary Steps to install the Serial module.
4.1 Installation of the serials Measuring module
Connect the Serial Measuring Module with an external current supply or the USB bus.
Installation INDUSBADPETH (Ethernet-Modul) INDUSBADPRS232 (Serielles-Modul) 19
© QUANCOM Informationssysteme GmbH
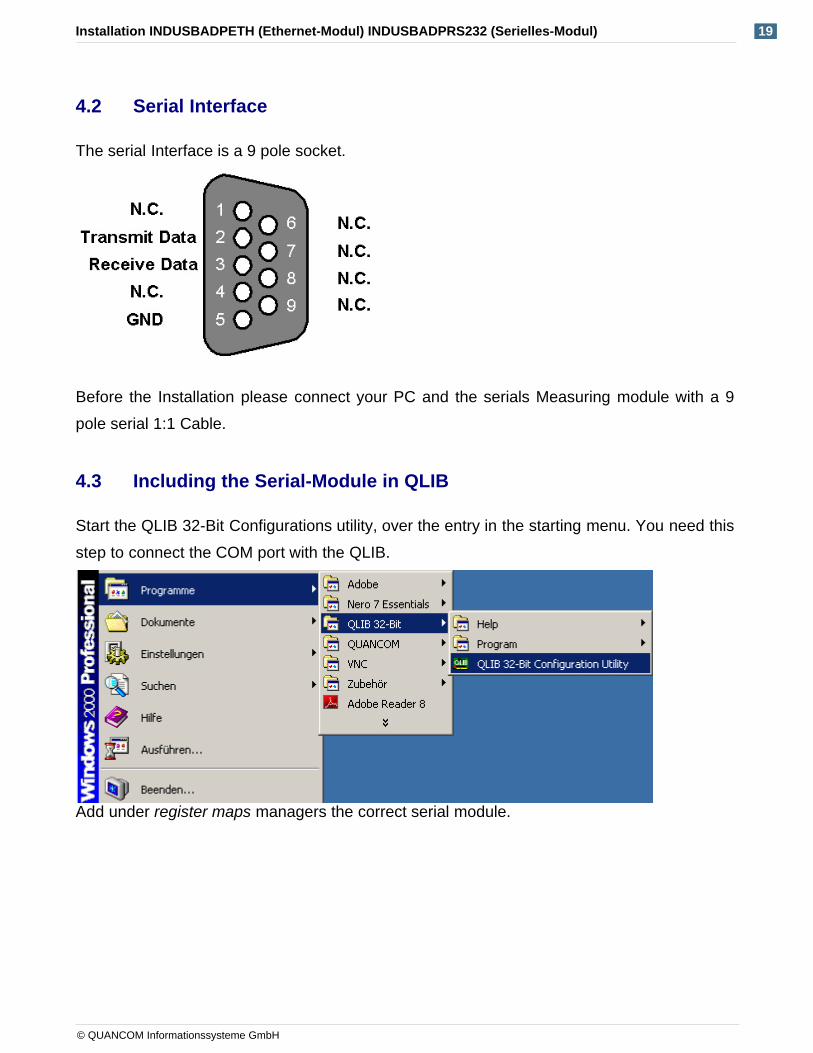
4.2 Serial Interface
The serial Interface is a 9 pole socket.
Before the Installation please connect your PC and the serials Measuring module with a 9
pole serial 1:1 Cable.
4.3 Including the Serial-Module in QLIB
Start the QLIB 32-Bit Configurations utility, over the entry in the starting menu. You need this
step to connect the COM port with the QLIB.
Add under register maps managers the correct serial module.

Including the Serial-Modules in QLIB 20
© QUANCOM Informationssysteme GmbH
Select afterwards the COM interface, with which you connected the serial measuring
module. If you have any questions you have to turn to your system administrator.
Adjust the desired "Serial Timeout".

Installation INDUSBADPETH (Ethernet-Modul) INDUSBADPRS232 (Serielles-Modul) 21
© QUANCOM Informationssysteme GmbH
Close now the QLIB 32-Bit Configurations Utility.
The "Serial Timeout" TIme should be adjusted moderately to 50ms.
5. Annex
5.1 Frequently asked questions (FAQ)
5.1.1 General informations
Can i get any Problems if i have other boards in my PC?
Yes, it is dependent on which I/O addresses the QUANCOM board and the others lies.

Annex 22
© QUANCOM Informationssysteme GmbH
Resource conflicts can occur, if several devices use the same I/O address. Either you
change the address of the QUANCOM map or the address of the other component.
5.1.2 Problems with boards running under Windows Me/98/95 and WindowsXP/2000/NT
Why is the ”Control Panel” board configuration dialog ”QLIB” empty?
• There is no QUANCOM PCI board in the system.
• There are no drivers installed for a QUANCOM ISA board.
I get the message ”QLIBNDRV.SYS not found ”or ”QLIBNDRV.VXD not found”after installation. What can I do?
• Check that the QLIB is installed properly. For further information about the
installation process and the general programming with the QLIB please see the
“QLIB” manual which is included on the installation CD.
• If you use a QUANCOM ISA board check if the drivers for the QUANCOM
board are installed.
Why do I get the message "Driver QLIBNDRV.SYS” or ”DriverQLIBNDRV.VXD” could not be load?
• Check that the QLIB is installed properly. For further information about the
installation process and the general programming with the QLIB please read the
“QLIB” manual which is included on the installation CD.
• The driver for the QUANCOM board was not loaded. (Control Panel =>
System )
Windows XP/2000/NT: Why do I get the message ”Driver could not beinstalled” during the installation?
• The driver’s installation has failed, because the QLIB was not installed with
administration-rights.
• QLIB-Software was installed on a network drive. Always install the QLIB on
your local drive.
Why do I have to restart the driver after every reboot?
· The starting type of the driver is set to ”Manual”. If you wanted to you are able
change this setting on “Automatic” to start the driver on every reboot of the
system.

Installation INDUSBADPETH (Ethernet-Modul) INDUSBADPRS232 (Serielles-Modul) 23
© QUANCOM Informationssysteme GmbH
Windows XP/2000/NT: How can I manually install the driverQLIBNDRV.SYS?
If the QLIBNDRV.SYS failed to install, it may be necessary to install the driver
manually.
Please take the following steps to install the driver manually:
• Search on the installation CD ”Tools” for the tool instdrv.exe in the directory.
With this tool you can install and de-install the driver manually.
• Please call this tool with the following command line parameters:
instdrv libndrv d:\directory\qlibndrv.sys .
(Replace d:\directory with the drive, where the driver qlibndrv.sys is located.)
• Go to ”Start -> Settings ->Control panel ->(Administrative Tools / Windows
2000 only) -> Drivers” change the start type to ”Automatic”, then click on
the ”Start” button. Please restart the system for the changes to become
active.

Annex 24
© QUANCOM Informationssysteme GmbH
5.2 Customer Communication and Help
Did you need help? If you don’t know how to go on during the installation
or operation of your QUANCOM board please
consult this user’s guide first.
! Tip ! You can find an ASCII – text – file README.TXT,
which includes changes made after printing of this
user’s manual on the QUANCOM installation CD.
! Important ! Informationen bereit:If you have further questions
please contact our support team. For this case
please prepare the following information:
· Exact type of the board.
· Version of the driver
· Version of the QLIB
· Operating system, hardware equipment and bus -
system
· Name and version of the program, which reports the
failure
· A detailed failure description. To make sure, please
try to reproduce the failure, and describe exactly,
which steps led to this failure.
Contact?
The QUANCOM internet website
www.quancom.de
Per Fax

Installation INDUSBADPETH (Ethernet-Modul) INDUSBADPRS232 (Serielles-Modul) 25
© QUANCOM Informationssysteme GmbH
+49 22 36 / 89 92 - 49
Per E-Mail:
Address:
QUANCOM INFORMATIONSSYSTEME GmbH
In der Flecht 14
50389 Wesseling
Germany
If you need urgent help call:
QUANCOM Hotline Germany
0 22 36 / 89 92 - 20
Monday-Thursday
from 9:00 to 18:00
Friday
from 9:00 to 17:00

Annex 26
© QUANCOM Informationssysteme GmbH
Actual drivers
You can find the latest version of QUANCOM
software on our internet website www.quancom.de.
You can also find a lot of information and "
Frequently asked questions (FAQ's)" there.,
please check if you are using the latest software
version of the QUANCOM software before
contacting the QUANCOM support.
Repair
If you are not sure whether your QUANCOM board is
defective please call the QUANCOM Hotline:
Tel.: +49 22 36 / 89 92 – 20
Before sending us the QUANCOM board to be
repaired call:
Tel.: +49 22 36 / 89 92 – 20
If you send your QUANCOM board to us, please use
original package or any other suitable package, to
protect the contents against transport damage. You
also need to send us a copy of the original bill and
the RMA number.
You can shorten the repair time by sending us an
exact failure description, so that a faster failure
search is possible. Send your QUANCOM board
directly to the service department of QUANCOM
Informations-systeme GmbH.
Installation INDUSBADPETH (Ethernet-Modul) INDUSBADPRS232 (Serielles-Modul) 27
© QUANCOM Informationssysteme GmbH
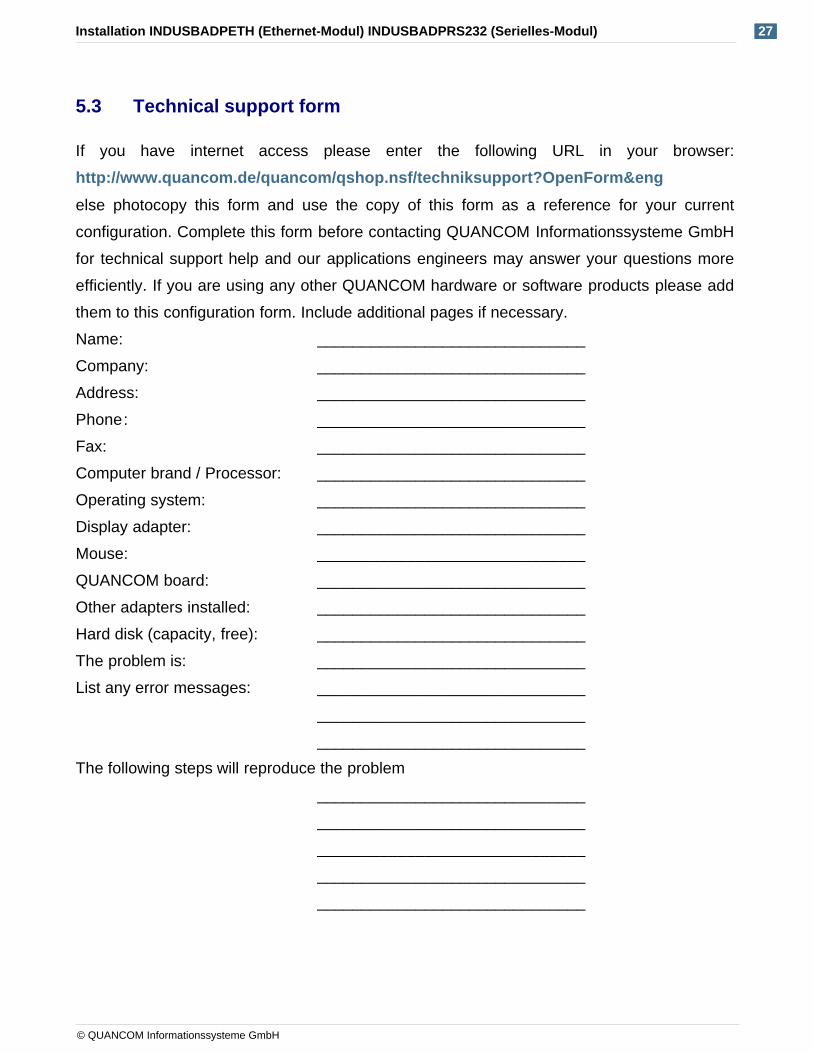
5.3 Technical support form
If you have internet access please enter the following URL in your browser:
http://www.quancom.de/quancom/qshop.nsf/techniksupport?OpenForm&eng
else photocopy this form and use the copy of this form as a reference for your current
configuration. Complete this form before contacting QUANCOM Informationssysteme GmbH
for technical support help and our applications engineers may answer your questions more
efficiently. If you are using any other QUANCOM hardware or software products please add
them to this configuration form. Include additional pages if necessary.
Name:
Company:
Address:
Phone:
Fax:
Computer brand / Processor:
Operating system:
Display adapter:
Mouse:
QUANCOM board:
Other adapters installed:
Hard disk (capacity, free):
The problem is:
List any error messages:
______________________________
______________________________
______________________________
______________________________
______________________________
______________________________
______________________________
______________________________
______________________________
______________________________
______________________________
______________________________
______________________________
______________________________
______________________________
______________________________
The following steps will reproduce the problem
______________________________
______________________________
______________________________
______________________________
______________________________
Annex 28
© QUANCOM Informationssysteme GmbH
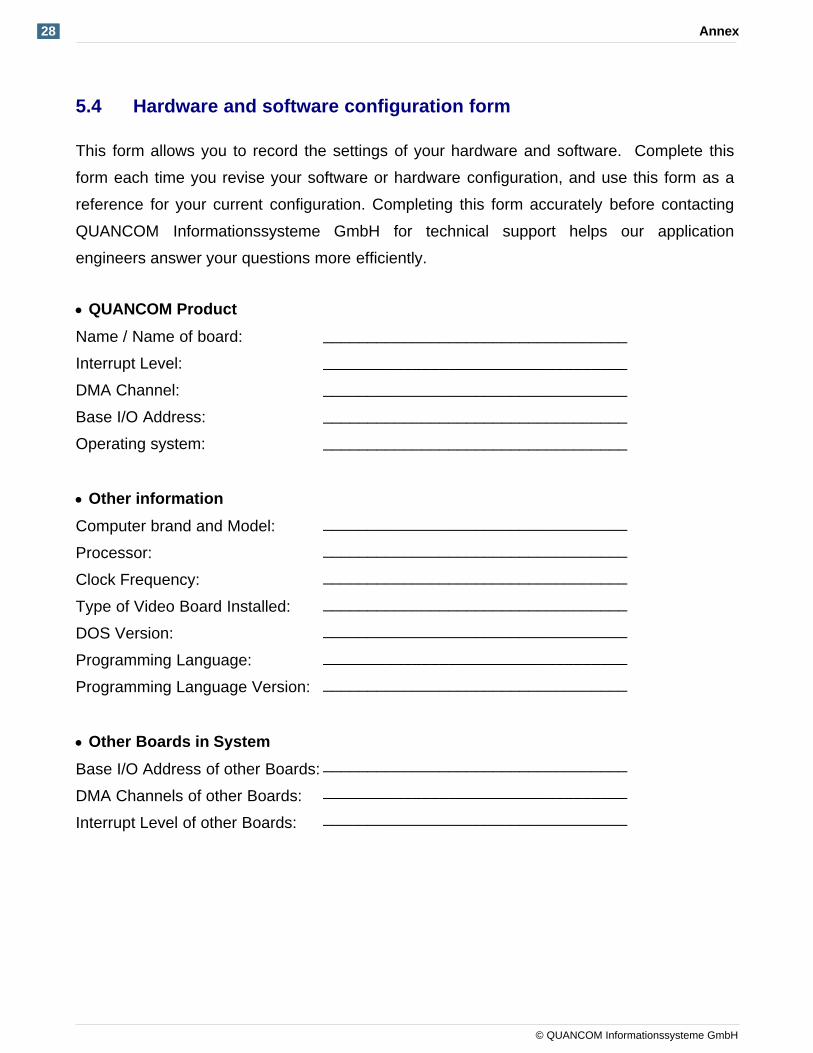
5.4 Hardware and software configuration form
This form allows you to record the settings of your hardware and software. Complete this
form each time you revise your software or hardware configuration, and use this form as a
reference for your current configuration. Completing this form accurately before contacting
QUANCOM Informationssysteme GmbH for technical support helps our application
engineers answer your questions more efficiently.
· QUANCOM Product
Name / Name of board:
Interrupt Level:
DMA Channel:
Base I/O Address:
Operating system:
· Other information
Computer brand and Model:
Processor:
Clock Frequency:
Type of Video Board Installed:
DOS Version:
Programming Language:
Programming Language Version:
· Other Boards in System
Base I/O Address of other Boards:
DMA Channels of other Boards:
Interrupt Level of other Boards:
__________________________________
__________________________________
__________________________________
__________________________________
__________________________________
__________________________________
__________________________________
__________________________________
__________________________________
__________________________________
__________________________________
__________________________________
__________________________________
__________________________________
__________________________________

Installation INDUSBADPETH (Ethernet-Modul) INDUSBADPRS232 (Serielles-Modul) 29
© QUANCOM Informationssysteme GmbH
5.5 Documentation comment form
QUANCOM Informationsysteme GmbH would like you to comment on the documentation
supplied with our products. This information helps us to provide you with quality products to
meet your needs. Include additional pages if necessary.
Titel: Installation INDUSBADPETH (Ethernet-Modul)
INDUSBADPRS232 (Serielles-Modul)
Edition date: 15.04.2009
Name:
Firma:
Adresse:
Telefon:
Fax:
Kommentar:
________________________________________________
________________________________________________
________________________________________________
________________________________________________
________________________________________________
________________________________________________
________________________________________________
________________________________________________
________________________________________________
________________________________________________
Email to: [email protected]
Fax to: +49 2236 89 92 49
Adress: QUANCOM Informationssysteme GmbHIn der Flecht 1450389 WesselingGermany

Annex 30
© QUANCOM Informationssysteme GmbH
5.6 Trademarks
Linux is registered trade-mark of Linus Torvalds.
MS, MS-DOS, Microsoft, Visual Basic, Windows, Windows Vista/XP/2000/NT/ME/98/95 is
registered trade-mark of Microsoft Corporation.
XT and PS/2 are trade-marks and IBM, OS/2 and AT are registered trade-mark of
International Business Machines Corporation.
Intel, Pentium is registered trade-mark of Intel Corporation.
USB is registered trade-mark of USB Implementers Forum Inc.
JAVA is registered trade-mark of Sun Microsystems.
DELPHI and Pascal are registered trade-mark of Borland Corporation.
PCI is registered trade-mark of PCI Special Interest Group.
PCI Express is registered trade-mark of PCI-SIG.
National Instruments, LABVIEW is registered trade-mark of National Instruments
Corporation.
Agilent VEE is registered trade-mark of Agilent Technologies.
By other product- and company names, that are mentioned in this manual, it may deal with
trademarks of the respective owners.