Istr. Serie 853-LED Rev.A 06-2016 - neri.biz 853_LED-P... · Toute reproduction et utilisation pour...
28
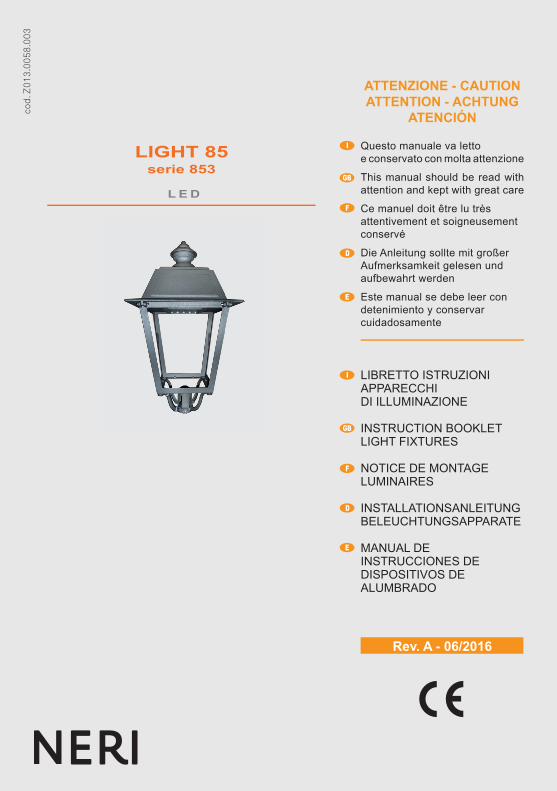
cod. Z013.0058.003 I GB F D E Rev. A - 06/2016 ATTENZIONE - CAUTION ATTENTION - ACHTUNG ATENCIÓN Questo manuale va letto e conservato con molta attenzione This manual should be read with attention and kept with great care Ce manuel doit être lu très attentivement et soigneusement conservé Die Anleitung sollte mit großer Aufmerksamkeit gelesen und aufbewahrt werden Este manual se debe leer con detenimiento y conservar cuidadosamente LIBRETTO ISTRUZIONI APPARECCHI DI ILLUMINAZIONE INSTRUCTION BOOKLET LIGHT FIXTURES NOTICE DE MONTAGE LUMINAIRES INSTALLATIONSANLEITUNG BELEUCHTUNGSAPPARATE MANUAL DE INSTRUCCIONES DE DISPOSITIVOS DE ALUMBRADO I GB F D E LED LIGHT 85 serie 853
Transcript of Istr. Serie 853-LED Rev.A 06-2016 - neri.biz 853_LED-P... · Toute reproduction et utilisation pour...
cod.
Z01
3.00
58.0
03
I
GB
F
D
E
Rev. A - 06/2016
ATTENZIONE - CAUTIONATTENTION - ACHTUNG
ATENCIÓN
Questo manuale va lettoe conservato con molta attenzione
This manual should be read withattention and kept with great care
Ce manuel doit être lu trèsattentivement et soigneusementconservé
Die Anleitung sollte mit großerAufmerksamkeit gelesen undaufbewahrt werden
Este manual se debe leer condetenimiento y conservarcuidadosamente
LIBRETTO ISTRUZIONIAPPARECCHIDI ILLUMINAZIONE
INSTRUCTION BOOKLETLIGHT FIXTURES
NOTICE DE MONTAGELUMINAIRES
INSTALLATIONSANLEITUNGBELEUCHTUNGSAPPARATE
MANUAL DEINSTRUCCIONES DEDISPOSITIVOS DE ALUMBRADO
I
GB
F
D
E
L E D
LIGHT 85serie 853
NERI S.p.AVia Emilia 1622 (laboratori) • Via delle Querce 4 (produzione)
47020 Longiano (FC) • Italy • Tel. +39 0547 652111 • Fax +39 0547 54074 [email protected] • www.neri.biz
www.facebook.com/NeriSpa • www. twitter.com/Neri_spa
Ogni riproduzione ed utilizzo per fi ni propri di questo manuale non è consentita. Tutti i diritti sono riservati.
E’ vietata la riproduzione anche parziale di esso senza il consenso scritto della Neri spa.La Neri spa si riserva il diritto di apportare modifi che ai propri prodotti e alla documentazione senza obbligo di preavviso.
Any reproduction and use for its own purposes of this manual is not permitted. All rights reserved.
Reproduction of this manual, even partially, is forbidden without written consent from Neri spa.Neri spa reserves the right to modify its products and documentation without obligation to give prior warning.
Toute reproduction et utilisation pour ses propres fi ns de ce manuel n’est pas autorisée. Tous droits réservés.
Ce manuel ne peut être reproduit, même partiellement, sans l’accord écrit de Neri spa.Neri spa se réserve le droit d’apporter toutes modifi cations à ses produits et à la documentation sans préavis.
Eine Vervielfältigung und Nutzung für den eigenen Zweck dieses Handbuches ist nicht gestattet. Alle Rechte vorbehalten.
Seine - auch auszugsweise - Reproduktion ohne schriftliche Zustimmung der Neri spa ist verboten.Die Neri spa behält sich das Recht vor, an ihren Produkten und der Dokumentation Veränderungen vorzunehmen, ohne dies
vorher ankündigen zu müssen.
Cualquier reproducción y uso para sus propios fi nes de este manual no está permitido. Todos los derechos reservados.
Se prohíbe su reproducción incluso parcial sin autorización por escrito de la empresa Neri spa.Neri spa se reserva el derecho de aportar cambios a sus productos y a la documentación sin obligación de aviso previo.
Titolo: Libretto istruzioni apparecchi di illuminazione - Pubblicatore: Neri spaProgetto e coordinamento grafi co: Daniele Lombardi - Stampa: Grafi che MDM s.r.l., Forlì (FC), Giugno 2016.Tutti i diritti riservati. E’ fatto espresso divieto a qualunque riproduzione parziale o totale del presente testo.
DESIGN PATENTED, PRINTED IN ITALY

3www.neri.biz
INDICE - CONTENTS - INDEX - INHALTVERZEICHNIS - INDICE
SIMBOLI ED ETICHETTA SYMBOLS AND LABEL SYMBOLES ET ETIQUETTE SYMBOLE UND AUFKLEBER SÍMBOLOS Y ETIQUETASpag 5-7
1°IGBFDE
NOTE GENERALI ALLA CONSEGNA DELIVERY INFORMATIONNOTES GENERALES POUR LA LIVRAISON ALLGEMEINE ANMERKUNGEN ZUR ANLIEFERUNG NOTAS GENERALES A LA ENTREGApag 8
2°IGBFDE
PRESCRIZIONI DI SICUREZZASAFETY PRECAUTIONSPRESCRIPTIONS DE SECURITESICHERHEITSVORSCHRIFTENNORMAS DE SEGURIDADpag 9
3°IGBFDE
DISIMBALLOUNPACKINGDEBALLAGEAUSPACKENDESEMBALAJEpag 10-11
4°IGBFDE
INSTALLAZIONEINSTALLATIONFIXATIONSOCKELENGANCHEpag 12-14
5°IGBFDE
OTTICHEREFLECTORREFLECTEURSOPTIKREFLECTORESpag 15
6°IGBFDE
DESTINAZIONE D’USOINTENDED USEUTILISATION DES LUMINAIRESZWECKBESTIMMUNGUTILIZACIÓNpag 21
11°IGBFDE
GARANZIAGARANTEEGARANTIEGARANTIEGARANTIApag 21
12°IGBFDE
SMALTIMENTODISPOSALMISE AU REBUTENTSORGUNGRECICLADOpag 23
14°IGBFDE
MANUTENZIONEMAINTENANCEENTRETIENWARTUNGMANTENIMIENTOpag 24-25
15°IGBFDE
RICAMBISPARE PARTSPIÈCES DE RECHANGEERSATZTEILERECAMBIOSpag 26
16°IGBFDE
ORIENTAMENTO OTTICAREFLECTOR POSITIONINGORIENTATION DU RÉFLECTEURREFLEKTOR AUSRIGHTUNGORIENTACIÓN DEL REFLECTORpag 27
17°IGBFDE
CARATTERISTICHECHARACTERISTICSCARACTERISTIQUESEIGENSCHAFTENCARACTERISTÌCASpag 19-20
10°IGBFDE
GARANZIA ESTESA A 5 ANNIWARRANTY EXTENDED TO 5 YEARSGARANTIE ÉTENDUE À 5 ANSAUF 5 JAHRE ERWEITERTE GARANTIEGARANTÍA ADICIONAL DE 5 AÑOSpag 22
13°IGBFDE
AVVERTENZE PER L’INSTALLAZIONEINSTALLATION INFORMATIONPRECAUTIONS POUR L’INSTALLATIONINSTALLATIONSANLEITUNGADVERTENCIAS PARA INSTALACIÓNpag 17-18
9°IGBFDE
TAGLIE DI FLUSSOLUMINOUS FLUX OUTPUTTAILLES DE FLUXLCIHTSTROMABGABENCLASES LUMINOTÉCNICAS
CARATTERISTICHE DRIVERDRIVER FEATURESCARACTÉRISTIQUES DISPOSITIF DRIVERTREIBEREIGENSCHAFTENALIMENTADOR ELECTRONICO
7°
8°
I
I
GB
GB
F
F
D
D
E
E
pag 15
pag 16

4
I
GB
F
D
E
INTRODUZIONE - INTRODUCTION - INTRODUCTION - EINLEITUNG - INTRODUCCIÓN
La Neri spa è impegnata costantemente nella ricerca e progettazione di prodotti di alta qualità, lunga durata e sicurezza. Questo manuale intende presentare le metodiche di installazione corrette dei corpi illuminanti, ponendosi come guida nei confronti di installatori professionali. A tale scopo questo manuale va letto e conservato con molta attenzione.
Neri S.p.A is constantly committed to research and design for products of high quality, durability and safety. This manual aims to present correct installation procedures for light fi xtures as a guide for professional installers. To this end the manual should be read and preserved with extreme attention.
Neri spa a toujours eu pour objectif la recherche et la conception de produits de haute qualité, offrant longévité et sécurité. Ce manuel, qui présente les modes d’installation corrects des armatures d’éclairage, est un guide à l’adresse des installateurs professionnels. Il doit donc être lu très attentivement et conservé.
Die Neri spa ist konstant um Forschung und Entwicklung zeitbeständiger und sicherer Produkte von hoher Qualität bemüht. Dieses Handbuch stellt die korrekten Installationsmethoden für die Leuchtkörper bereit und bietet sich gegenüber professionellen Installateuren als ein Ratgeber an. Deswegen sollte dies Handbuch sehr aufmerksam gelesen werden und konserviert.
La empresa Neri spa trabaja de continuo en el estudio y proyección de productos de alta calidad, larga duración y seguridad. Este manual presentará los métodos de instalación correcta de los cuerpos de iluminación, siendo una guía para instaladores profesionales. Por ello, este manual debe leerse con gran detenimiento y preservado.
Certifi cato/Certifi cate 9105.DONE
ISO 9001:2008
Certifi cato/Certifi cate9191.NER1
ISO 14001:2004
5www.neri.biz
Fig. 1 Fig. 9Fig. 8Fig. 7Fig. 6Fig. 5Fig. 4Fig. 3Fig. 2
I
GB
F
D
E
I
GB
F
D
E
SIMBOLI ED ETICHETTA - SYMBOLS AND LABEL- SYMBOLES ET ETIQUETTESYMBOLE UND AUFKLEBER - SÍMBOLOS Y ETIQUETAS1°
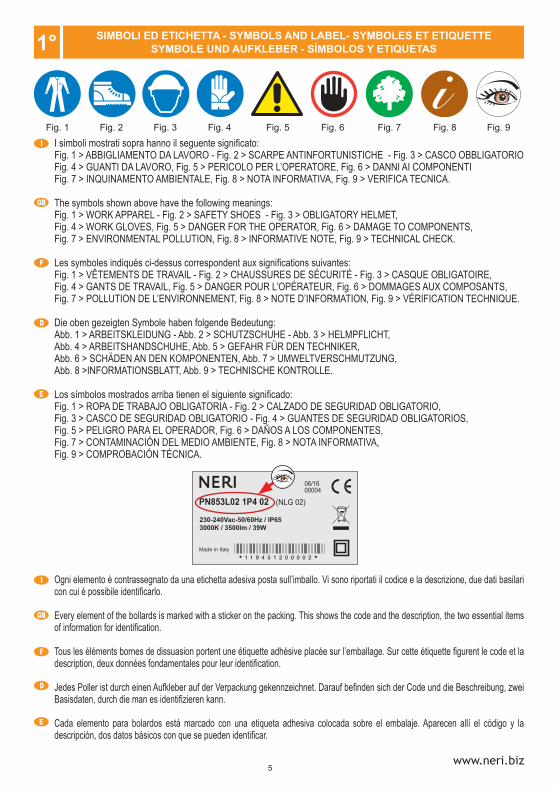
I simboli mostrati sopra hanno il seguente signifi cato: Fig. 1 > ABBIGLIAMENTO DA LAVORO - Fig. 2 > SCARPE ANTINFORTUNISTICHE - Fig. 3 > CASCO OBBLIGATORIO Fig. 4 > GUANTI DA LAVORO, Fig. 5 > PERICOLO PER L’OPERATORE, Fig. 6 > DANNI AI COMPONENTIFig. 7 > INQUINAMENTO AMBIENTALE, Fig. 8 > NOTA INFORMATIVA, Fig. 9 > VERIFICA TECNICA.
The symbols shown above have the following meanings:Fig. 1 > WORK APPAREL - Fig. 2 > SAFETY SHOES - Fig. 3 > OBLIGATORY HELMET,Fig. 4 > WORK GLOVES, Fig. 5 > DANGER FOR THE OPERATOR, Fig. 6 > DAMAGE TO COMPONENTS,Fig. 7 > ENVIRONMENTAL POLLUTION, Fig. 8 > INFORMATIVE NOTE, Fig. 9 > TECHNICAL CHECK.
Les symboles indiqués ci-dessus correspondent aux signifi cations suivantes:Fig. 1 > VÊTEMENTS DE TRAVAIL - Fig. 2 > CHAUSSURES DE SÉCURITÉ - Fig. 3 > CASQUE OBLIGATOIRE,Fig. 4 > GANTS DE TRAVAIL, Fig. 5 > DANGER POUR L’OPÉRATEUR, Fig. 6 > DOMMAGES AUX COMPOSANTS, Fig. 7 > POLLUTION DE L’ENVIRONNEMENT, Fig. 8 > NOTE D’INFORMATION, Fig. 9 > VÉRIFICATION TECHNIQUE.
Die oben gezeigten Symbole haben folgende Bedeutung:Abb. 1 > ARBEITSKLEIDUNG - Abb. 2 > SCHUTZSCHUHE - Abb. 3 > HELMPFLICHT,Abb. 4 > ARBEITSHANDSCHUHE, Abb. 5 > GEFAHR FÜR DEN TECHNIKER,Abb. 6 > SCHÄDEN AN DEN KOMPONENTEN, Abb. 7 > UMWELTVERSCHMUTZUNG, Abb. 8 >INFORMATIONSBLATT, Abb. 9 > TECHNISCHE KONTROLLE.
Los símbolos mostrados arriba tienen el siguiente signifi cado:Fig. 1 > ROPA DE TRABAJO OBLIGATORIA - Fig. 2 > CALZADO DE SEGURIDAD OBLIGATORIO, Fig. 3 > CASCO DE SEGURIDAD OBLIGATORIO - Fig. 4 > GUANTES DE SEGURIDAD OBLIGATORIOS, Fig. 5 > PELIGRO PARA EL OPERADOR, Fig. 6 > DAÑOS A LOS COMPONENTES, Fig. 7 > CONTAMINACIÓN DEL MEDIO AMBIENTE, Fig. 8 > NOTA INFORMATIVA, Fig. 9 > COMPROBACIÓN TÉCNICA.
Ogni elemento è contrassegnato da una etichetta adesiva posta sull’imballo. Vi sono riportati il codice e la descrizione, due dati basilari con cui è possibile identifi carlo.
Every element of the bollards is marked with a sticker on the packing. This shows the code and the description, the two essential items of information for identifi cation.
Tous les éléments bornes de dissuasion portent une étiquette adhésive placée sur l’emballage. Sur cette étiquette fi gurent le code et la description, deux données fondamentales pour leur identifi cation.
Jedes Poller ist durch einen Aufkleber auf der Verpackung gekennzeichnet. Darauf befi nden sich der Code und die Beschreibung, zwei Basisdaten, durch die man es identifi zieren kann.
Cada elemento para bolardos está marcado con una etiqueta adhesiva colocada sobre el embalaje. Aparecen allí el código y la descripción, dos datos básicos con que se pueden identifi car.
230-240Vac-50/60Hz / IP653000K / 3500lm / 39W
06/1600004
Made in Italy
PN853L02 1P4 02 (NLG 02)
6
I
GB
F
D
E
SIMBOLI ED ETICHETTA - SYMBOLS AND LABEL- SYMBOLES ET ETIQUETTESYMBOLE UND AUFKLEBER - SÍMBOLOS Y ETIQUETAS1°
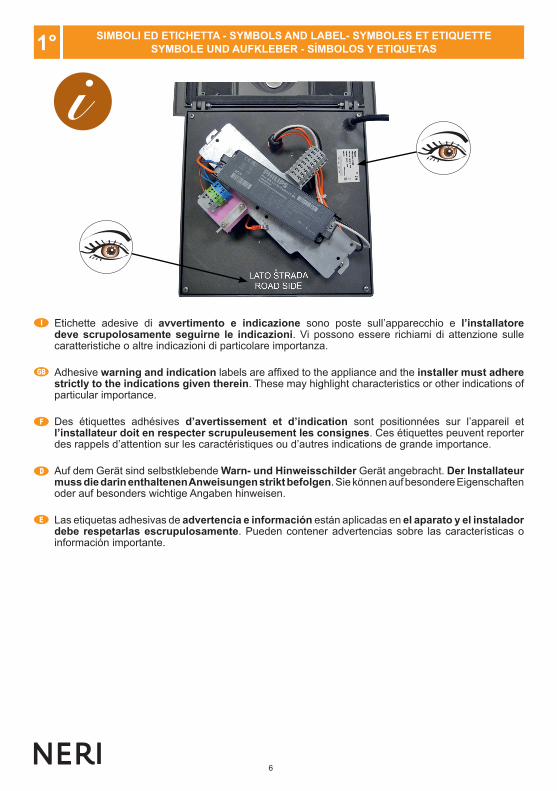
Etichette adesive di avvertimento e indicazione sono poste sull’apparecchio e l’installatore deve scrupolosamente seguirne le indicazioni. Vi possono essere richiami di attenzione sulle caratteristiche o altre indicazioni di particolare importanza.
Adhesive warning and indication labels are affi xed to the appliance and the installer must adhere strictly to the indications given therein. These may highlight characteristics or other indications of particular importance.
Des étiquettes adhésives d’avertissement et d’indication sont positionnées sur l’appareil et l’installateur doit en respecter scrupuleusement les consignes. Ces étiquettes peuvent reporter des rappels d’attention sur les caractéristiques ou d’autres indications de grande importance.
Auf dem Gerät sind selbstklebende Warn- und Hinweisschilder Gerät angebracht. Der Installateur muss die darin enthaltenen Anweisungen strikt befolgen. Sie können auf besondere Eigenschaften oder auf besonders wichtige Angaben hinweisen.
Las etiquetas adhesivas de advertencia e información están aplicadas en el aparato y el instalador debe respetarlas escrupulosamente. Pueden contener advertencias sobre las características o información importante.
SIMBOLI ED ETICHETTA - SYMBOLS AND LABEL- SYMBOLES ET ETIQUETTESYMBOLE UND AUFKLEBER - SÍMBOLOS Y ETIQUETAS1°
7www.neri.biz
BA
CI
GB
F
D
E
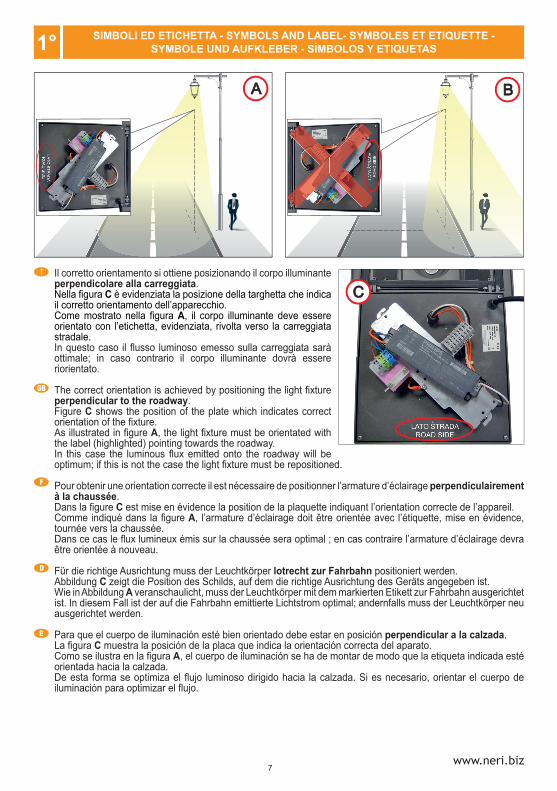
Il corretto orientamento si ottiene posizionando il corpo illuminante perpendicolare alla carreggiata.Nella fi gura C è evidenziata la posizione della targhetta che indica il corretto orientamento dell’apparecchio.Come mostrato nella fi gura A, il corpo illuminante deve essere orientato con l’etichetta, evidenziata, rivolta verso la carreggiata stradale.In questo caso il fl usso luminoso emesso sulla carreggiata sarà ottimale; in caso contrario il corpo illuminante dovrà essere riorientato.
The correct orientation is achieved by positioning the light fi xture perpendicular to the roadway. Figure C shows the position of the plate which indicates correct orientation of the fi xture.As illustrated in fi gure A, the light fi xture must be orientated with the label (highlighted) pointing towards the roadway.In this case the luminous fl ux emitted onto the roadway will be optimum; if this is not the case the light fi xture must be repositioned.
Pour obtenir une orientation correcte il est nécessaire de positionner l’armature d’éclairage perpendiculairement à la chaussée. Dans la fi gure C est mise en évidence la position de la plaquette indiquant l’orientation correcte de l’appareil.Comme indiqué dans la fi gure A, l’armature d’éclairage doit être orientée avec l’étiquette, mise en évidence, tournée vers la chaussée.Dans ce cas le fl ux lumineux émis sur la chaussée sera optimal ; en cas contraire l’armature d’éclairage devra être orientée à nouveau.
Für die richtige Ausrichtung muss der Leuchtkörper lotrecht zur Fahrbahn positioniert werden.Abbildung C zeigt die Position des Schilds, auf dem die richtige Ausrichtung des Geräts angegeben ist.Wie in Abbildung A veranschaulicht, muss der Leuchtkörper mit dem markierten Etikett zur Fahrbahn ausgerichtet ist. In diesem Fall ist der auf die Fahrbahn emittierte Lichtstrom optimal; andernfalls muss der Leuchtkörper neu ausgerichtet werden.
Para que el cuerpo de iluminación esté bien orientado debe estar en posición perpendicular a la calzada. La fi gura C muestra la posición de la placa que indica la orientación correcta del aparato.Como se ilustra en la fi gura A, el cuerpo de iluminación se ha de montar de modo que la etiqueta indicada esté orientada hacia la calzada.De esta forma se optimiza el fl ujo luminoso dirigido hacia la calzada. Si es necesario, orientar el cuerpo de iluminación para optimizar el fl ujo.
SIMBOLI ED ETICHETTA - SYMBOLS AND LABEL- SYMBOLES ET ETIQUETTESYMBOLE UND AUFKLEBER - SÍMBOLOS Y ETIQUETAS1° SIMBOLI ED ETICHETTA - SYMBOLS AND LABEL- SYMBOLES ET ETIQUETTE -
SYMBOLE UND AUFKLEBER - SÍMBOLOS Y ETIQUETAS1°
8
A
I
GB
F
D
E
2°NOTE GENERALI ALLA CONSEGNA - DELIVERY INFORMATION - NOTES GENERALES POUR LA LIVRAISON - ALLGEMEINE ANMERKUNGEN ZUR ANLIEFERUNG - NOTAS
GENERALES A LA ENTREGA
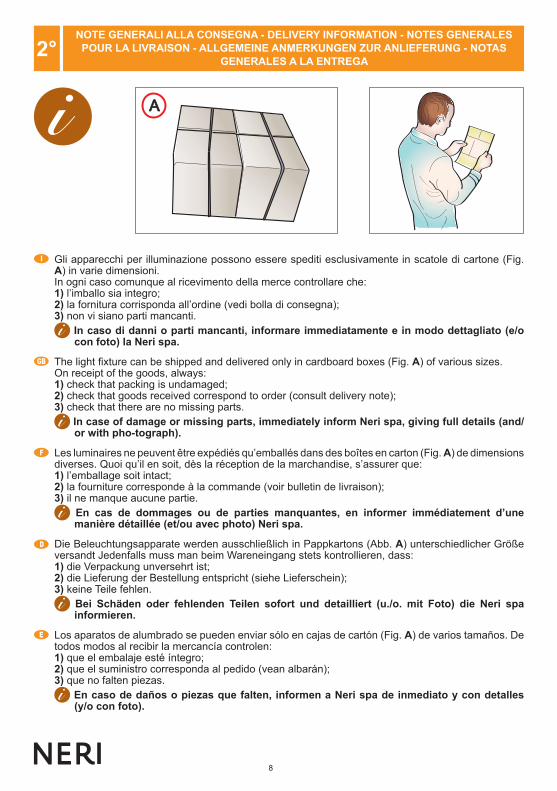
Gli apparecchi per illuminazione possono essere spediti esclusivamente in scatole di cartone (Fig. A) in varie dimensioni. In ogni caso comunque al ricevimento della merce controllare che: 1) l’imballo sia integro; 2) la fornitura corrisponda all’ordine (vedi bolla di consegna); 3) non vi siano parti mancanti.
In caso di danni o parti mancanti, informare immediatamente e in modo dettagliato (e/o con foto) la Neri spa.
The light fi xture can be shipped and delivered only in cardboard boxes (Fig. A) of various sizes. On receipt of the goods, always: 1) check that packing is undamaged; 2) check that goods received correspond to order (consult delivery note); 3) check that there are no missing parts.
In case of damage or missing parts, immediately inform Neri spa, giving full details (and/or with pho-tograph).
Les luminaires ne peuvent être expédiés qu’emballés dans des boîtes en carton (Fig. A) de dimensions diverses. Quoi qu’il en soit, dès la réception de la marchandise, s’assurer que: 1) l’emballage soit intact; 2) la fourniture corresponde à la commande (voir bulletin de livraison); 3) il ne manque aucune partie.
En cas de dommages ou de parties manquantes, en informer immédiatement d’une manière détaillée (et/ou avec photo) Neri spa.
Die Beleuchtungsapparate werden ausschließlich in Pappkartons (Abb. A) unterschiedlicher Größe versandt Jedenfalls muss man beim Wareneingang stets kontrollieren, dass: 1) die Verpackung unversehrt ist; 2) die Lieferung der Bestellung entspricht (siehe Lieferschein); 3) keine Teile fehlen.
Bei Schäden oder fehlenden Teilen sofort und detailliert (u./o. mit Foto) die Neri spa informieren.
Los aparatos de alumbrado se pueden enviar sólo en cajas de cartón (Fig. A) de varios tamaños. De todos modos al recibir la mercancía controlen: 1) que el embalaje esté íntegro; 2) que el suministro corresponda al pedido (vean albarán); 3) que no falten piezas.
En caso de daños o piezas que falten, informen a Neri spa de inmediato y con detalles (y/o con foto).
9www.neri.biz
ATTENZIONE - CAUTIONATTENTION - ACHTUNG
ATENCIÓN
I
GB
F
D
E
In base alle varie direttive in vigore nei vari paesi europei ed extraeuropei, nel luogo di lavoro devono essere rispettate determinate regole. Le indicazioni di sicurezza non hanno lo scopo di alterare o modifi care le direttive sopra menzionate; il loro unico scopo è quello di sottolinearle o amplifi carle. Queste prescrizioni di sicurezza sono indirizzate agli installatori professionali, i quali devono attentamente leggere e comprendere questo manuale di installazione.
ATTENZIONE! La non osservanza delle prescrizioni citate in questo manuale aumenta il rischio di incidenti.
Prima di effettuare qualsiasi operazione munirsi di: casco antiurto, guanti da lavoro, scarpe antifortunistiche, abbigliamento da lavoro.
A variety of rules must be followed in workplaces, depending on the legislation applicable in different countries of Europe and elsewhere. The aim of the safety precautions illustrated here is not to replace or modify this applicable legislation, but solely to emphasize or reinforce it. These safety precautions are intended for professional installers, who must carefully read and understand this installation manual.
WARNING! Failure to observe the prescriptions given in this manual will increase the risk of accidents.Before carrying out any operations whatsoever installers must put on: safety helmets, work gloves, safety footwear and suitable working clothes.
Conformément aux différentes directives en vigueur dans les pays européens et extra-européens, les lieux de travail sont soumis à des règles précises qui doivent être respectées. Ces indications de sécurité n’entendent ni modifi er ni altérer les directives susdites mais ont pour but de les souligner ou d’en étendre l’application. Ces prescriptions de sécurité s’adressent aux installateurs professionnels, qui devront lire attentivement ce manuel d’installation et en comprendre parfaitement le contenu.
ATTENTION! La non-observation des prescriptions indiquées dans ce manuel augmente le risque d’accidents.
Avant d’effectuer toute opération, s’équiper de: casque antichoc, gants de travail, chaussures de sécurité, habillement de travail.
Auf Grundlage der verschiedenen in europäischen und außereuropäischen Ländern geltenden Vorschriften, müssen am Ort der Arbeit bestimmte Regeln eingehalten werden. Die Sicherheitsangaben haben nicht den Sinn, die o.a. Vorschriften zu verändern; ihr einziger Zweck ist es, sie zu unterstreichen oder zu erweitern. Diese Sicherheitsvorschriften wenden sich an professionelle Installateure, die dieses Installationshandbuch aufmerksam lesen und begreifen müssen.
ACHTUNG! Wenn die in diesem Handbuch angegebenen Vorschriften nicht eingehalten werden, erhöht sich die Unfallgefahr.
Vor der Durchführung von Arbeiten muss man sich eindecken mit: Schutzhelm, Arbeitshandschuhen, unfallsicheren Schuhen, Arbeitsbekleidung.
De acuerdo con las diversas directivas en vigor en los países europeos y en los de fuera de Europa, en el lugar de trabajo se deben respetar determinadas normas. Las normas de seguridad no tienen el objetivo de alterar o modifi car las directivas mencionadas anteriormente; el único objetivo es el de ponerlas en evidencia o ampliarlas. Estas normas de seguridad se dirigen a los instaladores profesionales, los cuales deben leer atentamente y comprender perfectamente este manual de instalación.
ATENCIÓN! El incumplimiento de las normas contenidas en este manual hace aumentar el riesgo de accidente.
Antes de iniciar cualquier trabajo, equiparse con: casco de seguridad, guantes de trabajo, calzado especial de trabajo, ropa de trabajo.
SIMBOLI ED ETICHETTA - SYMBOLS AND LABEL- SYMBOLES ET ETIQUETTESYMBOLE UND AUFKLEBER - SÍMBOLOS Y ETIQUETAS1°3° PRESCRIZIONI DI SICUREZZA - SAFETY PRECAUTIONS - PRESCRIPTIONS DE SECURITE -
SICHERHEITSVORSCHRIFTEN - NORMAS DE SEGURIDAD
10
A B
C D
ATTENZIONE PERICOLOCAUTION : DANGERATTENTION DANGERACHTUNG GEFAHR
ATENCIÓN, PELIGRO
I
GB
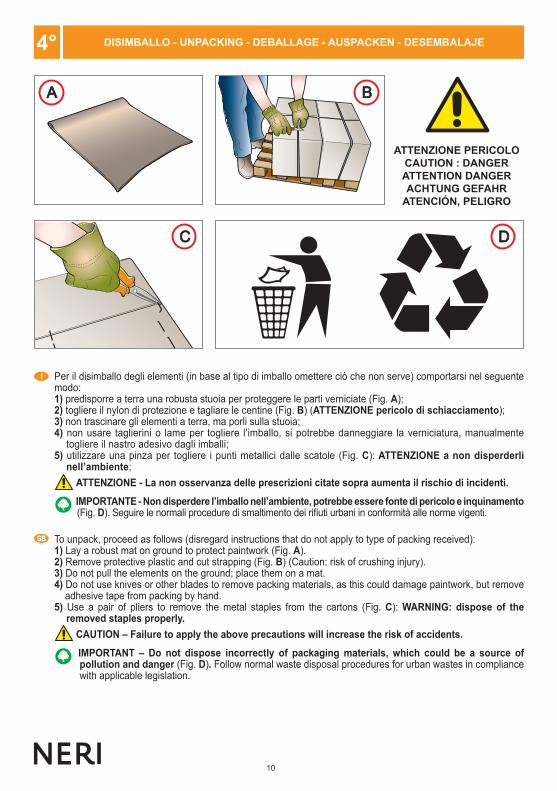
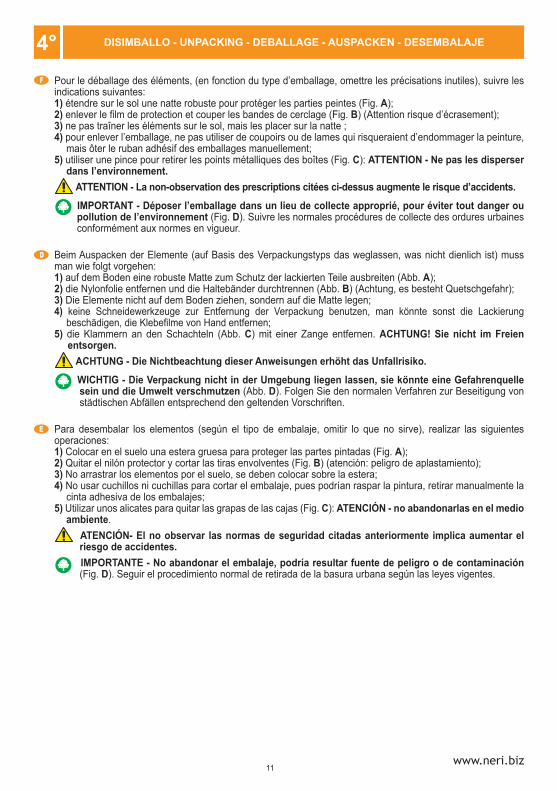
Per il disimballo degli elementi (in base al tipo di imballo omettere ciò che non serve) comportarsi nel seguente modo: 1) predisporre a terra una robusta stuoia per proteggere le parti verniciate (Fig. A); 2) togliere il nylon di protezione e tagliare le centine (Fig. B) (ATTENZIONE pericolo di schiacciamento); 3) non trascinare gli elementi a terra, ma porli sulla stuoia; 4) non usare taglierini o lame per togliere l’imballo, si potrebbe danneggiare la verniciatura, manualmente
togliere il nastro adesivo dagli imballi; 5) utilizzare una pinza per togliere i punti metallici dalle scatole (Fig. C): ATTENZIONE a non disperderli
nell’ambiente;
ATTENZIONE - La non osservanza delle prescrizioni citate sopra aumenta il rischio di incidenti.
IMPORTANTE - Non disperdere l’imballo nell’ambiente, potrebbe essere fonte di pericolo e inquinamento (Fig. D). Seguire le normali procedure di smaltimento dei rifi uti urbani in conformità alle norme vigenti.
To unpack, proceed as follows (disregard instructions that do not apply to type of packing received): 1) Lay a robust mat on ground to protect paintwork (Fig. A). 2) Remove protective plastic and cut strapping (Fig. B) (Caution: risk of crushing injury). 3) Do not pull the elements on the ground; place them on a mat. 4) Do not use knives or other blades to remove packing materials, as this could damage paintwork, but remove
adhesive tape from packing by hand. 5) Use a pair of pliers to remove the metal staples from the cartons (Fig. C): WARNING: dispose of the
removed staples properly.
CAUTION – Failure to apply the above precautions will increase the risk of accidents.
IMPORTANT – Do not dispose incorrectly of packaging materials, which could be a source of pollution and danger (Fig. D). Follow normal waste disposal procedures for urban wastes in compliance with applicable legislation.
SIMBOLI ED ETICHETTA - SYMBOLS AND LABEL- SYMBOLES ET ETIQUETTESYMBOLE UND AUFKLEBER - SÍMBOLOS Y ETIQUETAS1°4° DISIMBALLO - UNPACKING - DEBALLAGE - AUSPACKEN - DESEMBALAJE
11www.neri.biz
F
D
E
SIMBOLI ED ETICHETTA - SYMBOLS AND LABEL- SYMBOLES ET ETIQUETTESYMBOLE UND AUFKLEBER - SÍMBOLOS Y ETIQUETAS1°4° DISIMBALLO - UNPACKING - DEBALLAGE - AUSPACKEN - DESEMBALAJE
Pour le déballage des éléments, (en fonction du type d’emballage, omettre les précisations inutiles), suivre les indications suivantes: 1) étendre sur le sol une natte robuste pour protéger les parties peintes (Fig. A); 2) enlever le fi lm de protection et couper les bandes de cerclage (Fig. B) (Attention risque d’écrasement); 3) ne pas traîner les éléments sur le sol, mais les placer sur la natte ; 4) pour enlever l’emballage, ne pas utiliser de coupoirs ou de lames qui risqueraient d’endommager la peinture,
mais ôter le ruban adhésif des emballages manuellement; 5) utiliser une pince pour retirer les points métalliques des boîtes (Fig. C): ATTENTION - Ne pas les disperser
dans l’environnement.
ATTENTION - La non-observation des prescriptions citées ci-dessus augmente le risque d’accidents.
IMPORTANT - Déposer l’emballage dans un lieu de collecte approprié, pour éviter tout danger ou pollution de l’environnement (Fig. D). Suivre les normales procédures de collecte des ordures urbaines conformément aux normes en vigueur.
Beim Auspacken der Elemente (auf Basis des Verpackungstyps das weglassen, was nicht dienlich ist) muss man wie folgt vorgehen: 1) auf dem Boden eine robuste Matte zum Schutz der lackierten Teile ausbreiten (Abb. A); 2) die Nylonfolie entfernen und die Haltebänder durchtrennen (Abb. B) (Achtung, es besteht Quetschgefahr); 3) Die Elemente nicht auf dem Boden ziehen, sondern auf die Matte legen; 4) keine Schneidewerkzeuge zur Entfernung der Verpackung benutzen, man könnte sonst die Lackierung
beschädigen, die Klebefi lme von Hand entfernen; 5) die Klammern an den Schachteln (Abb. C) mit einer Zange entfernen. ACHTUNG! Sie nicht im Freien
entsorgen.
ACHTUNG - Die Nichtbeachtung dieser Anweisungen erhöht das Unfallrisiko.
WICHTIG - Die Verpackung nicht in der Umgebung liegen lassen, sie könnte eine Gefahrenquelle sein und die Umwelt verschmutzen (Abb. D). Folgen Sie den normalen Verfahren zur Beseitigung von städtischen Abfällen entsprechend den geltenden Vorschriften.
Para desembalar los elementos (según el tipo de embalaje, omitir lo que no sirve), realizar las siguientes operaciones: 1) Colocar en el suelo una estera gruesa para proteger las partes pintadas (Fig. A); 2) Quitar el nilón protector y cortar las tiras envolventes (Fig. B) (atención: peligro de aplastamiento); 3) No arrastrar los elementos por el suelo, se deben colocar sobre la estera; 4) No usar cuchillos ni cuchillas para cortar el embalaje, pues podrían raspar la pintura, retirar manualmente la
cinta adhesiva de los embalajes; 5) Utilizar unos alicates para quitar las grapas de las cajas (Fig. C): ATENCIÓN - no abandonarlas en el medio
ambiente.
ATENCIÓN- El no observar las normas de seguridad citadas anteriormente implica aumentar el riesgo de accidentes.
IMPORTANTE - No abandonar el embalaje, podría resultar fuente de peligro o de contaminación (Fig. D). Seguir el procedimiento normal de retirada de la basura urbana según las leyes vigentes.
12
40 Nm
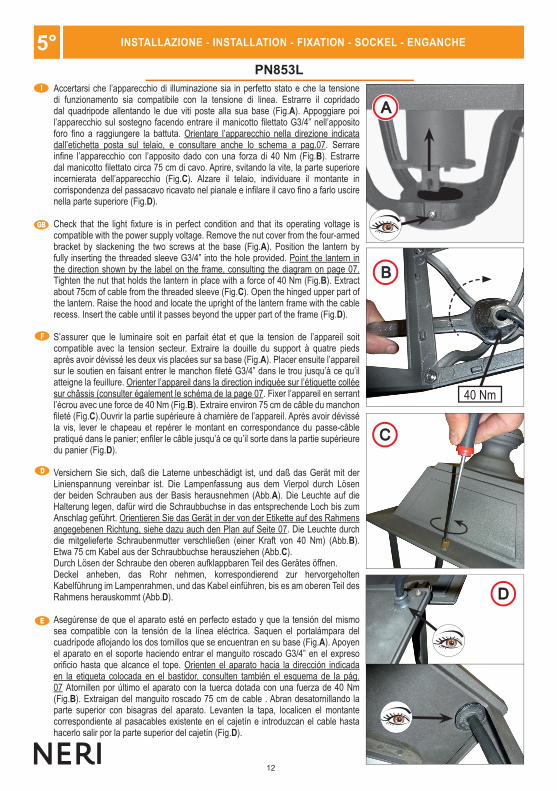
PN853LAccertarsi che l’apparecchio di illuminazione sia in perfetto stato e che la tensione di funzionamento sia compatibile con la tensione di linea. Estrarre il copridado dal quadripode allentando le due viti poste alla sua base (Fig.A). Appoggiare poi l’apparecchio sul sostegno facendo entrare il manicotto fi lettato G3/4” nell’apposito foro fi no a raggiungere la battuta. Orientare l’apparecchio nella direzione indicata dall’etichetta posta sul telaio, e consultare anche lo schema a pag.07. Serrare infi ne l’apparecchio con l’apposito dado con una forza di 40 Nm (Fig.B). Estrarre dal manicotto fi lettato circa 75 cm di cavo. Aprire, svitando la vite, la parte superiore incernierata dell’apparecchio (Fig.C). Alzare il telaio, individuare il montante in corrispondenza del passacavo ricavato nel pianale e infi lare il cavo fi no a farlo uscire nella parte superiore (Fig.D).
Check that the light fi xture is in perfect condition and that its operating voltage is compatible with the power supply voltage. Remove the nut cover from the four-armed bracket by slackening the two screws at the base (Fig.A). Position the lantern by fully inserting the threaded sleeve G3/4” into the hole provided. Point the lantern in the direction shown by the label on the frame, consulting the diagram on page 07. Tighten the nut that holds the lantern in place with a force of 40 Nm (Fig.B). Extract about 75cm of cable from the threaded sleeve (Fig.C). Open the hinged upper part of the lantern. Raise the hood and locate the upright of the lantern frame with the cable recess. Insert the cable until it passes beyond the upper part of the frame (Fig.D).
S’assurer que le luminaire soit en parfait état et que la tension de l’appareil soit compatible avec la tension secteur. Extraire la douille du support à quatre pieds après avoir dévissé les deux vis placées sur sa base (Fig.A). Placer ensuite l’appareil sur le soutien en faisant entrer le manchon fi leté G3/4” dans le trou jusqu’à ce qu’il atteigne la feuillure. Orienter l’appareil dans la direction indiquée sur l’étiquette collée sur châssis (consulter également le schéma de la page 07. Fixer l’appareil en serrant l’écrou avec une force de 40 Nm (Fig.B). Extraire environ 75 cm de câble du manchon fi leté (Fig.C).Ouvrir la partie supérieure à charnière de l’appareil. Après avoir dévissé la vis, lever le chapeau et repérer le montant en correspondance du passe-câble pratiqué dans le panier; enfi ler le câble jusqu’à ce qu’il sorte dans la partie supérieure du panier (Fig.D).
Versichern Sie sich, daß die Laterne unbeschädigt ist, und daß das Gerät mit der Linienspannung vereinbar ist. Die Lampenfassung aus dem Vierpol durch Lösen der beiden Schrauben aus der Basis herausnehmen (Abb.A). Die Leuchte auf die Halterung legen, dafür wird die Schraubbuchse in das entsprechende Loch bis zum Anschlag geführt. Orientieren Sie das Gerät in der von der Etikette auf des Rahmens angegebenen Richtung, siehe dazu auch den Plan auf Seite 07. Die Leuchte durch die mitgelieferte Schraubenmutter verschließen (einer Kraft von 40 Nm) (Abb.B). Etwa 75 cm Kabel aus der Schraubbuchse herausziehen (Abb.C). Durch Lösen der Schraube den oberen aufklappbaren Teil des Gerätes öffnen. Deckel anheben, das Rohr nehmen, korrespondierend zur hervorgeholten Kabelführung im Lampenrahmen, und das Kabel einführen, bis es am oberen Teil des Rahmens herauskommt (Abb.D).
Asegúrense de que el aparato esté en perfecto estado y que la tensión del mismo sea compatible con la tensión de la línea eléctrica. Saquen el portalámpara del cuadrípode afl ojando los dos tornillos que se encuentran en su base (Fig.A). Apoyen el aparato en el soporte haciendo entrar el manguito roscado G3/4” en el expreso orifi cio hasta que alcance el tope. Orienten el aparato hacia la dirección indicada en la etiqueta colocada en el bastidor, consulten también el esquema de la pág. 07 Atornillen por último el aparato con la tuerca dotada con una fuerza de 40 Nm (Fig.B). Extraigan del manguito roscado 75 cm de cable . Abran desatornillando la parte superior con bisagras del aparato. Levanten la tapa, localicen el montante correspondiente al pasacables existente en el cajetín e introduzcan el cable hasta hacerlo salir por la parte superior del cajetín (Fig.D).
A
B
D
C
GB
E
D
F
I
1°5° INSTALLAZIONE - INSTALLATION - FIXATION - SOCKEL - ENGANCHE
13www.neri.biz
E
G
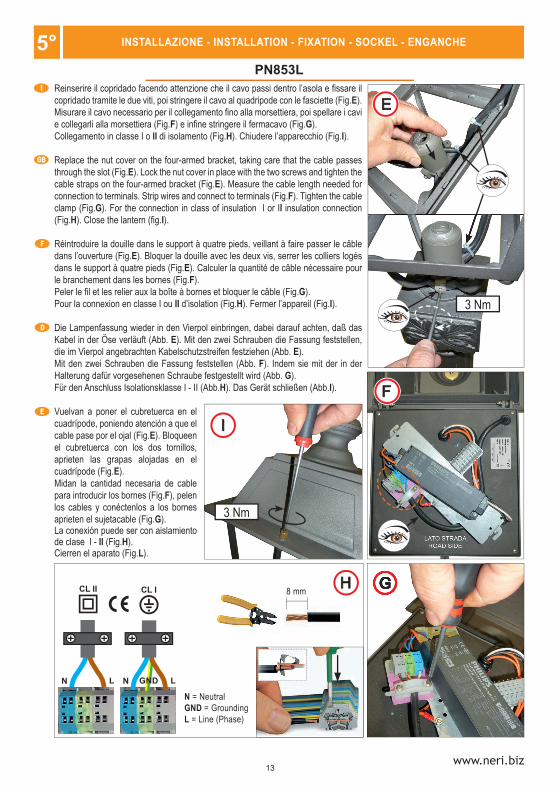
PN853LReinserire il copridado facendo attenzione che il cavo passi dentro l’asola e fi ssare il copridado tramite le due viti, poi stringere il cavo al quadripode con le fasciette (Fig.E). Misurare il cavo necessario per il collegamento fi no alla morsettiera, poi spellare i cavi e collegarli alla morsettiera (Fig.F) e infi ne stringere il fermacavo (Fig.G).Collegamento in classe I o II di isolamento (Fig.H). Chiudere l’apparecchio (Fig.I).
Replace the nut cover on the four-armed bracket, taking care that the cable passes through the slot (Fig.E). Lock the nut cover in place with the two screws and tighten the cable straps on the four-armed bracket (Fig.E). Measure the cable length needed for connection to terminals. Strip wires and connect to terminals (Fig.F). Tighten the cable clamp (Fig.G). For the connection in class of insulation I or II insulation connection (Fig.H). Close the lantern (fi g.I).
Réintroduire la douille dans le support à quatre pieds, veillant à faire passer le câble dans l’ouverture (Fig.E). Bloquer la douille avec les deux vis, serrer les colliers logés dans le support à quatre pieds (Fig.E). Calculer la quantité de câble nécessaire pour le branchement dans les bornes (Fig.F). Peler le fi l et les relier aux la boîte à bornes et bloquer le câble (Fig.G). Pour la connexion en classe I ou II d’isolation (Fig.H). Fermer l’appareil (Fig.I).
Die Lampenfassung wieder in den Vierpol einbringen, dabei darauf achten, daß das Kabel in der Öse verläuft (Abb. E). Mit den zwei Schrauben die Fassung feststellen, die im Vierpol angebrachten Kabelschutzstreifen festziehen (Abb. E). Mit den zwei Schrauben die Fassung feststellen (Abb. F). Indem sie mit der in der Halterung dafür vorgesehenen Schraube festgestellt wird (Abb. G). Für den Anschluss Isolationsklasse I - II (Abb.H). Das Gerät schließen (Abb.I).
Vuelvan a poner el cubretuerca en el cuadrípode, poniendo atención a que el cable pase por el ojal (Fig.E). Bloqueen el cubretuerca con los dos tornillos, aprieten las grapas alojadas en el cuadrípode (Fig.E). Midan la cantidad necesaria de cable para introducir los bornes (Fig.F), pelen los cables y conéctenlos a los bornes aprieten el sujetacable (Fig.G). La conexión puede ser con aislamiento de clase I - II (Fig.H).Cierren el aparato (Fig.L).
3 Nm
F
GG8 mmCL I
N LGND
CL II
N L
N = Neutral GND = Grounding L = Line (Phase)
I
3 Nm
H
GB
E
D
F
I
1°5° INSTALLAZIONE - INSTALLATION - FIXATION - SOCKEL - ENGANCHE
14
1
B
A
SN853L
C
3 Nm
60 cm
D
8 mmCL I
N LGND
CL II
N L
N = Neutral GND = Grounding L = Line (Phase)
E
3 Nm
I
1°5° INSTALLAZIONE - INSTALLATION - FIXATION - SOCKEL - ENGANCHE
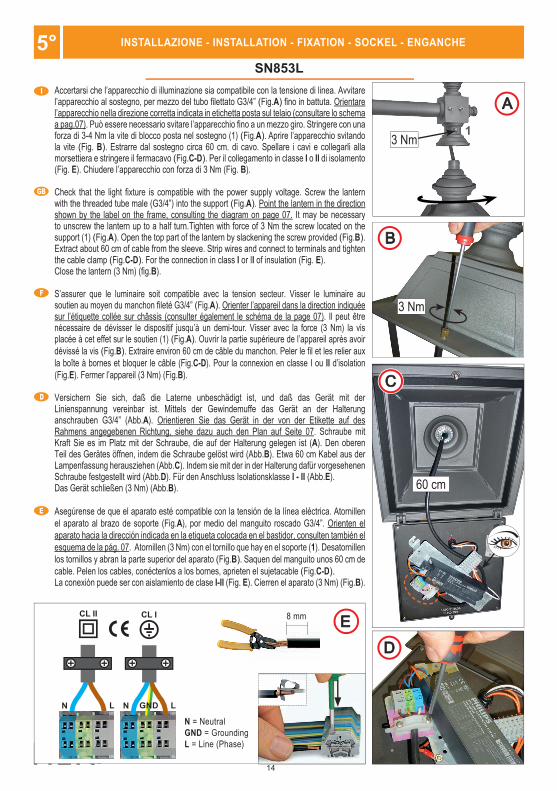
Accertarsi che l’apparecchio di illuminazione sia compatibile con la tensione di linea. Avvitare l’apparecchio al sostegno, per mezzo del tubo fi lettato G3/4” (Fig.A) fi no in battuta. Orientare l’apparecchio nella direzione corretta indicata in etichetta posta sul telaio (consultare lo schema a pag.07). Può essere necessario svitare l’apparecchio fi no a un mezzo giro. Stringere con una forza di 3-4 Nm la vite di blocco posta nel sostegno (1) (Fig.A). Aprire l’apparecchio svitando la vite (Fig. B). Estrarre dal sostegno circa 60 cm. di cavo. Spellare i cavi e collegarli alla morsettiera e stringere il fermacavo (Fig.C-D). Per il collegamento in classe I o II di isolamento (Fig. E). Chiudere l’apparecchio con forza di 3 Nm (Fig. B).
Check that the light fi xture is compatible with the power supply voltage. Screw the lantern with the threaded tube male (G3/4”) into the support (Fig.A). Point the lantern in the direction shown by the label on the frame, consulting the diagram on page 07. It may be necessary to unscrew the lantern up to a half turn.Tighten with force of 3 Nm the screw located on the support (1) (Fig.A). Open the top part of the lantern by slackening the screw provided (Fig.B). Extract about 60 cm of cable from the sleeve. Strip wires and connect to terminals and tighten the cable clamp (Fig.C-D). For the connection in class I or II of insulation (Fig. E). Close the lantern (3 Nm) (fi g.B).
S’assurer que le luminaire soit compatible avec la tension secteur. Visser le luminaire au soutien au moyen du manchon fi leté G3/4” (Fig.A). Orienter l’appareil dans la direction indiquée sur l’étiquette collée sur châssis (consulter également le schéma de la page 07). Il peut être nécessaire de dévisser le dispositif jusqu’à un demi-tour. Visser avec la force (3 Nm) la vis placée à cet effet sur le soutien (1) (Fig.A). Ouvrir la partie supérieure de l’appareil après avoir dévissé la vis (Fig.B). Extraire environ 60 cm de câble du manchon. Peler le fi l et les relier aux la boîte à bornes et bloquer le câble (Fig.C-D). Pour la connexion en classe I ou II d’isolation (Fig.E). Fermer l’appareil (3 Nm) (Fig.B).
Versichern Sie sich, daß die Laterne unbeschädigt ist, und daß das Gerät mit der Linienspannung vereinbar ist. Mittels der Gewindemuffe das Gerät an der Halterung anschrauben G3/4” (Abb.A). Orientieren Sie das Gerät in der von der Etikette auf des Rahmens angegebenen Richtung, siehe dazu auch den Plan auf Seite 07. Schraube mit Kraft Sie es im Platz mit der Schraube, die auf der Halterung gelegen ist (A). Den oberen Teil des Gerätes öffnen, indem die Schraube gelöst wird (Abb.B). Etwa 60 cm Kabel aus der Lampenfassung herausziehen (Abb.C). Indem sie mit der in der Halterung dafür vorgesehenen Schraube festgestellt wird (Abb.D). Für den Anschluss Isolationsklasse I - II (Abb.E). Das Gerät schließen (3 Nm) (Abb.B).
Asegúrense de que el aparato esté compatible con la tensión de la línea eléctrica. Atornillen el aparato al brazo de soporte (Fig.A), por medio del manguito roscado G3/4”. Orienten el aparato hacia la dirección indicada en la etiqueta colocada en el bastidor, consulten también el esquema de la pág. 07. Atornillen (3 Nm) con el tornillo que hay en el soporte (1). Desatornillen los tornillos y abran la parte superior del aparato (Fig.B). Saquen del manguito unos 60 cm de cable. Pelen los cables, conéctenlos a los bornes, aprieten el sujetacable (Fig.C-D). La conexión puede ser con aislamiento de clase I-II (Fig. E). Cierren el aparato (3 Nm) (Fig.B).
GB
F
D
E

15www.neri.biz
AModule LED
3000KCode lm W lm/W1P2 2.500 27 791P4 3.500 39 76
Module LED
4000KCode lm W lm/W3P2 2.500 26 823P4 3.500 36 82
I
GB
D
F
E
1°6° OTTICHE - REFLECTOR - OPTIK - ELEMENTE - REFLECTORES
1°7° TAGLIE DI FLUSSO - LUMINOUS FLUX OUTPUT - TAILLES DE FLUX LICHTSTROMABGABEN- CLASES LUMÍNICAS
Taglia di fl usso. L’apparecchio è confi gurabile in origine con taglie di fl usso diversifi cati in funzione delle effettive necessità illuminotecniche, con due possibili scelte della temperatura di colore 3.000K o 4.000K.
Luminous fl ux output.The fi xture can be confi gured at source with two luminous fl ux outputs which are diversifi ed depending on real lighting needs, with two possible colour temperature choices (3,000K or 4,000K).
Tailles de fl ux. L’appareil peut être confi guré à l’origine avec des tailles de fl ux diversifi ées en fonction des nécessités effectives d’éclairage, avec deux choix possibles de la température de couleur 3.000K ou 4.000K.
Lichtstromabgabe. Das Gerät kann ursprünglich mit je nach den tatsächlichen beleuchtungstechnischen Anforderungen unterschiedlichen Lichtstromabgaben mit zwei möglichen Farbtemperaturen von 3.000K bzw. 4.000K konfi guriert werden.
Clase lumínica.En su confi guración original el aparato posee clases lumínicas diversifi cadas en función de las necesidades luminotécnicas reales, con dos posibilidades de temperatura de color 3000K o 4000K.
3500LM 3000K 39W
NLG 02
PN853L021P402
A B0202 0606I
GB
F
D
E
Light 853 sono confi gurati con due possibili sistemi ottici:• ottica 02 stradale (soddisfa le classi illuminotecniche CE) (Fig. A);• ottica 06 aree miste (soddisfa le classi illuminotecniche S) (Fig.B).
Light 853, may be confi gured with two possible optic systems:Optic 02 streetlight (meet CE lighting classes) (Fig. A) - Optic 06 rmixed area - (meet S lighting classes) (Fig. B).
Light 853 peuvent être confi gurés avec deux systèmes optiques possibles: Optique 02 pour éclairage de rues (satisfaisant les classes d’éclairage CE) (Fig. A) - Optique 06 pour éclairage de zones mixtes (satisfaisant les classes d’éclairage S) (Fig. B).
Die Geräte Light 853 können mit zwei verschiedenen optischen Systemen konfi guriert werden: Straßenoptik 02 (erfüllt die Anforderungen der Beleuchtungsklassen CE) (Abb. A) - Optik für Mischzonen 06 (gemischten Gebieten; erfüllt die Anforderungen der Beleuchtungsklassen S) (Abb. B).
Los aparatos Light 853 se pueden confi gurar mediante los sistemas ópticos: Óptica 02 para carreteras (satisface las clases luminotécnicas CE) (Fig. A) - Óptica 06 para áreas mixtas (satisface las clases luminotécnicas S) (Fig. B).
120-277V 50/60Hz IP55
16
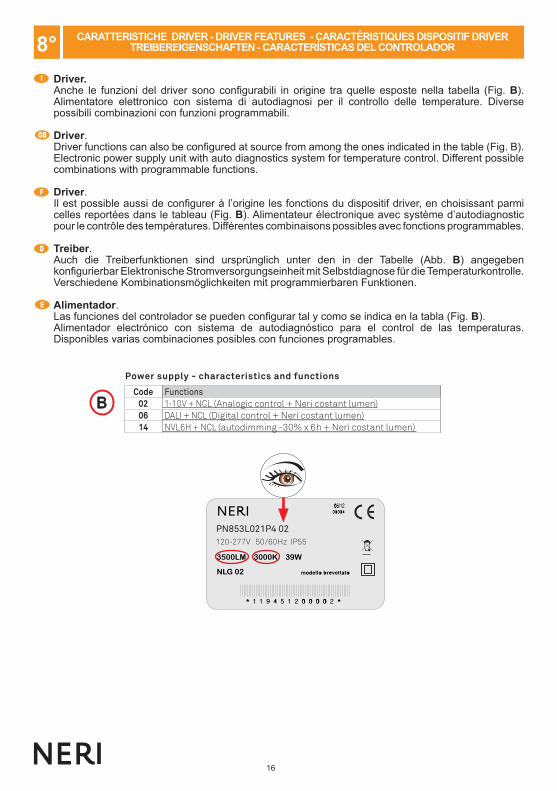
B
Power supply - characteristics and functions
Code Functions02 1-10V + NCL (Analogic control + Neri costant lumen)06 DALI + NCL (Digital control + Neri costant lumen)14 NVL6H + NCL (autodimming -30% x 6h + Neri costant lumen)
I
GB
D
F
E
3500LM 3000K 39W
NLG 02
PN853L021P4 02120-277V 50/60Hz IP55
Driver. Anche le funzioni del driver sono confi gurabili in origine tra quelle esposte nella tabella (Fig. B). Alimentatore elettronico con sistema di autodiagnosi per il controllo delle temperature. Diverse possibili combinazioni con funzioni programmabili.
Driver. Driver functions can also be confi gured at source from among the ones indicated in the table (Fig. B).Electronic power supply unit with auto diagnostics system for temperature control. Different possible combinations with programmable functions.
Driver. Il est possible aussi de confi gurer à l’origine les fonctions du dispositif driver, en choisissant parmi celles reportées dans le tableau (Fig. B). Alimentateur électronique avec système d’autodiagnostic pour le contrôle des températures. Différentes combinaisons possibles avec fonctions programmables.
Treiber. Auch die Treiberfunktionen sind ursprünglich unter den in der Tabelle (Abb. B) angegeben konfi gurierbar Elektronische Stromversorgungseinheit mit Selbstdiagnose für die Temperaturkontrolle. Verschiedene Kombinationsmöglichkeiten mit programmierbaren Funktionen.
Alimentador. Las funciones del controlador se pueden confi gurar tal y como se indica en la tabla (Fig. B). Alimentador electrónico con sistema de autodiagnóstico para el control de las temperaturas. Disponibles varias combinaciones posibles con funciones programables.
1°8° CARATTERISTICHE DRIVER - DRIVER FEATURES - CARACTÉRISTIQUES DISPOSITIF DRIVERTREIBEREIGENSCHAFTEN - CARACTERÍSTICAS DEL CONTROLADOR
17www.neri.biz
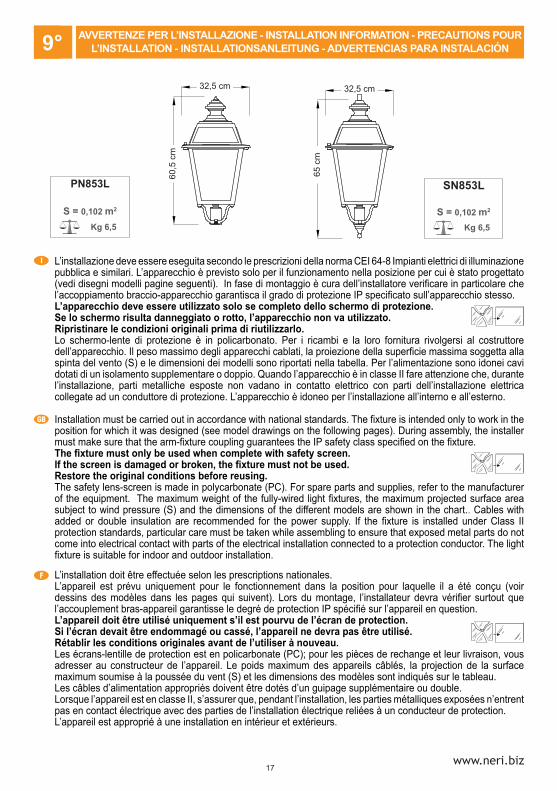
SN853L
S = 0,102 m2
Kg 6,5
PN853L
S = 0,102 m2
Kg 6,5
32,5 cm
60,5
cm
32,5 cm
65 c
m
I
GB
F
1°9° AVVERTENZE PER L’INSTALLAZIONE - INSTALLATION INFORMATION - PRECAUTIONS POUR L’INSTALLATION - INSTALLATIONSANLEITUNG - ADVERTENCIAS PARA INSTALACIÓN
L’installazione deve essere eseguita secondo le prescrizioni della norma CEI 64-8 Impianti elettrici di illuminazione pubblica e similari. L’apparecchio è previsto solo per il funzionamento nella posizione per cui è stato progettato (vedi disegni modelli pagine seguenti). In fase di montaggio è cura dell’installatore verifi care in particolare che l’accoppiamento braccio-apparecchio garantisca il grado di protezione IP specifi cato sull’apparecchio stesso. L’apparecchio deve essere utilizzato solo se completo dello schermo di protezione. Se lo schermo risulta danneggiato o rotto, l’apparecchio non va utilizzato. Ripristinare le condizioni originali prima di riutilizzarlo.Lo schermo-lente di protezione è in policarbonato. Per i ricambi e la loro fornitura rivolgersi al costruttore dell’apparecchio. Il peso massimo degli apparecchi cablati, la proiezione della superfi cie massima soggetta alla spinta del vento (S) e le dimensioni dei modelli sono riportati nella tabella. Per l’alimentazione sono idonei cavi dotati di un isolamento supplementare o doppio. Quando l’apparecchio è in classe II fare attenzione che, durante l’installazione, parti metalliche esposte non vadano in contatto elettrico con parti dell’installazione elettrica collegate ad un conduttore di protezione. L’apparecchio è idoneo per l’installazione all’interno e all’esterno.
Installation must be carried out in accordance with national standards. The fi xture is intended only to work in the position for which it was designed (see model drawings on the following pages). During assembly, the installer must make sure that the arm-fi xture coupling guarantees the IP safety class specifi ed on the fi xture.The fi xture must only be used when complete with safety screen.If the screen is damaged or broken, the fi xture must not be used. Restore the original conditions before reusing. The safety lens-screen is made in polycarbonate (PC). For spare parts and supplies, refer to the manufacturer of the equipment. The maximum weight of the fully-wired light fi xtures, the maximum projected surface area subject to wind pressure (S) and the dimensions of the different models are shown in the chart.. Cables with added or double insulation are recommended for the power supply. If the fi xture is installed under Class II protection standards, particular care must be taken while assembling to ensure that exposed metal parts do not come into electrical contact with parts of the electrical installation connected to a protection conductor. The light fi xture is suitable for indoor and outdoor installation.
L’installation doit être effectuée selon les prescriptions nationales. L’appareil est prévu uniquement pour le fonctionnement dans la position pour laquelle il a été conçu (voir dessins des modèles dans les pages qui suivent). Lors du montage, l’installateur devra vérifi er surtout que l’accouplement bras-appareil garantisse le degré de protection IP spécifi é sur l’appareil en question. L’appareil doit être utilisé uniquement s’il est pourvu de l’écran de protection. Si l’écran devait être endommagé ou cassé, l’appareil ne devra pas être utilisé. Rétablir les conditions originales avant de l’utiliser à nouveau.Les écrans-lentille de protection est en policarbonate (PC); pour les pièces de rechange et leur livraison, vous adresser au constructeur de l’appareil. Le poids maximum des appareils câblés, la projection de la surface maximum soumise à la poussée du vent (S) et les dimensions des modèles sont indiqués sur le tableau. Les câbles d’alimentation appropriés doivent être dotés d’un guipage supplémentaire ou double. Lorsque l’appareil est en classe II, s’assurer que, pendant l’installation, les parties métalliques exposées n’entrent pas en contact électrique avec des parties de l’installation électrique reliées à un conducteur de protection. L’appareil est approprié à une installation en intérieur et extérieurs.
18
D
E
1°9° AVVERTENZE PER L’INSTALLAZIONE - INSTALLATION INFORMATION - PRECAUTIONS POUR L’INSTALLATION - INSTALLATIONSANLEITUNG - ADVERTENCIAS PARA INSTALACIÓN
Die Installierung wird ausschließlich nach den Vorschriften der deutschen Normen durchgeführt. Der Apparat ist nur für den Betrieb in der Position, für die er projektiert wurde, vorgesehen (siehe Modellzeichnungen auf den nachstehenden Seiten). Bei der Installation liegt es in der Verantwortung des Installateurs, insbesondere sicherzustellen, dass die Kopplung Arm-Apparat den auf dem Apparat selbst spezifi zierten IP Schutzgrad garantiert.Das Gerät darf nur komplett mit Schutzschirm benutzt werden. Sollte der Schirm beschädigt oder zerstört sein, darf der Apparat nicht benutzt werden. Stellen Sie den Originalzustand vor der erneuten Benutzung wieder her. Das Gerät kann mit Bildschirm-Objektiv polycarbonat versehen sein (PC). Nehmen Sie für Ersatzteile und deren Lieferung Kontakt mit dem Hersteller des Apparats auf. Das Höchstgewicht des verkabelten Apparates, die Projektion der Windstößen ausgesetzten maximalen Oberfl äche (S) und die Abmessungen der Modelle werden in der Tabelle aufgeführt. Wenn der Apparat zur Klasse II gehört, muss man bei der Installation darauf achten, dass keine Metallteile mit Teilen der Elektroinstallation Kontakt bekommen, die mit einem Schutzleiter verbunden sind. Der Apparat ist für interne und externe Installation verwendbar.
La instalación debe efectuarse según las prescripciones nacionales. El aparato sólo puede funcionar en la posición para la cual ha sido proyectado (véanse los dibujos de los modelos en las páginas siguientes). Durante el montaje, el instalador debe controlar atentamente que el acoplamiento brazo-aparato garantice el grado de protección IP especifi cado en el aparato en cuestión. El aparato sólo se puede utilizar con las pantallas de protección. Si la pantalla se daña o se rompe, no utilicen el aparato. Restablezcan las condiciones originales antes de volverlo a utilizar. La pantalla de protección está en policarbonato (PC); para los recambios y su suministro, ponerse en contacto con el fabricante del aparato. El peso máximo de los aparatos cableados, la protección máxima de la superfi cie sujeta a la fuerza del viento (S) y las dimensiones de los modelos aparecen en la tabla. Para la alimentación son idóneos los cables dotados de aislamiento suplementario o doble. Cuando el aparato está en clase II, presten atención a que durante la instalación las partes metálicas expuestas no entren en contacto eléctrico con partes de la instalación eléctrica conectadas a un conductor de protección. El aparato es idóneo para la instalación interna y externa.
SN853L
S = 0,102 m2
Kg 6,5
PN853L
S = 0,102 m2
Kg 6,5
32,5 cm
60,5
cm
32,5 cm
65 c
m
19www.neri.biz
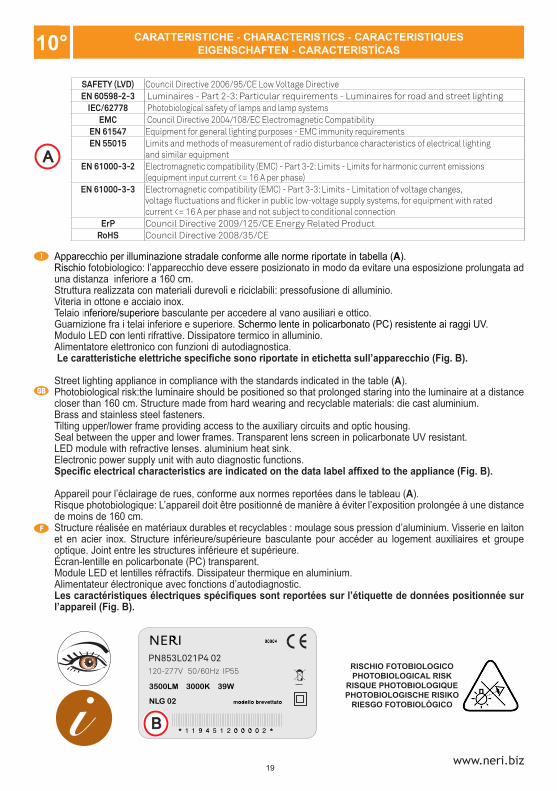
A
SAFETY (LVD) Council Directive 2006/95/CE Low Voltage DirectiveEN 60598-2-3 Luminaires - Part 2-3: Particular requirements - Luminaires for road and street lighting
IEC/62778 Photobiological safety of lamps and lamp systemsEMC Council Directive 2004/108/EC Electromagnetic Compatibility
EN 61547 Equipment for general lighting purposes - EMC immunity requirementsEN 55015 Limits and methods of measurement of radio disturbance characteristics of electrical lighting
and similar equipmentEN 61000-3-2 Electromagnetic compatibility (EMC) - Part 3-2: Limits - Limits for harmonic current emissions
(equipment input current <= 16 A per phase)EN 61000-3-3 Electromagnetic compatibility (EMC) - Part 3-3: Limits - Limitation of voltage changes,
voltage fl uctuations and fl icker in public low-voltage supply systems, for equipment with rated current <= 16 A per phase and not subject to conditional connection
ErP Council Directive 2009/125/CE Energy Related ProductRoHS Council Directive 2008/35/CE
RISCHIO FOTOBIOLOGICOPHOTOBIOLOGICAL RISK
RISQUE PHOTOBIOLOGIQUEPHOTOBIOLOGISCHE RISIKO
RIESGO FOTOBIOLÓGICO
3500LM 3000K 39W
NLG 02
PN853L021P4 02120-277V 50/60Hz IP55
B
I
GB
F
1°10° CARATTERISTICHE - CHARACTERISTICS - CARACTERISTIQUES EIGENSCHAFTEN - CARACTERISTÍCAS
Apparecchio per illuminazione stradale conforme alle norme riportate in tabella (A). Rischio fotobiologico: l’apparecchio deve essere posizionato in modo da evitare una esposizione prolungata ad una distanza inferiore a 160 cm. Struttura realizzata con materiali durevoli e riciclabili: pressofusione di alluminio. Viteria in ottone e acciaio inox. Telaio inferiore/superiore basculante per accedere al vano ausiliari e ottico. Guarnizione fra i telai inferiore e superiore. Schermo lente in policarbonato (PC) resistente ai raggi UV. Modulo LED con lenti rifrattive. Dissipatore termico in alluminio. Alimentatore elettronico con funzioni di autodiagnostica. Le caratteristiche elettriche specifi che sono riportate in etichetta sull’apparecchio (Fig. B).
Street lighting appliance in compliance with the standards indicated in the table (A). Photobiological risk:the luminaire should be positioned so that prolonged staring into the luminaire at a distancecloser than 160 cm. Structure made from hard wearing and recyclable materials: die cast aluminium. Brass and stainless steel fasteners. Tilting upper/lower frame providing access to the auxiliary circuits and optic housing. Seal between the upper and lower frames. Transparent lens screen in policarbonate UV resistant. LED module with refractive lenses. aluminium heat sink. Electronic power supply unit with auto diagnostic functions. Specifi c electrical characteristics are indicated on the data label affi xed to the appliance (Fig. B).
Appareil pour l’éclairage de rues, conforme aux normes reportées dans le tableau (A). Risque photobiologique: L’appareil doit être positionné de manière à éviter l’exposition prolongée à une distance de moins de 160 cm.Structure réalisée en matériaux durables et recyclables : moulage sous pression d’aluminium. Visserie en laiton et en acier inox. Structure inférieure/supérieure basculante pour accéder au logement auxiliaires et groupe optique. Joint entre les structures inférieure et supérieure. Écran-lentille en policarbonate (PC) transparent. Module LED et lentilles réfractifs. Dissipateur thermique en aluminium. Alimentateur électronique avec fonctions d’autodiagnostic. Les caractéristiques électriques spécifi ques sont reportées sur l’étiquette de données positionnée sur l’appareil (Fig. B).
20
3500LM 3000K 39W
NLG 02
PN853L021P4 02120-277V 50/60Hz IP55
B
A
SAFETY (LVD) Council Directive 2006/95/CE Low Voltage DirectiveEN 60598-2-3 Luminaires - Part 2-3: Particular requirements - Luminaires for road and street lighting
IEC/62778 Photobiological safety of lamps and lamp systemsEMC Council Directive 2004/108/EC Electromagnetic Compatibility
EN 61547 Equipment for general lighting purposes - EMC immunity requirementsEN 55015 Limits and methods of measurement of radio disturbance characteristics of electrical lighting
and similar equipmentEN 61000-3-2 Electromagnetic compatibility (EMC) - Part 3-2: Limits - Limits for harmonic current emissions
(equipment input current <= 16 A per phase)EN 61000-3-3 Electromagnetic compatibility (EMC) - Part 3-3: Limits - Limitation of voltage changes,
voltage fl uctuations and fl icker in public low-voltage supply systems, for equipment with rated current <= 16 A per phase and not subject to conditional connection
ErP Council Directive 2009/125/CE Energy Related ProductRoHS Council Directive 2008/35/CE
RISCHIO FOTOBIOLOGICOPHOTOBIOLOGICAL RISK
RISQUE PHOTOBIOLOGIQUEPHOTOBIOLOGISCHE RISIKO
RIESGO FOTOBIOLÓGICO
D
E
1°10° CARATTERISTICHE - CHARACTERISTICS - CARACTERISTIQUESEIGENSCHAFTEN - CARACTERISTÍCAS
Gerät zur Straßenbeleuchtung, entsprechend den Normen lt. Tabelle (A). Photobiologische Gefahr: Das Gerät muss so positioniert werden, wie in einem Abstand von weniger als 160 cm längerer Exposition zu vermeiden.. Gehäuse aus dauerhaften und recycelbaren Werkstoffen: Aluminiumdruckguss und Aluminiumblech. Kleinteile aus Messing und rostfreiem Stahl. Unterer/oberer Rahmen klappbar für den Zugriff auf den Anschlussraum und die Optik. Dichtung zwischen unterem und oberem Rahmen. Leuchtenabdeckung aus geeistem, durchsichtigem Policarbonat (PC). Modul LED und Brechungslinsen für jede einzelne LED. Kühlkörper aus Aluminium. Elektronisches Netzgerät mit Eigendiagnosefunktion.Die elektrischen Eigenschaften sind auf dem Leistungsschild des Geräts angegeben (Abb. B).
Luminaria vial conforme con las normas incluidas en la tabla (A). Fotobiológico peligro: Luminaria debe colocarse de manera que se evite la exposición prolongada a una distancia de menos de 160 cm. Estructura realizada con materiales resistentes y reciclables: aluminio presofundido. Tornillos de latón y acero inoxidable. Bastidor inferior o superior basculante para acceder al compartimiento de auxiliares y óptico. Junta entre los bastidores inferior y superior. Pantalla de policarbonato transparente (PC). Módulo LED y lentes refractivas. Disipador térmico de aluminio. Alimentador electrónico con autodiagnóstico.

21www.neri.biz
I
GB
F
D
E
I
GB
F
D
E
L’apparecchio è stato realizzato a regola d’arte. La sua durata ed effi cienza sarà migliore se usato correttamente e con interventi di manutenzione regolare. Questo apparecchio deve essere destinato solo all’uso per il quale è stato progettato, e cioè l’illuminazione di ambienti esterni-interni. Ogni altro uso è considerato improprio e pericoloso, ed il costruttore non può essere considerato responsabile per danni derivanti da un uso improprio e irragionevole.
The light fi xture has been manufactured in compliance with correct practice. Its duration and effi ciency will be greater if used correctly and with regular maintenance operations. This light fi xture must be installed only for the use for which it was designed, namely for the illumination of outdoor / indoor spaces. Any other use must be considered to be improper and dangerous, and the manufacturer cannot be held liable for any damage caused by improper and unreasonable use.
L’appareil a été réalisé dans les règles de l’art. Sa durée et son effi cacité seront meilleures s’il est utilisé correctement et soumis à de régulières interventions d’entretien. Cet appareil ne doit être destiné qu’à l’utilisation pour laquelle il a été conçu, à savoir, l’éclairage de milieux externe et interne. Toute autre utilisation étant considérée comme impropre et dangereuse, le constructeur décline toute responsabilité en cas de dommages dérivant d’une utilisation impropre et irraisonnable de l’appareil.
Der Apparat ist fachgerecht hergestellt worden. Seine Lebensdauer und Effi zienz wird besser sein, wenn er korrekt verwendet und regelrecht gewartet wird. Dieser Apparat darf nur für den Zweck vorgesehen werden, für den er entwickelt wurde, das ist: Beleuchten im externen und internen Bereich. Jede andere Verwendung ist als unsachgemäß und gefährlich anzusehen, und der Hersteller kann nicht verantwortlich für Schäden gemacht werden, die aus einem unsachgemäßen und unvernünftigen Gebrauch herrühren.
El aparato ha sido fabricado perfectamente. Su duración y efi ciencia resultarán mejores si se utiliza correctamente y se realizan intervenciones regulares de mantenimiento. Este aparato debe ser destinado exclusivamente al uso para el cual ha sido concebido, es decir: para alumbrar entornos interna y externa. Cualquier otro empleo se considera inadecuado y peligroso, y el constructor no puede ser considerado responsable de ello.
1°11° DESTINAZIONE D’USO - INTENDED USE - UTILISATION DES LUMINAIRES - ZWECKBESTIMMUNG - UTILIZACIÓN
La garanzia del costruttore opera per anni 2 (due) dalla data di fattura. La garanzia è esclusa nelle ipotesi in cui sia fatto un uso improprio dell’apparecchio, in caso di interventi o modifi che non autorizzate dalla costruttrice, e comunque ogni qualvolta non siano state rispettate le istruzioni del presente manuale. Qualsiasi intervento per modifi che alle parti meccaniche ed elettriche anche di lieve entità invalida ogni forma di garanzia e di responsabilità del costruttore.The manufacturer’s guarantee is valid for 2 (two) years from the date of invoicing. The guarantee is invalidated if the light fi xture is used improperly, in case of operations or modifi cations that have not been authorized by the manufacturer, and in all other situations in which the instructions given in this manual are not respected. Any kind of operation to modify mechanical or electrical components, even if only slight, will invalidate all forms of guarantee and liability of the manufacturer.La garantie du constructeur est valable 2 (deux) ans à compter de la date de la facture. La garantie perd toute validité en cas d’utilisation impropre de l’appareil, en cas d’interventions ou de modifi cations non autorisées par le constructeur et, quoi qu’il en soit, en cas de non-respect des instructions indiquées dans le présent manuel. Toute intervention de modifi cation sur les parties mécaniques et électriques, même légère, annule toute forme de garantie et de responsabilité du constructeur.Die Herstellergarantie gilt für 2 Jahre (zwei) ab dem Rechnungsdatum. Die Garantie wird ausgeschlossen bei unsachgemäßer Verwendung des Apparates, bei nicht vom Hersteller autorisierten Eingriffen oder Veränderungen und jedenfalls immer, wenn die Anweisungen dieser Anleitung nicht beachtet worden sind. Jede auch geringfügige Änderungsmaßnahme an mechanischen und elektrischen Teilen lässt jede Form von Garantie und Verantwortung des Herstellers ungültig werden.La garantía del fabricante es válida durante 2 años (dos), a partir de la fecha de facturación. Queda excluida la garantía cuando se realice un empleo inadecuado del aparato, en caso de intervenciones o modifi caciones no autorizadas por el fabricante, y en todo caso, cada vez que no hayan sido respetadas las instrucciones del presente manual. Cualquier intervención para realizar modifi caciones en las partes mecánicas y eléctricas, aunque sean de entidad leve, invalida cualquier forma de garantía y exime de la responsabilidad al fabricante.
1°12° GARANZIA - GARANTEE - GARANTIE - GARANTIE - GARANTIA
22
I
GB
F
D
E
SIMBOLI ED ETICHETTA - SYMBOLS AND LABEL- SYMBOLES ET ETIQUETTESYMBOLE UND AUFKLEBER - SÍMBOLOS Y ETIQUETAS1°13° GARANZIA ESTESA A 5 ANNI - WARRANTY EXTENDED TO 5 YEARS - GARANTIE ÉTENDUE
À 5 ANS - AUF 5 JAHRE ERWEITERTE GARANTIE - GARANTÍA ADICIONAL DE 5 AÑOS
1) NERI SpA garantisce che le sorgenti a LED e i componenti di alimentazione (drivers) impiegate nei prodotti a proprio marchio risultano esenti da vizi di fabbricazione e/o di materiale, quando utilizzati conformemente alle relative destinazioni d’impiego previste, per un periodo di cinque (5) anni dalla data della fattura. 2) La presente garanzia è rilasciata da NERI SpA a favore del Cliente sui Prodotti presenti nei propri cataloghi e comunque su quelli oggetto di fornitura di cui al precedente p.to 1.
1) NERI S.p.A guarantees that the LED light sources and the power supply components (drivers) used in NERI products, when used in accordance with their relative intended use, shall remain free from manufacturing and/or material defects for a period of fi ve (5) years as of the date of invoicing. 2) This guarantee is issued by NERI S.p.A to the Customer for products included in its catalogues and in any case to those objects of supply referred to in the previous point 1.
1) NERI SpA garantit que les sources à LED et les composants d’alimentation (drivers) utilisés dans les produits sous son propre marque sont exempts de tout vice de fabrication et/ou de matériel, en cas d’utilisation conforme aux relatives destinations d’usage prévues, pour une période de cinq (5) ans à compter de la date de la facture.2) La présente garantie est émise par NERI SpA en faveur du Client sur les Produits présents dans ses propres catalogues et en tout cas sur les produits objets d’une fourniture conformément au précédent point 1.
1) Die Firma NERI SpA gewährt eine 5-jährige Garantie auf Herstellungs- und Materialfehler der in ihren Produkten verwendeten LED-Lichtquellen und Stromversorgungskomponenten (Treiber), sofern diese Produkte in Einklang mit ihrem vorgesehenen Bestimmungszweck verwendet werden. 2) Diese Garantie wird dem Kunden von der Firma NERI SpA für die Produkte gewährt, die in ihrem Katalog aufgeführt und in jedem Fall Gegenstand der Lieferung gemäß dem vorherigen Punkt 1 sind.
1) NERI SpA garantiza que las fuentes de LED y los componentes de alimentación (controladores) utilizados en los productos de su marca no presentan defectos de fabricación ni de material, siempre y cuando se utilicen de acuerdo con su uso previsto, por un periodo de cinco (5) años desde la fecha indicada en la factura. 2) NERI SpA emite esta garantía a favor del Cliente para los productos incluidos en los catálogos de la marca y para todos los productos que forman parte del suministro descrito anteriormente en el punto 1.
23www.neri.biz
I
GB
F
D
E
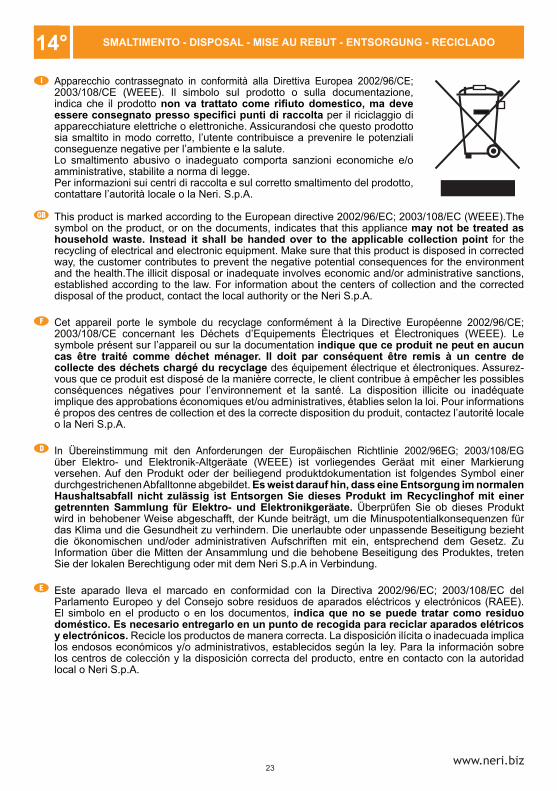
1°14° SMALTIMENTO - DISPOSAL - MISE AU REBUT - ENTSORGUNG - RECICLADO
Apparecchio contrassegnato in conformità alla Direttiva Europea 2002/96/CE; 2003/108/CE (WEEE). Il simbolo sul prodotto o sulla documentazione, indica che il prodotto non va trattato come rifi uto domestico, ma deve essere consegnato presso specifi ci punti di raccolta per il riciclaggio di apparecchiature elettriche o elettroniche. Assicurandosi che questo prodotto sia smaltito in modo corretto, l’utente contribuisce a prevenire le potenziali conseguenze negative per l’ambiente e la salute.Lo smaltimento abusivo o inadeguato comporta sanzioni economiche e/o amministrative, stabilite a norma di legge. Per informazioni sui centri di raccolta e sul corretto smaltimento del prodotto, contattare l’autorità locale o la Neri. S.p.A.
This product is marked according to the European directive 2002/96/EC; 2003/108/EC (WEEE).The symbol on the product, or on the documents, indicates that this appliance may not be treated as household waste. Instead it shall be handed over to the applicable collection point for the recycling of electrical and electronic equipment. Make sure that this product is disposed in corrected way, the customer contributes to prevent the negative potential consequences for the environment and the health.The illicit disposal or inadequate involves economic and/or administrative sanctions, established according to the law. For information about the centers of collection and the corrected disposal of the product, contact the local authority or the Neri S.p.A.
Cet appareil porte le symbole du recyclage conformément à la Directive Européenne 2002/96/CE; 2003/108/CE concernant les Déchets d’Equipements Èlectriques et Èlectroniques (WEEE). Le symbole présent sur l’appareil ou sur la documentation indique que ce produit ne peut en aucun cas être traité comme déchet ménager. Il doit par conséquent être remis à un centre de collecte des déchets chargé du recyclage des équipement électrique et électroniques. Assurez-vous que ce produit est disposé de la manière correcte, le client contribue à empêcher les possibles conséquences négatives pour l’environnement et la santé. La disposition illicite ou inadéquate implique des approbations économiques et/ou administratives, établies selon la loi. Pour informations é propos des centres de collection et des la correcte disposition du produit, contactez l’autorité locale o la Neri S.p.A.
In Übereinstimmung mit den Anforderungen der Europäischen Richtlinie 2002/96EG; 2003/108/EG über Elektro- und Elektronik-Altgeräate (WEEE) ist vorliegendes Geräat mit einer Markierung versehen. Auf den Produkt oder der beiliegend produktdokumentation ist folgendes Symbol einer durchgestrichenen Abfalltonne abgebildet. Es weist darauf hin, dass eine Entsorgung im normalen Haushaltsabfall nicht zulässig ist Entsorgen Sie dieses Produkt im Recyclinghof mit einer getrennten Sammlung für Elektro- und Elektronikgeräate. Überprüfen Sie ob dieses Produkt wird in behobener Weise abgeschafft, der Kunde beiträgt, um die Minuspotentialkonsequenzen für das Klima und die Gesundheit zu verhindern. Die unerlaubte oder unpassende Beseitigung bezieht die ökonomischen und/oder administrativen Aufschriften mit ein, entsprechend dem Gesetz. Zu Information über die Mitten der Ansammlung und die behobene Beseitigung des Produktes, treten Sie der lokalen Berechtigung oder mit dem Neri S.p.A in Verbindung.
Este aparado lleva el marcado en conformidad con la Directiva 2002/96/EC; 2003/108/EC del Parlamento Europeo y del Consejo sobre residuos de aparados eléctricos y electrónicos (RAEE). El simbolo en el producto o en los documentos, indica que no se puede tratar como residuo doméstico. Es necesario entregarlo en un punto de recogida para reciclar aparados elétricos y electrónicos. Recicle los productos de manera correcta. La disposición ilícita o inadecuada implica los endosos económicos y/o administrativos, establecidos según la ley. Para la información sobre los centros de colección y la disposición correcta del producto, entre en contacto con la autoridad local o Neri S.p.A.
24
ON
OFF
A
I
GB
I
GB
F
D
E
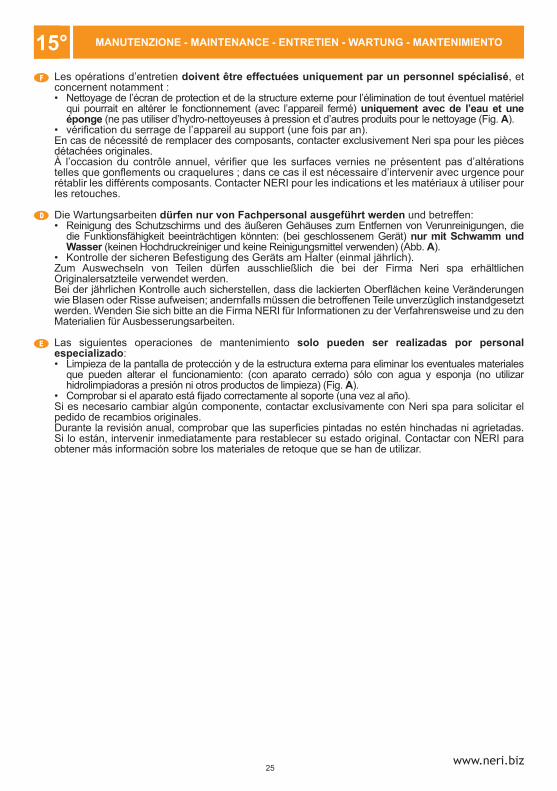
1°15° MANUTENZIONE - MAINTENANCE - ENTRETIEN - WARTUNG - MANTENIMIENTO
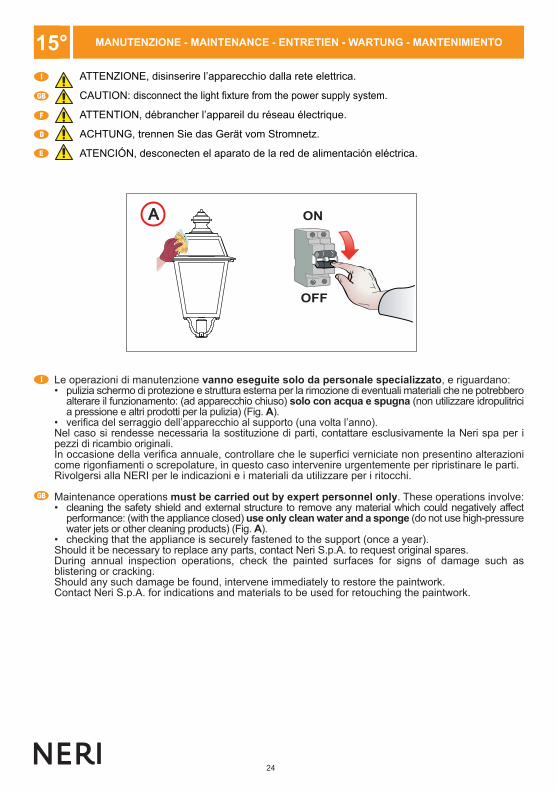
Le operazioni di manutenzione vanno eseguite solo da personale specializzato, e riguardano: • pulizia schermo di protezione e struttura esterna per la rimozione di eventuali materiali che ne potrebbero
alterare il funzionamento: (ad apparecchio chiuso) solo con acqua e spugna (non utilizzare idropulitrici a pressione e altri prodotti per la pulizia) (Fig. A).
• verifi ca del serraggio dell’apparecchio al supporto (una volta l’anno).Nel caso si rendesse necessaria la sostituzione di parti, contattare esclusivamente la Neri spa per i pezzi di ricambio originali. In occasione della verifi ca annuale, controllare che le superfi ci verniciate non presentino alterazioni come rigonfi amenti o screpolature, in questo caso intervenire urgentemente per ripristinare le parti. Rivolgersi alla NERI per le indicazioni e i materiali da utilizzare per i ritocchi.
Maintenance operations must be carried out by expert personnel only. These operations involve: • cleaning the safety shield and external structure to remove any material which could negatively affect
performance: (with the appliance closed) use only clean water and a sponge (do not use high-pressure water jets or other cleaning products) (Fig. A).
• checking that the appliance is securely fastened to the support (once a year).Should it be necessary to replace any parts, contact Neri S.p.A. to request original spares. During annual inspection operations, check the painted surfaces for signs of damage such as blistering or cracking. Should any such damage be found, intervene immediately to restore the paintwork. Contact Neri S.p.A. for indications and materials to be used for retouching the paintwork.
ATTENZIONE, disinserire l’apparecchio dalla rete elettrica.
CAUTION: disconnect the light fi xture from the power supply system.
ATTENTION, débrancher l’appareil du réseau électrique.
ACHTUNG, trennen Sie das Gerät vom Stromnetz.
ATENCIÓN, desconecten el aparato de la red de alimentación eléctrica.
25www.neri.biz
F
D
1°15° MANUTENZIONE - MAINTENANCE - ENTRETIEN - WARTUNG - MANTENIMIENTO
Les opérations d’entretien doivent être effectuées uniquement par un personnel spécialisé, et concernent notamment : • Nettoyage de l’écran de protection et de la structure externe pour l’élimination de tout éventuel matériel
qui pourrait en altérer le fonctionnement (avec l’appareil fermé) uniquement avec de l’eau et une éponge (ne pas utiliser d’hydro-nettoyeuses à pression et d’autres produits pour le nettoyage (Fig. A).
• vérifi cation du serrage de l’appareil au support (une fois par an).En cas de nécessité de remplacer des composants, contacter exclusivement Neri spa pour les pièces détachées originales. À l’occasion du contrôle annuel, vérifi er que les surfaces vernies ne présentent pas d’altérations telles que gonfl ements ou craquelures ; dans ce cas il est nécessaire d’intervenir avec urgence pour rétablir les différents composants. Contacter NERI pour les indications et les matériaux à utiliser pour les retouches.
Die Wartungsarbeiten dürfen nur von Fachpersonal ausgeführt werden und betreffen: • Reinigung des Schutzschirms und des äußeren Gehäuses zum Entfernen von Verunreinigungen, die
die Funktionsfähigkeit beeinträchtigen könnten: (bei geschlossenem Gerät) nur mit Schwamm und Wasser (keinen Hochdruckreiniger und keine Reinigungsmittel verwenden) (Abb. A).
• Kontrolle der sicheren Befestigung des Geräts am Halter (einmal jährlich).Zum Auswechseln von Teilen dürfen ausschließlich die bei der Firma Neri spa erhältlichen Originalersatzteile verwendet werden. Bei der jährlichen Kontrolle auch sicherstellen, dass die lackierten Oberfl ächen keine Veränderungen wie Blasen oder Risse aufweisen; andernfalls müssen die betroffenen Teile unverzüglich instandgesetzt werden. Wenden Sie sich bitte an die Firma NERI für Informationen zu der Verfahrensweise und zu den Materialien für Ausbesserungsarbeiten.
Las siguientes operaciones de mantenimiento solo pueden ser realizadas por personal especializado: • Limpieza de la pantalla de protección y de la estructura externa para eliminar los eventuales materiales
que pueden alterar el funcionamiento: (con aparato cerrado) sólo con agua y esponja (no utilizar hidrolimpiadoras a presión ni otros productos de limpieza) (Fig. A).
• Comprobar si el aparato está fi jado correctamente al soporte (una vez al año).Si es necesario cambiar algún componente, contactar exclusivamente con Neri spa para solicitar el pedido de recambios originales. Durante la revisión anual, comprobar que las superfi cies pintadas no estén hinchadas ni agrietadas. Si lo están, intervenir inmediatamente para restablecer su estado original. Contactar con NERI para obtener más información sobre los materiales de retoque que se han de utilizar.
E
26
I
GB
F
D
E
1°16° RICAMBI - SPARE PARTS - PIÈCES DE RECHANGE - ERSATZTEILE - RECAMBIOS
Essendo il corpo illuminante dotato ci componenti elettronici di alta tecnologia, le sostituzioni di componenti danneggiati con ricambi originali deve essere fatta solo da personale specializzato, responsabile dell’intervento e del ripristino alle condizioni originali dell’apparecchio autorizzato dalla NERI spa.Rivolgersi direttamente alla Neri spa per la manutenzione. Rivolgersi direttamente alla Neri spa per la manutenzione.
Being as the light fi xture is fi tted with high-tech electronic components, the replacement of damaged parts with original spares must be carried out exclusively by expert personnel authorized by Neri S.p.A.. Said personnel is responsible for carrying out the necessary work and restoring the original operating conditions.Please contact Neri S.p.A. directly for maintenance needs.Please contact Neri S.p.A. directly for maintenance needs.
L’armature d’éclairage est munie de composants électroniques de haute technologie, donc le remplacement de composants endommagés, avec des pièces de rechange originales, doit être effectué uniquement par un personnel spécialisé, responsable de l’intervention et du rétablissement des conditions originelles de l’appareil et autorisé par NERI spa.S’adresser directement à Neri spa pour l’entretien.S’adresser directement à Neri spa pour l’entretien.
Da der Leuchtkörper elektronische High-Tech-Komponenten enthält, darf der Austausch von defekten Komponenten durch Originalersatzteile nur von Fachpersonal ausgeführt werden, das von der Firma Neri spa hierzu autorisiert wurde und für die Ausführung der Arbeit und die Wiederherstellung des ursprünglichen Zustands des Geräts verantwortlich ist.Wenden Sie sich bitte für die Wartung direkt an die Firma Neri spa.Wenden Sie sich bitte für die Wartung direkt an die Firma Neri spa.
El cuerpo de iluminación incorpora componentes electrónicos de alta tecnología, por ello El cuerpo de iluminación incorpora componentes electrónicos de alta tecnología, por ello los componentes dañados deben ser sustituidos con recambios originales exclusivamente los componentes dañados deben ser sustituidos con recambios originales exclusivamente por personal especializado autorizado por NERI spa y responsable de las operaciones y del por personal especializado autorizado por NERI spa y responsable de las operaciones y del restablecimiento de las condiciones originales del aparato.restablecimiento de las condiciones originales del aparato.Contactar directamente con Neri spa para realizar el mantenimiento.Contactar directamente con Neri spa para realizar el mantenimiento.

27www.neri.biz
1°17° ORIENTAMENTO OTTICA - REFLECTOR POSITIONING - ORIENTATION DU RÉFLECTEURREFLEKTOR AUSRIGHTUNG - ORIENTACIÓN DEL REFLECTOR
MarciapiedePavement
StradaRoad

28