· NOCKPUNKT Der Nockpunkt ist die zweite wichtige Einstellung Ihres Bogens. Ohne die passende...
5
www.bearpaw-blog.de www.bearpaw-blog.com , Bearpaw_Owners_Manual_2013.indd 1 11.02.13 11:10
Transcript of · NOCKPUNKT Der Nockpunkt ist die zweite wichtige Einstellung Ihres Bogens. Ohne die passende...
BODNIK BOWSOWNER s MANUALBODNIK BOWSOWNER s MANUALBODNIK BOWSBODNIK BOWS
www.bearpaw-blog.dewww.bearpaw-blog.com
,
Bearpaw_Owners_Manual_2013.indd 1 11.02.13 11:10

RECHTSHANDBOGENODER LINKSHANDBOGEN
Im Bild 1 wird eine Rechtshandschützin dargestellt. Der Rechtshandschütze benötigt auch den Bogen in der Rechts-handausführung. Das Wort „Rechtshand“ bezieht sich auf die Hand, mit welcher die Sehne ausgezogen wird. Der Rechts-handschütze hält seinen Bogen in der linken Hand und zieht die Sehne mit seiner rechten Hand zum Ankerpunkt.
Im Bild 2 wird eine Linkshand Bogenschützin dargestellt. Sie benötigt auch ihren Bogen in der Linkshandausführung. Das Wort „Linkshand“ bezieht sich auf die Hand, mit welcher die Sehne ausgezogen wird. Der Linkshandschütze hält seinen Bogen in der rechten Hand und zieht die Sehne mit seiner linken Hand zum Ankerpunkt.
RIGHT-HAND BOW OR LEFT-HAND BOW
A right-hand archer (picture 1) needs their bow in the right-hand version. The word „right hand“ corresponds to the hand with which the bow string is drawn. A right-hand archer holds their bow in their left hand and draws the string to the an-chor point with their right hand. This means that both anchor point and arrow are situated below the right eye. The arrow
lies on the bow‘s left side.
A left-hand archer (picture 2) needs their bow in the left-hand version. The word „left hand“ corresponds to the hand with which
the bow string is drawn. A left-hand archer holds their bow in their right hand and pulls the
string with their left hand to the anchor point. This me-ans that both anchor point and arrow are situated below the left eye. The arrow lies on the bow‘s right side.2
1
FACHMÄNNISCHES SPANNENIHRES BOGENS
Bei Benutzung der Spannschnur Longbow (70031) oder Recurve (70032) werden die beiden Lederschuhe am Ende der Spannschnur über die Tips (Bogenenden) geschoben. Bitte achten Sie genauestens darauf, dass die Sehne am unteren Wurfarm exakt in den Sehnenkerben des Bogentips liegt. Am oberen Wurfarm muss die Sehnenkerbe frei liegen (Bild 1), damit die Sehne während des Spannvorgangs eingeschoben werden kann.
Bild 2Beim Spannen Ihres Bogens steigen Sie bitte mit beiden Füßen auf die Spannleine und platzieren Ihre Füße in etwa schulterbreit. Ziehen Sie den Bogen kräftig nach oben. Schieben Sie die Sehne am oberen Wurfarm zur Außenkante des Bogens, bis die Sehne sicher in den Nockkerben des Tips einrastet.Beim Entspannen des Bogens führen Sie diesen Vorgang in umgekehrter Reihenfolge durch und lassen die Sehne über den Wurfarm nach innen rutschen oder nehmen sie nach außen ab.
Bei der Benutzung der Spannschnur mit Spannschuh (Bild 3) legen Sie den Lederspannschuh mit der rutschfesten Gummifl äche nach unten auf die Oberseite des Wurfarmes auf. Bitte achten Sie darauf, dass Ihr Wurfarm an dieser Stelle nicht feucht oder nass ist. Diese Spannschnur ist sowohl für Recurves als auch für Longbows einsetzbar. Im Gegensatz zu den beiden anderen Spannschnüren kann hier die Sehne auch nach außen vom Wurfarm abgenommen werden.
Die Länge der Spannschnur ist entsprechend der Bogenlänge und Körpergröße des Schützen anzupassen.
PROFESSIONAL STRINGING OF YOUR BOW
When using the stringer longbow or recurve both leather straps at the end of the stringer are slipped over the tips (bow ends). It is absolutely vital that the string at the lower limb lies exactly in the string grooves of the bow tip.
On the upper limb the string groove has to be open. (picture 1) so that the string can be slipped in during the stringing procedure.
Picture 2When stringing the bow, step with both feet onto the string cord and position your feet approximately as wide as the distance between your shoulders. Pull the bow strongly upwards. Push the string on the upper limb to the outer edge of the bow until the string fi rmly snaps into the nock grooves of the tip.When taking down the bow carry out this action in reverse order, letting the string slide inwards over the limb or taking it off outwards.
When using the universal stringer for all bow types (picture 3) put the leather tongue with the non-slip rubber surface downwards onto the upper side of the limb. Please ensure that your bow‘s limb is neither damp nor wet at this spot. This stringer can be used universally for both for recurve and longbows. In contrast to the stringers Longbow and Recurve, here, the string can also be taken off the limb outwards.
Before its fi rst use, the length of the stringer always has to be adapted to the size of the archer.
1
2
3
Der richtigeumgang mitihrem bogen
the correcthandlingof your bowhandlingof your bowhandling
Bearpaw_Owners_Manual_2013.indd 2-3 11.02.13 11:10
STANDHÖHE
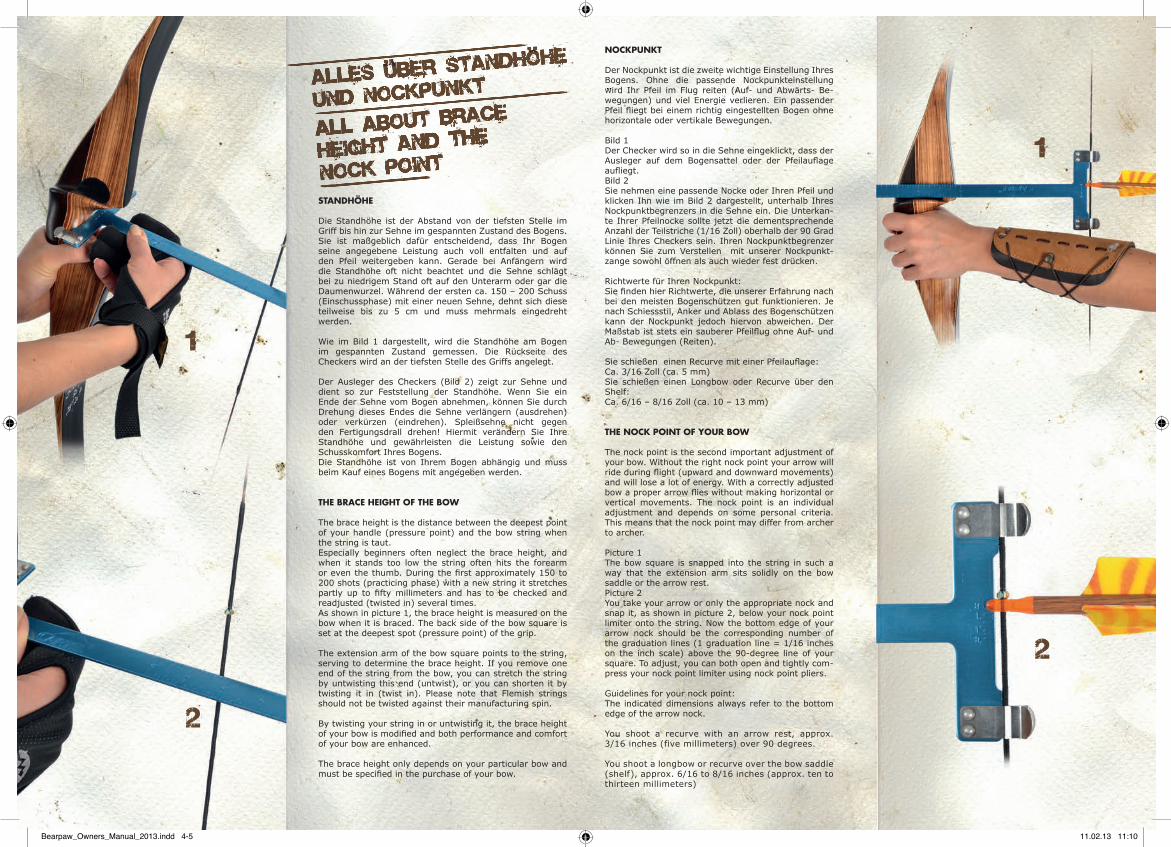
Die Standhöhe ist der Abstand von der tiefsten Stelle im Griff bis hin zur Sehne im gespannten Zustand des Bogens.Sie ist maßgeblich dafür entscheidend, dass Ihr Bogen seine angegebene Leistung auch voll entfalten und auf den Pfeil weitergeben kann. Gerade bei Anfängern wird die Standhöhe oft nicht beachtet und die Sehne schlägt bei zu niedrigem Stand oft auf den Unterarm oder gar die Daumenwurzel. Während der ersten ca. 150 – 200 Schuss (Einschussphase) mit einer neuen Sehne, dehnt sich diese teilweise bis zu 5 cm und muss mehrmals eingedreht werden.
Wie im Bild 1 dargestellt, wird die Standhöhe am Bogen im gespannten Zustand gemessen. Die Rückseite des Checkers wird an der tiefsten Stelle des Griffs angelegt.
Der Ausleger des Checkers (Bild 2) zeigt zur Sehne und dient so zur Feststellung der Standhöhe. Wenn Sie ein Ende der Sehne vom Bogen abnehmen, können Sie durch Drehung dieses Endes die Sehne verlängern (ausdrehen) oder verkürzen (eindrehen). Spleißsehne nicht gegen den Fertigungsdrall drehen! Hiermit verändern Sie Ihre Standhöhe und gewährleisten die Leistung sowie den Schusskomfort Ihres Bogens.Die Standhöhe ist von Ihrem Bogen abhängig und muss beim Kauf eines Bogens mit angegeben werden.
THE BRACE HEIGHT OF THE BOW
The brace height is the distance between the deepest point of your handle (pressure point) and the bow string when the string is taut.Especially beginners often neglect the brace height, and when it stands too low the string often hits the forearm or even the thumb. During the fi rst approximately 150 to 200 shots (practicing phase) with a new string it stretches partly up to fi fty millimeters and has to be checked and readjusted (twisted in) several times.As shown in picture 1, the brace height is measured on the bow when it is braced. The back side of the bow square is set at the deepest spot (pressure point) of the grip.
The extension arm of the bow square points to the string, serving to determine the brace height. If you remove one end of the string from the bow, you can stretch the string by untwisting this end (untwist), or you can shorten it by twisting it in (twist in). Please note that Flemish strings should not be twisted against their manufacturing spin.
By twisting your string in or untwisting it, the brace height of your bow is modifi ed and both performance and comfort of your bow are enhanced.
The brace height only depends on your particular bow and must be specifi ed in the purchase of your bow.
NOCKPUNKT
Der Nockpunkt ist die zweite wichtige Einstellung Ihres Bogens. Ohne die passende Nockpunkteinstellung wird Ihr Pfeil im Flug reiten (Auf- und Abwärts- Be-wegungen) und viel Energie verlieren. Ein passender Pfeil fl iegt bei einem richtig eingestellten Bogen ohne horizontale oder vertikale Bewegungen.
Bild 1Der Checker wird so in die Sehne eingeklickt, dass der Ausleger auf dem Bogensattel oder der Pfeilaufl age aufl iegt.Bild 2Sie nehmen eine passende Nocke oder Ihren Pfeil und klicken Ihn wie im Bild 2 dargestellt, unterhalb Ihres Nockpunktbegrenzers in die Sehne ein. Die Unterkan-te Ihrer Pfeilnocke sollte jetzt die dementsprechende Anzahl der Teilstriche (1/16 Zoll) oberhalb der 90 Grad Linie Ihres Checkers sein. Ihren Nockpunktbegrenzer können Sie zum Verstellen mit unserer Nockpunkt-zange sowohl öffnen als auch wieder fest drücken.
Richtwerte für Ihren Nockpunkt:Sie fi nden hier Richtwerte, die unserer Erfahrung nach bei den meisten Bogenschützen gut funktionieren. Je nach Schiessstil, Anker und Ablass des Bogenschützen kann der Nockpunkt jedoch hiervon abweichen. Der Maßstab ist stets ein sauberer Pfeilfl ug ohne Auf- und Ab- Bewegungen (Reiten).
Sie schießen einen Recurve mit einer Pfeilaufl age:Ca. 3/16 Zoll (ca. 5 mm)Sie schießen einen Longbow oder Recurve über den Shelf:Ca. 6/16 – 8/16 Zoll (ca. 10 – 13 mm)
THE NOCK POINT OF YOUR BOW
The nock point is the second important adjustment of your bow. Without the right nock point your arrow will ride during fl ight (upward and downward movements) and will lose a lot of energy. With a correctly adjusted bow a proper arrow fl ies without making horizontal or vertical movements. The nock point is an individual adjustment and depends on some personal criteria. This means that the nock point may differ from archer to archer.
Picture 1The bow square is snapped into the string in such a way that the extension arm sits solidly on the bow saddle or the arrow rest.Picture 2You take your arrow or only the appropriate nock and snap it, as shown in picture 2, below your nock point limiter onto the string. Now the bottom edge of your arrow nock should be the corresponding number of the graduation lines (1 graduation line = 1/16 inches on the inch scale) above the 90-degree line of your square. To adjust, you can both open and tightly com-press your nock point limiter using nock point pliers.
Guidelines for your nock point:The indicated dimensions always refer to the bottom edge of the arrow nock.
You shoot a recurve with an arrow rest, approx. 3/16 inches (five millimeters) over 90 degrees.
You shoot a longbow or recurve over the bow saddle (shelf), approx. 6/16 to 8/16 inches (approx. ten to thirteen millimeters)
2
1
2
1
Alles uber Standhohe
und Nockpunkt
All About brace
height and theAll About brace
height and theAll About brace
nock point
wird Ihr Pfeil im Flug reiten (Auf- und Abwärts- Be-Alles uber Sta
ndhohe Alles uber Sta
ndhohe Alles uber Sta
ndhohe
Bearpaw_Owners_Manual_2013.indd 4-5 11.02.13 11:10

ORDER OF THE SHOT 1Before the shot
ORDER OF THE SHOT 2During drawing
ORDER OF THE SHOT 3At full draw of the bow
ORDER OF THE SHOT 4After the shot
SCHUSSABLAUF IVor dem Schuss
SCHUSSABLAUF IIWährend des
Auszuges
SCHUSSABLAUF IIIVollauszugdes Bogens
SCHUSSABLAUF IVNach dem Schuss
IM VOLLAUSZUG STEHEN BEIDE SCHULTERBLÄTTER GLEICHMÄSSIG NEBENEINANDER.IM VOLLAUSZUG IST DER RÜCKEN GERADE UND GESTRECKT.
IM VOLLAUSZUG BEFINDEN SICH PFEIL UND ZUGARM IN EINER LINIE.IM VOLLAUSZUG IST DER ANKERPUNKT EXAKT POSITIONIERT.
IM VOLLAUSZUG ZIEHEN UNSERE RÜCKENMUSKELN BESTÄNDIG WEITER (RÜCKENSPANNUNG).
AT FULL DRAW, BOTH SHOULDER BLADES STAND EVENLY SIDE BY SIDE.AT FULL DRAW, THE BACK IS STRAIGHT AND STRETCHED.
AT FULL DRAW, ARROW AND DRAWING ARM FORM ONE LINE.AT FULL DRAW, THE ANCHOR POINT IS EXACTLY POSITIONED.
AT FULL DRAW, OUR BACK MUSCLES CONTINUE TO WORK CONSTANTLY (MUSCLE TENSION).
Der Schussablauf
order of the shotDer Schussablauf
order of the shotDer Schussablauf
Bearpaw_Owners_Manual_2013.indd 6-7 11.02.13 11:10

BUCHTIPP: INSTINKTIVES BOGENSCHIESSEN MIT HENRY BODNIKInstinktives Bogenschießen ist die ursprünglichste Art, einen Pfeil ins Ziel zu bringen. Von vielen irrtümlich dogmatisiert und ritualisiert, haben viele Bogenschützen eine total abwegige Vorstellung darüber, wie instinktives Bogenschießen funktioniert. Der strukturierte Aufbau dieses Buches basiert auf meiner über 20-jährigen Erfahrung und Praxis mit Pfeil und Bogen. Verständlich und einfach werden hier die körperlichen und mentalen Grundlagen dargelegt, um Einsteiger, Umsteiger und Fortgeschrittene auf den einfachen Weg des instinktiven Bogenschießens zu führen.Art.Nr. 90029
BOOK RECOMMENDATION: INSTINCTIVE ARCHERY WITH HENRY BODNIKInstinctive archery is the most natural way to shoot an arrow into the target. Often dogmatized and ritualized by mistake, many archers have a completely misguided idea of how instinctive archery works. The structure of this book is based on my more than 20 years of experience and practice with bow and arrow. In this book the physical and mental principles are explained in an easily comprehensible way to lead newcomers, seekers and advanced learners onto the simple way of instinctive archery.Item No. 90188
BOGENTYP/BOWTYPE:
SERIENNUMMER/SERIALNUMBER:
AMO, BOGENLÄNGE/AMO/BOW LENGTH:
STANDHÖHE/BRACE HEIGHT:
KAUFDATUM/DATE OF PURCHASE:
Bei Garantieansprüchen diesen Abschnitt mit dem Bogen einsenden / For warranty claims, submit this bow certifi cate with your bow
more about
Bogenzertifikat
bow certificateBogenzertifikat
bow certificateBogenzertifikat FOLGEN SIE UNS AUFFOLLOW US
FACEBOOK.COM/BEARPAWPRODUCTS
Bearpaw_Owners_Manual_2013.indd 8 11.02.13 11:10