Refill-System pro Bedienungsanleitung D v5_15035860960.pdf · eingetauchtem Ende könnte nach dem...
40
1 Refill-System pro Bedienungsanleitung D Die Niveausteuerung Refill-System pro ist eine Nachfüllautomatik für Unterschrankfilter. AB Aqua Medic GmbH Gewerbepark 24, 49143 Bissendorf, Germany _______________________________________________________________________________
Transcript of Refill-System pro Bedienungsanleitung D v5_15035860960.pdf · eingetauchtem Ende könnte nach dem...

1
Refill-System pro
Bedienungsanleitung D
Die Niveausteuerung Refill-System pro ist eine Nachfüllautomatik für Unterschrankfilter.
AB Aqua Medic GmbH Gewerbepark 24, 49143 Bissendorf, Germany
_______________________________________________________________________________

2
1. Lieferumfang
1. Netzteil AC/DC, Input 100 - 240 V AC 50/60 Hz, Output 12 V DC 2.0 A 2. Steuergerät 3. Infrarotsensor N1 4. Sensor N2 5. Nachfüllpumpe Input DC 3,5 - 12 V DC / 0,5 - 5,0 W Hmax = 220 cm Qmax = 350 l/h 6. Sensor N3 7. 2 m Nachfüllschlauch 8/12 2. Merkmale - Permanente Überwachung des Wasserstandes im Aquarium durch Infrarotsensor mit
Verzögerungsschaltung. - Automatische Wassernachfüllung des verdunsteten Aquarienwassers. - Justierbarer Wasserstand mit Überlaufschutz im Filterbecken (Sicherheitsabschaltung bei
defektem Füllstandsensor). - Trockenlaufschutz der Nachfüllpumpe – optischer und akustischer Alarm. - Einfache Montage und Wartung durch Steckverbindungen an allen Kabeln. - 12 V Kleinspannung 3. Installation Wichtig! Bitte die Stromzufuhr erst einschalten, wenn alle anderen Kabel angeschlossen sind, andernfalls könnte das Steuergerät Schaden nehmen. Sollen Stecker gezogen werden, ebenfalls zunächst Stromzufuhr unterbrechen. Das Aqua Medic Refill-System pro ist als Nachfüllung für Unterschrankfiltersysteme konzipiert. Eine Anbringung der Sensoren N1 und N2 inklusive des mitgelieferten Halters am Aquarium ist nur bei einer ausreichend hohen Umrandung des Aquariums (ca. 13 cm) möglich.
Abb. 1: Anschlussdose des Steuergeräts LED-Anzeigen: D1 = Nachfüllung aktiv D2 = Alarm bei zu niedrigem Wasserstand im Nachfüllbehälter (+ Signalton) D3 = Power Das Netzteil hat auswechselbare Stecker, was den Einsatz in vielen Ländern ermöglicht. Zur Abnahme muss der Entriegelungsknopf auf der Rückseite des Netzgerätes gedrückt werden. Der Stecker des Netzgerätes, der zum Steuergerät geht, wird dort an die Buchse DC 12 V angeschlossen, auf derselben Seite befindet sich auch der Anschluss für die Pumpe.

3
Abb. 2: 1. Netzteil 6. Sensor N3 (Trockenlaufschutz Nachfüllpumpe) 2. Steuergerät 7. Nachfüllschlauch zum Filterbecken 3. Sensor N1 (gewünschter Wasserstand) 8. Nachfüllschlauch von der Pumpe kommend 4. Sensor N2 (Überlaufsicherung) 9. Filterbecken 5. Nachfüllpumpe 10. Nachfüllreservoir Die Sensoren müssen sauber, frei von Algenwuchs und sonstigen Ablagerungen sein. Da sie sich über Wasser befinden, sind Störungen durch Schnecken und andere Tiere weitestgehend ausgeschlossen.
Abb. 3: Nachfüllpumpe und Trockenlaufschutz werden mit Saughaltern am Boden des Nachfüllbehälters angebracht.
Abb. 4: Nachfüllschlauch mit Halter

4
Abb. 5: Der Nachfüllschlauch muss oberhalb des Wasserspiegels angebracht werden. Bei eingetauchtem Ende könnte nach dem Prinzip der kommunizierenden Röhren Wasser vom Filterbecken ins Reservoir oder umgekehrt fließen, bis beide Wasserstände gleich sind.
Abb. 6: Montage der Sensoren N1 und N2 mit Hilfe des mitgelieferten Halters. 1. Infrarotsensor N1 2. Überlaufsicherung Sensor N2 3. Sensorhalter Unterteil 4. Sensorhalter Oberteil 5. Kabelhalter 6. Befestigungsschrauben für Halter 7. Befestigungsschrauben für Sensoren
Verfügbare Ersatzteile: siehe www.aqua-medic.de.
5
Die Nachfüllung schaltet sich ab, sobald der Wasserstand die Spitze des Infrarotsensors N1 erreicht. Feine Luftblasen, die sich an der Spitze des Sensors N1 ablagern, führen zu Fehlfunktionen. Deshalb den Sensor an einer Stelle im Filterbecken unterbringen, die frei von solchen Blasen ist. Fällt dieser Sensor einmal aus, steigt das Wasser bis zum Sensor N2, der dann die Nachfüllung unterbricht. Der Infrarotsensor hat eine Verzögerungsfunktion, wodurch ein ständiges Ein- und Ausschalten bei Wellenbewegungen unterdrückt wird. Fehlt Nachfüllwasser im Vorratsbehälter, ertönt ein akustischer Alarm. 4. Garantie
AB Aqua Medic GmbH gewährt eine 24-monatige Garantie ab Kaufdatum auf alle Material- und Verarbeitungsfehler des Gerätes. Als Garantienachweis gilt der Original-Kaufbeleg. Während dieser Zeit werden wir das Produkt kostenlos durch Einbau neuer oder erneuerter Teile instand setzen (ausgenommen Frachtkosten). Im Fall, dass während oder nach Ablauf der Garantiezeit Probleme mit Ihrem Gerät auftreten, wenden Sie sich bitte an Ihren Fachhändler. Diese Garantie gilt nur für den Erstkäufer. Sie deckt nur Material- und Verarbeitungsfehler, die bei bestimmungsgemäßem Gebrauch auftreten. Sie gilt nicht bei Schäden durch Transporte oder unsachgemäße Behandlung, Fahrlässigkeit, falschen Einbau sowie Eingriffen und Veränderungen, die von nicht-autorisierten Stellen vorgenommen wurden. AB Aqua Medic GmbH haftet nicht für Folgeschäden, die durch den Gebrauch des Gerätes entstehen.
AB Aqua Medic GmbH - Gewerbepark 24 -49143 Bissendorf/Germany - Technische Änderungen vorbehalten – Stand 08/2017
Aktuelle Anleitungen stehen zum Download unter www.aqua-medic.de bereit.

6
Refill-System pro
Operation Manual ENG
The level control Refill-System pro is an automatic top up unit for a cabinet filter.
AB Aqua Medic GmbH Gewerbepark 24, 49143 Bissendorf, Germany
_______________________________________________________________________________

7
1. Delivery
1. Power supply AC/DC, Input 100 - 240 V AC 50/60 Hz, Output 12 V DC 2.0 A 2. Control unit 3. Infrared sensor N1 4. Sensor N2 5. Refill pump Input DC 3.5 - 12 V DC / 0.5 – 5.0 W Hmax = 220 cm Qmax = 350 l/h 6. Sensor N3 7. 2 m refill hose 8/12 2. Features - Permanent monitoring of the water level in the aquarium with an infrared sensor incl. delay
circuit. - Automatic refilling of evaporated aquarium water. - Adjustable water level with overflow protection in the filter tank (safety shutdown in case of a
defective level sensor). - Dry-running protection of the refill pump – optical and acoustic alarm. - Easy installation and maintenance due to plug connections on all cables. - 12 V low voltage 3. Installation Important! Please turn on the power supply only when all of the cables and sensors are connected, otherwise the control unit may be damaged. Unplug the power from the unit in case plugs are to be pulled. The Aqua Medic Refill-System pro is designed as a refill unit for cabinet filter systems, only if the aquarium has a minimum height of approx. 13 cm between the top of the aquarium and the water level. Mounting of the sensors N1 and N2 is achieved with the bracket supplied.
Pict. 1: Socket of the control unit LED display: D1 = Refilling is active D2 = Alarm in case of low water level in the refill unit (+ beep) D3 = Power The power supply has an exchangeable plug for use in different countries. To remove the plug, press the release button on the back of the power supply. The power supply is connected to the DC 12 V socket, the pump is connected to the other socket on the unit.

8
Pict. 2: 1. Power supply 6. Sensor N3 (dry-running protection of the refill pump) 2. Control unit 7. Refill hose for the filter tank 3. Sensor N1 (requested water level) 8. Refill hose coming from the pump 4. Sensor N2 (overflow protection) 9. Filter tank 5. Refill pump 10. Refill reservoir The sensors have to be clean, free from algae and other deposits. Since they're placed above water, interference caused by snails or other animals is unlikely.
Pict. 3: Refill pump and dry-running protection are fixed on the bottom of the refill tank by the suction cups.
Pict. 4: Refill hose incl. holder

9
Pict. 5: The refill hose has to be attached above the water level. If immersed, water could flow from the filter tank into the reservoir or vice versa until both water levels are equal.
Pict. 6: Mounting of the sensors N1 and N2 by using the supplied holder. 1. Infrared sensor N1 2. Overflow protection sensor N2 3. Sensor holder lower part 4. Sensor holder upper part 5. Cable holder 6. Fixing screws for the holder 7. Fixing screws for the sensors Available spare parts: Please refer to www.aqua-medic.de.

10
The refill unit switches itself off as soon as the water level reaches the top of the infrared sensor N1. Fine air bubbles that are deposited at the tip of the N1 sensor lead to failures. Therefore, place the sensor somewhere in the filter tank where no such bubbles are. In case this sensor fails, the water rises up to the sensor N2 which then interrupts the refilling. The infrared sensor has a delay function that suppresses a constant on and off with wave motions. If the refill reservoir is empty, an audible alarm will sound. 4. Warranty Should any defect in materials or workmanship be found within 24 months of the date of purchase AB Aqua Medic undertakes to repair, or at our option replace, the defective part free of charge – always provided the product has been installed correctly, is used for the purpose that was intended by us, is used in accordance with the operating instructions and is returned to us carriage paid. Proof of Purchase is required by presentation of the original invoice or receipt indicating the dealer’s name, the model number and date of purchase, or a Guarantee Card if appropriate. This warranty may not apply if any model or production number has been altered, deleted or removed, unauthorised persons or organisations have executed repairs, modifications or alterations, or damage is caused by accident, misuse or neglect. We regret we are unable to accept any liability for any consequential loss. Please note that the product is not defective under the terms of this Warranty where the product, or any of its component parts, was not originally designed and / or manufactured for the market in which it is used. These statements do not affect your statutory rights as a customer.
AB Aqua Medic GmbH - Gewerbepark 24 - 49143 Bissendorf/Germany - Technical changes reserved - 08/2017
Current manuals are available for download at www.aqua-medic.de.

11
Refill-System pro
Mode d’emploi F
Le régulateur de niveau Refill-System pro est un système automatique de mise à niveau pour filtre incorporé dans un meuble.
AB Aqua Medic GmbH Gewerbepark 24, 49143 Bissendorf, Allemagne
_______________________________________________________________________________

12
1. Contenu du colis
1. Alimentation AC/DC, Entreé 100 - 240 V AC 50/60 Hz, Sortie 12 V DC 2.0 A 2. Appareil de contrôle 3. Détecteur infrarouge N1 4. Sonde N2 5. Pompe de remplissage Entrée DC 3,5 - 12 V DC / 0,5 - 5,0 W Hmax = 220 cm Débitmax = 350 l/h 6. Sonde N3 7. Tuyau de remplissage 8/12, longueur 2 m 2. Caractéristiques - Surveillance permanente du niveau d’eau dans l’aquarium par sonde infrarouge avec commande
d’approvisionnement. - Réapprovisionnement automatique de l’eau évaporée. - Niveau d’eau ajustable avec protection anti débordement dans le bac de filtration (arrête de
sécurité en cas de défaut de la sonde de niveau d’eau). - Protection anti marche à sec de la pompe de remplissage – alarme visuelle et sonore. - Montage et entretien simples par fiches de connection sur tous les cables. - Basse tension 12 V. 3. Installation IMPORTANT! Ne mettre sous tension que lorsque tous les cables sont connectés sinon l’appareil pourrait subir des dommages. Si des prises doivent être retirées, prière de couper l’approvisionnement en courant. L’appareil Aqua Medic Refill-System pro est conçu pour le réapprovisionnement en eau des filtres situés dans le meuble support. Une installation des sondes N1 et N2 y compris du support inclus sur l’aquarium n’est possible que dans le cas d’un bord suffisamment haut de l’aquarium (environ 13 cm).
Photo 1: Appareil de contrôle avec sondes N1 – N3 branchées Affichages LED: D1 = Remplissage actif D2 = Alarme en cas de niveau d’eau trop bas dans le récipient de remplissage d’eau (+ signal
sonore) D3 = Courant Les prises de courant secteurs sont interchangeables, ce qui permet l’utilisation dans de nombreux pays. Pour le retirer il faut appuyer sur le bouton de déverrouillage situé à l’arrière du bloc d’alimentation. La prise du bloc d’alimentation, qui va à l’unité de contrôle, est reliée à la prise Jack DC 12 V, sur le même côté se trouve aussi le raccord pour la pompe.

13
Schéma 2: 1. Bloc d’alimentation 6. Sonde N3 (protection contre la marche à sec de 2. Appareil de contrôle la pompe de remplissage) 3. Sonde N1 (niveau d’eau souhaité) 7. Tuyau de remplissage pour le bac du filtre 4. Sonde N2 (protection débordement) 8. Tuyau de remplissage venant de la pompe 5. Pompe de remplissage 9. Bac du filtre 10. Réservoir de réassort en eau Les sondes doivent être propres, sans algues ni autres dépôts. Comme elles sont situées au dessus de l’eau, des perturbations dues aux escargots ou autres animaux sont largement exclues.
Photo 3: La pompe de remplissage et la protection contre la marche à sec sont fixés sur le sol du bac de réassort avec des ventouses.
Photo 4: Tuyau de remplissage avec support

14
Photo 5: Le tuyau de remplissage doit être placé au-dessus de la surface de l’eau. En cas de fin de tuyau immergé de l’eau pourrait couler du bac de filtration vers le réservoir ou inversement selon le principe des vases communicants, jusqu’à égalité des niveaux.
Photo 6: Montage des sondes N1 et N2 avec les supports fournis. 1. Sonde infrarouge N1 2. Sonde N2 anti débordement 3. Partie inférieure du support de sonde 4. Partie supérieure du support de sonde 5. Support de câble 6. Vis de fixation du support 7. Vis de fixation des sondes Pièces de rechange disponibles: voir sous www.aqua-medic.de.

15
Le remplissage s’arrête dès que le niveau d’eau atteint l’extrémité de la sonde infrarouge N1. Fines bulles d'air, qui se déposent à l'extrémité de la sonde N° 1, conduisant à un disfonctionnement. Pour cette raison, il faut installer la sonde en un endroit libre de ces bulles. Si cette sonde tombe en panne, l’eau monte jusqu’à la sonde N2, qui coupe alors le remplissage. La sonde infrarouge possède une fonction retard, empêchant un allumage et une extinction intempestifs dus à des vagues. Si l’eau de réassort vient à manquer dans le réservoir, une alarme sonore se met en route. 4. Garantie
AB Aqua Medic GmbH donne une garantie durant 24 mois à partir de la date d’achat sur tous les défauts de matériau et de fabrication de l’appareil. La facture originale de l’achat sert de preuve pour la garantie. Durant cette période nous remettrons le produit en état par mise en place d’éléments neufs ou rénovés (sauf frais de transport). La garantie ne vaut que pour le premier acheteur. Elle ne couvre que les défauts de matériel et de fabrication pouvant survenir lors de l’utilisation normale. Elle n’est pas valable lors de dommages dus au transport ou à une utilisation non adaptée, ou à la négligeance, à une mauvaise installation ou à des manipulations et des modifications, effectuées par des par des personnes non autorisées. AB Aqua Medic GmbH n’est pas responsable des dégats collatéraux pouvant résulter de l’utilisation de l’appareil.
AB Aqua Medic GmbH - Gewerbepark 24 - 49143 Bissendorf/Allemagne - Sous réserve de toute modification - 08/2017
Les modes d’emploi actuels sont disponibles sur www.aqua-medic.de.

16
Refill-System pro
Handleiding NL
De niveau regelaar Refill-System pro is een automatische top eenheid voor een filter kast.
AB Aqua Medic GmbH Gewerbepark 24, 49143 Bissendorf, Germany
_______________________________________________________________________________

17
1. De levering
1. Voeding AC/DC, Input 100 - 240 V AC 50/60 Hz, Output 12 V DC 2.0 A 2. Controller 3. Infrarood sensor N1 4. Sensor N2 5. Bijvul pomp Input DC 3.5 - 12 V DC / 0.5 – 5.0 W Hmax = 220 cm Qmax = 350 l/h 6. Sensor N3 7. 2 m bijvul slang 8/12 2. Eigenschappen - Continue monitoring van het water niveau in het aquarium met een infrarood sensor incl
vertraging. - Automatische bijvulling van het verdampte aquarium water. - Regelbaar waterniveau met overstroom beveiliging in de sump (veiligheidsafsluiting in geval van
een defecte waterniveau sensor). - Droog loop beveiliging van de bijvulpomp – optisch en akoestisch alarm. - Eenvoudige installatie en onderhoud door de plug verbindingen aan alle kabels. - 12 V lag voltage 3. Installatie Belangrijk! Sluit de stroom alleen aan als alle kabels en sensoren aangesloten zijn, anders kan de controller beschadigd raken. Schakel de stroom uit als u verbindingen wilt los maken. Het Aqua Medic Refill-System pro is ontworpen als een bijvul system voor systemen met een onderkast. Alleen als het aquarium een minimale hoogte heeft van ca. 13 cm tussen het hoogste punt van het aquarium en het waterniveau. Het bevestigen van de sensoren N1 en N2 gebeurd met de bijgevoegde klemmen.
Pict. 1: Aansluiting van de controller LED display: D1 = Bijvullen geactiveerd D2 = Alarm in geal van lag niveau in de bijvul eenheid (+ beep) D3 = Stroom De stroom voorziening heeft een uitwisselbare aansluiting voor gebruik in verschillende landen. Om de plu te verwijderen dient u op de knop “release” te drukken aan de achterzijde van de voeding. De stroomvoorziening is verbonden met een 12 V DC stekker, de pomp is verbonden met de andere stekker aan de unit.

18
Afb. 2: 1. Voeding 6. Sensor N3 (droogloop beveiliging van de 2. Control unit bijvulpomp) 3. Sensor N1 (vereiste water niveau) 7. Bijvulslang voor de sump 4. Sensor N2 (overstroom beveiliging) 8. Bijvulslang komende van de pomp 5. Bijvul pomp 9. Filter tank 10. Bijvul reservoir De sensoren moeten schoon zij, vrij van al gen andere vormen van neerslag. Omdat ze boven water geplaatst worden zult u waarschijnlijk geen last hebben van slakken en andere dieren.
Afb. 3: Bijvulpomp en droogloop beveiliging worden bevestigd op de bodem van de bijvultank dmv zuignappen.
Afb. 4: Bijvulslang incl houder

19
Afb. 5: De bijvulslang moeten boven het waterniveau bevestigd worden. Als deze in het water hangt kan het water van de sump naar het reservoir stromen of andersom, net zo lang totdat de waterniveaus gelijk zijn.
Afb. 6: Bevestiging van de sensoren N1 en N2 dmv de bijgeleverde houder. 1. Infrarood sensor N1 2. Overstroombeveiligingssensor N2 3. Sensor houder onderste deel 4. Sensor houder bovenste deel 5. Kabelhouder 6. Bevestigingsschroeven voor de houder 7. Bevestigingsschroeven voor de sensoren Voor beschikbare reserve onderdelen, zie de website www.aqua-medic.de.

20
De bijvul unit schakelt zichzelf uit als het waterniveau de rand van de infrarood sensor N1 bereikt. Kleine luchtbelletjes die zich aan de N1 sensor bevinden kunnen leiden tot fouten. Plaats de sensor op een plaats in de filtertank waar geen belletjes aanwezig zijn. In het geval dat de sensor niet goed functioneert zal het niveau stijgen tot sensor N2. Deze zal dan het bijvullen beëindigen. DE infrarood sensor heeft een vertraging die zorgt voor een constante aan en uit schakeling. Als het bijvulstation leeg is zal een geluidsalarm klinken. 4. Garantie AB Aqua Medic GmbH verleent een garantie van 24 maanden vanaf de aankoopdatum tegen alle defecten in materiaal of afwerking van het apparaat. Garantie alleen door het bewijs van de originele aankoopbon. Gedurende deze periode zal het product kosteloos worden gerepareerd door nieuwe of gereviseerde onderdelen set (exclusief verzendkosten). In het geval dat er problemen optreden met het apparaat tijdens of na de garantieperiode, neem dan contact op met uw dealer. Deze garantie geldt alleen voor de oorspronkelijke koper. Dit geldt alleen voor materiaal-en fabricagefouten die bij normaal gebruik ontstaan. Het is niet van toepassing op schade veroorzaakt door transport of onjuiste behandeling, nalatigheid, onjuiste installatie, wijzigingen of wijzigingen die zijn gemaakt door onbevoegden. AB Aqua Medic GmbH is niet aansprakelijk voor eventuele gevolgschade voortvloeiend uit het gebruik van het apparaat.
AB Aqua Medic GmbH - Gewerbepark 24 - 49143 Bissendorf/Germany - Technische veranderingen ondervoorbehoud - 08/2017
De huidige handleidingen zijn beschikbaar om te downloaden op www.aqua-medic.de.

21
Refill-System pro
Manual de Instrucciones ES
El controlador de nivel Refill-System pro es una unidad automática de nivel superior para filtros bajo mesa.
AB Aqua Medic GmbH Gewerbepark 24, 49143 Bissendorf, Alemania
_______________________________________________________________________________

22
1. Envío
1. Transformador AC/DC, Entrada 100 - 240 V AC 50/60 Hz, Salida 12 V DC 2.0 A 2. Unidad de contro 3. Sensor infrarojo N1 4. Sensor N2 5. Bomba de relleno; Entrada DC 3.5 - 12 V DC / 0.5 – 5.0 W Hmax = 220 cm Qmax = 350 l/h 6. Sensor N3 7. 2 m de tubería de relleno 8/12 2. Características
- Monitorzación permanente del nivel del agua en el acuario mediante un sensor infrarrojo incl.
circuito de retardo. - Relleno automático del agua del acuario evaporada. - Nivel del agua ajustable con protección contra el desbordamiento en el tanque de filtro
(desconexión de seguridad en caso de un sensor de nivel defectuoso). - Protección de la bomba de llenado contra funcionamiento en seco - alarma óptica y acústica. - Fácil instalación y mantenimiento gracias a las conexiones de enchufe en todos los cables. - 12 V, de baja tensión. 3. Instalación ¡Importante! Por favor, active la fuente de alimentación sólo cuando todos los demás cables estén conectados, de lo contrario la unidad de control puede resultar dañada. Si los enchufes han de ser retirados, primero de todo interrumpa la fuente de alimentación. El Aqua Medic Refill-System pro está diseñado como una unidad de reposición para sistemas de filtro bajo la mesa. Sólo si el acuario tiene un borde de una altura mínima de aprox. 13 cm, será posible el montaje de los sensores N1 y N2 empleando el soporte suministrado en el acuario.
Fig. 1: Enchufe de la unidad de control D1 = El relleno está realizandose D2 = Alarma luminosa en caso de bajo nivel de agua en la unidad de relleno (+ alarma sonora) D3 = Estado de la unidad activado La fuente de alimentación dispone de enchufes intercambiables que hacen posible su uso en muchos países. Para quitar la clavija, pulse el botón de liberación de la parte posterior de la fuente de alimentación. El enchufe de la fuente de alimentación que conduce a la unidad de control está conectado a la toma de DC de 12 V. En el mismo lado está también el puerto de la bomba.

23
Fig. 2: 1. Transformador eléctrico 7. Tubería de relleno dirigida hacia el 2. Caja de control tanque de filtración 3. Sensor N1 (nivel de agua requerido) 8. Tubería de relleno que llega desde la 4. Sensor N2 (protección contra desbordamiento) bomba 5. Bomba de relleno 9. Tanque de filtración 6. Sensor N3 (protección contra trabajo en seco 10. Tanque de reserva de agua para de la bomba de relleno) rellenar Los sensores tienen que estar limpios, libres de algas y otros depósitos. Ya que están colocados sobre el agua, la interferencia causada por caracoles u otros animales es casi imposible.
Fig. 3: La bomba de relleno y el protector contra trabajo en seco se fijan en la base del tanque de relleno mediante ventosas.
Fig. 4: Tubería de relleno incl. sujeción

24
Fig. 5: La tubería de relleno ha de ser situada sobre el nivel del agua. En caso de que se sumerja la punta, el agua puede retornar desde el tanque de filtración hacia el tanque de reserva o viceversa, hasta que ambos niveles de agua queden parejos.
Fig. 6: Montaje de los sensores N1 y N2 empleando el porta sondas aportado. 1. Sensor infrarojo N1 2. Sensor de protección contra rebosamiento N2 3. Parte inferior del porta sensor 4. Parte superior del portasensor 5. Sujeción para cables 6. Tornillos de fijación para el porta sensor 7. Tornillos de fijación para los sensores Repuestos disponibles: Por favor diríjase a www.aqua-medic.de.

25
La unidad de reposición de agua se desconecta tan pronto como el nivel del agua alcanza la parte superior del sensor de infrarrojos N1. Las burbujas de aire finas que se depositan en la punta del sensor N1 pueden provocar errores. Por lo tanto, coloque el sensor en algún lugar en el tanque del filtro donde no haya burbujas. En caso de que este sensor falle, el agua se eleva hasta el sensor N2 que interrumpe entonces la recarga. El sensor de infrarrojos tiene una función de retardo que suprime un constante conectar y desconectar debido a movimientos ondulatorios del agua del depósito. Si no hay agua de reposición en el depósito se activará una alarma audible. 4. Garantía Ante defectos en el material o mano de obra AB Aqua Medic garantiza durante 24 meses a partir de la fecha de la compra, repara ó sustituye las partes defectuosas de forma gratuita - siempre que dicho producto se haya instalado correctamente, se está usando para el propósito para el que ha sido diseñado, se usa conforme al manual de instrucciones y nos sea devuelto a portes pagados. No cubre la garantía las partes consumibles. Se requerirá la factura o ticket de compra original donde se indique el nombre del distribuidor, el número de modelo y la fecha de la compra, ó una tarjeta de garantía oficial. Esta garantía no se aplicará sobre los productos en los que se haya alterado el modelo o número de producto, eliminado o borrado, haya sido reparado, modificado ó alterado por personal no autorizado, ó el daño se ha causado por accidente o negligencia. Estas advertencias no afectan a sus derechos legales como cliente.
AB Aqua Medic GmbH - Gewerbepark 24 - 49143 Bissendorf/Germany - Cambios técnicos reservados - 08/2017
Los manuales actuales están disponibles para descargar en www.aqua-medic.de.
26
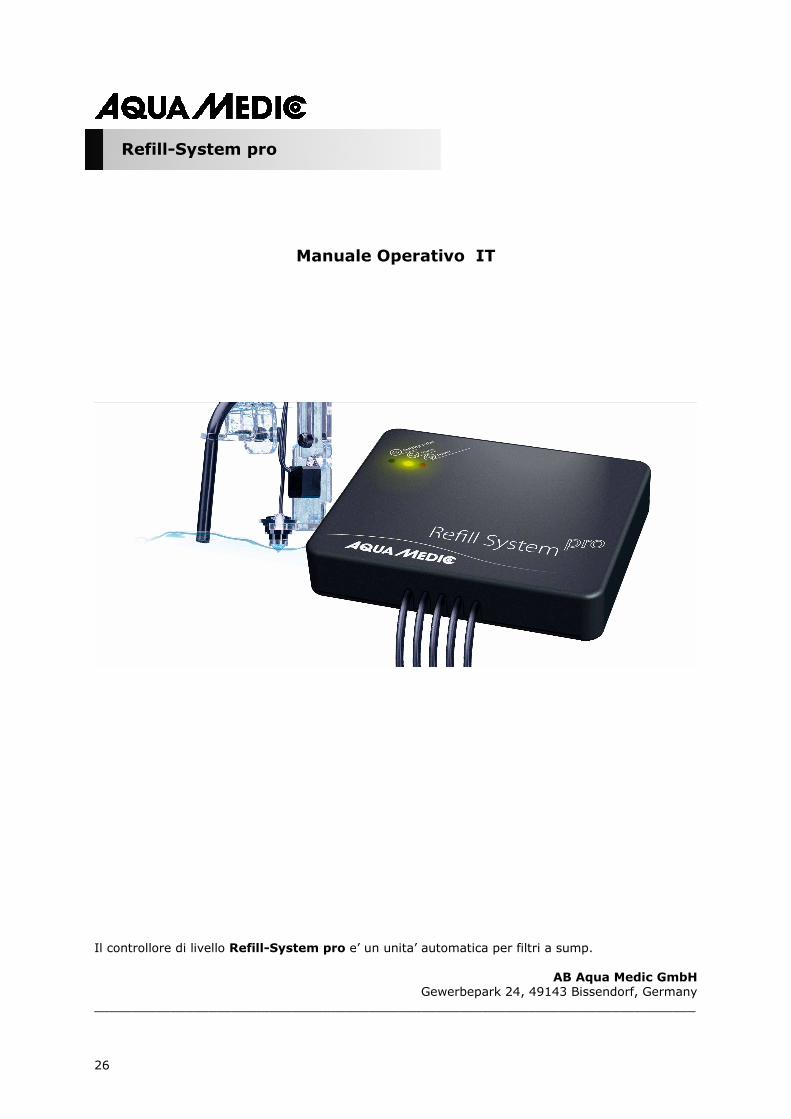
Refill-System pro
Manuale Operativo IT
Il controllore di livello Refill-System pro e’ un unita’ automatica per filtri a sump.
AB Aqua Medic GmbH Gewerbepark 24, 49143 Bissendorf, Germany
_______________________________________________________________________________

27
1. Consegna
1. Trasformatore AC/DC, ingresso 100 - 240 V AC 50/60 Hz, uscita 12 V DC 2.0 A 2. Unita’ di controllo 3. Sensore infrarossi N1 4. Sensore N2 5. Pompa rabbocco ingresso DC 3.5 - 12 V DC / 0.5 – 5.0 W Hmax = 220 cm Qmax = 350 l/h 6. Sensore N3 7. 2 m tubo flessibile 8/12 2. Caratteristiche - Monitoraggio permanente del livello d’acqua dell’acquario con sensore a infrarossi incluso
circuito ritardante. - Rabbocco automatic dell’acqua evaporata. - Livello d’acqua adattabile con protezione da straripamento in vasca (arresto di sicurezza in caso
di sensore di livello difettoso). - Protezione da funzionamento a secco della pompa di rabbocco – allarme visivo e acustico. - Installazione e manutenzione facile con spina di collegamento su tutti i cavi. - 12 V basso voltaggio 3. Istallazione Importante! Per favore accendere il trasformatore solo dopo aver collegato tutti i cavi ed i sensori altrimenti il prodotto potrebbe danneggiarsi. Scollegare il prodotto nel caso in cui le spine debbano essere tirate. Refill-System pro di Aqua Medic e’ studiato come unita’ di rabbocco per sistemi filtranti a sump, solo se l’acquario ha un altezza minima di circa 13 cm tra altezza massima e livello dell’acqua. Il montaggio dei sensori N1 e N2 viene raggiunto con il supporto fornito.
Fig. 1: Attacco dell’unita’ di controllo
D1 = Rabbocco attivo D2 = Allarme in caso di livello basso d’acqua nell’unita’ di rabbocco (+ beep) D3 = Potenza Il trasformatore ha una spina scambiabile per uso in diversi paesi. Per rimuovere la spina, premere il tasto di rilascio sul retro. Il trasformatore e’ collegato all’attacco DC 12 V, la pompa e’ collegata all’altro attacco sull’unita’.

28
Fig. 2: 1. Trasformatore 6. Sensore N3 (protezione da funzionamento a 2. Scatola di controllo secco della pompa di rabbocco) 3. Sensore N1 (livello d’acqua richiestol) 7. Tubo flessibile di rabbocco per flltro 4. Sensore N2 (protezione straripamento) 8. Tubo flessibile di rabbocco dalla pompa 5. Pompa di rabbocco 9. Filtro 10. Filtro riserva per rabbocco I sensori devono essere puliti, liberi da alghe e altri depositi. Data la posizione sull’acqua, fate attenzione ad interferenze causate da lumache o altri animaletti.
Fig. 3: Pompa di rabbocco e protezione da movimento a secco sono fissati sul fondo della vasca di rabbocco con delle ventose.
Fig. 4: Tubo flessibile incluso supporto

29
Fig. 5: Il tubo flessibile di rabbocco deve essere attaccato sotto al livello dell’acqua. Se immerso, l’acqua potrebbe fluire dalla vasca alla riserva o viceversa fino a che i 2 livelli siano uguali.
Fig. 6: Montaggio dei sensori N1 e N2 usando il supporto fornito. 1. Sensore infrarossi N1 2. Sensore protezione straripamento N2 3. Supporto sensore parte bassa 4. Supporto sensore parte alta 5. Supporto cavi 6. Fissaggio viti per il supporto 7. Fissaggio viti per i sensori Pezzi di ricambio disponibili: per favore consultare www.aqua-medic.de.

30
L’unita‘ di rabbocco si spegne in automatico quando il livello dell’acqua raggiunge il punto del sensore infrarossi N1. Le bolle d’aria fini depositate all’estremita’ del sensore N1 provocano errore. Quindi posizionare il sensore nel filtro dove non sono presenti le bolle. In caso che questo sensore non funzioni, l’acqua arriva al sensore N2 che interrompe il rabbocco. Il sensore infrarossi ha una funzione ritardante che blocca il rabbocco con movimento ondoso. Se la vasca di riserva e’ piena, scattera’ l’allarme sonoro. 4. Garanzia Nel caso di difetti nei materiali o di fabbricazione, rilevati entro 24 mesi dalla data dell’acquisto, AB Aqua Medic GmbH provvederà a riparare o, a propria scelta, sostituire gratuitamente la parte difettosa – sempre che il prodotto sia stato installato correttamente, utilizzato per gli scopi indicati dalla casa costruttrice, utilizzato secondo il manuale di istruzioni. I termini della garanzia non si applicano per tutti i materiali di consumo. E’ richiesta la prova di acquisto, presentando la fattura di acquisto originale o lo scontrino fiscale indicante il nome del rivenditore, il numero del modello e la data di acquisto oppure, se è il caso, il cartoncino della garanzia. Questa Garanzia decade se il numero del modello o di produzione è alterato, cancellato o rimosso, se persone o enti non autorizzati hanno eseguito riparazioni, modifiche o alterazioni del prodotto, o se il danno è stato causato accidentalmente, da un uso scorretto o per negligenza. Se il suo prodotto AB Aqua Medic GmbH non sembra funzionare correttamente o appare difettoso si prega di contattare dapprima il suo rivenditore. La nostra politica è il continuo miglioramento tecnico e ci riserviamo il diritto di modificare e migliorare le specifiche dei nostri prodotti senza un precedente avviso.
AB Aqua Medic GmbH - Gewerbepark 24 - 49143 Bissendorf/Germania - Modifiche tecniche riservate – 08/2017
I manuali sono disponibili sul sito www.aqua-medic.de.

31
Refill-System pro
Instrukcja Użytkownika PL
Czujnik i sterownik poziomu wody Refill-System pro to system do automatycznego uzupełniania odparowanej wody w akwariach z sumpem.
AB Aqua Medic GmbH Gewerbepark 24, 49143 Bissendorf, Niemcy
_______________________________________________________________________________

32
1. W zestawie
1. Zasilacz AC/DC, zasilanie 100 - 240 V AC 50/60 Hz, Wyjście 12 V DC 2.0 A 2. Jednostka główna 3. Czujnik podczerwieni N1 4. Czujnik N2 5. Pompa wody zasilanie DC 3.5 - 12 V DC / 0.5 – 5.0 W Hmax = 220 cm Qmax = 350 l/h 6. Czujnik N3 7. 2 m wężyk przyłączeniowy 8/12 2. Cechy - Monitorowanie poziomu wody w akwarium za pomocą czujnika na podczerwień z obwodem
opóźniającym. - Automatyczne uzupełnianie odparowanej wody z akwarium. - Regulowany poziom wody z zabezpieczeniem przed przelaniem (automatyczne rozłączenie w
przypadku uszkodzenia czujnika). - Zabezpieczenie przed suchobiegiem pompy uzupełniającej wodę – alarm optyczny i dźwiękowy. - Latwa instalacja dzięki zintegrowanym gniazdom i wtyczkom. - Bezpieczne zasilanie 12 V 3. Instalacja Ważne – podłączenie do zasilania może być tylko wtedy, kiedy wszystkie czujniki są podłączone – w każdym innym przypadku może dojść do zniszczenia urządzenia. Jeśli jakakolwiek gniazdo ma być odłączone, należy odłączyć wcześniej zasilanie. Aqua Medic Refill-System pro został zaprojektowany z myślą o podłączeniu do sumpa (filtra podszafkowego). Minimalna wysokość filtra to powinna wynosić 13 cm od krawędzi zbiornika do poziomu wody w filtrze. Mocowanie czujników N1 I N2 odbywa się na dołączonym do zestawu statywie.
Rys. 1: Gniazda sterownika Wyświetlacz LED: D1 = Uzupełnianie wody w trakcie D2 = Alarm w przypadku niskiego poziomu wody w zbiorniku retencyjnym (+ sygnał dźwiękowy) D3 = Zasilanie Zasilacz ma wymienne końcówki dla różnych krajów. Aby wymienić końcówkę, należy wcisnąć klawisz na tyle zasilacza. Zasilanie jest podłączane do gniazda DC 12V, pompa jest podłączana do innego gniazda.

33
Rys. 2: 1. Zasilacz 6. Czujnik N3 (zabezpieczenie suchobiegu) 2. Control unit 7. Wąż do uzupełniania wody 3. Czujnik N1 (ustala poziom wody) 8. Wąż z pompy uzupełniającej 4. Czujnik N2 (zabezpieczenie) 9. Zbiornik filtra 5. Pompa wody 10. Zbiornik retencyjny Czujniki powinny być czyste, wolne od glonów i innych złogów. Ponieważ czujniki umieszcza się ponad wodą, zakłócenie działania przez chodzące ślimaki i inne zwierzęta jest mało prawdopodobne.
Rys. 3: pompa uzupełniająca z zabezpieczeniem przed suchobiegiem jest mocowana za pomocą przyssawek na dnie zbiornika.
Rys. 4: Mocowanie węża uzupełniającego wodę
34
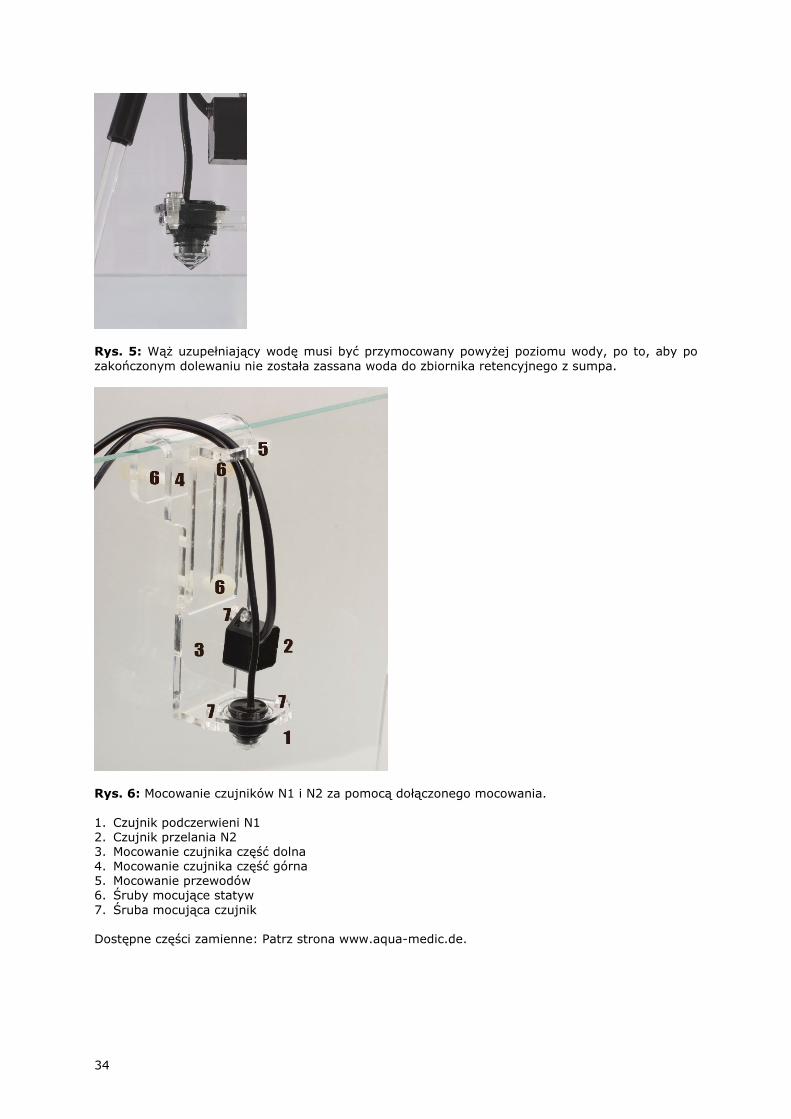
Rys. 5: Wąż uzupełniający wodę musi być przymocowany powyżej poziomu wody, po to, aby po zakończonym dolewaniu nie została zassana woda do zbiornika retencyjnego z sumpa.
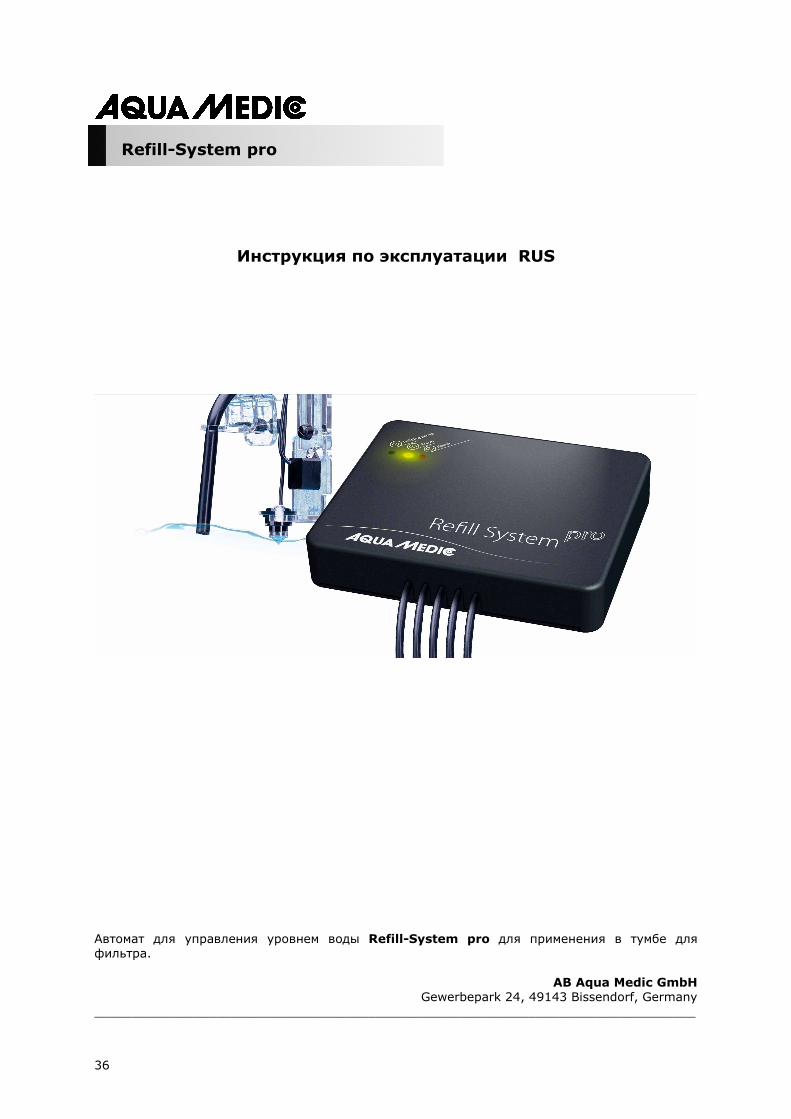
Rys. 6: Mocowanie czujników N1 i N2 za pomocą dołączonego mocowania. 1. Czujnik podczerwieni N1 2. Czujnik przelania N2 3. Mocowanie czujnika część dolna 4. Mocowanie czujnika część górna 5. Mocowanie przewodów 6. Śruby mocujące statyw 7. Śruba mocująca czujnik Dostępne części zamienne: Patrz strona www.aqua-medic.de.

35
Urządzenie wyłącza się tak szybko, jak poziom wody osiągnie poziom górnej części czujnika podczerwieni N1. Drobne pęcherzyki powietrza osadzające się na czujniku N1 powodują niewłaściwe działanie. Czujnik powinien być umieszczony w takim miejscu, gdzie nie ma takich drobnych pęcherzyków. W przypadku awarii czujnika, woda będzie się dopełniała do czujnika zabezpieczającego N2 – po osiągnięciu poziomu tego czujnika, urządzenie przerwie dolewanie. Czujnik podczerwieni ma swoją zwłokę, tak aby przy zafalowaniu nie następowało częste załączanie. Jeśli zbiornik retencyjny będzie pusty, słuszalny będzie alarm dźwiękowy. 4. Gwarancja Aqua Medic udziela gwarancji na usterki materiałów i produktów oświetleniowych na okres 24 miesięcy od daty zakupu. Jeśli produkt jest uszkodzony, gwarant według własnego uznania dokona naprawy lub wymiany wadliwego towaru. Gwarancją nie są objęte uszkodzenia powstałe w wyniku nieodpowiedniej instalacji, nieodpowiedniego użycia lub zmian dokonanych przez użytkownika. Aqua Medic nie odpowiada za jakiekolwiek powstałe uszkodzenia spowodowane użyciem produktu. Gwarancja ważna jest jedynie wraz z dowodem zakupu. Z przykrością informujemy, że nie jesteśmy odpowiedzialni za straty pośrednie i bezpośrednie wynikające z awarii sprzętu. Żadne z powyższych nie ma wpływu na statutowe prawa jakie przysługą Państwu na mocy obowiązujących przepisów.
AB Aqua Medic GmbH - Gewerbepark 24 - 49143 Bissendorf/Germany - Zastrzegamy prawo zmian - 08/2017
Aktualne instrukcje są do pobrania pod adresem www.aqua-medic.de.
36
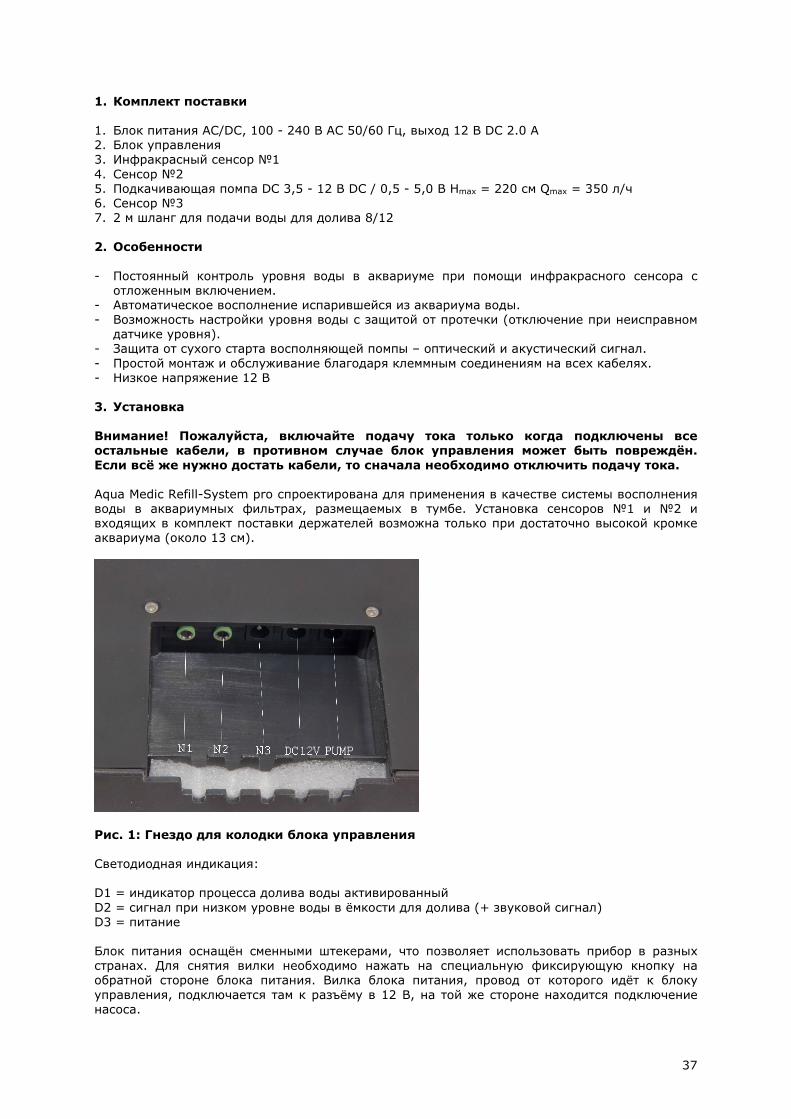
Refill-System pro
Инструкция по эксплуатации RUS
Автомат для управления уровнем воды Refill-System pro для применения в тумбе для фильтра.
AB Aqua Medic GmbH Gewerbepark 24, 49143 Bissendorf, Germany
_______________________________________________________________________________
37
1. Комплект поставки
1. Блок питания AC/DC, 100 - 240 В AC 50/60 Гц, выход 12 В DC 2.0 A 2. Блок управления 3. Инфракрасный сенсор №1 4. Сенсор №2 5. Подкачивающая помпа DC 3,5 - 12 В DC / 0,5 - 5,0 В Hmax = 220 см Qmax = 350 л/ч 6. Сенсор №3 7. 2 м шланг для подачи воды для долива 8/12 2. Особенности - Постоянный контроль уровня воды в аквариуме при помощи инфракрасного сенсора с
отложенным включением. - Автоматическое восполнение испарившейся из аквариума воды. - Возможность настройки уровня воды с защитой от протечки (отключение при неисправном
датчике уровня). - Защита от сухого старта восполняющей помпы – оптический и акустический сигнал. - Простой монтаж и обслуживание благодаря клеммным соединениям на всех кабелях. - Низкое напряжение 12 В 3. Установка Внимание! Пожалуйста, включайте подачу тока только когда подключены все остальные кабели, в противном случае блок управления может быть повреждён. Если всё же нужно достать кабели, то сначала необходимо отключить подачу тока. Aqua Medic Refill-System pro спроектирована для применения в качестве системы восполнения воды в аквариумных фильтрах, размещаемых в тумбе. Установка сенсоров №1 и №2 и входящих в комплект поставки держателей возможна только при достаточно высокой кромке аквариума (около 13 см).
Рис. 1: Гнездо для колодки блока управления Светодиодная индикация: D1 = индикатор процесса долива воды активированный D2 = сигнал при низком уровне воды в ёмкости для долива (+ звуковой сигнал) D3 = питание Блок питания оснащён сменными штекерами, что позволяет использовать прибор в разных странах. Для снятия вилки необходимо нажать на специальную фиксирующую кнопку на обратной стороне блока питания. Вилка блока питания, провод от которого идёт к блоку управления, подключается там к разъёму в 12 В, на той же стороне находится подключение насоса.

38
Рис. 2: 1. Блок питания 6. Сенсор №3 (Защита помпы от сухого старта) 2. Блок управления 7. Шланг для долива воды (в коробку фильтра) 3. Сенсор №1 (желаемый уровень воды) 8. Шланг для долива (из помпы) 4. Сенсор №2 (защита от перелива) 9. Коробка для фильтра 5. Помпа для восполнения 10. Резервуар для воды Сенсоры должны быть чистыми и свободными от водорослей и других отложений. Поскольку они находятся над водой, то неполадки, вызванные улитками или другими животными в целом исключены.
Рис. 3: Помпа для поддержания уровня с защитой от сухого старта. Крепится при помощи присосок на дне резервуара для воды.
Рис. 4: Шланг для долива с держателем

39
Рис. 5: Шланг для долива должен находиться над уровнем воды. Если он находится ниже уровня воды, то по принципу сообщающихся сосудов вода может течь по нему и её уровень в резервуаре и в фильтре может стать одинаковым.
Рис. 6: Монтаж сенсоров №1 и №2 с помощью поставляемого держателя. 1. Инфракрасный сенсор №1 2. Сенсор защиты от перелива №2 3. Нижняя часть скобы сенсора 4. Верхняя часть скобы сенсора 5. Держатель кабеля 6. Фиксирующий болт для скобы 7. Фиксирующий болт для сенсора Доступные запасные части: см. www.aqua-medic.de.

40
Долив воды включается, как только уровень воды доходит до верхней части инфракрасного датчике №1. Мелкие воздушные пузырьки, которые собираются на кончике сенсора №1, приводят к сбоям в работе. В связи с этим сенсор необходимо размещать в фильтре в месте, где нет таких пузырьков. Если датчик неисправен, то уровень воды достигает сенсора №2, который отключает подачу воды. Инфракрасный датчик имеет встроенную функцию задержки отключения, благодаря которой предотвращается постоянное включение и выключение из-за волн на поверхности воды. При недостаточном уровне воды в резервуаре включается звуковой сигнал. 4. Гарантия
AB Aqua Medic GmbH предоставляет 24-месячную гарантию со дня приобретения на все дефекты по материалам прибора и дефекты при обработке. Подтверждением гарантии служит оригинал чека на покупку. В этот промежуток времени мы бесплатно отремонтируем продукт, монтируя новые или отреставрированные детали (исключая расходы по доставке). В случае, если по истечении гарантийного срока с Вашим прибором возникнут проблемы, обратитесь, пожалуйста, к Вашему дилеру. Эта гарантия действительна только при первичной покупке. Она покрывает только дефекты по материалам и обработке, которые появятся при использовании прибора по назначению. Она не действительна при повреждениях при транспортировке или ненадлежащем обращении, халатности, неправильном монтаже, а также при вмешательстве и изменениях, произведенных в несанкционированных местах. AB Aqua Medic GmbH не несет ответственности за повторные повреждения, возникающие при использовании прибора.
AB Aqua Medic GmbH - Gewerbepark 24 - 49143 Bissendorf/Germany - оставляем за собой право на технические изменения конструкции - 08/2017
Актуальные инструкции по эксплуатации можно скачать по ссылке www.aqua-medic.de.