Steuerung eines Plotters Zeichnen von mathematischen ... · 1 Gerhart-Hauptmann-Gymnasium...
82
1 Gerhart-Hauptmann-Gymnasium Wernigerode Informatikkurs Klasse 12 Schuljahr 1998 / 1999 Steuerung eines Plotters Zeichnen von mathematischen Funktionen Mitglieder: Christoph Lumme (12c) Georg Ruß (12c) Leiter: Frank Grüning
Transcript of Steuerung eines Plotters Zeichnen von mathematischen ... · 1 Gerhart-Hauptmann-Gymnasium...
1
Gerhart-Hauptmann-Gymnasium Wernigerode Informatikkurs Klasse 12 Schuljahr 1998 / 1999
Steuerung eines Plotters Zeichnen von mathematischen Funktionen Mitglieder: Christoph Lumme (12c)
Georg Ruß (12c) Leiter: Frank Grüning

2
Inhaltsverzeichnis
Projektaufgabe ......................................................................................................................................................................................4
Verwendete Programmiersprachen ................................................................................................................................................4 Microsoft Visual Basic ..................................................................................................................................................................... 4 Javascript............................................................................................................................................................................................. 4 VBScript.............................................................................................................................................................................................. 4 WIL (Windows Interface Language).............................................................................................................................................. 4
Features ..................................................................................................................................................................................................5
Systemvoraussetzungen......................................................................................................................................................................5
verwendete Soft- und Hardware ......................................................................................................................................................5
Programmaufbau .................................................................................................................................................................................5 Beschreibung der einzelnen Menüpunkte: .................................................................................................................................... 6
Stiftauswahl.................................................................................................................................................................................... 6 Projekt ............................................................................................................................................................................................. 6 Einstellungen.................................................................................................................................................................................. 6 Funktionsplotter............................................................................................................................................................................. 6
Bedienungsanleitung ...........................................................................................................................................................................7 nach der Installation...................................................................................................................................................................... 7 Papierformat einstellen................................................................................................................................................................. 7 Stiftfarbe auswählen ..................................................................................................................................................................... 7 Neues Projekt ................................................................................................................................................................................. 8 Projekt laden .................................................................................................................................................................................. 8 Projekt speichern ........................................................................................................................................................................... 8 Projekt plotten................................................................................................................................................................................ 8 Programm beenden....................................................................................................................................................................... 8 Funktionsplotter einrichten.......................................................................................................................................................... 8 Funktionseingabe.......................................................................................................................................................................... 9 Funktion zeichnen....................................................................................................................................................................... 10
genauere Erklärung ausgewählter Features anhand von Quelltextauszügen...................................................................10 speichern....................................................................................................................................................................................... 10 laden .............................................................................................................................................................................................. 11
Ausführungen zur Effizienz des Compilers ....................................................................................................................... 17 Freihandzeichnen ........................................................................................................................................................................ 17 Texteingabe.................................................................................................................................................................................. 18 Rechteck / Kreis / Linie.............................................................................................................................................................. 19 Funktionsplotter........................................................................................................................................................................... 21
Fazit .......................................................................................................................................................................................................25
Anhang ..................................................................................................................................................................................................26
benutzte Literatur..............................................................................................................................................................................26
Anteile am Projekt.............................................................................................................................................................................26
Betatester..............................................................................................................................................................................................26
Sponsor .................................................................................................................................................................................................26
Copyright .............................................................................................................................................................................................26
Schriftverkehr im Internet..............................................................................................................................................................27
Quelltext ...............................................................................................................................................................................................31 Form1 ........................................................................................................................................................................................... 31
Eigenschaften der visuell erstellten Objekte in Form1..................................................................................................... 57
3
Form2 ........................................................................................................................................................................................... 59 Eigenschaften der visuell erstellten Objekte in Form2..................................................................................................... 61
Form3 ........................................................................................................................................................................................... 63 Eigenschaften der visuell erstellten Objekte in Form3..................................................................................................... 65
Form4 ........................................................................................................................................................................................... 69 Eigenschaften der visuell erstellten Objekte in Form4..................................................................................................... 75
Form5 ........................................................................................................................................................................................... 76 Eigenschaften der visuell erstellten Objekte in Form5..................................................................................................... 77
Form6 ........................................................................................................................................................................................... 79 Eigenschaften der visuell erstellten Objekte in Form6..................................................................................................... 79
Form7 ........................................................................................................................................................................................... 80 Eigenschaften der visuell erstellten Objekte in Form7..................................................................................................... 80
Form8 ........................................................................................................................................................................................... 81 Eigenschaften der visuell erstellten Objekte in Form8..................................................................................................... 81
MDIForm1 .................................................................................................................................................................................. 82 Eigenschaften der visuell erstellten Objekte in MDIForm1 ............................................................................................ 84

4
Projektaufgabe Ansteuerung eines x-y-Plotters über serielle oder parallele Schnittstelle Zusatz: Programmierung eines Funktionsplotters (Funktionsausgabe an Plotter) Eigene Idee: Erstellen eines Compilers, Laden, Speichern von Gezeichnetem
Verwendete Programmiersprachen Es erscheint sinnvoll, vorab die verwendeten Programmier-, Skriptsprachen und Automatisierungshilfen zu erläutern, da grundlegende Programmteile dann besser verständlich werden.
Microsoft Visual Basic Visual Basic ist eine objektorientierte Programmiersprache. Wie der Name bereits vermuten läßt, handelt es sich um eine Sprache, die der von Basic oder Qbasic sehr ähnlich ist. Der Namensteil „Visual“ könnte sich entweder auf die Erstellung solcher Objekte (Auswählen eines Objekts in der Toolbar, Ziehen auf gewünschte Position und Größe („visualisiertes Erstellen“)) oder auf die Programmierung Windows-basierter Anwendungen beziehen. Wie alle modernen Programmiersprachen unterstützt Visual Basic eine Reihe von allgemeinen Programmierkonstrukten und Sprachelementen. Ungefähr 99 % unseres Quelltextes beruhen auf VB, da jedoch ein Hauptteil (Funktionsplotter) aufgrund eines(!) fehlenden Befehls nicht allein mit VB realisierbar war, mußten drei weitere „Hilfssprachen“ zum Einsatz kommen.
Javascript Diese Skriptsprache kommt hauptsächlich bei der Erstellung interaktiver Webseiten zum Einsatz. „Skriptsprache“ bedeutet, daß ein Programm auch zur Laufzeit im Quelltext vorliegt und vom entsprechenden Programm im Gegensatz zu z.B. Basic interpretiert anstatt kompiliert wird. Das interpretierende Programm ist in diesem Fall ein Webbrowser (MS Internet Explorer oder Netscape Communicator, um die marktbeherrschenden Vertreter zu nennen). Javascript ist sozusagen ein „Add-On“ zu HTML (Hypertext Markup Language, Standardsprache für das Internet). Die Syntax ähnelt der von C++, da sie ein Gemisch aus C++ und anderen objektorientierten Sprachen wie SmallTalk, Eiffel und Objective C ist.
VBScript Auch dies ist eine Skriptsprache, die bei der Internetkommunikation (Active-X-Technologie) zum Einsatz kommt. VBScript ist eine Untermenge von VBA (Visual Basic for Applications), das wiederum auf VB basiert. Somit ist die Syntax nahezu gleich der von Visual Basic. Die Funktion, die gemeinhin als Sicherheitslücke in Windows bezeichnet wird (Windows Scripting Host), war für uns die Möglichkeit, auf die Festplatte des Anwenders zu schreiben und somit die Funktionseingabe zu realisieren.
WIL (Windows Interface Language) WIL ist ein Spracheninterpreter, der dem Windows-Anwender eine Reihe von Funktionen zur Verfügung stellt. Ähnlich wie die Batch-Sprache unter DOS wird WIL auch WinBatch genannt, da die Befehle auch in einer simplen Batch-Datei geschrieben werden, allerdings zum Ausführen als EXE erst kompiliert werden müssen, so daß sich WIL aus unserer Sicht als „Zwischending“ zwischen VB und Skriptsprachen darstellt. Wie bereits erwähnt, wurden die letzten drei Sprachen nur verwendet, um ein „Workaround“ für die fehlende „evaluate“- Funktion in VB zu erstellen (dazu später mehr).
5
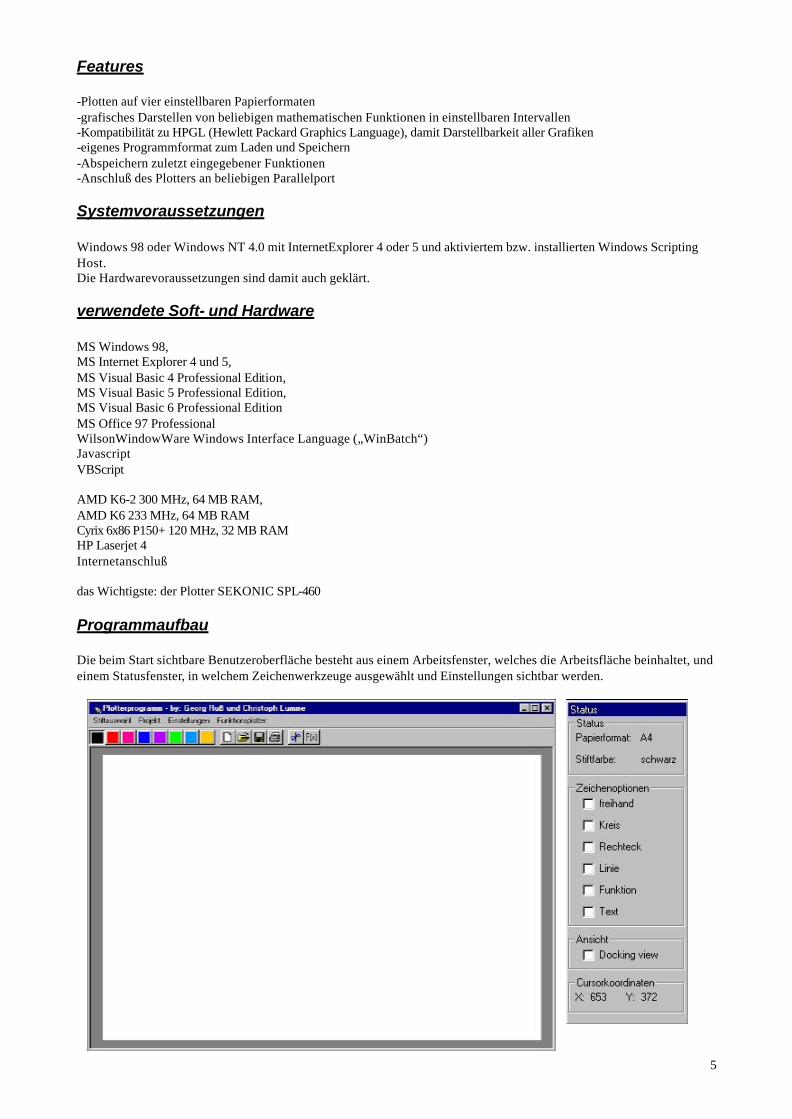
Features -Plotten auf vier einstellbaren Papierformaten -grafisches Darstellen von beliebigen mathematischen Funktionen in einstellbaren Intervallen -Kompatibilität zu HPGL (Hewlett Packard Graphics Language), damit Darstellbarkeit aller Grafiken -eigenes Programmformat zum Laden und Speichern -Abspeichern zuletzt eingegebener Funktionen -Anschluß des Plotters an beliebigen Parallelport
Systemvoraussetzungen Windows 98 oder Windows NT 4.0 mit InternetExplorer 4 oder 5 und aktiviertem bzw. installierten Windows Scripting Host. Die Hardwarevoraussetzungen sind damit auch geklärt.
verwendete Soft- und Hardware MS Windows 98, MS Internet Explorer 4 und 5, MS Visual Basic 4 Professional Edition, MS Visual Basic 5 Professional Edition, MS Visual Basic 6 Professional Edition MS Office 97 Professional WilsonWindowWare Windows Interface Language („WinBatch“) Javascript VBScript AMD K6-2 300 MHz, 64 MB RAM, AMD K6 233 MHz, 64 MB RAM Cyrix 6x86 P150+ 120 MHz, 32 MB RAM HP Laserjet 4 Internetanschluß das Wichtigste: der Plotter SEKONIC SPL-460
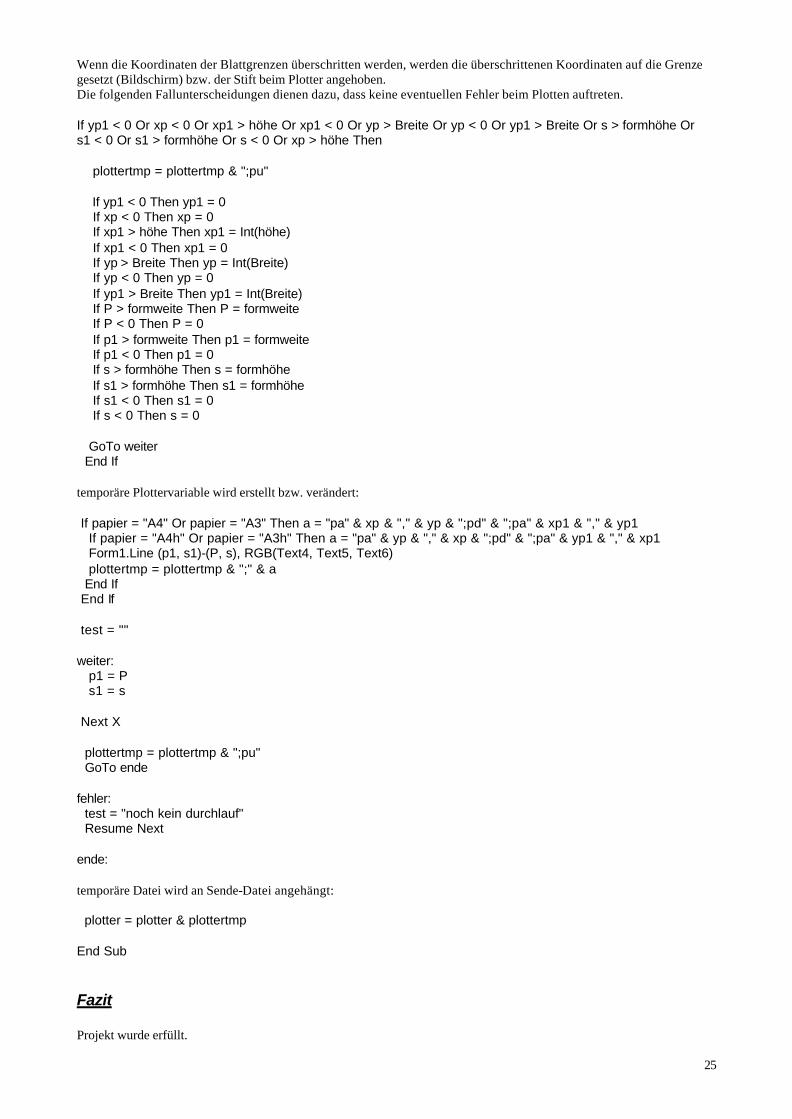
Programmaufbau Die beim Start sichtbare Benutzeroberfläche besteht aus einem Arbeitsfenster, welches die Arbeitsfläche beinhaltet, und einem Statusfenster, in welchem Zeichenwerkzeuge ausgewählt und Einstellungen sichtbar werden.
6
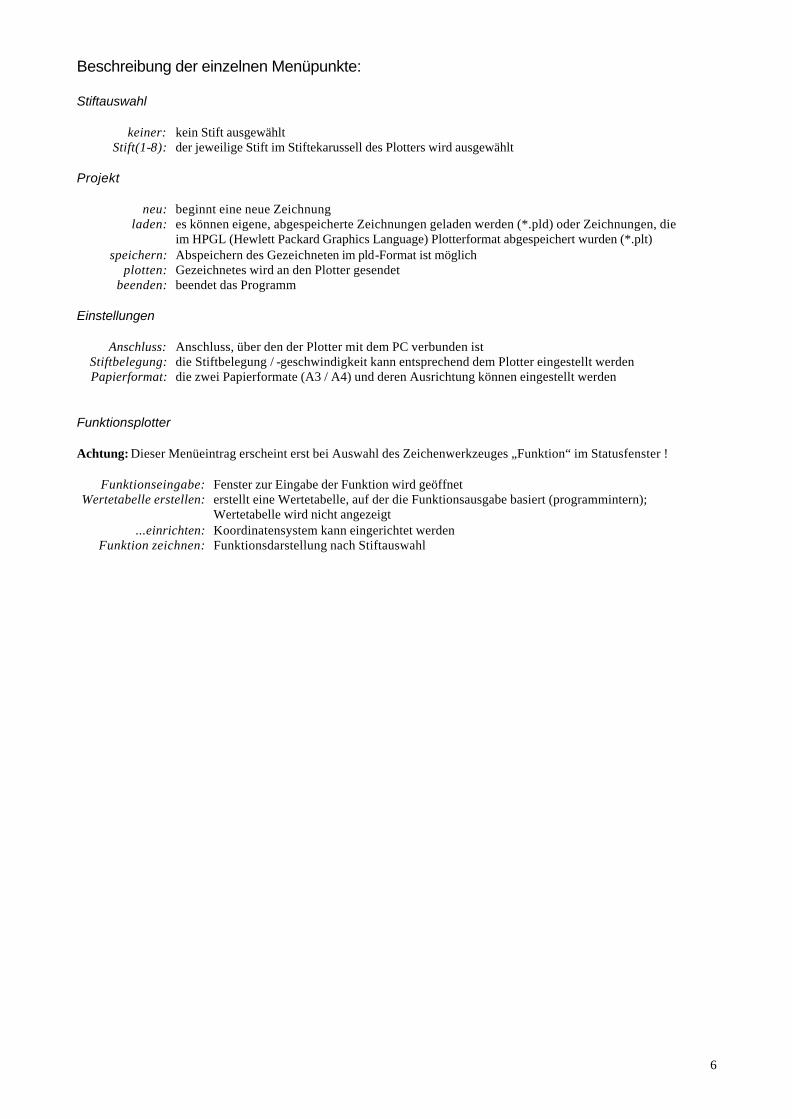
Beschreibung der einzelnen Menüpunkte: Stiftauswahl
keiner: kein Stift ausgewählt
Stift(1-8): der jeweilige Stift im Stiftekarussell des Plotters wird ausgewählt Projekt
neu: beginnt eine neue Zeichnung laden: es können eigene, abgespeicherte Zeichnungen geladen werden (*.pld) oder Zeichnungen, die
im HPGL (Hewlett Packard Graphics Language) Plotterformat abgespeichert wurden (*.plt) speichern: Abspeichern des Gezeichneten im pld-Format ist möglich
plotten: Gezeichnetes wird an den Plotter gesendet beenden: beendet das Programm
Einstellungen
Anschluss: Anschluss, über den der Plotter mit dem PC verbunden ist Stiftbelegung: die Stiftbelegung / -geschwindigkeit kann entsprechend dem Plotter eingestellt werden Papierformat: die zwei Papierformate (A3 / A4) und deren Ausrichtung können eingestellt werden
Funktionsplotter Achtung: Dieser Menüeintrag erscheint erst bei Auswahl des Zeichenwerkzeuges „Funktion“ im Statusfenster !
Funktionseingabe: Fenster zur Eingabe der Funktion wird geöffnet Wertetabelle erstellen: erstellt eine Wertetabelle, auf der die Funktionsausgabe basiert (programmintern);
Wertetabelle wird nicht angezeigt ...einrichten: Koordinatensystem kann eingerichtet werden
Funktion zeichnen: Funktionsdarstellung nach Stiftauswahl
7
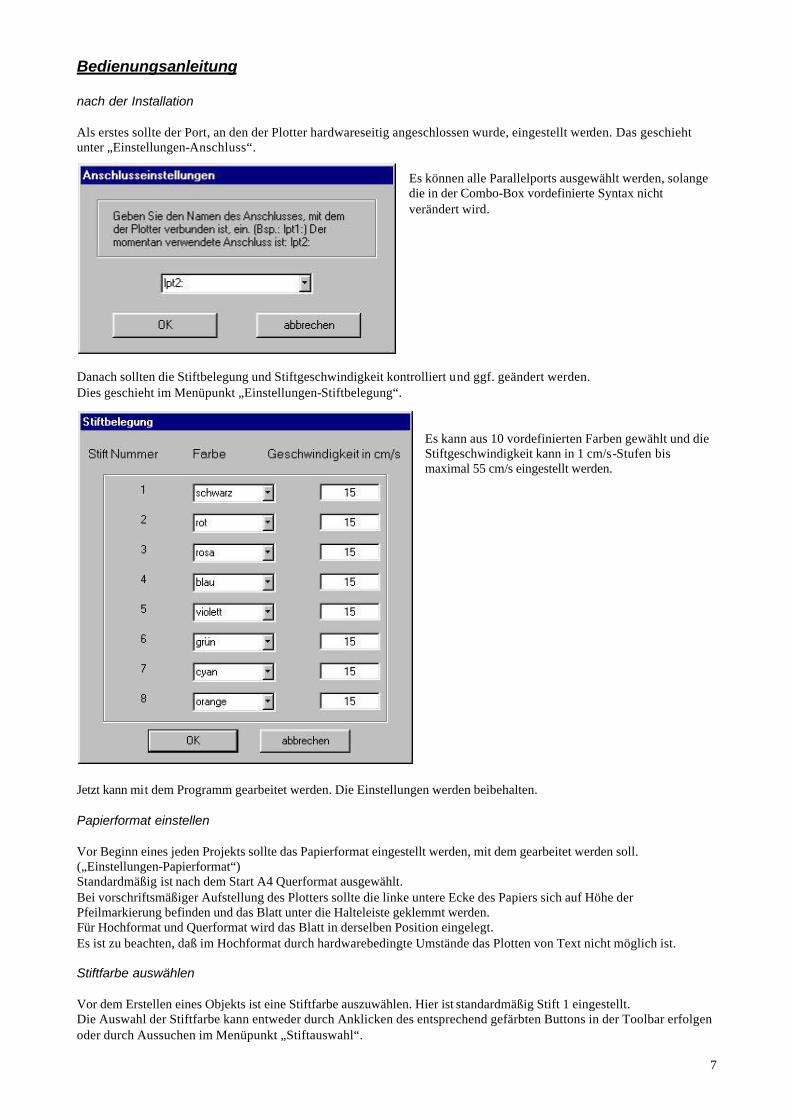
Bedienungsanleitung nach der Installation Als erstes sollte der Port, an den der Plotter hardwareseitig angeschlossen wurde, eingestellt werden. Das geschieht unter „Einstellungen-Anschluss“.
Es können alle Parallelports ausgewählt werden, solange die in der Combo-Box vordefinierte Syntax nicht verändert wird.
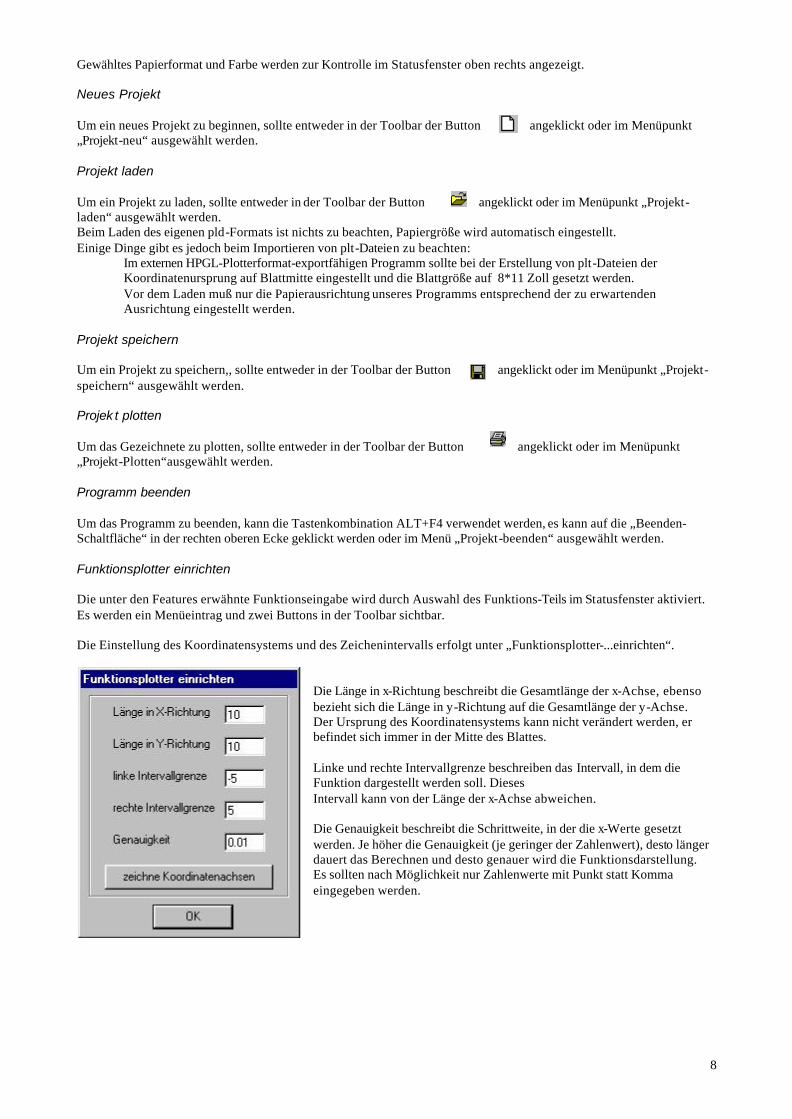
Danach sollten die Stiftbelegung und Stiftgeschwindigkeit kontrolliert und ggf. geändert werden. Dies geschieht im Menüpunkt „Einstellungen-Stiftbelegung“.
Es kann aus 10 vordefinierten Farben gewählt und die Stiftgeschwindigkeit kann in 1 cm/s-Stufen bis maximal 55 cm/s eingestellt werden.
Jetzt kann mit dem Programm gearbeitet werden. Die Einstellungen werden beibehalten. Papierformat einstellen Vor Beginn eines jeden Projekts sollte das Papierformat eingestellt werden, mit dem gearbeitet werden soll. („Einstellungen-Papierformat“) Standardmäßig ist nach dem Start A4 Querformat ausgewählt. Bei vorschriftsmäßiger Aufstellung des Plotters sollte die linke untere Ecke des Papiers sich auf Höhe der Pfeilmarkierung befinden und das Blatt unter die Halteleiste geklemmt werden. Für Hochformat und Querformat wird das Blatt in derselben Position eingelegt. Es ist zu beachten, daß im Hochformat durch hardwarebedingte Umstände das Plotten von Text nicht möglich ist. Stiftfarbe auswählen Vor dem Erstellen eines Objekts ist eine Stiftfarbe auszuwählen. Hier ist standardmäßig Stift 1 eingestellt. Die Auswahl der Stiftfarbe kann entweder durch Anklicken des entsprechend gefärbten Buttons in der Toolbar erfolgen oder durch Aussuchen im Menüpunkt „Stiftauswahl“.
8
Gewähltes Papierformat und Farbe werden zur Kontrolle im Statusfenster oben rechts angezeigt. Neues Projekt Um ein neues Projekt zu beginnen, sollte entweder in der Toolbar der Button angeklickt oder im Menüpunkt „Projekt-neu“ ausgewählt werden. Projekt laden Um ein Projekt zu laden, sollte entweder in der Toolbar der Button angeklickt oder im Menüpunkt „Projekt-laden“ ausgewählt werden. Beim Laden des eigenen pld-Formats ist nichts zu beachten, Papiergröße wird automatisch eingestellt. Einige Dinge gibt es jedoch beim Importieren von plt-Dateien zu beachten:
Im externen HPGL-Plotterformat-exportfähigen Programm sollte bei der Erstellung von plt-Dateien der Koordinatenursprung auf Blattmitte eingestellt und die Blattgröße auf 8*11 Zoll gesetzt werden. Vor dem Laden muß nur die Papierausrichtung unseres Programms entsprechend der zu erwartenden Ausrichtung eingestellt werden.
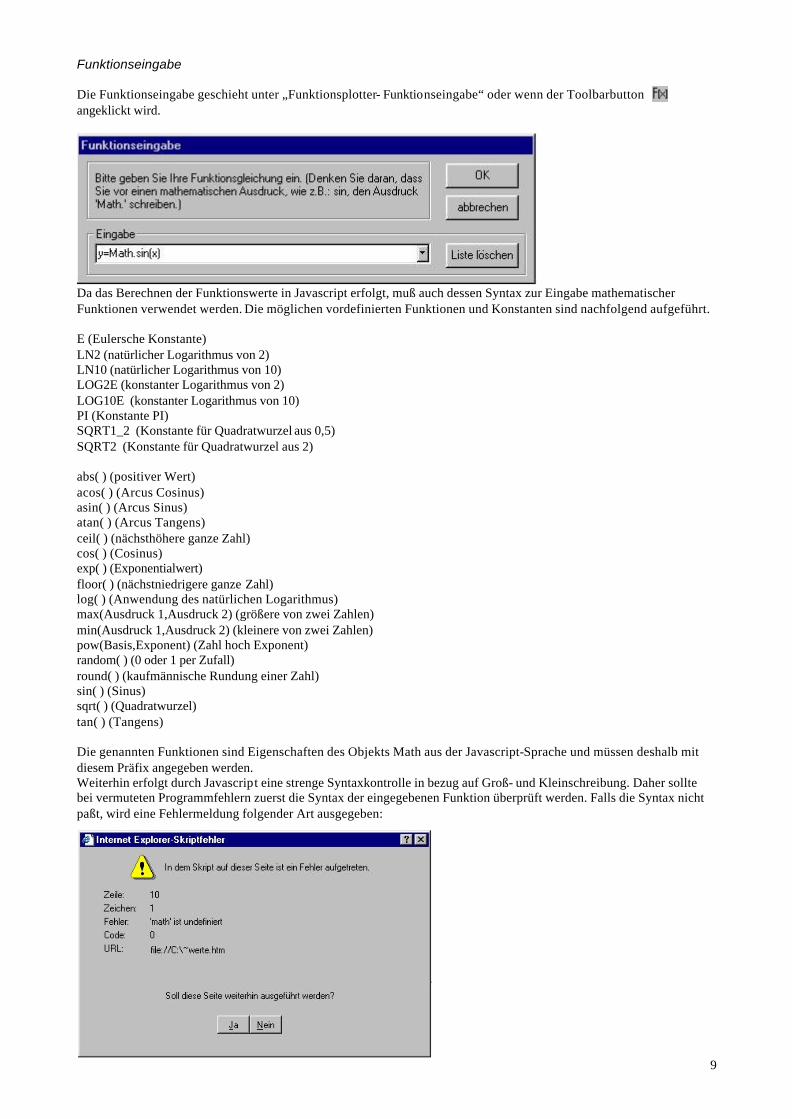
Projekt speichern Um ein Projekt zu speichern,, sollte entweder in der Toolbar der Button angeklickt oder im Menüpunkt „Projekt-speichern“ ausgewählt werden. Projek t plotten Um das Gezeichnete zu plotten, sollte entweder in der Toolbar der Button angeklickt oder im Menüpunkt „Projekt-Plotten“ausgewählt werden. Programm beenden Um das Programm zu beenden, kann die Tastenkombination ALT+F4 verwendet werden, es kann auf die „Beenden-Schaltfläche“ in der rechten oberen Ecke geklickt werden oder im Menü „Projekt-beenden“ ausgewählt werden. Funktionsplotter einrichten Die unter den Features erwähnte Funktionseingabe wird durch Auswahl des Funktions-Teils im Statusfenster aktiviert. Es werden ein Menüeintrag und zwei Buttons in der Toolbar sichtbar. Die Einstellung des Koordinatensystems und des Zeichenintervalls erfolgt unter „Funktionsplotter-...einrichten“.
Die Länge in x-Richtung beschreibt die Gesamtlänge der x-Achse, ebenso bezieht sich die Länge in y-Richtung auf die Gesamtlänge der y-Achse. Der Ursprung des Koordinatensystems kann nicht verändert werden, er befindet sich immer in der Mitte des Blattes. Linke und rechte Intervallgrenze beschreiben das Intervall, in dem die Funktion dargestellt werden soll. Dieses Intervall kann von der Länge der x-Achse abweichen. Die Genauigkeit beschreibt die Schrittweite, in der die x-Werte gesetzt werden. Je höher die Genauigkeit (je geringer der Zahlenwert), desto länger dauert das Berechnen und desto genauer wird die Funktionsdarstellung. Es sollten nach Möglichkeit nur Zahlenwerte mit Punkt statt Komma eingegeben werden.
9
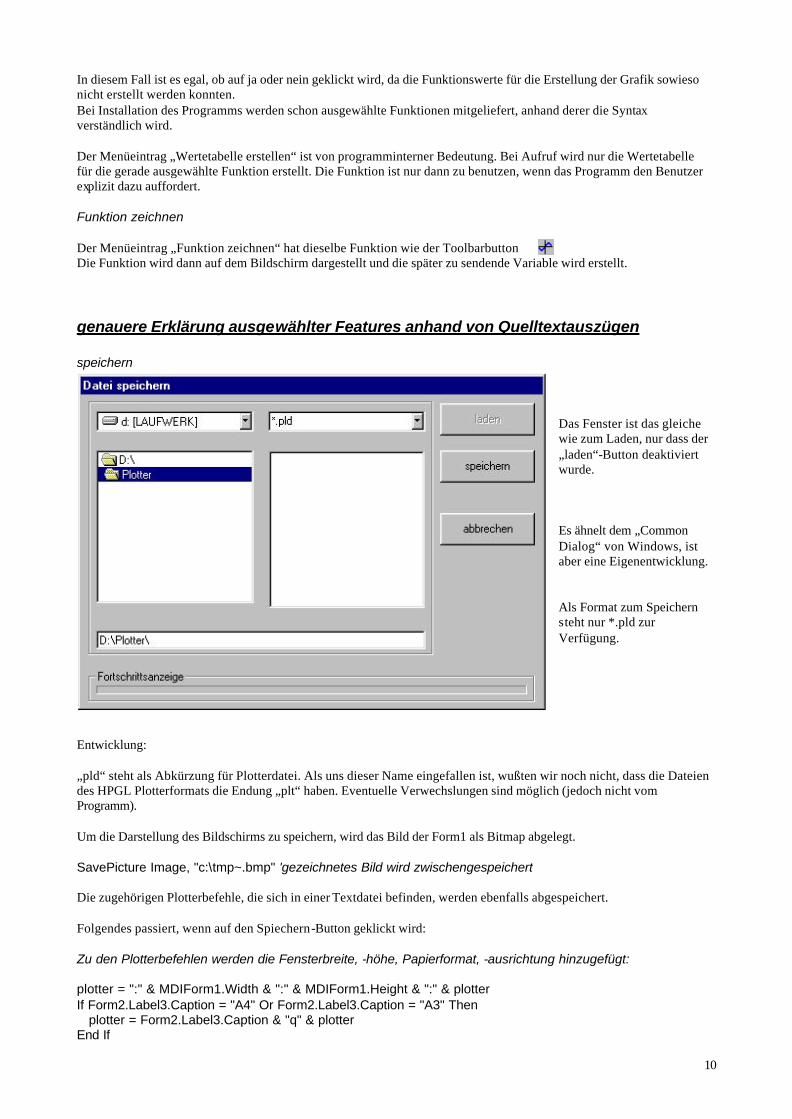
Funktionseingabe Die Funktionseingabe geschieht unter „Funktionsplotter- Funktionseingabe“ oder wenn der Toolbarbutton angeklickt wird.
Da das Berechnen der Funktionswerte in Javascript erfolgt, muß auch dessen Syntax zur Eingabe mathematischer Funktionen verwendet werden. Die möglichen vordefinierten Funktionen und Konstanten sind nachfolgend aufgeführt. E (Eulersche Konstante) LN2 (natürlicher Logarithmus von 2) LN10 (natürlicher Logarithmus von 10) LOG2E (konstanter Logarithmus von 2) LOG10E (konstanter Logarithmus von 10) PI (Konstante PI) SQRT1_2 (Konstante für Quadratwurzel aus 0,5) SQRT2 (Konstante für Quadratwurzel aus 2) abs( ) (positiver Wert) acos( ) (Arcus Cosinus) asin( ) (Arcus Sinus) atan( ) (Arcus Tangens) ceil( ) (nächsthöhere ganze Zahl) cos( ) (Cosinus) exp( ) (Exponentialwert) floor( ) (nächstniedrigere ganze Zahl) log( ) (Anwendung des natürlichen Logarithmus) max(Ausdruck 1,Ausdruck 2) (größere von zwei Zahlen) min(Ausdruck 1,Ausdruck 2) (kleinere von zwei Zahlen) pow(Basis,Exponent) (Zahl hoch Exponent) random( ) (0 oder 1 per Zufall) round( ) (kaufmännische Rundung einer Zahl) sin( ) (Sinus) sqrt( ) (Quadratwurzel) tan( ) (Tangens) Die genannten Funktionen sind Eigenschaften des Objekts Math aus der Javascript-Sprache und müssen deshalb mit diesem Präfix angegeben werden. Weiterhin erfolgt durch Javascript eine strenge Syntaxkontrolle in bezug auf Groß- und Kleinschreibung. Daher sollte bei vermuteten Programmfehlern zuerst die Syntax der eingegebenen Funktion überprüft werden. Falls die Syntax nicht paßt, wird eine Fehlermeldung folgender Art ausgegeben:
10
In diesem Fall ist es egal, ob auf ja oder nein geklickt wird, da die Funktionswerte für die Erstellung der Grafik sowieso nicht erstellt werden konnten. Bei Installation des Programms werden schon ausgewählte Funktionen mitgeliefert, anhand derer die Syntax verständlich wird. Der Menüeintrag „Wertetabelle erstellen“ ist von programminterner Bedeutung. Bei Aufruf wird nur die Wertetabelle für die gerade ausgewählte Funktion erstellt. Die Funktion ist nur dann zu benutzen, wenn das Programm den Benutzer explizit dazu auffordert. Funktion zeichnen Der Menüeintrag „Funktion zeichnen“ hat dieselbe Funktion wie der Toolbarbutton Die Funktion wird dann auf dem Bildschirm dargestellt und die später zu sendende Variable wird erstellt.
genauere Erklärung ausgewählter Features anhand von Quelltextauszügen speichern
Das Fenster ist das gleiche wie zum Laden, nur dass der „laden“-Button deaktiviert wurde. Es ähnelt dem „Common Dialog“ von Windows, ist aber eine Eigenentwicklung. Als Format zum Speichern steht nur *.pld zur Verfügung.
Entwicklung: „pld“ steht als Abkürzung für Plotterdatei. Als uns dieser Name eingefallen ist, wußten wir noch nicht, dass die Dateien des HPGL Plotterformats die Endung „plt“ haben. Eventuelle Verwechslungen sind möglich (jedoch nicht vom Programm). Um die Darstellung des Bildschirms zu speichern, wird das Bild der Form1 als Bitmap abgelegt. SavePicture Image, "c:\tmp~.bmp" 'gezeichnetes Bild wird zwischengespeichert Die zugehörigen Plotterbefehle, die sich in einer Textdatei befinden, werden ebenfalls abgespeichert. Folgendes passiert, wenn auf den Spiechern-Button geklickt wird: Zu den Plotterbefehlen werden die Fensterbreite, -höhe, Papierformat, -ausrichtung hinzugefügt: plotter = ":" & MDIForm1.Width & ":" & MDIForm1.Height & ":" & plotter If Form2.Label3.Caption = "A4" Or Form2.Label3.Caption = "A3" Then plotter = Form2.Label3.Caption & "q" & plotter End If

11
If Form2.Label3.Caption = "A4h" Or Form2.Label3.Caption = "A3h" Then plotter = Form2.Label3.Caption & plotter End If fertiger String (Zeichenkette) wird als pldtmp.xxx gespeichert: Open "c:\pldtmp.xxx" For Output As #1 Write #1, plotter Close #1 Da die Bitmaps nicht das effizienteste Bildformat sind, also relativ viel Platz beanspruchen, werden die beiden Dateien (Bitmap und Textdatei) mit einem Komprimierungsprogramm verkleinert (arj). Da dies ein DOS-Befehl ist, wird eine Batchdatei erstellt, die das Komprimieren der beiden Dateien veranlaßt. a = "arj a -vva -r -jm1 " & Text1 & " c:\pldtmp.xxx" -erste Zeile der Batchdatei a1 = "arj a -vva -r -jm1 " & Text1 & " c:\tmp~.bmp" -zweite Zeile der Batchdatei Open "~~tmp.bat" For Output As #1 -Batchdatei wird erstellt(„~~tmp.bat“) Print #1, a -Befehle werden in Datei geschrieben Print #1, a1 Print #1, "exit" Close #1 BP = Shell("~~tmp.bat", 1) -Batchdatei wird ausgeführt Als nächstes Problem ergab sich, daß die entstandenen DOS-Fenster nicht automatisch geschlossen wurden. Also schrieben wir mit WinBatch ein kleines Hilfsprogramm, das dieses Schließen bewerkstelligt („dosclose.exe“) Prinzip: Ein Programm, das darauf wartet, daß ein Fenster namens „Beendet - ~~tmp“ existiert, dieses dann schließt und sich selbst beendet. :start if winexist("Beendet - ~~tmp") then goto label goto start :label winclose("Beendet - ~~tmp") exit Dieses Programm wird jetzt in VB aufgerufen. esso = Shell("dosclose.exe") Die Prozedur zum Speichern ist damit beendet. laden
Auch diese Form unterscheidet sich nur dadurch von der „speichern“-Form, daß der „laden“-Button aktiviert und der „speichern“-Button deaktiviert wurde.

12
Zum Aufbau von plt-Dateien: Diese Dateien, die zum Beispiel mit CorelDraw aus vektororientierten Grafiken erstellt werden können, sind Textdateien, die Plotterbefehle eines HP-Plotters in Zeilenform enthalten. In folgendem vergleichenden Beispiel wird ein Rechteck gezeichnet:
HP (plt) Erklärung SEKONIC (pld) IN; VS32,1; VS32,2; VS32,3; VS32,4; VS32,5; VS32,6; VS32,7; VS32,8; WU0; PW0.350,1; PW0.350,2; PW0.350,3; PW0.350,4; PW0.350,5; PW0.350,6; PW0.350,7; PW0.350,8;
Der erste Befehl dient zum Initialisieren, wird jedoch nicht berücksichtigt, da er sowieso am Anfang jeder von uns erstellten Datei gesendet wird. Die anderen Werte geben Stiftgeschwindigkeit und andere Einstellungen an, die jedoch auch keine Berücksichtigung finden.
IN;
SP1; Befehl zum Nehmen des ersten Stiftes SP1; PU1484 2605; PD788 2605; PD788 301; PD1484 301; PD1484 2605;
eigentliche Koordinaten; das Koordinatensystem des HP-Plotters befindet sich in der Mitte, wohingegen sich das des SPL-460 in der linken unteren Ecke befindet. (Bei Sekonic wurde nicht berücksichtigt, dass die Koordinaten erst noch umgerechnet werden müssen.)
PU;PA1484,2605; PD;PA788,2605; PA788,301; PA1484,301; PA1484,2605;
SP0; „Wegbringen“ des letzten Stiftes SP0; Sicherheitskopie der geöffneten Datei, mit der gearbeitet wird, wird angelegt FileCopy Form4.Text1, "c:\plt.tmp" Die Zeilenanzahl, die die Grundlage für die Berechnung der Statusanzeige bildet, wird ermittelt. If Combo1.Text = "*.plt" Then Open "c:\plt.tmp" For Input As #2 Do While Not EOF(2) ' Schleife bis Dateiende. Input #2, statusanzeige anzeige = anzeige + 1 Loop Close #2 pos = 0.9 px1 = -1 py1 = -1 plotter = "in;" Plotterinitialisierungsbefehl wird an den Anfang der Datei geschrieben An dieser Stelle beginnt das Umwandeln der plt-Datei in unser eigenes pld-Format.(Compiler) Die Ausgangsdatei wird zeilenweise eingelesen und die Befehle werden Schritt für Schritt umgewandelt. Da die Befehle immer zwei Zeichen lang sind, werden auch immer gleich zwei Zeichen eingelesen. Open "c:\plt.tmp" For Input As #2 Do While Not EOF(2) ' Schleife bis Dateiende. Input #2, plttmp fortschritt = fortschritt + 1 ProgressBar1.Value = Int(100 / anzeige * fortschritt) vergleichsvariable = Left(plttmp, 2) plottertmp = "" Befehle für die Stiftnummer sind bei beiden Firmen gleich, so daß die Befehle übernommen werden können.
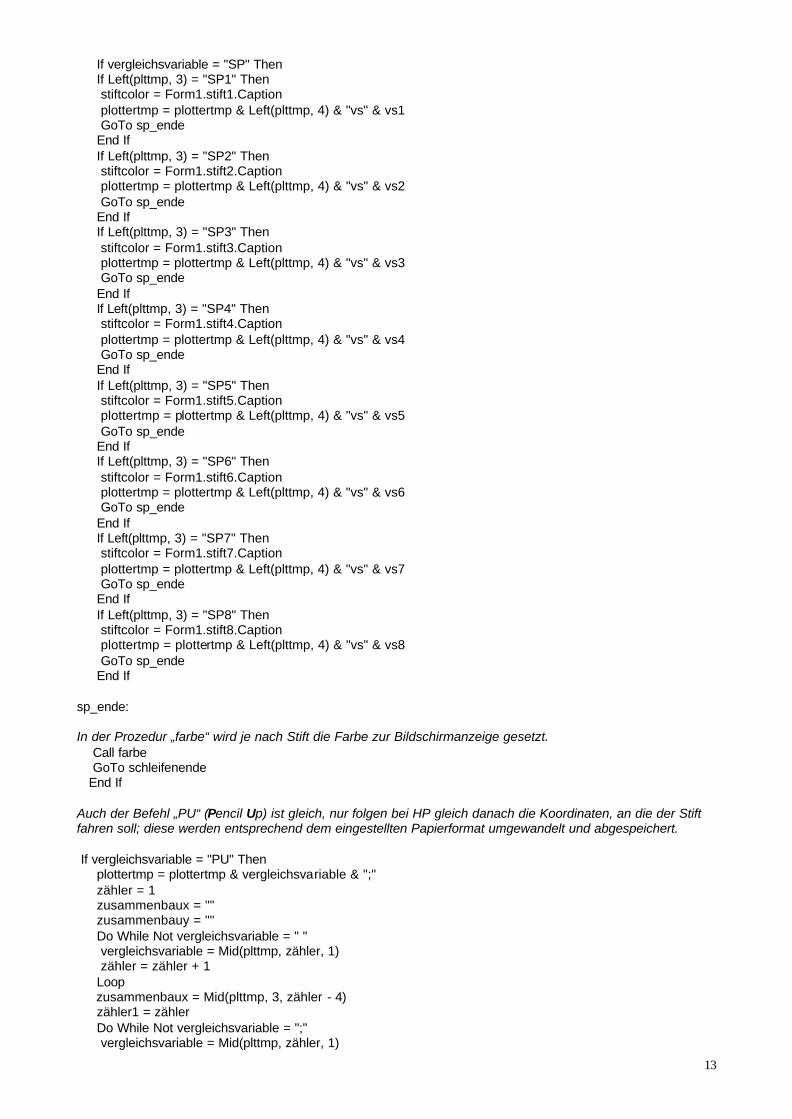
13
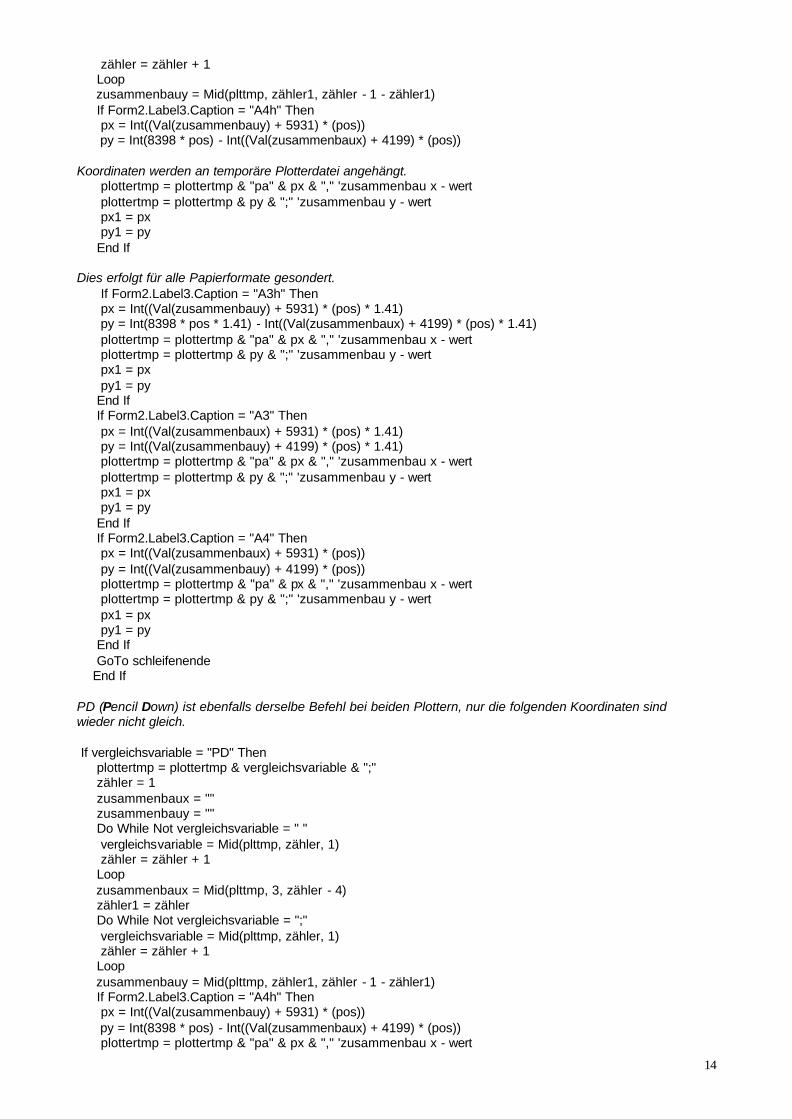
If vergleichsvariable = "SP" Then If Left(plttmp, 3) = "SP1" Then stiftcolor = Form1.stift1.Caption plottertmp = plottertmp & Left(plttmp, 4) & "vs" & vs1 GoTo sp_ende End If If Left(plttmp, 3) = "SP2" Then stiftcolor = Form1.stift2.Caption plottertmp = plottertmp & Left(plttmp, 4) & "vs" & vs2 GoTo sp_ende End If If Left(plttmp, 3) = "SP3" Then stiftcolor = Form1.stift3.Caption plottertmp = plottertmp & Left(plttmp, 4) & "vs" & vs3 GoTo sp_ende End If If Left(plttmp, 3) = "SP4" Then stiftcolor = Form1.stift4.Caption plottertmp = plottertmp & Left(plttmp, 4) & "vs" & vs4 GoTo sp_ende End If If Left(plttmp, 3) = "SP5" Then stiftcolor = Form1.stift5.Caption plottertmp = plottertmp & Left(plttmp, 4) & "vs" & vs5 GoTo sp_ende End If If Left(plttmp, 3) = "SP6" Then stiftcolor = Form1.stift6.Caption plottertmp = plottertmp & Left(plttmp, 4) & "vs" & vs6 GoTo sp_ende End If If Left(plttmp, 3) = "SP7" Then stiftcolor = Form1.stift7.Caption plottertmp = plottertmp & Left(plttmp, 4) & "vs" & vs7 GoTo sp_ende End If If Left(plttmp, 3) = "SP8" Then stiftcolor = Form1.stift8.Caption plottertmp = plottertmp & Left(plttmp, 4) & "vs" & vs8 GoTo sp_ende End If sp_ende: In der Prozedur „farbe“ wird je nach Stift die Farbe zur Bildschirmanzeige gesetzt. Call farbe GoTo schleifenende End If Auch der Befehl „PU“ (Pencil Up) ist gleich, nur folgen bei HP gleich danach die Koordinaten, an die der Stift fahren soll; diese werden entsprechend dem eingestellten Papierformat umgewandelt und abgespeichert. If vergleichsvariable = "PU" Then plottertmp = plottertmp & vergleichsvariable & ";" zähler = 1 zusammenbaux = "" zusammenbauy = "" Do While Not vergleichsvariable = " " vergleichsvariable = Mid(plttmp, zähler, 1) zähler = zähler + 1 Loop zusammenbaux = Mid(plttmp, 3, zähler - 4) zähler1 = zähler Do While Not vergleichsvariable = ";" vergleichsvariable = Mid(plttmp, zähler, 1)
14
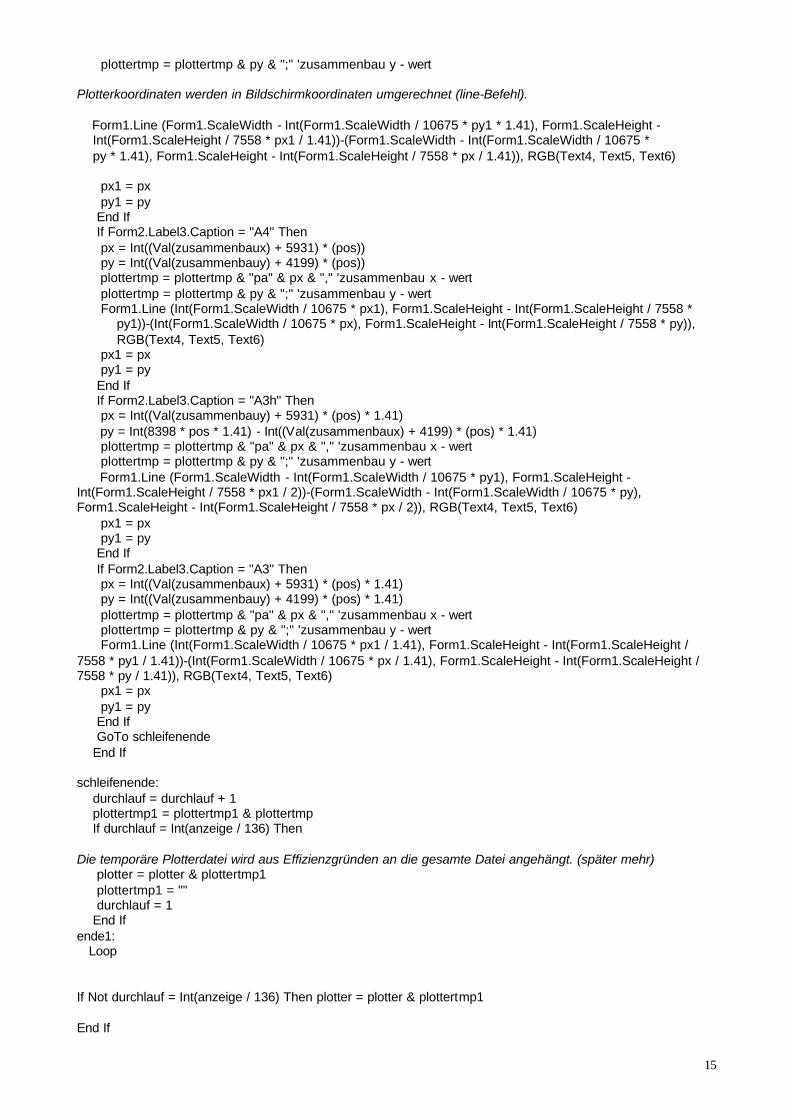
zähler = zähler + 1 Loop zusammenbauy = Mid(plttmp, zähler1, zähler - 1 - zähler1) If Form2.Label3.Caption = "A4h" Then px = Int((Val(zusammenbauy) + 5931) * (pos)) py = Int(8398 * pos) - Int((Val(zusammenbaux) + 4199) * (pos)) Koordinaten werden an temporäre Plotterdatei angehängt. plottertmp = plottertmp & "pa" & px & "," 'zusammenbau x - wert plottertmp = plottertmp & py & ";" 'zusammenbau y - wert px1 = px py1 = py End If Dies erfolgt für alle Papierformate gesondert. If Form2.Label3.Caption = "A3h" Then px = Int((Val(zusammenbauy) + 5931) * (pos) * 1.41) py = Int(8398 * pos * 1.41) - Int((Val(zusammenbaux) + 4199) * (pos) * 1.41) plottertmp = plottertmp & "pa" & px & "," 'zusammenbau x - wert plottertmp = plottertmp & py & ";" 'zusammenbau y - wert px1 = px py1 = py End If If Form2.Label3.Caption = "A3" Then px = Int((Val(zusammenbaux) + 5931) * (pos) * 1.41) py = Int((Val(zusammenbauy) + 4199) * (pos) * 1.41) plottertmp = plottertmp & "pa" & px & "," 'zusammenbau x - wert plottertmp = plottertmp & py & ";" 'zusammenbau y - wert px1 = px py1 = py End If If Form2.Label3.Caption = "A4" Then px = Int((Val(zusammenbaux) + 5931) * (pos)) py = Int((Val(zusammenbauy) + 4199) * (pos)) plottertmp = plottertmp & "pa" & px & "," 'zusammenbau x - wert plottertmp = plottertmp & py & ";" 'zusammenbau y - wert px1 = px py1 = py End If GoTo schleifenende End If PD (Pencil Down) ist ebenfalls derselbe Befehl bei beiden Plottern, nur die folgenden Koordinaten sind wieder nicht gleich. If vergleichsvariable = "PD" Then plottertmp = plottertmp & vergleichsvariable & ";" zähler = 1 zusammenbaux = "" zusammenbauy = "" Do While Not vergleichsvariable = " " vergleichsvariable = Mid(plttmp, zähler, 1) zähler = zähler + 1 Loop zusammenbaux = Mid(plttmp, 3, zähler - 4) zähler1 = zähler Do While Not vergleichsvariable = ";" vergleichsvariable = Mid(plttmp, zähler, 1) zähler = zähler + 1 Loop zusammenbauy = Mid(plttmp, zähler1, zähler - 1 - zähler1) If Form2.Label3.Caption = "A4h" Then px = Int((Val(zusammenbauy) + 5931) * (pos)) py = Int(8398 * pos) - Int((Val(zusammenbaux) + 4199) * (pos)) plottertmp = plottertmp & "pa" & px & "," 'zusammenbau x - wert
15
plottertmp = plottertmp & py & ";" 'zusammenbau y - wert Plotterkoordinaten werden in Bildschirmkoordinaten umgerechnet (line-Befehl). Form1.Line (Form1.ScaleWidth - Int(Form1.ScaleWidth / 10675 * py1 * 1.41), Form1.ScaleHeight - Int(Form1.ScaleHeight / 7558 * px1 / 1.41))-(Form1.ScaleWidth - Int(Form1.ScaleWidth / 10675 * py * 1.41), Form1.ScaleHeight - Int(Form1.ScaleHeight / 7558 * px / 1.41)), RGB(Text4, Text5, Text6) px1 = px py1 = py End If If Form2.Label3.Caption = "A4" Then px = Int((Val(zusammenbaux) + 5931) * (pos)) py = Int((Val(zusammenbauy) + 4199) * (pos)) plottertmp = plottertmp & "pa" & px & "," 'zusammenbau x - wert plottertmp = plottertmp & py & ";" 'zusammenbau y - wert Form1.Line (Int(Form1.ScaleWidth / 10675 * px1), Form1.ScaleHeight - Int(Form1.ScaleHeight / 7558 * py1))-(Int(Form1.ScaleWidth / 10675 * px), Form1.ScaleHeight - Int(Form1.ScaleHeight / 7558 * py)), RGB(Text4, Text5, Text6) px1 = px py1 = py End If If Form2.Label3.Caption = "A3h" Then px = Int((Val(zusammenbauy) + 5931) * (pos) * 1.41) py = Int(8398 * pos * 1.41) - Int((Val(zusammenbaux) + 4199) * (pos) * 1.41) plottertmp = plottertmp & "pa" & px & "," 'zusammenbau x - wert plottertmp = plottertmp & py & ";" 'zusammenbau y - wert Form1.Line (Form1.ScaleWidth - Int(Form1.ScaleWidth / 10675 * py1), Form1.ScaleHeight - Int(Form1.ScaleHeight / 7558 * px1 / 2))-(Form1.ScaleWidth - Int(Form1.ScaleWidth / 10675 * py), Form1.ScaleHeight - Int(Form1.ScaleHeight / 7558 * px / 2)), RGB(Text4, Text5, Text6) px1 = px py1 = py End If If Form2.Label3.Caption = "A3" Then px = Int((Val(zusammenbaux) + 5931) * (pos) * 1.41) py = Int((Val(zusammenbauy) + 4199) * (pos) * 1.41) plottertmp = plottertmp & "pa" & px & "," 'zusammenbau x - wert plottertmp = plottertmp & py & ";" 'zusammenbau y - wert Form1.Line (Int(Form1.ScaleWidth / 10675 * px1 / 1.41), Form1.ScaleHeight - Int(Form1.ScaleHeight / 7558 * py1 / 1.41))-(Int(Form1.ScaleWidth / 10675 * px / 1.41), Form1.ScaleHeight - Int(Form1.ScaleHeight / 7558 * py / 1.41)), RGB(Text4, Text5, Text6) px1 = px py1 = py End If GoTo schleifenende End If schleifenende: durchlauf = durchlauf + 1 plottertmp1 = plottertmp1 & plottertmp If durchlauf = Int(anzeige / 136) Then Die temporäre Plotterdatei wird aus Effizienzgründen an die gesamte Datei angehängt. (später mehr) plotter = plotter & plottertmp1 plottertmp1 = "" durchlauf = 1 End If ende1: Loop If Not durchlauf = Int(anzeige / 136) Then plotter = plotter & plottertmp1 End If
16
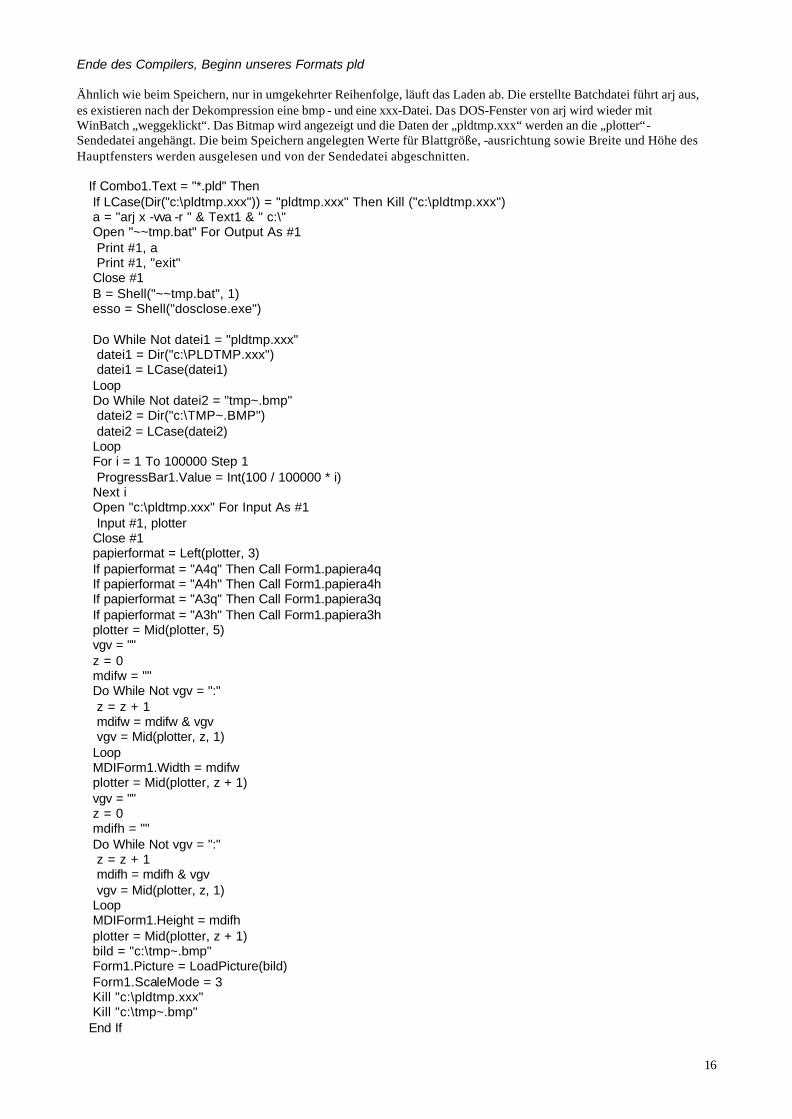
Ende des Compilers, Beginn unseres Formats pld Ähnlich wie beim Speichern, nur in umgekehrter Reihenfolge, läuft das Laden ab. Die erstellte Batchdatei führt arj aus, es existieren nach der Dekompression eine bmp - und eine xxx-Datei. Das DOS-Fenster von arj wird wieder mit WinBatch „weggeklickt“. Das Bitmap wird angezeigt und die Daten der „pldtmp.xxx“ werden an die „plotter“-Sendedatei angehängt. Die beim Speichern angelegten Werte für Blattgröße, -ausrichtung sowie Breite und Höhe des Hauptfensters werden ausgelesen und von der Sendedatei abgeschnitten. If Combo1.Text = "*.pld" Then If LCase(Dir("c:\pldtmp.xxx")) = "pldtmp.xxx" Then Kill ("c:\pldtmp.xxx") a = "arj x -vva -r " & Text1 & " c:\" Open "~~tmp.bat" For Output As #1 Print #1, a Print #1, "exit" Close #1 B = Shell("~~tmp.bat", 1) esso = Shell("dosclose.exe") Do While Not datei1 = "pldtmp.xxx" datei1 = Dir("c:\PLDTMP.xxx") datei1 = LCase(datei1) Loop Do While Not datei2 = "tmp~.bmp" datei2 = Dir("c:\TMP~.BMP") datei2 = LCase(datei2) Loop For i = 1 To 100000 Step 1 ProgressBar1.Value = Int(100 / 100000 * i) Next i Open "c:\pldtmp.xxx" For Input As #1 Input #1, plotter Close #1 papierformat = Left(plotter, 3) If papierformat = "A4q" Then Call Form1.papiera4q If papierformat = "A4h" Then Call Form1.papiera4h If papierformat = "A3q" Then Call Form1.papiera3q If papierformat = "A3h" Then Call Form1.papiera3h plotter = Mid(plotter, 5) vgv = "" z = 0 mdifw = "" Do While Not vgv = ":" z = z + 1 mdifw = mdifw & vgv vgv = Mid(plotter, z, 1) Loop MDIForm1.Width = mdifw plotter = Mid(plotter, z + 1) vgv = "" z = 0 mdifh = "" Do While Not vgv = ":" z = z + 1 mdifh = mdifh & vgv vgv = Mid(plotter, z, 1) Loop MDIForm1.Height = mdifh plotter = Mid(plotter, z + 1) bild = "c:\tmp~.bmp" Form1.Picture = LoadPicture(bild) Form1.ScaleMode = 3 Kill "c:\pldtmp.xxx" Kill "c:\tmp~.bmp" End If
17
Ausführungen zur Effizienz des Compilers Am Anfang steht die Überlegung, daß es sich bei den von uns verwandten Dateien in der Mehrzahl um Textdateien bzw. Strings (Zeichenketten) handelt. Diese sind einfach anzulegen, sie können verändert, gelesen, gelöscht u.v.m. werden. Weiterhin nimmt mit zunehmender Komplexität der Zeichnungen folglich auch die Länge dieser Strings zu. Eine 1,7 Megabyte große Textdatei (siehe Anhang, Bild 1) hat bereits 96000 Zeilen nur Text, die vom Compiler abgearbeitet werden müssen. Jeder Rechner, sei er auch noch so schnell, braucht eine bestimmte Zeit, um Text aus einer Variable einzulesen. Je länger (größer) dieser String ist, um so länger dauert dieser Prozeß. Da von uns bei jedem Durchlauf der Compilerschleife (Do...Loop) der String mehrfach eingelesen wird, gab es anfänglich erhebliche Zeitprobleme beim Laden von plt-Dateien. Für die oben erwähnte Datei wurden 5,5 Stunden (!) auf einem AMD K6-2 300MHz mit 64 MB Hauptspeicher und 100 MHz Bustakt benötigt. Die erste Effizienzsteigerung erfolgte dadurch, daß Sprungbefehle eingebaut wurden, die aus einer Bedingung herausspringen. Wenn z.B. innerhalb der „SP“-Schleife der Befehl „SP1“ identifiziert wurde, müssen die anderen Bedingungen nicht mehr verarbeitet werden, da unmöglich noch ein SPx-Befehl darauffolgen kann. Ähnliches gilt auch für PU-, PD-Befehle. Der Compiler wurde dadurch ungefähr 5% schneller. Die stärkste Effizienzsteigerung erfolgte mit Hilfe eines simplen, aber einleuchtenden Algorithmus‘. Die steigende Stringlänge führt dazu, daß bei jedem Durchlauf der Compiler zum Einlesen und Aktualisieren der Strings länger braucht. Die Zeitdauer, die benötigt wurde (der Rechner ist dann komplett ausgelastet, was wie ein Programmabsturz aussieht), brachte uns zur Fehlerbehebung auf die Idee, eine Statusanzeige einzubauen, an der die Aktivität sichtbar wird. An dieser Fortschrittsanzeige war dann auch der Grund ersichtlich, an dem die Zeitdauer zu liegen schien. Das Programm brauchte immer länger, um einen bestimmten Prozentsatz der Statusanzeige weiterzukommen. Dies brachte uns auf die Idee, nicht jedesmal den kompletten plotter-String einzulesen, sondern eine temporäre Variable (plottertmp) anzulegen, die dann nur periodisch in die plotter-Variable übernommen wird. Dazu wurde die Zeilenanzahl der Ausgangsdatei durch 136 geteilt. Dieser Wert ist empirisch ermittelt. Wenn der Wert größer wird, dauert das Kompilieren länger, ebenso, wenn der Wert kleiner wird. Die Compilerschleife wird (Zeilenanzahl : 136)-mal durchlaufen, erst dann werden die in der Zwischenzeit in der plottertmp -Variable gespeicherten Werte in den plotter-String übernommen. Die dadurch erzielte Zeitverkürzung betrug ca. 99%. Für die 1,7 Megabyte-Datei wurden dann nur noch 3,5 Minuten (!) benötigt. Eine weitere Verbesserung, die jedoch von uns nicht beeinflusst werden konnte, war die verbesserte interne Compilerleistung von Visual Basic. Da wir am Anfang noch VB 4.0 Professional verwendeten, konnte die Leistung des eigenen Programms durch Updaten auf neuere Versionen der verwendeten Programmiersprache (VB 5.0 Pro und VB 6.0 Pro) weiter erhöht werden. Der Zeitvorteil betrug von VB4 zu VB5 weitere 50%, die 1,7 Megabyte-Datei brauchte noch 1,75 Minuten (!). Der Zeitvorteil von VB5 zu VB6 betrug weitere 39%, die 1,7 Megabyte-Datei brauchte noch 65 Sekunden (!). Im Verlauf des Programmierens wurde ein gesamter Zeitvorteil von ca. 99,62% erzielt, also der Compiler mehr als 300mal so schnell. (Hardware=konstant) Der Zeitvorteil macht sich erst bei Dateien, die größer als 10 Kilobyte sind, bemerkbar. Freihandzeichnen Dazu muß die Checkbox „freihand“ im Statusfenster ausgewählt sein. Bei VisualBasic gibt es vordefinierte Prozeduren, die dafür von Bedeutung sind: MouseMove: wird ausgeführt, wenn die Maus bewegt wird Cursorkoordinaten können abgefragt werden es kann ermittelt werden, ob eine Maustaste gedrückt wird oder nicht MouseDown: wird ausgeführt, wenn eine Maustaste gedrückt wird MouseUp: wird ausgeführt, wenn die Maustaste losgelassen wird If Form2.Check3.Value = 1 Then (Freihandzeichnen ausgewählt) If Button = 1 Then (linke Maustaste gedrückt) If papier = "A4h" Then xp = Int((8398 * 0.9 / formweite) * X) yp = Int((11862 * 0.9 / formhöhe) * (Y)) höhe = 8398 * 0.9 Breite = 11862 * 0.9 End If
18
If papier = "A4" Then xp = Int((11862 * 0.9 / formweite) * X) yp = Int((8398 * 0.9 / formhöhe) * (Y)) yp = Int(8398 * 0.9 - yp) höhe = Int(11862 * 0.9) Breite = 8398 * 0.9 End If If papier = "A3" Then xp = Int((16796 * 0.9 / formweite) * X) yp = Int((11862 * 0.9 / formhöhe) * (Y)) yp = Int(11862 * 0.9 - yp) Breite = 11862 * 0.9 höhe = 16796 * 0.9 End If If papier = "A3h" Then xp = Int((11862 * 0.9 / formweite) * X) yp = Int((16796 * 0.9 / formhöhe) * (Y)) höhe = 11862 * 0.9 Breite = 16796 * 0.9 End If Nach erfolgter Umrechnung der Mauskoordinaten auf das gewählte Papierformat werden die Koordinaten in die plotter.tmp-Datei geschrieben. If Not papier = "A4h" Or Not papier = "A3h" Then a = "pa" & xp & "," & yp If papier = "A4h" Or papier = "A3h" Then a = "pa" & yp & "," & xp plottertmp = plottertmp & ";" & a plottertmp = plottertmp & ";pd" Line -(X, Y), RGB(Text4, Text5, Text6) End If Diese Prozedur wird jedesmal aufgerufen, wenn sich die Mauskoordinaten ändern. Der Line-Befehl, der die Koordinaten sichtbar macht, zeichnet in diesem Fall von der zuletzt aktuellen zur momentan aktuellen Position, daher die Syntax „Line –(X,Y)“. „RGB...“ gibt die Farbe der Linie an. Die Anteile der Farben (RGB=RotGrünBlau) sind in den Variablen dahinter gespeichert. Wenn die Maus schneller bewegt wird, ergeben sich Strecken auf dem Bildschirm, das liegt daran, dass die Prozedur erst dann wieder aufgerufen werden kann, wenn sie einmal abgearbeitet wurde. Auch hier gilt das Prinzip des Compilers: je kürzer die Dateien, desto effektiver das Programm. Es wird also auch mit temporären Dateien gearbeitet, die dann erst zum Schluß an die plotter.tmp angehängt werden. Es fehlen zwar keine Befehle, wenn der Gesamtstring benutzt wird, aber die Bildschirmausgabe hängt doch merklich hinter den Mausbewegungen hinterher. Texteingabe Auch diese befindet sich in der MouseDown-Prozedur. Wenn Texteingabe ausgewählt wurde, werden beim Drücken der linken Maustaste die Koordinaten des Cursors abgenommen und in Bildschirm- bzw. Plotterkoordinaten umgewandelt. Gleichzeitig wird eine InputBox (Texteingabefeld) geöffnet, in die der gewünschte Text eingegeben werden kann. Anfangs war die Schriftgröße noch nicht veränderlich, so daß auf dem Bildschirm bei wechselnder Formgröße die Schriftgröße erhalten blieb. Wenn jedoch die Form kleiner wurde, paßte der Text nicht mehr in das Fenster. Das führte dazu, dass die Schriftgröße von der Formgröße abhängig gemacht wurde. Form1.ForeColor = RGB(Text4, Text5, Text6) Die Textfarbe wird gesetzt t = InputBox("Geben Sie hier hier Ihren Text ein") Die Input-Box wird aufgerufen und liefert die
Variable t zurück, in der der eingegebene Text enthalten ist. If formweite < formhöhe Then schriftgröße = Int(18 / 435 * formhöhe) Form1.FontSize = schriftgröße Die Schriftgröße wird abhängig von der Formgröße gesetzt End If If formweite > formhöhe Then schriftgröße = Int(18 / 669 * formweite) Form1.FontSize = schriftgröße End If If formweite = formhöhe Then schriftgröße = Int(18 / 669 * formweite)
19
Form1.FontSize = schriftgröße End If Nach der Umrechnung auf verschiedene Papierformate wird der Text an den Plotter gesendet. If papier = "A4" Then xp = Int((11862 * 0.9 / formweite) * X) yp = Int((8398 * 0.9 / formhöhe) * (Y + Form1.FontSize)) yp = Int(8398 * 0.9 - yp) höhe = Int(11862 * 0.9) Breite = 8398 * 0.9 End If If papier = "A3" Then xp = Int((16796 * 0.9 / formweite) * X) yp = Int((11862 * 0.9 / formhöhe) * (Y + Form1.FontSize)) yp = Int(11862 * 0.9 - yp) Breite = 11862 * 0.9 höhe = 16796 * 0.9 End If If Not Val(Text4) + Val(Text5) + Val(Text6) = 765 Then If xp > höhe Then xp = Int(höhe) If xp < 0 Then xp = 0 If yp > Breite Then yp = Int(Breite) If yp < 0 Then yp = 0 Der Plotterbefehl sieht folgendermaßen aus: paxp,yp;lb t +Chr$(3) PA und die Koordinaten (xp,yp) geben an, wo der Stift hinfahren soll; lb ist der Plotterbefehl zum Darstellen von Text; t ist die Zeichenfolge, die geplottet wird; +Chr$(3) ist eine Escape-Zeichenfolge, die dem Plotter signalisiert, dass das Plotten von Text jetzt beendet ist. Diese Escape-Zeichenfolge erklärt sich daraus, daß die gesendeten Befehle eigentlich nur aus Text bestehen. Wenn die Escape-Zeichenolge weggelassen würde, würde der Plotter die eigentlich gesendeten Positions- oder Objektbefehle als Text verstehen und ausplotten und nicht die Befehle interpretieren. Dieser Fehler wurde von uns erst später behoben, als wir die Textausgabe ausprobierten. If Not papier = "A4h" Or Not papier = "A3h" Then a = "pa" & xp & "," & yp & ";lb" & t + Chr$(3) plotter = plotter & ";" & a Print t Text wird an der Mausklick-Position auf dem Bildschirm ausgegeben. End If Rechteck / Kreis / Linie Hier werden Befehle verwendet, die der Plotter direkt für diese Objekte bereitstellt. Rechteck bzw. Linie sind jeweils durch zwei Punkte eindeutig festgelegt, der Kreis durch Mittelpunkt und Radius. Die Plotterbefehle sehen wie folgt aus: Rechteck: es wird erst zur Anfangsposition gefahren (PAX,Y) dann wird die andere Ecke(X,Y) angegeben (EAX,Y) Kreis: es wird erst zur Anfangsposition (Mittelpunkt) gefahren (PAX,Y) der vorher berechnete Radius R wird angegeben (CIR) Linie: hier wird kein vordefinierter Befehl verwendet, da keiner existiert es wird erst zur Anfangsposition gefahren (PAX,Y) der Stift wird gesenkt (PD)
von dort aus wird zur zweiten Position gefahren (PAX,Y) der Stift wird gehoben (PU)
Für alle Objekte sind zwei Punkte erforderlich, die in den Prozeduren MouseDown und MouseUp ermittelt werden. Zum Erstellen der Objekte muß also die linke Maustaste gedrückt und gleichzeitig die Maus bewegt werden.
20
In MouseDown wird der erste Punkt ermittelt: If Form2.Check1.Value = 1 Or Form2.Check2.Value = 1 Or Form2.Check4.Value = 1 Then If Button = 1 Then mx = CurrentX (Mauskoordinaten werden abgenommen) my = CurrentY lx = mx lx1 = mx ly = my ly1 = my löschen = 0 Timer2.Interval = 1 (Timerintervall wird auf 1 ms gesetzt) End If End If In MouseUp wird der zweite Punkt ermittelt: If Form2.Check1.Value = 1 Or Form2.Check2.Value = 1 Or Form2.Check4.Value = 1 Then If Button = 1 Then CurrentY = Y CurrentX = X lx = X ly = Y End If End If Für alle Objekte werden erst die Mauskoordinaten auf die jeweilige Papiergröße (in xp,yp bzw. xp1,yp1) umgerechnet und dann über den plotter-String an den Plotter gesendet. Genaues siehe Quelltext. für Rechteck: If Form2.Check2.Value = 1 Then If papier = "A4" Or papier = "A3" Then a = "pa" & xp & "," & yp & ";ea" & xp1 & "," & yp1 If papier = "A3h" Or papier = "A4h" Then a = "pa" & yp & "," & xp & ";ea" & yp1 & "," & xp1 End If für Linie: If Form2.Check4.Value = 1 Then If papier = "A4" Or papier = "A3" Then a = "pa" & xp & "," & yp & ";pd" & ";pa" & xp1 & "," & yp1 If papier = "A4h" Or papier = "A3h" Then a = "pa" & yp & "," & xp & ";pd" & ";pa" & yp1 & "," & xp1 End If für Kreis: Radius = Sqr((xp - cpx) ^ 2 + (yp - cpy) ^ 2) If papier = "A4" Or papier = "A3" Then a = "pa" & xp & "," & yp & ";ci" & Radius If papier = "A4h" Or papier = "A3h" Then a = "pa" & yp & "," & xp & ";ci" & Radius für alle Objekte wird an den plotter-String die entstandene Variable a übergeben: plotter = plotter & ";" & a Da alle gängigen Grafikbearbeitungsprogramme eine „Preview“-Funktion (Vorschau) aufweisen, wurde diese auf Drängen unseres Kursleiters hin auch eingebaut. Das Prinzip: Es wird periodisch ein Objekt mit der jeweiligen Stiftfarbe und den aktuellen Koordinaten gezeichnet, dieses Objekt wird jedoch nach einer bestimmbaren Zeitdauer wieder mit einem Objekt gleicher Form und Größe, nur in weiß, überzeichnet, so daß eine „Vorschau“-Funktion entsteht. Diese hat allerdings den nichtbehebbaren Nachteil, daß bereits gezeichnete Objekte durch das Überzeichnen „unsichtbar“ werden. Geplottet werden die überzeichneten Objekte allerdings trotzdem, da die „Unsichtbarkeit“ sich auf die Bildschirmdarstellung beschränkt. Zur Realisierung dieser Funktion wurde ein weiteres Objekt verwendet: der Timer Dieser hat die Eigenschaft, daß alles, was innerhalb seines Bereichs steht, periodisch in einem einstellbaren Intervall ausgeführt wird. In diesen Timer wurde dann das Überzeichnen eingefügt.
21
Am Beispiel einer Linie: Im normalen Timerbetrieb werden löschen=0 bzw. löschen=1 bei jedem Timerdurchlauf vertauscht, dadurch erscheint jeweils ein farbiges bzw. ein weißes Objekt. If löschen = 0 Then Line (mx, my)-(lx, ly), RGB(Text4, Text5, Text6) lx1 = lx ly1 = ly löschen = 1 GoTo ende End If If löschen = 1 Then Line (mx, my)-(lx1, ly1), RGB(255, 255, 255) End If löschen = 0 Wenn die Maustaste losgelassen wird, wird löschen = 3 gesetzt, also wird das Endobjekt gezeichnet. If löschen = 3 Then Line (mx, my)-(lx1, ly1), RGB(Text4, Text5, Text6) GoTo ende End If ende: Der Timer wird aktiviert, wenn Linie, Kreis oder Rechteck ausgewählt werden und zwar folgendermaßen: Timer1.Interval=1 (1 ms) deaktiviert wird er durch: Timer1.Interval=0 Funktionsplotter Die Lösung dieses Problems war der weitaus schwierigste Teil des Projektes. Es ist vorstellbar, daß eine mathematische Funktionsgleichung zur Entwicklungszeit in den Quelltext geschrieben kann, diese kann jedoch zur Laufzeit durch Visual Basic nicht verändert werden (exe -Datei). Auf den ersten Blick erscheint es seltsam, da sich die Möglichkeit zu bieten scheint, die Gleichung einfach in eine Variable einzulesen, die dann zur Laufzeit als Folge von Befehlen interpretiert wird. Dazu bedürfte es jedoch einer „evaluate“-Funktion, die eine Zeichenkette als Befehlsfolge interpretieren kann. Da diese jedoch in Visual Basic nicht vorhanden ist und wir uns nicht noch in andere Programmiersprachen wie C++ oder Visual FoxPro einarbeiten wollten, wandten wir uns an ein webbasiertes VisualBasic-Forum, schickten unsere Fragen dorthin und bekamen auch Antworten, die uns die Idee lieferten. (Schriftwechsel siehe Anhang: „Schriftverkehr im Internet“)) Daß wir ein „Workaround“ für die fehlende „evaluate“-Funktion schreiben mußten, war schon vorher klar. Die Idee ist folgende: Wie bereits zu Anfang der Dokumentation erwähnt, sind Javascript und VBScript schon dem Namen nach Skriptsprachen, die auch zur Laufzeit im Quelltext vorliegen und nur noch interpretiert werden müssen. Damit war bereits klar, wie die Funktionseingabe und die Berechnung der Werte erfolgen würde: Direkt in Visual Basic wird nach jeder Funktionseingabe eine HTML-Seite Zeile für Zeile zusammengesetzt, wobei auch die jeweils aktuelle Funktion mit eingebaut wird. Diese Seite wird abgespeichert und vom internen Webbrowser aufgerufen, der auf dem MS Internet Explorer basiert. Javascript bietet noch einen weiteren unschätzbaren Vorteil: Bei nicht definierten Funktionen (z.B. Quadratwurzel aus –2) liefert es „NaN“ („Not a Number“) zurück, diese Werte werden von unserem Programm erkannt und ausgelassen. Damit war die Berechnung der Werte erledigt. Jetzt stellte sich bereits die nächste Frage: Wie sollte die Rückübergabe der Werte an Visual Basic erfolgen? Da die HTML-Seite unabhängig von Visual Basic ausgeführt wird, konnte nicht einfach eine Variablenübergabe erfolgen, es blieb also nur die Möglichkeit des Abspeicherns auf Festplatte und anschließenden Auslesens durch Visual Basic.

22
Da JavaScript hauptsächlich im Internet verwendet wird, enthält es keine Funktion, die dieses Abspeichern bewerkstelligen könnte, also mußte VBScript zum Einsatz kommen. Spätestens seit dem Skandal um Sicherheitslücken im Internet Explorer in Verbindung mit dem WSH (Windows Scripting Host) war uns klar, daß VBScript eben wegen dieser Möglichkeit des Schreibens auf Festplatte das geeignete Mittel dazu ist. Glücklicherweise können innerhalb von HTML-Seiten Variablen global definiert werden, so daß die Übergabe von Javascript an VBScript einfach durch ein und dieselbe Variable erfolgen konnte. VBScript schreibt dann diese Werte als temporäre Datei auf die Festplatte, so daß Visual Basic diese auslesen und verwerten kann. In der abgelegten Datei sind nur die y-Werte gespeichert, da die x-Werte durch vorgegebenes Intervall und Schrittweite auch separat in Visual Basic durchgezählt werden können und die jeweils passenden Ordinaten aus der abgelegten Datei ermittelt werden. Am Beispiel einer Sinusfunktion im Intervall von 0 bis Pi: erstellte HTML-Datei: <html> <script language="javascript"> var x var y var a x=0 a="" while(x <=3.141592764) { y=Math.sin(x) x=x+0.1 a= a + y + ":"} </script> <script language="vbscript"> a="""" & a & """" set fs = CreateObject("Scripting.FileSystemObject") set datei = fs.CreateTextFile("c:\~werte.tmp",True) datei.WriteLine(a) datei.Close </script> </html> Beim Ausführen dieser Datei mit dem integrierten Webbrowser erscheint folgendes Fenster:
Da die von uns verwendeten Befehle jedoch nicht unsicher sind, wäre dieses Fenster für den Benutzer nur hinderlich. Mit der von uns verwendeten Makrosprache WinBatch kann ermittelt werden, ob solch ein Fenster existiert und es kann bei Existenz „auf ja geklickt“ werden. Falls dieses Fenster auf Ihrem System durch uns unbekannte Umstände doch vorhanden bleiben sollte, bestätigen Sie einfach mit „Ja“. Das Makro wird von uns durch die folgenden wenigen Zeilen realisiert: run("hinweis.exe",1) winactivate("hinweis") :start if winexist("Sicherheitshinweis") then goto label if winexist("Internet Explorer") then goto label1 goto start :label

23
Sendkeysto("Sicherheitshinweis","j") winclose("hinweis") exit :label1 Sendkeysto("Internet Explorer","j") winclose("hinweis") exit Es mußten durch die geänderte Sicherheitsabfrage des Internet Explorer 5 zwei Fallunterscheidungen für verschieden benannte Fenster zustande kommen. Am Anfang des Makros wird noch ein exe -File aufgerufen, das dem Benutzer folgende Nachricht anzeigt:
Das Makro wartet dann solange, bis die Abfrage des InternetExplorer vorhanden ist und schickt dann die Taste „J“ dorthin. Danach wird dann noch das „Hinweis“-Fenster geschlossen, bevor sich das Makro selbst beendet. Die Befehle sind unserer Auffassung nach selbsterklärend. erstellte Wertetabelle: "0:0.09983341664682815:0.19866933079506122:0.2955202066613396:0.3894183423086505:0.479425538604203:0.5646424733950354:0.644217687237691:0.7173560908995227:0.7833269096274833:0.8414709848078964:0.8912073600614353:0.9320390859672263:0.963558185417193:0.9854497299884602:0.9974949866040544:0.9995736030415051:0.9916648104524686:0.973847630878195:0.9463000876874142:0.9092974268256815:0.8632093666488735:0.8084964038195899:0.7457052121767197:0.6754631805511503:0.5984721441039558:0.5155013718214634:0.42737988023382894:0.33498815015590383:0.23924932921398112:0.1411200080598659:0.04158066243328916:" Die Werte befinden sich direkt hintereinander ohne Leerzeichen. Als Trennzeichen für die Werte wurde ein Doppelpunkt verwendet. Der letzbeschriebene Ablauf wird jedesmal ausgeführt, wenn auf den Menüeintrag „Wertetabelle erstellen“ geklickt, eine Funktionseingabe bestätigt oder im Fenster „...einrichten“ ein Parameter geändert wird. Nun zur Darstellung: Die für Intervall und Schrittweite angegebenen Werte werden nun von Visual Basic verwendet, um den Graph der Funktion sowohl auf dem Bildschirm als auch auf dem Plotter darzustellen. test = "noch kein durchlauf" stiftcolor = Form2.Label4.Caption Call malfarbe v = formweite / (Val(Form5.Text1)) 'Umrechnungsverhältnis von Welt in Bild berechnen k = Val(Form5.Text3) 'linke Intervallgrenze der Funktion wird eingelesen l = Val(Form5.Text4) 'rechte Intervallgrenze der Funktion wird eingelesen xweite = Abs(k) + Abs(l) 'gesamte Intervalllänge wird ermittelt zähler = 0 yw = "" Open "c:\~werte.tmp" For Input As #1 Input #1, yw 'y-Werte aus Datei werden komplett in Variable eingelesen Close #1 For X = k To l Step Val(Form5.Text5) 'Intervall wird im Abstand der Genauigkeit durchgezählt vgv = "" Y = "" z1 = 0

24
zähler = zähler + 1 „vgv“ ist eine zeichenweise eingelesene Variable, es wird solange eingelesen, bis der Doppelpunkt als Trennzeichen auftaucht, dann ist ein y-Wert vollständig. Do While Not vgv = ":" 'y-Werte werden zeichenweise eingelesen z1 = z1 + 1 Y = Y & vgv vgv = Mid(yw, z1, 1) If vgv = "," Then vgv = "." 'Kommata werden durch Punkte ersetzt (ältere Version des MSIE) Loop yw = Mid(yw, z1 + 1) 'gerade eingelesener Wert wird von der Werte-Variable vorn abgeschnitten If Y = "NaN" Then GoTo weiter 'falls „NaN“ auftaucht, wird es übersprungen Y = Val(Y) P = v * X + formweite / 2 'Umrechnung der x-Werte in Bildschirmkoordinaten und mittige Anzeige Y = Y * formhöhe / (Val(Form5.Text2)) 'Umrechnung der y-Werte s = (formhöhe / 2 - Y) 'Bildschirmkoordinatensystem in der linken oberen Ecke, daher Abzug Es erfolgt die Umrechnung der Werte von Bildschirm- in Plotterkoordinaten entsprechend Papierformat und Papierausrichtung. Die Prozedur entspricht der der Linie-Zeichnen-Prozedur. Es muß jedoch erst ein Durchlauf erfolgt sein, da der Line-Befehl zwei Punkte benötigt. If Not test = "noch kein durchlauf" Then If papier = "A4h" Then xp = Int((8398 * 0.9 / formweite) * p1) yp = Int((11862 * 0.9 / formhöhe) * (s1)) xp1 = Int((8398 * 0.9 / formweite) * P) yp1 = Int((11862 * 0.9 / formhöhe) * (s)) höhe = 8398 * 0.9 Breite = 11862 * 0.9 End If If papier = "A4" Then xp = Int((11862 * 0.9 / formweite) * p1) yp = Int((8398 * 0.9 / formhöhe) * (s1)) yp = Int(8398 * 0.9 - yp) xp1 = Int((11862 * 0.9 / formweite) * P) yp1 = Int((8398 * 0.9 / formhöhe) * (s)) yp1 = Int(8398 * 0.9 - yp1) höhe = 11862 * 0.9 Breite = 8398 * 0.9 End If If papier = "A3" Then xp = Int((16796 * 0.9 / formweite) * p1) yp = Int((11862 * 0.9 / formhöhe) * (s1)) yp = Int(11862 * 0.9 - yp) xp1 = Int((16796 * 0.9 / formweite) * P) yp1 = Int((11862 * 0.9 / formhöhe) * (s)) yp1 = Int(11862 * 0.9 - yp1) höhe = 16796 * 0.9 Breite = 11862 * 0.9 End If If papier = "A3h" Then xp = Int((11862 * 0.9 / Form1.Width) * p1) yp = Int((16796 * 0.9 / formhöhe) * (s1)) xp1 = Int((11862 * 0.9 / formweite) * P) yp1 = Int((16796 * 0.9 / formhöhe) * (s)) höhe = 11862 * 0.9 Breite = 16796 * 0.9 End If
25
Wenn die Koordinaten der Blattgrenzen überschritten werden, werden die überschrittenen Koordinaten auf die Grenze gesetzt (Bildschirm) bzw. der Stift beim Plotter angehoben. Die folgenden Fallunterscheidungen dienen dazu, dass keine eventuellen Fehler beim Plotten auftreten. If yp1 < 0 Or xp < 0 Or xp1 > höhe Or xp1 < 0 Or yp > Breite Or yp < 0 Or yp1 > Breite Or s > formhöhe Or s1 < 0 Or s1 > formhöhe Or s < 0 Or xp > höhe Then plottertmp = plottertmp & ";pu" If yp1 < 0 Then yp1 = 0 If xp < 0 Then xp = 0 If xp1 > höhe Then xp1 = Int(höhe) If xp1 < 0 Then xp1 = 0 If yp > Breite Then yp = Int(Breite) If yp < 0 Then yp = 0 If yp1 > Breite Then yp1 = Int(Breite) If P > formweite Then P = formweite If P < 0 Then P = 0 If p1 > formweite Then p1 = formweite If p1 < 0 Then p1 = 0 If s > formhöhe Then s = formhöhe If s1 > formhöhe Then s1 = formhöhe If s1 < 0 Then s1 = 0 If s < 0 Then s = 0 GoTo weiter End If temporäre Plottervariable wird erstellt bzw. verändert: If papier = "A4" Or papier = "A3" Then a = "pa" & xp & "," & yp & ";pd" & ";pa" & xp1 & "," & yp1 If papier = "A4h" Or papier = "A3h" Then a = "pa" & yp & "," & xp & ";pd" & ";pa" & yp1 & "," & xp1 Form1.Line (p1, s1)-(P, s), RGB(Text4, Text5, Text6) plottertmp = plottertmp & ";" & a End If End If test = "" weiter: p1 = P s1 = s Next X plottertmp = plottertmp & ";pu" GoTo ende fehler: test = "noch kein durchlauf" Resume Next ende: temporäre Datei wird an Sende-Datei angehängt: plotter = plotter & plottertmp End Sub
Fazit Projekt wurde erfüllt.

26
Anhang
benutzte Literatur Microsoft Press 375: Active-X-Steuerelemente Microsoft Press 376: Inside Visual Basic Scripting Edition Self-HTML: Online-HTML-Anleitung diverse Internetseiten
Anteile am Projekt Es ist diffizil, die Anteile direkt auf die beteiligten Personen aufzuteilen, da aufgrund des Wohnortes der beiden Programmierer sehr viel zusammen programmiert wurde (Abstand der Wohnhäuser ca. 25 Meter, ständige Telefonverbindung). Bei unserer Art des Programmierens ist es nicht möglich, die Anteile der beteiligten Personen anzugeben, da alle Ideen gemeinsam entstanden sind und Lösungsansätze gemeinsam verwirklicht wurden, so daß das fertige Programm eine Gemeinschaftsproduktion der beiden Programmierer ist.
Betatester Christin Lumme Michael Ameling Christoph Lumme Georg Ruß Martin Ruß
Sponsor Wir danken: Schneider Schreibgeräte GmbH Wernigerode Ohne die Unterstützung dieses ortsansässigen Schreibwarenherstellers wäre es uns aufgrund des schlechten Zustandes der mitgelieferten Plotterfilzstifte nicht möglich gewesen, das Plotter-Programm auch nur annähernd auf diesen Entwicklungsstand zu bringen. Die Zeichnungen, die mit Hilfe der Filzstifte erstellt wurden, waren in einem nicht annehmbaren Zustand. Die gelieferten Stifte waren zwar nicht mehr aktuell, aber noch in Stückzahlen vorhanden. Allerdings mußten zur Anfertigung der anderen Farben außer schwarz Kleinstserien farbgefüllter Patronen produziert werden, denen eine längere Entwicklungszeit zur Ermittlung der passenden Tintenart vorausging. Die fertigen Stifte mit 0,35mm-Metallspitze können bis zu einer Geschwindigkeit von 15 cm/s problemlos verwendet werden.
Copyright Alle verwendeten Firmen und Produktnamen sind eingetragene Warenzeichen der jeweiligen Hersteller.

27
Schriftverkehr im Internet
Input of mathematical functions Visual Basic Web Directory Forums: General Discussion: Input of mathematical functions
By Georg Russ on Wednesday, February 17, 1999 - 12:38 pm: Hi there ! We are writing a plotting program for mathematical functions with VB 4.0 Pro 32-bit. There is just one question: How can the function be entered into the source code in a running exe file ? (a value shall be put in and it calculates a new value, ie: Somewhere is entered: y = x * x and the program shall calculate the values for y with x = 1 to 10) Input of the function shall be done by a text or an input box. Thanks for helping Georg & Christoph Please mail to [email protected]
By Lothar A. Haensler on Thursday, February 18, 1999 - 01:58 am: There is no eval function in VB, unfortunately. You have to write your expression evaluator yourself. As a workaround you can write a DHTML scriptlet and use the Microsoft Script Control and call a Javascript function from your VB program. Javascript does have a built-in eval function.
By Georg Russ on Thursday, February 18, 1999 - 04:08 pm: To Lothar A. Haensler could you write an example for a javascript that does the input if possible ? Thanks P.S. You can also write in German
By Lothar A. Haensler on Friday, February 19, 1999 - 01:52 am: Ok, hier wäre ein einfaches Beispiel: <html> <input type="button" onclick="doeval()";> <script language="javascript"> function doeval() { alert(eval("14 * 5")); // Vorsicht: hierher gehört eine geschweifte Klammer-zu. Die scheint der Formatter dieses Forums wegzuschmeißen! </script> </html> } in der echten Anwendung könnte dann die Formel als String an die Javascriptfunktion übergeben werden. Die Javascriptfunktion würde dann einfach das Ergebnis von eval zurückgeben via return(eval(...));
28
Das ganze müßte dann noch als DHTML-Scriptlet gebaut werden, so daß es vom MS ScritpletControl aufgerufen werden kann. Ich habe dies einmal verwendet, um regular expressions in VB zu verwenden. Viel Glück
By Georg Russ on Friday, February 19, 1999 - 06:23 am: Irgendwie nimmt das Forum hier keinen HTML-Text an Wir haben den Kram auf unsere Homepage gepackt http://members.tripod.de/Chlumme/ Auf der Homepage befand sich folgender Text als Zip-File gepackt: Danke erstmal für die Hilfe beim letzten Mal. Wir haben das jetzt soweit ausprobiert. Hier unser Beispiel: <html> <input type="button" onclick="doeval()";> <form name="Test"><input name="funkti"><input name="x"> </form> <script language="javascript"> function doeval() { x=Test.x.value alert(eval(Test.funkti.value)); } </script> </html> Jetzt noch eine Frage: Geht das mit Java auch, wenn in das Feld "funkti" irgendeine mathematische Funktion, z.B. sin(x)/cos(2+x) eingegeben wird und x das frei wählbare Argument bezeichnet, das dann in die 'erkannte' Funktion eingesetzt wird, so dass der Funktionswert berechnet werden kann ? Die Übergabe und -nahme der Werte von und nach VB ist soweit klar. Christoph und Georg Es wäre auch einfacher, wenn Du uns deine Mailadresse gäbest.
By Lothar A. Haensler on Friday, February 19, 1999 - 06:43 am: Stimmt! Das Forum hat eigene Formatierungs-Tags, die irgendwo in der Dokumentationssektion beschrieben sind. Wenn ich meine Mailadresse bekanntgäbe...
...ich bleib mal lieber semi-anonym
By Lothar A. Haensler on Friday, February 19, 1999 - 07:15 am: Folks, hier ist Eure Lösung: <html> <input type="text" name="formel" id="formel"> <input type="button" onclick="doeval()";> <script language="javascript"> function doeval() { alert(eval(document.all.formel.value)); }
29
</script> </html> wenn im Textfeld "Math.sin(x)" eingegeben wird, braucht Ihr nur das x im Javascript durch was auch immer zu ersetzen und dann eval aufzurufen und schon geht alles. Sinus und Cosinus und so Zeug sind im Math-Paket definiert und müssen auch mit diesem Präfix angegeben werden.
By Georg Russ on Saturday, February 20, 1999 - 07:53 am: To Lothar Erstmal vielen Dank auch. Die Funktionseingabe funktioniert jetzt wunderbar. Frage: Kann der Javascript auch unter VB 4.0 Pro, eingebunden werden ? Wenn nein, ab welcher Version von VB funktioniert das ? Danke
By Lothar A. Haensler on Friday, March 12, 1999 - 04:16 am: To Georg Russ sitze im Moment in Taipei im Urlaub. Melde mich fruehestens Ende Maerz wieder. Sorry.
Quelltext Der Quelltext erscheint in der ausgedruckten Form etwas unübersichtlich, daher kann zum besseren Verständnis auch der Projekt-Quelltext in Dateiform unter der grafischen Benutzeroberfläche von Visual Basic herangezogen werden. Kommentare beginnen mit einem Hochkomma. (') Form1 'Variablendeklarationsteil 'Form1 ist nur das weiße Blatt innerhalb der MDI-Form1 Dim click Dim cheat Dim formhohe, formweite Dim firstclick Dim abfrage Dim plottertmp Dim startbild Dim ly Dim lx Dim lx1 Dim ly1 Dim loschen Dim anschluss Dim drawnow As Integer Dim Text4 As Integer Dim Text5 As Integer Dim Text6 As Integer Dim stiftcolor As String Dim papier As String Dim stiftfarbe As String Dim z As Integer Dim mx As Integer Dim my As Integer Dim Radius As Integer Dim plotter As String Dim eingabe_funktion As Variant

30
Dim Y As Variant Dim vs1 As Integer Dim vs2 As Integer Dim vs3 As Integer Dim vs4 As Integer Dim vs5 As Integer Dim vs6 As Integer Dim vs7 As Integer Dim vs8 As Integer Public Sub funktiubergabe() 'eingegebene Funktionsgleichung wird als Variable eingelesen eingabe_funktion = Form8.Combo1.Text Unload Form8 Call werte_Click 'Aufruf der Prozedur zur Erstellung der Wertetabelle End Sub Public Sub kozeichnen() 'Koordinatensystem wird erstellt If firstclick = 0 Then 'Aktueller Arbeitsbereich wird nach angefangener Zeichnung festgesetzt firstclick = 1 Form1.Line (0, 0)-(Form1.ScaleWidth, Form1.ScaleHeight), RGB(150, 150, 150), B formhohe = Form1.ScaleHeight formweite = Form1.ScaleWidth End If stiftcolor = Form2.Label4.Caption Call malfarbe papier = Form2.Label3.Caption Open "stift.ini" For Input As #1 Input #1, stiftfarbe, v Form1.stift1.Caption = stiftfarbe vs1 = v Close #1 'y-achse p1 = Int(formweite / 2) s1 = formhohe P = Int(formweite / 2) s = 0 If papier = "A4h" Then xp = Int((8398 * 0.9 / formweite) * p1) yp = Int((11862 * 0.9 / formhohe) * (s1)) xp1 = Int((8398 * 0.9 / formweite) * P) yp1 = Int((11862 * 0.9 / formhohe) * (s)) End If If papier = "A4" Then xp = Int((11862 * 0.9 / formweite) * p1) yp = Int((8398 * 0.9 / formhohe) * (s1)) yp = Int(8398 * 0.9 - yp) xp1 = Int((11862 * 0.9 / formweite) * P) yp1 = Int((8398 * 0.9 / formhohe) * (s)) yp1 = Int(8398 * 0.9 - yp1) End If If papier = "A3" Then xp = Int((16796 * 0.9 / formweite) * p1) yp = Int((11862 * 0.9 / formhohe) * (s1)) yp = Int(11862 * 0.9 - yp) xp1 = Int((16796 * 0.9 / formweite) * P) yp1 = Int((11862 * 0.9 / formhohe) * (s)) yp1 = Int(11862 * 0.9 - yp1) End If If papier = "A3h" Then xp = Int((11862 * 0.9 / formweite) * p1) yp = Int((16796 * 0.9 / formhohe) * (s1)) xp1 = Int((11862 * 0.9 / formweite) * P) yp1 = Int((16796 * 0.9 / formhohe) * (s)) End If If papier = "A4" Or papier = "A3" Then a = "pa" & xp & "," & yp & ";pa" & xp1 & "," & yp1 If papier = "A3h" Or papier = "A4h" Then a = "pa" & yp & "," & xp & ";pa" & yp1 & "," & xp1 If papier = "A4" Or papier = "A3" Then a = "pa" & xp & "," & yp & ";pd" & ";pa" & xp1 & "," & yp1 If papier = "A4h" Or papier = "A3h" Then a = "pa" & yp & "," & xp & ";pd" & ";pa" & yp1 & "," & xp1 plotter = plotter & ";" & a plotter = plotter & ";pu"
31
'Bildschirmausgabe Form1.Line (formweite / 2, formhohe)-(formweite / 2, 0), RGB(Text4, Text5, Text6) 'x-Achse p1 = 0 s1 = formhohe / 2 P = formweite s = formhohe / 2 If papier = "A4h" Then xp = Int((8398 * 0.9 / formweite) * p1) yp = Int((11862 * 0.9 / formhohe) * (s1)) xp1 = Int((8398 * 0.9 / formweite) * P) yp1 = Int((11862 * 0.9 / formhohe) * (s)) End If If papier = "A4" Then xp = Int((11862 * 0.9 / formweite) * p1) yp = Int((8398 * 0.9 / formhohe) * (s1)) yp = Int(8398 * 0.9 - yp) xp1 = Int((11862 * 0.9 / formweite) * P) yp1 = Int((8398 * 0.9 / formhohe) * (s)) yp1 = Int(8398 * 0.9 - yp1) End If If papier = "A3" Then xp = Int((16796 * 0.9 / formweite) * p1) yp = Int((11862 * 0.9 / formhohe) * (s1)) yp = Int(11862 * 0.9 - yp) xp1 = Int((16796 * 0.9 / formweite) * P) yp1 = Int((11862 * 0.9 / formhohe) * (s)) yp1 = Int(11862 * 0.9 - yp1) End If If papier = "A3h" Then xp = Int((11862 * 0.9 / formweite) * p1) yp = Int((16796 * 0.9 / formhohe) * (s1)) xp1 = Int((11862 * 0.9 / formweite) * P) yp1 = Int((16796 * 0.9 / formhohe) * (s)) End If If papier = "A4" Or papier = "A3" Then a = "pa" & xp & "," & yp & ";pa" & xp1 & "," & yp1 If papier = "A3h" Or papier = "A4h" Then a = "pa" & yp & "," & xp & ";pa" & yp1 & "," & xp1 If papier = "A4" Or papier = "A3" Then a = "pa" & xp & "," & yp & ";pd" & ";pa" & xp1 & "," & yp1 If papier = "A4h" Or papier = "A3h" Then a = "pa" & yp & "," & xp & ";pd" & ";pa" & yp1 & "," & xp1 plotter = plotter & ";" & a plotter = plotter & ";pu" 'Bildschirmausgabe Form1.Line (0, formhohe / 2)-(formweite, formhohe / 2), RGB(Text4, Text5, Text6) 'unterer Teil des Pfeils an der x-Achse p1 = formweite - 10 s1 = formhohe / 2 + 5 P = formweite s = formhohe / 2 If papier = "A4h" Then xp = Int((8398 * 0.9 / formweite) * p1) yp = Int((11862 * 0.9 / formhohe) * (s1)) xp1 = Int((8398 * 0.9 / formweite) * P) yp1 = Int((11862 * 0.9 / formhohe) * (s)) End If If papier = "A4" Then xp = Int((11862 * 0.9 / formweite) * p1) yp = Int((8398 * 0.9 / formhohe) * (s1)) yp = Int(8398 * 0.9 - yp) xp1 = Int((11862 * 0.9 / formweite) * P) yp1 = Int((8398 * 0.9 / formhohe) * (s)) yp1 = Int(8398 * 0.9 - yp1) End If If papier = "A3" Then xp = Int((16796 * 0.9 / formweite) * p1) yp = Int((11862 * 0.9 / formhohe) * (s1)) yp = Int(11862 * 0.9 - yp) xp1 = Int((16796 * 0.9 / formweite) * P) yp1 = Int((11862 * 0.9 / formhohe) * (s)) yp1 = Int(11862 * 0.9 - yp1) End If
32
If papier = "A3h" Then xp = Int((11862 * 0.9 / formweite) * p1) yp = Int((16796 * 0.9 / formhohe) * (s1)) xp1 = Int((11862 * 0.9 / formweite) * P) yp1 = Int((16796 * 0.9 / formhohe) * (s)) End If If papier = "A4" Or papier = "A3" Then a = "pa" & xp & "," & yp & ";pa" & xp1 & "," & yp1 If papier = "A3h" Or papier = "A4h" Then a = "pa" & yp & "," & xp & ";pa" & yp1 & "," & xp1 If papier = "A4" Or papier = "A3" Then a = "pa" & xp & "," & yp & ";pd" & ";pa" & xp1 & "," & yp1 If papier = "A4h" Or papier = "A3h" Then a = "pa" & yp & "," & xp & ";pd" & ";pa" & yp1 & "," & xp1 plotter = plotter & ";" & a plotter = plotter & ";pu" 'Bildschirmausgabe Form1.Line (formweite - 10, formhohe / 2 + 5)-(formweite, formhohe / 2), RGB(Text4, Text5, Text6) 'oberer Teil des Pfeils an der x-Achse p1 = formweite - 10 s1 = formhohe / 2 - 5 P = formweite s = formhohe / 2 If papier = "A4h" Then xp = Int((8398 * 0.9 / formweite) * p1) yp = Int((11862 * 0.9 / formhohe) * (s1)) xp1 = Int((8398 * 0.9 / formweite) * P) yp1 = Int((11862 * 0.9 / formhohe) * (s)) End If If papier = "A4" Then xp = Int((11862 * 0.9 / formweite) * p1) yp = Int((8398 * 0.9 / formhohe) * (s1)) yp = Int(8398 * 0.9 - yp) xp1 = Int((11862 * 0.9 / formweite) * P) yp1 = Int((8398 * 0.9 / formhohe) * (s)) yp1 = Int(8398 * 0.9 - yp1) End If If papier = "A3" Then xp = Int((16796 * 0.9 / formweite) * p1) yp = Int((11862 * 0.9 / formhohe) * (s1)) yp = Int(11862 * 0.9 - yp) xp1 = Int((16796 * 0.9 / formweite) * P) yp1 = Int((11862 * 0.9 / formhohe) * (s)) yp1 = Int(11862 * 0.9 - yp1) End If If papier = "A3h" Then xp = Int((11862 * 0.9 / formweite) * p1) yp = Int((16796 * 0.9 / formhohe) * (s1)) xp1 = Int((11862 * 0.9 / formweite) * P) yp1 = Int((16796 * 0.9 / formhohe) * (s)) End If If papier = "A4" Or papier = "A3" Then a = "pa" & xp & "," & yp & ";pa" & xp1 & "," & yp1 If papier = "A3h" Or papier = "A4h" Then a = "pa" & yp & "," & xp & ";pa" & yp1 & "," & xp1 If papier = "A4" Or papier = "A3" Then a = "pa" & xp & "," & yp & ";pd" & ";pa" & xp1 & "," & yp1 If papier = "A4h" Or papier = "A3h" Then a = "pa" & yp & "," & xp & ";pd" & ";pa" & yp1 & "," & xp1 plotter = plotter & ";" & a plotter = plotter & ";pu" 'Bildschirmausgabe Form1.Line (formweite - 10, formhohe / 2 - 5)-(formweite, formhohe / 2), RGB(Text4, Text5, Text6) 'rechter Teil des Pfeils an der y-Achse p1 = formweite / 2 + 5 s1 = 10 P = formweite / 2 s = 0 If papier = "A4h" Then xp = Int((8398 * 0.9 / formweite) * p1) yp = Int((11862 * 0.9 / formhohe) * (s1)) xp1 = Int((8398 * 0.9 / formweite) * P) yp1 = Int((11862 * 0.9 / formhohe) * (s)) End If If papier = "A4" Then xp = Int((11862 * 0.9 / formweite) * p1) yp = Int((8398 * 0.9 / formhohe) * (s1)) yp = Int(8398 * 0.9 - yp) xp1 = Int((11862 * 0.9 / formweite) * P) yp1 = Int((8398 * 0.9 / formhohe) * (s)) yp1 = Int(8398 * 0.9 - yp1)
33
End If If papier = "A3" Then xp = Int((16796 * 0.9 / formweite) * p1) yp = Int((11862 * 0.9 / formhohe) * (s1)) yp = Int(11862 * 0.9 - yp) xp1 = Int((16796 * 0.9 / formweite) * P) yp1 = Int((11862 * 0.9 / formhohe) * (s)) yp1 = Int(11862 * 0.9 - yp1) End If If papier = "A3h" Then xp = Int((11862 * 0.9 / formweite) * p1) yp = Int((16796 * 0.9 / formhohe) * (s1)) xp1 = Int((11862 * 0.9 / formweite) * P) yp1 = Int((16796 * 0.9 / formhohe) * (s)) End If If papier = "A4" Or papier = "A3" Then a = "pa" & xp & "," & yp & ";pa" & xp1 & "," & yp1 If papier = "A3h" Or papier = "A4h" Then a = "pa" & yp & "," & xp & ";pa" & yp1 & "," & xp1 If papier = "A4" Or papier = "A3" Then a = "pa" & xp & "," & yp & ";pd" & ";pa" & xp1 & "," & yp1 If papier = "A4h" Or papier = "A3h" Then a = "pa" & yp & "," & xp & ";pd" & ";pa" & yp1 & "," & xp1 plotter = plotter & ";" & a plotter = plotter & ";pu" 'Bildschirmausgabe Form1.Line (formweite / 2 + 5, 10)-(formweite / 2, 0), RGB(Text4, Text5, Text6) 'linker Teil des Pfeils an der y-Achse p1 = formweite / 2 - 5 s1 = 10 P = formweite / 2 s = 0 If papier = "A4h" Then xp = Int((8398 * 0.9 / formweite) * p1) yp = Int((11862 * 0.9 / formhohe) * (s1)) xp1 = Int((8398 * 0.9 / formweite) * P) yp1 = Int((11862 * 0.9 / formhohe) * (s)) End If If papier = "A4" Then xp = Int((11862 * 0.9 / formweite) * p1) yp = Int((8398 * 0.9 / formhohe) * (s1)) yp = Int(8398 * 0.9 - yp) xp1 = Int((11862 * 0.9 / formweite) * P) yp1 = Int((8398 * 0.9 / formhohe) * (s)) yp1 = Int(8398 * 0.9 - yp1) End If If papier = "A3" Then xp = Int((16796 * 0.9 / formweite) * p1) yp = Int((11862 * 0.9 / formhohe) * (s1)) yp = Int(11862 * 0.9 - yp) xp1 = Int((16796 * 0.9 / formweite) * P) yp1 = Int((11862 * 0.9 / formhohe) * (s)) yp1 = Int(11862 * 0.9 - yp1) End If If papier = "A3h" Then xp = Int((11862 * 0.9 / formweite) * p1) yp = Int((16796 * 0.9 / formhohe) * (s1)) xp1 = Int((11862 * 0.9 / formweite) * P) yp1 = Int((16796 * 0.9 / formhohe) * (s)) End If If papier = "A4" Or papier = "A3" Then a = "pa" & xp & "," & yp & ";pa" & xp1 & "," & yp1 If papier = "A3h" Or papier = "A4h" Then a = "pa" & yp & "," & xp & ";pa" & yp1 & "," & xp1 If papier = "A4" Or papier = "A3" Then a = "pa" & xp & "," & yp & ";pd" & ";pa" & xp1 & "," & yp1 If papier = "A4h" Or papier = "A3h" Then a = "pa" & yp & "," & xp & ";pd" & ";pa" & yp1 & "," & xp1 plotter = plotter & ";" & a plotter = plotter & ";pu" 'Bildschirmausgabe Form1.Line (formweite / 2 - 5, 10)-(formweite / 2, 0), RGB(Text4, Text5, Text6) zahler = 0 anzahl_linien = (Val(Form5.Text1) / 2) abstandlinien = ((formweite / 2) / anzahl_linien) 'Anzahl der Linien und deren Abstand wurden berechnet For i = 1 To anzahl_linien Step 1 'Achseneinteilung der positiven x-Achse zahler = zahler + 1 xkoordinate = abstandlinien * zahler p1 = Int(formweite / 2 + xkoordinate) s1 = Int(formhohe / 2 + 5)

34
P = p1 s = Int(formhohe / 2 - 5) If papier = "A4h" Then xp = Int((8398 * 0.9 / formweite) * p1) yp = Int((11862 * 0.9 / formhohe) * (s1)) xp1 = Int((8398 * 0.9 / formweite) * P) yp1 = Int((11862 * 0.9 / formhohe) * (s)) End If If papier = "A4" Then xp = Int((11862 * 0.9 / formweite) * p1) yp = Int((8398 * 0.9 / formhohe) * (s1)) yp = Int(8398 * 0.9 - yp) xp1 = Int((11862 * 0.9 / formweite) * P) yp1 = Int((8398 * 0.9 / formhohe) * (s)) yp1 = Int(8398 * 0.9 - yp1) End If If papier = "A3" Then xp = Int((16796 * 0.9 / formweite) * p1) yp = Int((11862 * 0.9 / formhohe) * (s1)) yp = Int(11862 * 0.9 - yp) xp1 = Int((16796 * 0.9 / formweite) * P) yp1 = Int((11862 * 0.9 / formhohe) * (s)) yp1 = Int(11862 * 0.9 - yp1) End If If papier = "A3h" Then xp = Int((11862 * 0.9 / formweite) * p1) yp = Int((16796 * 0.9 / formhohe) * (s1)) xp1 = Int((11862 * 0.9 / formweite) * P) yp1 = Int((16796 * 0.9 / formhohe) * (s)) End If If papier = "A4" Or papier = "A3" Then a = "pa" & xp & "," & yp & ";pa" & xp1 & "," & yp1 If papier = "A3h" Or papier = "A4h" Then a = "pa" & yp & "," & xp & ";pa" & yp1 & "," & xp1 If papier = "A4" Or papier = "A3" Then a = "pa" & xp & "," & yp & ";pd" & ";pa" & xp1 & "," & yp1 If papier = "A4h" Or papier = "A3h" Then a = "pa" & yp & "," & xp & ";pd" & ";pa" & yp1 & "," & xp1 plotter = plotter & ";" & a plotter = plotter & ";pu" 'Bildschirmausgabe Form1.Line (P, s)-(p1, s1), RGB(Text4, Text5, Text6) Next i zahler = 0 anzahl_linien = (Val(Form5.Text1) / 2) abstandlinien = ((formweite / 2) / anzahl_linien) For i = 1 To anzahl_linien Step 1 'Achseneinteilung der negativen x-Achse zahler = zahler + 1 xkoordinate = abstandlinien * zahler p1 = Int(formweite / 2 - xkoordinate) s1 = Int(formhohe / 2 + 5) P = p1 s = Int(formhohe / 2 - 5) If papier = "A4h" Then xp = Int((8398 * 0.9 / formweite) * p1) yp = Int((11862 * 0.9 / formhohe) * (s1)) xp1 = Int((8398 * 0.9 / formweite) * P) yp1 = Int((11862 * 0.9 / formhohe) * (s)) End If If papier = "A4" Then xp = Int((11862 * 0.9 / formweite) * p1) yp = Int((8398 * 0.9 / formhohe) * (s1)) yp = Int(8398 * 0.9 - yp) xp1 = Int((11862 * 0.9 / formweite) * P) yp1 = Int((8398 * 0.9 / formhohe) * (s)) yp1 = Int(8398 * 0.9 - yp1) End If If papier = "A3" Then xp = Int((16796 * 0.9 / formweite) * p1) yp = Int((11862 * 0.9 / formhohe) * (s1)) yp = Int(11862 * 0.9 - yp) xp1 = Int((16796 * 0.9 / formweite) * P) yp1 = Int((11862 * 0.9 / formhohe) * (s)) yp1 = Int(11862 * 0.9 - yp1) End If If papier = "A3h" Then xp = Int((11862 * 0.9 / formweite) * p1) yp = Int((16796 * 0.9 / formhohe) * (s1)) xp1 = Int((11862 * 0.9 / formweite) * P)

35
yp1 = Int((16796 * 0.9 / formhohe) * (s)) End If If papier = "A4" Or papier = "A3" Then a = "pa" & xp & "," & yp & ";pa" & xp1 & "," & yp1 If papier = "A3h" Or papier = "A4h" Then a = "pa" & yp & "," & xp & ";pa" & yp1 & "," & xp1 If papier = "A4" Or papier = "A3" Then a = "pa" & xp & "," & yp & ";pd" & ";pa" & xp1 & "," & yp1 If papier = "A4h" Or papier = "A3h" Then a = "pa" & yp & "," & xp & ";pd" & ";pa" & yp1 & "," & xp1 plotter = plotter & ";" & a plotter = plotter & ";pu" 'Bildschirmausgabe Form1.Line (P, s)-(p1, s1), RGB(Text4, Text5, Text6) Next i zahler = 0 anzahl_linien = (Val(Form5.Text2) / 2) abstandlinien = ((formhohe / 2) / anzahl_linien) For i = 1 To anzahl_linien Step 1 'Achseneinteilung der negativen y-Achse zahler = zahler + 1 xkoordinate = abstandlinien * zahler s1 = Int(formhohe / 2 + xkoordinate) p1 = Int(formweite / 2 + 5) s = s1 P = Int(formweite / 2 - 5) If papier = "A4h" Then xp = Int((8398 * 0.9 / formweite) * p1) yp = Int((11862 * 0.9 / formhohe) * (s1)) xp1 = Int((8398 * 0.9 / formweite) * P) yp1 = Int((11862 * 0.9 / formhohe) * (s)) End If If papier = "A4" Then xp = Int((11862 * 0.9 / formweite) * p1) yp = Int((8398 * 0.9 / formhohe) * (s1)) yp = Int(8398 * 0.9 - yp) xp1 = Int((11862 * 0.9 / formweite) * P) yp1 = Int((8398 * 0.9 / formhohe) * (s)) yp1 = Int(8398 * 0.9 - yp1) End If If papier = "A3" Then xp = Int((16796 * 0.9 / formweite) * p1) yp = Int((11862 * 0.9 / formhohe) * (s1)) yp = Int(11862 * 0.9 - yp) xp1 = Int((16796 * 0.9 / formweite) * P) yp1 = Int((11862 * 0.9 / formhohe) * (s)) yp1 = Int(11862 * 0.9 - yp1) End If If papier = "A3h" Then xp = Int((11862 * 0.9 / formweite) * p1) yp = Int((16796 * 0.9 / formhohe) * (s1)) xp1 = Int((11862 * 0.9 / formweite) * P) yp1 = Int((16796 * 0.9 / formhohe) * (s)) End If If papier = "A4" Or papier = "A3" Then a = "pa" & xp & "," & yp & ";pa" & xp1 & "," & yp1 If papier = "A3h" Or papier = "A4h" Then a = "pa" & yp & "," & xp & ";pa" & yp1 & "," & xp1 If papier = "A4" Or papier = "A3" Then a = "pa" & xp & "," & yp & ";pd" & ";pa" & xp1 & "," & yp1 If papier = "A4h" Or papier = "A3h" Then a = "pa" & yp & "," & xp & ";pd" & ";pa" & yp1 & "," & xp1 plotter = plotter & ";" & a plotter = plotter & ";pu" 'Bildschirmausgabe Form1.Line (P, s)-(p1, s1), RGB(Text4, Text5, Text6) Next i zahler = 0 anzahl_linien = (Val(Form5.Text2) / 2) abstandlinien = ((formhohe / 2) / anzahl_linien) For i = 1 To anzahl_linien Step 1 'Achseneinteilung der positiven y-Achse zahler = zahler + 1 xkoordinate = abstandlinien * zahler s1 = Int(formhohe / 2 - xkoordinate) p1 = Int(formweite / 2 + 5) s = s1 P = Int(formweite / 2 - 5)

36
If papier = "A4h" Then xp = Int((8398 * 0.9 / formweite) * p1) yp = Int((11862 * 0.9 / formhohe) * (s1)) xp1 = Int((8398 * 0.9 / formweite) * P) yp1 = Int((11862 * 0.9 / formhohe) * (s)) End If If papier = "A4" Then xp = Int((11862 * 0.9 / formweite) * p1) yp = Int((8398 * 0.9 / formhohe) * (s1)) yp = Int(8398 * 0.9 - yp) xp1 = Int((11862 * 0.9 / formweite) * P) yp1 = Int((8398 * 0.9 / formhohe) * (s)) yp1 = Int(8398 * 0.9 - yp1) End If If papier = "A3" Then xp = Int((16796 * 0.9 / formweite) * p1) yp = Int((11862 * 0.9 / formhohe) * (s1)) yp = Int(11862 * 0.9 - yp) xp1 = Int((16796 * 0.9 / formweite) * P) yp1 = Int((11862 * 0.9 / formhohe) * (s)) yp1 = Int(11862 * 0.9 - yp1) End If If papier = "A3h" Then xp = Int((11862 * 0.9 / formweite) * p1) yp = Int((16796 * 0.9 / formhohe) * (s1)) xp1 = Int((11862 * 0.9 / formweite) * P) yp1 = Int((16796 * 0.9 / formhohe) * (s)) End If If papier = "A4" Or papier = "A3" Then a = "pa" & xp & "," & yp & ";pa" & xp1 & "," & yp1 If papier = "A3h" Or papier = "A4h" Then a = "pa" & yp & "," & xp & ";pa" & yp1 & "," & xp1 If papier = "A4" Or papier = "A3" Then a = "pa" & xp & "," & yp & ";pd" & ";pa" & xp1 & "," & yp1 If papier = "A4h" Or papier = "A3h" Then a = "pa" & yp & "," & xp & ";pd" & ";pa" & yp1 & "," & xp1 plotter = plotter & ";" & a plotter = plotter & ";pu" 'Bildschirmausgabe Form1.Line (P, s)-(p1, s1), RGB(Text4, Text5, Text6) Next i End Sub Private Sub a3_Click() 'A3-Hochformat ist ausgewahlt antwort = MsgBox("Dieser Vorgang erfordert, dass Sie ein neues Projekt beginnen. Alle nicht gespeicherten Daten gehen verloren !Wollen Sie den Vorgang fortsetzen ? ", 4) If antwort = vbYes Then 'Wenn auf "ja" geklickt wurde abfrage = 1 'damit Frage nicht zweimal auftaucht Call neu_Click 'neues Projekt wird begonnen End If If antwort = vbNo Then GoTo ende 'Wenn auf "Nein" geklickt wurde papier = "A3" Form2.Label3.Caption = papier MDIForm1.Height = Screen.Height * 0.7 'Neues Fenster betragt 70% der Bildschirmgroße MDIForm1.Width = Screen.Width * 0.7 MDIForm1.Top = (Screen.Height - MDIForm1.Height) / 2 'Position der MDI-Form wird gesetzt MDIForm1.Left = (Screen.Width - MDIForm1.Width - Form2.Width) / 2 If Form2.Check5.Value = 1 Then Form2.Left = MDIForm1.Left + MDIForm1.Width 'Statusfenster wird an Hauptfenster angedockt Form2.Top = MDIForm1.Top Form2.Height = MDIForm1.Height If Form2.Height < 4665 Then Form2.Height = 4665 End If ende: End Sub Private Sub a3h_Click() 'Kommentar vgl. "Private Sub a3_Click()" antwort = MsgBox("Dieser Vorgang erfordert, dass Sie ein neues Projekt beginnen. Alle nicht gespeicherten Daten gehen verloren !Wollen Sie den Vorgang fortsetzen ?", 4) If antwort = vbYes Then abfrage = 1 Call neu_Click End If
37
If antwort = vbNo Then GoTo ende papier = "A3h" Form2.Label3.Caption = papier MDIForm1.Height = Screen.Height * 0.8 MDIForm1.Width = Screen.Width * 0.5 MDIForm1.Top = (Screen.Height - MDIForm1.Height) / 2 MDIForm1.Left = (Screen.Width - MDIForm1.Width - Form2.Width) / 2 If Form2.Check5.Value = 1 Then Form2.Left = MDIForm1.Left + MDIForm1.Width Form2.Top = MDIForm1.Top Form2.Height = MDIForm1.Height If Form2.Height < 4665 Then Form2.Height = 4665 End If ende: End Sub Private Sub a4_Click() 'Kommentar vgl. "Private Sub a3_Click()" antwort = MsgBox("Dieser Vorgang erfordert, dass Sie ein neues Projekt beginnen. Alle nicht gespeicherten Daten gehen verloren !Wollen Sie den Vorgang fortsetzen ? ", 4) If antwort = vbYes Then abfrage = 1 Call neu_Click End If If antwort = vbNo Then GoTo ende papier = "A4" Form2.Label3.Caption = papier MDIForm1.Height = Screen.Height * 0.7 MDIForm1.Width = Screen.Width * 0.7 MDIForm1.Top = (Screen.Height - MDIForm1.Height) / 2 MDIForm1.Left = (Screen.Width - MDIForm1.Width - Form2.Width) / 2 If Form2.Check5.Value = 1 Then Form2.Left = MDIForm1.Left + MDIForm1.Width Form2.Top = MDIForm1.Top Form2.Height = MDIForm1.Height If Form2.Height < 4665 Then Form2.Height = 4665 End If ende: End Sub Private Sub A4h_Click() 'Kommentar vgl. "Private Sub a3_Click()" antwort = MsgBox("Dieser Vorgang erfordert, dass Sie ein neues Projekt beginnen. Alle nicht gespeicherten Daten gehen verloren !Wollen Sie den Vorgang fortsetzen ? ", 4) If antwort = vbYes Then abfrage = 1 Call neu_Click End If If antwort = vbNo Then GoTo ende papier = "A4h" Form2.Label3.Caption = papier MDIForm1.Height = Screen.Height * 0.8 MDIForm1.Width = Screen.Width * 0.5 MDIForm1.Top = (Screen.Height - MDIForm1.Height) / 2 MDIForm1.Left = (Screen.Width - MDIForm1.Width - Form2.Width) / 2 If Form2.Check5.Value = 1 Then Form2.Left = MDIForm1.Left + Form1.Width Form2.Top = MDIForm1.Top Form2.Height = MDIForm1.Height If Form2.Height < 4665 Then Form2.Height = 4665 End If ende: End Sub
38
Private Sub anschl_Click() Form6.Show 'AnschluBeinstellungen werden geoffnet Open "port.ini" For Output As #1 Write #1, anschluss 'Anschluss wird in port.ini-Datei geschrieben Close #1 End Sub Private Sub beenden_Click() Unload MDIForm1 'Programm beenden End Sub Public Sub drucken_Click() Open "port.ini" For Input As #1 Input #1, anschluss 'Anschluss wird aus port.ini-Datei gelesen Close #1 plotter = plotter & ";sp0" Open anschluss For Output As #1 ' der ausgewahlte Anschluss wird geoffnet Print #1, plotter 'und die Plotterdatei gesendet Close #1 Form2.Label4.Caption = "Keine" '"keine Stiftfarbe" wird ausgewahlt End Sub Private Sub einrichten_Click() MDIForm1.Enabled = False Form2.Enabled = False Form5.Show 'Koordinatensystem wird zur Einrichtung freigegeben End Sub Public Sub feingabe_Click() Form8.Label1.Caption = "Bitte geben Sie Ihre Funktionsgleichung ein. (Denken Sie daran, dass Sie vor einen mathematischen Ausdruck, wie z.B.: sin, den Ausdruck 'Math.' schreiben.) " If LCase(Dir("funkti.dat")) = "funkti.dat" Then Open "funkti.dat" For Input As #1 Do While Not EOF(1) Input #1, funkti Form8.Combo1.AddItem funkti 'In die Combo-Box der Funktionseingabe werden die zuletzt eingegebenen Funktionen eingelesen Loop Close #1 End If Form8.Combo1.Text = eingabe_funktion Form8.Show 'Form zur Funktionseingabe wird angezeigt End Sub Private Sub Form_DblClick() 'undokumentierte Geheimfunktion If click = 0 Then n.Visible = True click = 1 Else n.Visible = False click = 0 cheat = 0 End If End Sub Private Sub Form_Load() On Error GoTo fehler 'Variableninitialisierung cheat = 0 eingabe_funktion = "y=Math.sin(x)" 'Standardfunktion wird festgesetzt firstclick = 0 formhohe = 0

39
formweite = 0 Form2.Hide Form7.Height = 250 'GroBe der Toolbarbuttons wird gesetzt Form7.Width = 250 Form7.Visible = False Form2.Show 'Statusform wird angezeigt Form1.Height = MDIForm1.Height * 0.95 'BlattgroBe entspricht 95% der GroBe der MDI-Form Form1.Width = MDIForm1.Width * 0.95 MDIForm1.Top = (Screen.Height - MDIForm1.Height) / 2 'MDI-Form-Position wird gesetzt MDIForm1.Left = (Screen.Width - MDIForm1.Width - Form2.Width) / 2 ScaleMode = 3 ' Skalierung auf Pixel setzen AutoRedraw = -1 ' AutoRedraw einschalten Timer1.Interval = 100 'Timerintervall auf 100ms setzen Text4 = "255" 'Farbe WeiB wird eingestellt Text5 = "255" Text6 = "255" Form2.Check5.Value = 1 'Docking View wird angeschaltet plotter = "in" 'Standardbefehl zum Plotter-Initialisieren Form2.Check3.Value = 1 'Freihandzeichnen wird eingeschaltet papier = "A4" 'Standardpapier:A4 Form2.Label3.Caption = papier 'Label der Papieranzeige im Statusfenster wird benannt Call init_toolbar 'Toolbar wird initialisiert Call Form1.stift1_Click 'Erster Stift im Stiftekarussell wird gewahlt Form1.Show 'Anzeige des Blattes a = 1 Open "port.ini" For Input As #1 'Anschluss wird aus ini-Datei-eingelesen Input #1, anschluss Close #1 GoTo ende fehler: Select Case Err.Number Case 53 'falls Dateien (port.ini oder stift.ini) nicht vorhanden sind If Not a = 1 Then m = MsgBox("Es sind keine Einstellungen vorhanden. Die Option Stiftbelegung wird gestartet. Bitte stellen sie die Angaben gemaB dem Plotter ein !") Form3.Show Form1.Hide Form2.Hide End If If a = 1 Then anschluss = "lpt1:" End Select Resume Next ende: End Sub Public Sub Form_MouseDown(Button As Integer, Shift As Integer, X As Single, Y As Single) If firstclick = 0 Then firstclick = 1 'Aktueller Arbeitsbereich wird nach angefangener Zeichnung festgesetzt Form1.Line (0, 0)-(Form1.ScaleWidth, Form1.ScaleHeight), RGB(150, 150, 150), B formhohe = Form1.ScaleHeight formweite = Form1.ScaleWidth End If If X > formweite Then X = formweite 'Falls der Zeichenbereich uberschritten wird, wird die uberschrittene Koordinate auf die Grenze gesetzt End If If Y > formhohe Then Y = formhohe 'Falls der Zeichenbereich uberschritten wird, wird die uberschrittene Koordinate auf die Grenze gesetzt End If Call malfarbe 'Prozedur Malfarbe wird aufgerufen If Not Form2.Label4.Caption = "Keine" Then drawnow = -1 CurrentX = X CurrentY = Y If Form2.Check3.Value = 1 Then 'Freihandzeichnen gewahlt If Button = 1 Then If papier = "A4h" Then 'Cursorkoordinaten werden entsprechend der PapiergroBe umgerechnet xp = Int((8398 * 0.9 / formweite) * X) yp = Int((11862 * 0.9 / formhohe) * (Y)) hohe = 8398 * 0.9

40
Breite = 11862 * 0.9 End If If papier = "A4" Then xp = Int((11862 * 0.9 / formweite) * X) yp = Int((8398 * 0.9 / formhohe) * (Y)) yp = Int(8398 * 0.9 - yp) hohe = Int(11862 * 0.9) Breite = 8398 * 0.9 End If If papier = "A3" Then xp = Int((16796 * 0.9 / formweite) * X) yp = Int((11862 * 0.9 / formhohe) * (Y)) yp = Int(11862 * 0.9 - yp) Breite = 11862 * 0.9 hohe = 16796 * 0.9 End If If papier = "A3h" Then xp = Int((11862 * 0.9 / formweite) * X) yp = Int((16796 * 0.9 / formhohe) * (Y)) hohe = 11862 * 0.9 Breite = 16796 * 0.9 End If If Not Val(Text4) + Val(Text5) + Val(Text6) = 765 Then 'Wenn Stiftfarbe nicht weiB ist If xp > hohe Then xp = Int(hohe) 'Blattbegrenzungen durfen nicht uberschritten werden If xp < 0 Then xp = 0 If yp > Breite Then yp = Int(Breite) If yp < 0 Then yp = 0 If Not papier = "A4h" Or Not papier = "A3h" Then a = "pa" & xp & "," & yp If papier = "A4h" Or papier = "A3h" Then a = "pa" & yp & "," & xp plottertmp = plottertmp & ";" & a 'Daten werden in temporare Plotterdatei geschrieben plottertmp = plottertmp & ";pd" PSet (X, Y), RGB(Text4, Text5, Text6) 'Punkt wird auf Bildschirm gesetzt End If End If End If If Form2.Check7.Value = 1 Then 'Texteingabe gewahlt Form1.ForeColor = RGB(Text4, Text5, Text6) 'Farbe, in der auf die Form gezeichnet wird t = InputBox("Geben Sie hier hier Ihren Text ein") If formweite < formhohe Then schriftgroBe = Int(18 / 435 * formhohe) 'Anpassung der SchriftgroBe an FormgroBe Form1.FontSize = schriftgroBe End If If formweite > formhohe Then schriftgroBe = Int(18 / 669 * formweite) Form1.FontSize = schriftgroBe End If If formweite = formhohe Then schriftgroBe = Int(18 / 669 * forweite) Form1.FontSize = schriftgroBe End If If papier = "A4" Then xp = Int((11862 * 0.9 / formweite) * X) yp = Int((8398 * 0.9 / formhohe) * (Y + Form1.FontSize)) yp = Int(8398 * 0.9 - yp) hohe = Int(11862 * 0.9) Breite = 8398 * 0.9 End If If papier = "A3" Then xp = Int((16796 * 0.9 / formweite) * X) yp = Int((11862 * 0.9 / formhohe) * (Y + Form1.FontSize)) yp = Int(11862 * 0.9 - yp) Breite = 11862 * 0.9 hohe = 16796 * 0.9 End If If Not Val(Text4) + Val(Text5) + Val(Text6) = 765 Then If xp > hohe Then xp = Int(hohe) If xp < 0 Then xp = 0 If yp > Breite Then yp = Int(Breite) If yp < 0 Then yp = 0 If Not papier = "A4h" Or Not papier = "A3h" Then a = "pa" & xp & "," & yp & ";lb" & t + Chr$(3) plotter = plotter & ";" & a Print t End If End If If Form2.Check1.Value = 1 Or Form2.Check2.Value = 1 Or Form2.Check4.Value = 1 Then If Button = 1 Then mx = CurrentX 'Zwei Punkte, die fur die Erstellung von Kreis, my = CurrentY 'Linie oder Rechteck notwendig sind, werden eingelesen lx = mx
41
lx1 = mx ly = my ly1 = my loschen = 0 Timer2.Interval = 1 End If End If End If If Form2.Label4.Caption = "Keine" Then m = MsgBox("Es ist keine Stiftfarbe ausgewahlt !") End If ende: End Sub Private Sub Form_MouseMove(Button As Integer, Shift As Integer, X As Single, Y As Single) If Button = 0 Or Button = 1 Then Form2.Label7.Caption = X 'Cursorkoordinatenanzeige Form2.Label9.Caption = Y End If If X > formweite Then X = formweite 'Blattbegrenzung nicht uberschreiten End If If Y > formhohe Then Y = formhohe 'Blattbegrenzung nicht uberschreiten End If If Not Form2.Label4.Caption = "Keine" Then 'Wenn eine Farbe ausgewahlt wurde If Form2.Check3.Value = 1 Then 'Freihandzeichnen gewahlt If Button = 1 Then If papier = "A4h" Then xp = Int((8398 * 0.9 / formweite) * X) yp = Int((11862 * 0.9 / formhohe) * (Y)) hohe = 8398 * 0.9 Breite = 11862 * 0.9 End If If papier = "A4" Then xp = Int((11862 * 0.9 / formweite) * X) yp = Int((8398 * 0.9 / formhohe) * (Y)) yp = Int(8398 * 0.9 - yp) hohe = Int(11862 * 0.9) Breite = 8398 * 0.9 End If If papier = "A3" Then xp = Int((16796 * 0.9 / formweite) * X) yp = Int((11862 * 0.9 / formhohe) * (Y)) yp = Int(11862 * 0.9 - yp) Breite = 11862 * 0.9 hohe = 16796 * 0.9 End If If papier = "A3h" Then xp = Int((11862 * 0.9 / formweite) * X) yp = Int((16796 * 0.9 / formhohe) * (Y)) hohe = 11862 * 0.9 Breite = 16796 * 0.9 End If If Not Val(Text4) + Val(Text5) + Val(Text6) = 765 Then If xp > hohe Then xp = Int(hohe) If xp < 0 Then xp = 0 If yp > Breite Then yp = Int(Breite) If yp < 0 Then yp = 0 If Not papier = "A4h" Or Not papier = "A3h" Then a = "pa" & xp & "," & yp If papier = "A4h" Or papier = "A3h" Then a = "pa" & yp & "," & xp plottertmp = plottertmp & ";" & a plottertmp = plottertmp & ";pd" Line -(X, Y), RGB(Text4, Text5, Text6) End If End If End If If Form2.Check1.Value = 1 Or Form2.Check2.Value = 1 Or Form2.Check4.Value = 1 Then If Button = 1 Then CurrentY = Y

42
CurrentX = X lx = X ly = Y End If End If End If ende: If cheat = 1 And Not Button = 1 Then If papier = "A4h" Then xp = Int((8398 * 0.9 / formweite) * X) yp = Int((11862 * 0.9 / formhohe) * (Y)) hohe = 8398 * 0.9 Breite = 11862 * 0.9 End If If papier = "A4" Then xp = Int((11862 * 0.9 / formweite) * X) yp = Int((8398 * 0.9 / formhohe) * (Y)) yp = Int(8398 * 0.9 - yp) hohe = Int(11862 * 0.9) Breite = 8398 * 0.9 End If If papier = "A3" Then xp = Int((16796 * 0.9 / formweite) * X) yp = Int((11862 * 0.9 / formhohe) * (Y)) yp = Int(11862 * 0.9 - yp) Breite = 11862 * 0.9 hohe = 16796 * 0.9 End If If papier = "A3h" Then xp = Int((11862 * 0.9 / formweite) * X) yp = Int((16796 * 0.9 / formhohe) * (Y)) hohe = 11862 * 0.9 Breite = 16796 * 0.9 End If If Not Val(Text4) + Val(Text5) + Val(Text6) = 765 Then If xp > hohe Then xp = Int(hohe) If xp < 0 Then xp = 0 If yp > Breite Then yp = Int(Breite) If yp < 0 Then yp = 0 If Not papier = "A4h" Or Not papier = "A3h" Then a = "pa" & xp & "," & yp If papier = "A4h" Or papier = "A3h" Then a = "pa" & yp & "," & xp ac = a ac = ac Open anschluss For Output As #1 Print #1, ac 'aktuelle Mausposition wird an Plotter gesendet Close #1 End If End If End Sub Private Sub Form_MouseUp(Button As Integer, Shift As Integer, X As Single, Y As Single) If X > formweite Then X = formweite 'Zeichenblattbegrenzung nicht uberschreiten End If If Y > formhohe Then Y = formhohe 'Zeichenblattbegrenzung nicht uberschreiten End If If Not Form2.Label4.Caption = "Keine" Then If Form2.Check3.Value = 1 Then plotter = plotter & plottertmp plottertmp = "" End If CurrentX = lx1 CurrentY = ly1 If Form2.Check1.Value = 1 Then 'Kreis zeichnen, wenn Maustaste gelost wird If Button = 1 Then CX = lx1 CY = ly1 Radius = Sqr((mx - lx1) ^ 2 + (my - ly1) ^ 2) Timer2.Interval = 0 loschen = 3 If papier = "A4h" Then xp = Int((8398 * 0.9 / formweite) * mx)
43
yp = Int((11862 * 0.9 / formhohe) * (my)) cpx = Int((8398 * 0.9 / formweite) * (CX)) cpy = Int((11862 * 0.9 / formhohe) * (CY)) hohe = 8398 * 0.9 Breite = 11862 * 0.9 End If If papier = "A4" Then xp = Int((11862 * 0.9 / formweite) * mx) yp = Int((8398 * 0.9 / formhohe) * (my)) yp = Int(8398 * 0.9 - yp) cpx = Int((11862 * 0.9 / formweite) * (CX)) cpy = Int((8398 * 0.9 / formhohe) * (CY)) cpy = Int(8398 * 0.9 - cpy) hohe = 11862 * 0.9 Breite = 8398 * 0.9 End If If papier = "A3" Then xp = Int((16796 * 0.9 / formweite) * mx) yp = Int((11862 * 0.9 / formhohe) * (my)) yp = Int(11862 * 0.9 - yp) cpx = Int((16796 * 0.9 / formweite) * (CX)) cpy = Int((11862 * 0.9 / formhohe) * (CY)) cpy = Int(11862 * 0.9 - cpy) hohe = 16796 * 0.9 Breite = 11862 * 0.9 End If If papier = "A3h" Then xp = Int((11862 * 0.9 / formweite) * mx) yp = Int((16796 * 0.9 / formhohe) * (my)) cpx = Int((11862 * 0.9 / formweite) * (CX)) cpy = Int((16796 * 0.9 / formhohe) * (CY)) hohe = 11862 * 0.9 Breite = 16796 * 0.9 End If If Not Val(Text4) + Val(Text5) + Val(Text6) = 765 Then If xp > hohe Then xp = Int(hohe) If xp < 0 Then xp = 0 If yp > Breite Then yp = Int(Breite) If yp < 0 Then yp = 0 Radius = Sqr((xp - cpx) ^ 2 + (yp - cpy) ^ 2) If papier = "A4" Or papier = "A3" Then a = "pa" & xp & "," & yp & ";ci" & Radius If papier = "A4h" Or papier = "A3h" Then a = "pa" & yp & "," & xp & ";ci" & Radius plotter = plotter & ";" & a End If End If End If If Form2.Check2.Value = 1 Or Form2.Check4.Value = 1 Then 'Rechteck bzw. Linie zeichnen, wenn Maustaste losgelassen wird Timer2.Interval = 0 loschen = 3 If papier = "A4h" Then xp = Int((8398 * 0.9 / formweite) * mx) yp = Int((11862 * 0.9 / formhohe) * (my)) xp1 = Int((8398 * 0.9 / formweite) * CurrentX) yp1 = Int((11862 * 0.9 / formhohe) * (CurrentY)) hohe = 8398 * 0.9 Breite = 11862 * 0.9 End If If papier = "A4" Then xp = Int((11862 * 0.9 / formweite) * mx) yp = Int((8398 * 0.9 / formhohe) * (my)) yp = Int(8398 * 0.9 - yp) xp1 = Int((11862 * 0.9 / formweite) * CurrentX) yp1 = Int((8398 * 0.9 / formhohe) * (CurrentY)) yp1 = Int(8398 * 0.9 - yp1) hohe = 11862 * 0.9 Breite = 8398 * 0.9 End If If papier = "A3" Then xp = Int((16796 * 0.9 / formweite) * mx) yp = Int((11862 * 0.9 / formhohe) * my) yp = Int(11862 * 0.9 - yp) xp1 = Int((16796 * 0.9 / formweite) * CurrentX) yp1 = Int((11862 * 0.9 / formhohe) * CurrentY) yp1 = Int(11862 * 0.9 - yp1) hohe = 16796 * 0.9 Breite = 11862 * 0.9 End If If papier = "A3h" Then xp = Int((11862 * 0.9 / Form1.Width) * mx) yp = Int((16796 * 0.9 / formhohe) * m)
44
xp1 = Int((11862 * 0.9 / formweite) * CurrentX) yp1 = Int((16796 * 0.9 / formhohe) * CurrentY) hohe = 11862 * 0.9 Breite = 16796 * 0.9 End If If Not Val(Text4) + Val(Text5) + Val(Text6) = 765 Then If xp > hohe Then xp = Int(hohe) If xp < 0 Then xp = 0 If xp1 > hohe Then xp1 = Int(hohe) If xp1 < 0 Then xp1 = 0 If yp > Breite Then yp = Int(Breite) If yp < 0 Then yp = 0 If yp1 > Breite Then yp1 = Int(Breite) If yp1 < 0 Then yp1 = 0 If Button = 1 Then If Form2.Check2.Value = 1 Then If papier = "A4" Or papier = "A3" Then a = "pa" & xp & "," & yp & ";ea" & xp1 & "," & yp1 If papier = "A3h" Or papier = "A4h" Then a = "pa" & yp & "," & xp & ";ea" &yp1 & "," & xp1 End If If Form2.Check4.Value = 1 Then If papier = "A4" Or papier = "A3" Then a = "pa" & xp & "," & yp & ";pd" & ";pa" & xp1 & "," & yp1 If papier = "A4h" Or papier = "A3h" Then a = "pa" & yp & "," & xp & ";pd" & ";pa" & yp1 & "," & xp1 End If plotter = plotter & ";" & a End If End If End If plotter = plotter & ";pu" drawnow = 0 End If ende: End Sub Private Sub Form_Unload(Cancel As Integer) On Error GoTo fehler Kill ("s1.bmp") 'Erstellte Bilder werden geloscht Kill ("s2.bmp") Kill ("s3.bmp") Kill ("s4.bmp") Kill ("s5.bmp") Kill ("s6.bmp") Kill ("s7.bmp") Kill ("s8.bmp") Kill ("~~tmp.bat") 'temporare Dateien werden geloscht Kill ("c:\pld.tmp") Kill ("c:\tmp~.bmp") Kill ("c:\~werte.htm") Kill ("c:\~werte.tmp") Unload Form7 'andere Formulare werden geschlossen Unload Form2 Unload Form3 Unload Form4 Unload Form5 Unload Form6 Unload Form8 GoTo ende fehler: Resume Next ende: End Sub Public Sub fzeichnen_Click() If Not LCase(Dir("c:\~werte.tmp")) = "~werte.tmp" Then MsgBox "Es ist keine Wertetabelle vorhanden! Klicken Sie auf Wertetabelle erstellen und wiederholen Sie den Vorgang" GoTo ende End If If Form2.Label4.Caption = "Keine" Then m = MsgBox("Es ist keine Stiftfarbe ausgewahlt !") End If If Form2.Label4.Caption = "Keine" Then GoTo ende
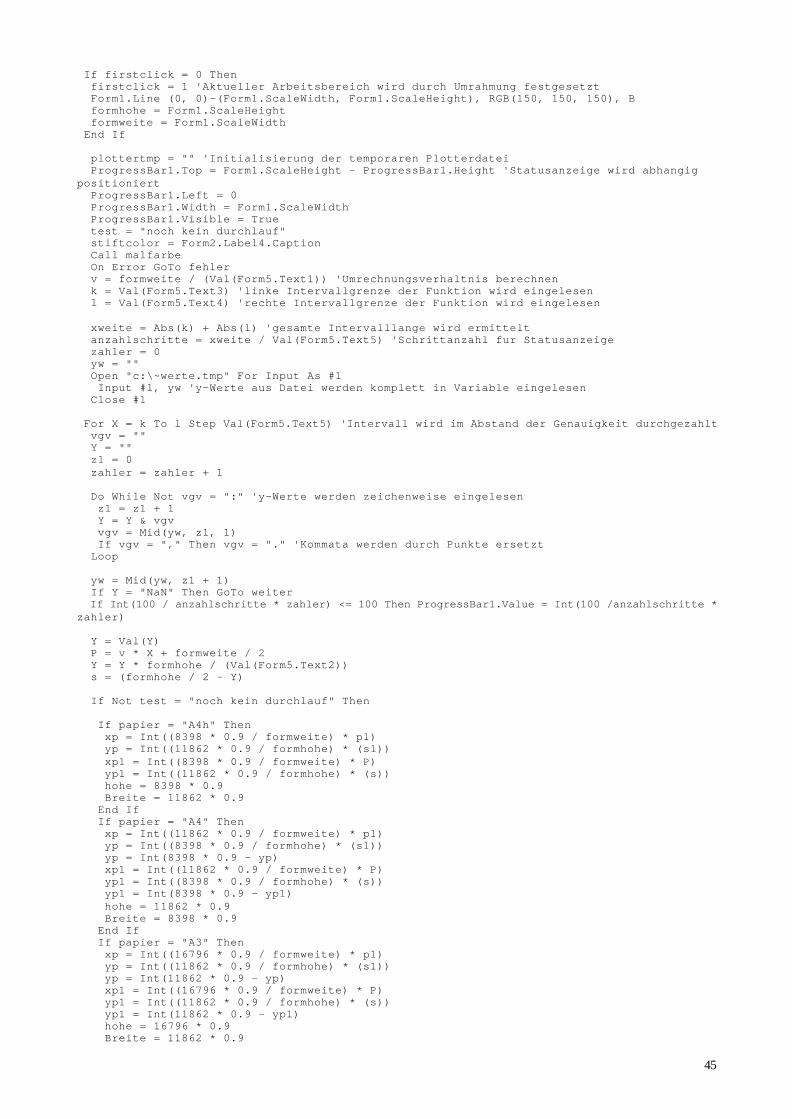
45
If firstclick = 0 Then firstclick = 1 'Aktueller Arbeitsbereich wird durch Umrahmung festgesetzt Form1.Line (0, 0)-(Form1.ScaleWidth, Form1.ScaleHeight), RGB(150, 150, 150), B formhohe = Form1.ScaleHeight formweite = Form1.ScaleWidth End If plottertmp = "" 'Initialisierung der temporaren Plotterdatei ProgressBar1.Top = Form1.ScaleHeight - ProgressBar1.Height 'Statusanzeige wird abhangig positioniert ProgressBar1.Left = 0 ProgressBar1.Width = Form1.ScaleWidth ProgressBar1.Visible = True test = "noch kein durchlauf" stiftcolor = Form2.Label4.Caption Call malfarbe On Error GoTo fehler v = formweite / (Val(Form5.Text1)) 'Umrechnungsverhaltnis berechnen k = Val(Form5.Text3) 'linke Intervallgrenze der Funktion wird eingelesen l = Val(Form5.Text4) 'rechte Intervallgrenze der Funktion wird eingelesen xweite = Abs(k) + Abs(l) 'gesamte Intervalllange wird ermittelt anzahlschritte = xweite / Val(Form5.Text5) 'Schrittanzahl fur Statusanzeige zahler = 0 yw = "" Open "c:\~werte.tmp" For Input As #1 Input #1, yw 'y-Werte aus Datei werden komplett in Variable eingelesen Close #1 For X = k To l Step Val(Form5.Text5) 'Intervall wird im Abstand der Genauigkeit durchgezahlt vgv = "" Y = "" z1 = 0 zahler = zahler + 1 Do While Not vgv = ":" 'y-Werte werden zeichenweise eingelesen z1 = z1 + 1 Y = Y & vgv vgv = Mid(yw, z1, 1) If vgv = "," Then vgv = "." 'Kommata werden durch Punkte ersetzt Loop yw = Mid(yw, z1 + 1) If Y = "NaN" Then GoTo weiter If Int(100 / anzahlschritte * zahler) <= 100 Then ProgressBar1.Value = Int(100 /anzahlschritte * zahler) Y = Val(Y) P = v * X + formweite / 2 Y = Y * formhohe / (Val(Form5.Text2)) s = (formhohe / 2 - Y) If Not test = "noch kein durchlauf" Then If papier = "A4h" Then xp = Int((8398 * 0.9 / formweite) * p1) yp = Int((11862 * 0.9 / formhohe) * (s1)) xp1 = Int((8398 * 0.9 / formweite) * P) yp1 = Int((11862 * 0.9 / formhohe) * (s)) hohe = 8398 * 0.9 Breite = 11862 * 0.9 End If If papier = "A4" Then xp = Int((11862 * 0.9 / formweite) * p1) yp = Int((8398 * 0.9 / formhohe) * (s1)) yp = Int(8398 * 0.9 - yp) xp1 = Int((11862 * 0.9 / formweite) * P) yp1 = Int((8398 * 0.9 / formhohe) * (s)) yp1 = Int(8398 * 0.9 - yp1) hohe = 11862 * 0.9 Breite = 8398 * 0.9 End If If papier = "A3" Then xp = Int((16796 * 0.9 / formweite) * p1) yp = Int((11862 * 0.9 / formhohe) * (s1)) yp = Int(11862 * 0.9 - yp) xp1 = Int((16796 * 0.9 / formweite) * P) yp1 = Int((11862 * 0.9 / formhohe) * (s)) yp1 = Int(11862 * 0.9 - yp1) hohe = 16796 * 0.9 Breite = 11862 * 0.9

46
End If If papier = "A3h" Then xp = Int((11862 * 0.9 / Form1.Width) * p1) yp = Int((16796 * 0.9 / formhohe) * (s1)) xp1 = Int((11862 * 0.9 / formweite) * P) yp1 = Int((16796 * 0.9 / formhohe) * (s)) hohe = 11862 * 0.9 Breite = 16796 * 0.9 End If If Not Val(Text4) + Val(Text5) + Val(Text6) = 765 Then If xp > hohe Then plottertmp = plottertmp & ";pu" GoTo weiter End If If yp1 < 0 Or xp < 0 Or xp1 > hohe Or xp1 < 0 Or yp > Breite Or yp < 0 Or yp1 > Breite Or s > formhohe Or s1 < 0 Or s1 > formhohe Or s < 0 Then plottertmp = plottertmp & ";pu" If yp1 < 0 Then yp1 = 0 'diverse Fallunterscheidungen (Naheres siehe Dokumentation) If xp < 0 Then xp = 0 If xp1 > hohe Then xp1 = Int(hohe) If xp1 < 0 Then xp1 = 0 If yp > Breite Then yp = Int(Breite) If yp < 0 Then yp = 0 If yp1 > Breite Then yp1 = Int(Breite) If P > formweite Then P = formweite If P < 0 Then P = 0 If p1 > formweite Then p1 = formweite If p1 < 0 Then p1 = 0 If s > formhohe Then s = formhohe If s1 > formhohe Then s1 = formhohe If s1 < 0 Then s1 = 0 If s < 0 Then s = 0 GoTo weiter End If If papier = "A4" Or papier = "A3" Then a = "pa" & xp & "," & yp & ";pd" & ";pa" xp1 & "," & yp1 If papier = "A4h" Or papier = "A3h" Then a = "pa" & yp & "," & xp & ";pd" & ";pa" & yp1 & "," & xp1 Form1.Line (p1, s1)-(P, s), RGB(Text4, Text5, Text6) plottertmp = plottertmp & ";" & a End If End If test = "" weiter: p1 = P s1 = s Next X plottertmp = plottertmp & ";pu" GoTo ende fehler: test = "noch kein durchlauf" Resume Next ende: plotter = plotter & plottertmp 'temporare Datei wird an Sende-Datei angehangt ProgressBar1.Value = 0 ProgressBar1.Visible = False 'Statusanzeige wird ausgeschaltet MDIForm1.Enabled = True Form2.Enabled = True End Sub Private Sub keiner_Click() 'Stiftfarbe wird auf weiB gesetzt (kein Stift ausgewahlt) Text4 = "255" Text5 = "255" Text6 = "255" plotter = plotter & ";sp0" stiftcolor = "Keine" Form2.Label4.Caption = stiftcolor
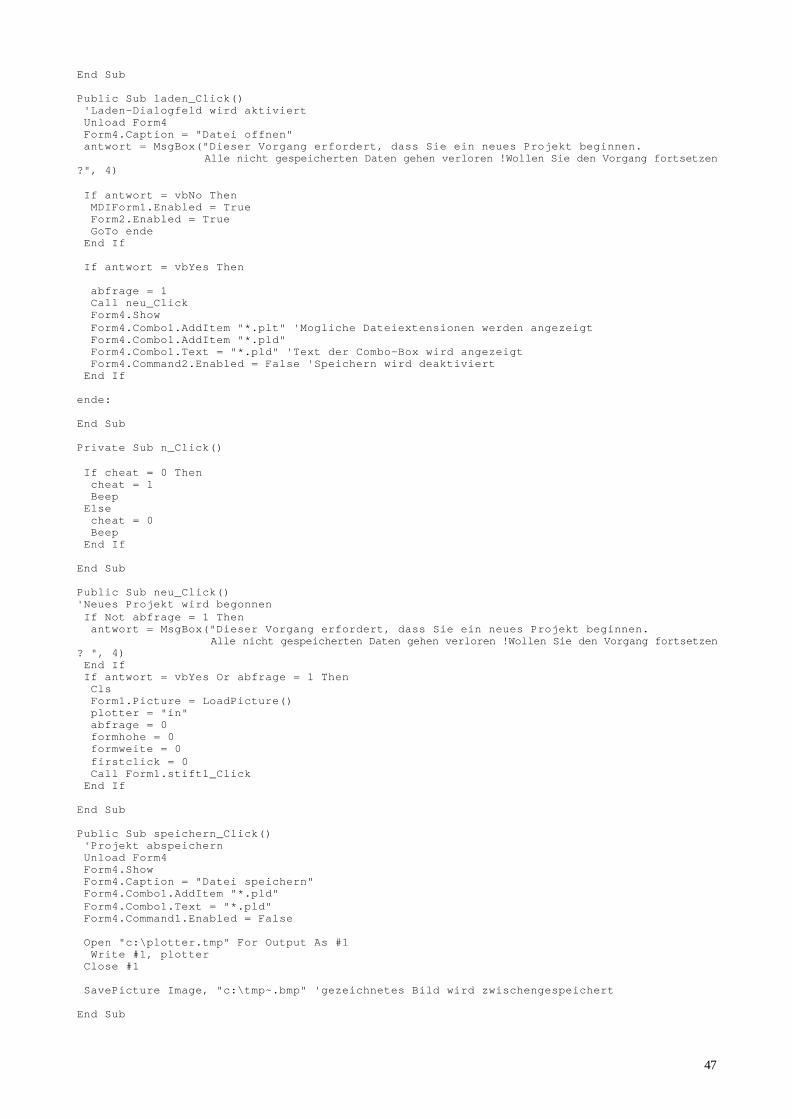
47
End Sub Public Sub laden_Click() 'Laden-Dialogfeld wird aktiviert Unload Form4 Form4.Caption = "Datei offnen" antwort = MsgBox("Dieser Vorgang erfordert, dass Sie ein neues Projekt beginnen. Alle nicht gespeicherten Daten gehen verloren !Wollen Sie den Vorgang fortsetzen ?", 4) If antwort = vbNo Then MDIForm1.Enabled = True Form2.Enabled = True GoTo ende End If If antwort = vbYes Then abfrage = 1 Call neu_Click Form4.Show Form4.Combo1.AddItem "*.plt" 'Mogliche Dateiextensionen werden angezeigt Form4.Combo1.AddItem "*.pld" Form4.Combo1.Text = "*.pld" 'Text der Combo-Box wird angezeigt Form4.Command2.Enabled = False 'Speichern wird deaktiviert End If ende: End Sub Private Sub n_Click() If cheat = 0 Then cheat = 1 Beep Else cheat = 0 Beep End If End Sub Public Sub neu_Click() 'Neues Projekt wird begonnen If Not abfrage = 1 Then antwort = MsgBox("Dieser Vorgang erfordert, dass Sie ein neues Projekt beginnen. Alle nicht gespeicherten Daten gehen verloren !Wollen Sie den Vorgang fortsetzen ? ", 4) End If If antwort = vbYes Or abfrage = 1 Then Cls Form1.Picture = LoadPicture() plotter = "in" abfrage = 0 formhohe = 0 formweite = 0 firstclick = 0 Call Form1.stift1_Click End If End Sub Public Sub speichern_Click() 'Projekt abspeichern Unload Form4 Form4.Show Form4.Caption = "Datei speichern" Form4.Combo1.AddItem "*.pld" Form4.Combo1.Text = "*.pld" Form4.Command1.Enabled = False Open "c:\plotter.tmp" For Output As #1 Write #1, plotter Close #1 SavePicture Image, "c:\tmp~.bmp" 'gezeichnetes Bild wird zwischengespeichert End Sub
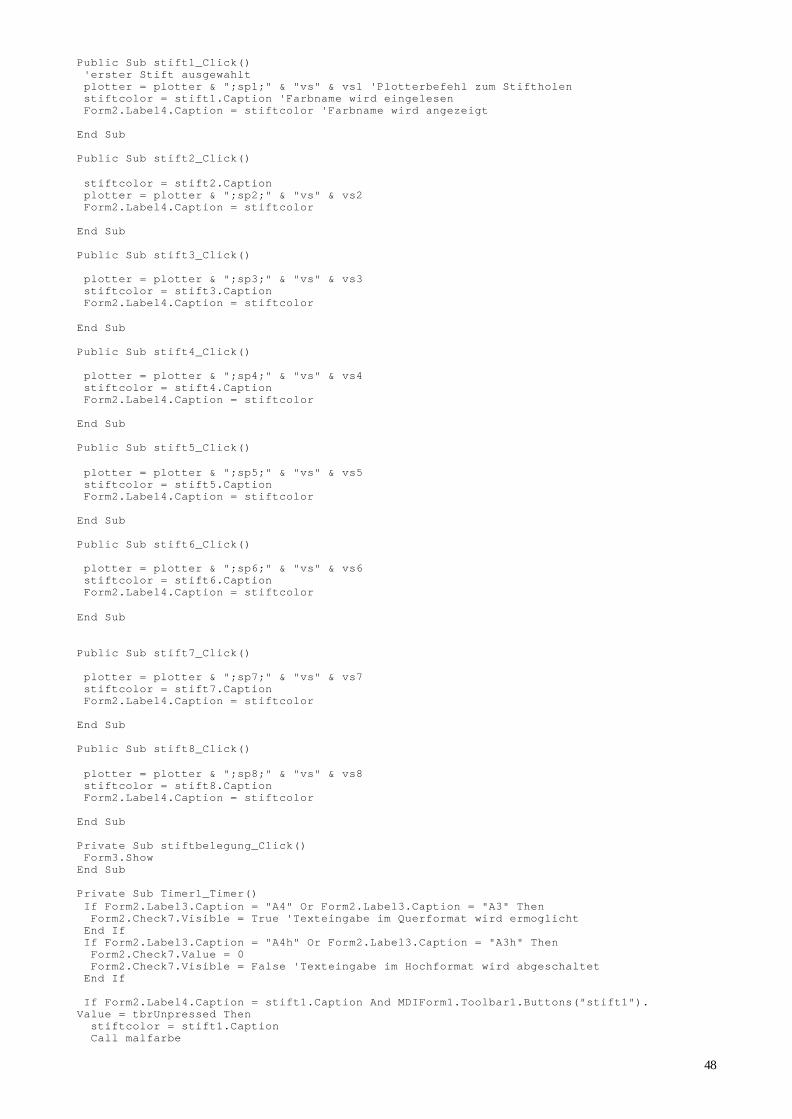
48
Public Sub stift1_Click() 'erster Stift ausgewahlt plotter = plotter & ";sp1;" & "vs" & vs1 'Plotterbefehl zum Stiftholen stiftcolor = stift1.Caption 'Farbname wird eingelesen Form2.Label4.Caption = stiftcolor 'Farbname wird angezeigt End Sub Public Sub stift2_Click() stiftcolor = stift2.Caption plotter = plotter & ";sp2;" & "vs" & vs2 Form2.Label4.Caption = stiftcolor End Sub Public Sub stift3_Click() plotter = plotter & ";sp3;" & "vs" & vs3 stiftcolor = stift3.Caption Form2.Label4.Caption = stiftcolor End Sub Public Sub stift4_Click() plotter = plotter & ";sp4;" & "vs" & vs4 stiftcolor = stift4.Caption Form2.Label4.Caption = stiftcolor End Sub Public Sub stift5_Click() plotter = plotter & ";sp5;" & "vs" & vs5 stiftcolor = stift5.Caption Form2.Label4.Caption = stiftcolor End Sub Public Sub stift6_Click() plotter = plotter & ";sp6;" & "vs" & vs6 stiftcolor = stift6.Caption Form2.Label4.Caption = stiftcolor End Sub Public Sub stift7_Click() plotter = plotter & ";sp7;" & "vs" & vs7 stiftcolor = stift7.Caption Form2.Label4.Caption = stiftcolor End Sub Public Sub stift8_Click() plotter = plotter & ";sp8;" & "vs" & vs8 stiftcolor = stift8.Caption Form2.Label4.Caption = stiftcolor End Sub Private Sub stiftbelegung_Click() Form3.Show End Sub Private Sub Timer1_Timer() If Form2.Label3.Caption = "A4" Or Form2.Label3.Caption = "A3" Then Form2.Check7.Visible = True 'Texteingabe im Querformat wird ermoglicht End If If Form2.Label3.Caption = "A4h" Or Form2.Label3.Caption = "A3h" Then Form2.Check7.Value = 0 Form2.Check7.Visible = False 'Texteingabe im Hochformat wird abgeschaltet End If If Form2.Label4.Caption = stift1.Caption And MDIForm1.Toolbar1.Buttons("stift1"). Value = tbrUnpressed Then stiftcolor = stift1.Caption Call malfarbe
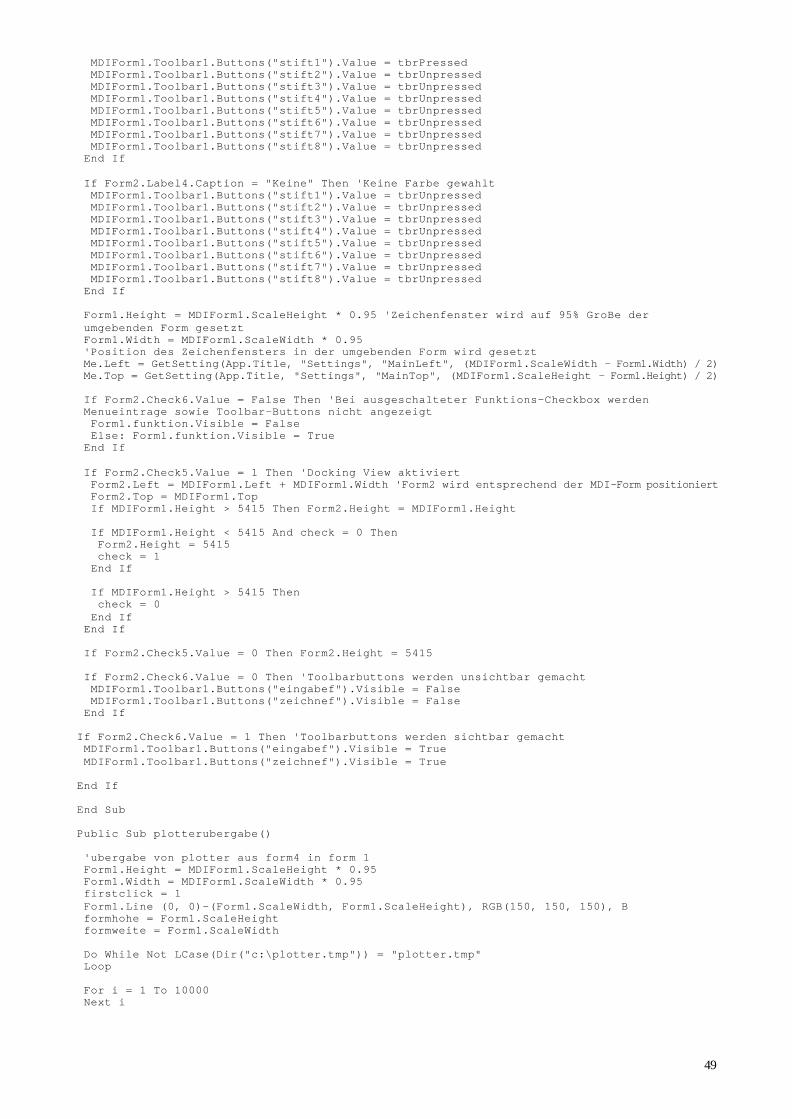
49
MDIForm1.Toolbar1.Buttons("stift1").Value = tbrPressed MDIForm1.Toolbar1.Buttons("stift2").Value = tbrUnpressed MDIForm1.Toolbar1.Buttons("stift3").Value = tbrUnpressed MDIForm1.Toolbar1.Buttons("stift4").Value = tbrUnpressed MDIForm1.Toolbar1.Buttons("stift5").Value = tbrUnpressed MDIForm1.Toolbar1.Buttons("stift6").Value = tbrUnpressed MDIForm1.Toolbar1.Buttons("stift7").Value = tbrUnpressed MDIForm1.Toolbar1.Buttons("stift8").Value = tbrUnpressed End If If Form2.Label4.Caption = "Keine" Then 'Keine Farbe gewahlt MDIForm1.Toolbar1.Buttons("stift1").Value = tbrUnpressed MDIForm1.Toolbar1.Buttons("stift2").Value = tbrUnpressed MDIForm1.Toolbar1.Buttons("stift3").Value = tbrUnpressed MDIForm1.Toolbar1.Buttons("stift4").Value = tbrUnpressed MDIForm1.Toolbar1.Buttons("stift5").Value = tbrUnpressed MDIForm1.Toolbar1.Buttons("stift6").Value = tbrUnpressed MDIForm1.Toolbar1.Buttons("stift7").Value = tbrUnpressed MDIForm1.Toolbar1.Buttons("stift8").Value = tbrUnpressed End If Form1.Height = MDIForm1.ScaleHeight * 0.95 'Zeichenfenster wird auf 95% GroBe der umgebenden Form gesetzt Form1.Width = MDIForm1.ScaleWidth * 0.95 'Position des Zeichenfensters in der umgebenden Form wird gesetzt Me.Left = GetSetting(App.Title, "Settings", "MainLeft", (MDIForm1.ScaleWidth - Form1.Width) / 2) Me.Top = GetSetting(App.Title, "Settings", "MainTop", (MDIForm1.ScaleHeight - Form1.Height) / 2) If Form2.Check6.Value = False Then 'Bei ausgeschalteter Funktions-Checkbox werden Menueintrage sowie Toolbar-Buttons nicht angezeigt Form1.funktion.Visible = False Else: Form1.funktion.Visible = True End If If Form2.Check5.Value = 1 Then 'Docking View aktiviert Form2.Left = MDIForm1.Left + MDIForm1.Width 'Form2 wird entsprechend der MDI-Form positioniert Form2.Top = MDIForm1.Top If MDIForm1.Height > 5415 Then Form2.Height = MDIForm1.Height If MDIForm1.Height < 5415 And check = 0 Then Form2.Height = 5415 check = 1 End If If MDIForm1.Height > 5415 Then check = 0 End If End If If Form2.Check5.Value = 0 Then Form2.Height = 5415 If Form2.Check6.Value = 0 Then 'Toolbarbuttons werden unsichtbar gemacht MDIForm1.Toolbar1.Buttons("eingabef").Visible = False MDIForm1.Toolbar1.Buttons("zeichnef").Visible = False End If If Form2.Check6.Value = 1 Then 'Toolbarbuttons werden sichtbar gemacht MDIForm1.Toolbar1.Buttons("eingabef").Visible = True MDIForm1.Toolbar1.Buttons("zeichnef").Visible = True End If End Sub Public Sub plotterubergabe() 'ubergabe von plotter aus form4 in form 1 Form1.Height = MDIForm1.ScaleHeight * 0.95 Form1.Width = MDIForm1.ScaleWidth * 0.95 firstclick = 1 Form1.Line (0, 0)-(Form1.ScaleWidth, Form1.ScaleHeight), RGB(150, 150, 150), B formhohe = Form1.ScaleHeight formweite = Form1.ScaleWidth Do While Not LCase(Dir("c:\plotter.tmp")) = "plotter.tmp" Loop For i = 1 To 10000 Next i

50
Open "c:\plotter.tmp" For Input As #1 Input #1, plotter1 Close #1 plotter = plotter & ";" & plotter1 Kill "c:\plotter.tmp" End Sub Public Sub papiera4q() 'Einstellungen fur A4-Querformat papier = "A4" Form2.Label3.Caption = papier Form1.Height = Screen.Height * 0.7 Form1.Width = Screen.Width * 0.7 Form1.Top = (Screen.Height - Form1.Height) / 2 Form1.Left = (Screen.Width - Form1.Width - Form2.Width) / 2 End Sub Public Sub papiera4h() 'Einstellungen fur A4-Hochformat papier = "A4h" Form2.Label3.Caption = papier Form1.Height = Screen.Height * 0.8 Form1.Width = Screen.Width * 0.5 Form1.Top = (Screen.Height - Form1.Height) / 2 Form1.Left = (Screen.Width - Form1.Width - Form2.Width) / 2 End Sub Public Sub papiera3q() 'Einstellungen fur A3-Querformat papier = "A3" Form2.Label3.Caption = papier Form1.Height = Screen.Height * 0.7 Form1.Width = Screen.Width * 0.7 Form1.Top = (Screen.Height - Form1.Height) / 2 Form1.Left = (Screen.Width - Form1.Width - Form2.Width) / 2 End Sub Public Sub papiera3h() 'Einstellungen fur A3-Hochformat papier = "A3h" Form2.Label3.Caption = papier Form1.Height = Screen.Height * 0.8 Form1.Width = Screen.Width * 0.5 Form1.Top = (Screen.Height - Form1.Height) / 2 Form1.Left = (Screen.Width - Form1.Width - Form2.Width) / 2 End Sub Private Sub Timer2_Timer() 'Preview-Funktion beim Zeichnen von Linie, Kreis und Rechteck If Form2.Check1.Value = 1 Then 'Kreis If loschen = 3 Then Circle (mx, my), Sqr((mx - lx1) ^ 2 + (my - ly1) ^ 2), RGB(Text4, Text5, Text6) GoTo ende End If If loschen = 0 Then Circle (mx, my), Sqr((mx - lx) ^ 2 + (my - ly) ^ 2), RGB(Text4, Text5, Text6) lx1 = lx ly1 = ly loschen = 1 GoTo ende End If If loschen = 1 Then Circle (mx, my), Sqr((mx - lx1) ^ 2 + (my - ly1) ^ 2), RGB(255, 255, 255) End If loschen = 0 End If If Form2.Check2.Value = 1 Then 'Rechteck If loschen = 3 Then Line (mx, my)-(lx1, ly1), RGB(Text4, Text5, Text6), B GoTo ende End If If loschen = 0 Then Line (mx, my)-(lx, ly), RGB(Text4, Text5, Text6), B lx1 = lx ly1 = ly loschen = 1
51
GoTo ende End If If loschen = 1 Then Line (mx, my)-(lx1, ly1), RGB(255, 255, 255), B End If loschen = 0 End If If Form2.Check4.Value = 1 Then 'Linie If loschen = 3 Then Line (mx, my)-(lx1, ly1), RGB(Text4, Text5, Text6) GoTo ende End If If loschen = 0 Then Line (mx, my)-(lx, ly), RGB(Text4, Text5, Text6) lx1 = lx ly1 = ly loschen = 1 GoTo ende End If If loschen = 1 Then Line (mx, my)-(lx1, ly1), RGB(255, 255, 255) End If loschen = 0 End If ende: End Sub Private Sub Toolbar1_ButtonClick(ByVal Button As Button) 'Prozeduraufruf entsprechend angeklicktem Toolbarbutton Select Case Button.Key Case Is = "stift1" Call stift1_Click Case Is = "stift2" Call stift2_Click Case Is = "stift3" Call stift3_Click Case Is = "stift4" Call stift4_Click Case Is = "stift5" Call stift5_Click Case Is = "stift6" Call stift6_Click Case Is = "stift7" Call stift7_Click Case Is = "stift8" Call stift8_Click End Select End Sub Public Sub malfarbe() 'Farbanteile werden gesetzt If stiftcolor = "cyan" Then Text4 = "0" Text5 = "150" Text6 = "255" End If If stiftcolor = "rosa" Then Text4 = "255" Text5 = "0" Text6 = "150" End If If stiftcolor = "schwarz" Then Text4 = "0" Text5 = "0" Text6 = "0" End If If stiftcolor = "rot" Then Text4 = "255" Text5 = "0" Text6 = "0" End If If stiftcolor = "grun" Then Text4 = "0" Text5 = "255"

52
Text6 = "0" End If If stiftcolor = "gelb" Then Text4 = "255" Text5 = "255" Text6 = "0" End If If stiftcolor = "blau" Then Text4 = "0" Text5 = "0" Text6 = "255" End If If stiftcolor = "violett" Then Text4 = "180" Text5 = "0" Text6 = "255" End If If stiftcolor = "braun" Then Text4 = "200" Text5 = "120" Text6 = "0" End If If stiftcolor = "orange" Then Text4 = "255" Text5 = "200" Text6 = "0" End If End Sub Public Sub init_toolbar() 'Toolbar wird initialisiert Open "stift.ini" For Input As #1 Input #1, stiftfarbe, v Form1.stift1.Caption = stiftfarbe vs1 = v stiftcolor = stiftfarbe Call malfarbe Form7.BackColor = RGB(Text4, Text5, Text6) Call Form7.s1 Input #1, stiftfarbe, v Form1.stift2.Caption = stiftfarbe vs2 = v stiftcolor = stiftfarbe Call malfarbe Form7.BackColor = RGB(Text4, Text5, Text6) Call Form7.s2 Input #1, stiftfarbe, v Form1.stift3.Caption = stiftfarbe vs3 = v stiftcolor = stiftfarbe Call malfarbe Form7.BackColor = RGB(Text4, Text5, Text6) Call Form7.s3 Input #1, stiftfarbe, v Form1.stift4.Caption = stiftfarbe vs4 = v stiftcolor = stiftfarbe Call malfarbe Form7.BackColor = RGB(Text4, Text5, Text6) Call Form7.s4 Input #1, stiftfarbe, v Form1.stift5.Caption = stiftfarbe vs5 = v stiftcolor = stiftfarbe Call malfarbe Form7.BackColor = RGB(Text4, Text5, Text6) Call Form7.s5 Input #1, stiftfarbe, v Form1.stift6.Caption = stiftfarbe
53
vs6 = v stiftcolor = stiftfarbe Call malfarbe Form7.BackColor = RGB(Text4, Text5, Text6) Call Form7.s6 Input #1, stiftfarbe, v Form1.stift7.Caption = stiftfarbe vs7 = v stiftcolor = stiftfarbe Call malfarbe Form7.BackColor = RGB(Text4, Text5, Text6) Call Form7.s7 Input #1, stiftfarbe, v Form1.stift8.Caption = stiftfarbe vs8 = v stiftcolor = stiftfarbe Call malfarbe Form7.BackColor = RGB(Text4, Text5, Text6) Call Form7.s8 Close #1 Dim imgX As ListImage 'Bilder in Abbildungsliste-Steuerelement laden. Set imgX = ImageList1.ListImages. _ Add(, "stift1", LoadPicture("s1.bmp")) ' 1 Set imgX = ImageList1.ListImages. _ Add(, "stift2", LoadPicture("s2.bmp")) ' 2 Set imgX = ImageList1.ListImages. _ Add(, "stift3", LoadPicture("s3.bmp")) ' 3 Set imgX = ImageList1.ListImages. _ Add(, "stift4", LoadPicture("s4.bmp")) ' 4 Set imgX = ImageList1.ListImages. _ Add(, "stift5", LoadPicture("s5.bmp")) ' 5 Set imgX = ImageList1.ListImages. _ Add(, "stift6", LoadPicture("s6.bmp")) ' 6 Set imgX = ImageList1.ListImages. _ Add(, "stift7", LoadPicture("s7.bmp")) ' 7 Set imgX = ImageList1.ListImages. _ Add(, "stift8", LoadPicture("s8.bmp")) ' 8 MDIForm1.Toolbar1.ImageList = ImageList1 Set imgX = ImageList1.ListImages. _ Add(, "plott", LoadPicture("print.bmp")) ' Druckknopf MDIForm1.Toolbar1.ImageList = ImageList1 Set imgX = ImageList1.ListImages. _ Add(, "eingabef", LoadPicture("feing.bmp")) ' F(x)-Bild MDIForm1.Toolbar1.ImageList = ImageList1 Set imgX = ImageList1.ListImages. _ Add(, "zeichnef", LoadPicture("funkti.bmp")) ' Wertetabelle MDIForm1.Toolbar1.ImageList = ImageList1 Set imgX = ImageList1.ListImages. _ Add(, "open", LoadPicture("open.bmp")) ' offnen MDIForm1.Toolbar1.ImageList = ImageList1 Set imgX = ImageList1.ListImages. _ Add(, "neu", LoadPicture("neu.bmp")) ' neues Projekt MDIForm1.Toolbar1.ImageList = ImageList1 Set imgX = ImageList1.ListImages. _ Add(, "save", LoadPicture("save.bmp")) ' speichern MDIForm1.Toolbar1.ImageList = ImageList1 Dim btnX As Button ' Button-Objekte zu Buttons-Auflistung mit Hilfe der ' Add-Methode hinzufugen. Nach dem Erstellen der einzelnen ' Schaltflachen Description- und ToolTipText-Eigenschaften setzen. Set btnX = MDIForm1.Toolbar1.Buttons.Add(, "stift1", , tbrDefault, "stift1") btnX.ToolTipText = stift1.Caption btnX.Description = btnX.ToolTipText Set btnX = MDIForm1.Toolbar1.Buttons.Add(, "stift2", , tbrDefault, "stift2") btnX.ToolTipText = stift2.Caption btnX.Description = btnX.ToolTipText Set btnX = MDIForm1.Toolbar1.Buttons.Add(, "stift3", , tbrCheckGroup, "stift3") btnX.ToolTipText = stift3.Caption btnX.Description = btnX.ToolTipText Set btnX = MDIForm1.Toolbar1.Buttons.Add(, "stift4", , tbrCheckGroup, "stift4")
54
btnX.ToolTipText = stift4.Caption btnX.Description = btnX.ToolTipText Set btnX = MDIForm1.Toolbar1.Buttons.Add(, "stift5", , tbrCheckGroup, "stift5") btnX.ToolTipText = stift5.Caption btnX.Description = btnX.ToolTipText Set btnX = MDIForm1.Toolbar1.Buttons.Add(, "stift6", , tbrGroup, "stift6") btnX.ToolTipText = stift6.Caption btnX.Description = btnX.ToolTipText Set btnX = MDIForm1.Toolbar1.Buttons.Add(, "stift7", , tbrGroup, "stift7") btnX.ToolTipText = stift7.Caption Set btnX = MDIForm1.Toolbar1.Buttons.Add(, "stift8", , tbrGroup, "stift8") btnX.ToolTipText = stift8.Caption Set btnX = MDIForm1.Toolbar1.Buttons.Add(, , , tbrSeparator) Set btnX = MDIForm1.Toolbar1.Buttons.Add(, "neu", , tbrGroup, "neu") btnX.ToolTipText = "neues Projekt" Set btnX = MDIForm1.Toolbar1.Buttons.Add(, "open", , tbrGroup, "open") btnX.ToolTipText = "Projekt offnen" Set btnX = MDIForm1.Toolbar1.Buttons.Add(, "save", , tbrGroup, "save") btnX.ToolTipText = "Projekt speichern" Set btnX = MDIForm1.Toolbar1.Buttons.Add(, "plott", , tbrGroup, "plott") btnX.ToolTipText = "plotten" Set btnX = MDIForm1.Toolbar1.Buttons.Add(, , , tbrSeparator) Set btnX = MDIForm1.Toolbar1.Buttons.Add(, "zeichnef", , tbrGroup, "zeichnef") btnX.ToolTipText = "Funktion zeichnen" Set btnX = MDIForm1.Toolbar1.Buttons.Add(, "eingabef", , tbrGroup, "eingabef") btnX.ToolTipText = "Funktion eingeben" btnX.Description = btnX.ToolTipText Form2.Label4.Caption = stift1.Caption End Sub Public Sub werte_Click() 'Erstellung der HTML-Seite aral = Shell("wb.exe") 'Aufruf von WinBatch zum automatischen Wegklicken von Warnungen If LCase(Dir("c:\~werte.htm")) = "~werte.htm" Then Kill ("c:\~werte.htm") If eingabe_funktion = "" Then eingabe_funktion = "y=x*x" k = (Form5.Text3) l = (Form5.Text4) Open "c:\~werte.htm" For Output As #1 'in HTML-Seite werden Werte berechnet und auf Platte gespeichert funkti = eingabe_funktion g = Form5.Text5 Print #1, "<html>" Print #1, "<script language=" & """" & "javascript" & """" & ">" Print #1, "var x" Print #1, "var y" Print #1, "var a" Print #1, "x=" & k Print #1, "a=" & """" & """" Print #1, "while(x <=" & l & ")" Print #1, "{" Print #1, funkti Print #1, "x=x+" & g Print #1, "a= a + y + " & """" & ":" & """" & "}" Print #1, "</script>" Print #1, "<script language=" & """" & "vbscript" & """" & ">" Print #1, "a=" & """" & """" & """" & """" & " & a & " & """" & """" & """" & """" Print #1, "set fs = CreateObject(" & """" & "Scripting.FileSystemObject" & """" & ")" Print #1, "set datei = fs.CreateTextFile(" & """" & "c:\~werte.tmp" & """" & ",True)" Print #1, "datei.WriteLine(a)" Print #1, "datei.Close" Print #1, "</script>" Print #1, "</html>" Close #1 Do While Not LCase(Dir("c:\~werte.htm")) = "~werte.htm" Loop WebBrowser1.Navigate ("c:\~werte.htm") 'erstellte Seite wird im Hintergrund ausgefuhrt End Sub Eigenschaften der visuell erstellten Objekte in Form1 Object = "{6B7E6392-850A-101B-AFC0-4210102A8DA7}#1.3#0"; "COMCTL32.OCX" Object = "{EAB22AC0-30C1-11CF-A7EB-0000C05BAE0B}#1.1#0"; "SHDOCVW.DLL" Begin VB.Form Form1 BackColor = &H00FFFFFF& BorderStyle = 0 'Kein

55
Caption = "Plotterprogramm" ClientHeight = 3810 ClientLeft = 2040 ClientTop = 615 ClientWidth = 6270 BeginProperty Font Name = "MS Sans Serif" Size = 18 Charset = 0 Weight = 400 Underline = 0 'False Italic = 0 'False Strikethrough = 0 'False EndProperty ForeColor = &H00000000& Icon = (Symbol) LinkTopic = "Form1" MDIChild = -1 'True PaletteMode = 1 'ZReihenfolge ScaleHeight = 3810 ScaleWidth = 6270 ShowInTaskbar = 0 'False Visible = 0 'False Begin SHDocVwCtl.WebBrowser WebBrowser1 Height = 375 Left = 2640 TabIndex = 1 Top = 2.45745e5 Width = 1335 ExtentX = 2355 ExtentY = 661 ViewMode = 1 Offline = 0 Silent = 0 RegisterAsBrowser= 0 RegisterAsDropTarget= 1 AutoArrange = -1 'True NoClientEdge = 0 'False AlignLeft = 0 'False ViewID = "{0057D0E0-3573-11CF-AE69-08002B2E1262}" Location = "" End Begin VB.Timer Timer2 Left = 1800 Top = 960 End Begin VB.Timer Timer1 Left = 720 Top = 960 End Begin ComctlLib.ProgressBar ProgressBar1 Height = 135 Left = 360 TabIndex = 0 Top = 1920 Visible = 0 'False Width = 4575 _ExtentX = 8070 _ExtentY = 238 _Version = 327682 Appearance = 1 End Begin ComctlLib.ImageList ImageList2 Left = 1440 Top = 2640 _ExtentX = 1005 _ExtentY = 1005 BackColor = -2147483643 MaskColor = 12632256 _Version = 327682 End Begin ComctlLib.ImageList ImageList1 Left = 600 Top = 2520 _ExtentX = 1005 _ExtentY = 1005 BackColor = -2147483643 MaskColor = 12632256 _Version = 327682 End Begin VB.Menu stift Caption = "Stiftauswahl"
56
Begin VB.Menu n Caption = "" Visible = 0 'False End Begin VB.Menu keiner Caption = "Keiner" End Begin VB.Menu stift1 Caption = "Stift 1" End Begin VB.Menu stift2 Caption = "Stift 2" End Begin VB.Menu stift3 Caption = "Stift 3" End Begin VB.Menu stift4 Caption = "Stift 4" End Begin VB.Menu stift5 Caption = "Stift 5" End Begin VB.Menu stift6 Caption = "Stift 6" End Begin VB.Menu stift7 Caption = "Stift 7" End Begin VB.Menu stift8 Caption = "Stift 8" End End Begin VB.Menu sitzung Caption = "Projekt" Begin VB.Menu neu Caption = "neu" End Begin VB.Menu laden Caption = "laden " End Begin VB.Menu speichern Caption = "speichern" End Begin VB.Menu drucken Caption = "Plotten" End Begin VB.Menu beenden Caption = "beenden" End End Begin VB.Menu optionen Caption = "Einstellungen" Begin VB.Menu anschl Caption = "Anschluss" End Begin VB.Menu stiftbelegung Caption = "Stiftbelegung" End Begin VB.Menu papierformat Caption = "Papierformat" Begin VB.Menu A4 Caption = "A4(Querformat)" End Begin VB.Menu A4h Caption = "A4 (Hochformat)" End Begin VB.Menu a3 Caption = "A3 (Querformat)" End Begin VB.Menu a3h Caption = "A3 (Hochformat)" End End End Begin VB.Menu funktion Caption = "Funktionsplotter" Begin VB.Menu feingabe Caption = "Funktionseingabe" End Begin VB.Menu werte Caption = "Wertetabelle erstellen" End
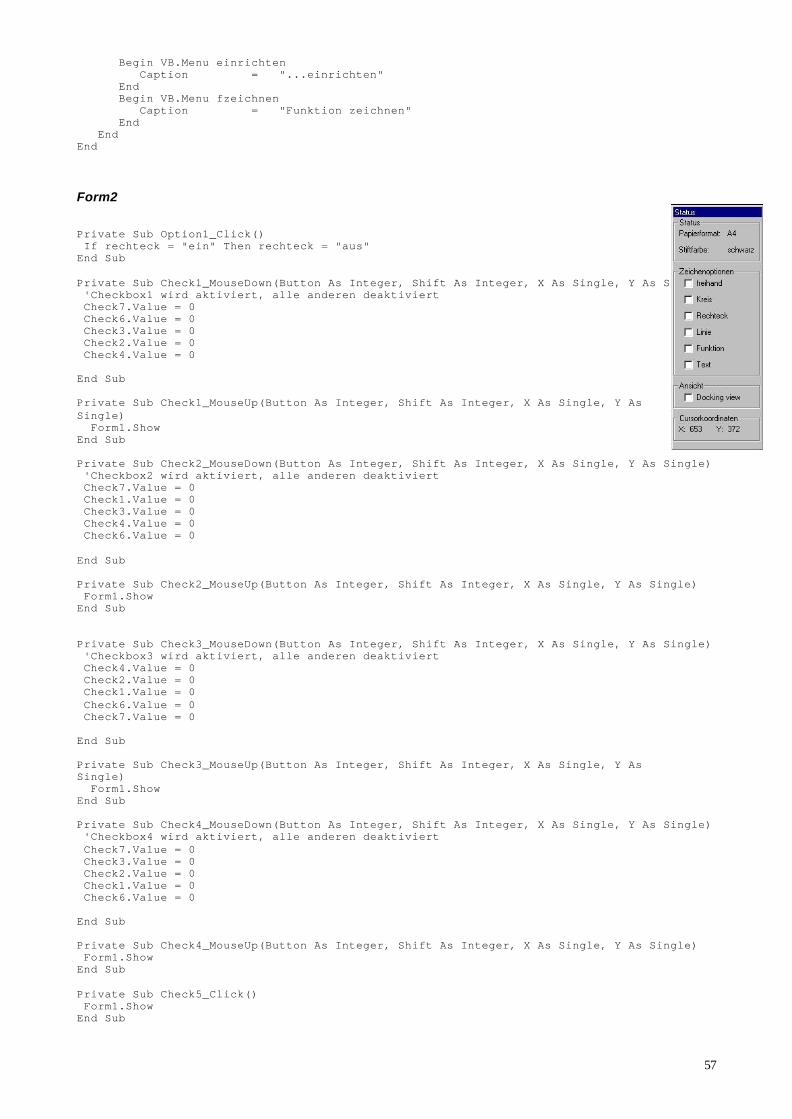
57
Begin VB.Menu einrichten Caption = "...einrichten" End Begin VB.Menu fzeichnen Caption = "Funktion zeichnen" End End End Form2 Private Sub Option1_Click() If rechteck = "ein" Then rechteck = "aus" End Sub Private Sub Check1_MouseDown(Button As Integer, Shift As Integer, X As Single, Y As Single) 'Checkbox1 wird aktiviert, alle anderen deaktiviert Check7.Value = 0 Check6.Value = 0 Check3.Value = 0 Check2.Value = 0 Check4.Value = 0 End Sub Private Sub Check1_MouseUp(Button As Integer, Shift As Integer, X As Single, Y As Single) Form1.Show End Sub Private Sub Check2_MouseDown(Button As Integer, Shift As Integer, X As Single, Y As Single) 'Checkbox2 wird aktiviert, alle anderen deaktiviert Check7.Value = 0 Check1.Value = 0 Check3.Value = 0 Check4.Value = 0 Check6.Value = 0 End Sub Private Sub Check2_MouseUp(Button As Integer, Shift As Integer, X As Single, Y As Single) Form1.Show End Sub Private Sub Check3_MouseDown(Button As Integer, Shift As Integer, X As Single, Y As Single) 'Checkbox3 wird aktiviert, alle anderen deaktiviert Check4.Value = 0 Check2.Value = 0 Check1.Value = 0 Check6.Value = 0 Check7.Value = 0 End Sub Private Sub Check3_MouseUp(Button As Integer, Shift As Integer, X As Single, Y As Single) Form1.Show End Sub Private Sub Check4_MouseDown(Button As Integer, Shift As Integer, X As Single, Y As Single) 'Checkbox4 wird aktiviert, alle anderen deaktiviert Check7.Value = 0 Check3.Value = 0 Check2.Value = 0 Check1.Value = 0 Check6.Value = 0 End Sub Private Sub Check4_MouseUp(Button As Integer, Shift As Integer, X As Single, Y As Single) Form1.Show End Sub Private Sub Check5_Click() Form1.Show End Sub
58
Private Sub check6_MouseDown(Button As Integer, Shift As Integer, X As Single, Y A s Single) 'Checkbox6 wird aktiviert, alle anderen deaktiviert Check7.Value = 0 Check3.Value = 0 Check2.Value = 0 Check1.Value = 0 Check4.Value = 0 End Sub Private Sub check6_MouseUp(Button As Integer, Shift As Integer, X As Single, Y As Single) Form1.Show End Sub Private Sub Check7_MouseDown(Button As Integer, Shift As Integer, X As Single, Y As Single) 'Checkbox7 wird aktiviert, alle anderen deaktiviert Check6.Value = 0 Check3.Value = 0 Check2.Value = 0 Check1.Value = 0 Check4.Value = 0 End Sub Private Sub Check7_MouseUp(Button As Integer, Shift As Integer, X As Single, Y As Single) Form1.Show End Sub Private Sub Form_Click() Form1.Show End Sub Private Sub Form_DblClick() Form1.Show End Sub Private Sub Frame1_MouseDown(Button As Integer, Shift As Integer, X As Single, Y As Single) Form1.Show End Sub Private Sub Frame1_MouseUp(Button As Integer, Shift As Integer, X As Single, Y As Single) Form1.Show End Sub Private Sub Frame2_MouseDown(Button As Integer, Shift As Integer, X As Single, Y As Single) Form1.Show End Sub Private Sub Frame2_MouseUp(Button As Integer, Shift As Integer, X As Single, Y As Single) Form1.Show End Sub Private Sub Frame3_MouseDown(Button As Integer, Shift As Integer, X As Single, Y As Single) Form1.Show End Sub Private Sub Frame3_MouseUp(Button As Integer, Shift As Integer, X As Single, Y As Single) Form1.Show End Sub Private Sub Label1_Click() Form1.Show End Sub Private Sub Label1_DblClick() Form1.Show End Sub Private Sub Label2_Click() Form1.Show End Sub Private Sub Label2_DblClick() Form1.Show End Sub Private Sub Label3_Click() Form1.Show End Sub

59
Private Sub label3_DblClick() Form1.Show End Sub Private Sub Label4_Click() Form1.Show End Sub Private Sub Label4_DblClick() Form1.Show End Sub Private Sub Label5_Click() Form1.Show End Sub Private Sub Label5_DblClick() Form1.Show End Sub Eigenschaften der visuell erstellten Objekte in Form2 Begin VB.Form Form2 AutoRedraw = -1 'True BorderStyle = 4 'Festes Werkzeugfenster Caption = "Status" ClientHeight = 5010 ClientLeft = 8595 ClientTop = 2550 ClientWidth = 1965 ControlBox = 0 'False LinkTopic = "Form2" MaxButton = 0 'False MinButton = 0 'False PaletteMode = 1 'ZReihenfolge ScaleHeight = 5010 ScaleWidth = 1965 ShowInTaskbar = 0 'False WhatsThisHelp = -1 'True Begin VB.Frame Frame4 Caption = "Cursorkoordinaten" Height = 615 Left = 0 TabIndex = 13 Top = 4320 Width = 1935 Begin VB.Label Label9 Height = 255 Left = 1200 TabIndex = 17 Top = 240 Width = 615 End Begin VB.Label Label8 Caption = "Y:" Height = 255 Left = 960 TabIndex = 16 Top = 240 Width = 255 End Begin VB.Label Label7 Height = 255 Left = 360 TabIndex = 15 Top = 240 Width = 615 End Begin VB.Label Label6 Caption = "X:" Height = 255 Left = 120 TabIndex = 14 Top = 240 Width = 135 End End Begin VB.Frame Frame2 Caption = "Zeichenoptionen" Height = 2415 Left = 0
60
TabIndex = 6 Top = 1080 Width = 1935 Begin VB.CheckBox Check7 Caption = "Text" Height = 255 Left = 240 TabIndex = 18 Top = 2040 Width = 1215 End Begin VB.CheckBox Check1 Caption = "Kreis" Height = 255 Left = 240 TabIndex = 11 Top = 600 Width = 1575 End Begin VB.CheckBox Check2 Caption = "Rechteck" Height = 255 Left = 240 TabIndex = 10 Top = 960 Width = 1575 End Begin VB.CheckBox Check3 Caption = "freihand" Height = 255 Left = 240 TabIndex = 9 Top = 240 Width = 1575 End Begin VB.CheckBox Check4 Caption = "Linie" Height = 255 Left = 240 TabIndex = 8 Top = 1320 Width = 1575 End Begin VB.CheckBox Check6 Caption = "Funktion" Height = 255 Left = 240 TabIndex = 7 Top = 1680 Width = 1575 End End Begin VB.Frame Frame1 Caption = "Status" Height = 975 Left = 0 TabIndex = 1 Top = 0 Width = 1935 Begin VB.Label Label1 Caption = "Papierformat:" Height = 255 Left = 120 TabIndex = 5 Top = 240 Width = 975 End Begin VB.Label Label2 Caption = "Stiftfarbe:" Height = 255 Left = 120 TabIndex = 4 Top = 600 Width = 855 End Begin VB.Label Label3 Caption = "Label3" Height = 255 Left = 1200 TabIndex = 3
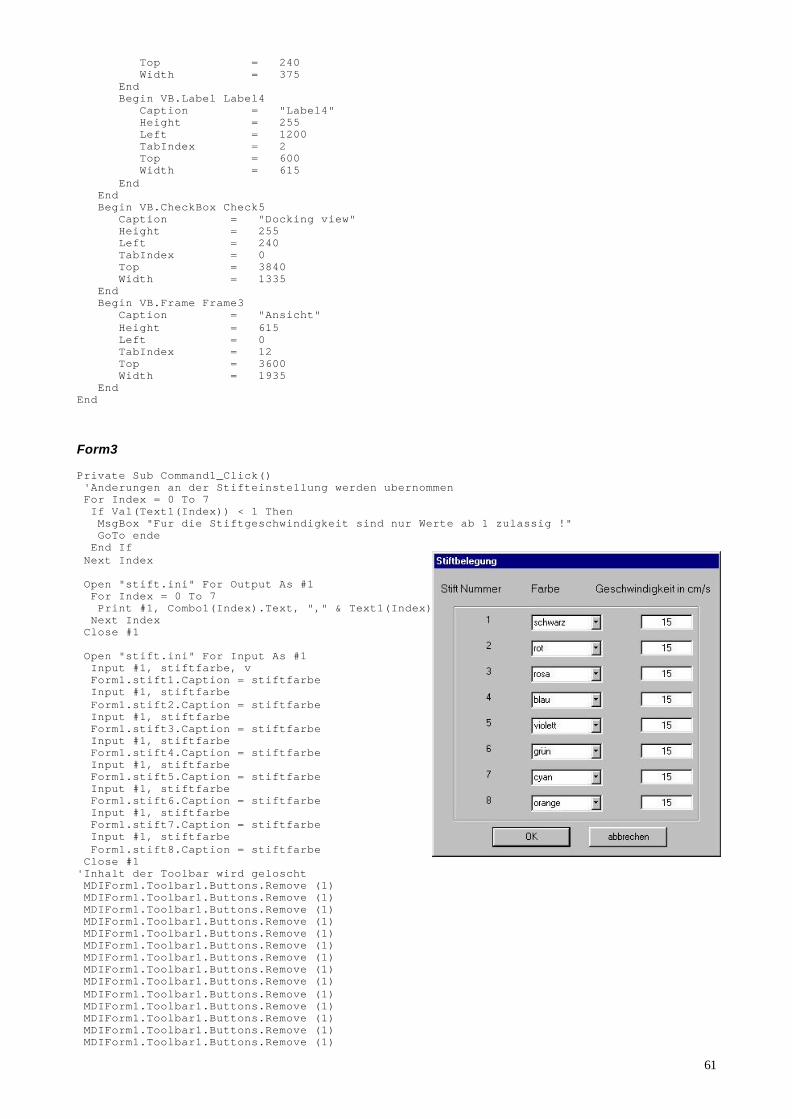
61
Top = 240 Width = 375 End Begin VB.Label Label4 Caption = "Label4" Height = 255 Left = 1200 TabIndex = 2 Top = 600 Width = 615 End End Begin VB.CheckBox Check5 Caption = "Docking view" Height = 255 Left = 240 TabIndex = 0 Top = 3840 Width = 1335 End Begin VB.Frame Frame3 Caption = "Ansicht" Height = 615 Left = 0 TabIndex = 12 Top = 3600 Width = 1935 End End Form3 Private Sub Command1_Click() 'Anderungen an der Stifteinstellung werden ubernommen For Index = 0 To 7 If Val(Text1(Index)) < 1 Then MsgBox "Fur die Stiftgeschwindigkeit sind nur Werte ab 1 zulassig !" GoTo ende End If Next Index Open "stift.ini" For Output As #1 For Index = 0 To 7 Print #1, Combo1(Index).Text, "," & Text1(Index) Next Index Close #1 Open "stift.ini" For Input As #1 Input #1, stiftfarbe, v Form1.stift1.Caption = stiftfarbe Input #1, stiftfarbe Form1.stift2.Caption = stiftfarbe Input #1, stiftfarbe Form1.stift3.Caption = stiftfarbe Input #1, stiftfarbe Form1.stift4.Caption = stiftfarbe Input #1, stiftfarbe Form1.stift5.Caption = stiftfarbe Input #1, stiftfarbe Form1.stift6.Caption = stiftfarbe Input #1, stiftfarbe Form1.stift7.Caption = stiftfarbe Input #1, stiftfarbe Form1.stift8.Caption = stiftfarbe Close #1 'Inhalt der Toolbar wird geloscht MDIForm1.Toolbar1.Buttons.Remove (1) MDIForm1.Toolbar1.Buttons.Remove (1) MDIForm1.Toolbar1.Buttons.Remove (1) MDIForm1.Toolbar1.Buttons.Remove (1) MDIForm1.Toolbar1.Buttons.Remove (1) MDIForm1.Toolbar1.Buttons.Remove (1) MDIForm1.Toolbar1.Buttons.Remove (1) MDIForm1.Toolbar1.Buttons.Remove (1) MDIForm1.Toolbar1.Buttons.Remove (1) MDIForm1.Toolbar1.Buttons.Remove (1) MDIForm1.Toolbar1.Buttons.Remove (1) MDIForm1.Toolbar1.Buttons.Remove (1) MDIForm1.Toolbar1.Buttons.Remove (1) MDIForm1.Toolbar1.Buttons.Remove (1)

62
MDIForm1.Toolbar1.Buttons.Remove (1) MDIForm1.Toolbar1.Buttons.Remove (1) Form1.ImageList2.ListImages.Clear Dim imgX As ListImage ' Bilder in Abbildungsliste-Steuerelement laden. Set imgX = Form1.ImageList2.ListImages. _ Add(, "stift1", LoadPicture("s1.bmp")) ' 1 MDIForm1.Toolbar1.ImageList = Form1.ImageList2 Form1.ImageList1.ListImages.Clear Call Form1.init_toolbar 'Toolbar wird neu erstellt Form2.Show MDIForm1.Show MDIForm1.Enabled = True Form2.Enabled = True Unload Form3 ende: End Sub Private Sub Command2_Click() 'Abbrechen-Button MDIForm1.Enabled = True Form2.Enabled = True Unload Form3 End Sub Private Sub Form_Load() Form3.Left = (Screen.Width - Form3.Width) / 2 Form3.Top = (Screen.Height - Form3.Height) / 2 MDIForm1.Enabled = False Form2.Enabled = False On Error GoTo fehler For i = 0 To 7 Combo1(i).AddItem "schwarz" Combo1(i).AddItem "rot" Combo1(i).AddItem "grun" Combo1(i).AddItem "gelb" Combo1(i).AddItem "blau" Combo1(i).AddItem "violett" Combo1(i).AddItem "braun" Combo1(i).AddItem "orange" Combo1(i).AddItem "cyan" Combo1(i).AddItem "rosa" Next i Open "stift.ini" For Input As #1 For i = 0 To 7 If Not EOF(1) Then Input #1, combo, geschwindigkeit Combo1(i).Text = combo Text1(i) = geschwindigkeit Next i Close #1 GoTo ende: fehler: Select Case Err.Number Case 53 m = MsgBox("Es sind keine Einstellungen vorhanden. Bitte stellen sie die Farben gemaB dem Plotter ein !") End Select ende: End Sub Eigenschaften der visuell erstellten Objekte in Form3 Begin VB.Form Form3 BorderStyle = 3 'Fester Dialog Caption = "Stiftbelegung" ClientHeight = 5310 ClientLeft = 4665 ClientTop = 2310 ClientWidth = 5295 ControlBox = 0 'False

63
Icon = (Symbol) LinkTopic = "Form3" MaxButton = 0 'False MinButton = 0 'False PaletteMode = 1 'ZReihenfolge ScaleHeight = 5310 ScaleWidth = 5295 ShowInTaskbar = 0 'False Begin VB.Frame Frame1 Height = 4095 Left = 360 TabIndex = 5 Top = 600 Width = 4575 Begin VB.ComboBox Combo1 Height = 315 Index = 0 Left = 1440 TabIndex = 21 Text = "schwarz" Top = 240 Width = 1335 End Begin VB.ComboBox Combo1 Height = 315 Index = 1 Left = 1440 TabIndex = 20 Text = "schwarz" Top = 720 Width = 1335 End Begin VB.ComboBox Combo1 Height = 315 Index = 2 Left = 1440 TabIndex = 19 Text = "schwarz" Top = 1200 Width = 1335 End Begin VB.ComboBox Combo1 Height = 315 Index = 3 Left = 1440 TabIndex = 18 Text = "schwarz" Top = 1680 Width = 1335 End Begin VB.ComboBox Combo1 Height = 315 Index = 4 Left = 1440 TabIndex = 17 Text = "schwarz" Top = 2160 Width = 1335 End Begin VB.ComboBox Combo1 Height = 315 Index = 5 Left = 1440 TabIndex = 16 Text = "schwarz" Top = 2640 Width = 1335 End Begin VB.ComboBox Combo1 Height = 315 Index = 6 Left = 1440 TabIndex = 15 Text = "schwarz" Top = 3120 Width = 1335 End Begin VB.ComboBox Combo1 Height = 315 Index = 7 Left = 1440 TabIndex = 14
64
Text = "schwarz" Top = 3600 Width = 1335 End Begin VB.TextBox Text1 Alignment = 2 'Zentriert Height = 285 Index = 0 Left = 3480 TabIndex = 13 Text = "32" Top = 240 Width = 975 End Begin VB.TextBox Text1 Alignment = 2 'Zentriert Height = 285 Index = 1 Left = 3480 TabIndex = 12 Text = "32" Top = 720 Width = 975 End Begin VB.TextBox Text1 Alignment = 2 'Zentriert Height = 285 Index = 2 Left = 3480 TabIndex = 11 Text = "32" Top = 1200 Width = 975 End Begin VB.TextBox Text1 Alignment = 2 'Zentriert Height = 285 Index = 3 Left = 3480 TabIndex = 10 Text = "32" Top = 1680 Width = 975 End Begin VB.TextBox Text1 Alignment = 2 'Zentriert Height = 285 Index = 4 Left = 3480 TabIndex = 9 Text = "32" Top = 2160 Width = 975 End Begin VB.TextBox Text1 Alignment = 2 'Zentriert Height = 285 Index = 5 Left = 3480 TabIndex = 8 Text = "32" Top = 2640 Width = 975 End Begin VB.TextBox Text1 Alignment = 2 'Zentriert Height = 285 Index = 6 Left = 3480 TabIndex = 7 Text = "32" Top = 3120 Width = 975 End Begin VB.TextBox Text1 Alignment = 2 'Zentriert Height = 285 Index = 7 Left = 3480 TabIndex = 6 Text = "32" Top = 3600

65
Width = 975 End Begin VB.Label Label3 Caption = "1" Height = 255 Left = 600 TabIndex = 29 Top = 240 Width = 615 End Begin VB.Label Label4 Caption = "2" Height = 255 Left = 600 TabIndex = 28 Top = 720 Width = 615 End Begin VB.Label Label5 Caption = "3" Height = 255 Left = 600 TabIndex = 27 Top = 1200 Width = 615 End Begin VB.Label Label6 Caption = "4" Height = 255 Left = 600 TabIndex = 26 Top = 1680 Width = 615 End Begin VB.Label Label7 Caption = "5" Height = 255 Left = 600 TabIndex = 25 Top = 2160 Width = 615 End Begin VB.Label Label8 Caption = "6" Height = 255 Left = 600 TabIndex = 24 Top = 2640 Width = 615 End Begin VB.Label Label9 Caption = "7" Height = 255 Left = 600 TabIndex = 23 Top = 3120 Width = 615 End Begin VB.Label Label10 Caption = "8" Height = 255 Left = 600 TabIndex = 22 Top = 3600 Width = 615 End End Begin VB.CommandButton Command2 Caption = "abbrechen" Height = 375 Left = 2880 TabIndex = 4 Top = 4800 Width = 1455 End Begin VB.CommandButton Command1 Caption = "OK" Height = 375 Left = 1080 TabIndex = 2 Top = 4800 Width = 1455

66
End Begin VB.Label Label11 Caption = "Geschwindigkeit in cm/s" BeginProperty Font Name = "MS Sans Serif" Size = 9.75 Charset = 0 Weight = 400 Underline = 0 'False Italic = 0 'False Strikethrough = 0 'False EndProperty Height = 255 Left = 3000 TabIndex = 3 Top = 240 Width = 2655 End Begin VB.Label Label2 Caption = "Farbe" BeginProperty Font Name = "MS Sans Serif" Size = 9.75 Charset = 0 Weight = 400 Underline = 0 'False Italic = 0 'False Strikethrough = 0 'False EndProperty Height = 375 Left = 1800 TabIndex = 1 Top = 240 Width = 735 End Begin VB.Label Label1 Caption = "Stift Nummer" BeginProperty Font Name = "MS Sans Serif" Size = 9.75 Charset = 0 Weight = 400 Underline = 0 'False Italic = 0 'False Strikethrough = 0 'False EndProperty Height = 375 Left = 120 TabIndex = 0 Top = 240 Width = 1455 End End Form4 'Variablendeklarationsteil Dim stiftcolor Dim vs1 Dim vs2 Dim vs3 Dim vs4 Dim vs5 Dim vs6 Dim vs7 Dim vs8 Dim Text4 Dim Text5 Dim Text6 Private Sub Command1_Click() 'Laden-Button On Error GoTo fehler Timer1.Enabled = False Kill "c:\pld.tmp" Kill "c:\tmp~.bmp" durchlauf = 0 plottertmp1 = "" anzeige = 0 fortschritt = 0
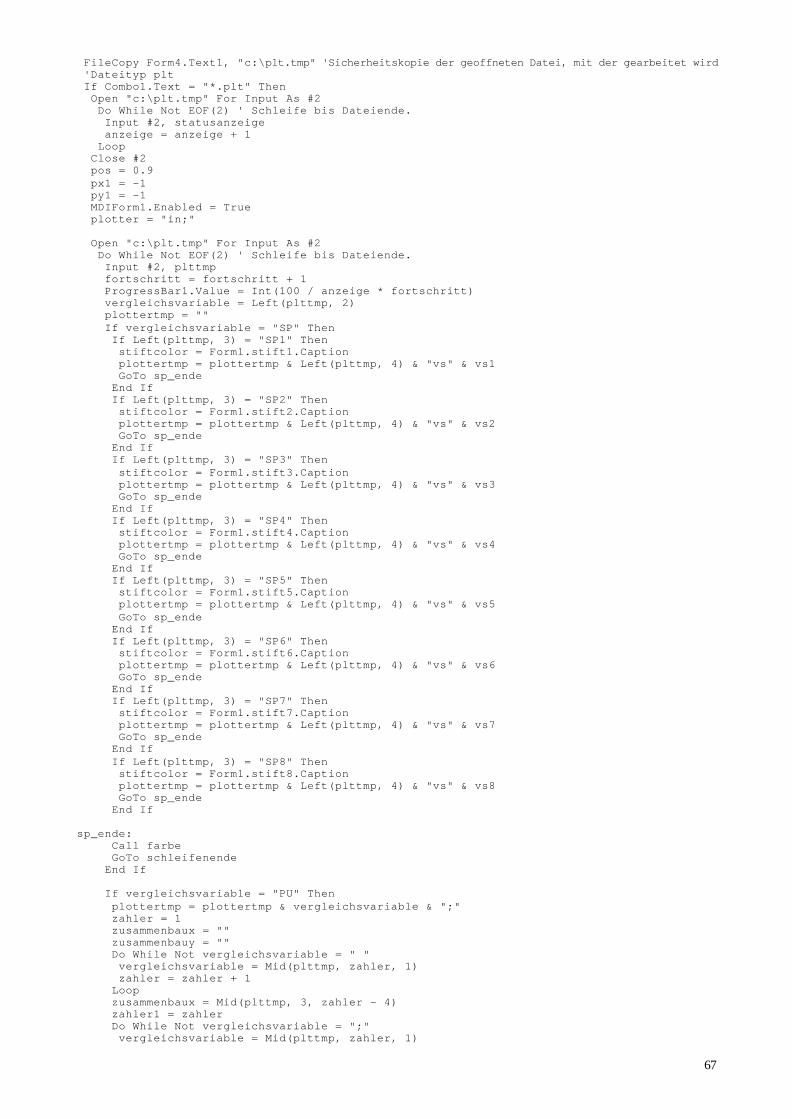
67
FileCopy Form4.Text1, "c:\plt.tmp" 'Sicherheitskopie der geoffneten Datei, mit der gearbeitet wird 'Dateityp plt If Combo1.Text = "*.plt" Then Open "c:\plt.tmp" For Input As #2 Do While Not EOF(2) ' Schleife bis Dateiende. Input #2, statusanzeige anzeige = anzeige + 1 Loop Close #2 pos = 0.9 px1 = -1 py1 = -1 MDIForm1.Enabled = True plotter = "in;" Open "c:\plt.tmp" For Input As #2 Do While Not EOF(2) ' Schleife bis Dateiende. Input #2, plttmp fortschritt = fortschritt + 1 ProgressBar1.Value = Int(100 / anzeige * fortschritt) vergleichsvariable = Left(plttmp, 2) plottertmp = "" If vergleichsvariable = "SP" Then If Left(plttmp, 3) = "SP1" Then stiftcolor = Form1.stift1.Caption plottertmp = plottertmp & Left(plttmp, 4) & "vs" & vs1 GoTo sp_ende End If If Left(plttmp, 3) = "SP2" Then stiftcolor = Form1.stift2.Caption plottertmp = plottertmp & Left(plttmp, 4) & "vs" & vs2 GoTo sp_ende End If If Left(plttmp, 3) = "SP3" Then stiftcolor = Form1.stift3.Caption plottertmp = plottertmp & Left(plttmp, 4) & "vs" & vs3 GoTo sp_ende End If If Left(plttmp, 3) = "SP4" Then stiftcolor = Form1.stift4.Caption plottertmp = plottertmp & Left(plttmp, 4) & "vs" & vs4 GoTo sp_ende End If If Left(plttmp, 3) = "SP5" Then stiftcolor = Form1.stift5.Caption plottertmp = plottertmp & Left(plttmp, 4) & "vs" & vs5 GoTo sp_ende End If If Left(plttmp, 3) = "SP6" Then stiftcolor = Form1.stift6.Caption plottertmp = plottertmp & Left(plttmp, 4) & "vs" & vs6 GoTo sp_ende End If If Left(plttmp, 3) = "SP7" Then stiftcolor = Form1.stift7.Caption plottertmp = plottertmp & Left(plttmp, 4) & "vs" & vs7 GoTo sp_ende End If If Left(plttmp, 3) = "SP8" Then stiftcolor = Form1.stift8.Caption plottertmp = plottertmp & Left(plttmp, 4) & "vs" & vs8 GoTo sp_ende End If sp_ende: Call farbe GoTo schleifenende End If If vergleichsvariable = "PU" Then plottertmp = plottertmp & vergleichsvariable & ";" zahler = 1 zusammenbaux = "" zusammenbauy = "" Do While Not vergleichsvariable = " " vergleichsvariable = Mid(plttmp, zahler, 1) zahler = zahler + 1 Loop zusammenbaux = Mid(plttmp, 3, zahler - 4) zahler1 = zahler Do While Not vergleichsvariable = ";" vergleichsvariable = Mid(plttmp, zahler, 1)
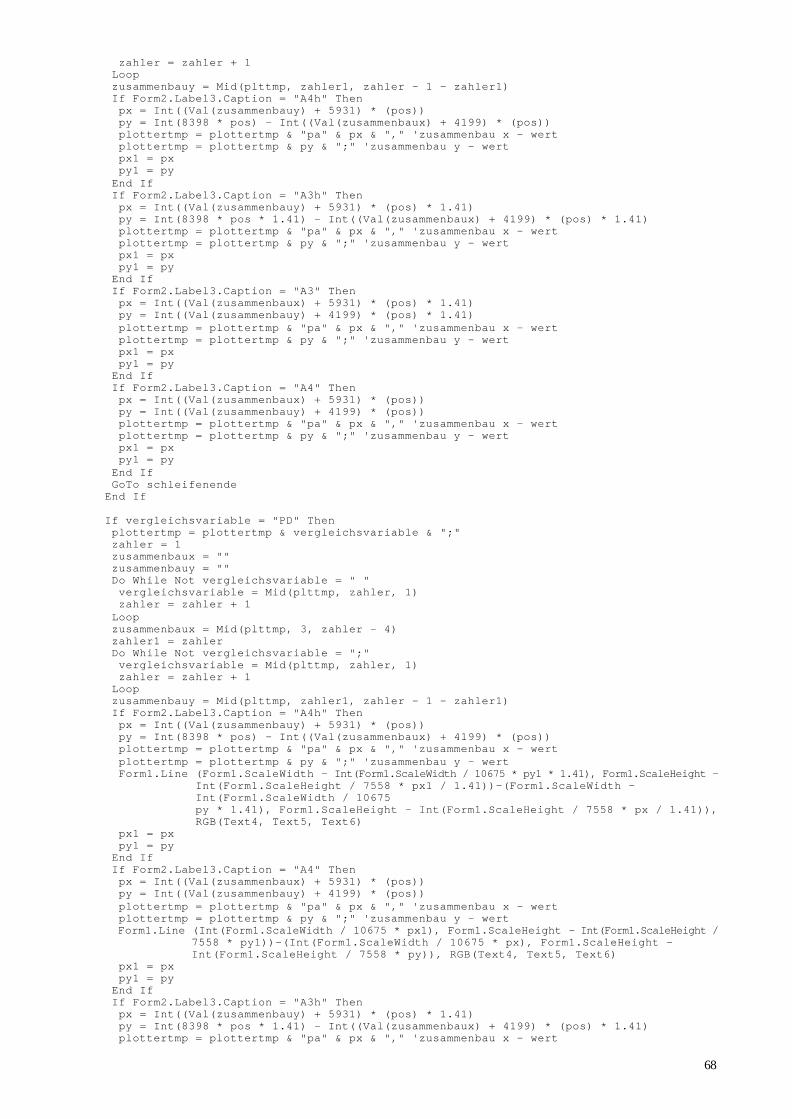
68
zahler = zahler + 1 Loop zusammenbauy = Mid(plttmp, zahler1, zahler - 1 - zahler1) If Form2.Label3.Caption = "A4h" Then px = Int((Val(zusammenbauy) + 5931) * (pos)) py = Int(8398 * pos) - Int((Val(zusammenbaux) + 4199) * (pos)) plottertmp = plottertmp & "pa" & px & "," 'zusammenbau x - wert plottertmp = plottertmp & py & ";" 'zusammenbau y - wert px1 = px py1 = py End If If Form2.Label3.Caption = "A3h" Then px = Int((Val(zusammenbauy) + 5931) * (pos) * 1.41) py = Int(8398 * pos * 1.41) - Int((Val(zusammenbaux) + 4199) * (pos) * 1.41) plottertmp = plottertmp & "pa" & px & "," 'zusammenbau x - wert plottertmp = plottertmp & py & ";" 'zusammenbau y - wert px1 = px py1 = py End If If Form2.Label3.Caption = "A3" Then px = Int((Val(zusammenbaux) + 5931) * (pos) * 1.41) py = Int((Val(zusammenbauy) + 4199) * (pos) * 1.41) plottertmp = plottertmp & "pa" & px & "," 'zusammenbau x - wert plottertmp = plottertmp & py & ";" 'zusammenbau y - wert px1 = px py1 = py End If If Form2.Label3.Caption = "A4" Then px = Int((Val(zusammenbaux) + 5931) * (pos)) py = Int((Val(zusammenbauy) + 4199) * (pos)) plottertmp = plottertmp & "pa" & px & "," 'zusammenbau x - wert plottertmp = plottertmp & py & ";" 'zusammenbau y - wert px1 = px py1 = py End If GoTo schleifenende End If If vergleichsvariable = "PD" Then plottertmp = plottertmp & vergleichsvariable & ";" zahler = 1 zusammenbaux = "" zusammenbauy = "" Do While Not vergleichsvariable = " " vergleichsvariable = Mid(plttmp, zahler, 1) zahler = zahler + 1 Loop zusammenbaux = Mid(plttmp, 3, zahler - 4) zahler1 = zahler Do While Not vergleichsvariable = ";" vergleichsvariable = Mid(plttmp, zahler, 1) zahler = zahler + 1 Loop zusammenbauy = Mid(plttmp, zahler1, zahler - 1 - zahler1) If Form2.Label3.Caption = "A4h" Then px = Int((Val(zusammenbauy) + 5931) * (pos)) py = Int(8398 * pos) - Int((Val(zusammenbaux) + 4199) * (pos)) plottertmp = plottertmp & "pa" & px & "," 'zusammenbau x - wert plottertmp = plottertmp & py & ";" 'zusammenbau y - wert Form1.Line (Form1.ScaleWidth - Int(Form1.ScaleWidth / 10675 * py1 * 1.41), Form1.ScaleHeight – Int(Form1.ScaleHeight / 7558 * px1 / 1.41))-(Form1.ScaleWidth - Int(Form1.ScaleWidth / 10675 py * 1.41), Form1.ScaleHeight - Int(Form1.ScaleHeight / 7558 * px / 1.41)), RGB(Text4, Text5, Text6) px1 = px py1 = py End If If Form2.Label3.Caption = "A4" Then px = Int((Val(zusammenbaux) + 5931) * (pos)) py = Int((Val(zusammenbauy) + 4199) * (pos)) plottertmp = plottertmp & "pa" & px & "," 'zusammenbau x - wert plottertmp = plottertmp & py & ";" 'zusammenbau y - wert Form1.Line (Int(Form1.ScaleWidth / 10675 * px1), Form1.ScaleHeight - Int(Form1.ScaleHeight /
7558 * py1))-(Int(Form1.ScaleWidth / 10675 * px), Form1.ScaleHeight - Int(Form1.ScaleHeight / 7558 * py)), RGB(Text4, Text5, Text6)
px1 = px py1 = py End If If Form2.Label3.Caption = "A3h" Then px = Int((Val(zusammenbauy) + 5931) * (pos) * 1.41) py = Int(8398 * pos * 1.41) - Int((Val(zusammenbaux) + 4199) * (pos) * 1.41) plottertmp = plottertmp & "pa" & px & "," 'zusammenbau x - wert
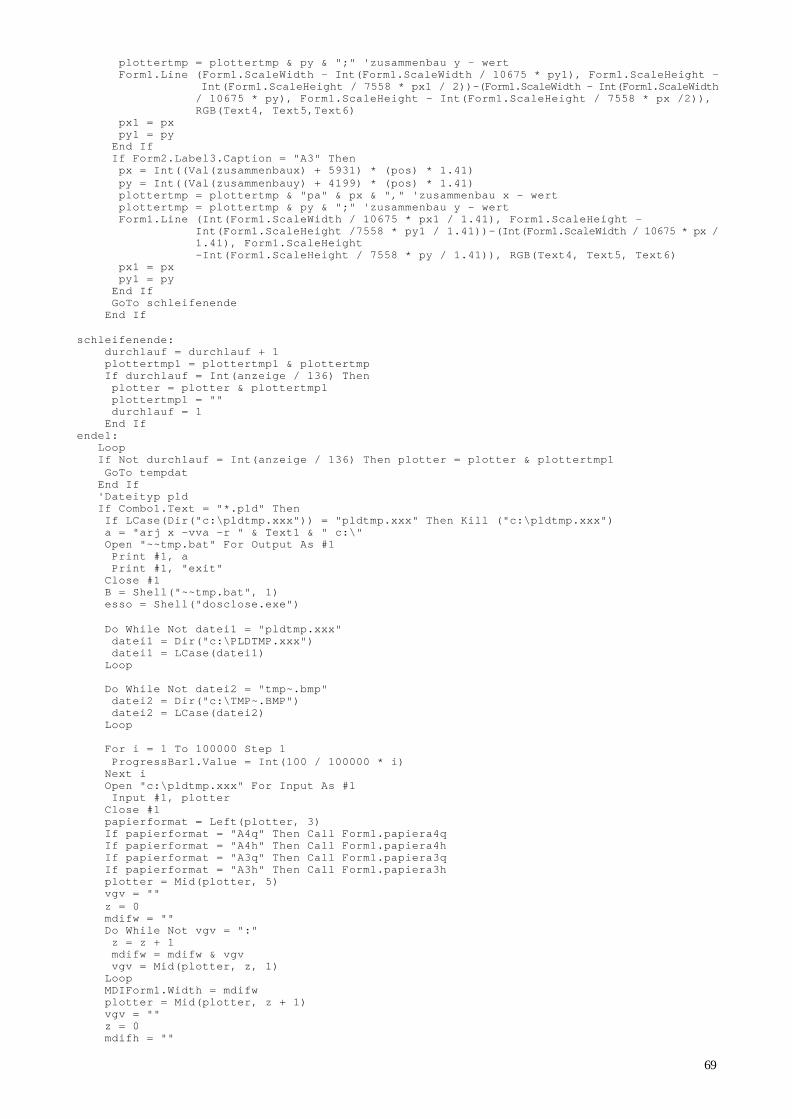
69
plottertmp = plottertmp & py & ";" 'zusammenbau y - wert Form1.Line (Form1.ScaleWidth - Int(Form1.ScaleWidth / 10675 * py1), Form1.ScaleHeight – Int(Form1.ScaleHeight / 7558 * px1 / 2))-(Form1.ScaleWidth - Int(Form1.ScaleWidth / 10675 * py), Form1.ScaleHeight - Int(Form1.ScaleHeight / 7558 * px /2)), RGB(Text4, Text5,Text6) px1 = px py1 = py End If If Form2.Label3.Caption = "A3" Then px = Int((Val(zusammenbaux) + 5931) * (pos) * 1.41) py = Int((Val(zusammenbauy) + 4199) * (pos) * 1.41) plottertmp = plottertmp & "pa" & px & "," 'zusammenbau x - wert plottertmp = plottertmp & py & ";" 'zusammenbau y - wert Form1.Line (Int(Form1.ScaleWidth / 10675 * px1 / 1.41), Form1.ScaleHeight - Int(Form1.ScaleHeight /7558 * py1 / 1.41))-(Int(Form1.ScaleWidth / 10675 * px / 1.41), Form1.ScaleHeight –Int(Form1.ScaleHeight / 7558 * py / 1.41)), RGB(Text4, Text5, Text6) px1 = px py1 = py End If GoTo schleifenende End If schleifenende: durchlauf = durchlauf + 1 plottertmp1 = plottertmp1 & plottertmp If durchlauf = Int(anzeige / 136) Then plotter = plotter & plottertmp1 plottertmp1 = "" durchlauf = 1 End If ende1: Loop If Not durchlauf = Int(anzeige / 136) Then plotter = plotter & plottertmp1 GoTo tempdat End If 'Dateityp pld If Combo1.Text = "*.pld" Then If LCase(Dir("c:\pldtmp.xxx")) = "pldtmp.xxx" Then Kill ("c:\pldtmp.xxx") a = "arj x -vva -r " & Text1 & " c:\" Open "~~tmp.bat" For Output As #1 Print #1, a Print #1, "exit" Close #1 B = Shell("~~tmp.bat", 1) esso = Shell("dosclose.exe") Do While Not datei1 = "pldtmp.xxx" datei1 = Dir("c:\PLDTMP.xxx") datei1 = LCase(datei1) Loop Do While Not datei2 = "tmp~.bmp" datei2 = Dir("c:\TMP~.BMP") datei2 = LCase(datei2) Loop For i = 1 To 100000 Step 1 ProgressBar1.Value = Int(100 / 100000 * i) Next i Open "c:\pldtmp.xxx" For Input As #1 Input #1, plotter Close #1 papierformat = Left(plotter, 3) If papierformat = "A4q" Then Call Form1.papiera4q If papierformat = "A4h" Then Call Form1.papiera4h If papierformat = "A3q" Then Call Form1.papiera3q If papierformat = "A3h" Then Call Form1.papiera3h plotter = Mid(plotter, 5) vgv = "" z = 0 mdifw = "" Do While Not vgv = ":" z = z + 1 mdifw = mdifw & vgv vgv = Mid(plotter, z, 1) Loop MDIForm1.Width = mdifw plotter = Mid(plotter, z + 1) vgv = "" z = 0 mdifh = ""
70
Do While Not vgv = ":" z = z + 1 mdifh = mdifh & vgv vgv = Mid(plotter, z, 1) Loop MDIForm1.Height = mdifh plotter = Mid(plotter, z + 1) bild = "c:\tmp~.bmp" Form1.Picture = LoadPicture(bild) Form1.ScaleMode = 3 Kill "c:\pldtmp.xxx" Kill "c:\tmp~.bmp" End If tempdat: Open "c:\plotter.tmp" For Output As #1 Write #1, plotter Close #1 Do While Not LCase(Dir("c:\plotter.tmp")) = "plotter.tmp" Loop Call Form1.plotterubergabe Close #2 Kill "c:\plt.tmp" GoTo ende fehler: Select Case Err.Number Case 53 End Select Resume Next ende: MDIForm1.Enabled = True Form2.Enabled = True Unload Form4 End Sub Private Sub Command2_Click() 'Speichern-Button Open "c:\plotter.tmp" For Input As #1 Input #1, plotter Close #1 plotter = ":" & MDIForm1.Width & ":" & MDIForm1.Height & ":" & plotter If Form2.Label3.Caption = "A4" Or Form2.Label3.Caption = "A3" Then plotter = Form2.Label3.Caption & "q" & plotter End If If Form2.Label3.Caption = "A4h" Or Form2.Label3.Caption = "A3h" Then plotter = Form2.Label3.Caption & plotter End If Text1 = Text1 & " " Do While Not vergleichsvariable = "." zahler = zahler + 1 vergleichsvariable = Mid(Text1, zahler, 1) If vergleichsvariable = " " Then Text1 = Left(Text1, zahler - 1) & ".pld" GoTo weiter End If Loop weiter: Open "c:\pldtmp.xxx" For Output As #1 Write #1, plotter Close #1 a = "arj a -vva -r -jm1 " & Text1 & " c:\pldtmp.xxx" a1 = "arj a -vva -r -jm1 " & Text1 & " c:\tmp~.bmp" Open "~~tmp.bat" For Output As #1 Print #1, a Print #1, a1 Print #1, "exit" Close #1 B = Shell("~~tmp.bat", 1) esso = Shell("dosclose.exe") Kill "c:\plotter.tmp" Unload Form4 MDIForm1.Enabled = True Form2.Enabled = True
71
End Sub Private Sub Command3_Click() 'Abbrechen-Button On Error GoTo ende Kill "plotter.tmp" Kill "tmp~.bmp" ende: MDIForm1.Enabled = True Form2.Enabled = True Unload Form4 End Sub Private Sub Dir1_Change() 'Verzeichnisfeld wird geandert File1.Path = Dir1.Path If Right(File1.Path, 1) <> "\" Then Text1 = Dir1.Path & "\" & File1.FileName Else Text1 = Dir1.Path & File1.FileName End If End Sub Private Sub Drive1_Change() 'Laufwerk wird geandert On Error GoTo fehler Dir1.Path = Drive1.Drive If Right(File1.Path, 1) <> "\" Then Text1 = Dir1.Path & "\" & File1.FileName Else Text1 = Dir1.Path & File1.FileName End If GoTo ende: fehler: m = MsgBox("Im Laufwerk befindet sich kein Datentrager") Drive1.Drive = Dir1.Path ende: End Sub Private Sub File1_Click() 'Datei wird ausgewahlt If Right(File1.Path, 1) <> "\" Then Text1 = Dir1.Path & "\" & File1.FileName Else Text1 = Dir1.Path & File1.FileName End If End Sub Private Sub File1_DblClick() 'Datei doppelt geklickt, wird geladen If Command1.Enabled = True And Command2.Enabled = False Then Call Command1_Click If Command2.Enabled = True And Command1.Enabled = False Then Call Command2_Click MDIForm1.Enabled = True Form2.Enabled = True End Sub Private Sub Form_Load() 'Form wird geladen Timer1.Enabled = True Timer1.Interval = 1 Form4.Top = (Screen.Height - Form4.Height) / 2 Form4.Left = (Screen.Width - Form4.Width) / 2 MDIForm1.Enabled = False Form2.Enabled = False Drive1.Drive = CurDir Dir1.Path = CurDir File1.Pattern = Combo1.Text Text1 = Dir1.Path If Not Right(Text1, 1) = "\" Then Text1 = Text1 & "\" If LCase(Dir("c:\tmp~.bmp")) = "tmp~.bmp" Then Kill "c:\tmp~.bmp" End Sub
72
Private Sub Timer1_Timer() 'Dateierweiterung (*.plt oder *.pld) wird standig aktualisiert File1.Pattern = Combo1.Text End Sub Public Sub farbe() 'farbanteile werden entsprechend dem Farbanmen gesetzt If stiftcolor = "cyan" Then Text4 = "0" Text5 = "150" Text6 = "255" GoTo ende End If If stiftcolor = "rosa" Then Text4 = "255" Text5 = "0" Text6 = "150" GoTo ende End If If stiftcolor = "schwarz" Then Text4 = "0" Text5 = "0" Text6 = "0" GoTo ende End If If stiftcolor = "rot" Then Text4 = "255" Text5 = "0" Text6 = "0" GoTo ende End If If stiftcolor = "grun" Then Text4 = "0" Text5 = "255" Text6 = "0" GoTo ende End If If stiftcolor = "gelb" Then Text4 = "255" Text5 = "255" Text6 = "0" GoTo ende End If If stiftcolor = "blau" Then Text4 = "0" Text5 = "0" Text6 = "255" GoTo ende End If If stiftcolor = "violett" Then Text4 = "180" Text5 = "0" Text6 = "255" GoTo ende End If If stiftcolor = "braun" Then Text4 = "200" Text5 = "120" Text6 = "0" GoTo ende End If If stiftcolor = "orange" Then Text4 = "255" Text5 = "200" Text6 = "0" GoTo ende End If ende: End Sub Eigenschaften der visuell erstellten Objekte in Form4 Object = "{6B7E6392-850A-101B-AFC0-4210102A8DA7}#1.3#0"; "COMCTL32.OCX" Begin VB.Form Form4 BorderStyle = 3 'Fester Dialog Caption = "Form4" ClientHeight = 4770 ClientLeft = 3015 ClientTop = 2835

73
ClientWidth = 7095 ControlBox = 0 'False Icon = (Symbol) LinkTopic = "Form4" MaxButton = 0 'False MinButton = 0 'False PaletteMode = 1 'ZReihenfolge ScaleHeight = 4770 ScaleWidth = 7095 ShowInTaskbar = 0 'False Begin VB.Frame Frame1 Caption = "Fortschrittsanzeige" Height = 495 Left = 120 TabIndex = 8 Top = 4200 Width = 6855 Begin ComctlLib.ProgressBar ProgressBar1 Height = 135 Left = 120 TabIndex = 9 Top = 240 Width = 6615 _ExtentX = 11668 _ExtentY = 238 _Version = 327682 Appearance = 1 End End Begin VB.Timer Timer1 Left = 5880 Top = 1320 End Begin VB.ComboBox Combo1 Height = 315 Left = 2880 TabIndex = 7 Text = "Combo1" Top = 240 Width = 2415 End Begin VB.TextBox Text1 Height = 285 Left = 240 TabIndex = 6 Text = "Text1" Top = 3600 Width = 5055 End Begin VB.CommandButton Command3 Caption = "abbrechen" Height = 495 Left = 5520 TabIndex = 5 Top = 1800 Width = 1455 End Begin VB.CommandButton Command2 Caption = "speichern" Height = 495 Left = 5520 TabIndex = 4 Top = 840 Width = 1455 End Begin VB.CommandButton Command1 Caption = "laden" Height = 495 Left = 5520 TabIndex = 3 Top = 120 Width = 1455 End Begin VB.FileListBox File1 Height = 2430 Left = 2880 TabIndex = 2 Top = 840 Width = 2415 End Begin VB.DirListBox Dir1 Height = 2505
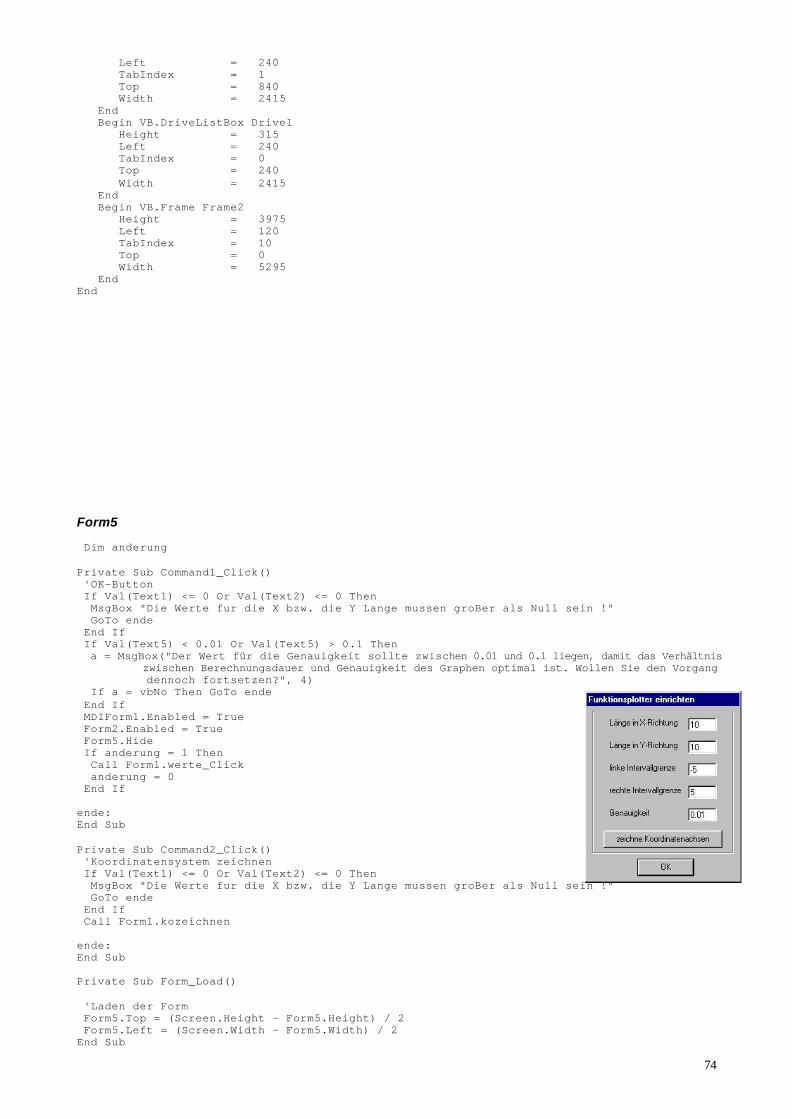
74
Left = 240 TabIndex = 1 Top = 840 Width = 2415 End Begin VB.DriveListBox Drive1 Height = 315 Left = 240 TabIndex = 0 Top = 240 Width = 2415 End Begin VB.Frame Frame2 Height = 3975 Left = 120 TabIndex = 10 Top = 0 Width = 5295 End End Form5 Dim anderung Private Sub Command1_Click() 'OK-Button If Val(Text1) <= 0 Or Val(Text2) <= 0 Then MsgBox "Die Werte fur die X bzw. die Y Lange mussen groBer als Null sein !" GoTo ende End If If Val(Text5) < 0.01 Or Val(Text5) > 0.1 Then a = MsgBox("Der Wert für die Genauigkeit sollte zwischen 0.01 und 0.1 liegen, damit das Verhältnis zwischen Berechnungsdauer und Genauigkeit des Graphen optimal ist. Wollen Sie den Vorgang dennoch fortsetzen?", 4) If a = vbNo Then GoTo ende End If MDIForm1.Enabled = True Form2.Enabled = True Form5.Hide If anderung = 1 Then Call Form1.werte_Click anderung = 0 End If ende: End Sub Private Sub Command2_Click() 'Koordinatensystem zeichnen If Val(Text1) <= 0 Or Val(Text2) <= 0 Then MsgBox "Die Werte fur die X bzw. die Y Lange mussen groBer als Null sein !" GoTo ende End If Call Form1.kozeichnen ende: End Sub Private Sub Form_Load() 'Laden der Form Form5.Top = (Screen.Height - Form5.Height) / 2 Form5.Left = (Screen.Width - Form5.Width) / 2 End Sub

75
Private Sub Text3_Change() anderung = 1 End Sub Private Sub Text4_Change() anderung = 1 End Sub Private Sub Text5_Change() anderung = 1 End Sub Eigenschaften der visuell erstellten Objekte in Form5 VERSION 5.00 Begin VB.Form Form5 BorderStyle = 3 'Fester Dialog Caption = "Funktionsplotter einrichten" ClientHeight = 3705 ClientLeft = 5385 ClientTop = 2460 ClientWidth = 3255 ControlBox = 0 'False Icon = (Symbol) LinkTopic = "Form5" MaxButton = 0 'False MinButton = 0 'False PaletteMode = 1 'ZReihenfolge ScaleHeight = 3705 ScaleWidth = 3255 ShowInTaskbar = 0 'False Begin VB.Frame Frame1 Height = 3135 Left = 120 TabIndex = 1 Top = 0 Width = 3015 Begin VB.TextBox Text1 Height = 285 Left = 2040 TabIndex = 7 Text = "10" Top = 240 Width = 615 End Begin VB.TextBox Text2 Height = 285 Left = 2040 TabIndex = 6 Text = "10" Top = 720 Width = 615 End Begin VB.TextBox Text3 Height = 285 Left = 2040 TabIndex = 5 Text = "-5" Top = 1200 Width = 615 End Begin VB.TextBox Text4 Height = 285 Left = 2040 TabIndex = 4 Text = "5" Top = 1680 Width = 615 End Begin VB.TextBox Text5 Height = 285 Left = 2040 TabIndex = 3 Text = "0.01" Top = 2160 Width = 615 End Begin VB.CommandButton Command2 Caption = "zeichne Koordinatenachsen" Height = 375 Left = 240

76
TabIndex = 2 Top = 2640 Width = 2535 End Begin VB.Label Label1 Caption = "Lange in X-Richtung" Height = 255 Left = 360 TabIndex = 12 Top = 240 Width = 1575 End Begin VB.Label Label2 Caption = "Lange in Y-Richtung" Height = 255 Left = 360 TabIndex = 11 Top = 720 Width = 1575 End Begin VB.Label Label3 Caption = "linke Intervallgrenze" Height = 255 Left = 360 TabIndex = 10 Top = 1200 Width = 1575 End Begin VB.Label Label4 Caption = "rechte Intervallgrenze" Height = 255 Left = 360 TabIndex = 9 Top = 1680 Width = 1575 End Begin VB.Label Label5 Caption = "Genauigkeit" Height = 255 Left = 360 TabIndex = 8 Top = 2160 Width = 1455 End End Begin VB.CommandButton Command1 Caption = "OK" Height = 375 Left = 1080 TabIndex = 0 Top = 3240 Width = 1215 End End Form6 Dim anschluss Private Sub Command1_Click() 'Abbrechen-Button MDIForm1.Enabled = True Form2.Enabled = True Unload Form6 End Sub Private Sub Command2_Click() 'OK-Button anschluss = Combo1.Text Open "port.ini" For Output As #1 Print #1, anschluss Close #1 MDIForm1.Enabled = True Form2.Enabled = True Unload Form6 End Sub Private Sub Form_Load() 'Laden der Form
77
Form6.Top = (Screen.Height - Form5.Height) / 2 Form6.Left = (Screen.Width - Form5.Width) / 2 MDIForm1.Enabled = False Form2.Enabled = False Open "port.ini" For Input As #1 Input #1, anschluss Close #1 Label1.Caption = "Geben Sie den Namen des Anschlusses, mit dem der Plotter verbun den ist, ein. (Bsp.: lpt1:) Der momentan verwendete Anschluss ist: " & anschluss Combo1.AddItem "lpt1:" Combo1.AddItem "lpt2:" Combo1.AddItem "lpt3:" Combo1.AddItem "lpt4:" Combo1.Text = anschluss End Sub Eigenschaften der visuell erstellten Objekte in Form6 VERSION 5.00 Begin VB.Form Form6 BorderStyle = 3 'Fester Dialog Caption = "Anschlusseinstellungen" ClientHeight = 2490 ClientLeft = 3510 ClientTop = 2340 ClientWidth = 4695 ControlBox = 0 'False Icon = (Symbol) LinkTopic = "Form6" MaxButton = 0 'False MinButton = 0 'False PaletteMode = 1 'ZReihenfolge ScaleHeight = 2490 ScaleWidth = 4695 ShowInTaskbar = 0 'False Begin VB.CommandButton Command2 Caption = "OK" Height = 375 Left = 480 TabIndex = 4 Top = 1920 Width = 1575 End Begin VB.CommandButton Command1 Caption = "abbrechen" Height = 375 Left = 2640 TabIndex = 3 Top = 1920 Width = 1575 End Begin VB.ComboBox Combo1 Height = 315 Left = 1200 TabIndex = 2 Text = "Combo1" Top = 1320 Width = 2295 End Begin VB.Frame Frame1 Height = 975 Left = 240 TabIndex = 0 Top = 120 Width = 4215 Begin VB.Label Label1 Height = 615 Left = 240 TabIndex = 1 Top = 240 Width = 3735 End End End Form7 Public Sub s1() SavePicture Image, "s1.bmp"
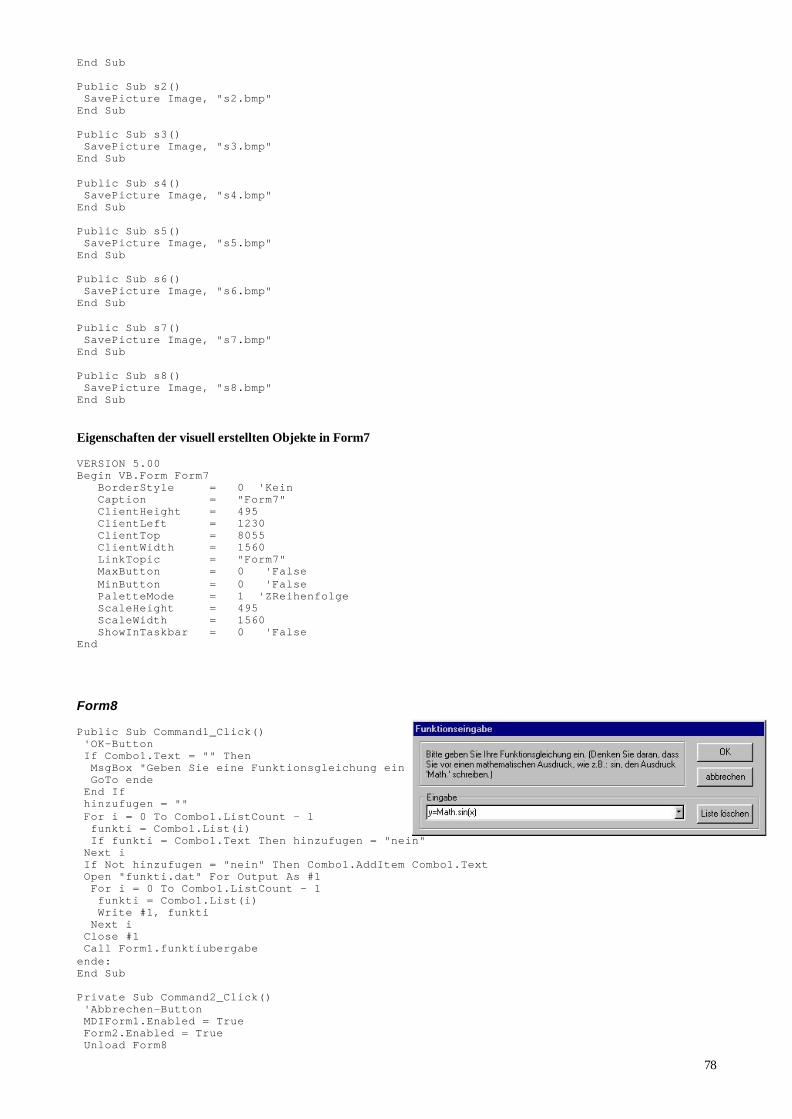
78
End Sub Public Sub s2() SavePicture Image, "s2.bmp" End Sub Public Sub s3() SavePicture Image, "s3.bmp" End Sub Public Sub s4() SavePicture Image, "s4.bmp" End Sub Public Sub s5() SavePicture Image, "s5.bmp" End Sub Public Sub s6() SavePicture Image, "s6.bmp" End Sub Public Sub s7() SavePicture Image, "s7.bmp" End Sub Public Sub s8() SavePicture Image, "s8.bmp" End Sub Eigenschaften der visuell erstellten Objekte in Form7 VERSION 5.00 Begin VB.Form Form7 BorderStyle = 0 'Kein Caption = "Form7" ClientHeight = 495 ClientLeft = 1230 ClientTop = 8055 ClientWidth = 1560 LinkTopic = "Form7" MaxButton = 0 'False MinButton = 0 'False PaletteMode = 1 'ZReihenfolge ScaleHeight = 495 ScaleWidth = 1560 ShowInTaskbar = 0 'False End Form8 Public Sub Command1_Click() 'OK-Button If Combo1.Text = "" Then MsgBox "Geben Sie eine Funktionsgleichung ein !" GoTo ende End If hinzufugen = "" For i = 0 To Combo1.ListCount - 1 funkti = Combo1.List(i) If funkti = Combo1.Text Then hinzufugen = "nein" Next i If Not hinzufugen = "nein" Then Combo1.AddItem Combo1.Text Open "funkti.dat" For Output As #1 For i = 0 To Combo1.ListCount - 1 funkti = Combo1.List(i) Write #1, funkti Next i Close #1 Call Form1.funktiubergabe ende: End Sub Private Sub Command2_Click() 'Abbrechen-Button MDIForm1.Enabled = True Form2.Enabled = True Unload Form8

79
End Sub Private Sub Command3_Click() 'Liste loschen swap = Combo1.Text Combo1.Clear Combo1.Text = swap If LCase(Dir("funkti.dat")) = "funkti.dat" Then Kill ("funkti.dat") End If End Sub Private Sub Form_Load() 'Laden des Formulars MDIForm1.Enabled = False Form2.Enabled = False End Sub Private Sub Form_Unload(Cancel As Integer) 'SchlieBen des Formulars Form1.Enabled = True Form2.Enabled = True End Sub Eigenschaften der visuell erstellten Objekte in Form8 VERSION 5.00 Begin VB.Form Form8 BorderStyle = 3 'Fester Dialog Caption = "Funktionseingabe" ClientHeight = 1890 ClientLeft = 45 ClientTop = 330 ClientWidth = 6825 ControlBox = 0 'False LinkTopic = "Form8" MaxButton = 0 'False MinButton = 0 'False ScaleHeight = 1890 ScaleWidth = 6825 ShowInTaskbar = 0 'False StartUpPosition = 2 'Bildschirmmitte Begin VB.CommandButton Command3 Caption = "Liste loschen" Height = 375 Left = 5520 TabIndex = 3 Top = 1320 Width = 1095 End Begin VB.CommandButton Command2 Caption = "abbrechen" Height = 375 Left = 5520 TabIndex = 2 Top = 600 Width = 1095 End Begin VB.CommandButton Command1 Caption = "OK" Height = 375 Left = 5520 TabIndex = 1 Top = 120 Width = 1095 End Begin VB.ComboBox Combo1 Height = 315 Left = 240 TabIndex = 0 Text = "y=Math.sin(x)" Top = 1320 Width = 5055 End Begin VB.Frame Frame1 Height = 975 Left = 120 TabIndex = 4 Top = 0 Width = 5175 Begin VB.Label Label1

80
Caption = <...> Height = 615 Left = 120 TabIndex = 5 Top = 240 Width = 4935 End End Begin VB.Frame Frame2 Caption = "Eingabe" Height = 735 Left = 120 TabIndex = 6 Top = 1080 Width = 6615 End End MDIForm1 Private Sub MDIForm_Load() 'Laden der MDI-Form MDIForm1.Height = Screen.Height * 0.7 MDIForm1.Width = Screen.Width * 0.7 MDIForm1.Top = (Screen.Height - MDIForm1.Height) / 2 MDIForm1.Left = (Screen.Width - MDIForm1.Width) / 2 Form1.Show End Sub Private Sub Timer1_Timer() 'Abschalten des Timers Timer1.Enabled = False End Sub Private Sub MDIForm_QueryUnload(Cancel As Integer, UnloadMode As Integer) 'Abfrage vor dem Beenden des Programms antwort = MsgBox("Wollen Sie das Programm beenden? Alle nicht gespeicherten Datengehen verloren !Wollen Sie den Vorgang fortsetzen ? ", 4) If antwort = vbNo Then Cancel = True End If End Sub Private Sub Toolbar1_ButtonClick(ByVal Button As ComctlLib.Button) 'Deaktivieren der jeweils anderen Buttons beim Aktivieren eines Buttons Select Case Button.Key Case Is = "stift1" MDIForm1.Toolbar1.Buttons("stift1").Value = tbrPressed MDIForm1.Toolbar1.Buttons("stift2").Value = tbrUnpressed MDIForm1.Toolbar1.Buttons("stift3").Value = tbrUnpressed MDIForm1.Toolbar1.Buttons("stift4").Value = tbrUnpressed MDIForm1.Toolbar1.Buttons("stift5").Value = tbrUnpressed MDIForm1.Toolbar1.Buttons("stift6").Value = tbrUnpressed MDIForm1.Toolbar1.Buttons("stift7").Value = tbrUnpressed MDIForm1.Toolbar1.Buttons("stift8").Value = tbrUnpressed Call Form1.stift1_Click Case Is = "stift2" MDIForm1.Toolbar1.Buttons("stift1").Value = tbrUnpressed

81
MDIForm1.Toolbar1.Buttons("stift2").Value = tbrPressed MDIForm1.Toolbar1.Buttons("stift3").Value = tbrUnpressed MDIForm1.Toolbar1.Buttons("stift4").Value = tbrUnpressed MDIForm1.Toolbar1.Buttons("stift5").Value = tbrUnpressed MDIForm1.Toolbar1.Buttons("stift6").Value = tbrUnpressed MDIForm1.Toolbar1.Buttons("stift7").Value = tbrUnpressed MDIForm1.Toolbar1.Buttons("stift8").Value = tbrUnpressed Call Form1.stift2_Click Case Is = "stift3" MDIForm1.Toolbar1.Buttons("stift1").Value = tbrUnpressed MDIForm1.Toolbar1.Buttons("stift2").Value = tbrUnpressed MDIForm1.Toolbar1.Buttons("stift3").Value = tbrPressed MDIForm1.Toolbar1.Buttons("stift4").Value = tbrUnpressed MDIForm1.Toolbar1.Buttons("stift5").Value = tbrUnpressed MDIForm1.Toolbar1.Buttons("stift6").Value = tbrUnpressed MDIForm1.Toolbar1.Buttons("stift7").Value = tbrUnpressed MDIForm1.Toolbar1.Buttons("stift8").Value = tbrUnpressed Call Form1.stift3_Click Case Is = "stift4" MDIForm1.Toolbar1.Buttons("stift1").Value = tbrUnpressed MDIForm1.Toolbar1.Buttons("stift2").Value = tbrUnpressed MDIForm1.Toolbar1.Buttons("stift3").Value = tbrUnpressed MDIForm1.Toolbar1.Buttons("stift4").Value = tbrPressed MDIForm1.Toolbar1.Buttons("stift5").Value = tbrUnpressed MDIForm1.Toolbar1.Buttons("stift6").Value = tbrUnpressed MDIForm1.Toolbar1.Buttons("stift7").Value = tbrUnpressed MDIForm1.Toolbar1.Buttons("stift8").Value = tbrUnpressed Call Form1.stift4_Click Case Is = "stift5" MDIForm1.Toolbar1.Buttons("stift1").Value = tbrUnpressed MDIForm1.Toolbar1.Buttons("stift2").Value = tbrUnpressed MDIForm1.Toolbar1.Buttons("stift3").Value = tbrUnpressed MDIForm1.Toolbar1.Buttons("stift4").Value = tbrUnpressed MDIForm1.Toolbar1.Buttons("stift5").Value = tbrPressed MDIForm1.Toolbar1.Buttons("stift6").Value = tbrUnpressed MDIForm1.Toolbar1.Buttons("stift7").Value = tbrUnpressed MDIForm1.Toolbar1.Buttons("stift8").Value = tbrUnpressed Call Form1.stift5_Click Case Is = "stift6" MDIForm1.Toolbar1.Buttons("stift1").Value = tbrUnpressed MDIForm1.Toolbar1.Buttons("stift2").Value = tbrUnpressed MDIForm1.Toolbar1.Buttons("stift3").Value = tbrUnpressed MDIForm1.Toolbar1.Buttons("stift4").Value = tbrUnpressed MDIForm1.Toolbar1.Buttons("stift5").Value = tbrUnpressed MDIForm1.Toolbar1.Buttons("stift6").Value = tbrPressed MDIForm1.Toolbar1.Buttons("stift7").Value = tbrUnpressed MDIForm1.Toolbar1.Buttons("stift8").Value = tbrUnpressed Call Form1.stift6_Click Case Is = "stift7" MDIForm1.Toolbar1.Buttons("stift1").Value = tbrUnpressed MDIForm1.Toolbar1.Buttons("stift2").Value = tbrUnpressed MDIForm1.Toolbar1.Buttons("stift3").Value = tbrUnpressed MDIForm1.Toolbar1.Buttons("stift4").Value = tbrUnpressed MDIForm1.Toolbar1.Buttons("stift5").Value = tbrUnpressed MDIForm1.Toolbar1.Buttons("stift6").Value = tbrUnpressed MDIForm1.Toolbar1.Buttons("stift7").Value = tbrPressed MDIForm1.Toolbar1.Buttons("stift8").Value = tbrUnpressed Call Form1.stift7_Click Case Is = "stift8" MDIForm1.Toolbar1.Buttons("stift1").Value = tbrUnpressed MDIForm1.Toolbar1.Buttons("stift2").Value = tbrUnpressed MDIForm1.Toolbar1.Buttons("stift3").Value = tbrUnpressed MDIForm1.Toolbar1.Buttons("stift4").Value = tbrUnpressed MDIForm1.Toolbar1.Buttons("stift5").Value = tbrUnpressed MDIForm1.Toolbar1.Buttons("stift6").Value = tbrUnpressed MDIForm1.Toolbar1.Buttons("stift7").Value = tbrUnpressed MDIForm1.Toolbar1.Buttons("stift8").Value = tbrPressed Call Form1.stift8_Click Case Is = "plott" Call Form1.drucken_Click Case Is = "eingabef" Call Form1.feingabe_Click Case Is = "zeichnef" Call Form1.fzeichnen_Click Case Is = "neu" Call Form1.neu_Click Case Is = "save" Call Form1.speichern_Click Case Is = "open" Call Form1.laden_Click End Select

82
End Sub Eigenschaften der visuell erstellten Objekte in MDIForm1 VERSION 5.00 Object = "{6B7E6392-850A-101B-AFC0-4210102A8DA7}#1.3#0"; "COMCTL32.OCX" Begin VB.MDIForm MDIForm1 BackColor = &H00808080& Caption = "Plotterprogramm - by: Georg RuB und Christoph Lumme" ClientHeight = 4755 ClientLeft = 60 ClientTop = 345 ClientWidth = 6705 Icon = (Symbol) LinkTopic = "MDIForm1" Begin ComctlLib.Toolbar Toolbar1 Align = 1 'Oben ausrichten Height = 420 Left = 0 TabIndex = 0 Top = 0 Width = 6705 _ExtentX = 11827 _ExtentY = 741 ButtonWidth = 529 ButtonHeight = 529 Appearance = 1 _Version = 327682 End End