TCB-EXS21TLE - Ideal Air Heating And Cooling
20
EG F D I P GR ES NE Made in Japan Save These Instructions! Conserver ce mode d’emploi Bewahren Sie bitte diese Bedienungsanleitung auf. Conservate queste istruzioni Guarde estas instruções Φυλάτε τις δηγίες αυτές Guarde estas instrucciones Bewaar deze gebruiksaanwijzing! Pub. OI-85464189916000 TCB-EXS21TLE Schedule Timer Temporisateur Zeitplangeber Timer programmatore Temporizador ρνδιακπτης πργραμματισμύ Temporizador de programas Tijdklok • INSTRUCTION MANUAL • MODE D’EMPLOI • BEDIENUNGSANLEITUNG • ISTRUZIONI PER L’USO • MANUAL DE INSTRUÇÕES • EΓXEIPIΔIO OΔHΓIΩN • MANUAL DE INSTRUCCIONES • HANDLEIDING For Weekly Timer Mode Only (SDI/DI) Pour le mode Programmateur hebdomadaire uniquement (SDI/DI) Nur für den Zeitgeberwochenmodus (SDI/DI) Soltanto per il modo timer settimanale (SDI/DI) Apenas para o modo de programação semanal do temporizador (SDI/DI) Μν για λειτυργία εδμαδιαίυ ρνδιακπτη (SDI/DI) Solo para el modo de temporizador semanal (SDI/DI) Enkel voor de wekelijkse tijdklokmodus (SDI/DI) 916_TCB-EXS21TLE_Book1.book 1 ページ 2007年8月21日 火曜日 午後3時20分
Transcript of TCB-EXS21TLE - Ideal Air Heating And Cooling

EG
F
D
I
P
GR
ES
NE
Made in Japan
Save These Instructions!Conserver ce mode d’emploiBewahren Sie bitte dieseBedienungsanleitung auf.Conservate queste istruzioniGuarde estas instruçõesΦυλά�τε τις �δηγίες αυτέςGuarde estas instruccionesBewaar deze gebruiksaanwijzing!
Pub. OI-85464189916000
TCB-EXS21TLE
Schedule Timer
Temporisateur
Zeitplangeber
Timer programmatore
Temporizador
�ρ�ν�διακ�πτης πρ�γραμματισμ�ύ
Temporizador de programas
Tijdklok
• INSTRUCTION MANUAL
• MODE D’EMPLOI
• BEDIENUNGSANLEITUNG
• ISTRUZIONI PER L’USO
• MANUAL DE INSTRUÇÕES
• EΓXEIPIΔIO OΔHΓIΩN
• MANUAL DE INSTRUCCIONES
• HANDLEIDING
For Weekly Timer Mode Only (SDI/DI)Pour le mode Programmateur hebdomadaire uniquement (SDI/DI)
Nur für den Zeitgeberwochenmodus (SDI/DI)Soltanto per il modo timer settimanale (SDI/DI)
Apenas para o modo de programação semanal do temporizador (SDI/DI)Μ�ν� για λειτ�υργία ε�δ�μαδιαί�υ �ρ�ν�διακ�πτη (SDI/DI)
Solo para el modo de temporizador semanal (SDI/DI)Enkel voor de wekelijkse tijdklokmodus (SDI/DI)
916_TCB-EXS21TLE_Book1.book 1 ページ 2007年8月21日 火曜日 午後3時20分
2
ContentsPage
Product Information........................................................................................... 2Alert Symbols.................................................................................................... 2Installation Location .......................................................................................... 3Electrical Requirements .................................................................................... 3Safety Instructions............................................................................................. 3Names and Functions of Parts.......................................................................... 4
Operating Buttons................................................................................. 4Display .................................................................................................. 5
Using the Schedule Timer................................................................................. 5Setting the Present Time ...................................................................... 6Setting Today’s Day of the Week .......................................................... 7Setting Up Programmed Operations..................................................... 8Setting Errors...................................................................................... 10How to Check Program Times ............................................................ 12How to Copy Program Times.............................................................. 13How to Set Holidays in a Scheduled Week of Operation .................... 15How to Disable the Timer Operation................................................... 16How to Clear Programs....................................................................... 17
Important Information to Remember ............................................................... 181 Power Outages ................................................................................... 182 Schedule Timer and Air Conditioner Operation .................................. 18
Troubleshooting............................................................................................... 19
Product InformationIf you have problems or questions concerning your Air Conditioner, you will need the following information. Model and serial numbers are on the nameplate on the bottom of the cabinet.
Model No. Serial No. ____________________
Date of purchase ________________________________________________
Dealer’s address ________________________________________________
Phone number ________________
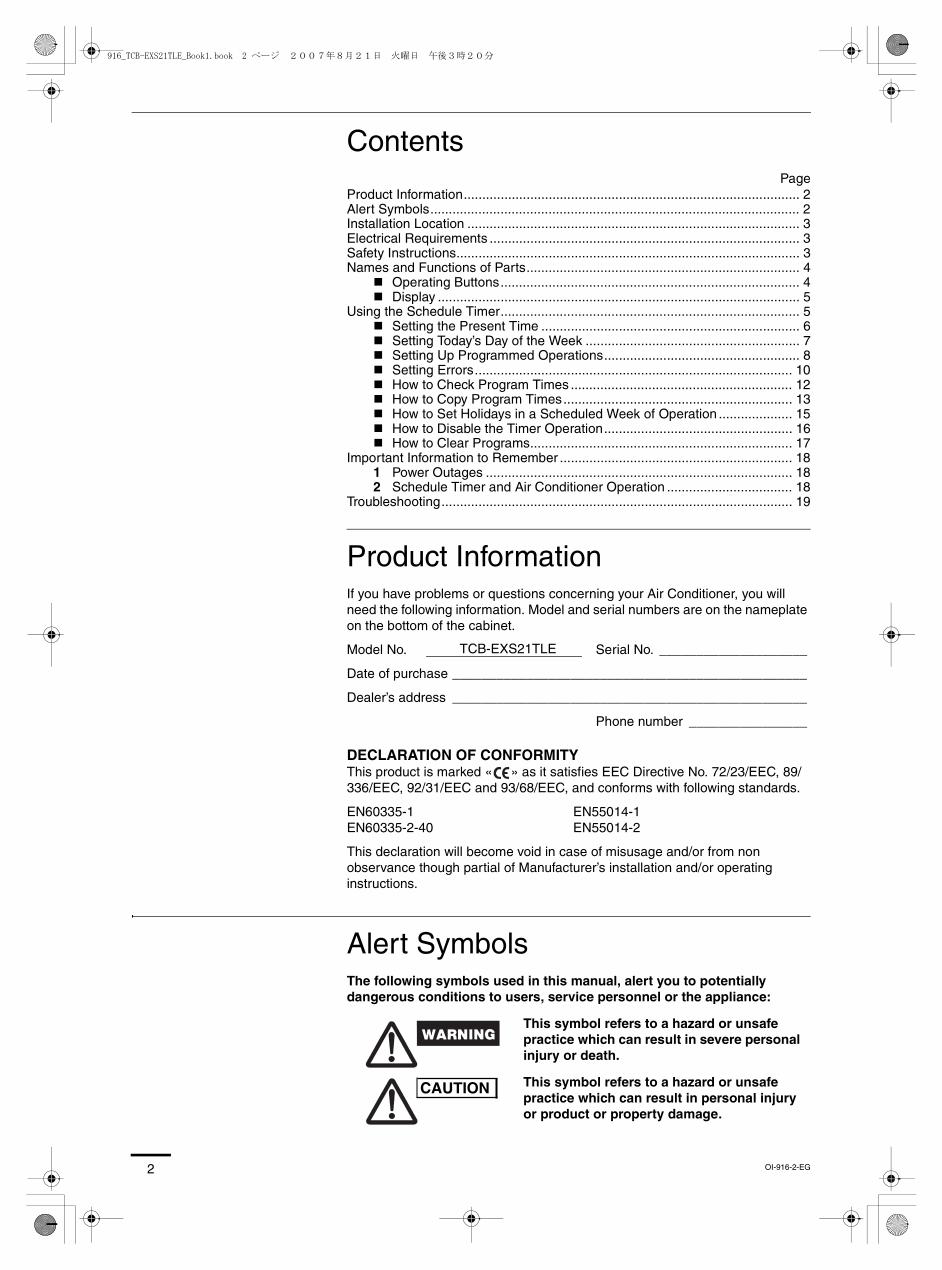
Alert SymbolsThe following symbols used in this manual, alert you to potentially dangerous conditions to users, service personnel or the appliance:
DECLARATION OF CONFORMITYThis product is marked « » as it satisfies EEC Directive No. 72/23/EEC, 89/336/EEC, 92/31/EEC and 93/68/EEC, and conforms with following standards.
EN60335-1 EN55014-1EN60335-2-40 EN55014-2
This declaration will become void in case of misusage and/or from non observance though partial of Manufacturer’s installation and/or operating instructions.
This symbol refers to a hazard or unsafe practice which can result in severe personal injury or death.
This symbol refers to a hazard or unsafe practice which can result in personal injury or product or property damage.
TCB-EXS21TLE
CAUTION
OI-916-2-EG
916_TCB-EXS21TLE_Book1.book 2 ページ 2007年8月21日 火曜日 午後3時20分

3
EG
Installation Location• We recommend that this schedule timer be installed properly by
qualified installation technicians in accordance with the Installation Instructions provided with the schedule timer.
Electrical Requirements1. All wiring must conform to the local electrical codes. Consult your dealer or a
qualified electrician for details.2. Wiring must be done by a qualified electrician.
Safety Instructions• Read this Instruction carefully before using this schedule timer. If you
still have any difficulties or problems, consult your dealer for help.• The air conditioner is designed to give you comfortable room
conditions. Use this only for its intended purpose as described in this Instruction Manual.
• Do not install this schedule timer where there are fumes or flammable gases, or in an extremely humid space such as a greenhouse.
• Do not install the schedule timer where excessively high heat-generating objects are placed.
To warm up the system, the power mains must be turned on at least twelve (12) hours before operation. Leave the power mains ON unless you will not be using this appliance for an extended period.
• Never touch the unit with wet hands.• Never use or store gasoline or other flammable vapor or liquid near
the air conditioner — it is very dangerous.• The air conditioner has no ventilator for intaking fresh air from
outdoors. You must open doors or windows frequently when you use gas or oil heating appliances in the same room, which consume a lot of oxygen from the air. Otherwise there is a risk of suffocation in an extreme case.
• Do not turn the air conditioner on and off from the power mains switch. Use the ON/OFF operation button.
• Do not stick anything into the air outlet of the outdoor unit. This is dangerous because the fan is rotating at high speed.
• Do not let children play with the air conditioner.• Do not cool or heat the room too much if babies or invalids are
present.
CAUTION Power mains
ON
CAUTION
916_TCB-EXS21TLE_Book1.book 3 ページ 2007年8月21日 火曜日 午後3時20分

4
Names and Functions of Parts
Operating Buttons
A: PROGRAM button Use to start setting programs and to enter program settings.
B: PROG. COPY buttons Use to copy programs to specific days in a schedule. (Refer to page 12)The button is not used.
C: CLEAR button Press to clear the settings of the currently displayed program.• The current program is not cleared unless the button is pressed
after pressing the CLEAR button.
D: Setting buttons Use to make program settings and to set the present time.
Press to set groups for programmed operation.
Press to set today’s day and days of programmed operation.
Press to set the present time and times used in programmed operation.
Use to start/stop indoor units via the timer.
Not used.
Use to set programmed operation trigger time.• Program settings are not entered unless the button is pressed at
the end of setting operations.
E: HOLIDAY button Press to set and cancel holidays during a scheduled week of operation.
F: CANCEL button Press to cancel the current program setting operation, copying operation or holiday setting operation. When the CANCEL button is held down for 2 seconds, the current setting operation or copying operation is canceled and the normal display returns.
G: TIMER OFF button Press to turn the timer OFF when timer operation will not be used for a long period of time. When this button is held down for 2 seconds, appears on the display. Programs cannot be run until the button is again held down for 2 seconds.
• Some of these buttons are disabled when SDI/DI is used with the schedule timer in the conventional weekly timer mode. If any of the disabled buttons is pressed, appears on the display. For more information, contact your dealer.
A: PROGRAM button
B: PROG. COPY buttons
C: CLEAR button
D: Setting buttons
G: TIMER OFF button
F: CANCEL button
E: HOLIDAY button
OI-916-4-EG
916_TCB-EXS21TLE_Book1.book 4 ページ 2007年8月21日 火曜日 午後3時20分
5
EG
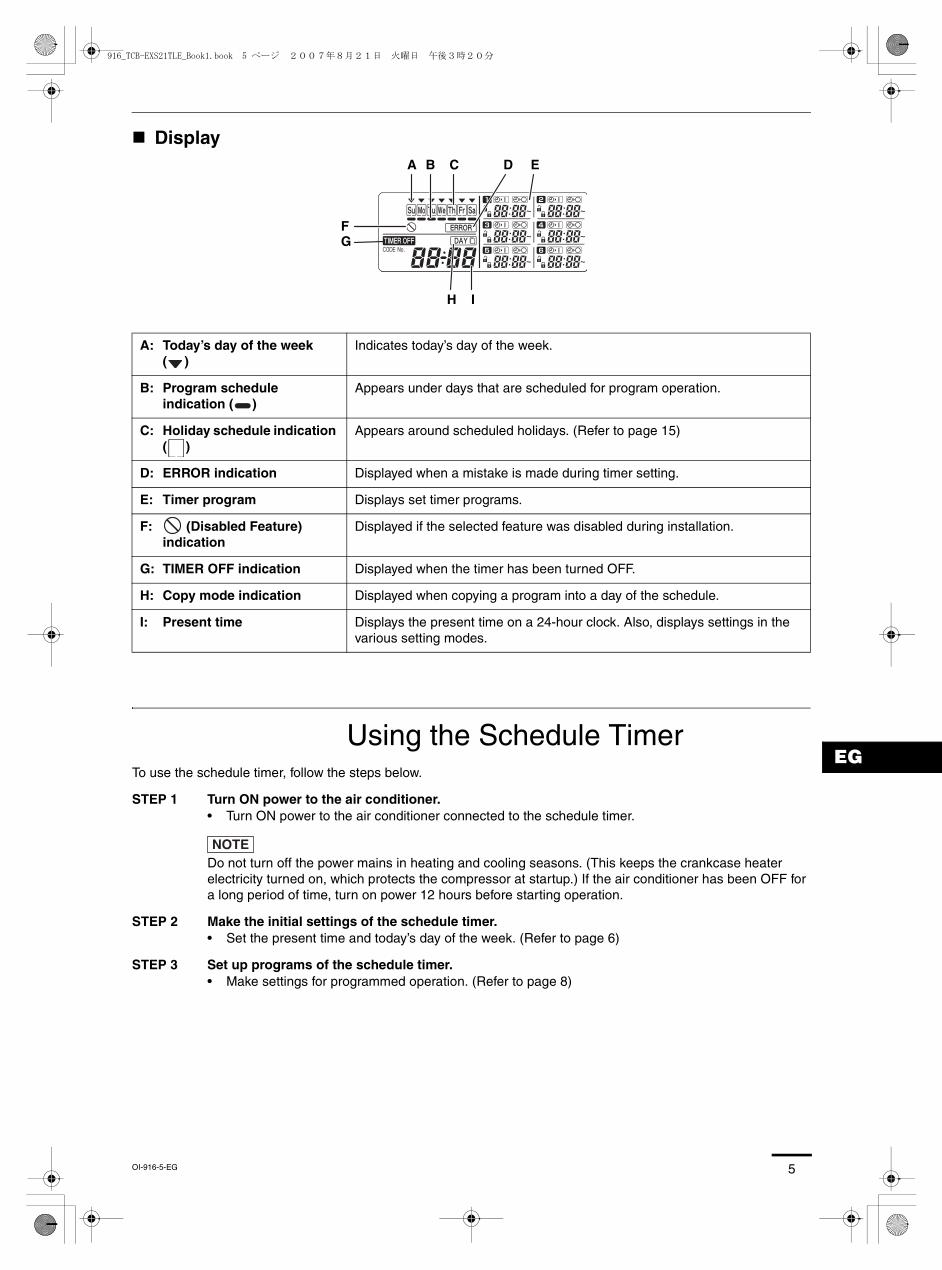
Display
Using the Schedule TimerTo use the schedule timer, follow the steps below.
STEP 1 Turn ON power to the air conditioner.• Turn ON power to the air conditioner connected to the schedule timer.
NOTEDo not turn off the power mains in heating and cooling seasons. (This keeps the crankcase heater electricity turned on, which protects the compressor at startup.) If the air conditioner has been OFF for a long period of time, turn on power 12 hours before starting operation.
STEP 2 Make the initial settings of the schedule timer.• Set the present time and today’s day of the week. (Refer to page 6)
STEP 3 Set up programs of the schedule timer.• Make settings for programmed operation. (Refer to page 8)
A: Today’s day of the week ( )
Indicates today’s day of the week.
B: Program schedule indication ( )
Appears under days that are scheduled for program operation.
C: Holiday schedule indication ( )
Appears around scheduled holidays. (Refer to page 15)
D: ERROR indication Displayed when a mistake is made during timer setting.
E: Timer program Displays set timer programs.
F: (Disabled Feature) indication
Displayed if the selected feature was disabled during installation.
G: TIMER OFF indication Displayed when the timer has been turned OFF.
H: Copy mode indication Displayed when copying a program into a day of the schedule.
I: Present time Displays the present time on a 24-hour clock. Also, displays settings in the various setting modes.
A B C D E
FG
H I
OI-916-5-EG
916_TCB-EXS21TLE_Book1.book 5 ページ 2007年8月21日 火曜日 午後3時20分
6
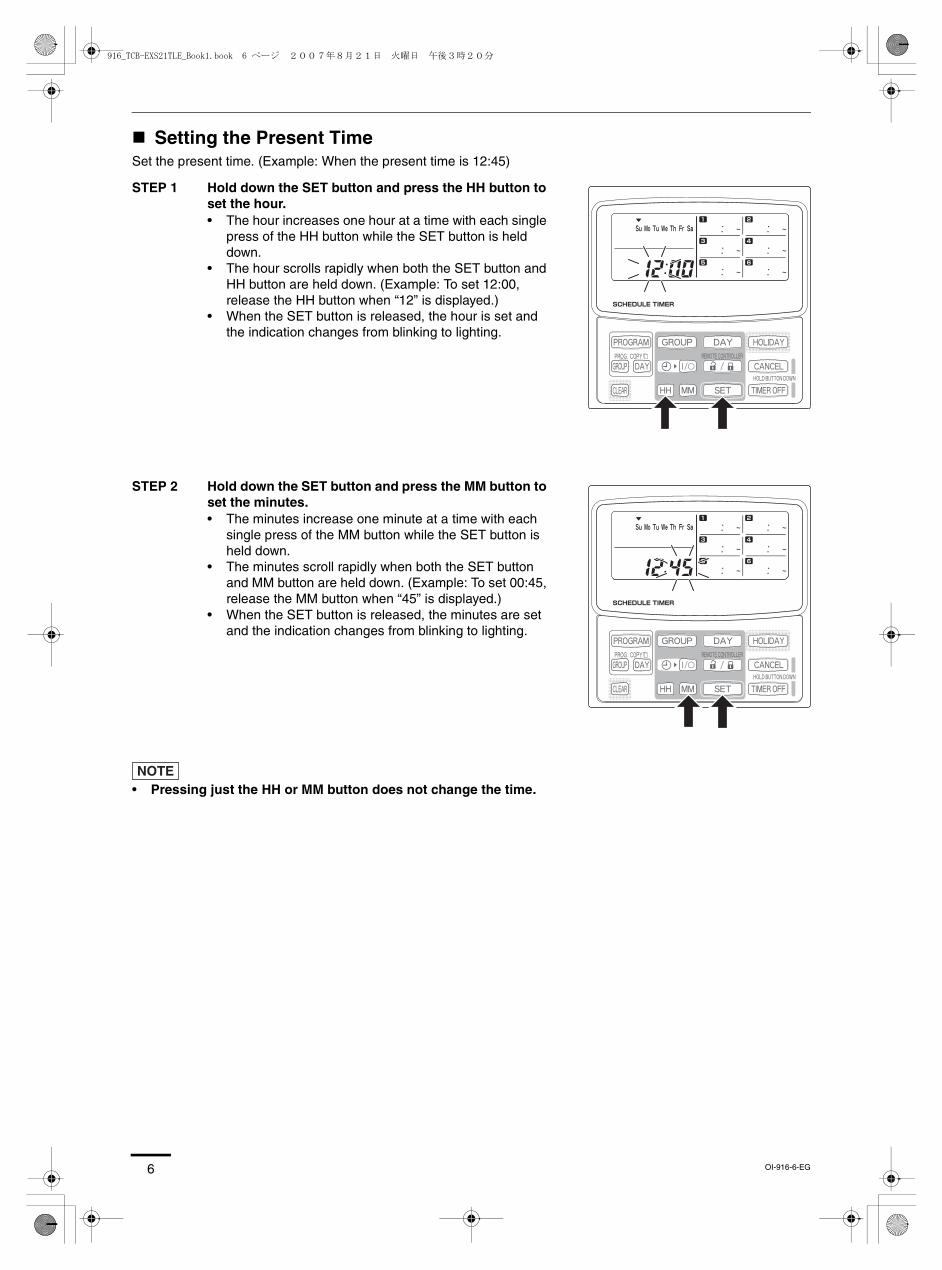
Setting the Present TimeSet the present time. (Example: When the present time is 12:45)
STEP 1 Hold down the SET button and press the HH button to set the hour.• The hour increases one hour at a time with each single
press of the HH button while the SET button is held down.
• The hour scrolls rapidly when both the SET button and HH button are held down. (Example: To set 12:00, release the HH button when “12” is displayed.)
• When the SET button is released, the hour is set and the indication changes from blinking to lighting.
STEP 2 Hold down the SET button and press the MM button to set the minutes.• The minutes increase one minute at a time with each
single press of the MM button while the SET button is held down.
• The minutes scroll rapidly when both the SET button and MM button are held down. (Example: To set 00:45, release the MM button when “45” is displayed.)
• When the SET button is released, the minutes are set and the indication changes from blinking to lighting.
NOTE• Pressing just the HH or MM button does not change the time.
OI-916-6-EG
916_TCB-EXS21TLE_Book1.book 6 ページ 2007年8月21日 火曜日 午後3時20分

7
EG
Setting Today’s Day of the WeekSet today’s day of the week. (Example: When today is Wednesday)
STEP 1 Hold down the SET button and press the DAY button to set today’s day of the week.• blinks and moves one day at a time across the days
of the week with each single press of the DAY button while the SET button is held down.
• When the SET button is released, the day of the week is set and the changes from blinking to lighting.
NOTE• Pressing just the DAY button does not change the day of the week.
OI-916-7-EG
916_TCB-EXS21TLE_Book1.book 7 ページ 2007年8月21日 火曜日 午後3時20分

8
Setting Up Programmed OperationsCorrectly set the present time and today’s day of the week.Unless both are correctly set, the programs will not run as expected.• Up to 3 programmed operations can be set per day for day of the week.• To change the settings of an existing program, use the same below
procedure used to set up a new program.
STEP 1 Press the PROGRAM button• When the PROGRAM button is pressed, today’s day
of the week start blinking and the present time indication changes to a blinking “PG-1”.
STEP 2 Press the DAY button and select a day of the week for programmed operation.• When the SET button is pressed, the program
schedule marker ( ) changes from blinking to lighting and, at the same time, the time set in program
starts blinking. Also, the present time indication changes to a blinking “PG-2”.
NOTE• The currently selected day of the week blinks slowly at
this time.
Example settings
OI-916-8-EG
916_TCB-EXS21TLE_Book1.book 8 ページ 2007年8月21日 火曜日 午後3時20分
9
EG
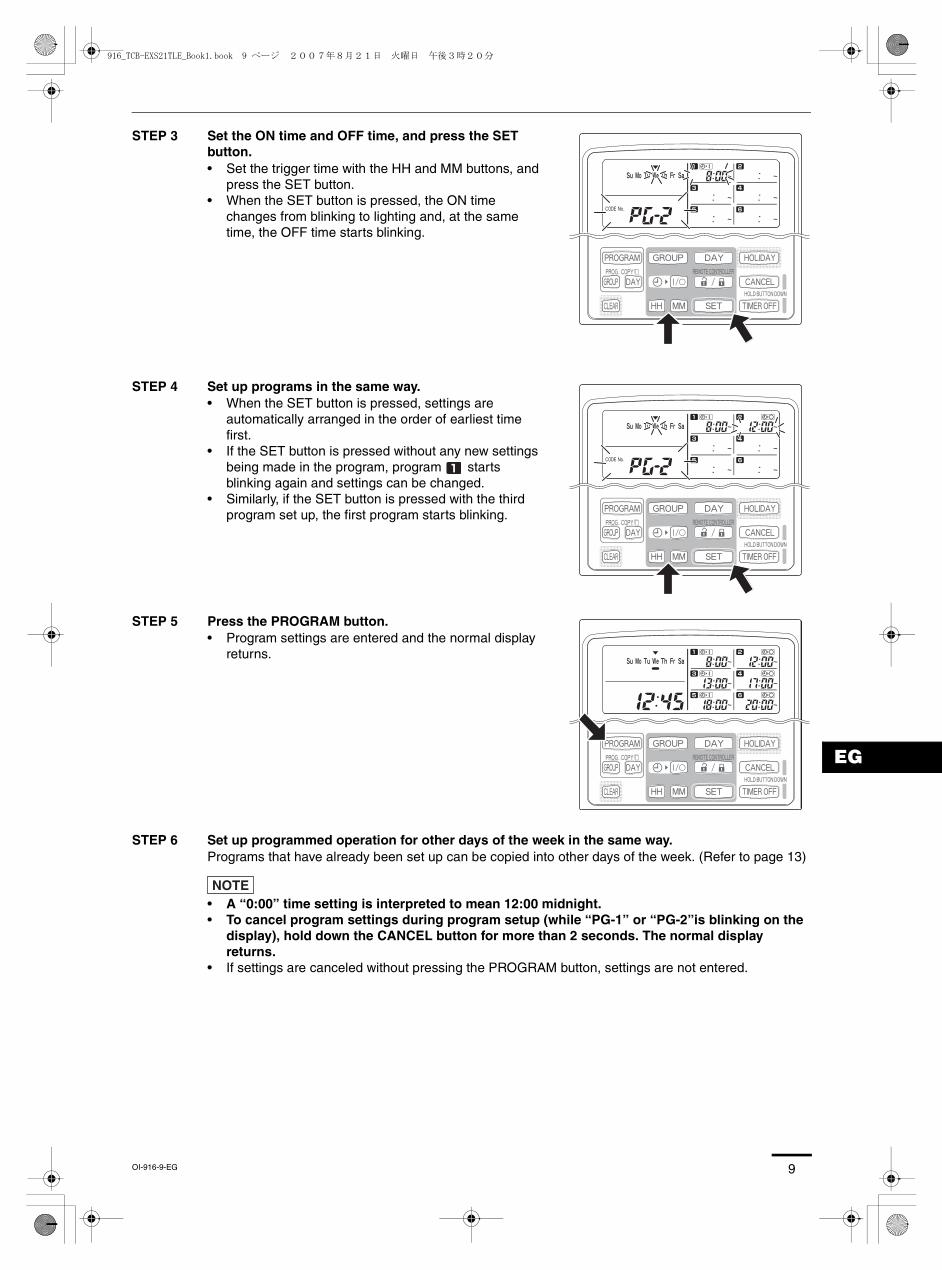
STEP 3 Set the ON time and OFF time, and press the SET button.• Set the trigger time with the HH and MM buttons, and
press the SET button.• When the SET button is pressed, the ON time
changes from blinking to lighting and, at the same time, the OFF time starts blinking.
STEP 4 Set up programs in the same way.• When the SET button is pressed, settings are
automatically arranged in the order of earliest time first.
• If the SET button is pressed without any new settings being made in the program, program starts blinking again and settings can be changed.
• Similarly, if the SET button is pressed with the third program set up, the first program starts blinking.
STEP 5 Press the PROGRAM button.• Program settings are entered and the normal display
returns.
STEP 6 Set up programmed operation for other days of the week in the same way.Programs that have already been set up can be copied into other days of the week. (Refer to page 13)
NOTE• A “0:00” time setting is interpreted to mean 12:00 midnight.• To cancel program settings during program setup (while “PG-1” or “PG-2”is blinking on the
display), hold down the CANCEL button for more than 2 seconds. The normal display returns.
• If settings are canceled without pressing the PROGRAM button, settings are not entered.
OI-916-9-EG
916_TCB-EXS21TLE_Book1.book 9 ページ 2007年8月21日 火曜日 午後3時20分

10
Setting ErrorsIf “ERROR” is displayed (the indication blinks) while the programmed operation is set up, correct the set time using the following steps.
If Program Times Are the Same
STEP 1 Every time the SET button is pressed, ON time and OFF time of the error program switch alternately. Select the program to be corrected.
STEP 2 Change the time setting with the HH and MM buttons.
STEP 3 Press the SET button and check “ERROR” is not displayed.
STEP 4 Press the PROGRAM button to end the setting mode.
The following ON time/OFF time settings generate an error.
1) When operating times overlap
2) When OFF time is earlier than ON time
3) When ON time and OFF time are equal
4) When only ON time or OFF time is set
0:00 23:59
ON OFF
ON OFF
Example:
0:00 23:59
Example:
OFF ON
0:00 23:59
Example:
ON OFF
0:00 23:59
Example:
ON
OI-916-10-EG
916_TCB-EXS21TLE_Book1.book 10 ページ 2007年8月21日 火曜日 午後3時20分
11
EG
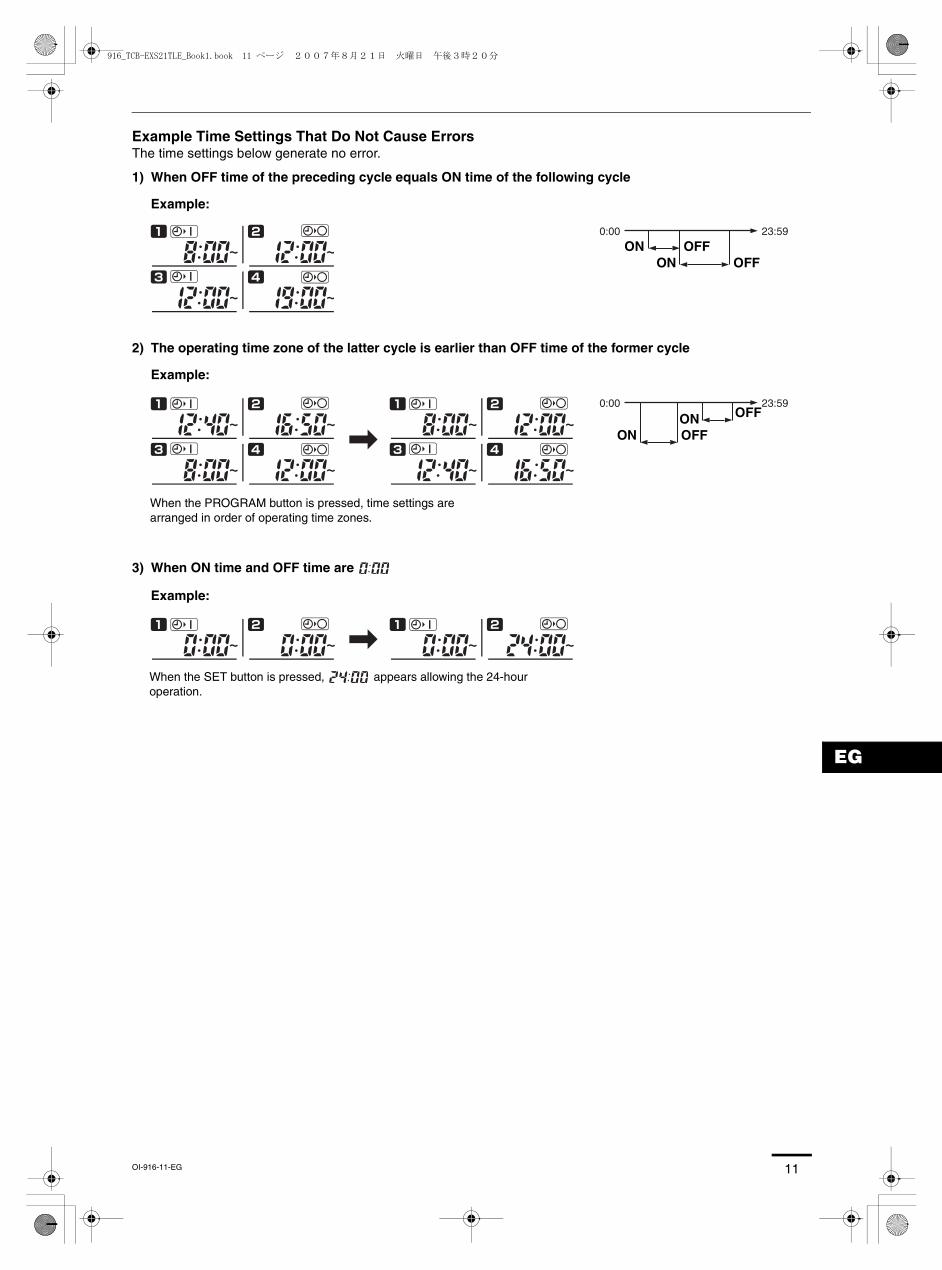
Example Time Settings That Do Not Cause ErrorsThe time settings below generate no error.
1) When OFF time of the preceding cycle equals ON time of the following cycle
2) The operating time zone of the latter cycle is earlier than OFF time of the former cycle
3) When ON time and OFF time are
0:00 23:59
Example:
ON OFFON OFF
0:00 23:59
Example:
ON OFFON OFF
When the PROGRAM button is pressed, time settings are arranged in order of operating time zones.
Example:
When the SET button is pressed, appears allowing the 24-hour operation.
OI-916-11-EG
916_TCB-EXS21TLE_Book1.book 11 ページ 2007年8月21日 火曜日 午後3時20分
12
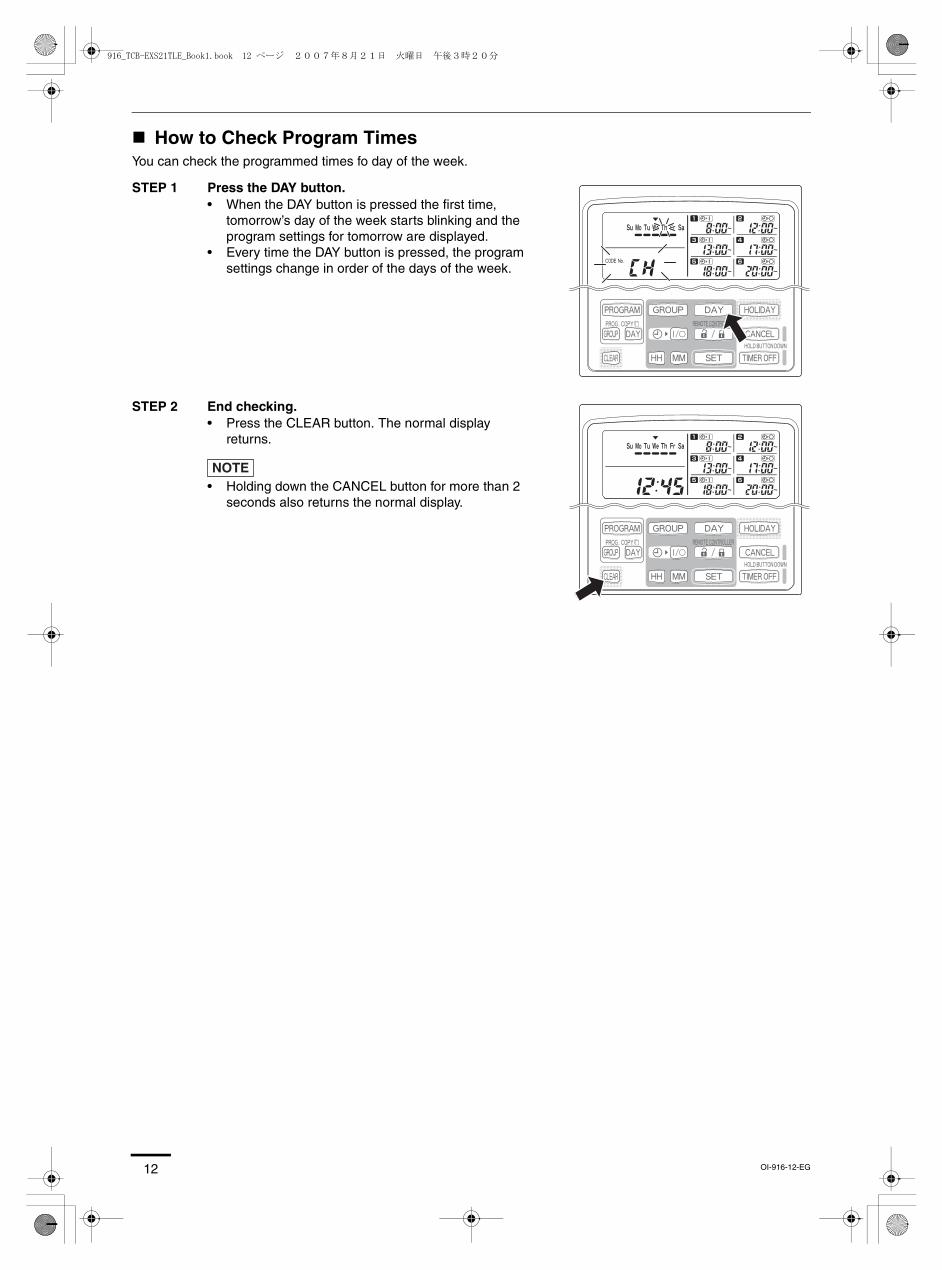
How to Check Program TimesYou can check the programmed times fo day of the week.
STEP 1 Press the DAY button.• When the DAY button is pressed the first time,
tomorrow’s day of the week starts blinking and the program settings for tomorrow are displayed.
• Every time the DAY button is pressed, the program settings change in order of the days of the week.
STEP 2 End checking.• Press the CLEAR button. The normal display
returns.
NOTE• Holding down the CANCEL button for more than 2
seconds also returns the normal display.
OI-916-12-EG
916_TCB-EXS21TLE_Book1.book 12 ページ 2007年8月21日 火曜日 午後3時20分

13
EG
How to Copy Program TimesYou can copy the already set program of one day into another day (Day Program Copying).
How to Copy Day Programs
STEP 1 Press the PROG. COPY DAY button.• The present day of the week indication starts
blinking and the present time indication changes to a blinking “CP-1”.
STEP 2 Select a source day program to copy.• Every time the DAY button is pressed, the
moves across the days of the week display, therefore select a day of the week that will serve as the copy source.
• Once having selected the copy source day, press the SET button to set it. The display changes to key you to select a copy destination day.
STEP 3 Select a copy destination day.• When the schedule timer is ready for you to select a
copy destination day, “CP-2” starts blinking in the present time display area, while the selected copy source day blinks in the days of the week.Therefore, select a day of the week as the copy destination, using the DAY button.
Example of Day Program Copying (Copying Monday’s program into Tuesday)
OI-916-13-EG
916_TCB-EXS21TLE_Book1.book 13 ページ 2007年8月21日 火曜日 午後3時20分

14
STEP 4 Press the SET button to copy.• Press the SET button and the program schedule
marker ( ) will be displayed.
STEP 5 Select other copy destination days if desired.• You can copy the selected source day program into
other days by repeatedly pressing the DAY button to select a day of the week followed by the SET button to set it.
NOTE• Pressing the CLEAR button extinguishes the
program schedule marker ( ) and cancels the copy operation.
STEP 6 Press the PROG. COPY DAY button to enter the copied program in the selected days.• The normal display returns.
NOTE• If a program already exists in the copy destination day, the newly copied program overwrites the existing
program.• If you accidentally copy over a program in the day program copy mode, holding down the CANCEL
button for more than 2 seconds returns the program to the point prior to pressing the PROG. COPY DAY button in STEP 1. (All changes and copy operations made up until that point are cleared.)
OI-916-14-EG
916_TCB-EXS21TLE_Book1.book 14 ページ 2007年8月21日 火曜日 午後3時20分
15
EG
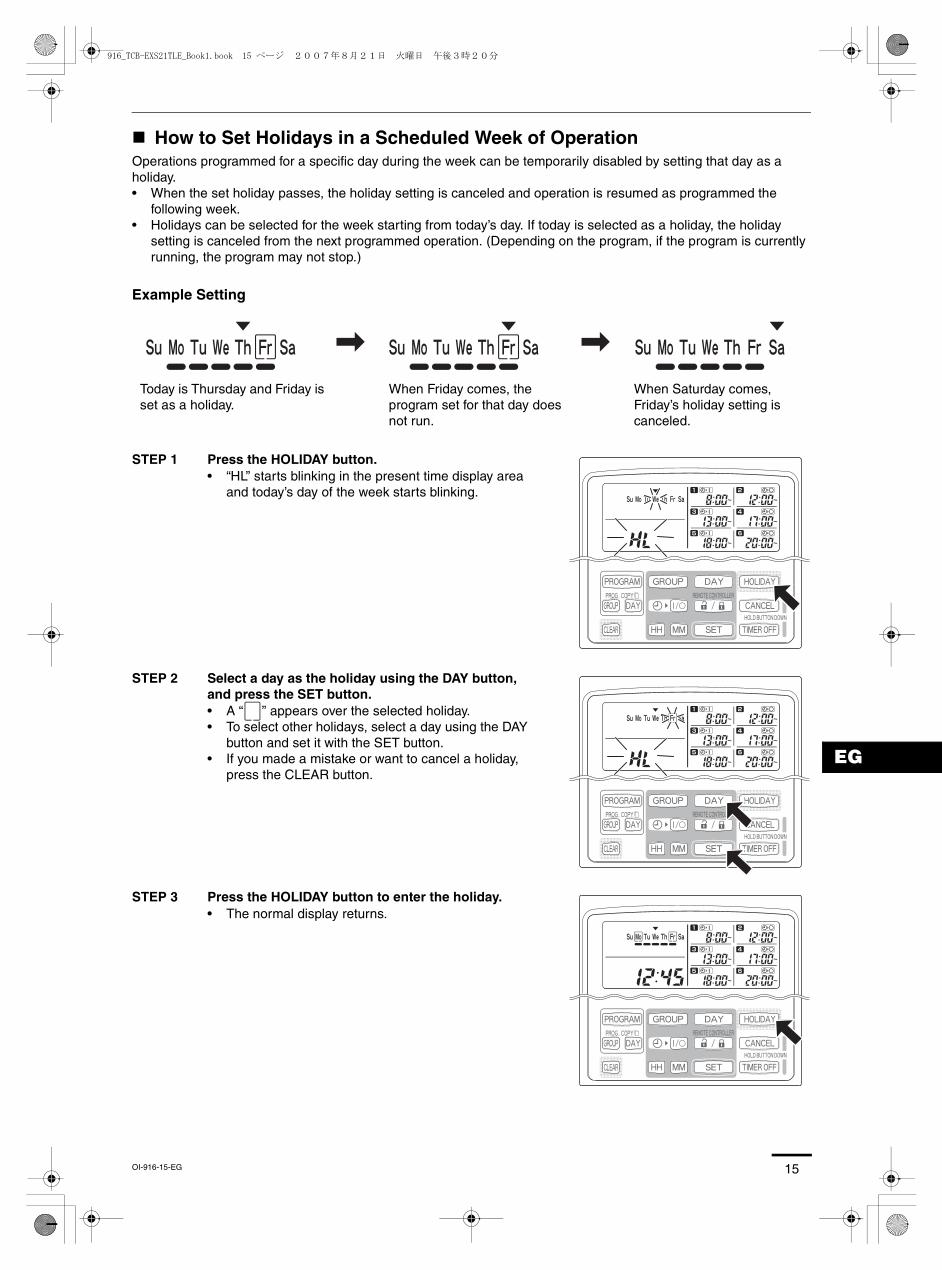
How to Set Holidays in a Scheduled Week of OperationOperations programmed for a specific day during the week can be temporarily disabled by setting that day as a holiday.• When the set holiday passes, the holiday setting is canceled and operation is resumed as programmed the
following week.• Holidays can be selected for the week starting from today’s day. If today is selected as a holiday, the holiday
setting is canceled from the next programmed operation. (Depending on the program, if the program is currently running, the program may not stop.)
Example Setting
STEP 1 Press the HOLIDAY button.• “HL” starts blinking in the present time display area
and today’s day of the week starts blinking.
STEP 2 Select a day as the holiday using the DAY button, and press the SET button.• A “ ” appears over the selected holiday.• To select other holidays, select a day using the DAY
button and set it with the SET button.• If you made a mistake or want to cancel a holiday,
press the CLEAR button.
STEP 3 Press the HOLIDAY button to enter the holiday.• The normal display returns.
Today is Thursday and Friday is set as a holiday.
When Friday comes, the program set for that day does not run.
When Saturday comes, Friday’s holiday setting is canceled.
OI-916-15-EG
916_TCB-EXS21TLE_Book1.book 15 ページ 2007年8月21日 火曜日 午後3時20分

16
How to Disable the Timer OperationTo halt programmed operation for one week or more, you can disable all timer programs.• Once the timer has been disabled, programmed operations are not run until the below procedure is performed.
Hold down the TIMER OFF button for more than 2 seconds
• appears on the display. The timer is disabled from the next scheduled program.
To turn the timer back ON, hold down the TIMER OFF button for more than 2 seconds
• goes out and the timer is enabled from the next scheduled program.
OI-916-16-EG
916_TCB-EXS21TLE_Book1.book 16 ページ 2007年8月21日 火曜日 午後3時20分

17
EG
How to Clear ProgramsPress the PROGRAM button.
• When the PROGRAM button is pressed, the present day of the week starts blinking and the present time indication changes to a blinking “PG-1”.
NOTE• Holding down the CANCEL button for more than 2 seconds
returns the program to the point prior to pressing the PROGRAM button. (All operations made up until that point are cleared.)
To cancel specific days
• Select a day to be deleted using the DAY button and press the CLEAR button. The program contents are completely cleared. The display appears as shown above.
• Press the PROGRAM button to enter the clear operation. The normal display returns without the program schedule marker ( ) underneath the days of the week.
To cancel individual programs on specific days
• Select a day and press the SET button. Programmed operations start blinking in rotation from the first one. Press the CLEAR button when the programmed operation to be cleared starts blinking. (The remaining programmed operations are automatically arranged in chronological order.)
• Press the PROGRAM button to enter the clear operation. The normal display returns.
Example:Display after the second program was cleared from the display content above
OI-916-17-EG
916_TCB-EXS21TLE_Book1.book 17 ページ 2007年8月21日 火曜日 午後3時20分
18
Important Information to Remember
1. Power OutagesIf the battery incorporated in the schedule timer ran out and the power of the air conditioner was lost and then the power has been restored, the following display appears with the colon “:” of the present time blinking. Pressing the PROGRAM button restores the normal display screen. If the present time is within the programmed operation time zone, the air conditioner starts running.• Program settings are retained in the non-volatile memory of the schedule timer, therefore they are not cleared in
the event of a power outage. Also, the present time and today’s day of the week are retained for a maximum of 100 hours by the internal battery.
Schedule timer settings (Example)
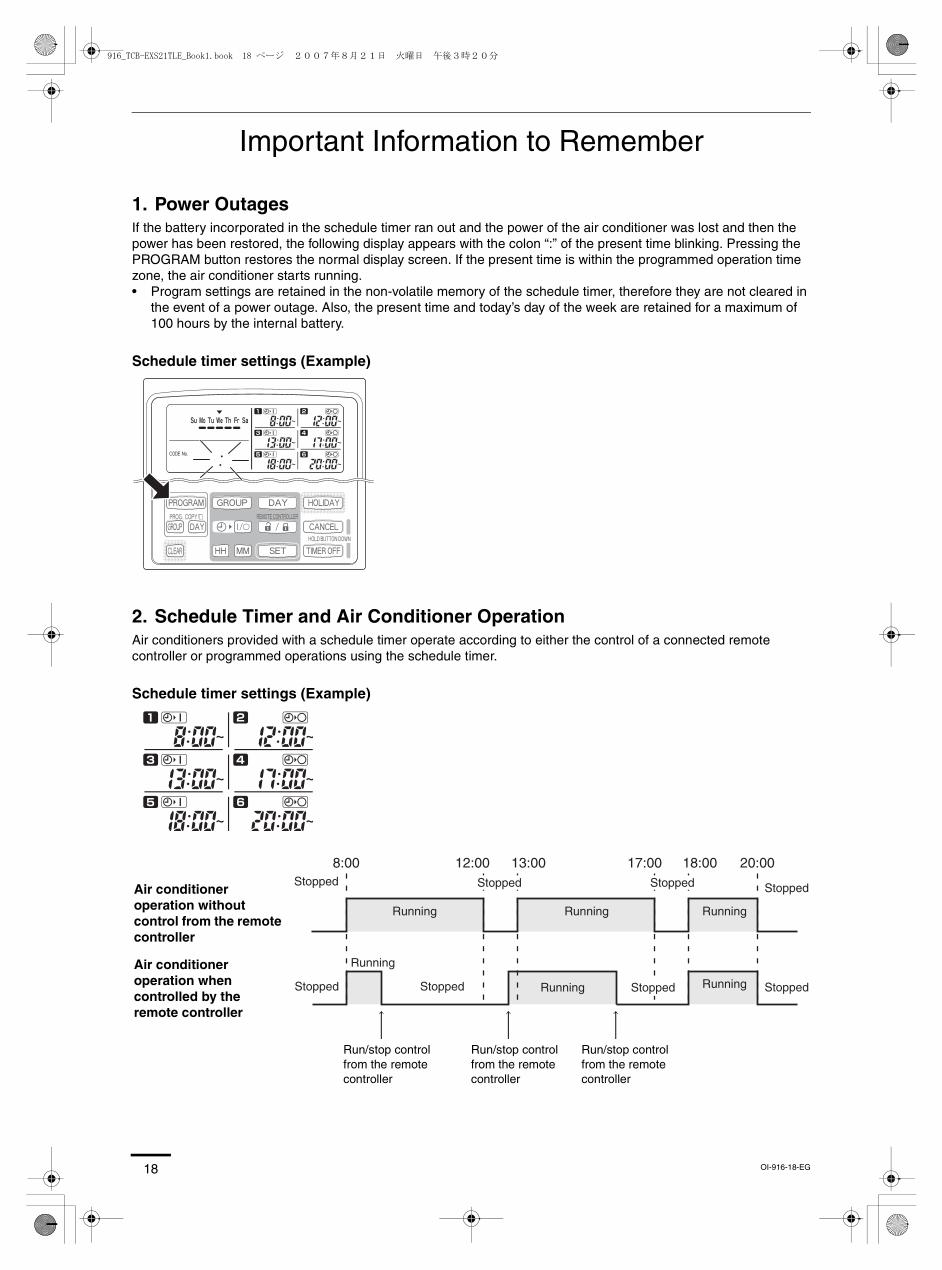
2. Schedule Timer and Air Conditioner OperationAir conditioners provided with a schedule timer operate according to either the control of a connected remote controller or programmed operations using the schedule timer.
Schedule timer settings (Example)
8:00 12:00 17:00 20:0013:00 18:00Stopped Stopped
StoppedStopped
Stopped
Stopped
Stopped
Stopped
R
Running
Running
unning Running Running
Running
Air conditioner operation without control from the remote controller
Air conditioner operation when controlled by the remote controller
Run/stop control from the remote controller
Run/stop control from the remote controller
Run/stop control from the remote controller
OI-916-18-EG
916_TCB-EXS21TLE_Book1.book 18 ページ 2007年8月21日 火曜日 午後3時20分

19
EG
TroubleshootingBefore requesting servicing, check the following.
If trouble persists despite taking the above action, stop the schedule timer, turn off the unit and report the serial number and problem to your dealer. Never service the unit yourself as this is dangerous.
Trouble Cause/Remedy
Air conditioners do not operate as scheduled when the set time comes.
The timer has been disabled. (Refer to page 16)A holiday has been scheduled. (Refer to page 15)
The present time indication is a blinking “ ”. There was a power outage. Press the PROGRAM button. (Refer to page 18.)
blinks in the present time display area. Power to the air conditioner was lost for a long period of time. Set the present time and today’s day of the week again. (Refer to page 6 and 7)
Ch
eck
bef
ore
req
ues
tin
g s
ervi
cin
g
OI-916-19-EG
916_TCB-EXS21TLE_Book1.book 19 ページ 2007年8月21日 火曜日 午後3時20分

916_TCB-EXS21TLE_Book1.book 147 ページ 2007年8月21日 火曜日 午後3時20分