Technaxx Security Premium Kamera-Set ... - Westfalia Versand
132
1 Technaxx ® * Gebrauchsanleitung Security Premium Kamera-Set 10.1 TX-29 Security Premium Kamera-Set 18.5 TX-30 Wichtiger Hinweis in Bezug auf die Gebrauchsanleitungen: Alle Sprachen der Gebrauchsanleitung befinden sich auf der beiliegenden CD. Garantie 2 Jahre Inhaltsverzeichnis 1. Besonderheiten ................................................................................................................ 2 2. Packungsinhalt ................................................................................................................ 3 3. Produktüberblick .............................................................................................................. 3 4. Installation........................................................................................................................ 6 4.1 Installation von TX-29 und TX-30................................................................................... 7 4.2 Antenneninstallation ....................................................................................................... 7 4.3 Festplatteninstallation .................................................................................................... 8 4.4 Kamera zu TX-29/TX-30 hinzufügen.............................................................................. 9 5. Software-Funktionen ...................................................................................................... 10 5.1 Geteilter Bildschirm ...................................................................................................... 10 5.2 Kamera verw................................................................................................................ 10 5.4 Wiedergabe ................................................................................................................. 20 5.5 Videobackup ................................................................................................................ 21 5.6 Farbeinstellung ............................................................................................................ 22 5.7 PTZ (Nicht für gelieferte Kameras) .............................................................................. 23 5.8 Manu. Aufnahme .......................................................................................................... 23 5.9 Lautstärke .................................................................................................................... 23 5.10 Assistent .................................................................................................................... 23 5.11 Netzwerk .................................................................................................................... 23 5.12 Kamera hinzufügen .................................................................................................... 24 5.13 System verl. ............................................................................................................... 24 6. Gerätezugriff .................................................................................................................. 24 6.1 Zugriff über LAN (lokale WEB-Benutzeroberfläche)..................................................... 24 6.2 Zugriff über WAN (globale WEB-Benutzeroberfläche) ................................................. 25 6.3 Mobile Anwendung (Security Premium) ....................................................................... 26 7. Security Premium PC-Client .......................................................................................... 32 8. Erweiterte Kameraeinstellungen .................................................................................... 36 9. Fehlerbehebung............................................................................................................. 36 10. Technische Daten ........................................................................................................ 37 11. Anhang: Einige getestete und empfohlene HDDs für TX-29 und TX-30 sind hier aufgelistet. Andere HDD-Modelle können kompatibel sein, wurden von uns aber nicht getestet. ............................................................................................................................. 38
Transcript of Technaxx Security Premium Kamera-Set ... - Westfalia Versand
1
Technaxx® * Gebrauchsanleitung
Security Premium Kamera-Set 10.1 TX-29
Security Premium Kamera-Set 18.5 TX-30
Wichtiger Hinweis in Bezug auf die Gebrauchsanleitungen:
Alle Sprachen der Gebrauchsanleitung befinden sich auf der
beiliegenden CD. Garantie 2 Jahre
Inhaltsverzeichnis 1. Besonderheiten ................................................................................................................ 2
2. Packungsinhalt ................................................................................................................ 3
3. Produktüberblick .............................................................................................................. 3
4. Installation ........................................................................................................................ 6
4.1 Installation von TX-29 und TX-30 ................................................................................... 7
4.2 Antenneninstallation ....................................................................................................... 7
4.3 Festplatteninstallation .................................................................................................... 8
4.4 Kamera zu TX-29/TX-30 hinzufügen .............................................................................. 9
5. Software-Funktionen ...................................................................................................... 10
5.1 Geteilter Bildschirm ...................................................................................................... 10
5.2 Kamera verw ................................................................................................................ 10
5.4 Wiedergabe ................................................................................................................. 20
5.5 Videobackup ................................................................................................................ 21
5.6 Farbeinstellung ............................................................................................................ 22
5.7 PTZ (Nicht für gelieferte Kameras) .............................................................................. 23
5.8 Manu. Aufnahme .......................................................................................................... 23
5.9 Lautstärke .................................................................................................................... 23
5.10 Assistent .................................................................................................................... 23
5.11 Netzwerk .................................................................................................................... 23
5.12 Kamera hinzufügen .................................................................................................... 24
5.13 System verl. ............................................................................................................... 24
6. Gerätezugriff .................................................................................................................. 24
6.1 Zugriff über LAN (lokale WEB-Benutzeroberfläche) ..................................................... 24
6.2 Zugriff über WAN (globale WEB-Benutzeroberfläche) ................................................. 25
6.3 Mobile Anwendung (Security Premium) ....................................................................... 26
7. Security Premium PC-Client .......................................................................................... 32
8. Erweiterte Kameraeinstellungen .................................................................................... 36
9. Fehlerbehebung ............................................................................................................. 36
10. Technische Daten ........................................................................................................ 37
11. Anhang: Einige getestete und empfohlene HDDs für TX-29 und TX-30 sind hier
aufgelistet. Andere HDD-Modelle können kompatibel sein, wurden von uns aber nicht
getestet. ............................................................................................................................. 38
2
Hiermit erklärt der Hersteller Technaxx Deutschland GmbH & Co.KG, dass sich dieses
Gerät, zu dem diese Bedienungsanleitung gehört, in Übereinstimmung mit den
grundlegenden Anforderungen der Normen gemäß Richtlinie R&TTE 2014/53/EU. Hier
finden Sie die Konformitätserklärung: www.technaxx.de/ (in der unteren Leiste unter
“Konformitätserklärung”). Vor dem ersten Gebrauch lesen Sie die Gebrauchsanleitung
sorgfältig durch.
Telefonnummer für den technischen Service: 01805 012643 (14 Cent/Minute aus dem
deutschen Festnetz und 42 Cent/Minute aus Mobilfunknetzen). Kostenfreie E-Mail:
Wenn Sie ein Loch in die Wand bohren vergewissern Sie sich, dass keine
Strom-/Netz-/Elektrokabel und/oder Rohrleitungen beschädigt werden. Bei Verwendung
des mitgelieferten Befestigungsmaterials übernehmen wir nicht gleichzeitig auch die
Haftung für eine fachgerechte Montage. Sie alleine haften dafür, dass das
Befestigungsmaterials für das jeweilige Mauerwerk geeignet ist, und dass die Montage
fachgerecht ausgeführt wird. Bei Arbeiten in größeren Höhen besteht Absturzgefahr! Daher
sorgen Sie für geeignete Absturzsicherungen.
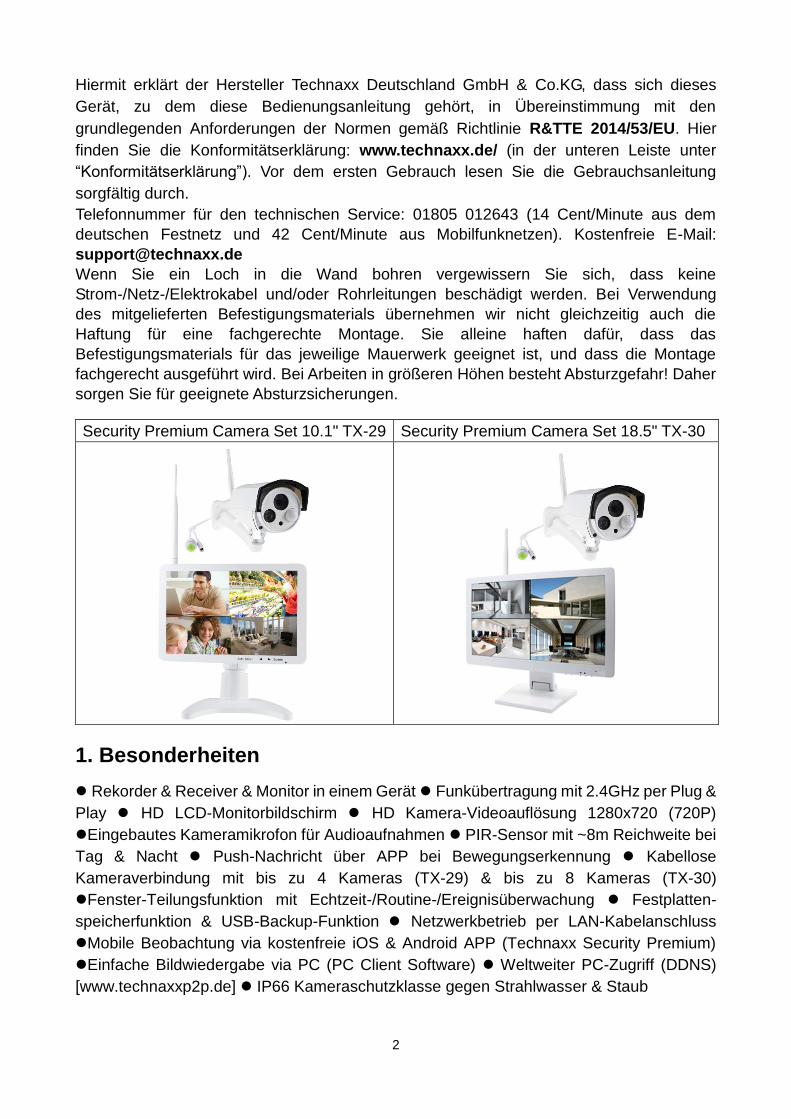
Security Premium Camera Set 10.1" TX-29 Security Premium Camera Set 18.5" TX-30
1. Besonderheiten
Rekorder & Receiver & Monitor in einem Gerät Funkübertragung mit 2.4GHz per Plug &
Play HD LCD-Monitorbildschirm HD Kamera-Videoauflösung 1280x720 (720P)
Eingebautes Kameramikrofon für Audioaufnahmen PIR-Sensor mit ~8m Reichweite bei
Tag & Nacht Push-Nachricht über APP bei Bewegungserkennung Kabellose
Kameraverbindung mit bis zu 4 Kameras (TX-29) & bis zu 8 Kameras (TX-30)
Fenster-Teilungsfunktion mit Echtzeit-/Routine-/Ereignisüberwachung Festplatten-
speicherfunktion & USB-Backup-Funktion Netzwerkbetrieb per LAN-Kabelanschluss
Mobile Beobachtung via kostenfreie iOS & Android APP (Technaxx Security Premium)
Einfache Bildwiedergabe via PC (PC Client Software) Weltweiter PC-Zugriff (DDNS)
[www.technaxxp2p.de] IP66 Kameraschutzklasse gegen Strahlwasser & Staub
3
2. Packungsinhalt
TX-29: Monitor mit Standfuß, AC/DC Adapter 12V/2A, Wandhalterung & Schrauben &
Dübel, HDD-Halterung & Schrauben, Antenne, Aussenkamera mit AC/DC Adapter 12V/1A,
Wandhalterung & Schrauben & Dübel, Antenne, Wasserfeste Abschlusskappe, Allgemein:
USB-Maus, Netzwerkkabel (2m), CD, Gebrauchsanleitung, [*HDD nicht enthalten]
TX-30: Monitor mit Standfuß, AC/DC Adapter 12V/3A, Wandhalterung & Schrauben &
Dübel, Antenne, Aussenkamera mit AC/DC Adapter 12V/1A, Wandhalterung & Schrauben
& Dübel, Antenne, Wasserfeste Abschlusskappe, Allgemein: USB-Maus, Netzwerkkabel
(2m), CD, Gebrauchsanleitung, [*HDD nicht enthalten]
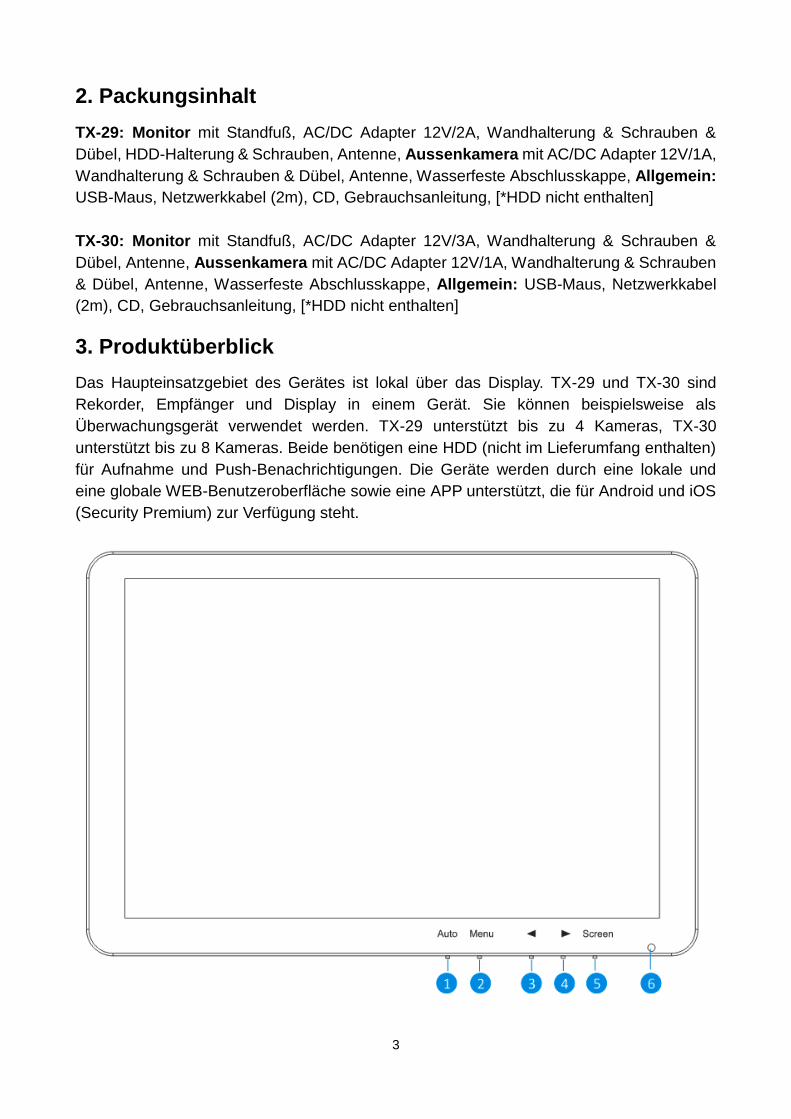
3. Produktüberblick
Das Haupteinsatzgebiet des Gerätes ist lokal über das Display. TX-29 und TX-30 sind
Rekorder, Empfänger und Display in einem Gerät. Sie können beispielsweise als
Überwachungsgerät verwendet werden. TX-29 unterstützt bis zu 4 Kameras, TX-30
unterstützt bis zu 8 Kameras. Beide benötigen eine HDD (nicht im Lieferumfang enthalten)
für Aufnahme und Push-Benachrichtigungen. Die Geräte werden durch eine lokale und
eine globale WEB-Benutzeroberfläche sowie eine APP unterstützt, die für Android und iOS
(Security Premium) zur Verfügung steht.
4
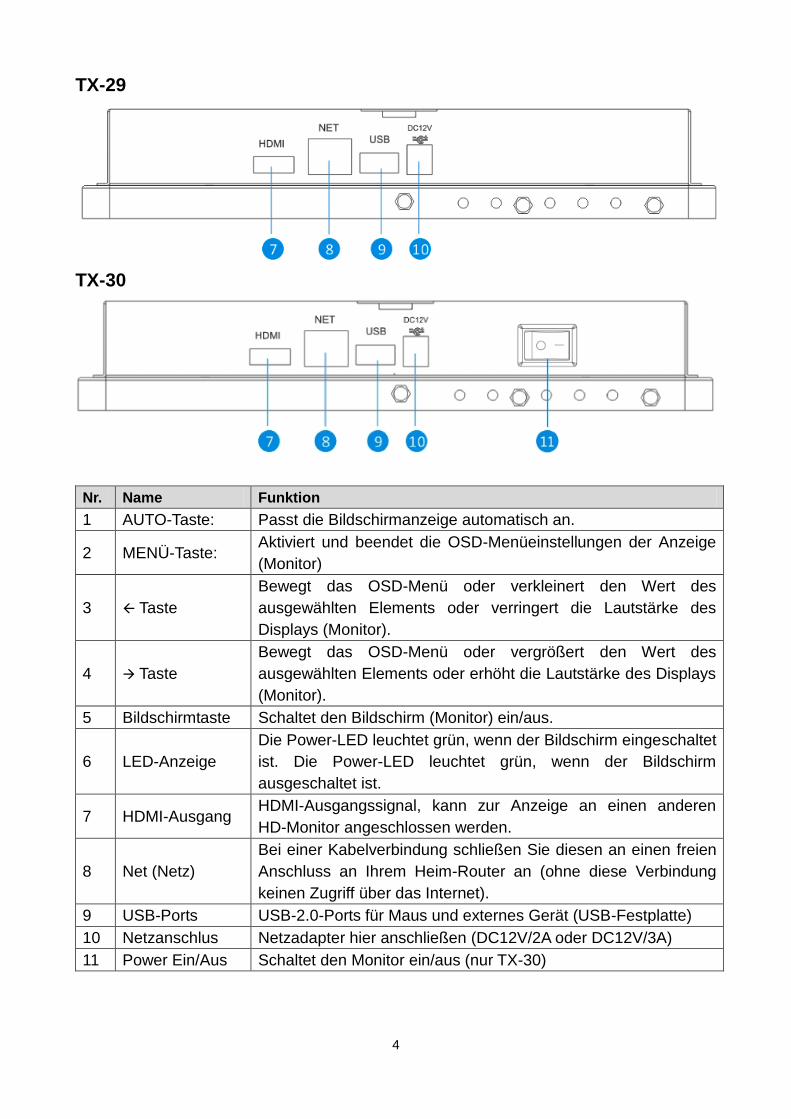
TX-29
TX-30
Nr. Name Funktion
1 AUTO-Taste: Passt die Bildschirmanzeige automatisch an.
2 MENÜ-Taste: Aktiviert und beendet die OSD-Menüeinstellungen der Anzeige
(Monitor)
3 Taste
Bewegt das OSD-Menü oder verkleinert den Wert des
ausgewählten Elements oder verringert die Lautstärke des
Displays (Monitor).
4 Taste
Bewegt das OSD-Menü oder vergrößert den Wert des
ausgewählten Elements oder erhöht die Lautstärke des Displays
(Monitor).
5 Bildschirmtaste Schaltet den Bildschirm (Monitor) ein/aus.
6 LED-Anzeige
Die Power-LED leuchtet grün, wenn der Bildschirm eingeschaltet
ist. Die Power-LED leuchtet grün, wenn der Bildschirm
ausgeschaltet ist.
7 HDMI-Ausgang HDMI-Ausgangssignal, kann zur Anzeige an einen anderen
HD-Monitor angeschlossen werden.
8 Net (Netz)
Bei einer Kabelverbindung schließen Sie diesen an einen freien
Anschluss an Ihrem Heim-Router an (ohne diese Verbindung
keinen Zugriff über das Internet).
9 USB-Ports USB-2.0-Ports für Maus und externes Gerät (USB-Festplatte)
10 Netzanschlus Netzadapter hier anschließen (DC12V/2A oder DC12V/3A)
11 Power Ein/Aus Schaltet den Monitor ein/aus (nur TX-30)
5
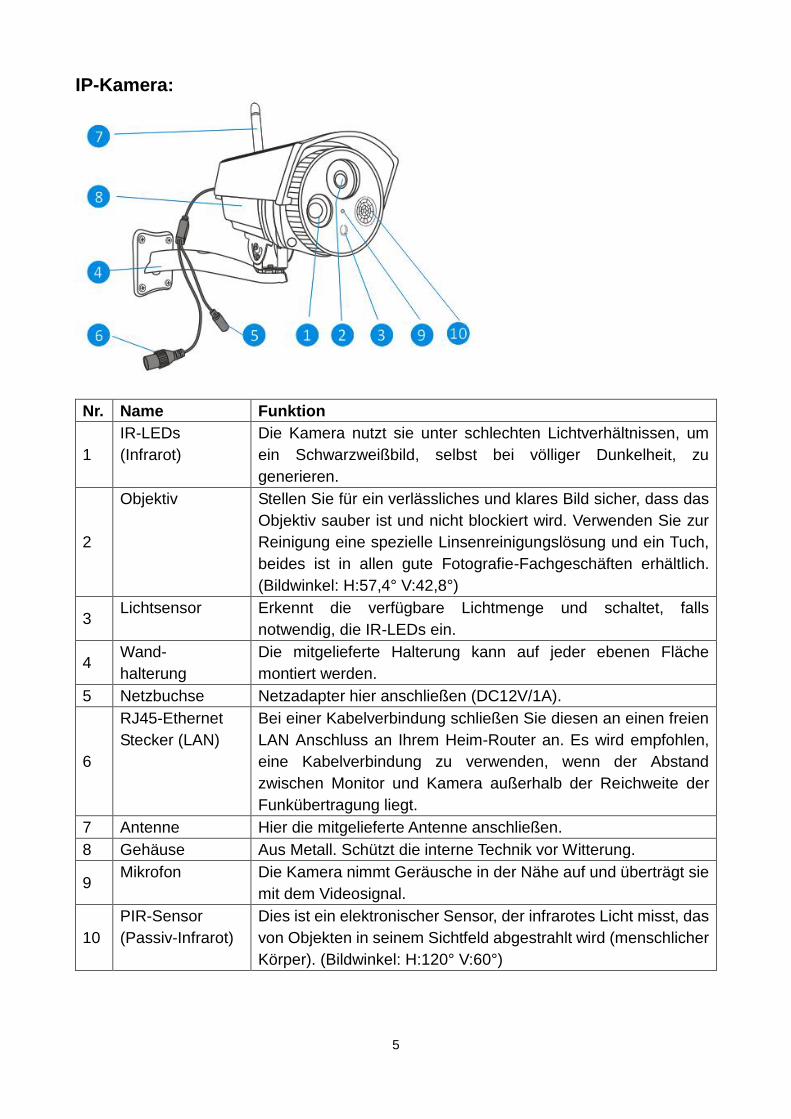
IP-Kamera:
Nr. Name Funktion
1
IR-LEDs
(Infrarot)
Die Kamera nutzt sie unter schlechten Lichtverhältnissen, um
ein Schwarzweißbild, selbst bei völliger Dunkelheit, zu
generieren.
2
Objektiv Stellen Sie für ein verlässliches und klares Bild sicher, dass das
Objektiv sauber ist und nicht blockiert wird. Verwenden Sie zur
Reinigung eine spezielle Linsenreinigungslösung und ein Tuch,
beides ist in allen gute Fotografie-Fachgeschäften erhältlich.
(Bildwinkel: H:57,4° V:42,8°)
3 Lichtsensor Erkennt die verfügbare Lichtmenge und schaltet, falls
notwendig, die IR-LEDs ein.
4 Wand-
halterung
Die mitgelieferte Halterung kann auf jeder ebenen Fläche
montiert werden.
5 Netzbuchse Netzadapter hier anschließen (DC12V/1A).
6
RJ45-Ethernet
Stecker (LAN)
Bei einer Kabelverbindung schließen Sie diesen an einen freien
LAN Anschluss an Ihrem Heim-Router an. Es wird empfohlen,
eine Kabelverbindung zu verwenden, wenn der Abstand
zwischen Monitor und Kamera außerhalb der Reichweite der
Funkübertragung liegt.
7 Antenne Hier die mitgelieferte Antenne anschließen.
8 Gehäuse Aus Metall. Schützt die interne Technik vor Witterung.
9 Mikrofon Die Kamera nimmt Geräusche in der Nähe auf und überträgt sie
mit dem Videosignal.
10
PIR-Sensor
(Passiv-Infrarot)
Dies ist ein elektronischer Sensor, der infrarotes Licht misst, das
von Objekten in seinem Sichtfeld abgestrahlt wird (menschlicher
Körper). (Bildwinkel: H:120° V:60°)
6
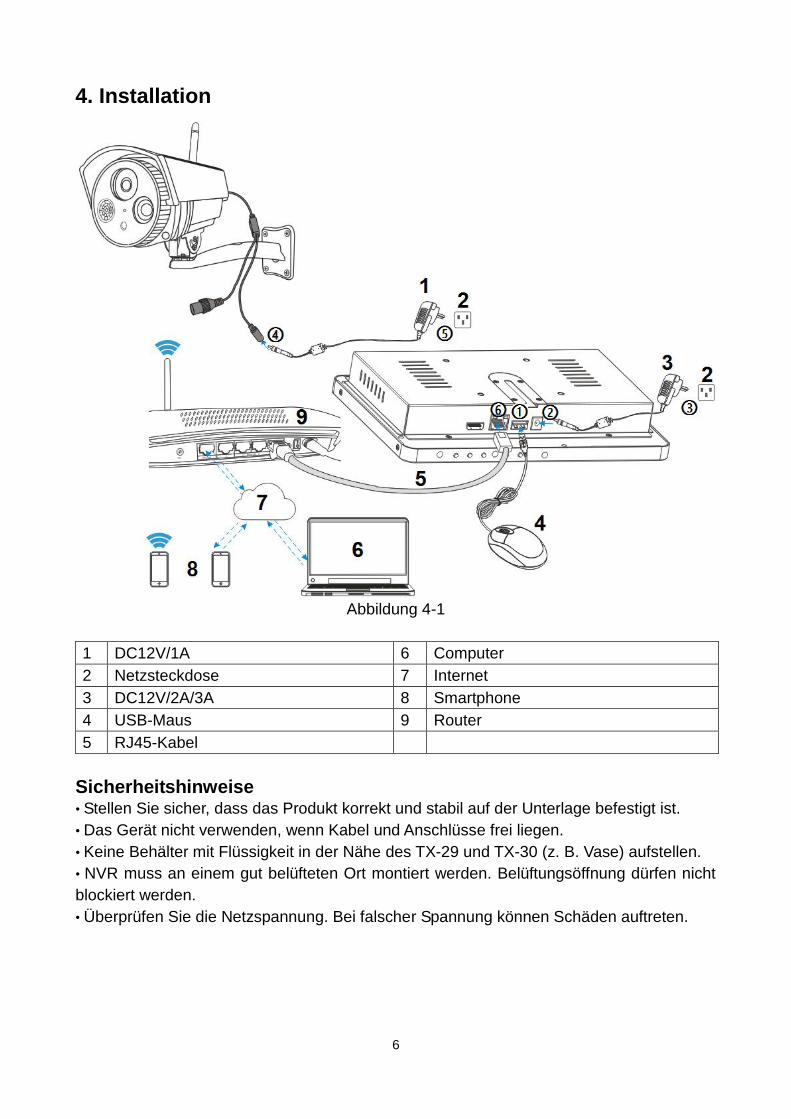
4. Installation
Abbildung 4-1
1 DC12V/1A 6 Computer
2 Netzsteckdose 7 Internet
3 DC12V/2A/3A 8 Smartphone
4 USB-Maus 9 Router
5 RJ45-Kabel
Sicherheitshinweise • Stellen Sie sicher, dass das Produkt korrekt und stabil auf der Unterlage befestigt ist.
• Das Gerät nicht verwenden, wenn Kabel und Anschlüsse frei liegen.
• Keine Behälter mit Flüssigkeit in der Nähe des TX-29 und TX-30 (z. B. Vase) aufstellen.
• NVR muss an einem gut belüfteten Ort montiert werden. Belüftungsöffnung dürfen nicht
blockiert werden.
• Überprüfen Sie die Netzspannung. Bei falscher Spannung können Schäden auftreten.
7
4.1 Installation von TX-29 und TX-30
Siehe Abbildung 4-1 oben und folgen Sie den Schritten unten.
① Verbinden Sie die mitgelieferte USB-Maus mit einem der USB-Stecker.
② Schließen Sie den mitgelieferten 12V-Netzadapter an die Netzbuchse des NVRs an.
③ Stecken Sie den Netzadapter in die Netzsteckdose.
④ Schließen Sie den mitgelieferten 12V-Netzadapter an die Netzbuchse der Kamera an.
⑤ Stecken Sie den Netzadapter in die Netzsteckdose.
Warten Sie einige Minuten bis TX-29/TX-30 und die IP-Kamera die Inbetriebnahme
abgeschlossen haben. Das lokale Überwachungssystem ist bereit.
⑥ Falls Sie dieses System mit einem Smartphone oder Computer aus der Ferne steuern
möchten, müssen Sie das TX-29/TX-30 an Ihren WLAN-Router über ein
RJ45-Netzwerkkabel anschließen und sicherstellen, dass der Router mit dem Internet
verbunden worden ist. Informationen zur Smartphone-Installation finden Sie im Kapitel 6.3
Mobile Anwendung (Security Premium).
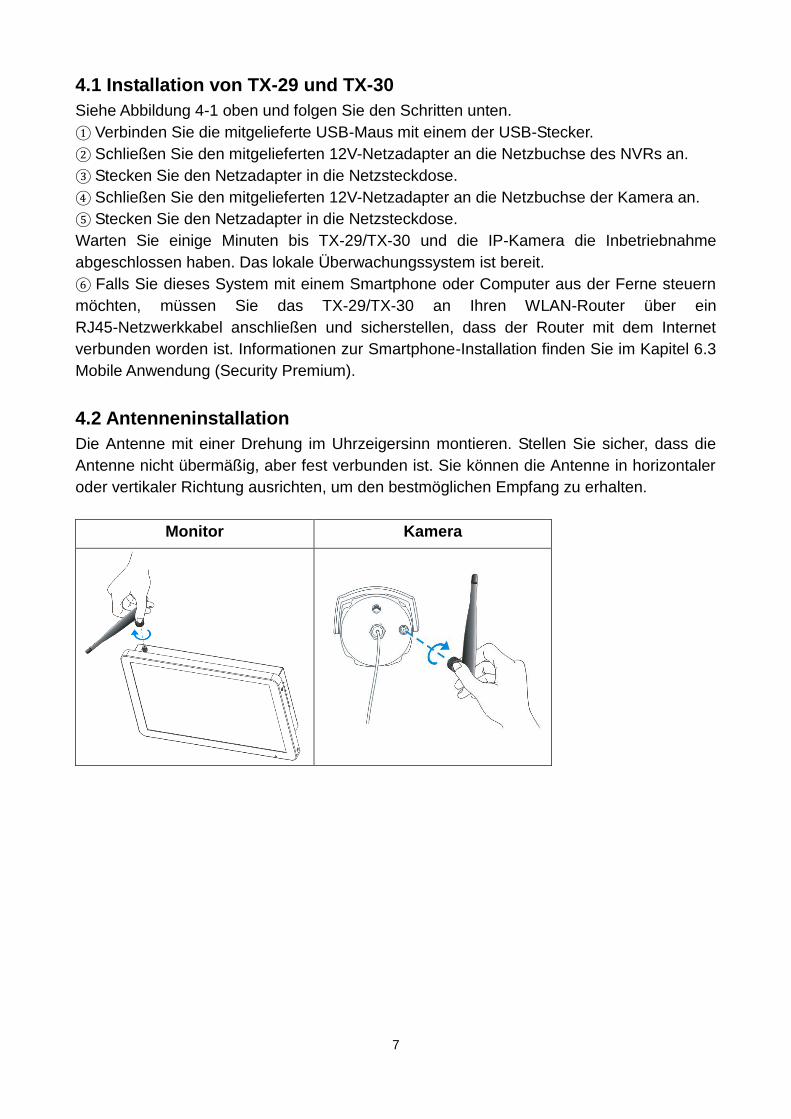
4.2 Antenneninstallation
Die Antenne mit einer Drehung im Uhrzeigersinn montieren. Stellen Sie sicher, dass die
Antenne nicht übermäßig, aber fest verbunden ist. Sie können die Antenne in horizontaler
oder vertikaler Richtung ausrichten, um den bestmöglichen Empfang zu erhalten.
Monitor Kamera
8
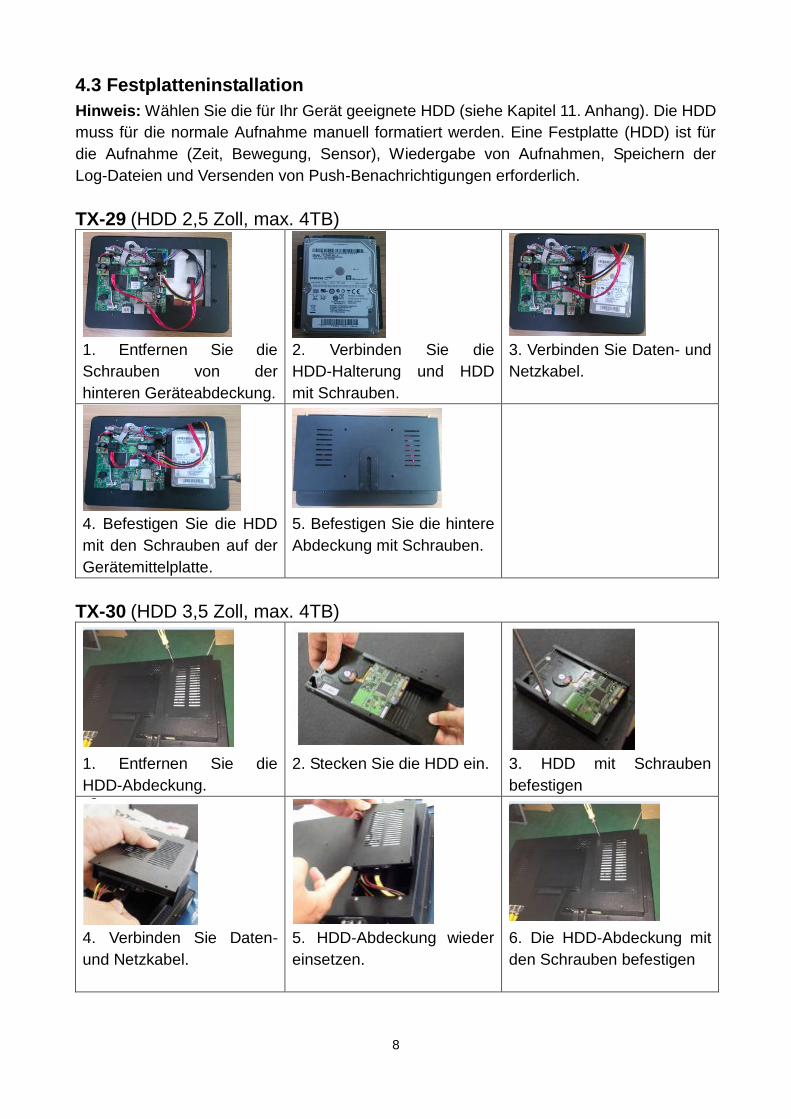
4.3 Festplatteninstallation
Hinweis: Wählen Sie die für Ihr Gerät geeignete HDD (siehe Kapitel 11. Anhang). Die HDD
muss für die normale Aufnahme manuell formatiert werden. Eine Festplatte (HDD) ist für
die Aufnahme (Zeit, Bewegung, Sensor), Wiedergabe von Aufnahmen, Speichern der
Log-Dateien und Versenden von Push-Benachrichtigungen erforderlich.
TX-29 (HDD 2,5 Zoll, max. 4TB)
1. Entfernen Sie die
Schrauben von der
hinteren Geräteabdeckung.
2. Verbinden Sie die
HDD-Halterung und HDD
mit Schrauben.
3. Verbinden Sie Daten- und
Netzkabel.
4. Befestigen Sie die HDD
mit den Schrauben auf der
Gerätemittelplatte.
5. Befestigen Sie die hintere
Abdeckung mit Schrauben.
TX-30 (HDD 3,5 Zoll, max. 4TB)
1. Entfernen Sie die
HDD-Abdeckung.
2. Stecken Sie die HDD ein.
3. HDD mit Schrauben
befestigen
4. Verbinden Sie Daten-
und Netzkabel.
5. HDD-Abdeckung wieder
einsetzen.
6. Die HDD-Abdeckung mit
den Schrauben befestigen
9
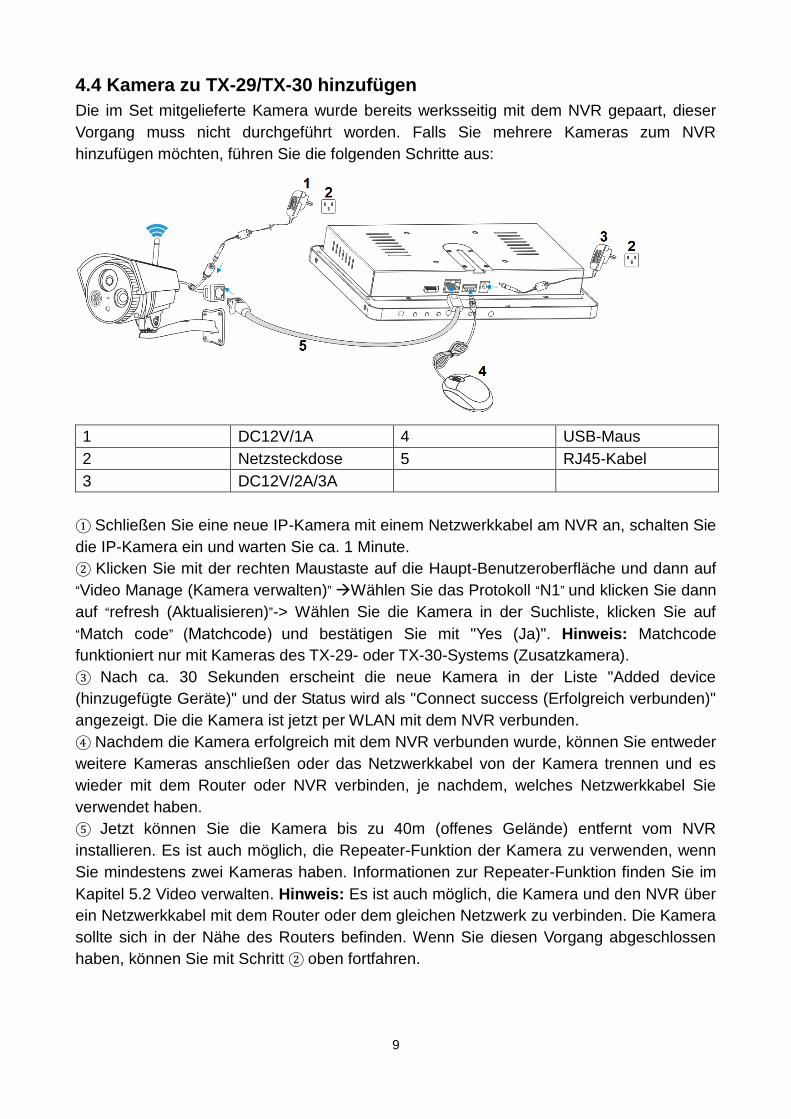
4.4 Kamera zu TX-29/TX-30 hinzufügen
Die im Set mitgelieferte Kamera wurde bereits werksseitig mit dem NVR gepaart, dieser
Vorgang muss nicht durchgeführt worden. Falls Sie mehrere Kameras zum NVR
hinzufügen möchten, führen Sie die folgenden Schritte aus:
1 DC12V/1A 4 USB-Maus
2 Netzsteckdose 5 RJ45-Kabel
3 DC12V/2A/3A
① Schließen Sie eine neue IP-Kamera mit einem Netzwerkkabel am NVR an, schalten Sie
die IP-Kamera ein und warten Sie ca. 1 Minute.
② Klicken Sie mit der rechten Maustaste auf die Haupt-Benutzeroberfläche und dann auf
“Video Manage (Kamera verwalten)” Wählen Sie das Protokoll “N1” und klicken Sie dann
auf “refresh (Aktualisieren)”-> Wählen Sie die Kamera in der Suchliste, klicken Sie auf
“Match code” (Matchcode) und bestätigen Sie mit "Yes (Ja)". Hinweis: Matchcode
funktioniert nur mit Kameras des TX-29- oder TX-30-Systems (Zusatzkamera).
③ Nach ca. 30 Sekunden erscheint die neue Kamera in der Liste "Added device
(hinzugefügte Geräte)" und der Status wird als "Connect success (Erfolgreich verbunden)"
angezeigt. Die die Kamera ist jetzt per WLAN mit dem NVR verbunden.
④ Nachdem die Kamera erfolgreich mit dem NVR verbunden wurde, können Sie entweder
weitere Kameras anschließen oder das Netzwerkkabel von der Kamera trennen und es
wieder mit dem Router oder NVR verbinden, je nachdem, welches Netzwerkkabel Sie
verwendet haben.
⑤ Jetzt können Sie die Kamera bis zu 40m (offenes Gelände) entfernt vom NVR
installieren. Es ist auch möglich, die Repeater-Funktion der Kamera zu verwenden, wenn
Sie mindestens zwei Kameras haben. Informationen zur Repeater-Funktion finden Sie im
Kapitel 5.2 Video verwalten. Hinweis: Es ist auch möglich, die Kamera und den NVR über
ein Netzwerkkabel mit dem Router oder dem gleichen Netzwerk zu verbinden. Die Kamera
sollte sich in der Nähe des Routers befinden. Wenn Sie diesen Vorgang abgeschlossen
haben, können Sie mit Schritt ② oben fortfahren.
10
5. Software-Funktionen
Die folgenden Funktionen werden angezeigt, wenn Sie mit der rechten Maustaste auf den
Anzeigebildschirm klicken.
5.1 Geteilter Bildschirm
Falls Sie die Anzahl der Monitoranzeigen ändern möchten, klicken Sie mit der rechten
Maustaste auf den Bildschirm. Wählen Sie: x1 = 1-Kanalansicht, x4 = 4-Kanalansicht, x6 =
6-Kanalansicht usw.
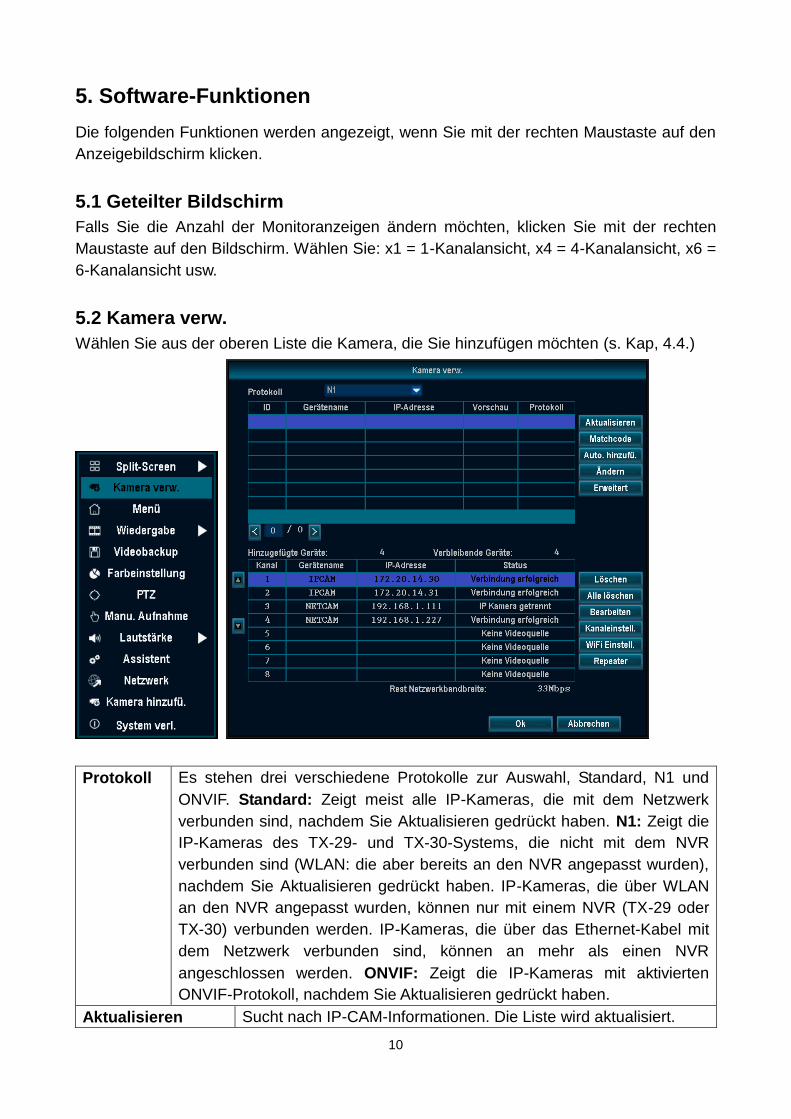
5.2 Kamera verw.
Wählen Sie aus der oberen Liste die Kamera, die Sie hinzufügen möchten (s. Kap, 4.4.)
Protokoll Es stehen drei verschiedene Protokolle zur Auswahl, Standard, N1 und
ONVIF. Standard: Zeigt meist alle IP-Kameras, die mit dem Netzwerk
verbunden sind, nachdem Sie Aktualisieren gedrückt haben. N1: Zeigt die
IP-Kameras des TX-29- und TX-30-Systems, die nicht mit dem NVR
verbunden sind (WLAN: die aber bereits an den NVR angepasst wurden),
nachdem Sie Aktualisieren gedrückt haben. IP-Kameras, die über WLAN
an den NVR angepasst wurden, können nur mit einem NVR (TX-29 oder
TX-30) verbunden werden. IP-Kameras, die über das Ethernet-Kabel mit
dem Netzwerk verbunden sind, können an mehr als einen NVR
angeschlossen werden. ONVIF: Zeigt die IP-Kameras mit aktivierten
ONVIF-Protokoll, nachdem Sie Aktualisieren gedrückt haben.
Aktualisieren Sucht nach IP-CAM-Informationen. Die Liste wird aktualisiert.
11
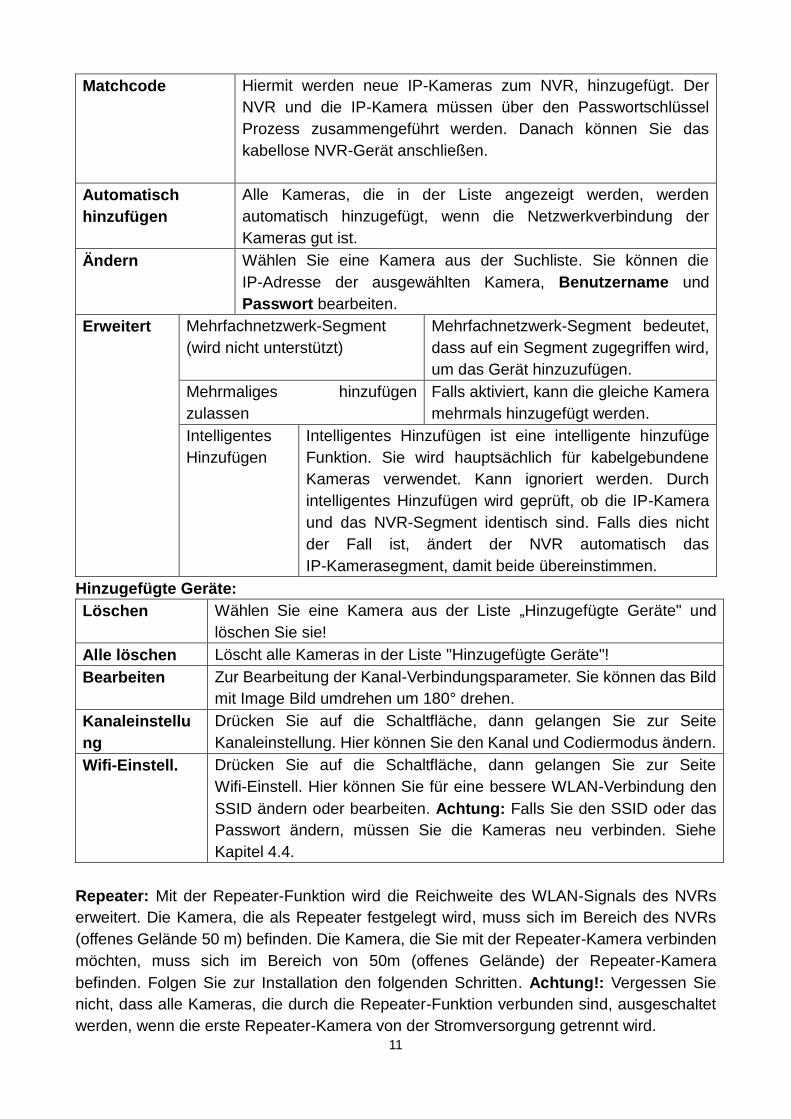
Matchcode Hiermit werden neue IP-Kameras zum NVR, hinzugefügt. Der
NVR und die IP-Kamera müssen über den Passwortschlüssel
Prozess zusammengeführt werden. Danach können Sie das
kabellose NVR-Gerät anschließen.
Automatisch
hinzufügen
Alle Kameras, die in der Liste angezeigt werden, werden
automatisch hinzugefügt, wenn die Netzwerkverbindung der
Kameras gut ist.
Ändern Wählen Sie eine Kamera aus der Suchliste. Sie können die
IP-Adresse der ausgewählten Kamera, Benutzername und
Passwort bearbeiten.
Erweitert Mehrfachnetzwerk-Segment
(wird nicht unterstützt)
Mehrfachnetzwerk-Segment bedeutet,
dass auf ein Segment zugegriffen wird,
um das Gerät hinzuzufügen.
Mehrmaliges hinzufügen
zulassen
Falls aktiviert, kann die gleiche Kamera
mehrmals hinzugefügt werden.
Intelligentes
Hinzufügen
Intelligentes Hinzufügen ist eine intelligente hinzufüge
Funktion. Sie wird hauptsächlich für kabelgebundene
Kameras verwendet. Kann ignoriert werden. Durch
intelligentes Hinzufügen wird geprüft, ob die IP-Kamera
und das NVR-Segment identisch sind. Falls dies nicht
der Fall ist, ändert der NVR automatisch das
IP-Kamerasegment, damit beide übereinstimmen.
Hinzugefügte Geräte:
Löschen Wählen Sie eine Kamera aus der Liste „Hinzugefügte Geräte" und
löschen Sie sie!
Alle löschen Löscht alle Kameras in der Liste "Hinzugefügte Geräte"!
Bearbeiten Zur Bearbeitung der Kanal-Verbindungsparameter. Sie können das Bild
mit Image Bild umdrehen um 180° drehen.
Kanaleinstellu
ng
Drücken Sie auf die Schaltfläche, dann gelangen Sie zur Seite
Kanaleinstellung. Hier können Sie den Kanal und Codiermodus ändern.
Wifi-Einstell. Drücken Sie auf die Schaltfläche, dann gelangen Sie zur Seite
Wifi-Einstell. Hier können Sie für eine bessere WLAN-Verbindung den
SSID ändern oder bearbeiten. Achtung: Falls Sie den SSID oder das
Passwort ändern, müssen Sie die Kameras neu verbinden. Siehe
Kapitel 4.4.
Repeater: Mit der Repeater-Funktion wird die Reichweite des WLAN-Signals des NVRs
erweitert. Die Kamera, die als Repeater festgelegt wird, muss sich im Bereich des NVRs
(offenes Gelände 50 m) befinden. Die Kamera, die Sie mit der Repeater-Kamera verbinden
möchten, muss sich im Bereich von 50m (offenes Gelände) der Repeater-Kamera
befinden. Folgen Sie zur Installation den folgenden Schritten. Achtung!: Vergessen Sie
nicht, dass alle Kameras, die durch die Repeater-Funktion verbunden sind, ausgeschaltet
werden, wenn die erste Repeater-Kamera von der Stromversorgung getrennt wird.
12
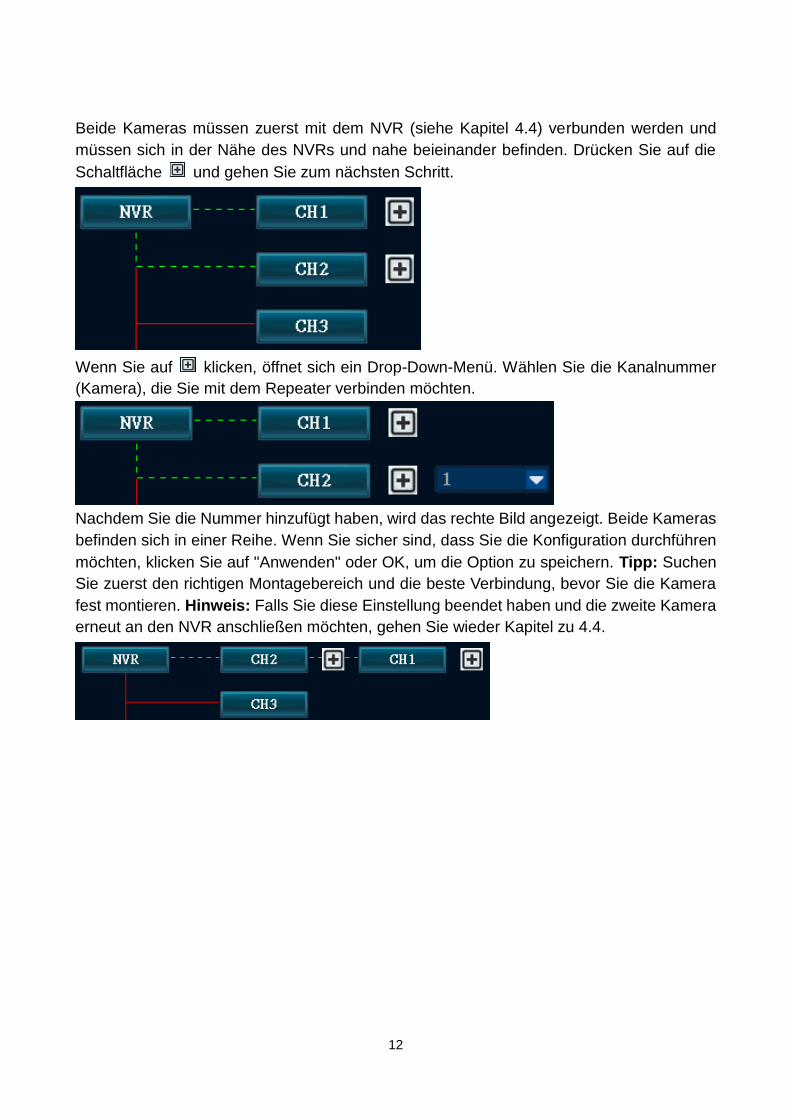
Beide Kameras müssen zuerst mit dem NVR (siehe Kapitel 4.4) verbunden werden und
müssen sich in der Nähe des NVRs und nahe beieinander befinden. Drücken Sie auf die
Schaltfläche und gehen Sie zum nächsten Schritt.
Wenn Sie auf klicken, öffnet sich ein Drop-Down-Menü. Wählen Sie die Kanalnummer
(Kamera), die Sie mit dem Repeater verbinden möchten.
Nachdem Sie die Nummer hinzufügt haben, wird das rechte Bild angezeigt. Beide Kameras
befinden sich in einer Reihe. Wenn Sie sicher sind, dass Sie die Konfiguration durchführen
möchten, klicken Sie auf "Anwenden" oder OK, um die Option zu speichern. Tipp: Suchen
Sie zuerst den richtigen Montagebereich und die beste Verbindung, bevor Sie die Kamera
fest montieren. Hinweis: Falls Sie diese Einstellung beendet haben und die zweite Kamera
erneut an den NVR anschließen möchten, gehen Sie wieder Kapitel zu 4.4.
13
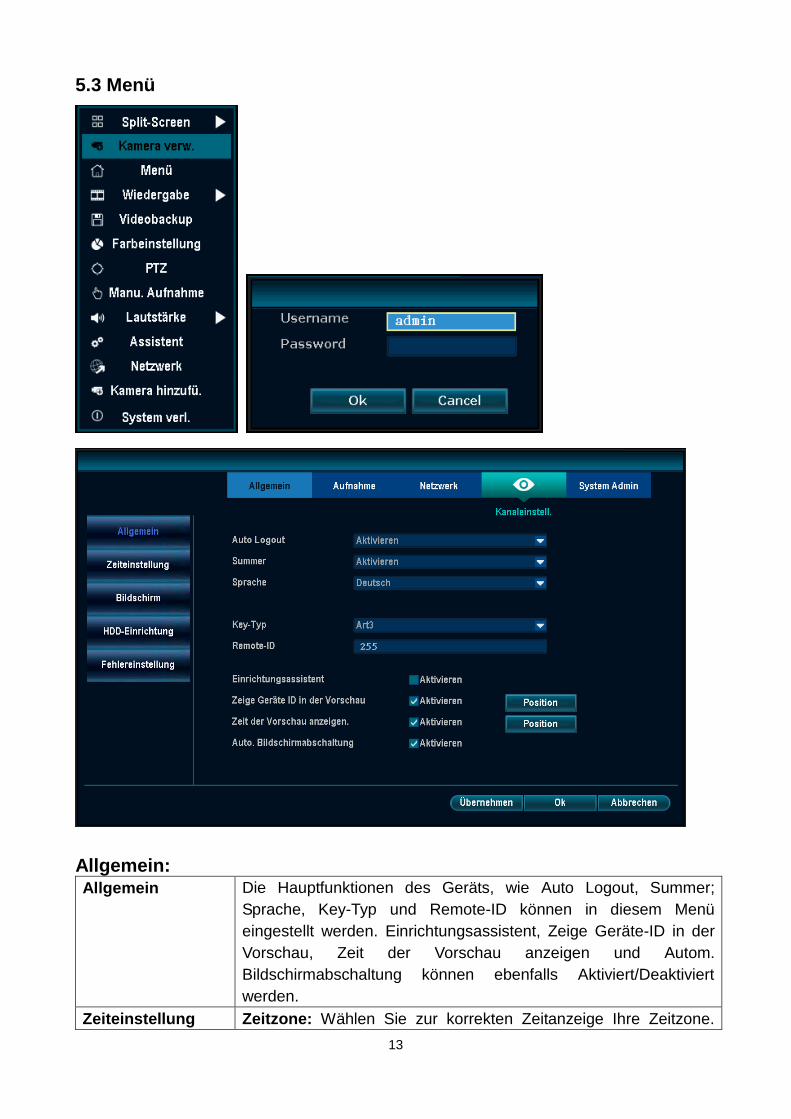
5.3 Menü
Allgemein: Allgemein Die Hauptfunktionen des Geräts, wie Auto Logout, Summer;
Sprache, Key-Typ und Remote-ID können in diesem Menü
eingestellt werden. Einrichtungsassistent, Zeige Geräte-ID in der
Vorschau, Zeit der Vorschau anzeigen und Autom.
Bildschirmabschaltung können ebenfalls Aktiviert/Deaktiviert
werden.
Zeiteinstellung Zeitzone: Wählen Sie zur korrekten Zeitanzeige Ihre Zeitzone.
14
Datumsformat: Legen Sie das korrekte Datumsformat für Ihre
Region fest. Systemdatum: Wird automatisch vom Rekorder
eingestellt. Systemzeit: Wird automatisch vom Rekorder
eingestellt. Sync Zeit: Die Systemzeit kann über den Link unter
"Erweitert" synchronisiert werden (das Gerät muss mit dem
Internet verbunden sein). Zeitformat: Wählen Sie zwischen dem
12- und 24-Stunden-Format.
Bildschirm OSD Alpha: In diesem Menü kann der Weißabgleich eingestellt
werden. Auflösung: Hier wird die Bildauflösung eingestellt. Auto
Switch: Schaltet zwischen x1-Ansicht und x4-Ansicht um (2 bis 10
Sekunden).
HDD-Einrichtung Sie können die Festplatte formatieren und den Wert festlegen,
nach welchem Zeitraum die älteste Datei gelöscht werden soll.
Fehlereinstellung Aktivieren Sie einen oder mehrere der folgenden Alarme, bei
denen eine Benachrichtigung ausgelöst werden soll. (wenn HDDs
nicht gefunden werden, Festplattenfehler, nicht genügend
Speicherplatz, Netzwerktrennung, IP-Adressenkonflikt,
Aufnahmefehler oder alle). Wählen Sie aus den drei
Benachrichtigungsmöglichkeiten. Alarm: In der Live-Ansicht wird
ein rotes Dreieck mit einem Ausrufezeichen angezeigt, wenn ein
oder mehrere Fehler auftreten.
Summer: Das Gerät gibt einen Summton ab, wenn ein oder
mehrere Fehler auftreten.
E-Mail-Benachrichtigung: Das Gerät sendet eine E-Mail mit der
entsprechenden Fehlermeldung.
Aufnahme:
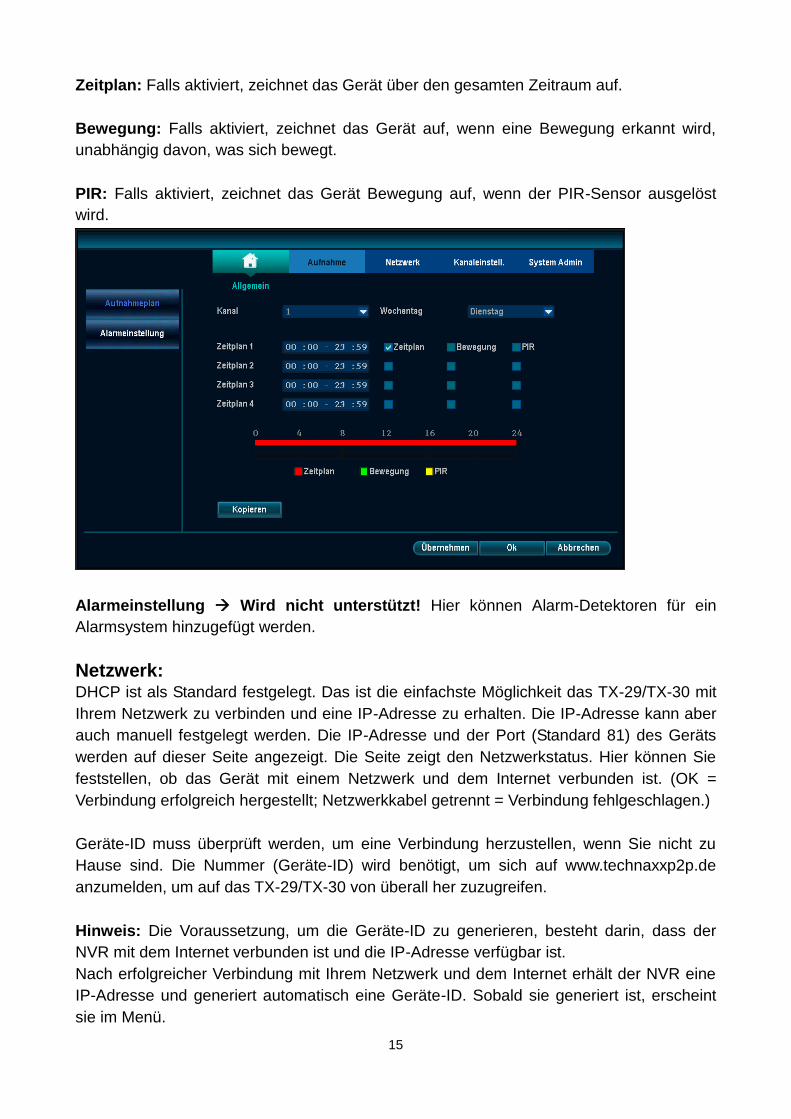
Aufnahmeplan Kann 4 Zeitintervalle für jeden Kanal und jeden Tag der Woche
festlegen. Wählen Sie zuerst den Kanal und den Wochentag. Legen Sie danach die
Zeiträume fest, in denen Sie informiert werden möchten. Sie können den Zeitplan,
Bewegung, PIR oder alle drei festlegen, indem Sie die Kontrollkästchen markieren. (Falls
Sie "Bewegung" markiert haben, erscheint in der rechten oberen Ecke ein gelber gehender
Mann in dem Kanal, indem ein Alarm ausgelöst wurde. Falls Sie den "Zeitplan" und nicht
"Bewegung" aktiviert haben, wird in der rechten oberen Ecke des Kanals eine Uhr
angezeigt. Falls Sie "PIR" aktiviert haben, wird in der rechten oberen Ecke des Kanals ein
gelbes Dreieck mit einem Ausrufezeichen angezeigt.) Falls Sie eine Kopie für jeden Tag
benötigen, klicken Sie "Ok", um die Einstellung für alle Wochentage zu speichern. Mit
"Kopieren" können Sie die Einstellungen von einem Kanal zum anderen oder für alle
Kanäle kopieren. Vergessen Sie nicht, die Einstellungen zu speichern, indem Sie auf
„Übernehmen“ und „OK“ klicken. Hinweis: Um zur Bewegungserkennung zu wechseln und
um den Bereich festzulegen, in dem die Bewegung erkannt werden sollte, Gehen Sie zu
Kanaleinstell. Bewegungsalarm.
15
Zeitplan: Falls aktiviert, zeichnet das Gerät über den gesamten Zeitraum auf.
Bewegung: Falls aktiviert, zeichnet das Gerät auf, wenn eine Bewegung erkannt wird,
unabhängig davon, was sich bewegt.
PIR: Falls aktiviert, zeichnet das Gerät Bewegung auf, wenn der PIR-Sensor ausgelöst
wird.
Alarmeinstellung Wird nicht unterstützt! Hier können Alarm-Detektoren für ein
Alarmsystem hinzugefügt werden.
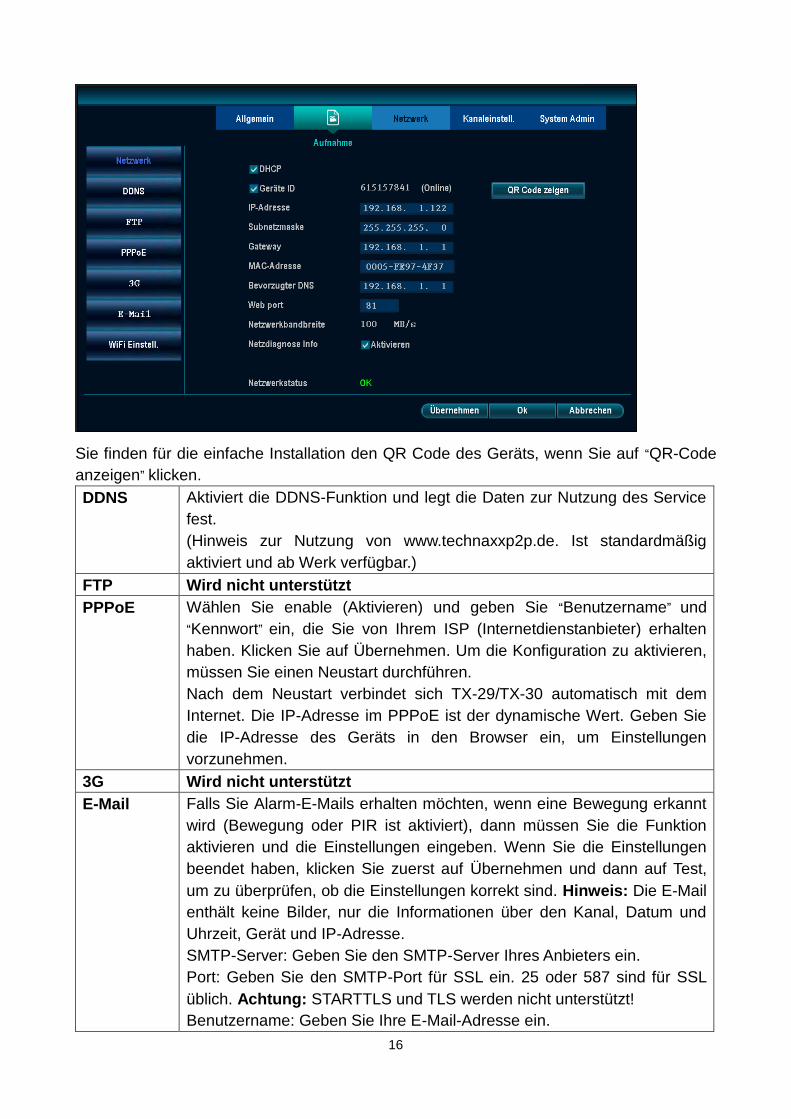
Netzwerk: DHCP ist als Standard festgelegt. Das ist die einfachste Möglichkeit das TX-29/TX-30 mit
Ihrem Netzwerk zu verbinden und eine IP-Adresse zu erhalten. Die IP-Adresse kann aber
auch manuell festgelegt werden. Die IP-Adresse und der Port (Standard 81) des Geräts
werden auf dieser Seite angezeigt. Die Seite zeigt den Netzwerkstatus. Hier können Sie
feststellen, ob das Gerät mit einem Netzwerk und dem Internet verbunden ist. (OK =
Verbindung erfolgreich hergestellt; Netzwerkkabel getrennt = Verbindung fehlgeschlagen.)
Geräte-ID muss überprüft werden, um eine Verbindung herzustellen, wenn Sie nicht zu
Hause sind. Die Nummer (Geräte-ID) wird benötigt, um sich auf www.technaxxp2p.de
anzumelden, um auf das TX-29/TX-30 von überall her zuzugreifen.
Hinweis: Die Voraussetzung, um die Geräte-ID zu generieren, besteht darin, dass der
NVR mit dem Internet verbunden ist und die IP-Adresse verfügbar ist.
Nach erfolgreicher Verbindung mit Ihrem Netzwerk und dem Internet erhält der NVR eine
IP-Adresse und generiert automatisch eine Geräte-ID. Sobald sie generiert ist, erscheint
sie im Menü.
16
Sie finden für die einfache Installation den QR Code des Geräts, wenn Sie auf “QR-Code
anzeigen” klicken.
DDNS Aktiviert die DDNS-Funktion und legt die Daten zur Nutzung des Service
fest.
(Hinweis zur Nutzung von www.technaxxp2p.de. Ist standardmäßig
aktiviert und ab Werk verfügbar.)
FTP Wird nicht unterstützt
PPPoE Wählen Sie enable (Aktivieren) und geben Sie “Benutzername” und
“Kennwort” ein, die Sie von Ihrem ISP (Internetdienstanbieter) erhalten
haben. Klicken Sie auf Übernehmen. Um die Konfiguration zu aktivieren,
müssen Sie einen Neustart durchführen.
Nach dem Neustart verbindet sich TX-29/TX-30 automatisch mit dem
Internet. Die IP-Adresse im PPPoE ist der dynamische Wert. Geben Sie
die IP-Adresse des Geräts in den Browser ein, um Einstellungen
vorzunehmen.
3G Wird nicht unterstützt
E-Mail Falls Sie Alarm-E-Mails erhalten möchten, wenn eine Bewegung erkannt
wird (Bewegung oder PIR ist aktiviert), dann müssen Sie die Funktion
aktivieren und die Einstellungen eingeben. Wenn Sie die Einstellungen
beendet haben, klicken Sie zuerst auf Übernehmen und dann auf Test,
um zu überprüfen, ob die Einstellungen korrekt sind. Hinweis: Die E-Mail
enthält keine Bilder, nur die Informationen über den Kanal, Datum und
Uhrzeit, Gerät und IP-Adresse.
SMTP-Server: Geben Sie den SMTP-Server Ihres Anbieters ein.
Port: Geben Sie den SMTP-Port für SSL ein. 25 oder 587 sind für SSL
üblich. Achtung: STARTTLS und TLS werden nicht unterstützt!
Benutzername: Geben Sie Ihre E-Mail-Adresse ein.
17
Kennwort: Geben Sie das Passwort Ihrer obigen E-Mail-Adresse ein.
Verschlüsselungstyp: Verwenden Sie zur Verschlüsselung SSL.
Absender: Geben Sie Ihre E-Mail-Adresse erneut ein.
Empfänger1: Geben Sie die Empfänger-E-Mail-Adresse ein (Anregung:
Verwenden Sie wieder Ihre eigene).
Empfänger2: Geben Sie die Empfänger-E-Mail-Adresse ein (Anregung:
Verwenden Sie die E-Mail-Adresse einer anderen Person).
Betreff: Geben Sie die Überschrift der E-Mail ein.
Intervall: Wie oft die E-Mail gesendet werden soll (Einheit in Sekunden).
Funktionsprüfung: Falls Sie alle xx Minuten aktiviert haben, erhalten Sie
eine E-Mail, falls der Versand funktioniert.
Test: Klicken Sie nach dem Speichern auf Test, um zu überprüfen, ob Ihre
Einstellungen funktionieren.
WiFi
Einstell. Wichtig: Das WLAN dient nur für den Anschluss von Kameras. Es kann
nicht als Zugriffspunkt für andere Geräte verwendet werden!
Richten Sie das WLAN-Netzwerk für die Verwendung des Kits im
kabellosen Modus ein. Passen Sie die WLAN-SSID und das Passwort an.
Der WIFI Kanal kann ausgewählt werden, um zu einem weniger
frequentierten Kanal zu wechseln. Dies ist wichtig, um
WLAN-Interferenzen zu vermeiden. Wenn Sie auf "Aktualisieren" klicken,
werden die Daten aktualisiert. Wenn Sie auf die Schaltfläche
Zurücksetzen klicken, werden die WiFi Einstellungen auf die
Standardwerte zurückgesetzt.
Achtung: Sie müssen die richtige "Region" auswählen, damit das SET
ordnungsgemäß funktioniert! Standard EU.
Hinweis: Falls Sie WLAN-SSID und Passwort ändern, müssen Sie die
Kameras wieder mit Matchcode verbinden. Siehe Kapitel 4.4.
Kanaleinstellung: Kodierung Wählen Sie den korrekten Kanal und den Kodierungsmodus (AV-Stream =
Video und Ton). Der Haupt-Stream und Sub-Stream werden automatisch
eingestellt.
PTZ
Einstellung-
en
Wird für das gelieferte Kameramodell (Nicht unterstützt). Sie können für
die Route mit bis zu 32 Stopps einstellen. Für jede Voreinstellung kann
festgelegt werden, wie lange die Position überwacht wird. Die Tour
Positionsliste kann hinzugefügt, aktualisiert oder entfernt werden!
Kanal OSD Kanal: Wählen Sie den Kanal aus und passen Sie seine Farbe an.
Kamera Titel: Kamerabezeichnung anpassen.
Statusanzeige: Die Position der Statusanzeige der Kanäle kann für jede
Kamera festgelegt werden, indem Sie auf Display Einstellungen klicken:
Folgende Einstellungen sind möglich: Oben links, Knapp oberhalb, Oben
Rechts, Unten links, Knapp unterhalb, Unten rechts, Mitte.
Verbindungsqualität: Falls aktiviert, wird die WLAN-Stärke für jeden
Kanal angezeigt.

18
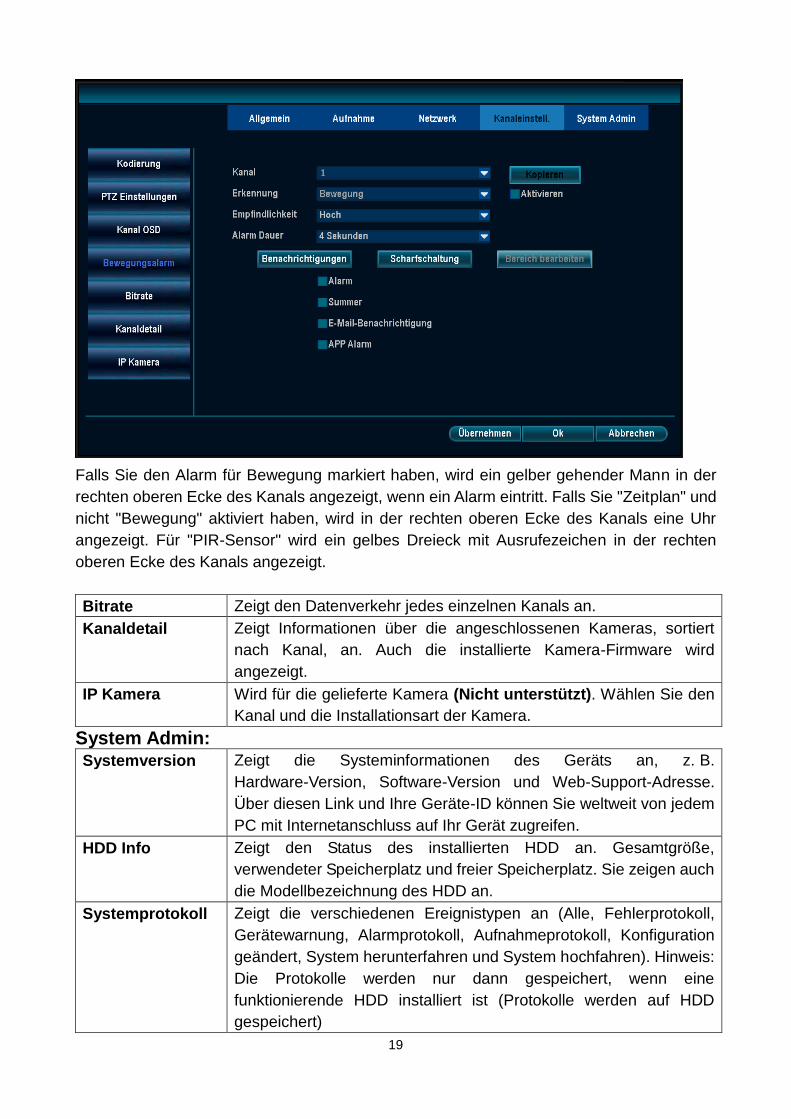
Bewegungsalarm
Kanal: Legen Sie den Kanal fest, für den die Erkennung konfiguriert werden soll. Mit
„Kopieren“ können Sie die Einstellungen eines Kanals für alle Kanäle kopieren.
Erkennung: Hier können Sie eine der drei oder alle Erkennungsmethoden aktivieren.
Es wird empfohlen, entweder Bewegung oder PIR Sensor oder Video Verlust zu
verwenden. Unterscheid zwischen Bewegung und PIR Sensor: Beim Test der
Bewegungserkennung wird durch eine experimentelle Bildänderung ein Alarm ausgelöst,
und der PIR-Alarmsensor ist der Sensor für die Erkennung von Menschen, der zum
Hardware-Modul (Kamera) gehört.
Empfindlichkeit: Muss aktiviert sein. Sie können die Empfindlichkeit von Am
niedrigsten bis Am höchsten in 5 Schritten einstellen. Mit der Alarmdauer legen Sie fest,
wie lange der Alarm andauert, z. B. für die Summerfunktion.
Bedienung: Hier können die verschiedenen verfügbaren Benachrichtigungsoptionen
eingestellt werden. Das rote Dreieck-Symbol in der linken unteren Ecke dient der
Alarm-Erinnerung. Klicken Sie darauf, um die Alarminformationen anzuzeigen.
Nach der Aktivierung der Summer-Funktion gibt TX-29/TX-30 einen akustischen Alarmton
ab, wenn ein Alarm erkannt wird (Lautstärke mit Pfeil-Tasten im Display einstellen).
Aktivieren Sie E-Mail-Benachrichtigung, um durch eine Email (E-Mail) informiert zu
werden, falls ein Alarm auftritt. Note (Hinweis): Sie müssen die E-Mail-Konfiguration unter
Netzwerk E-Mail festlegen.
Falls Sie Security Premium auf Ihrem Smartphone installiert haben, erhalten Sie
Push-Benachrichtigungen, wenn Sie die APP Alarm aktivieren. (Aktivieren Sie unter Mein
Konto) die Alarmeinstellungen in der APP.)
Scharfschaltung: Sie können bis zu vier verschiedene Zeiträume festlegen, in denen die
Erkennung ausgeführt wird. Zum Aktivieren markieren Sie das Kontrollkästchen dahinter.
Bereich bearbeiten: Sie können den Erkennungsbereich festlegen (nur für Bewegung).
PIR Sensor: Zur Aktivierung von PIR, müssen Sie nur die Erkennung auf PIR
Eingangsscharfschaltung festlegen und die Benachrichtigung unter Bedienung und
Scharfschaltzeit anpassen.
Videoverlust: Legen Sie zur Aktivierung die Alarmdauer und den Benachrichtigungstyp
unter "Bedienung" und die Scharfschaltzeit fest.
19
Falls Sie den Alarm für Bewegung markiert haben, wird ein gelber gehender Mann in der
rechten oberen Ecke des Kanals angezeigt, wenn ein Alarm eintritt. Falls Sie "Zeitplan" und
nicht "Bewegung" aktiviert haben, wird in der rechten oberen Ecke des Kanals eine Uhr
angezeigt. Für "PIR-Sensor" wird ein gelbes Dreieck mit Ausrufezeichen in der rechten
oberen Ecke des Kanals angezeigt.
Bitrate Zeigt den Datenverkehr jedes einzelnen Kanals an.
Kanaldetail Zeigt Informationen über die angeschlossenen Kameras, sortiert
nach Kanal, an. Auch die installierte Kamera-Firmware wird
angezeigt.
IP Kamera Wird für die gelieferte Kamera (Nicht unterstützt). Wählen Sie den
Kanal und die Installationsart der Kamera.
System Admin: Systemversion Zeigt die Systeminformationen des Geräts an, z. B.
Hardware-Version, Software-Version und Web-Support-Adresse.
Über diesen Link und Ihre Geräte-ID können Sie weltweit von jedem
PC mit Internetanschluss auf Ihr Gerät zugreifen.
HDD Info Zeigt den Status des installierten HDD an. Gesamtgröße,
verwendeter Speicherplatz und freier Speicherplatz. Sie zeigen auch
die Modellbezeichnung des HDD an.
Systemprotokoll Zeigt die verschiedenen Ereignistypen an (Alle, Fehlerprotokoll,
Gerätewarnung, Alarmprotokoll, Aufnahmeprotokoll, Konfiguration
geändert, System herunterfahren und System hochfahren). Hinweis:
Die Protokolle werden nur dann gespeichert, wenn eine
funktionierende HDD installiert ist (Protokolle werden auf HDD
gespeichert)
20
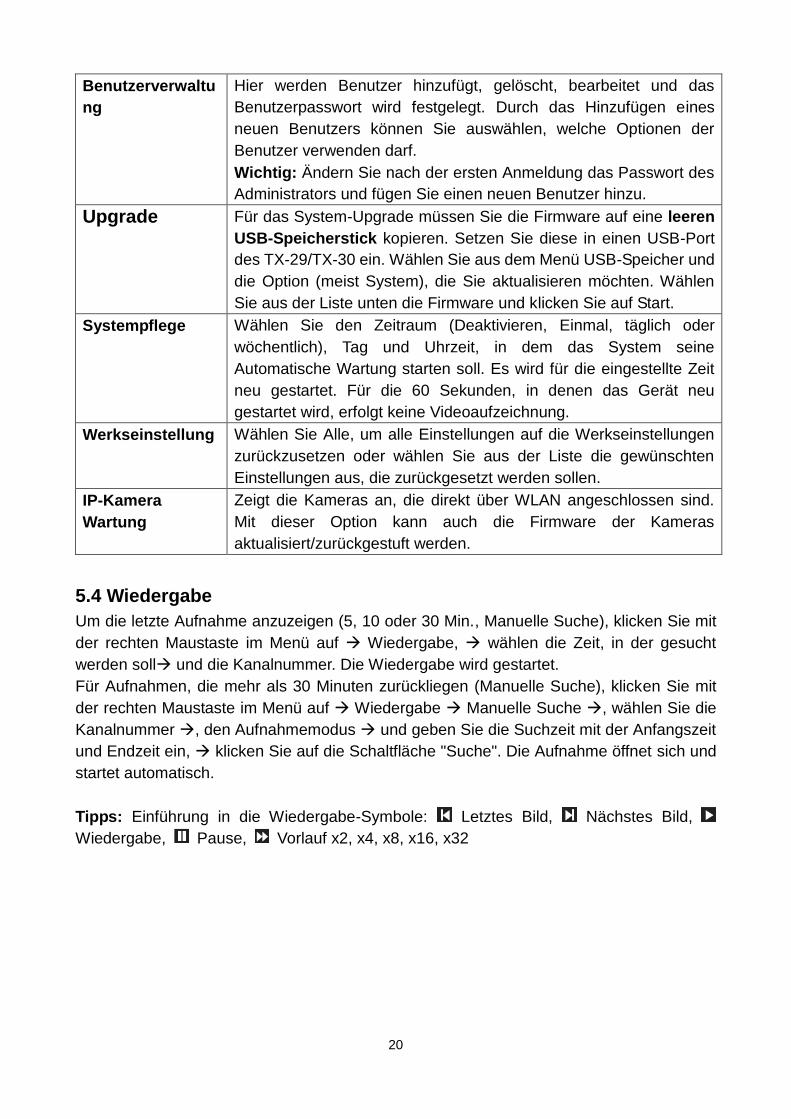
Benutzerverwaltu
ng
Hier werden Benutzer hinzufügt, gelöscht, bearbeitet und das
Benutzerpasswort wird festgelegt. Durch das Hinzufügen eines
neuen Benutzers können Sie auswählen, welche Optionen der
Benutzer verwenden darf.
Wichtig: Ändern Sie nach der ersten Anmeldung das Passwort des
Administrators und fügen Sie einen neuen Benutzer hinzu.
Upgrade Für das System-Upgrade müssen Sie die Firmware auf eine leeren
USB-Speicherstick kopieren. Setzen Sie diese in einen USB-Port
des TX-29/TX-30 ein. Wählen Sie aus dem Menü USB-Speicher und
die Option (meist System), die Sie aktualisieren möchten. Wählen
Sie aus der Liste unten die Firmware und klicken Sie auf Start.
Systempflege Wählen Sie den Zeitraum (Deaktivieren, Einmal, täglich oder
wöchentlich), Tag und Uhrzeit, in dem das System seine
Automatische Wartung starten soll. Es wird für die eingestellte Zeit
neu gestartet. Für die 60 Sekunden, in denen das Gerät neu
gestartet wird, erfolgt keine Videoaufzeichnung.
Werkseinstellung Wählen Sie Alle, um alle Einstellungen auf die Werkseinstellungen
zurückzusetzen oder wählen Sie aus der Liste die gewünschten
Einstellungen aus, die zurückgesetzt werden sollen.
IP-Kamera
Wartung
Zeigt die Kameras an, die direkt über WLAN angeschlossen sind.
Mit dieser Option kann auch die Firmware der Kameras
aktualisiert/zurückgestuft werden.
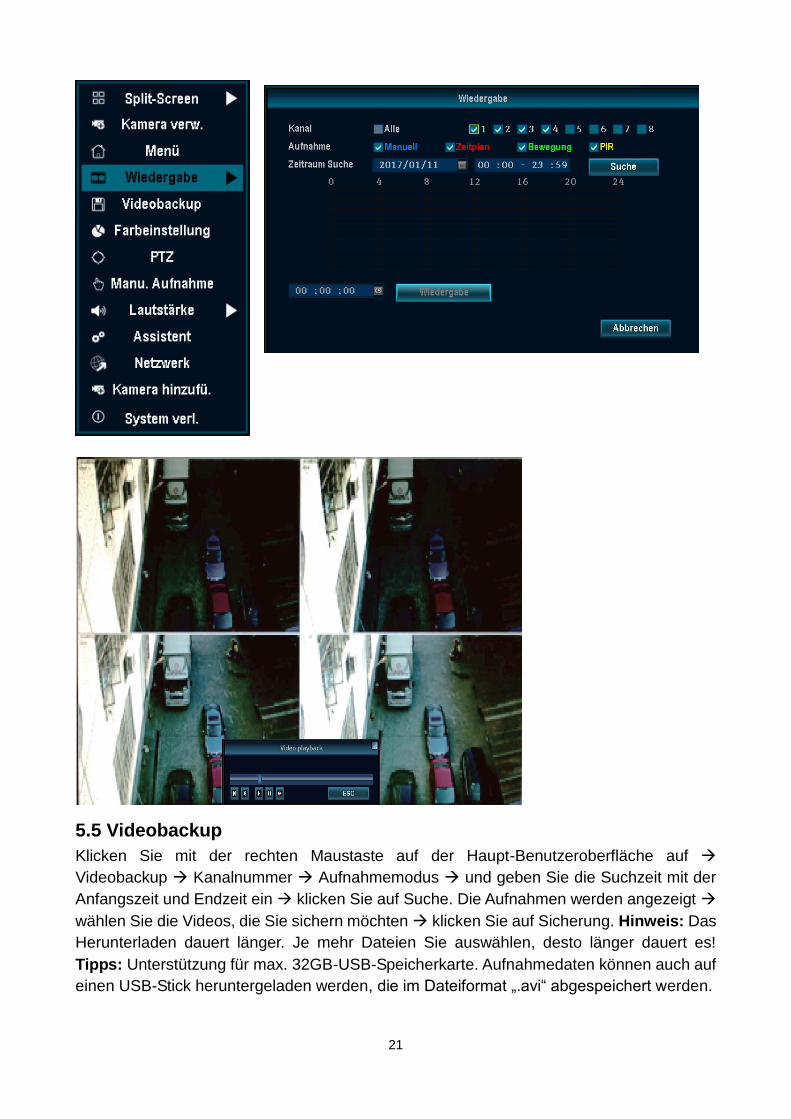
5.4 Wiedergabe
Um die letzte Aufnahme anzuzeigen (5, 10 oder 30 Min., Manuelle Suche), klicken Sie mit
der rechten Maustaste im Menü auf Wiedergabe, wählen die Zeit, in der gesucht
werden soll und die Kanalnummer. Die Wiedergabe wird gestartet.
Für Aufnahmen, die mehr als 30 Minuten zurückliegen (Manuelle Suche), klicken Sie mit
der rechten Maustaste im Menü auf Wiedergabe Manuelle Suche , wählen Sie die
Kanalnummer , den Aufnahmemodus und geben Sie die Suchzeit mit der Anfangszeit
und Endzeit ein, klicken Sie auf die Schaltfläche "Suche". Die Aufnahme öffnet sich und
startet automatisch.
Tipps: Einführung in die Wiedergabe-Symbole: Letztes Bild, Nächstes Bild,
Wiedergabe, Pause, Vorlauf x2, x4, x8, x16, x32
21
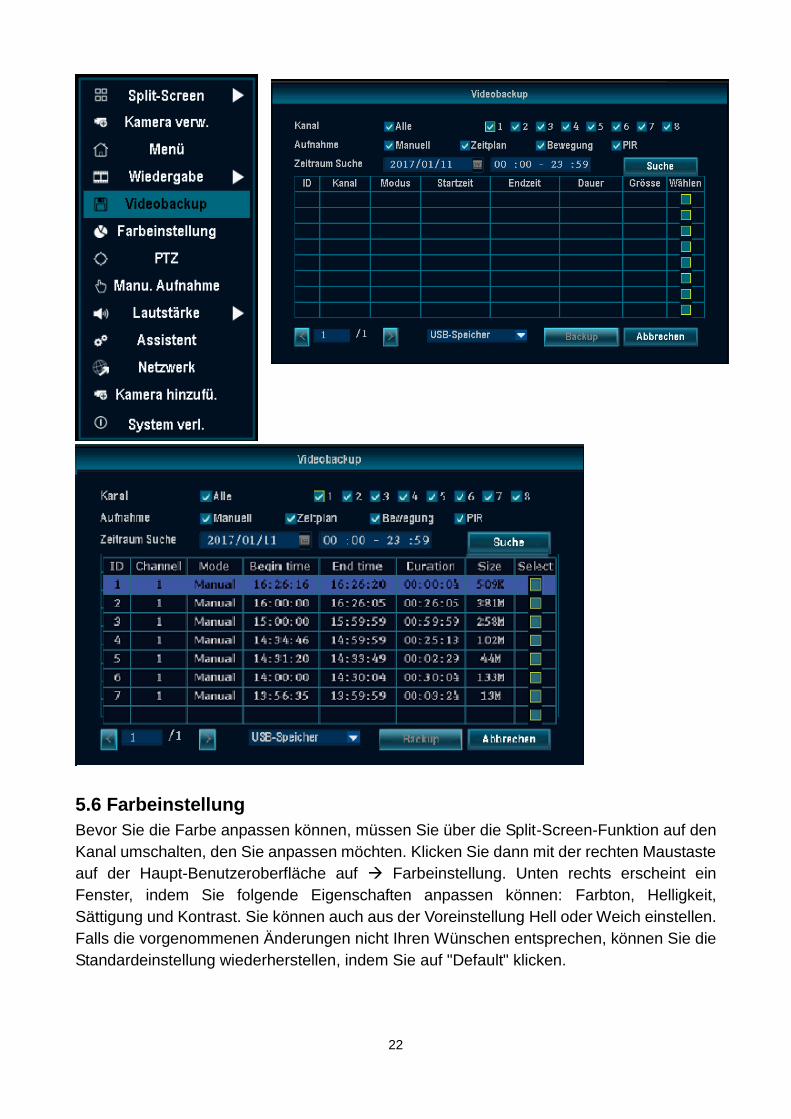
5.5 Videobackup
Klicken Sie mit der rechten Maustaste auf der Haupt-Benutzeroberfläche auf
Videobackup Kanalnummer Aufnahmemodus und geben Sie die Suchzeit mit der
Anfangszeit und Endzeit ein klicken Sie auf Suche. Die Aufnahmen werden angezeigt
wählen Sie die Videos, die Sie sichern möchten klicken Sie auf Sicherung. Hinweis: Das
Herunterladen dauert länger. Je mehr Dateien Sie auswählen, desto länger dauert es!
Tipps: Unterstützung für max. 32GB-USB-Speicherkarte. Aufnahmedaten können auch auf
einen USB-Stick heruntergeladen werden, die im Dateiformat „.avi“ abgespeichert werden.
22
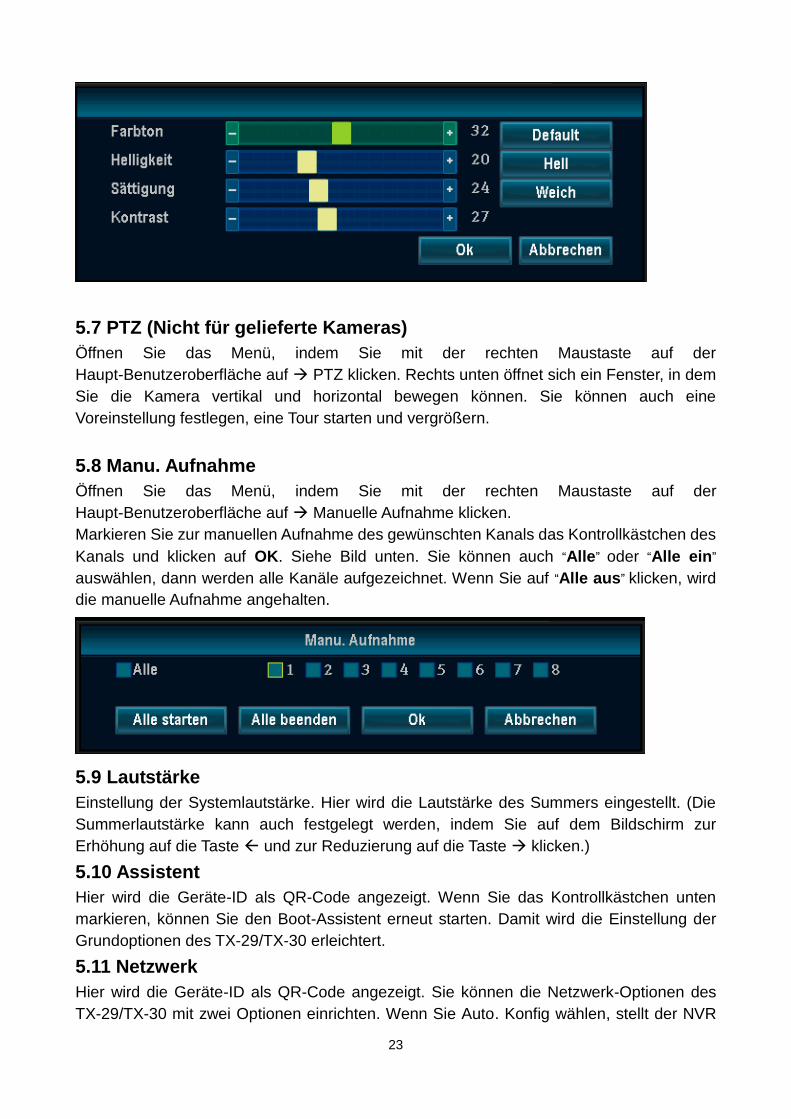
5.6 Farbeinstellung
Bevor Sie die Farbe anpassen können, müssen Sie über die Split-Screen-Funktion auf den
Kanal umschalten, den Sie anpassen möchten. Klicken Sie dann mit der rechten Maustaste
auf der Haupt-Benutzeroberfläche auf Farbeinstellung. Unten rechts erscheint ein
Fenster, indem Sie folgende Eigenschaften anpassen können: Farbton, Helligkeit,
Sättigung und Kontrast. Sie können auch aus der Voreinstellung Hell oder Weich einstellen.
Falls die vorgenommenen Änderungen nicht Ihren Wünschen entsprechen, können Sie die
Standardeinstellung wiederherstellen, indem Sie auf "Default" klicken.
23
5.7 PTZ (Nicht für gelieferte Kameras)
Öffnen Sie das Menü, indem Sie mit der rechten Maustaste auf der
Haupt-Benutzeroberfläche auf PTZ klicken. Rechts unten öffnet sich ein Fenster, in dem
Sie die Kamera vertikal und horizontal bewegen können. Sie können auch eine
Voreinstellung festlegen, eine Tour starten und vergrößern.
5.8 Manu. Aufnahme
Öffnen Sie das Menü, indem Sie mit der rechten Maustaste auf der
Haupt-Benutzeroberfläche auf Manuelle Aufnahme klicken.
Markieren Sie zur manuellen Aufnahme des gewünschten Kanals das Kontrollkästchen des
Kanals und klicken auf OK. Siehe Bild unten. Sie können auch “Alle” oder “Alle ein”
auswählen, dann werden alle Kanäle aufgezeichnet. Wenn Sie auf “Alle aus” klicken, wird
die manuelle Aufnahme angehalten.
5.9 Lautstärke
Einstellung der Systemlautstärke. Hier wird die Lautstärke des Summers eingestellt. (Die
Summerlautstärke kann auch festgelegt werden, indem Sie auf dem Bildschirm zur
Erhöhung auf die Taste und zur Reduzierung auf die Taste klicken.)
5.10 Assistent
Hier wird die Geräte-ID als QR-Code angezeigt. Wenn Sie das Kontrollkästchen unten
markieren, können Sie den Boot-Assistent erneut starten. Damit wird die Einstellung der
Grundoptionen des TX-29/TX-30 erleichtert.
5.11 Netzwerk
Hier wird die Geräte-ID als QR-Code angezeigt. Sie können die Netzwerk-Optionen des
TX-29/TX-30 mit zwei Optionen einrichten. Wenn Sie Auto. Konfig wählen, stellt der NVR
24
alles automatisch ein oder Sie wählen Manuelle Konfig, dann müssen Sie die IP, Gateway
und die Sub-Maske selbst einstellen. Unter Manuelle Konfig. können Sie auch auswählen,
ob Sie die PPPoE-Funktion benötigen. Klicken Sie auf Anwenden oder OK, um die
Einstellungen zu speichern. Wenn Sie auf die Schaltfläche Prüfen klicken, scannt der NVR
seine Netzwerkverbindung und zeigt seine Status in der Zeile Netzwerk-Status an.
5.12 Kamera hinzufügen
Wenn Sie diese Option öffnen, startet der NVR die Suche nach Kameras, die sich in der
Nähe befinden und fügt diese hinzu. Es ist eine Funktion zum schnellen Hinzufügen. Sie
wird beendet, wenn Sie auf Verlassen klicken. Danach werden die automatisch
hinzugefügten Kameras auf dem Display angezeigt.
5.13 System verl.
Unter System verlassen können Sie den aktuellen Benutzer Abmelden(Logout), den
Neustart des Geräts durchführen, den Monitor Ausschalten und das System komplett
„Ausschalten.
6. Gerätezugriff
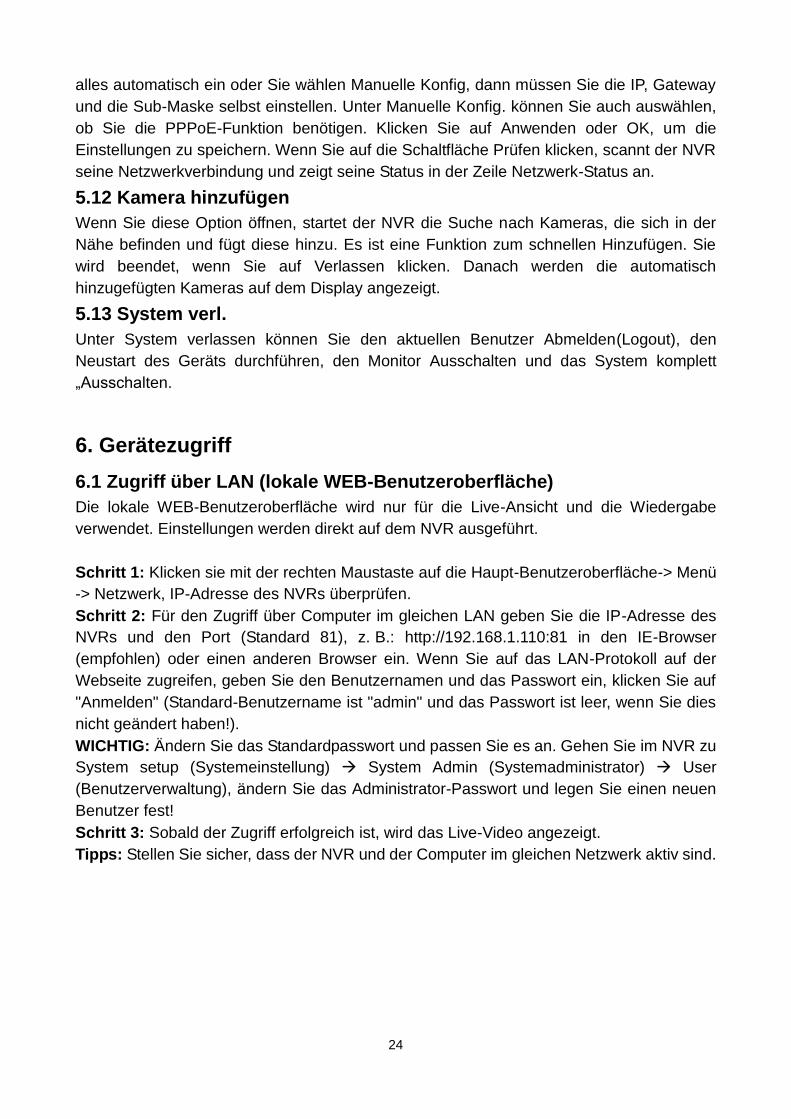
6.1 Zugriff über LAN (lokale WEB-Benutzeroberfläche)
Die lokale WEB-Benutzeroberfläche wird nur für die Live-Ansicht und die Wiedergabe
verwendet. Einstellungen werden direkt auf dem NVR ausgeführt.
Schritt 1: Klicken sie mit der rechten Maustaste auf die Haupt-Benutzeroberfläche-> Menü
-> Netzwerk, IP-Adresse des NVRs überprüfen.
Schritt 2: Für den Zugriff über Computer im gleichen LAN geben Sie die IP-Adresse des
NVRs und den Port (Standard 81), z. B.: http://192.168.1.110:81 in den IE-Browser
(empfohlen) oder einen anderen Browser ein. Wenn Sie auf das LAN-Protokoll auf der
Webseite zugreifen, geben Sie den Benutzernamen und das Passwort ein, klicken Sie auf
"Anmelden" (Standard-Benutzername ist "admin" und das Passwort ist leer, wenn Sie dies
nicht geändert haben!).
WICHTIG: Ändern Sie das Standardpasswort und passen Sie es an. Gehen Sie im NVR zu
System setup (Systemeinstellung) System Admin (Systemadministrator) User
(Benutzerverwaltung), ändern Sie das Administrator-Passwort und legen Sie einen neuen
Benutzer fest!
Schritt 3: Sobald der Zugriff erfolgreich ist, wird das Live-Video angezeigt.
Tipps: Stellen Sie sicher, dass der NVR und der Computer im gleichen Netzwerk aktiv sind.
25
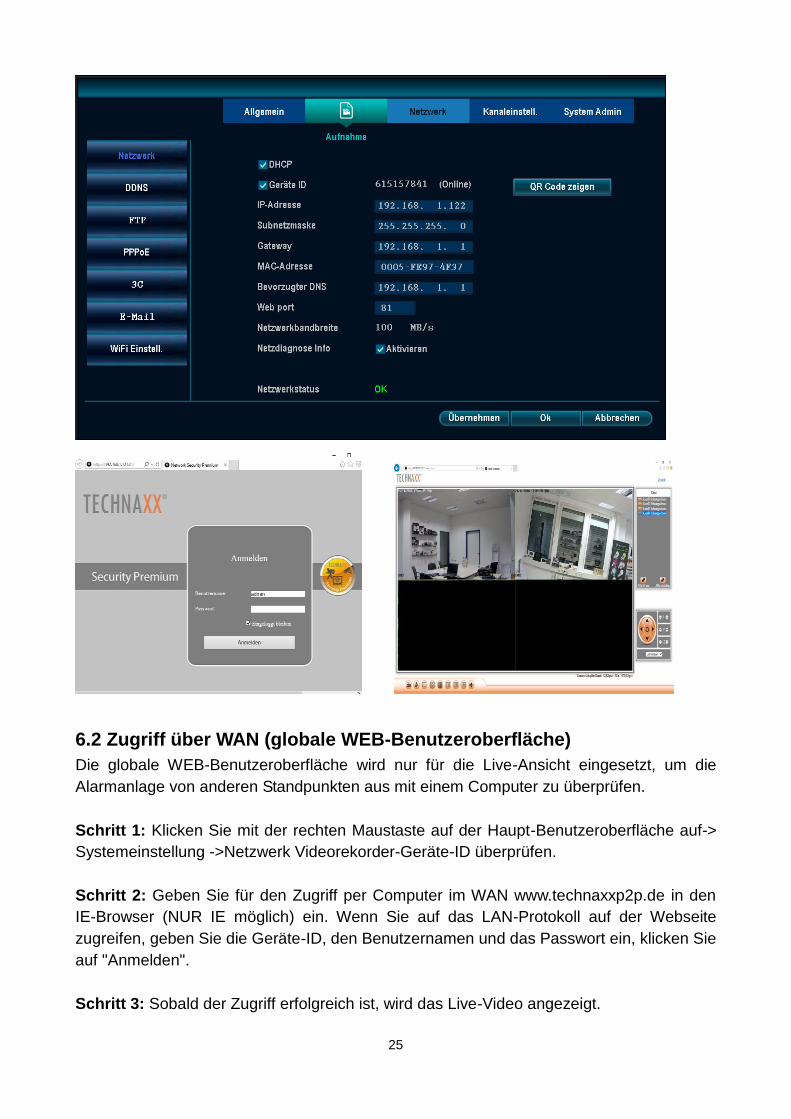
6.2 Zugriff über WAN (globale WEB-Benutzeroberfläche)
Die globale WEB-Benutzeroberfläche wird nur für die Live-Ansicht eingesetzt, um die
Alarmanlage von anderen Standpunkten aus mit einem Computer zu überprüfen.
Schritt 1: Klicken Sie mit der rechten Maustaste auf der Haupt-Benutzeroberfläche auf->
Systemeinstellung ->Netzwerk Videorekorder-Geräte-ID überprüfen.
Schritt 2: Geben Sie für den Zugriff per Computer im WAN www.technaxxp2p.de in den
IE-Browser (NUR IE möglich) ein. Wenn Sie auf das LAN-Protokoll auf der Webseite
zugreifen, geben Sie die Geräte-ID, den Benutzernamen und das Passwort ein, klicken Sie
auf "Anmelden".
Schritt 3: Sobald der Zugriff erfolgreich ist, wird das Live-Video angezeigt.
26
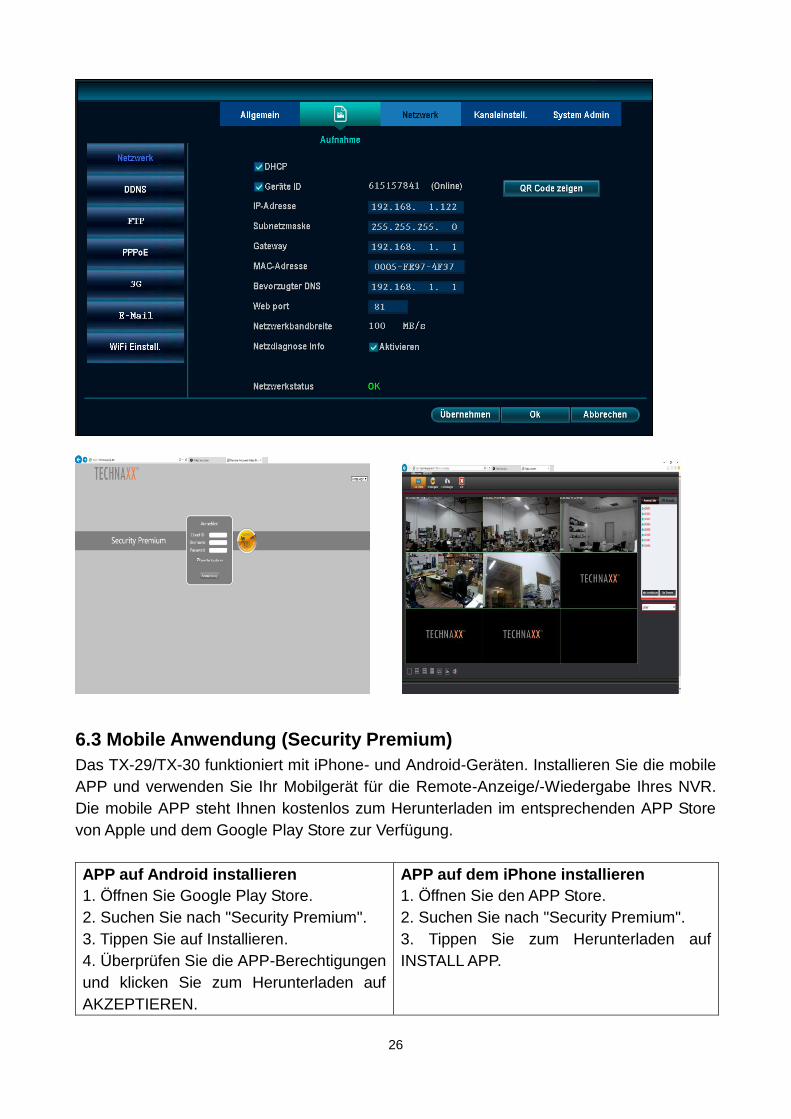
6.3 Mobile Anwendung (Security Premium)
Das TX-29/TX-30 funktioniert mit iPhone- und Android-Geräten. Installieren Sie die mobile
APP und verwenden Sie Ihr Mobilgerät für die Remote-Anzeige/-Wiedergabe Ihres NVR.
Die mobile APP steht Ihnen kostenlos zum Herunterladen im entsprechenden APP Store
von Apple und dem Google Play Store zur Verfügung.
APP auf Android installieren
1. Öffnen Sie Google Play Store.
2. Suchen Sie nach "Security Premium".
3. Tippen Sie auf Installieren.
4. Überprüfen Sie die APP-Berechtigungen
und klicken Sie zum Herunterladen auf
AKZEPTIEREN.
APP auf dem iPhone installieren
1. Öffnen Sie den APP Store.
2. Suchen Sie nach "Security Premium".
3. Tippen Sie zum Herunterladen auf
INSTALL APP.
27
Nach der Installation der Security Premium APP auf Ihrem Mobilgerät, suchen Sie die
Security Premium APP und tippen Sie auf das Symbol zum Öffnen. Bitte bestätigen Sie die
Datenschutzbestimmungen. Die APP wird geladen und Sie gelangen direkt zum
Anmelde-Bildschirm. Die Anmeldung ist notwendig, um Push-Benachrichtigungen zu
erhalten und um die hinzugefügten Geräte zu speichern.
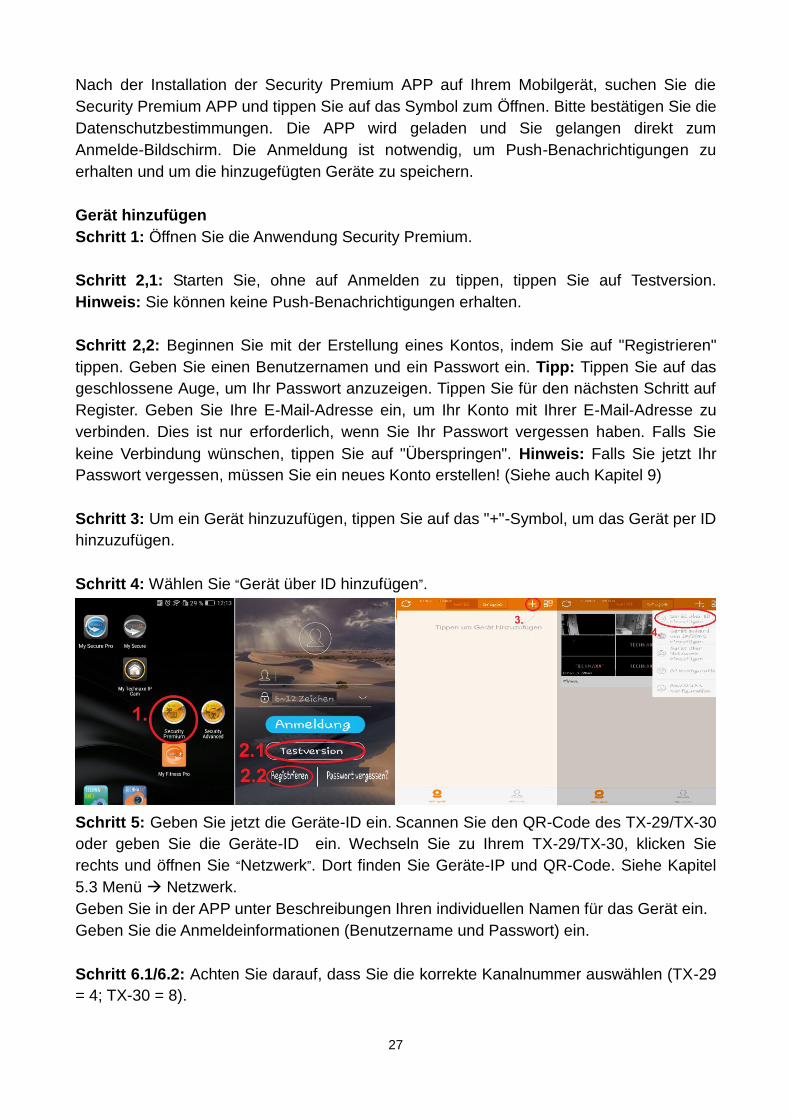
Gerät hinzufügen
Schritt 1: Öffnen Sie die Anwendung Security Premium.
Schritt 2,1: Starten Sie, ohne auf Anmelden zu tippen, tippen Sie auf Testversion.
Hinweis: Sie können keine Push-Benachrichtigungen erhalten.
Schritt 2,2: Beginnen Sie mit der Erstellung eines Kontos, indem Sie auf "Registrieren"
tippen. Geben Sie einen Benutzernamen und ein Passwort ein. Tipp: Tippen Sie auf das
geschlossene Auge, um Ihr Passwort anzuzeigen. Tippen Sie für den nächsten Schritt auf
Register. Geben Sie Ihre E-Mail-Adresse ein, um Ihr Konto mit Ihrer E-Mail-Adresse zu
verbinden. Dies ist nur erforderlich, wenn Sie Ihr Passwort vergessen haben. Falls Sie
keine Verbindung wünschen, tippen Sie auf "Überspringen". Hinweis: Falls Sie jetzt Ihr
Passwort vergessen, müssen Sie ein neues Konto erstellen! (Siehe auch Kapitel 9)
Schritt 3: Um ein Gerät hinzuzufügen, tippen Sie auf das "+"-Symbol, um das Gerät per ID
hinzuzufügen.
Schritt 4: Wählen Sie “Gerät über ID hinzufügen”.
Schritt 5: Geben Sie jetzt die Geräte-ID ein. Scannen Sie den QR-Code des TX-29/TX-30
oder geben Sie die Geräte-ID ein. Wechseln Sie zu Ihrem TX-29/TX-30, klicken Sie
rechts und öffnen Sie “Netzwerk”. Dort finden Sie Geräte-IP und QR-Code. Siehe Kapitel
5.3 Menü Netzwerk.
Geben Sie in der APP unter Beschreibungen Ihren individuellen Namen für das Gerät ein.
Geben Sie die Anmeldeinformationen (Benutzername und Passwort) ein.
Schritt 6.1/6.2: Achten Sie darauf, dass Sie die korrekte Kanalnummer auswählen (TX-29
= 4; TX-30 = 8).
28
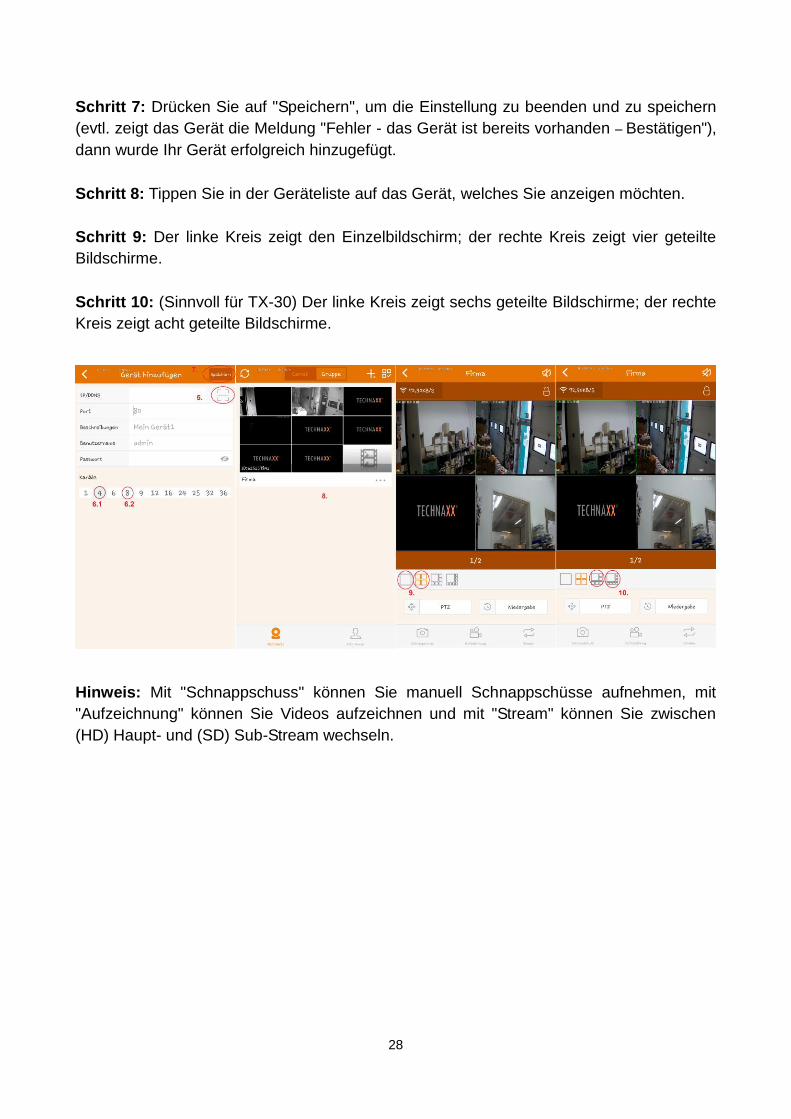
Schritt 7: Drücken Sie auf "Speichern", um die Einstellung zu beenden und zu speichern
(evtl. zeigt das Gerät die Meldung "Fehler - das Gerät ist bereits vorhanden – Bestätigen"),
dann wurde Ihr Gerät erfolgreich hinzugefügt.
Schritt 8: Tippen Sie in der Geräteliste auf das Gerät, welches Sie anzeigen möchten.
Schritt 9: Der linke Kreis zeigt den Einzelbildschirm; der rechte Kreis zeigt vier geteilte
Bildschirme.
Schritt 10: (Sinnvoll für TX-30) Der linke Kreis zeigt sechs geteilte Bildschirme; der rechte
Kreis zeigt acht geteilte Bildschirme.
Hinweis: Mit "Schnappschuss" können Sie manuell Schnappschüsse aufnehmen, mit
"Aufzeichnung" können Sie Videos aufzeichnen und mit "Stream" können Sie zwischen
(HD) Haupt- und (SD) Sub-Stream wechseln.
29
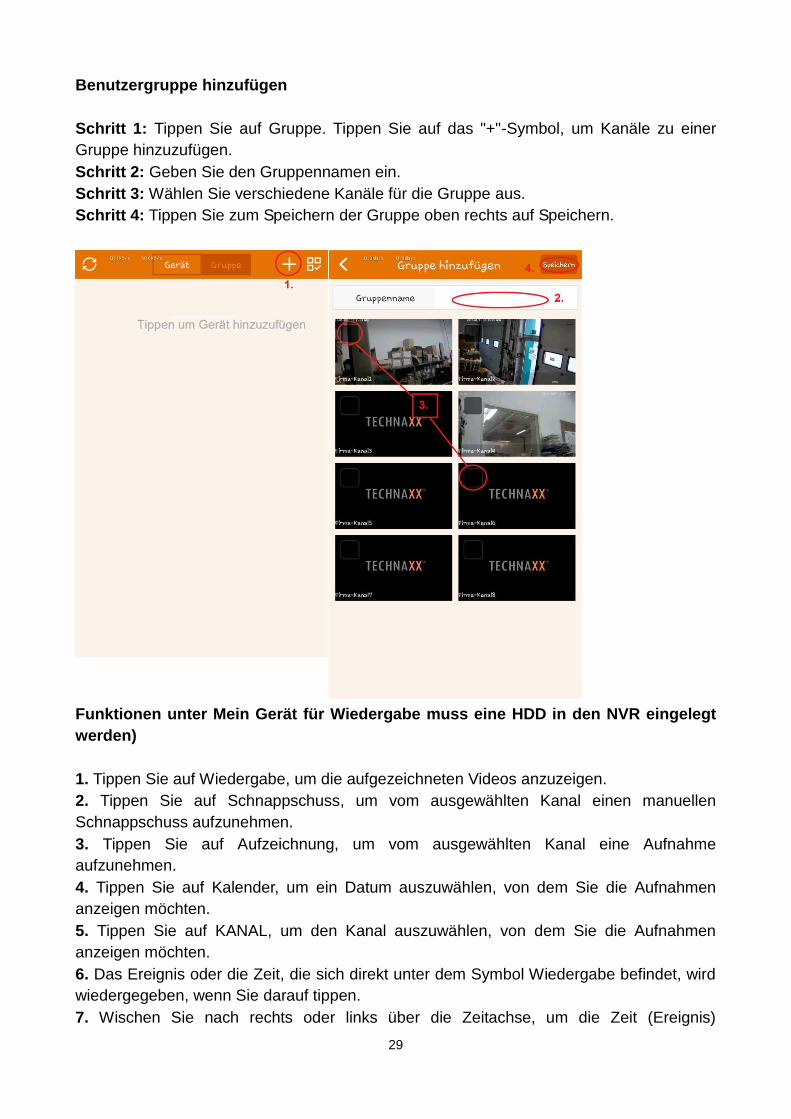
Benutzergruppe hinzufügen
Schritt 1: Tippen Sie auf Gruppe. Tippen Sie auf das "+"-Symbol, um Kanäle zu einer
Gruppe hinzuzufügen.
Schritt 2: Geben Sie den Gruppennamen ein.
Schritt 3: Wählen Sie verschiedene Kanäle für die Gruppe aus.
Schritt 4: Tippen Sie zum Speichern der Gruppe oben rechts auf Speichern.
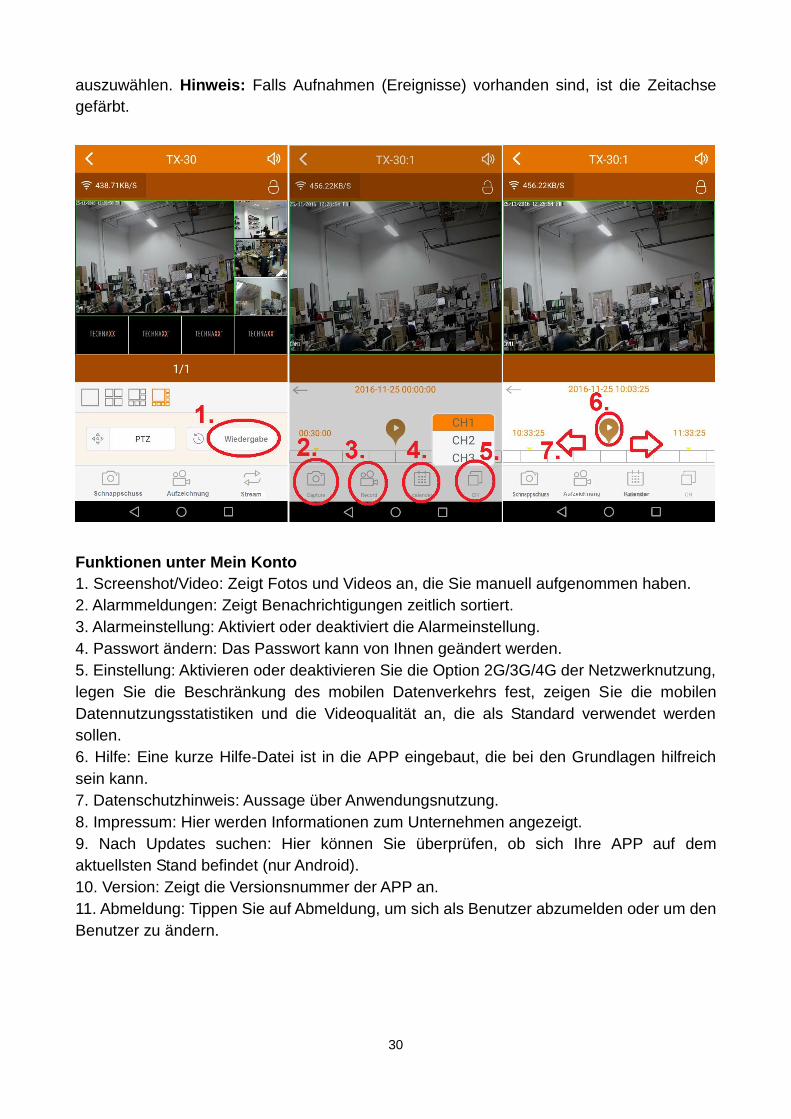
Funktionen unter Mein Gerät für Wiedergabe muss eine HDD in den NVR eingelegt
werden)
1. Tippen Sie auf Wiedergabe, um die aufgezeichneten Videos anzuzeigen.
2. Tippen Sie auf Schnappschuss, um vom ausgewählten Kanal einen manuellen
Schnappschuss aufzunehmen.
3. Tippen Sie auf Aufzeichnung, um vom ausgewählten Kanal eine Aufnahme
aufzunehmen.
4. Tippen Sie auf Kalender, um ein Datum auszuwählen, von dem Sie die Aufnahmen
anzeigen möchten.
5. Tippen Sie auf KANAL, um den Kanal auszuwählen, von dem Sie die Aufnahmen
anzeigen möchten.
6. Das Ereignis oder die Zeit, die sich direkt unter dem Symbol Wiedergabe befindet, wird
wiedergegeben, wenn Sie darauf tippen.
7. Wischen Sie nach rechts oder links über die Zeitachse, um die Zeit (Ereignis)
30
auszuwählen. Hinweis: Falls Aufnahmen (Ereignisse) vorhanden sind, ist die Zeitachse
gefärbt.
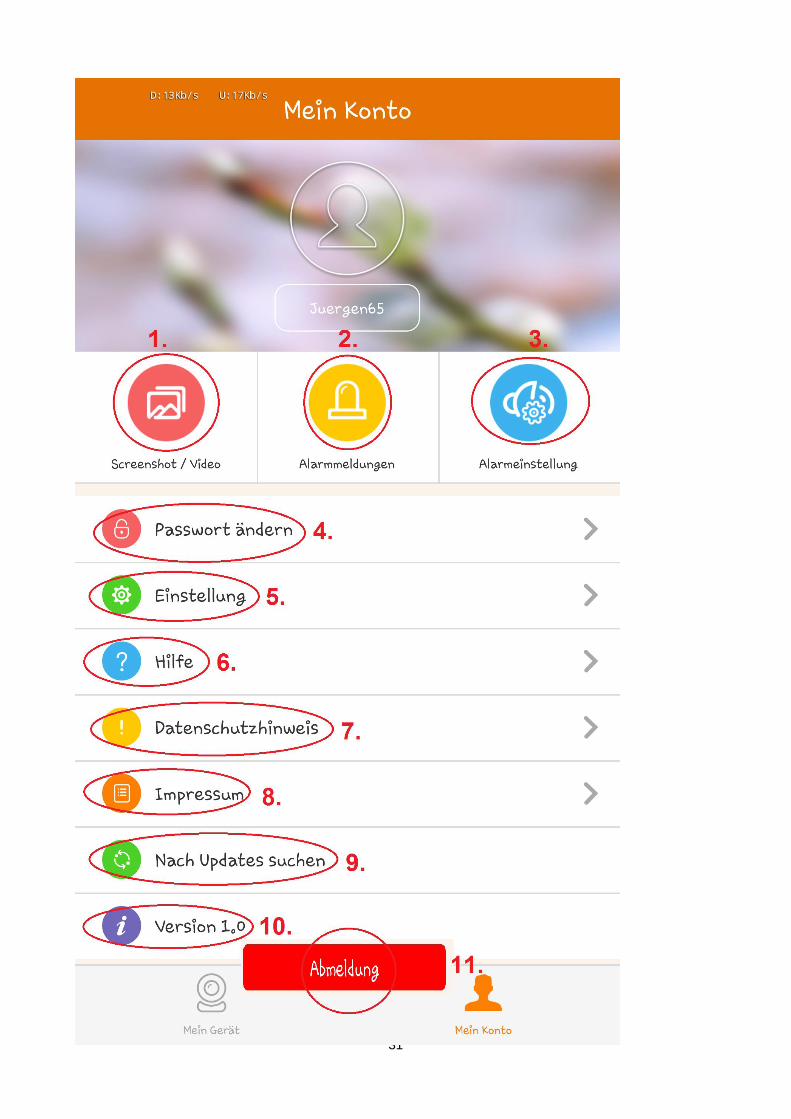
Funktionen unter Mein Konto
1. Screenshot/Video: Zeigt Fotos und Videos an, die Sie manuell aufgenommen haben.
2. Alarmmeldungen: Zeigt Benachrichtigungen zeitlich sortiert.
3. Alarmeinstellung: Aktiviert oder deaktiviert die Alarmeinstellung.
4. Passwort ändern: Das Passwort kann von Ihnen geändert werden.
5. Einstellung: Aktivieren oder deaktivieren Sie die Option 2G/3G/4G der Netzwerknutzung,
legen Sie die Beschränkung des mobilen Datenverkehrs fest, zeigen Sie die mobilen
Datennutzungsstatistiken und die Videoqualität an, die als Standard verwendet werden
sollen.
6. Hilfe: Eine kurze Hilfe-Datei ist in die APP eingebaut, die bei den Grundlagen hilfreich
sein kann.
7. Datenschutzhinweis: Aussage über Anwendungsnutzung.
8. Impressum: Hier werden Informationen zum Unternehmen angezeigt.
9. Nach Updates suchen: Hier können Sie überprüfen, ob sich Ihre APP auf dem
aktuellsten Stand befindet (nur Android).
10. Version: Zeigt die Versionsnummer der APP an.
11. Abmeldung: Tippen Sie auf Abmeldung, um sich als Benutzer abzumelden oder um den
Benutzer zu ändern.
31
32
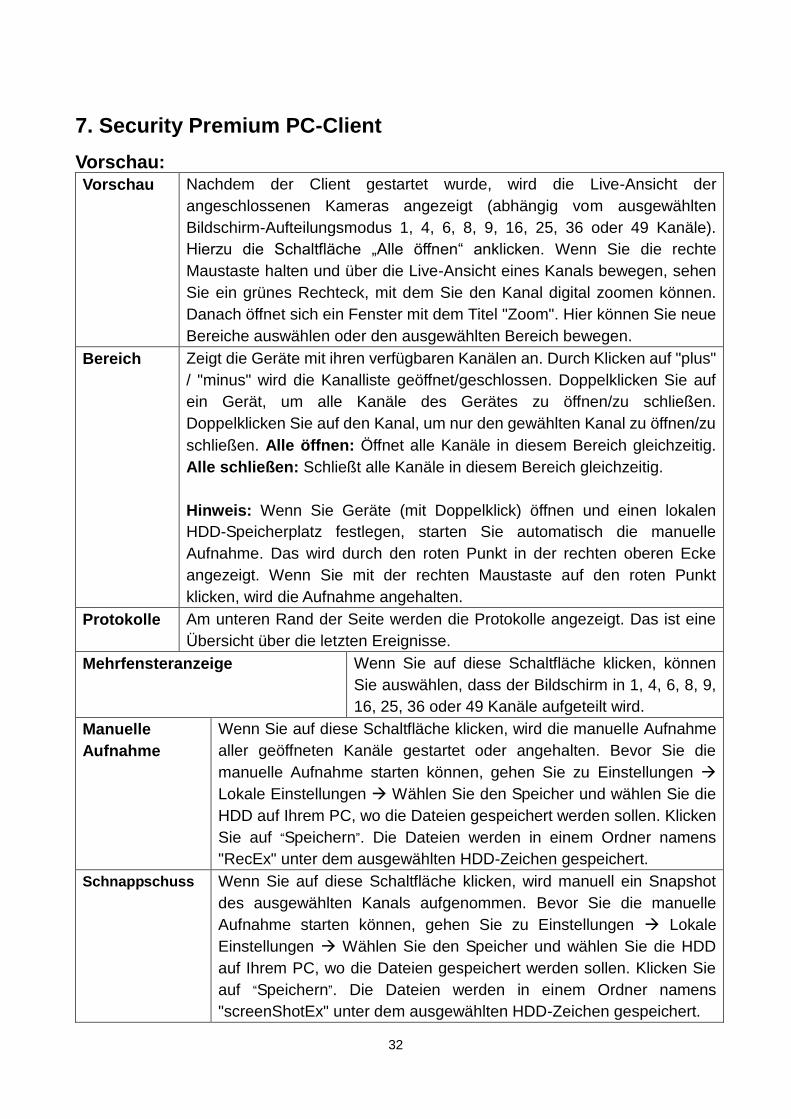
7. Security Premium PC-Client
Vorschau: Vorschau Nachdem der Client gestartet wurde, wird die Live-Ansicht der
angeschlossenen Kameras angezeigt (abhängig vom ausgewählten
Bildschirm-Aufteilungsmodus 1, 4, 6, 8, 9, 16, 25, 36 oder 49 Kanäle).
Hierzu die Schaltfläche „Alle öffnen“ anklicken. Wenn Sie die rechte
Maustaste halten und über die Live-Ansicht eines Kanals bewegen, sehen
Sie ein grünes Rechteck, mit dem Sie den Kanal digital zoomen können.
Danach öffnet sich ein Fenster mit dem Titel "Zoom". Hier können Sie neue
Bereiche auswählen oder den ausgewählten Bereich bewegen.
Bereich Zeigt die Geräte mit ihren verfügbaren Kanälen an. Durch Klicken auf "plus"
/ "minus" wird die Kanalliste geöffnet/geschlossen. Doppelklicken Sie auf
ein Gerät, um alle Kanäle des Gerätes zu öffnen/zu schließen.
Doppelklicken Sie auf den Kanal, um nur den gewählten Kanal zu öffnen/zu
schließen. Alle öffnen: Öffnet alle Kanäle in diesem Bereich gleichzeitig.
Alle schließen: Schließt alle Kanäle in diesem Bereich gleichzeitig.
Hinweis: Wenn Sie Geräte (mit Doppelklick) öffnen und einen lokalen
HDD-Speicherplatz festlegen, starten Sie automatisch die manuelle
Aufnahme. Das wird durch den roten Punkt in der rechten oberen Ecke
angezeigt. Wenn Sie mit der rechten Maustaste auf den roten Punkt
klicken, wird die Aufnahme angehalten.
Protokolle Am unteren Rand der Seite werden die Protokolle angezeigt. Das ist eine
Übersicht über die letzten Ereignisse.
Mehrfensteranzeige Wenn Sie auf diese Schaltfläche klicken, können
Sie auswählen, dass der Bildschirm in 1, 4, 6, 8, 9,
16, 25, 36 oder 49 Kanäle aufgeteilt wird.
Manuelle
Aufnahme
Wenn Sie auf diese Schaltfläche klicken, wird die manuelle Aufnahme
aller geöffneten Kanäle gestartet oder angehalten. Bevor Sie die
manuelle Aufnahme starten können, gehen Sie zu Einstellungen
Lokale Einstellungen Wählen Sie den Speicher und wählen Sie die
HDD auf Ihrem PC, wo die Dateien gespeichert werden sollen. Klicken
Sie auf “Speichern”. Die Dateien werden in einem Ordner namens
"RecEx" unter dem ausgewählten HDD-Zeichen gespeichert.
Schnappschuss Wenn Sie auf diese Schaltfläche klicken, wird manuell ein Snapshot
des ausgewählten Kanals aufgenommen. Bevor Sie die manuelle
Aufnahme starten können, gehen Sie zu Einstellungen Lokale
Einstellungen Wählen Sie den Speicher und wählen Sie die HDD
auf Ihrem PC, wo die Dateien gespeichert werden sollen. Klicken Sie
auf “Speichern”. Die Dateien werden in einem Ordner namens
"screenShotEx" unter dem ausgewählten HDD-Zeichen gespeichert.

33
Automatischer
Abruf
Aktualisiert die Kameravorschau.
Fenstervollbild Durch Anklicken dieser Schaltfläche wird die Größe/das Format der
gegenwärtigen Videovorschau geändert.
Vollbild Durch Anklicken dieser Schaltfläche wechselt der ausgewählte
Bildschirm-Aufteilungsmodus in den Vollbild-Modus. Um den
Vollbild-Modus zu schließen, klicken Sie mit der rechten Maus und
wählen Sie aus dem angezeigten Menü “Zurück zum Hauptfenster”.
Audio Die Lautstärke des ausgewählten Kanals wird erhöht/verringert.
PTZ (Wird nicht
unterstützt)
Verschiebt die Kameras vertikal und horizontal. Zoomt und
fokussiert die Kamera. Schaltet die Blende ein oder aus.
Wiedergabe (max. 4 Kanäle gleichzeitig): Bereich Zeigt die Geräte mit ihren verfügbaren Kanälen an. Durch Klicken auf
"plus" / "minus" wird die Kanalliste geöffnet/geschlossen. Doppelklicken
Sie auf ein Gerät, um alle Kanäle des Gerätes zu öffnen/zu schließen.
Doppelklicken Sie auf den Kanal, um nur den gewählten Kanal zu
öffnen/zu schließen. Alle öffnen: Öffnet alle Kanäle in diesem Bereich
gleichzeitig. Alle schließen: Schließt alle Kanäle in diesem Bereich
gleichzeitig. Tipp: Die beste Option für die Wiedergabe ist, dass Sie
einen Kanal öffnen und die Wiedergabe betrachten.
Abspielen / Pause Wiedergabe läuft oder wird angehalten.
Stopp Wiedergabe wird angehalten.
Schnappschuss Wenn Sie auf diese Schaltfläche klicken, wird manuell ein Snapshot der
ausgewählten Wiedergabe aufgenommen. Die Dateien werden in
einem Ordner namens "screenShotEx" unter dem ausgewählten
HDD-Zeichen gespeichert.
Langsam Wählen Sie die Geschwindigkeit der Wiedergabe 1/2x, 1/4x oder 1/8x.
Schnell Wählen Sie die Geschwindigkeit der Wiedergabe 2x, 4x oder 8x.
Audio Die Lautstärke der ausgewählten Wiedergabe wird erhöht/verringert.
Zeitachse Am unteren Bildrand wird die Zeitachse aller Kanäle mit den
aufgenommenen Videos angezeigt. Die unterschiedliche Farbe zeigt
die Art der Aufnahme. (Rot = Zeitpunkt, grün = Bewegung und blau =
Manuell) Durch einen Klick auf die farbigen Balken öffnet sich die
Wiedergabe. Klicken Sie zum Starten auf Wiedergabe.
Lokal oder
Fernzugriff
Lokal bedeutet, dass die Aufnahme auf der PC-Festplatte manuell
aufgenommen wird und Fernzugriff bedeutet, dass die Aufnahme auf
der Gerätefestplatte nach Zeitplan, Bewegung oder PIR aufgezeichnet
wird.
Aufnahmetyp Wählen Sie den Aufnahmetyp, nachdem gesucht werden soll.
Kalender Wählen Sie das Datum für die benötigte Aufnahme. Nach der
Einstellung von "Lokal" oder "Fernzugriff", Aufnahmetyp und Datum
klicken Sie unten auf "Suche".
34
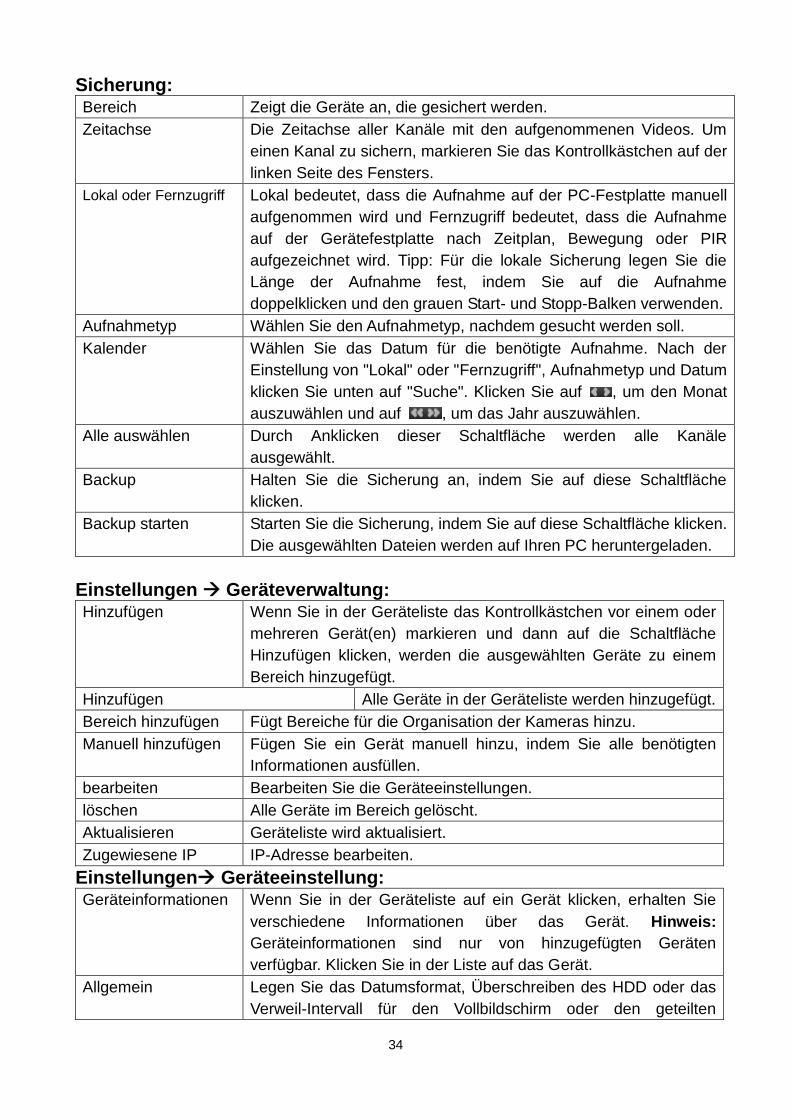
Sicherung: Bereich Zeigt die Geräte an, die gesichert werden.
Zeitachse Die Zeitachse aller Kanäle mit den aufgenommenen Videos. Um
einen Kanal zu sichern, markieren Sie das Kontrollkästchen auf der
linken Seite des Fensters.
Lokal oder Fernzugriff Lokal bedeutet, dass die Aufnahme auf der PC-Festplatte manuell
aufgenommen wird und Fernzugriff bedeutet, dass die Aufnahme
auf der Gerätefestplatte nach Zeitplan, Bewegung oder PIR
aufgezeichnet wird. Tipp: Für die lokale Sicherung legen Sie die
Länge der Aufnahme fest, indem Sie auf die Aufnahme
doppelklicken und den grauen Start- und Stopp-Balken verwenden.
Aufnahmetyp Wählen Sie den Aufnahmetyp, nachdem gesucht werden soll.
Kalender Wählen Sie das Datum für die benötigte Aufnahme. Nach der
Einstellung von "Lokal" oder "Fernzugriff", Aufnahmetyp und Datum
klicken Sie unten auf "Suche". Klicken Sie auf , um den Monat
auszuwählen und auf , um das Jahr auszuwählen.
Alle auswählen Durch Anklicken dieser Schaltfläche werden alle Kanäle
ausgewählt.
Backup Halten Sie die Sicherung an, indem Sie auf diese Schaltfläche
klicken.
Backup starten Starten Sie die Sicherung, indem Sie auf diese Schaltfläche klicken.
Die ausgewählten Dateien werden auf Ihren PC heruntergeladen.
Einstellungen Geräteverwaltung: Hinzufügen Wenn Sie in der Geräteliste das Kontrollkästchen vor einem oder
mehreren Gerät(en) markieren und dann auf die Schaltfläche
Hinzufügen klicken, werden die ausgewählten Geräte zu einem
Bereich hinzugefügt.
Hinzufügen Alle Geräte in der Geräteliste werden hinzugefügt.
Bereich hinzufügen Fügt Bereiche für die Organisation der Kameras hinzu.
Manuell hinzufügen Fügen Sie ein Gerät manuell hinzu, indem Sie alle benötigten
Informationen ausfüllen.
bearbeiten Bearbeiten Sie die Geräteeinstellungen.
löschen Alle Geräte im Bereich gelöscht.
Aktualisieren Geräteliste wird aktualisiert.
Zugewiesene IP IP-Adresse bearbeiten.
Einstellungen Geräteeinstellung: Geräteinformationen Wenn Sie in der Geräteliste auf ein Gerät klicken, erhalten Sie
verschiedene Informationen über das Gerät. Hinweis:
Geräteinformationen sind nur von hinzugefügten Geräten
verfügbar. Klicken Sie in der Liste auf das Gerät.
Allgemein Legen Sie das Datumsformat, Überschreiben des HDD oder das
Verweil-Intervall für den Vollbildschirm oder den geteilten
35
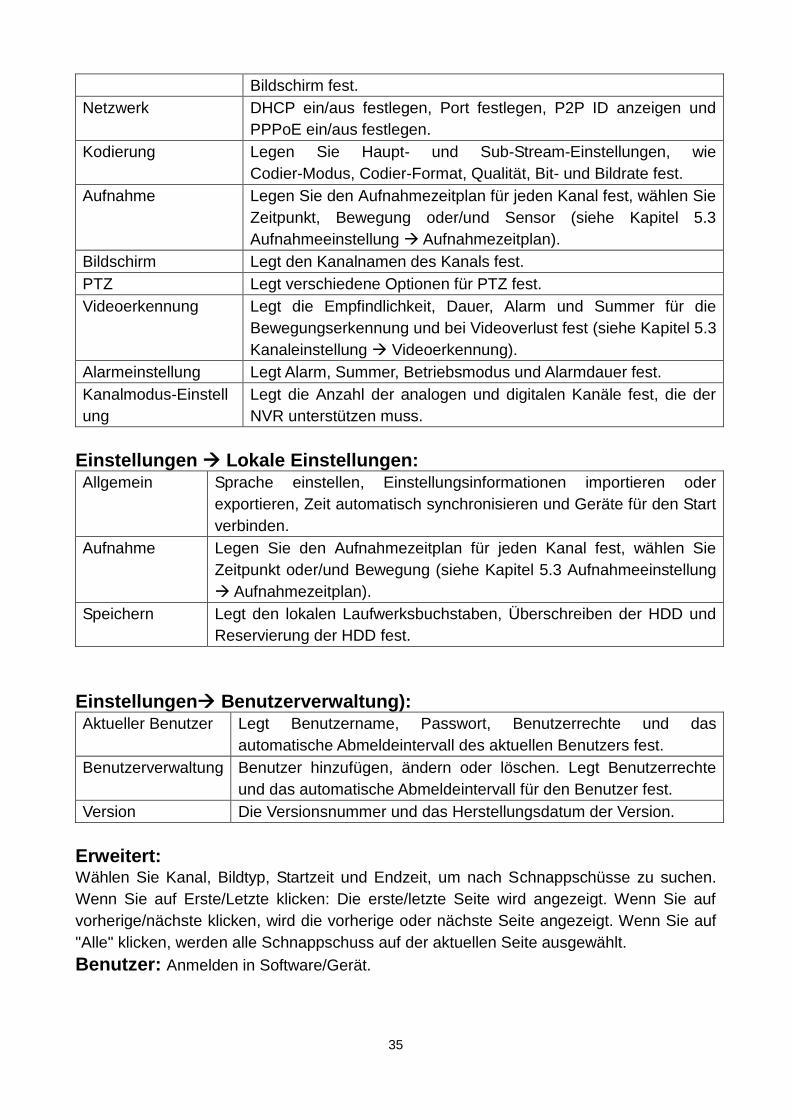
Bildschirm fest.
Netzwerk DHCP ein/aus festlegen, Port festlegen, P2P ID anzeigen und
PPPoE ein/aus festlegen.
Kodierung Legen Sie Haupt- und Sub-Stream-Einstellungen, wie
Codier-Modus, Codier-Format, Qualität, Bit- und Bildrate fest.
Aufnahme Legen Sie den Aufnahmezeitplan für jeden Kanal fest, wählen Sie
Zeitpunkt, Bewegung oder/und Sensor (siehe Kapitel 5.3
Aufnahmeeinstellung Aufnahmezeitplan).
Bildschirm Legt den Kanalnamen des Kanals fest.
PTZ Legt verschiedene Optionen für PTZ fest.
Videoerkennung Legt die Empfindlichkeit, Dauer, Alarm und Summer für die
Bewegungserkennung und bei Videoverlust fest (siehe Kapitel 5.3
Kanaleinstellung Videoerkennung).
Alarmeinstellung Legt Alarm, Summer, Betriebsmodus und Alarmdauer fest.
Kanalmodus-Einstell
ung
Legt die Anzahl der analogen und digitalen Kanäle fest, die der
NVR unterstützen muss.
Einstellungen Lokale Einstellungen: Allgemein Sprache einstellen, Einstellungsinformationen importieren oder
exportieren, Zeit automatisch synchronisieren und Geräte für den Start
verbinden.
Aufnahme Legen Sie den Aufnahmezeitplan für jeden Kanal fest, wählen Sie
Zeitpunkt oder/und Bewegung (siehe Kapitel 5.3 Aufnahmeeinstellung
Aufnahmezeitplan).
Speichern Legt den lokalen Laufwerksbuchstaben, Überschreiben der HDD und
Reservierung der HDD fest.
Einstellungen Benutzerverwaltung): Aktueller Benutzer Legt Benutzername, Passwort, Benutzerrechte und das
automatische Abmeldeintervall des aktuellen Benutzers fest.
Benutzerverwaltung Benutzer hinzufügen, ändern oder löschen. Legt Benutzerrechte
und das automatische Abmeldeintervall für den Benutzer fest.
Version Die Versionsnummer und das Herstellungsdatum der Version.
Erweitert: Wählen Sie Kanal, Bildtyp, Startzeit und Endzeit, um nach Schnappschüsse zu suchen.
Wenn Sie auf Erste/Letzte klicken: Die erste/letzte Seite wird angezeigt. Wenn Sie auf
vorherige/nächste klicken, wird die vorherige oder nächste Seite angezeigt. Wenn Sie auf
"Alle" klicken, werden alle Schnappschuss auf der aktuellen Seite ausgewählt.
Benutzer: Anmelden in Software/Gerät.
36
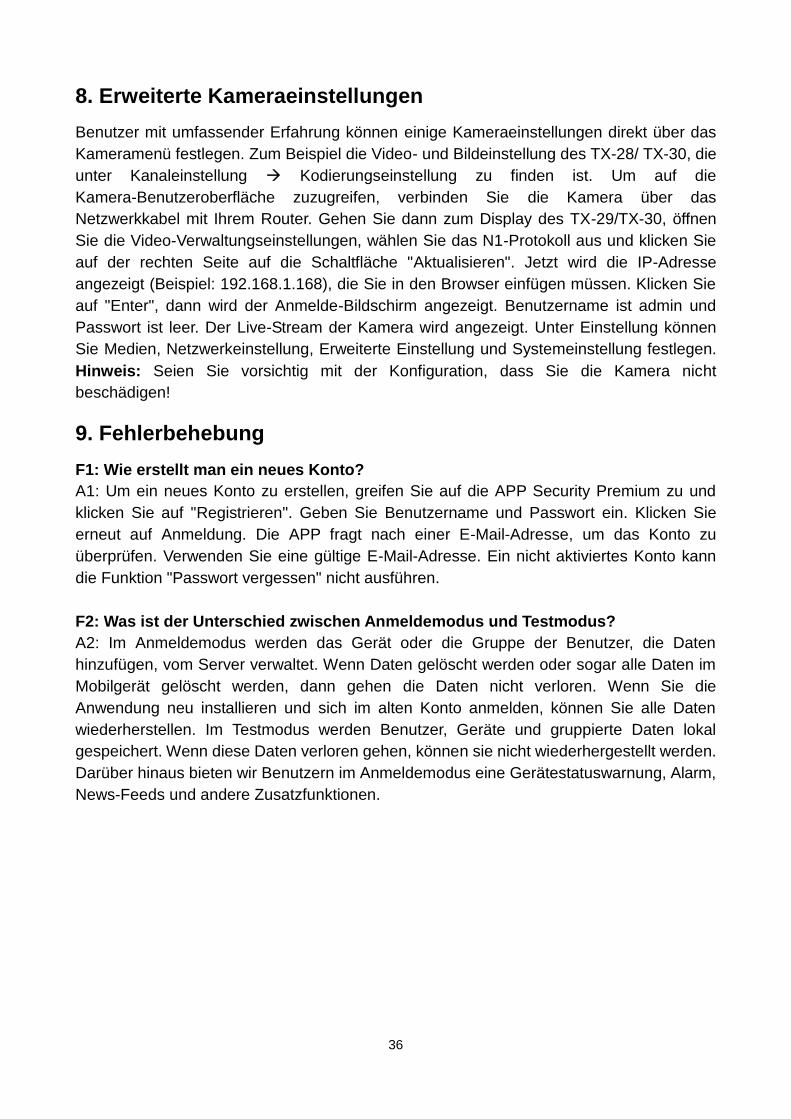
8. Erweiterte Kameraeinstellungen
Benutzer mit umfassender Erfahrung können einige Kameraeinstellungen direkt über das
Kameramenü festlegen. Zum Beispiel die Video- und Bildeinstellung des TX-28/ TX-30, die
unter Kanaleinstellung Kodierungseinstellung zu finden ist. Um auf die
Kamera-Benutzeroberfläche zuzugreifen, verbinden Sie die Kamera über das
Netzwerkkabel mit Ihrem Router. Gehen Sie dann zum Display des TX-29/TX-30, öffnen
Sie die Video-Verwaltungseinstellungen, wählen Sie das N1-Protokoll aus und klicken Sie
auf der rechten Seite auf die Schaltfläche "Aktualisieren". Jetzt wird die IP-Adresse
angezeigt (Beispiel: 192.168.1.168), die Sie in den Browser einfügen müssen. Klicken Sie
auf "Enter", dann wird der Anmelde-Bildschirm angezeigt. Benutzername ist admin und
Passwort ist leer. Der Live-Stream der Kamera wird angezeigt. Unter Einstellung können
Sie Medien, Netzwerkeinstellung, Erweiterte Einstellung und Systemeinstellung festlegen.
Hinweis: Seien Sie vorsichtig mit der Konfiguration, dass Sie die Kamera nicht
beschädigen!
9. Fehlerbehebung
F1: Wie erstellt man ein neues Konto?
A1: Um ein neues Konto zu erstellen, greifen Sie auf die APP Security Premium zu und
klicken Sie auf "Registrieren". Geben Sie Benutzername und Passwort ein. Klicken Sie
erneut auf Anmeldung. Die APP fragt nach einer E-Mail-Adresse, um das Konto zu
überprüfen. Verwenden Sie eine gültige E-Mail-Adresse. Ein nicht aktiviertes Konto kann
die Funktion "Passwort vergessen" nicht ausführen.
F2: Was ist der Unterschied zwischen Anmeldemodus und Testmodus?
A2: Im Anmeldemodus werden das Gerät oder die Gruppe der Benutzer, die Daten
hinzufügen, vom Server verwaltet. Wenn Daten gelöscht werden oder sogar alle Daten im
Mobilgerät gelöscht werden, dann gehen die Daten nicht verloren. Wenn Sie die
Anwendung neu installieren und sich im alten Konto anmelden, können Sie alle Daten
wiederherstellen. Im Testmodus werden Benutzer, Geräte und gruppierte Daten lokal
gespeichert. Wenn diese Daten verloren gehen, können sie nicht wiederhergestellt werden.
Darüber hinaus bieten wir Benutzern im Anmeldemodus eine Gerätestatuswarnung, Alarm,
News-Feeds und andere Zusatzfunktionen.
37
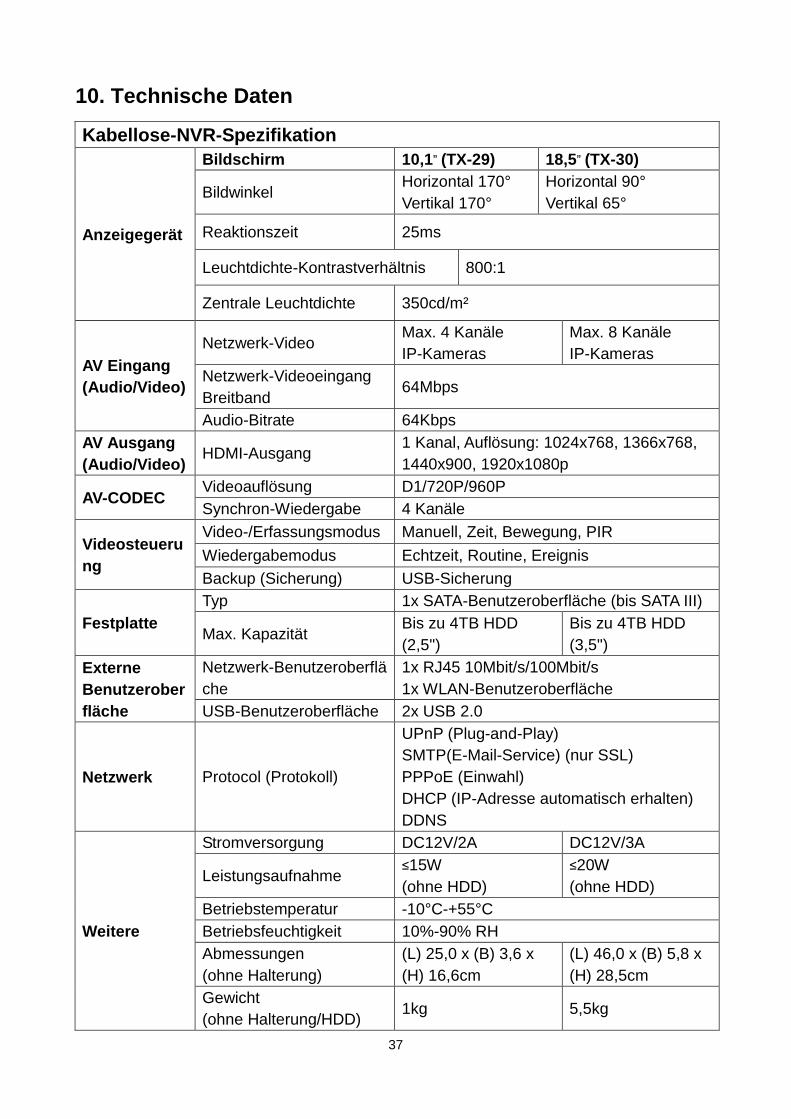
10. Technische Daten
Kabellose-NVR-Spezifikation
Anzeigegerät
Bildschirm 10,1” (TX-29) 18,5” (TX-30)
Bildwinkel Horizontal 170°
Vertikal 170°
Horizontal 90°
Vertikal 65°
Reaktionszeit 25ms
Leuchtdichte-Kontrastverhältnis 800:1
Zentrale Leuchtdichte 350cd/m²
AV Eingang
(Audio/Video)
Netzwerk-Video Max. 4 Kanäle
IP-Kameras
Max. 8 Kanäle
IP-Kameras
Netzwerk-Videoeingang
Breitband 64Mbps
Audio-Bitrate 64Kbps
AV Ausgang
(Audio/Video) HDMI-Ausgang
1 Kanal, Auflösung: 1024x768, 1366x768,
1440x900, 1920x1080p
AV-CODEC Videoauflösung D1/720P/960P
Synchron-Wiedergabe 4 Kanäle
Videosteueru
ng
Video-/Erfassungsmodus Manuell, Zeit, Bewegung, PIR
Wiedergabemodus Echtzeit, Routine, Ereignis
Backup (Sicherung) USB-Sicherung
Festplatte
Typ 1x SATA-Benutzeroberfläche (bis SATA III)
Max. Kapazität Bis zu 4TB HDD
(2,5")
Bis zu 4TB HDD
(3,5")
Externe
Benutzerober
fläche
Netzwerk-Benutzeroberflä
che
1x RJ45 10Mbit/s/100Mbit/s
1x WLAN-Benutzeroberfläche
USB-Benutzeroberfläche 2x USB 2.0
Netzwerk Protocol (Protokoll)
UPnP (Plug-and-Play)
SMTP(E-Mail-Service) (nur SSL)
PPPoE (Einwahl)
DHCP (IP-Adresse automatisch erhalten)
DDNS
Weitere
Stromversorgung DC12V/2A DC12V/3A
Leistungsaufnahme ≤15W
(ohne HDD)
≤20W
(ohne HDD)
Betriebstemperatur -10°C-+55°C
Betriebsfeuchtigkeit 10%-90% RH
Abmessungen
(ohne Halterung)
(L) 25,0 x (B) 3,6 x
(H) 16,6cm
(L) 46,0 x (B) 5,8 x
(H) 28,5cm
Gewicht
(ohne Halterung/HDD) 1kg 5,5kg
38
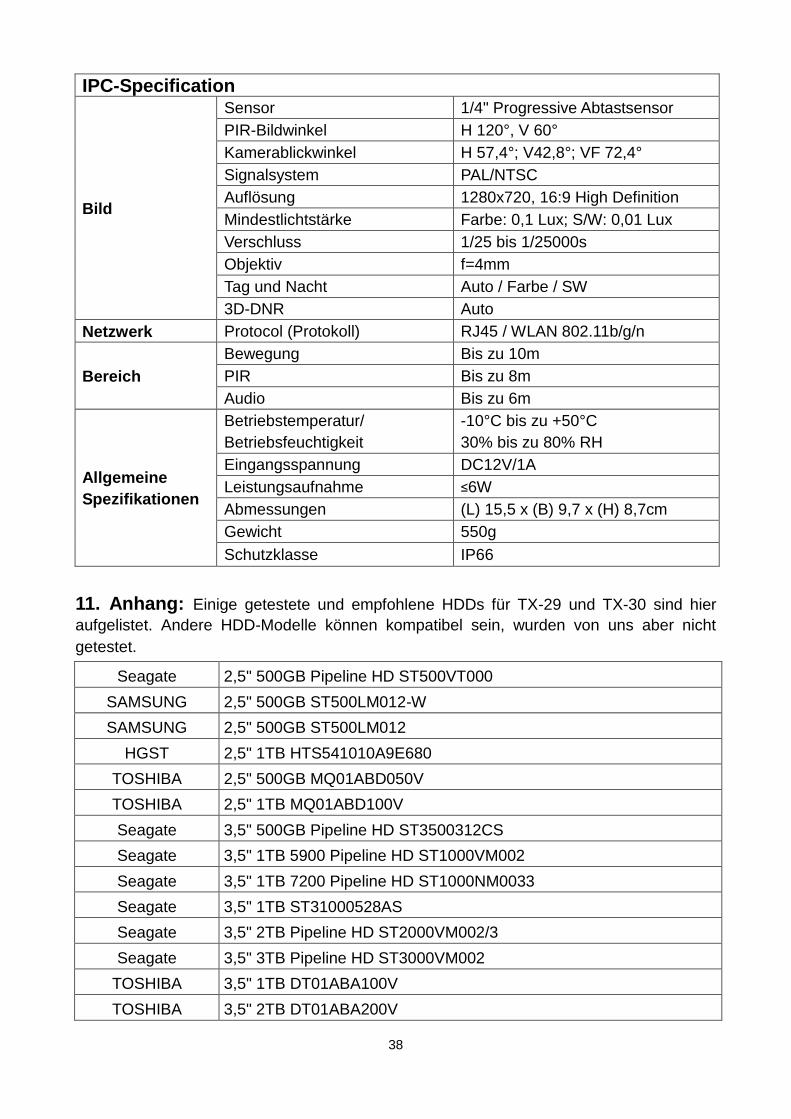
IPC-Specification
Bild
Sensor 1/4" Progressive Abtastsensor
PIR-Bildwinkel H 120°, V 60°
Kamerablickwinkel H 57,4°; V42,8°; VF 72,4°
Signalsystem PAL/NTSC
Auflösung 1280x720, 16:9 High Definition
Mindestlichtstärke Farbe: 0,1 Lux; S/W: 0,01 Lux
Verschluss 1/25 bis 1/25000s
Objektiv f=4mm
Tag und Nacht Auto / Farbe / SW
3D-DNR Auto
Netzwerk Protocol (Protokoll) RJ45 / WLAN 802.11b/g/n
Bereich
Bewegung Bis zu 10m
PIR Bis zu 8m
Audio Bis zu 6m
Allgemeine
Spezifikationen
Betriebstemperatur/
Betriebsfeuchtigkeit
-10°C bis zu +50°C
30% bis zu 80% RH
Eingangsspannung DC12V/1A
Leistungsaufnahme ≤6W
Abmessungen (L) 15,5 x (B) 9,7 x (H) 8,7cm
Gewicht 550g
Schutzklasse IP66
11. Anhang: Einige getestete und empfohlene HDDs für TX-29 und TX-30 sind hier
aufgelistet. Andere HDD-Modelle können kompatibel sein, wurden von uns aber nicht
getestet.
Seagate 2,5" 500GB Pipeline HD ST500VT000
SAMSUNG 2,5" 500GB ST500LM012-W
SAMSUNG 2,5" 500GB ST500LM012
HGST 2,5" 1TB HTS541010A9E680
TOSHIBA 2,5" 500GB MQ01ABD050V
TOSHIBA 2,5" 1TB MQ01ABD100V
Seagate 3,5" 500GB Pipeline HD ST3500312CS
Seagate 3,5" 1TB 5900 Pipeline HD ST1000VM002
Seagate 3,5" 1TB 7200 Pipeline HD ST1000NM0033
Seagate 3,5" 1TB ST31000528AS
Seagate 3,5" 2TB Pipeline HD ST2000VM002/3
Seagate 3,5" 3TB Pipeline HD ST3000VM002
TOSHIBA 3,5" 1TB DT01ABA100V
TOSHIBA 3,5" 2TB DT01ABA200V
39
Hinweise zum Umweltschutz: Verpackungen sind recycelbares Rohmaterial. Alte Geräte nicht im Hausmüll entsorgen. Reinigung: Gerät vor Verschmutzung schützen (mit sauberem Tuch reinigen). Keine rauen, groben Materialien oder Lösungsmittel oder andere aggressive Reinigungsmittel verwenden. Gereinigtes Gerät gründlich abwischen. Inverkehrbringer: Technaxx Deutschland GmbH & Co.KG, Kruppstr. 105, 60388 Frankfurt a.M., Deutschland
This product includes software developed by third parties, including software which
is released under the GNU General Public License Version 2 (GPL v2). This program
is free software; you can redistribute it and/or modify it under the terms of the GNU
General Public License as published by the Free Software Foundation; either version
2 of the License, or (at your option) any later version. You may obtain a complete
machine-readable copy of the source code for the above mentioned software under
the terms of GPL v2 without charge except for the cost of media, shipping, and
handling, upon written request to Technaxx GmbH & Co. KG, Kruppstraße 105, 60388
Frankfurt am Main, Germany.
This program is distributed in the hope that it will be useful, but WITHOUT ANY
WARRANTY; without even the implied warranty of MERCHANTABILITY or FITNESS
FOR A PARTICULAR PURPOSE. See the GNU General Public License for more
details. You should have received a copy of the GNU General Public License along
with this program; if not, write to the Free Software Foundation, Inc., 51 Franklin
Street, Fifth Floor, Boston, MA 02110-1301, USA. (Notice from Technaxx: A copy of
the GPL is included below).
GNU GENERAL PUBLIC LICENSE: Version 2, June 1991 / Copyright (C) 1989, 1991 Free
Software Foundation, Inc. / 51 Franklin Street, Fifth Floor, Boston, MA 02110-1301,
USA. Everyone is permitted to copy and distribute verbatim copies of this license
document, but changing it is not allowed.
Preamble
The licenses for most software are designed to take away your freedom to share and
change it. By contrast, the GNU General Public License is intended to guarantee your
freedom to share and change free software--to make sure the software is free for all its
users. This General Public License applies to most of the Free Software Foundation's
software and to any other program whose authors commit to using it. (Some other Free
Software Foundation software is covered by the GNU Lesser General Public License
instead.) You can apply it to your programs, too.
When we speak of free software, we are referring to freedom, not price. Our General Public
Licenses are designed to make sure that you have the freedom to distribute copies of free
software (and charge for this service if you wish), that you receive source code or can get it
if you want it, that you can change the software or use pieces of it in new free programs; and
that you know you can do these things.
40
To protect your rights, we need to make restrictions that forbid anyone to deny you these
rights or to ask you to surrender the rights. These restrictions translate to certain
responsibilities for you if you distribute copies of the software, or if you modify it.
For example, if you distribute copies of such a program, whether gratis or for a fee, you must
give the recipients all the rights that you have. You must make sure that they, too, receive or
can get the source code. And you must show them these terms so they know their rights.
We protect your rights with two steps: (1) copyright the software, and (2) offer you this
license which gives you legal permission to copy, distribute and/or modify the software.
Also, for each author's protection and ours, we want to make certain that everyone
understands that there is no warranty for this free software. If the software is modified by
someone else and passed on, we want its recipients to know that what they have is not the
original, so that any problems introduced by others will not reflect on the original authors'
reputations.
Any free program is threatened constantly by software patents. We wish to avoid the danger
that redistributors of a free program will individually obtain patent licenses, in effect making
the program proprietary. To prevent this, we have made it clear that any patent must be
licensed for everyone's free use or not licensed at all.
The precise terms and conditions for copying, distribution and modification follow.
TERMS AND CONDITIONS FOR COPYING, DISTRIBUTION AND MODIFICATION
0. This License applies to any program or other work which contains a notice placed by the
copyright holder saying it may be distributed under the terms of this General Public License.
The "Program", below, refers to any such program or work, and a "work based on the
Program" means either the Program or any derivative work under copyright law: that is to
say, a work containing the Program or a portion of it, either verbatim or with modifications
and/or translated into another language. (Hereinafter, translation is included without
limitation in the term "modification".) Each licensee is addressed as "you".
Activities other than copying, distribution and modification are not covered by this License;
they are outside its scope. The act of running the Program is not restricted, and the output
from the Program is covered only if its contents constitute a work based on the Program
(independent of having been made by running the Program). Whether that is true depends
on what the Program does.
1. You may copy and distribute verbatim copies of the Program's source code as you receive
it, in any medium, provided that you conspicuously and appropriately publish on each copy
an appropriate copyright notice and disclaimer of warranty; keep intact all the notices that
refer to this License and to the absence of any warranty; and give any other recipients of the
Program a copy of this License along with the Program. You may charge a fee for the
physical act of transferring a copy, and you may at your option offer warranty protection in
exchange for a fee.

41
2. You may modify your copy or copies of the Program or any portion of it, thus forming a
work based on the Program, and copy and distribute such modifications or work under the
terms of Section 1 above, provided that you also meet all of these conditions:
a) You must cause the modified files to carry prominent notices stating that you changed the
files and the date of any change.
b) You must cause any work that you distribute or publish, that in whole or in part contains or
is derived from the Program or any part thereof, to be licensed as a whole at no charge to all
third parties under the terms of this License.
c) If the modified program normally reads commands interactively when run, you must
cause it, when started running for such interactive use in the most ordinary way, to print or
display an announcement including an appropriate copyright notice and a notice that there is
no warranty (or else, saying that you provide a warranty) and that users may redistribute the
program under these conditions, and telling the user how to view a copy of this License.
(Exception: if the Program itself is interactive but does not normally print such an
announcement, your work based on the Program is not required to print an announcement.)
These requirements apply to the modified work as a whole. If identifiable sections of that
work are not derived from the Program, and can be reasonably considered independent and
separate works in themselves, then this License, and its terms, do not apply to those
sections when you distribute them as separate works. But when you distribute the same
sections as part of a whole which is a work based on the Program, the distribution of the
whole must be on the terms of this License, whose permissions for other licensees extend to
the entire whole, and thus to each and every part regardless of who wrote it.
Thus, it is not the intent of this section to claim rights or contest your rights to work written
entirely by you; rather, the intent is to exercise the right to control the distribution of
derivative or collective works based on the Program. In addition, mere aggregation of
another work not based on the Program with the Program (or with a work based on the
Program) on a volume of a storage or distribution medium does not bring the other work
under the scope of this License.
3. You may copy and distribute the Program (or a work based on it, under Section 2) in
object code or executable form under the terms of Sections 1 and 2 above provided that you
also do one of the following:
a) Accompany it with the complete corresponding machine-readable source code, which
must be distributed under the terms of Sections 1 and 2 above on a medium customarily
used for software interchange; or,
b) Accompany it with a written offer, valid for at least three years, to give any third party, for a
charge no more than your cost of physically performing source distribution, a complete
machine-readable copy of the corresponding source code, to be distributed under the terms
of Sections 1 and 2 above on a medium customarily used for software interchange; or,
c) Accompany it with the information you received as to the offer to distribute corresponding
source code. (This alternative is allowed only for noncommercial distribution and only if you
42
received the program in object code or executable form with such an offer, in accord with
Subsection b above.)
The source code for a work means the preferred form of the work for making modifications to
it. For an executable work, complete source code means all the source code for all modules
it contains, plus any associated interface definition files, plus the scripts used to control
compilation and installation of the executable. However, as a special exception, the source
code distributed need not include anything that is normally distributed (in either source or
binary form) with the major components (compiler, kernel, and so on) of the operating
system on which the executable runs, unless that component itself accompanies the
executable.
If distribution of executable or object code is made by offering access to copy from a
designated place, then offering equivalent access to copy the source code from the same
place counts as distribution of the source code, even though third parties are not compelled
to copy the source along with the object code.
4. You may not copy, modify, sublicense, or distribute the Program except as expressly
provided under this License. Any attempt otherwise to copy, modify, sublicense or distribute
the Program is void, and will automatically terminate your rights under this License.
However, parties who have received copies, or rights, from you under this License will not
have their licenses terminated so long as such parties remain in full compliance.
5. You are not required to accept this License, since you have not signed it. However,
nothing else grants you permission to modify or distribute the Program or its derivative
works. These actions are prohibited by law if you do not accept this License. Therefore, by
modifying or distributing the Program (or any work based on the Program), you indicate your
acceptance of this License to do so, and all its terms and conditions for copying, distributing
or modifying the Program or works based on it.
6. Each time you redistribute the Program (or any work based on the Program), the recipient
automatically receives a license from the original licensor to copy, distribute or modify the
Program subject to these terms and conditions. You may not impose any further restrictions
on the recipients' exercise of the rights granted herein. You are not responsible for enforcing
compliance by third parties to this License.
7. If, as a consequence of a court judgment or allegation of patent infringement or for any
other reason (not limited to patent issues), conditions are imposed on you (whether by court
order, agreement or otherwise) that contradict the conditions of this License, they do not
excuse you from the conditions of this License. If you cannot distribute so as to satisfy
simultaneously your obligations under this License and any other pertinent obligations, then
as a consequence you may not distribute the Program at all. For example, if a patent license
would not permit royalty-free redistribution of the Program by all those who receive copies
directly or indirectly through you, then the only way you could satisfy both it and this License
would be to refrain entirely from distribution of the Program.
If any portion of this section is held invalid or unenforceable under any particular
43
circumstance, the balance of the section is intended to apply and the section as a whole is
intended to apply in other circumstances.
It is not the purpose of this section to induce you to infringe any patents or other property
right claims or to contest validity of any such claims; this section has the sole purpose of
protecting the integrity of the free software distribution system, which is implemented by
public license practices. Many people have made generous contributions to the wide range
of software distributed through that system in reliance on consistent application of that
system; it is up to the author/donor to decide if he or she is willing to distribute software
through any other system and a licensee cannot impose that choice. This section is intended
to make thoroughly clear what is believed to be a consequence of the rest of this License.
8. If the distribution and/or use of the Program is restricted in certain countries either by
patents or by copyrighted interfaces, the original copyright holder who places the Program
under this License may add an explicit geographical distribution limitation excluding those
countries, so that distribution is permitted only in or among countries not thus excluded. In
such case, this License incorporates the limitation as if written in the body of this License.
9. The Free Software Foundation may publish revised and/or new versions of the General
Public License from time to time. Such new versions will be similar in spirit to the present
version, but may differ in detail to address new problems or concerns.
Each version is given a distinguishing version number. If the Program specifies a version
number of this License which applies to it and "any later version", you have the option of
following the terms and conditions either of that version or of any later version published by
the Free Software Foundation. If the Program does not specify a version number of this
License, you may choose any version ever published by the Free Software Foundation.
10. If you wish to incorporate parts of the Program into other free programs whose
distribution conditions are different, write to the author to ask for permission. For software
which is copyrighted by the Free Software Foundation, write to the Free Software
Foundation; we sometimes make exceptions for this. Our decision will be guided by the two
goals of preserving the free status of all derivatives of our free software and of promoting the
sharing and reuse of software generally.
NO WARRANTY
11. Because the program is licensed free of charge, there is no warranty for the program, to
the extent permitted by applicable law. Except when otherwise stated in writing the
Copyright holder and/or other parties provide the program "AS IS" without warranty of any
kind, either expressed or implied, including, but not limited to, the implied warranties of
merchantability and fitness for a particular purpose. The entire risk as to the quality and
performance of the program is with you. Should the program prove defective, you assume
the cost of all necessary servicing, repair or correction.
12. In no event unless required by applicable law or agreed to in writing will any Copyright
holder, or any other party who may modify and/or redistribute the program as permitted
above, be liable to you for damages, including any general, specia, incidental or
consequential. Damages arising out of the use or inability to use the program (including but

44
not limited to loss of data or data being rendered inaccurate or losses sustained by you or
third parties or a failure of the program to operate with any other programs), even if such
holder or other party has been advised of the possibility of such damages.
END OF TERMS AND CONDITIONS
45
HOW TO APPLY THESE TERMS TO YOUR NEW PROGRAMS
(1) If you develop a new program, and you want it to be of the greatest possible use to the
public, the best way to achieve this is to make it free software which everyone can
redistribute and change under these terms.
(2) To do so, attach the following notices to the program. It is safest to attach them to the
start of each source file to most effectively convey the exclusion of warranty; and each file
should have at least the "copyright" line and a pointer to where the full notice is found.
<one line to give the program's name and an idea of what it does.>
Copyright (C) <yyyy> <name of author>
(3) This program is free software; you can redistribute it and/or modify it under the terms of
the GNU General Public License as published by the Free Software Foundation; either
version 2 of the License, or (at your option) any later version.
(4) This program is distributed in the hope that it will be useful, but WITHOUT ANY
WARRANTY; without even the implied warranty of MERCHANTABILITY or FITNESS FOR A
PARTICULAR PURPOSE. See the GNU General Public License for more details.
(5) You should have received a copy of the GNU General Public License along with this
program; if not, write to the Free Software Foundation Inc; 51 Franklin Street, Fifth Floor,
Boston, MA 02110-1301, USA.
(6) Also add information on how to contact you by electronic and paper mail.
(7) If the program is interactive, make it output a short notice like this when it starts in an
interactive mode: Gnomovision version 69, Copyright (C) year name of author Gnomovision
comes with ABSOLUTELY NO WARRANTY; for details type `show w'. (8) This is free
software, and you are welcome to redistribute it under certain conditions; type `show c' for
details.
(9) The hypothetical commands `show w' and `show c' should show the appropriate parts of
the General Public License. Of course, the commands you use may be called something
other than ̀ show w' and ̀ show c'; they could even be mouse-clicks or menu items--whatever
suits your program.
(10) You should also get your employer (if you work as a programmer) or your school, if any,
to sign a "copyright disclaimer" for the program, if necessary. Here is a sample; alter the
names: (11) Yoyodyne, Inc., hereby disclaims all copyright interest in the program
`Gnomovision' (which makes passes at compilers) written by James Hacker. <signature of
Ty Coon>, 1 April 1989 [Ty Coon, President of Vice]
(12) This General Public License does not permit incorporating your program into
proprietary programs. If your program is a subroutine library, you may consider it more
useful to permit linking proprietary applications with the library. If this is what you want to do,
use the GNU Lesser General Public License instead of this License.
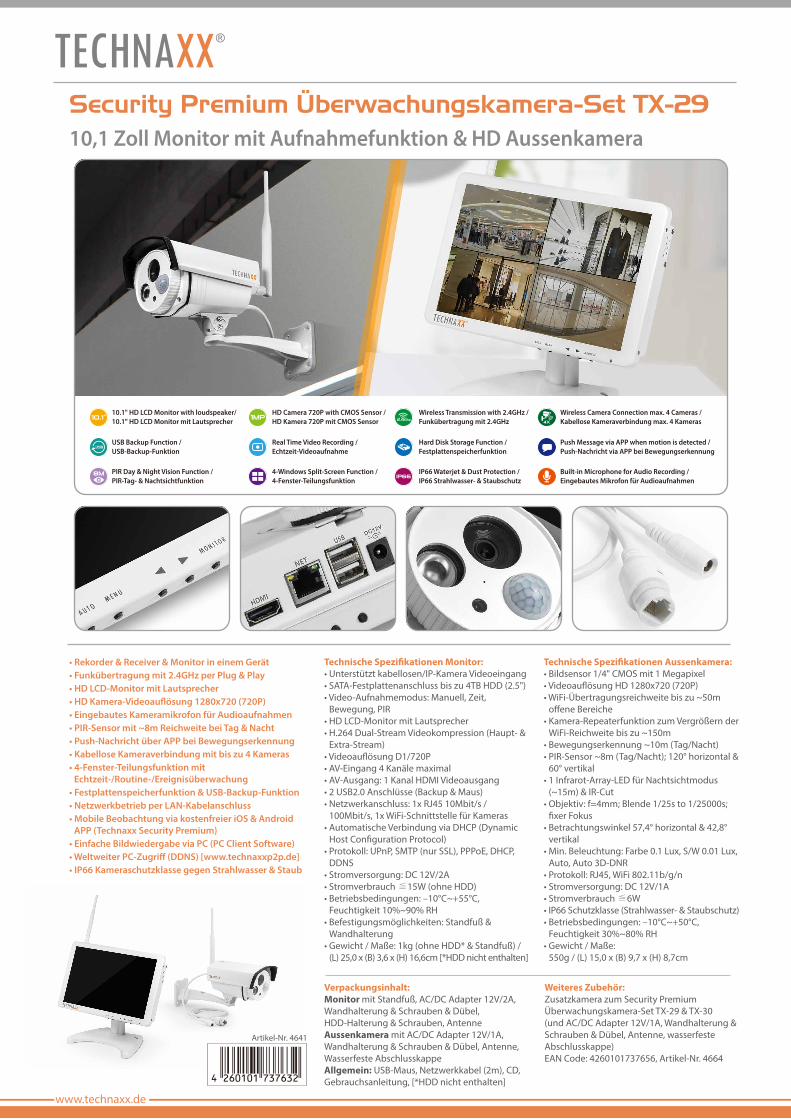
www.technaxx.de
Technische Spezi�kationen Monitor:• Unterstützt kabellosen/IP-Kamera Videoeingang • SATA-Festplattenanschluss bis zu 4TB HDD (2.5")• Video-Aufnahmemodus: Manuell, Zeit,
Bewegung, PIR• HD LCD-Monitor mit Lautsprecher• H.264 Dual-Stream Videokompression (Haupt- &
Extra-Stream)• Videoau�ösung D1/720P• AV-Eingang 4 Kanäle maximal• AV-Ausgang: 1 Kanal HDMI Videoausgang• 2 USB2.0 Anschlüsse (Backup & Maus)• Netzwerkanschluss: 1x RJ45 10Mbit/s /
100Mbit/s, 1x WiFi-Schnittstelle für Kameras• Automatische Verbindung via DHCP (Dynamic
Host Con�guration Protocol)• Protokoll: UPnP, SMTP (nur SSL), PPPoE, DHCP,
DDNS• Stromversorgung: DC 12V/2A• Stromverbrauch ≦15W (ohne HDD)• Betriebsbedingungen: –10°C~+55°C,
Feuchtigkeit 10%~90% RH• Befestigungsmöglichkeiten: Standfuß &
Wandhalterung• Gewicht / Maße: 1kg (ohne HDD* & Standfuß) /
(L) 25,0 x (B) 3,6 x (H) 16,6cm [*HDD nicht enthalten]
Technische Spezi�kationen Aussenkamera:• Bildsensor 1/4" CMOS mit 1 Megapixel• Videoau�ösung HD 1280x720 (720P)• WiFi-Übertragungsreichweite bis zu ~50m
o�ene Bereiche• Kamera-Repeaterfunktion zum Vergrößern der
WiFi-Reichweite bis zu ~150m• Bewegungserkennung ~10m (Tag/Nacht)• PIR-Sensor ~8m (Tag/Nacht); 120° horizontal &
60° vertikal• 1 Infrarot-Array-LED für Nachtsichtmodus
(~15m) & IR-Cut• Objektiv: f=4mm; Blende 1/25s to 1/25000s;
�xer Fokus• Betrachtungswinkel 57,4° horizontal & 42,8°
vertikal• Min. Beleuchtung: Farbe 0.1 Lux, S/W 0.01 Lux,
Auto, Auto 3D-DNR• Protokoll: RJ45, WiFi 802.11b/g/n• Stromversorgung: DC 12V/1A• Stromverbrauch ≦6W• IP66 Schutzklasse (Strahlwasser- & Staubschutz)• Betriebsbedingungen: –10°C~+50°C,
Feuchtigkeit 30%~80% RH• Gewicht / Maße:
550g / (L) 15,0 x (B) 9,7 x (H) 8,7cm
Security Premium Überwachungskamera-Set TX-29 10,1 Zoll Monitor mit Aufnahmefunktion & HD Aussenkamera
• Rekorder & Receiver & Monitor in einem Gerät• Funkübertragung mit 2.4GHz per Plug & Play• HD LCD-Monitor mit Lautsprecher• HD Kamera-Videoau�ösung 1280x720 (720P)• Eingebautes Kameramikrofon für Audioaufnahmen• PIR-Sensor mit ~8m Reichweite bei Tag & Nacht• Push-Nachricht über APP bei Bewegungserkennung• Kabellose Kameraverbindung mit bis zu 4 Kameras• 4-Fenster-Teilungsfunktion mit
Echtzeit-/Routine-/Ereignisüberwachung• Festplattenspeicherfunktion & USB-Backup-Funktion• Netzwerkbetrieb per LAN-Kabelanschluss• Mobile Beobachtung via kostenfreier iOS & Android
APP (Technaxx Security Premium)• Einfache Bildwiedergabe via PC (PC Client Software)• Weltweiter PC-Zugri� (DDNS) [www.technaxxp2p.de]• IP66 Kameraschutzklasse gegen Strahlwasser & Staub
Verpackungsinhalt:Monitor mit Standfuß, AC/DC Adapter 12V/2A, Wandhalterung & Schrauben & Dübel, HDD-Halterung & Schrauben, AntenneAussenkamera mit AC/DC Adapter 12V/1A, Wandhalterung & Schrauben & Dübel, Antenne, Wasserfeste AbschlusskappeAllgemein: USB-Maus, Netzwerkkabel (2m), CD, Gebrauchsanleitung, [*HDD nicht enthalten]
Artikel-Nr. 4641
Weiteres Zubehör:Zusatzkamera zum Security Premium Überwachungskamera-Set TX-29 & TX-30 (und AC/DC Adapter 12V/1A, Wandhalterung & Schrauben & Dübel, Antenne, wasserfeste Abschlusskappe) EAN Code: 4260101737656, Artikel-Nr. 4664
10.1" HD LCD Monitor with loudspeaker/ 10.1" HD LCD Monitor mit Lautsprecher
Wireless Camera Connection max. 4 Cameras / Kabellose Kameraverbindung max. 4 Kameras
4-Windows Split-Screen Function / 4-Fenster-Teilungsfunktion
Push Message via APP when motion is detected / Push-Nachricht via APP bei Bewegungserkennung
PIR Day & Night Vision Function / PIR-Tag- & Nachtsichtfunktion
USB Backup Function / USB-Backup-Funktion
IP66 Waterjet & Dust Protection / IP66 Strahlwasser- & Staubschutz
Wireless Transmission with 2.4GHz / Funkübertragung mit 2.4GHz
Hard Disk Storage Function / Festplattenspeicherfunktion
Real Time Video Recording / Echtzeit-Videoaufnahme
HD Camera 720P with CMOS Sensor / HD Kamera 720P mit CMOS Sensor
Built-in Microphone for Audio Recording / Eingebautes Mikrofon für Audioaufnahmen
1
Technaxx® * User Manual
Security Premium Camera Set 10.1 TX-29
Security Premium Camera Set 18.5 TX-30
Important Hint regarding the user manuals:
All languages of the user manual are on the CD enclosed. Warranty 2 years
Contents 1 Features ............................................................................................................................ 2
2. Package content .............................................................................................................. 3
3. Product Overview............................................................................................................. 3
4. Installation ........................................................................................................................ 6
4.1 How to install TX-29 & TX-30 ......................................................................................... 7
4.2 Antenna installation ........................................................................................................ 7
4.3 Hard disk installation ...................................................................................................... 8
4.4 Add camera to TX-29/TX-30 .......................................................................................... 9
5. Software Functions ........................................................................................................ 10
5.1 Split screen .................................................................................................................. 10
5.2 Video Manage .............................................................................................................. 10
5.4 Video playback ............................................................................................................. 15
5.5 Video backup ............................................................................................................... 20
5.6 Color adjust .................................................................................................................. 21
5.7 PTZ control (not for included cameras) ........................................................................ 21
5.8 Manual record .............................................................................................................. 22
5.9 Volume ......................................................................................................................... 22
5.10 Setup Wizard ............................................................................................................. 22
5.11 Fast network ............................................................................................................... 22
5.12 Add Camera ............................................................................................................... 22
5.13 Exit System ................................................................................................................ 22
6. Device Access ............................................................................................................... 23
6.1 Access via LAN (local WEB Interface) ......................................................................... 23
6.2 Access via WAN ( global WEB Interface) ..................................................................... 24
6.3 Mobile application (Security Premium) ......................................................................... 25
7. Security Premium PC Client .......................................................................................... 29
8. Advanced camera settings ............................................................................................. 32
9. Troubleshooting ............................................................................................................. 32
10. Specifications ............................................................................................................... 33
11. Attachment ................................................................................................................... 34
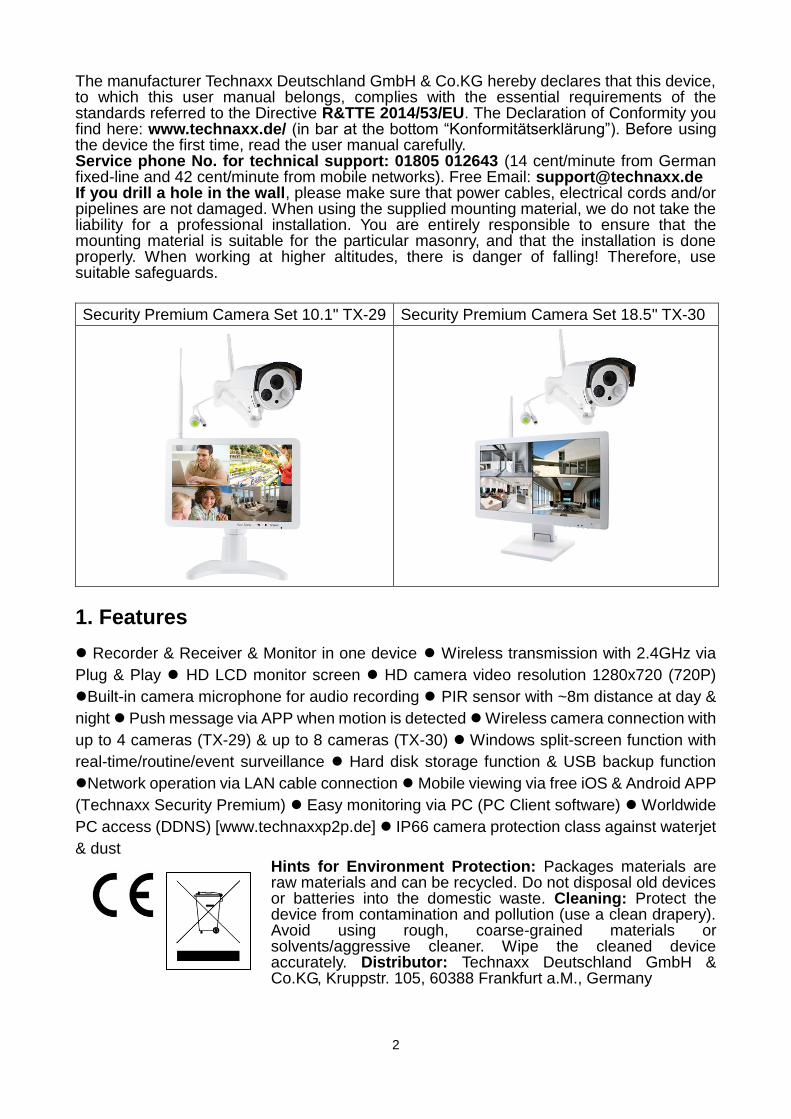
2
The manufacturer Technaxx Deutschland GmbH & Co.KG hereby declares that this device, to which this user manual belongs, complies with the essential requirements of the standards referred to the Directive R&TTE 2014/53/EU. The Declaration of Conformity you find here: www.technaxx.de/ (in bar at the bottom “Konformitätserklärung”). Before using the device the first time, read the user manual carefully. Service phone No. for technical support: 01805 012643 (14 cent/minute from German fixed-line and 42 cent/minute from mobile networks). Free Email: [email protected] If you drill a hole in the wall, please make sure that power cables, electrical cords and/or pipelines are not damaged. When using the supplied mounting material, we do not take the liability for a professional installation. You are entirely responsible to ensure that the mounting material is suitable for the particular masonry, and that the installation is done properly. When working at higher altitudes, there is danger of falling! Therefore, use suitable safeguards.
Security Premium Camera Set 10.1" TX-29 Security Premium Camera Set 18.5" TX-30
1. Features
Recorder & Receiver & Monitor in one device Wireless transmission with 2.4GHz via
Plug & Play HD LCD monitor screen HD camera video resolution 1280x720 (720P)
Built-in camera microphone for audio recording PIR sensor with ~8m distance at day &
night Push message via APP when motion is detected Wireless camera connection with
up to 4 cameras (TX-29) & up to 8 cameras (TX-30) Windows split-screen function with
real-time/routine/event surveillance Hard disk storage function & USB backup function
Network operation via LAN cable connection Mobile viewing via free iOS & Android APP
(Technaxx Security Premium) Easy monitoring via PC (PC Client software) Worldwide
PC access (DDNS) [www.technaxxp2p.de] IP66 camera protection class against waterjet
& dust Hints for Environment Protection: Packages materials are raw materials and can be recycled. Do not disposal old devices or batteries into the domestic waste. Cleaning: Protect the device from contamination and pollution (use a clean drapery). Avoid using rough, coarse-grained materials or solvents/aggressive cleaner. Wipe the cleaned device accurately. Distributor: Technaxx Deutschland GmbH & Co.KG, Kruppstr. 105, 60388 Frankfurt a.M., Germany
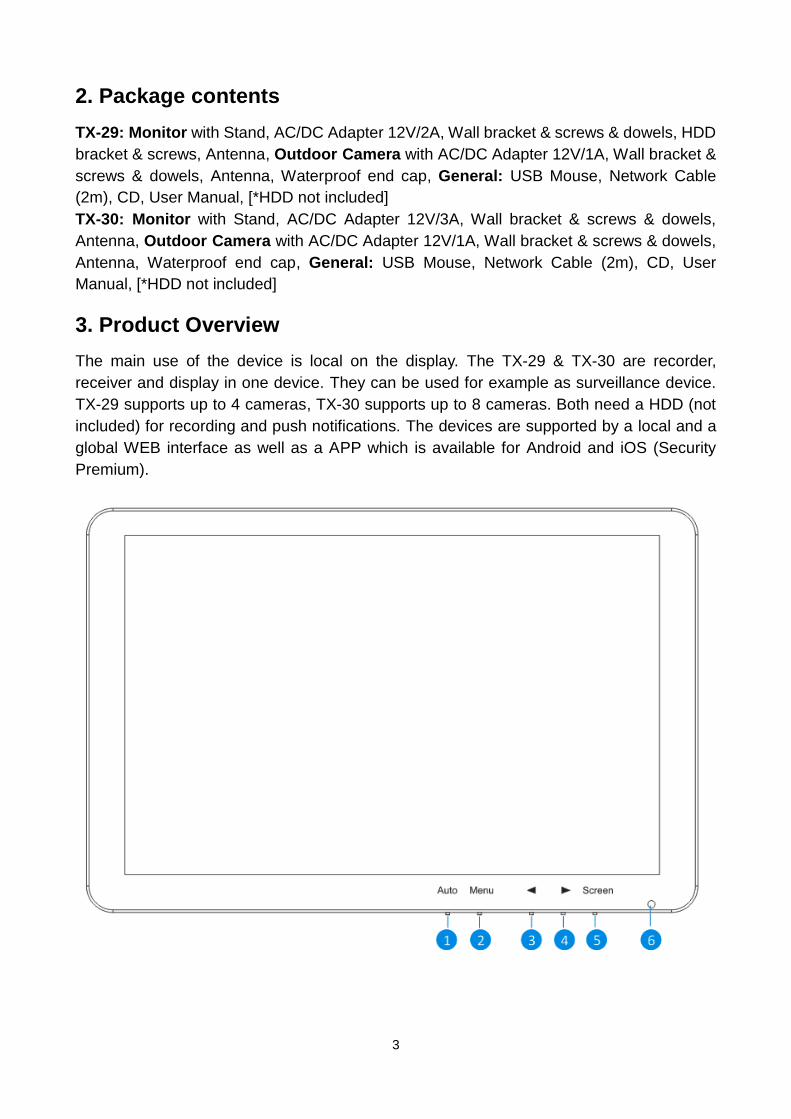
3
2. Package contents
TX-29: Monitor with Stand, AC/DC Adapter 12V/2A, Wall bracket & screws & dowels, HDD
bracket & screws, Antenna, Outdoor Camera with AC/DC Adapter 12V/1A, Wall bracket &
screws & dowels, Antenna, Waterproof end cap, General: USB Mouse, Network Cable
(2m), CD, User Manual, [*HDD not included]
TX-30: Monitor with Stand, AC/DC Adapter 12V/3A, Wall bracket & screws & dowels,
Antenna, Outdoor Camera with AC/DC Adapter 12V/1A, Wall bracket & screws & dowels,
Antenna, Waterproof end cap, General: USB Mouse, Network Cable (2m), CD, User
Manual, [*HDD not included]
3. Product Overview
The main use of the device is local on the display. The TX-29 & TX-30 are recorder,
receiver and display in one device. They can be used for example as surveillance device.
TX-29 supports up to 4 cameras, TX-30 supports up to 8 cameras. Both need a HDD (not
included) for recording and push notifications. The devices are supported by a local and a
global WEB interface as well as a APP which is available for Android and iOS (Security
Premium).
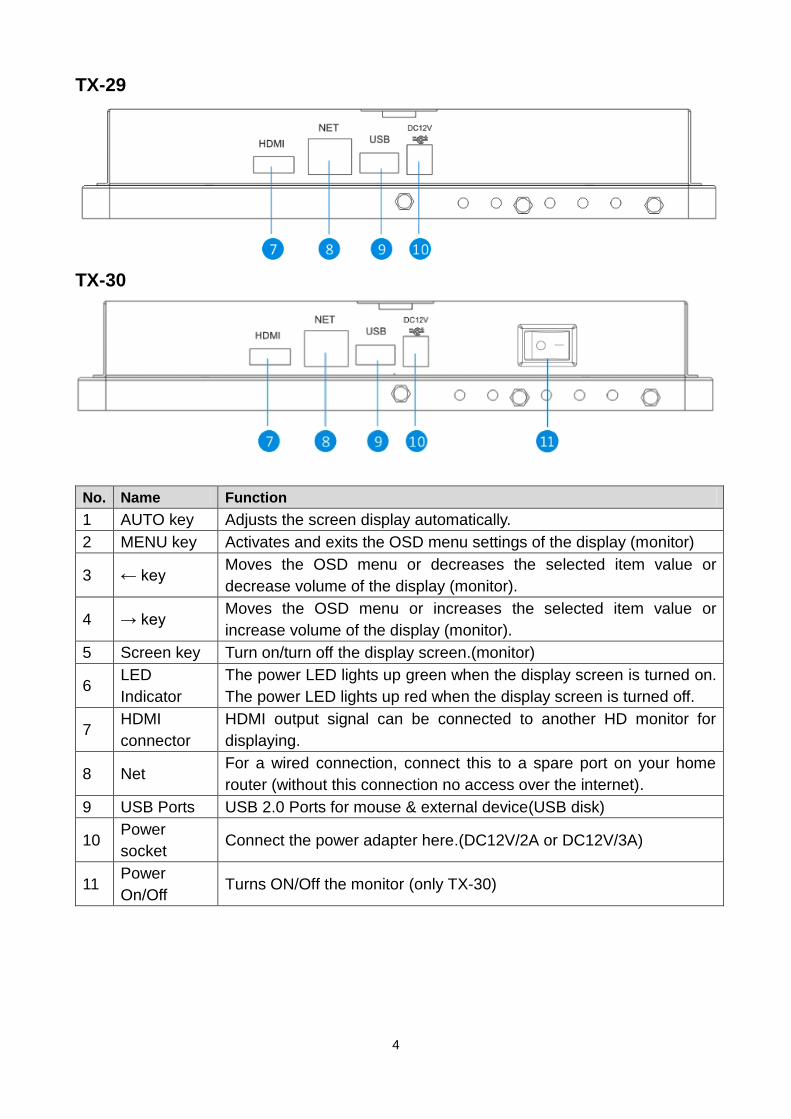
4
TX-29
TX-30
No. Name Function
1 AUTO key Adjusts the screen display automatically.
2 MENU key Activates and exits the OSD menu settings of the display (monitor)
3 ← key Moves the OSD menu or decreases the selected item value or
decrease volume of the display (monitor).
4 → key Moves the OSD menu or increases the selected item value or
increase volume of the display (monitor).
5 Screen key Turn on/turn off the display screen.(monitor)
6 LED
Indicator
The power LED lights up green when the display screen is turned on.
The power LED lights up red when the display screen is turned off.
7 HDMI
connector
HDMI output signal can be connected to another HD monitor for
displaying.
8 Net For a wired connection, connect this to a spare port on your home
router (without this connection no access over the internet).
9 USB Ports USB 2.0 Ports for mouse & external device(USB disk)
10 Power
socket Connect the power adapter here.(DC12V/2A or DC12V/3A)
11 Power
On/Off Turns ON/Off the monitor (only TX-30)
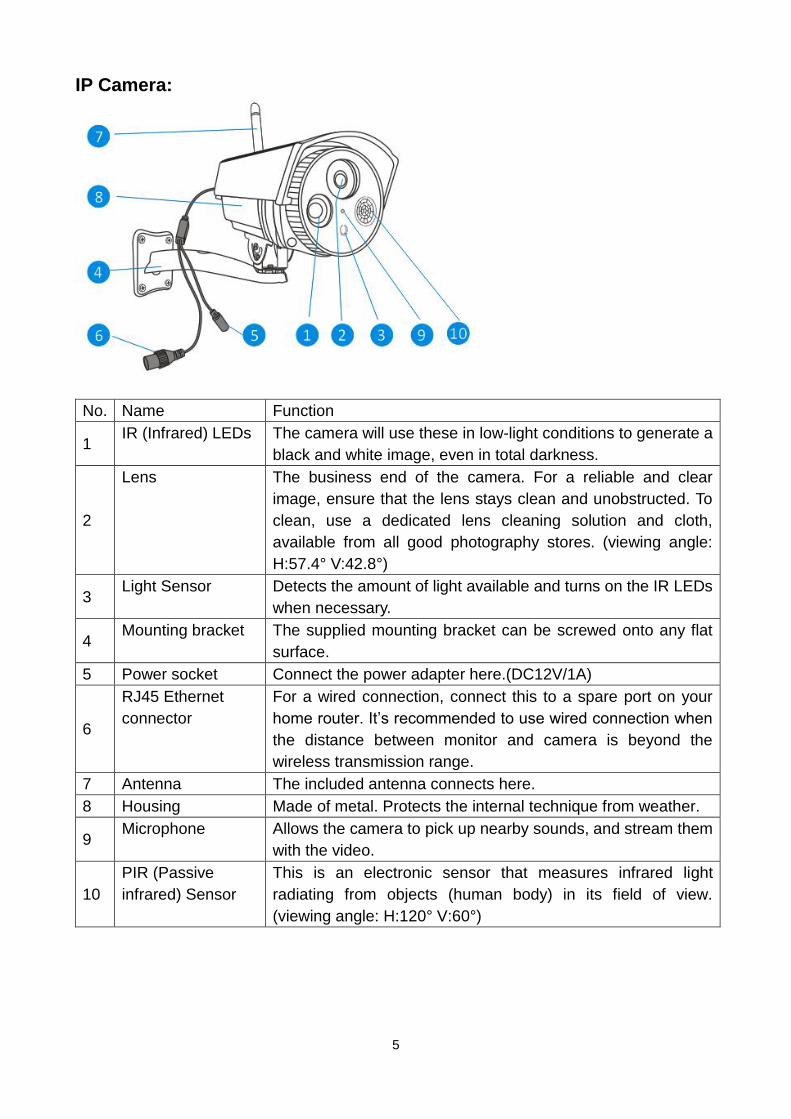
5
IP Camera:
No. Name Function
1 IR (Infrared) LEDs The camera will use these in low-light conditions to generate a
black and white image, even in total darkness.
2
Lens The business end of the camera. For a reliable and clear
image, ensure that the lens stays clean and unobstructed. To
clean, use a dedicated lens cleaning solution and cloth,
available from all good photography stores. (viewing angle:
H:57.4° V:42.8°)
3 Light Sensor Detects the amount of light available and turns on the IR LEDs
when necessary.
4 Mounting bracket The supplied mounting bracket can be screwed onto any flat
surface.
5 Power socket Connect the power adapter here.(DC12V/1A)
6
RJ45 Ethernet
connector
For a wired connection, connect this to a spare port on your
home router. It’s recommended to use wired connection when
the distance between monitor and camera is beyond the
wireless transmission range.
7 Antenna The included antenna connects here.
8 Housing Made of metal. Protects the internal technique from weather.
9 Microphone Allows the camera to pick up nearby sounds, and stream them
with the video.
10
PIR (Passive
infrared) Sensor
This is an electronic sensor that measures infrared light
radiating from objects (human body) in its field of view.
(viewing angle: H:120° V:60°)
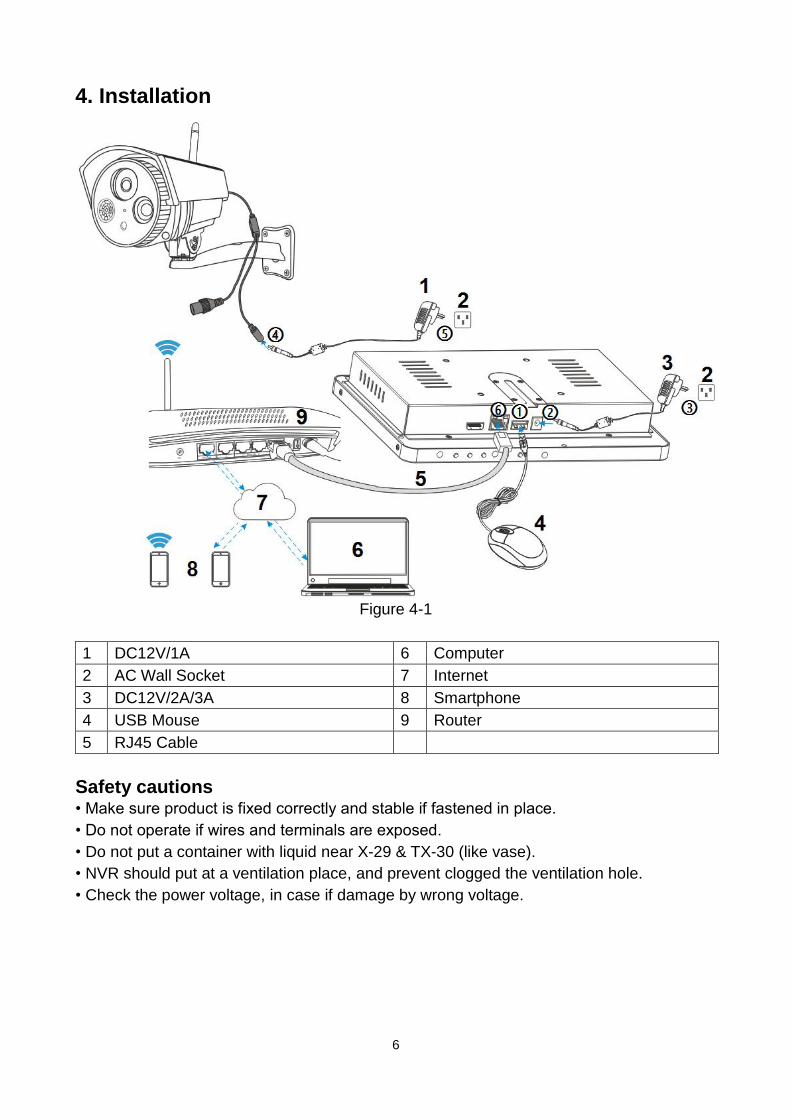
6
4. Installation
Figure 4-1
1 DC12V/1A 6 Computer
2 AC Wall Socket 7 Internet
3 DC12V/2A/3A 8 Smartphone
4 USB Mouse 9 Router
5 RJ45 Cable
Safety cautions • Make sure product is fixed correctly and stable if fastened in place.
• Do not operate if wires and terminals are exposed.
• Do not put a container with liquid near X-29 & TX-30 (like vase).
• NVR should put at a ventilation place, and prevent clogged the ventilation hole.
• Check the power voltage, in case if damage by wrong voltage.
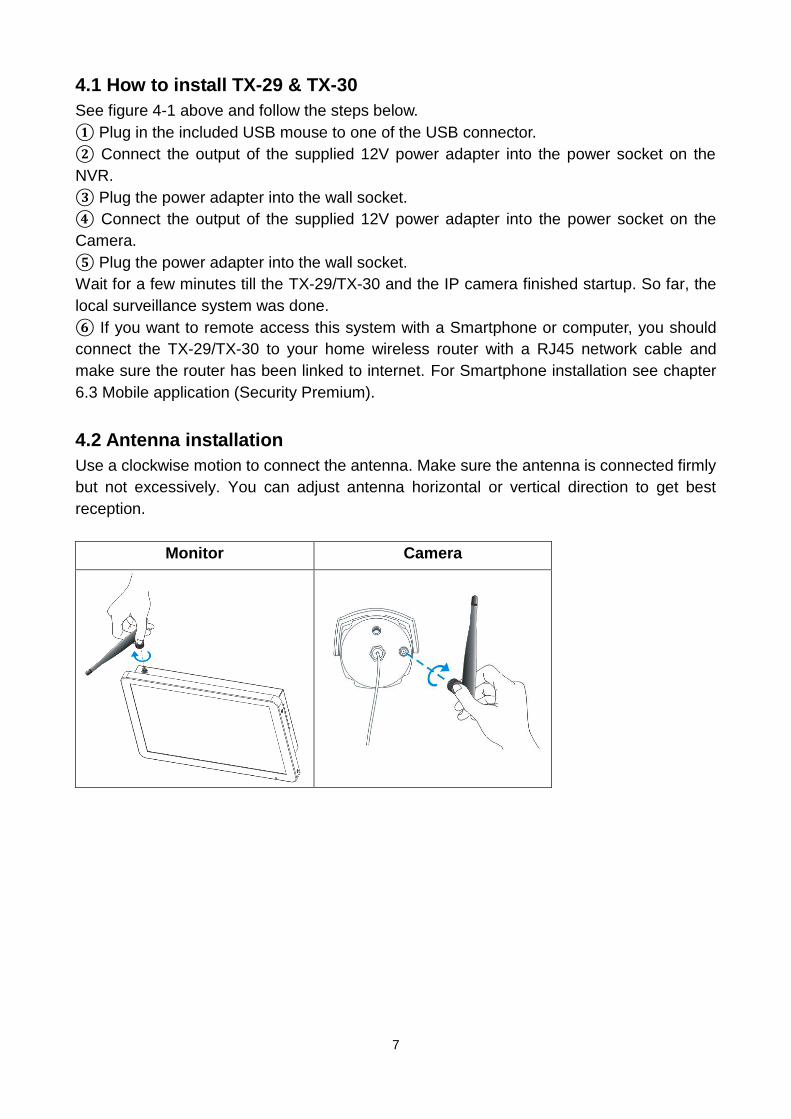
7
4.1 How to install TX-29 & TX-30
See figure 4-1 above and follow the steps below.
① Plug in the included USB mouse to one of the USB connector.
② Connect the output of the supplied 12V power adapter into the power socket on the
NVR.
③ Plug the power adapter into the wall socket.
④ Connect the output of the supplied 12V power adapter into the power socket on the
Camera.
⑤ Plug the power adapter into the wall socket.
Wait for a few minutes till the TX-29/TX-30 and the IP camera finished startup. So far, the
local surveillance system was done.
⑥ If you want to remote access this system with a Smartphone or computer, you should
connect the TX-29/TX-30 to your home wireless router with a RJ45 network cable and
make sure the router has been linked to internet. For Smartphone installation see chapter
6.3 Mobile application (Security Premium).
4.2 Antenna installation
Use a clockwise motion to connect the antenna. Make sure the antenna is connected firmly
but not excessively. You can adjust antenna horizontal or vertical direction to get best
reception.
Monitor Camera
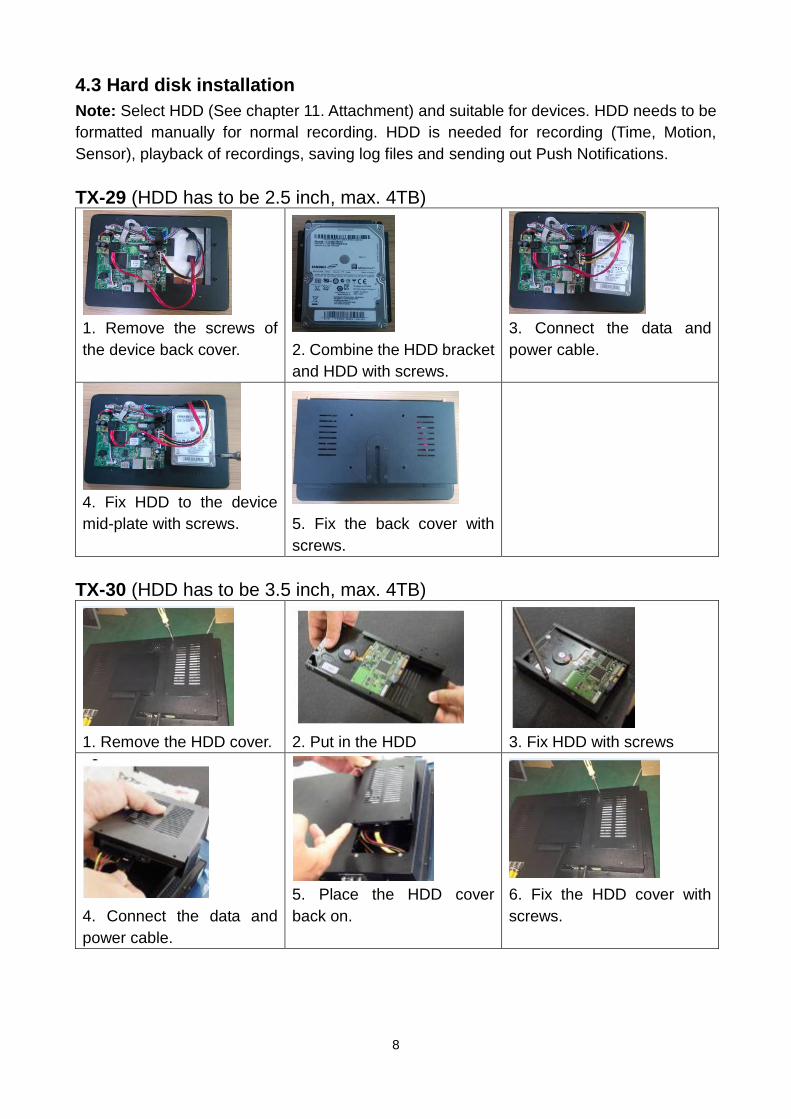
8
4.3 Hard disk installation
Note: Select HDD (See chapter 11. Attachment) and suitable for devices. HDD needs to be
formatted manually for normal recording. HDD is needed for recording (Time, Motion,
Sensor), playback of recordings, saving log files and sending out Push Notifications.
TX-29 (HDD has to be 2.5 inch, max. 4TB)
1. Remove the screws of
the device back cover.
2. Combine the HDD bracket
and HDD with screws.
3. Connect the data and
power cable.
4. Fix HDD to the device
mid-plate with screws.
5. Fix the back cover with
screws.
TX-30 (HDD has to be 3.5 inch, max. 4TB)
1. Remove the HDD cover.
2. Put in the HDD
3. Fix HDD with screws
4. Connect the data and
power cable.
5. Place the HDD cover
back on.
6. Fix the HDD cover with
screws.
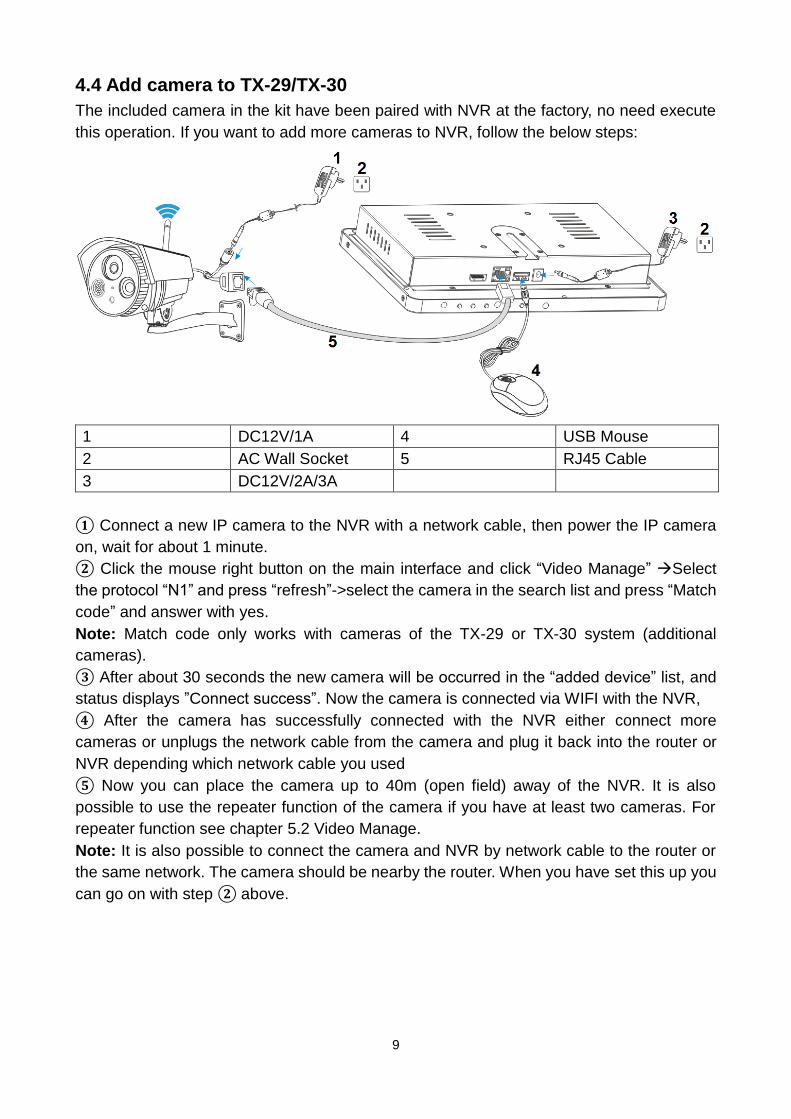
9
4.4 Add camera to TX-29/TX-30
The included camera in the kit have been paired with NVR at the factory, no need execute
this operation. If you want to add more cameras to NVR, follow the below steps:
1 DC12V/1A 4 USB Mouse
2 AC Wall Socket 5 RJ45 Cable
3 DC12V/2A/3A
① Connect a new IP camera to the NVR with a network cable, then power the IP camera
on, wait for about 1 minute.
② Click the mouse right button on the main interface and click “Video Manage” Select
the protocol “N1” and press “refresh”->select the camera in the search list and press “Match
code” and answer with yes.
Note: Match code only works with cameras of the TX-29 or TX-30 system (additional
cameras).
③ After about 30 seconds the new camera will be occurred in the “added device” list, and
status displays ”Connect success”. Now the camera is connected via WIFI with the NVR,
④ After the camera has successfully connected with the NVR either connect more
cameras or unplugs the network cable from the camera and plug it back into the router or
NVR depending which network cable you used
⑤ Now you can place the camera up to 40m (open field) away of the NVR. It is also
possible to use the repeater function of the camera if you have at least two cameras. For
repeater function see chapter 5.2 Video Manage.
Note: It is also possible to connect the camera and NVR by network cable to the router or
the same network. The camera should be nearby the router. When you have set this up you
can go on with step ② above.
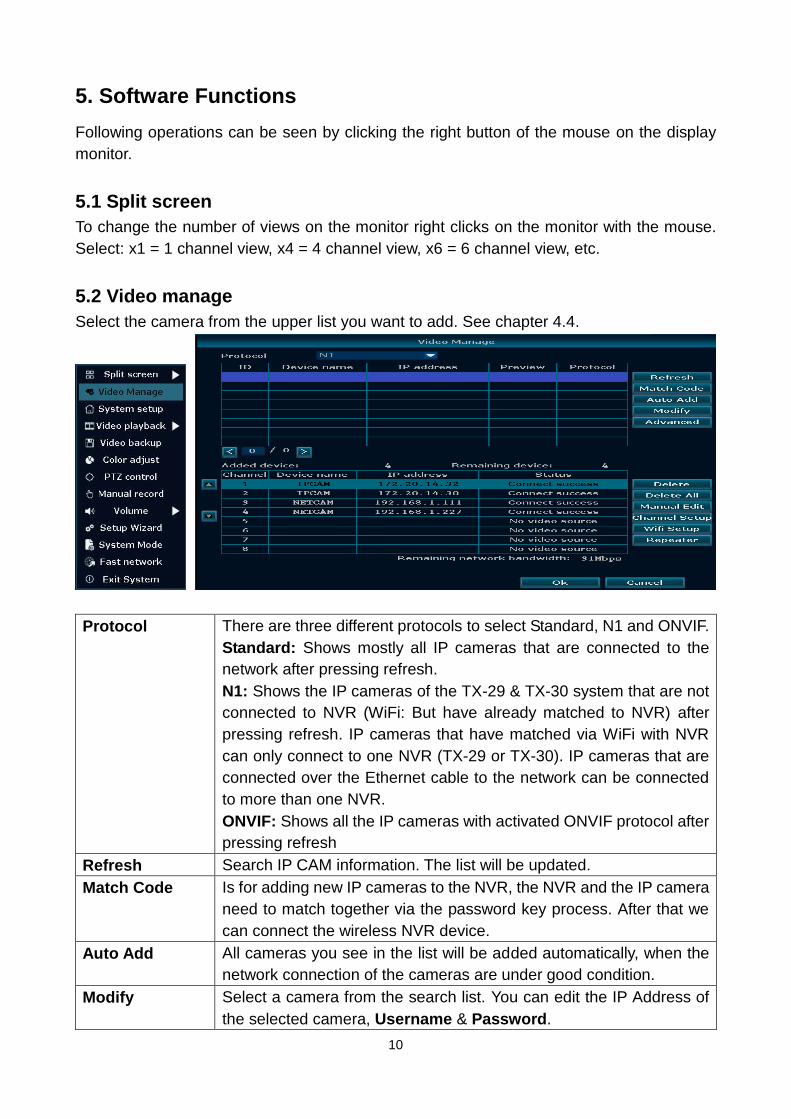
10
5. Software Functions
Following operations can be seen by clicking the right button of the mouse on the display
monitor.
5.1 Split screen
To change the number of views on the monitor right clicks on the monitor with the mouse.
Select: x1 = 1 channel view, x4 = 4 channel view, x6 = 6 channel view, etc.
5.2 Video manage
Select the camera from the upper list you want to add. See chapter 4.4.
Protocol There are three different protocols to select Standard, N1 and ONVIF.
Standard: Shows mostly all IP cameras that are connected to the
network after pressing refresh.
N1: Shows the IP cameras of the TX-29 & TX-30 system that are not
connected to NVR (WiFi: But have already matched to NVR) after
pressing refresh. IP cameras that have matched via WiFi with NVR
can only connect to one NVR (TX-29 or TX-30). IP cameras that are
connected over the Ethernet cable to the network can be connected
to more than one NVR.
ONVIF: Shows all the IP cameras with activated ONVIF protocol after
pressing refresh
Refresh Search IP CAM information. The list will be updated.
Match Code Is for adding new IP cameras to the NVR, the NVR and the IP camera
need to match together via the password key process. After that we
can connect the wireless NVR device.
Auto Add All cameras you see in the list will be added automatically, when the
network connection of the cameras are under good condition.
Modify Select a camera from the search list. You can edit the IP Address of
the selected camera, Username & Password.
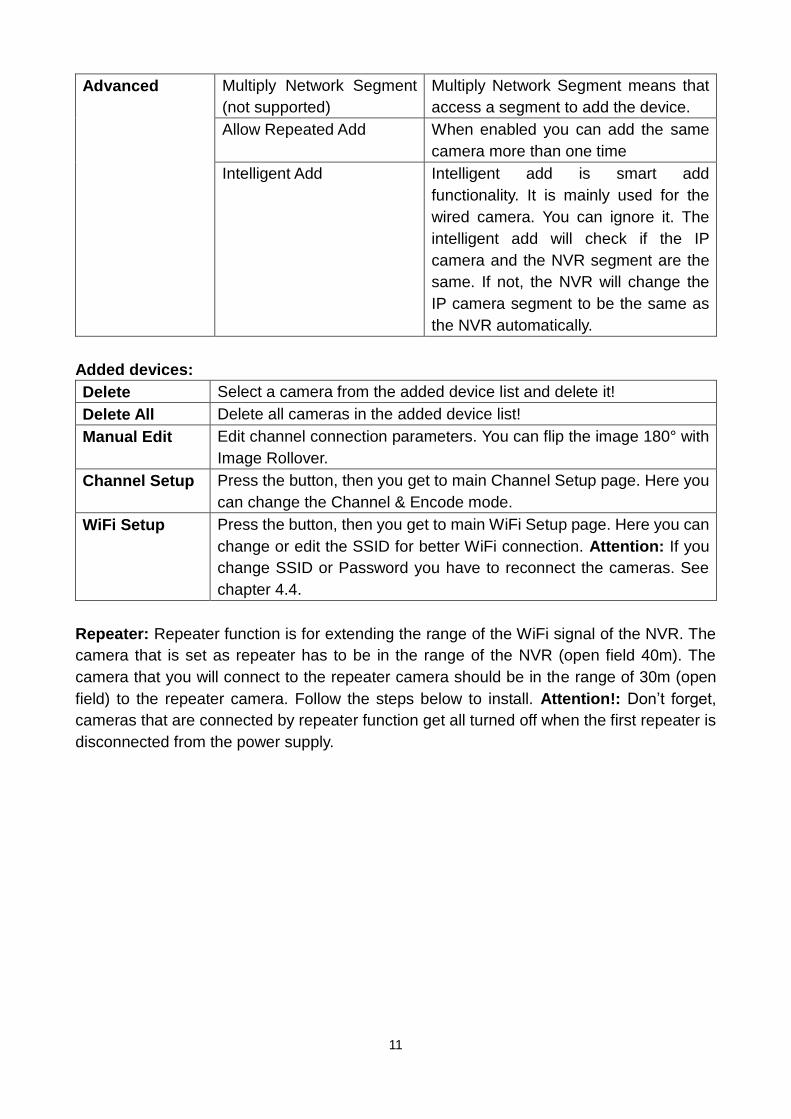
11
Advanced Multiply Network Segment
(not supported)
Multiply Network Segment means that
access a segment to add the device.
Allow Repeated Add When enabled you can add the same
camera more than one time
Intelligent Add Intelligent add is smart add
functionality. It is mainly used for the
wired camera. You can ignore it. The
intelligent add will check if the IP
camera and the NVR segment are the
same. If not, the NVR will change the
IP camera segment to be the same as
the NVR automatically.
Added devices:
Delete Select a camera from the added device list and delete it!
Delete All Delete all cameras in the added device list!
Manual Edit Edit channel connection parameters. You can flip the image 180° with
Image Rollover.
Channel Setup Press the button, then you get to main Channel Setup page. Here you
can change the Channel & Encode mode.
WiFi Setup Press the button, then you get to main WiFi Setup page. Here you can
change or edit the SSID for better WiFi connection. Attention: If you
change SSID or Password you have to reconnect the cameras. See
chapter 4.4.
Repeater: Repeater function is for extending the range of the WiFi signal of the NVR. The
camera that is set as repeater has to be in the range of the NVR (open field 40m). The
camera that you will connect to the repeater camera should be in the range of 30m (open
field) to the repeater camera. Follow the steps below to install. Attention!: Don’t forget,
cameras that are connected by repeater function get all turned off when the first repeater is
disconnected from the power supply.
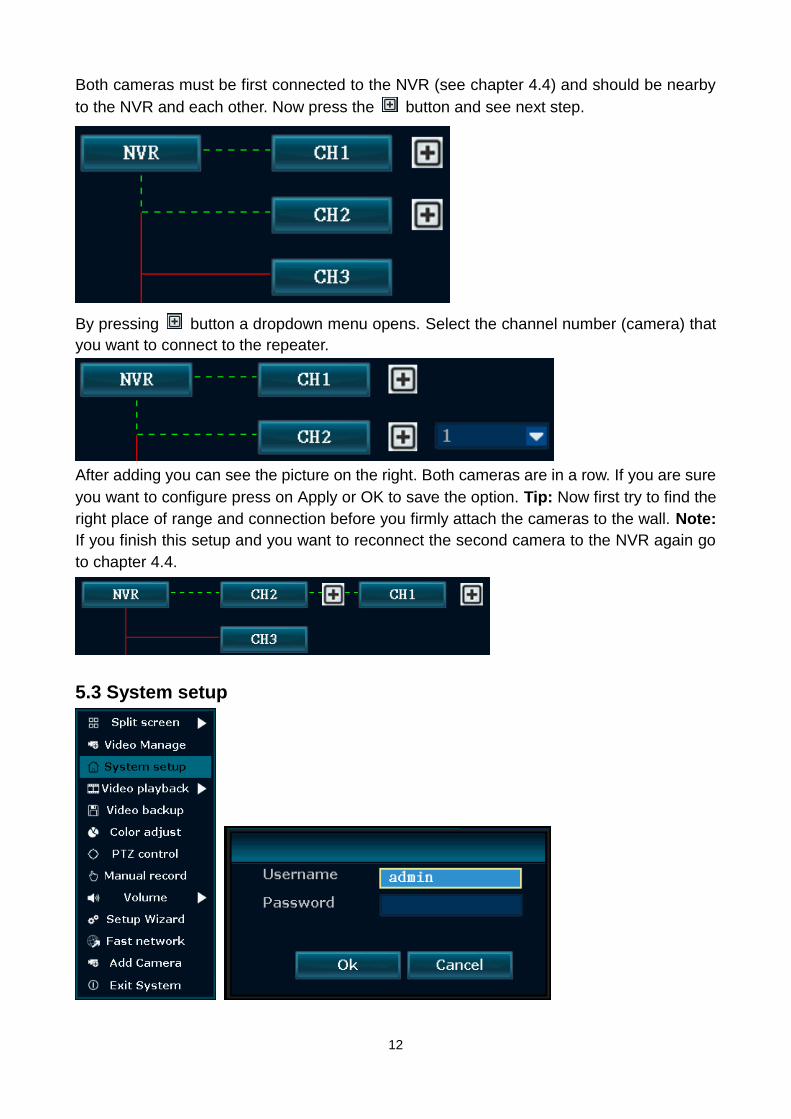
12
Both cameras must be first connected to the NVR (see chapter 4.4) and should be nearby
to the NVR and each other. Now press the button and see next step.
By pressing button a dropdown menu opens. Select the channel number (camera) that
you want to connect to the repeater.
After adding you can see the picture on the right. Both cameras are in a row. If you are sure
you want to configure press on Apply or OK to save the option. Tip: Now first try to find the
right place of range and connection before you firmly attach the cameras to the wall. Note:
If you finish this setup and you want to reconnect the second camera to the NVR again go
to chapter 4.4.
5.3 System setup
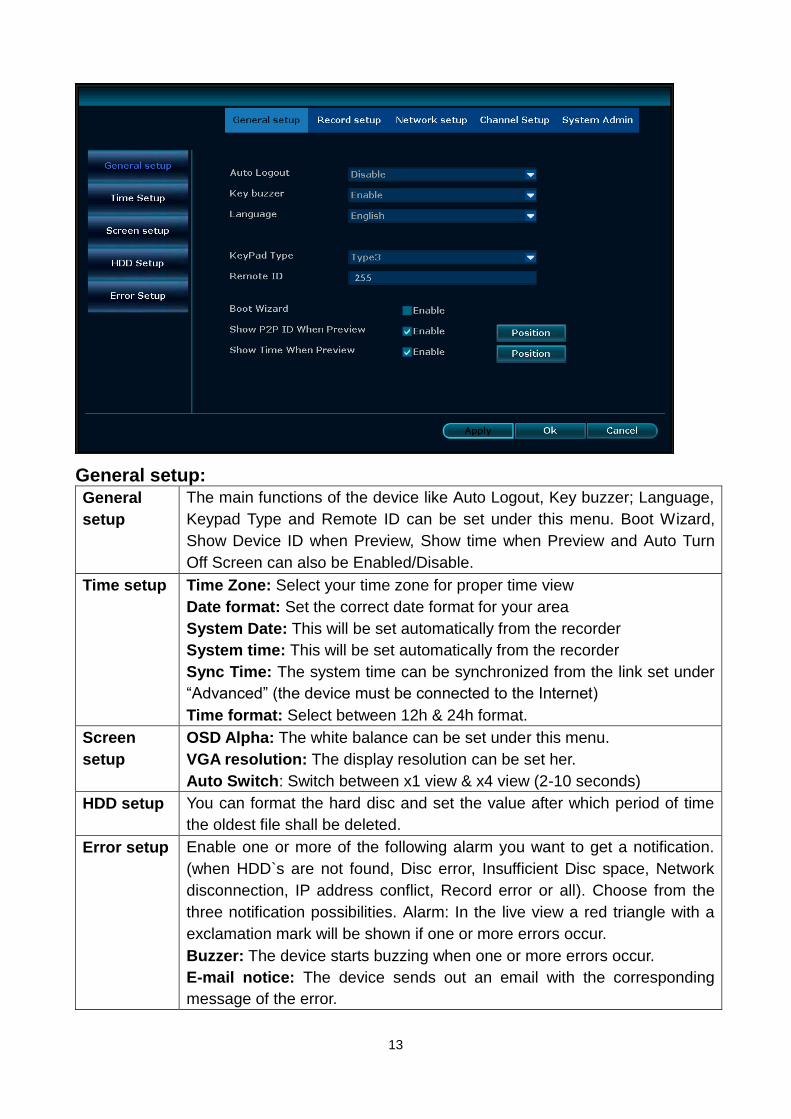
13
General setup: General
setup
The main functions of the device like Auto Logout, Key buzzer; Language,
Keypad Type and Remote ID can be set under this menu. Boot Wizard,
Show Device ID when Preview, Show time when Preview and Auto Turn
Off Screen can also be Enabled/Disable.
Time setup Time Zone: Select your time zone for proper time view
Date format: Set the correct date format for your area
System Date: This will be set automatically from the recorder
System time: This will be set automatically from the recorder
Sync Time: The system time can be synchronized from the link set under
“Advanced” (the device must be connected to the Internet)
Time format: Select between 12h & 24h format.
Screen
setup OSD Alpha: The white balance can be set under this menu.
VGA resolution: The display resolution can be set her.
Auto Switch: Switch between x1 view & x4 view (2-10 seconds)
HDD setup You can format the hard disc and set the value after which period of time
the oldest file shall be deleted.
Error setup Enable one or more of the following alarm you want to get a notification.
(when HDD`s are not found, Disc error, Insufficient Disc space, Network
disconnection, IP address conflict, Record error or all). Choose from the
three notification possibilities. Alarm: In the live view a red triangle with a
exclamation mark will be shown if one or more errors occur.
Buzzer: The device starts buzzing when one or more errors occur.
E-mail notice: The device sends out an email with the corresponding
message of the error.
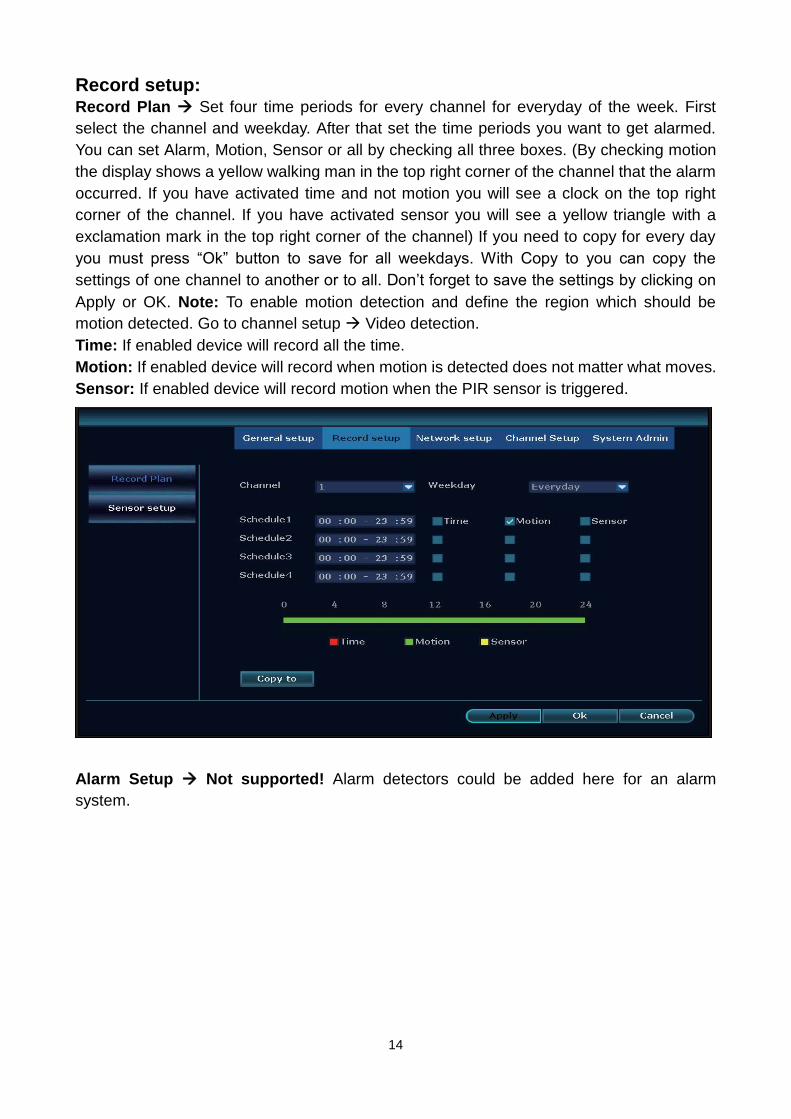
14
Record setup: Record Plan Set four time periods for every channel for everyday of the week. First
select the channel and weekday. After that set the time periods you want to get alarmed.
You can set Alarm, Motion, Sensor or all by checking all three boxes. (By checking motion
the display shows a yellow walking man in the top right corner of the channel that the alarm
occurred. If you have activated time and not motion you will see a clock on the top right
corner of the channel. If you have activated sensor you will see a yellow triangle with a
exclamation mark in the top right corner of the channel) If you need to copy for every day
you must press “Ok” button to save for all weekdays. With Copy to you can copy the
settings of one channel to another or to all. Don’t forget to save the settings by clicking on
Apply or OK. Note: To enable motion detection and define the region which should be
motion detected. Go to channel setup Video detection.
Time: If enabled device will record all the time.
Motion: If enabled device will record when motion is detected does not matter what moves.
Sensor: If enabled device will record motion when the PIR sensor is triggered.
Alarm Setup Not supported! Alarm detectors could be added here for an alarm
system.
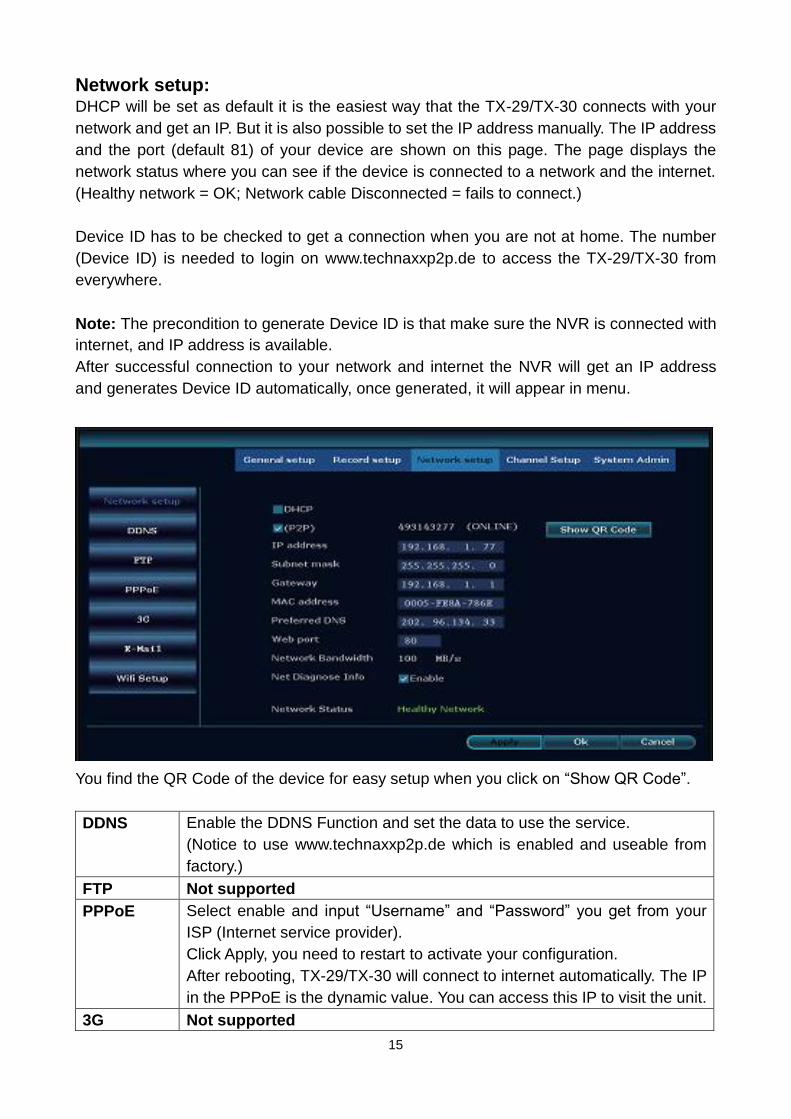
15
Network setup: DHCP will be set as default it is the easiest way that the TX-29/TX-30 connects with your
network and get an IP. But it is also possible to set the IP address manually. The IP address
and the port (default 81) of your device are shown on this page. The page displays the
network status where you can see if the device is connected to a network and the internet.
(Healthy network = OK; Network cable Disconnected = fails to connect.)
Device ID has to be checked to get a connection when you are not at home. The number
(Device ID) is needed to login on www.technaxxp2p.de to access the TX-29/TX-30 from
everywhere.
Note: The precondition to generate Device ID is that make sure the NVR is connected with
internet, and IP address is available.
After successful connection to your network and internet the NVR will get an IP address
and generates Device ID automatically, once generated, it will appear in menu.
You find the QR Code of the device for easy setup when you click on “Show QR Code”.
DDNS Enable the DDNS Function and set the data to use the service.
(Notice to use www.technaxxp2p.de which is enabled and useable from
factory.)
FTP Not supported
PPPoE Select enable and input “Username” and “Password” you get from your
ISP (Internet service provider).
Click Apply, you need to restart to activate your configuration.
After rebooting, TX-29/TX-30 will connect to internet automatically. The IP
in the PPPoE is the dynamic value. You can access this IP to visit the unit.
3G Not supported
16
E-Mail If you want to receive alarm emails when motion (motion or sensor
enabled) is detected, you must enable the function and fill in the settings.
When you are finished with the settings first press Apply and then Test to
check if your settings are right. Health Mail Interval is to check if the mail
function is working properly. Note: Mail will not include picture just the
information about channel, date & time, device and IP address.
SMTP Server: Fill in the SMTP server of your provider.
Port: Fill in the SMTP Port for SSL. 25 or 587 are the common for SSL.
Attention: STARTTLS and TLS are not supported!
Username: Enter your email address.
Password: Enter the password of your Email address above.
Encryption Type: For encryption use SSL.
Sender: Fill in your email address again.
Receiver1: Fill in the receiving email address (suggestion use your own
again).
Receiver2. Fill in a receiving email address (suggestion use email address
of other person).
Subject. Fill in the headline of the email.
Interval: How often the email will be send (Unit is in seconds).
Health Mail Interval: If enabled every xx minutes you will receive an email
if sending is working.
Test: After saving press Test to check if your settings are working.
WiFi setup Important: The WIFI is just for connecting the cameras to it can’t be used
as access point for other devices!
Set the WIFI network for using the kit in wireless mode. Customize the
WIFI SSID & password. The WIFI Channel can be selected to switch to
lower frequented channel. This is important to avoid WIFI interferences.
By clicking on update the data will be refreshed. By pressing Reset button
the default settings will be restored for WiFi Setup.
Attention: You must select the correct “Region” in order to work the KIT
correctly!
Note: If you change WiFi SSID and password you have to connect the
cameras again with match code. See chapter 4.4.
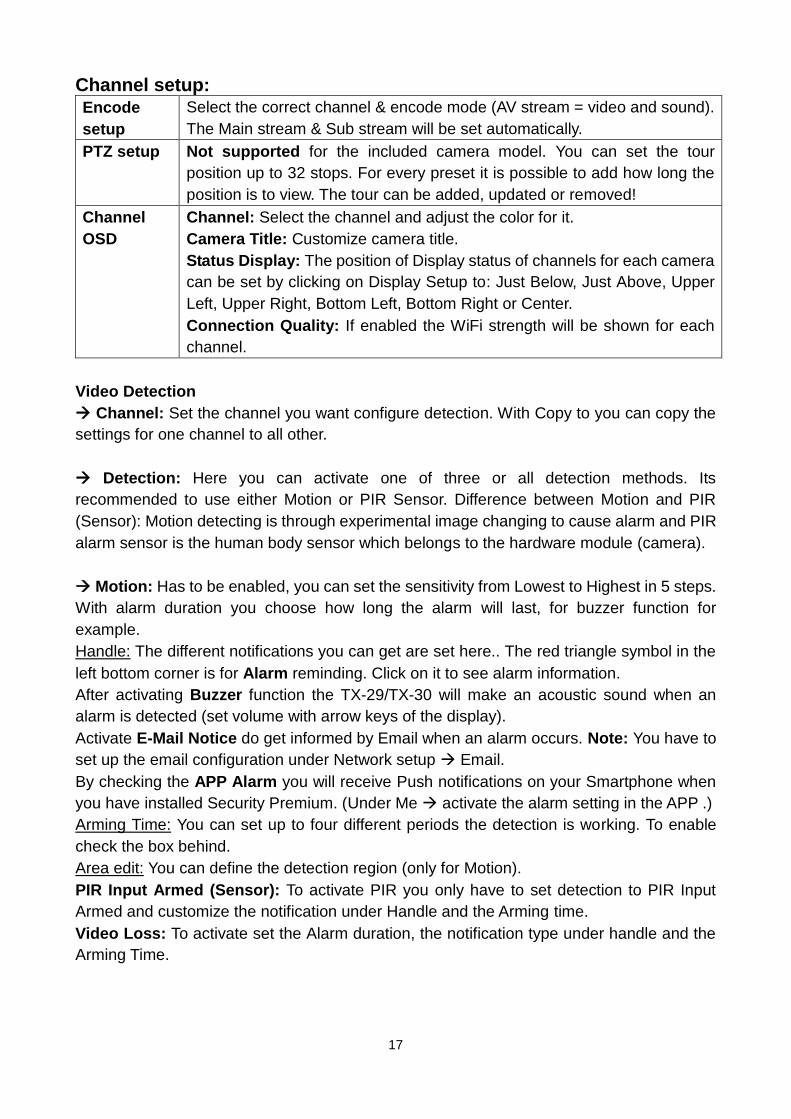
17
Channel setup: Encode
setup
Select the correct channel & encode mode (AV stream = video and sound).
The Main stream & Sub stream will be set automatically.
PTZ setup Not supported for the included camera model. You can set the tour
position up to 32 stops. For every preset it is possible to add how long the
position is to view. The tour can be added, updated or removed!
Channel
OSD Channel: Select the channel and adjust the color for it.
Camera Title: Customize camera title.
Status Display: The position of Display status of channels for each camera
can be set by clicking on Display Setup to: Just Below, Just Above, Upper
Left, Upper Right, Bottom Left, Bottom Right or Center.
Connection Quality: If enabled the WiFi strength will be shown for each
channel.
Video Detection
Channel: Set the channel you want configure detection. With Copy to you can copy the
settings for one channel to all other.
Detection: Here you can activate one of three or all detection methods. Its
recommended to use either Motion or PIR Sensor. Difference between Motion and PIR
(Sensor): Motion detecting is through experimental image changing to cause alarm and PIR
alarm sensor is the human body sensor which belongs to the hardware module (camera).
Motion: Has to be enabled, you can set the sensitivity from Lowest to Highest in 5 steps.
With alarm duration you choose how long the alarm will last, for buzzer function for
example.
Handle: The different notifications you can get are set here.. The red triangle symbol in the
left bottom corner is for Alarm reminding. Click on it to see alarm information.
After activating Buzzer function the TX-29/TX-30 will make an acoustic sound when an
alarm is detected (set volume with arrow keys of the display).
Activate E-Mail Notice do get informed by Email when an alarm occurs. Note: You have to
set up the email configuration under Network setup Email.
By checking the APP Alarm you will receive Push notifications on your Smartphone when
you have installed Security Premium. (Under Me activate the alarm setting in the APP .)
Arming Time: You can set up to four different periods the detection is working. To enable
check the box behind.
Area edit: You can define the detection region (only for Motion).
PIR Input Armed (Sensor): To activate PIR you only have to set detection to PIR Input
Armed and customize the notification under Handle and the Arming time.
Video Loss: To activate set the Alarm duration, the notification type under handle and the
Arming Time.
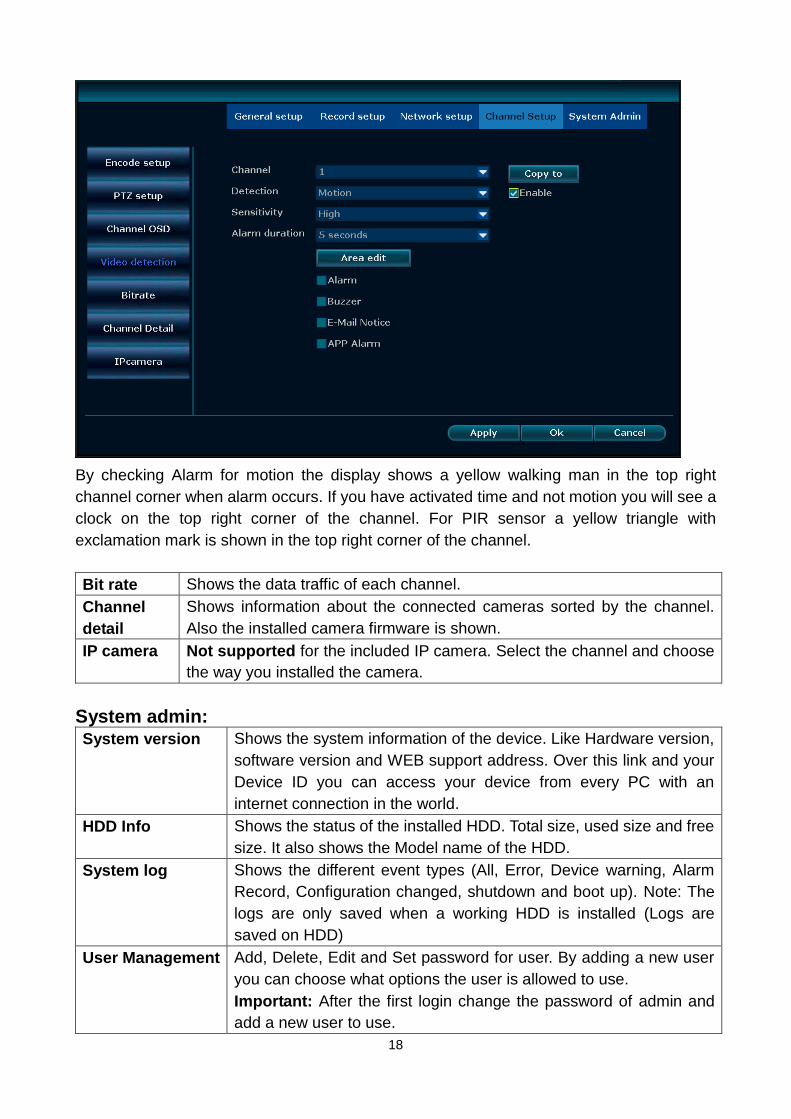
18
By checking Alarm for motion the display shows a yellow walking man in the top right
channel corner when alarm occurs. If you have activated time and not motion you will see a
clock on the top right corner of the channel. For PIR sensor a yellow triangle with
exclamation mark is shown in the top right corner of the channel.
Bit rate Shows the data traffic of each channel.
Channel
detail
Shows information about the connected cameras sorted by the channel.
Also the installed camera firmware is shown.
IP camera Not supported for the included IP camera. Select the channel and choose
the way you installed the camera.
System admin: System version Shows the system information of the device. Like Hardware version,
software version and WEB support address. Over this link and your
Device ID you can access your device from every PC with an
internet connection in the world.
HDD Info Shows the status of the installed HDD. Total size, used size and free
size. It also shows the Model name of the HDD.
System log Shows the different event types (All, Error, Device warning, Alarm
Record, Configuration changed, shutdown and boot up). Note: The
logs are only saved when a working HDD is installed (Logs are
saved on HDD)
User Management Add, Delete, Edit and Set password for user. By adding a new user
you can choose what options the user is allowed to use.
Important: After the first login change the password of admin and
add a new user to use.
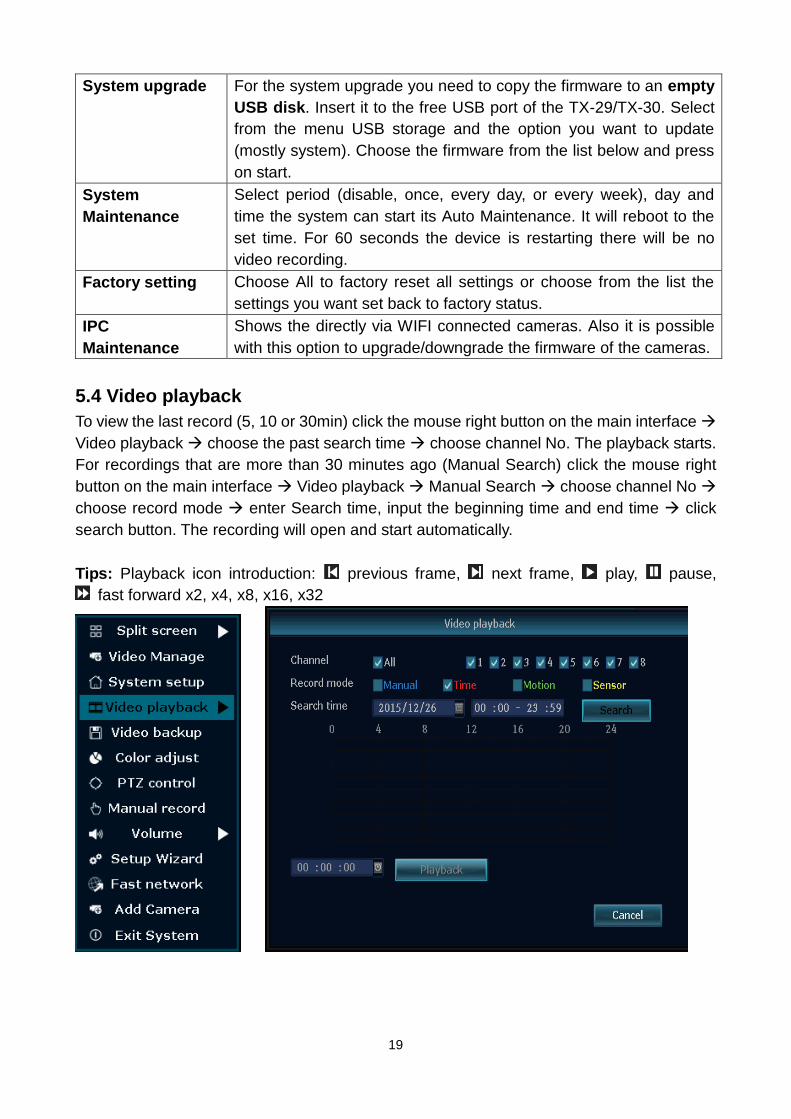
19
System upgrade For the system upgrade you need to copy the firmware to an empty
USB disk. Insert it to the free USB port of the TX-29/TX-30. Select
from the menu USB storage and the option you want to update
(mostly system). Choose the firmware from the list below and press
on start.
System
Maintenance
Select period (disable, once, every day, or every week), day and
time the system can start its Auto Maintenance. It will reboot to the
set time. For 60 seconds the device is restarting there will be no
video recording.
Factory setting Choose All to factory reset all settings or choose from the list the
settings you want set back to factory status.
IPC
Maintenance
Shows the directly via WIFI connected cameras. Also it is possible
with this option to upgrade/downgrade the firmware of the cameras.
5.4 Video playback
To view the last record (5, 10 or 30min) click the mouse right button on the main interface
Video playback choose the past search time choose channel No. The playback starts.
For recordings that are more than 30 minutes ago (Manual Search) click the mouse right
button on the main interface Video playback Manual Search choose channel No
choose record mode enter Search time, input the beginning time and end time click
search button. The recording will open and start automatically.
Tips: Playback icon introduction: previous frame, next frame, play, pause,
fast forward x2, x4, x8, x16, x32
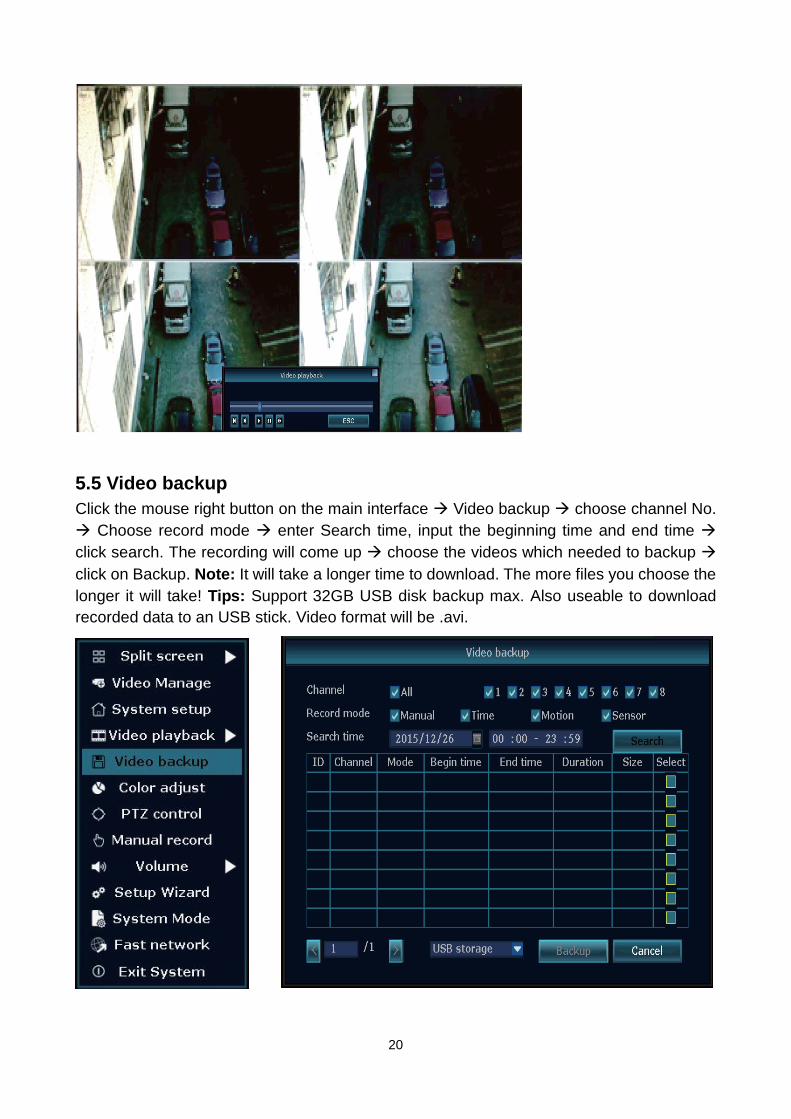
20
5.5 Video backup
Click the mouse right button on the main interface Video backup choose channel No.
Choose record mode enter Search time, input the beginning time and end time
click search. The recording will come up choose the videos which needed to backup
click on Backup. Note: It will take a longer time to download. The more files you choose the
longer it will take! Tips: Support 32GB USB disk backup max. Also useable to download
recorded data to an USB stick. Video format will be .avi.
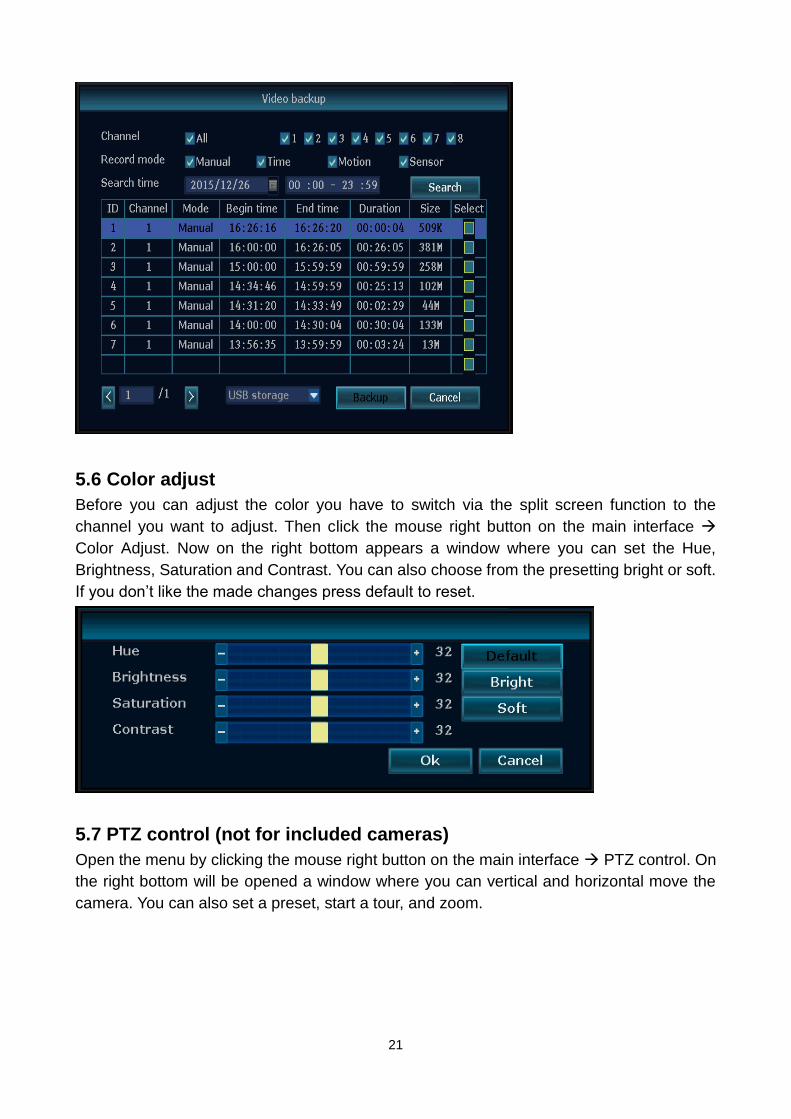
21
5.6 Color adjust
Before you can adjust the color you have to switch via the split screen function to the
channel you want to adjust. Then click the mouse right button on the main interface
Color Adjust. Now on the right bottom appears a window where you can set the Hue,
Brightness, Saturation and Contrast. You can also choose from the presetting bright or soft.
If you don’t like the made changes press default to reset.
5.7 PTZ control (not for included cameras)
Open the menu by clicking the mouse right button on the main interface PTZ control. On
the right bottom will be opened a window where you can vertical and horizontal move the
camera. You can also set a preset, start a tour, and zoom.
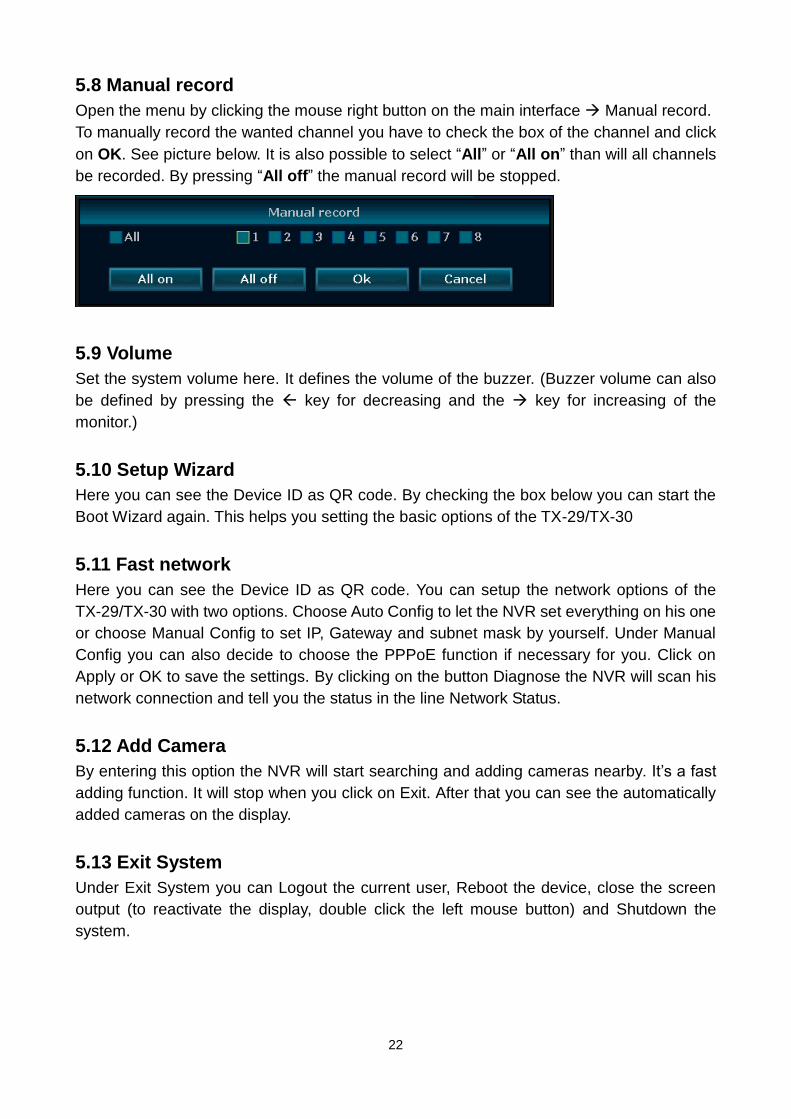
22
5.8 Manual record
Open the menu by clicking the mouse right button on the main interface Manual record.
To manually record the wanted channel you have to check the box of the channel and click
on OK. See picture below. It is also possible to select “All” or “All on” than will all channels
be recorded. By pressing “All off” the manual record will be stopped.
5.9 Volume
Set the system volume here. It defines the volume of the buzzer. (Buzzer volume can also
be defined by pressing the key for decreasing and the key for increasing of the
monitor.)
5.10 Setup Wizard
Here you can see the Device ID as QR code. By checking the box below you can start the
Boot Wizard again. This helps you setting the basic options of the TX-29/TX-30
5.11 Fast network
Here you can see the Device ID as QR code. You can setup the network options of the
TX-29/TX-30 with two options. Choose Auto Config to let the NVR set everything on his one
or choose Manual Config to set IP, Gateway and subnet mask by yourself. Under Manual
Config you can also decide to choose the PPPoE function if necessary for you. Click on
Apply or OK to save the settings. By clicking on the button Diagnose the NVR will scan his
network connection and tell you the status in the line Network Status.
5.12 Add Camera
By entering this option the NVR will start searching and adding cameras nearby. It’s a fast
adding function. It will stop when you click on Exit. After that you can see the automatically
added cameras on the display.
5.13 Exit System
Under Exit System you can Logout the current user, Reboot the device, close the screen
output (to reactivate the display, double click the left mouse button) and Shutdown the
system.
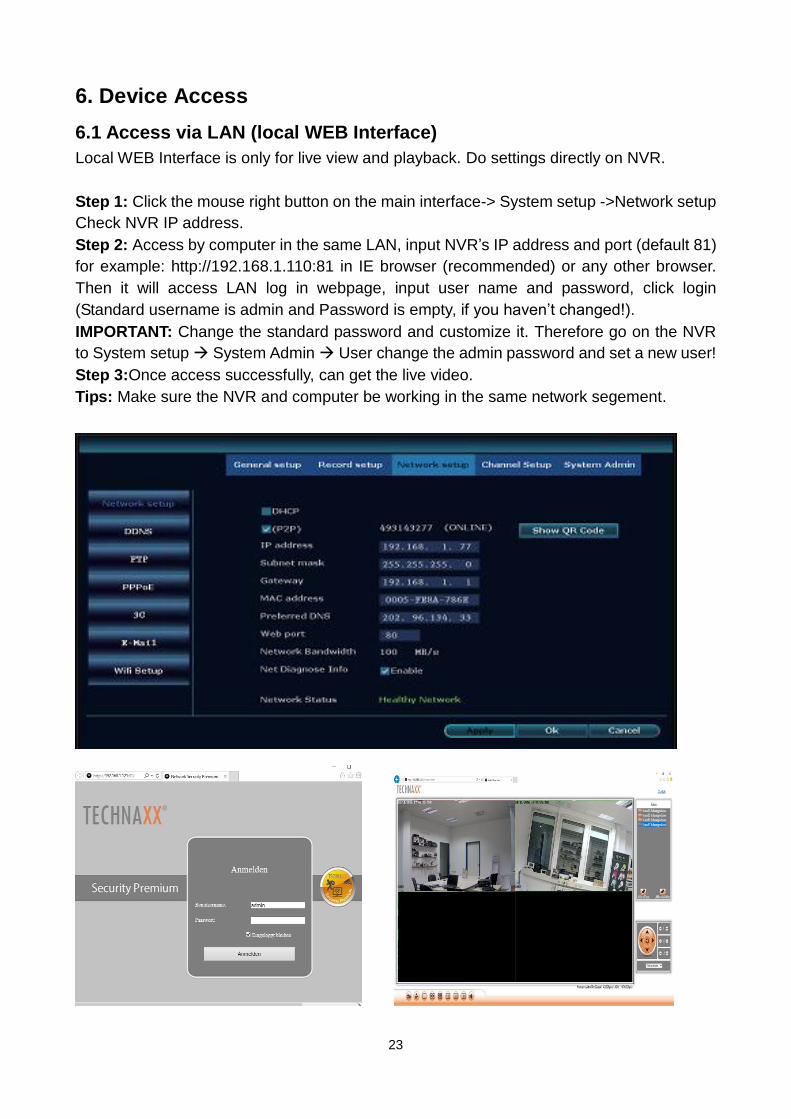
23
6. Device Access
6.1 Access via LAN (local WEB Interface)
Local WEB Interface is only for live view and playback. Do settings directly on NVR.
Step 1: Click the mouse right button on the main interface-> System setup ->Network setup
Check NVR IP address.
Step 2: Access by computer in the same LAN, input NVR’s IP address and port (default 81)
for example: http://192.168.1.110:81 in IE browser (recommended) or any other browser.
Then it will access LAN log in webpage, input user name and password, click login
(Standard username is admin and Password is empty, if you haven’t changed!).
IMPORTANT: Change the standard password and customize it. Therefore go on the NVR
to System setup System Admin User change the admin password and set a new user!
Step 3:Once access successfully, can get the live video.
Tips: Make sure the NVR and computer be working in the same network segement.
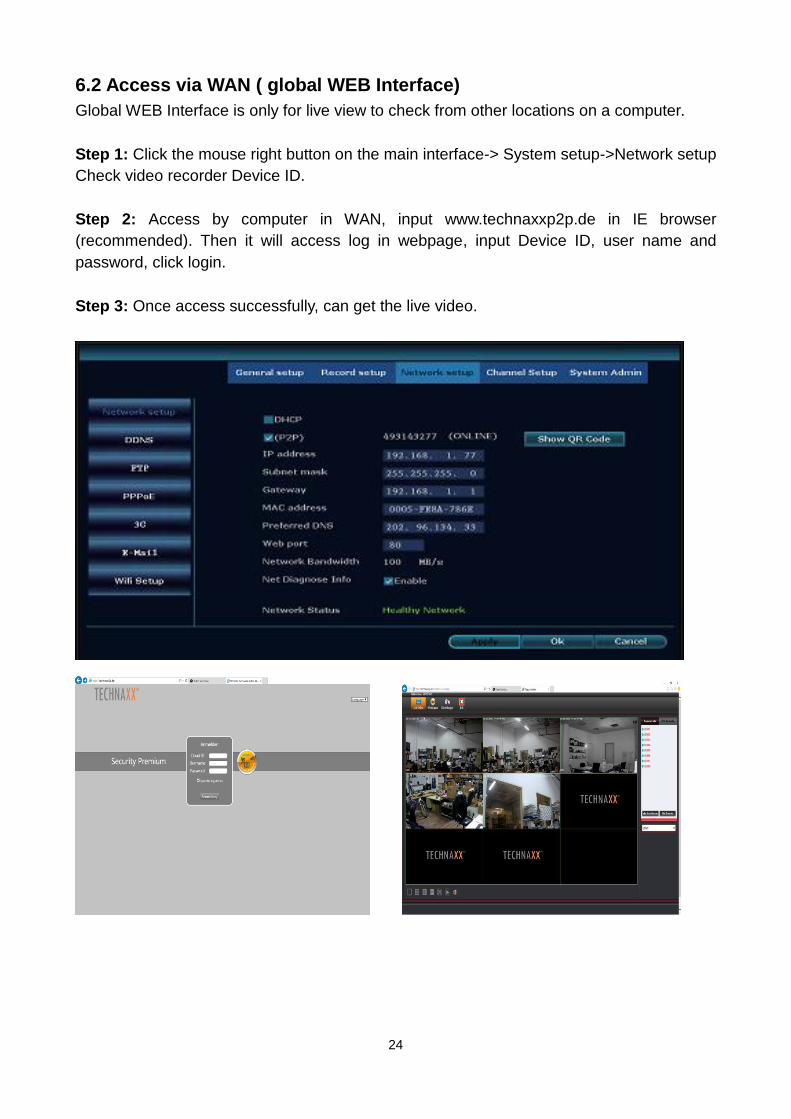
24
6.2 Access via WAN ( global WEB Interface)
Global WEB Interface is only for live view to check from other locations on a computer.
Step 1: Click the mouse right button on the main interface-> System setup->Network setup
Check video recorder Device ID.
Step 2: Access by computer in WAN, input www.technaxxp2p.de in IE browser
(recommended). Then it will access log in webpage, input Device ID, user name and
password, click login.
Step 3: Once access successfully, can get the live video.
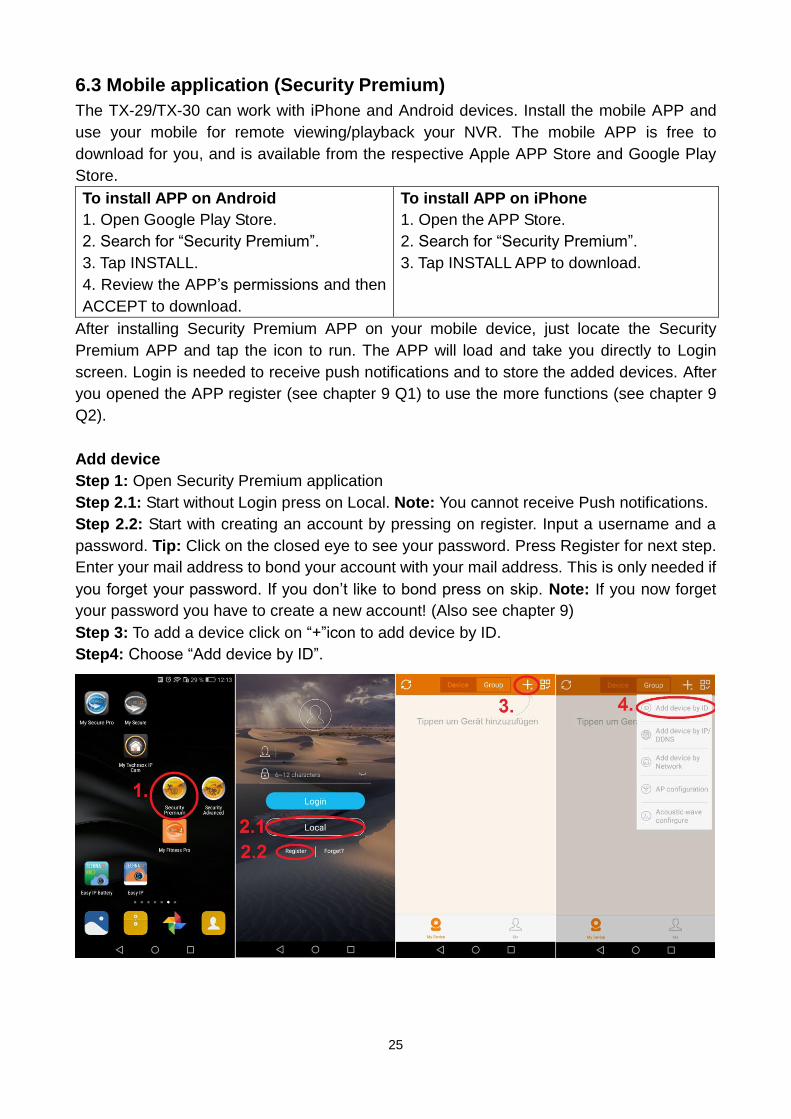
25
6.3 Mobile application (Security Premium)
The TX-29/TX-30 can work with iPhone and Android devices. Install the mobile APP and
use your mobile for remote viewing/playback your NVR. The mobile APP is free to
download for you, and is available from the respective Apple APP Store and Google Play
Store.
To install APP on Android
1. Open Google Play Store.
2. Search for “Security Premium”.
3. Tap INSTALL.
4. Review the APP’s permissions and then
ACCEPT to download.
To install APP on iPhone
1. Open the APP Store.
2. Search for “Security Premium”.
3. Tap INSTALL APP to download.
After installing Security Premium APP on your mobile device, just locate the Security
Premium APP and tap the icon to run. The APP will load and take you directly to Login
screen. Login is needed to receive push notifications and to store the added devices. After
you opened the APP register (see chapter 9 Q1) to use the more functions (see chapter 9
Q2).
Add device
Step 1: Open Security Premium application
Step 2.1: Start without Login press on Local. Note: You cannot receive Push notifications.
Step 2.2: Start with creating an account by pressing on register. Input a username and a
password. Tip: Click on the closed eye to see your password. Press Register for next step.
Enter your mail address to bond your account with your mail address. This is only needed if
you forget your password. If you don’t like to bond press on skip. Note: If you now forget
your password you have to create a new account! (Also see chapter 9)
Step 3: To add a device click on “+”icon to add device by ID.
Step4: Choose “Add device by ID”.
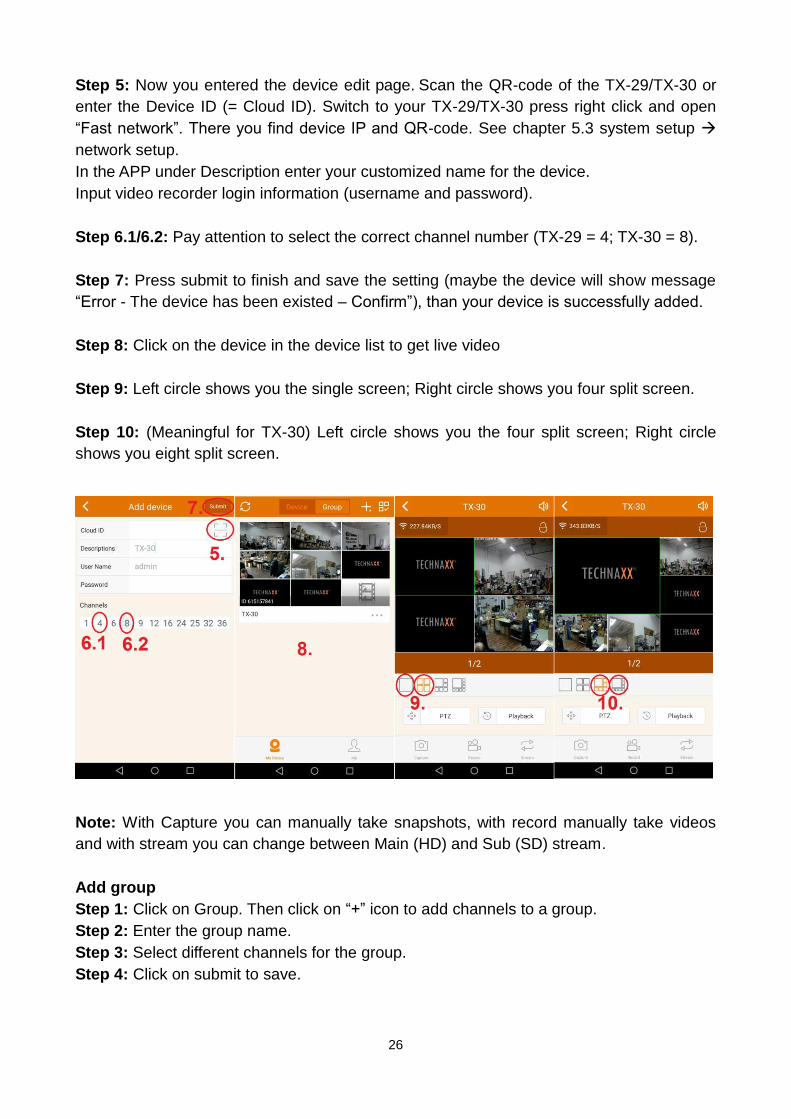
26
Step 5: Now you entered the device edit page. Scan the QR-code of the TX-29/TX-30 or
enter the Device ID (= Cloud ID). Switch to your TX-29/TX-30 press right click and open
“Fast network”. There you find device IP and QR-code. See chapter 5.3 system setup
network setup.
In the APP under Description enter your customized name for the device.
Input video recorder login information (username and password).
Step 6.1/6.2: Pay attention to select the correct channel number (TX-29 = 4; TX-30 = 8).
Step 7: Press submit to finish and save the setting (maybe the device will show message
“Error - The device has been existed – Confirm”), than your device is successfully added.
Step 8: Click on the device in the device list to get live video
Step 9: Left circle shows you the single screen; Right circle shows you four split screen.
Step 10: (Meaningful for TX-30) Left circle shows you the four split screen; Right circle
shows you eight split screen.
Note: With Capture you can manually take snapshots, with record manually take videos
and with stream you can change between Main (HD) and Sub (SD) stream.
Add group
Step 1: Click on Group. Then click on “+” icon to add channels to a group.
Step 2: Enter the group name.
Step 3: Select different channels for the group.
Step 4: Click on submit to save.
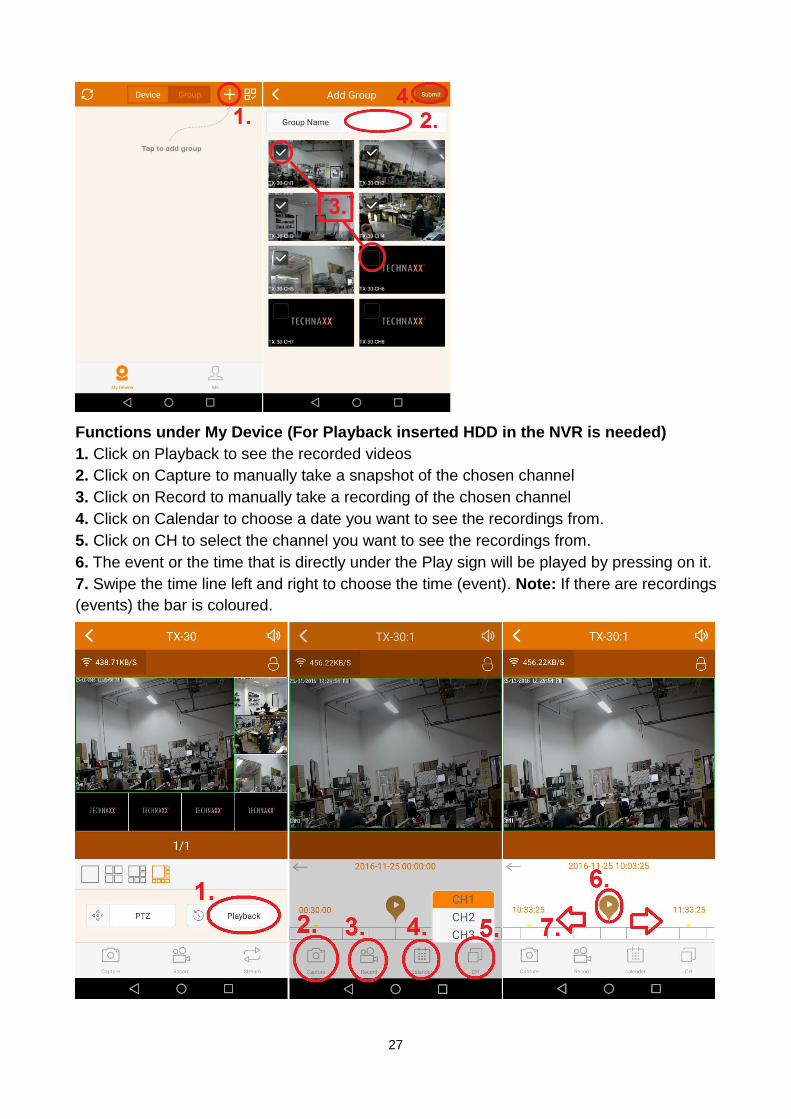
27
Functions under My Device (For Playback inserted HDD in the NVR is needed)
1. Click on Playback to see the recorded videos
2. Click on Capture to manually take a snapshot of the chosen channel
3. Click on Record to manually take a recording of the chosen channel
4. Click on Calendar to choose a date you want to see the recordings from.
5. Click on CH to select the channel you want to see the recordings from.
6. The event or the time that is directly under the Play sign will be played by pressing on it.
7. Swipe the time line left and right to choose the time (event). Note: If there are recordings
(events) the bar is coloured.
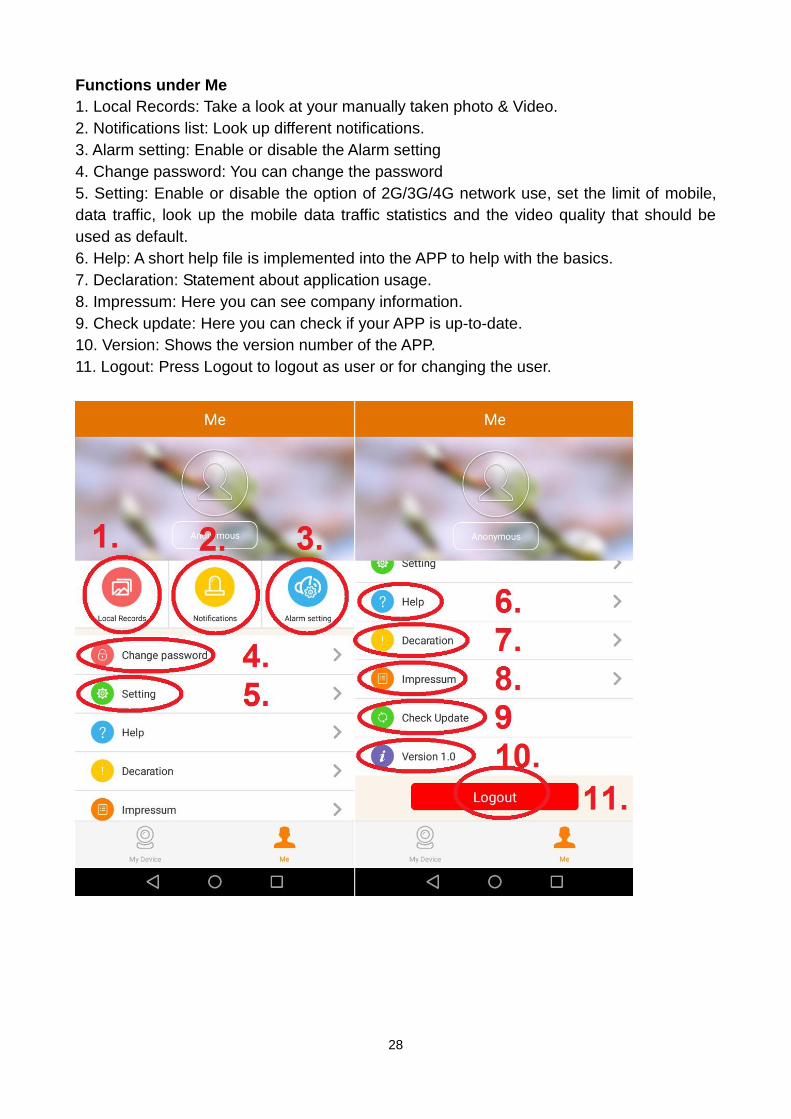
28
Functions under Me
1. Local Records: Take a look at your manually taken photo & Video.
2. Notifications list: Look up different notifications.
3. Alarm setting: Enable or disable the Alarm setting
4. Change password: You can change the password
5. Setting: Enable or disable the option of 2G/3G/4G network use, set the limit of mobile,
data traffic, look up the mobile data traffic statistics and the video quality that should be
used as default.
6. Help: A short help file is implemented into the APP to help with the basics.
7. Declaration: Statement about application usage.
8. Impressum: Here you can see company information.
9. Check update: Here you can check if your APP is up-to-date.
10. Version: Shows the version number of the APP.
11. Logout: Press Logout to logout as user or for changing the user.
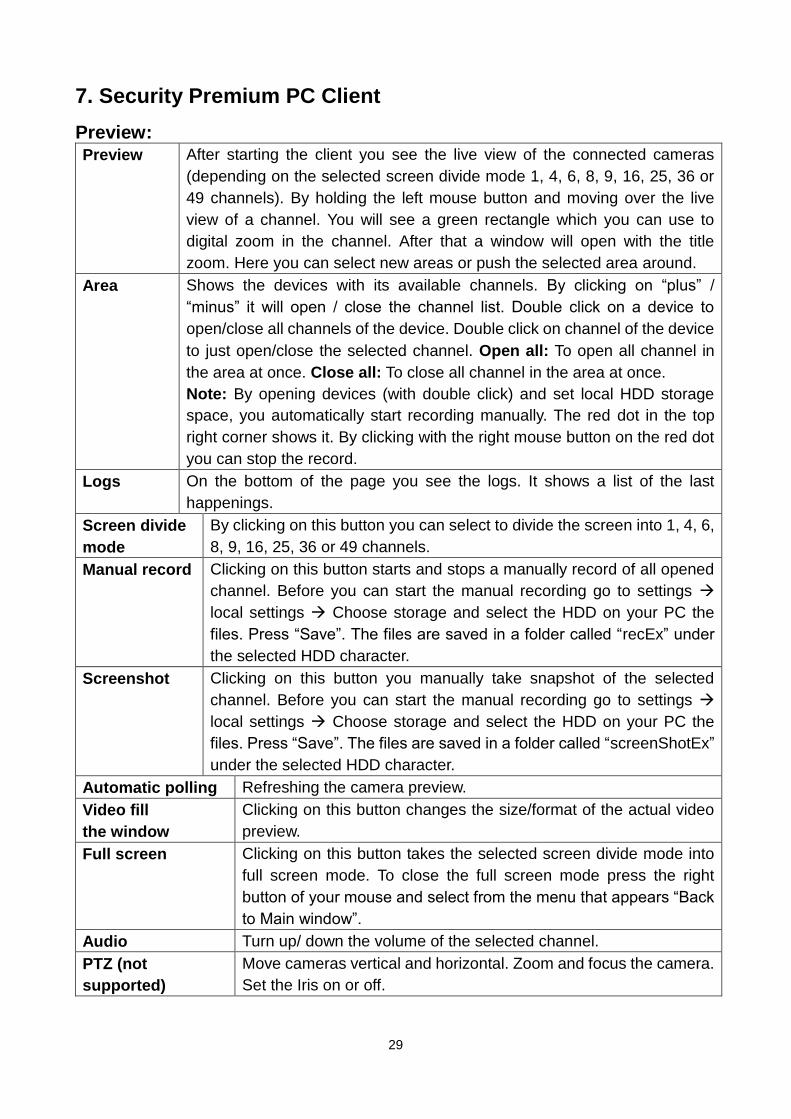
29
7. Security Premium PC Client
Preview: Preview After starting the client you see the live view of the connected cameras
(depending on the selected screen divide mode 1, 4, 6, 8, 9, 16, 25, 36 or
49 channels). By holding the left mouse button and moving over the live
view of a channel. You will see a green rectangle which you can use to
digital zoom in the channel. After that a window will open with the title
zoom. Here you can select new areas or push the selected area around.
Area Shows the devices with its available channels. By clicking on “plus” /
“minus” it will open / close the channel list. Double click on a device to
open/close all channels of the device. Double click on channel of the device
to just open/close the selected channel. Open all: To open all channel in
the area at once. Close all: To close all channel in the area at once.
Note: By opening devices (with double click) and set local HDD storage
space, you automatically start recording manually. The red dot in the top
right corner shows it. By clicking with the right mouse button on the red dot
you can stop the record.
Logs On the bottom of the page you see the logs. It shows a list of the last
happenings.
Screen divide
mode
By clicking on this button you can select to divide the screen into 1, 4, 6,
8, 9, 16, 25, 36 or 49 channels.
Manual record Clicking on this button starts and stops a manually record of all opened
channel. Before you can start the manual recording go to settings
local settings Choose storage and select the HDD on your PC the
files. Press “Save”. The files are saved in a folder called “recEx” under
the selected HDD character.
Screenshot Clicking on this button you manually take snapshot of the selected
channel. Before you can start the manual recording go to settings
local settings Choose storage and select the HDD on your PC the
files. Press “Save”. The files are saved in a folder called “screenShotEx”
under the selected HDD character.
Automatic polling Refreshing the camera preview.
Video fill
the window
Clicking on this button changes the size/format of the actual video
preview.
Full screen Clicking on this button takes the selected screen divide mode into
full screen mode. To close the full screen mode press the right
button of your mouse and select from the menu that appears “Back
to Main window”.
Audio Turn up/ down the volume of the selected channel.
PTZ (not
supported)
Move cameras vertical and horizontal. Zoom and focus the camera.
Set the Iris on or off.
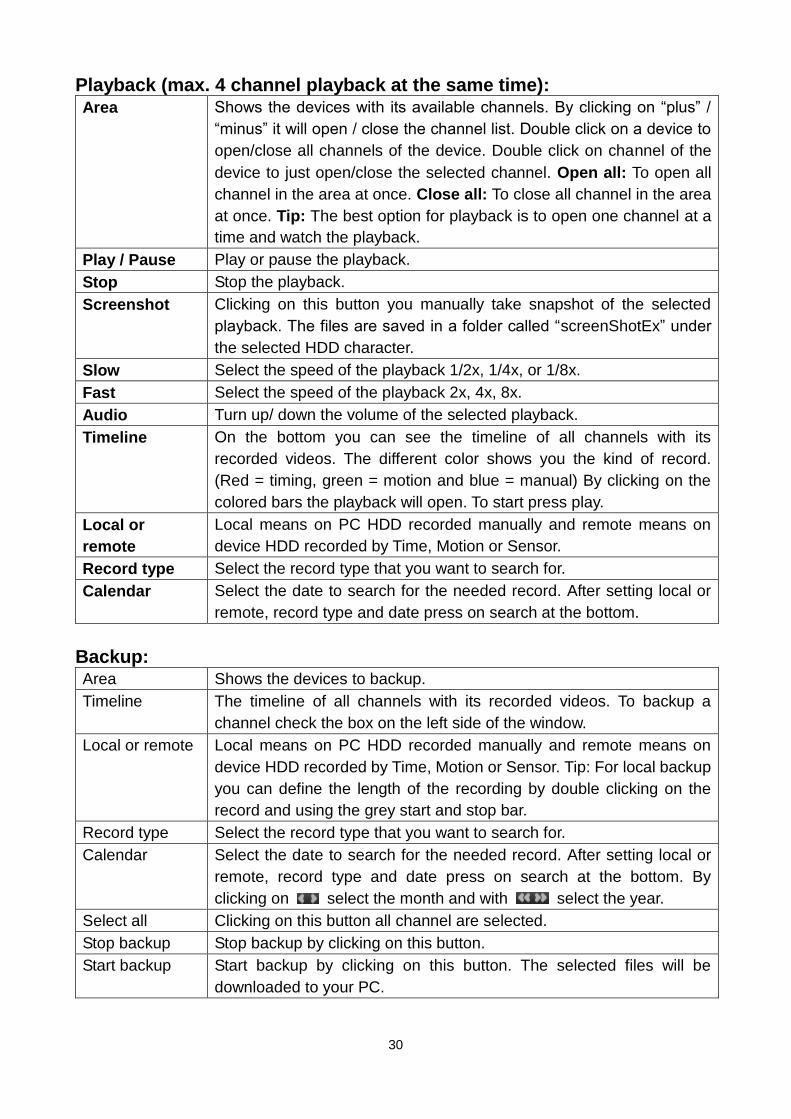
30
Playback (max. 4 channel playback at the same time): Area Shows the devices with its available channels. By clicking on “plus” /
“minus” it will open / close the channel list. Double click on a device to
open/close all channels of the device. Double click on channel of the
device to just open/close the selected channel. Open all: To open all
channel in the area at once. Close all: To close all channel in the area
at once. Tip: The best option for playback is to open one channel at a
time and watch the playback.
Play / Pause Play or pause the playback.
Stop Stop the playback.
Screenshot Clicking on this button you manually take snapshot of the selected
playback. The files are saved in a folder called “screenShotEx” under
the selected HDD character.
Slow Select the speed of the playback 1/2x, 1/4x, or 1/8x.
Fast Select the speed of the playback 2x, 4x, 8x.
Audio Turn up/ down the volume of the selected playback.
Timeline On the bottom you can see the timeline of all channels with its
recorded videos. The different color shows you the kind of record.
(Red = timing, green = motion and blue = manual) By clicking on the
colored bars the playback will open. To start press play.
Local or
remote
Local means on PC HDD recorded manually and remote means on
device HDD recorded by Time, Motion or Sensor.
Record type Select the record type that you want to search for.
Calendar Select the date to search for the needed record. After setting local or
remote, record type and date press on search at the bottom.
Backup: Area Shows the devices to backup.
Timeline The timeline of all channels with its recorded videos. To backup a
channel check the box on the left side of the window.
Local or remote Local means on PC HDD recorded manually and remote means on
device HDD recorded by Time, Motion or Sensor. Tip: For local backup
you can define the length of the recording by double clicking on the
record and using the grey start and stop bar.
Record type Select the record type that you want to search for.
Calendar Select the date to search for the needed record. After setting local or
remote, record type and date press on search at the bottom. By
clicking on select the month and with select the year.
Select all Clicking on this button all channel are selected.
Stop backup Stop backup by clicking on this button.
Start backup Start backup by clicking on this button. The selected files will be
downloaded to your PC.
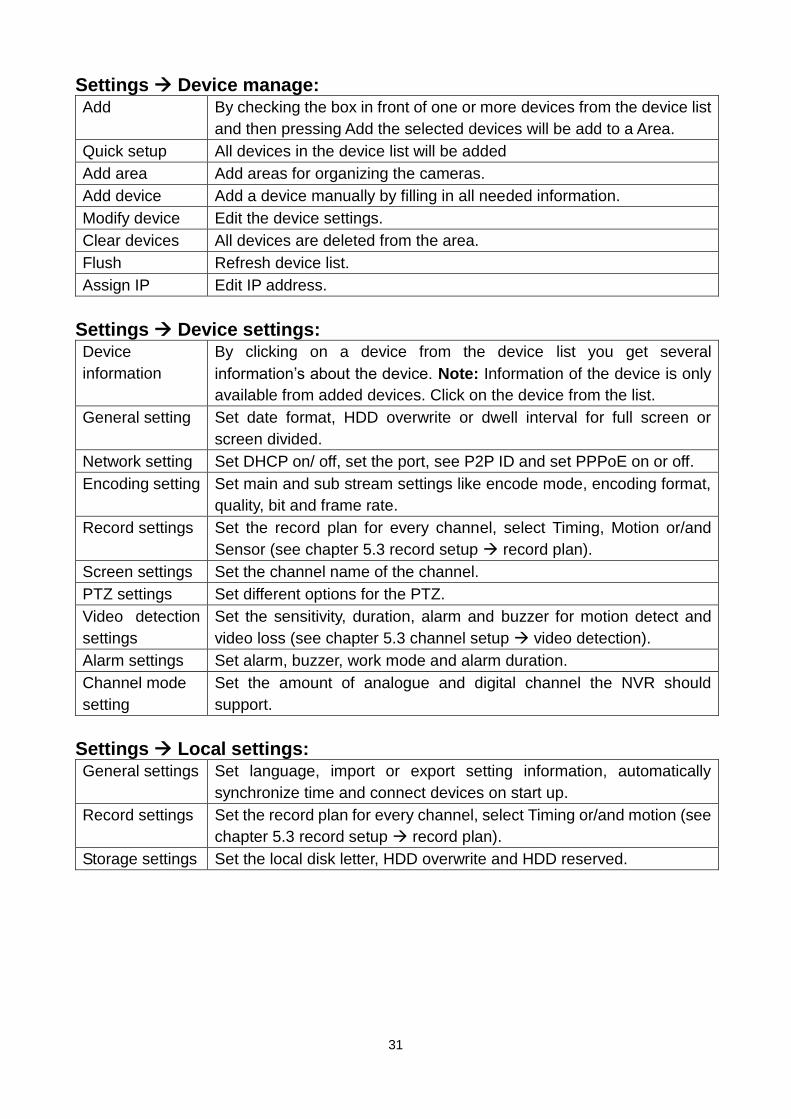
31
Settings Device manage: Add By checking the box in front of one or more devices from the device list
and then pressing Add the selected devices will be add to a Area.
Quick setup All devices in the device list will be added
Add area Add areas for organizing the cameras.
Add device Add a device manually by filling in all needed information.
Modify device Edit the device settings.
Clear devices All devices are deleted from the area.
Flush Refresh device list.
Assign IP Edit IP address.
Settings Device settings: Device
information
By clicking on a device from the device list you get several
information’s about the device. Note: Information of the device is only
available from added devices. Click on the device from the list.
General setting Set date format, HDD overwrite or dwell interval for full screen or
screen divided.
Network setting Set DHCP on/ off, set the port, see P2P ID and set PPPoE on or off.
Encoding setting Set main and sub stream settings like encode mode, encoding format,
quality, bit and frame rate.
Record settings Set the record plan for every channel, select Timing, Motion or/and
Sensor (see chapter 5.3 record setup record plan).
Screen settings Set the channel name of the channel.
PTZ settings Set different options for the PTZ.
Video detection
settings
Set the sensitivity, duration, alarm and buzzer for motion detect and
video loss (see chapter 5.3 channel setup video detection).
Alarm settings Set alarm, buzzer, work mode and alarm duration.
Channel mode
setting
Set the amount of analogue and digital channel the NVR should
support.
Settings Local settings: General settings Set language, import or export setting information, automatically
synchronize time and connect devices on start up.
Record settings Set the record plan for every channel, select Timing or/and motion (see
chapter 5.3 record setup record plan).
Storage settings Set the local disk letter, HDD overwrite and HDD reserved.
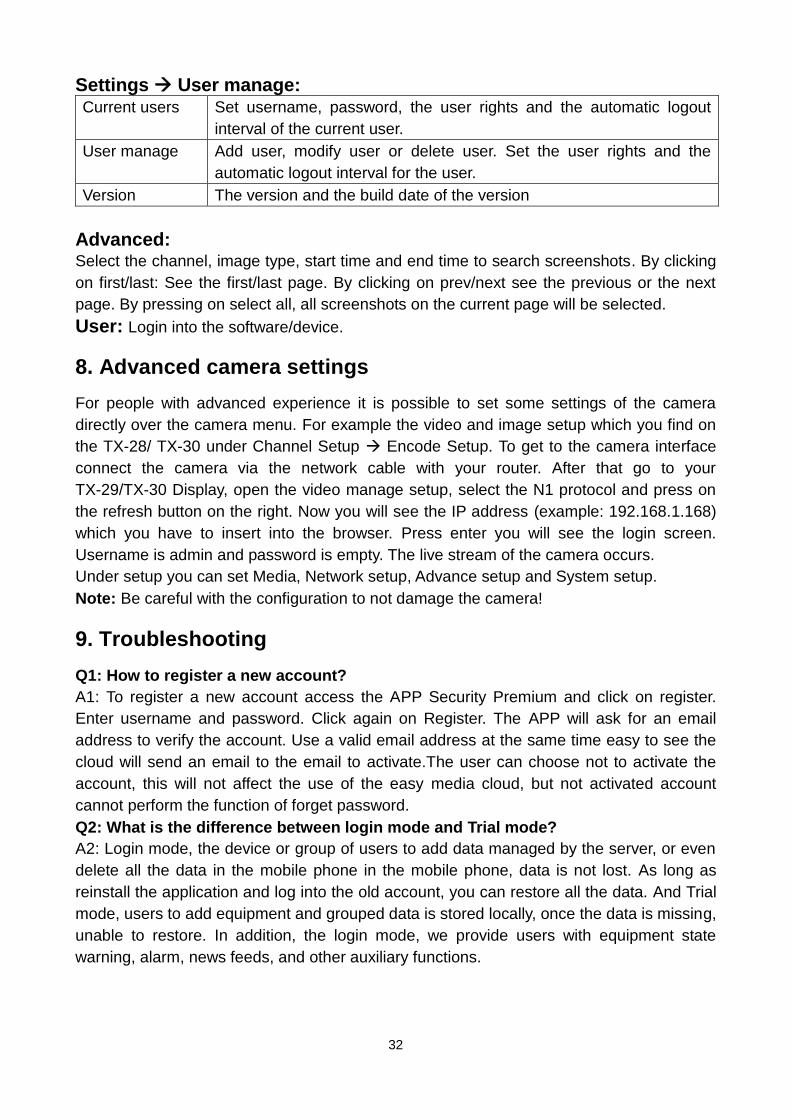
32
Settings User manage: Current users Set username, password, the user rights and the automatic logout
interval of the current user.
User manage Add user, modify user or delete user. Set the user rights and the
automatic logout interval for the user.
Version The version and the build date of the version
Advanced: Select the channel, image type, start time and end time to search screenshots. By clicking
on first/last: See the first/last page. By clicking on prev/next see the previous or the next
page. By pressing on select all, all screenshots on the current page will be selected.
User: Login into the software/device.
8. Advanced camera settings
For people with advanced experience it is possible to set some settings of the camera
directly over the camera menu. For example the video and image setup which you find on
the TX-28/ TX-30 under Channel Setup Encode Setup. To get to the camera interface
connect the camera via the network cable with your router. After that go to your
TX-29/TX-30 Display, open the video manage setup, select the N1 protocol and press on
the refresh button on the right. Now you will see the IP address (example: 192.168.1.168)
which you have to insert into the browser. Press enter you will see the login screen.
Username is admin and password is empty. The live stream of the camera occurs.
Under setup you can set Media, Network setup, Advance setup and System setup.
Note: Be careful with the configuration to not damage the camera!
9. Troubleshooting
Q1: How to register a new account?
A1: To register a new account access the APP Security Premium and click on register.
Enter username and password. Click again on Register. The APP will ask for an email
address to verify the account. Use a valid email address at the same time easy to see the
cloud will send an email to the email to activate.The user can choose not to activate the
account, this will not affect the use of the easy media cloud, but not activated account
cannot perform the function of forget password.
Q2: What is the difference between login mode and Trial mode?
A2: Login mode, the device or group of users to add data managed by the server, or even
delete all the data in the mobile phone in the mobile phone, data is not lost. As long as
reinstall the application and log into the old account, you can restore all the data. And Trial
mode, users to add equipment and grouped data is stored locally, once the data is missing,
unable to restore. In addition, the login mode, we provide users with equipment state
warning, alarm, news feeds, and other auxiliary functions.
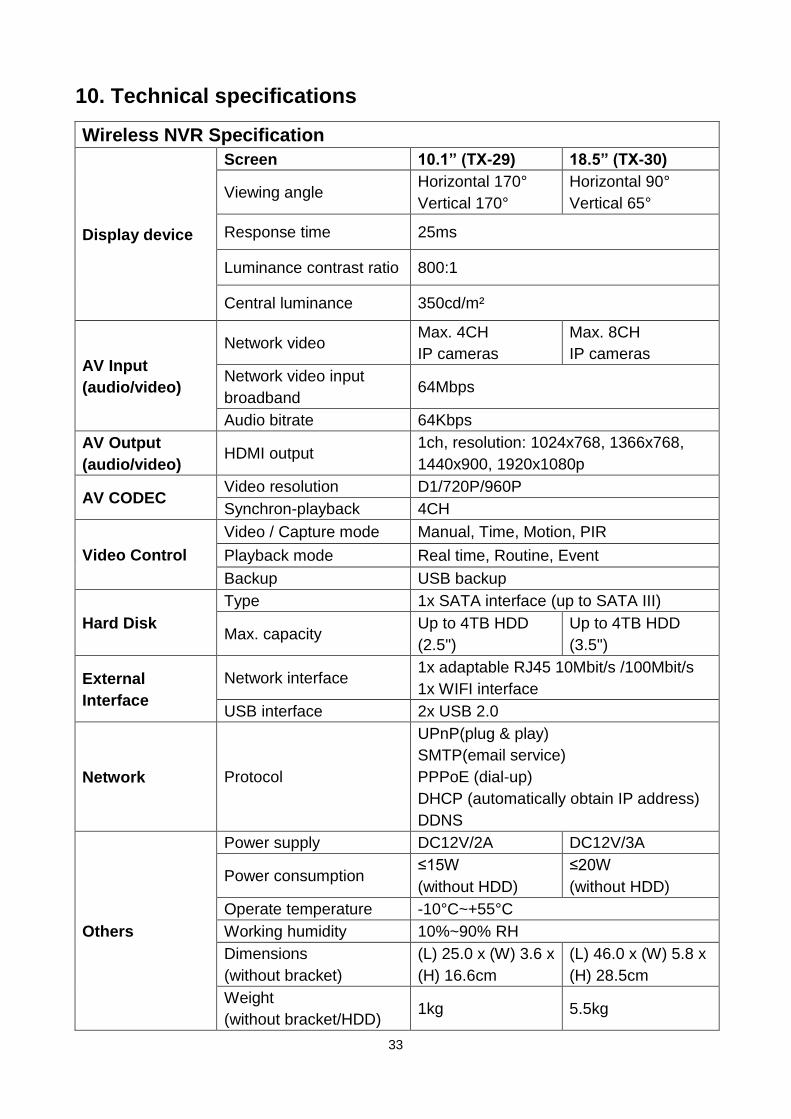
33
10. Technical specifications
Wireless NVR Specification
Display device
Screen 10.1” (TX-29) 18.5” (TX-30)
Viewing angle Horizontal 170°
Vertical 170°
Horizontal 90°
Vertical 65°
Response time 25ms
Luminance contrast ratio 800:1
Central luminance 350cd/m²
AV Input
(audio/video)
Network video Max. 4CH
IP cameras
Max. 8CH
IP cameras
Network video input
broadband 64Mbps
Audio bitrate 64Kbps
AV Output
(audio/video) HDMI output
1ch, resolution: 1024x768, 1366x768,
1440x900, 1920x1080p
AV CODEC Video resolution D1/720P/960P
Synchron-playback 4CH
Video Control
Video / Capture mode Manual, Time, Motion, PIR
Playback mode Real time, Routine, Event
Backup USB backup
Hard Disk
Type 1x SATA interface (up to SATA III)
Max. capacity Up to 4TB HDD
(2.5")
Up to 4TB HDD
(3.5")
External
Interface
Network interface 1x adaptable RJ45 10Mbit/s /100Mbit/s
1x WIFI interface
USB interface 2x USB 2.0
Network Protocol
UPnP(plug & play)
SMTP(email service)
PPPoE (dial-up)
DHCP (automatically obtain IP address)
DDNS
Others
Power supply DC12V/2A DC12V/3A
Power consumption ≤15W
(without HDD)
≤20W
(without HDD)
Operate temperature -10°C~+55°C
Working humidity 10%~90% RH
Dimensions
(without bracket)
(L) 25.0 x (W) 3.6 x
(H) 16.6cm
(L) 46.0 x (W) 5.8 x
(H) 28.5cm
Weight
(without bracket/HDD) 1kg 5.5kg
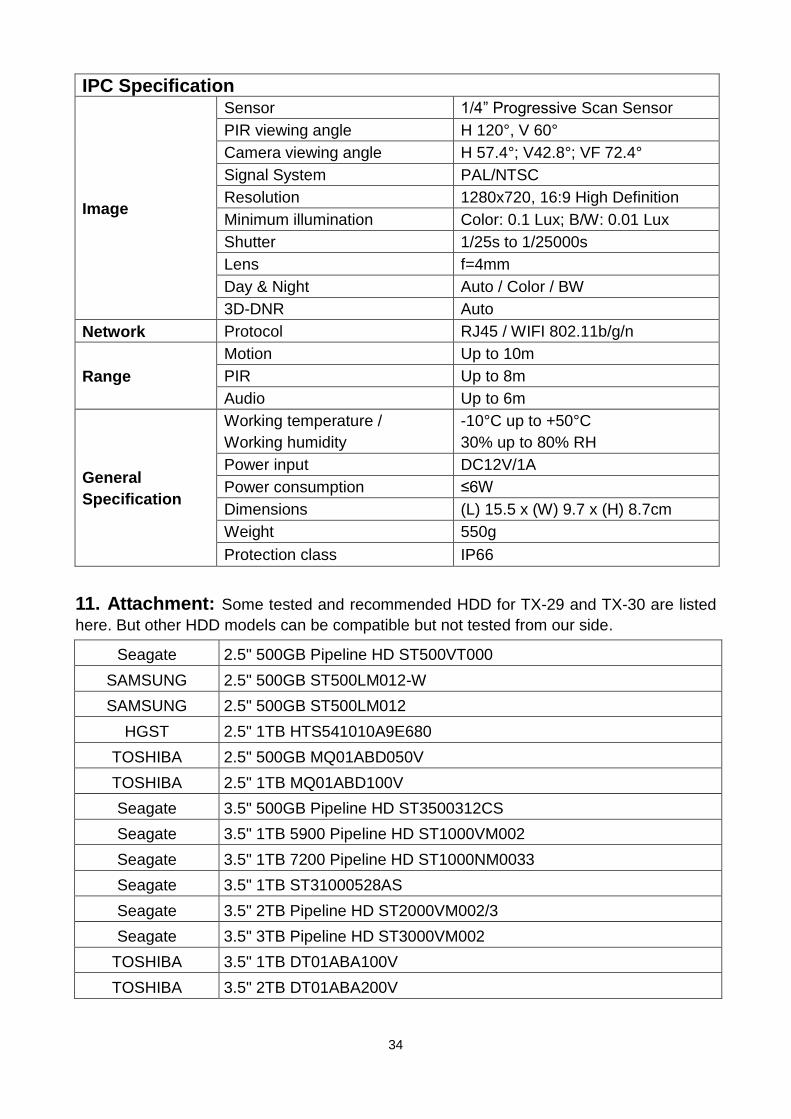
34
IPC Specification
Image
Sensor 1/4” Progressive Scan Sensor
PIR viewing angle H 120°, V 60°
Camera viewing angle H 57.4°; V42.8°; VF 72.4°
Signal System PAL/NTSC
Resolution 1280x720, 16:9 High Definition
Minimum illumination Color: 0.1 Lux; B/W: 0.01 Lux
Shutter 1/25s to 1/25000s
Lens f=4mm
Day & Night Auto / Color / BW
3D-DNR Auto
Network Protocol RJ45 / WIFI 802.11b/g/n
Range
Motion Up to 10m
PIR Up to 8m
Audio Up to 6m
General
Specification
Working temperature /
Working humidity
-10°C up to +50°C
30% up to 80% RH
Power input DC12V/1A
Power consumption ≤6W
Dimensions (L) 15.5 x (W) 9.7 x (H) 8.7cm
Weight 550g
Protection class IP66
11. Attachment: Some tested and recommended HDD for TX-29 and TX-30 are listed
here. But other HDD models can be compatible but not tested from our side.
Seagate 2.5" 500GB Pipeline HD ST500VT000
SAMSUNG 2.5" 500GB ST500LM012-W
SAMSUNG 2.5" 500GB ST500LM012
HGST 2.5" 1TB HTS541010A9E680
TOSHIBA 2.5" 500GB MQ01ABD050V
TOSHIBA 2.5" 1TB MQ01ABD100V
Seagate 3.5" 500GB Pipeline HD ST3500312CS
Seagate 3.5" 1TB 5900 Pipeline HD ST1000VM002
Seagate 3.5" 1TB 7200 Pipeline HD ST1000NM0033
Seagate 3.5" 1TB ST31000528AS
Seagate 3.5" 2TB Pipeline HD ST2000VM002/3
Seagate 3.5" 3TB Pipeline HD ST3000VM002
TOSHIBA 3.5" 1TB DT01ABA100V
TOSHIBA 3.5" 2TB DT01ABA200V
35
This product includes software developed by third parties, including software which
is released under the GNU General Public License Version 2 (GPL v2). This program
is free software; you can redistribute it and/or modify it under the terms of the GNU
General Public License as published by the Free Software Foundation; either version
2 of the License, or (at your option) any later version. You may obtain a complete
machine-readable copy of the source code for the above mentioned software under
the terms of GPL v2 without charge except for the cost of media, shipping, and
handling, upon written request to Technaxx GmbH & Co. KG, Kruppstraße 105, 60388
Frankfurt am Main, Germany.
This program is distributed in the hope that it will be useful, but WITHOUT ANY
WARRANTY; without even the implied warranty of MERCHANTABILITY or FITNESS
FOR A PARTICULAR PURPOSE. See the GNU General Public License for more
details. You should have received a copy of the GNU General Public License along
with this program; if not, write to the Free Software Foundation, Inc., 51 Franklin
Street, Fifth Floor, Boston, MA 02110-1301, USA. (Notice from Technaxx: A copy of
the GPL is included below).
GNU GENERAL PUBLIC LICENSE: Version 2, June 1991 / Copyright (C) 1989, 1991 Free
Software Foundation, Inc. / 51 Franklin Street, Fifth Floor, Boston, MA 02110-1301,
USA. Everyone is permitted to copy and distribute verbatim copies of this license
document, but changing it is not allowed.
Preamble
The licenses for most software are designed to take away your freedom to share and
change it. By contrast, the GNU General Public License is intended to guarantee your
freedom to share and change free software--to make sure the software is free for all its
users. This General Public License applies to most of the Free Software Foundation's
software and to any other program whose authors commit to using it. (Some other Free
Software Foundation software is covered by the GNU Lesser General Public License
instead.) You can apply it to your programs, too.
When we speak of free software, we are referring to freedom, not price. Our General Public
Licenses are designed to make sure that you have the freedom to distribute copies of free
software (and charge for this service if you wish), that you receive source code or can get it
if you want it, that you can change the software or use pieces of it in new free programs; and
that you know you can do these things.
To protect your rights, we need to make restrictions that forbid anyone to deny you these
rights or to ask you to surrender the rights. These restrictions translate to certain
responsibilities for you if you distribute copies of the software, or if you modify it.
For example, if you distribute copies of such a program, whether gratis or for a fee, you must
give the recipients all the rights that you have. You must make sure that they, too, receive or
can get the source code. And you must show them these terms so they know their rights.
We protect your rights with two steps: (1) copyright the software, and (2) offer you this
license which gives you legal permission to copy, distribute and/or modify the software.
36
Also, for each author's protection and ours, we want to make certain that everyone
understands that there is no warranty for this free software. If the software is modified by
someone else and passed on, we want its recipients to know that what they have is not the
original, so that any problems introduced by others will not reflect on the original authors'
reputations.
Any free program is threatened constantly by software patents. We wish to avoid the danger
that redistributors of a free program will individually obtain patent licenses, in effect making
the program proprietary. To prevent this, we have made it clear that any patent must be
licensed for everyone's free use or not licensed at all.
The precise terms and conditions for copying, distribution and modification follow.
TERMS AND CONDITIONS FOR COPYING, DISTRIBUTION AND MODIFICATION
0. This License applies to any program or other work which contains a notice placed by the
copyright holder saying it may be distributed under the terms of this General Public License.
The "Program", below, refers to any such program or work, and a "work based on the
Program" means either the Program or any derivative work under copyright law: that is to
say, a work containing the Program or a portion of it, either verbatim or with modifications
and/or translated into another language. (Hereinafter, translation is included without
limitation in the term "modification".) Each licensee is addressed as "you".
Activities other than copying, distribution and modification are not covered by this License;
they are outside its scope. The act of running the Program is not restricted, and the output
from the Program is covered only if its contents constitute a work based on the Program
(independent of having been made by running the Program). Whether that is true depends
on what the Program does.
1. You may copy and distribute verbatim copies of the Program's source code as you receive
it, in any medium, provided that you conspicuously and appropriately publish on each copy
an appropriate copyright notice and disclaimer of warranty; keep intact all the notices that
refer to this License and to the absence of any warranty; and give any other recipients of the
Program a copy of this License along with the Program. You may charge a fee for the
physical act of transferring a copy, and you may at your option offer warranty protection in
exchange for a fee.
2. You may modify your copy or copies of the Program or any portion of it, thus forming a
work based on the Program, and copy and distribute such modifications or work under the
terms of Section 1 above, provided that you also meet all of these conditions:
a) You must cause the modified files to carry prominent notices stating that you changed the
files and the date of any change.
b) You must cause any work that you distribute or publish, that in whole or in part contains or
is derived from the Program or any part thereof, to be licensed as a whole at no charge to all
third parties under the terms of this License.
37
c) If the modified program normally reads commands interactively when run, you must
cause it, when started running for such interactive use in the most ordinary way, to print or
display an announcement including an appropriate copyright notice and a notice that there is
no warranty (or else, saying that you provide a warranty) and that users may redistribute the
program under these conditions, and telling the user how to view a copy of this License.
(Exception: if the Program itself is interactive but does not normally print such an
announcement, your work based on the Program is not required to print an announcement.)
These requirements apply to the modified work as a whole. If identifiable sections of that
work are not derived from the Program, and can be reasonably considered independent and
separate works in themselves, then this License, and its terms, do not apply to those
sections when you distribute them as separate works. But when you distribute the same
sections as part of a whole which is a work based on the Program, the distribution of the
whole must be on the terms of this License, whose permissions for other licensees extend to
the entire whole, and thus to each and every part regardless of who wrote it.
Thus, it is not the intent of this section to claim rights or contest your rights to work written
entirely by you; rather, the intent is to exercise the right to control the distribution of
derivative or collective works based on the Program. In addition, mere aggregation of
another work not based on the Program with the Program (or with a work based on the
Program) on a volume of a storage or distribution medium does not bring the other work
under the scope of this License.
3. You may copy and distribute the Program (or a work based on it, under Section 2) in
object code or executable form under the terms of Sections 1 and 2 above provided that you
also do one of the following:
a) Accompany it with the complete corresponding machine-readable source code, which
must be distributed under the terms of Sections 1 and 2 above on a medium customarily
used for software interchange; or,
b) Accompany it with a written offer, valid for at least three years, to give any third party, for a
charge no more than your cost of physically performing source distribution, a complete
machine-readable copy of the corresponding source code, to be distributed under the terms
of Sections 1 and 2 above on a medium customarily used for software interchange; or,
c) Accompany it with the information you received as to the offer to distribute corresponding
source code. (This alternative is allowed only for noncommercial distribution and only if you
received the program in object code or executable form with such an offer, in accord with
Subsection b above.)
The source code for a work means the preferred form of the work for making modifications to
it. For an executable work, complete source code means all the source code for all modules
it contains, plus any associated interface definition files, plus the scripts used to control
compilation and installation of the executable. However, as a special exception, the source
code distributed need not include anything that is normally distributed (in either source or
binary form) with the major components (compiler, kernel, and so on) of the operating
system on which the executable runs, unless that component itself accompanies the
executable.
38
If distribution of executable or object code is made by offering access to copy from a
designated place, then offering equivalent access to copy the source code from the same
place counts as distribution of the source code, even though third parties are not compelled
to copy the source along with the object code.
4. You may not copy, modify, sublicense, or distribute the Program except as expressly
provided under this License. Any attempt otherwise to copy, modify, sublicense or distribute
the Program is void, and will automatically terminate your rights under this License.
However, parties who have received copies, or rights, from you under this License will not
have their licenses terminated so long as such parties remain in full compliance.
5. You are not required to accept this License, since you have not signed it. However,
nothing else grants you permission to modify or distribute the Program or its derivative
works. These actions are prohibited by law if you do not accept this License. Therefore, by
modifying or distributing the Program (or any work based on the Program), you indicate your
acceptance of this License to do so, and all its terms and conditions for copying, distributing
or modifying the Program or works based on it.
6. Each time you redistribute the Program (or any work based on the Program), the recipient
automatically receives a license from the original licensor to copy, distribute or modify the
Program subject to these terms and conditions. You may not impose any further restrictions
on the recipients' exercise of the rights granted herein. You are not responsible for enforcing
compliance by third parties to this License.
7. If, as a consequence of a court judgment or allegation of patent infringement or for any
other reason (not limited to patent issues), conditions are imposed on you (whether by court
order, agreement or otherwise) that contradict the conditions of this License, they do not
excuse you from the conditions of this License. If you cannot distribute so as to satisfy
simultaneously your obligations under this License and any other pertinent obligations, then
as a consequence you may not distribute the Program at all. For example, if a patent license
would not permit royalty-free redistribution of the Program by all those who receive copies
directly or indirectly through you, then the only way you could satisfy both it and this License
would be to refrain entirely from distribution of the Program.
If any portion of this section is held invalid or unenforceable under any particular
circumstance, the balance of the section is intended to apply and the section as a whole is
intended to apply in other circumstances.
It is not the purpose of this section to induce you to infringe any patents or other property
right claims or to contest validity of any such claims; this section has the sole purpose of
protecting the integrity of the free software distribution system, which is implemented by
public license practices. Many people have made generous contributions to the wide range
of software distributed through that system in reliance on consistent application of that
system; it is up to the author/donor to decide if he or she is willing to distribute software
through any other system and a licensee cannot impose that choice. This section is intended
to make thoroughly clear what is believed to be a consequence of the rest of this License.

39
8. If the distribution and/or use of the Program is restricted in certain countries either by
patents or by copyrighted interfaces, the original copyright holder who places the Program
under this License may add an explicit geographical distribution limitation excluding those
countries, so that distribution is permitted only in or among countries not thus excluded. In
such case, this License incorporates the limitation as if written in the body of this License.
9. The Free Software Foundation may publish revised and/or new versions of the General
Public License from time to time. Such new versions will be similar in spirit to the present
version, but may differ in detail to address new problems or concerns.
Each version is given a distinguishing version number. If the Program specifies a version
number of this License which applies to it and "any later version", you have the option of
following the terms and conditions either of that version or of any later version published by
the Free Software Foundation. If the Program does not specify a version number of this
License, you may choose any version ever published by the Free Software Foundation.
10. If you wish to incorporate parts of the Program into other free programs whose
distribution conditions are different, write to the author to ask for permission. For software
which is copyrighted by the Free Software Foundation, write to the Free Software
Foundation; we sometimes make exceptions for this. Our decision will be guided by the two
goals of preserving the free status of all derivatives of our free software and of promoting the
sharing and reuse of software generally.
NO WARRANTY
11. Because the program is licensed free of charge, there is no warranty for the program, to
the extent permitted by applicable law. Except when otherwise stated in writing the
Copyright holder and/or other parties provide the program "AS IS" without warranty of any
kind, either expressed or implied, including, but not limited to, the implied warranties of
merchantability and fitness for a particular purpose. The entire risk as to the quality and
performance of the program is with you. Should the program prove defective, you assume
the cost of all necessary servicing, repair or correction.
12. In no event unless required by applicable law or agreed to in writing will any Copyright
holder, or any other party who may modify and/or redistribute the program as permitted
above, be liable to you for damages, including any general, specia, incidental or
consequential. Damages arising out of the use or inability to use the program (including but
not limited to loss of data or data being rendered inaccurate or losses sustained by you or
third parties or a failure of the program to operate with any other programs), even if such
holder or other party has been advised of the possibility of such damages.
END OF TERMS AND CONDITIONS

40
HOW TO APPLY THESE TERMS TO YOUR NEW PROGRAMS
(1) If you develop a new program, and you want it to be of the greatest possible use to the
public, the best way to achieve this is to make it free software which everyone can
redistribute and change under these terms.
(2) To do so, attach the following notices to the program. It is safest to attach them to the
start of each source file to most effectively convey the exclusion of warranty; and each file
should have at least the "copyright" line and a pointer to where the full notice is found.
<one line to give the program's name and an idea of what it does.>
Copyright (C) <yyyy> <name of author>
(3) This program is free software; you can redistribute it and/or modify it under the terms of
the GNU General Public License as published by the Free Software Foundation; either
version 2 of the License, or (at your option) any later version.
(4) This program is distributed in the hope that it will be useful, but WITHOUT ANY
WARRANTY; without even the implied warranty of MERCHANTABILITY or FITNESS FOR A
PARTICULAR PURPOSE. See the GNU General Public License for more details.
(5) You should have received a copy of the GNU General Public License along with this
program; if not, write to the Free Software Foundation Inc; 51 Franklin Street, Fifth Floor,
Boston, MA 02110-1301, USA.
(6) Also add information on how to contact you by electronic and paper mail.
(7) If the program is interactive, make it output a short notice like this when it starts in an
interactive mode: Gnomovision version 69, Copyright (C) year name of author Gnomovision
comes with ABSOLUTELY NO WARRANTY; for details type `show w'. (8) This is free
software, and you are welcome to redistribute it under certain conditions; type `show c' for
details.
(9) The hypothetical commands `show w' and `show c' should show the appropriate parts of
the General Public License. Of course, the commands you use may be called something
other than ̀ show w' and ̀ show c'; they could even be mouse-clicks or menu items--whatever
suits your program.
(10) You should also get your employer (if you work as a programmer) or your school, if any,
to sign a "copyright disclaimer" for the program, if necessary. Here is a sample; alter the
names: (11) Yoyodyne, Inc., hereby disclaims all copyright interest in the program
`Gnomovision' (which makes passes at compilers) written by James Hacker. <signature of
Ty Coon>, 1 April 1989 [Ty Coon, President of Vice]
(12) This General Public License does not permit incorporating your program into
proprietary programs. If your program is a subroutine library, you may consider it more
useful to permit linking proprietary applications with the library. If this is what you want to do,
use the GNU Lesser General Public License instead of this License.
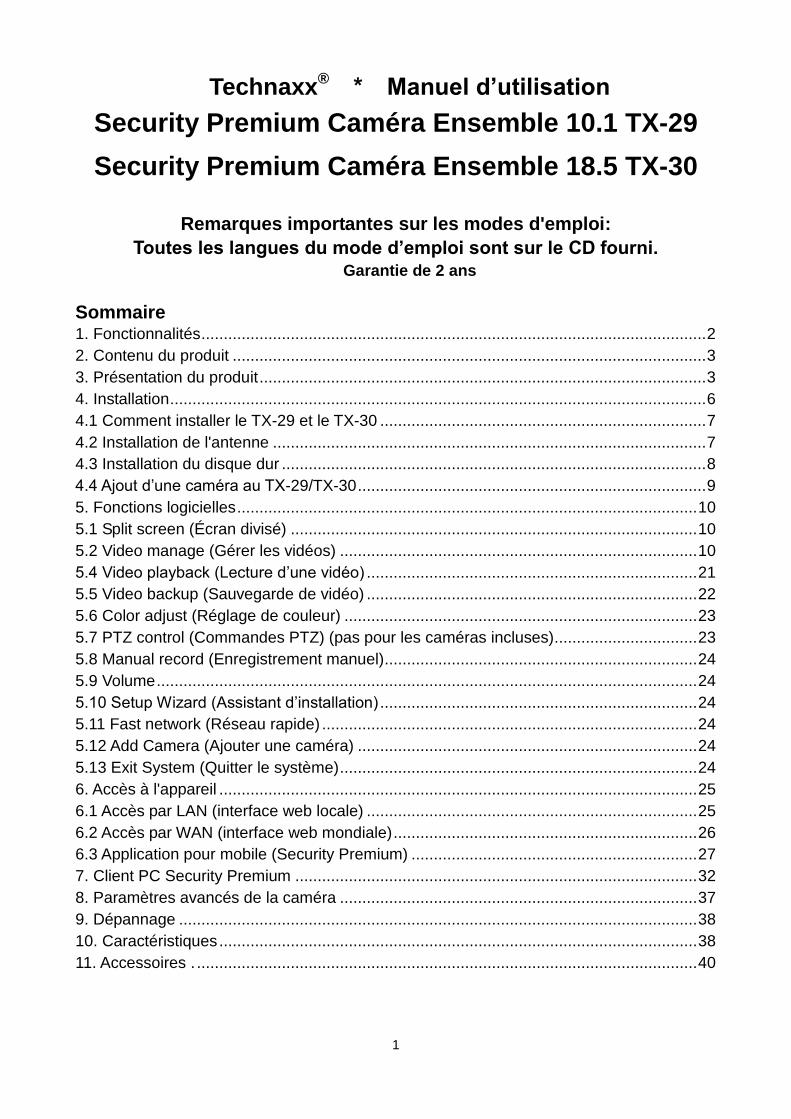
1
Technaxx® * Manuel d’utilisation
Security Premium Caméra Ensemble 10.1 TX-29
Security Premium Caméra Ensemble 18.5 TX-30
Remarques importantes sur les modes d'emploi:
Toutes les langues du mode d’emploi sont sur le CD fourni. Garantie de 2 ans
Sommaire 1. Fonctionnalités ................................................................................................................. 2
2. Contenu du produit .......................................................................................................... 3
3. Présentation du produit .................................................................................................... 3
4. Installation ........................................................................................................................ 6
4.1 Comment installer le TX-29 et le TX-30 ......................................................................... 7
4.2 Installation de l'antenne ................................................................................................. 7
4.3 Installation du disque dur ............................................................................................... 8
4.4 Ajout d’une caméra au TX-29/TX-30 .............................................................................. 9
5. Fonctions logicielles ....................................................................................................... 10
5.1 Split screen (Écran divisé) ........................................................................................... 10
5.2 Video manage (Gérer les vidéos) ................................................................................ 10
5.4 Video playback (Lecture d’une vidéo) .......................................................................... 21
5.5 Video backup (Sauvegarde de vidéo) .......................................................................... 22
5.6 Color adjust (Réglage de couleur) ............................................................................... 23
5.7 PTZ control (Commandes PTZ) (pas pour les caméras incluses)................................ 23
5.8 Manual record (Enregistrement manuel) ...................................................................... 24
5.9 Volume ......................................................................................................................... 24
5.10 Setup Wizard (Assistant d’installation) ....................................................................... 24
5.11 Fast network (Réseau rapide) .................................................................................... 24
5.12 Add Camera (Ajouter une caméra) ............................................................................ 24
5.13 Exit System (Quitter le système) ................................................................................ 24
6. Accès à l'appareil ........................................................................................................... 25
6.1 Accès par LAN (interface web locale) .......................................................................... 25
6.2 Accès par WAN (interface web mondiale) .................................................................... 26
6.3 Application pour mobile (Security Premium) ................................................................ 27
7. Client PC Security Premium .......................................................................................... 32
8. Paramètres avancés de la caméra ................................................................................ 37
9. Dépannage .................................................................................................................... 38
10. Caractéristiques ........................................................................................................... 38
11. Accessoires . ................................................................................................................ 40
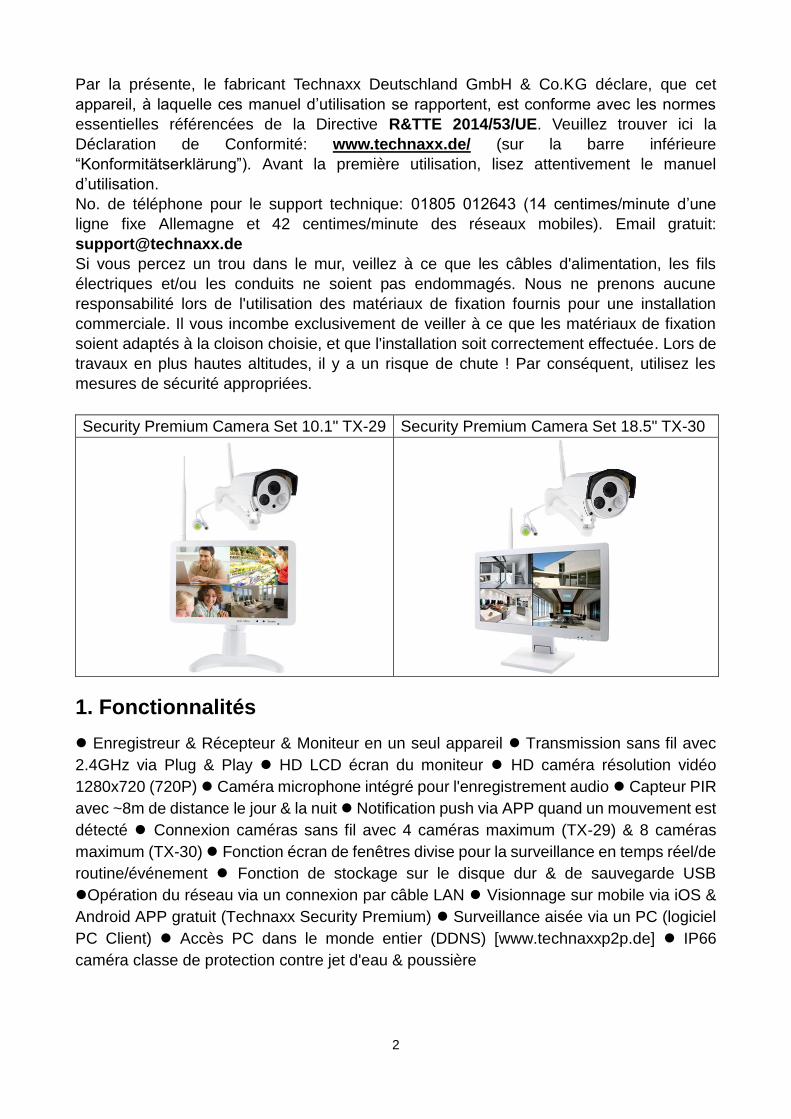
2
Par la présente, le fabricant Technaxx Deutschland GmbH & Co.KG déclare, que cet
appareil, à laquelle ces manuel d’utilisation se rapportent, est conforme avec les normes
essentielles référencées de la Directive R&TTE 2014/53/UE. Veuillez trouver ici la
Déclaration de Conformité: www.technaxx.de/ (sur la barre inférieure
“Konformitätserklärung”). Avant la première utilisation, lisez attentivement le manuel
d’utilisation.
No. de téléphone pour le support technique: 01805 012643 (14 centimes/minute d’une
ligne fixe Allemagne et 42 centimes/minute des réseaux mobiles). Email gratuit:
Si vous percez un trou dans le mur, veillez à ce que les câbles d'alimentation, les fils
électriques et/ou les conduits ne soient pas endommagés. Nous ne prenons aucune
responsabilité lors de l'utilisation des matériaux de fixation fournis pour une installation
commerciale. Il vous incombe exclusivement de veiller à ce que les matériaux de fixation
soient adaptés à la cloison choisie, et que l'installation soit correctement effectuée. Lors de
travaux en plus hautes altitudes, il y a un risque de chute ! Par conséquent, utilisez les
mesures de sécurité appropriées.
Security Premium Camera Set 10.1" TX-29 Security Premium Camera Set 18.5" TX-30
1. Fonctionnalités
Enregistreur & Récepteur & Moniteur en un seul appareil Transmission sans fil avec
2.4GHz via Plug & Play HD LCD écran du moniteur HD caméra résolution vidéo
1280x720 (720P) Caméra microphone intégré pour l'enregistrement audio Capteur PIR
avec ~8m de distance le jour & la nuit Notification push via APP quand un mouvement est
détecté Connexion caméras sans fil avec 4 caméras maximum (TX-29) & 8 caméras
maximum (TX-30) Fonction écran de fenêtres divise pour la surveillance en temps réel/de
routine/événement Fonction de stockage sur le disque dur & de sauvegarde USB
Opération du réseau via un connexion par câble LAN Visionnage sur mobile via iOS &
Android APP gratuit (Technaxx Security Premium) Surveillance aisée via un PC (logiciel
PC Client) Accès PC dans le monde entier (DDNS) [www.technaxxp2p.de] IP66
caméra classe de protection contre jet d'eau & poussière
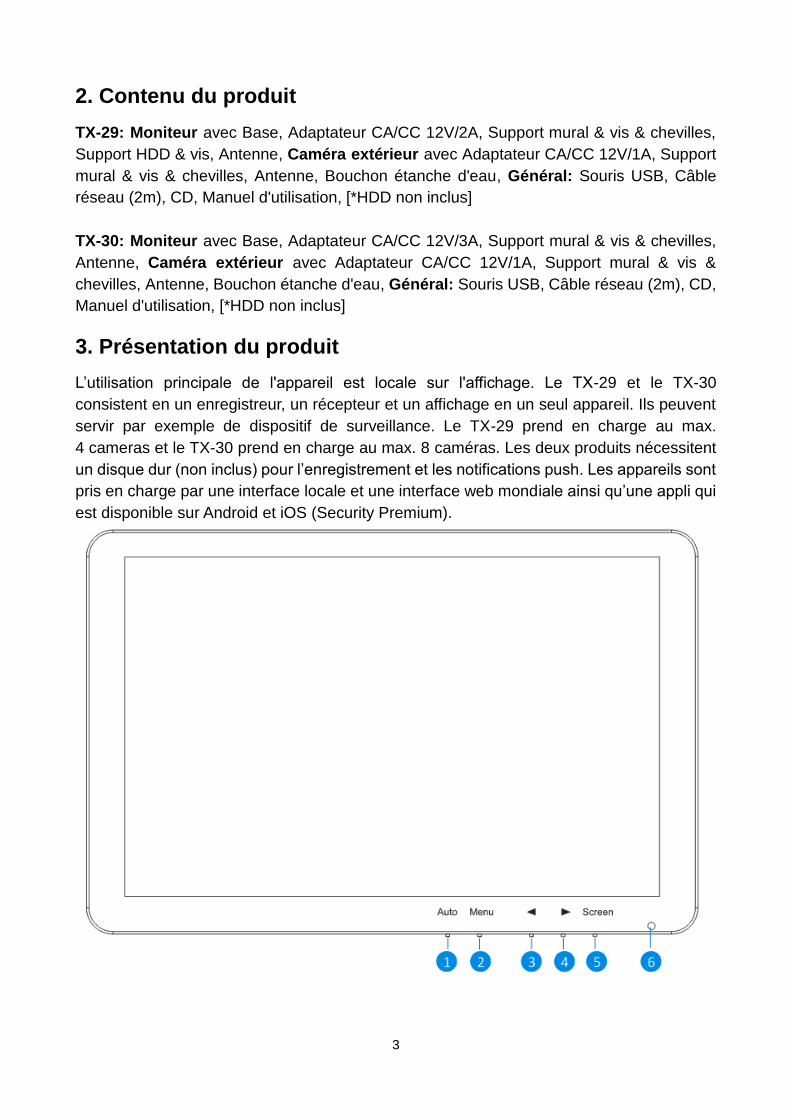
3
2. Contenu du produit
TX-29: Moniteur avec Base, Adaptateur CA/CC 12V/2A, Support mural & vis & chevilles,
Support HDD & vis, Antenne, Caméra extérieur avec Adaptateur CA/CC 12V/1A, Support
mural & vis & chevilles, Antenne, Bouchon étanche d'eau, Général: Souris USB, Câble
réseau (2m), CD, Manuel d'utilisation, [*HDD non inclus]
TX-30: Moniteur avec Base, Adaptateur CA/CC 12V/3A, Support mural & vis & chevilles,
Antenne, Caméra extérieur avec Adaptateur CA/CC 12V/1A, Support mural & vis &
chevilles, Antenne, Bouchon étanche d'eau, Général: Souris USB, Câble réseau (2m), CD,
Manuel d'utilisation, [*HDD non inclus]
3. Présentation du produit
L’utilisation principale de l'appareil est locale sur l'affichage. Le TX-29 et le TX-30
consistent en un enregistreur, un récepteur et un affichage en un seul appareil. Ils peuvent
servir par exemple de dispositif de surveillance. Le TX-29 prend en charge au max.
4 cameras et le TX-30 prend en charge au max. 8 caméras. Les deux produits nécessitent
un disque dur (non inclus) pour l’enregistrement et les notifications push. Les appareils sont
pris en charge par une interface locale et une interface web mondiale ainsi qu’une appli qui
est disponible sur Android et iOS (Security Premium).
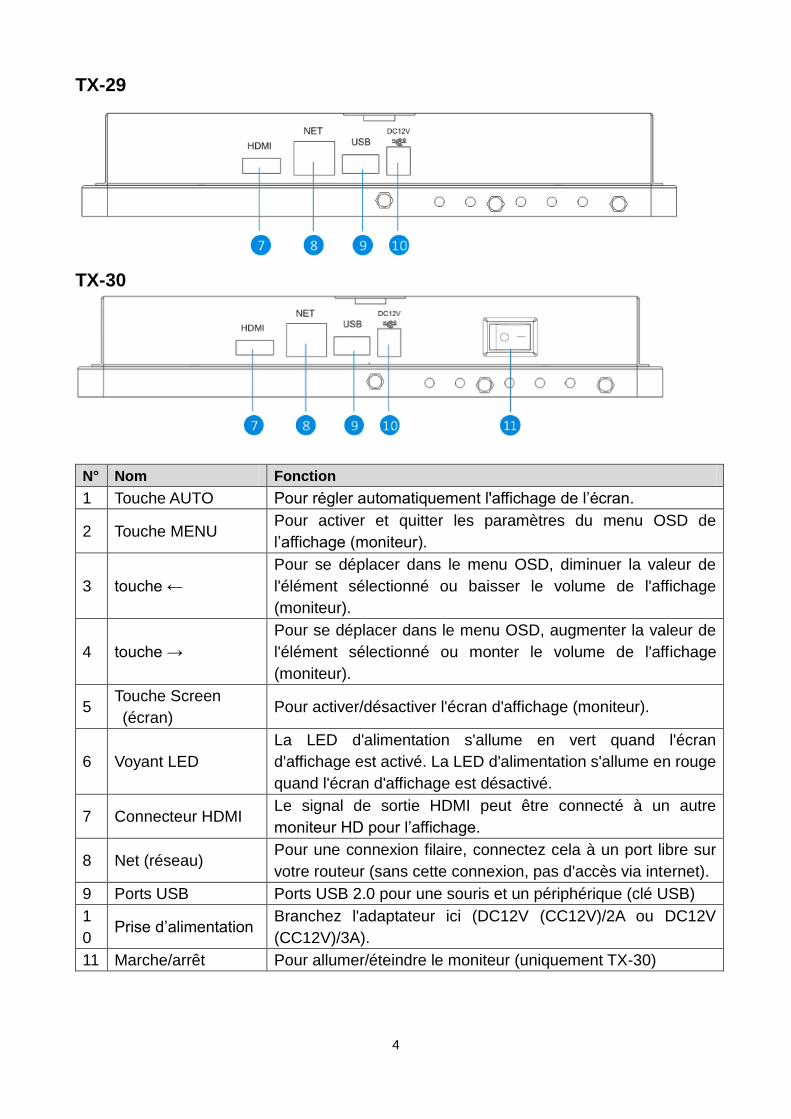
4
TX-29
TX-30
N° Nom Fonction
1 Touche AUTO Pour régler automatiquement l'affichage de l’écran.
2 Touche MENU Pour activer et quitter les paramètres du menu OSD de
l’affichage (moniteur).
3 touche ←
Pour se déplacer dans le menu OSD, diminuer la valeur de
l'élément sélectionné ou baisser le volume de l'affichage
(moniteur).
4 touche →
Pour se déplacer dans le menu OSD, augmenter la valeur de
l'élément sélectionné ou monter le volume de l'affichage
(moniteur).
5 Touche Screen
(écran) Pour activer/désactiver l'écran d'affichage (moniteur).
6 Voyant LED
La LED d'alimentation s'allume en vert quand l'écran
d'affichage est activé. La LED d'alimentation s'allume en rouge
quand l'écran d'affichage est désactivé.
7 Connecteur HDMI Le signal de sortie HDMI peut être connecté à un autre
moniteur HD pour l’affichage.
8 Net (réseau) Pour une connexion filaire, connectez cela à un port libre sur
votre routeur (sans cette connexion, pas d'accès via internet).
9 Ports USB Ports USB 2.0 pour une souris et un périphérique (clé USB)
1
0 Prise d’alimentation
Branchez l'adaptateur ici (DC12V (CC12V)/2A ou DC12V
(CC12V)/3A).
11 Marche/arrêt Pour allumer/éteindre le moniteur (uniquement TX-30)

5
Caméra IP :
N° Nom Fonction
1
LED IR
(Infrarouges)
La caméra l’utilisera dans des conditions de luminosité faible
pour générer une image en noir et blanc, même dans
l’obscurité totale.
2
Objectif Le rôle final de la caméra. Pour une image fiable et claire,
vérifiez que l’objectif reste propre et non obstrué. Pour le
nettoyage, utilisez une solution de nettoyage pour objectif et
un textile dédiés, disponibles auprès des bons magasins de
photographie. (angle de vue : H : 57,4° V : 42,8°)
3 Capteur de lumière Détecte la quantité de lumière disponible et allume les LED IR
si nécessaire.
4 Support de fixation Le support de montage fourni peut être vissé sur n’importe
quelle surface plane.
5 Prise
d’alimentation
Branchez l'adaptateur d'alimentation ici (DC12V (CC12V)/1A).
6
Connecteur
Ethernet RJ45
Pour une connexion filaire, connectez cela à un port libre sur
votre routeur. Il est recommandé d’utiliser une connexion filaire
quand la distance entre le moniteur et la caméra est
supérieure à la portée de transmission sans fil.
7 Antenne L’antenne incluse se branche ici.
8 Boîtier Fait en métal. Protège les composants internes des
intempéries.
9 Microphone Permet à la caméra de capter les sons avoisinants et des les
transmettre avec la vidéo.
10
Capteur IRP
(Infrarouge passif)
Il s'agit d’un capteur électronique mesurant la lumière
infrarouge rayonnant depuis des objets (corps humain) dans
son champ de vision. (angle de vue : H : 120° V : 60°)
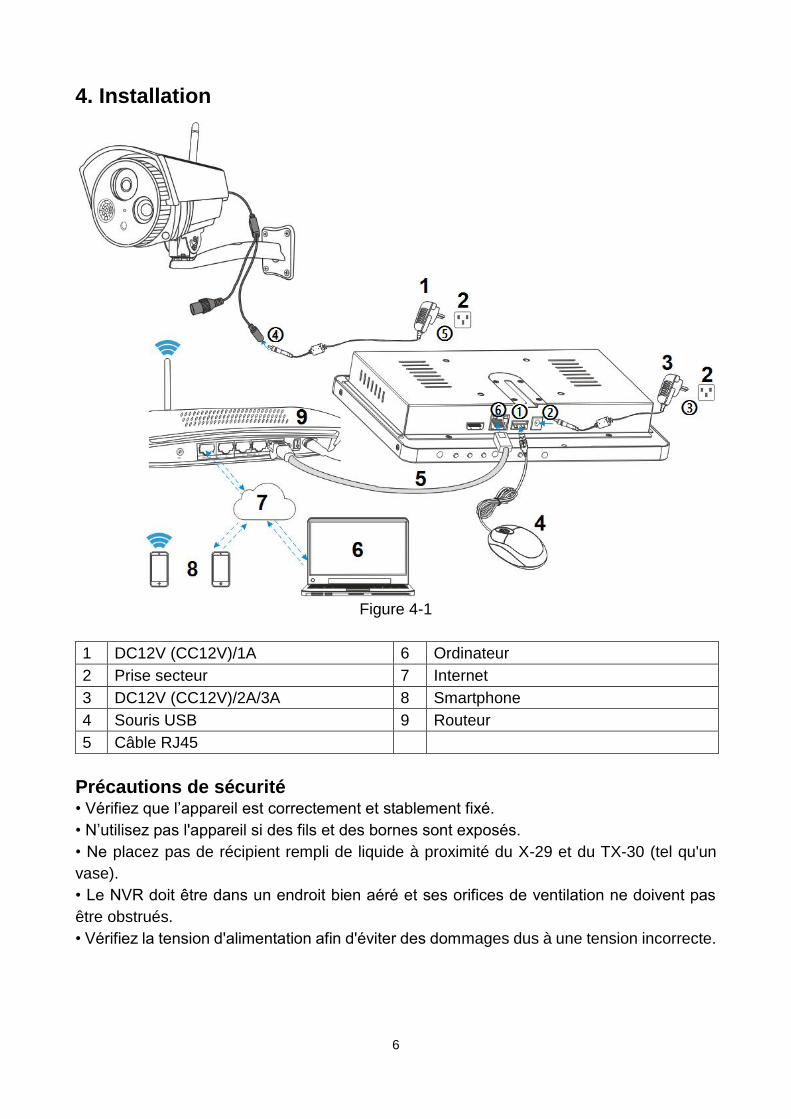
6
4. Installation
Figure 4-1
1 DC12V (CC12V)/1A 6 Ordinateur
2 Prise secteur 7 Internet
3 DC12V (CC12V)/2A/3A 8 Smartphone
4 Souris USB 9 Routeur
5 Câble RJ45
Précautions de sécurité • Vérifiez que l’appareil est correctement et stablement fixé.
• N’utilisez pas l'appareil si des fils et des bornes sont exposés.
• Ne placez pas de récipient rempli de liquide à proximité du X-29 et du TX-30 (tel qu'un
vase).
• Le NVR doit être dans un endroit bien aéré et ses orifices de ventilation ne doivent pas
être obstrués.
• Vérifiez la tension d'alimentation afin d'éviter des dommages dus à une tension incorrecte.
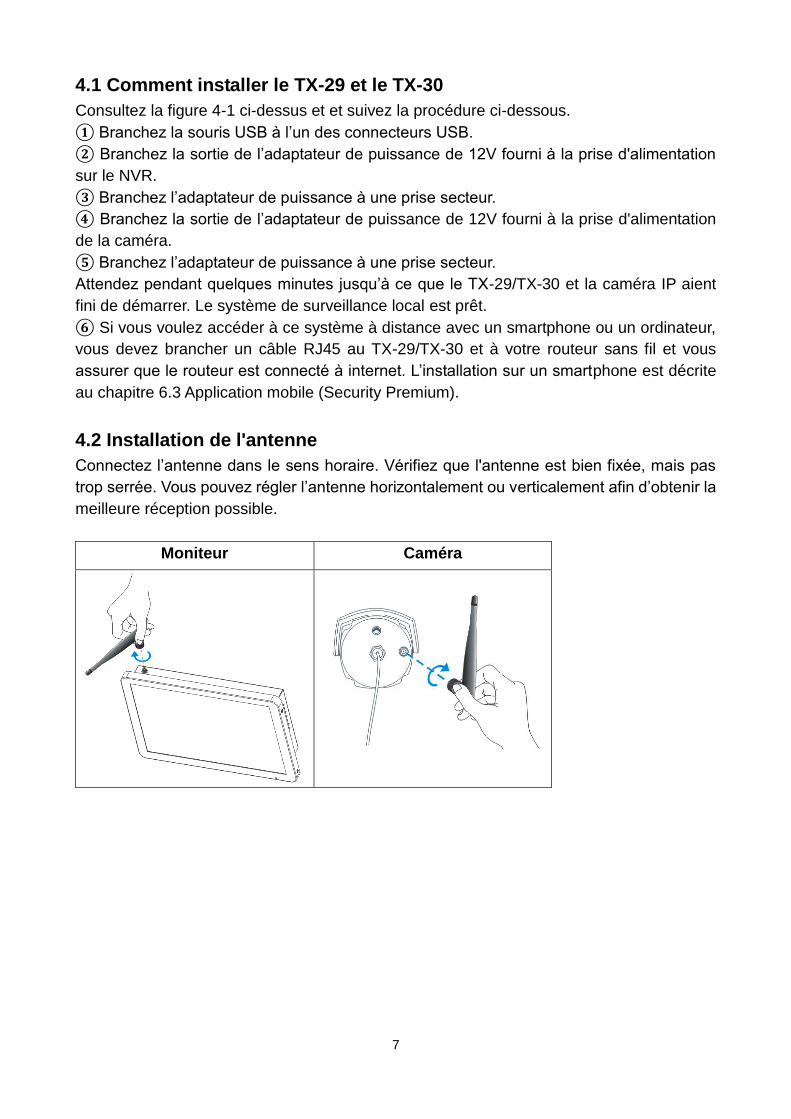
7
4.1 Comment installer le TX-29 et le TX-30
Consultez la figure 4-1 ci-dessus et et suivez la procédure ci-dessous.
① Branchez la souris USB à l’un des connecteurs USB.
② Branchez la sortie de l’adaptateur de puissance de 12V fourni à la prise d'alimentation
sur le NVR.
③ Branchez l’adaptateur de puissance à une prise secteur.
④ Branchez la sortie de l’adaptateur de puissance de 12V fourni à la prise d'alimentation
de la caméra.
⑤ Branchez l’adaptateur de puissance à une prise secteur.
Attendez pendant quelques minutes jusqu’à ce que le TX-29/TX-30 et la caméra IP aient
fini de démarrer. Le système de surveillance local est prêt.
⑥ Si vous voulez accéder à ce système à distance avec un smartphone ou un ordinateur,
vous devez brancher un câble RJ45 au TX-29/TX-30 et à votre routeur sans fil et vous
assurer que le routeur est connecté à internet. L’installation sur un smartphone est décrite
au chapitre 6.3 Application mobile (Security Premium).
4.2 Installation de l'antenne
Connectez l’antenne dans le sens horaire. Vérifiez que l'antenne est bien fixée, mais pas
trop serrée. Vous pouvez régler l’antenne horizontalement ou verticalement afin d’obtenir la
meilleure réception possible.
Moniteur Caméra
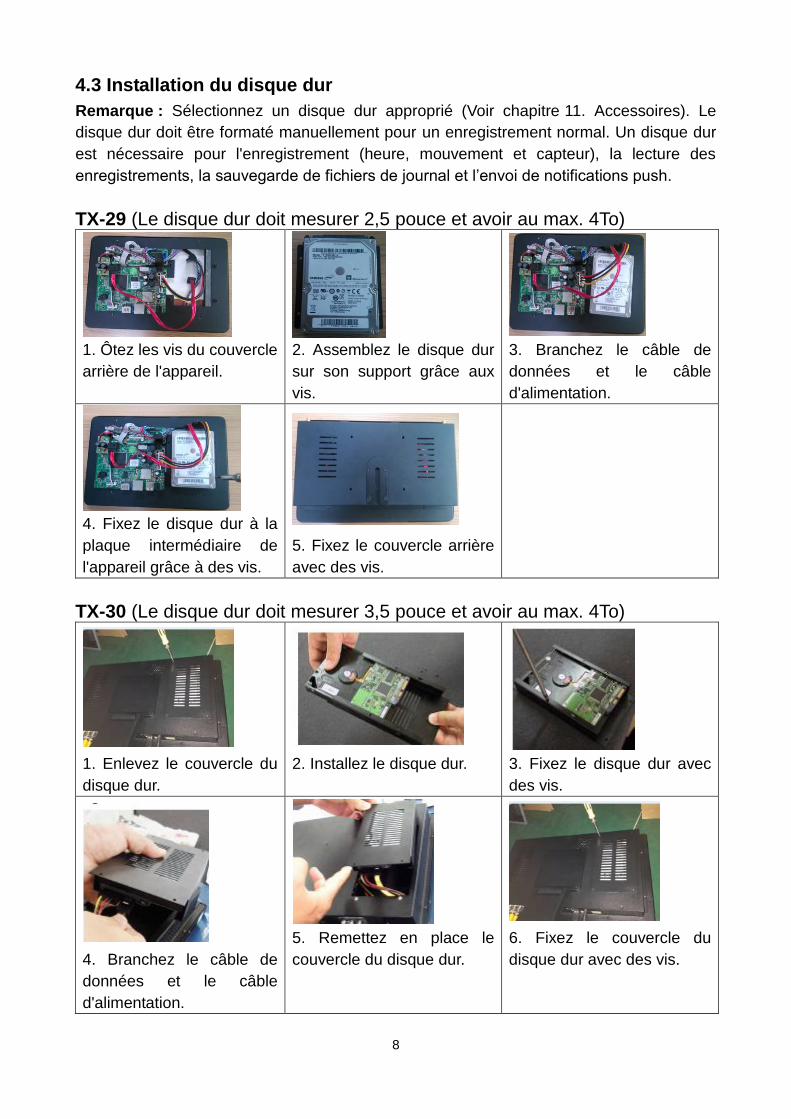
8
4.3 Installation du disque dur
Remarque : Sélectionnez un disque dur approprié (Voir chapitre 11. Accessoires). Le
disque dur doit être formaté manuellement pour un enregistrement normal. Un disque dur
est nécessaire pour l'enregistrement (heure, mouvement et capteur), la lecture des
enregistrements, la sauvegarde de fichiers de journal et l’envoi de notifications push.
TX-29 (Le disque dur doit mesurer 2,5 pouce et avoir au max. 4To)
1. Ôtez les vis du couvercle
arrière de l'appareil.
2. Assemblez le disque dur
sur son support grâce aux
vis.
3. Branchez le câble de
données et le câble
d'alimentation.
4. Fixez le disque dur à la
plaque intermédiaire de
l'appareil grâce à des vis.
5. Fixez le couvercle arrière
avec des vis.
TX-30 (Le disque dur doit mesurer 3,5 pouce et avoir au max. 4To)
1. Enlevez le couvercle du
disque dur.
2. Installez le disque dur.
3. Fixez le disque dur avec
des vis.
4. Branchez le câble de
données et le câble
d'alimentation.
5. Remettez en place le
couvercle du disque dur.
6. Fixez le couvercle du
disque dur avec des vis.
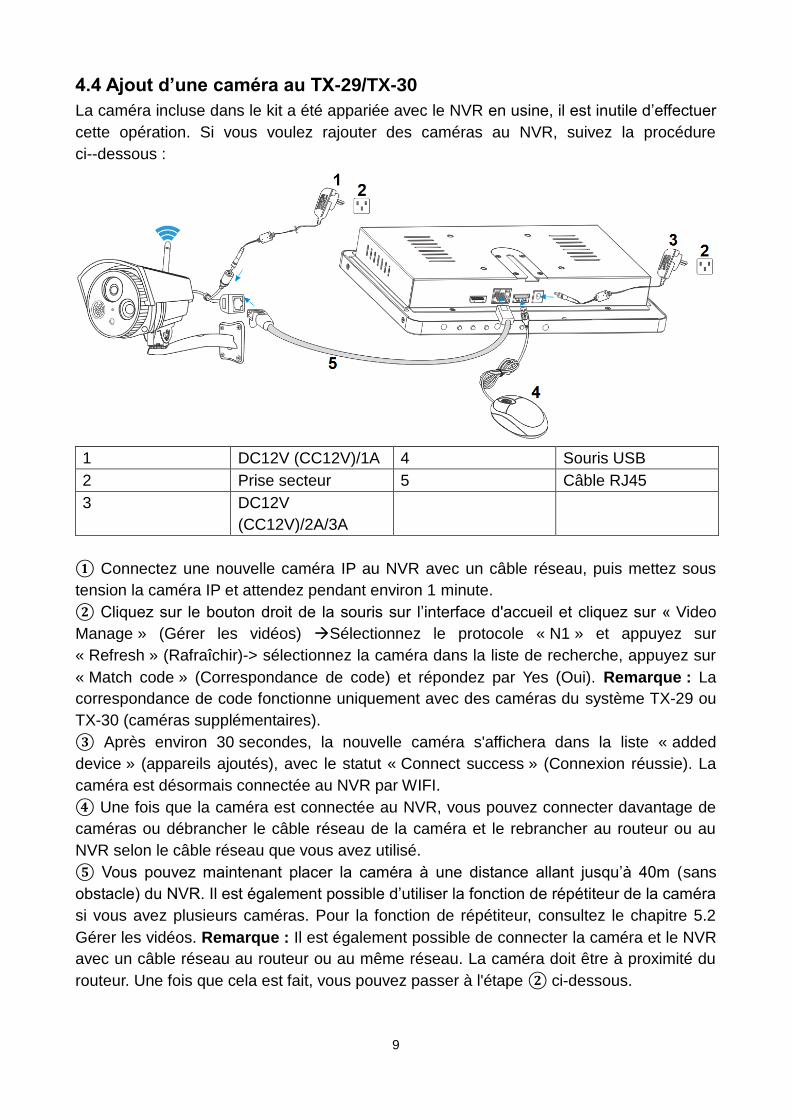
9
4.4 Ajout d’une caméra au TX-29/TX-30
La caméra incluse dans le kit a été appariée avec le NVR en usine, il est inutile d’effectuer
cette opération. Si vous voulez rajouter des caméras au NVR, suivez la procédure
ci--dessous :
1 DC12V (CC12V)/1A 4 Souris USB
2 Prise secteur 5 Câble RJ45
3 DC12V
(CC12V)/2A/3A
① Connectez une nouvelle caméra IP au NVR avec un câble réseau, puis mettez sous
tension la caméra IP et attendez pendant environ 1 minute.
② Cliquez sur le bouton droit de la souris sur l’interface d'accueil et cliquez sur « Video
Manage » (Gérer les vidéos) Sélectionnez le protocole « N1 » et appuyez sur
« Refresh » (Rafraîchir)-> sélectionnez la caméra dans la liste de recherche, appuyez sur
« Match code » (Correspondance de code) et répondez par Yes (Oui). Remarque : La
correspondance de code fonctionne uniquement avec des caméras du système TX-29 ou
TX-30 (caméras supplémentaires).
③ Après environ 30 secondes, la nouvelle caméra s'affichera dans la liste « added
device » (appareils ajoutés), avec le statut « Connect success » (Connexion réussie). La
caméra est désormais connectée au NVR par WIFI.
④ Une fois que la caméra est connectée au NVR, vous pouvez connecter davantage de
caméras ou débrancher le câble réseau de la caméra et le rebrancher au routeur ou au
NVR selon le câble réseau que vous avez utilisé.
⑤ Vous pouvez maintenant placer la caméra à une distance allant jusqu’à 40m (sans
obstacle) du NVR. Il est également possible d’utiliser la fonction de répétiteur de la caméra
si vous avez plusieurs caméras. Pour la fonction de répétiteur, consultez le chapitre 5.2
Gérer les vidéos. Remarque : Il est également possible de connecter la caméra et le NVR
avec un câble réseau au routeur ou au même réseau. La caméra doit être à proximité du
routeur. Une fois que cela est fait, vous pouvez passer à l'étape ② ci-dessous.
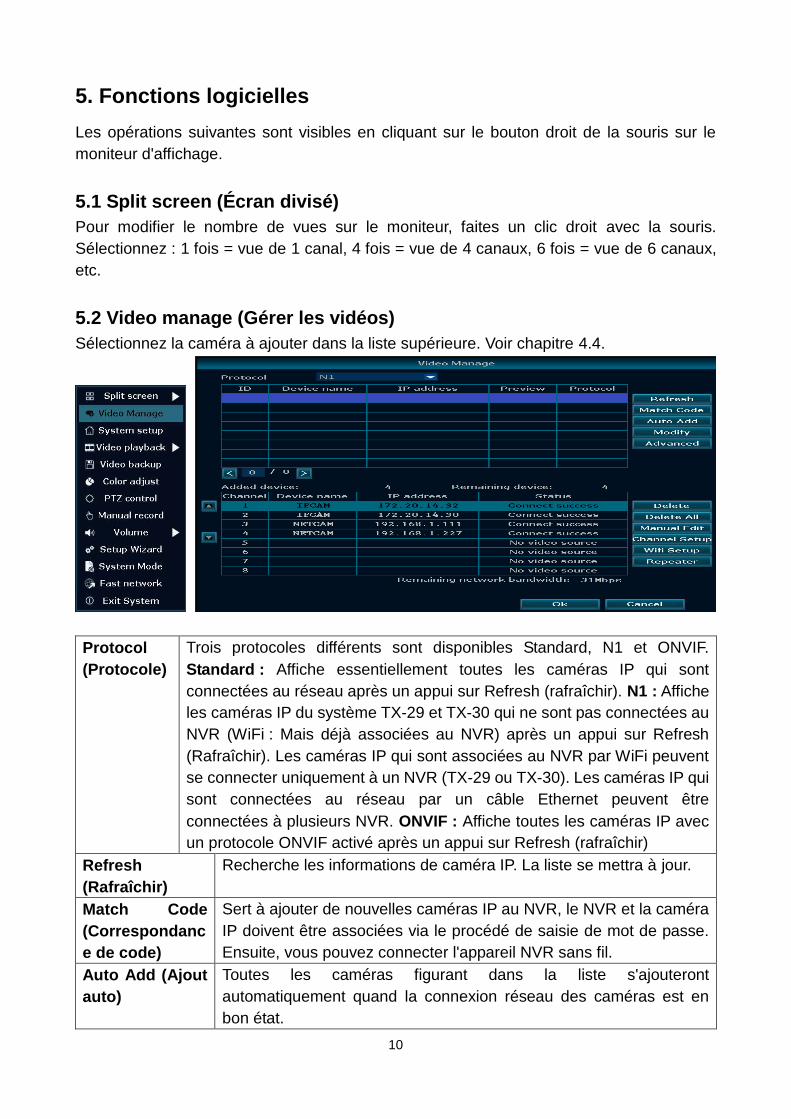
10
5. Fonctions logicielles
Les opérations suivantes sont visibles en cliquant sur le bouton droit de la souris sur le
moniteur d'affichage.
5.1 Split screen (Écran divisé)
Pour modifier le nombre de vues sur le moniteur, faites un clic droit avec la souris.
Sélectionnez : 1 fois = vue de 1 canal, 4 fois = vue de 4 canaux, 6 fois = vue de 6 canaux,
etc.
5.2 Video manage (Gérer les vidéos)
Sélectionnez la caméra à ajouter dans la liste supérieure. Voir chapitre 4.4.
Protocol
(Protocole)
Trois protocoles différents sont disponibles Standard, N1 et ONVIF.
Standard : Affiche essentiellement toutes les caméras IP qui sont
connectées au réseau après un appui sur Refresh (rafraîchir). N1 : Affiche
les caméras IP du système TX-29 et TX-30 qui ne sont pas connectées au
NVR (WiFi : Mais déjà associées au NVR) après un appui sur Refresh
(Rafraîchir). Les caméras IP qui sont associées au NVR par WiFi peuvent
se connecter uniquement à un NVR (TX-29 ou TX-30). Les caméras IP qui
sont connectées au réseau par un câble Ethernet peuvent être
connectées à plusieurs NVR. ONVIF : Affiche toutes les caméras IP avec
un protocole ONVIF activé après un appui sur Refresh (rafraîchir)
Refresh
(Rafraîchir)
Recherche les informations de caméra IP. La liste se mettra à jour.
Match Code
(Correspondanc
e de code)
Sert à ajouter de nouvelles caméras IP au NVR, le NVR et la caméra
IP doivent être associées via le procédé de saisie de mot de passe.
Ensuite, vous pouvez connecter l'appareil NVR sans fil.
Auto Add (Ajout
auto)
Toutes les caméras figurant dans la liste s'ajouteront
automatiquement quand la connexion réseau des caméras est en
bon état.
11
Modify
(Modifier)
Sélectionnez une caméra dans la liste de recherche. Vous pouvez
modifier l'adresse IP de la caméra sélectionnée, Username (Nom
d’utilisateur) et Password (Mot de passe).
Advanced
(Avancé)
Multiply Network Segment
(Multiplier le segment
réseau) (non pris en
charge)
Multiplier le segment réseau signifie
accéder à un segment pour ajouter
l'appareil.
Allow Repeated Add
(Autoriser un ajout répété)
Quand cela est activé, vous pouvez
ajouter la même caméra plusieurs fois.
Intelligent Add (Ajout
intelligent)
L'ajout intelligent est une fonctionnalité
d'ajout intelligent. Cela sert
principalement à la caméra filaire. Vous
pouvez l’ignorer. L'ajout intelligent
vérifiera si la caméra IP et le segment
NVR sont identiques. Si ce n’est pas le
cas, le NVR rendra automatiquement le
segment de caméra IP identique au
NVR.
Added devices (Appareils ajoutés) :
Delete
(Supprimer)
Sélectionne et supprime une caméra à partir de la liste added device
(appareils ajoutés) !
Delete All (Tout
supprimer)
Supprime toutes les caméras dans la liste added device (appareils
ajoutés) !
Manual Edit
(Modification
manuelle)
Modifie les paramètres de connexion de canal. Vous pouvez pivoter
l’image à 180°.
Channel Setup
(Configuration
de canal)
Appuyez sur le bouton pour accéder à la page d'accueil Channel
Setup (Configuration de canal). Ici, vous pouvez modifier Channel
(Canal) et Encode mode (Mode de codage).
WiFi Setup
(Configuration
WiFi)
Appuyez sur le bouton pour accéder à la page d'accueil WiFi Setup
(Configuration WiFi). Ici, vous pouvez modifier le SSID pour améliorer
la connexion WiFi. Attention : Si vous modifiez le SSID ou le mot de
passe, vous devez reconnecter les caméras. Voir chapitre 4.4.
Repeater (Répétiteur) : La fonction de répétiteur sert à étendre la portée du signal WiFi du
NVR. La caméra qui est définie comme répétiteur doit être à portée du NVR (40m sans
obstacle). La caméra que vous connecterez à la caméra de répétiteur doit être à une
distance de moins de 30m (sans obstacle) de la caméra de répétiteur. Procédez comme
suit pour l’installation. Attention ! : N’oubliez pas que les caméras qui sont connectées par
fonction de répétiteur sont toutes désactivées quand le premier répétiteur déconnecté de
l'alimentation électrique.

12
Les deux caméras doivent être d’abord connectées au NVR (voir chapitre 4.4) et doivent
être à proximité du NVR et l’une de l’autre. Appuyez ensuite sur le bouton et allez à
l'étape suivante.
Quand vous appuyez sur le bouton , un menu déroulant s’ouvre. Sélectionnez le numéro
de canal (caméra) à connecter au répétiteur.
Après l'ajout, vous verrez l’image à droite. Les deux caméras sont à la suite. Pour appliquer
la configuration, appuyez sur Apply (Appliquer) ou OK pour sauvegarder l’option. Conseil :
Ensuite, essayez de trouver le bon endroit à portée et de connexion avant de fixer
fermement les caméras au mur. Remarque : Si vous terminez cette configuration et
souhaitez reconnecter la deuxième caméra au NVR, consultez le chapitre 4.4.
5.3 System setup (Configuration système)
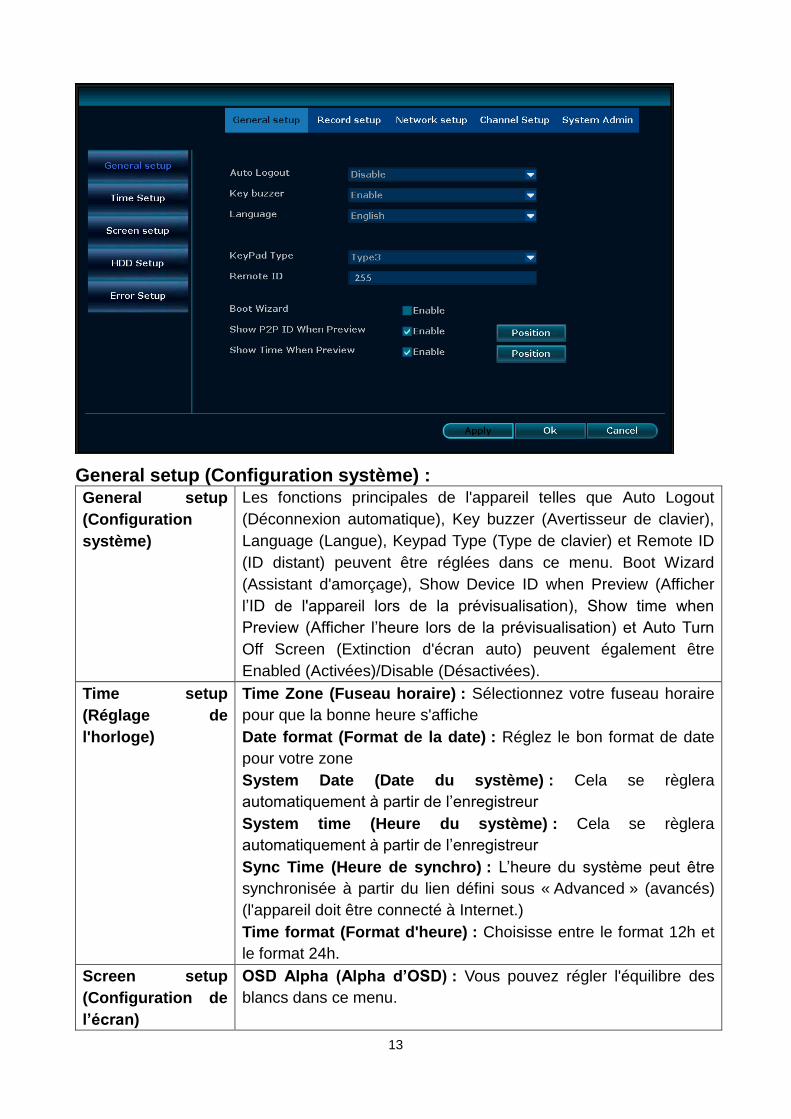
13
General setup (Configuration système) : General setup
(Configuration
système)
Les fonctions principales de l'appareil telles que Auto Logout
(Déconnexion automatique), Key buzzer (Avertisseur de clavier),
Language (Langue), Keypad Type (Type de clavier) et Remote ID
(ID distant) peuvent être réglées dans ce menu. Boot Wizard
(Assistant d'amorçage), Show Device ID when Preview (Afficher
l’ID de l'appareil lors de la prévisualisation), Show time when
Preview (Afficher l’heure lors de la prévisualisation) et Auto Turn
Off Screen (Extinction d'écran auto) peuvent également être
Enabled (Activées)/Disable (Désactivées).
Time setup
(Réglage de
l'horloge)
Time Zone (Fuseau horaire) : Sélectionnez votre fuseau horaire
pour que la bonne heure s'affiche
Date format (Format de la date) : Réglez le bon format de date
pour votre zone
System Date (Date du système) : Cela se règlera
automatiquement à partir de l’enregistreur
System time (Heure du système) : Cela se règlera
automatiquement à partir de l’enregistreur
Sync Time (Heure de synchro) : L’heure du système peut être
synchronisée à partir du lien défini sous « Advanced » (avancés)
(l'appareil doit être connecté à Internet.)
Time format (Format d'heure) : Choisisse entre le format 12h et
le format 24h.
Screen setup
(Configuration de
l’écran)
OSD Alpha (Alpha d’OSD) : Vous pouvez régler l'équilibre des
blancs dans ce menu.
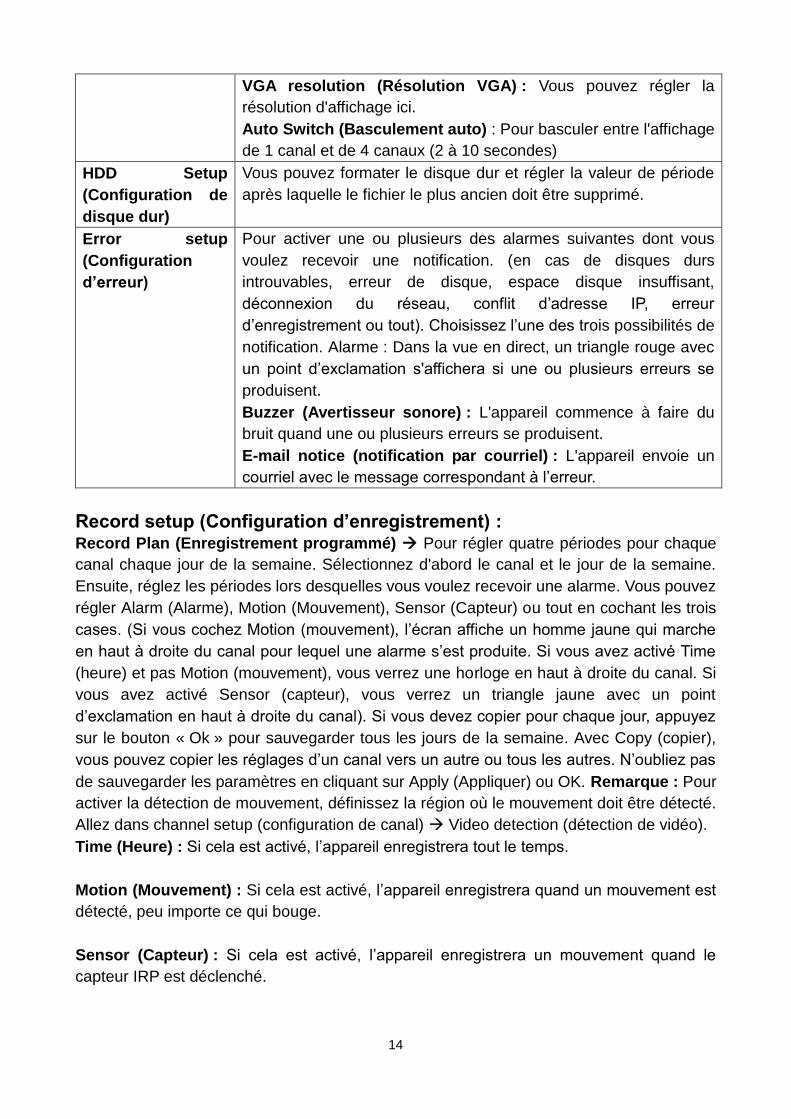
14
VGA resolution (Résolution VGA) : Vous pouvez régler la
résolution d'affichage ici.
Auto Switch (Basculement auto) : Pour basculer entre l'affichage
de 1 canal et de 4 canaux (2 à 10 secondes)
HDD Setup
(Configuration de
disque dur)
Vous pouvez formater le disque dur et régler la valeur de période
après laquelle le fichier le plus ancien doit être supprimé.
Error setup
(Configuration
d’erreur)
Pour activer une ou plusieurs des alarmes suivantes dont vous
voulez recevoir une notification. (en cas de disques durs
introuvables, erreur de disque, espace disque insuffisant,
déconnexion du réseau, conflit d’adresse IP, erreur
d’enregistrement ou tout). Choisissez l’une des trois possibilités de
notification. Alarme : Dans la vue en direct, un triangle rouge avec
un point d’exclamation s'affichera si une ou plusieurs erreurs se
produisent.
Buzzer (Avertisseur sonore) : L'appareil commence à faire du
bruit quand une ou plusieurs erreurs se produisent.
E-mail notice (notification par courriel) : L'appareil envoie un
courriel avec le message correspondant à l’erreur.
Record setup (Configuration d’enregistrement) : Record Plan (Enregistrement programmé) Pour régler quatre périodes pour chaque
canal chaque jour de la semaine. Sélectionnez d'abord le canal et le jour de la semaine.
Ensuite, réglez les périodes lors desquelles vous voulez recevoir une alarme. Vous pouvez
régler Alarm (Alarme), Motion (Mouvement), Sensor (Capteur) ou tout en cochant les trois
cases. (Si vous cochez Motion (mouvement), l’écran affiche un homme jaune qui marche
en haut à droite du canal pour lequel une alarme s’est produite. Si vous avez activé Time
(heure) et pas Motion (mouvement), vous verrez une horloge en haut à droite du canal. Si
vous avez activé Sensor (capteur), vous verrez un triangle jaune avec un point
d’exclamation en haut à droite du canal). Si vous devez copier pour chaque jour, appuyez
sur le bouton « Ok » pour sauvegarder tous les jours de la semaine. Avec Copy (copier),
vous pouvez copier les réglages d’un canal vers un autre ou tous les autres. N’oubliez pas
de sauvegarder les paramètres en cliquant sur Apply (Appliquer) ou OK. Remarque : Pour
activer la détection de mouvement, définissez la région où le mouvement doit être détecté.
Allez dans channel setup (configuration de canal) Video detection (détection de vidéo).
Time (Heure) : Si cela est activé, l’appareil enregistrera tout le temps.
Motion (Mouvement) : Si cela est activé, l’appareil enregistrera quand un mouvement est
détecté, peu importe ce qui bouge.
Sensor (Capteur) : Si cela est activé, l’appareil enregistrera un mouvement quand le
capteur IRP est déclenché.
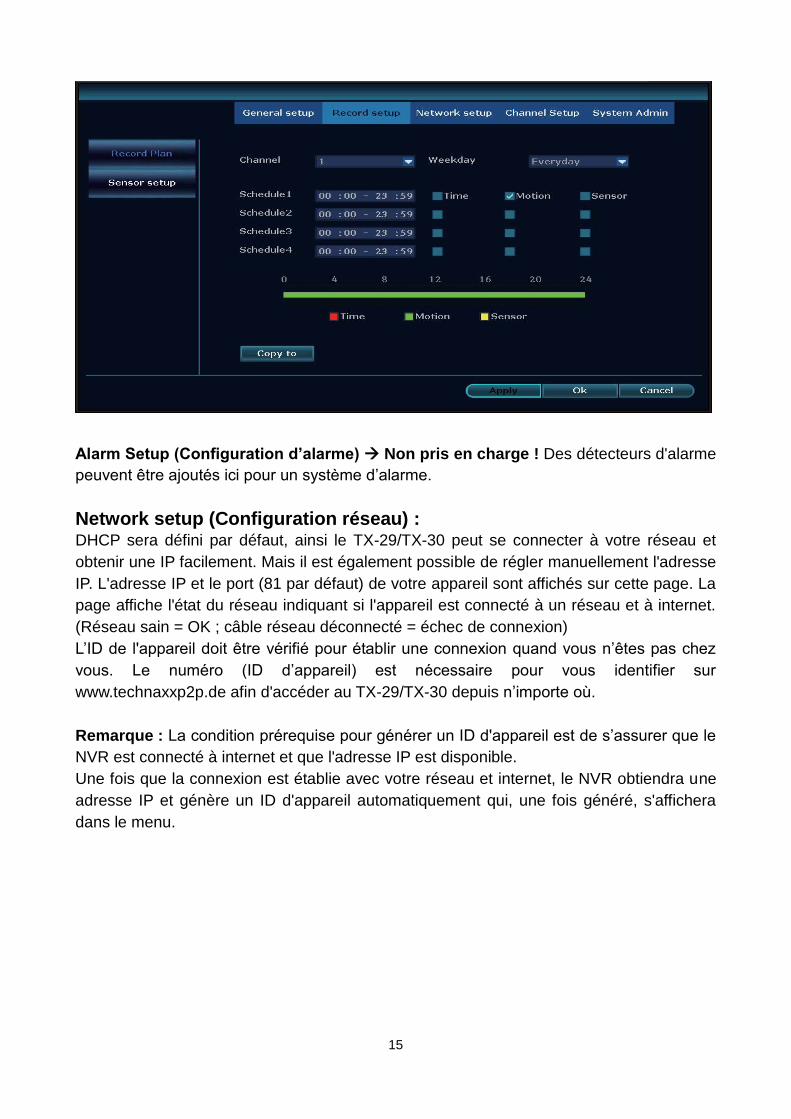
15
Alarm Setup (Configuration d’alarme) Non pris en charge ! Des détecteurs d'alarme
peuvent être ajoutés ici pour un système d’alarme.
Network setup (Configuration réseau) : DHCP sera défini par défaut, ainsi le TX-29/TX-30 peut se connecter à votre réseau et
obtenir une IP facilement. Mais il est également possible de régler manuellement l'adresse
IP. L'adresse IP et le port (81 par défaut) de votre appareil sont affichés sur cette page. La
page affiche l'état du réseau indiquant si l'appareil est connecté à un réseau et à internet.
(Réseau sain = OK ; câble réseau déconnecté = échec de connexion)
L’ID de l'appareil doit être vérifié pour établir une connexion quand vous n’êtes pas chez
vous. Le numéro (ID d’appareil) est nécessaire pour vous identifier sur
www.technaxxp2p.de afin d'accéder au TX-29/TX-30 depuis n’importe où.
Remarque : La condition prérequise pour générer un ID d'appareil est de s’assurer que le
NVR est connecté à internet et que l'adresse IP est disponible.
Une fois que la connexion est établie avec votre réseau et internet, le NVR obtiendra une
adresse IP et génère un ID d'appareil automatiquement qui, une fois généré, s'affichera
dans le menu.
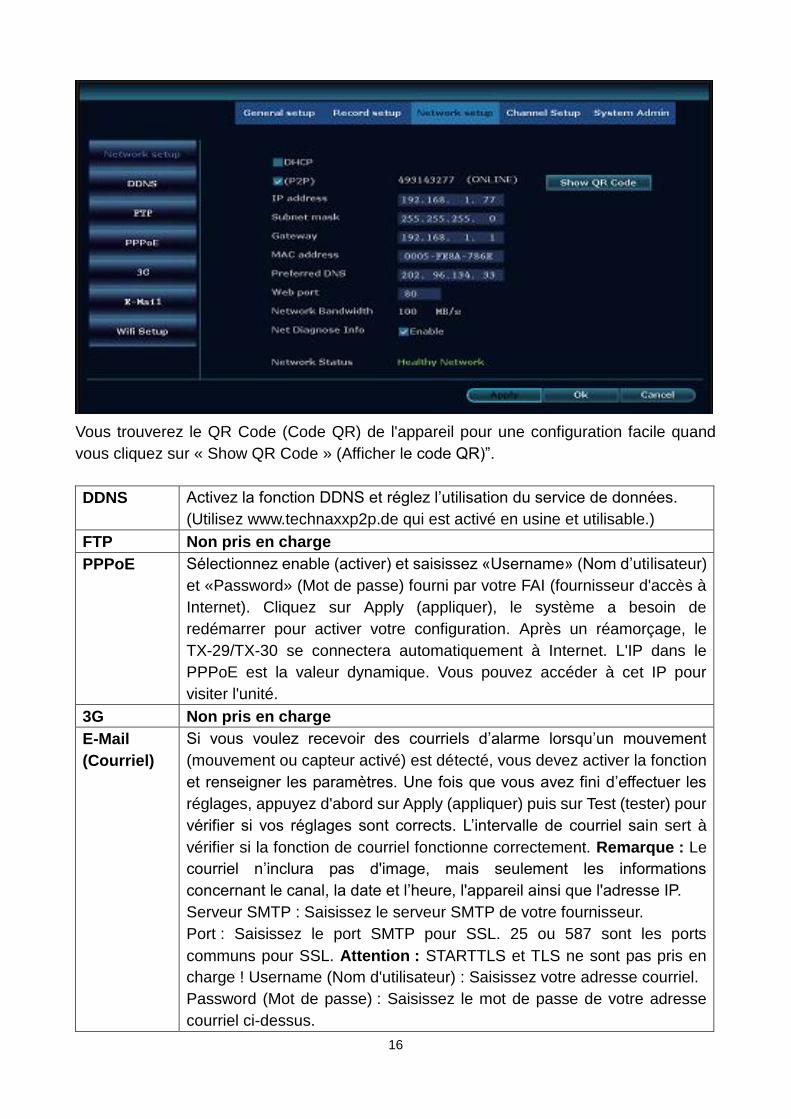
16
Vous trouverez le QR Code (Code QR) de l'appareil pour une configuration facile quand
vous cliquez sur « Show QR Code » (Afficher le code QR)”.
DDNS Activez la fonction DDNS et réglez l’utilisation du service de données.
(Utilisez www.technaxxp2p.de qui est activé en usine et utilisable.)
FTP Non pris en charge
PPPoE Sélectionnez enable (activer) et saisissez «Username» (Nom d’utilisateur)
et «Password» (Mot de passe) fourni par votre FAI (fournisseur d'accès à
Internet). Cliquez sur Apply (appliquer), le système a besoin de
redémarrer pour activer votre configuration. Après un réamorçage, le
TX-29/TX-30 se connectera automatiquement à Internet. L'IP dans le
PPPoE est la valeur dynamique. Vous pouvez accéder à cet IP pour
visiter l'unité.
3G Non pris en charge
(Courriel)
Si vous voulez recevoir des courriels d’alarme lorsqu’un mouvement
(mouvement ou capteur activé) est détecté, vous devez activer la fonction
et renseigner les paramètres. Une fois que vous avez fini d’effectuer les
réglages, appuyez d'abord sur Apply (appliquer) puis sur Test (tester) pour
vérifier si vos réglages sont corrects. L’intervalle de courriel sain sert à
vérifier si la fonction de courriel fonctionne correctement. Remarque : Le
courriel n’inclura pas d'image, mais seulement les informations
concernant le canal, la date et l’heure, l'appareil ainsi que l'adresse IP.
Serveur SMTP : Saisissez le serveur SMTP de votre fournisseur.
Port : Saisissez le port SMTP pour SSL. 25 ou 587 sont les ports
communs pour SSL. Attention : STARTTLS et TLS ne sont pas pris en
charge ! Username (Nom d'utilisateur) : Saisissez votre adresse courriel.
Password (Mot de passe) : Saisissez le mot de passe de votre adresse
courriel ci-dessus.
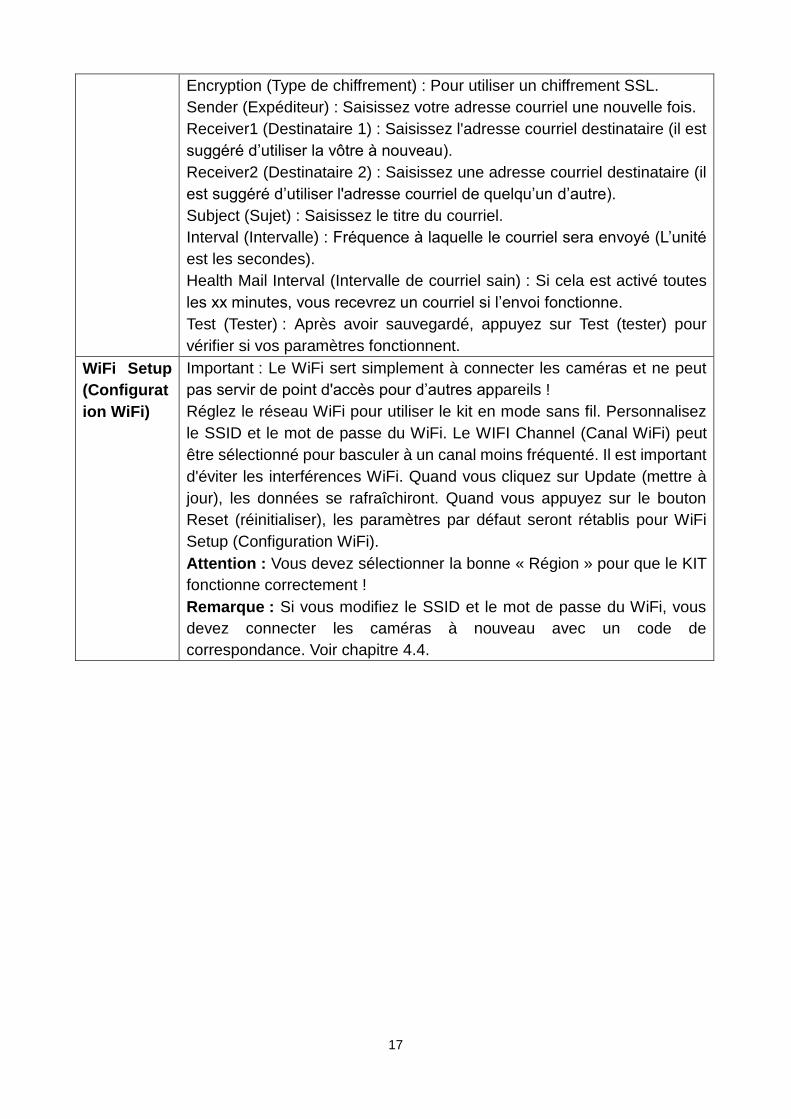
17
Encryption (Type de chiffrement) : Pour utiliser un chiffrement SSL.
Sender (Expéditeur) : Saisissez votre adresse courriel une nouvelle fois.
Receiver1 (Destinataire 1) : Saisissez l'adresse courriel destinataire (il est
suggéré d’utiliser la vôtre à nouveau).
Receiver2 (Destinataire 2) : Saisissez une adresse courriel destinataire (il
est suggéré d’utiliser l'adresse courriel de quelqu’un d’autre).
Subject (Sujet) : Saisissez le titre du courriel.
Interval (Intervalle) : Fréquence à laquelle le courriel sera envoyé (L’unité
est les secondes).
Health Mail Interval (Intervalle de courriel sain) : Si cela est activé toutes
les xx minutes, vous recevrez un courriel si l’envoi fonctionne.
Test (Tester) : Après avoir sauvegardé, appuyez sur Test (tester) pour
vérifier si vos paramètres fonctionnent.
WiFi Setup
(Configurat
ion WiFi)
Important : Le WiFi sert simplement à connecter les caméras et ne peut
pas servir de point d'accès pour d’autres appareils !
Réglez le réseau WiFi pour utiliser le kit en mode sans fil. Personnalisez
le SSID et le mot de passe du WiFi. Le WIFI Channel (Canal WiFi) peut
être sélectionné pour basculer à un canal moins fréquenté. Il est important
d'éviter les interférences WiFi. Quand vous cliquez sur Update (mettre à
jour), les données se rafraîchiront. Quand vous appuyez sur le bouton
Reset (réinitialiser), les paramètres par défaut seront rétablis pour WiFi
Setup (Configuration WiFi).
Attention : Vous devez sélectionner la bonne « Région » pour que le KIT
fonctionne correctement !
Remarque : Si vous modifiez le SSID et le mot de passe du WiFi, vous
devez connecter les caméras à nouveau avec un code de
correspondance. Voir chapitre 4.4.
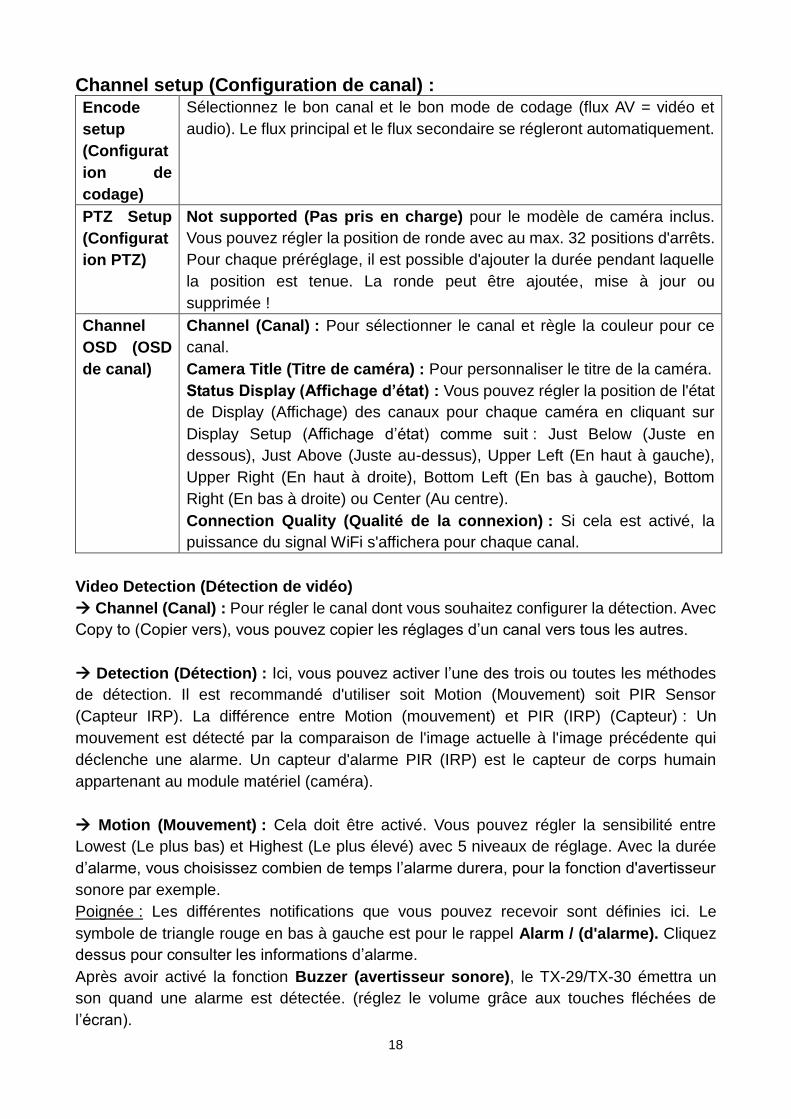
18
Channel setup (Configuration de canal) : Encode
setup
(Configurat
ion de
codage)
Sélectionnez le bon canal et le bon mode de codage (flux AV = vidéo et
audio). Le flux principal et le flux secondaire se régleront automatiquement.
PTZ Setup
(Configurat
ion PTZ)
Not supported (Pas pris en charge) pour le modèle de caméra inclus.
Vous pouvez régler la position de ronde avec au max. 32 positions d'arrêts.
Pour chaque préréglage, il est possible d'ajouter la durée pendant laquelle
la position est tenue. La ronde peut être ajoutée, mise à jour ou
supprimée !
Channel
OSD (OSD
de canal)
Channel (Canal) : Pour sélectionner le canal et règle la couleur pour ce
canal.
Camera Title (Titre de caméra) : Pour personnaliser le titre de la caméra.
Status Display (Affichage d’état) : Vous pouvez régler la position de l'état
de Display (Affichage) des canaux pour chaque caméra en cliquant sur
Display Setup (Affichage d’état) comme suit : Just Below (Juste en
dessous), Just Above (Juste au-dessus), Upper Left (En haut à gauche),
Upper Right (En haut à droite), Bottom Left (En bas à gauche), Bottom
Right (En bas à droite) ou Center (Au centre).
Connection Quality (Qualité de la connexion) : Si cela est activé, la
puissance du signal WiFi s'affichera pour chaque canal.
Video Detection (Détection de vidéo)
Channel (Canal) : Pour régler le canal dont vous souhaitez configurer la détection. Avec
Copy to (Copier vers), vous pouvez copier les réglages d’un canal vers tous les autres.
Detection (Détection) : Ici, vous pouvez activer l’une des trois ou toutes les méthodes
de détection. Il est recommandé d'utiliser soit Motion (Mouvement) soit PIR Sensor
(Capteur IRP). La différence entre Motion (mouvement) et PIR (IRP) (Capteur) : Un
mouvement est détecté par la comparaison de l'image actuelle à l'image précédente qui
déclenche une alarme. Un capteur d'alarme PIR (IRP) est le capteur de corps humain
appartenant au module matériel (caméra).
Motion (Mouvement) : Cela doit être activé. Vous pouvez régler la sensibilité entre
Lowest (Le plus bas) et Highest (Le plus élevé) avec 5 niveaux de réglage. Avec la durée
d’alarme, vous choisissez combien de temps l’alarme durera, pour la fonction d'avertisseur
sonore par exemple.
Poignée : Les différentes notifications que vous pouvez recevoir sont définies ici. Le
symbole de triangle rouge en bas à gauche est pour le rappel Alarm / (d'alarme). Cliquez
dessus pour consulter les informations d’alarme.
Après avoir activé la fonction Buzzer (avertisseur sonore), le TX-29/TX-30 émettra un
son quand une alarme est détectée. (réglez le volume grâce aux touches fléchées de
l’écran).
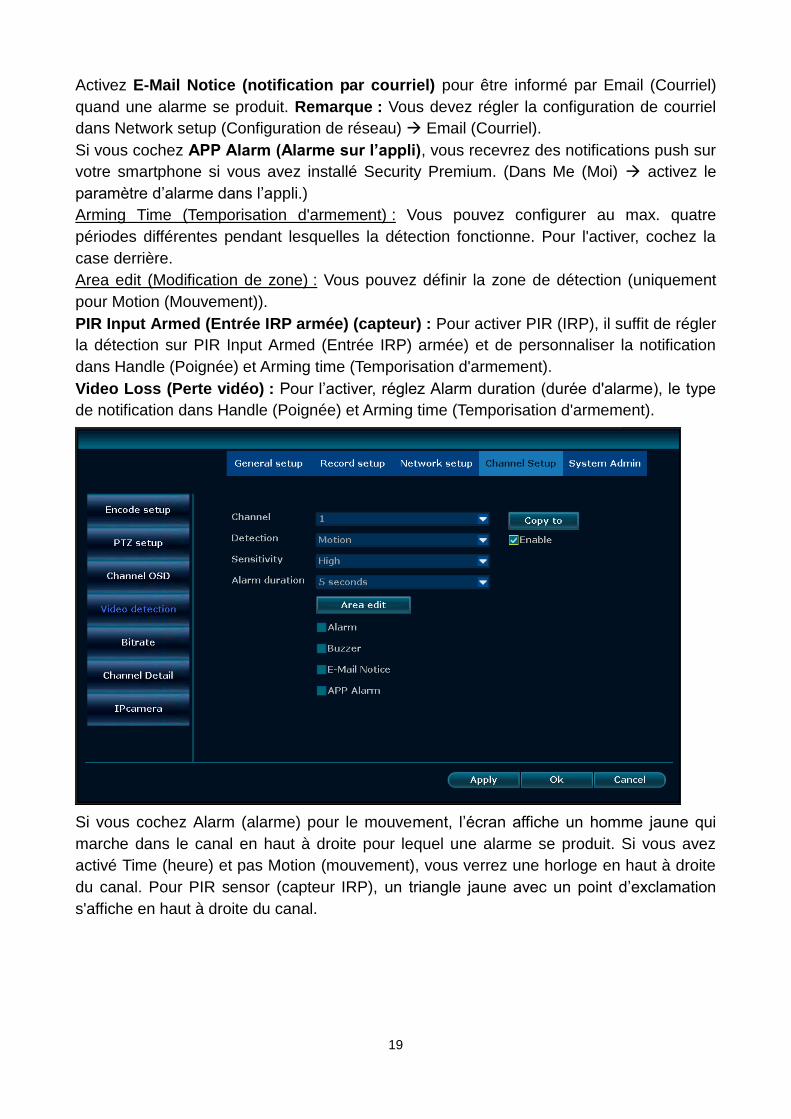
19
Activez E-Mail Notice (notification par courriel) pour être informé par Email (Courriel)
quand une alarme se produit. Remarque : Vous devez régler la configuration de courriel
dans Network setup (Configuration de réseau) Email (Courriel).
Si vous cochez APP Alarm (Alarme sur l’appli), vous recevrez des notifications push sur
votre smartphone si vous avez installé Security Premium. (Dans Me (Moi) activez le
paramètre d’alarme dans l’appli.)
Arming Time (Temporisation d'armement) : Vous pouvez configurer au max. quatre
périodes différentes pendant lesquelles la détection fonctionne. Pour l'activer, cochez la
case derrière.
Area edit (Modification de zone) : Vous pouvez définir la zone de détection (uniquement
pour Motion (Mouvement)).
PIR Input Armed (Entrée IRP armée) (capteur) : Pour activer PIR (IRP), il suffit de régler
la détection sur PIR Input Armed (Entrée IRP) armée) et de personnaliser la notification
dans Handle (Poignée) et Arming time (Temporisation d'armement).
Video Loss (Perte vidéo) : Pour l’activer, réglez Alarm duration (durée d'alarme), le type
de notification dans Handle (Poignée) et Arming time (Temporisation d'armement).
Si vous cochez Alarm (alarme) pour le mouvement, l’écran affiche un homme jaune qui
marche dans le canal en haut à droite pour lequel une alarme se produit. Si vous avez
activé Time (heure) et pas Motion (mouvement), vous verrez une horloge en haut à droite
du canal. Pour PIR sensor (capteur IRP), un triangle jaune avec un point d’exclamation
s'affiche en haut à droite du canal.
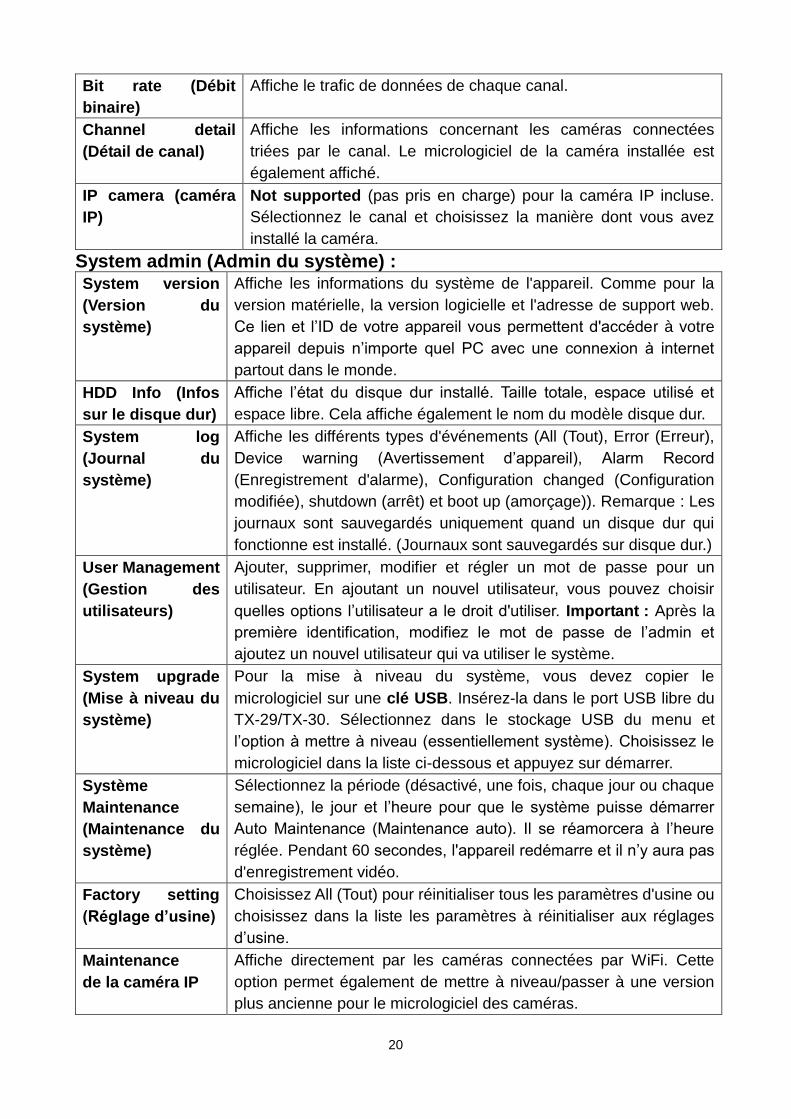
20
Bit rate (Débit
binaire) Affiche le trafic de données de chaque canal.
Channel detail
(Détail de canal)
Affiche les informations concernant les caméras connectées
triées par le canal. Le micrologiciel de la caméra installée est
également affiché.
IP camera (caméra
IP) Not supported (pas pris en charge) pour la caméra IP incluse.
Sélectionnez le canal et choisissez la manière dont vous avez
installé la caméra.
System admin (Admin du système) : System version
(Version du
système)
Affiche les informations du système de l'appareil. Comme pour la
version matérielle, la version logicielle et l'adresse de support web.
Ce lien et l’ID de votre appareil vous permettent d'accéder à votre
appareil depuis n’importe quel PC avec une connexion à internet
partout dans le monde.
HDD Info (Infos
sur le disque dur)
Affiche l’état du disque dur installé. Taille totale, espace utilisé et
espace libre. Cela affiche également le nom du modèle disque dur.
System log
(Journal du
système)
Affiche les différents types d'événements (All (Tout), Error (Erreur),
Device warning (Avertissement d’appareil), Alarm Record
(Enregistrement d'alarme), Configuration changed (Configuration
modifiée), shutdown (arrêt) et boot up (amorçage)). Remarque : Les
journaux sont sauvegardés uniquement quand un disque dur qui
fonctionne est installé. (Journaux sont sauvegardés sur disque dur.)
User Management
(Gestion des
utilisateurs)
Ajouter, supprimer, modifier et régler un mot de passe pour un
utilisateur. En ajoutant un nouvel utilisateur, vous pouvez choisir
quelles options l’utilisateur a le droit d'utiliser. Important : Après la
première identification, modifiez le mot de passe de l’admin et
ajoutez un nouvel utilisateur qui va utiliser le système.
System upgrade
(Mise à niveau du
système)
Pour la mise à niveau du système, vous devez copier le
micrologiciel sur une clé USB. Insérez-la dans le port USB libre du
TX-29/TX-30. Sélectionnez dans le stockage USB du menu et
l’option à mettre à niveau (essentiellement système). Choisissez le
micrologiciel dans la liste ci-dessous et appuyez sur démarrer.
Système
Maintenance
(Maintenance du
système)
Sélectionnez la période (désactivé, une fois, chaque jour ou chaque
semaine), le jour et l’heure pour que le système puisse démarrer
Auto Maintenance (Maintenance auto). Il se réamorcera à l’heure
réglée. Pendant 60 secondes, l'appareil redémarre et il n’y aura pas
d'enregistrement vidéo.
Factory setting
(Réglage d’usine)
Choisissez All (Tout) pour réinitialiser tous les paramètres d'usine ou
choisissez dans la liste les paramètres à réinitialiser aux réglages
d’usine.
Maintenance
de la caméra IP
Affiche directement par les caméras connectées par WiFi. Cette
option permet également de mettre à niveau/passer à une version
plus ancienne pour le micrologiciel des caméras.
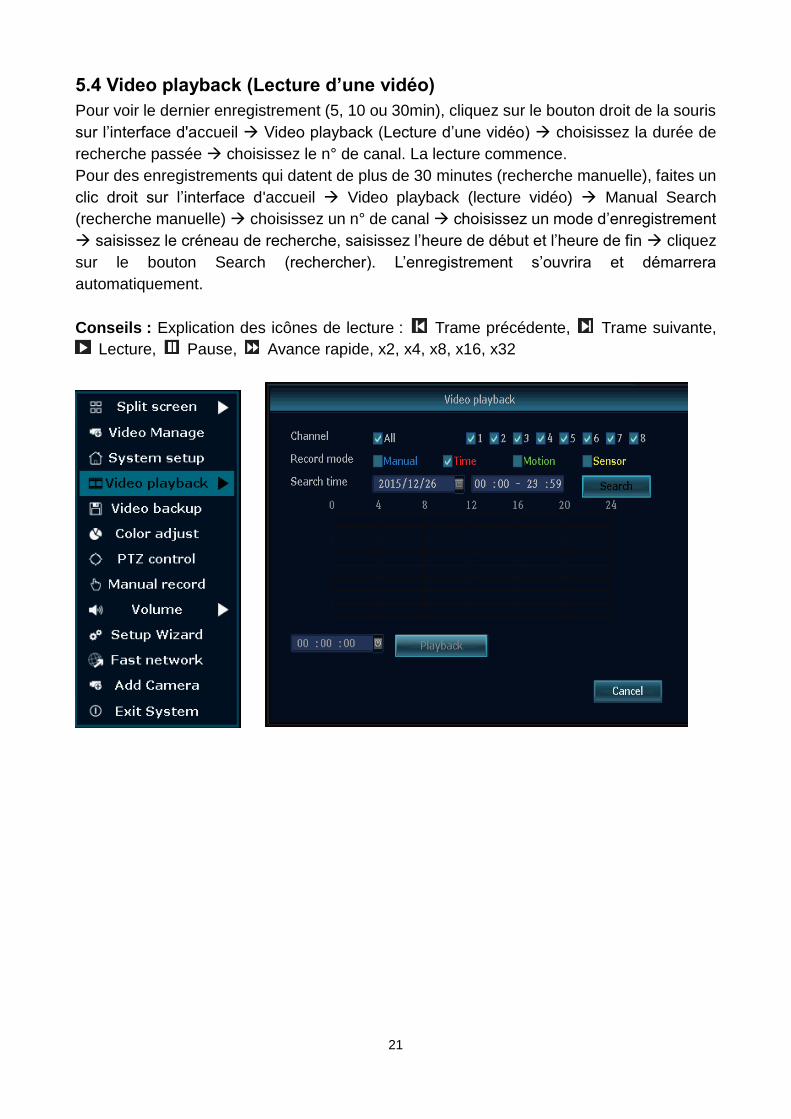
21
5.4 Video playback (Lecture d’une vidéo)
Pour voir le dernier enregistrement (5, 10 ou 30min), cliquez sur le bouton droit de la souris
sur l’interface d'accueil Video playback (Lecture d’une vidéo) choisissez la durée de
recherche passée choisissez le n° de canal. La lecture commence.
Pour des enregistrements qui datent de plus de 30 minutes (recherche manuelle), faites un
clic droit sur l’interface d'accueil Video playback (lecture vidéo) Manual Search
(recherche manuelle) choisissez un n° de canal choisissez un mode d’enregistrement
saisissez le créneau de recherche, saisissez l’heure de début et l’heure de fin cliquez
sur le bouton Search (rechercher). L’enregistrement s’ouvrira et démarrera
automatiquement.
Conseils : Explication des icônes de lecture : Trame précédente, Trame suivante,
Lecture, Pause, Avance rapide, x2, x4, x8, x16, x32
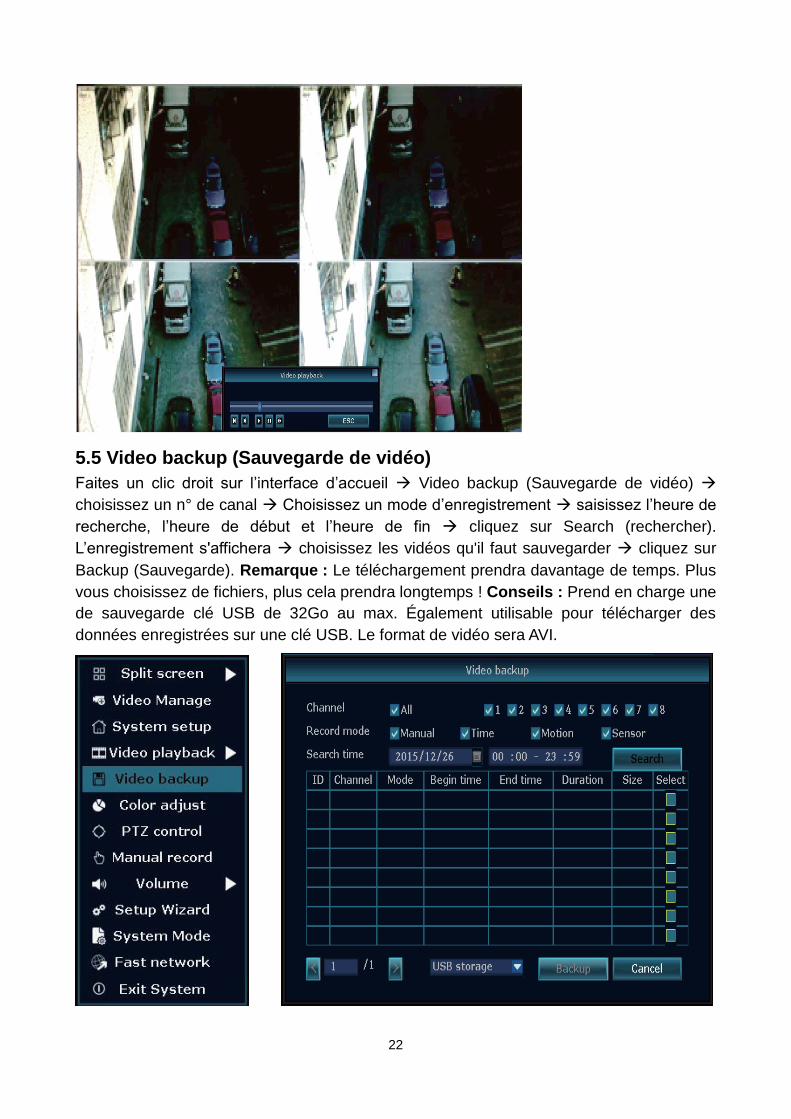
22
5.5 Video backup (Sauvegarde de vidéo)
Faites un clic droit sur l’interface d’accueil Video backup (Sauvegarde de vidéo)
choisissez un n° de canal Choisissez un mode d’enregistrement saisissez l’heure de
recherche, l’heure de début et l’heure de fin cliquez sur Search (rechercher).
L’enregistrement s'affichera choisissez les vidéos qu'il faut sauvegarder cliquez sur
Backup (Sauvegarde). Remarque : Le téléchargement prendra davantage de temps. Plus
vous choisissez de fichiers, plus cela prendra longtemps ! Conseils : Prend en charge une
de sauvegarde clé USB de 32Go au max. Également utilisable pour télécharger des
données enregistrées sur une clé USB. Le format de vidéo sera AVI.

23
5.6 Color adjust (Réglage de couleur)
Avant de pouvoir régler la couleur, il faut basculer sur le canal à régler via la fonction
d'écran divisé. Ensuite, faites un clic droit sur l’interface d'accueil Color Adjust (Réglage
de couleur). En bas à droite apparaît une fenêtre où vous pouvez régler Hue (teinte),
Brightness (luminosité), Saturation (saturation) et Contrast (contraste). Vous pouvez
également choisir le préréglage lumineux ou doux. Si les changements vous déplaisent,
appuyez sur default (rétablir) pour réinitialiser les réglages.
5.7 PTZ control (Commandes PTZ) (pas pour les caméras incluses)
Ouvrez le menu en faisant un clic droit sur l’interface d'accueil PTZ control (Commandes
PTZ). En bas à droite s’ouvrira une fenêtre où vous pouvez déplacer la caméra
verticalement et horizontalement. Vous pouvez également définir un préréglage, démarrer
une ronde et faire un zoom.
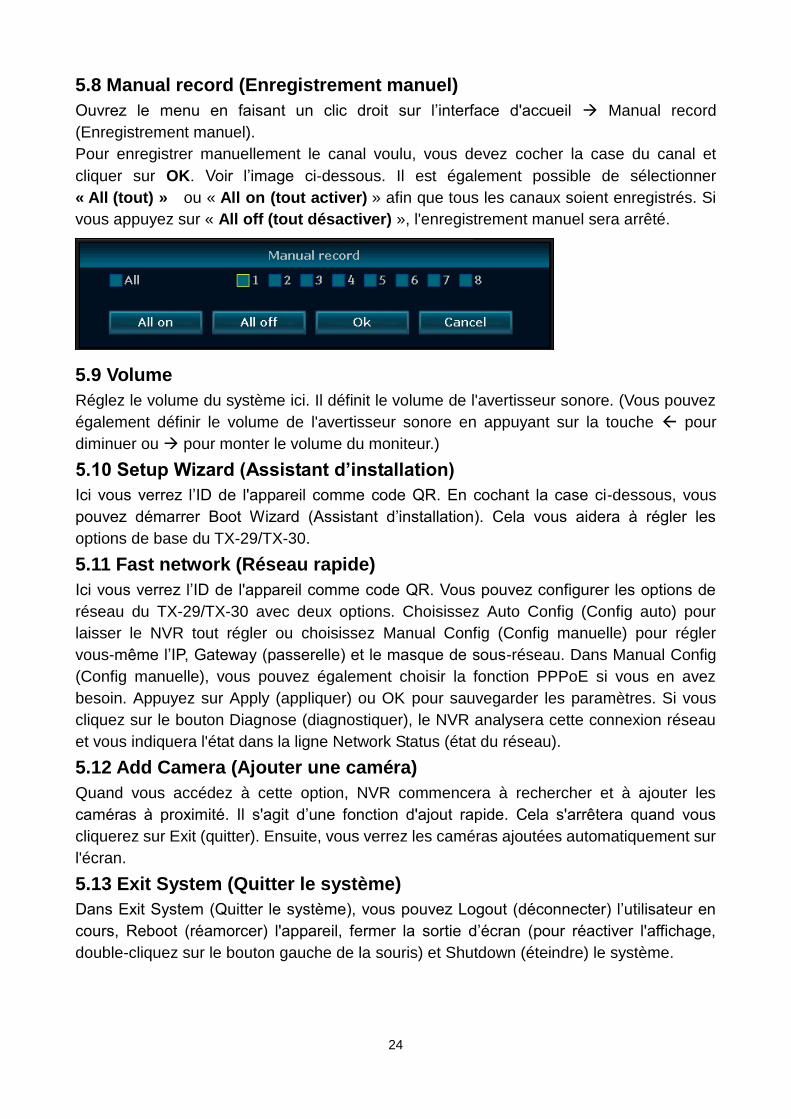
24
5.8 Manual record (Enregistrement manuel)
Ouvrez le menu en faisant un clic droit sur l’interface d'accueil Manual record
(Enregistrement manuel).
Pour enregistrer manuellement le canal voulu, vous devez cocher la case du canal et
cliquer sur OK. Voir l’image ci-dessous. Il est également possible de sélectionner
« All (tout) » ou « All on (tout activer) » afin que tous les canaux soient enregistrés. Si
vous appuyez sur « All off (tout désactiver) », l'enregistrement manuel sera arrêté.
5.9 Volume
Réglez le volume du système ici. Il définit le volume de l'avertisseur sonore. (Vous pouvez
également définir le volume de l'avertisseur sonore en appuyant sur la touche pour
diminuer ou pour monter le volume du moniteur.)
5.10 Setup Wizard (Assistant d’installation)
Ici vous verrez l’ID de l'appareil comme code QR. En cochant la case ci-dessous, vous
pouvez démarrer Boot Wizard (Assistant d’installation). Cela vous aidera à régler les
options de base du TX-29/TX-30.
5.11 Fast network (Réseau rapide)
Ici vous verrez l’ID de l'appareil comme code QR. Vous pouvez configurer les options de
réseau du TX-29/TX-30 avec deux options. Choisissez Auto Config (Config auto) pour
laisser le NVR tout régler ou choisissez Manual Config (Config manuelle) pour régler
vous-même l’IP, Gateway (passerelle) et le masque de sous-réseau. Dans Manual Config
(Config manuelle), vous pouvez également choisir la fonction PPPoE si vous en avez
besoin. Appuyez sur Apply (appliquer) ou OK pour sauvegarder les paramètres. Si vous
cliquez sur le bouton Diagnose (diagnostiquer), le NVR analysera cette connexion réseau
et vous indiquera l'état dans la ligne Network Status (état du réseau).
5.12 Add Camera (Ajouter une caméra)
Quand vous accédez à cette option, NVR commencera à rechercher et à ajouter les
caméras à proximité. Il s'agit d’une fonction d'ajout rapide. Cela s'arrêtera quand vous
cliquerez sur Exit (quitter). Ensuite, vous verrez les caméras ajoutées automatiquement sur
l'écran.
5.13 Exit System (Quitter le système)
Dans Exit System (Quitter le système), vous pouvez Logout (déconnecter) l’utilisateur en
cours, Reboot (réamorcer) l'appareil, fermer la sortie d’écran (pour réactiver l'affichage,
double-cliquez sur le bouton gauche de la souris) et Shutdown (éteindre) le système.
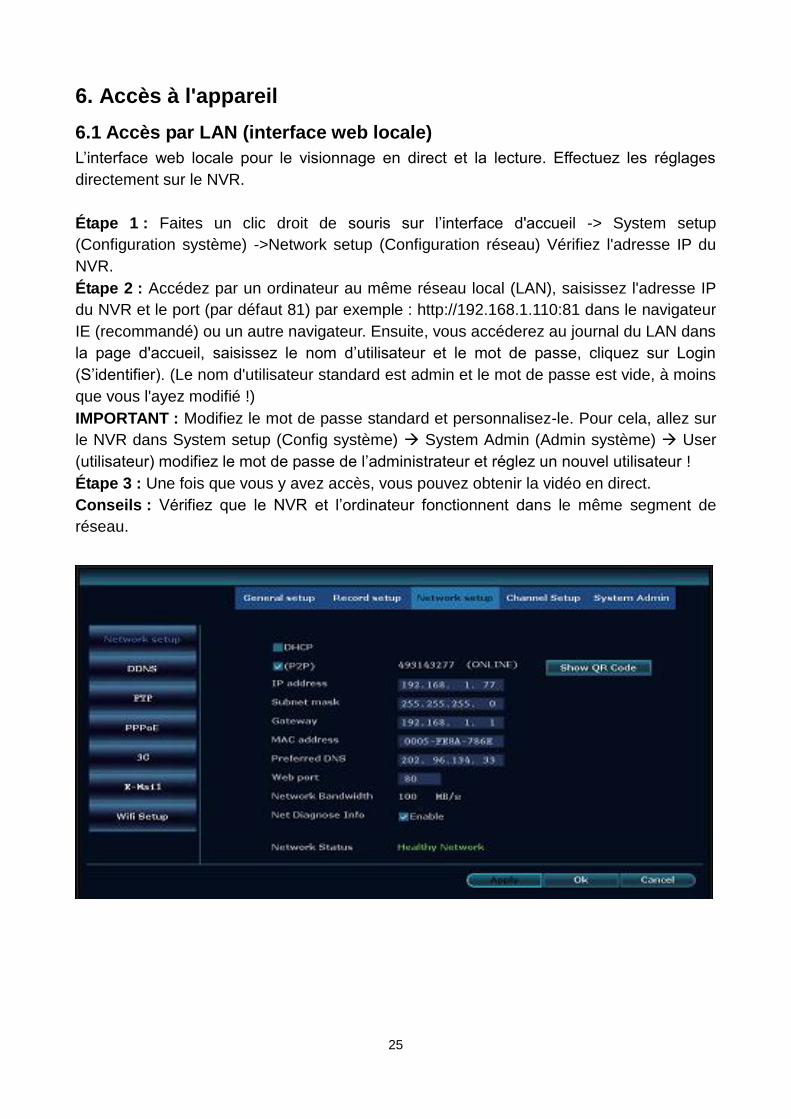
25
6. Accès à l'appareil
6.1 Accès par LAN (interface web locale)
L’interface web locale pour le visionnage en direct et la lecture. Effectuez les réglages
directement sur le NVR.
Étape 1 : Faites un clic droit de souris sur l’interface d'accueil -> System setup
(Configuration système) ->Network setup (Configuration réseau) Vérifiez l'adresse IP du
NVR.
Étape 2 : Accédez par un ordinateur au même réseau local (LAN), saisissez l'adresse IP
du NVR et le port (par défaut 81) par exemple : http://192.168.1.110:81 dans le navigateur
IE (recommandé) ou un autre navigateur. Ensuite, vous accéderez au journal du LAN dans
la page d'accueil, saisissez le nom d’utilisateur et le mot de passe, cliquez sur Login
(S’identifier). (Le nom d'utilisateur standard est admin et le mot de passe est vide, à moins
que vous l'ayez modifié !)
IMPORTANT : Modifiez le mot de passe standard et personnalisez-le. Pour cela, allez sur
le NVR dans System setup (Config système) System Admin (Admin système) User
(utilisateur) modifiez le mot de passe de l’administrateur et réglez un nouvel utilisateur !
Étape 3 : Une fois que vous y avez accès, vous pouvez obtenir la vidéo en direct.
Conseils : Vérifiez que le NVR et l’ordinateur fonctionnent dans le même segment de
réseau.
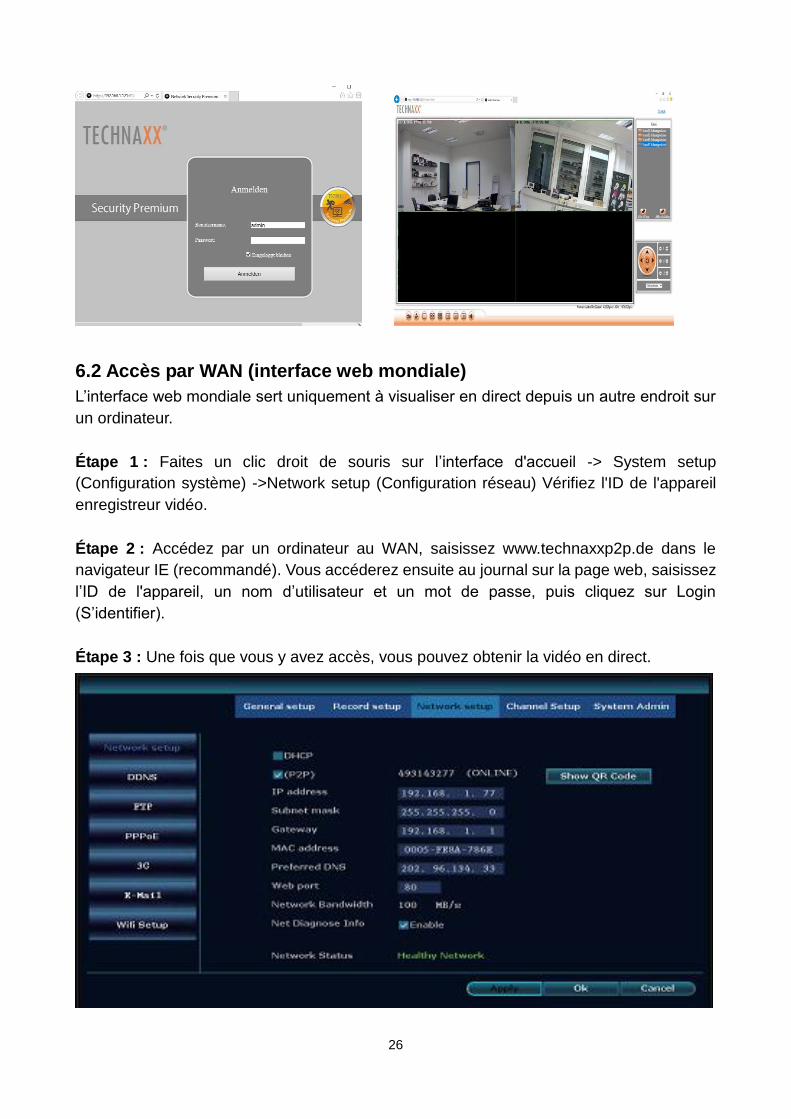
26
6.2 Accès par WAN (interface web mondiale)
L’interface web mondiale sert uniquement à visualiser en direct depuis un autre endroit sur
un ordinateur.
Étape 1 : Faites un clic droit de souris sur l’interface d'accueil -> System setup
(Configuration système) ->Network setup (Configuration réseau) Vérifiez l'ID de l'appareil
enregistreur vidéo.
Étape 2 : Accédez par un ordinateur au WAN, saisissez www.technaxxp2p.de dans le
navigateur IE (recommandé). Vous accéderez ensuite au journal sur la page web, saisissez
l’ID de l'appareil, un nom d’utilisateur et un mot de passe, puis cliquez sur Login
(S’identifier).
Étape 3 : Une fois que vous y avez accès, vous pouvez obtenir la vidéo en direct.
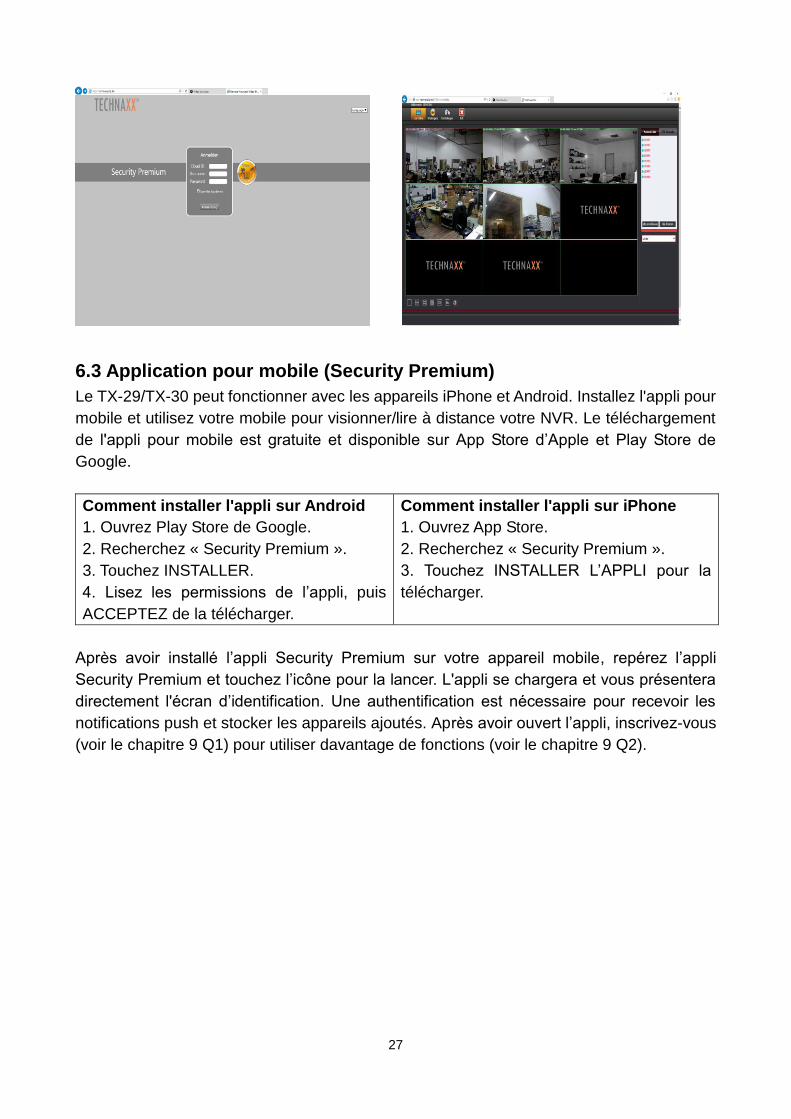
27
6.3 Application pour mobile (Security Premium)
Le TX-29/TX-30 peut fonctionner avec les appareils iPhone et Android. Installez l'appli pour
mobile et utilisez votre mobile pour visionner/lire à distance votre NVR. Le téléchargement
de l'appli pour mobile est gratuite et disponible sur App Store d’Apple et Play Store de
Google.
Comment installer l'appli sur Android
1. Ouvrez Play Store de Google.
2. Recherchez « Security Premium ».
3. Touchez INSTALLER.
4. Lisez les permissions de l’appli, puis
ACCEPTEZ de la télécharger.
Comment installer l'appli sur iPhone
1. Ouvrez App Store.
2. Recherchez « Security Premium ».
3. Touchez INSTALLER L’APPLI pour la
télécharger.
Après avoir installé l’appli Security Premium sur votre appareil mobile, repérez l’appli
Security Premium et touchez l’icône pour la lancer. L'appli se chargera et vous présentera
directement l'écran d’identification. Une authentification est nécessaire pour recevoir les
notifications push et stocker les appareils ajoutés. Après avoir ouvert l’appli, inscrivez-vous
(voir le chapitre 9 Q1) pour utiliser davantage de fonctions (voir le chapitre 9 Q2).
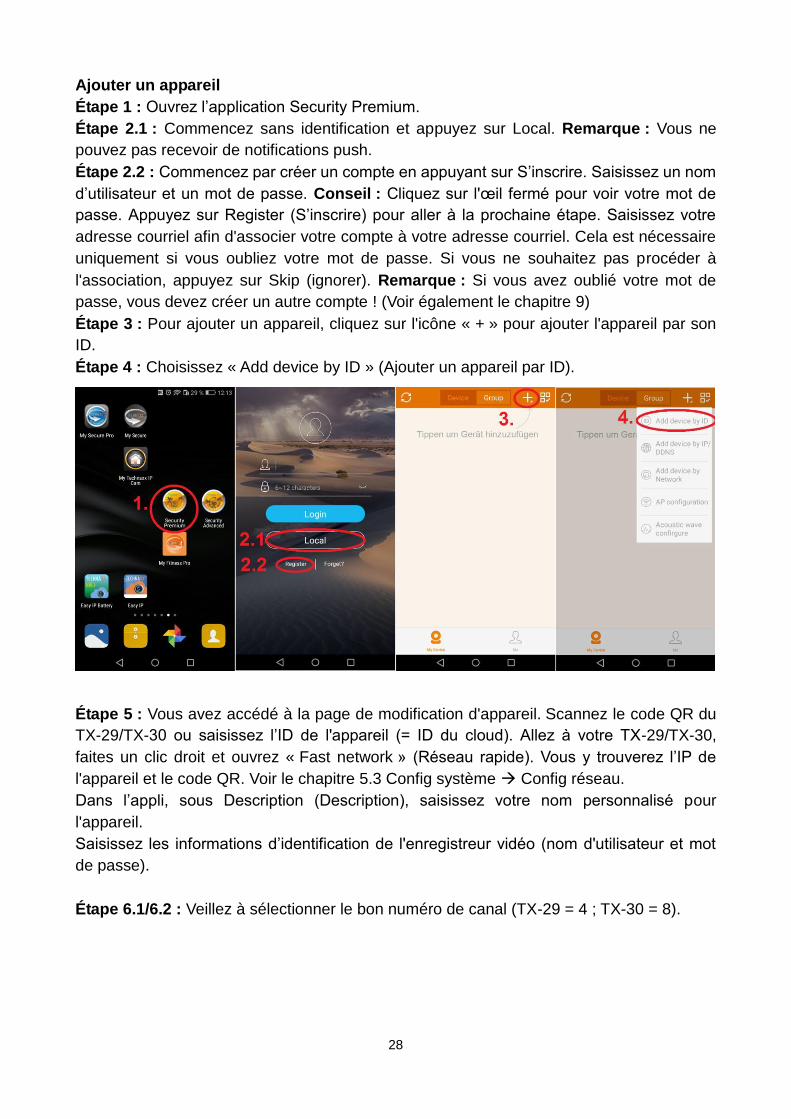
28
Ajouter un appareil
Étape 1 : Ouvrez l’application Security Premium.
Étape 2.1 : Commencez sans identification et appuyez sur Local. Remarque : Vous ne
pouvez pas recevoir de notifications push.
Étape 2.2 : Commencez par créer un compte en appuyant sur S’inscrire. Saisissez un nom
d’utilisateur et un mot de passe. Conseil : Cliquez sur l'œil fermé pour voir votre mot de
passe. Appuyez sur Register (S’inscrire) pour aller à la prochaine étape. Saisissez votre
adresse courriel afin d'associer votre compte à votre adresse courriel. Cela est nécessaire
uniquement si vous oubliez votre mot de passe. Si vous ne souhaitez pas procéder à
l'association, appuyez sur Skip (ignorer). Remarque : Si vous avez oublié votre mot de
passe, vous devez créer un autre compte ! (Voir également le chapitre 9)
Étape 3 : Pour ajouter un appareil, cliquez sur l'icône « + » pour ajouter l'appareil par son
ID.
Étape 4 : Choisissez « Add device by ID » (Ajouter un appareil par ID).
Étape 5 : Vous avez accédé à la page de modification d'appareil. Scannez le code QR du
TX-29/TX-30 ou saisissez l’ID de l'appareil (= ID du cloud). Allez à votre TX-29/TX-30,
faites un clic droit et ouvrez « Fast network » (Réseau rapide). Vous y trouverez l’IP de
l'appareil et le code QR. Voir le chapitre 5.3 Config système Config réseau.
Dans l’appli, sous Description (Description), saisissez votre nom personnalisé pour
l'appareil.
Saisissez les informations d’identification de l'enregistreur vidéo (nom d'utilisateur et mot
de passe).
Étape 6.1/6.2 : Veillez à sélectionner le bon numéro de canal (TX-29 = 4 ; TX-30 = 8).
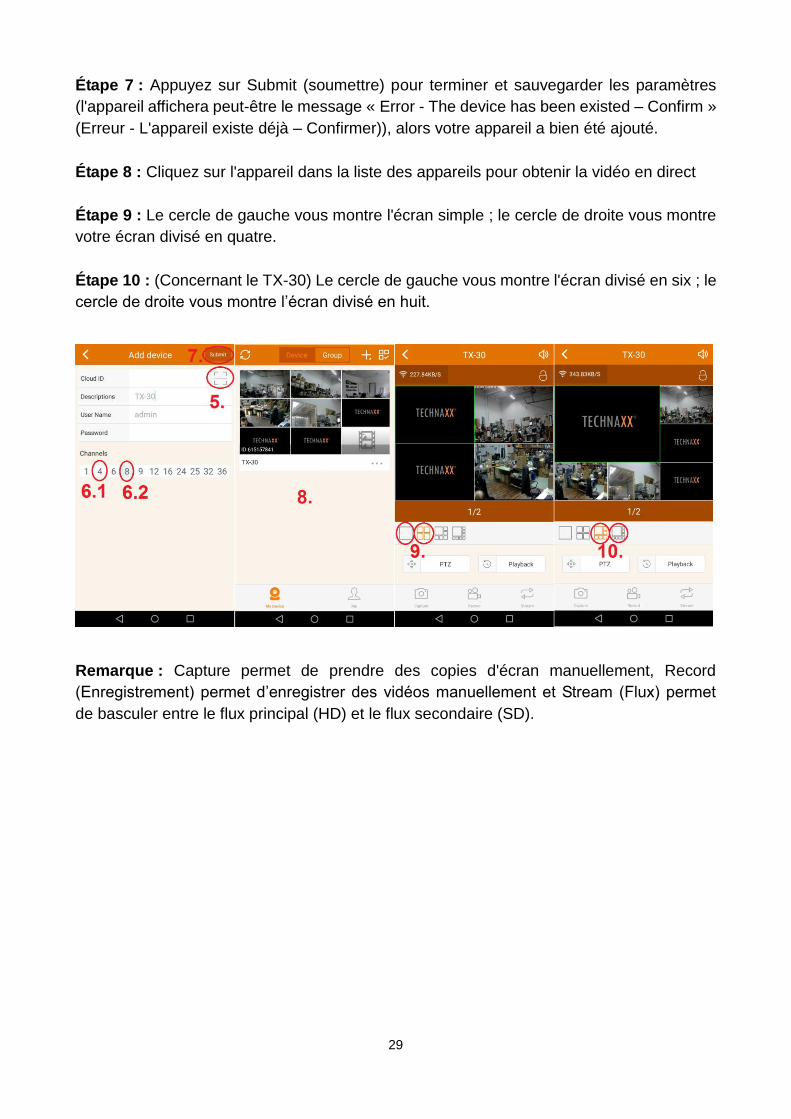
29
Étape 7 : Appuyez sur Submit (soumettre) pour terminer et sauvegarder les paramètres
(l'appareil affichera peut-être le message « Error - The device has been existed – Confirm »
(Erreur - L'appareil existe déjà – Confirmer)), alors votre appareil a bien été ajouté.
Étape 8 : Cliquez sur l'appareil dans la liste des appareils pour obtenir la vidéo en direct
Étape 9 : Le cercle de gauche vous montre l'écran simple ; le cercle de droite vous montre
votre écran divisé en quatre.
Étape 10 : (Concernant le TX-30) Le cercle de gauche vous montre l'écran divisé en six ; le
cercle de droite vous montre l’écran divisé en huit.
Remarque : Capture permet de prendre des copies d'écran manuellement, Record
(Enregistrement) permet d’enregistrer des vidéos manuellement et Stream (Flux) permet
de basculer entre le flux principal (HD) et le flux secondaire (SD).
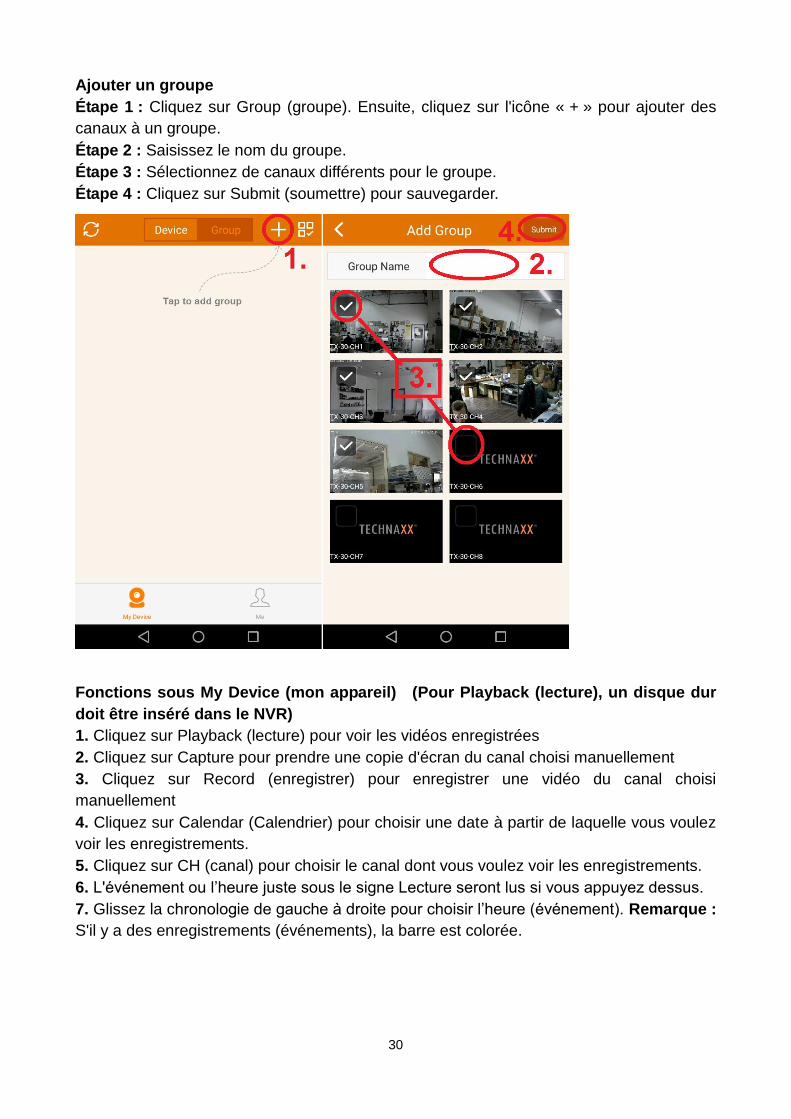
30
Ajouter un groupe
Étape 1 : Cliquez sur Group (groupe). Ensuite, cliquez sur l'icône « + » pour ajouter des
canaux à un groupe.
Étape 2 : Saisissez le nom du groupe.
Étape 3 : Sélectionnez de canaux différents pour le groupe.
Étape 4 : Cliquez sur Submit (soumettre) pour sauvegarder.
Fonctions sous My Device (mon appareil) (Pour Playback (lecture), un disque dur
doit être inséré dans le NVR)
1. Cliquez sur Playback (lecture) pour voir les vidéos enregistrées
2. Cliquez sur Capture pour prendre une copie d'écran du canal choisi manuellement
3. Cliquez sur Record (enregistrer) pour enregistrer une vidéo du canal choisi
manuellement
4. Cliquez sur Calendar (Calendrier) pour choisir une date à partir de laquelle vous voulez
voir les enregistrements.
5. Cliquez sur CH (canal) pour choisir le canal dont vous voulez voir les enregistrements.
6. L'événement ou l’heure juste sous le signe Lecture seront lus si vous appuyez dessus.
7. Glissez la chronologie de gauche à droite pour choisir l’heure (événement). Remarque :
S'il y a des enregistrements (événements), la barre est colorée.
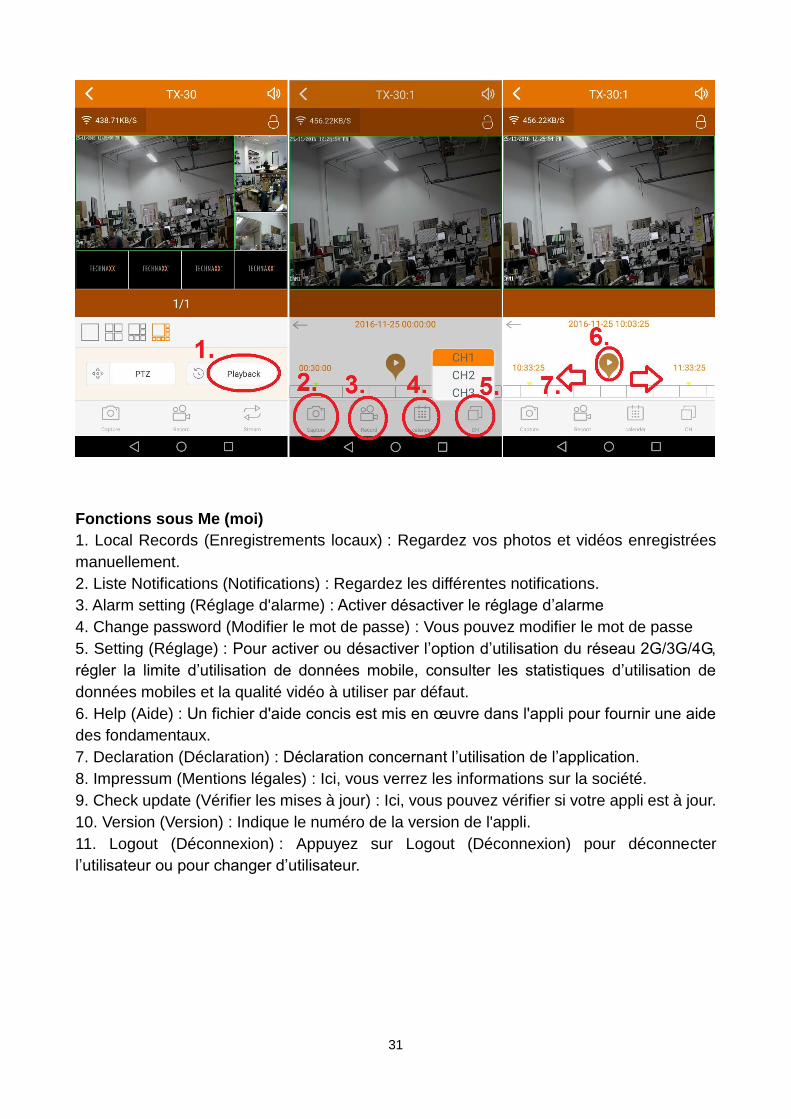
31
Fonctions sous Me (moi)
1. Local Records (Enregistrements locaux) : Regardez vos photos et vidéos enregistrées
manuellement.
2. Liste Notifications (Notifications) : Regardez les différentes notifications.
3. Alarm setting (Réglage d'alarme) : Activer désactiver le réglage d’alarme
4. Change password (Modifier le mot de passe) : Vous pouvez modifier le mot de passe
5. Setting (Réglage) : Pour activer ou désactiver l’option d’utilisation du réseau 2G/3G/4G,
régler la limite d’utilisation de données mobile, consulter les statistiques d’utilisation de
données mobiles et la qualité vidéo à utiliser par défaut.
6. Help (Aide) : Un fichier d'aide concis est mis en œuvre dans l'appli pour fournir une aide
des fondamentaux.
7. Declaration (Déclaration) : Déclaration concernant l’utilisation de l’application.
8. Impressum (Mentions légales) : Ici, vous verrez les informations sur la société.
9. Check update (Vérifier les mises à jour) : Ici, vous pouvez vérifier si votre appli est à jour.
10. Version (Version) : Indique le numéro de la version de l'appli.
11. Logout (Déconnexion) : Appuyez sur Logout (Déconnexion) pour déconnecter
l’utilisateur ou pour changer d’utilisateur.
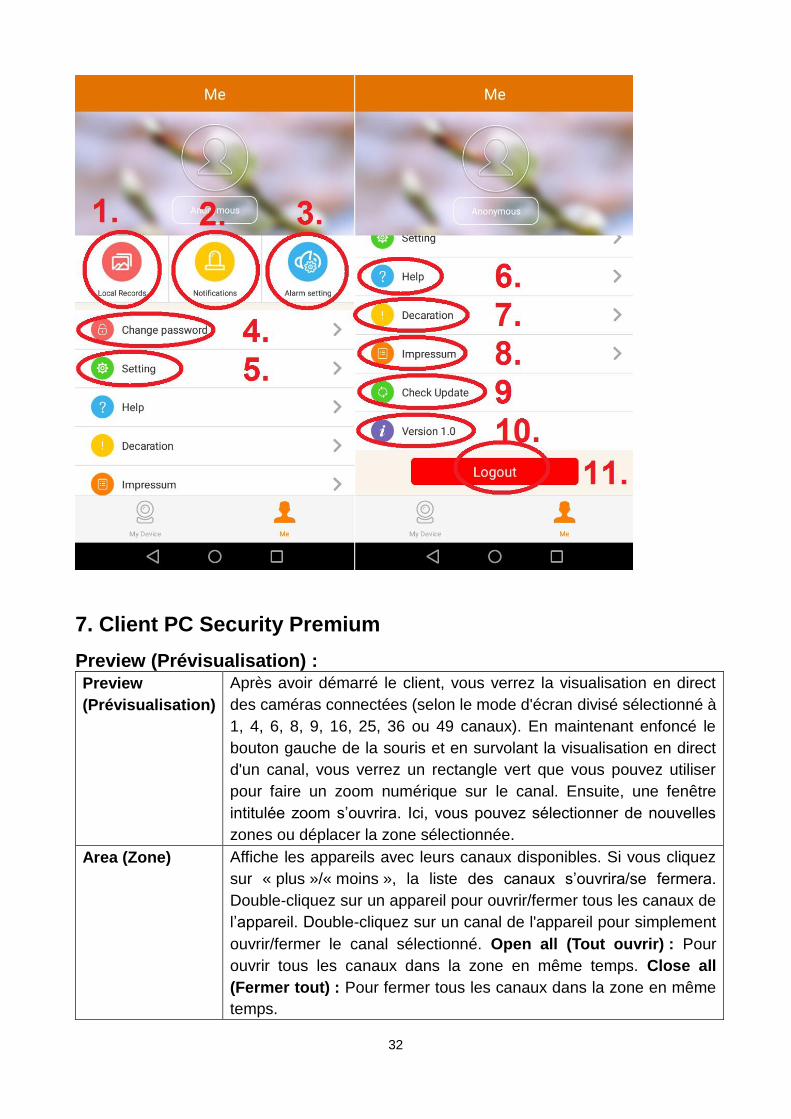
32
7. Client PC Security Premium
Preview (Prévisualisation) : Preview
(Prévisualisation)
Après avoir démarré le client, vous verrez la visualisation en direct
des caméras connectées (selon le mode d'écran divisé sélectionné à
1, 4, 6, 8, 9, 16, 25, 36 ou 49 canaux). En maintenant enfoncé le
bouton gauche de la souris et en survolant la visualisation en direct
d'un canal, vous verrez un rectangle vert que vous pouvez utiliser
pour faire un zoom numérique sur le canal. Ensuite, une fenêtre
intitulée zoom s’ouvrira. Ici, vous pouvez sélectionner de nouvelles
zones ou déplacer la zone sélectionnée.
Area (Zone) Affiche les appareils avec leurs canaux disponibles. Si vous cliquez
sur « plus »/« moins », la liste des canaux s’ouvrira/se fermera.
Double-cliquez sur un appareil pour ouvrir/fermer tous les canaux de
l’appareil. Double-cliquez sur un canal de l'appareil pour simplement
ouvrir/fermer le canal sélectionné. Open all (Tout ouvrir) : Pour
ouvrir tous les canaux dans la zone en même temps. Close all
(Fermer tout) : Pour fermer tous les canaux dans la zone en même
temps.
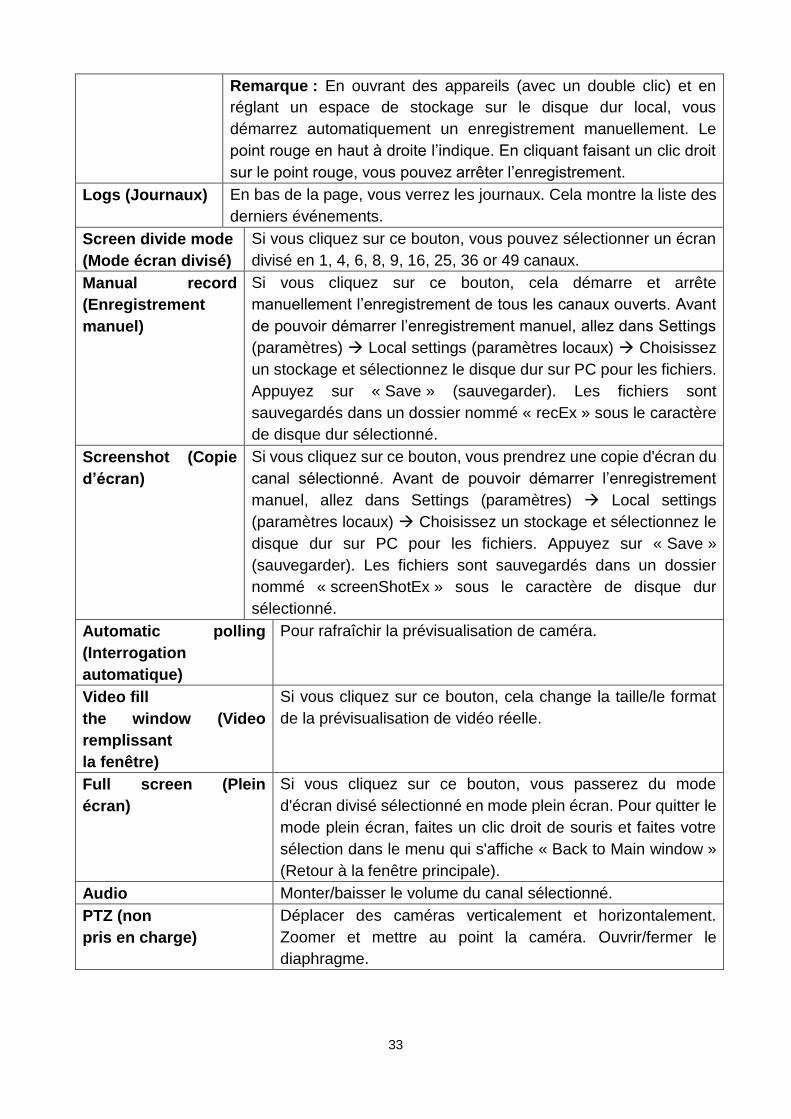
33
Remarque : En ouvrant des appareils (avec un double clic) et en
réglant un espace de stockage sur le disque dur local, vous
démarrez automatiquement un enregistrement manuellement. Le
point rouge en haut à droite l’indique. En cliquant faisant un clic droit
sur le point rouge, vous pouvez arrêter l’enregistrement.
Logs (Journaux) En bas de la page, vous verrez les journaux. Cela montre la liste des
derniers événements.
Screen divide mode
(Mode écran divisé)
Si vous cliquez sur ce bouton, vous pouvez sélectionner un écran
divisé en 1, 4, 6, 8, 9, 16, 25, 36 or 49 canaux.
Manual record
(Enregistrement
manuel)
Si vous cliquez sur ce bouton, cela démarre et arrête
manuellement l’enregistrement de tous les canaux ouverts. Avant
de pouvoir démarrer l’enregistrement manuel, allez dans Settings
(paramètres) Local settings (paramètres locaux) Choisissez
un stockage et sélectionnez le disque dur sur PC pour les fichiers.
Appuyez sur « Save » (sauvegarder). Les fichiers sont
sauvegardés dans un dossier nommé « recEx » sous le caractère
de disque dur sélectionné.
Screenshot (Copie
d’écran)
Si vous cliquez sur ce bouton, vous prendrez une copie d'écran du
canal sélectionné. Avant de pouvoir démarrer l’enregistrement
manuel, allez dans Settings (paramètres) Local settings
(paramètres locaux) Choisissez un stockage et sélectionnez le
disque dur sur PC pour les fichiers. Appuyez sur « Save »
(sauvegarder). Les fichiers sont sauvegardés dans un dossier
nommé « screenShotEx » sous le caractère de disque dur
sélectionné.
Automatic polling
(Interrogation
automatique)
Pour rafraîchir la prévisualisation de caméra.
Video fill
the window (Video
remplissant
la fenêtre)
Si vous cliquez sur ce bouton, cela change la taille/le format
de la prévisualisation de vidéo réelle.
Full screen (Plein
écran)
Si vous cliquez sur ce bouton, vous passerez du mode
d'écran divisé sélectionné en mode plein écran. Pour quitter le
mode plein écran, faites un clic droit de souris et faites votre
sélection dans le menu qui s'affiche « Back to Main window »
(Retour à la fenêtre principale).
Audio Monter/baisser le volume du canal sélectionné.
PTZ (non
pris en charge)
Déplacer des caméras verticalement et horizontalement.
Zoomer et mettre au point la caméra. Ouvrir/fermer le
diaphragme.

34
Playback (Lecture) (lecture de 4 canaux en même temps au max.) : Area (Zone) Affiche les appareils avec leurs canaux disponibles. Si vous cliquez
sur « plus »/« moins », la liste des canaux s’ouvrira/se fermera.
Double-cliquez sur un appareil pour ouvrir/fermer tous les canaux de
l’appareil. Double-cliquez sur un canal de l'appareil pour simplement
ouvrir/fermer le canal sélectionné. Open all (Tout ouvrir) : Pour
ouvrir tous les canaux dans la zone en même temps. Close all
(Fermer tout) : Pour fermer tous les canaux dans la zone en même
temps. Conseil : La meilleure option pour la lecture est d’ouvrir un
canal à la fois et de regarder la lecture.
Play (Lecture) /
Pause (Pause)
Pour lire ou mettre en pause.
Stop (Arrêt) Pour arrêter la lecture.
Screenshot
(Copie d’écran)
Si vous cliquez sur ce bouton, vous prendrez une copie d'écran de la
lecture sélectionnée. Les fichiers sont sauvegardés dans un dossier
nommé « screenShotEx » sous le caractère de disque dur
sélectionné.
Slow (Lent) Sélectionnez un vitesse de lecture parmi 1/2x, 1/4x et 1/8x.
Fast (Rapide) Sélectionnez un vitesse de lecture parmi 2x, 4x et 8x.
Audio (Audio) Monter/baisser le volume de la lecture sélectionnée.
Timeline
(Chronologie)
En bas, vous verrez la chronologie de tous les canaux avec leurs
vidéos enregistrées. Chaque couleur correspond à un type
d’enregistrement. (Rouge = temporisation, vert = mouvement et bleu
= manuel) Si vous cliquez sur les barres de couleur, la lecture se
lancera. Pour commencer, appuyez sur Play (Lecture).
Local or
Remote (Local ou
distant)
Local signifie enregistré manuellement sur le disque dur du PC et
Remote (distant) signifie enregistré sur le disque dur de l'appareil par
temporisation, mouvement ou capteur.
Record type
(Type
d'enregistrement)
Pour sélectionner le type d'enregistrement à rechercher.
Calendar
(Calendrier)
Sélectionnez la date à laquelle rechercher l'enregistrement requis.
Après avoir réglé local ou distant, le type d’enregistrement et la date,
appuyez sur Search (recherche) en bas.
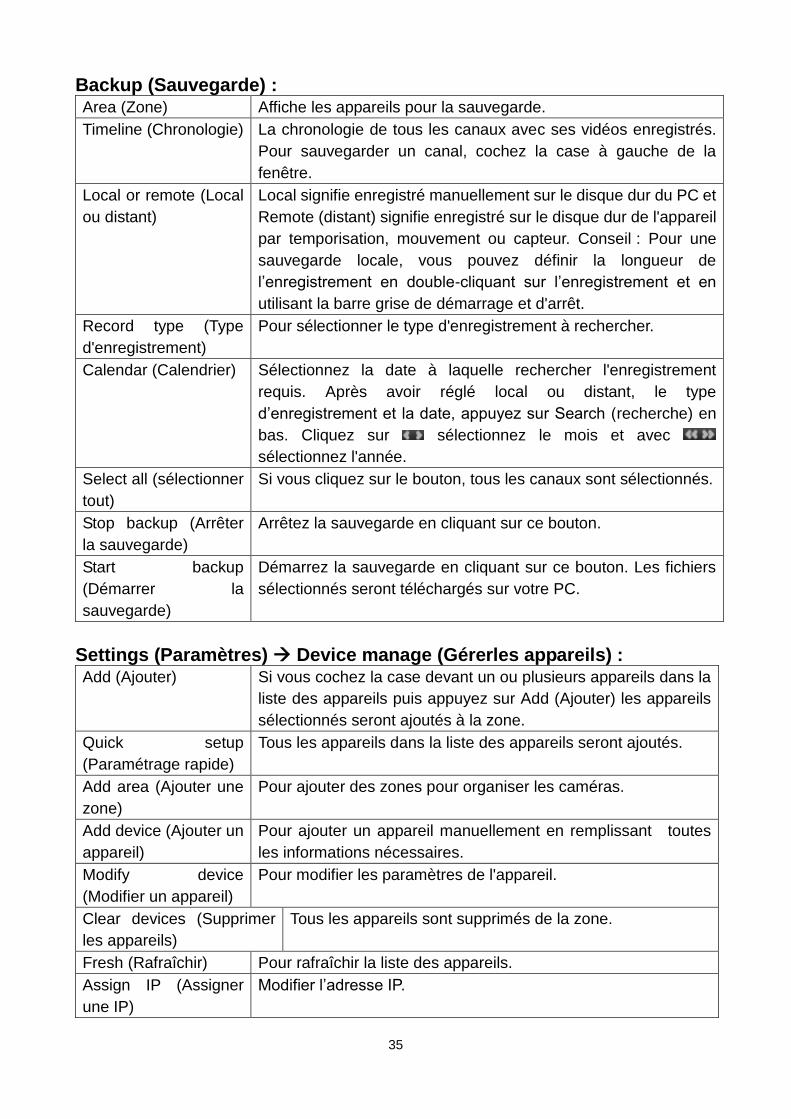
35
Backup (Sauvegarde) : Area (Zone) Affiche les appareils pour la sauvegarde.
Timeline (Chronologie) La chronologie de tous les canaux avec ses vidéos enregistrés.
Pour sauvegarder un canal, cochez la case à gauche de la
fenêtre.
Local or remote (Local
ou distant)
Local signifie enregistré manuellement sur le disque dur du PC et
Remote (distant) signifie enregistré sur le disque dur de l'appareil
par temporisation, mouvement ou capteur. Conseil : Pour une
sauvegarde locale, vous pouvez définir la longueur de
l’enregistrement en double-cliquant sur l’enregistrement et en
utilisant la barre grise de démarrage et d'arrêt.
Record type (Type
d'enregistrement)
Pour sélectionner le type d'enregistrement à rechercher.
Calendar (Calendrier) Sélectionnez la date à laquelle rechercher l'enregistrement
requis. Après avoir réglé local ou distant, le type
d’enregistrement et la date, appuyez sur Search (recherche) en
bas. Cliquez sur sélectionnez le mois et avec
sélectionnez l'année.
Select all (sélectionner
tout)
Si vous cliquez sur le bouton, tous les canaux sont sélectionnés.
Stop backup (Arrêter
la sauvegarde)
Arrêtez la sauvegarde en cliquant sur ce bouton.
Start backup
(Démarrer la
sauvegarde)
Démarrez la sauvegarde en cliquant sur ce bouton. Les fichiers
sélectionnés seront téléchargés sur votre PC.
Settings (Paramètres) Device manage (Gérerles appareils) : Add (Ajouter) Si vous cochez la case devant un ou plusieurs appareils dans la
liste des appareils puis appuyez sur Add (Ajouter) les appareils
sélectionnés seront ajoutés à la zone.
Quick setup
(Paramétrage rapide)
Tous les appareils dans la liste des appareils seront ajoutés.
Add area (Ajouter une
zone)
Pour ajouter des zones pour organiser les caméras.
Add device (Ajouter un
appareil)
Pour ajouter un appareil manuellement en remplissant toutes
les informations nécessaires.
Modify device
(Modifier un appareil)
Pour modifier les paramètres de l'appareil.
Clear devices (Supprimer
les appareils)
Tous les appareils sont supprimés de la zone.
Fresh (Rafraîchir) Pour rafraîchir la liste des appareils.
Assign IP (Assigner
une IP)
Modifier l’adresse IP.
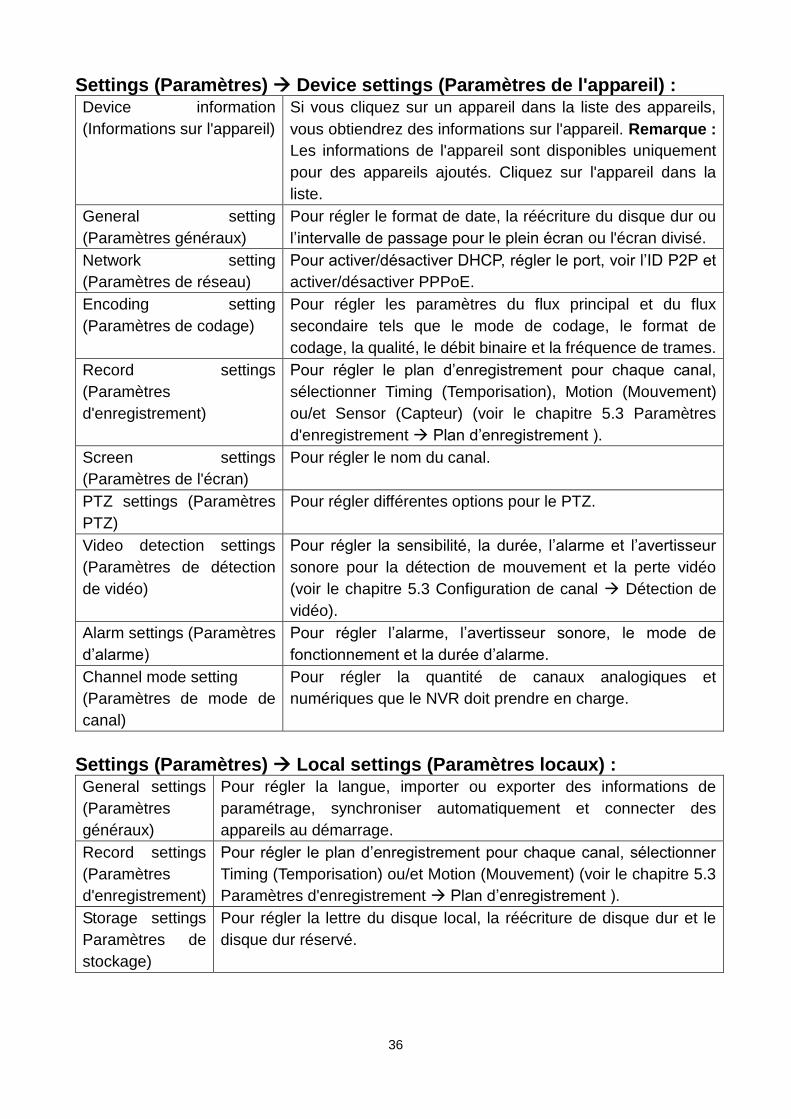
36
Settings (Paramètres) Device settings (Paramètres de l'appareil) : Device information
(Informations sur l'appareil)
Si vous cliquez sur un appareil dans la liste des appareils,
vous obtiendrez des informations sur l'appareil. Remarque :
Les informations de l'appareil sont disponibles uniquement
pour des appareils ajoutés. Cliquez sur l'appareil dans la
liste.
General setting
(Paramètres généraux)
Pour régler le format de date, la réécriture du disque dur ou
l’intervalle de passage pour le plein écran ou l'écran divisé.
Network setting
(Paramètres de réseau)
Pour activer/désactiver DHCP, régler le port, voir l’ID P2P et
activer/désactiver PPPoE.
Encoding setting
(Paramètres de codage)
Pour régler les paramètres du flux principal et du flux
secondaire tels que le mode de codage, le format de
codage, la qualité, le débit binaire et la fréquence de trames.
Record settings
(Paramètres
d'enregistrement)
Pour régler le plan d’enregistrement pour chaque canal,
sélectionner Timing (Temporisation), Motion (Mouvement)
ou/et Sensor (Capteur) (voir le chapitre 5.3 Paramètres
d'enregistrement Plan d’enregistrement ).
Screen settings
(Paramètres de l'écran)
Pour régler le nom du canal.
PTZ settings (Paramètres
PTZ)
Pour régler différentes options pour le PTZ.
Video detection settings
(Paramètres de détection
de vidéo)
Pour régler la sensibilité, la durée, l’alarme et l’avertisseur
sonore pour la détection de mouvement et la perte vidéo
(voir le chapitre 5.3 Configuration de canal Détection de
vidéo).
Alarm settings (Paramètres
d’alarme)
Pour régler l’alarme, l’avertisseur sonore, le mode de
fonctionnement et la durée d’alarme.
Channel mode setting
(Paramètres de mode de
canal)
Pour régler la quantité de canaux analogiques et
numériques que le NVR doit prendre en charge.
Settings (Paramètres) Local settings (Paramètres locaux) : General settings
(Paramètres
généraux)
Pour régler la langue, importer ou exporter des informations de
paramétrage, synchroniser automatiquement et connecter des
appareils au démarrage.
Record settings
(Paramètres
d'enregistrement)
Pour régler le plan d’enregistrement pour chaque canal, sélectionner
Timing (Temporisation) ou/et Motion (Mouvement) (voir le chapitre 5.3
Paramètres d'enregistrement Plan d’enregistrement ).
Storage settings
Paramètres de
stockage)
Pour régler la lettre du disque local, la réécriture de disque dur et le
disque dur réservé.
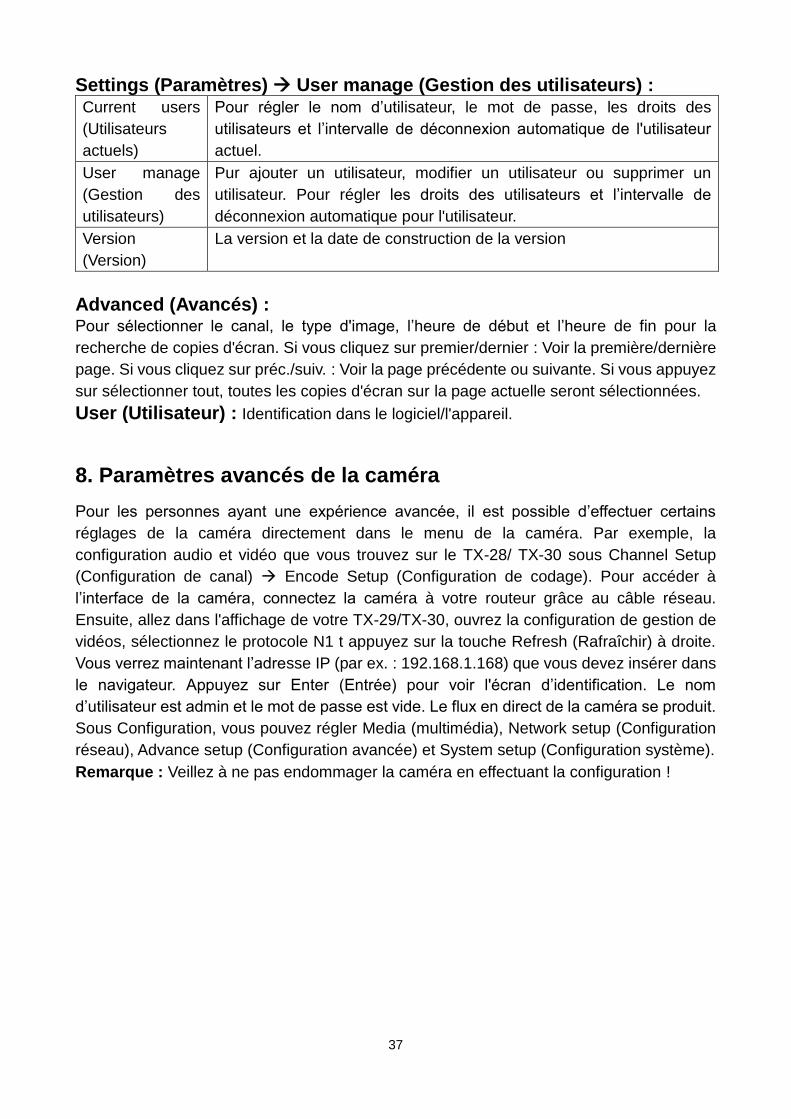
37
Settings (Paramètres) User manage (Gestion des utilisateurs) : Current users
(Utilisateurs
actuels)
Pour régler le nom d’utilisateur, le mot de passe, les droits des
utilisateurs et l’intervalle de déconnexion automatique de l'utilisateur
actuel.
User manage
(Gestion des
utilisateurs)
Pur ajouter un utilisateur, modifier un utilisateur ou supprimer un
utilisateur. Pour régler les droits des utilisateurs et l’intervalle de
déconnexion automatique pour l'utilisateur.
Version
(Version)
La version et la date de construction de la version
Advanced (Avancés) : Pour sélectionner le canal, le type d'image, l’heure de début et l’heure de fin pour la
recherche de copies d'écran. Si vous cliquez sur premier/dernier : Voir la première/dernière
page. Si vous cliquez sur préc./suiv. : Voir la page précédente ou suivante. Si vous appuyez
sur sélectionner tout, toutes les copies d'écran sur la page actuelle seront sélectionnées.
User (Utilisateur) : Identification dans le logiciel/l'appareil.
8. Paramètres avancés de la caméra
Pour les personnes ayant une expérience avancée, il est possible d’effectuer certains
réglages de la caméra directement dans le menu de la caméra. Par exemple, la
configuration audio et vidéo que vous trouvez sur le TX-28/ TX-30 sous Channel Setup
(Configuration de canal) Encode Setup (Configuration de codage). Pour accéder à
l’interface de la caméra, connectez la caméra à votre routeur grâce au câble réseau.
Ensuite, allez dans l'affichage de votre TX-29/TX-30, ouvrez la configuration de gestion de
vidéos, sélectionnez le protocole N1 t appuyez sur la touche Refresh (Rafraîchir) à droite.
Vous verrez maintenant l’adresse IP (par ex. : 192.168.1.168) que vous devez insérer dans
le navigateur. Appuyez sur Enter (Entrée) pour voir l'écran d’identification. Le nom
d’utilisateur est admin et le mot de passe est vide. Le flux en direct de la caméra se produit.
Sous Configuration, vous pouvez régler Media (multimédia), Network setup (Configuration
réseau), Advance setup (Configuration avancée) et System setup (Configuration système).
Remarque : Veillez à ne pas endommager la caméra en effectuant la configuration !
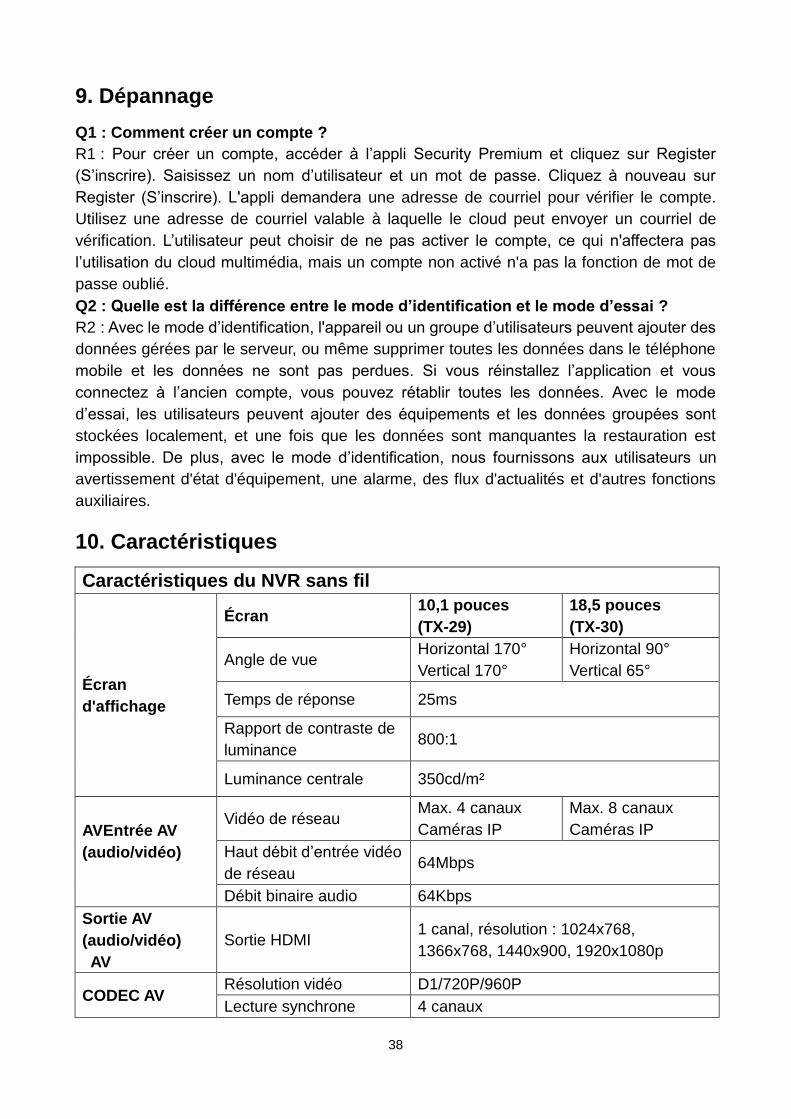
38
9. Dépannage
Q1 : Comment créer un compte ?
R1 : Pour créer un compte, accéder à l’appli Security Premium et cliquez sur Register
(S’inscrire). Saisissez un nom d’utilisateur et un mot de passe. Cliquez à nouveau sur
Register (S’inscrire). L'appli demandera une adresse de courriel pour vérifier le compte.
Utilisez une adresse de courriel valable à laquelle le cloud peut envoyer un courriel de
vérification. L’utilisateur peut choisir de ne pas activer le compte, ce qui n'affectera pas
l’utilisation du cloud multimédia, mais un compte non activé n'a pas la fonction de mot de
passe oublié.
Q2 : Quelle est la différence entre le mode d’identification et le mode d’essai ?
R2 : Avec le mode d’identification, l'appareil ou un groupe d’utilisateurs peuvent ajouter des
données gérées par le serveur, ou même supprimer toutes les données dans le téléphone
mobile et les données ne sont pas perdues. Si vous réinstallez l’application et vous
connectez à l’ancien compte, vous pouvez rétablir toutes les données. Avec le mode
d’essai, les utilisateurs peuvent ajouter des équipements et les données groupées sont
stockées localement, et une fois que les données sont manquantes la restauration est
impossible. De plus, avec le mode d’identification, nous fournissons aux utilisateurs un
avertissement d'état d'équipement, une alarme, des flux d'actualités et d'autres fonctions
auxiliaires.
10. Caractéristiques
Caractéristiques du NVR sans fil
Écran
d'affichage
Écran 10,1 pouces
(TX-29)
18,5 pouces
(TX-30)
Angle de vue Horizontal 170°
Vertical 170°
Horizontal 90°
Vertical 65°
Temps de réponse 25ms
Rapport de contraste de
luminance 800:1
Luminance centrale 350cd/m²
AVEntrée AV
(audio/vidéo)
Vidéo de réseau Max. 4 canaux
Caméras IP
Max. 8 canaux
Caméras IP
Haut débit d’entrée vidéo
de réseau 64Mbps
Débit binaire audio 64Kbps
Sortie AV
(audio/vidéo)
AV
Sortie HDMI 1 canal, résolution : 1024x768,
1366x768, 1440x900, 1920x1080p
CODEC AV Résolution vidéo D1/720P/960P
Lecture synchrone 4 canaux
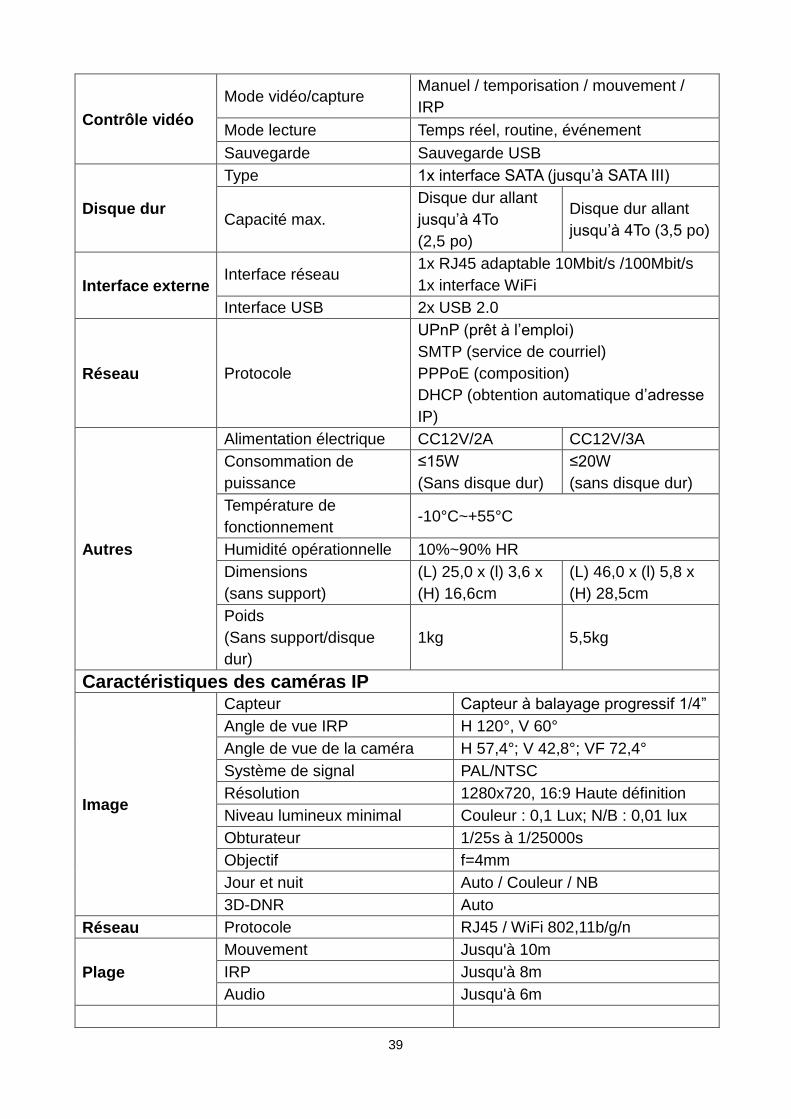
39
Contrôle vidéo
Mode vidéo/capture Manuel / temporisation / mouvement /
IRP
Mode lecture Temps réel, routine, événement
Sauvegarde Sauvegarde USB
Disque dur
Type 1x interface SATA (jusqu’à SATA III)
Capacité max.
Disque dur allant
jusqu’à 4To
(2,5 po)
Disque dur allant
jusqu’à 4To (3,5 po)
Interface externe Interface réseau
1x RJ45 adaptable 10Mbit/s /100Mbit/s
1x interface WiFi
Interface USB 2x USB 2.0
Réseau Protocole
UPnP (prêt à l’emploi)
SMTP (service de courriel)
PPPoE (composition)
DHCP (obtention automatique d’adresse
IP)
Autres
Alimentation électrique CC12V/2A CC12V/3A
Consommation de
puissance
≤15W
(Sans disque dur)
≤20W
(sans disque dur)
Température de
fonctionnement -10°C~+55°C
Humidité opérationnelle 10%~90% HR
Dimensions
(sans support)
(L) 25,0 x (l) 3,6 x
(H) 16,6cm
(L) 46,0 x (l) 5,8 x
(H) 28,5cm
Poids
(Sans support/disque
dur)
1kg 5,5kg
Caractéristiques des caméras IP
Image
Capteur Capteur à balayage progressif 1/4”
Angle de vue IRP H 120°, V 60°
Angle de vue de la caméra H 57,4°; V 42,8°; VF 72,4°
Système de signal PAL/NTSC
Résolution 1280x720, 16:9 Haute définition
Niveau lumineux minimal Couleur : 0,1 Lux; N/B : 0,01 lux
Obturateur 1/25s à 1/25000s
Objectif f=4mm
Jour et nuit Auto / Couleur / NB
3D-DNR Auto
Réseau Protocole RJ45 / WiFi 802,11b/g/n
Plage
Mouvement Jusqu'à 10m
IRP Jusqu'à 8m
Audio Jusqu'à 6m

40
Caractéristiques
générales
Température opérationnelle/
Humidité opérationnelle
-10°C à +50°C
30% à 80% HR
Entrée d'alimentation CC12V/1A
Consommation de puissance ≤6W
Dimensions (L) 15,5 x (l) 9,7 x (H) 8,7cm
Poids 550g
Indice de protection IP66
11. Accessoires : Certains disques durs testés et recommandés pour le TX-29 et le
TX-30 sont répertoriés ici. Mais d'autres modèles de disques durs que nous n'avons pas
testés peuvent être compatibles.
Seagate 2,5" 500Go Pipeline HD ST500VT000
SAMSUNG 2,5" 500Go ST500LM012-W
SAMSUNG 2,5" 500Go ST500LM012
HGST 2,5" 1To HTS541010A9E680
TOSHIBA 2,5" 500Go MQ01ABD050V
TOSHIBA 2,5" 1To MQ01ABD100V
Seagate 3,5" 500Go Pipeline HD ST3500312CS
Seagate 3,5" 1To 5900 Pipeline HD ST1000VM002
Seagate 3,5" 1To 7200 Pipeline HD ST1000NM0033
Seagate 3,5" 1To ST31000528AS
Seagate 3,5" 2To Pipeline HD ST2000VM002/3
Seagate 3,5" 3To Pipeline HD ST3000VM002
TOSHIBA 3,5" 1To DT01ABA100V
TOSHIBA 3,5" 2To DT01ABA200V
Conseils pour le respect de l'environnement: Matériaux packages sont des matières premières et peuvent être recyclés. Ne pas jeter les appareils ou les batteries usagés avec les déchets domestiques. Nettoyage: Protéger le dispositif de la saleté et de la pollution (nettoyer avec un chiffon propre). Ne pas utiliser des matériaux dures, à gros grain/des solvants/des agents nettoyants agressifs. Essuyer soigneusement le dispositif nettoyé. Distributeur: Technaxx Deutschland GmbH & Co.KG, Kruppstr. 105, 60388 Frankfurt a.M., Allemagne

41
This product includes software developed by third parties, including software which
is released under the GNU General Public License Version 2 (GPL v2). This program
is free software; you can redistribute it and/or modify it under the terms of the GNU
General Public License as published by the Free Software Foundation; either version
2 of the License, or (at your option) any later version. You may obtain a complete
machine-readable copy of the source code for the above mentioned software under
the terms of GPL v2 without charge except for the cost of media, shipping, and
handling, upon written request to Technaxx GmbH & Co. KG, Kruppstraße 105, 60388
Frankfurt am Main, Germany.
This program is distributed in the hope that it will be useful, but WITHOUT ANY
WARRANTY; without even the implied warranty of MERCHANTABILITY or FITNESS
FOR A PARTICULAR PURPOSE. See the GNU General Public License for more
details. You should have received a copy of the GNU General Public License along
with this program; if not, write to the Free Software Foundation, Inc., 51 Franklin
Street, Fifth Floor, Boston, MA 02110-1301, USA. (Notice from Technaxx: A copy of
the GPL is included below).
GNU GENERAL PUBLIC LICENSE: Version 2, June 1991 / Copyright (C) 1989, 1991 Free
Software Foundation, Inc. / 51 Franklin Street, Fifth Floor, Boston, MA 02110-1301,
USA. Everyone is permitted to copy and distribute verbatim copies of this license
document, but changing it is not allowed.
Preamble
The licenses for most software are designed to take away your freedom to share and
change it. By contrast, the GNU General Public License is intended to guarantee your
freedom to share and change free software--to make sure the software is free for all its
users. This General Public License applies to most of the Free Software Foundation's
software and to any other program whose authors commit to using it. (Some other Free
Software Foundation software is covered by the GNU Lesser General Public License
instead.) You can apply it to your programs, too.
When we speak of free software, we are referring to freedom, not price. Our General Public
Licenses are designed to make sure that you have the freedom to distribute copies of free
software (and charge for this service if you wish), that you receive source code or can get it
if you want it, that you can change the software or use pieces of it in new free programs; and
that you know you can do these things.
To protect your rights, we need to make restrictions that forbid anyone to deny you these
rights or to ask you to surrender the rights. These restrictions translate to certain
responsibilities for you if you distribute copies of the software, or if you modify it.
For example, if you distribute copies of such a program, whether gratis or for a fee, you must
give the recipients all the rights that you have. You must make sure that they, too, receive or
can get the source code. And you must show them these terms so they know their rights.
We protect your rights with two steps: (1) copyright the software, and (2) offer you this
license which gives you legal permission to copy, distribute and/or modify the software.
42
Also, for each author's protection and ours, we want to make certain that everyone
understands that there is no warranty for this free software. If the software is modified by
someone else and passed on, we want its recipients to know that what they have is not the
original, so that any problems introduced by others will not reflect on the original authors'
reputations.
Any free program is threatened constantly by software patents. We wish to avoid the danger
that redistributors of a free program will individually obtain patent licenses, in effect making
the program proprietary. To prevent this, we have made it clear that any patent must be
licensed for everyone's free use or not licensed at all.
The precise terms and conditions for copying, distribution and modification follow.
TERMS AND CONDITIONS FOR COPYING, DISTRIBUTION AND MODIFICATION
0. This License applies to any program or other work which contains a notice placed by the
copyright holder saying it may be distributed under the terms of this General Public License.
The "Program", below, refers to any such program or work, and a "work based on the
Program" means either the Program or any derivative work under copyright law: that is to
say, a work containing the Program or a portion of it, either verbatim or with modifications
and/or translated into another language. (Hereinafter, translation is included without
limitation in the term "modification".) Each licensee is addressed as "you".
Activities other than copying, distribution and modification are not covered by this License;
they are outside its scope. The act of running the Program is not restricted, and the output
from the Program is covered only if its contents constitute a work based on the Program
(independent of having been made by running the Program). Whether that is true depends
on what the Program does.
1. You may copy and distribute verbatim copies of the Program's source code as you receive
it, in any medium, provided that you conspicuously and appropriately publish on each copy
an appropriate copyright notice and disclaimer of warranty; keep intact all the notices that
refer to this License and to the absence of any warranty; and give any other recipients of the
Program a copy of this License along with the Program. You may charge a fee for the
physical act of transferring a copy, and you may at your option offer warranty protection in
exchange for a fee.
2. You may modify your copy or copies of the Program or any portion of it, thus forming a
work based on the Program, and copy and distribute such modifications or work under the
terms of Section 1 above, provided that you also meet all of these conditions:
a) You must cause the modified files to carry prominent notices stating that you changed the
files and the date of any change.
b) You must cause any work that you distribute or publish, that in whole or in part contains or
is derived from the Program or any part thereof, to be licensed as a whole at no charge to all
third parties under the terms of this License.

43
c) If the modified program normally reads commands interactively when run, you must
cause it, when started running for such interactive use in the most ordinary way, to print or
display an announcement including an appropriate copyright notice and a notice that there is
no warranty (or else, saying that you provide a warranty) and that users may redistribute the
program under these conditions, and telling the user how to view a copy of this License.
(Exception: if the Program itself is interactive but does not normally print such an
announcement, your work based on the Program is not required to print an announcement.)
These requirements apply to the modified work as a whole. If identifiable sections of that
work are not derived from the Program, and can be reasonably considered independent and
separate works in themselves, then this License, and its terms, do not apply to those
sections when you distribute them as separate works. But when you distribute the same
sections as part of a whole which is a work based on the Program, the distribution of the
whole must be on the terms of this License, whose permissions for other licensees extend to
the entire whole, and thus to each and every part regardless of who wrote it.
Thus, it is not the intent of this section to claim rights or contest your rights to work written
entirely by you; rather, the intent is to exercise the right to control the distribution of
derivative or collective works based on the Program. In addition, mere aggregation of
another work not based on the Program with the Program (or with a work based on the
Program) on a volume of a storage or distribution medium does not bring the other work
under the scope of this License.
3. You may copy and distribute the Program (or a work based on it, under Section 2) in
object code or executable form under the terms of Sections 1 and 2 above provided that you
also do one of the following:
a) Accompany it with the complete corresponding machine-readable source code, which
must be distributed under the terms of Sections 1 and 2 above on a medium customarily
used for software interchange; or,
b) Accompany it with a written offer, valid for at least three years, to give any third party, for a
charge no more than your cost of physically performing source distribution, a complete
machine-readable copy of the corresponding source code, to be distributed under the terms
of Sections 1 and 2 above on a medium customarily used for software interchange; or,
c) Accompany it with the information you received as to the offer to distribute corresponding
source code. (This alternative is allowed only for noncommercial distribution and only if you
received the program in object code or executable form with such an offer, in accord with
Subsection b above.)
The source code for a work means the preferred form of the work for making modifications to
it. For an executable work, complete source code means all the source code for all modules
it contains, plus any associated interface definition files, plus the scripts used to control
compilation and installation of the executable. However, as a special exception, the source
code distributed need not include anything that is normally distributed (in either source or
binary form) with the major components (compiler, kernel, and so on) of the operating
system on which the executable runs, unless that component itself accompanies the
executable.

44
If distribution of executable or object code is made by offering access to copy from a
designated place, then offering equivalent access to copy the source code from the same
place counts as distribution of the source code, even though third parties are not compelled
to copy the source along with the object code.
4. You may not copy, modify, sublicense, or distribute the Program except as expressly
provided under this License. Any attempt otherwise to copy, modify, sublicense or distribute
the Program is void, and will automatically terminate your rights under this License.
However, parties who have received copies, or rights, from you under this License will not
have their licenses terminated so long as such parties remain in full compliance.
5. You are not required to accept this License, since you have not signed it. However,
nothing else grants you permission to modify or distribute the Program or its derivative
works. These actions are prohibited by law if you do not accept this License. Therefore, by
modifying or distributing the Program (or any work based on the Program), you indicate your
acceptance of this License to do so, and all its terms and conditions for copying, distributing
or modifying the Program or works based on it.
6. Each time you redistribute the Program (or any work based on the Program), the recipient
automatically receives a license from the original licensor to copy, distribute or modify the
Program subject to these terms and conditions. You may not impose any further restrictions
on the recipients' exercise of the rights granted herein. You are not responsible for enforcing
compliance by third parties to this License.
7. If, as a consequence of a court judgment or allegation of patent infringement or for any
other reason (not limited to patent issues), conditions are imposed on you (whether by court
order, agreement or otherwise) that contradict the conditions of this License, they do not
excuse you from the conditions of this License. If you cannot distribute so as to satisfy
simultaneously your obligations under this License and any other pertinent obligations, then
as a consequence you may not distribute the Program at all. For example, if a patent license
would not permit royalty-free redistribution of the Program by all those who receive copies
directly or indirectly through you, then the only way you could satisfy both it and this License
would be to refrain entirely from distribution of the Program.
If any portion of this section is held invalid or unenforceable under any particular
circumstance, the balance of the section is intended to apply and the section as a whole is
intended to apply in other circumstances.
It is not the purpose of this section to induce you to infringe any patents or other property
right claims or to contest validity of any such claims; this section has the sole purpose of
protecting the integrity of the free software distribution system, which is implemented by
public license practices. Many people have made generous contributions to the wide range
of software distributed through that system in reliance on consistent application of that
system; it is up to the author/donor to decide if he or she is willing to distribute software
through any other system and a licensee cannot impose that choice. This section is intended
to make thoroughly clear what is believed to be a consequence of the rest of this License.
45
8. If the distribution and/or use of the Program is restricted in certain countries either by
patents or by copyrighted interfaces, the original copyright holder who places the Program
under this License may add an explicit geographical distribution limitation excluding those
countries, so that distribution is permitted only in or among countries not thus excluded. In
such case, this License incorporates the limitation as if written in the body of this License.
9. The Free Software Foundation may publish revised and/or new versions of the General
Public License from time to time. Such new versions will be similar in spirit to the present
version, but may differ in detail to address new problems or concerns.
Each version is given a distinguishing version number. If the Program specifies a version
number of this License which applies to it and "any later version", you have the option of
following the terms and conditions either of that version or of any later version published by
the Free Software Foundation. If the Program does not specify a version number of this
License, you may choose any version ever published by the Free Software Foundation.
10. If you wish to incorporate parts of the Program into other free programs whose
distribution conditions are different, write to the author to ask for permission. For software
which is copyrighted by the Free Software Foundation, write to the Free Software
Foundation; we sometimes make exceptions for this. Our decision will be guided by the two
goals of preserving the free status of all derivatives of our free software and of promoting the
sharing and reuse of software generally.
NO WARRANTY
11. Because the program is licensed free of charge, there is no warranty for the program, to
the extent permitted by applicable law. Except when otherwise stated in writing the
Copyright holder and/or other parties provide the program "AS IS" without warranty of any
kind, either expressed or implied, including, but not limited to, the implied warranties of
merchantability and fitness for a particular purpose. The entire risk as to the quality and
performance of the program is with you. Should the program prove defective, you assume
the cost of all necessary servicing, repair or correction.
12. In no event unless required by applicable law or agreed to in writing will any Copyright
holder, or any other party who may modify and/or redistribute the program as permitted
above, be liable to you for damages, including any general, specia, incidental or
consequential. Damages arising out of the use or inability to use the program (including but
not limited to loss of data or data being rendered inaccurate or losses sustained by you or
third parties or a failure of the program to operate with any other programs), even if such
holder or other party has been advised of the possibility of such damages.
END OF TERMS AND CONDITIONS

46
HOW TO APPLY THESE TERMS TO YOUR NEW PROGRAMS
(1) If you develop a new program, and you want it to be of the greatest possible use to the
public, the best way to achieve this is to make it free software which everyone can
redistribute and change under these terms.
(2) To do so, attach the following notices to the program. It is safest to attach them to the
start of each source file to most effectively convey the exclusion of warranty; and each file
should have at least the "copyright" line and a pointer to where the full notice is found.
<one line to give the program's name and an idea of what it does.>
Copyright (C) <yyyy> <name of author>
(3) This program is free software; you can redistribute it and/or modify it under the terms of
the GNU General Public License as published by the Free Software Foundation; either
version 2 of the License, or (at your option) any later version.
(4) This program is distributed in the hope that it will be useful, but WITHOUT ANY
WARRANTY; without even the implied warranty of MERCHANTABILITY or FITNESS FOR A
PARTICULAR PURPOSE. See the GNU General Public License for more details.
(5) You should have received a copy of the GNU General Public License along with this
program; if not, write to the Free Software Foundation Inc; 51 Franklin Street, Fifth Floor,
Boston, MA 02110-1301, USA.
(6) Also add information on how to contact you by electronic and paper mail.
(7) If the program is interactive, make it output a short notice like this when it starts in an
interactive mode: Gnomovision version 69, Copyright (C) year name of author Gnomovision
comes with ABSOLUTELY NO WARRANTY; for details type `show w'. (8) This is free
software, and you are welcome to redistribute it under certain conditions; type `show c' for
details.
(9) The hypothetical commands `show w' and `show c' should show the appropriate parts of
the General Public License. Of course, the commands you use may be called something
other than ̀ show w' and ̀ show c'; they could even be mouse-clicks or menu items--whatever
suits your program.
(10) You should also get your employer (if you work as a programmer) or your school, if any,
to sign a "copyright disclaimer" for the program, if necessary. Here is a sample; alter the
names: (11) Yoyodyne, Inc., hereby disclaims all copyright interest in the program
`Gnomovision' (which makes passes at compilers) written by James Hacker. <signature of
Ty Coon>, 1 April 1989 [Ty Coon, President of Vice]
(12) This General Public License does not permit incorporating your program into
proprietary programs. If your program is a subroutine library, you may consider it more
useful to permit linking proprietary applications with the library. If this is what you want to do,
use the GNU Lesser General Public License instead of this License.