uDuro - web.ros-medical.comweb.ros-medical.com/public/uploads/files/neuro/uDuro_OPT_dt_engl_R... ·...
20
Schnelle und sichere Anwendung Quick and safe application uDuro ™ kyphoplasty system OP-Technik l Surgical Technique Maßstab für Qualität und Preis. Benchmark for quality and price.
Transcript of uDuro - web.ros-medical.comweb.ros-medical.com/public/uploads/files/neuro/uDuro_OPT_dt_engl_R... ·...
Schnelle und sichere Anwendung
Quick and safe application
uDuro™
kyphoplasty system
OP-Technik l Surgical Technique
Maßstab für Qualität und Preis.Benchmark for quality and price.
2
Zuverlässigkeit und deutsche Präzision seit 100 Jahren
Wirbelsäulensysteme von ulrich medical® stehen für Qualität „Made in Germany“. Sie sind das erfolgreiche Ergebnis systematischer Entwicklungsarbeit und langjähriger Erfahrung in der Medizintechnik. Seit über 100 Jahren geben wir mit unseren selbst entwickelten und innovativen Produkten täglich unser Bestes für unsere Kunden und die Gesundheit der Patienten.
Spitzentechnologie und Kompetenz aus einer Hand
100 years of reliability and German precision
Spinal systems by ulrich medical® stand for quality “Made in Germany.”They are the successful result of systematic development activities and many years of experience in medical technology.For more than 100 years, we have done our best every day for our customers and for patient health with our proprietary and innovative products.
Leading-edge technology and competence from one source
1
uDuroTM OP-technik l Surgical technique
2
3
4
5
3
Inhalt l Content
SeitePage
Einleitung
Introduction
Indikationen und Kontraindikationen
Indications and contraindications
uDuro™ Instrumente
uDuro™ instruments
Operationstechnik
Surgical technique
Komponenten
Components
4
4
5
5
67
67
8 18
8 18
19
19
uDuroTM OP-technik l Surgical technique
1
4
Einleitung l Introduction
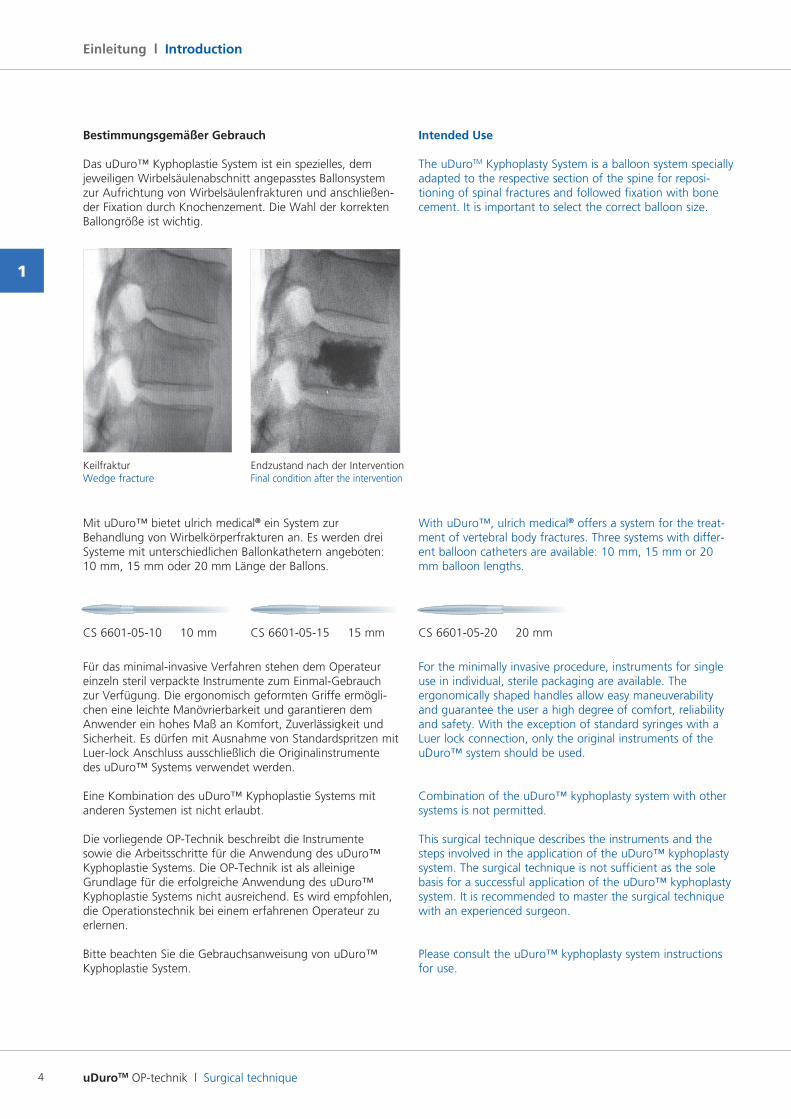
Bestimmungsgemäßer Gebrauch
Das uDuro™ Kyphoplastie System ist ein spezielles, dem jeweiligen Wirbelsäulenabschnitt angepasstes Ballonsystem zur Aufrichtung von Wirbelsäulenfrakturen und anschließender Fixation durch Knochenzement. Die Wahl der korrekten Ballongröße ist wichtig.
Mit uDuro™ bietet ulrich medical® ein System zur Behandlung von Wirbelkörperfrakturen an. Es werden drei Systeme mit unterschiedlichen Ballonkathetern angeboten: 10 mm, 15 mm oder 20 mm Länge der Ballons.
Für das minimalinvasive Verfahren stehen dem Operateur einzeln steril verpackte Instrumente zum EinmalGebrauch zur Verfügung. Die ergonomisch geformten Griffe ermöglichen eine leichte Manövrierbarkeit und garantieren dem Anwender ein hohes Maß an Komfort, Zuverlässigkeit und Sicherheit. Es dürfen mit Ausnahme von Standardspritzen mit Luerlock Anschluss ausschließlich die Originalinstrumente des uDuro™ Systems verwendet werden.
Eine Kombination des uDuro™ Kyphoplastie Systems mit anderen Systemen ist nicht erlaubt.
Die vorliegende OPTechnik beschreibt die Instrumente sowie die Arbeitsschritte für die Anwendung des uDuro™ Kyphoplastie Systems. Die OPTechnik ist als alleinige Grundlage für die erfolgreiche Anwendung des uDuro™ Kyphoplastie Systems nicht ausreichend. Es wird empfohlen, die Operationstechnik bei einem erfahrenen Operateur zu erlernen.
Bitte beachten Sie die Gebrauchsanweisung von uDuro™ Kyphoplastie System.
Intended Use
The uDuroTM Kyphoplasty System is a balloon system specially adapted to the respective section of the spine for repositioning of spinal fractures and followed fixation with bone cement. It is important to select the correct balloon size.
With uDuro™, ulrich medical® offers a system for the treatment of vertebral body fractures. Three systems with different balloon catheters are available: 10 mm, 15 mm or 20 mm balloon lengths.
For the minimally invasive procedure, instruments for single use in individual, sterile packaging are available. The ergonomically shaped handles allow easy maneuverability and guarantee the user a high degree of comfort, reliability and safety. With the exception of standard syringes with a Luer lock connection, only the original instruments of the uDuro™ system should be used.
Combination of the uDuro™ kyphoplasty system with othersystems is not permitted.
This surgical technique describes the instruments and the steps involved in the application of the uDuro™ kyphoplasty system. The surgical technique is not sufficient as the sole basis for a successful application of the uDuro™ kyphoplasty system. It is recommended to master the surgical technique with an experienced surgeon.
Please consult the uDuro™ kyphoplasty system instructions for use.
CS 66010510 10 mm CS 66010515 15 mm CS 66010520 20 mm
Keilfraktur Wedge fracture
Endzustand nach der InterventionFinal condition after the intervention
uDuroTM OP-technik l Surgical technique
2
5
Indikationen und Kontraindikationen l Indications and contraindications
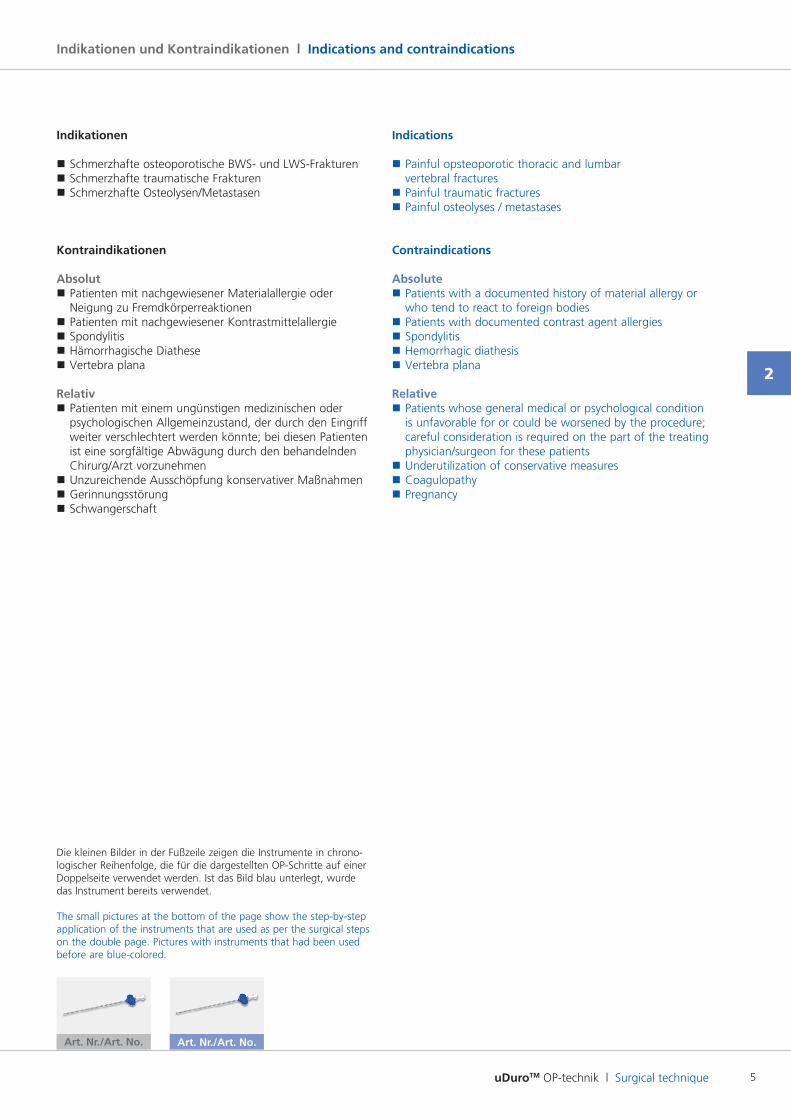
Indikationen
� Schmerzhafte osteoporotische BWS und LWSFrakturen � Schmerzhafte traumatische Frakturen � Schmerzhafte Osteolysen/Metastasen
Kontraindikationen
Absolut � Patienten mit nachgewiesener Materialallergie oder Neigung zu Fremdkörperreaktionen
� Patienten mit nachgewiesener Kontrastmittelallergie � Spondylitis � Hämorrhagische Diathese � Vertebra plana
Relativ � Patienten mit einem ungünstigen medizinischen oder psychologischen Allgemeinzustand, der durch den Eingriff weiter verschlechtert werden könnte; bei diesen Patienten ist eine sorgfältige Abwägung durch den behandelnden Chirurg/Arzt vorzunehmen
� Unzureichende Ausschöpfung konservativer Maßnahmen � Gerinnungsstörung � Schwangerschaft
Indications
� Painful opsteoporotic thoracic and lumbar vertebral fractures
� Painful traumatic fractures � Painful osteolyses / metastases
Contraindications
Absolute � Patients with a documented history of material allergy or who tend to react to foreign bodies
� Patients with documented contrast agent allergies � Spondylitis � Hemorrhagic diathesis � Vertebra plana
Relative � Patients whose general medical or psychological condition is unfavorable for or could be worsened by the procedure; careful consideration is required on the part of the treating physician/surgeon for these patients
� Underutilization of conservative measures � Coagulopathy � Pregnancy
Art. Nr./Art. No. Art. Nr./Art. No.
Die kleinen Bilder in der Fußzeile zeigen die Instrumente in chronologischer Reihen folge, die für die dargestellten OPSchritte auf einer Doppelseite verwendet werden. Ist das Bild blau unterlegt, wurde das Instrument bereits verwendet.
The small pictures at the bottom of the page show the stepbystep application of the instruments that are used as per the surgical steps on the double page. Pictures with instruments that had been used before are bluecolored.
uDuroTM OP-technik l Surgical technique
3
6
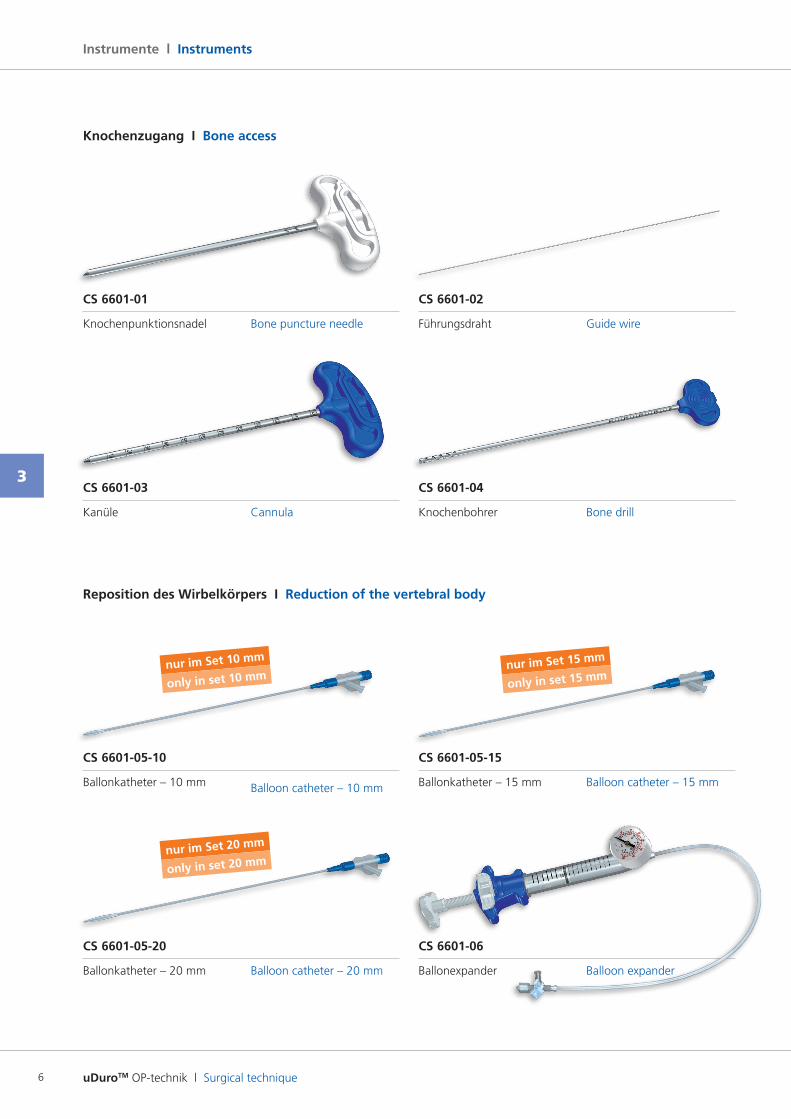
Instrumente l Instruments
CS 6601-04CS 6601-03
KnochenbohrerKanüle Bone drillCannula
CS 6601-05-10
Ballonkatheter – 10 mm Balloon catheter – 10 mm
CS 6601-05-15
Ballonkatheter – 15 mm Balloon catheter – 15 mm
Guide wire
CS 6601-02 CS 6601-01
Führungsdraht Knochenpunktionsnadel Bone puncture needle
CS 6601-05-20
Ballonkatheter – 20 mm Balloon catheter – 20 mm
nur im Set 10 mm
only in set 10 mmnur im Set 15 mm
only in set 15 mm
nur im Set 20 mm
only in set 20 mm
Knochenzugang I Bone access
Reposition des Wirbelkörpers I Reduction of the vertebral body
Balloon expander
CS 6601-06
Ballonexpander

uDuroTM OP-technik l Surgical technique
3
7
CS 6601-07
Knochenzementapplikator Bone cement applicator
CS 6603
uFix Knochenzement uFix Bone cement
CS 6602
Knochenstanze Bone extractor
Stabilisierung des Wirbelkörpers I Stabilization of the vertebral body
Zusätzliche Einzelkomponeneten I Additional single components
CS 6601-08
Kanüle, all in one, mit schräger Spitze
Cannula, all in one, with bevel tip
CS 6601-09
Kanüle, all in one, mit Trokar Spitze
Cannula, all in one, with trocar tip
uDuroTM OP-technik l Surgical technique
4
8
Operationstechnik l Surgical technique
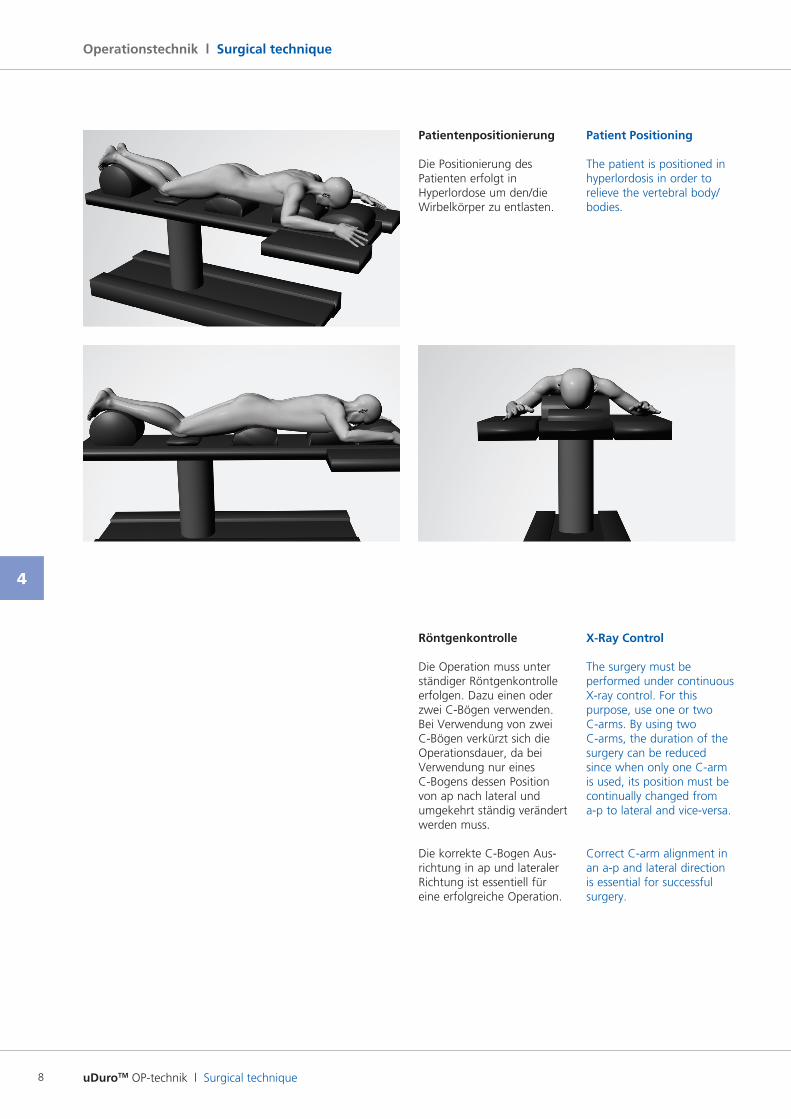
Patientenpositionierung
Die Positionierung des Patienten erfolgt in Hyperlordose um den/die Wirbelkörper zu entlasten.
Röntgenkontrolle
Die Operation muss unter ständiger Röntgenkontrolle erfolgen. Dazu einen oder zwei CBögen verwenden. Bei Verwendung von zwei CBögen verkürzt sich die Operationsdauer, da bei Verwendung nur eines CBogens dessen Position von ap nach lateral und umgekehrt ständig verändert werden muss.
Die korrekte CBogen Ausrichtung in ap und lateraler Richtung ist essentiell für eine erfolgreiche Operation.
Patient Positioning
The patient is positioned in hyperlordosis in order to relieve the vertebral body/bodies.
X-Ray Control
The surgery must be performed under continuous Xray control. For this purpose, use one or two Carms. By using two Carms, the duration of the surgery can be reduced since when only one Carm is used, its position must be continually changed from ap to lateral and viceversa.
Correct Carm alignment in an ap and lateral direction is essential for successful surgery.
uDuroTM OP-technik l Surgical technique
4
9
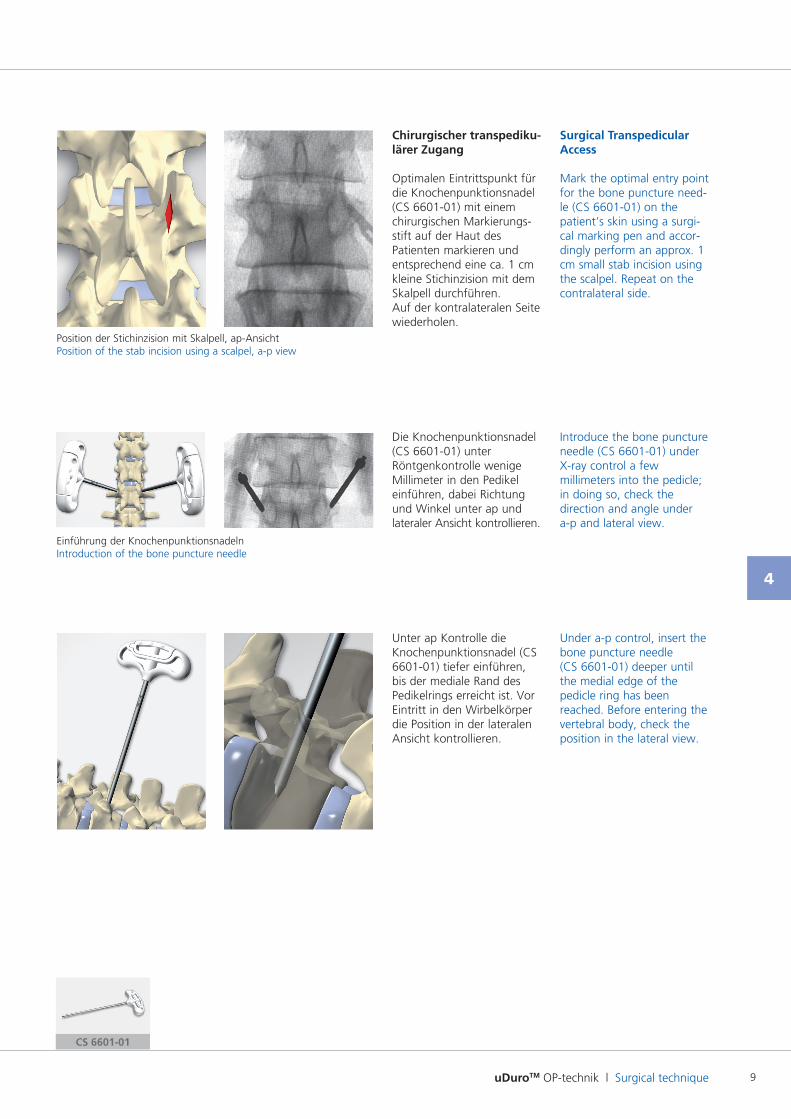
Chirurgischer transpediku-lärer Zugang
Optimalen Eintrittspunkt für die Knochenpunktionsnadel (CS 660101) mit einem chirurgischen Markierungsstift auf der Haut des Patienten markieren und entsprechend eine ca. 1 cm kleine Stichinzision mit dem Skalpell durchführen. Auf der kontralateralen Seite wiederholen.
Die Knochenpunktionsnadel (CS 660101) unter Röntgenkontrolle wenige Millimeter in den Pedikel einführen, dabei Richtung und Winkel unter ap und lateraler Ansicht kontrollieren.
Unter ap Kontrolle die Knochenpunktionsnadel (CS 660101) tiefer einführen, bis der mediale Rand des Pedikelrings erreicht ist. Vor Eintritt in den Wirbelkörper die Position in der lateralen Ansicht kontrollieren.
Surgical Transpedicular Access
Mark the optimal entry point for the bone puncture needle (CS 660101) on the patient‘s skin using a surgical marking pen and accordingly perform an approx. 1 cm small stab incision using the scalpel. Repeat on the contralateral side.
Introduce the bone puncture needle (CS 660101) under Xray control a few millimeters into the pedicle; in doing so, check the direction and angle under ap and lateral view.
Under ap control, insert the bone puncture needle (CS 660101) deeper until the medial edge of the pedicle ring has been reached. Before entering the vertebral body, check the position in the lateral view.
Position der Stichinzision mit Skalpell, apAnsichtPosition of the stab incision using a scalpel, ap view
Einführung der KnochenpunktionsnadelnIntroduction of the bone puncture needle
CS 6601-01
uDuroTM OP-technik l Surgical technique
4
10
Operationstechnik l Surgical technique
CS 6601-02 CS 6601-03
Einführung der Führungsdrähte, apAnsicht Introduction of the guide wires, ap view
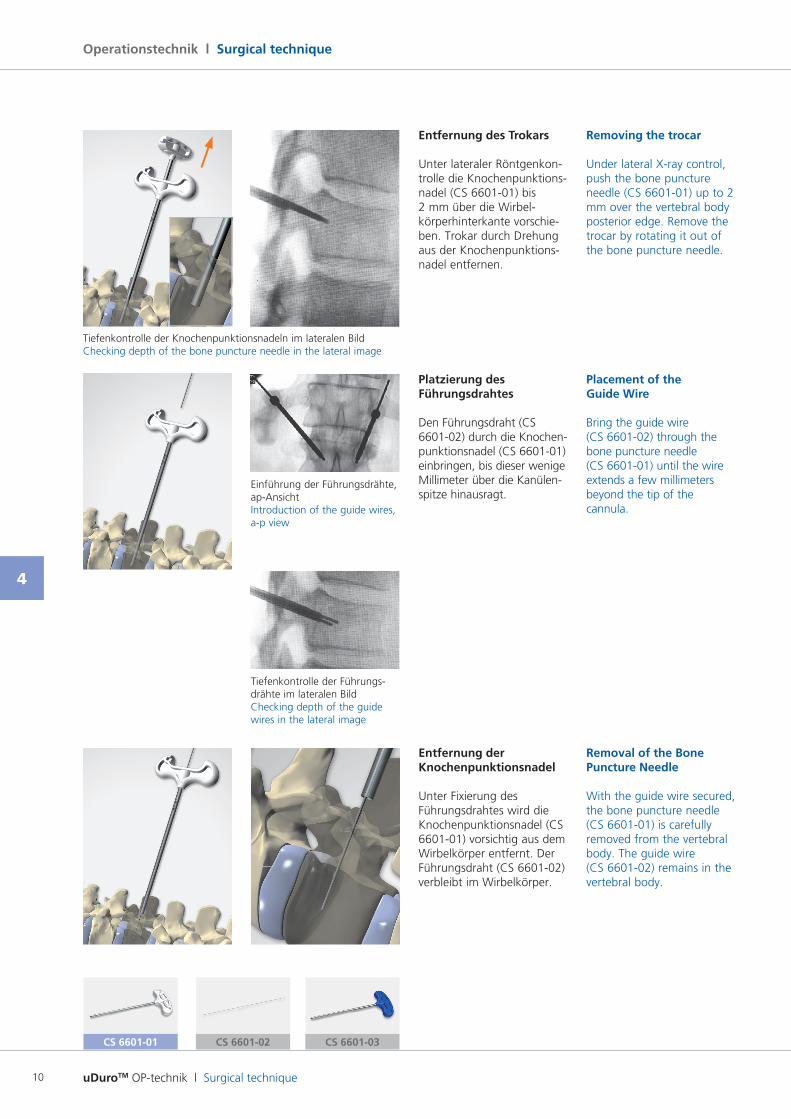
Entfernung des Trokars
Unter lateraler Röntgenkontrolle die Knochenpunktionsnadel (CS 660101) bis 2 mm über die Wirbelkörperhinterkante vorschieben. Trokar durch Drehung aus der Knochenpunktionsnadel entfernen.
Platzierung des Führungsdrahtes
Den Führungsdraht (CS 660102) durch die Knochenpunktionsnadel (CS 660101) einbringen, bis dieser wenige Millimeter über die Kanülenspitze hinausragt.
Entfernung der Knochenpunktionsnadel
Unter Fixierung des Führungsdrahtes wird die Knochenpunktionsnadel (CS 660101) vorsichtig aus dem Wirbelkörper entfernt. Der Führungsdraht (CS 660102) verbleibt im Wirbelkörper.
Removing the trocar
Under lateral Xray control, push the bone puncture needle (CS 660101) up to 2 mm over the vertebral body posterior edge. Remove the trocar by rotating it out of the bone puncture needle.
Placement of the Guide Wire
Bring the guide wire (CS 660102) through the bone puncture needle (CS 660101) until the wire extends a few millimeters beyond the tip of the cannula.
Removal of the Bone Puncture Needle
With the guide wire secured, the bone puncture needle (CS 660101) is carefully removed from the vertebral body. The guide wire (CS 660102) remains in the vertebral body.
Tiefenkontrolle der Knochenpunktionsnadeln im lateralen BildChecking depth of the bone puncture needle in the lateral image
Tiefenkontrolle der Führungsdrähte im lateralen Bild Checking depth of the guide wires in the lateral image
CS 6601-01
uDuroTM OP-technik l Surgical technique
4
11
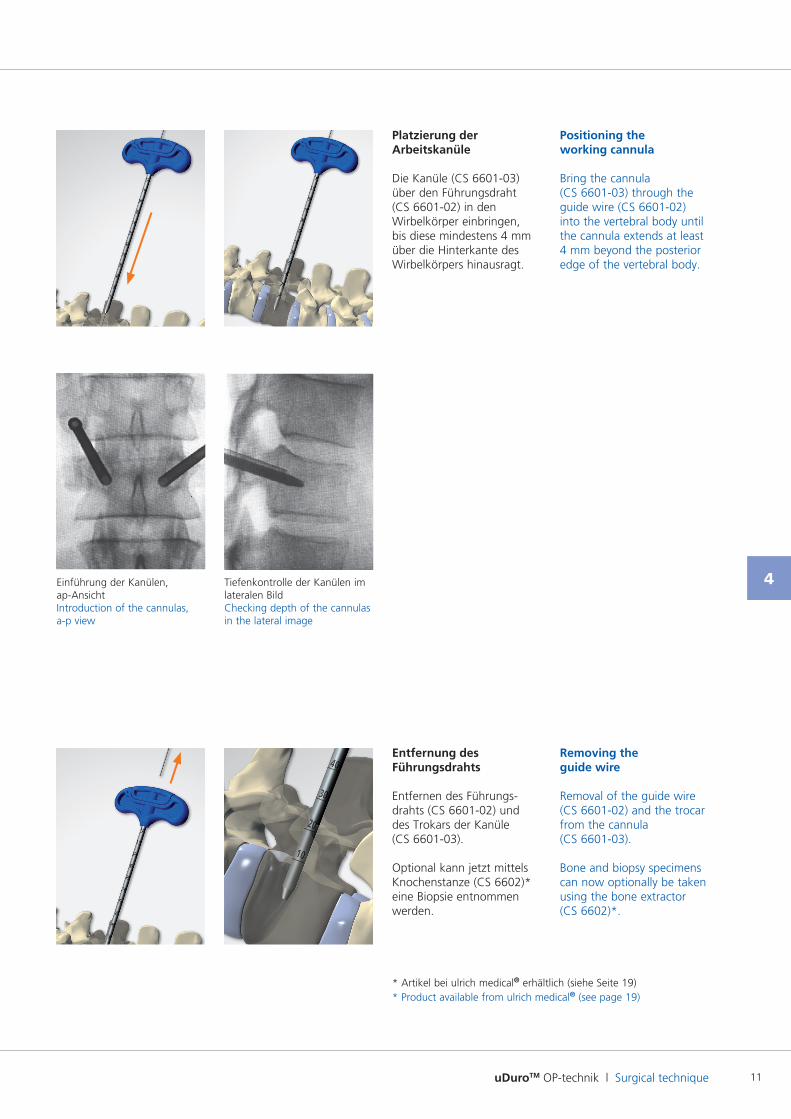
Platzierung der Arbeitskanüle
Die Kanüle (CS 660103) über den Führungsdraht (CS 660102) in den Wirbelkörper einbringen, bis diese mindestens 4 mm über die Hinterkante des Wirbelkörpers hinausragt.
Entfernung des Führungsdrahts
Entfernen des Führungsdrahts (CS 660102) und des Trokars der Kanüle (CS 660103).
Optional kann jetzt mittels Knochenstanze (CS 6602)* eine Biopsie entnommen werden.
Positioning the working cannula
Bring the cannula (CS 660103) through the guide wire (CS 660102) into the vertebral body until the cannula extends at least 4 mm beyond the posterior edge of the vertebral body.
Removing the guide wire
Removal of the guide wire (CS 660102) and the trocar from the cannula (CS 660103).
Bone and biopsy specimens can now optionally be taken using the bone extractor (CS 6602)*.
Einführung der Kanülen, apAnsicht Introduction of the cannulas, ap view
Tiefenkontrolle der Kanülen im lateralen Bild Checking depth of the cannulas in the lateral image
* Artikel bei ulrich medical® erhältlich (siehe Seite 19)* Product available from ulrich medical® (see page 19)
uDuroTM OP-technik l Surgical technique
4
12
Operationstechnik l Surgical technique
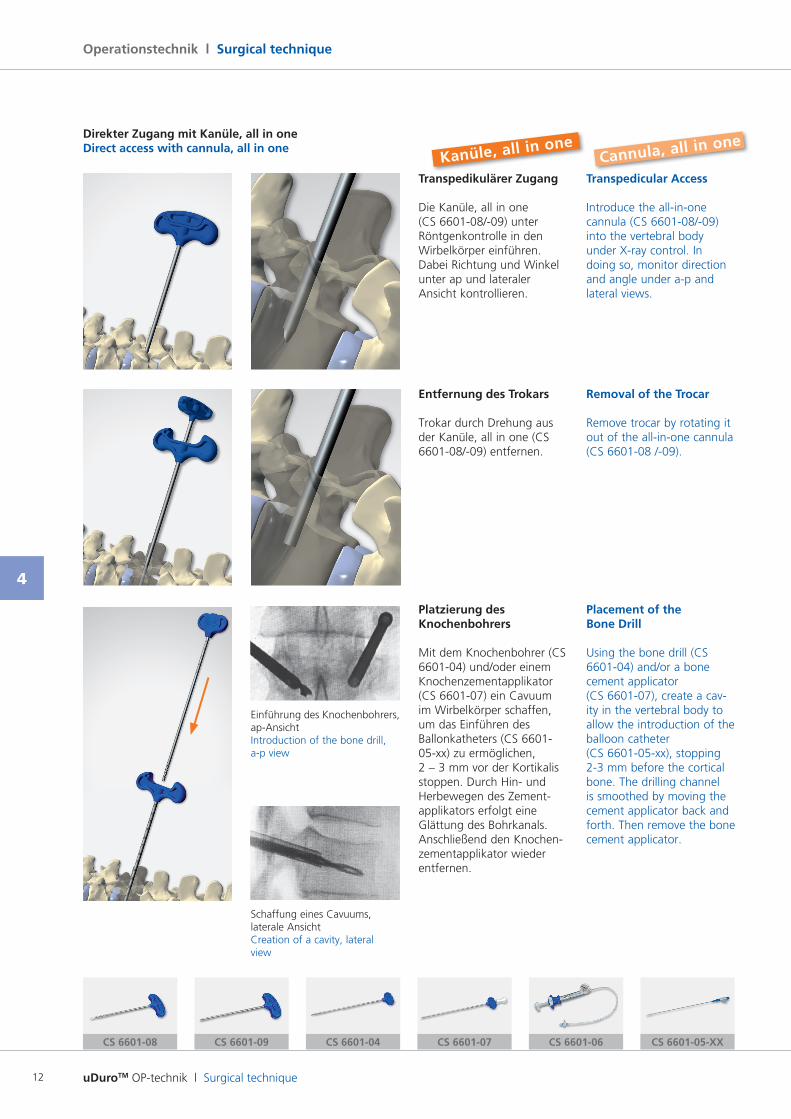
Transpedikulärer Zugang
Die Kanüle, all in one (CS 660108/09) unter Röntgenkontrolle in den Wirbelkörper einführen. Dabei Richtung und Winkel unter ap und lateraler Ansicht kontrollieren.
Entfernung des Trokars
Trokar durch Drehung aus der Kanüle, all in one (CS 660108/09) entfernen.
Platzierung des Knochenbohrers
Mit dem Knochenbohrer (CS 660104) und/oder einem Knochenzementapplikator (CS 660107) ein Cavuum im Wirbelkörper schaffen, um das Einführen des Ballonkatheters (CS 660105xx) zu ermöglichen, 2 – 3 mm vor der Kortikalis stoppen. Durch Hin und Herbewegen des Zementapplikators erfolgt eine Glättung des Bohrkanals. Anschließend den Knochenzementapplikator wieder entfernen.
Transpedicular Access
Introduce the allinone cannula (CS 660108/09) into the vertebral body under Xray control. In doing so, monitor direction and angle under ap and lateral views.
Removal of the Trocar
Remove trocar by rotating it out of the allinone cannula (CS 660108 /09).
Placement of theBone Drill
Using the bone drill (CS 660104) and/or a bone cement applicator (CS 660107), create a cavity in the vertebral body to allow the introduction of the balloon catheter (CS 660105xx), stopping 23 mm before the cortical bone. The drilling channel is smoothed by moving the cement applicator back and forth. Then remove the bone cement applicator.
Einführung des Knochenbohrers, apAnsicht Introduction of the bone drill, ap view
Schaffung eines Cavuums, laterale Ansicht Creation of a cavity, lateral view
CS 6601-06 CS 6601-05-XXCS 6601-04CS 6601-08 CS 6601-07CS 6601-09
Kanüle, all in oneDirekter Zugang mit Kanüle, all in oneDirect access with cannula, all in one
Cannula, all in one
uDuroTM OP-technik l Surgical technique
4
13
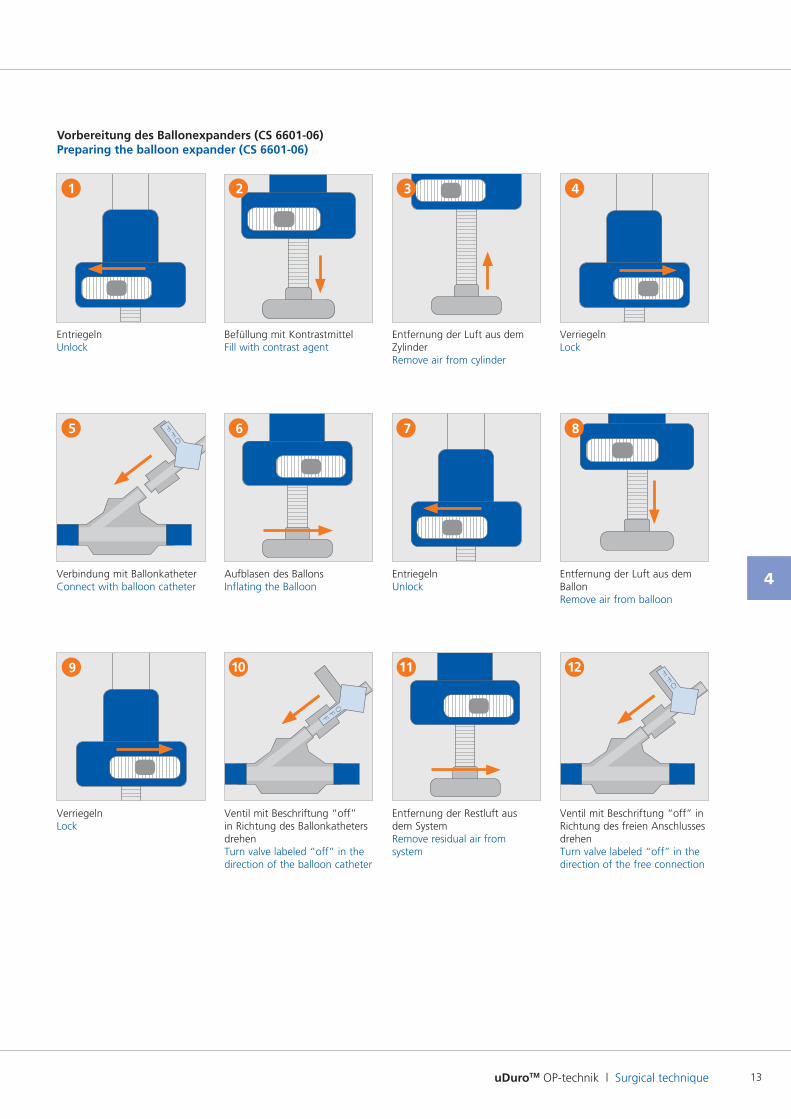
Vorbereitung des Ballonexpanders (CS 6601-06)Preparing the balloon expander (CS 6601-06)
EntriegelnUnlock
EntriegelnUnlock
Entfernung der Luft aus dem BallonRemove air from balloon
Verbindung mit BallonkatheterConnect with balloon catheter
Ventil mit Beschriftung “off” in Richtung des Ballonkatheters drehenTurn valve labeled “off” in the direction of the balloon catheter
Ventil mit Beschriftung “off” in Richtung des freien Anschlusses drehenTurn valve labeled “off” in the direction of the free connection
Aufblasen des BallonsInflating the Balloon
Entfernung der Restluft aus dem SystemRemove residual air from system
Befüllung mit KontrastmittelFill with contrast agent
VerriegelnLock
VerriegelnLock
Entfernung der Luft aus dem ZylinderRemove air from cylinder
1 2 4
8765
9 10 11 12
3
uDuroTM OP-technik l Surgical technique
4
14
Operationstechnik l Surgical technique
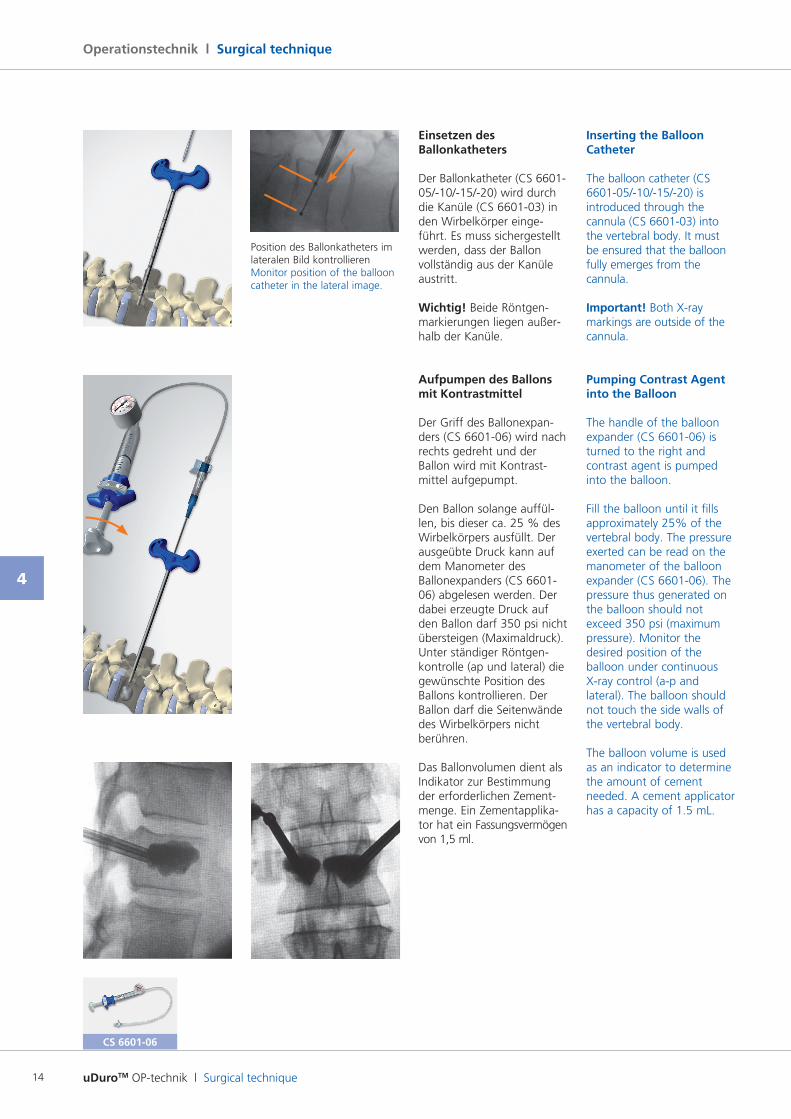
Einsetzen des Ballonkatheters
Der Ballonkatheter (CS 660105/10/15/20) wird durch die Kanüle (CS 660103) in den Wirbelkörper eingeführt. Es muss sichergestellt werden, dass der Ballon vollständig aus der Kanüle austritt.
Wichtig! Beide Röntgenmarkierungen liegen außerhalb der Kanüle.
Aufpumpen des Ballons mit Kontrastmittel
Der Griff des Ballonexpanders (CS 660106) wird nach rechts gedreht und der Ballon wird mit Kontrastmittel aufgepumpt.
Den Ballon solange auffüllen, bis dieser ca. 25 % des Wirbelkörpers ausfüllt. Der ausgeübte Druck kann auf dem Manometer des Ballonexpanders (CS 660106) abgelesen werden. Der dabei erzeugte Druck auf den Ballon darf 350 psi nicht übersteigen (Maximaldruck). Unter ständiger Röntgenkontrolle (ap und lateral) die gewünschte Position des Ballons kontrollieren. Der Ballon darf die Seitenwände des Wirbelkörpers nicht berühren.
Das Ballonvolumen dient als Indikator zur Bestimmung der erforderlichen Zementmenge. Ein Zementapplikator hat ein Fassungsvermögen von 1,5 ml.
Inserting the Balloon Catheter
The balloon catheter (CS 660105/10/15/20) is introduced through the cannula (CS 660103) into the vertebral body. It must be ensured that the balloon fully emerges from the cannula.
Important! Both Xray markings are outside of the cannula.
Pumping Contrast Agent into the Balloon
The handle of the balloon expander (CS 660106) is turned to the right and contrast agent is pumped into the balloon.
Fill the balloon until it fills approximately 25% of the vertebral body. The pressure exerted can be read on the manometer of the balloon expander (CS 660106). The pressure thus generated on the balloon should not exceed 350 psi (maximum pressure). Monitor the desired position of the balloon under continuous Xray control (ap and lateral). The balloon should not touch the side walls of the vertebral body.
The balloon volume is used as an indicator to determine the amount of cement needed. A cement applicator has a capacity of 1.5 mL.
Position des Ballonkatheters im lateralen Bild kontrollierenMonitor position of the balloon catheter in the lateral image.
CS 6601-06
uDuroTM OP-technik l Surgical technique
4
15
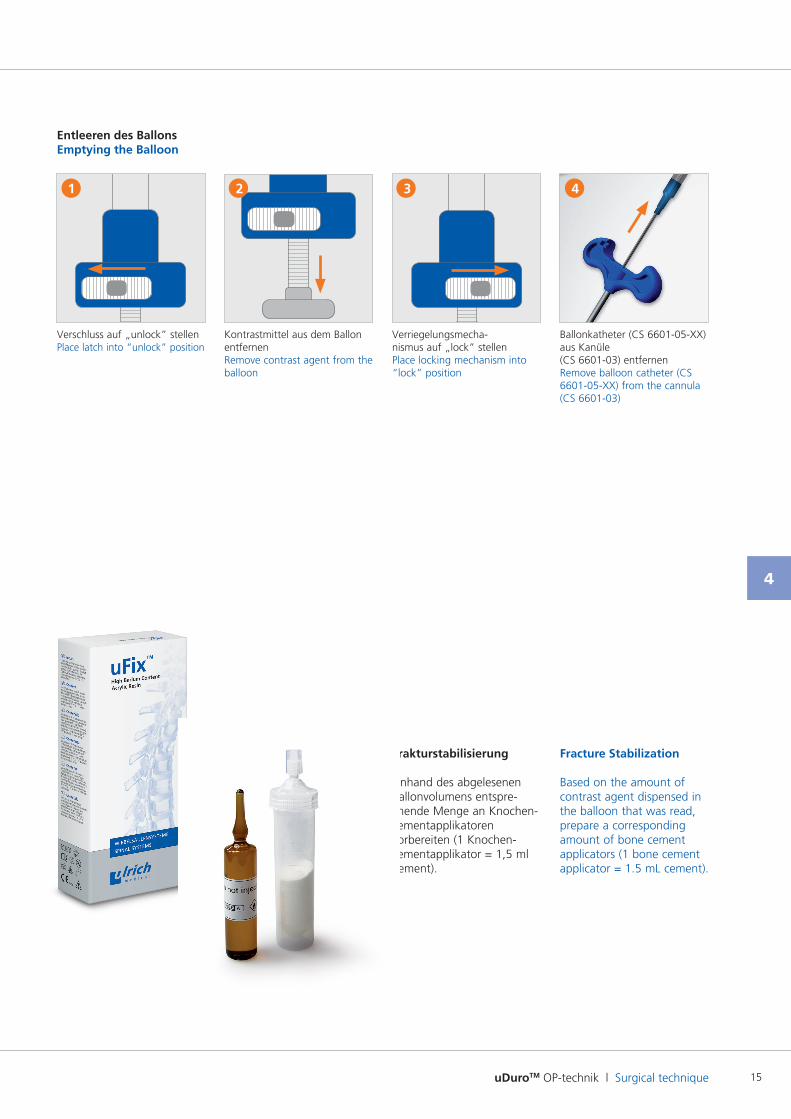
Frakturstabilisierung
Anhand des abgelesenen Ballonvolumens entsprechende Menge an Knochenzementapplikatoren vorbereiten (1 Knochen zementapplikator = 1,5 ml Zement).
Fracture Stabilization
Based on the amount of contrast agent dispensed in the balloon that was read, prepare a corresponding amount of bone cement applicators (1 bone cement applicator = 1.5 mL cement).
Entleeren des BallonsEmptying the Balloon
Verschluss auf „unlock” stellenPlace latch into “unlock” position
Kontrastmittel aus dem Ballon entfernenRemove contrast agent from the balloon
Verriegelungsmecha nismus auf „lock” stellenPlace locking mechanism into “lock” position
Ballonkatheter (CS 660105XX) aus Kanüle (CS 660103) entfernenRemove balloon catheter (CS 660105XX) from the cannula (CS 660103)
1 2 3 4
uDuroTM OP-technik l Surgical technique
4
16
Operationstechnik l Surgical technique
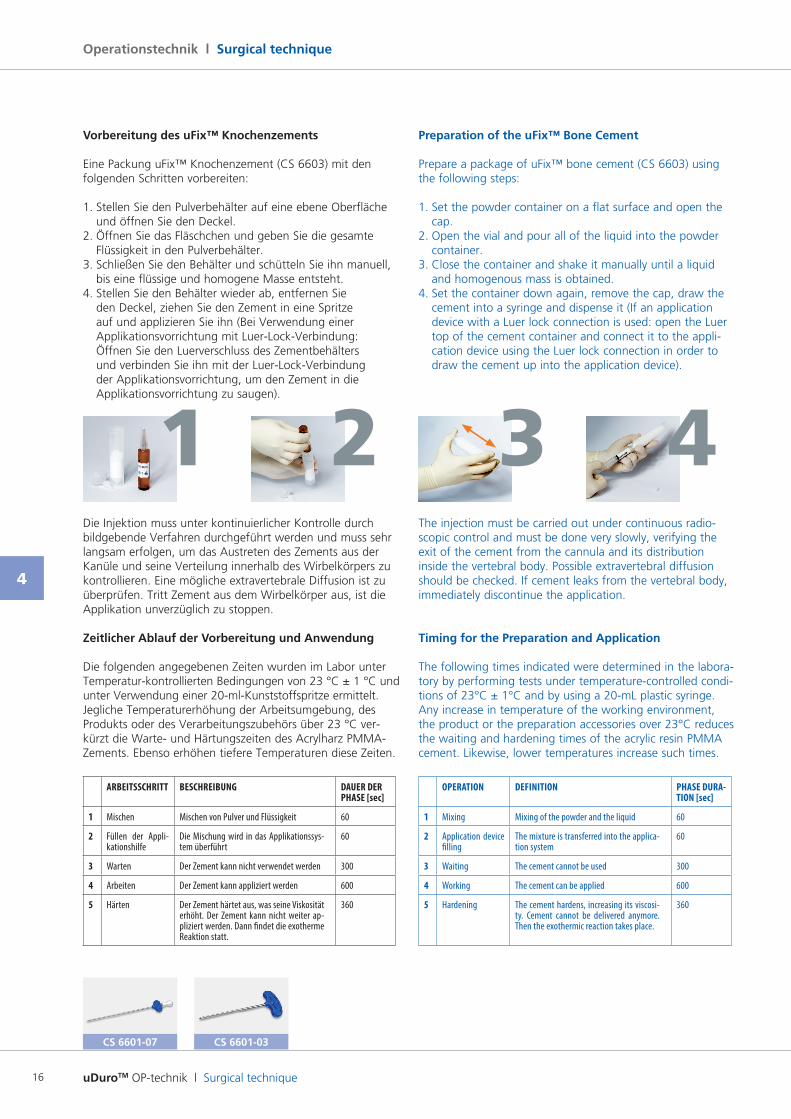
Vorbereitung des uFix™ Knochenzements
Eine Packung uFix™ Knochenzement (CS 6603) mit den folgenden Schritten vorbereiten:
1. Stellen Sie den Pulverbehälter auf eine ebene Oberfläche und öffnen Sie den Deckel.
2. Öffnen Sie das Fläschchen und geben Sie die gesamte Flüssigkeit in den Pulverbehälter.
3. Schließen Sie den Behälter und schütteln Sie ihn manuell, bis eine flüssige und homogene Masse entsteht.
4. Stellen Sie den Behälter wieder ab, entfernen Sie den Deckel, ziehen Sie den Zement in eine Spritze auf und applizieren Sie ihn (Bei Verwendung einer Applikationsvorrichtung mit LuerLockVerbindung: Öffnen Sie den Luerverschluss des Zementbehälters und verbinden Sie ihn mit der LuerLockVerbindung der Applikationsvorrichtung, um den Zement in die Applikationsvorrichtung zu saugen).
Die Injektion muss unter kontinuierlicher Kontrolle durch bildgebende Verfahren durchgeführt werden und muss sehr langsam erfolgen, um das Austreten des Zements aus der Kanüle und seine Verteilung innerhalb des Wirbelkörpers zu kontrollieren. Eine mögliche extravertebrale Diffusion ist zu überprüfen. Tritt Zement aus dem Wirbelkörper aus, ist die Applikation unverzüglich zu stoppen.
Zeitlicher Ablauf der Vorbereitung und Anwendung
Die folgenden angegebenen Zeiten wurden im Labor unter Temperaturkontrollierten Bedingungen von 23 °C ± 1 °C und unter Verwendung einer 20mlKunststoffspritze ermittelt.Jegliche Temperaturerhöhung der Arbeitsumgebung, des Produkts oder des Verarbeitungszubehörs über 23 °C verkürzt die Warte und Härtungszeiten des Acrylharz PMMAZements. Ebenso erhöhen tiefere Temperaturen diese Zeiten.
ARBEITSSCHRITT BESCHREIBUNG DAUER DER PHASE [sec]
1 Mischen Mischen von Pulver und Flüssigkeit 60
2 Füllen der Appli-kationshilfe
Die Mischung wird in das Applikationssys-tem überführt
60
3 Warten Der Zement kann nicht verwendet werden 300
4 Arbeiten Der Zement kann appliziert werden 600
5 Härten Der Zement härtet aus, was seine Viskosität erhöht. Der Zement kann nicht weiter ap-pliziert werden. Dann findet die exotherme Reaktion statt.
360
Preparation of the uFix™ Bone Cement
Prepare a package of uFix™ bone cement (CS 6603) using the following steps:
1. Set the powder container on a flat surface and open the cap.
2. Open the vial and pour all of the liquid into the powder container.
3. Close the container and shake it manually until a liquid and homogenous mass is obtained.
4. Set the container down again, remove the cap, draw the cement into a syringe and dispense it (If an application device with a Luer lock connection is used: open the Luer top of the cement container and connect it to the application device using the Luer lock connection in order to draw the cement up into the application device).
The injection must be carried out under continuous radioscopic control and must be done very slowly, verifying the exit of the cement from the cannula and its distribution inside the vertebral body. Possible extravertebral diffusion should be checked. If cement leaks from the vertebral body, immediately discontinue the application.
Timing for the Preparation and Application
The following times indicated were determined in the laboratory by performing tests under temperaturecontrolled conditions of 23°C ± 1°C and by using a 20mL plastic syringe. Any increase in temperature of the working environment, the product or the preparation accessories over 23°C reduces the waiting and hardening times of the acrylic resin PMMA cement. Likewise, lower temperatures increase such times.
OPERATION DEFINITION PHASE DURA-TION [sec]
1 Mixing Mixing of the powder and the liquid 60
2 Application device filling
The mixture is transferred into the applica-tion system
60
3 Waiting The cement cannot be used 300
4 Working The cement can be applied 600
5 Hardening The cement hardens, increasing its viscosi-ty. Cement cannot be delivered anymore. Then the exothermic reaction takes place.
360
CS 6601-07
1 2 43
CS 6601-03
uDuroTM OP-technik l Surgical technique
4
17
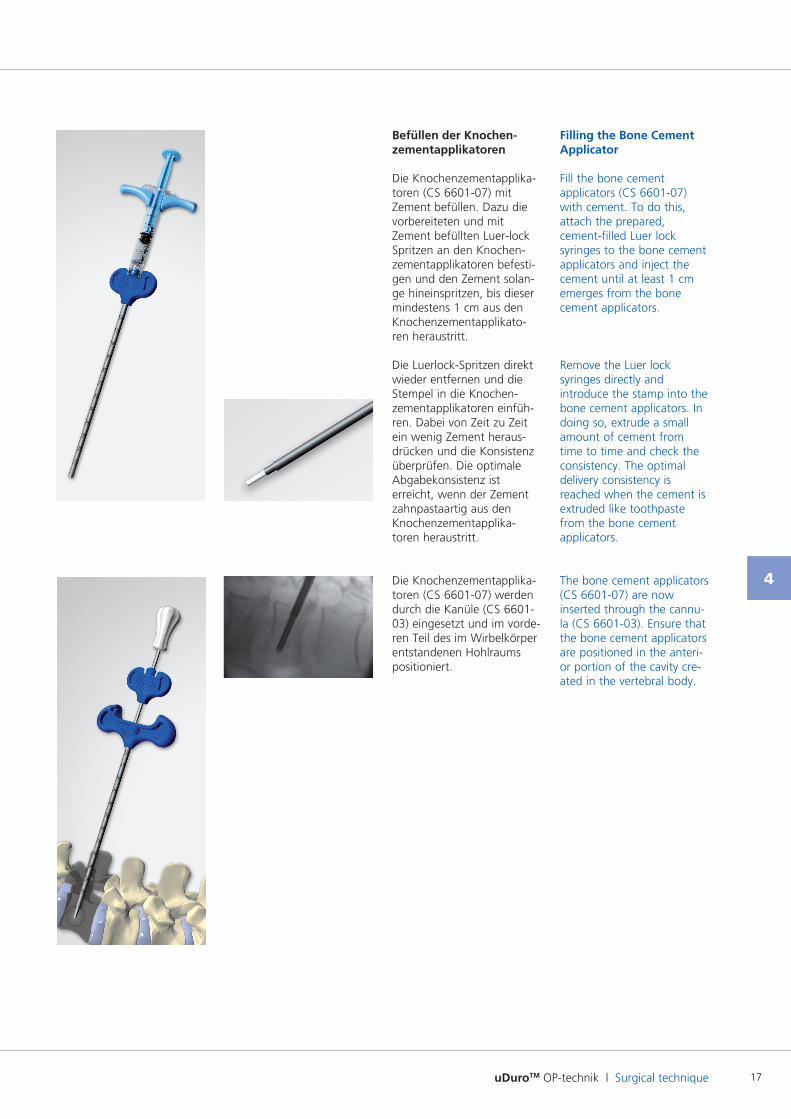
Befüllen der Knochen-zementapplikatoren
Die Knochenzementapplikatoren (CS 660107) mit Zement befüllen. Dazu die vorbereiteten und mit Zement befüllten Luerlock Spritzen an den Knochenzementapplikatoren befestigen und den Zement solange hineinspritzen, bis dieser mindestens 1 cm aus den Knochenzementapplikatoren heraustritt.
Die LuerlockSpritzen direkt wieder entfernen und die Stempel in die Knochenzementapplikatoren einführen. Dabei von Zeit zu Zeit ein wenig Zement herausdrücken und die Konsistenz überprüfen. Die optimale Abgabekonsistenz ist erreicht, wenn der Zement zahnpastaartig aus den Knochenzementapplikatoren heraustritt.
Die Knochenzementapplikatoren (CS 660107) werden durch die Kanüle (CS 660103) eingesetzt und im vorderen Teil des im Wirbelkörper entstandenen Hohlraums positioniert.
Filling the Bone Cement Applicator
Fill the bone cementapplicators (CS 660107) with cement. To do this, attach the prepared, cementfilled Luer lock syringes to the bone cement applicators and inject the cement until at least 1 cm emerges from the bone cement applicators.
Remove the Luer lock syringes directly and introduce the stamp into the bone cement applicators. In doing so, extrude a small amount of cement from time to time and check the consistency. The optimal delivery consistency is reached when the cement is extruded like toothpaste from the bone cement applicators.
The bone cement applicators (CS 660107) are now inserted through the cannula (CS 660103). Ensure that the bone cement applicators are positioned in the anterior portion of the cavity created in the vertebral body.

uDuroTM OP-technik l Surgical technique
4
18
Operationstechnik l Surgical technique
Applikation mit Knochen zement
Mit dem Stempel des Knochenzementapplikators (CS 660107) wird der Knochenzement in den Hohlraum gedrückt. Dabei zuerst die Knochenzementapplikatoren vorne belassen und unter Abgabe von Zement kontinuierlich nach hinten ziehen. Unter ständiger Röntgenkontrolle die Verteilung des Zements überwachen. Den Zement solange abgeben, bis die von den Ballons geschaffenen Hohlräume ausgefüllt sind. Der Wirbelkörper darf insbesondere im posterioren Bereich des Wirbelkörpers nicht überfüllt werden. Bei Zementaustritt aus dem Wirbelkörper sofort mit dem Befüllen aufhören.
Hinweis: Nach Befüllen des Wirbelkörpers mit Zement, leeren Zementapplikator einführen und bis zur Aushärtung in Situ belassen um einen Zementrückfluss zu vermeiden.
Entfernen aller Instrumente
Nach abgeschlossener Zementbefüllung alle Instrumente entfernen und die Stichinzisionen nach Standardtechnik schließen.
Filling with bone cement
The bone cement is forced into the cavity using the stamp of the bone cement applicator (CS 660107). First leave the bone cement applicators in front and continuously pull back while dispensing cement. Monitor continuously under Xray control.Dispense cement until the cavities created by the balloons are filled. The vertebral body must not be overfilled, particularly in the posterior area of the vertebral body. If cement should leak out of the vertebral body, immediately stop filling.
Note:After filling the vertebral body with cement, introduce the empty cement applicator and leave in situ until hardening in order to avoid back flow of cement.
Remove all instruments
After completing cementfilling, remove all instruments and close the stab incisions according to the standard technique.
Zementbefüllung, ap Ansicht Cement filling, ap view
CS 6601-07
Zementbefüllung, laterale Ansicht Cement filling, lateral view
uDuroTM OP-technik l Surgical technique
5
19
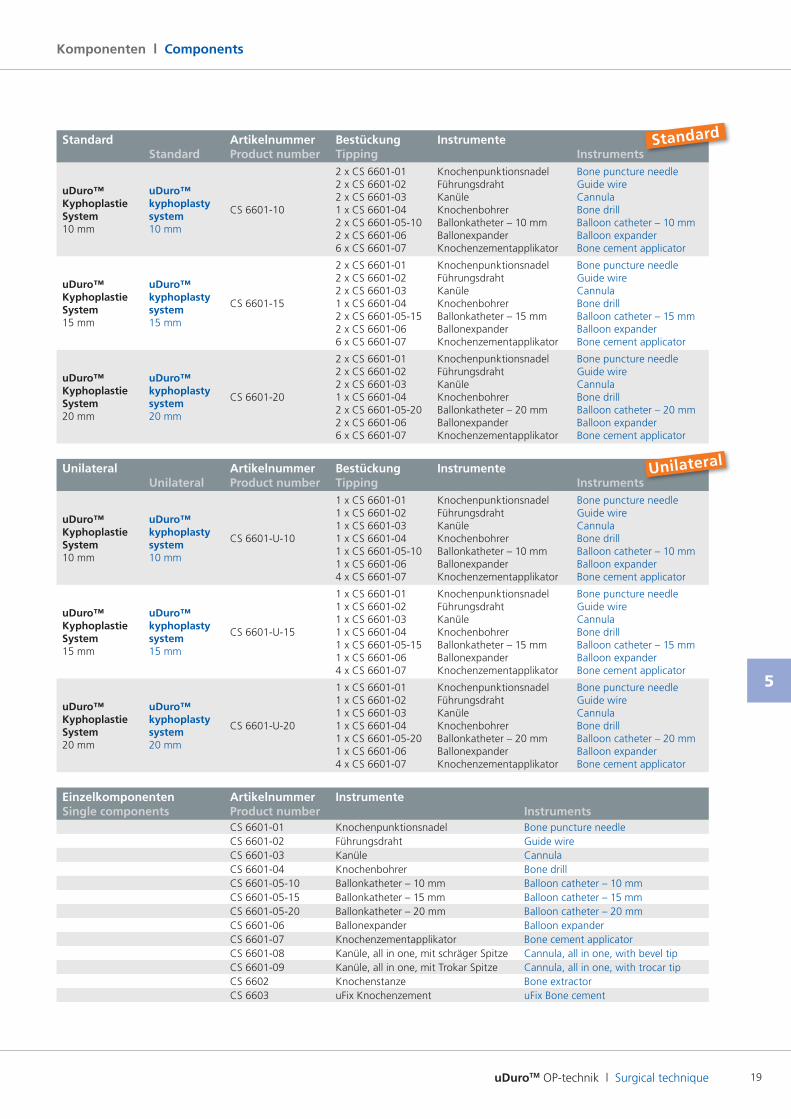
Komponenten l Components
Standard Standard
ArtikelnummerProduct number
BestückungTipping
Instrumente Instruments
uDuro™ Kyphoplastie System 10 mm
uDuro™ kyphoplasty system 10 mm
CS 660110
2 x CS 6601012 x CS 6601022 x CS 6601031 x CS 6601042 x CS 660105102 x CS 6601066 x CS 660107
Knochenpunktionsnadel Führungsdraht Kanüle Knochenbohrer Ballonkatheter – 10 mm Ballonexpander Knochenzementapplikator
Bone puncture needle Guide wire Cannula Bone drill Balloon catheter – 10 mm Balloon expander Bone cement applicator
uDuro™ Kyphoplastie System 15 mm
uDuro™ kyphoplasty system 15 mm
CS 660115
2 x CS 6601012 x CS 6601022 x CS 6601031 x CS 6601042 x CS 660105152 x CS 6601066 x CS 660107
Knochenpunktionsnadel Führungsdraht Kanüle Knochenbohrer Ballonkatheter – 15 mm Ballonexpander Knochenzementapplikator
Bone puncture needle Guide wire Cannula Bone drill Balloon catheter – 15 mm Balloon expander Bone cement applicator
uDuro™ Kyphoplastie System 20 mm
uDuro™ kyphoplasty system 20 mm
CS 660120
2 x CS 6601012 x CS 6601022 x CS 6601031 x CS 6601042 x CS 660105202 x CS 6601066 x CS 660107
Knochenpunktionsnadel Führungsdraht Kanüle Knochenbohrer Ballonkatheter – 20 mm Ballonexpander Knochenzementapplikator
Bone puncture needle Guide wire Cannula Bone drill Balloon catheter – 20 mm Balloon expander Bone cement applicator
Unilateral Unilateral
ArtikelnummerProduct number
BestückungTipping
Instrumente Instruments
uDuro™ Kyphoplastie System 10 mm
uDuro™ kyphoplasty system 10 mm
CS 6601U10
1 x CS 6601011 x CS 6601021 x CS 6601031 x CS 6601041 x CS 660105101 x CS 6601064 x CS 660107
Knochenpunktionsnadel Führungsdraht Kanüle Knochenbohrer Ballonkatheter – 10 mm Ballonexpander Knochenzementapplikator
Bone puncture needle Guide wire Cannula Bone drill Balloon catheter – 10 mm Balloon expander Bone cement applicator
uDuro™ Kyphoplastie System 15 mm
uDuro™ kyphoplasty system 15 mm
CS 6601U15
1 x CS 6601011 x CS 6601021 x CS 6601031 x CS 6601041 x CS 660105151 x CS 6601064 x CS 660107
Knochenpunktionsnadel Führungsdraht Kanüle Knochenbohrer Ballonkatheter – 15 mm Ballonexpander Knochenzementapplikator
Bone puncture needle Guide wire Cannula Bone drill Balloon catheter – 15 mm Balloon expander Bone cement applicator
uDuro™ Kyphoplastie System 20 mm
uDuro™ kyphoplasty system 20 mm
CS 6601U20
1 x CS 6601011 x CS 6601021 x CS 6601031 x CS 6601041 x CS 660105201 x CS 6601064 x CS 660107
Knochenpunktionsnadel Führungsdraht Kanüle Knochenbohrer Ballonkatheter – 20 mm Ballonexpander Knochenzementapplikator
Bone puncture needle Guide wire Cannula Bone drill Balloon catheter – 20 mm Balloon expander Bone cement applicator
EinzelkomponentenSingle components
ArtikelnummerProduct number
Instrumente Instruments
CS 660101 Knochenpunktionsnadel Bone puncture needleCS 660102 Führungsdraht Guide wireCS 660103 Kanüle CannulaCS 660104 Knochenbohrer Bone drillCS 66010510 Ballonkatheter – 10 mm Balloon catheter – 10 mmCS 66010515 Ballonkatheter – 15 mm Balloon catheter – 15 mmCS 66010520 Ballonkatheter – 20 mm Balloon catheter – 20 mmCS 660106 Ballonexpander Balloon expanderCS 660107 Knochenzementapplikator Bone cement applicatorCS 660108 Kanüle, all in one, mit schräger Spitze Cannula, all in one, with bevel tipCS 660109 Kanüle, all in one, mit Trokar Spitze Cannula, all in one, with trocar tipCS 6602 Knochenstanze Bone extractorCS 6603 uFix Knochenzement uFix Bone cement
Unilateral
Standard
WS
6601
R3/
2013
08
ulrich GmbH & Co. KG l Buchbrunnenweg 12 l 89081 Ulm l GermanyTelefon/Phone: +49 (0)731 96540 l Fax national/international: +49 (0)731 96542705/[email protected] l www.ulrichmedical.com
Tech
nisc
he Ä
nder
unge
n, D
ruck
fehl
er u
nd Ir
rtum
vor
beha
lten
l W
ith r
eser
vatio
ns o
f of
tec
hnic
al c
hang
es, m
ispr
ints
and
err
ors