Umschalten auf Perfektion - Industrial Spare Parts … Montage von Schaltschrank-Kühlgeräten Bei...
13
Rittal SK Umschalten auf Perfektion Umweltorientierte Kühltechnik Schaltschrank- Kühlgerät Cooling unit Climatiseur Koelaggregaat Kylaggregat Condizionatore per armadi Refrigerador para armarios Montageanleitung Assembly instructions Notice de montage Montage-instructie Montageanvisning Istruzioni di montaggio Instrucciones de montaje SK 3296.100 SK 3296.500 SK 3296.140 SK 3296.540 SK 3272.100 SK 3290.100 SK 3290.500 SK 3290.140 SK 3290.540 SK 3280.100 SK 3256.100 SK 3256.500 SK 3256.140 SK 3256.540
Transcript of Umschalten auf Perfektion - Industrial Spare Parts … Montage von Schaltschrank-Kühlgeräten Bei...

ACHTUNG!Montage vonSchaltschrank-KühlgerätenBei der Montage ist zu beachten, daß Warmluftein- und Kaltluftaustritt nicht zu verbauen sind. Eine ungehinderte Luft-zirkulation im Innenkreislauf ist zu ge-währleisten. Ein Abstand zu den Luft-aus- und -eintrittsöffnungen von 200 mm bis zur Installation ist einzuhalten. Wird das Gerät vom Netz getrennt, darf ein erneutes Einschalten erst nach einer Wartezeit von > 5 min. erfolgen.
Einsatz von Türpositionsschalternbei KühlgerätenSerie .100 / .140: Die o.g. Wartezeit muß z.B. durch die Verwendung eines Zeitrelais sichergestellt werden.Serie .500 / .540: Die o.g. Wartezeit wird durch den integrierten Microcontroller sichergestellt. Pro Gerät ist ein potentialfreier Türpositionskontakt zu verwenden; es dürfen auf keinen Fall mehrere Geräte über einen Türend-schalter betrieben werden.In Umgebungen mit erhöhter elektro-magnetischer Störung muß eine geschirmte Leitung verwendet werden. Der Türkontakt ist über zusätzliches Relais, das in der Nähe des Gerätes pla-ziert ist, zu schalten. Die Leitungen sind getrennt von den Netzleitungen zu ver-legen. Auf kurze Leitungswege achten!
Einsatz von Motor- bzw. Trafoschutzschaltern bei KühlgerätenDrehstromgeräte sind über einen Motorschutzschalter an ein TN-Netz mit geerdetem Sternpunkt anzuschließen. Beim Einsatz von Schaltschrank-Kühl-geräten der Serie .140 / .540 mit Transformatoren und Geräten in Sonder-spannung, die ebenfalls mit Trafo ausgerüstet sind, sind normale Motor-schutzschalter von ihrer Einschalt-charakteristik nicht mehr ausreichend. Deshalb müssen kundenseitig Trafo-schutzschalter installiert werden. Diese sind auf den auf dem Typenschild angegebenen Nennstrom einzustellen.
ATTENTION!Installation of cooling unitsPlease make sure during installation that warm air inlet and cold air outlet are not obstructed. An unobstructed air circu-lation in the inside circuit has to be ensured. A distance of 200 mm from air inlet and air outlet openings to the installed equipment should be respected. After disconnection of the cooling unit, waiting period of > 5 min. before reactivation.
Use of door operated switch with cooling unitsSeries .100 / .140: The mentioned above waiting period has to be ensured by using a time relay.Series .500 / .540: One potential-free door operated contact has to be used per unit, never operate more than one unit via one door operated switch. In environments with high electromagnetic interference a shielded cable has tobe used. The door contact is to be connected via an additional relay, which is placed near the unit. The cables and the supply line are to be laid separately. Please ensure that the cables are as short as possible.
Use of motor or transformer protection switch with cooling unitsThree-phase devices are to be connected via a motor protection switch to a TN network with earthed neutral. If units of series .140 / .540 are used with transformers and units with special voltage, also equipped with transformer, standard motor protection switches are not sufficient due to their closed cricuit condition. That is why transformer protection switches have to be installed by the customer, and have to be adjusted to the rated current on the type plate.
ATTENTION!Montage des climatiseurs d’armoires électriquesVeiller lors du montage à n’obstruer ou gêner ni l’entrée de l’air chaud ni la sortie de l’air froid. L’air doit pouvoir circuler librement dans le circuit intérieur. Respecter un écartement de 200 mm entre l’appareil installé et les ouvertures d’entrée et de sortie d’air. Lorsque l’appareil a été coupé du secteur, attendre au moins 5 minutes avant de le remettre en circuit.
Utilisation d’un interrupteur de porte avec les climatiseurSéries .100 / .140: La durée d’attente mentionnée plus haut sera assurée en installant un relais retardeur.Séries .500 / .540: Utiliser un interrupteur de porte sans potentiel pour chaque appareil. Ne jamais faire fonctionner plusieurs appareils avec un seul interrupteur de porte. Lorsque le milieu ambiant est soumis à d’importantes interférences électro-magnétiques, utiliser un câble avec contacteur de protection. Monter le contact de la porte avec un relais supplémentaire placé à proximité de l’appareil. Lors de la pose des conduc-teurs, veiller à les séparer des lignes d’alimentation et choisir la voie la plus courte.
Utilisation d’un contacteur-disjoncteur ou disjoncteur de protection pour transformateur dans les climatiseurs d’armoires électriquesLes appareils à courant triphasé doivent être connectés par un contacteur-disjoncteur au réseau TN avec neutre mis à la terre. Dans le cas des climati-seurs d’armoires électriques des séries .140 / 540, équipés de transformateurs et dans le cas des appareils avec tensions spéciales également équipés de trans-formateurs, les propriétés d’enclenche-ment des disjoncteurs standard ne sont pas suffisantes. Le client devra alors prévoir des disjoncteurs de protection pour transformateurs et les régler sur la valeur du courant nominal indiquée sur la plaque signalétique.
LET OP!Montage van schakelkast-koelaggregatenBij de montage dient erop te worden gelet dat de aanzuigopeningen van de warme lucht en de inblaasopeningen van de koude lucht niet mogen worden gemodificeerd. Anders kan geen ongehinderde luchtcirculatie in het binnencircuit worden gegarandeerd. Tussen de luchtaanzuig-, luchtinblaas-openingen en de installatie dient een afstand van minimaal 200 mm te worden aangehouden. Wordt het aggregaat van het net gescheiden, dan mag het pas na een wachttijd van tenminste 5 minuten opnieuw worden ingeschakeld.
Toepassing van deurschakelaars bij koelaggregatenSerie .100 / .140: De hierboven genoem-de wachttijd dient door toepassing van bijv. een tijdrelais te worden zeker-gesteld. Serie .500 / .540: Per aggregaat dient één potentiaalvrij deurcontact te worden toegepast; er mogen in geen geval meerdere aggregaten op één deurschakelaar worden aangesloten. In omgevingen waar verhoogde elektro-magnetische storingen voorkomen, dient een afgeschermde kabel te worden toegepast. Het deurcontact kan via een extra relais, dat in de buurt van het aggregaat is aangebracht, worden geschakeld. De kabels diene geschei-den van de netvoedingskabels te worden gelegd. Let erop dat zo kort mogelijke kabels worden gebruikt!
Inzet van motor respectievelijk transformatorbeveiligingsschakelaar bij koelaggregatenDraaistroomaggregaten zijn via een motorbeveiligingsschakelaar aan een TN-stelsel met geaard sterpunt ann te sluiten. Bij de toepassing van schakel-kast-koelaggregaten van de serie .140 / .540 met transformatoren en aggregaten met afwijkende spanningen die ookzijn voorzien van een transformator zijn standaard motorbeveiligingsautoma-ten niet voldoende als gevolg van hun inschakelkarakteristiek. Daarom dienen trafobeveiligingsschakelaars door de klant zelf te worden geïnstalleerd en te worden ingesteld volgens de op het type-plaatje aangegeven nominale stroom.
VARNING!Montering av apparatskåpskylaggregatVid montering måste beaktas att varmluftsintag och kalluftsutblås inte är spärrade. En fri luftcirkulation inuti skåpet måste garanteras. Utrymmet mellan luftintag, utblåsöppningar och installationerna måste vara 200 mm. Efter att kylaggregatet stängts av kan det startas först efter 5 minuter.
Användning av dörrkontakt med kylaggregatVid serierna .100 / .140 måste den ovan nämnda väntetiden åstadkommas genom ett tidrelä.Vid serierna .500 / .540 måste en potentialfri dörrkontakt användas per enhet, det får heller aldrig användas mer än en enhet per dörrkontakt. I miljöer med hög elektromagnetisk påverkan måste en skärmad kabel användas. Dörrkontakten ska kopplas via ytterligare ett relö, vilket placeras nära enheten. Kablage dras skiljt från nätledningen. Se till att kablarna är så korta som möjligt!
Användning av motor- resp transfor-matorskyddsbrytare med kylaggregatTrefasaggregat ansluts via en motorskyddsbrytare till ett TN-nät med jordad nollpunkt. Om kylaggregat ur serierna .140 / .540 används med transformatorer och enheter med specialspänning, även de utrustade med transformatorer, räcker inte standard motorskyddsbrytare beroende på deras slutna kretsar. Därför måste transformatorskyddsbrytare installeras, Dessa ska ställas in på den på typskylten angivna nätströmmen.
ATTENZIONE!Installazione di condizionatoriDurante il montaggio accertarsi che l’entrata aria calda e l’uscita aria fredda non siano ostruite. Occorre assicurare la libera circolazione dell’aria nel circuito interno, nonchè rispettare una distanza di 200 mm dalle aperture di entrata e scarico aria al luogo di installazione. Una volta disinserito l’apparecchio è possibile riavviarlo soltanto dopo > 5 min. di attesa.
Impiego di interruttori di posiziona-mento porta nei condizionatoriSerie .100 / .140: il suddetto tempo di attesa prima di riavviare l’apparecchio deve essere rispettato utilizzando ad es. un relais a tempo.Serie .500 / .540: il tempo di attesa sopra indicato viene assicurato dal microcontroller integrato. Si deve utilizzare un interruttore di posiziona-mento porta per ogni apparecchio; non è possibile in nessun caso azionare più apparecchi con un interruttore. In ambienti particolarmente soggetti ad interferenze elettromagnetiche occorre utilizzare un cavo schermato. L’interruttore per la porta dovrà essere collegato ad un ulteriore relais, situato vicino all’apparecchio. I cavi e le linee elettriche devono essere posati in sede separata. Prevedere linee di connes-sione con lunghezza limitata.
Impiego di interruttori di protezione trasformatore nei condizionatoriI normalli interruttori di protezione dei motori, per le loro caratteristiche, non sono più sufficienti per essere impiegati su condizionatori della serie .140 / .540 con trasformatori e apparecchiature a tensione speciale, dotate anch’esse di trasformatore: Il cliente dovrà quindi installare interruttori di protezione del trasformatore, da tarare in base al valore della corrente nominale indicato sulla targhetta.
¡ATENCION!Montaje de refrigeradoresEn el montaje debe tenerse en cuenta que la entrada de aire caliente y la salida de aire frío no se encuentren obstruidas. Debe garantizarse una circulación adecuada del aire en el circuito interior. Debe mantenerse una distancia de 200 mm entre las escota-duras de salida y de entrada de aire hasta el punto de instalación. Tras la desconexión del aparato deben trans-currir > 5 min. hasta la próxima conexión.
Uso de interruptores de posición de puerta en refrigeradoresSerie .100 / .140: El tiempo de reposo mencionado arriba debe garantizarse mediante el montaje de un relé de tiempo.Serie .500 / .540: Debe utilizarse un contacto libre de potencial de posición de puerta por aparato; en ningún caso deberá utilizarse un sólo interruptor final para más de un aparato. En entornos con elevada perturbación electromagnética debe utilizarse un cable apantallado. El contacto de puerta debe conectarse a través de un relé adicional situado cerca del aparato. Los cables deben tenderse separados de los cables de red. Procure que los cables sean lo más cortos posibles.
Uso de interruptores de protección de motores o de transformadores en refrigeradoresLos aparatos de corriente trifásica deben conectarse mediante un inter-ruptor de protección de motores a una red TN con toma de tierra en forma de estrella. Con la aplicación de los refrige-radores para armarios de las series.140 / .540 con transformadores y apa-ratos con tensión especial, equipados también con transformadores, los interruptores de protección de motor normales son insuficientes a causa de sus características de conexión. Por tal motivo el cliente deberá instalar un interruptor de protección de transforma-dor. Estos deben ajustarse en función de la corriente nominal indicada en la placa de características.
GBD F NL
S I E J
Rittal
SK
Umschalten auf PerfektionUmschalten auf Perfektion
UmweltorientierteK ü h l t e c h n i k
<U
mschlag A
3>
7/97
2. A
ufl.
9/99
Rittal-Werk · Rudolf Loh GmbH & Co. KG · Postfach 1662 · D-35726 HerbornTelefon (02772) 505-0 · Telefax (02772) 505-2319 · eMail: [email protected] · Internet: http://www.rittal.de
Schaltschrank-SystemeEnclosure systemsSystèmes d’armoires électriquesSchakelkastsystemenApparatskåpssystemSistemi di armadi per quadri di comandoSistemas de armarios
Elektronik-Aufbau-Systeme ELElectronic systems ELSystèmes de montage électroniques ELElektronica-opbouwsystemen ELElektroniksystem ELSistemi di allestimento EL per l’elettronica industrialeSistemas de soporte electrónicos EL
Schaltschrank-Klimatisierung SKEnclosure air-conditioning SKClimatisation d’armoires électriques SKSchakelkastklimaatbeheersing SKApparatskåpsklimatisering SKApparecchi SK per la climatizzazione di quadri di com.Climatización de armarios SK
Stromverteilungs-Komponenten SVPower distribution components SVComposants de distribution de courant SVStroomverdelingscomponenten SVStrömfördelningskomponenter SVComponenti SV per la distribuzione di corrente elettricaComponentes de distribución de corriente SV
Datenübertragungs-Komponenten DKData communication components DKComposants de distribution de données informat. DKData-overdrachtscomponenten DKDataöverföringskomponenter DKArmadi e contenitori DK per trasmissione dati e telefoniaComponentes de la transmisión de datos
Outdoor-Gehäuse CS Outdoor enclosures CS Armoires outdoor CSOutdoor-behuizingen CSUtomhusskåp CSArmadi modulari CS per applicazioni da esternoCajas para la intemperie CS
233604
Schaltschrank-KühlgerätCooling unitClimatiseurKoelaggregaatKylaggregatCondizionatoreper armadiRefrigeradorpara armarios
MontageanleitungAssembly instructionsNotice de montageMontage-instructieMontageanvisningIstruzioni di montaggioInstrucciones de montaje
SK 3296.100SK 3296.500SK 3296.140SK 3296.540SK 3272.100SK 3290.100SK 3290.500SK 3290.140SK 3290.540SK 3280.100SK 3256.100SK 3256.500SK 3256.140SK 3256.540

600
340
464
350
450
330
600
140
Ø 8
130 250 80
378
464
600
400
460
475
550
600
275
312
426
7045
300
237.5187.5
Ø 8426310
340
454
460686
70
315100
65
600
475
225
320
460
375
215
Ø 10
275275
Tab. 2.1
Technische Daten
Tab. 2.1
Technical data
Tab. 2.1
Données techniques
Tab. 2.1
Technische gegevens
Tab. 2.1
Tekniska data
Tab. 2.1
Caratteristiche tecniche
Tab. 2.1
Datos técnicos
Betriebs-spannung
Nenn-strom
Anlauf-strom
Vorsiche-rung T
Einschalt-dauer
Nennleistung Nutzkühlleistung Kältemittel zul. Betriebs-überdruck
Temperatur-bereich
Geräusch-pegel
SchutzartInnenkreislaufAußenkreislauf
Abmessungen (B x H x T) mm
Gewicht Farbton
Operating voltage
Rated current
Starting current
Pre-fuse T
Duty cycle Nom. refrigeration
Useful cooling output
Refrigerant Permis-sible pressure
Temperature range
Noiselevel
Protection categ.Internal circuitExternal circuit
Dimensions (W x H x D)mm
Weight Colour
Tension nominale
Courant nominal
Courant dedémarrage
Dispositif de sécurité T
Durée de mise en cir-cuit
Puissance nominale
Puissance frigorifique de rég.
Fluidefrigori-gène
Pressionde régime autor.
Plage de température
Niveausonore
Degré de protect.Circuit intérieurCircuit extérieur
Dimensions (L x H x P)mm
Poids Coloris
Bedrijfs-spanning
Nominale stroom
Aanloop-stroom
Primaire zekering T
Inschakel-duur
Nominaal vermogen
Nuttig koelvermogen
Koel-middel
p. max. Temperatuur-bereik
Geluids-nivo
Beschermklasseinwendig circuituitwend. circuit
Afmetingen (B x H x D)mm
Gewicht Kleur
Anslut-nings-spänning
Märk-ström
Startström Försäkring gL
Inkopp-lingstid
Märkeffekt Effektiv kyleffekt
Kylmedel Tillåtet drifts-övertryck
Temperatur-område
Ljudnivå KapslingsklassInre kretsloppYttre kretslopp
Mått(B x H x D)mm
Vikt Färgton
Tensione nominale
Correntenominale
Corrente di spunto
Fusibili T Ciclo d’in-sercione
Potenza nominale
Potenza frigorifera utile
Fluido frigorigeno
Pressione max.
Campo ditemperatura
Livellodi rumore
Grado di protez.Circuito internoCircuito esterno
Dimensioni(L x A x P)mm
Peso Colore
Tensión deservicio
Intensidad nominal
Intensidadde arranque
Fusible T Duración de conexión
Potencianominal
Potencia frigorífica útil
Fluido frigorífico
Presión máxima admis.
Campo detemperaturas
Nivelde ruido
ProtecciónCircuito interiorCircuito exterior
Dimensiones(anch. x alt. x prof.) mm
Peso Color
L35 L35L35 L50
DIN 3168/EN 814L35 L35L35 L50 EN 60 529
SK 3296.100SK 3296.500
230 V, 50/60 Hz
3.2 A/3.9 A
11.4 A/11.0 A
6 A/6 A 100% 330 W/430 W
390 W/525 W800 W/860 W615 W/685 W
R134 a,750 g 25 bar + 20 –
+ 55
°
C 62 dB (A) IP 54IP 34 600 x 340 x 464 38 kg RAL
7032
SK 3296.140SK 3296.540
400 V, 50/60 Hz
1.9 A/2.3 A
6.6 A/6.3 A
4 A/4 A 100% 345 W/450 W
415 W/545 W800 W/860 W615 W/685 W
R134 a,750 g 25 bar + 20 –
+ 55
°
C 62 dB (A) IP 54IP 34 600 x 340 x 464 41 kg RAL
7032
SK 3272.100
115 V, 50/60 Hz
6.3 A/6.6 A
18.2 A/20.7 A
10 A/10 A 100% 345 W/450 W
415 W/545 W800 W/860 W615 W/685 W
R134 a, 750 g 25 bar + 20 –
+ 55
°
C 62 dB (A) IP 54IP 34 600 x 340 x 464 41 kg RAL
7032
SK 3290.100SK 3290.500
230 V, 50/60 Hz
5.3 A/6.0 A
16.6 A/15.5 A
6 A/10 A 100% 710 W/800 W
840 W/920 W1400 W/1400 W1040 W/1200 W
R134 a, 950 g 25 bar + 20 –
+ 55
°
C 62 dB (A) IP 54IP 44 600 x 400 x 426 44 kg RAL
7032
SK 3290.140SK 3290.540
400 V, 50/60 Hz
3.1 A/3.5 A
9.6 A/8.9 A
6 A/6 A 100% 740 W/825 W
860 W/940 W1400 W/1400 W1040 W/1200 W
R134 a, 950 g 25 bar + 20 –
+ 55
°
C 62 dB (A) IP 54IP 44 600 x 400 x 426 50 kg RAL
7032
SK 3280.100
115 V, 50/60 Hz
10.5 A/12.8 A
24.6 A/28.7 A
16 A/16 A 100% 740 W/825 W
860 W/940 W1400 W/1400 W1040 W/1200 W
R134 a, 950 g 25 bar + 20 –
+ 55
°
C 62 dB (A) IP 54IP 44 600 x 400 x 426 50 kg RAL
7032
SK 3256.100SK 3256.500
230 V, 50/60 Hz
8.9 A/9.8 A
24.7 A/22.5 A
10 A/10 A 100% 1480 W/1480 W
1590 W2050 W/2060 W1490 W
R134 a, 980 g 24 bar + 20 –
55
°
C/+ 45
°
C 62 dB (A) IP 54IP 34 600 x 454 x 460 54 kg RAL
7032
SK 3256.140SK 3256.540
400 V, 50/60 Hz
5.1 A/5.7 A
14.2 A/13.0 A
10 A/10 A 100% 1520 W/1520 W
1640 W2050 W/2060 W1490 W
R134 a, 980 g 24 bar + 20 –
55
°
C/+ 45
°
C 62 dB (A) IP 54IP 34 600 x 454 x 460 59 kg RAL
7032
D
GB
F
NL
S
I
E
J
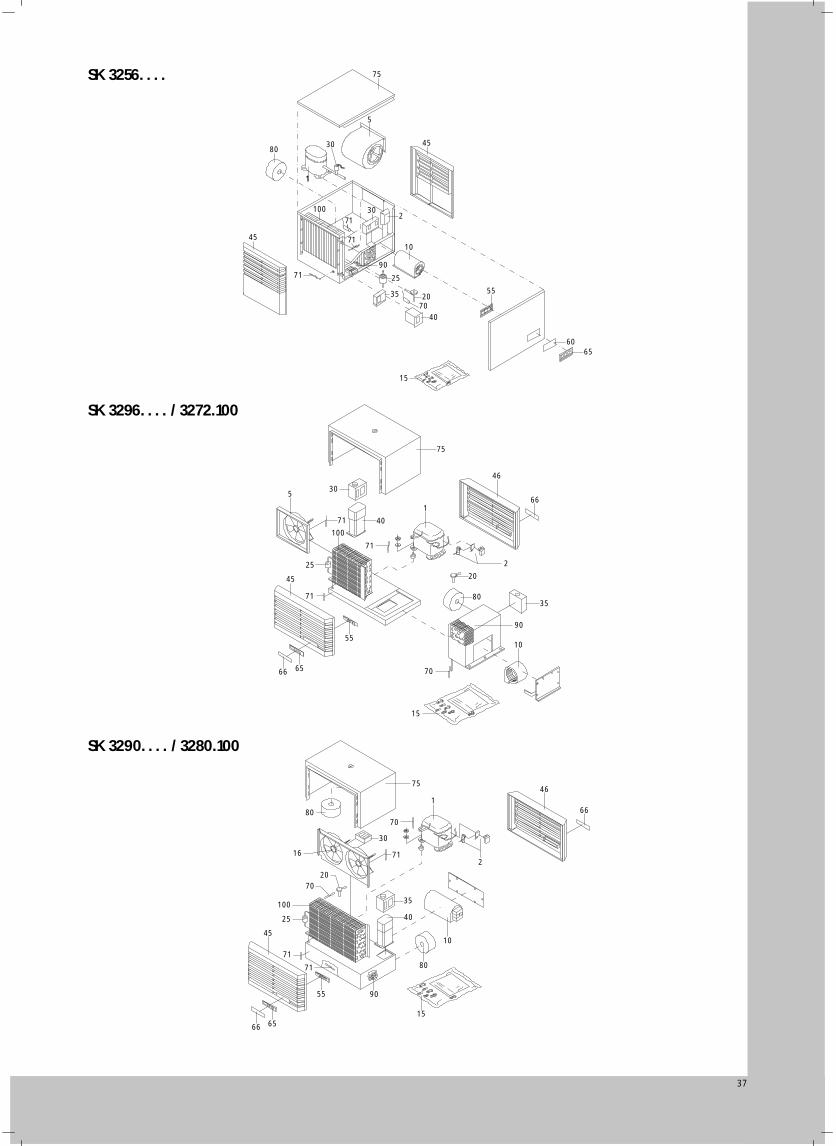
SK 3256. . . .
Abb. 3.2
Dachblechversteifung SK 3256. . . .
Fig. 3.2
Roof plate stiffening SK 3256. . . .
Fig. 3.2
Renforcement du toit en tôle SK 3256. . . .
Afb. 3.2
Versteviging van het dak SK 3256. . . .
Bild 3.2
Takplåtsförstyrning SK 3256. . . .
Fig. 3.2
Rinforzare la lamiera del tetto SK 3256. . . .
Fig. 3.2
Refuerzo del techo SK 3256. . . .
Abb. 3.3
Gerätemontage
Fig. 3.3
Mounting
Fig. 3.3
Montage
Afb. 3.3
Montage
Bild 3.3
Montage
Fig. 3.3
Montaggio
Fig. 3.3
Montaje
SK 3296. . . . / 3272.100
Abb. 3.1
Montageausschnitte
Fig. 3.1
Mounting cut-out
Fig. 3.1
Découpe de montage
Afb. 3.1
Montage-uitsparingen
Bild 3.1
Håltagning
Fig. 3.1
Dime di foratura
Fig. 3.1
Recorte del montaje
SK 3290. . . . / 3280.100

6
English
Contents1. Application2. Technical data3. Assembly4. Electrical connection5. Commencing operation and control
behaviour6. BUS System (Model No. SK 3124.000)7. Technical information8. Maintenance9. Scope of supply and guarantee
10. Fault indication and fault analysis11. Programming
1. ApplicationEnclosure cooling units are designed and built to dissipate heat from enclosures, by cooling the air inside the enclosure and protecting tem-perature sensitive components. Enclosure cool-ing units are particularly suitable for the temperature range of + 40 °C to + 55 °C.
2. Technical Data(see table 2.1)
3. AssemblyMake 2 cut-outs and screw holes in the top of the enclosure in accordance with fig. 3.1.Prior to mounting, ensure that� the site for the enclosure, and hence the
arrangement of the cooling unit, is selected so as to ensure good ventilation;
� the location is free from excessive dirt and moisture;
� the mains connection ratings, as stated on the name plate, are available;
� the ambient temperature is no higher than + 55 °C;
� the packaging shows no signs of damage. Traces of oil are an indication of coolant loss and of leakage in the unit system. Any damage to the packaging can become the cause of a subsequent function failure;
� the enclosure is sealed on all sides.Condensation will occur if the enclosure is leaky;
� the separation of the units from one another and from the wall should not be less than 200 mm;
� air inlet and outlet must not be obstructed on the inside;
� units should only be fitted vertically in the specified position. Max. deviation from true vertical: 2°;
� condensate drainage is provided (see 6.3);� electrical connection and repair must be
carried out only by authorized specialist personnel. Use only original replacement parts!
� To avoid an increase in condensation, a door operated switch (e. g. PS 4127.000) should be used which will switch the cooling unit off when the enclosure door is opened (see 5.2.3.3).
Stick the enclosed sealing gasket onto the enclosure roof.Important: To achieve a permanent seal between the cooling unit and the enclosure, the mounting surface may have to be strengthened or supported (see example on PS 3256. . . ., fig. 3.2).
Accessories for roof plate stiffening on the PS:Mounting rail“U” nutFixing bracketThreaded block
SK 3290. . . . / 3280. . . . / 3296. . . . / 3272. . . . – 6 x M6 SK 3256. . . . – 8 x M8 screw setscrews into the blind nuts on the underside of the unit and fix the unit with washers and nuts from underneath. For transportation of unit by crane: remove the blanking plug and screw in an eyebolt M12.
4. Electrical ConnectionThe connected voltage and frequency must corre-spond to the values stated on the name plate. The cooling unit must be connected to the mains via an isolating device, which ensures at least 3 mm contact opening when switched off. The unit must not have any additional temperature control con-nected before it. Line protection should be provid-ed by means of the pre-fuse specified on the name plate. Observe the relevant regulations during installation!
Version . . . . .100Connection should be made to the cable attached to the unit (see Detailed Wiring Diagram).
Version . . . . .500Connect the mains connection to the plug-in ter-minal strip X 10 (see Wiring Diagram).� Door limit switch, see 5.2.3.3� Collective fault signal connection, see 5.2.3.1� Note the designations on the terminal strip
(see Wiring Diagram).� The unit must be disconnected prior to
checking the protective earth conductor, high voltage and the insulation in the enclosure.
5. Commencing Operationand Control Behaviour
Following the completion of mounting and a waiting period of approximately 30 minutes (to allow oil to collect in the compressor in order to ensure lubrication and cooling) electrical connec-tion can be made.
5.1 Control by Thermostat
Version . . . . .100The cooling unit operates automatically, i.e. follow-ing the electrical connection, the evaporator fan will run continuously to circulate the air inside the enclosure. This provides a uniform temperature distribution in the enclosure. The built-in tempera-ture controller (setting the desired internal temper-ature) effects automatically controlled switch-off of the cooling unit by the value of the fixed switching difference setting of 5 K. This is set at the factory to + 35°C.
5.1.1 Temperature Setting at the Controller
Fig. 5.1 Thermostat
Set the desired temperature. Setting range + 20°C to + 55°C.To avoid cyclic operation of the compressor, it is imperative that the set switching difference of 5K is not changed and does not deviate to a lower value.
°C
1020
308
6
43
°C °C
5560
5045
4035
25
Diff.
5.2 Control by Microcontroller
Version . . . . .500
Fig. 5.2 Microcontroller
After electrical connection the internal fan turns on and circulates the enclosure air. This helps assure even temperature distribution within the enclosure. The condensor fan and compressor are con-trolled by the microcontroller. The minimum run time is 90 seconds. The switching difference is 5 – 10 K and is set at the factory. In order to maximize energy efficiency the thermostat should be set to the highest enclosure temperature as allowed by the electronics.
5.2.1 Operation of the MicrocontrollerThe display terminal H1 consists of a 3 position 7-segment display which indicates the enclosure internal temperature in °C or °F (changeable, see section 5.2.2) as well as any fault codes. The actual enclosure internal temperature is con-stantly displayed. If a fault occurs then the fault number is indicated in the left position. When pro-gramming the microcontroller the program level and parameter value is indicated on the display.When the “TEST” button is pushed the compres-sor and the fans will run for 5 minutes regardless of the internal temperature or door limit switch. This allows for a system test after an extended shutdown period (e.g. after the winter).
5.2.2 ProgrammingIn the EEPROM of the microcontroller various parameters are stored which can be changed through using the “ENTER” and “ ” buttons, 9 different parameters are changeable as outlined in table 5.1. To access the programming mode push both the “ENTER” and “ ” buttons simulta-neously for 10 seconds. The left digit will then indicate the program level and the LED for the “ENTER” and “ ” buttons will blink. By pushing the “ ” button the program level can be ad-vanced to the next level. In order to access levels 5 through 9 a security code must be entered. If no buttons are pushed for 60 seconds the display will return to the standard mode which displays the enclosure temperature. Programming of the para-meters is made easy with diagram 5.1 on page 35. A description of the parameters to be program-med can be found in table 5.1. All parameters are stored in the EEPROM and are retained when power is shut off to the air conditioner.
5.2.3 Fault Signalling FacilityAll faults on the cooling unit are registered and indicated by H1 as a fault number. The display is by means of the left-hand number. The display cycles through all pending fault messages in a 2 second cycle, starting with the internal tempera-ture of the enclosure.H1 indicates the following faults as a fault number:1 = Enclosure internal temperature too high
(5 K above setpoint value)2 = Current monitor, condenser3 = Evaporator (no collective fault indication)4 = High-pressure monitor5 = Current monitor, condenser fan6 = Current monitor, evaporator fan7 = Filter mat soiled8 = Temperature sensor cable break/short-circuit
H1 = Display TerminalH2 = LED °CH3 = LED °FH4 = LED ENTERH5 = LED ➡
°C TEST ENTER
°F
H4 H5H2H1
H3
➡
➡
➡
➡

7
5.2.3.1 Fault Signal Contact(K1, potential-free)
The fault signal relay is pulled in at normal condi-tion. Any faults will cause the relay to drop out (except low-pressure monitor, fault number 3). Any failure of the control voltage will also lead to drop-out of the relay and can thus be registered. The connection is made on the terminal strip X10. For contact data and assignment, see wiring dia-gram.
5.2.3.2 Filter Mat MonitoringThe specified filter mat has large pores and filters coarse dust and lint from the air. Oil condensate is partially separated out. Fine dust is drawn through the filter mat and the external circuit of the unit due to the high suction power of the fan. It does not have any damaging effect on the function of the unit.
Fig. 5.3 Filter Mat Replacement
Function of the Filter Mat Monitor:The filter mat is monitored for soiling by meas-uring the temperature difference in the external circulation of the cooling unit. In the event of any filter mat soiling, the temperature difference will increase. The setpoint value of the temperature difference in the external circulation is adapted to various air conditioner operating conditions. This eliminates the need for subsequent adjustment of the setpoint value for different operating points of the unit. (For the setting of the filter mat replace-ment see table 5.1 and fig. 5.1.)
5.2.3.3 Door Limit Switch S 2 (supplied by customer)
Where a door limit switch is used and the enclo-sure door is open (contact is closed when door is open), the cooling unit (fans and condenser) will switch off after approx. 10 s, thereby avoiding an increase in condensation while the door is open. To avoid cyclic operation, switch-on of condenser and external fan is delayed by about 3 minutes after the door has been closed. The internal fan will start up immediately on closure of the door. Connection is made at the terminal strip X10, ter-minals 1 and 2. The extra low voltage is supplied by the internal power pack, current is approx. 30 mA DC (no extra low safety voltage). Connect the door limit switch free from potential only, no external voltage! The display will flash during the door delay time. The system message “1010” is transmitted via the PLC interface.
5.2.3.4 PLC Interface X2 (Option)The interface is used for the transmission of the actual internal temperature of the enclosure and any system messages of the cooling unit to the PLC. The transmitted information can be dis-played by means of the output facilities (e.g. plain text display) which are connected to the PLC, or by means of the serial interface to a higher order computer.Construction of the PLC interface:The construction is potential separated via opto-coupler (wiring diagram fig. 5.4). Connection is made by the customer to the 15-pin socket on the control board (fig. 5.4) to the PLC input card.
Attention!The electrical signals at the interface are of an extra-low voltage (not extra-low safety voltages according to EN 60 335).
Fig. 5.4 PLC Interface
Max. loading of the outputs:30 V/10 mA, direct currentConnection: screened 15-core control cable.The possibility exists to access this information over the PLC interface (level 8, table 5.1 or fig. 5.1).
a) Standard mode (Level 8 = “0”)Communication of the enclosure internal tempera-ture and of the fault messages is made succes-sively in 2 s cycle. Since this is an 8-bit parallel transmission, input signals should not be accept-ed as valid in the PLC until they have been pres-ent for 0.5 s. This ensures that no invalid input in-formation will be evaluated in the event of signal changes at the inputs.
Fig. 5.5 PLC Interface X2Pulse/time diagram (example)
9
1E x.0
2E x.1
e.g.+ 24 V
3E x.2
4E x.3
5E x.4
6E x.5
7E x.6
8E x.7
PLC
inpu
t car
d
Cus
tom
er’s
sup
ply
15-pin. Sub-D
Coo
ling
unit
cont
rol c
ard
2 sec. 27
6
5
4
3
2
1
0
8
7
6
5
4
3
2
1
0.5
2
0.5
2
0.5
2
0.5 X2Sub-D plug
Pin
Temperature32 °C 33 °C
5 Fault 6store cancel
Temperature34 °C
Bit
Enclosure internal temperature:Transmission with 2 digits in BCD format
System messages:The system messages are transferred by means of identification (4 bit) and a fault number (1 digit BCD). The identification is structured as follows:
In the event of a fault XXXX (BCD), the identifica-tion is transmitted cyclically. This information can be used to store the fault message in the PLC.
This identification is transferred once, as soon as the fault with the number XXXX/BCD has been rectified. This information can be used to delete the fault message in the PLC.
Evaluation of the interface signals in the PLC:Messages:If bit 1 and bit 3 of the input byte have a 1 signal, the transmitted information is a system mes-sage. In this case, the meaning of bit 0 is either the information “store fault message” (bit 0 = 0) or “cancel fault message” (bit 0 = 1).Bit 4 to 7 represent the appropriate message number (BCD).
Temperature:If the AND operation of bit 1 and bit 3 is not fulfil-led, the input information represents the actual internal temperature of the enclosure. In this case, both BCD digits have valid values (< = 9).
b) Parallel fault codes (Level 8 = “1”).This can be accessed as follows:Every one of the eight outputs stands for a cer-tain system message (see below). It is not pos-sible to display the internal temperature at the same time as the system messages.
Output/ System MessageBit0 Max. enclosure internal temperature1 Filter mat soiled2 Enclosure door is open3 High-pressure monitor4 Evaporator5 Current monitor, compressor6 Current monitor, internal fan7 Current monitor, external fan
Because these fault codes are transmitted through an optocoupler, they can be switched to a parallel transmission.
Bit 7ZZZZ EEEE
UnitsTens
0
Fault number1 to 8(see list)
Bit 7XXXX 1010
Identification
0
“Store faultmessage”
Fault number1 to 8(see list)
Bit 7XXXX 1011
Identification
0
“Store faultmessage”

7. Technical InformationThe cooling unit (compression refrigeration unit) consists of four main components: the coolant compressor, evaporator, condenser, and the con-trol or expansion valve, which are connected by suitable pipework. This circuit is filled with a readily boiling substance, the coolant. The R134 a (CH2FC3) coolant is free from chlorine. It has an ozone destroying potential (ODP) of 0 and is therefore environmentally friendly. A filter dryer which is integrated in the hermetically sealed cooling circuit, provides effective protection against moisture, acid, dirt particles, and foreign bodies within the cooling circuit.
7.1 Operation of the Cooling Unit
Fig. 7.1 Cooling circuit
When a coolant compressor is put into operation, the coolant vapour evaporates from the evapora-tor. The heat required for the evaporation of the coolant is drawn from the evaporator environment (internal circuit of the enclosure), causing it to cool down. The heat fed to the coolant in the evaporator is its environment (assisted by fans), making the coolant once more liquid due to the condensation which takes place. In the thermo-statically controlled expansion valve, the liquid coolant is reduced to the particular evaporator pressure required. The cooling which occurs due to the reduction of pressure, releases the heat from the liquid, which evaporates part of the coolant flow. The mixture of cold liquid and throttle vapour is returned to the evaporator. The cooling cycle is thus completed, the aforementioned process of the heat transfer starts afresh.
7.2 Safety EquipmentThe cooling circuit of the cooling unit embodies a component tested high-pressure monitor to VBG 20.7.1 which is set to maximum operating pressure and operates via an automatic reset device at recurring pressure drop. Temperature and low-pressure monitoring will prevent the eva-porator from icing up. If there is a risk of icing up, the condenser is switched off and automatically switched on again at higher temperatures. The coolant compressor and the fans are equipped with thermal winding protection against excess current and excess temperature.
7.3 Condensate Discharge1. To drain away any incidental condensate, attach a discharge hose to the 12 mm by SK 3296.100 / 3296.500 / 3272.100 and 15 mm by SK 3290.100 / 3290.500 / 3280.100 pipe connection piece, which protrudes from the unit.Connect the drain hose to the angled connection piece (1) (avoiding any kinks) and route the hose directly downwards in order to prevent any back-flow and overflow of the condensate inside the unit.2. To prevent external air flowing through the condensate discharge connection piece into the interior of the enclosure, fit the enclosed backflow preventer (2) in the drain hose.The nonwoven fabric inserted in the backflow preventer ensures safe drainage of the conden-sate.The backflow preventer may become contamina-ted over a period of time and should be examined at least once per annum and replaced as neces-sary.
Fan 2
Fan 1
Pressostat
Compressor
Evaporator
External circuitInternal circuit
Expansion valve
Thermostat
Filterdryer
Liquefier
6. BUS System (Model No. SK 3124.000)
6.1 General
The BUS system allows a maximum of 7 cooling units to be interconnected. As a result, the follow-ing functions are available to the operator:� Parallel unit control
(the cooling units in the network can be simultaneously switched on and off).
� Parallel door status messages (“door open”).� Collective fault message.
The data exchange is carried out using cables (shielded two-wire leads).All units are assigned an address. This address also includes the ID for “Master” or “Slave”.The BUS system cannot be used to link the cooling units to a PC.
The PLC interface is switched to parallel error encoding.
NOTEThe following restrictions must be heeded:only 6 outputs (0 to 5) are available; outputs 5, 6 and 7 are routed in parallel to output 5.
6.2 Notes Regarding Installation
ATTENTION!The electrical signals at the interface are of an extra-low voltage (not extra-low safety voltages according to EN 60 335).Always heed the following notes!
� De-energise the cooling units to be connected.
� Ensure proper electrical insulation. � Make sure the cables are not laid in parallel
to power lines.� Make sure that the lines are short.
6.3 Programming the Cooling Unit
See diagram 5.1 for details on programming.
IDs:
NOTEOnly one unit may be configured as master;the address ID must match the number of slave units.The individual slave units must have different addresses; the addresses must be in ascendingorder (without gaps in between).
Example: 1 master cooling unit with 2 slave cooling units
Master cooling unit Slave cooling unit
00 Basic state 00 Basic state
01 Master with 1 slave 11 Slave
with address 1
02 Masterwith 2 slaves 12 Slave
with address 2
03 Master with 3 slaves 13 Slave
with address 3
04 Master with 4 slaves 14 Slave
with address 4
05 Master with 5 slaves 15 Slave
with address 5
06 Master with 6 slaves 16 Slave
with address 6
Master 02
Slave 11
Slave 12
Fig. 7.3 Condensate Discharge
7.4 GeneralStorage temperature: The cooling units must not be subjected to temperatures above + 70 °C during storage. Transport attitude: The cooling units must always be transported upright. Waste disposal: The closed cooling circuit contains cool-ant and oil which must be correctly disposed of for the protection of the environment. The disposal can be carried out at Rittal-Werk. Technical modi-fications reserved.
8. MaintenanceAs a maintenance-free, hermetically sealed system, the cooling circuit has been filled in the factory with the required amount of coolant, and tested for leaks and subjected to a function trial run. The installed maintenance-free fans use bull bearings, they are protected against moisture and dust, and are fitted with a temperature monitor. The life expectancy is at least 30,000 operating hours. The cooling unit is thus largely mainte-nance-free.All that may be required from time is that the com-ponents of the external air circuit are cleaned by compressed air. The use of a filter mat is recom-mended only if large particles of lint are present in the air, so that blockage of the condenser is pre-vented.(Filter mat replacement, fig 5.3)Caution: Prior to any maintenance work, the power to the cooling unit must be disconnected.
9. Scope of Supplyand Guarantee
1 cooling unit, ready for connection1 sealing gasket1 eyebolt M121 angled hose fitting1 backflow preventer6 setscrews M6 x 306 washers A 8.46 nuts M68 setscrews M 8 x 40 (SK 3256.. . .)8 washers A 8.4 (SK 3256. . . .)8 nuts M 8 (SK 3256. . . .)1 drilling template1 set of mounting and operating instructions1 3-pole plug
(SK 3296.100 / 3272.100 / 3280.100)1 5-pole plug (SK 3290.500)
Guarantee:This unit is covered by a 1-year guarantee from the date of supply, subject to correct usage. Within this period, the returned unit will be re-paired in the factory or replaced free of charge.The cooling unit is to be used for the cooling of enclosures only. If it is connected or handled improperly the manufacturer’s guarantee does not apply and in this case we are not liable for any damage caused.
2
1
> 500 mm
English
8
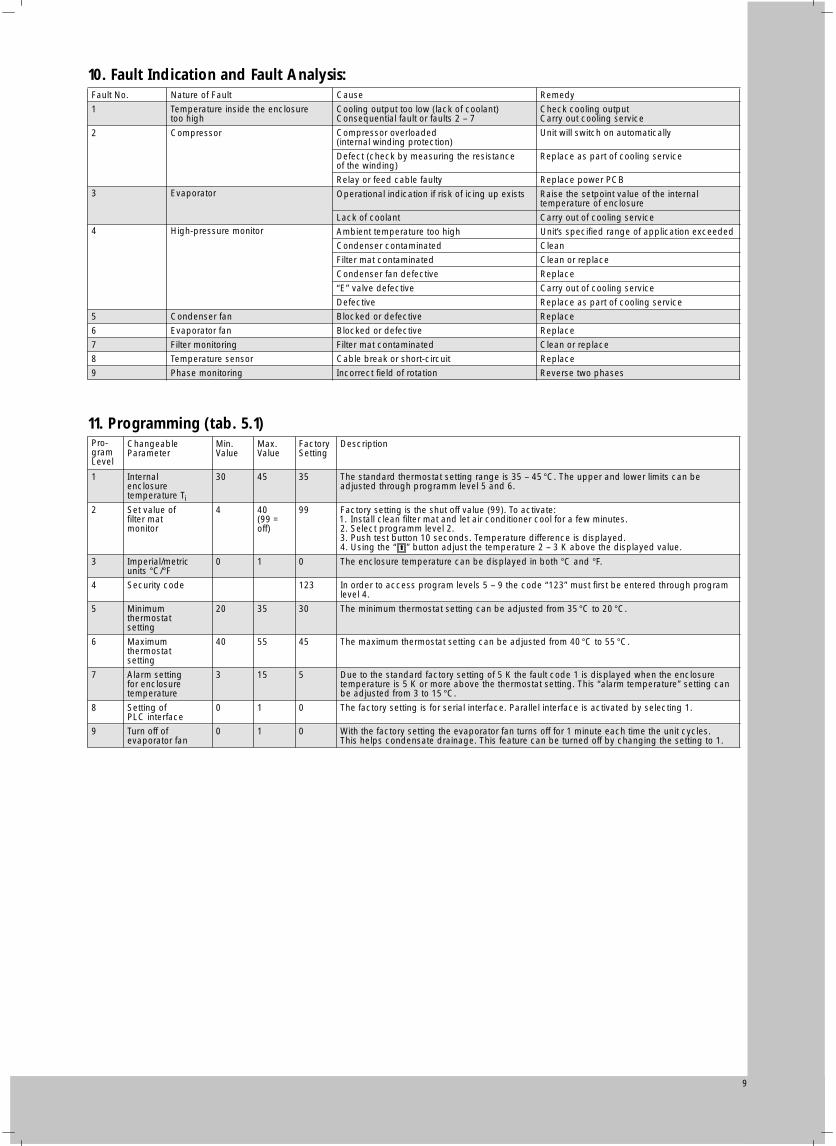
10. Fault Indication and Fault Analysis: Fault No. Nature of Fault Cause Remedy
1 Temperature inside the enclosuretoo high
Cooling output too low (lack of coolant)Consequential fault or faults 2 – 7
Check cooling outputCarry out cooling service
2 Compressor Compressor overloaded(internal winding protection)
Unit will switch on automatically
Defect (check by measuring the resistanceof the winding)
Replace as part of cooling service
Relay or feed cable faulty Replace power PCB3 Evaporator Operational indication if risk of icing up exists Raise the setpoint value of the internal
temperature of enclosure
Lack of coolant Carry out of cooling service4 High-pressure monitor Ambient temperature too high Unit’s specified range of application exceeded
Condenser contaminated Clean
Filter mat contaminated Clean or replace
Condenser fan defective Replace
“E” valve defective Carry out of cooling service
Defective Replace as part of cooling service
5 Condenser fan Blocked or defective Replace
6 Evaporator fan Blocked or defective Replace
7 Filter monitoring Filter mat contaminated Clean or replace
8 Temperature sensor Cable break or short-circuit Replace
9 Phase monitoring Incorrect field of rotation Reverse two phases
9
11. Programming (tab. 5.1) Pro-gramLevel
ChangeableParameter
Min.Value
Max.Value
FactorySetting
Description
1 Internalenclosuretemperature Ti
30 45 35 The standard thermostat setting range is 35 – 45 °C. The upper and lower limits can beadjusted through programm level 5 and 6.
2 Set value offilter matmonitor
4 40(99 =off)
99 Factory setting is the shut off value (99). To activate:1. Install clean filter mat and let air conditioner cool for a few minutes.2. Select programm level 2.3. Push test button 10 seconds. Temperature difference is displayed.4. Using the “ ” button adjust the temperature 2 – 3 K above the displayed value.
3 Imperial/metric units °C/°F
0 1 0 The enclosure temperature can be displayed in both °C and °F.
4 Security code 123 In order to access program levels 5 – 9 the code “123” must first be entered through program level 4.
5 Minimumthermostatsetting
20 35 30 The minimum thermostat setting can be adjusted from 35 °C to 20 °C.
6 Maximumthermostatsetting
40 55 45 The maximum thermostat setting can be adjusted from 40 °C to 55 °C.
7 Alarm settingfor enclosuretemperature
3 15 5 Due to the standard factory setting of 5 K the fault code 1 is displayed when the enclosuretemperature is 5 K or more above the thermostat setting. This “alarm temperature” setting can be adjusted from 3 to 15 °C.
8 Setting ofPLC interface
0 1 0 The factory setting is for serial interface. Parallel interface is activated by selecting 1.
9 Turn off ofevaporator fan
0 1 0 With the factory setting the evaporator fan turns off for 1 minute each time the unit cycles.This helps condensate drainage. This feature can be turned off by changing the setting to 1.
➡
34
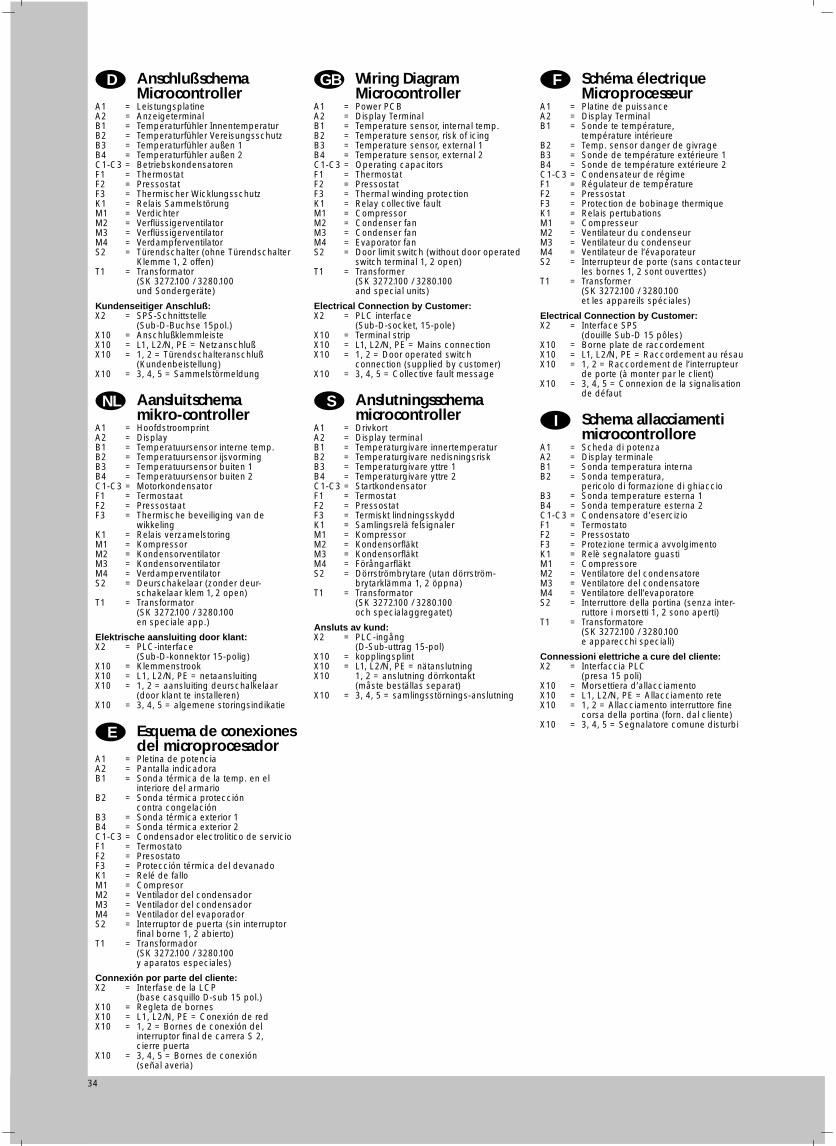
AnschlußschemaMicrocontroller
A1 = LeistungsplatineA2 = AnzeigeterminalB1 = Temperaturfühler InnentemperaturB2 = Temperaturfühler VereisungsschutzB3 = Temperaturfühler außen 1B4 = Temperaturfühler außen 2C1-C3 = BetriebskondensatorenF1 = ThermostatF2 = PressostatF3 = Thermischer WicklungsschutzK1 = Relais SammelstörungM1 = VerdichterM2 = VerflüssigerventilatorM3 = VerflüssigerventilatorM4 = VerdampferventilatorS2 = Türendschalter (ohne Türendschalter
Klemme 1, 2 offen)T1 = Transformator
(SK 3272.100 / 3280.100und Sondergeräte)
Kundenseitiger Anschluß:X2 = SPS-Schnittstelle
(Sub-D-Buchse 15pol.)X10 = AnschlußklemmleisteX10 = L1, L2/N, PE = NetzanschlußX10 = 1, 2 = Türendschalteranschluß
(Kundenbeistellung)X10 = 3, 4, 5 = Sammelstörmeldung
Aansluitschemamikro-controller
A1 = HoofdstroomprintA2 = DisplayB1 = Temperatuursensor interne temp.B2 = Temperatuursensor ijsvormingB3 = Temperatuursensor buiten 1B4 = Temperatuursensor buiten 2C1-C3 = MotorkondensatorF1 = TermostaatF2 = PressostaatF3 = Thermische beveiliging van de
wikkelingK1 = Relais verzamelstoringM1 = KompressorM2 = KondensorventilatorM3 = KondensorventilatorM4 = VerdamperventilatorS2 = Deurschakelaar (zonder deur-
schakelaar klem 1, 2 open)T1 = Transformator
(SK 3272.100 / 3280.100en speciale app.)
Elektrische aansluiting door klant:X2 = PLC-interface
(Sub-D-konnektor 15-polig)X10 = KlemmenstrookX10 = L1, L2/N, PE = netaansluitingX10 = 1, 2 = aansluiting deurschalkelaar
(door klant te installeren)X10 = 3, 4, 5 = algemene storingsindikatie
Esquema de conexionesdel microprocesador
A1 = Pletina de potenciaA2 = Pantalla indicadoraB1 = Sonda térmica de la temp. en el
interiore del armarioB2 = Sonda térmica protección
contra congelaciónB3 = Sonda térmica exterior 1B4 = Sonda térmica exterior 2C1-C3 = Condensador electrolitico de servicioF1 = TermostatoF2 = PresostatoF3 = Protección térmica del devanadoK1 = Relé de falloM1 = CompresorM2 = Ventilador del condensadorM3 = Ventilador del condensadorM4 = Ventilador del evaporadorS2 = Interruptor de puerta (sin interruptor
final borne 1, 2 abierto)T1 = Transformador
(SK 3272.100 / 3280.100y aparatos especiales)
Connexión por parte del cliente:X2 = Interfase de la LCP
(base casquillo D-sub 15 pol.)X10 = Regleta de bornesX10 = L1, L2/N, PE = Conexión de redX10 = 1, 2 = Bornes de conexión del
interruptor final de carrera S 2,cierre puerta
X10 = 3, 4, 5 = Bornes de conexión(señal averia)
D
NL
E
Wiring DiagramMicrocontroller
A1 = Power PCBA2 = Display TerminalB1 = Temperature sensor, internal temp.B2 = Temperature sensor, risk of icingB3 = Temperature sensor, external 1B4 = Temperature sensor, external 2C1-C3 = Operating capacitorsF1 = ThermostatF2 = PressostatF3 = Thermal winding protectionK1 = Relay collective faultM1 = CompressorM2 = Condenser fanM3 = Condenser fanM4 = Evaporator fanS2 = Door limit switch (without door operated
switch terminal 1, 2 open)T1 = Transformer
(SK 3272.100 / 3280.100and special units)
Electrical Connection by Customer:X2 = PLC interface
(Sub-D-socket, 15-pole)X10 = Terminal stripX10 = L1, L2/N, PE = Mains connectionX10 = 1, 2 = Door operated switch
connection (supplied by customer)X10 = 3, 4, 5 = Collective fault message
Anslutningsschemamicrocontroller
A1 = DrivkortA2 = Display terminalB1 = Temperaturgivare innertemperaturB2 = Temperaturgivare nedisningsriskB3 = Temperaturgivare yttre 1B4 = Temperaturgivare yttre 2C1-C3 = StartkondensatorF1 = TermostatF2 = PressostatF3 = Termiskt lindningsskyddK1 = Samlingsrelä felsignalerM1 = KompressorM2 = KondensorfläktM3 = KondensorfläktM4 = FörångarfläktS2 = Dörrströmbrytare (utan dörrström-
brytarklämma 1, 2 öppna)T1 = Transformator
(SK 3272.100 / 3280.100och specialaggregatet)
Ansluts av kund:X2 = PLC-ingång
(D-Sub-uttrag 15-pol)X10 = kopplingsplintX10 = L1, L2/N, PE = nätanslutningX10 1, 2 = anslutning dörrkontakt
(måste beställas separat)X10 = 3, 4, 5 = samlingsstörnings-anslutning
GB
S
Schéma électriqueMicroprocesseur
A1 = Platine de puissanceA2 = Display TerminalB1 = Sonde te température,
température intérieureB2 = Temp. sensor danger de givrageB3 = Sonde de température extérieure 1B4 = Sonde de température extérieure 2C1-C3 = Condensateur de régimeF1 = Régulateur de températureF2 = PressostatF3 = Protection de bobinage thermiqueK1 = Relais pertubationsM1 = CompresseurM2 = Ventilateur du condenseurM3 = Ventilateur du condenseurM4 = Ventilateur de l’évaporateurS2 = Interrupteur de porte (sans contacteur
les bornes 1, 2 sont ouverttes)T1 = Transformer
(SK 3272.100 / 3280.100et les appareils spéciales)
Electrical Connection by Customer:X2 = Interface SPS
(douille Sub-D 15 pôles)X10 = Borne plate de raccordementX10 = L1, L2/N, PE = Raccordement au résauX10 = 1, 2 = Raccordement de l’interrupteur
de porte (à monter par le client)X10 = 3, 4, 5 = Connexion de la signalisation
de défaut
Schema allacciamentimicrocontrollore
A1 = Scheda di potenzaA2 = Display terminaleB1 = Sonda temperatura internaB2 = Sonda temperatura,
pericolo di formazione di ghiaccioB3 = Sonda temperature esterna 1B4 = Sonda temperature esterna 2C1-C3 = Condensatore d’esercizioF1 = TermostatoF2 = PressostatoF3 = Protezione termica avvolgimentoK1 = Relè segnalatore guastiM1 = CompressoreM2 = Ventilatore del condensatoreM3 = Ventilatore del condensatoreM4 = Ventilatore dell’evaporatoreS2 = Interruttore della portina (senza inter-
ruttore i morsetti 1, 2 sono aperti)T1 = Transformatore
(SK 3272.100 / 3280.100e apparecchi speciali)
Connessioni elettriche a cure del cliente:X2 = Interfaccia PLC
(presa 15 poli)X10 = Morsettiera d’allacciamentoX10 = L1, L2/N, PE = Allacciamento reteX10 = 1, 2 = Allacciamento interruttore fine
corsa della portina (forn. dal cliente)X10 = 3, 4, 5 = Segnalatore comune disturbi
F
I

35
F2
M1 M2 M4
C1
F1
C4
F3
C2
T1
M1~
M1~
M1~
L/L′ *
N
L
N
q>
P>
P<
N
PE
L
Technische Datensiehe Typenschild * nur bei Trafoeinbau
* only if transformer is installedTechnical datasee name plate
L′
F2
M1 M2 M4
C1
F1
C4
F3
C2
T1
M1~
M1~ M3
C3
M1~
M1~
L/L′ *
N
L
N
q>
P>
P<
N
PE
L
Technische Datensiehe Typenschild * nur bei Trafoeinbau
* only if transformer is installedTechnical datasee name plate
L′
M2
K1
X 10
A1
S2
C1 C3
M4
M3
C2C1
M2
A2
X 2
M1
F2
2
54321L2
L1
B3
B2
B1
PE
21
22
N
B4
2
2
2
6
8
°C °F
TEST ENTER
15
14
1110
1312
L1 PEL2N 21 3 54
P
M
1~ 1~
M
M
1~1~
M{
nuronlySK 3290.500SK 3290.540
Technische Datensiehe Typenschild
Technical datasee name plate
K 1
M2
M4
F2
F1
M1
C1
C2
(A)(C)1422
HP LP
21 111224
M1~
312
Technische Datensiehe Typenschild
Technical Data see name plate
PE L N 1 2
°C
ML N PE
(T1)
1~
WirkschaltplanDetailed Wiring DiagramSchéma des connexions détailléWerkingsschemaDriftschemaSchema d’allacciamentoEsquema de funcionamiento
AnschlußschemaWiring DiagramSchéma électriqueAansluitschemaAnslutningsschemaSchema allacciamentiEsquema de conexiones
WirkschaltplanDetailed Wiring DiagramSchéma des connexions détailléWerkingsschemaDriftschemaSchema d’allacciamentoEsquema de funcionamiento
SK 3296.100
SK 3296.140
SK 3272.100
Kontaktdaten K1Contact Data K1Caracteristiques des contacts K1Kontaktgegevens K1Kontaktdata K1Caratteristiche dei contatti K1Características del contacto K1
ACcosf = 1
DVL/R = 40 ms
I max. = 5 AU max. = 230 V
I min. = 10 mAU max. = 100 V !I max. = 200 mAU max. = 20 V !I max. = 5 A
SK 3296.500
SK 3290.500
SK 3296.540
SK 3290.540
SK 3256.500
SK 3256.540
SK 3290.100
SK 3290.140
SK 3280.100
WirkschaltplanDetailed Wiring DiagramSchéma des connexions détailléWerkingsschemaDriftschemaSchema d’allacciamentoEsquema de funcionamiento
SK 3256.100
SK 3256.140

Ersatzteil-liste
SparesList
Listede pièces détachées
Lijstreserve-delen
Reserv-delslista
Lista dei pezzi di ricambio
Lista de piezas de repuesto
Bezeichnung Description Signification Benaming Beteckning Descrizione Descripción
1 Kompressor Compressor Compresseur Compressor Kompressor Compressore Compresor
2 Anlaßvorrichtung Starting device Dispositivde démarrage Startinrichting Startanordning Dispositivo
di avviamentoDispositivode arranque
5 Verflüssiger-ventilator Condensing fan Soupape
du condenseurCondensor-ventilator Kondensorfläkt Ventilatore
del condensatoreVentiladordel condensador
10 Verdampfer-ventilator Evaporator fan Soupape
de l’évaporateurVerdamper-ventilator Förångarfläkt Ventilatore
dell’evaporatoreVentiladordel evaporador
15 Versandbeutel Dispatch bag Pochetted’accessoires Zakje toebehoren Tillbehörspåse Sacchetto
accessoriBolsa deaccesorios
20 Expansionsventil Expansion valve Soupape de détente Expansieventiel Expansionsventil Valvola
d’espansioneVálvula deexpansión
25 Filtertrockner Filter dryer Assècheur de filtre Filterdroger Filtertork Filtro essicatore Secador del filtro
30 Pressostat Pressostat Pressostat Pressostaat Pressostat Pressostato Presostato
35 Thermostat Thermostat Thermostat Thermostaat Thermostat Termostato Termostato
40 Microcontroller-Box Microcontroller box Micro-processeurbox
MicrocontrollerE-box Microkontroll box Box Microcontroller Carcasa
microcontrolador
45 Lamellengitter 2 Louvred grille 2 Grille à lamelles 2 Rooster 2 Lamellgitter 2 Griglia a lamelle 2 Rejilla 2
46 Lamellengitter 1 Louvred grille 1 Grille à lamelles 1 Rooster 1 Lamellgitter 1 Griglia a lamelle 1 Rejilla 1
50 Abdeckblende Infill panel Couvercle Afdekplaat Täckplåt Copertura cieca Pantalla cubierta
55 Anzeigeplatine Display PCB Platine d’indication Displayprint Displaykort Scheda dicomando
Pletina de indicación
60 Displayaufnahme Display support Support de platine Display Displayram AlloggiamentoDisplay Display
65 Folientastatur Membranekeyboard
Clavier àeffleurement Folietoetsenbord Folie tryckkrappar Tastiera a
membranaTeclado demembrana
66 Abdeckfolie Coveringmembrane
Feuille derecouvrement Afdekfolie Täckfolie Lamina di
copertura Lámina cubierta
70 Temperaturfühler,Vereisung
Icingsensor
Sonde degivrage
Aanwijzings-sensor
Nedisnings-givare
Sondariferimento
Sensorreferencial
71 Temperaturfühler Temperaturesensor
Sonde detempérature
Temperatuur-sensor Temperaturgivare Sonda di
temperatura Sonda térmica
75 Haube Cover Couvercle Afdekkap Huv Calotta Capucha
80 Transformator Transformer Transformateur Trafo Trafo Trasformatore Transformador
85 Tropfenabscheider Mist collector Paregouttes Lekbok Kondensvattenanskiljare Separatore gocce Colector de gotas
90 Verdampfer Evaporator Evaporateur Verdamper Kondensor Evaporatore Evaporador
100 Verflüssiger Condenser Condenseur Condensor Förångar Condensatore Condensador
D E JGB NL IF S
36
PositionItemPos.Pos.Pos.Pos.Posición
37
45
5
75
71
100
45
1
65
10
25
2
35
90
20
40
71
30
15
80
60
55
30
71
70
66 65
55
45
5
75
46
10
30
4071
80
1
2520
70
15
71
71
100
66
35
90
2
66
1565
55
45
7546
25
100
71
71
1
70
80
90
10
20
16
35
40
71
70
30
6680
2
SK 3296. . . . / 3272.100
SK 3290. . . . / 3280.100
SK 3256. . . .

38
Tu
Pel
Ti
55
45
35
25
0.2
0.3
0.4
0.5
0.6
2520 30 35 40 45 50 55
Tu
Pel
Ti
0.2
1.1
0.9
0.8
0.4
0.6
0.3
1.0
0.7
0.5
55453525
55504540353020 25Tu
Pel
Ti
2520 30 35 40 45 50 551.0
1.2
1.4
1.6
1.5
1.3
1.1
1.7
1.8
1.9
25
35
4555
20 25 30 35 4540 50 55
300
200
400
500
600
700
800
900
1000
2025
30
35
40
455055
1100
1200
1300
1400
Tu
QK.
Ti
20 25 30 35 4540 50 55
600
400
800
1200
1000
1400
1600
1800
20
25
30
35
40
45
50
55
2000
2200
2400
Tu
QK.
Ti
20 25 30 35 4540 50 55
800
1200
1600
2000
2400
2800
2025
30
35
40
45
50
55
3200
3600
Tu
QK.
Ti
Kennlinienfeld (DIN 3168)Performance DiagramDiagramme des lignes caracteristiquesKarakteristiekKarakteristik kurvaDiagramma delle curve caratteristicheDiagrama de potencia
Dauer-Nutzkühlleistung (W)Cooling outputPuissance frigorifique utiliséeNuttig koelvermogenKyleffektPotenza frigorifera utilePotencia útil de refrigeración
Q· K =
Schaltschrank-Innentemperatur (°C)Enclosure internal temperatureTemperature a l’interieur de l’armoireTemperatuur in de kastTemperatur inne i skåpetTemperatura interna dell’armadioTemperatura interior del armario de mando
Ti =
Umgebungstemperatur (°C)Ambient temperatureTempérature ambianteOmgevingstemperatuurOmgivningstemperaturTemperatura ambienteTemperatura ambiente
Tu =
Verflüssigereintritt (°C)Liquifier entryEntrée du condenseurKondensorinlaatKondensoringångIngresso condensatoreEntrada del condensador
Tu =
Verdampfereintritt (°C)Evaporator entryEntrée de l’évaporateurVerdamperinlaatFörångaringångIngresso evaporatoreEntrada del evaporador
Ti =
Leistungsaufnahme (kW)Performance entryPuissance absorbéeVermogensopnameIneffektPotenza assorbitaAbsorción de potencia
Pel =
Kennlinienfeld SK 3296. . . . /3272.100 (DIN 3168) (50 Hz)
Kennlinienfeld SK 3290. . . . /3280.100 (DIN 3168) (50 Hz)
Kennfeld LeistungsaufnahmeSK 3296. . . . / 3272.100 (DIN 3168) (50 Hz)
Kennfeld LeistungsaufnahmeSK 3290. . . . / 3280.100 (DIN 3168) (50 Hz)
Kennfeld LeistungsaufnahmeSK 3256. . . . (DIN 3168) (50 Hz)
Kennlinienfeld SK 3256. . . .(DIN 3168) (50 Hz)
Kennfeld LeistungsaufnahmePerformance Input DiagramPuissance absorbéeKarakteristiekvermogensopnameKarakteristik kurva ineffektDiagramma delle potenze assorbiteDiagrama de absorciónde potencia
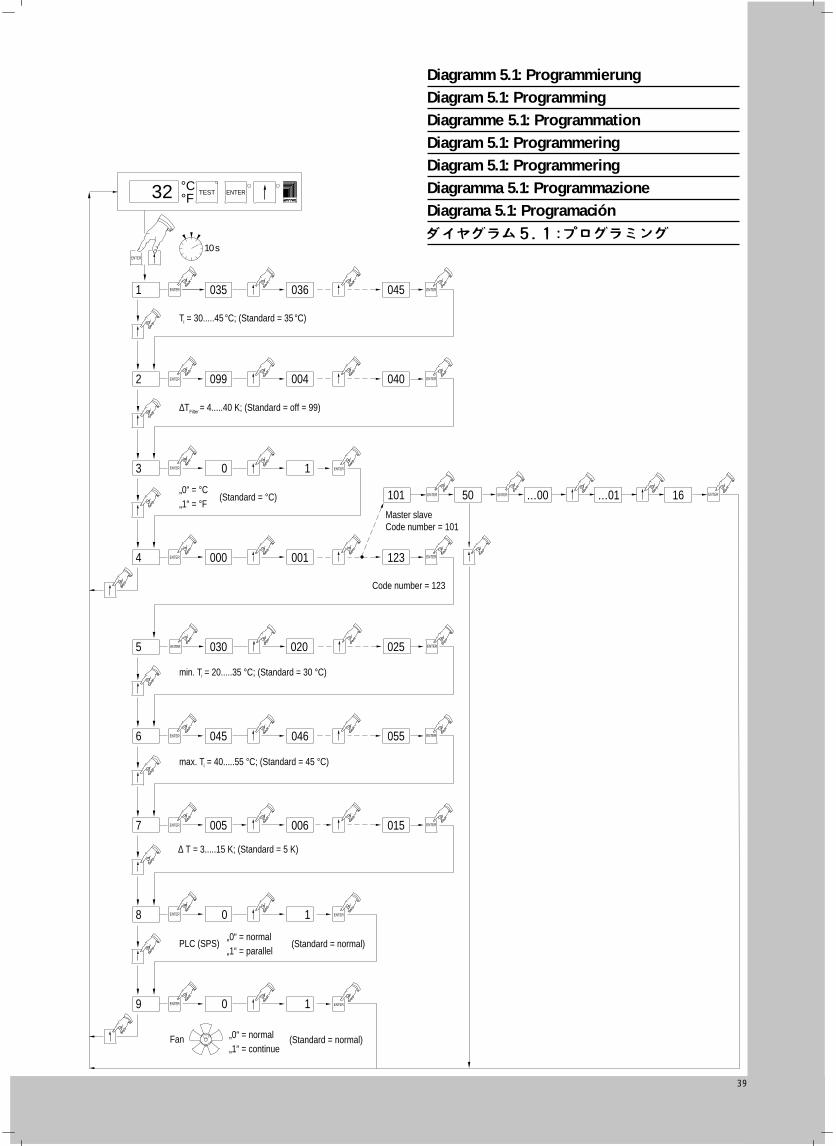
39
ENTER
ENTER
ENTER
ENTER
°C TEST ENTER°F
(Standard = normal)
(Standard = normal)
Fan„1“ = continue„0“ = normal
„1“ = parallel„0“ = normal
PLC (SPS)
∆ T = 3.....15 K; (Standard = 5 K)
max. Ti = 40.....55 °C; (Standard = 45 °C)
min. Ti = 20.....35 °C; (Standard = 30 °C)
Code number = 123
Master slaveCode number = 101
(Standard = °C)„1“ = °F„0“ = °C
Ti = 30.....45 °C; (Standard = 35 °C)
∆TFilter = 4.....40 K; (Standard = off = 99)
0 1
099 004 040
045036035
32
9
8
7
6
5
4
3
2
1
10s
ENTER
ENTER 0 1 ENTER
ENTER
ENTER
ENTER 000 001 123 ENTER
ENTER 0 1 ENTER
ENTER 030 020 025 ENTER
ENTER 045 046 055 ENTER
ENTER 005 006 015 ENTER
101 ENTER …00ENTER 50 …01 16 ENTER
Diagramm 5.1: ProgrammierungDiagram 5.1: ProgrammingDiagramme 5.1: ProgrammationDiagram 5.1: ProgrammeringDiagram 5.1: ProgrammeringDiagramma 5.1: ProgrammazioneDiagrama 5.1: Programación