
User Guide - Surftown · - 6 - 2. Sicherheitsvorschriften/Wichtige Informationen Benutzen Sie...
69
- 1 - DE – Bedienungsanleitung EN – User Guide FR – Guide d’utilisation horseAlarm
Transcript of User Guide - Surftown · - 6 - 2. Sicherheitsvorschriften/Wichtige Informationen Benutzen Sie...

- 1 -
DE – BedienungsanleitungEN – UserGuideFR – Guided’utilisation
horseAlarm

- 2 -
Copyright LUDA Elektronik AB
This guide is published by LUDA Elektronik AB.
All rights reserved. Any rights not expressly granted
herein are reserved.
© LUDA Elektronik, 2011
Inhalt / Content / Contenu
1. Deutsch .........................................................................................................3
2. English ........................................................................................................25
3. Français ......................................................................................................47
4. Declaration of Conformity ...........................................................................69

- 3 -
DE
EN
FR
EN
Deutsch
Bedienungsanleitung

- 4 -
Inhaltsverzeichnis
1. Einleitung ......................................................................................................5
2. Sicherheitsvorschriften/Wichtige informationen ...........................................6
3. Einthalten in Ihrem horseAlarm-Paket ...........................................................7
4. Erläuterungen zu enthaltenen Produkten ......................................................8
5. horseAlarm – Funktionsweise .....................................................................10
6. Bevor Sie mit der Installation beginnen ......................................................11
7. Understanding and testing before use ........................................................12
8. Platzierung von Gurt, Transmitter & Repeater .............................................16
9. Das Anbringen der Antenne ........................................................................17
10. Empfangsmodus – Easy ..............................................................................18
11. Batteriesymbole ..........................................................................................18
12. Alarm-modi ..................................................................................................19
13. Receiver-modus – Advanced ......................................................................20
14. Receiver-modus – Einstellungen .................................................................21
15. Sollten Sie mehr als ein Pferd haben ..........................................................21
16. Häufig gestellte fragen .................................................................................22
17. Fehlerbehebung ..........................................................................................22
18. Garantiebedingungen ..................................................................................23
19. Informationen über das Wiederverwertung .................................................24
20. Kontakt, Zubehör und Support ...................................................................24

- 5 -
DE
EN
FR
EN
1. Einleitung
Herzlichen Glückwunsch zum Erwerb der horseAlarm™ der LUDA Elektronik AB!
Ihr horseAlarm-Paket gewährleistet Ihnen Sicherheit beim Überwachen Ihres Pferdes/Ihrer Pferde.
Der tragbare Empfänger macht es möglich, schnurlos ein wachsames Auge auf Ihr Pferd/Ihre
Pferde zu halten.
Wir hoffen, dass Sie mit ihrem horseAlarm-Paket zufrieden sind und dass Ihre Erwartungen über-
troffen werden.
Das Produkt erfüllt alle gesetzlichen Anforderungen, da es das CE-Prüfsiegel besitzt. Somit kann
das Produkt innerhalb der EU in Betrieb genommen werden. Die CE-Kennzeichnung gewähr-
leistet, dass die Funkwellen des Produktes die Grenzwerte der EMC-Richtlinie 89/336/EEC und
der R&TTE-Richtlinie (1999/5/EC) unterschreiten.
Wir bedanken uns dafür, dass Sie das horseAlarm-Paket erworben haben und wünschen Ihnen
gutes Gelingen bei der Installation. Sollten während der Installation Fragen auftreten, schauen Sie
im entsprechenden Kapitel zur Fehlersuche sowie im Kapitel zu den häufig gestellten Fragen und
Antworten nach. Sollten Fragen unbeantwortet bleiben, hilft Ihnen unser kompetenter Kundendi-
enst gerne weiter.
Vor der Installation Ihres neuerworbenen horseAlarm-Paketes, bitten wir Sie Kapitel 2. Sicherheits-
vorschriften/Wichtige Informationen zu lesen.
Für Neuigkeiten und Zubehör zur horseAlarm™ besuchen Sie:
www.horsealarm-europe.com
LUDA Elektronik AB

- 6 -
2. Sicherheitsvorschriften/Wichtige Informationen
Benutzen Sie ausschließlich die vorgesehenen Netzteile für die jeweiligen Produkte, da Sie sonst riskieren, die Produkte zu beschädigen.
Benutzen Sie die Produkte nicht an folgenden Orten:
Benutzen Sie die Produkte nicht in der Nähe von medizinischen Geräten, da nicht aus-
zuschließen ist, dass die horseAlarm empfindliche Betriebsanlagen stören kann.
Benutzen Sie die Produkte nicht in Flugzeugen, da die Produkte empfindliche Betriebsanla-
gen stören können.
- Befolgen Sie stets die gültigen Gesetze des Landes, in dem Sie wohnen.
- Halten Sie kleine Plastikteile von klein Kindern fern.
- Schließen Sie die Stromadapter nicht im Außenbereich oder in der Nähe von Wasser an das
Stromnetz an.
- Vermeiden sie die Abdeckung der Stromadapter und platzieren Sie diese nicht auf tempera
turempfindlichem Untergrund.
- Heben Sie die receiver nicht an der Antenne hoch.
LUDA Elektronik AB entzieht sich jeglicher Verantwortung bei Schäden, die bei Missbrauch
oder unsachgemäßer Verwendung der Produkte entstehen können. LUDA Elektronik AB
kann nicht garantieren, dass horseAlarm Sie bei jedem Abfohlen alarmiert. Es dient Ihnen
zur Unterstützung während des Abfohlzeitraums.

- 7 -
DE
EN
FR
ENLadugård
47
2.
3.4.
5.1.
Ihre horseAlarm-Lösung enthält folgende Produkte:
1. 1 Geschirr mit eingebauten Sensoren. (Art.-Nr. 656SHA)
2. 1 Transmitter.
3. 1 Repeater zur Rückübertragung des Signals. (Art.-Nr. 653RLH)
4. 1 R300-Funkantenne. (Art.-Nr. 350AHA)
5. 1 Drahtlosen Receiver mit LCD-Monitor, Verlaufs-Funktion und Alarm. (Art.-Nr. 651RXH)
Ihre horseAlarm-Lösung enthält außerdem folgende Produkte:
1 12V-Netzstecker für das Repeater.
1 12V-Netzstecker für den Receiver.
3 AAA-Batterien für die Transmitter.
1 7,5m-Antennenkabel zwischen Repeater und R300-Antenne.
2 Schrumpfschläuche als Wetterschutz für die Antennen-Kabelanschlüsse.
3 Streifen für die Kabel.
1 Gurt mit Sicherheits-Gummi-Stopper
1 Bedienungsanleitung.
Bitte vergewissern Sie sich, dass alle Produkte in Ihrem Paket enthalten sind und außerdem mit
entsprechenden Artikelnummern versehen sind. Stellen Sie sicher, dass nichts beschädigt oder
zerbrochen ist.
3. Enthalten in Ihrem horseAlarm-Paket:

- 8 -
4. Erläuterungen zu den enthaltenen Produkten
Um die Installation erfolgreich durchführen zu können, ist es dringend erforderlich, sich mit den
enthaltenen Produkten vertraut zu machen.
Funk-Transmitter mit
Positionssensoren
Signalanzeige
Schwitzsensoren
Gurt mit Transmitter und Sattelgurt (Art.-Nr. 656SHA)
SignalanzeigeAntenneneingang
Repeater. (Art. no 653RLH)
Fach für
Transmitter
Sattelgurt mit
Gummi-Stopper
Wandhalterung
Stromeingang (12 V)
Externer Antennenausgang
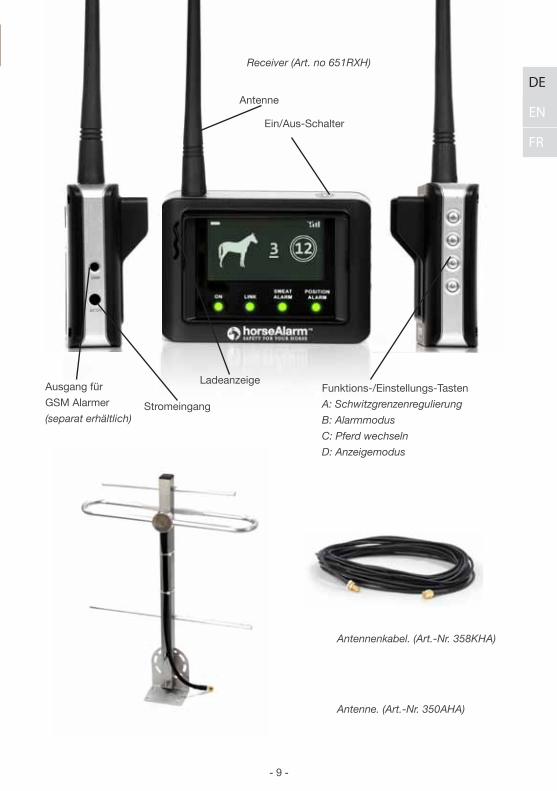
- 9 -
DE
EN
FR
EN
Antenna
Ausgang für
GSM Alarmer
(separat erhältlich)
Receiver (Art. no 651RXH)
Antennenkabel. (Art.-Nr. 358KHA)
Antenne. (Art.-Nr. 350AHA)
Antenne
Ein/Aus-Schalter
Funktions-/Einstellungs-Tasten
A: Schwitzgrenzenregulierung
B: Alarmmodus
C: Pferd wechseln
D: Anzeigemodus
Stromeingang
Ladeanzeige

- 10 -
1. Die Sensoren messen, wie stark das Pferd schwitzt und ob es steht oder liegt.
2. Die Informationen werden von den Sensoren zum Repeater übertragen, welche dann
das Signal durch die R300-Antenne rücküberträgt.
3. Der Receiver empfängt das Signal kabellos und sowohl diese Werte als auch der
jüngste Verlauf werden auf dem LCD-Bildschirm angezeigt.
4. Sollten die Sensoren beim Pferd Anzeichen des Fohlens oder einer Kolik verzeichnen,
löst horseAlarm sowie akustischen als auch visuellen Alarm aus.
Der Gurt mit der Transmitter ist ausgestattet mit drei Sensoren. Zwei befinden sich an der In-
nenseite des Gurtes und messen, wie stark das Pferd schwitzt. Der dritte sitzt in der Transmitter
und fühlt, wenn sich die Stute flach auf die Seite legt. Die Information wird kabellos zum Repeater
übertragen.
Das Repeater kann gleichzeitig Informationen von bis zu acht Transmitteren empfangen. Die Infor-
mation wird mit Hilfe der R300-Antenne vom Stall ins Haus übertragen. Im Haus wird das Signal
vom Receiver empfangen, der die Information auf dem Bildschirm wiedergibt. Im Advanced-
Modus können Sie die Aktivitäten Ihres Pferdes bis zu sechs Stunden zurückverfolgen.
horseAlarm verfügt sowohl über Licht- als auch Akustikalarm. Die Standardeinstellungen von
horseAlarm sind geeignet für herkömmliche Benutzung, aber können auch sehr leicht an die An-
forderungen von Pferd und Umgebung angepasst werden.
5. horseAlarm – Funktionsweise
Ladugård
47
1
2 3
4
INFoRMAtIoN
Die Signale werden mittels Wellen durch die Luft übertragen. Die Wellen
durchdringen die meisten Gegenstände, jedoch wird das Signal mit jedem zu
durchdringenden Gegenstand schwächer. Versuchen Sie deshalb, den Bereich
zwischen Antenne und Receiver so frei wie möglich zu halten, um den Erhalt
eines guten Signals zu gewährleisten.

- 11 -
DE
EN
FR
EN
DC
!
12V
6. Bevor Sie mit der Installation beginnen
Lesen Sie die Instruktionen in diesem Handbuch durch, bevor Sie mit
der Installation Ihres horseAlarm-Paketes beginnen.
Laden Sie zuerst den Receiver auf, da dieser etwas später
im Installationsvorgang zum Einsatz kommt. Die Batterie
ist nicht vollständig geladen und wird deshalb nur
für eine gewisse Zeit funktionieren, wenn sie nicht
aufgeladen wird.
1. Schließen Sie den Netzstecker (12V) an den
Stromeingang des Receivers an und anschließend an eine
Wandsteckdose (220V).
2. Stellen Sie sicher, dass die Ladeanzeige ein ist.
Eine voll aufgeladene Batterie hält zwischen 12 Stunden
(wenn Hintergrundbeleuchtung auf EIN geschaltet ist) und
30 Stunden (wenn Hintergrundbeleuchtung auf AUTO
geschaltet ist)
3. Schließen Sie den Repeater ans Stromnetz an, indem Sie den Netzadapter, der mit Repeater/
Radio Link only gekennzeichnet ist, verwenden. Sobald Sie den Repeater an Strom
anschließen leuchtet ein grünes
Licht auf.
4. Gehen Sie zu Kapitel 7 – Verste
hen und Prüfen vor der Benutzung
HINWEIS!Benutzen Sie ausschließlich den mit Receiver
gekennzeichneten 12V-Stecker für die Stromzufuhr des
Receivers. Die Benutzung anderer Stromquellen kann
den Receiver beschädigen und fällt NICHT unter die
Garantieleistungen.

- 12 -
7. Verstehen und Prüfen vor der Benutzung
Es ist wichtig, dass Sie sich vor der Installation und Benutzung mit dem Alarm und seinen Funk-
tionen vertraut machen. Das folgende Kapitel führt Sie durch eine Demonstration aller wichtigen
Funktionen.
1. Schalten Sie den Empfänger ein, indem Sie die ON-Taste oben auf dem Gerät drücken:
2. Stellen Sie sicher, dass sie die Einstellung Einfacher Modus am Empfänger verwenden, indem
Sie die Taste D drücken, bis dieses Bild von einem Pferd erscheint.
Nach etwa 40 Sekunden ändert sich die Farbe der Anzeige LINK nach rot und der Empfänger
gibt einen Ton ab, um Ihnen mitzuteilen, dass er keine Werte vom Transmitter empfängt.
15
1
- 13 -
DE
EN
FR
EN
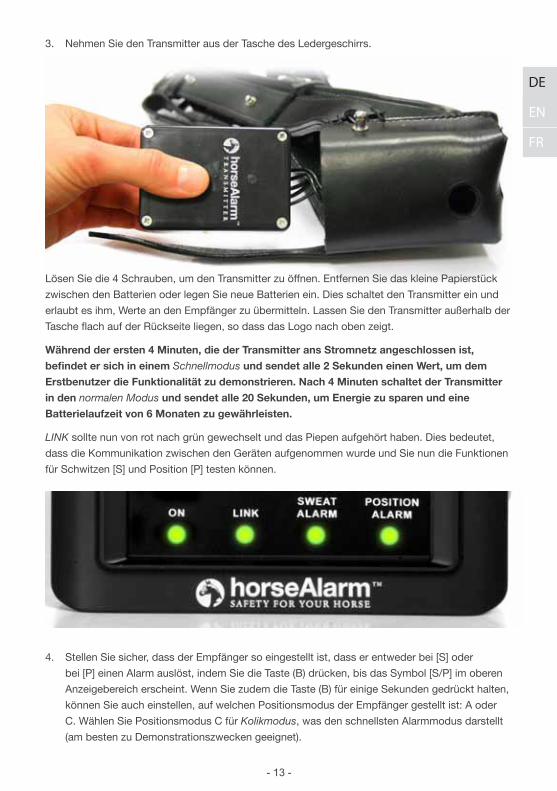
3. Nehmen Sie den Transmitter aus der Tasche des Ledergeschirrs.
Lösen Sie die 4 Schrauben, um den Transmitter zu öffnen. Entfernen Sie das kleine Papierstück
zwischen den Batterien oder legen Sie neue Batterien ein. Dies schaltet den Transmitter ein und
erlaubt es ihm, Werte an den Empfänger zu übermitteln. Lassen Sie den Transmitter außerhalb der
Tasche flach auf der Rückseite liegen, so dass das Logo nach oben zeigt.
Während der ersten 4 Minuten, die der transmitter ans Stromnetz angeschlossen ist,
befindet er sich in einem Schnellmodus und sendet alle 2 Sekunden einen Wert, um dem
Erstbenutzer die Funktionalität zu demonstrieren. Nach 4 Minuten schaltet der transmitter
in den normalen Modus und sendet alle 20 Sekunden, um Energie zu sparen und eine
Batterielaufzeit von 6 Monaten zu gewährleisten.
LINK sollte nun von rot nach grün gewechselt und das Piepen aufgehört haben. Dies bedeutet,
dass die Kommunikation zwischen den Geräten aufgenommen wurde und Sie nun die Funktionen
für Schwitzen [S] und Position [P] testen können.
4. Stellen Sie sicher, dass der Empfänger so eingestellt ist, dass er entweder bei [S] oder
bei [P] einen Alarm auslöst, indem Sie die Taste (B) drücken, bis das Symbol [S/P] im oberen
Anzeigebereich erscheint. Wenn Sie zudem die Taste (B) für einige Sekunden gedrückt halten,
können Sie auch einstellen, auf welchen Positionsmodus der Empfänger gestellt ist: A oder
C. Wählen Sie Positionsmodus C für Kolikmodus, was den schnellsten Alarmmodus darstellt
(am besten zu Demonstrationszwecken geeignet).
- 14 -
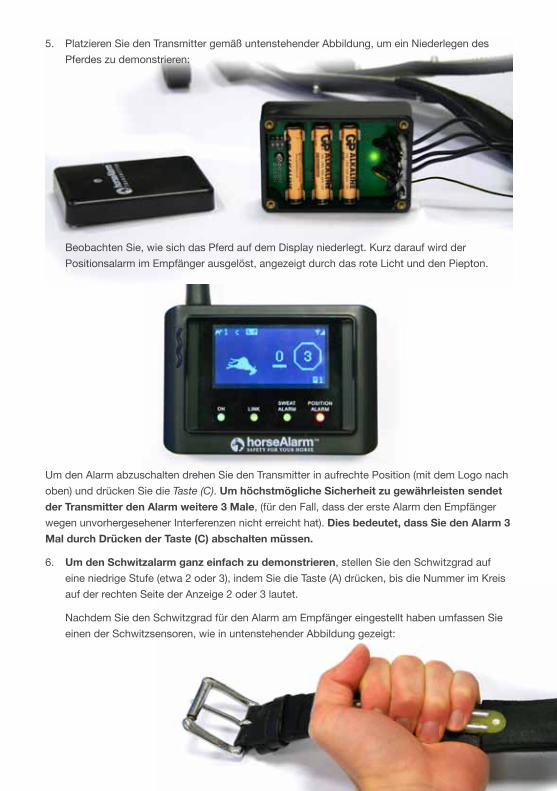
5. Platzieren Sie den Transmitter gemäß untenstehender Abbildung, um ein Niederlegen des
Pferdes zu demonstrieren:
Beobachten Sie, wie sich das Pferd auf dem Display niederlegt. Kurz darauf wird der
Positionsalarm im Empfänger ausgelöst, angezeigt durch das rote Licht und den Piepton.
Um den Alarm abzuschalten drehen Sie den Transmitter in aufrechte Position (mit dem Logo nach
oben) und drücken Sie die Taste (C). Um höchstmögliche Sicherheit zu gewährleisten sendet
der transmitter den Alarm weitere 3 Male, (für den Fall, dass der erste Alarm den Empfänger
wegen unvorhergesehener Interferenzen nicht erreicht hat). Dies bedeutet, dass Sie den Alarm 3
Mal durch Drücken der taste (C) abschalten müssen.
6. Um den Schwitzalarm ganz einfach zu demonstrieren, stellen Sie den Schwitzgrad auf
eine niedrige Stufe (etwa 2 oder 3), indem Sie die Taste (A) drücken, bis die Nummer im Kreis
auf der rechten Seite der Anzeige 2 oder 3 lautet.
Nachdem Sie den Schwitzgrad für den Alarm am Empfänger eingestellt haben umfassen Sie
einen der Schwitzsensoren, wie in untenstehender Abbildung gezeigt:

- 15 -
DE
EN
FR
EN
Wenn der gemessene Schwitzpegel so hoch wie Ihr Alarmpegel (oder höher) ist, löst der
Empfänger einen Alarm durch rotes Leuchten und Piepen aus. Um den Alarm abzuschalten, lassen
Sie den Sensor los und drücken Sie die Taste (C).
Fortgeschrittener Modus:
In den Fortgeschrittenen Modus (auch Graphenmodus oder Verlaufsmodus genannt) gelangt man,
indem man die Taste (D) drückt; dieser stellt dar, wie sich das Pferd während der letzten 6 Stunden
verhalten hat.
Soll dieser Modus auf seine Funktionalität überprüft werden, empfiehlt es sich, den Transmitter
zurückzusetzen, indem Sie eine der Batterien aus dem Gerät entnehmen und wieder einsetzen.
Dadurch sendet der Transmitter schneller Informationen und vereinfacht die Demonstration.
Im Demonstrationsmodus wird die gesamte Anzeige innerhalb von 10 Minuten mit
Diagramm- Informationen gefüllt. Bei normaler Verwendung (4 Minuten nach dem Reset)
dauert es 6 Stunden, um das Display mit Graphen über das Verhalten des Pferdes zu füllen.
Legen Sie den Transmitter auf verschiedene Seiten und umfassen Sie die Schwitzsensoren, um
Diagramme zu erstellen, die den Folgenden ähneln:
Die Alarme funktionieren so wie im einfachen Modus.
Der nächste Schritt ist, mit der Installation zu beginnen, siehe Kapitel 8.
- 16 -
INFoRMAtIoN
Als Verlängerung für das Stromkabel benutzen Sie ein handelsübliches
220V-Verlängerungskabel. Falls Sie aus Sicherheitsgründen kein Starkstromkabel
in der Nähe ihrer Pferde benutzen möchten, können Sie im Handel ein
Niederspannungs-Verlängerungskabel käuflich erwerben.
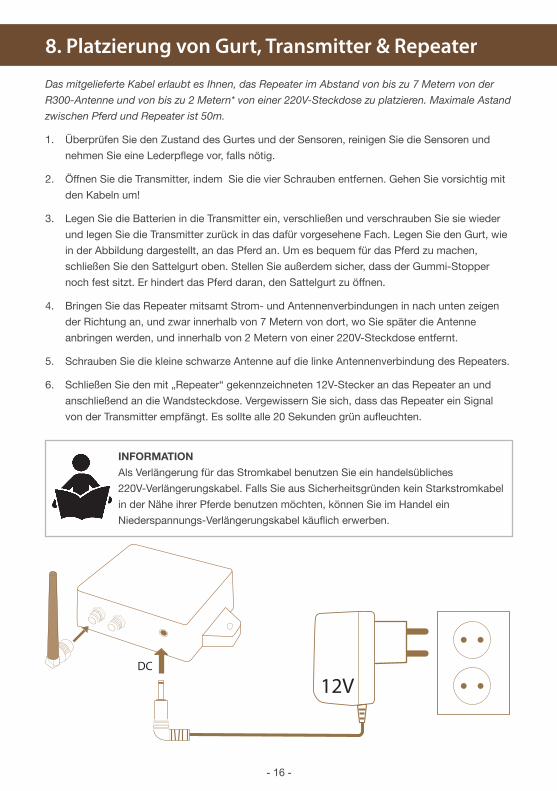
8. Platzierung von Gurt, Transmitter & Repeater
Das mitgelieferte Kabel erlaubt es Ihnen, das Repeater im Abstand von bis zu 7 Metern von der
R300-Antenne und von bis zu 2 Metern* von einer 220V-Steckdose zu platzieren. Maximale Astand
zwischen Pferd und Repeater ist 50m.
1. Überprüfen Sie den Zustand des Gurtes und der Sensoren, reinigen Sie die Sensoren und
nehmen Sie eine Lederpflege vor, falls nötig.
2. Öffnen Sie die Transmitter, indem Sie die vier Schrauben entfernen. Gehen Sie vorsichtig mit
den Kabeln um!
3. Legen Sie die Batterien in die Transmitter ein, verschließen und verschrauben Sie sie wieder
und legen Sie die Transmitter zurück in das dafür vorgesehene Fach. Legen Sie den Gurt, wie
in der Abbildung dargestellt, an das Pferd an. Um es bequem für das Pferd zu machen,
schließen Sie den Sattelgurt oben. Stellen Sie außerdem sicher, dass der Gummi-Stopper
noch fest sitzt. Er hindert das Pferd daran, den Sattelgurt zu öffnen.
4. Bringen Sie das Repeater mitsamt Strom- und Antennenverbindungen in nach unten zeigen
der Richtung an, und zwar innerhalb von 7 Metern von dort, wo Sie später die Antenne
anbringen werden, und innerhalb von 2 Metern von einer 220V-Steckdose entfernt.
5. Schrauben Sie die kleine schwarze Antenne auf die linke Antennenverbindung des Repeaters.
6. Schließen Sie den mit „Repeater“ gekennzeichneten 12V-Stecker an das Repeater an und
anschließend an die Wandsteckdose. Vergewissern Sie sich, dass das Repeater ein Signal
von der Transmitter empfängt. Es sollte alle 20 Sekunden grün aufleuchten.
DC
12V
- 17 -
DE
EN
FR
EN
90˚90˚
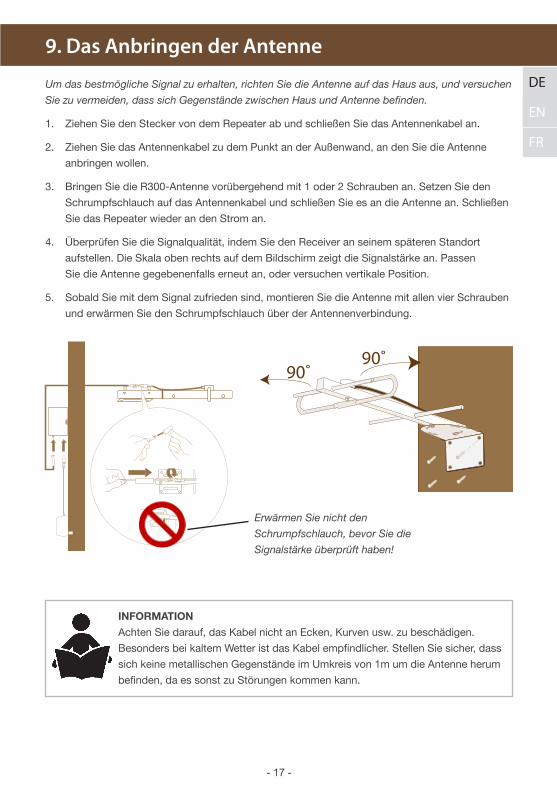
9. Das Anbringen der Antenne
Um das bestmögliche Signal zu erhalten, richten Sie die Antenne auf das Haus aus, und versuchen
Sie zu vermeiden, dass sich Gegenstände zwischen Haus und Antenne befinden.
1. Ziehen Sie den Stecker von dem Repeater ab und schließen Sie das Antennenkabel an.
2. Ziehen Sie das Antennenkabel zu dem Punkt an der Außenwand, an den Sie die Antenne
anbringen wollen.
3. Bringen Sie die R300-Antenne vorübergehend mit 1 oder 2 Schrauben an. Setzen Sie den
Schrumpfschlauch auf das Antennenkabel und schließen Sie es an die Antenne an. Schließen
Sie das Repeater wieder an den Strom an.
4. Überprüfen Sie die Signalqualität, indem Sie den Receiver an seinem späteren Standort
aufstellen. Die Skala oben rechts auf dem Bildschirm zeigt die Signalstärke an. Passen
Sie die Antenne gegebenenfalls erneut an, oder versuchen vertikale Position.
5. Sobald Sie mit dem Signal zufrieden sind, montieren Sie die Antenne mit allen vier Schrauben
und erwärmen Sie den Schrumpfschlauch über der Antennenverbindung.
Erwärmen Sie nicht den
Schrumpfschlauch, bevor Sie die
Signalstärke überprüft haben!
INFoRMAtIoN
Achten Sie darauf, das Kabel nicht an Ecken, Kurven usw. zu beschädigen.
Besonders bei kaltem Wetter ist das Kabel empfindlicher. Stellen Sie sicher, dass
sich keine metallischen Gegenstände im Umkreis von 1m um die Antenne herum
befinden, da es sonst zu Störungen kommen kann.

- 18 -
15
1
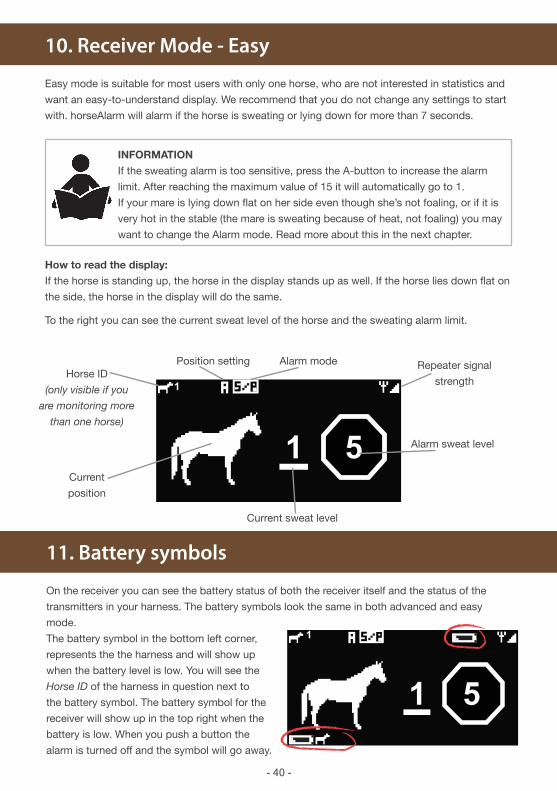
10. Empfangsmodus – Easy
Der Easy-Modus ist für Nutzer mit nur einem Pferd gut geeignet, die kein Interesse an Statistiken
haben, sondern ein leicht zu verstehendes Display bevorzugen.
Wir empfehlen Ihnen, anfangs die Einstellungen nicht zu verändern. horseAlarm alarmiert Sie
sofort, sollte das Pferd schwitzen oder sich für mehr als 7 Sekunden hinlegen.
Richtiges Ablesen des Displays:
Wenn Ihr Pferd steht, steht das Pferd auf dem Display ebenfalls. Liegt Ihr Pferd flach auf der Seite,
so tut es das Pferd auf dem Display ebenfalls. Rechts sehen Sie die gegenwärtige Schwitzstärke
des Pferdes und die Schwitzalarmgrenze.
Pferde-Kennzahl
(nur sichtbar, wenn
sie mehr als ein
Pferd beobachten)
AlarmmodusRepeater
Signalstärke
Alarm
Schwitzstärke
Gegenwärtige Schwitzstärke
Gegenwärtige
Position
Positionseinstellung
11. Batteriesymbole
Am Receiver können Sie den Batteriestatus sowohl vom Receiver selbst als auch den Status der
Transmitter in Ihrem Gurt sehen. Die Batteriesymbole sehen sowohl im Advanced- als auch im
Easy-Modus gleich aus.
Das Batteriesymbol links unten in der Ecke stellt
den Gurt dar und wird angezeigt, wenn der Bat-
teriestand niedrig ist. Sie sehen die betroffene
Pferde-Kennzahl neben dem Batteriesymbol.
Das Batteriesymbol des Receivers wird oben
15
1
1
INFoRMAtIoN
Sollte der Schwitzalarm zu empfindlich sein, drücken Sie die Taste A, um den
oberen Grenzwert des Alarms zu erhöhen. Bei Erreichen des Maximalwertes 15
schaltet das Gerät automatisch auf 1 zurück.
Liegt ihre Stute flach auf der Seite, ohne jedoch zu fohlen, oder für den Fall, dass
es sehr heiß im Stall ist (die Stute schwitzt aufgrund von Hitze und nicht, weil sie
fohlt), können Sie den Alarmmodus verändern. Lesen Sie mehr dazu im nächsten
Kapitel.

- 19 -
DE
EN
FR
EN
12. Alarm-Modi
Alle Pferde sind verschieden und manchmal kommt es vor, dass Sie die Alarmfunktionen
an horseAlarm verändern müssen. Wenn es beispielsweise sehr heiß ist, sollten Sie sich
ausschließlich auf den Positionsalarm verlassen.
Drücken Sie die Taste B, um zwischen den folgenden Modi auszuwählen:
Schwitzeinstellungen
Drücken Sie die Taste A, um den oberen Grenzwert für den Schwitzalarm zu erhöhen. Nach
Erreichen des Maximalwertes 15 stellt sich das Gerät automatisch auf 1 zurück.
Positionseinstellungen
Normalerweise schläft eine Stute gegen Ende ihrer Trächtigkeit nicht flach auf der Seite. Daran
können wir erkennen, dass bei Einnahme einer Liegeposition möglicherweise die Geburt
begonnen hat. Bei einem normalen Fohlvorgang empfehlen wir, Einstellung A zu benutzen.
Halten Sie die Taste B für einige Sekunden gedrückt, um zwischen den verschiedenen
Positionseinstellungen auszuwählen. Lassen Sie die Taste los, sobald die gewünschte Einstellung
auf dem Bildschirm erscheint. Sie können zwischen Folgendem wählen:
Schwitzen oder
Position
Standarde-
instellung.
Lesen Sie hierzu
die Paragraphen
S und P.
Position
Löst Alarm
aus, sobald
das Pferd eine
bestimmte Zeit
lang am Boden
liegt.
Lesen Sie hierzu
Paragraph P.
Schwitzen &
Position
Alarm wird ausge-
löst, wenn beides,
sowohl Schwitz-
stärke als auch
Position, über-
schritten werden.
Lesen Sie hierzu
die Paragraphen
S und P.
Schwitzen
Löst Alarm aus,
sobald das Pferd
über den einges-
tellten Grenzwert
hinaus schwitzt.
Lesen Sie hierzu
Paragraph S.
rechts angezeigt, wenn der Batteriestand niedrig ist. Wenn Sie eine Taste drücken, wird der Alarm
ausgeschaltet und das Symbol verschwindet.
INFoRMAtIoN
Um die Batterie zu schonen, werden die Informationen nur alle 20 Sekunden
übertragen. Der Alarm wird Sie trotzdem entsprechend den Beschreibungen für
A, B und C benachrichtigen, da die Daten alle zwei Sekunden aufgezeichnet
werden. Die Daten, die während der letzten 20 Sekunden aufgezeichnet wurden,
werden als ein ”Paket” übertragen und dann vom Empfänger ausgewertet.
Alarm aus
Der Receiver
wird weder
blinken noch
Töne von
sich geben.

- 20 -
1
Stalltemperatur
22
PositionsdiagrammSchweißdiagramm
5
13. Receiver-Modus – Advanced
Im Advanced-Modus läuft der horseAlarm stetig und erhält somit den Verlauf aller Werte. Das
bedeutet, dass Sie somit sehen können, was innerhalb der letzten 6 Stunden passiert ist, ohne
anwesend gewesen zu sein. Sowohl Schwitzen als auch Positionen werden aufgezeichnet. Der
Bildschirm aktualisiert sich alle drei minuten.
Außerdem können Sie die Stall-Temperatur sehen, wodurch es einfacher zu ermitteln ist, ob die
Stute wegen Hitze oder wegen des Abfohlens schwitzt.
Lesen des Positionsdiagramms:
Liegt das Pferd auf seiner rechten Seite, so erscheint eine dicke Linie unterhalb der dünnen Linie.
Liegt das Pferd auf seiner linken Seite, so erscheint eine dicke Linie oberhalb der dünnen Linie.
Lesen des Schwitzdiagramms:
Das Diagramm zeigt auf, wie stark das Pferd schwitzt. 0 ist am geringsten und 15 ist am stärksten.
Der gewählte Grenzwert wird als kleiner Punkt rechts auf dem Bildschirm, und als Zahl angezeigt.
Passen Sie die Schwitzgrenze mit der Taste A an. Nach 15 schaltet es automatisch auf 1 zurück.
Pferde-KennzahlAlarmmodus
Repeater
Signalstärke
Alarm Schwitzstärke
Gegenwärtige
Schwitzstärke
Gegenwärtige
Position
Positionseinstellung
– Der Positionsalarm startet, sobald sich das Pferd für länger als 7 Sekunden hinlegt. Eine
Wehe dauert erwiesenermaßen mindestens 7 Sekunden. Legt sich das Pferd für weniger als 7
Sekunden hin, geht der Alarm nicht los.
– Für kolikanfällige oder andersartig kranke Pferde. Der Alarm wird sofort ausgelöst (2 Sek.),
sobald sich das Pferd hinlegt.
- 21 -
DE
EN
FR
EN
7654321 8ON ON ON ON ON ON ON ON
15. Sollten Sie mehr als ein Pferd haben
Zusätzliche Gurte können Sie bei Ihrem Händler käuflich erwerben. Der Gurtsatz besteht aus Gurt
und Sender.
Ändern Sie die Kennzahl des Senders, indem Sie diesen öffnen und die drei Schalter
entsprechend der untenstehenden Abbildung in Position bringen. Jeder Sender benötigt seine
eigene Kennzahl, was bedeutet, dass Sie bis zu acht Pferde gleichzeitig beobachten können, da
Ihnen acht verschiedene Kennzahlen zur Verfügung stehen.
Wie das Display bei mehreren Pferden zu lesen ist
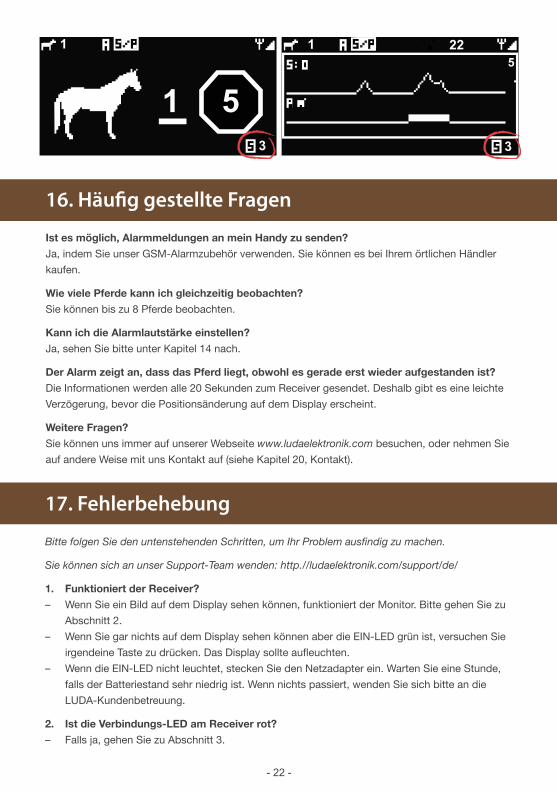
Sagen wir Sie überwachen drei Pferde gleichzeitig. (ID 1, 2 und 3) Sie sehen sich gerade Pferd
Nr. 1 an, aber Pferd Nr. 3 schwitzt stärker als die eingestellte Alarmgrenze erlaubt. Sogar während
Sie sich Pferd Nr. 1 ansehen wird der Empfänger wie gewohnt Alarm schlagen. Sie werden einen
Hinweis von dem Pferd, das den Alarm ausgelöst hat, in der rechten unteren Ecke des Bildschirms
sehen.
Auf der nächsten Seite ist eine Darstellung der Anzeige wie sie jeweils im Einfachen und im
Erweiterten Modus aussieht:
14. Receiver-Modus – Einstellungen
Halten Sie die Taste D für einige Sekunden lang gedrückt, bis der Einstellungs-Bildschirm
erscheint.
Einstellen der Hintergrundbeleuchtung
Drücken Sie die Taste A, um die Einstellung für die Hintergrundbeleuchtung ON & AUT
auszuwählen. Die Standardeinstellung ist Auto (AUT), bei der die Hintergrundbeleuchtung fünf
Sekunden lang aufleuchtet, nachdem ein Knopf gedrückt wurde. Die Beleuchtung ständig zu
betreiben, verkürzt die Lebensdauer der Batterie des Receivers.
thermometereinstellungen
Sie können zwischen Celsius und Fahrenheit auswählen, indem Sie die Tasten B drücken. Hier
haben Sie außerdem die Möglichkeit, die Temperatur zu kalibrieren, da es während der Produktion
manchmal zu Abweichungen kommen kann. Drücken Sie die Taste B, um dies zu tun. Durch
einmaliges Drücken wird die Zahl um ein Grad erhöht.
Sound-Einstellungen
Drücken Sie die Taste C, um den akustischen Alarm ON (Ein) oder OFF (Aus) zu stellen.
- 22 -
1 225
33
15
1
16. Häufig gestellte Fragen
Ist es möglich, Alarmmeldungen an mein Handy zu senden?
Ja, indem Sie unser GSM-Alarmzubehör verwenden. Sie können es bei Ihrem örtlichen Händler
kaufen.
Wie viele Pferde kann ich gleichzeitig beobachten?
Sie können bis zu 8 Pferde beobachten.
Kann ich die Alarmlautstärke einstellen?
Ja, sehen Sie bitte unter Kapitel 14 nach.
Der Alarm zeigt an, dass das Pferd liegt, obwohl es gerade erst wieder aufgestanden ist?
Die Informationen werden alle 20 Sekunden zum Receiver gesendet. Deshalb gibt es eine leichte
Verzögerung, bevor die Positionsänderung auf dem Display erscheint.
Weitere Fragen?
Sie können uns immer auf unserer Webseite www.ludaelektronik.com besuchen, oder nehmen Sie
auf andere Weise mit uns Kontakt auf (siehe Kapitel 20, Kontakt).
17. Fehlerbehebung
Bitte folgen Sie den untenstehenden Schritten, um Ihr Problem ausfindig zu machen.
Sie können sich an unser Support-Team wenden: http.//ludaelektronik.com/support/de/
1. Funktioniert der Receiver?
– Wenn Sie ein Bild auf dem Display sehen können, funktioniert der Monitor. Bitte gehen Sie zu
Abschnitt 2.
– Wenn Sie gar nichts auf dem Display sehen können aber die EIN-LED grün ist, versuchen Sie
irgendeine Taste zu drücken. Das Display sollte aufleuchten.
– Wenn die EIN-LED nicht leuchtet, stecken Sie den Netzadapter ein. Warten Sie eine Stunde,
falls der Batteriestand sehr niedrig ist. Wenn nichts passiert, wenden Sie sich bitte an die
LUDA-Kundenbetreuung.
2. Ist die Verbindungs-LED am Receiver rot?
– Falls ja, gehen Sie zu Abschnitt 3.

- 23 -
DE
EN
FR
EN
– Wenn sie grün ist, wenden Sie sich bitte an die LUDA-Kundenbetreuung.
3. Funktioniert der Repeater?
Ziehen Sie den Strom vom Repeater ab und schließen Sie ihn anschließend erneut an. Sie
sollten ein grünes Blinken sehen, wenn der Strom eingeschaltet wird. Innerhalb von 1 Minute
sollten Sie ein zweites Blinken sehen.
– Wenn Sie kein Blinken gesehen haben, überprüfen Sie bitte, ob Ihre Steckdose mit Strom
versorgt wird. Wenn Sie Strom haben, wenden Sie sich an die LUDA-Kundenbetreuung.
– Wenn Sie zu Beginn ein Blinken und dann ein zweites Blinken gesehen haben, gehen Sie bitte
zu Abschnitt 5.
– Wenn Sie ein erstes Blinken und anschließend nichts oder ein konstantes grünes Licht
gesehen haben, gehen Sie bitte zu Abschnitt 4.
4. Funktioniert der transmitter?
Überprüfen Sie, ob alle 20 Sekunden eine grüne LED auf der Transmitter-Box blinkt.
– Wenn Sie kein Blinken gesehen haben, wechseln Sie die Batterien im Transmitter aus.
Wenn das Auswechseln der Batterien nichts bringt, wenden Sie sich bitte an die LUDA-
Kundenbetreuung.
– Wenn Sie alle 20 Sekunden ein Blinken gesehen haben, gehen Sie bitte zu Abschnitt 5.
5. Überprüfen Sie den Abstand zwischen dem transmitter und dem Repeater
Versuchen Sie den Transmitter und den Repeater näher zueinander zu bewegen und schauen
Sie nach, ob Sie ein Signal empfangen. Wenn Sie ein Signal empfangen, sehen Sie ein grünes
Blinken am Repeater. Überprüfen Sie auch, ob die Antennen mit den richtigen Anschlüssen
verbunden sind. (Siehe Kapitel 8.)
6. Überprüfen Sie den Abstand zwischen Repeater und Receiver
Versuchen Sie den Receiver näher an die Außenantenne R300 zu bewegen und schauen
Sie nach, ob Sie ein Signal empfangen. Überprüfen Sie auch, ob die Antennen mit den
richtigen Anschlüssen am Repeater verbunden sind. (Siehe Kapitel 8.) Stellen Sie außerdem
sicher, dass das Antennenkabel nicht beschädigt ist.
18. Informationen über das Wiederverwertung
Das Symbol der durchgestrichenen Abfalltonne auf Rädern, das auf dem Produkt, auf dem Akku,
in der Dokumentation oder auf dem Verpackungsmaterial zu finden ist, bedeutet, dass elektrische
und elektronische Produkte, Batterien und Akkus am Ende ihrer Lebensdauer einer getrennten
Müllsammlung zugeführt werden müssen. Diese Vorschriften gelten in der Europäischen Union.
Entsorgen Sie diese Produkte nicht über den unsortierten Hausmüll.
Entsorgen Sie gebrauchte elektronische Produkte, Akkus und Verpackungsmaterial stets bei den
entsprechenden Sammelstellen. Sie beugen so der unkontrollierten Müllbeseitigung vor und för-
dern die Wiederverwertung von stofflichen Ressourcen. Batterien können Quecksilber,
Blei oder Cadmium enthalten - Stoffe, die für unsere Gesundheit und unsere Umwelt
schädlich sind. Weitere Informationen erhalten Sie über den Händler, bei dem Sie das
Produkt erworben haben, von regionalen Abfallunternehmen oder Ihre staatlichen Be-
hörden für die Einhaltung der erweiterten Herstellerhaftung oder dem für Ihr Land.

- 24 -
20. Kontakt, Zubehör und Support
LUDA Elektronik AB wurde 2003 gegründet und ist in den letzten Jahren zu einem führenden
Anbieter von schnurloser Videoausrüstung auf ausgewählten Märkten geworden. Das Unterneh-
men besitzt ein fundiertes Wissen von schnurloser Videotechnik und dessen Anwendungsgebiete.
Das trägt dazu bei, dass wir unseren Kunden außer den Produkten auch eine hochqualifizierte
Produkt- und Kaufberatung, sowie Service und Support anbieten können.
Zubehör und Support
Besuchen Sie www.ludaelektronik.com/support/de/ für Informationen zu Zubehör und Support.
Kontakt:
LUDA Elektronik AB, Aschebergsgatan 46, SE41133 Göteborg, Schweden
Tel: +46 (0)31 3130290 (English & svenska)
Fax: +46 (0)31 3130299
E-mail: [email protected]
19. Garantiebedingungen
Die Garantie gilt, wenn nichts anderes angegeben, 12 Monate ab Kaufdatum beim Fachhändler.
Während der Garantiezeit übernimmt LUDA Elektronik AB evtl. nötige Reparationen oder erstattet
Ihnen ein mindestens gleichwertiges Austauschgerät. Wenn Ihnen LUDA Elektronik AB ein Produkt
ersetzt, wird dieses Produkt durch die ursprüngliche Garantie für die verbleibende Zeit gedeckt.
Wenn ihr Produkt ausgetauscht wird, können benutzte, noch funktionierende Teile weiterhin
verwendet werden. Die ausgestauschten Ersatzteile sind Eigentum der LUDA Elektronik AB.
Die Garantie schützt nicht vor Schäden durch physischen Gewalt, Unfälle, Naturkatastrophen, die
Verwendung von falschen Netzteilen oder unsachgemäßer Behandlung von Produkten (außer wie
es von LUDA Elektronik AB und diesem Benutzerhandbuch beschrieben wird).
Der Endkunde ist für alle Versandkosten verantwortlich, die durch den Transport zur LUDA
Elektronik AB Reparaturwerkstatt aufkommen.
Die Garantie ist nur gültig, wenn der originale Kaufbeleg, der durch den LUDA Händler ausgestellt
wurde, vorgezeigt wird. Der Kaufbeleg muss Informationen hinsichtlich Kaufort, datum,
Ausstellungszeitpunkt und Produktbeschreibung enthalten. LUDA Elektronik AB behält sich das
Recht vor, Garantieansprüche, wenn sie die oben genannten Kaufbelegskriterien nicht erfüllen,
entfernt oder verändert worden sind, zurückzuweisen.

- 25 -
DE
EN
FR
English
Userguide
- 26 -
Contents
1. Introduction .................................................................................................27
2. Safety precautions / Important information ................................................28
3. What is included in your horseAlarm package ............................................29
4. Explanation of the included products .........................................................30
5. horseAlarm – How It Works .........................................................................32
6. Before you begin the installation .................................................................33
7. Understanding and testing before use ........................................................34
8. Placement of harness, Transmitter & Repeater ...........................................38
9. Mounting the antenna .................................................................................39
10. Receiver mode – Easy .................................................................................40
11. Battery symbols ..........................................................................................40
12. Alarm modes ...............................................................................................41
13. Receiver mode – Advanced ........................................................................42
14. Receiver mode – Settings ...........................................................................42
15. If you have more than one horse .................................................................43
16. Frequently Asked Questions .......................................................................43
17. Troubleshooting ...........................................................................................44
18. Warranty ......................................................................................................45
19. Information regarding recycling ...................................................................45
20. Contact us, accessories and support .........................................................45
- 27 -
DE
EN
FR
1. Introduction
Congratulations to your purchase of horseAlarm™ from LUDA Elektronik AB!
Your horseAlarm-solution will make foaling safer and more secure. The portable and wireless
receiver will allow you to supervise the wellbeing of your horse(s) from the comfort of your home.
We hope that the horseAlarm-solution will satisfy your needs and will exceed your expectations.
The product is CE-certified which means that it fulfils all established rules and demands for usage
within the EU. The CE-certification further implies that the radiation level is below the established
radiation levels stated in the EMC directive 89/336/EEC and R&TTE directive (1999/5/EC).
We thank you for purchasing the horseAlarm-solution and we hope you’ll easily get through the
installation process. If questions arise during the installation, please read through the different
troubleshooting chapters and the FAQ chapter. If further questions arise you are very welcome to
contact our friendly customer support.
Before you start reading about the installation of your horseAlarm-solution we ask you to read
through chapter 2. Safety precautions / Important information.
For news on our product range or accessories to your horseAlarm-solution, please visit our
website: www.horsealarm-europe.com
LUDA Elektronik AB

- 28 -
2. Safety precautions / Important information
Always use the correct power adaptor for each product.
the products will be damaged if they are supplied with wrong voltage!
Do not use the products in the following places:
Do not use the products in hospitals since they might interfere with sensitive equipment.
Do not use the products on-board airplanes since they might interfere with sensitive equipment.
- Always follow the laws and legislations that apply in your country.
- Do not leave plastic packaging material near children to avoid the risk of suffocation.
- Do not place any of the included power adaptors outside or close to water.
- Do not cover or place the power adaptors on heat sensitive materials.
- Do not lift the receiver in the antenna.
- Do not use several Transmitteres with the same frequency within the same area since they
will interfere with each other.
LUDA Elektronik AB resigns all responsibility that might occur from abuse or incorrect
usage of the products. Always follow the instructions in this User Guide. LUDA Elektronik
AB cannot guarantee that horseAlarm always will alarm when foaling, the product should be
seen as an aid during the foaling period.

- 29 -
DE
EN
FR
Your horseAlarm-solution includes the following products:
1. 1 Harness with built in sensors. (Art. nr 656SHA)
2. 1 Transmitter.
3. 1 Repeater, for retransmission of the signal. (Art. nr 653RLH)
4. 1 Transmitting R300-antenna. (Art. nr 350AHA)
5. 1 Wireless receiver with LCD-monitor, history function and alarm. (Art. nr 651RXH)
Your horseAlarm-solution also includes:
1 12V power adaptor for the Repeater.
1 12V power adaptor for the receiver.
3 AAA batteries for the Transmitter.
1 7,5 m antenna cable between the Repeater and the R300-antenna.
2 pcs of shrink tube for weather protection of antenna cable joints.
3 Cable ties
1 Surcingle with rubber stoppers
1 User Guide.
Please make sure that all products are included in your package and that all products are marked
with respective article number. Make sure nothing is damaged or broken.
3. Included in your horseAlarm-package:
Ladugård
47
2.
3.4.
5.1.

- 30 -
4. Explanation of the included products
To succeed with the installation process, it is imperatively important that you get familiar with the
included products.
Transmitter with
position sensors
Signal indicator
Sweating sensors
Harness with Transmitter and surcingle (Art. no 656SHA)
Pocket for the
Transmitter
Surcingle
with security
rubber stop
Wall mounting
Signal indicatorAntenna input
Power input (12V)
Repeater. (Art. no 653RLH)External antenna output
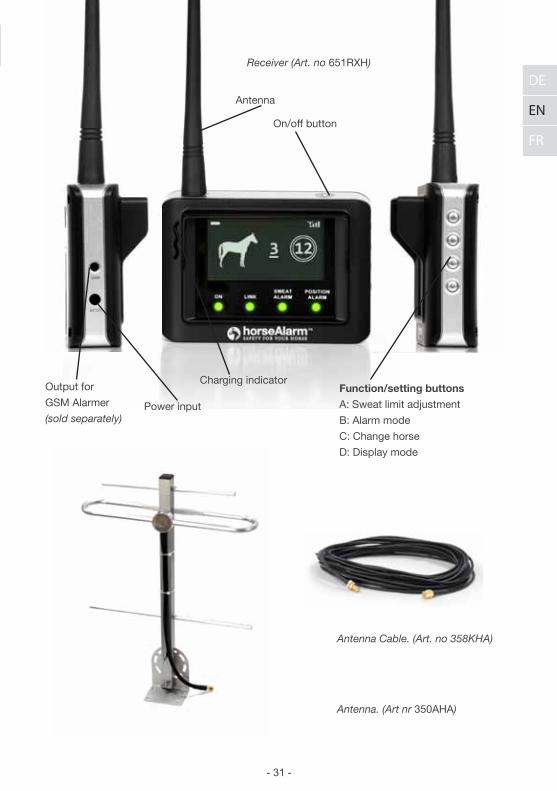
- 31 -
DE
EN
FR
Antenna
Output for
GSM Alarmer
(sold separately)
Receiver (Art. no 651RXH)
Antenna Cable. (Art. no 358KHA)
Antenna. (Art nr 350AHA)
Antenna
On/off button
Function/setting buttons
A: Sweat limit adjustment
B: Alarm mode
C: Change horse
D: Display mode
Power input
Charging indicator
- 32 -
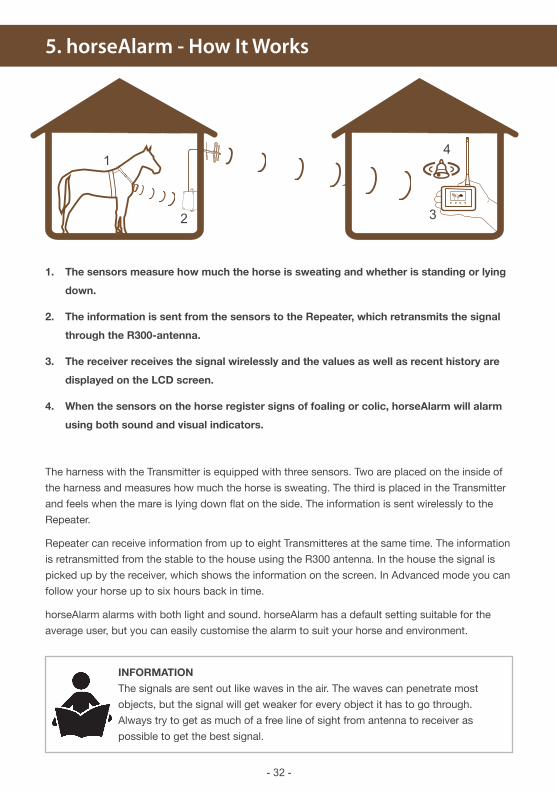
1. the sensors measure how much the horse is sweating and whether is standing or lying
down.
2. the information is sent from the sensors to the Repeater, which retransmits the signal
through the R300-antenna.
3. the receiver receives the signal wirelessly and the values as well as recent history are
displayed on the LCD screen.
4. When the sensors on the horse register signs of foaling or colic, horseAlarm will alarm
using both sound and visual indicators.
The harness with the Transmitter is equipped with three sensors. Two are placed on the inside of
the harness and measures how much the horse is sweating. The third is placed in the Transmitter
and feels when the mare is lying down flat on the side. The information is sent wirelessly to the
Repeater.
Repeater can receive information from up to eight Transmitteres at the same time. The information
is retransmitted from the stable to the house using the R300 antenna. In the house the signal is
picked up by the receiver, which shows the information on the screen. In Advanced mode you can
follow your horse up to six hours back in time.
horseAlarm alarms with both light and sound. horseAlarm has a default setting suitable for the
average user, but you can easily customise the alarm to suit your horse and environment.
5. horseAlarm - How It Works
Ladugård
47
1
2 3
4
INFoRMAtIoN
The signals are sent out like waves in the air. The waves can penetrate most
objects, but the signal will get weaker for every object it has to go through.
Always try to get as much of a free line of sight from antenna to receiver as
possible to get the best signal.

- 33 -
DE
EN
FR
6. Before You Begin the Installation
Read through the instructions in this manual before you begin
installing you horseAlarm package.
Start with charging the receiver as it will be used later in the
installation process. The battery is only partly charged and
will therefore only work for a short while if not charged.
1. Connect the power adapter (12V) to the power
input of the receiver and then to a wall socket
(220V).
2. Check that the charging indicator is on.
A fully charged battery will last between 12 hours (With
background light ON) to 30 hours (With background light
set to AUTO)
NotE!Only use the 12V adapter marked Receiver to power
the receiver! Usage of any other power source may
damage the receiver and is NOT covered by the
warranty.
DC
!
12V
3. Connect power to the repeater by using the power adapter marked with Repeater/RadioLink
only. When you connect power to the repeater you will see a green flash.
4. Go to Chapter 7 - Understanding
and testing before use.

- 34 -
7. Understanding and Testing Before Use
It is important that you are familiar and comfortable with the alarm and its functions before
installing and start of use. The following chapter will take you through a demonstration of all
important functions.
1. Turn on the receiver by pressing the ON-button on the top of the unit:
2. Make sure you are using the setting Simple Mode on the receiver by pressing the D-button
until the screen below appears.
After about 40 seconds the LINK indicator will change color to red and the receiver will sound,
telling you that the receiver is not receiving values from the transmitter.
15
1
- 35 -
DE
EN
FR
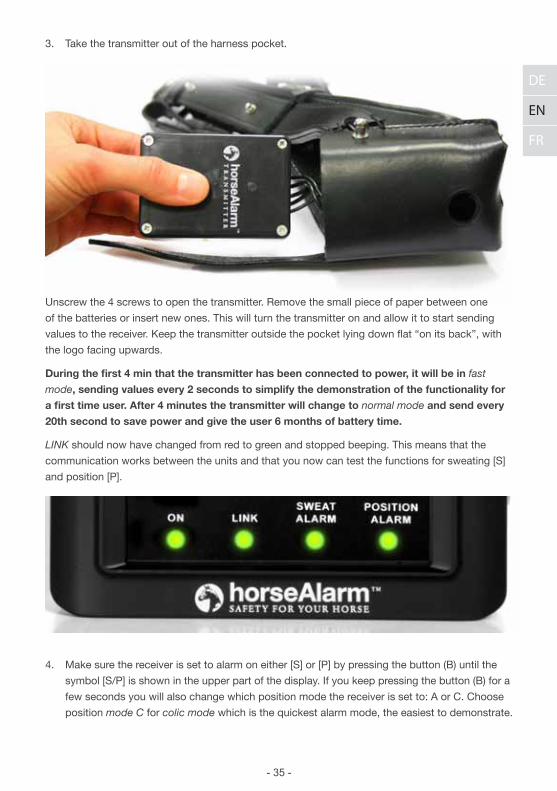
3. Take the transmitter out of the harness pocket.
Unscrew the 4 screws to open the transmitter. Remove the small piece of paper between one
of the batteries or insert new ones. This will turn the transmitter on and allow it to start sending
values to the receiver. Keep the transmitter outside the pocket lying down flat “on its back”, with
the logo facing upwards.
During the first 4 min that the transmitter has been connected to power, it will be in fast
mode, sending values every 2 seconds to simplify the demonstration of the functionality for
a first time user. After 4 minutes the transmitter will change to normal mode and send every
20th second to save power and give the user 6 months of battery time.
LINK should now have changed from red to green and stopped beeping. This means that the
communication works between the units and that you now can test the functions for sweating [S]
and position [P].
4. Make sure the receiver is set to alarm on either [S] or [P] by pressing the button (B) until the
symbol [S/P] is shown in the upper part of the display. If you keep pressing the button (B) for a
few seconds you will also change which position mode the receiver is set to: A or C. Choose
position mode C for colic mode which is the quickest alarm mode, the easiest to demonstrate.

- 36 -
5. Place the transmitter according to the picture below, to simulate that the horse is lying down:
Watch how the horse lies down on the display. Shortly the position alarm will go on in the
receiver, shown by the red light and the beeping.
To turn off the alarm, turn the transmitter upright (with the logo up) and press the (C) button.
For highest possible security the transmitter continues to send the alarm 3 times, (in
case the first alarm would not reach the receiver because of unpredicted interference). this
means that you will have to turn off the alarm 3 times by pressing button (C).
6. to easily demonstrate the sweating alarm, set the sweating level to a low level (such as 2
or 3), by pressing the (A) button until the number in the circle on the right side of the display is
2 or 3.
After you have set the sweating alarm level on the receiver, grip one of the sweating sensors
as in the picture below:

- 37 -
DE
EN
FR
When the measured sweat level is as high as your alarm level (or higher), the receiver starts to
alarm with red light and beeping. To turn off the alarm, let go of the sensors and press the (C) but-
ton.
Advanced Mode:
Advanced Mode, (which also can be called Graph Mode or History Mode), is entered by pressing
the (D) button and tells the user how the horse has been during the last 6 hours.
When used to demonstrate its functionality, it is recommended to reset the transmitter by taking
out one of the batteries from the transmitter and insert it again. This will make the transmitter send
more rapidly to simplify the demonstration.
In demonstration mode the whole display is filled with diagram information in 10 minutes.
When used as normal, (4 min after it has been reset), it takes 6 hours to fill the display with
graphs of the horse’s behavior.
Lay the transmitter down on various sides and simultaneously grip the sweating sensors to create
diagrams similar to the ones below:
The alarms work in the same way as in Simple Mode.
The next step is to start the installation, please go to chapter 8.

- 38 -
8. Placement of harness, Transmitter & Repeater
The included cable will allow you to place the Repeater within 7 meters from the R300 antenna
and within 2 meters* from a 220V socket. Maximum distance between horse and Repeater is 50m.
1. Check the state of the harness and sensors, clean the sensors and condition the leather if
needed.
2. Open the Transmitter by unscrewing the four screws. Be careful not to stretch the cables!
3. Put the batteries in the Transmitter, close, screw back the screws, then put it back in the
Transmitter pocket. Put the harness on the horse according to the illustration. To make it
comfortable for the horse, close the surcingle at the top. Also make sure that the rubber stop
is still on. It prevents the horse from opening the surcingle.
4. Mount the Repeater with the power and antenna connections facing down, within 7 meters
from where you will place the antenna, and 2 meters from a 220V socket.
5. Screw the small black antenna onto the left antenna connection of the Repeater.
6. Connect the 12V adapter marked with Repeater to the Repeater and then to the wall socket.
Make sure the Repeater is receiving a signal from the Transmitter, it should flash in green
every 20th second.
DC
12V
INFoRMAtIoN
*To lengthen the power cable, use a regular 220V extending cable. If you due to
security reasons do not wish to use high voltage cables close to your horses, you
can purchase a low voltage extending cable from your retailer.

- 39 -
DE
EN
FR
9. Mounting the Antenna
To achieve the best signal reception, mount the antenna facing the house you will be receiving the
signal in, with no objects between.
1. Unplug the power to the Repeater, connect the antenna cable.
2. Drag the antenna cable to the point on the outer wall where you have chosen to mount the
antenna.
3. Mount the R300 antenna temporarily with 1 or 2 screws. Put the shrinking tube on the
antenna cable and connect it to the antenna. Plug in the power to the Repeater again.
4. Check the signal quality using the receiver at the intended receiving point. The scale to the
upper right on the screen shows the signal strength. Adjust the antenna if needed, or try
vertical position.
5. Mount the antenna with all four screws and heat the shrink tube over the antenna
connection when you are satisfied with the signal.
Do not heat the shrinking
tube until you have checked
the signal strength!
90˚90˚
INFoRMAtIoN
Be careful not to break the cable when going around corners etc. Especially in
cold weather as the cable will be more sensitive.
Make sure there are no metal objects within 1 m of the antenna, as they may
cause interference.
- 40 -
10. Receiver Mode - Easy
Easy mode is suitable for most users with only one horse, who are not interested in statistics and
want an easy-to-understand display. We recommend that you do not change any settings to start
with. horseAlarm will alarm if the horse is sweating or lying down for more than 7 seconds.
15
1
How to read the display:
If the horse is standing up, the horse in the display stands up as well. If the horse lies down flat on
the side, the horse in the display will do the same.
To the right you can see the current sweat level of the horse and the sweating alarm limit.
Horse ID
(only visible if you
are monitoring more
than one horse)
Alarm mode Repeater signal
strength
Alarm sweat level
Current sweat level
Current
position
Position setting
11. Battery symbols
On the receiver you can see the battery status of both the receiver itself and the status of the
transmitters in your harness. The battery symbols look the same in both advanced and easy
mode.
The battery symbol in the bottom left corner,
represents the the harness and will show up
when the battery level is low. You will see the
Horse ID of the harness in question next to
the battery symbol. The battery symbol for the
receiver will show up in the top right when the
battery is low. When you push a button the
alarm is turned off and the symbol will go away.
15
1
INFoRMAtIoN
If the sweating alarm is too sensitive, press the A-button to increase the alarm
limit. After reaching the maximum value of 15 it will automatically go to 1.
If your mare is lying down flat on her side even though she’s not foaling, or if it is
very hot in the stable (the mare is sweating because of heat, not foaling) you may
want to change the Alarm mode. Read more about this in the next chapter.

- 41 -
DE
EN
FR
12. Alarm Modes
All horses are different and sometimes you will need to change the alarm function on horseAlarm.
For example, in hot condition you may need to rely on the position alarm only.
Press the B button to switch between the following modes:
Sweat Settings
Press the A button to increase the alarm limit for sweating. After reaching the maximum level of 15
it will jump down to 1.
Position Settings
Normally the mare is not sleeping flat on her side at the end of the pregnancy. Thus we can detect
when she is lying down flat and assume that the foaling has begun. For normal foaling cases we
recommend that you use setting A.
Press the B button for a few seconds to switch between the different position settings. Release
when your chosen setting is visible on the screen. You can choose between the following:
– The position alarm will alarm if the horse is laying down for more than 7 seconds. A contrac-
tion lasts for at least 7 seconds. If the horse is lying down for less than 7 seconds the alarm will
not go off.
– For horses with colic or that are ill in other ways. The alarm will trigger immediately (2 sec)
after the horse lies down.
Sweat or positionThe default setting.
Read both the S and P paragraphs.
PositionWill alarm if the horse is lying down for a certain time. Read the P paragraph.
Sweat & Position Will need both sweating and position to exceed their levels to alarm. Read the S and P paragraph.
Alarm offThe receiver will not blink or sound at all.
SweatWill alarm when the horse is sweating more than the set limit.Read the S paragraph.
INFoRMAtIoN
To save battery life, the information is only transmitted every 20th second. The
alarm will still alarm according to the descriptions for A and C above, as data is
recorded every two seconds. The data recorded during the last 20 seconds is
transmitted as a ”package” and then interpreted by the receiver.

- 42 -
13. Receiver Mode - Advanced
In advanced mode the horseAlarm will keep track and draw the history of the values. This means
that you can see what has happened during the last 6 hours, even if you have not been awake the
whole time. Both sweating and position is recorded. The screen updates every three minutes.
You can also see the stable temperature, making it easier to determine if the mare is sweating
because of heat or foaling.
How to read the position diagram:
If the horse is lying on its right side, a thick line will appear below the thin line.
If the horse is lying on its left side, a thick line will appear above the thin line.
How to read the sweat diagram:
The diagram will display how much the horse is sweating, 0 is the least and 15 is the most.
The chosen limit is shown as a small dot at the right of the screen and also as a number. Adjust
the sweat-limit with the A button. After 15 it will automatically go to 1.
1Horse ID
Alarm modeRepeater
signal strength
Alarm sweat level
Current
sweat level
Current position
Position settingStable temperature
22
Position diagramSweat diagram
5
14. Receiver Mode - Settings
Press the D button for a few seconds until the settings screen appear.
Setting the backgound light
Press the A button to change the background light setting between ON and AUT.
The default setting is Auto (AUT), where the backround will light up for five seconds after a button
is pressed. Keeping the light on will shorten the battery life of the receiver.
thermometer settings
You can change between Celcius and Fahrenheit by holding the B button down.
Here you also have the possibility to calibrate the temperature as it is sometimes offset during pro-
duction. Press the B button to do this. Pressing one time increases the number with one degree.
Sound settings
Press the C button to change between OFF (0) or ON (1,2 or 3).

- 43 -
DE
EN
FR
7654321 8ON ON ON ON ON ON ON ON
16. Frequently Asked Questions
Is it possible to get alarm notifications sent to a mobile phone?
Yes, by using our GSM Alarmer accessory.
How many horses can I monitor simultaneously?
You can monitor up to 8 horses.
Can I adjust the alarm sound level?
Yes, please see chapter 14.
the alarm shows that the horse is lying down even though it just got up again?
The information is sent to the Receiver every 20th second. Thus, there is a slight delay before the
position change shows up on the display.
Further questions?
Visit our website www.ludaelektronik.com or contact us in another way (see chapter 20, Contact us).
15. If you have more than one horse
Extra harnesses can be purchased from your retailer. The harness kit include both harness and
transmitter. Extra harnesses are preset to ID 2.
Change the ID of the transmitter by opening the transmitter and setting the three switches in
positions according to the picture below. Each transmitter need its own ID, which means you can
monitor up to eight horses simultaneously as there are eight different IDs to choose from. How to
set the switches for each ID is illustrated below.
How to read the display with several horses
Let’s say you are monitoring three horses at the same time. (ID 1, 2 and 3) You are currently look-
ing at horse no 1, but horse no 3 is sweating more than the set alarm limit. Even though you are
looking at horse no 1, the receiver will alarm as usual. You will se an indication in the lower right
corner of the screen of which horse that has triggered the alarm.
Below is an illustration of what the indication looks like in Easy and Advanced mode respectively:
1 225
33
15
1

- 44 -
17. Troubleshooting
Please follow the steps below to locate your problem.
You can contact our support team at: http.//ludaelektronik.com/support/en/
1. Is the Receiver working?
– If you can see a picture in the display the monitor is considered working. Please go to section
2.
– If you cannot see anything in the display but the ON LED is green, try pressing any button.
The display should lit up.
– If the ON LED is not glowing, plug in the power adapter. Wait an hour in case the battery level
is very low. If nothing happens, please contact the LUDA customer support.
2. Is the Link LED on the Receiver red?
– If it is, go to section 3.
– If it is green, please contact the LUDA customer support.
3. Is the Repeater working?
Disconnect the power from the Repeater and then connect it again. You should see a green
flash when the power is plugged in. Within 1 minute you should see a second flash.
– If you didn’t see any flash, please check that there is power in your wall socket. If you have
power, contact the LUDA customer support.
– If you did see a flash at the start and then a second flash, please go to section 5.
– If you saw a first flash and then nothing or a constant green light, please go to section 4.
4. Is the transmitter working?
Check if there is a green LED flashing every 20th second on the Transmitter box.
– If you didn’t see any flash, change batteries in the Transmitter. If changing batteries doesn’t
help, please contact the LUDA customer support.
– If you did see a flash every 20th second, please go to section 5.
5. Check the distance between the transmitter and Repeater
Try moving the Transmitter and Repeater closer to each other and see if you get a signal. If
you get a signal you will see a green flash on the Repeater. Also check that the antennas are
connected to the right connections. (See chapter 8.)
6. Check the distance between the Repeater and Receiver
Try moving the Receiver closer to the outdoor R300 antenna and see if you get a signal. Also
check that the antennas are connected to the right connections on the Repeater. (See chapter
8.) Also make sure the antenna cable isn’t damaged in any way.

- 45 -
DE
EN
FR
18. Warranty
The warranty is due, if no other terms agreed, 12 months from the date the product is purchased from
the authorised LUDA Elektronik AB dealer. During the warranty time LUDA Elektronik AB is obliged to
repair, alternately, replace the broken product to a similar product or a product with better functions.
When LUDA Elektronik AB replaces the product, the new product will be covered by the original warranty
during the remaining warranty time. If your product is replaced, previously used, completely functioning
parts might be used. Replaced parts are owned and controlled by LUDA Elektronik AB. The warranty
does not cover damage that have arisen due to physical damage, accidents, natural disasters, the usage
of incorrect power adaptors or usage of the products in deviant behaviours from what is recommended
by LUDA Elektronik AB and in this user guide. The end consumer will be responsible for all shipping
costs that occur from transportation to the LUDA Elektronik AB repair shop. The warranty will only be
valid if the original receipt, issued by the authorised LUDA dealer, can be presented. The original receipt
needs to contain information regarding place of purchase, issue date and product description. LUDA
Elektronik AB reserve the right to refuse to perform the warranty service if above mentioned receipt
information has been removed, changed or is missing.
20. Contact us, accessories and support
LUDA Elektronik, founded in 2003, is a leading distributor of wireless video equipment. We have
in-depth expertise on t wireless video technology and its usage areas. Thanks to this we can offer
our customers the latest products and high quality sales support, service and customer support.
Accessories and support
Visit www.ludaelektronik.com/support/en/ for support and accessories to your horseAlarm.
Contact:
LUDA Elektronik AB, Aschebergsgatan 46, SE41133 Göteborg, Sweden
Tel: +46 (0)31 3130290
Fax: +46 (0)31 3130299
E-mail: [email protected]
19. Information regarding recycling
The crossed-out wheeled-bin symbol on your product, battery, literature, or packaging reminds
you that all electrical and electronic products, batteries, and accumulators must be taken to
separate collection at the end of their working life. This requirement applies in the European
Union. Do not dispose of these products as unsorted municipal waste.
Always return your used electronic products, batteries, and packaging materials to a dedicated
collection point. This way you help prevent uncontrolled waste disposal and promote the recy-
cling of materials. Batteries can contain mercury, lead or cadmium - substances that
are harmful to our health and our environment. More detailed information is available
from the product retailer, local waste authorities or your national producer responsibility
organization.

- 46 -

- 47 -
DE
EN
FR
SV
Français
Guided’utilisation

- 48 -
Table des matières
1. Introduction .................................................................................................49
2. Informations de sécurité & autres informations ..........................................50
3. Inclus avec votre horseAlarm ......................................................................51
4. Explications concernant les produits inclus ................................................52
5. horseAlarm – Fonctionnement ....................................................................54
6. Avant de commencer l’installation ..............................................................55
7. Understanding and testing before use ........................................................56
8. Mise en place du harnais, du boïtier des capteurs & du Repeater .............60
9. Mise en place de l’antenne .........................................................................61
10. Mode réception – Facile ..............................................................................62
11. Symboles de la batterie ..............................................................................62
12. Modes d’alarme ...........................................................................................63
13. Mode récepteur – Avancé ...........................................................................64
14. Mode récepteur – Paramètres .....................................................................65
15. Si vous aves plus d’un cheval: ....................................................................65
16. Foire Aux Questions ....................................................................................66
17. Resolution de problèmes ............................................................................66
18. Garantie .......................................................................................................67
19. Information concernant le recyclage ..........................................................68
20. Contactez nous, accessoires et support .....................................................68

- 49 -
DE
EN
FR
SV
1. Introduction
Félicitations pour votre achat de la horseAlarm™ de LUDA Elektronik AB!
Votre horseAlarm vous apportera le pouvoir de surveiller vos chevaux depuis l’étable ou le
camion. Ce récepteur portable et sans fil va vous permettre une supervision facile et constante de
vos chevaux.
Nous espérons que vous serez pleinement satisfait de la horseAlarm et qu’elle aura répondu à vos
attentes en tous points.
Ce produit est certifié conforme CE aux normes Européennes, ce qui signifie qu’il remplit les
règles strictes établies par l’UE. Cette certification de conformité implique aussi que les niveaux
de radiation sont en dessous des niveaux imposés par la directive EMC 89/336/EEC et la directive
R&TTE (1999/5/EC).
Nous vous remercions d’avoir acheté la horseAlarm et vous souhaitons bonne chance quand
à l’installation. Au cas où vous auriez des questions au cours de l’installation, veuillez lire les
différents chapitres relatifs aux difficultés connues et aux questions fréquentes (FAQ). Au cas où
vous auriez d’autres questions, nous vous encourageons à contacter notre service à la clientèle
compétente et chaleureuse.
Avant de commencer votre lecture du manuel d’installation de la horseAlarm, nous vous
recommandons de lire le chapitre 2 relatif aux précautions de sécurité et autres informations
importantes.
Pour trouver des informations sur notre ligne de produits et accessoires pour votre horseAlarm,
veuillez visiter notre site web: www.horsealarm-europe.com
LUDA Elektronik AB
- 50 -
2. Informations de sécurité & autres informations
toujours utiliser les adaptateurs secteur qui conviennent pour chaque produit. Autrement, ceux-ci pourraient être endommagés
s’ils sont sur le mauvais voltage!
Ne pas utiliser nos produits dans les endroits suivants:
Ne pas utiliser dans les hôpitaux car ils pourraient interférer avec les équipements sensibles.
Ne pas utiliser à bord des avions car ils pourraient interférer avec les équipements sensibles.
- Toujours utiliser le produit en considération des lois et règlements en vigueur dans
votre pays.
- Ne pas laisser les plastiques près des enfants.
- Ne pas placer les adaptateurs secteurs près d’une source d’eau ou à l’extérieur.
- Ne pas couvrir ou placer l’adaptateur sur des matériaux sensibles à la chaleur.
LUDA Elektronik AB décline toute responsabilité quand aux évènements pouvant résulter
d’une utilisation non conventionnelle ou contrevenant aux conseils du présent manuel.
LUDA Elektronik AB ne peut garantir que le horseAlarm vous avertira à chaque fois qu’il
se produit une mise à bas. Ce produit doit être considéré comme permettant de faciliter la
période de mise à bas.

- 51 -
DE
EN
FR
SVVotre horseAlarm comprend les produits suivants:1. 1 harnais avec capteurs intégrés. (Art. nr 656SHA)
2. 1 boîtier de capteurs.
3. 1 Repeater pour la transmission du signal. (Art. nr 653RLH)
4. 1 antenne de transmission R300. (Art. nr 350AHA)
5. 1 récepteur sans fil avec écran LCD, fonction mémoire et alarme. (Art. nr 651RXH)
Votre horseAlarm comprend également: 1 adaptateur secteur 12V pour la Repeater.
1 adaptateur secteur 12V pour le récepteur.
3 piles AAA pour le boîtier de capteurs.
1 câble d’antenne de 7,5 m entre la Repeater et l’antenne R300.
2 morceaux de câbles thermorétractables pour protéger les câbles de l’antenne des intempéries.
3 bandes pour les câbles.
1 surfaix avec un stop de martingale en caoutchouc
1 guide de l’utilisateur.
Veuillez vous assurer que tous les produits sont inclus avec votre alarme et qu’ils portent bien tous
le numéro de l’article. Assurez vous que rien n’est abîmé ou cassé.
3. Inclus avec votre horseAlarm:
Ladugård
47
2.
3.4.
5.1.
- 52 -
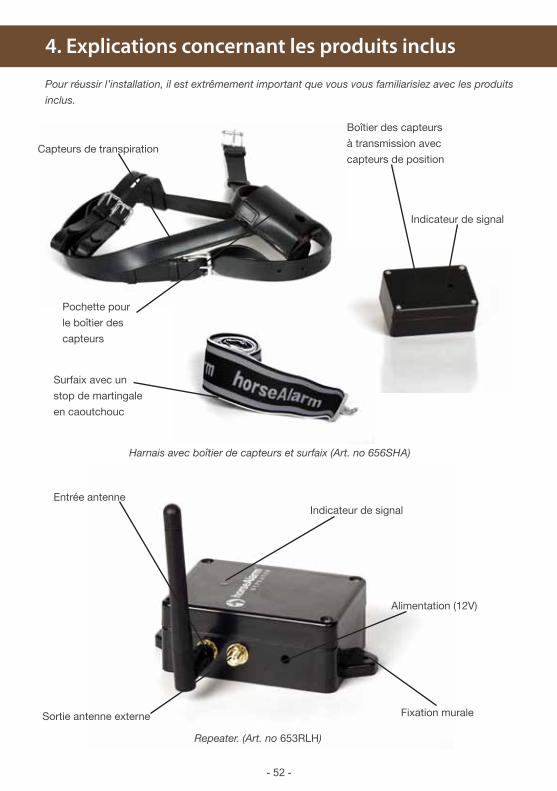
4. Explications concernant les produits inclus
Pour réussir l’installation, il est extrêmement important que vous vous familiarisiez avec les produits
inclus.
Boîtier des capteurs
à transmission avec
capteurs de position
Indicateur de signal
Capteurs de transpiration
Harnais avec boîtier de capteurs et surfaix (Art. no 656SHA)
Repeater. (Art. no 653RLH)
Pochette pour
le boîtier des
capteurs
Surfaix avec un
stop de martingale
en caoutchouc
Fixation murale
Indicateur de signalEntrée antenne
Alimentation (12V)
Sortie antenne externe

- 53 -
DE
EN
FR
SV
Antenna
Sortie pour
GSM Alarmer
(vendu séparément)
Récepteur (Art. no 651RXH)
Câble d’antenne. (Art. no 358KHA)
Antenne. (Art nr 350AHA)
Antenne
Boutons On/off
Boutons de réglage/fonction
A: Réglage du seuil limite de
transpiration
B: Mode alarme
C: Changer de cheval
D: Mode d’essai
Alimentation
Indicateur de
charge
- 54 -
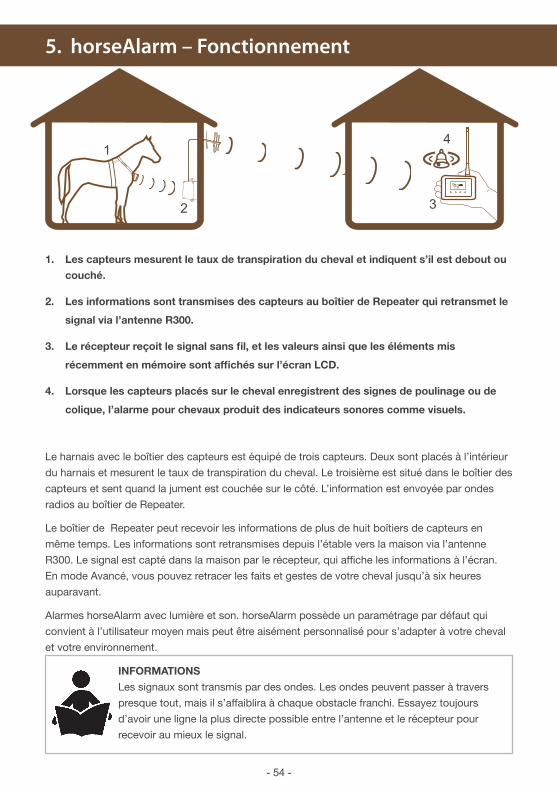
1. Les capteurs mesurent le taux de transpiration du cheval et indiquent s’il est debout ou
couché.
2. Les informations sont transmises des capteurs au boîtier de Repeater qui retransmet le
signal via l’antenne R300.
3. Le récepteur reçoit le signal sans fil, et les valeurs ainsi que les éléments mis
récemment en mémoire sont affichés sur l’écran LCD.
4. Lorsque les capteurs placés sur le cheval enregistrent des signes de poulinage ou de
colique, l’alarme pour chevaux produit des indicateurs sonores comme visuels.
Le harnais avec le boîtier des capteurs est équipé de trois capteurs. Deux sont placés à l’intérieur
du harnais et mesurent le taux de transpiration du cheval. Le troisième est situé dans le boîtier des
capteurs et sent quand la jument est couchée sur le côté. L’information est envoyée par ondes
radios au boîtier de Repeater.
Le boîtier de Repeater peut recevoir les informations de plus de huit boîtiers de capteurs en
même temps. Les informations sont retransmises depuis l’étable vers la maison via l’antenne
R300. Le signal est capté dans la maison par le récepteur, qui affiche les informations à l’écran.
En mode Avancé, vous pouvez retracer les faits et gestes de votre cheval jusqu’à six heures
auparavant.
Alarmes horseAlarm avec lumière et son. horseAlarm possède un paramétrage par défaut qui
convient à l’utilisateur moyen mais peut être aisément personnalisé pour s’adapter à votre cheval
et votre environnement.
5. horseAlarm – Fonctionnement
Ladugård
47
1
2 3
4
INFoRMAtIoNS
Les signaux sont transmis par des ondes. Les ondes peuvent passer à travers
presque tout, mais il s’affaiblira à chaque obstacle franchi. Essayez toujours
d’avoir une ligne la plus directe possible entre l’antenne et le récepteur pour
recevoir au mieux le signal.

- 55 -
DE
EN
FR
SV
6. Avant de commencer l’installation
Lisez les instructions de ce manuel avant de commencer à installer
les éléments de votre horseAlarm.
Commencez par charger le récepteur car il servira plus tard
durant l’installation. La batterie n’est que partiellement
chargée et fonctionnera donc assez peu de temps si
elle n’est pas rechargée.
1. Connectez l’adaptateur secteur (12V) à l’alimentation
du récepteur puis à une prise murale. (220V).
2. Vérifier que l’indicateur de charge est allumé.
3. Référez-vous au chapitre 7.
Une batterie complètement chargée a une durée
d’autonomie située entre 12 heures (avec la lampe
d’environnement allumée (ON) ) et 30 heures (avec la lampe
d’environnement réglée sur AUTO).
DC
!
12V
3. Branchez le répétiteur en utilisant l’adaptateur secteur sur lequel est indiqué Repeater/
radioLink Only. Lorsque vous brancherez le répétiteur, vous verrez un flash vert.
4. Référez-vous au chapitre 7 – Com
prendre et tester avant l’utilisation
REMARQUE!Only use the 12V adapter marked Receiver to power
the receiver! Usage of any other power source may
damage the receiver and is NOT covered by the
warranty.

- 56 -
7. Comprendre et tester avant l’utilisation
Il est important que vous vous familiarisiez et que vous vous sentiez à l’aise avec l’alarme et ses
fonctions avant de l’installer et de commencer à l’utiliser. Le chapitre suivant vous guidera dans
une démonstration de toutes les fonctions importantes.
1. Allumez le récepteur en appuyant sur le bouton ON sur la partie supérieure de l’unité:
2. Assurez-vous que vous utilisez le paramétrage Mode simple sur le récepteur, en appuyant sur
le bouton D jusqu’à ce qu’un cheval soit affiché.
Environ 40 secondes après, l’indicateur LINK passera au rouge et le récepteur émettra un son
pour vous avertir qu’il ne reçoit pas de valeurs du transmetteur.
15
1

- 57 -
DE
EN
FR
SV
3. Enlevez le transmetteur de la poche du harnais en cuir.
Dévissez les 4 vis pour ouvrir le transmetteur. Enlevez le petit morceau de papier qui se trouve
entre l’une des batteries ou introduisez une nouvelle. En faisant cela, le transmetteur s’allumera
et il vous permettra d’envoyer des valeurs au récepteur. Laissez le transmetteur en dehors de la
poche, à plat ” sur le dos”, avec le logo vers le haut.
Les premières 4 minutes suivant la connexion du transmetteur, celui-ci se trouvera en mode
rapide. Ainsi, il enverra des valeurs toutes les 2 secondes pour simplifier la démonstration
de la fonctionnalité à un utilisateur qui s’en servirait pour la première fois. Au bout des
4 minutes, le transmetteur passera au mode normal et enverra des valeurs toutes les 20
secondes afin d’économiser de l’énergie et pour que l’utilisateur puisse bénéficier de la
batterie pendant 6 mois.
LINK aura changé du rouge au vert, et aura arrêter de beeper. Cela signifie que la communication
est établie entre les unités et que vous pouvez désormais tester les fonctions de transpiration [S]
et Position [P].
4. Assurez-vous que le récepteur est défini sur alarme aussi bien sur [S] ou [P] en appuyant sur
le bouton (B) jusqu’à ce que le symbole [S/P] soit montré dans la partie supérieure de l’écran. Si
vous continuez à appuyer continuellement sur le bouton (B) pendant quelques secondes, vous
changerez également le mode position sur lequel le récepteur devra être réglé: A ou C. Choisissez
la position C pour le « mode colique », il s’agit du mode d’alarme le plus rapide (le plus simple à
démontrer).

- 58 -
5. Placez le transmetteur tel qu’indiqué sur l’image ci-dessous pour stimuler le cheval à se
coucher:
Observez la manière dont le cheval se couche sur l’écran. L’alarme de position sera bientôt
sur le récepteur, indiquée par la lumière rouge et le bip.
Pour éteindre l’alarme, tournez le transmetteur vers l’avant (le logo vers le haut) et appuyez sur le
bouton (C). Pour des raisons de sécurité, le transmetteur continue à envoyer l’alarme 3 fois,
(au cas où la première alarme n’atteindrait pas le récepteur à cause d’une interférence imprévue).
Cela signifie que vous devrez éteindre l’alarme 3 fois en appuyant sur le bouton (C).
6. Pour montrer facilement l’alarme de transpiration, réglez le niveau à un faible niveau (tel
que 2 ou 3) en appuyant sur le bouton (A) jusqu’à ce que le numéro du cercle du côté droit de
l’écran soit 2 ou 3.
Une fois que vous aurez réglé le niveau de l’alarme de transpiration sur le récepteur, serrez
l’un des capteurs de transpiration, tel que montré sur l’image ci-dessous:

- 59 -
DE
EN
FR
SV
Lorsque le niveau de transpiration mesuré est aussi élevé que votre niveau d’alarme (ou
supérieur), le récepteur commence à alarmer avec une lumière rouge et à beeper. Pour éteindre
l’alarme, relâchez les capteurs et appuyez sur le bouton (C).
Mode avance:
Le mode avancé (également désigné Mode graphique ou Mode Historique) est saisi en appuyant
sur le bouton (D), et indique à l’utilisateur ce que le cheval a fait au cours des 6 dernières heures.
Lorsque vous l’utiliserez pour montrer ses fonctionnalités, nous vous recommandons de
réinitialiser le transmetteur en enlevant l’une des batteries puis en l’introduisant à nouveau. Ainsi, le
transmetteur enverra des informations plus vite afin de simplifier la démonstration.
En mode démonstration, l’écran affiche un diagramme d’informations en 10 minutes.
Lorsqu’il est utilisé en mode normal (4 minutes après l’avoir réinitialisé), il faudra attendre 6
heures pour que l’écran affiche les graphiques du comportement du cheval.
Placez le transmetteur à plat sur différents côté tout en serrant les capteurs de transpiration pour
créer des diagrammes semblables à celui montré ci-après:
Les alarmes fonctionnent de la même manière que dans le Mode simple.
L’étape suivante consiste à commencer l’installation, veuillez vous rendre au chapitre 8.

- 60 -
8. Mise en place du harnais, du boîtier des capteurs & du Repeater
Le câble fourni vous permettra de placer la Repeater au maximum à 7 mètres de l’antenne R300
et au maximum à 2 mètres* d’une prise 220V. La distance maximale entre le cheval et Repeater est
de 50m.
1. Vérifiez l’état du harnais et des capteurs, nettoyez ces derniers et soignez le cuir si
nécessaire.
2. Ouvrez le boîtier des capteurs en dévissant les quatre vis. Veillez à ne pas étirer les câbles!
3. Mettez les piles dans le boîtier des capteurs, fermez, replacer les vis puis remettre le boîtier
dans la pochette du harnais. Placez le harnais sur le cheval comme indiqué sur l’illustration.
Fermez le surfaix en haut afin de le rendre confortable pour le cheval. De même, assurez-vous
que le stop de martingale en caoutchouc est toujours en place : cela empêchera le cheval
d’ouvrir le surfaix.
4. Montez le boîtier de Repeater avec les prises de l’alimentation et de l’antenne vers le bas,
dans les 7 mètres autour de l’endroit où vous placerez l’antenne et les 2 mètres de la prise
220V.
5. Vissez la petite antenne noire sur le raccordement de l’antenne gauche du Répéteur.
6. Branchez l’adaptateur 12V sur lequel est indiqué ”Repeater” sur le boîtier de liaison Repeater
sur la prise murale. Assurez-vous que la Repeater reçoit bien un signal du boîtier de capteurs,
une lumière verte doit clignoter toutes les 20 secondes.
DC
12V
INFoRMAtIoN
Pour rallonger le câble d’alimentation, utilisez un câble standard d’extension
200V. Si, pour des raisons de sécurité, vous ne souhaitez pas utiliser de câbles
de haut voltage à proximité de votre cheval, vous pouvez vous procurer un câble
d’extension de bas voltage en magasin.

- 61 -
DE
EN
FR
SV
9. Mise en place de l’antenne
Pour obtenir la meilleure réception du signal, installez l’antenne en face de la maison d’où vous
recevrez celui-ci, sans obstacle entre les deux.
1. Débranchez la prise secteur de la Repeater et branchez le câble de l’antenne.
2. Tirez le câble de l’antenne jusqu’à l’endroit du mur extérieur où vous désirez monter l’antenne.
3. Montez l’antenne R300 temporairement avec 1 ou 2 vis. Placer la gaine thermorétractable
autour du câble de l’antenne avant de le brancher à l’antenne. Rebranchez la prise secteur de
la Repeater.
4. Vérifiez la qualité du signal en utilisant le récepteur à l’endroit où vous souhaitez recevoir le
signal. L’échelle en haut à droite de l’écran indique la puissance du signal. Ajuster l’antenne si
nécessaire ou essayer de positionner l’antenne verticalement.
5. Montez l’antenne avec les quatre vis et chauffez la gaine thermorétractable au niveau du
branchement avec l’antenne lorsque vous êtes satisfait du signal.
Ne chauffez pas la gaine
thermorétractable avant d’avoir
vérifié la puissance du signal!
90˚90˚
INFoRMAtIoN
Faites attention à ne pas casser le câble lorsque vous tournez à un coin de mur,
etc. En particulier lorsqu’il fait froid car le câble sera plus fragile. Assurez-vous
qu’aucun objet métallique n’est présent à moins d’un mètre de l’antenne; cela
peut causer des interférences.
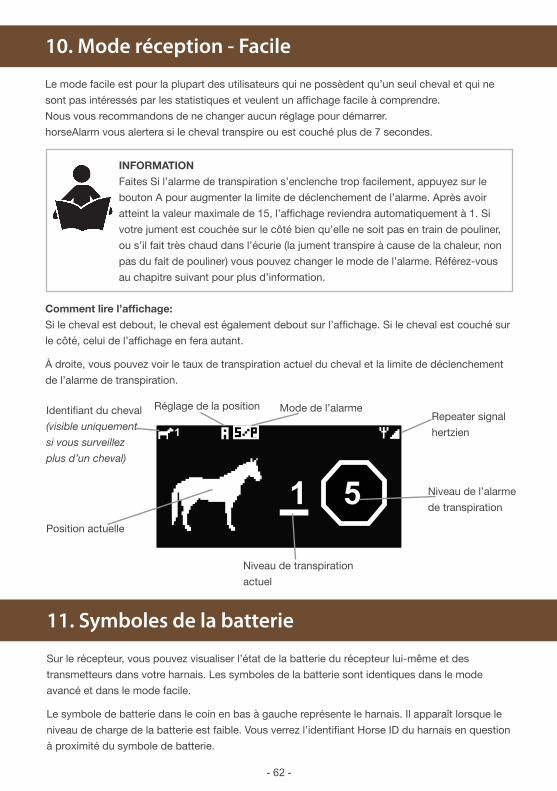
- 62 -
10. Mode réception - Facile
Le mode facile est pour la plupart des utilisateurs qui ne possèdent qu’un seul cheval et qui ne
sont pas intéressés par les statistiques et veulent un affichage facile à comprendre.
Nous vous recommandons de ne changer aucun réglage pour démarrer.
horseAlarm vous alertera si le cheval transpire ou est couché plus de 7 secondes.
15
1
Comment lire l’affichage:
Si le cheval est debout, le cheval est également debout sur l’affichage. Si le cheval est couché sur
le côté, celui de l’affichage en fera autant.
À droite, vous pouvez voir le taux de transpiration actuel du cheval et la limite de déclenchement
de l’alarme de transpiration.
Identifiant du cheval
(visible uniquement
si vous surveillez
plus d’un cheval)
Mode de l’alarmeRepeater signal
hertzien
Niveau de l’alarme
de transpiration
Niveau de transpiration
actuel
Position actuelle
Réglage de la position
11. Symboles de la batterie
Sur le récepteur, vous pouvez visualiser l’état de la batterie du récepteur lui-même et des
transmetteurs dans votre harnais. Les symboles de la batterie sont identiques dans le mode
avancé et dans le mode facile.
Le symbole de batterie dans le coin en bas à gauche représente le harnais. Il apparaît lorsque le
niveau de charge de la batterie est faible. Vous verrez l’identifiant Horse ID du harnais en question
à proximité du symbole de batterie.
INFoRMAtIoN
Faites Si l’alarme de transpiration s’enclenche trop facilement, appuyez sur le
bouton A pour augmenter la limite de déclenchement de l’alarme. Après avoir
atteint la valeur maximale de 15, l’affichage reviendra automatiquement à 1. Si
votre jument est couchée sur le côté bien qu’elle ne soit pas en train de pouliner,
ou s’il fait très chaud dans l’écurie (la jument transpire à cause de la chaleur, non
pas du fait de pouliner) vous pouvez changer le mode de l’alarme. Référez-vous
au chapitre suivant pour plus d’information.
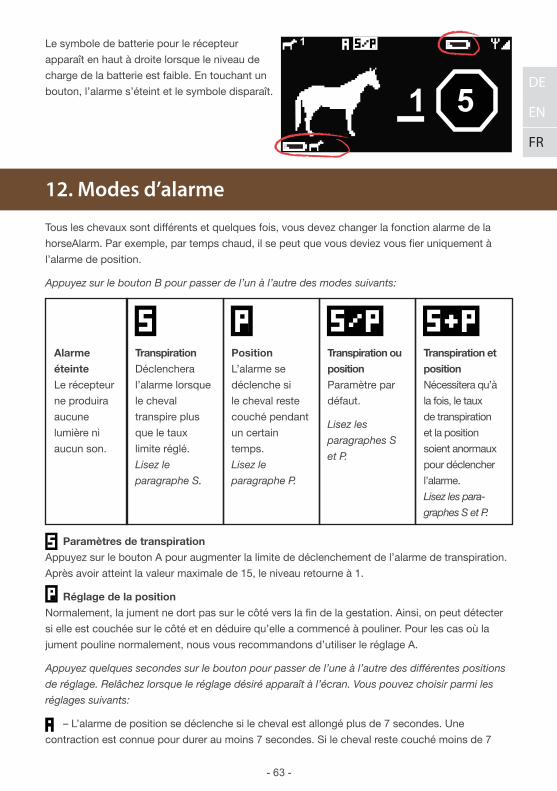
- 63 -
DE
EN
FR
SV
15
1
1
12. Modes d’alarme
Tous les chevaux sont différents et quelques fois, vous devez changer la fonction alarme de la
horseAlarm. Par exemple, par temps chaud, il se peut que vous deviez vous fier uniquement à
l’alarme de position.
Appuyez sur le bouton B pour passer de l’un à l’autre des modes suivants:
Paramètres de transpiration
Appuyez sur le bouton A pour augmenter la limite de déclenchement de l’alarme de transpiration.
Après avoir atteint la valeur maximale de 15, le niveau retourne à 1.
Réglage de la position
Normalement, la jument ne dort pas sur le côté vers la fin de la gestation. Ainsi, on peut détecter
si elle est couchée sur le côté et en déduire qu’elle a commencé à pouliner. Pour les cas où la
jument pouline normalement, nous vous recommandons d’utiliser le réglage A.
Appuyez quelques secondes sur le bouton pour passer de l’une à l’autre des différentes positions
de réglage. Relâchez lorsque le réglage désiré apparaît à l’écran. Vous pouvez choisir parmi les
réglages suivants:
– L’alarme de position se déclenche si le cheval est allongé plus de 7 secondes. Une
contraction est connue pour durer au moins 7 secondes. Si le cheval reste couché moins de 7
transpiration ou
position
Paramètre par
défaut.
Lisez les
paragraphes S
et P.
Position
L’alarme se
déclenche si
le cheval reste
couché pendant
un certain
temps.
Lisez le
paragraphe P.
transpiration et
position
Nécessitera qu’à
la fois, le taux
de transpiration
et la position
soient anormaux
pour déclencher
l’alarme.
Lisez les para-
graphes S et P.
Alarme
éteinte
Le récepteur
ne produira
aucune
lumière ni
aucun son.
transpiration
Déclenchera
l’alarme lorsque
le cheval
transpire plus
que le taux
limite réglé.
Lisez le
paragraphe S.
Le symbole de batterie pour le récepteur
apparaît en haut à droite lorsque le niveau de
charge de la batterie est faible. En touchant un
bouton, l’alarme s’éteint et le symbole disparaît.
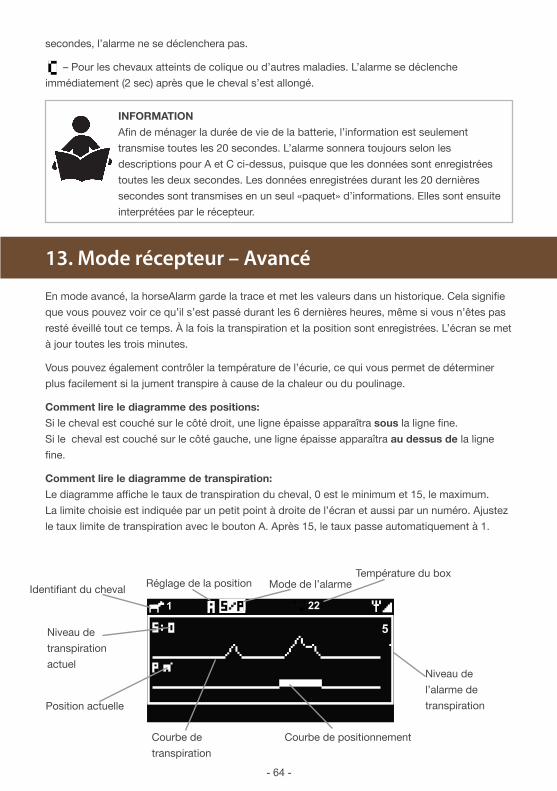
- 64 -
13. Mode récepteur – Avancé
En mode avancé, la horseAlarm garde la trace et met les valeurs dans un historique. Cela signifie
que vous pouvez voir ce qu’il s’est passé durant les 6 dernières heures, même si vous n’êtes pas
resté éveillé tout ce temps. À la fois la transpiration et la position sont enregistrées. L’écran se met
à jour toutes les trois minutes.
Vous pouvez également contrôler la température de l’écurie, ce qui vous permet de déterminer
plus facilement si la jument transpire à cause de la chaleur ou du poulinage.
Comment lire le diagramme des positions:
Si le cheval est couché sur le côté droit, une ligne épaisse apparaîtra sous la ligne fine.
Si le cheval est couché sur le côté gauche, une ligne épaisse apparaîtra au dessus de la ligne
fine.
Comment lire le diagramme de transpiration:
Le diagramme affiche le taux de transpiration du cheval, 0 est le minimum et 15, le maximum.
La limite choisie est indiquée par un petit point à droite de l’écran et aussi par un numéro. Ajustez
le taux limite de transpiration avec le bouton A. Après 15, le taux passe automatiquement à 1.
1Identifiant du cheval Mode de l’alarme
Niveau de
l’alarme de
transpiration
Niveau de
transpiration
actuel
Position actuelle
Réglage de la positionTempérature du box
22
Courbe de positionnementCourbe de
transpiration
5
secondes, l’alarme ne se déclenchera pas.
– Pour les chevaux atteints de colique ou d’autres maladies. L’alarme se déclenche
immédiatement (2 sec) après que le cheval s’est allongé.
INFoRMAtIoN
Afin de ménager la durée de vie de la batterie, l’information est seulement
transmise toutes les 20 secondes. L’alarme sonnera toujours selon les
descriptions pour A et C ci-dessus, puisque que les données sont enregistrées
toutes les deux secondes. Les données enregistrées durant les 20 dernières
secondes sont transmises en un seul «paquet» d’informations. Elles sont ensuite
interprétées par le récepteur.
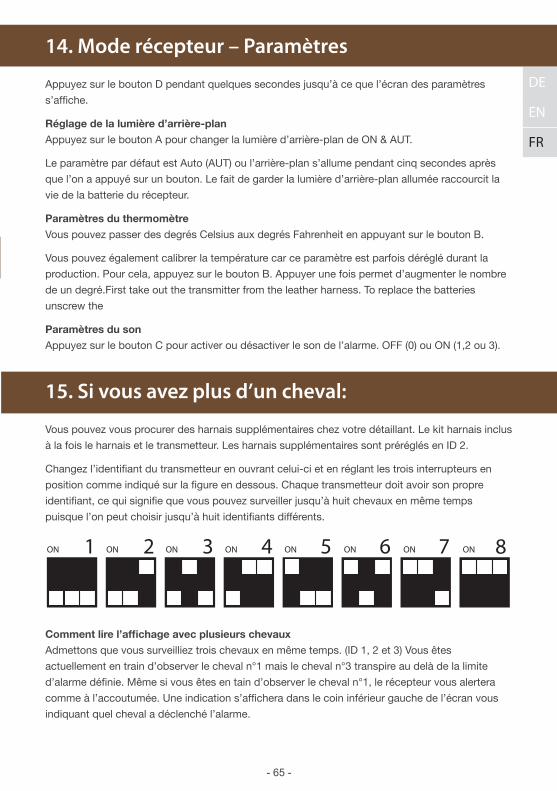
- 65 -
DE
EN
FR
SV
14. Mode récepteur – Paramètres
Appuyez sur le bouton D pendant quelques secondes jusqu’à ce que l’écran des paramètres
s’affiche.
Réglage de la lumière d’arrière-plan
Appuyez sur le bouton A pour changer la lumière d’arrière-plan de ON & AUT.
Le paramètre par défaut est Auto (AUT) ou l’arrière-plan s’allume pendant cinq secondes après
que l’on a appuyé sur un bouton. Le fait de garder la lumière d’arrière-plan allumée raccourcit la
vie de la batterie du récepteur.
Paramètres du thermomètre
Vous pouvez passer des degrés Celsius aux degrés Fahrenheit en appuyant sur le bouton B.
Vous pouvez également calibrer la température car ce paramètre est parfois déréglé durant la
production. Pour cela, appuyez sur le bouton B. Appuyer une fois permet d’augmenter le nombre
de un degré.First take out the transmitter from the leather harness. To replace the batteries
unscrew the
Paramètres du son
Appuyez sur le bouton C pour activer ou désactiver le son de l’alarme. OFF (0) ou ON (1,2 ou 3).
7654321 8ON ON ON ON ON ON ON ON
15. Si vous avez plus d’un cheval:
Vous pouvez vous procurer des harnais supplémentaires chez votre détaillant. Le kit harnais inclus
à la fois le harnais et le transmetteur. Les harnais supplémentaires sont préréglés en ID 2.
Changez l’identifiant du transmetteur en ouvrant celui-ci et en réglant les trois interrupteurs en
position comme indiqué sur la figure en dessous. Chaque transmetteur doit avoir son propre
identifiant, ce qui signifie que vous pouvez surveiller jusqu’à huit chevaux en même temps
puisque l’on peut choisir jusqu’à huit identifiants différents.
Comment lire l’affichage avec plusieurs chevaux
Admettons que vous surveilliez trois chevaux en même temps. (ID 1, 2 et 3) Vous êtes
actuellement en train d’observer le cheval n°1 mais le cheval n°3 transpire au delà de la limite
d’alarme définie. Même si vous êtes en tain d’observer le cheval n°1, le récepteur vous alertera
comme à l’accoutumée. Une indication s’affichera dans le coin inférieur gauche de l’écran vous
indiquant quel cheval a déclenché l’alarme.
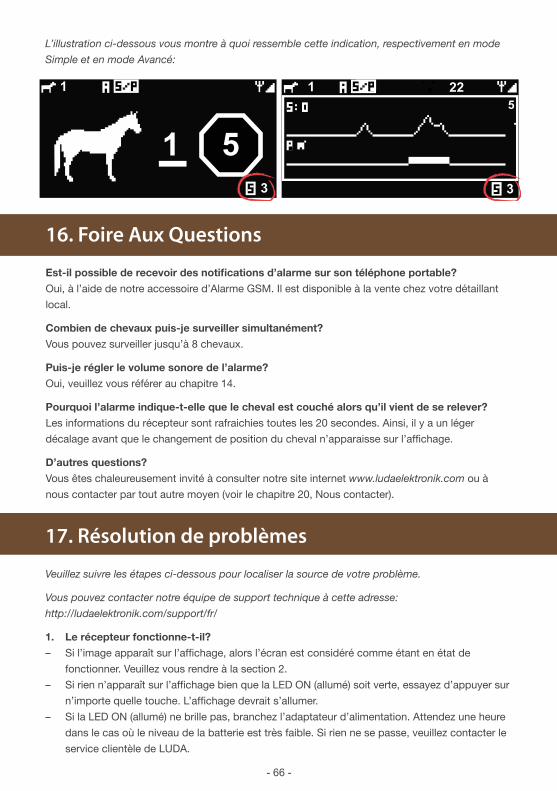
- 66 -
1 225
33
15
1
L’illustration ci-dessous vous montre à quoi ressemble cette indication, respectivement en mode
Simple et en mode Avancé:
17. Résolution de problèmes
Veuillez suivre les étapes ci-dessous pour localiser la source de votre problème.
Vous pouvez contacter notre équipe de support technique à cette adresse:
http://ludaelektronik.com/support/fr/
1. Le récepteur fonctionne-t-il?
– Si l’image apparaît sur l’affichage, alors l’écran est considéré comme étant en état de
fonctionner. Veuillez vous rendre à la section 2.
– Si rien n’apparaît sur l’affichage bien que la LED ON (allumé) soit verte, essayez d’appuyer sur
n’importe quelle touche. L’affichage devrait s’allumer.
– Si la LED ON (allumé) ne brille pas, branchez l’adaptateur d’alimentation. Attendez une heure
dans le cas où le niveau de la batterie est très faible. Si rien ne se passe, veuillez contacter le
service clientèle de LUDA.
16. Foire Aux Questions
Est-il possible de recevoir des notifications d’alarme sur son téléphone portable?
Oui, à l’aide de notre accessoire d’Alarme GSM. Il est disponible à la vente chez votre détaillant
local.
Combien de chevaux puis-je surveiller simultanément?
Vous pouvez surveiller jusqu’à 8 chevaux.
Puis-je régler le volume sonore de l’alarme?
Oui, veuillez vous référer au chapitre 14.
Pourquoi l’alarme indique-t-elle que le cheval est couché alors qu’il vient de se relever?
Les informations du récepteur sont rafraichies toutes les 20 secondes. Ainsi, il y a un léger
décalage avant que le changement de position du cheval n’apparaisse sur l’affichage.
D’autres questions?
Vous êtes chaleureusement invité à consulter notre site internet www.ludaelektronik.com ou à
nous contacter par tout autre moyen (voir le chapitre 20, Nous contacter).
- 67 -
DE
EN
FR
SV
2. La LED Link du récepteur est-elle rouge?
– Si oui, passez à la section 3.
– Si elle est verte, veuillez contacter le service clientèle LUDA.
3. Le répéteur fonctionne-t-il?
Débranchez l’alimentation du répéteur puis rebranchez-la. Vous devriez voir un flash vert
lorsque l’alimentation est connectée. Dans la minute qui suit, vous devriez voir un deuxième
flash.
– Si vous n’avez vu aucun flash, veuillez vérifier que la prise électrique est alimentée. Si la prise
électrique est alimentée, contactez le service clientèle LUDA.
– Si vous avez effectivement vu un flash au début puis un second, veuillez passer à la section 5.
– Si vous avez vu un premier flash puis plus rien ou une lumière verte continue, veuillez vous
rendre à la section 4.
4. Le transmetteur fonctionne-t-il?
Vérifiez qu’une LED verte clignote toutes les 20 secondes sur le boîtier du transmetteur.
– Si vous n’avez vu aucun flash, changez les piles du transmetteur. Si le changement de piles
n’améliore rien, veuillez contacter le service clientèle LUDA.
– Si vous avez effectivement vu un flash toutes les 20 secondes, veuillez passer à la section 5.
5. Vérifiez la distance entre le transmetteur et le répéteur
Essayez de rapprocher le transmetteur et le répéteur l’un de l’autre et voyez si vous avez
un signal. Si vous avez un signal, vous verrez un flash vert sur le répéteur. Vérifiez aussi que
les antennes sont branchées sur les bonnes connexions (voir le chapitre 8).
6. Vérifiez la distance entre le répéteur et le récepteur
Essayez de rapprocher le récepteur de l’antenne extérieure R300 et voyez si vous avez un
signal. Vérifiez aussi que les antennes sont branchées sur les bonnes connexions sur
le répéteur (voir le chapitre 8). De même, veillez à ce que le câble de l’antenne ne soit pas
endommagé d’une façon ou d’une autre.
18. Garantie
La garantie d’un an, à moins de termes prévoyant le contraire au contrat, débute à la date de
l’achat du produit d’un agent autorisé de LUDA Elektronik AB. Durant la garantie, LUDA Elektronik
AB s’engage à réparer ou à remplacer (s’il l’est nécessaire) le produit par le même ou l’équivalent.
Lorsque que de nouveaux produits sont remplacés par LUDA Elektronik AB , ceux-ci sont
couverts sous la garantie originale. Si des pièces sont remplacées, il se peut qu’elles soient des
pièces usagées, appartenant à LUDA Elektronik AB.
La garantie ne couvre pas les bris dus aux accidents, aux désastres naturels, usage inadéquat,
usage inconvenable des adaptateurs ou sources de courant, ou à tout autre comportement qui ne
convient pas aux recommandations faites pas LUDA Elektronik AB dans ce guide.
Le consommateur est responsable pour les coûts d’envoi postal jusqu’à l’atelier de réparation de
LUDA Elektronik AB.

- 68 -
20. Contactez nous, accessoires et support
LUDA Elektronik est né en 2003 et est maintenant le plus grand distributeur sur ce marché
distinct. La compagnie a une expertise incomparable au sujet des caméras sans fil et autres
technologies. Ainsi, nous vous offrons les meilleurs produits ainsi qu’un support technique de
haute qualité.
Accessoires et support
Visitez www.ludaelektronik.com/support/fr/ pour les accessoires et le support recherché pour
votre solution horseAlarm.
Contact:
LUDA Elektronik AB, Aschebergsgatan 46, SE41133 Göteborg, Sweden
Tel: +46 (0)31 3130290 (English & svenska)
Fax: +46 (0)31 3130299
E-mail: [email protected]
19. Information concernant le recyclage
Sur votre produit, votre batterie, la documentation ou l’emballage, le symbole de la poubelle
barrée d’une croix a pour objet de vous rappeler que les produits électriques et électroniques,
les batteries et les accumulateurs doivent faire l’objet d’une collecte sélective en fin de vie. Cette
exigence s’applique aux pays de l’Union Européenne. Ne jetez pas ces produits dans les ordures
ménagères non sujettes au tri sélectif.
Déposez toujours vos produits électroniques et batteries usagés, ainsi que leurs emballages,
dans les points de collecte appropriés. Vous contribuerez ainsi à la lutte contre la mise au rebut
non contrôlée et à la promotion du recyclage des matériaux. Les piles peuvent contenir du
mercure, du plomb ou du cadmium - les substances qui sont nuisibles à notre santé et
notre environnement. Vous pouvez obtenir des informations plus détaillées auprès du
revendeur de votre produit, des autorités locales en charge du traitement des déchets ou
votre associations national de constructeurs.
La garantie est valide seulement en vertu du reçu original émis par un agent de chez LUDA. Le
reçu original doit contenir les informations concernant l’endroit de l’achat, la date d’achat et une
description du produit. LUDA Elektronik AB se réserve le droit de refuser d’appliquer la garantie
si les informations du reçu original mentionnées précédemment ont été modifiées, supprimées ou
sont manquantes.
- 69 -
Declaration of Conformity