


Sprachen
Seiten
Rechtliche

®
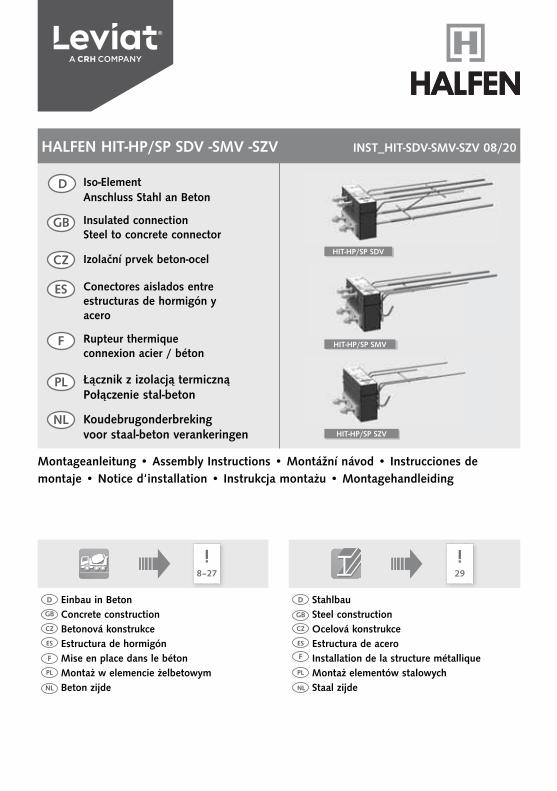
HALFEN HIT-HP/SP SDV -SMV -SZV INST_HIT-SDV-SMV-SZV 08/20
Iso-ElementAnschluss Stahl an Beton
Insulated connectionSteel to concrete connector
Izolační prvek beton-ocel
Koudebrugonderbrekingvoor staal-beton verankeringen
Conectores aislados entre estructuras de hormigón y acero
Rupteur thermique connexion acier / béton
D Einbau in Beton GB Concrete construction CZ Betonová konstrukce ES Estructura de hormigón F Mise en place dans le béton PL Montaż w elemencie żelbetowym NL Beton zijde
D Stahlbau GB Steel construction CZ Ocelová konstrukce ES Estructura de aceroF Installation de la structure métallique PL Montaż elementów stalowych NL Staal zijde
D
HIT-HP/SP SDV
HIT-HP/SP SZV
HIT-HP/SP SMV
Montageanleitung • Assembly Instructions • Montážní návod • Instrucciones de montaje • Notice d‘installation • Instrukcja montażu • Montagehandleiding
!29
!8–27
GB
CZ
ES
F
PL
NL
Łącznik z izolacją termiczną Połączenie stal-beton
2 3© 2021 · INST_HIT-HP/SP SDV - SMV - SZV 08/20 · www.halfen.com © 2021 · INST_HIT-HP/SP SDV - SMV - SZV 08/20 · www.halfen.com
HALFEN HIT-HP/SP SDV -SMV -SZV HALFEN HIT-HP/SP SDV -SMV -SZV
HIT-HP/SP SDV 6–13
HIT-HP /SP SMV 14–20
HIT-HP /SP SZV 21–27
D
GB
Bitte beachten / Sichtprüfung
Please check / Visual check
Pozor! Proveďte vizuální kontrolu!
Tenga en cuenta / inspección visual
Veuillez vérifi er / inspection visuelle
Sprawdź / kontrola optyczna
Controleren / visuele inspectie
D
GB
Installation bauseitig
On-site installation
Montáž na stavbě
Instalación in situ
Installation sur chantier
Montaż na budowie
Montage op de bouwplaats
D
GB
Lagesicherung gewährleisten!
Ensure the HIT is securely fi xed!
Ujistěte se, že je HIT bezpečně upevněn!
¡Asegúrate de que el HIT esté bien fi jado!
Sécuriser la position!
Zabezpieczyć przed przemieszczeniem!
Zorg voor goede fi xatie HIT
D
GB
Bauseitige Bewehrung nach Angaben des Tragwerksplaners.
The on-site reinforcement must be placed as specifi ed by the structural engineer.
Výztuž dodaná stavbou musí být uložena podle specifi kace projektanta-statika.
Refuerzo en obra según indicaciones del ingeniero estructural.
Mise en place des armatures sur site suivant les prescriptions.
Zbrojenie na budowie według projektu kon-strukcji.
Ophang- en splijtwapening aan vloer/wand zijde volgens verankeringsvoorstel HALFEN.
D
GB
D Legende GB Legend CZ Legenda ES Leyenda F Légende PL Legenda NL Legende
Bitte beachten!
Please note!
Pozor!
¡Atención Nota!
Veuillez noter!
Uwaga!
Let op!
Balkonseite
Balcony side
Strana balkonu
Lado exterior - voladizo
Côté balcon
Strona balkonu
Buiten / balkonzijde
D
GB
Deckenseite
Main slab side
Strana stropu
Lado interior - losa principal
Côté dalle
Strona stropu
Binnen / vloerzijde
D
GB
Stahlbau
Steel construction
Ocelová konstrukce
Estructura de acero
Structure métallique
Konstrukcja stalowa
Staalconstructie
D
GB
Rohbau
Concrete construction
Betonová konstrukce
Estructura de hormigón
Mise en place dans le béton
Konstrukcja żelbetowa
Betonconstructie
D
GB
CZ
ES
F
PL
NL
CZ
ES
F
PL
NL
CZ
ES
F
PL
NL
CZ
ES
F
PL
NL
CZ
ES
F
PL
NL
CZ
ES
F
PL
NL
CZ
ES
F
PL
NL
CZ
ES
F
PL
NL
CZ
ES
F
PL
NL

Notes on the position check
GB ES
a) Źle: przechylenie w poziomie!b) Źle: element obrócony!c) Źle: przechylenie w pionie!d) Dobrze!e) Źle: Element wychylony w stosunku
do krawędzi betonu, do przodu lub do tyłu
f) Dobrze: Element ustawionyprostopadle do płaszczyzny czołowej
Wskazówki do kontroli położenia
PL
a) fout: horizontale uitlijning gekanteld!
b) fout: horizontale uitlijning gedraaid!c) fout: verticale uitlijning gekanteld!d) juist!e) fout: HIT is in meerdere richtingen
verdraaid en/of verplaatstf) juist: HIT in alle richtingen
waterpas
Aandachtspunten verwerking HIT element
NL
a) chybné: vodorovné zarovnání nakloněné
b) chybné: vodorovné zarovnání otočené!
c) chybné: svislé zarovnání nakloněné!
d) správně!e) chybné: posunutí; vodorovně k
betonové hraně - dopředu nebo dozadu
f) správně: prvky zarovnané k jedné ose
Poznámky ke kontrole polohy
CZ
a) incorrect: alignement horizontal in-cliné
b) incorrect: alignement horizontal pivoté
c) incorrect: alignement vertical inclinéd) correct!e) incorrect: déplacement;
horizontalement au bord du béton - vers l'avant ou vers l'arrière
f) correct: éléments alignés sur un axe
Notes sur le contrôle du positionnement
F
a) incorrecto: Inclinación horizontalb) incorrecto: girado! no alineado con
el borde del forjadoc) incorrecto: no apoya en la
estructurad) ¡correcto!e) incorrecto: desplazamiento; hori-
zontalmente hasta el borde de hor-migón - hacia adelante o hacia atrás
f) correcto: Elemento alineado con los ejes
Notas sobre el control de colocación
4 5© 2021 · INST_HIT-HP/SP SDV - SMV - SZV 08/20 · www.halfen.com © 2021 · INST_HIT-HP/SP SDV - SMV - SZV 08/20 · www.halfen.com
HALFEN HIT-HP/SP SDV -SMV -SZV HALFEN HIT-HP/SP SDV -SMV -SZV
D Hinweise zur Lageprüfung
a b c d
e f
a) incorrect: horizontal alignment tilted!
b) incorrect: horizontal alignment rotated!
c) incorrect: vertical alignment tilted!d) correct!e) incorrect: displacement; horizontal-
ly to the concrete edge - forwards or backwards
f) correct: elements aligned on one axis
falsch: horizontale Ausrichtung gekippt!
falsch: Elemente springen horizontal zur Betonkante nach vorne oder nach hinten
richtig: Elemente an einer Achse ausgerichtet
falsch: horizontaleAusrichtung gedreht!
falsch: vertikale Ausrichtung gekippt!
richtig!

HIT label GB
Installation situations
A Monolithic masonry
B Monolithic masonry with ETICS
C Double-leaf masonry
D Double-leaf masonry (ventilated)Project information
QR code: Assembly instruction
Type
Connection type
Moment load range
Shear load range
Element height [cm]
Obe
n
Top
Bemessungswert der Wärmeleitfähigkeit des Wärmedämmstoffs:ffDesign value for the thermal conductivity of the insulation material:
= 0,035W/(m·K)
HALFEN HIT ISO-ELEMENTTANSCHLUSS STAHL AN BETONSTEEL TO CONCRETE CONNECT
HIT- HPSDV• HIT- SP SDV
Z-15.7-336Bauaufsichtlich zugelassenOffi cially approvedffiffi
DIBt*, Berlin*German Institute of Construction Engineering
install the HIT element with increased accuracy!
1 Bauseitige Bewehrung gemäß Angabe der Tragwerks-b
2
Außen Exterior
Innen Interior
HIT
- HP/
SP S
DV
- 12
/19
- Art
-Nr.0
565.
150-
0003
0
HIT-HP SDV-2M16-0208-20
Positionstext Element 5CuOr : 5300S041785 Date: 021019Pos: 20 (Position / position)CuNo: 12345678 (Kundennummer / customers number)CuNa: (Kundenname / customers name)PrNo: 981654 (Projektnummer / project number)
PrTx: Projektbezeichnung Projekt in Bayern
HIT-HP SDV-2M16-0208-20
Positionstext Element 5CuOr : 5300S041785 Date: 021019Pos: 20 (Position / position)CuNo: 12345678 (Kundennummer / customers number)CuNa: (Kundenname / customers name)PrNo: 981654 (Projektnummer / project number)
PrTx: Projektbezeichnung Projekt in Bayern
C DA B
A Ściana murowana jednowarstwowa
B Ściana murowana z izolacją i tynkiem
cienkowarstwowym (ETICS)
C Ściana dwuwarstwowa
D Ściana dwuwarstwowa z wentylacją
Warianty montażu PL
Etykieta HIT PLInformacje projektowe
Kod QR: Instrukcja montażu
Typ grupy wyrobów
Typ połączenia
Momenty – nośność
Siła poprzeczna – nośność
Wysokość elementu [cm]
A Enkelwandig metselwerk
B Enkelwandig metselwerk met isolatiesysteem
C Dubbelwandig metselwerk
D Dubbelwandig metselwerk (geventileerd)
InbouwsituatieNL
Typy montáže
A Monolitické zdivo
B Monolitické zdivo se zateplením
C Zdvojené zdivo
D Zdvojené zdivo (s mezerou)
CZ
Štítek na prvku HIT CZInformace o projektu
QR code: Montážní návod
Typ
Typ připojení
Momentové zatížení
Střihové zatížení
Výška prvku [cm]
Situations de montage
A Mur monolithique
B Mur monolithique avec ETICS (système d’isolation
thermique extérieure par enduit)
C Mur double
D Mur double (ventilé)
F
Etiquette HIT FInformation projet
Code QR: Notice d‘installation
Groupe de produit
Type de connection
Plage de charge Moment
Plage de charge Cisaillement
Hauteur individuelle d‘élément [cm]
A Mampostería de una sola hoja
B Mampostería revestida con un sistema de composite
con aislante térmico
C Mampostería de doble hoja
D Mampostería de doble hoja (ventilada)
Lugares de instalación
Etiqueta HIT ESDatos del proyecto
Código QR: Instrucciones de montaje
Tipo aislante
Familia
Rango de cargas - Momento
Rango de cargas - Cortante
Altura del elemento [cm]
6 7© 2021 · INST_HIT-HP/SP SDV - SMV - SZV 08/20 · www.halfen.com © 2021 · INST_HIT-HP/SP SDV - SMV - SZV 08/20 · www.halfen.com
HALFEN HIT-HP/SP SDV HALFEN HIT-HP/SP SDV
HIT-HP/SP SDV
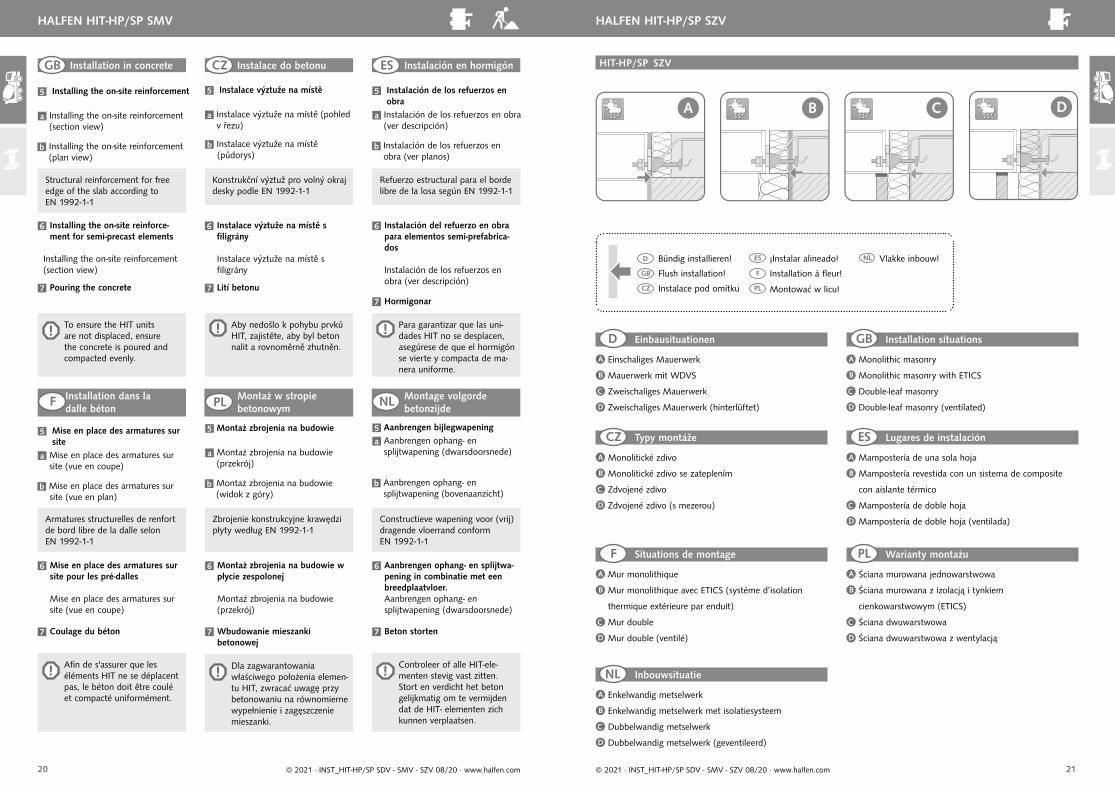
A Einschaliges Mauerwerk
B Mauerwerk mit WDVS
C Zweischaliges Mauerwerk
D Zweischaliges Mauerwerk (hinterlüftet)
EinbausituationenD GB
ES
HIT-HP SDV - 2M16 - 0208 - 20HIT Etikett
HIT-sticker
D
NL
Projektinformationen
QR-Code: Montageanleitung
Produktgruppe - Typ
Anschluss - Typ
Momenten-Tragstufe
Querkraft-Tragstufe
Elementhöhe [cm]
Order- en projectinformatie
QR-code: Montagehandleiding
Productgroep
Type krachtsoverbrenging
Aantal en type trekstaven (boven)
Aantal en type dwarskrachtstaven
Elementhoogte [cm]
D
GB
CZ
Bündig installieren!
Flush installation!
Instalace pod omítku
ES
F
PL
¡Instalar alineado!
Installation à fleur!
Montować w licu!
NL Vlakke inbouw!
TOR
Für eine spätere Montage der Stahlkonstruktion dasHIT-Element mit erhöhter Genauigkeit einbauen!For a later installation of the steel-construction, install the HIT element with increased accuracy!
planung einbauen.The on-site reinforcement must be placed as specified by the structural engineer.
2 Einbauhinweise der Montageanleitung beachtenObserve the information in the installation instructions.
12/1
9 - A
rt-N
r.056
5.15
0-0
A
B
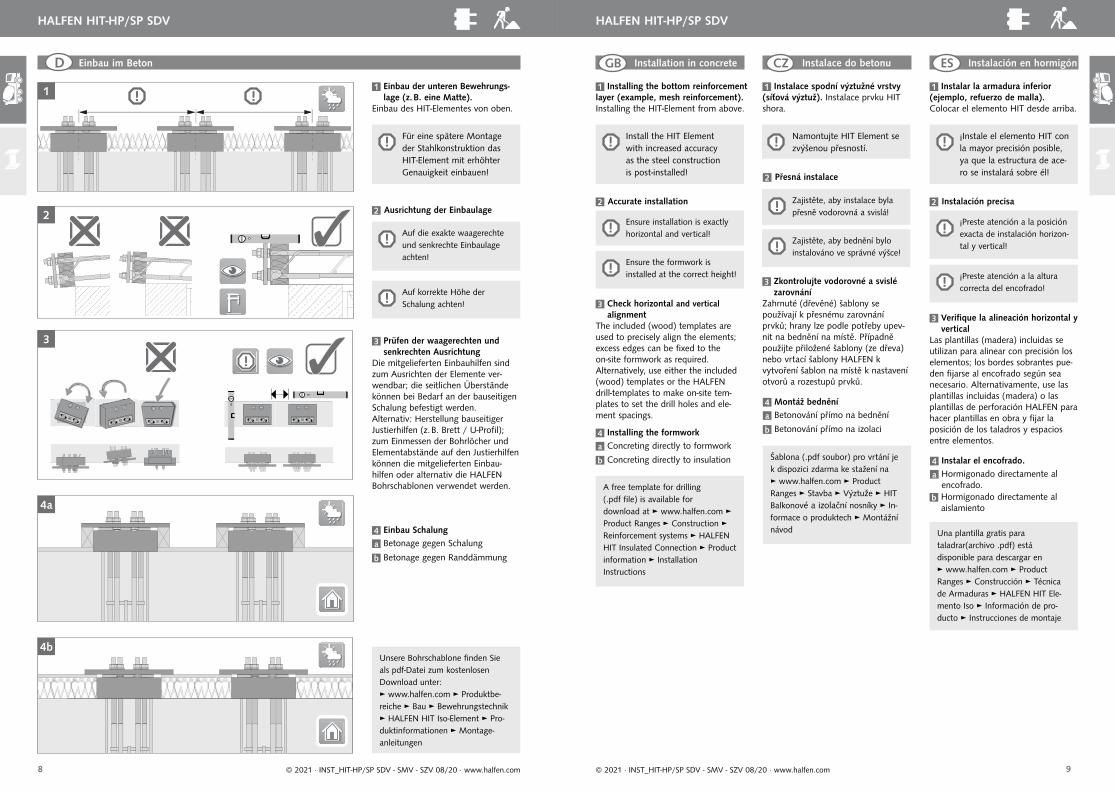
Installation in concrete
2 Accurate installation
Ensure the formwork is installed at the correct height!
Ensure installation is exactly horizontal and vertical!
1 Installing the bottom reinforcement layer (example, mesh reinforcement). Installing the HIT-Element from above.
Install the HIT Element with increased accuracy as the steel construction is post-installed!
A free template for drilling (.pdf fi le) is available for download at ► www.halfen.com ► Product Ranges ► Construction ► Reinforcement systems ► HALFEN HIT Insulated Connection ► Product information ► Installation Instructions
3 Check horizontal and vertical alignment
The included (wood) templates are used to precisely align the elements; excess edges can be fi xed to the on-site formwork as required. Alternatively, use either the included (wood) templates or the HALFENdrill-templates to make on-site tem-plates to set the drill holes and ele-ment spacings.
4 Installing the formwork
a Concreting directly to formwork
b Concreting directly to insulation
GB Instalace do betonu
2 Přesná instalace
Zajistěte, aby bednění bylo instalováno ve správné výšce!
Zajistěte, aby instalace byla přesně vodorovná a svislá!
1 Instalace spodní výztužné vrstvy (síťová výztuž). Instalace prvku HIT shora.
Namontujte HIT Element se zvýšenou přesností.
Šablona (.pdf soubor) pro vrtání je k dispozici zdarma ke stažení na► www.halfen.com ► Product Ranges ► Stavba ► Výztuže ► HIT Balkonové a izolační nosníky ► In-formace o produktech ► Montážní návod
3 Zkontrolujte vodorovné a svislé zarovnání
Zahrnuté (dřevěné) šablony se používají k přesnému zarovnání prvků; hrany lze podle potřeby upev-nit na bednění na místě. Případně použijte přiložené šablony (ze dřeva) nebo vrtací šablony HALFEN k vytvoření šablon na místě k nastavení otvorů a rozestupů prvků.
4 Montáž bednění
a Betonování přímo na bednění
b Betonování přímo na izolaci
CZ Instalación en hormigón
2 Instalación precisa
¡Preste atención a la altura correcta del encofrado!
¡Preste atención a la posición exacta de instalación horizon-tal y vertical!
1 Instalar la armadura inferior (ejemplo, refuerzo de malla).Colocar el elemento HIT desde arriba.
¡Instale el elemento HIT con la mayor precisión posible, ya que la estructura de ace-ro se instalará sobre él!
Una plantilla gratis para taladrar(archivo .pdf) está disponible para descargar en ► www.halfen.com ► Product Ranges ► Construcción ► Técnica de Armaduras ► HALFEN HIT Ele-mento Iso ► Información de pro-ducto ► Instrucciones de montaje
3 Verifi que la alineación horizontal y vertical
Las plantillas (madera) incluidas se utilizan para alinear con precisión los elementos; los bordes sobrantes pue-den fi jarse al encofrado según seanecesario. Alternativamente, use las plantillas incluidas (madera) o las plantillas de perforación HALFEN para hacer plantillas en obra y fi jar la posición de los taladros y espacios entre elementos.
4 Instalar el encofrado.
a Hormigonado directamente al encofrado.
b Hormigonado directamente al aislamiento
ES
8 9© 2021 · INST_HIT-HP/SP SDV - SMV - SZV 08/20 · www.halfen.com © 2021 · INST_HIT-HP/SP SDV - SMV - SZV 08/20 · www.halfen.com
HALFEN HIT-HP/SP SDV HALFEN HIT-HP/SP SDV
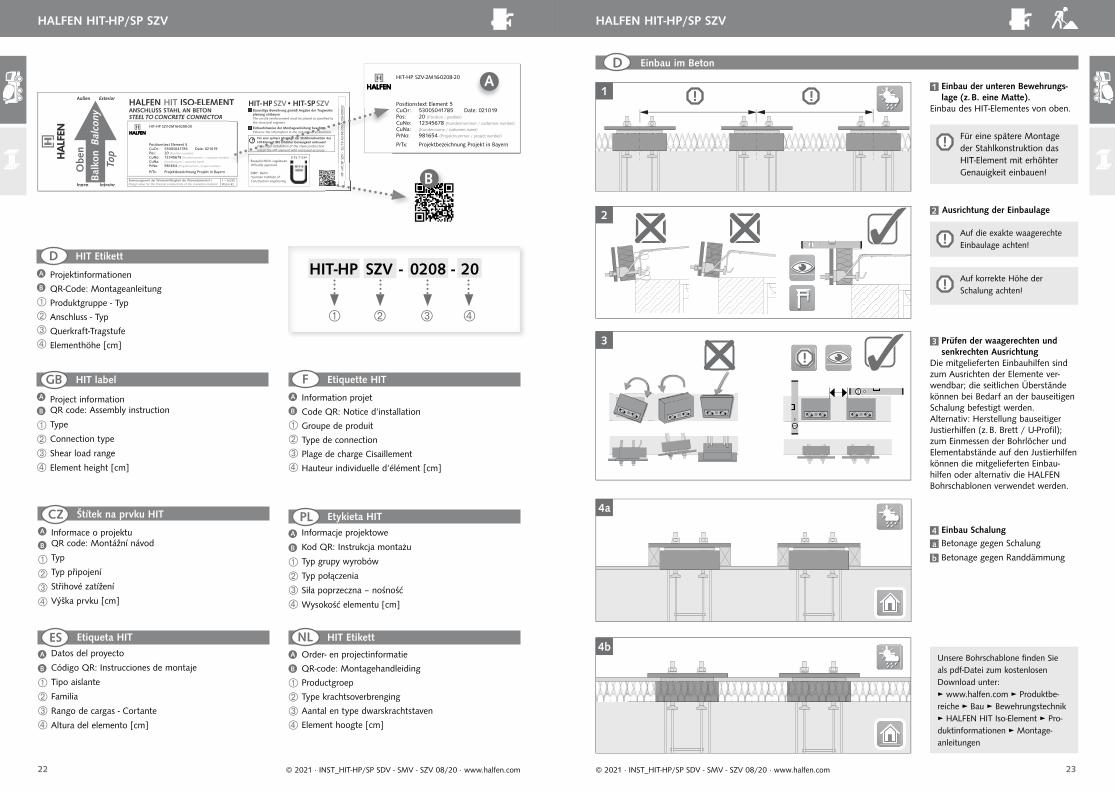
1 Einbau der unteren Bewehrungs- lage (z. B. eine Matte).
Einbau des HIT-Elementes von oben.
2 Ausrichtung der Einbaulage
Auf korrekte Höhe der Schalung achten!
Unsere Bohrschablone fi nden Sie als pdf-Datei zum kostenlosen Download unter:► www.halfen.com ► Produktbe-reiche ► Bau ► Bewehrungstechnik ► HALFEN HIT Iso-Element ► Pro-duktinformationen ► Montage-anleitungen
Für eine spätere Montage der Stahlkonstruktion das HIT-Element mit erhöhter Genauigkeit einbauen!
Auf die exakte waagerechte und senkrechte Einbaulage achten!
Einbau im BetonD
3 Prüfen der waagerechten und senkrechten Ausrichtung
Die mitgelieferten Einbauhilfen sind zum Ausrichten der Elemente ver-wendbar; die seitlichen Überstände können bei Bedarf an der bauseitigen Schalung befestigt werden.Alternativ: Herstellung bauseitiger Justierhilfen (z. B. Brett / U-Profi l); zum Einmessen der Bohrlöcher und Elementabstände auf den Justierhilfen können die mitgelieferten Einbau-hilfen oder alternativ die HALFENBohrschablonen verwendet werden.
4 Einbau Schalung
a Betonage gegen Schalung
b Betonage gegen Randdämmung
1
4a
4b
2
3
2 Sprawdzanie położenia elementu
Zwracać uwagę na poprawną wysokość deskowania!
Zwracać uwagę na dokładne położenie poziome i pionowe!
1 Montaż dolnego zbrojenia (np. maty zbrojeniowe).
Element HIT zamontować precyzyjnie dla późniejszego montażu konstrukcji stalowej!
Szablony do wiercenia HALFEN znajdziesz jako plik PDF do darmowego pobrania ze strony:► www.halfen.com ► Nasza Oferta ► Budownictwo ► Systemy zbrojeniowe ► HIT łączniki balkonowe ► informacja o produkcie ► Instrukcje montażu
3 Sprawdzić położenie poziome i pionowe
Dostarczone płytki montażowe używane są do wyrównania położenia elementu; boczne naddatki płytki mogą, w razie potrzeby, zostać wykorzystane do zamocowania do deskowania. Alternatywa: wykonanie pomocy montażowych na budowie (np. deski / profi l U). Do rozmierze-nia otworów wierconych i odstępów pomiędzy elementami, mogą zostać użyte dostarczone płytki montażowe lub alternatywnie szablony do wiercenia HALFEN.
4 Montaż deskowania
a Betonowanie w deskowaniu
b Betonowanie w deskowaniu z izolacją
Montaż w stropie betonowym
PL
Montaż elementu HIT od góry.
Montage volgorde betonzijde
NL
2 Nauwkeurige inbouw
Let op de juiste hoogtevan de bekisting!
Let op de exacte horizontaleen verticale inbouwpositie!
1 aanbrengen onderwapening vloer HIT element van bovenaf plaatsbaar.
Wanneer de staalconstructie naderhand wordt aange-bracht, dient de HIT aanslu-iting met extra aandacht te worden aangebracht (water-pas in alle richtingen).
Het boorsjabloon is als pdf-bestand te downloaden op:► www.halfen.nl ► Productoverzicht ► Bouw ► Wapeningssystemen ► HIT kondebrugonderbreking ► Product-informatie ► Montagehandleiding
3 Controleer de horizontale enverticale uitlijning
De meegeleverde (houten) montage-platen worden gebruikt om de ele-menten uit te lijnen. Overstekende randen kunnen, indien nodig, aan de bekisting van de achter constructie bevestigd worden. Als alternatief kun-nen de meegeleverde montage platen gebruikt worden als sjabloon voor het aftekenen van de gaten in de staal-constructie.
4 Fixeren in randkist
a Beton storten tegen bekisting
b Beton storten tegen randisolatie
Installation dans la dalle béton
2 Installation précise
Assurez-vous que le coff rage est installé à la bonne hau-teur!
Assurez-vous de la parfaite horizontalité et du parfait ap-lomb de l'installation
1 Installation de la nappe d'armatures inférieure (treillis soudé par exemple). Installation de l'élément HIT par le dessus.
Installez l'élément HIT avec grande précision vu que la structure métallique sera fi xée dans un second temps!
Un gabarit gratuit pour percement (fi chier.pdf) est disponible en téléchargement sur► www.halfen.com ► Product Ranges ► Construction ► Systémes d`armature ► HIT Rupteur de pont thermique ► Information produit ► Notice d`utilisation
3 Vérifi cation de l'alignement hori-zontal et vertical
Les gabarits fournis (en bois) permettent d’aligner avec précision les éléments; La partie extérieure du rupteur sortant du voile peut être fixée au coff rage sur site selon les be-soins. Pour la mesure des trous de perçage et de la distance des éléments sur les aides au réglage, vous pouvez utiliser les gabarits (en bois) fournis ou les gabarits de perça-ge HALFEN.
4 Installation du coff rage
a Bétonnage contre le coffrage
b Bétonnage contre l'isolation
F
10 11© 2021 · INST_HIT-HP/SP SDV - SMV - SZV 08/20 · www.halfen.com © 2021 · INST_HIT-HP/SP SDV - SMV - SZV 08/20 · www.halfen.com
HALFEN HIT-HP/SP SDV HALFEN HIT-HP/SP SDV
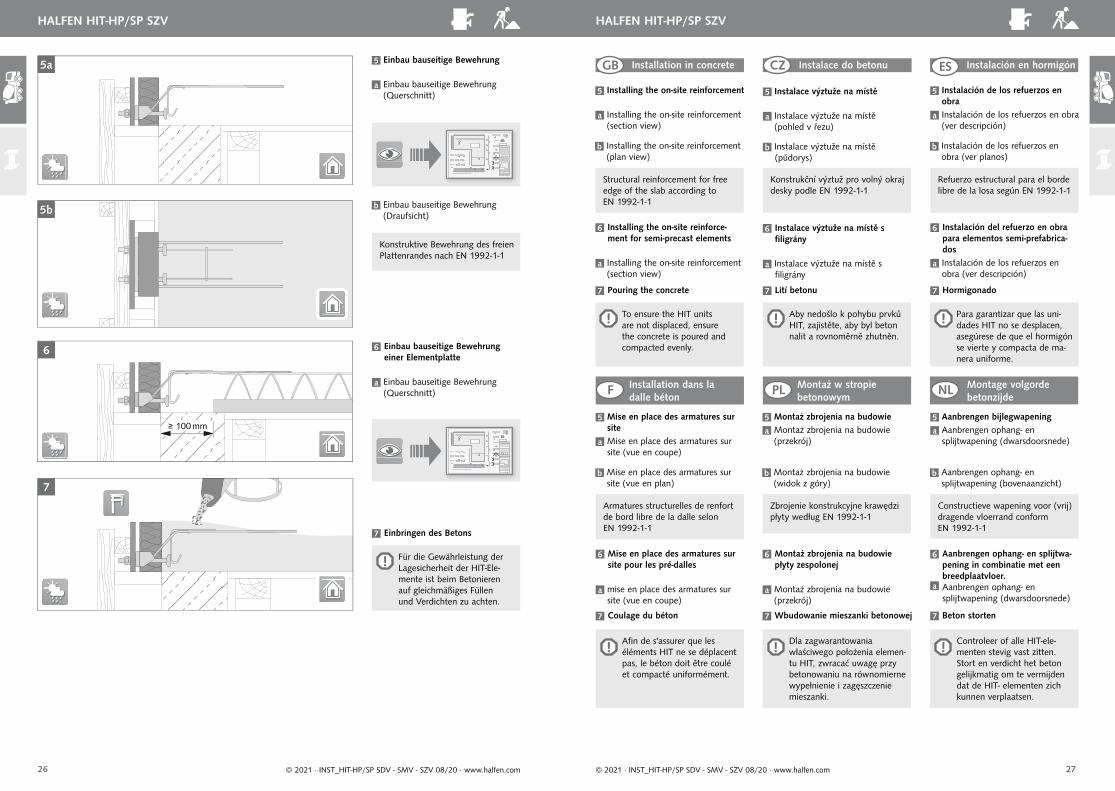
b Einbau bauseitige Bewehrung (Querschnitt)für HIT-HP/SP SDV-2M22
Für die Gewährleistung der Lage sicherheit der HIT-Ele-mente ist beim Betonieren auf gleich mäßiges Füllen und Verdichten zu achten.
Bügelanordnung gemäß EN 1992-1-1; 8.7.4.2
Konstruktive Bewehrung des freien Plattenrandes nach EN 1992-1-1
Konstruktive Bewehrung des freien Plattenrandes nach EN 1992-1-1
5 Einbau bauseitige Bewehrung
a Einbau bauseitige Bewehrung (Querschnitt)für HIT-HP/SP SDV-2M16
5a
5b
6
30 mm
30 mm
≥ 2 Ø14
≥ Ø14
≥ Ø14
≥ 4 Ø14
20 Ø6s=80mm
Einbau bauseitige Bewehrung (Draufsicht)für HIT-HP/SP SDV-2M16
Einbau bauseitige Bewehrung (Draufsicht)für HIT-HP/SP SDV-2M22
6 Einbringen des Betons
HIT-HP/SP SDV-2M16
HIT-HP/SP SDV-2M22
b Installing the on-site reinforcement (section view)for HIT-HP/SP SDV-2M22
b Mise en place des armatures sur site (vue en coupe) pour leHIT-HP/SP SDV-2M22
To ensure the HIT units are not displaced, ensure the concrete is poured and compacted evenly.
Afi n de s'assurer que les éléments HIT ne se déplacent pas, le béton doit être coulé et compacté uniformément.
Installing the on-site reinforcement (plan view)for HIT-HP/SP SDV-2M22
Mise en place des armatures sur site (vue en plan) pour leHIT-HP/SP SDV-2M22
6 Pouring the concrete6 Coulage du béton
5 Installing the on-site reinforcement
a Installing the on-site reinforcement (section view)for HIT-HP/SP SDV-2M16
5 Mise en place des armatures sur site
a Mise en place des armatures sur site (vue en coupe) pour le HIT-HP/SP SDV-2M16 Installing the on-site reinforcement
(plan view)for HIT-HP/SP SDV-2M16 Mise en place des armatures sur site
(vue en plan) pour le HIT-HP/SP SDV-2M16
Structural reinforcement for free edge of the slab according to EN 1992-1-1
Armatures structurelles de renfort de bord libre de la dalle selon EN 1992-1-1
Structural reinforcement for the free edge of the slab according to EN 1992-1-1
Armatures structurelles de renfort de bord libre de la dalle selon EN 1992-1-1
Stirrup layout in accordance with EN 1992-1-1; 8.7.4.2 Structure de l’étrier conforme à la
norme EN 1992-1-1; 8.7.4.2
GB Installation in concrete
b Montaż zbrojenia na budowie (przekrój) dla HIT-HP/SP SDV-2M22
Dla zagwarantowania właściwego położenia elemen-tu HIT, zwracać uwagę przy betonowaniu na równomierne wypełnienie i zagęszczenie mieszanki.
Montaż zbrojenia na budowie (widok z góry) dla HIT-HP/SP SDV-2M22
6 Wbudowanie mieszanki betonowej
5 Montaż zbrojenia na budowie
a Montaż zbrojenia na budowie (przekrój) dla HIT-HP/SP SDV-2M16
Montaż zbrojenia na budowie (widok z góry) dla HIT-HP/SP SDV-2M16
Zbrojenie konstrukcyjne krawędzi płyty według EN 1992-1-1
Zbrojenie konstrukcyjne krawędzi płyty według EN 1992-1-1
Strzemiona według EN 1992-1-1; 8.7.4.2
PL Montaż w stropie betonowym
b Aanbrengen ophang- en splijtwapening (dwarsdoorsnede) voor HIT-HP/SP SDV-2M22
Controleer of alle HIT-elementen stevig vast zitten. Stort en verdicht het beton gelijkmatig om te vermijden dat de HIT- elementen zich kunnen verplaatsen.
Aanbrengen ophang- en splijtwapening (bovenaanzicht) voor HIT-HP/SP SDV-2M22
6 Beton storten
5 Aanbrengen bijlegwapening
a Aanbrengen ophang- en splijtwapening (dwarsdoorsnede) voor HIT-HP/SP SDV-2M16
Aanbrengen ophang- en splijtwapening (bovenaanzicht)voor HIT-HP/SP SDV-2M16
Constructieve wapening voor (vrij) dragende vloerrand conform EN 1992-1-1
Constructieve wapening voor (vrij) dragende vloerrand conform EN 1992-1-1 en/of beugelwapening conform EN 1992-1-1; 8.7.4.2
NL Montage volgorde betonzijde
Instalace do betonu
b Instalace výztuže na místě (pohled v řezu) pro HIT-HP / SP SDV-2M22
Aby nedošlo k pohybu prvků HIT, zajistěte, aby byl beton nalit a rovnoměrně zhutněn.
Instalace vyztužení na místě (půdorys) pro HIT-HP / SP SDV-2M22
6 Lití betonu
5 Instalace výztuže na místě
a Instalace výztuže na místě (pohled v řezu)
pro HIT-HP / SP SDV-2M16
Instalace výztuže na místě(půdorys)pro HIT-HP / SP SDV-2M16
Konstrukční výztuž pro volný okraj desky podle EN 1992-1-1
Konstrukční výztuž pro volný okraj desky podle EN 1992-1-1
Rozmístění třmínků podle EN 1992-1-1; 8.7.4.2
CZ F Installation dans la dalle béton
Instalación en hormigón
b Instalación de los refuerzos en obra (ver descripción) para HIT-HP/SP SDV-2M22
Para garantizar que las uni-dades HIT no se desplacen, asegúrese de que el hormigón se vierte y compacta de ma-nera uniforme.
Instalación de los refuerzos en obra (ver planos) para HIT-HP/SP SDV-2M22
6 Hormigonar
5 Instalación de los refuerzos en obra
a Instalación de los refuerzos en obra (ver descripción) para HIT-HP/SP SDV-2M16
Instalación de los refuerzos en obra (ver planos) para HIT-HP/SP SDV-2M16
Refuerzo estructural para el borde libre de la losa según EN 1992-1-1
Refuerzo estructural para el borde libre de la losa según EN 1992-1-1
Diseño de estribo de acuerdo con EN 1992-1-1; 8.7.4.2
ES
12 13© 2021 · INST_HIT-HP/SP SDV - SMV - SZV 08/20 · www.halfen.com © 2021 · INST_HIT-HP/SP SDV - SMV - SZV 08/20 · www.halfen.com
HALFEN HIT-HP/SP SDVHALFEN HIT-HP/SP SDV

Installation situations
A Monolithic masonry
B Monolithic masonry with ETICS
C Double-leaf masonry
D Double-leaf masonry (ventilated)
GB
HIT label GBProject information
QR code: Assembly instruction
Type
Connection type
Moment load range
Shear load range
Element height [cm]
C DA B
Obe
n
Top
Bemessungswert der Wärmeleitfähigkeit des Wärmedämmstoffs:ffDesign value for the thermal conductivity of the insulation material:
= 0,035W/(m·K)
HALFEN HIT ISO-ELEMENTTANSCHLUSS STAHL AN BETONSTEEL TO CONCRETE CONNEC
Außen Exterior
Innen Interior
HIT
- HP/
SP S
MV
- 12
/19
Art
-Nr.
0565
.150
-000
31HIT- HPSMV• HIT- SP SMV
Z-15.7-336Bauaufsichtlich zugelassenOffi cially approvedffiffi
DIBt*, Berlin*German Institute of Construction Engineering
,install the HIT element with increased accuracy!
1
2
[ ]
HIT-HP SMV-2M16-0208-20
Positionstext Element 5CuOr : 5300S041785 Date: 021019Pos: 20 (Position / position)CuNo: 12345678 (Kundennummer / customers number)CuNa: (Kundenname / customers name)PrNo: 981654 (Projektnummer / project number)
PrTx: Projektbezeichnung Projekt in Bayern
A Ściana murowana jednowarstwowa
B Ściana murowana z izolacją i tynkiem
cienkowarstwowym (ETICS)
C Ściana dwuwarstwowa
D Ściana dwuwarstwowa z wentylacją
Warianty montażu PL
Etykieta HIT PLInformacje projektowe
Kod QR: Instrukcja montażu
Typ grupy wyrobów
Typ połączenia
Momenty – nośność
Siła poprzeczna – nośność
Wysokość elementu [cm]
A Enkelwandig metselwerk
B Enkelwandig metselwerk met isolatiesysteem
C Dubbelwandig metselwerk
D Dubbelwandig metselwerk (geventileerd)
InbouwsituatieNL
HIT-stickerNLOrder- en projectinformatie
QR-code: Montagehandleiding
Productgroep
Type krachtsoverbrenging
Aantal en type trekstaven (boven)
Aantal en type dwarskrachtstaven
Elementhoogte [cm]
Typy montáže
A Monolitické zdivo
B Monolitické zdivo se zateplením
C Zdvojené zdivo
D Zdvojené zdivo (s mezerou)
CZ
Štítek na prvku HIT CZInformace o projektu
QR code: Montážní návod
Typ
Typ připojení
Momentové zatížení
Střihové zatížení
Výška prvku [cm]
Situations de montage
A Mur monolithique
B Mur monolithique avec ETICS (système d’isolation
thermique extérieure par enduit)
C Mur double
D Mur double (ventilé)
F
Etiquette HIT FInformation projet
Code QR: Notice d‘installation
Groupe de produit
Type de connection
Plage de charge Moment
Plage de charge Cisaillement
Hauteur individuelle d‘élément [cm]
A Mampostería de una sola hoja
B Mampostería revestida con un sistema de composite
con aislante térmico
C Mampostería de doble hoja
D Mampostería de doble hoja (ventilada)
Lugares de instalación ES
Etiqueta HIT ESDatos del proyecto
Código QR: Instrucciones de montaje
Tipo aislante
Familia
Rango de cargas - Momento
Rango de cargas - Cortante
Altura del elemento [cm]
14 15© 2021 · INST_HIT-HP/SP SDV - SMV - SZV 08/20 · www.halfen.com © 2021 · INST_HIT-HP/SP SDV - SMV - SZV 08/20 · www.halfen.com
HALFEN HIT-HP/SP SMV HALFEN HIT-HP/SP SMV
HIT-HP/SP SMV
HIT-HP SMV - 2M16 - 0208 - 20
HIT-HP SMV-2M16-0208-20
Positionstext Element 5CuOr : 5300S041785 Date: 021019Pos: 20 (Position / position)CuNo: 12345678 (Kundennummer / customers number)CuNa: (Kundenname / customers name)PrNo: 981654 (Projektnummer / project number)
PrTx: Projektbezeichnung Projekt in Bayern
A
B
A Einschaliges Mauerwerk
B Mauerwerk mit WDVS
C Zweischaliges Mauerwerk
D Zweischaliges Mauerwerk (hinterlüftet)
EinbausituationenD
D
GB
CZ
Bündig installieren!
Flush installation!
Instalace pod omítku
ES
F
PL
¡Instalar alineado!
Installation à fleur!
Montować w licu!
NL Vlakke inbouw!HIT EtikettD
Projektinformationen
QR-Code: Montageanleitung
Produktgruppe - Typ
Anschluss - Typ
Momenten-Tragstufe
Querkraft-Tragstufe
Elementhöhe [cm]
NCTOR
2/19
Art
-Nr.
0565
.150
-000
Für eine spätere Montage der Stahlkonstruktion dasHIT-Element mit erhöhter Genauigkeit einbauen!For a later installation of the steel-construction,
1 Bauseitige Bewehrung gemäß Angabe der Tragwerks-planung einbauen.The on-site reinforcement must be placed as specified by the structural engineer.
2 Einbauhinweise der Montageanleitung beachtenObserve the information in the installation instructions.
1019

Installation in concrete
2 Accurate installation
Ensure the formwork is installed at the correct height!
Ensure installation is exactly horizontal and vertical!
1 Installing the bottom reinforcement layer (example, mesh reinforcement). Installing the HIT-Element from above.
Install the HIT Element with increased accuracy if the steel construction is to be post-installed!
3 Check horizontal and vertical alignment
The included (wood) templates are used to precisely align the elements; excess edges can be fi xed to the on-site formwork as required. Alternatively, use either the included (wood) templates or the HALFENdrill-templates to make on-site tem-plates to set the drill holes and ele-ment spacings.
4 Installing the formwork
a Concreting directly to formwork
b Concreting directly to insulation
A free template for drilling (.pdf fi le) is available for download at ► www.halfen.com ► Product Ranges ► Construction ► Reinforcement systems ► HALFEN HIT Insulated Connection ► Product information ► Installation Instructions
Instalace do betonu
2 Přesná instalace
Zajistěte, aby bednění bylo in-stalováno ve správné výšce!
Zajistěte, aby instalace byla přesně vodorovná a svislá!
1 Instalace spodní výztužné vrstvy (síťová výztuž). Instalace prvku HIT shora.
Namontujte HIT Element se zvýšenou přesností.
3 Zkontrolujte vodorovné a svislé zarovnání
Zahrnuté (dřevěné) šablony se používají k přesnému zarovnání prvků; hrany lze podle potřeby upev-nit na bednění na místě. Případně použijte přiložené šablony (ze dřeva) nebo vrtací šablony HALFEN k vytvoření šablon na místě k nastavení otvorů a rozestupů prvků.
4 Montáž bednění
a Betonování přímo na bednění
b Betonování přímo na izolaci
Šablona (.pdf soubor) pro vrtání je k dispozici zdarma ke stažení na► www.halfen.com ► Product Ranges ► Stavba ► Výztuže ► HIT Balkonové a izolační nosníky ► In-formace o produktech ► Montážní návod
Instalación en hormigón
2 Instalación precisa
¡Presta atención a la altura correcta del encofrado!
¡Preste atención a la posición exacta de instalación horizon-tal y vertical!
1 Instalar la armadura inferior (ejemplo, refuerzo de malla).Colocar el elemento HIT desde arriba.
¡Instale el elemento HIT con mayor precisión posible, ya que la estructura de acero se instalará sobre él!
3 Verifi que la alineación horizontal y vertical
Las plantillas (madera) incluidas se utilizan para alinear con precisión los elementos;los bordes sobrantes pue-den fi jarse al encofrado en el sitio según sea necesario. Alternativa-mente, use las plantillas incluidas (ma-dera) o las plantillas de perforación HALFEN para hacer plantillas en el obra para establecer los agujeros de perforación y los espacios entre ele-mentos.
4 Colocación en el encofrado.
a Hormigonado directamente al encofrado.
b Hormigonado directamente al aislamiento
ES
Una plantilla gratis para taladrar(archivo .pdf) está disponible paradescargar en ► www.halfen.com ► Product Ranges ► Construcción ► Técnica de Armaduras ► HALFEN HIT Ele-mento Iso ► Información de pro-ducto ► Instrucciones de montaje
16 17© 2021 · INST_HIT-HP/SP SDV - SMV - SZV 08/20 · www.halfen.com © 2021 · INST_HIT-HP/SP SDV - SMV - SZV 08/20 · www.halfen.com
HALFEN HIT-HP/SP SMV HALFEN HIT-HP/SP SMV
1 Einbau der unteren Bewehrungs- lage (z. B. eine Matte).
Einbau des HIT-Elementes von oben.
2 Ausrichtung der Einbaulage
Auf korrekte Höhe der Schalung achten!
Für eine spätere Montage der Stahlkonstruktion das HIT-Element mit erhöhter Genauigkeit einbauen!
Auf die exakte waagerechte und senkrechte Einbaulage achten!
Einbau im BetonD
Unsere Bohrschablone fi nden Sie als pdf-Datei zum kostenlosen Download unter:► www.halfen.com ► Produktbe-reiche ► Bau ► Bewehrungstechnik ► HALFEN HIT Iso-Element ► Pro-duktinformationen ► Montage-anleitungen
3 Prüfen der waagerechten und senkrechten Ausrichtung
Die mitgelieferten Einbauhilfen sind zum Ausrichten der Elemente ver-wendbar; die seitlichen Überstände können bei Bedarf an der bauseitigen Schalung befestigt werden.Alternativ: Herstellung bauseitiger Justierhilfen (z. B. Brett / U-Profi l); zum Einmessen der Bohrlöcher und Elementabstände auf den Justierhilfen können die mitgelieferten Einbau-hilfen oder alternativ die HALFENBohrschablonen verwendet werden.
4 Einbau Schalung
a Betonage gegen Schalung
b Betonage gegen Randdämmung
1
4a
4a
2
3
GB CZ
2 Sprawdzenie położenia elementu
Zwracać uwagę na poprawną wysokość deskowania!
Zwracać uwagę na dokładne położenie poziome i pionowe!
1 Montaż dolnego zbrojenia (np. maty zbrojeniowej) Montaż elementu HIT od góry.
Element HIT zamontować precyzyjnie - dla późniejszego montażu konstrukcji stalowej!
3 Sprawdzić poprawność położenia w poziomie i pionie
Dostarczone płytki montażowe używane są do wyrównania położenia elementu; boczne naddatki płytki mogą, w razie potrzeby, zostać wykorzystane do zamocowania do deskowania. Alternatywa: wykonanie pomocy montażowych na budowie (np. deski / profi l U). Do rozmierze-nia otworów wierconych i odstępów pomiędzy elementami, mogą zostać użyte dostarczone płytki montażowe lub alternatywnie szablony do wierce-nia HALFEN.
4 Montaż deskowania
a Betonowanie w deskowaniu
b Betonowanie w deskowaniu z izolacją
PL Montaż w stropie betonowym
Szablony do wiercenia HALFEN znajdziesz jako plik PDF do darmowego pobrania ze strony:► www.halfen.com ► Nasza Oferta ► Budownictwo ► Systemy zbrojeniowe ► HIT łączniki balkonowe ► informacja o produkcie ► Instrukcje montażu
Montage volgorde betonzijde
NL
2 Nauwkeurige inbouw
Let op de juiste hoogtevan de bekisting!
Let op de exacte horizontaleen verticale inbouwpositie!
1 Aanbrengen onderwapening vloer HIT element van bovenaf plaatsbaar.
Wanneer de staalconstructie naderhand wordt aange-bracht, dient de HIT aanslu-iting met extra aandacht te worden aangebracht (water-pas in alle richtingen).
3 Controleer de horizontale enverticale uitlijning
De meegeleverde (houten) montage-platen worden gebruikt om de ele-menten uit te lijnen. Overstekende randen kunnen, indien nodig, aan de bekisting van de achter constructie bevestigd worden. Als alternatief kun-nen de meegeleverde montage platen gebruikt worden als sjabloon voor het aftekenen van de gaten in de staal-constructie.
4 Fixeren in randkist
a Beton storten tegen bekisting
b Beton storten tegen randisolatie
Het boorsjabloon is als pdf-bestand te downloaden op:► www.halfen.nl ► Productoverzicht ► Bouw ► Wapeningssystemen ► HIT kondebrugonderbreking ► Product-informatie ► Montagehandleiding
Installation dans la dalle béton
2 Installation précise
Assurez-vous que le coff rage est installé à la bonne hau-teur!
Assurez-vous de la parfaite horizontalité et du parfait aplomb de l'installation
1 Installation de la nappe d'armatures inférieure (treillis soudé par exemple). Installation de l'élément HIT par le dessus.
Installez l'élément HIT avec grande précision vu que la structure métallique sera fi xée dans un second temps!
3 Vérifi cation de l'alignement horizontal et vertical
Les gabarits fournis (en bois) permettent d’aligner avec précision les éléments; La partie extérieure du rupteur sortant du voile peut être fixée au coff rage sur site selon les besoins. Pour la mesure des trous de perçage et de la distance des éléments sur les aides au réglage, vous pouvez utiliser les gabarits (en bois) fournis ou les gabarits de perçage HALFEN.
4 Installation du coff rage
a Bétonnage contre le coffrage
b Bétonnage contre l'isolation
F
Un gabarit gratuit pour percement (fi chier.pdf) est disponible en téléchargement sur► www.halfen.com ► Product Ranges ► Construction ► Systémes d`armature ► HIT Rupteur de pont thermique ► Information produit ► Notice d`utilisation
18 19© 2021 · INST_HIT-HP/SP SDV - SMV - SZV 08/20 · www.halfen.com © 2021 · INST_HIT-HP/SP SDV - SMV - SZV 08/20 · www.halfen.com
HALFEN HIT-HP/SP SMV HALFEN HIT-HP/SP SMV
6 Einbau bauseitige Bewehrung einer Elementplatte
Einbau bauseitige Bewehrung(Querschnitt)
Für die Gewährleistung der Lage sicherheit der HIT-Ele-mente ist beim Betonieren auf gleich mäßiges Füllen und Verdichten zu achten.
5 Einbau bauseitige Bewehrung
a Einbau bauseitige Bewehrung (Querschnitt)
5a
5b
6
7
30 mm
≥ 100 mm
b Einbau bauseitige Bewehrung (Draufsicht)
7 Einbringen des Betons
≥ 2 Ø14
≥ 2 Ø14
≥ Ø14
Konstruktive Bewehrung des freien Plattenrandes nach EN 1992-1-1
Montaż w stropie betonowym
Montage volgorde betonzijde
Installation dans la dalle béton
Installation in concrete Instalace do betonu Instalación en hormigón
6 Installing the on-site reinforce-ment for semi-precast elements
Installing the on-site reinforcement (section view)
6 Montaż zbrojenia na budowie w płycie zespolonej
Montaż zbrojenia na budowie (przekrój)
To ensure the HIT units are not displaced, ensure the concrete is poured and compacted evenly.
Dla zagwarantowania właściwego położenia elemen-tu HIT, zwracać uwagę przy betonowaniu na równomierne wypełnienie i zagęszczenie mieszanki.
5 Installing the on-site reinforcement
a Installing the on-site reinforcement (section view)
5 Montaż zbrojenia na budowie
a Montaż zbrojenia na budowie (przekrój)
b Installing the on-site reinforcement (plan view)
b Montaż zbrojenia na budowie(widok z góry)
7 Pouring the concrete
7 Wbudowanie mieszanki betonowej
Structural reinforcement for free edge of the slab according to EN 1992-1-1
Zbrojenie konstrukcyjne krawędzi płyty według EN 1992-1-1
GB
PL
Installation situations
A Monolithic masonry
B Monolithic masonry with ETICS
C Double-leaf masonry
D Double-leaf masonry (ventilated)
GB
C DA B
A Ściana murowana jednowarstwowa
B Ściana murowana z izolacją i tynkiem
cienkowarstwowym (ETICS)
C Ściana dwuwarstwowa
D Ściana dwuwarstwowa z wentylacją
Warianty montażu PL
A Enkelwandig metselwerk
B Enkelwandig metselwerk met isolatiesysteem
C Dubbelwandig metselwerk
D Dubbelwandig metselwerk (geventileerd)
InbouwsituatieNL
6 Aanbrengen ophang- en splijtwa-pening in combinatie met een breedplaatvloer.Aanbrengen ophang- en splijtwapening (dwarsdoorsnede)
Controleer of alle HIT-ele-menten stevig vast zitten. Stort en verdicht het beton gelijkmatig om te vermijden dat de HIT- elementen zich kunnen verplaatsen.
5 Aanbrengen bijlegwapening
a Aanbrengen ophang- en splijtwapening (dwarsdoorsnede)
b Aanbrengen ophang- en splijtwapening (bovenaanzicht)
7 Beton storten
Constructieve wapening voor (vrij) dragende vloerrand conform EN 1992-1-1
NL
6 Instalace výztuže na místě s fi ligrány
Instalace výztuže na místě s filigrány
Aby nedošlo k pohybu prvků HIT, zajistěte, aby byl beton nalit a rovnoměrně zhutněn.
5 Instalace výztuže na místě
a Instalace výztuže na místě (pohled v řezu)
b Instalace výztuže na místě (půdorys)
7 Lití betonu
Konstrukční výztuž pro volný okraj desky podle EN 1992-1-1
CZ
Typy montáže
A Monolitické zdivo
B Monolitické zdivo se zateplením
C Zdvojené zdivo
D Zdvojené zdivo (s mezerou)
CZ
F
6 Mise en place des armatures sur site pour les pré-dalles
Mise en place des armatures sur site (vue en coupe)
Afi n de s'assurer que les éléments HIT ne se déplacent pas, le béton doit être coulé et compacté uniformément.
5 Mise en place des armatures sur site
a Mise en place des armatures sur site (vue en coupe)
b Mise en place des armatures sur site (vue en plan)
7 Coulage du béton
Armatures structurelles de renfort de bord libre de la dalle selon EN 1992-1-1
Situations de montage
A Mur monolithique
B Mur monolithique avec ETICS (système d’isolation
thermique extérieure par enduit)
C Mur double
D Mur double (ventilé)
F
ES
6 Instalación del refuerzo en obra para elementos semi-prefabrica-dos
Instalación de los refuerzos en obra (ver descripción)
Para garantizar que las uni-dades HIT no se desplacen, asegúrese de que el hormigón se vierte y compacta de ma-nera uniforme.
5 Instalación de los refuerzos en obra
a Instalación de los refuerzos en obra (ver descripción)
b Instalación de los refuerzos en obra (ver planos)
7 Hormigonar
Refuerzo estructural para el borde libre de la losa según EN 1992-1-1
A Mampostería de una sola hoja
B Mampostería revestida con un sistema de composite
con aislante térmico
C Mampostería de doble hoja
D Mampostería de doble hoja (ventilada)
Lugares de instalación ES
20 21© 2021 · INST_HIT-HP/SP SDV - SMV - SZV 08/20 · www.halfen.com © 2021 · INST_HIT-HP/SP SDV - SMV - SZV 08/20 · www.halfen.com
HALFEN HIT-HP/SP SZVHALFEN HIT-HP/SP SMV
HIT-HP/SP SZV
A Einschaliges Mauerwerk
B Mauerwerk mit WDVS
C Zweischaliges Mauerwerk
D Zweischaliges Mauerwerk (hinterlüftet)
EinbausituationenD
D
GB
CZ
Bündig installieren!
Flush installation!
Instalace pod omítku
ES
F
PL
¡Instalar alineado!
Installation à fleur!
Montować w licu!
NL Vlakke inbouw!
HIT label GBProject informationQR code: Assembly instruction
Type
Connection type
Shear load range
Element height [cm]
Etykieta HIT PLInformacje projektowe
Kod QR: Instrukcja montażu
Typ grupy wyrobów
Typ połączenia
Siła poprzeczna – nośność
Wysokość elementu [cm]
Order- en projectinformatie
QR-code: Montagehandleiding
Productgroep
Type krachtsoverbrenging
Aantal en type dwarskrachtstaven
Element hoogte [cm]
HIT EtikettNL
Štítek na prvku HIT CZInformace o projektuQR code: Montážní návod
Typ
Typ připojení
Střihové zatížení
Výška prvku [cm]
Etiquette HIT FInformation projet
Code QR: Notice d‘installation
Groupe de produit
Type de connection
Plage de charge Cisaillement
Hauteur individuelle d‘élément [cm]
Etiqueta HIT ESDatos del proyecto
Código QR: Instrucciones de montaje
Tipo aislante
Familia
Rango de cargas - Cortante
Altura del elemento [cm]
22 23© 2021 · INST_HIT-HP/SP SDV - SMV - SZV 08/20 · www.halfen.com © 2021 · INST_HIT-HP/SP SDV - SMV - SZV 08/20 · www.halfen.com
HALFEN HIT-HP/SP SZV HALFEN HIT-HP/SP SZV
HIT-HP SZV - 0208 - 20
HIT-HP SZV-2M16-0208-20
Positionstext Element 5CuOr : 5300S041785 Date: 021019Pos: 20 (Position / position)CuNo: 12345678 (Kundennummer / customers number)CuNa: (Kundenname / customers name)PrNo: 981654 (Projektnummer / project number)
PrTx: Projektbezeichnung Projekt in Bayern
A
B
Obe
n
Top
Außen Exterior
Innen InteriorBemessungswert der Wärmeleitfähigkeit des Wärmedämmstoffs:ffffDesign value for the thermal conductivity of the insulation material:
= 0,035 W/(m·K)
HALFEN HIT ISO-ELEMENTTANSCHLUSS STAHL AN BETONSTEEL TO CONCRETE CONNECTOR
HIT-HPSZV• HIT- SPSZV
Offi cially approvedffi
DIBt*, Berlin*German Institute of Construction Engineering
1
2
HIT
- HP/
SP S
ZV -
12/1
9 A
rt-N
r.056
5.15
0-00
032
HIT-HP SZV-2M16-0208-20
Positionstext Element 5CuOr : 5300S041785 Date: 021019Pos: 20 (Position / position)CuNo: 12345678 (Kundennummer / customers number)CuNa: (Kundenname / customers name)PrNo: 981654 (Projektnummer / project number)
PrTx: Projektbezeichnung Projekt in Bayern
Z-15.7-336Bauaufsichtlich zugelassen
Für eine spätere Montage der Stahlkonstruktion das HIT-Element mit erhöhter Genauigkeit einbauen!For a later installation of the steel-construction, install the HIT element with increased accuracy!
1 Bauseitige Bewehrung gemäß Angabe der Tragwerks-planung einbauen.The on-site reinforcement must be placed as specified by the structural engineer.
2 Einbauhinweise der Montageanleitung beachtenObserve the information in the installation instructions.
SP S
ZV -
12/1
9 A
rt-N
r.056
5.15
0-00
03
)
HIT EtikettDProjektinformationen
QR-Code: Montageanleitung
Produktgruppe - Typ
Anschluss - Typ
Querkraft-Tragstufe
Elementhöhe [cm]
2 Ausrichtung der Einbaulage
Auf korrekte Höhe der Schalung achten!
Auf die exakte waagerechte Einbaulage achten!
Einbau im BetonD
1
4a
4b
2
3
Unsere Bohrschablone fi nden Sie als pdf-Datei zum kostenlosen Download unter:► www.halfen.com ► Produktbe-reiche ► Bau ► Bewehrungstechnik ► HALFEN HIT Iso-Element ► Pro-duktinformationen ► Montage-anleitungen
3 Prüfen der waagerechten und senkrechten Ausrichtung
Die mitgelieferten Einbauhilfen sind zum Ausrichten der Elemente ver-wendbar; die seitlichen Überstände können bei Bedarf an der bauseitigen Schalung befestigt werden.Alternativ: Herstellung bauseitiger Justierhilfen (z. B. Brett / U-Profi l); zum Einmessen der Bohrlöcher und Elementabstände auf den Justierhilfen können die mitgelieferten Einbau-hilfen oder alternativ die HALFEN Bohrschablonen verwendet werden.
4 Einbau Schalung
a Betonage gegen Schalung
b Betonage gegen Randdämmung
1 Einbau der unteren Bewehrungs- lage (z. B. eine Matte).
Einbau des HIT-Elementes von oben.
Für eine spätere Montage der Stahlkonstruktion das HIT-Element mit erhöhter Genauigkeit einbauen!
2 Accurate installation
2 Sprawdzenie położenia elementu
Ensure the formwork is installed at the correct height!
Zwracać uwagę na poprawną wysokość deskowania!
Ensure installation is exactly horizontal! Zwracać uwagę na dokładne
położenie poziome!
Installation in concrete
1 Installing the bottom reinforcement layer (example, mesh reinforcement). 1 Montaż dolnego zbrojenia
(np. maty zbrojeniowej).Montaż elementów HIT od góry.The HIT Elements must be
very precisely positioned if the steel components are installed at a later stage in the building process!
Element HIT zamontować precyzyjnie - dla późniejszego montażu konstrukcji stalowej!
3 Check horizontal and vertical alignment
The included (wood) templates are used to precisely align the elements; the excess edges can be used to secure the HIT to the on-site formwork as required. Alternatively, use either the included (wood) templates or the HALFEN drill-templates to make on-site templates to set the drill holes and element spacings.
3 Sprawdzić poprawność położenia w poziomie i pionie
Dostarczone płytki montażowe używane są do wyrównania położenia elementu; boczne naddatki płytki mogą, w razie potrzeby, zostać wykor-zystane do zamocowania do deskowa-nia. Alternatywa: wykonanie pomocy montażowych na budowie (np. deski / profi l U). Do rozmierzenia otworów wierconych i odstępów pomiędzy ele-mentami, mogą zostać użyte dostar-czone płytki montażowe lub alternaty-wnie szablony do wiercenia HALFEN.4 Installing the formwork
a Concreting directly to formwork
4 Montaż deskowania
a Betonowanie w deskowaniu
b Concreting directly to insulation
b Betonowanie w deskowaniu z izolacją
A free template for drilling (.pdf fi le) is available for download at ► www.halfen.com ► Product Ranges ► Construction ► Reinforcement systems ► HALFEN HIT Insulated Connection ► Product information ► Installation Instructions
Szablony do wiercenia HALFEN znajdziesz jako plik PDF do darmowego pobrania ze strony:► www.halfen.com ► Nasza Oferta ► Budownictwo ► Systemy zbrojeniowe ► HIT łączniki balkonowe ► informacja o produkcie ► Instrukcje montażu
Montage volgorde betonzijde
NL
2 Nauwkeurige inbouw
Let op de juiste hoogtevan de bekisting!
Let op de exacte horizontaleen verticale inbouwpositie!
1 aanbrengen onderwapening vloer HIT element van bovenaf plaatsbaar.
Wanneer de staalconstructie naderhand wordt aange-bracht, dient de HIT aanslu-iting met extra aandacht te worden aangebracht (water-pas in alle richtingen).
3 Controleer de horizontale enverticale uitlijning
De meegeleverde (houten) montage-platen worden gebruikt om de ele-menten uit te lijnen. Overstekende randen kunnen, indien nodig, aan de bekisting van de achter constructie bevestigd worden. Als alternatief kun-nen de meegeleverde montage platen gebruikt worden als sjabloon voor het aftekenen van de gaten in de staal-constructie.
4 Fixeren in randkist
a Beton storten tegen bekisting
b Beton storten tegen randisolatie
Het boorsjabloon is als pdf-bestand te downloaden op:► www.halfen.nl ► Productoverzicht ► Bouw ► Wapeningssystemen ► HIT kondebrugonderbreking ► Product-informatie ► Montagehandleiding
2 Přesná instalace
Zajistěte, aby bednění bylo in-stalováno ve správné výšce!
Zajistěte, aby instalace byla přesně vodorovná!
Instalace do betonu
1 Instalace spodní výztužné vrstvy (síťová výztuž).
Pokud jsou ocelové kompo-nenty instalovány v pozdější fázi stavebního procesu, musí být prvky HIT místěny velmi přesně!
3 Zkontrolujte vodorovné a svislé zarovnání
Zahrnuté (dřevěné) šablony se používají k přesnému zarovnání prvků; hrany lze podle potřeby upev-nit na bednění na místě. Případně použijte přiložené šablony (ze dřeva) nebo vrtací šablony HALFEN k vytvoření šablon na místě k nastavení otvorů a rozestupů prvků.
4 Montáž bednění
a Betonování přímo na bednění
b Betonování přímo na izolaci
Šablona (.pdf soubor) pro vrtání je k dispozici zdarma ke stažení na► www.halfen.com ► Product Ranges ► Stavba ► Výztuže ► HIT Balkonové a izolační nosníky ► In-formace o produktech ► Montážní návod
2 Installation précise
Assurez-vous que le coff rage est installé à la bonne hauteur!
Assurez-vous de la parfaite horizontalité de l'installation!
1 Installation de la nappe d'armatures inférieure (treillis soudé par exemple).
Les éléments HIT doivent être positionnés très précisé-ment vu que la structure métallique sera fi xée à un stade ultérieur du processus de construction!
3 Vérifi cation de l'alignement hori-zontal et vertical
Les gabarits fournis (en bois) permettent d’aligner avec précision les éléments; La partie extérieure du rupteur sortant du voile peut être fixée au coff rage sur site selon les besoins. Pour la mesure des trous de perçage et de la distance des éléments sur les aides au réglage, vous pouvez utiliser les gabarits (en bois) fournis ou les ga-barits de perçage HALFEN.
4 Installation du coff rage
a Bétonnage contre le coffrage
b Bétonnage contre l'isolation
Installation dans la dalle béton
Montaż w stropie betonowym
F
Un gabarit gratuit pour percement (fi chier.pdf) est disponible en téléchargement sur► www.halfen.com ► Product Ranges ► Construction ► Systémes d`armature ► HIT Rupteur de pont thermique ► Information produit ► Notice d`utilisation
Instalación en hormigón
2 Instalación precisa
¡Preste atención a la altura correcta del encofrado!
¡Preste atención a la posición exacta de instalación horizon-tal y vertical!
1 Instalar la armadura inferior (ejemplo, refuerzo de malla).Colocar el elemento HIT desde arriba.
¡Instale el elemento HIT con mayor precisión posible, ya que la estructura de acero se instalará sobre él!
3 Verifi que la alineación horizontal y vertical
Las plantillas (madera) incluidas se utilizan para alinear con precisión los elementos;los bordes sobrantes pue-den fi jarse al encofrado en el sitio según sea necesario. Alternativa-mente, use las plantillas incluidas (ma-dera) o las plantillas de perforación HALFEN para hacer plantillas en el obra para establecer los agujeros de perforación y los espacios entre ele-mentos.
4 Colocación en el encofrado
a Hormigonado directamente al encofrado.
b Hormigonado directamente al aislamiento
ES
Una plantilla gratis para taladrar(archivo .pdf) está disponible paradescargar en ► www.halfen.com ► Product Ranges ► Construcción ► Técnica de Armaduras ► HALFEN HIT Ele-mento Iso ► Información de pro-ducto ► Instrucciones de montaje
24 25© 2021 · INST_HIT-HP/SP SDV - SMV - SZV 08/20 · www.halfen.com © 2021 · INST_HIT-HP/SP SDV - SMV - SZV 08/20 · www.halfen.com
HALFEN HIT-HP/SP SZV HALFEN HIT-HP/SP SZV
GB PL CZ
Installation in concrete Instalace do betonu Instalación en hormigón
6 Installing the on-site reinforce-ment for semi-precast elements
a Installing the on-site reinforcement (section view)
6 Instalación del refuerzo en obra para elementos semi-prefabrica-dos
a Instalación de los refuerzos en obra (ver descripción)
To ensure the HIT units are not displaced, ensure the concrete is poured and compacted evenly.
Para garantizar que las uni-dades HIT no se desplacen, asegúrese de que el hormigón se vierte y compacta de ma-nera uniforme.
5 Installing the on-site reinforcement
a Installing the on-site reinforcement (section view)
5 Instalación de los refuerzos en obra
a Instalación de los refuerzos en obra (ver descripción)
b Installing the on-site reinforcement (plan view)
b Instalación de los refuerzos en obra (ver planos)
7 Pouring the concrete 7 Hormigonado
Structural reinforcement for free edge of the slab according to EN 1992-1-1
Refuerzo estructural para el borde libre de la losa según EN 1992-1-1
GB
Montage volgorde betonzijde
Installation dans la dalle béton
Montaż w stropie betonowym
6 Montaż zbrojenia na budowie płyty zespolonej
a Montaż zbrojenia na budowie (przekrój)
Dla zagwarantowania właściwego położenia elemen-tu HIT, zwracać uwagę przy betonowaniu na równomierne wypełnienie i zagęszczenie mieszanki.
5 Montaż zbrojenia na budowie
a Montaż zbrojenia na budowie (przekrój)
b Montaż zbrojenia na budowie(widok z góry)
7 Wbudowanie mieszanki betonowej
Zbrojenie konstrukcyjne krawędzi płyty według EN 1992-1-1
PL
6 Aanbrengen ophang- en splijtwa-pening in combinatie met een breedplaatvloer.
a Aanbrengen ophang- en splijtwapening (dwarsdoorsnede)
Controleer of alle HIT-ele-menten stevig vast zitten. Stort en verdicht het beton gelijkmatig om te vermijden dat de HIT- elementen zich kunnen verplaatsen.
5 Aanbrengen bijlegwapening
a Aanbrengen ophang- en splijtwapening (dwarsdoorsnede)
b Aanbrengen ophang- en splijtwapening (bovenaanzicht)
7 Beton storten
Constructieve wapening voor (vrij) dragende vloerrand conform EN 1992-1-1
NL
6 Instalace výztuže na místě s fi ligrány
a Instalace výztuže na místě s filigrány
Aby nedošlo k pohybu prvků HIT, zajistěte, aby byl beton nalit a rovnoměrně zhutněn.
5 Instalace výztuže na místě
a Instalace výztuže na místě (pohled v řezu)
b Instalace výztuže na místě (půdorys)
7 Lití betonu
Konstrukční výztuž pro volný okraj desky podle EN 1992-1-1
CZ
F
6 Mise en place des armatures sur site pour les pré-dalles
a mise en place des armatures sur site (vue en coupe)
Afi n de s'assurer que les éléments HIT ne se déplacent pas, le béton doit être coulé et compacté uniformément.
5 Mise en place des armatures sur site
a Mise en place des armatures sur site (vue en coupe)
b Mise en place des armatures sur site (vue en plan)
7 Coulage du béton
Armatures structurelles de renfort de bord libre de la dalle selon EN 1992-1-1
ES
26 27© 2021 · INST_HIT-HP/SP SDV - SMV - SZV 08/20 · www.halfen.com © 2021 · INST_HIT-HP/SP SDV - SMV - SZV 08/20 · www.halfen.com
HALFEN HIT-HP/SP SZV HALFEN HIT-HP/SP SZV
6 Einbau bauseitige Bewehrung einer Elementplatte
a Einbau bauseitige Bewehrung (Querschnitt)
Für die Gewährleistung der Lage sicherheit der HIT-Ele-mente ist beim Betonieren auf gleich mäßiges Füllen und Verdichten zu achten.
5 Einbau bauseitige Bewehrung
a Einbau bauseitige Bewehrung (Querschnitt)
5a
5b
6
7
b Einbau bauseitige Bewehrung (Draufsicht)
7 Einbringen des Betons
≥ 100 mm
Konstruktive Bewehrung des freien Plattenrandes nach EN 1992-1-1

1.
2.
28 29© 2021 · INST_HIT-HP/SP SDV - SMV - SZV 08/20 · www.halfen.com © 2021 · INST_HIT-HP/SP SDV - SMV - SZV 08/20 · www.halfen.com
HALFEN HIT-HP/SP SDV -SMV -SZV HALFEN HIT-HP/SP SDV -SMV -SZV
Iso-ElementAnschluss Stahl an Beton
Insulated connectionSteel to concrete connector
Łącznik z izolacją termiczną Połączenie elementów stalowych do żelbetowych
Izolační prvek beton-ocel
Conexiones aisladas entre losa de hormigón y acero
Koudebrugonderbreking voor staal-beton verankeringen
D
GB
CZ
ESHIT-HP/SP SDVSDV
HIT-HP/SP SZV
HIT-HP/SP SMV
Montageanleitung • Assembly Instructions • Montážní návod • Instrucciones de montaje • Notice d‘installation • Instrukcja montażu • Montagehandleiding
!29
Rupteur thermique connexion acier / béton
F
PL
NL
Stahlbau GB Steel construction CZ Ocelová konstrukce ES Estructura de aceroInstallation de la structure métallique PL Konstrukcja stalowa NL Staalconstructie
D
F
1 Anbringen der Stahlträger
4 Kontrolle der planmäßigen Lage des Stahlanschlusses
5 Nachjustieren und Schrauben anziehen
3 Anschrauben der StahlträgerZuerst die oberen Schrauben, dann die unteren Schrauben anbringen.
3
4
5
1
2
Montage an der StahlbaukonstruktionD
Bauseitige Stirnplatte nur mit Knagge montieren
Neigungskontrolle nach Angaben der Tragwerks-planung durchführen!
(waagerechte Lage oder plan-mäßige Überhöhung berücksichti-gen)
Die Gewindestangen dürfen gekürzt werden, so dass min. 2 Gewindegänge nach dem Verschrauben sichtbar bleiben.
i
2 Hinweise auf Aufkleber beachtenKorrekter Einbau der Schrägloch-platte: HALFEN-Logo vorne, Fase oben.

1 Fixing to steel girders 1 Fixation de poutres métalliques
4 Check the steel connection has been installed as planned
4 Vérifi ez que la connexion en acier a été installée comme prévu
5 Make fi nal adjustments, then tighten the nuts/screws
5 Réglage fi nal: serrez enfi n les écrous/vis
3 Fixing steel supportsAttach to the top bolts fi rst, then attach to the bottom bolts. 3 Fixation des structures métalliques
Fixez d'abord les boulons du haut, puis fi xez les boulons du bas.
Only use on-site end plates with a notch
Sur site n'utiliser que les plaques d'extrémité avec encoche
Check the gradient is in accordance with the design specifi cations!
Check if horizontally level or if the camber (where planned) is correct.
Vérifi ez que la pente est conforme aux spécifi cations de conception! Vérifi ez si la
mise à niveau horizontale ou si la pente (si prévue) est correcte.
The (threaded) bolts may be shortened; ensure at least 2 turns of the threads remain visible after fi nal installation. Les boulons (fi letés) peuvent
être raccourcis; Assurez-vous qu’au moins 2 tours de fi lets restent visibles après l’installation fi nale.
i
i
2 Please observe the information on the labelCorrect orientation of the angled slotted bracket: HALFEN logo is visible, bevelled edge at the top.
2 Veuillez vérifi er les informations sur l'étiquetteOrientation correcte du support perforé: le logo HALFEN est visi-ble, le bord biseauté au dessus.
Installing to steel components
Montage de la structure métallique
1 Zamocowanie belki stalowej
4 Sprawdzenie zgodności położenia elementu stalowego
5 Wykonać końcową regulację i dokręcić nakrętki
3 Przykręcenie dźwigara stalowegoNajpierw przymocować dźwigar na śrubach górnych, następnie na dol-nych.
Płytę czołową belki stalowej montować wraz z podkładką centrującą
Kontrolę pochylenia przeprowadzić według
danych projektu konstrukcyjnego (uwzględnić poziome położenie i zaprojektowane podniesienie wykonawcze).
Po dokręceniu nakrętek pręty gwintowane mogą być skró-cone, minimalnie 2 zwoje gwintu muszą pozostać wi-doczne.
i
2 Przestrzegać wskazówek umieszcz-onych na etykieciePrawidłowy montaż płytki z otwo-rami ukośnymi: Logo HALFEN z przodu, faza na górze.
Montaż konstrukcji stalowej
1 Aanbrengen staalconstructie
4 Controleer de positie/peilmaat van de staalconstructie
5 Na stellen mogelijk met behulp van hoogte verstel plaat.
3 Bevestiging stalenconstructie aan HIT: Bevestig eerst de bovenste bouten en daarna de onderste bouten.
Kopplaat van de staalcon-structie te allen tijde voorzien van aangelaste oplegnok.
Controleer of opgegeven toog overeenkomtmet de specifi caties van de
(staal) constructeur!
De draadstangen mogen worden ingekort; zorg ervoor dat minimaal 2 schroefdraad-gangen na montage zichtbaar blijven.
i
2 Lees de informatie op het etiketJuiste positie hoogte verstelplaat HIT:HALFEN-Logo aan voorzijde, afgeschuinde rand aan bovenzijde.
Montage van de staalconstructie
1 Upevnění na ocelové nosníky
4 Zkontrolujte, zda je ocelové spo-jení nainstalováno podle plánu
5 Konečné nastavení a poté dotáhněte matice / šrouby
3 Upevnění ocelových podpěrNejprve připevněte horní šrouby a poté spodní šrouby.
Používejte pouze koncové desky s vrubem
Zkontrolujte, zda je gradient v souladu s konstrukčními specifi kacemi! Zkontrolujte
správný úhel připojené konstrukce.
Šrouby mohou být zkráceny;ujistěte se, že po konečnéinstalaci zůstaly viditelnéalespoň 2 závity.
i
2 Dodržujte prosím informace uvedené na štítkuSprávná orientace štěrbinové konzoly: Logo HALFEN je viditelné, zkosená hrana nahoře.
Instalace ocelové konstrukce
1 Fijación a vigas de acero.
4 Verifi que que la conexión con la estructura de acero se ha hecho según lo previsto.
5 Ajuste fi nal, fi nalmente apriete las tuercas / tornillos
3 Fijación de soportes de aceroPrimero sujételo a los pernos superiores y luego a los pernos inferiores.
Utilice solo placas con muesca.
Control de inclinación según el diseño estructural (la posición horizontal o la
elevación planifi cada).
Los tornillos (varillas roscadas) pueden acortarse, si al menos quedan visibles 2 pasos de rosca después de atornillar.
i
2 Observe la información de la eti-queta.Orientación correcta del soporte ranurado: el logotipo de HALFEN es visible,borde biselado en la parte superior.
Instalación del elemento metálico
30 31© 2021 · INST_HIT-HP/SP SDV - SMV - SZV 08/20 · www.halfen.com © 2021 · INST_HIT-HP/SP SDV - SMV - SZV 08/20 · www.halfen.com
HALFEN HIT-HP/SP SDV -SMV -SZV HALFEN HIT-HP/SP SDV -SMV -SZV
GB NL PL F ES CZ

© 2
02
1 U
-92
0 –
08
/20
P
DF
10
/21
Imagine. Model. Make.
For more information on the products featured here, please contact Leviat:
Notes regarding this document
© Protected by copyright. The information in this publication is based on state-of-the-art technology
at the time of publication. In every case, project working details should be entrusted to appropriately
qualified and experienced persons. Leviat shall not accept liability for the accuracy of the information
in this document or for any printing errors. We reserve the right to make technical and design changes
at any time. With a policy of continuous product development, Leviat reserves the right to modify
product design and specification at any time.
Leviat.com Halfen.com
For information on certified management systems and standards, see www.halfen.com
Australia98 Kurrajong Avenue,Mount Druitt, Sydney, NSW 2770Tel: +61 - 2 8808 3100Email: [email protected]
AustriaLeonard-Bernstein-Str. 10Saturn Tower, 1220 WienTel: +43 - 1 - 259 6770Email: [email protected]
Belgium Borkelstraat 1312900 SchotenTel: +32 - 3 - 658 07 20Email: [email protected]
ChinaRoom 601 Tower D, Vantone CentreNo. A6 Chao Yang Men Wai StreetChaoyang DistrictBeijing · P.R. China 100020Tel: +86 - 10 5907 3200Email: [email protected]
Czech Republic Business Center ŠafránkovaŠafránkova 1238/1155 00 Praha 5Tel: +420 - 311 - 690 060Email: [email protected]
FinlandVädursgatan 5412 50 Göteborg / SwedenTel: +358 (0)10 6338781Email: [email protected]
France 18, rue Goubet75019 ParisTel: +33 - 1 - 44 52 31 00Email: [email protected]
GermanyLiebigstrasse 1440764 LangenfeldTel: +49 - 2173 - 970 - 0Email: [email protected]
India309, 3rd Floor, Orion Business ParkGhodbunder Road, Kapurbawdi, Thane West, Thane, Maharashtra 400607Tel: +91 - 22 2589 2032Email: [email protected]
Italy Via F.lli Bronzetti 2824124 BergamoTel: +39 - 035 - 0760711Email: [email protected]
Malaysia28 Jalan Anggerik Mokara 31/59Kota Kemuning, 40460 Shah Alam SelangorTel: +603 - 5122 4182Email: [email protected]
Netherlands Oostermaat 37623 CS BorneTel: +31 - 74 - 267 14 49Email: [email protected]
New Zealand2/19 Nuttall Drive, Hillsborough,Christchurch 8022Tel: +64 - 3 376 5205Email: [email protected]
Norway Vestre Svanholmen 54313 SandnesTel: +47 - 51 82 34 00Email: [email protected]
Philippines 2933 Regus, Joy Nostalg, ADB Avenue, Ortigas CenterPasig CityTel: +63 - 2 7957 6381Email: [email protected]
PolandUl. Obornicka 28760-691 PoznańTel: +48 - 61 - 622 14 14Email: [email protected]
Singapore14 Benoi CrescentSingapore 629977Tel: +65 - 6266 6802Email: [email protected]
Spain Polígono Industrial Santa Ana c/ Ignacio Zuloaga, 2028522 Rivas-VaciamadridTel: +34 - 91 632 18 40Email: [email protected]
SwedenVädursgatan 5412 50 GöteborgTel: +46 - 31 - 98 58 00Email: [email protected]
SwitzerlandHertistrasse 258304 WallisellenTel: +41 (0) 800 22 66 00Email: [email protected]
United Arab EmiratesRA08 TB02, PO Box 17225JAFZA, Jebel Ali, DubaiTel: +971 (0)4 883 4346Email: [email protected]
United Kingdom A1/A2 Portland CloseHoughton Regis LU5 5AWTel: +44 - 1582 - 470 300Email: [email protected]
USA / Canada6467 S Falkenburg RoadRiverview, FL 33578Tel: (800) 423-9140 Email: [email protected]
For countries not listedEmail: [email protected]
Top Related