BEDIENUNGSANLEITUNG - hoellein.com · 4 • Achten Sie stets auf sicheren Kontakt aller...
28
BEDIENUNGSANLEITUNG
Transcript of BEDIENUNGSANLEITUNG - hoellein.com · 4 • Achten Sie stets auf sicheren Kontakt aller...

BEDIENUNGSANLEITUNG
2
Beachten Sie beim Betrieb Ihres Ladegerätes unbedingt die nachfolgenden Hinweise, um einen sicheren und störungsfreien Betrieb zu gewährleisten!
• Achten Sie beim Anschluss des Ladegeräts unbedingt auf die korrekte Polung! Die rote Klemme muss an den Pluspol (+), die schwarze Klemme an den Minuspol (-) der DC 11-18V= Spannungsquelle angeschlossen werden. Das Gerät kann alternativ auch mit 100-240V~ Netzspannung betrieben werden.• Das Gerät niemals(!) öffnen! Es besteht die Gefahr eines Stromschlags!• Legen Sie den Akku und das Ladegerät auf eine nicht brennbare und eine elektrisch nicht leitende Unterlage! Akku und Ladegerät müssen auf einer hitzebständigen Unterlage liegen. Brennbare Flüssigkeiten oder Gegenstände von der Ladeanordnung stets fernhalten! Achten Sie auf eine gute Lüftung des Umfeldes.• Lassen Sie den Lade- bzw. Entladevorgang niemals(!) unbeaufsichtigt!• Lassen Sie das Ladegerät niemals unbeaufsichtigt an der Stromversorgung angeschlossen!• Beachten Sie stets die zulässigen Ladezeiten und Ladeströme für Ihren Akku! Diese finden Sie in den Ladehinweisen des jeweiligen Akku-Herstellers.• Schließen Sie immer nur einen Akku gleichzeitig an den Ladeausgang des Ladegerätes an!• Vermeiden Sie Kurzschlüsse mit den Anschlusssteckern des Ladekabels. Schließen Sie zuerst das Ladekabel an den Ladebuchsen des Ladegerätes an. Danach das Ladekabel mit dem Akku verbinden. Beim Abklemmen des Akkus in umgekehrter Reihenfolge verfahren.• Zwischen den Ladeausgängen und den Metallteilen eines Autos, besteht beim Betrieb an der Autobatterie Kurzschlussgefahr! Vermeiden Sie jeglichen Kontakt der Stecker am Ladekabel mit Teilen des Motors oder der Karosserie! Stellen Sie das Gerät selbst niemals direkt auf die Karosserie oder andere Metallteile im Motorraum des Fahrzeugs.• Schließen Sie das Ladegerät stets direkt mit dem original Anschlusskabel und den original Krokodil-klemmen an der Spannungsquelle an! Beim Betrieb an einer Auto batterie, müssen der Motor abgestellt und die Zündung des Fahrzeugs abgeschaltet sein. Die Autobatterie darf während des Betriebs des Ladegerätes nicht gleichzeitig aufgeladen werden!• Überprüfen Sie nach jedem Ladevorgang, ob die eingeladene Menge in etwa Ihrer erwarteten Menge entspricht. So lassen sich Frühabschaltungen und defekte Zellen frühzeitig erkennen.
SICHERHEITSHINWEISE

3
SICHERHEITSHINWEISE
• Schützen Sie das Ladegerät vor Feuchtigkeit, Schmutz, Vibrationen und mechanischer Krafteinwirkung! Vermeiden Sie direkte Sonneneinstrahlung.• Das Ladegerät verfügt am Gehäuse über zahlreiche Schlitze. Diese dienen zur Kühlung der elektronischen Komponenten. Diese Schlitze niemals abdecken oder gar verschließen! Das Ladegerät so aufstellen, dass die Luft ungehindert zirkulieren kann.• Akkus niemals gewaltsam öffnen oder ins Feuer werfen!• Folgende Zellen dürfen NICHT mit diesem Ladegerät geladen werden: ❈ NiCd- & NiMH-Akkus mit mehr als 15 Zellen ❈ LiPo-Akkus mit mehr als 6 Zellen ❈ Trockenbatterien - Explosionsgefahr! ❈ Akkutypen, die andere Ladeverfahren erfordern als NiCd-, NiMH-, LiPo/LiFe/LiIo- und Blei-Akkus ❈ Akkupacks, die aus unterschiedlichen Zellentypen bestehen ❈ Defekte oder beschädigte Akkus• Prüfen Sie vor jedem(!) Ladevorgang, ob Sie das korrekte Ladeprogramm für Ihren Akkutyp gewählt haben! Prüfen Sie außerdem, ob Sie alle Parameter wie Ladestrom, Zellenzahl und Abschaltspannung korrekt eingestellt haben!
Hinweise zum Laden von Akkus• Beim Aufladen von Akkus, wird den Zellen eine bestimmte Menge Strom zugeführt. Die Lademenge errechnet sich aus Ladestrom x Ladezeit. Beachten Sie unbedingt die Angaben des jeweiligen Akku-Herstellers für den maximal zulässigen Ladestrom Ihres Akkus. • Der Normalladestrom für Akkus beträgt in der Regel 1/10 der Nennkapazität. So liegt der Normalladestrom für einen Akku mit einer Kapazität von 2.400 mAh bei 240 mA. Dieser Normalladestrom darf nur bei Zellen überschritten werden, die vom Hersteller ausdrücklich als schnellladefähig bezeichnet werden!• Wenn Sie neue Zellen einsetzen, berücksichtigen Sie, dass diese mehrere Lade- & Entladezyklen benötigen, bis sie ihre volle Spannungslage und Kapazität erreichen. • Bei tiefentladenen Akkus kann es zur vorzeitigen Abschaltung der Ladeautomatik kommen. In diesem Fall müssen die Zellen ebenfalls mehrmals geladen und entladen werden. Bringt dies keine Besserung, müssen die Zellen fachgerecht entsorgt werden.• Sollte der Akku während des Ladevorgangs extrem heiß werden, kann dies auf defekte Zellen hinweisen. In diesem Fall müssen die Zellen fachgerecht entsorgt werden.

4
• Achten Sie stets auf sicheren Kontakt aller Steckverbindungen der Ladeanordnung. Kurzzeitige Wackelkontakte können einen Neustart des Ladevorgangs auslösen.• Die häufigste Ursache für fehlerhafte Abschaltungen des Ladevorgangs sind unbrauchbare Ladekabel. Durch Steckerverbindungen mit hohen Übergangswider- ständen kann es zu fehlerhaften Abschaltungen des Ladevorgangs kommen, da das Gerät nicht zwischen Akkuinnenwiderstand, Kabelwiderstand oder Steckverbindungswiderstand unterscheiden kann. Verwenden Sie stets ein Ladekabel mit ausreichendem Querschnitt und hochwertigen Gold-Kontakt-Anschlusssteckern! Die Länge des Ladekabels sollte 500 mm nicht überschreiten!
Standardwerte• Achten Sie stets auf die korrekte Einstllung der Lade-Parameter! Die nachfolgende Tabelle zeigt die Standardwerte für die jeweiligen Akkutypen, die Herstellerangaben haben stets Priorität!
Hinweise zum Laden von Senderakkus über die eingebaute Ladebuchse• Sender-Ladebuchsen sind oftmals mit einer Diode als Rückstromsicherung ausgestattet. Dies verhindert eine Beschädigung der Sender-Elektronik im Falle eines Kurzschlusses der Ladebuchse mit den blanken Enden des Ladekabels. In diesem Fall muss die Diode im Sender überbrückt werden, da das Ladegerät den Akku ansonsten nicht erkennt. Beachten Sie unbedingt die Angaben des Sender-Herstellers, wie die Überbrückung in Ihrem Sender durchgeführt werden muss.
Akku TypSchnell- Ladung
Zellen- Nennspannung
Ladeschluss- Spannung
Entladeschluss- Spannung
Lagerungs- Spannung
Ni-Cd 1 - 2C 1.2V 1.5V 0.85V
Ni-MH 1 - 2C 1.2V 1.5V 0.85V
Li-Ion <= 1C 3.6V 4.1V 2.5V 3.7V
Li-Po <= 1C 3.7V 4.2V 3.0V 3.8V
Li-Po HV <= 1C 3.8V 4.35V 3.3V 3.9V
Li-Fe <= 4C 3.3V 3.6V 2.0V 3.3V
PB <= 0.4C 2V 2.46V 1.75V
SICHERHEITSHINWEISE

5
• Überschreiten Sie niemals den für den Sender maximal zulässigen Ladestrom! Dies kann zu Beschädigungen der Sender-Elektronik führen.• Wir empfehlen prinzipiell, den Senderakku während des Ladevorgangs aus dem Batteriefach herauszunehmen, um einen Wärmestau oder die übermäßige Erhitzung des Senders zu vermeiden. Der Sender muss während des gesamten Ladevorgangs ausgeschaltet bleiben. Schalten Sie den Sender während des Ladevorgangs niemals ein! Die Elektronik des Senders könnte durch Überspannung zerstört werden!• Führen Sie keine Entlade- oder Pflege-Programme über die Ladebuchse aus. Die Sender-Ladebuchse ist für derartige Vorgänge nicht ausgelegt!
Haftungsausschluss• Da wir weder die Einhaltung der Montage- und Betriebsanleitung in Zusammenhang mit dem Gerät, noch die Bedienung und Methoden bei Installation, Betrieb, Verwend- ung und Wartung des Gerätes nebst zugehöriger Elektronik überwachen können, übernehmen wir keinerlei Haftung für Verluste, Schäden oder Kosten, die sich aus der fehlerhaften Verwendung und dem Betrieb ergeben oder in irgendeiner Weise damit zusammenhängen.• Soweit vom Gesetzgeber nicht anders vorgeschrieben, ist unsere Verpflichtung zur Leistung von Schadenersatz - gleich aus welchem Rechtsgrund - auf den Rechnungs- wert der an dem schadenstiftenden Ereignis unmittelbar beteiligten Warenmenge begrenzt. Dies gilt nicht, sofern wir nach zwingenden gesetzlichen Vorschriften wegen Vorsatz oder grober Fahrlässigkeit unbeschränkt haften.
SICHERHEITSHINWEISE
6
TECHNISCHE DATEN
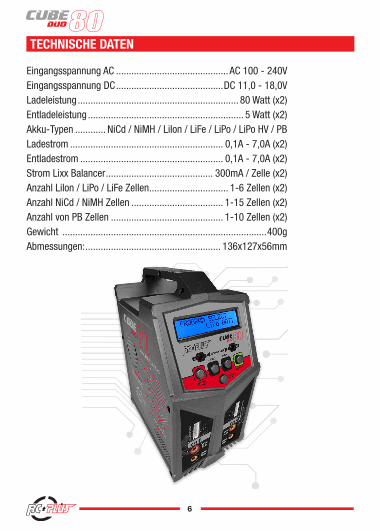
Eingangsspannung AC ............................................AC 100 - 240VEingangsspannung DC ..........................................DC 11,0 - 18,0VLadeleistung ............................................................... 80 Watt (x2)Entladeleistung ............................................................. 5 Watt (x2)Akku-Typen ............ NiCd / NiMH / LiIon / LiFe / LiPo / LiPo HV / PBLadestrom ............................................................ 0,1A - 7,0A (x2)Entladestrom ........................................................ 0,1A - 7,0A (x2)Strom Lixx Balancer .......................................... 300mA / Zelle (x2)Anzahl LiIon / LiPo / LiFe Zellen ............................... 1-6 Zellen (x2)Anzahl NiCd / NiMH Zellen .................................... 1-15 Zellen (x2)Anzahl von PB Zellen ............................................ 1-10 Zellen (x2) Gewicht ................................................................................400gAbmessungen: ..................................................... 136x127x56mm
7
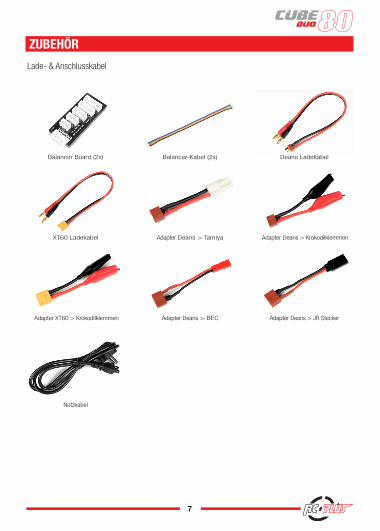
Balancer Board (2x) Balancer-Kabel (2x) Deans Ladekabel
XT60 Ladekabel Adapter Deans > Tamiya
Adapter Deans > BEC Adapter Deans > JR Stecker
Adapter Deans > Krokodilklemmen
Adapter XT60 > Krokodilklemmen
Netzkabel
Lade- & Anschlusskabel
ZUBEHÖR

8
2 Gleichwertige, unabhängige Ladeausgänge Der Lader verfügt über zwei gleichwertige Ladeausgänge an denen gleichzeitig unterschiedliche Akkus geladen oder entladen werden können. Microprozessor gesteuerter LadevorgangDie Software überwacht ständig den Strom und die Spannung beim Lade- & Entladevorgang. Insbesondere bei Lithium-Zellen ist diese Funktion sehr wichtig, um eine Überladung zu verhindern. Sowie ein Wert die zulässigen Grenzen überschreitet, unterbricht der Lader den Vorgang und signalisiert einen Fehler. Alle Grenzwerte können vom Benutzer vorgegeben werden.
Balancer für das Laden & Entladen von Lithium-AkkusDer Lader ist mit einem internen Blancer für Lithium-Akkus ausgestattet. Während des Lade-und Entladevorgangs werden die einzelnen Zellen im Akkupack balanciert.
Unterschiedliche Typen von Lithium-AkkusDer Lader ist ausgelegt für die Zellen-Typen LiPo, LiFe, LiIon und die neuenLiHV-Akkus mit 4,35V Ladeschlussspannung. Delta-Peak Empfindlichkeit für NiMH- & NiCd-AkkusDie automatische Abschaltung des Ladevorgangs erfolgt bei Nixx-Akkus nach derDelta-Peak-Methode. Die Abschaltempfindlichkeit kann frei gewählt werden (nur für erfahrene Benutzer empfohlen). Lade- & Entlade-Zyklen Der Lader bietet die Möglichkeit automatische Ladezyklen auszuführen. Dabei werden die Funk-tionen Laden > Entladen bzw. Entladen > Laden bis zu fünfmal wiederholt. Dies ist sinnvoll, um einen Akku nach längerer Pause wieder zu aktivieren. Maximaler LadestromDer maximal zulässige Ladestrom kann für Nixx-Akkus festgelegt werden. Dies ist bei kleineren Nixx-Zellen sinnvoll, die einen geringen Innenwiderstand haben. Maximale LadekapazitätDie Ladekapazität errechnet sich aus dem Ladestrom multipliziert mit der Ladezeit. Nach Erreichen der vorgegebenen, maximalen Ladekapazität wird der Ladevorgang abgebrochen, sofern ein Wert vorgegeben wird.
FEATURES

9
BEDIENELEMENTE
Netzanschluss AC 100-240V~
Ladeausgang4mm Bullit
DEC/INCVerändern der Werte, Abruf dereinzelnen Zellenspannungen
START/ENTERStart für Lade-/Entlade-
Vorgang, Bestätigung von Vorgängen
DC Anschluss 11V-18V=
Anschluss fürTemperatur-Sensor
Status LEDs fürLadeausgänge
JST-XH Balancer-Anschluss
Ladeausgang4mm Bullit
JST-XH Balancer-Anschluss
Auswahl-Taster fürLadeausgang 1 & 2
BATT TYPE/STOPStop für Lade-/Entlade-Vor-
gang, Durchblättern der Menüs
Anschluss fürTemperatur-Sensor
10
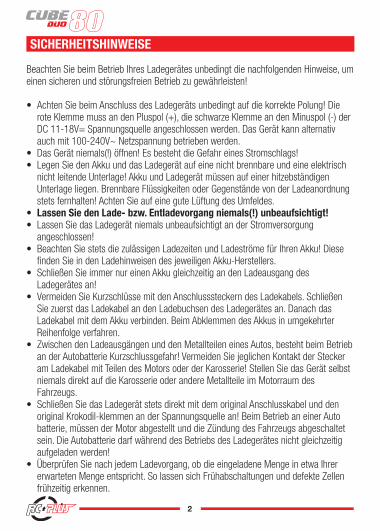
PROGRAM SELECTSAVE DATA SAVE DATA
StartEnter
PROGRAM SELECTLOAD DATA LOAD DATA
StartEnter
StartEnter
Key BeepBuzzer
Input Power LowCut-Off
INC
DEC
INC
DEC
Battery MeterProgram Select
LI Batt MeterMeasuring VOLWait PLEASE...
3.88 3.88 3.840.00 0.00 0.00
MAIN 11.61VH3.885V L3.837V
INC
DEC
PROGRAM SELECTPb BATT Pb DISCHARGEPb CHARGE
StartEnter INC
DEC
LIXX DISCHARGEPROGRAM SELECT
NiMH BATTNiMH CHARGE
'Aut' / 'Man' NiMH DISCHARGE NiMH CYCLEStartEnter INC
DEC
INC
DEC
PROGRAM SELECTNicd BATT
Nicd CHARGE'Aut' / 'Man'
Nicd DISCHARGE Nicd CYCLEStartEnter INC
DEC
INC
DEC
Capacity Cut-Off Safety TimerINC
DEC
INC
DEC
Waste TimeCHG>DCHG
USER SETPROGRAM LIXX V. Type Lilo / LiPo / LiFe
CHK TimeNiMH Sensitivity
D. PeakNicd Sensitivity
D. Peak
StartEnter INC
DEC
INC
DEC
INC
DEC
PROGRAM SELECTLIXX BATT
LIXX CHARGE LIXX BALANCE LIXX FAST CHG LIXX STORAGEStartEnter
INC
DEC
INC
DEC
INC
DEC
INC DEC
INC DEC
Batt typestop
Batt typestop
Batt typestop
Batt typestop
Batt typestop
Batt typestop
INC DECBatt typestop
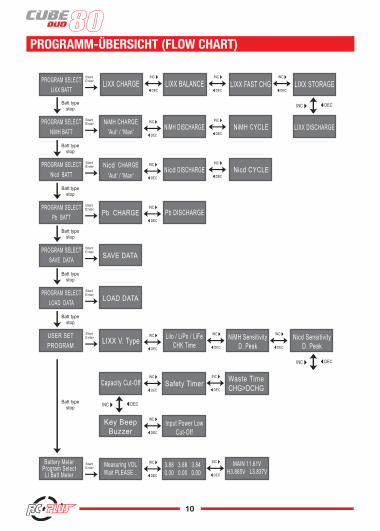
PROGRAMM-ÜBERSICHT (FLOW CHART)

11
SYSTEMEINSTELLUNGENIn den Systemeinstellungen werden globale Werte festgelegt. Werksseitig sind die Parameter so eingestellt, dass sie für die meisten Anwendungen passen.
Um die Werte zu verändern, drücken Sie die ENTER-START-TASTE, der Wert beginnt zu blinken. Mit den Tasten DEC & INC können die Werte verändert werden. Um die Werte zu speichern, drücken Sie erneut die ENTER-START-TASTE.
In diesem Punkt werden die Nennspannungen der Lithi-
um-Zellen angezeigt. Es gibt drei Zellentypen: LiFe(3.3V),
Lilo (3.6V) oder LiPo (3.7V). Werksseitig sind diese Werte
bereits korrekt voreingestellt. Die Veränderung dieser Werte
ist im Normalfall nicht erforderlich!
Die Erkennung der Zellenanzahl erfolgt bei Lithium-Zellen
zu Beginn des Lade-/Entladevorgangs. Bei tiefentladenen
Zellen kann die korrekte Erkennung durch den Lader
jedoch nicht erfolgen. In diesem Fall kann eine Verzögerung
festgelegt werden, bevor der Akku vom Lader vermessen
wird. Der voreingestellte Wert von 10 Minuten passt in den
meisten Fällen.

12
When performing a charge/discharge or discharge/charge cycle, your battery can often become warm after the charge or discharge period. The “waste time” setting will insert a time delay to occur after each charge and discharge process to allow the battery adequate time to cool down before starting the next process. The value ranges from 1 to 60 minutes.
Every charge is monitored by a safety timer. The default setting is 240 minutes or 4 hours. Once this time limit is reached the charger will stop charging regardless if the charge is complete. This is programmed to prevent accidental overcharging of the battery, or if the termination circuit cannot detect the battery is full. The value for the safety timer should be long enough to allow a full charge of the battery. When your charge completes, if the charger says “TIME” in the upper right corner of the screen, your charge was terminated due to the safety timer.
This shows the trigger voltage for automatic peak detection of NiMH and NiCd batteries. The effective value ranges from 5 to 20mV per cell. If the trigger voltage is set higher, there is a danger of overcharging the battery; if it is set lower, there is a possibility of premature termination. Please refer the technical specification of the battery. (NiCd default:12mV, NiMH default: 7mV)
An optional temperature probe contacting the surface of the battery can be used. You can set the maximum temperature at which the charger should allow the battery to reach during charge. Once a battery reaches this temperature during charge, the process will be terminated to protect the battery. This charger does not connect to your PC.
Diese Einstellung legt bei NiMH/NiCd-Akkus die Empfindlichkeit für
die Delta-Peak-Abschaltung fest. Der Einstellbereich beträgt 5 bis
20mV por Zelle. Je höher der Wert, desto größer die Gefahr der
Überladung. Je niedriger der Wert, desto größer die Chance für eine
vorzeitige Abschaltung des Ladevorgangs.
Grundeinstellung: NiCd:12mV, NiMH: 7mV
Wenn ein Temperatur-Sensor angeschlossen ist, kann eine Tempe-
raturgrenze festgelegt werden, bei der der Ladevorgang automatisch
beendet wird.
In diesem Menü wird die Wartezeit zwischen zwei Zyklen für das
Laden/Entladen im Cycle Mode festgelegt. Der Akku kann während
des Lade-/Entladevorgangs sehr warm werden. Es ist sinnvoll, den
Akku abkühlen zulassen, bevor er erneut geladen oder entladen wird.
Es können Werte von 1 - 60 Minuten eingegeben werden.
Bei jedem Ladevorgang startet automatisch der Sicherheitstimer und
überwacht die Ladezeit. Nach Ablauf der eingestellten Zeit, beendet
der Timer automatisch den Ladevorgang, falls ein anderes Abschalt-
verfahren zuvor nicht gegriffen hat. Der Wert für den Sicherheitstimer
muss so berechnet werden, dass der Akku in der gewählten Zeit voll
geladen werden kann.
SYSTEMEINSTELLUNGEN

13
This setting allows you to change the maximum capacity that will be supplied to the battery during charge. If the nominal pack voltage is not detected and the safety timer does not expire for any reason, this feature will automatically stop the process at the selected capacity value.
When connecting the charger to a 12 volt power source (lead acid battery) in the field, this setting will allow you to monitor the incoming voltage. Should the voltage drop below the value selected, the charger will terminate operation to protect the input battery.
The Key Beep/Buzzer settings allow you to turn off the individual button “beep” as well as the musical tone that is used to alert different mode changes.
Use these programs only when charging a lithium battery (Lilo/LiPo/LiHV/LiFe) with a nominal voltage of 3.6V, 3.7V, 3.8V or 3.3V per cell, respectively. The charge current going into the battery will vary depending on the chemistry type so it is VERY IMPORTANT that you select the correct type for your battery. The ending voltage of the charge is also important as it varies for all four types: 4.1V for Lilo, 4.2V for LiPo, 4.35V for LiHV and 3.6V for LiFe. The charge current (how many Amps you are putting into the pack) and nominal voltage (Proper voltage for the cell count of the battery you are charging) must be correct for the battery to be charged. To change these settings, press the START/ENTER key to make the selected value blink. Using the increase and decrease buttons, set your desired amperage, then press START/ENTER to save the setting. You will then be asked to select your nominal voltage/cell count. Again, use the increase/decrease buttons to reach your desired setting and Press the START/ENTER button to confirm and save.
Now, double check the charge settings. The upper left corner of the screen should read the specific battery chemistry you are trying to charge. In the case of the example, LiPo. The value underneath the chemistry type is the charge current. Check your batteries specifications for proper charge rating, but with all batteries, we recommend a 1C charge rate. If your battery is a 5000mAh, your charge current should be 5.0A. If using a 2200mAh pack, the charge rate would be 2.2A. Simply placing a decimal point after the first number in your capacity rating will give the correct 1C charge rating. To further elaborate, a 2C charge rate on a 5000mAh pack would be 10.0A.
The information on the right side of the screen will tell you which type of charge you are using and the voltage and cell count you are attempting to charge. Remember, THIS VALUE MUST BE SET TO PROPERLY CHARGE YOUR BATTERY.
When you are ready to charge, press and HOLD the START/ENTER button for 3 seconds.
(LiIo/LiPo/LiHV/LiFe) program
SYSTEMEINSTELLUNGENGeben Sie die maximal zulässige Kapazität ein, die in den Akku
eingeladen werden darf. Falls die Ladeschlusserkennung fehlschlägt,
erfolgt die Abschaltung in jedem Falle nach Erreichen der eingestellten
Kapazitätsgrenze.
Hier können Sie wählen, ob bei Betätigung der Taster ein Beep-Signal
ertönt. Ebenso kann gewählt werden, ob beim Ende des Lade-/Ent-
ladevorgangs und bei Fehlern eine akustische Signalisierung erfolgt.
Wählen Sie hier die minimale Eingangsspannung für das Ladegerät.
Diese Funktion schützt die Autobatterie vor einer zu tiefen Entladung,
um ein Anspringen des Motors sicherzustellen. Bei Unterschreiten der
eingestellten Spannung erfolgt der Abbruch des Ladevorgangs.
LITHIUM PROGRAMME (LILO/LIPO/LIFE)Diese Programme sind geeignet für das Laden & Entladen von Lithium-Akkus mit einer Zellenspannung von
3.3V, 3.6V und 3.7V pro Zelle. Lithium-Zellen müssen mit speziellen Ladeverfahren geladen und entladen
werden, die constant voltage (CV) und constant current (CC) genannt werden. Der Ladestrom hängt dabei
von dem Ladezustand und der Performance des Akkus ab. Ebenso muss die Ladeschlussspannung auf den
jeweiligen Lithium-Zellentyp abgestimmt sein. Hier sind werksseitig Ladeschlussspannungen von 4.2V für
LiPo, 3.6 V für LiFe, und 4.1V für Lilon eingestellt. Der Ladestrom und die Zellenspannung MÜSSEN stets
korrekt sein, damit das Ladegerät die Zellenzahl in den Akkupacks korrekt erkennt.
Auf der linken Seite wird in der 1. Zeile der gewählte Akkutyp und in
der 2. Zeile der eingestellte Ladestrom angezeigt. Nach Einstellung von
Ladestrom und Zellenzahl des Akkupacks, die START/ENTER Taste für 3
Sekunden drücken und gedrückt halten, um den Vorgang zu starten.
(Ladestrom: 0.1~7.0A, Zellenzahl: 1~6)> 3 Sekunden
LADEN VON LITHIUM AKKUS

14
The next screen will ask to confirm the settings after the charger examines the battery, giving a cell count. The “R:” value shows the number of cells detected by the charger. The “S:” value shows the number of cells you selected in the previous menu screen. If the “R:” value does not match the “S:” value, the charger is seeing a different cell count than you have selected. If this happens, press the Batt Type/Stop button to check the number of cells you have selected. If this is correct compared to the battery, you may have a problem with your battery. If the values are the same, it is safe to charge at this point. Press and hold START/ENTER to start the Charge sequence.
When charging, the screen provides useful information like the charge rate, number of cells being charged, battery voltage and the amount of mAh, or capacity that the charger has put into the pack being currently charged. Press Batt type/Stop to stop the charging process at any time.
Lithium batteries comprised of more than one cell will need to be balanced occasionally to ensure the best possible performance. When balancing you MUST connect the balance plug of your battery to the balance board that should be plugged in to the front of the charger. The red and black positive and negative charge leads will still need to be connected to the battery. The “balance” lead simply allows the charger to monitor each individual cell. When “balance” charging, the charger will monitor each individual cell attempting to bring them all to the same nominal voltage.
The next screen will ask to confirm the settings after the charger examines the battery by giving a cell count. The “R:” value shows the number of cells detected by the charger. The “S:” value shows the number of cells selected in the previous menu screen. If the “R:” value does not match the “S:” value, the charger is seeing a different cell count than what has been selected. If this happens, press the Batt Type/Stop button to check the number of cells selected. If this is correct compared to the battery, there may be a problem with the battery. If the values are the same, it is safe to charge at this point. Press and hold START/ENTER to start the charge sequence.
Like a standard charge sequence, the value in the lower left corner of the screen is the selected charge current, in the lower right, the voltage of the pack that will be charged. To change these values, press the START/ENTER key to cycle through the adjustable settings. Use the increase/decrease buttons to change the
values and use the START/ENTER button to confirm the values are set. When ready to BALANCE charge, press and hold the START/ENTER button for 3 seconds to start the process.
When charging, the screen provides useful information like the charge rate, number of cells being charged, battery voltage and the amount of mAh, or capacity that the charger has put into the pack being currently charged. When the balance plug is connected to the charger, you can press the “increase” button to view the individual cell voltages. Pressing the “increase button” a second time will return you to the previous screen. Press Batt type/Stop to stop the charging process at any time.
LADEN VON LITHIUM AKKUSIn dieser Ansicht wird das Messergebnis mit der Benutzereinstellung verglichen. R = Gemessene Zellenzahl vom Ladegerät S = Durch den Benutzer eingegebene Zellenzahl Wenn beide Werte gleich sind, kann der Ladevorgang gestartet werden. Falls nicht, die Taste BATT TYPE/STOP drücken, um den Vorgang abzubrechen. Überprüfen Sie Ihre Eingabe und korrigieren sie diese. Während des Ladevorgangs werden die aktuellen Daten angezeigt. Mit der Taste BATT TYPE/STOP kann der laufende Vorgang beendet werden.
LadezeitLadestrom
Akku-Spannung
GeladeneKapazität
Akkutyp&
Zellenzahl
LADEN IM LITHIUM BALANCE MODEMit diesem Programm werden die LiPo-Zellen im Balance Mode geladen. Dadurch wird sichergestellt, dass alle Zellen im Akkupack die gleiche Spannungslage haben. Der Akku muss sowohl mit dem Ladeausgang als auch mit dem Balancer-Anschluss verbunden werden. Während des Ladens / Entladens überwacht das Ladegerät ständig die Spannung der einzelnen Zellen im Akkupack und gleicht die Spannungen an. HINWEIS: Wir empfehlen, Lithium-Akkus stets mit dem Balance Mode zu laden!
Auf der linken Seite wird in der 1. Zeile der gewählte Akkutyp und in der 2. Zeile der eingestellte Ladestrom angezeigt. Nach Einstellung von Ladestrom und Zellenzahl des Akkupacks, die START/ENTER Taste für 3 Sekunden drücken und gedrückt halten, um den Vorgang zu starten. (Ladestrom: 0.1~7.0A, Zellenzahl: 1~6) In dieser Ansicht wird das Messergebnis mit der Benutzereinstellung verglichen. R = Gemessene Zellenzahl vom Ladegerät S = Durch den Benutzer eingegebene Zellenzahl Wenn beide Werte gleich sind, kann der Ladevorgang gestartet werden. Falls nicht, die Taste BATT TYPE/STOP drücken, um den Vorgang abzubre-chen. Überprüfen Sie Ihre Eingabe und korrigieren sie diese. Während des Ladevorgangs werden die aktuellen Daten angezeigt. Mit der Taste BATT TYPE/STOP kann der laufende Vorgang beendet werden.
> 3 Sekunden
LadezeitLadestrom
Akku-Spannung
GeladeneKapazität
Akkutyp&
Zellenzahl

15
When charging a Lithium battery, the charging current will begin to drop as the battery reaches nominal voltage. By using the FAST charge option, the reduction of power will not be as great as it is with a standard charge. The benefit of this is a reduced charge time. The drawback is that the pack will most likely not charge to its full capacity.
When charging, the screen provides useful information like the charge rate, number of cells being charged, battery voltage and the amount of mAh, or capacity that the charger has put into the pack being currently charged. Press Batt type/Stop to stop the charging process at any time.
When a lithium battery sits unused, for long periods of time, it is best to give that pack a STORAGE charge. This will charge the battery to a nominal storage voltage (3.75V for LiPo, 3.75V for Lilo, 3.80V for LiHV and 3.3V for LiFe per cell). Storage mode will automatically determine if the battery needs to be charged or discharged to reach this level. The balance plug of the battery must be plugged into the charger for a proper storage charge to take place. Set the charge current and the battery voltage/cell count as you would any other
charge mode by pressing the START/ENTER button to select the parameter you wish to change, and use the INCREASE/ DECREASE buttons to adjust the value. When you wish to confirm your setting, press the START/ENTER button. To initiate the storage charge, press and hold START/ENTER for 3 seconds, confirm the cell count selected is the same that the charger is indicating and press the START/ENTER button to begin charging.
Like a standard charge sequence, the value in the lower left corner of the screen is the selected charge current, in the lower right, the voltage of the pack that will be charged. To change these values, press the START/ENTER key to cycle through the
adjustable settings. Use the increase/decrease buttons to change the values and use the START/ENTER button to confirm the values set. When ready to FAST charge, press and hold the START/ENTER button for 3 seconds to start the process. Note, when FAST charging, the lower left corner of the screen will show “FAS” and not the selected charge current.
LADEN IM LITHIUM FAST MODE
LADEN IM LITHIUM STORAGE MODE
Mit zunehmend voller werdendem Akku, wird der Ladestrom reduziert. Wenn der Ladestrom unter 20% des eingestellten Ladestroms fällt, wird der Ladevorgang beendet. Der Akku ist in diesem Fall nicht 100% geladen,die Ladezeit ist jedoch deutlich kürzer.
Auf der linken Seite wird in der 1. Zeile der gewählte Akkutyp und in der 2. Zeile der eingestellte Ladestrom angezeigt. Nach Einstellung von Ladestrom und Zellenzahl des Akkupacks, die START/ENTER Taste für 3 Sekunden drücken und gedrückt halten, um den Vorgang zu starten. Während des Ladevorgangs werden die aktuellen Daten angezeigt. Mit der Taste BATT TYPE/STOP kann der laufende Vorgang beendet werden.
Mit dieser Funktion können Lithium-Akkus auf eine bestimmte Kapazität geladen / entladen werden, um sie
längere Zeit ohne Benutzung zu lagern. Die folgenden Spannungen sind für die unterschiedlichen Typen festgelegt:
3.75V Lilon, 3.85V LiPo, 3.95V LiPo HV und 3.3V LiFe. Das Programm lädt / entlädt die Zellen auf die genannten
Spannungswerte (ca. 50% Kapazität des Akkus).
In dieser Ansicht werden der Strom und die Anzahl der Zellen eingestellt. Der
eingestellte Strom gilt als Lade- oder Entladestrom.
Während des Vorgangs werden die aktuellen Daten angezeigt. Mit der Taste
BATT TYPE/STOP kann der laufende Vorgang beendet werden.
Ladezeit Lade-strom
Akku-Spannung
GeladeneKapazität
Akkutyp&
Zellenzahl
> 3 Sekunden
> 3 Sekunden
Ladezeit Lade-strom
Akku-Spannung
GeladeneKapazität
Akkutyp&
Zellenzahl

16
LIPO HV MODE
Use this setting to discharge a Lithium pack. The charge current and pack voltage are adjustable using the methods shown previously in the charge and balance instructions. Never exceed 1C for the discharge rate and never use a final voltage lower than what is recommended by the battery manufacturer. The balance plug of the battery must be plugged into the charger for a proper discharge to take place. Press and hold the START/ ENTER button to confirm cell count, then press the button again a second time to start the discharge process.
The processor monitors the voltage of individual cells during ‘storage-mode’ and ‘discharge’ of a Lithium battery pack. It tries to regulate the voltages to be equal. For this feature, the balance plug of the battery pack must be connected to the balance port of the charger. If the voltage of any one or more cells varies abnormally during the procedure, it terminates the process with an error message. If this happens, the battery pack contains a bad cell, or there is a bad connection at the balance plug. You can easily know which one cell is bad by pressing the increase button with the error message on screen to show the
individual cell voltages. This method of viewing cell voltages can be used during any lithium battery charge, or discharge process provided the balance lead from the battery is plugged into the charger.
In this example, the charger found that the voltage of one of the cells in this 4S pack is too low.
By pressing the “increase” button when the error message is displayed, we can see that cell #4 is reading 2.18, which is below the minimum recommended 3.0 per cell. If all cells read 0.00, the balance lead from the battery may have come disconnected. Also check your balance port connection at the charger.
Select LiHV battery with standard Voltage 3.8V from setting program, doubleconfirm the battery type when charging. If it’s not LiHV battery, press Stop button to exit; if it’s confirmed LiHV battery, then go to the program.
Warning: The LiHV mode only supports 4.35V LiHV batteries. Do not use any other battery type in this mode. Never charge a 4.20V LiPo battery under this mode as it may cause the battery to catch fire or explode.
When discharging, the screen provides useful information like the discharge rate, number of cells being discharged, battery voltage and the amount of mAh, or capacity that the charger has removed from the pack being currently discharged. Press Batt type/Stop to stop the discharging process at any time.
Wählen Sie den Akkutyp LiHV wenn LiPo-Akkus mit einer Nennspannung von 3,8V geladen werden sollen. Bestätigen Sie den Akkutyp zweimal. Laden Sie niemals normale LiPo-Akkus mit dem LiHV-Mode! ACHTUNG: Der LiHV Mode darf nur LiPo-Akkus mit einer Lade- schluss-Spannung von 4,35 V verwendet werden!
Geben Sie den gewünschten Entladestrom und die Zellenzahl des Akkupacks ein. Anschließend die START/ENTER Taste für 3 Sekunden drücken und gedrückt halten, um den Vorgang zu starten.
Während des Vorgangs werden die aktuellen Daten angezeigt. Mit der Taste BATT TYPE/STOP kann der laufende Vorgang beendet werden.
ENTLADEN VON LITHIUM AKKUS
Während der Entladung werden die Zellen gleichzeitig auch ausbalan-ciert. Dazu muss der Akku mit dem Balancer-Anschluss am Ladegerät angeschlossen sein. Falls bei dem Vorgang die Spannung einer Zelle außerhalb der zulässigen Werte liegt, erscheint eine Fehlermeldung und der Vorgang wird abgebro-chen. Durch Drücken der INC Taste werden die Zelleneinzelspannungen an-gezeitgt. So kann ausgelesen werden, welche Zelle den Fehler verursacht hat.
In dem Beispiel ist die Spannung der vierten Zelle zu niedrig.
BALANCING BEIM ENTLADEN VON LITHIUM AKKUS
> 3 Sekunden
Ladezeit Lade-strom
EntladeneKapazität
Akkutyp&
Zellenzahl
Akku-Spannung

17
Use these programs only when charging a NiMH (Nickel-Metal-Hydride) or NiCd (Nickel-Cadmium) battery. To alter the value on the display, press the START/ENTER key. The charge current can now be altered by using the increase/decrease buttons. The value will be saved by pressing Start/Enter key once. To start the process, press and hold the START/ENTER button for more than 3 seconds.
With NiMH and NiCD packs, you do not have to indicate to the charger how many cells are in the pack. In auto “AUT” mode, simply set your charge current (no more than a 1C rating), press START/ENTER for 3 seconds and the charge process will begin. In manual “MAN” mode, it will charge the battery with the charge current you set at the display. NOTE: Each mode can be switched by pressing increase/decrease button simultaneously when the current field is blinking.
The screen will display the current state of charging. To stop the process, press the Batt type/Stop key once. An audible sound will indicate you have ended of process.
The screen will display the current state of discharge. You can alter the discharge current by pressing the START/ENTER key during the process. Once you change the current value, store it by pressing START/ENTER button again. To stop discharging press Batt type/Stop key once. An audible sound will indicate the process has ended.
Set discharge current on the left and final voltage on the right. The discharge current ranges from 0.1 to 1.0A and the final voltage ranges from 0.1 to 25.0V. Refer to your battery’s specifications to determine optimal discharge current and final voltage. To start the process, press START/ENTER key for more than 3 seconds.
NICKEL PROGRAMME (NIMH/NICD)
ENTLADEN VON NIMH / NICD AKKUS
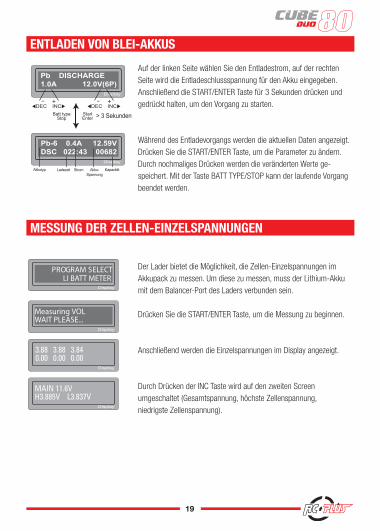
Auf der linken Seite wählen Sie den Entladestrom, auf der rechten Seite wird die Entladeschlussspannung für den Akku eingegeben. Anschließend die START/ENTER Taste für 3 Sekunden drücken und gedrückt halten, um den Vorgang zu starten.
Während des Entladevorgangs werden die aktuellen Daten angezeigt. Drücken Sie die START/ENTER Taste, um die Parameter zu ändern. Durch nochmaliges Drücken werden die veränderten Werte gespeichert. Mit der Taste BATT TYPE/STOP kann der laufende Vorgang beendet werden.
Mit diesem Programm können NiMH- oder NiCd-Akkus mit 1-15 Zellen geladen bzw. entladen werden. Für Schnellladung stets die Herstellerhinweise beachten!
LADEN VON NIMH / NICD AKKUS
Geben Sie den gewünschten Ladestrom ein. Anschließend die START/ENTER Taste für 3 Sekunden drücken und gedrückt halten, um den Vorgang zu starten.
Während des Ladevorgangs werden die aktuellen Daten angezeigt. Mit der Taste BATT TYPE/STOP kann der laufende Vorgang beendet werden.
> 3 Sekunden
Ladezeit Lade-strom
GeladeneKapazität
Akkutyp Akku-Spannung
> 3 Sekunden
Ladezeit Lade-strom
EntladeneKapazität
Akkutyp Akku-Spannung

18
Select the sequence based on the current state of the battery. If the battery is fully charged, use the Discharge/Charge sequence. If the battery needs to be charged, use Charge/ Discharge. Press START/ENTER to confirm the setting, then choose how many times to cycle the battery (1-5). Press and hold START/ENTER to begin the process.
To stop the process, press the Batt/Stop button once. Change the discharge or charge current by pressing START/ENTER while charging. An audible sound will indicate when the process has ended.
When the process is completed, use the increase/decrease buttons to see the amount of capacity that was charged/ discharged. By pressing increase/decrease again, the results of the next charge cycle will be shown.
Set up the charge current on the left and the nominal voltage of the battery on the right. The charge current ranges from 0.1A to 6.0A and the voltage should be matched with the battery being charged. Start the charge process by pressing the START/ ENTER button for more than 3 seconds.
The screen will display the current state of charging. To stop the process, press the Batt type/Stop key once. An audible sound will indicate you have ended of process.
This program is for charging Pb (lead-sulfuric acid) batteries with a nominal voltage from 2V to 20V.The optimal charge rate for a Pb battery is 1/10 of the capacity. Pb batteries must NOT be charged rapidly. Always follow the instructions supplied by the battery manufacturer.
When confident you have the correct settings for your Pb battery, press START/ENTER to begin editing the settings. Use the increase/decrease buttons to adjust the value and press START/ENTER to save the selected value.
LADEN & ENTLADEN IM NIMH / NICD CYCLE MODE
In diesem Programm werden automatische Ladezyklen (Laden > Entladen bzw. Entladen > Laden) bis zu fünfmal wiederholt ausgeführt. Dies ist sinnvoll, um einen Akku nach längerer Pause wieder zu aktivieren. Wählen Sie die Reihenfolge (Laden > Entladen oder Entladen > Laden) und legen Sie die Anzahl der Zyklen fest. Anschließend die START/ENTER Taste für 3 Sekunden drücken und gedrückt halten, um den Vorgang zu starten. Während des Lade-/Entladevorgangs werden die aktuellen Daten angezeigt. Mit der Taste BATT TYPE/STOP kann der laufende Vorgang beendet werden. Am Ende des Vorgangs können die Werte mit den Tasten INC oder DEC aufgerufen werden.
BLEI PROGRAMME (PB)
Auf der linken Seite wählen Sie den Ladestrom, auf der rechten Seite wird die Spannung des Akkus eingegeben. Anschließend die START/ENTER Taste für 3 Sekunden drücken und gedrückt halten, um den Vorgang zu starten.
Während des Ladevorgangs werden die aktuellen Daten angezeigt. Drücken Sie die START/ENTER Taste, um die Parameter zu ändern. Durch nochmaliges Drücken werden die veränderten Werte ges-peichert. Mit der Taste BATT TYPE/STOP kann der laufende Vorgang beendet werden.
LADEN VON BLEI-AKKUS
Mit diesem Programm können Blei-Akkus mit 1-10 Zellen (2-20V) geladen bzw. entladen werden. Der Ladestrom für Blei-Akkus beträgt in der Regel 1/10 der Kapazität. Blei-Akkus dürfen nicht schnellgeladen werden. Beachten Sie stets die Herstellerhinweise!
> 3 Sekunden
Ladezeit StromAkkutyp Akku-Spannung
Kapazität
> 3 Sekunden
StromAkkutyp Akku-Spannung
KapazitätLadezeit
19
Set discharge current on the left and final voltage on the right. The discharge current ranges from 0.1A to 7.0A.
Start the discharge process by pressing the START/ENTER button for more than 3 seconds.
The screen will display the current state of discharge. Alter the discharge current by pressing the START/ENTER button during charging. Once you have changed the value, save it by pressing START/ENTER again. To stop the process, press the Batt type/Stop key once. An audible sound will indicate you have ended the process.
Battery Meter testing can be a very valuable tool for battery diagnostics. To properly use the battery meter, you must connect both the charge lead and the balance lead to the charger.
To begin, press START/ENTER. The charger will provide the results in the form of a voltage reading. Press increase to check the total results of the pack. Press increase again to return to the single cell data.
The G.T. Pro Duo Charger provides a data storage and load feature for your convenience. This feature can store information for up to 5 batteries to be called back
for the process of charging or discharging without having to reprogram the charger. To alter the values, press START/ENTER, then change the blinking value using the increase/decrease buttons.
Auf der linken Seite wählen Sie den Entladestrom, auf der rechten Seite wird die Entladeschlussspannung für den Akku eingegeben. Anschließend die START/ENTER Taste für 3 Sekunden drücken und gedrückt halten, um den Vorgang zu starten. Während des Entladevorgangs werden die aktuellen Daten angezeigt. Drücken Sie die START/ENTER Taste, um die Parameter zu ändern. Durch nochmaliges Drücken werden die veränderten Werte ge- speichert. Mit der Taste BATT TYPE/STOP kann der laufende Vorgang beendet werden.
ENTLADEN VON BLEI-AKKUS
StromAkkutyp Akku-Spannung
KapazitätLadezeit
> 3 Sekunden
Der Lader bietet die Möglichkeit, die Zellen-Einzelspannungen im Akkupack zu messen. Um diese zu messen, muss der Lithium-Akku mit dem Balancer-Port des Laders verbunden sein. Drücken Sie die START/ENTER Taste, um die Messung zu beginnen. Anschließend werden die Einzelspannungen im Display angezeigt. Durch Drücken der INC Taste wird auf den zweiten Screen umgeschaltet (Gesamtspannung, höchste Zellenspannung,niedrigste Zellenspannung).
MESSUNG DER ZELLEN-EINZELSPANNUNGEN

20
PROFILSPEICHER ABLEGEN
Programm aufrufen Wählen Sie den Akku-Typ (LiPo/LiFe/LiIon/NiMH/NiCd/Pb), die Zellen- anzahl und die Kapazität des Akkus. Wählen Sie den Ladestrom. Wählen Sie den Entladestrom und die Entladeschlussspannung. Legen Sie ggf. die Reihenfolge (Laden > Entladen bzw. Entladen > Laden) und die Anzahl der Zyklen fest. Abschließend die START/ENTER Taste für 3 Sekunden drücken und gedrückt halten, um die Daten zu speichern.
Der Lader verfügt über 5 interne Profilspeicher, um Lade-/Entlade-Profile abzuspeichern. Diese Profilspeich-er bleiben auch nach dem Trennen des Laders vom Stromnetz erhalten. Um in einem Profilspeicherdie entsprechenden Parameterwerte abzulegen, gehen Sie wie folgt vor:
The value settings in this feature do NOT affect the charge or discharge process, but rather allows you to store statistics for commonly charged batteries to speed up the charger setup time. To use this feature, you will want to change the parameters to the exact specifications of the batteries you wish to store. This example shows a 12 cell, NiMH battery with a capacity of 3000mAh.
Set up the charge current for manual charge mode, or the current limit for automatic charge mode. Each mode can be changed by pressing the increase/decrease buttons at the same time when the “current” field is blinking.
Setting up discharge current and final voltage.
Setting up the sequence of charge and discharge as well as the amount of times to cycle.
Saving the data.
This program will call back the data that was stored during the “Save Data” program. To load the data, press START/ENTER once. Change the data number to the battery you wish to recall using the increase/decrease buttons, then press START/ENTER for 3 seconds.Program selectSelect the data number you wish to load. The data displayed on screen is matched with the number selected.
Loading the data.
Set discharge current on the left and final voltage on the right. The discharge current ranges from 0.1A to 7.0A.
Start the discharge process by pressing the START/ENTER button for more than 3 seconds.
The screen will display the current state of discharge. Alter the discharge current by pressing the START/ENTER button during charging. Once you have changed the value, save it by pressing START/ENTER again. To stop the process, press the Batt type/Stop key once. An audible sound will indicate you have ended the process.
Battery Meter testing can be a very valuable tool for battery diagnostics. To properly use the battery meter, you must connect both the charge lead and the balance lead to the charger.
To begin, press START/ENTER. The charger will provide the results in the form of a voltage reading. Press increase to check the total results of the pack. Press increase again to return to the single cell data.
The G.T. Pro Duo Charger provides a data storage and load feature for your convenience. This feature can store information for up to 5 batteries to be called back
for the process of charging or discharging without having to reprogram the charger. To alter the values, press START/ENTER, then change the blinking value using the increase/decrease buttons.
AkkutypAkku-Spannung
KapazitätSpeicher-Platz
> 3 Sekunden
> 3 Sekunden

21
PROFILSPEICHER AUFRUFEN
The value settings in this feature do NOT affect the charge or discharge process, but rather allows you to store statistics for commonly charged batteries to speed up the charger setup time. To use this feature, you will want to change the parameters to the exact specifications of the batteries you wish to store. This example shows a 12 cell, NiMH battery with a capacity of 3000mAh.
Set up the charge current for manual charge mode, or the current limit for automatic charge mode. Each mode can be changed by pressing the increase/decrease buttons at the same time when the “current” field is blinking.
Setting up discharge current and final voltage.
Setting up the sequence of charge and discharge as well as the amount of times to cycle.
Saving the data.
This program will call back the data that was stored during the “Save Data” program. To load the data, press START/ENTER once. Change the data number to the battery you wish to recall using the increase/decrease buttons, then press START/ENTER for 3 seconds.Program selectSelect the data number you wish to load. The data displayed on screen is matched with the number selected.
Loading the data.
> 3 Sekunden
Um die gespeicherten Werte aus dem Profilspeicher aufzurufen, gehen Sie wie folgt vor:
Programm aufrufen Anzeige des Speicherplatzes mit Akku-Typ, wählen Sie den gewünschten Speicherplatz aus. Drücken und halten Sie die ENTER-START-TASTE für 3 Sekunden, um den Speicher aufzurufen.
Während des Ladevorgangs können zahlreiche Informationen durch Drücken der INC- / DEC-Tasteim Display angezeigt werden. Dabei können die Zellen-Einzelspannungen und zahlreiche System- einstellungen aufgerufen werden.
Gewählte Lade-/Entlade-Schlussspannung
Anzeige der aktuellen Kapazitätsgrenze
Anzeige der maximal zulässigen Ladezeit
ANZEIGEN WÄHREND DES LADE-/ENTLADEVORGANGS
Final voltage for selected cell type.
Displayed capacity cut-off function is turned on and the current value the capacity is set to.
Displayed safety timer is turned on and the duration is setin minutes.
Displayed temperature cut-off function is turned on.
The external temperature is displayed when the temp probe is used.
Present input voltage.
The battery is connected using the balance lead and the voltages of the three individual cells is being displayed. The program will display the individual voltage of up to 6 cells. To view this screen when charging/discharging, pressthe increase button.
Here is a list of all warning and error messages the charger may display. Please refer to this list should you have any difficulty charging.

22
Incorrect polarity detected.
Battery connection was interrupted.
Short-circuit of the output termination.
Input voltage is wrong.
The voltage is lower than the setting currently selected.
Please check the number of cells in the battery pack.
The charger has an internal error. Please contact customer service.
Voltage of the pack is too low to charge safely. Please check the voltages of each cell.
Voltage of the pack is too high to charge safely. Please check the voltages of each cell.
Connector error. Please check the connections at the battery and charger.
Internal temperature of the charger is too high. Allow time for the charger to cool.
The processor cannot control the input current. Contact G.T. customer service.
A single cell in the connected battery is below safe voltage levels. Please check the voltage of each cell.
A single cell in the connected battery is too high. Please check the voltage of each cell.
Das Ladegerät verfügt über zahlreiche Sicherheitsfunktionen, um einen sicheren Betrieb zu gewährleisten. Im Falle einer Fehlfunktion, wird diese als Fehlermeldung im Display angezeigt und akustisch signalisiert.
Akku ist verpolt angeschlossen.
Verbindungsfehler zum Akku, prüfen Sie das Ladekabel.
Kurzschluss am Ladeausgang.
Die Eingangsspannung ist niedriger als der gewählte Wert.
Falsche Einstellung der Zellenzahl im Akkupack
WARN- & FEHLERMELDUNGEN
Final voltage for selected cell type.
Displayed capacity cut-off function is turned on and the current value the capacity is set to.
Displayed safety timer is turned on and the duration is setin minutes.
Displayed temperature cut-off function is turned on.
The external temperature is displayed when the temp probe is used.
Present input voltage.
The battery is connected using the balance lead and the voltages of the three individual cells is being displayed. The program will display the individual voltage of up to 6 cells. To view this screen when charging/discharging, pressthe increase button.
Here is a list of all warning and error messages the charger may display. Please refer to this list should you have any difficulty charging.
ANZEIGEN WÄHREND DES LADE-/ENTLADEVORGANGS
Anzeige des Wertes für die Temperaturabschaltung, falls aktiv.
Anzeige des externen Temperatur-Sensors (optional erhältlich)
Anzeige der aktuellen Eingangsspannung
Anzeige der Zellen-Einzelspannungen bei Lithium-Akkus.Hierzu muss der Akku mit dem Balancer-Port des Laders verbunden sein.

23
Interner Fehler, Lader vom Strom trennen und erneut anschließen.
Die Spannung des Akkus ist geringer, als eingestellt.
Die Spannung des Akkus ist höher, als eingestellt.
Unterbrochene Verbindung zum Akku, Anschlusskabel prüfen.
Die interne Geräte-Temperatur ist zu hoch.
Interner Fehler, Lader vom Strom trennen und erneut anschließen.
Die Spannung einer Zelle im Akkupack ist zu niedrig.
Die Spannung einer Zelle im Akkupack ist zu hoch.
WARN- & FEHLERMELDUNGEN
Incorrect polarity detected.
Battery connection was interrupted.
Short-circuit of the output termination.
Input voltage is wrong.
The voltage is lower than the setting currently selected.
Please check the number of cells in the battery pack.
The charger has an internal error. Please contact customer service.
Voltage of the pack is too low to charge safely. Please check the voltages of each cell.
Voltage of the pack is too high to charge safely. Please check the voltages of each cell.
Connector error. Please check the connections at the battery and charger.
Internal temperature of the charger is too high. Allow time for the charger to cool.
The processor cannot control the input current. Contact G.T. customer service.
A single cell in the connected battery is below safe voltage levels. Please check the voltage of each cell.
A single cell in the connected battery is too high. Please check the voltage of each cell.
24
SERVICE & GEWÄHRLEISTUNG
Alle RC-PLUS Artikel sind mit der gesetzlich vorgeschriebenen 24-monatigen Gewähr-leistung ausgestattet. Berechtigter Gewährleistungsanspruch muss bei Ihrem Händler geltend gemacht werden, der der Gewährleistungsgeber und für die Abwicklung zuständig ist. In diesem Zeitraum werden ggf. auftretende Funktionsmängel, Fabrikations- und Materialfehler kostenlos behoben. Weitergehende Ansprüche, wie beispielsweise bei Folgeschäden, sind ausgeschlossen.
Die Einsendung zu unserem Service muss frankiert erfolgen. Unfrei eingesandte Pa-kete werden von uns nicht angenommen. Der Rücktransport zu Ihnen erfolgt ebenfalls frei. Für Transportschäden und Verlust Ihrer Sendung übernehmen wir keine Haftung.
Bitte senden Sie Ihr Gerät an folgende Service-Anschrift: RC-PLUS, a division of JSP Group Intl BVBAService-AbteilungGeelseweg 80B-2250 Olen (Belgien) Um Ihre Gewährleistungsansprüche bearbeiten zu können, müssen folgende Voraus-setzungen erfüllt sein:
• Legen Sie Ihrer Sendung den Kaufbelg bei.• Ausführliche Fehlerbeschreibung liegt der Sendung bei.• Das Gerät wurde gemäß der Bedienungsanleitung und dem vorgesehenen Einsatzzweck eingesetzt. • Es wurde ausschließlich empfohlenes Zubehör verwendet.• Feuchtigkeitsschäden, Fremdeingriffe, Verpolung, Überlastungen und mechanische Beschädigungen liegen nicht vor.

25
ZULASSUNG & KONFORMITÄT
ENTSORGUNGDieses Symbol bedeutet, dass elektrische und elektronische Geräte am Ende ihrer Nutzungsdauer vom Hausmüll getrennt, entsorgt werden müssen. Entsorgen Sie das Gerät bei Ihrer örtlichen Sammelstelle oder Ihrem Recycling-Zentrum. Dies gilt für alle Länder in der EU und anderen europäischen Ländern mit lokalem Sammelsystem.
ZULASSUNGSBESTIMMUNGENAls Zeichen, dass die Geräte den gültigen Europäischen Normen entspre-chen, wird das CE-Symbol angebracht. Diese Kennzeichnung ist für alle Länder in der Europäischen Union gleich. Dieses Produkt kann in allen EU-Ländern und in der Schweiz betrieben werden.
KONFORMITÄTSERKLÄRUNGRC-PLUS erklärt hiermit, dass sich das vorliegende Gerät in Übereinstim-mung mit den grundlegenden Anforderungen und anderen relevanten Vorschriften der entsprechenden EU-Richtlinien befindet. Auf unserer Website www.rcplus.eu kann die Konformitätserklärung heruntergeladen werden.
HINWEIS ZUR BATTERIEVERORDNUNGDefekte Akkus sind Sondermüll und dürfen nicht über die Mülltonne ent-sorgt werden. Im Fachhandel, wo Sie die Akkus erworben haben, stehen Batterie-Recycling-Behälter für die Entsorgung bereit. Der Fachhandel ist zur Rücknahme verpflichtet.

26
ZULASSUNG & KONFORMITÄT
Declaration of Conformity
RC-PLUS CUBE DUO 80 AC/DC
RC-PLUS, a division of JSP Group Intl BVBA declares under sole responsibility that the battery charger CUBE DUO 80 AC/DC to which this declaration relate, conforms with the following LVD standards;
EN 60335-1:2012 +A11:2014EN 60335-2-29:2004 +A2:2010
The battery charger CUBE DUO 80 AC/DC also conforms with the following EMC standards;
EN 55014-1:2006 +A1:2009 +A2:2011EN 55014-2:1997 +A1:2001 +A2:2008EN 61000-3-2:2014EN 61000-3-3:2008
observing the provision of 2004/108/EG directive of 15 December 2014. The battery charger also conforms with the requirements in;
EN 62233:2008
Olen - Belgium12 December 2016
Stefan EngelenCeo

27
FÜR IHRE NOTIZEN

RC-Plus is distributed by Pro ModelsGeelseweg 80 • 2250 Olen • Belgium • Tel: +32 14 25 92 83