Gebrauchsanweisung Instructions for use - DENTAURUM · der Keramik Schichtschema DE. 12 carmen ®...
48
carmen ® gebrauchsanweisung / instructions for use de / en Gebrauchsanweisung Instructions for use
Transcript of Gebrauchsanweisung Instructions for use - DENTAURUM · der Keramik Schichtschema DE. 12 carmen ®...

carmen® gebrauchsanweisung / instructions for use de / en
Gebrauchsanweisung Instructions for use

2 carmen® gebrauchsanweisung de
Sehr geehrte Kundin, sehr geehrter Kunde
Mit der Wahl von Dentaurum-Produkten haben Sie sich für harmonisch aufeinander abge-stimmte Qualitätsprodukte zur Herstellung von ästhetischen Keramikarbeiten entschieden.
Basis für die Herstellung keramischer Arbeiten ist exaktes Arbeiten unter Berücksichtigung der Carmen® Gebrauchsanweisung.
In dieser Broschüre finden Sie viele praktische Tipps zur Verarbeitung unserer Produkte. Weitere Hinweise zur Verarbeitung der Carmen® Keramik finden Sie in unserer Broschüre „Verarbeitungstipps für Carmen® Keramik”, REF 989-677-10.
Sollten Sie dennoch einmal Fragen bei der Verarbeitung unserer Produkte haben, möchten wir Ihnen gerne hilfreich zur Seite stehen.
Für Ihre Fragen zur Verarbeitung unserer Produkte steht Ihnen unser Customer Support
gerne zur Verfügung.
Hotline Tel.-Nr. + 49 72 31 / 803 - 410
Informationen und Gebrauchsanweisungen zu den Dentaurum-Keramik-Systemen finden Sie
im Internet unter
www.dentaurum.de.
DEDE

carmen® gebrauchsanweisung de 3
Grundsätzliches ...............................................................................4Vorteile der Carmen® Keramik/WAK-Werte ......................................5Anwendungsgebiete der Keramikmassen ........................................6Gerüstvorbereitung ..........................................................................7Anwendung des Flash Opakers ........................................................8Anwendung des Carmen® Universal-Pastenopakers ..........................9Anwendung der Schulter- und Zervikalmassen ...............................10Schichtung der Keramik – Zuordnung der Schneidemassen .................11Schichtung (Standard) – Arbeitsschritte ..........................................12Anwendung der Flüssigkeiten ........................................................14Anwendung der Stains Universal ...................................................15Ofenkontrolle – Ofenreinigung ......................................................16Brenntabelle ..................................................................................17Anwendung der EspriVest Ultra Stumpfeinbettmasse .....................18Dentaurum-Dublierküvette ............................................................20Herstellung von Inlays, Onlays und Veneers ....................................21Herstellung von Vollkeramikkronen ................................................23
Inhaltsverzeichnis
DEDE
4 carmen® gebrauchsanweisung de
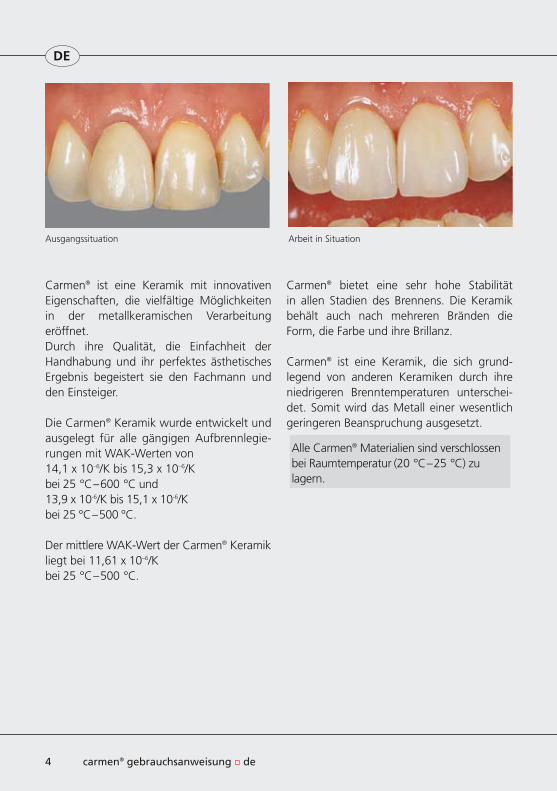
Ausgangssituation Arbeit in Situation
Carmen® ist eine Keramik mit innovativen Eigenschaften, die vielfältige Möglichkeiten in der metallkeramischen Verarbeitung eröffnet.Durch ihre Qualität, die Einfachheit der Handhabung und ihr perfektes ästhetisches Ergebnis begeistert sie den Fachmann und den Einsteiger.
Die Carmen® Keramik wurde ent wickelt und ausgelegt für alle gängigen Aufbrennlegie-rungen mit WAK-Werten von14,1 x 10–6/K bis 15,3 x 10⁻⁶/K bei 25 °C – 600 °C und 13,9 x 10⁻⁶/K bis 15,1 x 10⁻⁶/K bei 25 °C – 500 °C.
Der mittlere WAK-Wert der Carmen® Keramik liegt bei 11,61 x 10⁻⁶/K bei 25 °C – 500 °C.
Carmen® bietet eine sehr hohe Stabilität in allen Stadien des Brennens. Die Keramik behält auch nach mehreren Bränden die Form, die Farbe und ihre Brillanz.
Carmen® ist eine Keramik, die sich grund- legend von anderen Keramiken durch ihre niedrigeren Brenntem peraturen unterschei-det. Somit wird das Metall einer wesentlich geringeren Beanspruchung ausgesetzt.
Alle Carmen® Materialien sind verschlossen bei Raumtemperatur (20 °C – 25 °C) zu lagern.
DE

Legierungsbereich für Carmen® u. CCS
carmen® gebrauchsanweisung de 5
1. Brenn-, Form- und Kantenstabilität.
Keine Verkugelung, kein Verlaufen der Kanten.
2. Höchste Farbstabilität
3. Farbbrillanz
– die bestechende Brillanz – die hohe Transluzenz und Tiefenwirkung – die steuerbare Opazität – die natürliche Fluoreszenz – die stabile Opaleszenz – die hohe Lichtleitfähigkeit
und die natürliche Lichtbrechung an der Schneide kante von Carmen® sind das Geheimnis von Prismen effekten in der mikro kristallinen Struktur des Basis- materials.
4. Niedrige Brenntemperatur
Die niedrige Brenntemperatur von 870 °C beim Dentinbrand I und II verhindert eine mögliche Verformung des Metallgerüstes.
5. Legierungsunabhängigkeit
Carmen® eignet sich für alle gängigen Auf-brenn legierungen mit WAK-Werten von 14,1 x 10⁻⁶ /K bis 15,3 x 10⁻⁶ /K bei 25 °C – 600 °C und 13,9 x 10⁻⁶/K bis 15,1 x 10⁻⁶/K bei 25 °C – 500 °C. Sie ist besonders geeignet für sensible, hochgoldhaltige Legierungen.
6. Leichte Verarbeitung
Beste Modellierfähigkeit, hohe ästhetische Wirkung bei überschaubarer Produktpalette.
Darauf kommt es an.
Vorteile der Carmen® Keramik
8 9,6 10 13 13,5 14 14,5 15 15,5 16 16,5 x10⁻⁶/ K WAK (25 – 500 °C)
Wärmeausdehnungskoeffizienten (WAK) für Aufbrennwerkstoffe
Ni-Cr• remanium® CSe
• Ti
• ZrO2
• Al2O3
• DentAurum Bio
Legierungsbereich Triceram®
• remanium® 2000+ • remanium® star • remanium® 2001 • remanium® secura
Co Cr
Pd-Ag
Au-Pt
Pd-Cu
Legierungsbereich für dentCeram LF, u. dentCeram LF press
• remanium® LFC • DentAurum LFC
LFC-Legierungen (EM, EMF)
13,5 14 14,5 15 15,5 16 x10-6/KWAK (25 – 600 °C)
DE

6 carmen® gebrauchsanweisung de
Inzisal opalisierend 57-60 (IO):– opalisierend:
bläulicher Effekt im reflektierten Licht, orange- farbener Effekt im durchgehenden Licht
– zur Schneide-Wechselschichtung– verstärkt natürliche Lichtbrechung– Anwendung im Inzisalbereich
Transparent opalisierend 64 (TO):– blau-opalisierende Masse– Anwendung im Inzisalbereich
Neutral Transparent opalisierend 65 (NTO):– weiß-opalisierende Masse– zur Verstärkung der natürlichen
Opaleszenz und der Transparenz– Anwendung im Inzisalbereich
Inzisal intensiv 62 (II):– sehr opake, weiße Masse– zur Darstellung von entmineralisierten
Zonen– geeignet für Randleisten im
Molaren bereich
Inzisal intensiv 63 (II):– honigfarbene Masse– zur Gestaltung von Alterscharakteristiken– Anwendung im Inzisalbereich
Dentin intensiv (DI):– intensiv orange-farbene Masse– für Mamelonspitzen– zur Dentincharakterisierung– zum Einlegen im Bereich
der Zentral fissuren
Zervikalmasse (C):– bewirkt stärkere Farbintensität
im Zervikalbereich– mit entsprechender Dentinfarbe
abmischbar
Arteline (AL):– zur Erzeugung farblicher Tiefen– zur Nachahmung natürlicher Effekte im
Dentinkörper- und Mamelonbereich
Opak Dentin intensiv (ODI):– zur Steuerung der Helligkeitswerte– Anwendung im Dentin-
und Approximal bereich
Gingivalmasse (G/GD):– Aufbau und Rekonstruktion von
Zahnfleisch- und Papillensituation
Anwendungsgebiete der Keramikmassen
DE

carmen® gebrauchsanweisung de 7
Beachten Sie bitte unbedingt die Vor -schriften des Legierungsherstellers!Die Stärke des Metalls sollte 0,3 mm nicht unterschreiten.
Hinweis:Wir empfehlen das Ausarbeiten mit Hart-metall fräsen, Nachstrahlen mit Aluminium-oxid der Körnung min. 110 µm und eine sorgfältige Reinigung unter fließendem Wasser oder Dampfstrahlen.Vermeiden Sie scharfe Ecken und Kanten. Um ein Abscheren der Kanten zu vermeiden, sollte der Inzisalaufbau nicht mehr als 2 mm betragen. Ansonsten gezielte Unterstützung der Keramik vom Gerüst her vornehmen. Gerüst so gestalten, dass eine möglichst gleichmäßige Schichtstärke der Keramik erreicht wird.
Besondere Eigenschaften des Aesthetic Universal Bonders:– Steigerung der Verbundfestigkeit zwischen
Metall und Keramik– der warme Farbton des Aesthetic
Universal Bonders verbessert die optische Farbwirkung der Verblendkeramik
– optimale Farbgestaltung im Kronenrand-bereich
Lieferprogramm: Set mit Spritze (4 g Inhalt), Pinsel und Anleitung REF 292-200-15
Spritze (4 g Inhalt) REF 292-200-10
Vorbereitetes Gerüst
Gerüstvor- bereitung
Profitieren Sie von den hervorragenden Eigenschaften des Aesthetic Universal Bonders:
DE

8 carmen® gebrauchsanweisung de
Der Flash Opaker ist für edelmetall- freie Aufbrennlegierungen und kann für nahezu alle gängigen EM-Aufbrenn- legierungen ver wen det werden.
Der Flash Opaker besteht aus einer Basis- paste und entsprechend den Zahnfarben (A1 – D4) eingefärbten Streupulvern.
Der Flash Opaker hat mit nur einem Brand folgende Eigenschaften:– reduzierte Oxidbildung– keine Verfärbungen– gutes Abdecken
Verarbeitung:Auf das trockene Gerüst Basispaste wie bei Pastenopakern möglichst dünn und deckend aufbringen bis keine dunklen Stellen durch schimmern. Pfützen- und Trop-fenbildung sind zu vermeiden.
Aufstreuen des Flash Opaker-Pulvers auf den noch feuchten Untergrund über dem Auf fangtrichter mit Becher.
Überschüssiges Pulver durch leichtes Riffeln entfernen. Verblendfläche muss komplett mit Pulver bedeckt sein. Oberfläche darf nicht feucht schimmern.
Vermeiden Sie beim Aufstreuen, dass Pulver-partikel auf die Innenseite der Krone geraten.
Die Opakeroberfläche muss nach dem Brand matt und rau, nicht glänzend aussehen.
Behälter nach Gebrauch verschließen. Einge-dickte Basispaste nur mit Flash Opaker- Flüssigkeit wieder aufbereiten.
Tipp für den Praktiker: Edelmetallfreie und stark oxidierende Aufbrenn legierungen sind nach jedem Brand auch von der Innenseite unter fließendem Wasser abzu-bürsten, um Verfärbungen vorzubeugen.
In Verbindung mit Flash Opaker keine Beizmittel verwenden.
Flash Opaker
Anwendung des Flash Opakers
DE

carmen® gebrauchsanweisung de 9
Carmen® Universal-Pastenopaker ist univer-sell einsetzbar bei allen EM- und EM-freien Aufbrennlegierungen sowie für Galvano.
Er hat folgende Vorteile:– direkte Anwendung– in der Regel 1 Brand ausreichend– niedrigere Brenntemperatur– geringe Schichtstärke– gutes und dichtes Abdecken des
Metallunterbaus– leichtes, unkompliziertes Auftragen– seidiger Glanz
Verarbeitung:Vorbereitung des Carmen® Universal-Pasten-opakers:Den ersten Millimeter der Paste nach Heraus-drücken aus der Spritze nicht verwenden, wenn sie einen Überschuss an Flüssigkeit enthält. Die Opakermasse soll eine cremige
Konsistenz aufweisen.
Auftrag des Carmen® Universal-Pasten- opakers:Opaker gemäß der gewünschten Zahnfarbe gleichmäßig und deckend auf das Gerüst auftragen. Vermeiden Sie ein Zusammen-laufen im Interdentalbereich. Nach dem Brand soll die Oberfläche glatt und leicht glänzend sein. In der Regel ist ein Brand ausreichend. Benötigen Sie einen zweiten Brand, kann das gleiche Brennprogramm durchgeführt werden.
Hinweis:Pinsel für Carmen® Universal-Pastenopaker nur mit Carmen® Universalopaker-Flüssig keit reinigen, nicht mit Wasser in Berührung bringen.
Auftrag des Universal-Pastenopakers vor dem Brand
Seidenmatter Glanz nach dem Brand
Anwendung des Carmen® Universal-Pastenopakers
DE

10 carmen® gebrauchsanweisung de
SchultermassenDie Carmen® Keramik bietet vier Schulter-massen, die in die Farb gruppen A-B-C-D unterteilt sind. Mit der Schultermasse „weiß“ können alle Farbabstufungen von A1 bis D4 durch entsprechendes Mischen gemäß neben- stehender Mischtabelle eingestellt werden. Das Zumischen der Schultermasse „transpa-rent“ verstärkt die Transparenz der Schulter. Weitere individuelle Modifikationen können mit den Schultermassen „gelb“ und „orange“ erzielt werden.Zum Anmischen verwenden Sie die Schulter-massen-Flüssigkeit Universal.
A B C D WEISSA 1 50 % 50 %A 2 65 % 35 %A 3 70 % 30 %A 3,5 100 %A 4 100 % B 1 35 % 65 %B 2 80 % 20 %B 3 90 % 10 %B 4 100 %C 1 50 % 50 %C 2 75 % 25 %C 3 85 % 15 %C 4 100 % D 2 60 % 40 %D 3 60 % 30 % 10 %D 4 100 %
A 1
–50 % A2
+50 % CA
50 % A3+
50 % CA
50 % A3,5
+50 % CA
CA –50 % B2
+50 % CB
50 % B3+
50 % CBCB –
50 % C2+
50 % CC
50 % C3+
50 % CCCC CD CD CD
A 2 A 3 A 3,5 A 4 B 1 B 2 B 3 B 4 C 1 C 2 C 3 C 4 D 2 D 3 D 4
Anwendung der Schulter- und Zervikalmassen
ZervikalmassenBei Tangential-Präparationen stehen Zervikal-massen CA, CB, CC und CD zur Verfügung. Sie verstärken die Farbe im zer vi kalen Bereich der Krone, wenn nicht mit Schulter-
massen ge arbeitet werden kann. Sie müssen mit dem der Zahn farbe entsprechen-den Dentin gemischt werden (gemäß Misch tabelle).
Schultermasse nach erstem Brand
DE

carmen® gebrauchsanweisung de 11
Auswahl der Keramik-Massen nach ausge-suchter Zahnfarbe. Den Schichtaufbau entnehmen Sie dem abgebildeten Schema.
Hinweis:Zur Vermeidung einer klaren Abgrenzung des Metallunterbaus wird mit Opak Dentin (OD) gearbeitet. Dies verhindert ein Durch scheinen des opakisierten Metallunterbaus. Mit Opak Dentin-Massen kann ebenfalls der Hellig-keitswert individuell gesteuert werden (durch Mischen von Dentin- und Opak Dentin-Massen). Bei einer Schichtstärke ab 0,9 mm kann auf Opak Dentin verzichtet werden. Hinweise zur Anwendung der Flüssigkeiten und Stains Universal finden Sie auf den Seiten 14 – 15.
Carmen® ist ein transluzentes Keramik- material. Die NT-Masse ist daher sehr sparsam zu ver wenden.
Zuordnung der Schneidemassen:
A 1 IT 57 B 4 IT 60 A 2 IT 57 C 1 IT 60 A 3 IT 59 C 2 IT 59 A 3,5 IT 59 C 3 IT 59 A 4 IT 60 C 4 IT 60 B 1 IT 57 D 2 IT 60 B 2 IT 59 D 3 IT 59 B 3 IT 59 D 4 IT 59
Mit IT 58 können im Seitenzahnbereich zusätzliche Graueffekte erzielt werden.
Inzisalmasse
Dentin
Opak Dentin
Schultermasse
Opaker
Neutral transparent (bei Bedarf)
Schichtung der Keramik
Schichtschema
DE

12 carmen® gebrauchsanweisung de 12
1. Auftrag Opak Dentin 2. Schichten des Dentins
3. Zurückschneiden des Dentins 4. Ergänzen mit Inzisalmasse
5. Ergebnis nach dem ersten Brand
Schichtung (Standard)Arbeitsschritte1. Dentinbrand
DE

carmen® gebrauchsanweisung de 13
9. Glanzbrand palatinal8. Glanzbrand labial
7. Finishing nach dem zweiten Brand6. Zustand vor dem zweiten Brand
Schichtung (Standard)ArbeitsschritteKorrektur/Finish
DE
14 carmen® gebrauchsanweisung de 14
Modellier-Flüssigkeit LV+ Universal:– Standard-Flüssigkeit zum
Anmischen der Massen
Modellier-Flüssigkeit MV Universal: – zur Erhöhung der Plastizität– insbesondere bei trockenem,
warmen Klima– zur Verlängerung der
Modellierbarkeit
Universal Pasten-Flüssigkeit:– zur Einstellung der Viskosität
des Pastenopakers
Carmen® Flash Opaker Flüssigkeit:– zum Verdünnen der Flash
Opaker-Basispaste Vor Gebrauch gut schütteln!
Stains Universal-Flüssigkeit:– zum Anrühren der Stains Universal– für den Glanzbrand
Schultermassen-Flüssigkeit Universal:– zum Anmischen der Schultermassen
Kontrast-Marker:– zur Einfärbung angemischter Massen– für besseren Kontrast bei Schichtung– verbrennt rückstandslos– Viskosität entspricht Modellier-
Flüssigkeit LV Universal
Hinweis: Universal-Flüssigkeiten sind auch in Kombi-nation mit dem Triceram® System anwend-bar.
Anwendung der Flüssigkeiten
DE

carmen® gebrauchsanweisung de 15
Mit Stains-Materialien können farbliche Modifikationen vorgenommen werden. Sie können eingelegt und eingemischt werden. Stains sind bis max. 10 Gew.% den Keramikmassen zumischbar (SM, OD, D, IT, IO, NT + G). Desweiteren sind diese Massen mit der Stains Universal-Flüssigkeit auch zum Bemalen der Keramikoberfläche geeignet.Individuelle Charakteristika und eine besondere farbliche Tiefe zeichnen dieses Material aus.
Body Stains A Stains 7 dunkelrosa Body Stains B Stains 8 lila Body Stains C Stains 9 blau Stains 0 neutral Stains 10 grau Stains 1 weiß Stains 11 olivgrün Stains 2 vanille Stains 12 olivgelb Stains 3 gelb Stains 13 mittelbraun Stains 45 orange plus Stains 14 rotbraun Stains 6 rosa Stains 15 schwarz
Hinweis: Stains Universal sind auch in Kombination mit dem Triceram® und CCS System anwendbar (ein mischen und bemalen).
Anwendung der Stains Universal
DE

16 carmen® gebrauchsanweisung de
Um die Brenntemperatur Ihres Ofens abzu-stimmen, empfehlen wir einen Probebrand, da nur dadurch die Beurteilung der korrek ten Brandführung möglich ist. Benutzen Sie dazu NT-Masse (Neutral transparent), ange mischt mit der Modellierflüssigkeit LV Universal und brennen Sie bei folgenden Werten.• Basistemperatur: 500 °C • Trockenzeit: 8 min • Temperaturanstieg: 50 °C·min-1 • Vakuumbeginn: 500 °C • Vakuumende bei erreichter Endtemperatur von 870 °C • Haltezeit 1 Minute ohne Vakuum Brenn probe auf Platinfolie legen, nicht auf Brennwatte, da sonst die Gefahr von Trübung besteht. Die Temperatur des Ofens ist in Ordnung, wenn die Brennprobe klar und durchscheinend mit scharfen Kanten aus dem Ofen kommt. Bei zu hoher End-temperatur ist die Probe hochglänzend und zeigt keine scharfen Kanten mehr. Bei zu niedriger Endtemperatur ist die Probe milchig weiß. Bitte die Endtemperatur entsprechend in 10 °C Schritten senken bzw. anheben. Erneute Probe brennen.
Hinweis:Oxidbrand nach Herstellerangaben. Die An-gaben können je nach Art des Keramikofens variieren.
Lötung nach dem Brand:• 2er Lot: (745 °C) • Basistemperatur: 200 °C• Trockenzeit: 8 min• Temperaturanstieg: 55 °C·min-1
• Endtemperatur: 810 °C• Haltezeit: 30 Sekunden• Ohne Vakuum• Keine Langzeitabkühlung
Keramik-Brennöfen sollen regelmäßig gereinigt werden, um Ablagerungen an den Innen wänden der Brennkammer zu ent- fernen.
Deshalb empfehlen wir:
• Ofenreinigungsbrand mit Kohlefaser- plätchen durchführen, REF 260-317-00
• Brenngutträger mitreinigen • Basistemperatur: 600 °C • Trockenzeit: 1 Minute • Aufheizgeschwindigkeit: 100 – 120 °C·min-1 • Endtemperatur: 1050 °C • Haltezeit: 10 Minuten
Brennprogramm ohne Vakuum durchführen. Angaben der Ofenhersteller beachten!
Ofen geschlossen halten. Um Feuchtig-keit in der Brennkammer weitgehend zu vermeiden, Ofen stets nach Gebrauch schließen, gegebenenfalls auf Nacht-modus umstellen.
Ofenreinigung:Ofenkontrolle:
DE
carmen® gebrauchsanweisung de 17
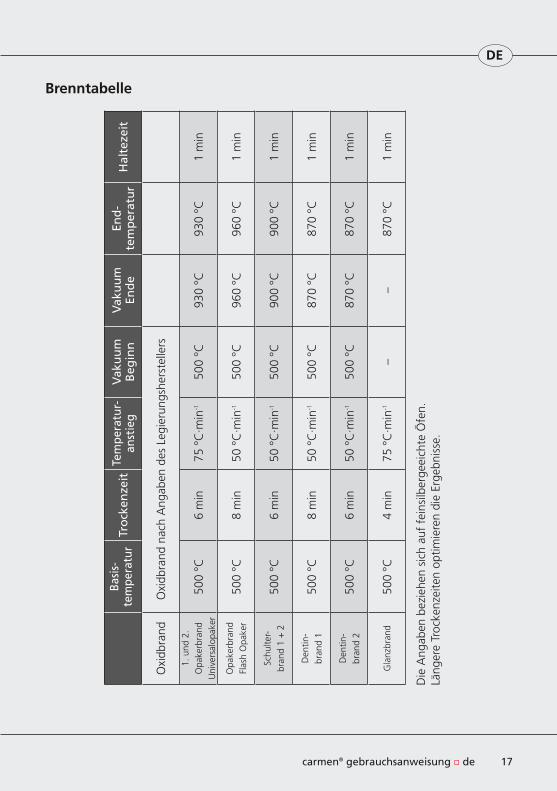
Die
Ang
aben
bez
iehe
n si
ch a
uf f
ein s
ilber
geei
chte
Öfe
n.
Läng
ere
Troc
kenz
eite
n op
timie
ren
die
Erge
bnis
se.
Brenntabelle
Basi
s-
tem
pera
tur
Tro
cken
zeit
Tem
pera
tur-
an
stie
g V
aku
um
B
egin
nV
aku
um
En
de
End
- te
mp
erat
ur
Hal
teze
it
Oxi
dbra
ndO
xidb
rand
nac
h A
ngab
en d
es L
egie
rung
sher
stel
lers
1. u
nd 2
. O
pake
rbra
nd
Uni
vers
alop
aker
500
°C6
min
75 °
C·m
in-1
500
°C93
0 °C
930
°C1
min
Opa
kerb
rand
Fl
ash
Opa
ker
500
°C8
min
50 °
C·m
in-1
500
°C96
0 °C
960
°C1
min
Schu
lter-
br
and
1 +
250
0 °C
6 m
in50
°C
·min
-150
0 °C
900
°C90
0 °C
1 m
in
Den
tin-
bran
d 1
500
°C8
min
50 °
C·m
in-1
500
°C87
0 °C
870
°C1
min
Den
tin-
bran
d 2
500
°C6
min
50 °
C·m
in-1
500
°C87
0 °C
870
°C1
min
Gla
nzbr
and
500
°C4
min
75 °
C·m
in-1
––
870
°C1
min
DE

18 carmen® gebrauchsanweisung de
Anwendung der EspriVest Ultra Stumpfeinbettmasse
Sicherheitshinweis
Einbettmassen enthalten Quarz. Staub nicht einatmen! Gefahr von Lungen-schäden (Silikose / Lungenkrebs). Empfehlungen: Atemschutzmaske vom Typ FFP 2 - EN 149 : 2001 verwenden. Beim Einfüllen der Einbettmasse in den Anmischbecher Staubbildung vermeiden.
Staub am Arbeitsplatz nur feucht entfernen.
Um Staub beim Ausbetten zu vermeiden, die nach dem Brand völlig ausge-kühlten Keramikobjekte von Einbettmasse befreien.
Beim Abstrahlen Absaugung mit Feinstaubfilter verwenden.
Technische Daten
Anmischverhältnis: 30 g Pulver + 10 g Flüssigkeit + 1 g dest. Wasser Verarbeitungszeit: 8 – 9 min Abbindezeit: 11 min Druckfestigkeit (nach dem Brennen): 22 MPa Thermische Expansion: 0,7 – 0,8 % Abbindeexpansion: < 0,4 %
Lieferform
EspriVest Ultra, Einbettmasse, 250 g REF 260-336-00 EspriVest Ultra, Anmischflüssigkeit, 100 ml REF 260-337-00
Herstellung von feuerfesten Stümpfen
Arbeitsschritte 1. Meister- bzw. Arbeitsmodell herstellen. 2. Ausblocken untersichgehender Stellen. 3. Zur Erzeugung eines Zementier- bzw. Klebespaltes Distanzlack bis ca. 1 mm vor die
Präparationsgrenze in einer möglichst gleichmäßigen Schicht auftragen. Sobald die Ober-fläche trocken ist, kann dubliert werden.
4. Meister- bzw. Arbeitsstümpfe oder Stumpfgruppe in Dublierküvette positionieren. 5. Dublieren vorzugsweise mit additionsvernetztem Silikon (z. B. rema® Sil von Dentaurum).
m
DE

carmen® gebrauchsanweisung de 19
6. EspriVest Ultra feuerfeste Stumpfeinbettmasse genau dosieren. Mischungsverhältnis: Um eine homogene Mischung zu erzielen, müssen mindestens 30 g Pulver mit
10 g EspriVest Ultra Anmischflüssigkeit und 1 g destilliertem Wasser angeteigt werden. Größere Flüssigkeitsmengen erhöhen die Fließfähigkeit, senken aber die Endhärte und verändern die Expansionswerte. Restfeuchtigkeit im Anrührbecher führt zu unkontrollier-baren Expansionswerten (bei Vollkeramikkronen abweichendes Anmischverhältnis beachten!).
7. In kleinem Vakuumrührbecher von Hand vormischen und dann ca. 45 sec im Vakuum-rührer intensiv mischen. Unterschreitung einer Mindest menge von 30 g Pulver ergibt inhomogene Mischung!
Sofern kein ausreichend kleiner Vakuumrührbecher vorhanden ist, muss intensiv von Hand gemischt werden.
8. Dublierform blasenfrei mit Stumpfeinbettmasse auf einem Rüttler ausfließen lassen. 9. Je nach Elastizität der Dubliermasse kann nach etwa 45 min entformt werden
(Gebrauchsanweisung der Dubliermassenhersteller beachten).10. Markierung der Präparationsgrenze mittels eines feuerfesten Stiftes.11. Entgasen der Stümpfe – Sinterbrand: Im Vorwärmeofen von ca. 50 °C Ausgangstemperatur mit 5 °C·min-1 auf 750 °C aufheizen.
Haltezeit 5 min. Danach umsetzen in Keramikofen. Basistemperatur 700 °C – Schließzeit 1 min – Aufheizrate 55 °C·min-1 – Endtemperatur 1050 °C – Haltezeit 5 min ohne Vakuum. Ergebnis sollte eine gleichmäßige Oberflächenfarbe aufweisen.
Werden mehr als 5 Stümpfe gleichzeitig gesintert, muss die Haltezeit auf 8 min verlängert werden. Die Stümpfe müssen nach dem Sinterbrand schneeweiß sein. Grauverfärbung der EspriVest Ultra Stümpfe kann folgende Ursachen haben:
– Sintertemperatur zu niedrig – Haltezeit zu kurz
Der Sinterbrand kompensiert die Abbindeexpansion. Bei genauer Beachtung des Anmischverhältnisses und der Sinterbrandführung haben der EspriVest Ultra Stumpf und der Meisterstumpf exakt identische Maße.
Hinweis: Wenn Stümpfe nicht unmittelbar nach dem Entfernen aus der Dublierform gesintert
werden, kann sich, besonders bei hoher Luftfeuchtigkeit, ein samtartiger Belag an der Stumpfoberfläche ausbilden. Dieses „Blühen” hat keinen Einfluss auf die Oberflächen-eigenschaften und die Passgenauigkeit von EspriVest Ultra. Der Belag entsteht nicht, wenn direkt gesintert wird bzw. verschwindet wieder nach dem Sintern.
DE

20 carmen® gebrauchsanweisung de
Dentaurum-DublierküvetteDie Dublierküvette kommt zum Einsatz bei Dublierungen von Inlay-, Onlay-, Veneer- und Voll-keramikkronen-Situationen. Sowohl Dubliersilikon als auch Stumpfeinbettmassen werden rationell ein-gesetzt. Ebenso dient die Dublierküvette zur material-sparenden Reproduzierung von Einzel stümpfen. Je nach Stumpfgröße können bis zu 2 Stümpfe in einer Küvette dubliert werden.
Lieferprogramm
Dublierküvette mit Fixierkitt REF 260-331-00 Dublierküvette ohne Fixierkit REF 260-332-00
Folgende Einzelteile können nachbestellt werden:
Alu-Oberteil REF 260-333-00 Kunststoff-Unterteil REF 260-334-00 Fixierkitt REF 260-335-00
Gebrauchsanweisung für den Einsatz der Dentaurum-Dublierküvette:
1. Die Vorbereitung der Meisterstumpf-Situation erfolgt wie gewohnt (Beschleifen, Aus-blocken, Oberflächenversiegelung, Distanzlack etc.).
2. Meister- bzw. Arbeitsstümpfe in das mit dem Fixierkitt beschickte Küvettenunterteil positionieren. Zur Vermeidung von Verdrehung des Küvettenoberteils empfiehlt es sich, Unterschnitte in den Fixierkitt zu schneiden.
3. Küvettenoberteil (Alu) auf das Küvettenunterteil (Kunststoff) aufsetzen. Durch die Öffnung im Oberteil vorzugsweise additionsvernetztes Silikon (z. B. rema® Sil von Dentaurum) einfließen lassen.
4. Nach Aushärten des Silikons Küvettenoberteil vorsichtig vom Unterteil lösen und Stumpf entnehmen. Hinweise für weiteres Vorgehen und Ausgießen mit EspriVest Ultra entnehmen Sie bitte den folgenden Seiten.
DE

carmen® gebrauchsanweisung de 21
Herstellung von Inlays, Onlays und Veneers
Anmischverhältnis der EspriVest Ultra Stumpfeinbettmasse bei Inlays, Onlays und Veneers:
30 g Pulver zu 10 g Anmischflüssigkeit + 1 g dest. Wasser
Wichtig: Gegenüber den normalen Dentin- und Korrekturbränden mit der Carmen® bzw. CCS Keramik wird die Brenntemperatur um 10 – 20 °C angehoben.
Vor jedem Brand muss der feuerfeste Stumpf in einem kleinen Wasserbad gut gewässert werden. Als Sättigungslösung wird empfohlen, Modellierflüssigkeit LV Universal (REF 299-160-81) zu verwenden. Sollte es nicht möglich sein, die Schichtung gleich in den Ofen zu setzen, empfiehlt es sich, den Stumpf mit der Modellation mit dem Fuß in das Wasserbad zu stellen, um somit ein Austrocknen der Keramik zu vermeiden (Homogenität).
Arbeitsschritte:1. Zum Versiegeln der Einbettmasse Washbrand mit dünnflüssig angemischtem Opak Dentin /
Dentin entsprechend der Zahnfarbe durchführen. Tipp: Nicht bis zur Präparationsgrenze gehen.
Brennprogramm:
Basis- Trockenzeit Temperatur- Vakuum Vakuum End- Haltezeit temperatur anstieg Beginn Ende temperatur
500 °C 6 min 55 °C·min-1 500 °C 890 °C 890 °C 1 min
2. Bei Inlays/Onlays Auskleiden des Kastens mit Opak Dentin / Dentin in der jeweiligen Zahn-farbe. Im Verlauf der Hauptfissuren einschneiden. Somit erfolgt die Schrumpfung des Opak Dentin / Dentin zur Einbettmasse hin.
Tipp: Nicht bis zur Präparationsgrenze gehen.
Brennprogramm:
Basis- Trockenzeit Temperatur- Vakuum Vakuum End- Haltezeit temperatur anstieg Beginn Ende temperatur
500 °C 6 min 55 °C·min-1 500 °C 880-890 °C 880-890 °C 1 min
3. Ergänzen der fehlenden Substanz mit Dentin-, Inzisal- und Transparentmassen bis zur Präparationsgrenze. Bei Veneers genauso verfahren. Bei Inlays im Verlauf der Fissuren leicht einschneiden.
Brennprogramm:
Basis- Trockenzeit Temperatur- Vakuum Vakuum End- Haltezeit temperatur anstieg Beginn Ende temperatur
500 °C 6 min 55 °C·min-1 500 °C 880-890 °C 880-890 °C 1 min
DE

22 carmen® gebrauchsanweisung de
11 21 Carmen® Veneers auf Modell
1 1 21 Carmen® Veneers Endsituation
4. Gegebenenfalls Korrekturbrand. Brandführung identisch mit Nr. 3.
5. Glanzbrand.
Brennprogramm:
Basis- Trockenzeit Temperatur- Vakuum Vakuum End- Haltezeit temperatur anstieg Beginn Ende temperatur
500 °C 6 min 75 °C·min-1 – – 880 °C 1 - 1,5 min
Durch ein Verlängern der Haltezeit wird der Glanzgrad erhöht.
6. Ausstrahlen der Einbettmasse mit Glasperlen 50 µm und einem Druck von max. 1,5 bar. Achtung: Ränder gut abdecken oder abstützen!
7. Umsetzen auf Masterstumpf und Modell. Fertigstellung unter Berücksichtigung von Passgenauigkeit, Funktion und Ästhetik.
Diese Angaben sind Erfahrungswerte. Brenntemperaturen können je nach Stumpfgröße und Ofentyp variieren. Es empfiehlt sich, generell einen Testbrand (Ofenkontrolle) zu machen.
DE
carmen® gebrauchsanweisung de 23
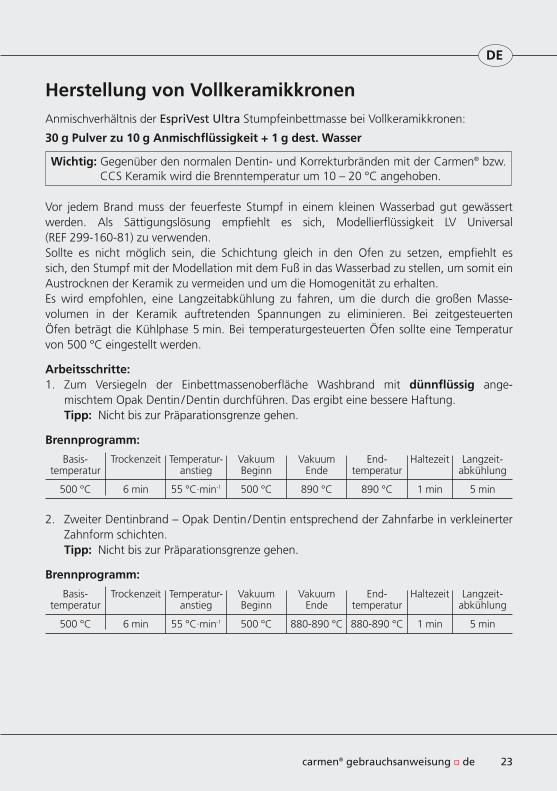
Herstellung von VollkeramikkronenAnmischverhältnis der EspriVest Ultra Stumpfeinbettmasse bei Vollkeramikkronen:
30 g Pulver zu 10 g Anmischflüssigkeit + 1 g dest. Wasser
Wichtig: Gegenüber den normalen Dentin- und Korrekturbränden mit der Carmen® bzw. CCS Keramik wird die Brenntemperatur um 10 – 20 °C angehoben.
Vor jedem Brand muss der feuerfeste Stumpf in einem kleinen Wasserbad gut gewässert werden. Als Sättigungslösung empfiehlt es sich, Modellierflüssigkeit LV Universal (REF 299-160-81) zu verwenden.Sollte es nicht möglich sein, die Schichtung gleich in den Ofen zu setzen, empfiehlt es sich, den Stumpf mit der Modellation mit dem Fuß in das Wasserbad zu stellen, um somit ein Aus trocknen der Keramik zu vermeiden und um die Homogenität zu erhalten.Es wird empfohlen, eine Langzeitabkühlung zu fahren, um die durch die großen Masse-volumen in der Keramik auftretenden Spannungen zu eliminieren. Bei zeitgesteuerten Öfen beträgt die Kühlphase 5 min. Bei temperaturgesteuerten Öfen sollte eine Temperatur von 500 °C eingestellt werden.
Arbeitsschritte:1. Zum Versiegeln der Einbettmassenoberfläche Washbrand mit dünnflüssig ange-
mischtem Opak Dentin / Dentin durchführen. Das ergibt eine bessere Haftung. Tipp: Nicht bis zur Präparationsgrenze gehen.
Brennprogramm:
Basis- Trockenzeit Temperatur- Vakuum Vakuum End- Haltezeit Langzeit- temperatur anstieg Beginn Ende temperatur abkühlung
500 °C 6 min 55 °C·min-1 500 °C 890 °C 890 °C 1 min 5 min
2. Zweiter Dentinbrand – Opak Dentin / Dentin entsprechend der Zahnfarbe in verkleinerter Zahnform schichten.
Tipp: Nicht bis zur Präparationsgrenze gehen.
Brennprogramm:
Basis- Trockenzeit Temperatur- Vakuum Vakuum End- Haltezeit Langzeit- temperatur anstieg Beginn Ende temperatur abkühlung
500 °C 6 min 55 °C·min-1 500 °C 880-890 °C 880-890 °C 1 min 5 min
DE

24 carmen® gebrauchsanweisung de
3. Ergänzen der fehlenden Substanz mit Dentin-, Inzisal- und Transparentmassen bis zur Präparationsgrenze.
Brennprogramm:
Basis- Trockenzeit Temperatur- Vakuum Vakuum End- Haltezeit Langzeit- temperatur anstieg Beginn Ende temperatur abkühlung
500 °C 6 min 55 °C·min-1 500 °C 880-890 °C 880-890 °C 1 min 5 min
4. Gegebenenfalls Korrekturbrand. Brandführung identisch mit Nr. 3.
5. Glanzbrand.
Brennprogramm:
Basis- Trockenzeit Temperatur- Vakuum Vakuum End- Haltezeit Langzeit- temperatur anstieg Beginn Ende temperatur abkühlung
500 °C 6 min 75 °C·min-1 – – 880 °C 1 - 1,5 min 5 min
Durch ein Verlängern der Haltezeit wird der Glanzgrad erhöht.
6. Ausstrahlen der Einbettmasse mit Glasperlen 50 µm und einem Druck von max. 1,5 bar. Achtung: Ränder gut abdecken oder abstützen!
7. Umsetzen auf Masterstumpf und Modell. Fertigstellung unter Berücksichtigung von Passgenauigkeit, Funktion und Ästhetik.
Diese Angaben sind Erfahrungswerte. Brenntemperaturen können je nach Ofentyp variieren. Es empfiehlt sich, generell einen Testbrand (Ofenkontrolle) zu machen.
Weitere Hinweise zur Verarbeitung der Carmen® Keramik finden Sie in unserer Broschüre „Verarbeitungstipps für
Carmen® und CCS Keramik”, REF 989-677-10.
Für Ihre Fragen zur Verarbeitung unserer Produkte steht Ihnen unser Customer Support gerne zur Verfügung.
Hotline Tel.-Nr. + 49 72 31 / 803 - 410
Informationen und Gebrauchsanweisungen zu den Dentaurum-Keramik-Systemen finden Sie
im Internet unter
www.dentaurum.de
DE
Dear Customer
In purchasing Dentaurum products you have selected high-quality products which are ideally adapted to one another for efficient and attractive ceramic work.
An essential pre-condition for working with ceramics is a high degree of precision and close adherence to the processing instructions.
This brochure contains a number of practical tips when working with our products.
Further tips for using Carmen® ceramics you will find in our brochure “Handling Tips for Carmen® ceramics”, REF 989-677-20.
Should any questions occur when you are using our products, we are here to assist you in solving them.
Our Customer Support will be pleased to help you with any questions regarding the use of our products
Hotline tel. no. + 49 72 31 / 803 - 410
Information and instructions for using Dentaurum ceramic systems can be found on the Internet at
www.dentaurum.de
carmen® instruction for use en 25
EN

26 carmen® instruction for use en
Basic factors ...............................................................................27Advantages of Carmen® ceramics/TEC-values .............................28Application of the ceramic materials ...........................................29Frame preparation ......................................................................30Use of flash opaque ....................................................................31Use of Carmen® universal paste opaque ......................................32Use of shoulder and cervical materials ........................................33Build-up technique – classification of the incisal materials .............34Layer build-up (standard) – working steps ...................................35Use of liquids ..............................................................................37Use of stains universal .................................................................38Furnace control – furnace cleaning .............................................39Firing chart .................................................................................40Use of EspriVest Ultra refractory die material ...............................41Dentaurum duplicating flash .......................................................43Instructions for inlays, onlays and veneers ...................................44Instructions for metal free crowns ...............................................46
Contents
EN

carmen® instruction for use en 27
Carmen® is a ceramic material with innovative characteristics which offers a whole range of possibilities in the field of metal and ceramic processing. Its quality, ease of use, and perfect aesthetic results convince both experts and beginners.
Carmen® ceramics was developed and designed for all major alloys with Thermal Expansion Coefficient (TEC) values of 14.1 x 10⁻⁶/K to 15.3 x 10⁻⁶/K for 25 °C – 600 °C / 77 °F – 1112 °F and 13.9 x 10⁻⁶/K to 15.1 x 10⁻⁶/K for 25 °C – 500 °C / 77 °F – 932 °F.
The average TEC value for Carmen® ceramics is 11.61 x 10⁻⁶/K for 25 °C – 500 °C / 77 °F – 932 °F.
Carmen® ceramics possesses an outstan dingly high stability in every phase of the bake. Even after several bakes, the ceramic material maintains its shape, colour and brilliance.
Carmen® is a ceramic material which is distinguished from other materials by its low bake temperatures. Consequently the metal frames are subjected to much less stress.
All Carmen® materials must be stored in closed containers at room temperature (i. e. 20 °C – 25 °C / 68 °F – 77 °F).
Initial situation Work “in situ”
EN

28 carmen® instruction for use en
1. Stability of shape and edgesNo formation of nodules, no collapsing of edges.
2. High stability of colour
3. Brilliance of colour – the impressive brilliance– the high translucency and depth of colour– the controllable opacity– the natural fluorescence– the stable opalescence– the high light conductivityand the natural refraction of light at the incisal edge of Carmen® materials are the secrets by prismatic effects in the micro-crystalline structure of the base material.
4. Low bake temperatureThe low bake temperature of 870 °C / 1598 °F during dentin bake I and II prevents deformation of the metal base.5. Independence of alloyCarmen® is suitable for all standard metal alloys with TEC = Thermal Expansion Coeffi-cient value of 14.1 x 10⁻⁶ /K to 15.3 x 10⁻⁶/K for 25 °C – 600 °C / 77 °F – 1112 °F and13.9 x 10-6/K to 15.1 x 10⁻⁶/K for25 °C – 500 °C / 77 °F – 932 °F, in particular for sensitive alloys with a high gold content.6. Easy processingOptimum modelling properties and aesthetic appearance achieved by a manageable range of products.
These are the important features!
Advantages of Carmen® ceramics
Alloy range for Carmen® and CCS
8 9,6 10 13 13,5 14 14,5 15 15,5 16 16,5 x10⁻⁶/K TEC (25 – 500 °C / 77 - 932 °F)
Thermal Expansion Coefficients (TEC) for dental materials
Ni-Cr• remanium® CSe
• Ti
• ZrO2
• Al2O3
Alloy range Triceram®
• remanium® 2000+ • remanium® star • remanium® 2001 • remanium® secura
Co Cr
Pd-Ag
Au-Pt
Pd-Cu
Alloy range for dentCeram LF, and dentCeram LF press
• remanium® LFC • DentAurum LFC
LFC-alloys (precious and non precious)
13,5 14 14,5 15 15,5 16 x10-6/KTEC (25 – 600 °C / 77 - 1112 °F)
• DentAurum BIO
EN

carmen® instruction for use en 29
Incisal opalescent 57-60 (IO):– opalescent: bluish effect in reflected light,
slightly orange effect in permeated light– for incisal alternative layer– intensifies natural refraction of light– application in incisal area
Transparent opalescent 64 (TO):– blue-opalescent material– application in incisal area
Neutral transparent opalescent 65 (NTO):– white-opalescent material– for reinforcing the natural opalescence and
transparency– application in incisal area
Incisal intensive 62 (II):– very opaque white material– for imitation of demineralized zones– suitable for edge strips in the molar area
Incisal intensive 63 (II):– honey-coloured material– for imitation of age characteristics– application in incisal area
Dentin intensive (DI):– intensive orange-coloured material– for mamelon tips– for dentin characterization– for insertion in central fissure area
Cervical material (C)– creates more intensive colour in cervical
area– can be tinted as required with dentin
colour
Arteline (AL):– for creating depth of colour– for imitating natural effects in dentin body
and mamelon areas
Opaque dentin intensive (ODI):– for controlling brightness– application in dentin and approximal areas
Gingival material (G/GD):– reconstruction of gingival and papilla
situation
Application of the ceramic materials
EN

30 carmen® instruction for use en
Always follow the instructions of the alloy manufacturer!The thickness of the metal should be not less than 0.3 mm.
Note:We recommend processing with carbide- tipped cutters followed by blasting with aluminium oxide with a minimum grain size of 110 µm and careful cleaning under running water or with a steam jet.Avoid sharp edges and corners. To prevent the edge from breaking off, the incisal height should not exceed 2 mm. Otherwise the ceramic material should receive some support from the frame. Shape the frame in such a way that the thickness of the ceramic layer is kept as even as possible.
Prepared frame
Frame preparation
Special properties of the Aesthetic Universal Bonder:– stronger bond between the metal and
ceramics– the warm hue of the Aesthetic Universal
Bonder enhances the optical shade effect of the bonding ceramic
– optimum shade in the marginal area of the crown
Availability:Set with syringe (contents 4 g),brush and instructions REF 292-200-15Syringe (contents 4 g) REF 292-200-10
Benefits from the advantages of the Aesthetic Universal Bonder:
EN

carmen® instruction for use en 31
The flash opaque can be used for non- precious metal alloys, and can also be used for almost all standard precious dental alloys.
The flash opaque consists of a base material and powders which yield the required shades (A1–D4).
With only one bake, the flash opaque possesses the following properties:– reduced oxide formation– no discolouring – good covering properties
Processing:Apply the base material as thin as possible to the dry frame (as with paste opaque). Ensure an even covering so that no dark areas are visible through the material. Avoid the formation of puddles and drops.
Sprinkle the flash opaque powder onto the moist base over a funnel and container to collect the excess powder.
Remove the surplus powder on the base by means of light vibration. The surface must be completely covered with powder. The surface must not appear moist.
When sprinkling the powder, ensure that no grains of powder enter the inside of the crown.
After the bake, the opaque surface must appear dull and rough, not shiny.
Close the container immediately after use. Thickened base material should be re conditioned using flash opaque liquid only.
Note:To prevent discolouring, non-precious metal and strongly oxidizing alloys should be brushed under running water (also from the inside) after every bake.
Do not use caustic substances with flash opaque.
Flash opaque
Use of flash opaque
EN

32 carmen® instruction for use en
Carmen® universal paste opaque can be used with all precious and non-precious dental alloys and galvano.
It has the following advantages:– is ready to be used (without mixing)– usually one bake is sufficient – low bake temperature– low layer thickness– good dense coverage of the metal frame– easy and uncomplicated layering– silky gloss
Processing:Preparation of the Carmen® universal paste opaque:Before using the first time, press approx. 1 mm of material out of the syringe and discard it, if the paste contains a surplus of liquid.
The opaque material should have a creamy consistency.
Application of the Carmen® universal paste opaque:Apply the paste according to the selected tooth shade ensuring that it covers the surface evenly and thoroughly. Avoid accumulation of the material in the interdental area. After the bake the surface should appear smooth and slightly glossy. Usually, one bake is sufficient. If you need a second bake, same program can be used.
Note:Clean the brush for Carmen® universal paste opaque with Carmen® universal opaque liquid only. Do not allow it to contact with water.
Application of universal paste opaque before bake
Silky gloss appearance after bake
Use of Carmen® universal paste opaque
EN
carmen® instruction for use en 33
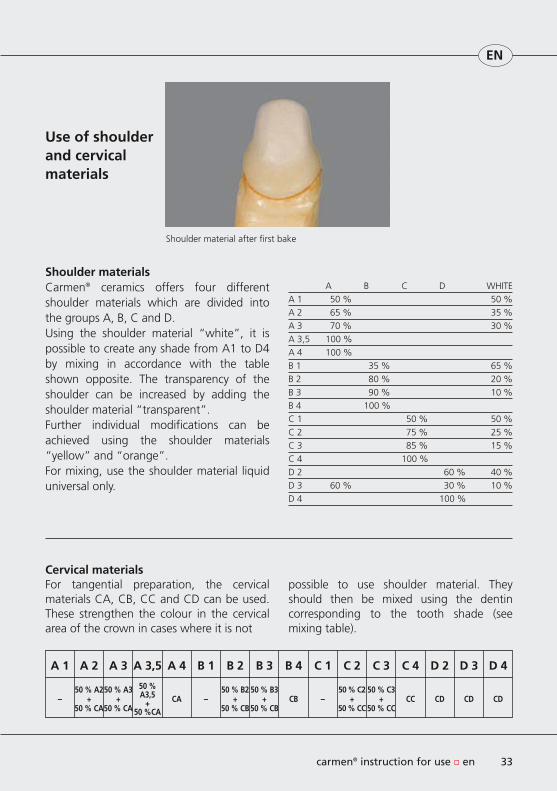
Shoulder materialsCarmen® ceramics offers four different shoulder materials which are divided into the groups A, B, C and D.Using the shoulder material “white”, it is possible to create any shade from A1 to D4 by mixing in accordance with the table shown opposite. The transparency of the shoulder can be increased by adding the shoulder material “transparent”.Further individual modifications can be achieved using the shoulder materials “yellow” and “orange”.For mixing, use the shoulder material liquid universal only.
A B C D WHITEA 1 50 % 50 %A 2 65 % 35 %A 3 70 % 30 %A 3,5 100 %A 4 100 % B 1 35 % 65 %B 2 80 % 20 %B 3 90 % 10 %B 4 100 %C 1 50 % 50 %C 2 75 % 25 %C 3 85 % 15 %C 4 100 % D 2 60 % 40 %D 3 60 % 30 % 10 %D 4 100 %
A 1
–50 % A2
+50 % CA
50 % A3+
50 % CA
50 % A3,5
+50 %CA
CA –50 % B2
+50 % CB
50 % B3+
50 % CBCB –
50 % C2+
50 % CC
50 % C3+
50 % CCCC CD CD CD
A 2 A 3 A 3,5 A 4 B 1 B 2 B 3 B 4 C 1 C 2 C 3 C 4 D 2 D 3 D 4
Use of shoulder and cervical materials
Cervical materialsFor tangential preparation, the cervical materials CA, CB, CC and CD can be used. These strengthen the colour in the cervical area of the crown in cases where it is not
possible to use shoulder material. They should then be mixed using the dentin corresponding to the tooth shade (see mixing table).
Shoulder material after first bake
EN

34 carmen® instruction for use en
Selection of the ceramic materials according to tooth shade. The build-up is shown in the layer diagram above.
Note:To avoid visible colour demarcations, use opaque dentin (OD). It also prevents the visibility of the opaqued metal frame. OD materials can also be used to control brightness (by mixing dentin and opaque dentin). At layer thicknesses from 0.9 mm on, opaque dentin is not required. For information on the use of liquids and stains universal, refer to the tables on page 37 and 38.
Carmen® is a very translucent ceramic material. Therefore, the neutral transparent material should be used sparingly.
Classification of the incisal materials.
A 1 IT 57 B 4 IT 60 A 2 IT 57 C 1 IT 60 A 3 IT 59 C 2 IT 59 A 3,5 IT 59 C 3 IT 59 A 4 IT 60 C 4 IT 60 B 1 IT 57 D 2 IT 60 B 2 IT 59 D 3 IT 59 B 3 IT 59 D 4 IT 59
With IT 58, it is possible to achieve additional grey effects in the area of the posteriors.
Incisal material
Dentin
Opaque dentin
Shoulder material
Opaque
Neutral transparent (as required)
Build-up technique
Layer diagram
EN

carmen® instruction for use en 35
1. Application of opaque dentin 2. Build-up of dentin
3. Cutting back the dentin 4. Addition of incisal material
5. Result after first bake
Layer build-up (standard)Working stepsDentin bake 1
EN

36 carmen® instruction for use en
9. Glaze bake (palatinal)8. Glaze bake (labial)
7. Finishing after second bake6. Condition before second bake
Layer build-up (standard)Working stepsCorrection / finish
EN

carmen® instruction for use en 37
Modelling liquid LV+ universal:– standard liquid for mixing materials
Modelling liquid MV universal:– to increase plasticity– especially in dry warm climates– for prolonging plasticity
Universal paste liquid:– to adjust the viscosity of the paste opaque
Carmen® flash opaque liquid:– for diluting flash opaque base material
Shake well before use!
Stains universal liquid:– for mixing stains universal– for the glaze bake
Shoulder material liquid universal:– for mixing shoulder materials
Contrast-marker:– for tinting mixed materials– for better contrast in layers– burns without residue– viscosity similar to that of modelling liquid
LV universal
Note: Universal liquids can also be used in combi-nation with the Triceram® system.
Use of liquids
EN
38 carmen® instruction for use en
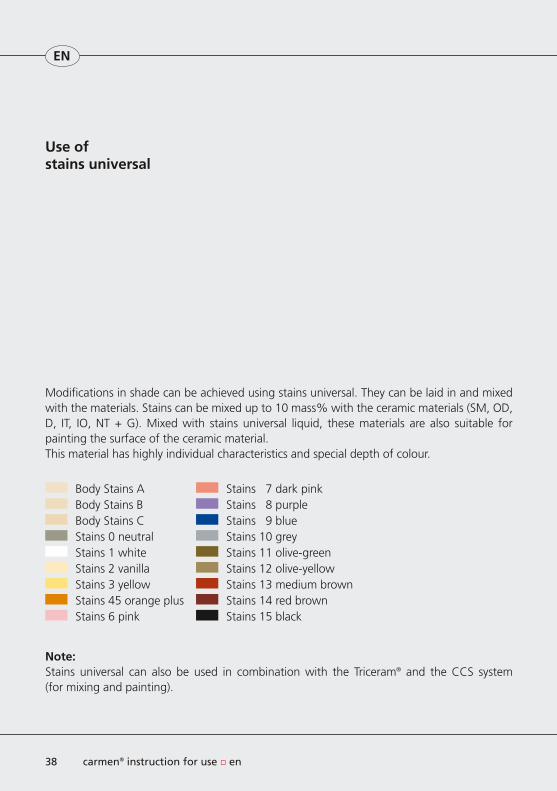
Modifications in shade can be achieved using stains universal. They can be laid in and mixed with the materials. Stains can be mixed up to 10 mass% with the ceramic materials (SM, OD, D, IT, IO, NT + G). Mixed with stains universal liquid, these materials are also suitable for painting the surface of the ceramic material.This material has highly individual characteristics and special depth of colour.
Body Stains A Stains 7 dark pink Body Stains B Stains 8 purple Body Stains C Stains 9 blue Stains 0 neutral Stains 10 grey Stains 1 white Stains 11 olive-green Stains 2 vanilla Stains 12 olive-yellow Stains 3 yellow Stains 13 medium brown Stains 45 orange plus Stains 14 red brown Stains 6 pink Stains 15 black
Note: Stains universal can also be used in combination with the Triceram® and the CCS system (for mixing and painting).
Use of stains universal
EN
carmen® instruction for use en 39
In order to adjust the firing temperature of your furnace, we recommend a firing test, as this is the only way to judge the correct bake sequence.For that purpose, use NT-material (neutral transparent) mixed with modelling liquid LV universal and fire at the following temperatures.• Base temperature: 500 °C / 932 °F• Drying time: 8 min• Heat rate: 50 °C / 122 °F per min• Vacuum start: 500 °C / 932 °F• Vacuum end at final temperature of 870 °C / 1598 °F• Holding time 1 minute without vacuum Put the bake specimen on platinum foil, not on firing cotton, as this may cause dulling. The temperature of the furnace is correct, when the specimen is clear and translucent with sharp edges. If the final temperature is too high, the specimen has a glossy appereance and the edges are not sharply defined. If the final temperature is too low, the specimen appears milky white. According to your result, please raise or lower the final temperature in steps of 10 °C / 50 °F and fire a new specimen.
Note:Oxide bake according to manufacturer’s instructions. Firing temperatures may vary depending on furnace type.
Soldering after bake:• Second solder: (745 °C / 1373 °F) • Base temperature: 200 °C / 392 °F• Drying time: 8 min• Heat rate: 55 °C / 131 °F per min• Final temperature: 810 °C / 1490 °F• Holding time: 30 s• Without vacuum• No slow cooling
Ceramic furnace must be purified regulary to purge all fallouts from the inside of the muffle.
We suggest:• Frequent furnace purge firings with carbon REF 260-317-00• Firing trays to be included• Base temperature: 600 °C / 1112 °F• Drying time: 1 min• Heat rate: 100 – 120 °C / 212 – 248 °F per min• Final temperature: 1050 °C / 1922 °F• Holding time: 10 minFiring program without vacuum. Follow instructions of furnace manufacturer!
Maintain furnace always closed. Close the furnace after use or switch to night modus to prevent uptake of humidity.
Furnace cleaning:Furnace control:
EN

This
dat
a is
val
id f
or f
ine-
silv
er c
alib
rate
d fu
rnac
es.
Long
er d
ryin
g tim
es w
ill o
ptim
ize
the
resu
lts.
Firing chartB
ase
tem
per
atu
reD
ryin
g
tim
eH
eat
rate
Vac
uu
m
star
tV
acu
um
en
dFi
nal
te
mp
era t
ure
Ho
ldin
g
tim
e
Oxi
de b
ake
Oxi
de b
ake
acco
rdin
g to
inst
ruct
ions
of
allo
y m
anuf
actu
rer
Opa
que
bake
1 +
2
Uni
vers
al o
paqu
e
500
°C /
932
°F6
min
75 °
C·m
in-1 /
167
°F·m
in-1
500
°C /
932
°F93
0 °C
/ 17
06 °
F93
0 °C
/ 17
06 °
F1
min
Opa
que
bake
Fl
ash
opaq
ue50
0 °C
/ 93
2 °F
8 m
in50
°C
·min
-1 /
122
°F·m
in-1
500
°C /
932
°F96
0 °C
/ 17
60 °
F96
0 °C
/ 17
60 °
F1
min
Shou
lder
ba
ke 1
+ 2
500
°C /
932
°F6
min
50 °
C·m
in-1 /
122
°F·m
in-1
500
°C /
932
°F90
0 °C
/ 16
52 °
F90
0 °C
/ 16
52 °
F1
min
Den
tin-
bake
150
0 °C
/ 93
2 °F
8 m
in50
°C
·min
-1 /
122
°F·m
in-1
500
°C /
932
°F87
0 °C
/ 15
98 °
F87
0 °C
/ 15
98 °
F1
min
Den
tin-
bake
250
0 °C
/ 93
2 °F
6 m
in50
°C
·min
-1 /
122
°F·m
in-1
500
°C /
932
°F87
0 °C
/ 15
98 °
F87
0 °C
/ 15
98 °
F1
min
Gla
ze b
ake
500
°C /
932
°F4
min
75 °
C·m
in-1 /
167
°F·m
in-1
––
870
°C /
1598
°F
1 m
in
40 carmen® instruction for use en
EN

carmen® instruction for use en 41
Use of EspriVest Ultra refractory die material
Safety tips
Investments contain quartz. Avoid inhalation of dust as this may cause lung diseases (silicosis / lung cancer). Wearing of face mask type FFP 2 - EN 149 : 2001 is recommended. Avoid creating clouds of dust when pouring the investment material into the mixing beaker.
Remove dust from working area only with a wet cloth.
In order to avoid dust accumulation, remove investment material from the ceramic object once it has completely cooled, after firing.
When sandblasting use suction with fine dust filter.
Technical data
Mixing properties: 30 g powder + 10 g mixing liquid + 1 g distilled water Working time: 8 – 9 min Setting time: 11 min Compressive strength (after bake): 22 MPa Thermal expansion: 0.7 – 0.8 % Setting expansion: < 0.4 %
Availability
EspriVest Ultra, refractory die material, 250 g REF 260-336-00 EspriVest Ultra, mixing liquid, 100 ml REF 260-337-00
Preparation of fireproof dies
Procedure:
1. Prepare master or working model.
2. Block out undercut areas.
3. For space of cement or bonder, apply an even layer of die spacer up to approx. 1 mm before the preparation line. As soon as the surface is dry, duplicating can begin.
4. Place the master or working dies or die group in the duplicating flask.
5. If possible, duplicate with addition cross-linked silicone (e. g. rema® Sil from Dentaurum).
6. Measure portions of EspriVest Ultra refractory die material very accurately.
Mixing ratio:
To achieve a homogeneous mixture, at least 30 g powder must be mixed with 10 g EspriVest Ultra mixing liquid and 1 g distilled water. Larger quantities of liquid increase
m
EN

42 carmen® instruction for use en
the flow of the mixture but decrease the final strength and alter the expansion values. Any residual moisture in the mixing beaker causes uncontrolled expansion (for metal-free crowns, observe different mixing ratio!).
7. Premix by hand in small vacuum mixing bowl and then mix thoroughly for approx. 45 sec in vacuum mixer. Less than the minimum quantity of 30 g powder results in inhomogeneous mixture!
If no small vacuum mixing bowl is available, mix thoroughly by hand.
8. Allow investment material to flow into the duplicating mould on a vibrator. Avoid bubbles.
9. Depending on the elasticity of the duplicating material the mould can be removed after approx. 45 min (follow instructions of duplicating material manufacturer).
10. Mark the preparation line with a fireproof pencil.
11. Degasing of dies - sinter bake:
From approx. 50 °C / 122 °F base temperature, heat up to 750 °C / 1382 °F in steps of 5 °C / 41 °F·min-1 in preheating furnace. Then transfer to ceramic furnace. Base temperature 700 °C / 1292 °F, closing time 1 min. Heat rate 55 °C / 131 °F·min-1. Final temperature 1050 °C / 1922 °F. Holding time 5 min without vacuum. The result should show an uniform surface colour.
If more than 5 dies are being sintered simultaneously, the holding time must be increased to 8 min. After the sinter bake, the dies must be snow-white. Greyish discolouration of the EspriVest Ultra dies may be due to the following causes:
– sintering temperature too low – holding time too short
The sinter bake compensates for the setting expansion. If the mixing ratios and the sintering sequence have been precisely observed, the dimensions of the EspriVest Ultra die and the master die must be identical.
Note:
If the dies are not sintered immediately after removal from the duplicating mould, a velvety film may develop on the die surface, especially under conditions of high humidity. However, this does not influence the surface characteristics or the accuracy of the EspriVest Ultra fit. The film does not appear if the die is sintered immediately, respectively disappears after sintering.
EN

carmen® instruction for use en 43
Dentaurum duplicating flaskThe Dentaurum duplicating flask is used for duplicating when fabricating inlays, onlays, laminate veneers and metal free crowns. It ensures cost-effective use of both duplicating silicone and refractory die material. The duplicating flask also saves material when reproducing single dies.
Two dies can be duplicated simultaneously in one flask, depending on the size of the dies.
Duplicating flask with putty REF 260-331-00 Duplicating flask without putty REF 260-332-00
The following items can be ordered separately:
Aluminium top section REF 260-333-00 Plastic lower section REF 260-334-00 Putty REF 260-335-00
Instructions for use - Dentaurum duplicating flask:
1. Prepare the master die as usual (trim, block out, seal the surface, apply die spacer etc.).
2. Position the master or working die in the bottom section of the flask which has been prepared with putty. We recommend cutting notches into the putty to prevent any movement of the top section of the flask.
3. Place the top aluminium section onto the bottom plastic section of the flask. Pour duplicating silicone, preferably addition-cured (e. g. rema® Sil, Dentaurum), into the opening in the top of the flask.
4. After the silicone has cured, separate the top section of the flask carefully from the bottom section and remove the die. Refer to the next pages for information on subsequent procedures and on pouring with EspriVest Ultra.
EN
44 carmen® instruction for use en
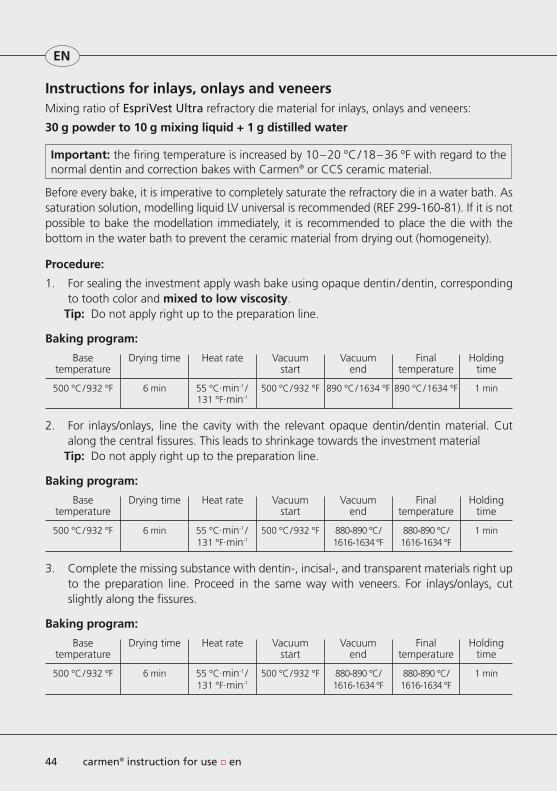
Instructions for inlays, onlays and veneersMixing ratio of EspriVest Ultra refractory die material for inlays, onlays and veneers:
30 g powder to 10 g mixing liquid + 1 g distilled water
Important: the firing temperature is increased by 10 – 20 °C / 18 – 36 °F with regard to the normal dentin and correction bakes with Carmen® or CCS ceramic material.
Before every bake, it is imperative to completely saturate the refractory die in a water bath. As saturation solution, modelling liquid LV universal is recommended (REF 299-160-81). If it is not possible to bake the modellation immediately, it is recommended to place the die with the bottom in the water bath to prevent the ceramic material from drying out (homogeneity).
Procedure:
1. For sealing the investment apply wash bake using opaque dentin / dentin, corresponding to tooth color and mixed to low viscosity.
Tip: Do not apply right up to the preparation line.
Baking program:
Base Drying time Heat rate Vacuum Vacuum Final Holding temperature start end temperature time
500 °C / 932 °F 6 min 55 °C·min-1 / 500 °C / 932 °F 890 °C / 1634 °F 890 °C / 1634 °F 1 min 131 °F·min-1
2. For inlays/onlays, line the cavity with the relevant opaque dentin/dentin material. Cut along the central fissures. This leads to shrinkage towards the investment material
Tip: Do not apply right up to the preparation line.
Baking program:
Base Drying time Heat rate Vacuum Vacuum Final Holding temperature start end temperature time
500 °C / 932 °F 6 min 55 °C·min-1 / 500 °C / 932 °F 880-890 °C / 880-890 °C / 1 min 131 °F·min-1 1616-1634 °F 1616-1634 °F
3. Complete the missing substance with dentin-, incisal-, and transparent materials right up to the preparation line. Proceed in the same way with veneers. For inlays/onlays, cut slightly along the fissures.
Baking program:
Base Drying time Heat rate Vacuum Vacuum Final Holding temperature start end temperature time
500 °C / 932 °F 6 min 55 °C·min-1 / 500 °C / 932 °F 880-890 °C / 880-890 °C / 1 min 131 °F·min-1 1616-1634 °F 1616-1634 °F
EN

carmen® instruction for use en 45
11 21 Carmen® veneers on model
1 1 21 Carmen® veneers after fitting
4. If necessary carry out correction bake. Bake sequence identical to no. 3.
5. Glaze bake
Baking program:
Base Drying time Heat rate Vacuum Vacuum Final Holding temperature start end temperature time
500 °C / 932 °F 6 min 75 °C·min-1 / – – 880 °C / 1616 °F 1 – 1.5 min 167 °F·min-1
The grade of glaze is increased by prolonging the holding time.
6. Sandblast the investment material with glass beads 50 µm and a pressure of max. 1.5 bar. Important: cover or support edges well!
7. Mount on master model. Finish with due regard to accuracy of fit, function and aesthetics.
This information is based on practical experience. Firing temperatures may vary depending on the size of the dies and the furnace type. Generally speaking, it is recommended to carry out a test bake (furnace control).
EN

46 carmen® instruction for use en
Instructions for metal-free crowns
Mixing ratio of EspriVest Ultra refractory die material for metal-free crowns:
30 g powder to 10 g mixing liquid + 1 g distilled water
Important: the firing temperature is increased by 10 – 20 °C / 18 – 36 °F with regard to the normal dentin and correction bakes with Carmen® or CCS ceramic material.
Before every bake, it is imperative to completely saturate the refractory die in a water bath. As saturation solution, modelling liquid LV universal is recommended (REF 299-160-81).
If it is not possible to bake the modellation immediately, it is recommended to place the die with the bottom in the water bath to prevent the ceramic material from drying out and to retain the homogeneity.
It is also recommended to keep to a slow cooling to eliminate the stresses caused by the high mass volumes in the ceramic material. In the case of furnaces with timer control, the cooling phase should be 5 minutes. Temperature-controlled furnaces should be set to 500 °C/932 °F.
Procedure:
1. Execute wash bake with thinly mixed opaque dentin/dentin to seal the surface of the investment material. This yields a better adhesion.
Tip: Do not apply right up to the preparation line.
Baking program:
Base Drying time Heat rate Vacuum Vacuum Final Holding Slow temperature start end temperature time cooling
500 °C / 932 °F 6 min 55 °C·min-1 / 500 °C / 932 °F 890 °C / 1634 °F 890 °C / 1634 °F 1 min 5 min 131 °F·min-1
2. Second dentine bake: layer opaque dentine / dentine corresponding to the tooth color in reduced anatomical shape.
Tip: Do not apply right up to the preparation line.
Baking program:
Base Drying time Heat rate Vacuum Vacuum Final Holding Slow temperature start end temperature time cooling
500 °C / 932 °F 6 min 55 °C·min-1 / 500 °C / 932 °F 880-890 °C / 880-890 °C / 1 min 5 min 131 °F·min-1 1616-1634 °F 1616-1634 °F
EN

carmen® instruction for use en 47
3. Complete the missing substance with dentin-, incisal-, and transparent materials right up to the preparation line.
Baking program:
Base Drying time Heat rate Vacuum Vacuum Final Holding Slow temperature start end temperature time cooling
500 °C / 932 °F 6 min 55 °C·min-1 / 500 °C / 932 °F 880-890 °C / 880-890 °C / 1 min 5 min 131 °F·min-1 1616-1634 °F 1616-1634 °F
4. If necessary, carry out correction bake. Bake sequence identical to no. 3.
5. Glaze bake.
Baking program:
Base Drying time Heat rate Vacuum Vacuum Final Holding Slow temperature start end temperature time cooling
500 °C / 932 °F 6 min 75 °C·min-1 / – – 880 °C / 1616 °F 1 – 1.5 min 5 min 167 °F·min-1
The grade of glaze is increased by prolonging the holding time.
6. Sandblast the investment material with glass beads 50 µm and a pressure of max. 1.5 bar. Important: cover or support edges well!
7. Mount on master model. Finish with due regard to accuracy of fit, function and aesthetics.
This information is based on practical experience. Firing temperatures may vary depending on furnace type. Generally speaking, it is recommended to carry out a test bake (furnace control).
Further tips for using Carmen® ceramics you will find in our brochure „Handling Tips for Carmen® and CCS ceramics“,
REF 989-677-20
Our Customer Support will be pleased to help you with any questions regarding the use of our products.
Hotline tel. no. + 49 72 31 / 803 - 410
Information and instructions for using Dentaurum ceramic systems can be found on the Internet at
www.dentaurum.de
EN

989-
761-
60
Prin
ted
by D
enta
urum
G
erm
any
03
/10/
C/R
1-8
Additional information regarding Dentaurum products can be found in the internet.
Stand der Information: 03/10 Änderungen vorbehalten
Date of information: 03/10 Subject to modifications
www.dentaurum.dewww.dentaurum.dewww.dentaurum.de
Turnstraße 31 · 75228 Ispringen · Germany · Phone + 49 72 31 / 803 - 0 · Fax + 49 72 31 / 803 - 295 www.dentaurum.de · E-Mail: [email protected]