Kurzanleitung neodrives Z15 sMMI Connect deutsch englisch ...
40
SMMI CONNECT KURZANLEITUNG | QUICK GUIDE
Transcript of Kurzanleitung neodrives Z15 sMMI Connect deutsch englisch ...

SMMI CONNECTK UR Z ANL EIT UNG | QUICK GUID E

2
DNEODRIVES SMMI CONNECTMit dem neodrives sMMI Connect erweitern Sie die Funktionsviel-falt Ihres Pedelecs und erhalten zusammen mit dem neuen Farbdis-play ein angenehmes Fahrerlebnis. Die vorliegende Kurzanleitung führt Sie in den Umgang mit Ihrem neuen sMMI Connect ein.
Wichtiger Hinweis: In dieser Anleitung wird ausschließlich die Bedienung des sMMI Connect und die dazugehörige Smart phone-App Smart Connect beschrieben. In der Smartphone-App selbst finden Sie weitere Hinweise zur Bedienung. Bitte beachten Sie für den Betrieb Ihres Pedelecs unbedingt auch die Kurzanleitung, wel-che Sie mit Ihrem Pedelec erhalten haben. Weitere Hinweise finden Sie auf unserer Homepage www.neodrives.de
LIEFERUMFANG
neodrives sMMI Connect (Display)
Diese Kurzanleitung
neodrives sMMI Connect
3
NEODRIVES SMMI CONNECTWith neodrives sMMI Connect, you expand the functionality of your Pedelec and get a pleasant riding experience together with the new colour display. This quick start guide introduces you to your new sMMI Connect and how it is used.
Important note: This guide only describes the operation of the sMMI Connect and the associated smartphone app smart Connect. In the smartphone app itself, you can find more information on operation. Also be sure to consult the quick start guide that came with your pedelec for operating information. For more information, visit our website at www.neodrives.de
SCOPE OF DELIVERY
neodrives sMMI Connect (display)
This quick start guide
Bild 2: neues Halterungsdock mit Halte-Pin Figure 2: New bracket dock with retaining pin
Bild 3: neuer ergonomischer Bediensa-tellit Figure 3: New ergonomic remote control
Bild 4: Halterungsdock mit Bediensatellit der alten Serie Figure 4: Handlebar dock with remote control of the old series
4
DDas sMMI ist sowohl mit den Halterungsdocks der ersten Serie als auch mit den neuen Halterungsdocks kompatibel. Am Halterungs-dock ist jeweils der Bediensatellit mit drei Tasten (Bild 3) fest verbaut/verkabelt. Der Halte-Pin auf dem neuen Halterungsdock (Bild 2) dient der besseren Fixierung des sMMI. Sie können das sMMI aber auch bedenkenlos auf dem Halterungsdock der alten Serie (Bild 4) anbringen.
ANBRINGEN UND ABNEHMEN DES SMMI
Anbringen (01)Setzen Sie das sMMI (Bild 5.1) in einem Winkel von etwa 30 Grad nach links verdreht auf das Dock (Bild 5.2). Drehen Sie das sMMI (Bild 5.1) auf dem Dock unter leichtem Druck um 30 Grad im Uhr-zeigersinn so, dass beide Komponenten aufeinander ausgerichtet sind (Bild 5.3). Bitte vermeiden Sie unbedingt, das sMMI in falscher Richtung aufzusetzen.
Abnehmen (02)Vor dem Abnehmen muss das sMMI ausgeschaltet sein. Drehen Sie das aufgedockte sMMI (Bild 5.1) ca. 30 Grad gegen den Uhrzeigersinn. Die elektrischen Verbindungen werden dabei gelöst und das sMMI (Bild 5.1) kann abgenommen werden.
Bild 5: Auf-/Abnehmen des sMMI Figure 5: Attaching/detaching the sMMI
5
The sMMI is compatible with the bracket docks of the first series as well as with the new bracket docks. The remote control with three buttons (figure 3) is permanently installed/wired on the handlebar dock. The retaining pin on the new bracket dock (figure 2) is used to better secure the sMMI, but you can also safely attach the sMMI to the bracket dock of the old series (figure 4).
ATTACHMENT AND DETACHMENT OF THE SMMI
Attachment (01)Place the sMMI (figure 5.1) on the dock at an angle of about 30 degrees to the left (figure 5.2). While applying slight pressure, turn the sMMI (figure 5.1) on the dock 30 degrees clockwise so that both components are aligned (figure 5.3). Be sure to avoid putting the sMMI on in the wrong direction.
Detachment (02)Before detachment, the sMMI must be switched off.Turn the docked sMMI (figure 5.1) by 30 degrees counterclockwise. The electrical connections are detached in the process and the sMMI (figure 5.1) can be removed.
01
02
30°
(Bild 5.1)
(Bild 5.3)
(Bild 5.2)

Bild 6: Standard-Screen (Bildschirm) Figure 6: Standard screen
6
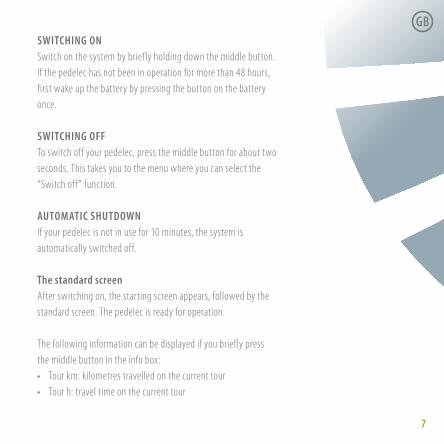
DEINSCHALTENSchalten Sie das System durch kurzes gedrückt halten der mittle-ren Taste ein. Sollte das Pedelec länger als 48 Stunden nicht in Betrieb gewesen sein, wecken Sie zunächst den Akku durch ein-maligen Druck auf die Taste am Akku.
AUSSCHALTENUm Ihr Pedelec auszuschalten, drücken Sie die mittlere Taste für ca. zwei Sekunden. Hierdurch gelangen Sie in das Menü, in dem Sie die Funktion „Ausschalten“ wählen können.
AUTOMATISCHE ABSCHALTUNGWird Ihr Pedelec zehn Minuten lang nicht benutzt, wird das Sys-tem automatisch ausgeschaltet.
Der Standard-Screen (Bildschirm)Nach dem Einschalten erscheint zunächst der Startbildschirm, danach der Standard-Screen. Das Pedelec ist nun betriebsbereit. Folgende Informationen können Sie mittels kurzen Drucks auf die mittlere Taste im Info-Feld darstellen:• Tour km: zurückgelegte Kilometer auf der aktuellen Tour• Tour h: zurückgelegte Zeit auf der aktuellen Tour
7
SWITCHING ONSwitch on the system by brief ly holding down the middle button. If the pedelec has not been in operation for more than 48 hours, first wake up the battery by pressing the button on the battery once.
SWITCHING OFFTo switch off your pedelec, press the middle button for about two seconds. This takes you to the menu where you can select the “Switch off” function.
AUTOMATIC SHUTDOWNIf your pedelec is not in use for 10 minutes, the system is automatically switched off.
The standard screenAfter switching on, the starting screen appears, followed by the standard screen. The pedelec is ready for operation. The following information can be displayed if you brief ly press the middle button in the info box:• Tour km: kilometres travelled on the current tour• Tour h: travel time on the current tour
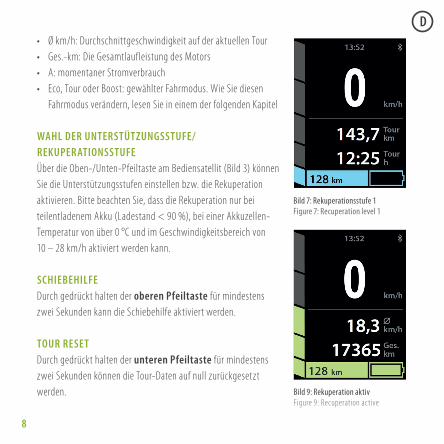
Bild 9: Rekuperation aktiv Figure 9: Recuperation active
Bild 7: Rekuperationsstufe 1 Figure 7: Recuperation level 1
8
D• Ø km/h: Durchschnittgeschwindigkeit auf der aktuellen Tour• Ges.-km: Die Gesamtlaufleistung des Motors• A: momentaner Stromverbrauch • Eco, Tour oder Boost: gewählter Fahrmodus. Wie Sie diesen
Fahrmodus verändern, lesen Sie in einem der folgenden Kapitel
WAHL DER UNTERSTÜTZUNGSSTUFE/ REKUPERATIONSSTUFEÜber die Oben-/Unten-Pfeiltaste am Bediensatellit (Bild 3) können Sie die Unterstützungsstufen einstellen bzw. die Rekuperation aktivieren. Bitte beachten Sie, dass die Rekuperation nur bei teilentladenem Akku (Ladestand < 90 %), bei einer Akkuzellen- Temperatur von über 0 °C und im Geschwindigkeitsbereich von 10 – 28 km/h aktiviert werden kann.
SCHIEBEHILFEDurch gedrückt halten der oberen Pfeiltaste für mindestens zwei Sekunden kann die Schiebehilfe aktiviert werden.
TOUR RESETDurch gedrückt halten der unteren Pfeiltaste für mindestens zwei Sekunden können die Tour-Daten auf null zurückgesetzt werden.
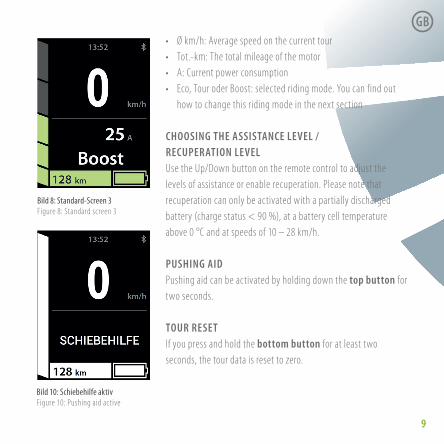
Bild 7: Rekuperationsstufe 1 Figure 7: Recuperation level 1
Bild 10: Schiebehilfe aktiv Figure 10: Pushing aid active
Bild 8: Standard-Screen 3 Figure 8: Standard screen 3
9
• Ø km/h: Average speed on the current tour• Tot.-km: The total mileage of the motor• A: Current power consumption • Eco, Tour oder Boost: selected riding mode. You can find out
how to change this riding mode in the next section
CHOOSING THE ASSISTANCE LEVEL / RECUPERATION LEVELUse the Up/Down button on the remote control to adjust the levels of assistance or enable recuperation. Please note that recuperation can only be activated with a partially discharged battery (charge status < 90 %), at a battery cell temperature above 0 °C and at speeds of 10 – 28 km/h.
PUSHING AIDPushing aid can be activated by holding down the top button for two seconds.
TOUR RESETIf you press and hold the bottom button for at least two seconds, the tour data is reset to zero.
10
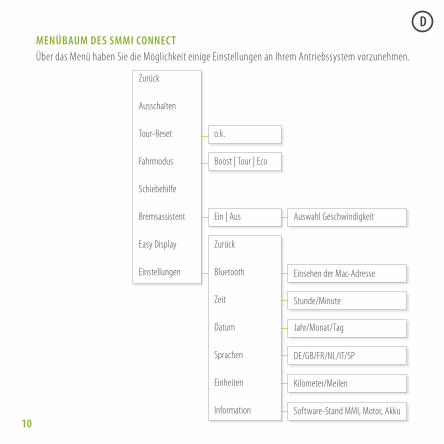
DMENÜBAUM DES SMMI CONNECTÜber das Menü haben Sie die Möglichkeit einige Einstellungen an Ihrem Antriebssystem vorzunehmen.
11
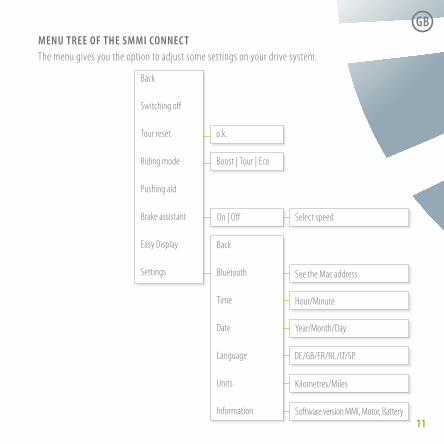
MENU TREE OF THE SMMI CONNECTThe menu gives you the option to adjust some settings on your drive system.
Back
Switching off
Tour reset
Riding mode
Pushing aid
Brake assistant
Easy Display
Settings
Back
Bluetooth
Time
Date
Language
Units
Information
Select speed
See the Mac address
Hour/Minute
Year/Month/Day
Kilometres/Miles
Software version MMI, Motor, Battery
On | Off

12
DDIE EINZELNEN MENÜPUNKTEAUSSCHALTENHier schalten Sie das System aus. Nachdem Sie mit der mittleren Taste bestätigt haben, erscheint das Hersteller-Logo im Display. Sobald dieses erlischt, können Sie das sMMI vom Dock entfernen.
TOUR RESETAlternativ zum Short-Cut (gedrückt halten der unteren Taste für für mindestens zwei Sekunden), können Sie hier die Tour-Daten der zuletzt gefahrenen Tour löschen.
FAHRMODUSHier haben Sie die Wahl zwischen den drei Modi Eco, Tour und Boost. • Eco: Moderates Ansprechverhalten für eine höhere Reichweite• Tour: Guter Mix aus Ansprechverhalten und energiebewusstem Fahren• Boost: Sportliches Ansprechverhalten für kurze, schnelle Beschleunigungsvorgänge
SCHIEBEHILFEAlternativ zum Short-Cut (gedrückt halten der oberen Taste für mindestens zwei Sekunden), können Sie hier die Schiebehilfe aktivieren. Sie aktiviert sich dann unmittelbar mit dem Drücken der oberen Taste. Besonderheit für Handbikes und Liegeräder: Mit der Aktivierung der Schiebe-hilfe können Sie mittels der unteren Taste rückwärts schieben. Bitte beachten Sie, dass sich die Pedale/die Kurbel dann ebenfalls mitdrehen. Bei aktivierter Schiebehilfe lassen sich die Unterstützungsstufen ab einer Fahrgeschwindigkeit von ca. 8 km/h ganz normal verstellen.
13
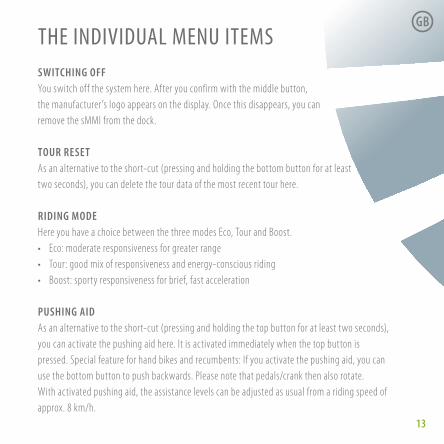
THE INDIVIDUAL MENU ITEMSSWITCHING OFFYou switch off the system here. After you confirm with the middle button, the manufacturer’s logo appears on the display. Once this disappears, you can remove the sMMI from the dock.
TOUR RESETAs an alternative to the short-cut (pressing and holding the bottom button for at least two seconds), you can delete the tour data of the most recent tour here.
RIDING MODEHere you have a choice between the three modes Eco, Tour and Boost. • Eco: moderate responsiveness for greater range• Tour: good mix of responsiveness and energy-conscious riding• Boost: sporty responsiveness for brief, fast acceleration
PUSHING AIDAs an alternative to the short-cut (pressing and holding the top button for at least two seconds), you can activate the pushing aid here. It is activated immediately when the top button is pressed. Special feature for hand bikes and recumbents: If you activate the pushing aid, you can use the bottom button to push backwards. Please note that pedals/crank then also rotate. With activated pushing aid, the assistance levels can be adjusted as usual from a riding speed of approx. 8 km/h.

Bild 11: Bremsassistent aktiv Figure 11: Brake assistant active
Bremsassistent aktiv Brake assistant active
14
DBREMSASSISTENTVor einer Fahrt kann der Bremsassistent aktiviert werden. Dieser unterstützt Sie beim Bremsen und sorgt für eine Energie- Rückspeisung in den Akku (sofern dieser nicht über den Grenzwert von ca. 90 % aufgeladen ist, bzw. die Temperatur nicht unter 0 °C liegt). Bitte halten Sie sich während der aktiven Rekuperation bzw. bei aktivem Bremsassistenten stets bremsbereit (über die vorhandenen Fahrradbremsen).
15
BRAKE ASSISTANTBefore a trip, the brake assistant can be activated. It supports you during braking and ensures energy is fed back into the battery (if it is not charged above the threshold of 90 % and the temperature is not below 0 °C). During active recuperation or with active brake assistant, always be ready to brake (using the existing bicycle brakes).
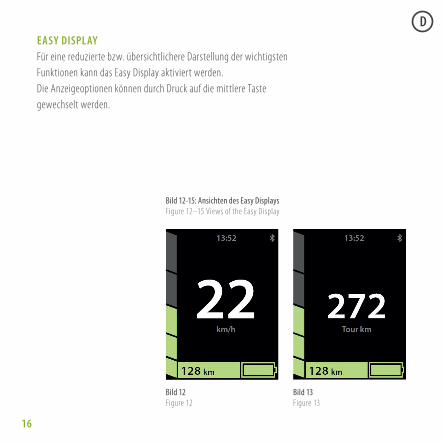
Bild 12-15: Ansichten des Easy Displays Figure 12–15 Views of the Easy Display
Bild 13Figure 13
Bild 12Figure 12
16
DEASY DISPLAYFür eine reduzierte bzw. übersichtlichere Darstellung der wichtigsten Funktionen kann das Easy Display aktiviert werden.Die Anzeigeoptionen können durch Druck auf die mittlere Taste gewechselt werden.
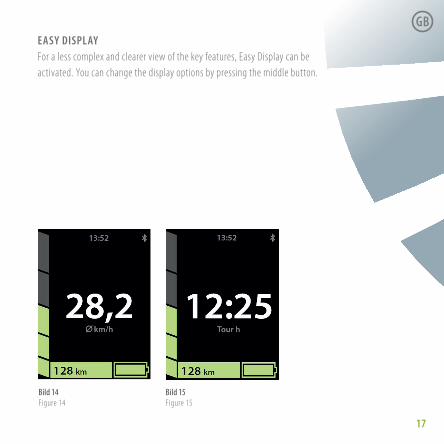
Bild 14Figure 14
Bild 15Figure 15
17
EASY DISPLAYFor a less complex and clearer view of the key features, Easy Display can be activated. You can change the display options by pressing the middle button.
18
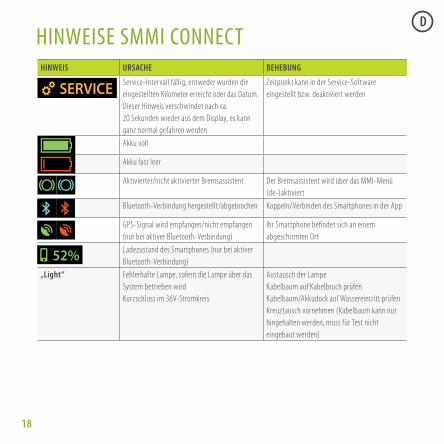
DHINWEISE SMMI CONNECT
HINWEIS URSACHE BEHEBUNG
Service-Intervall fällig, entweder wurden die eingestellten Kilometer erreicht oder das Datum. Dieser Hinweis verschwindet nach ca. 20 Sekunden wieder aus dem Display, es kann ganz normal gefahren werden
Zeitpunkt kann in der Service-Software eingestellt bzw. deaktiviert werden
Akku voll
Akku fast leer
Aktivierter/nicht aktivierter Bremsassistent Der Bremsassistent wird über das MMI-Menü (de-)aktiviert
Bluetooth-Verbindung hergestellt/abgebrochen Koppeln/Verbinden des Smartphones in der App
GPS-Signal wird empfangen/nicht empfangen (nur bei aktiver Bluetooth-Verbindung)
Ihr Smartphone befindet sich an einem abgeschirmten Ort
Ladezustand des Smartphones (nur bei aktiver Bluetooth-Verbindung)
„Light“ Fehlerhafte Lampe, sofern die Lampe über das System betrieben wird Kurzschluss im 36V-Stromkreis
Austausch der LampeKabelbaum auf Kabelbruch prüfenKabelbaum/Akkudock auf Wassereintritt prüfenKreuztausch vornehmen (Kabelbaum kann nur hingehalten werden, muss für Test nicht eingebaut werden)
19
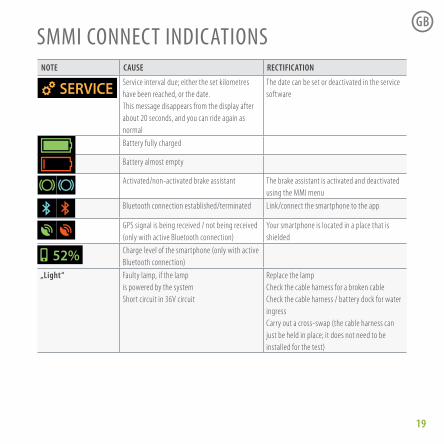
SMMI CONNECT INDICATIONSNOTE CAUSE RECTIFICATION
Service interval due; either the set kilometres have been reached, or the date.This message disappears from the display after about 20 seconds, and you can ride again as normal
The date can be set or deactivated in the service software
Battery fully charged
Battery almost empty
Activated/non-activated brake assistant The brake assistant is activated and deactivated using the MMI menu
Bluetooth connection established/terminated Link/connect the smartphone to the app
GPS signal is being received / not being received (only with active Bluetooth connection)
Your smartphone is located in a place that is shielded
Charge level of the smartphone (only with activeBluetooth connection)
„Light“ Faulty lamp, if the lampis powered by the systemShort circuit in 36V circuit
Replace the lampCheck the cable harness for a broken cableCheck the cable harness / battery dock for water ingressCarry out a cross-swap (the cable harness can just be held in place; it does not need to be installed for the test)

20
DPFLEGEHINWEISEDas abnehmbare sMMI wird über acht Kontakte elektrisch mit dem Halterungs-dock verbunden. Jeder dieser acht Kontakte übernimmt eine wichtige Funktion zum Betrieb des Systems, wie z. B. die Funktion der drei Bedientasten oder die Stromversorgung des sMMI. Es wird empfohlen die Kontaktf lächen am sMMI und die Kontaktpins am Halterungsdock von Zeit zu Zeit zu reinigen. Bitte benutzen Sie dafür ein nicht wasserhaltiges Kontaktspray.
LAGERUNGLagern Sie das sMMI optimalerweise bei einer Temperatur zwischen 5 °C und 20 °C. Vermeiden Sie nach Möglichkeit die Lagerung in feuchter Umgebung.
TRANSPORTBeim Transport des Pedelecs nehmen Sie bitte stets das sMMI vom Halterungs-dock ab und verstauen es separat an einem trockenen Ort.
TECHNISCHE DATEN• Farbdisplay, 2,4 Zoll, Auflösung 240 x 320 Pixel• Abmessungen sMMI ohne Dock (B x L x H) 53 mm x 85 mm x 14 mm• Mechanische/elektrische Kontaktierung Dreh-Bajonettverschluss • Beleuchtung LED Backlight, 70 – 350 cd/m²• USB-Anschluss zum Verbinden des sMMI mit der Diagnose-Software
(nur durch Fachhändler auszuführen)• Gewicht sMMI: ca. 60 g
21
CARE INSTRUCTIONSThe removable sMMI is electrically connected to the bracket dock via eight contacts. Each of these eight contacts assumes an important function for the operation of the system, such as the function of the three control buttons or the power supply of the sMMI. It is recommended that the contact surfaces on the sMMI and the contact pins on the bracket dock be cleaned from time to time. Please be sure to use a contact spray that does not contain water.
STORAGEIt is best to store the sMMI at a temperature between 5 °C and 20 °C. If possible, avoid storage in a damp environment.
TRANSPORTWhen transporting the pedelec, always detach the sMMI from the bracket dock and stow it separately in a dry place.
TECHNICAL DATA• Colour display, 2.4 inches, resolution 240 x 320 pixels• Dimensions of the sMMI without dock (W x L x H) 53 mm x 85 mm x 14 mm• Mechanical / electrical contacting rotating bayonet lock• Lighting LED backlight, 70 – 350 cd/m²• USB port for connecting the sMMI with the diagnostic software (to be carried out only by specialist dealers)• Weight of the sMMI: approx. 60 g

22
D
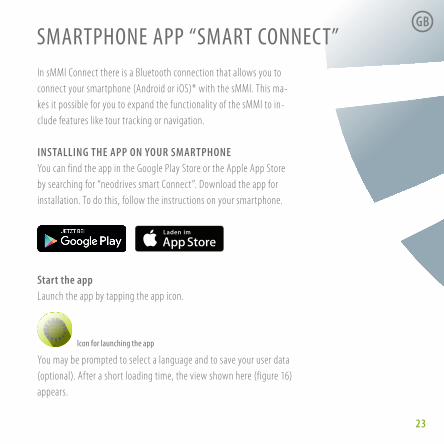
Im sMMI Connect ist eine Bluetooth Verbindung eingebaut, die es Ihnen erlaubt, Ihr Smartphone (Android oder IOS)* mit dem sMMI zu verbinden. Dadurch können Sie den Funktionsumfang Ihres sMMI um Features wie Touren-Tracking oder Navigation erweitern.
INSTALLATION DER APP AUF IHREM SMARTPHONESie finden die App im Google Play Store bzw. im Apple App Store indem Sie nach „neodrives smart Connect“ suchen. Laden Sie die App zur Installation herunter. Folgen Sie dazu bitte den Anwei-sungen auf Ihrem Smartphone.
Starten der AppStarten Sie die App durch Tippen auf das App-Icon.
Icon zum Starten der App
Ggf. werden Sie dazu aufgefordert eine Sprache zu wählen und Ihre Nutzerdaten zu hinterlegen (freiwillig). Nach einer kurzen Ladezeit erscheint die abgebildete Ansicht (Bild 16).
Bild 16: App-Screen „Fahren“Figure 16: App screen “Ride”
SMARTPHONE-APP „SMART CONNECT“
* App verfügbar für Android, ab Sommer 2016 auch für IOSApp available for Android; also available for iOS starting in the summer of 2016
23
In sMMI Connect there is a Bluetooth connection that allows you to connect your smartphone (Android or iOS)* with the sMMI. This ma-kes it possible for you to expand the functionality of the sMMI to in-clude features like tour tracking or navigation.
INSTALLING THE APP ON YOUR SMARTPHONEYou can find the app in the Google Play Store or the Apple App Store by searching for “neodrives smart Connect”. Download the app for installation. To do this, follow the instructions on your smartphone.
Start the appLaunch the app by tapping the app icon.
Icon for launching the app
You may be prompted to select a language and to save your user data (optional). After a short loading time, the view shown here (figure 16) appears.
SMARTPHONE APP “SMART CONNECT”
24
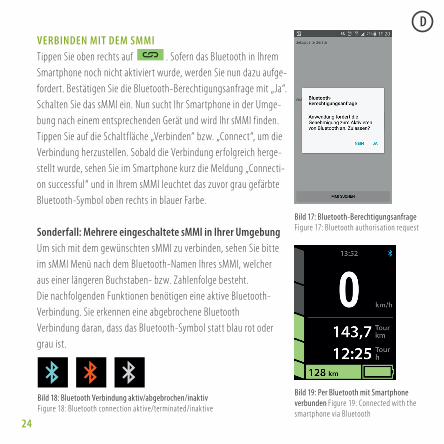
DVERBINDEN MIT DEM SMMITippen Sie oben rechts auf . Sofern das Bluetooth in Ihrem Smartphone noch nicht aktiviert wurde, werden Sie nun dazu auf ge-fordert. Bestätigen Sie die Bluetooth-Berechtigungsanfrage mit „Ja“. Schalten Sie das sMMI ein. Nun sucht Ihr Smartphone in der Umge-bung nach einem entsprechenden Gerät und wird Ihr sMMI finden. Tippen Sie auf die Schaltf läche „Verbinden“ bzw. „Connect“, um die Verbindung herzustellen. Sobald die Verbindung erfolgreich herge-stellt wurde, sehen Sie im Smartphone kurz die Meldung „Connecti-on successful“ und in Ihrem sMMI leuchtet das zuvor grau gefärbte Bluetooth-Symbol oben rechts in blauer Farbe.
Sonderfall: Mehrere eingeschaltete sMMI in Ihrer UmgebungUm sich mit dem gewünschten sMMI zu verbinden, sehen Sie bitte im sMMI Menü nach dem Bluetooth-Namen Ihres sMMI, welcher aus einer längeren Buchstaben- bzw. Zahlenfolge besteht. Die nachfolgenden Funktionen benötigen eine aktive Blue tooth-Verbindung. Sie erken nen eine abgebrochene Bluetooth Verbindung daran, dass das Blue tooth-Symbol statt blau rot oder grau ist.
Bild 17: Bluetooth-Berechtigungsanfrage Figure 17: Bluetooth authorisation request
Bild 19: Per Bluetooth mit Smartphone verbunden Figure 19: Connected with the smartphone via Bluetooth
Bild 18: Bluetooth Verbindung aktiv/abgebrochen/inaktivFigure 18: Bluetooth connection aktive/terminated/inaktive

25
CONNECTING WITH THE SMMIOn the top right, tap . If the Bluetooth is not activated on your phone, you will be prompted to activate it. Confirm the Blue-tooth authorisation request with “Yes”. Switch on the sMMI. Now your smartphone searches for a suitable device and finds your sMMI. Tap the “Connect” button to establish the connection. Once the connection is successfully established, on the smartphone you will see the message “Connection successful” and on your sMMI the previously grey Bluetooth icon lights up on the top right in blue.
Special case: Several sMMIs switched on near youTo connect to the desired sMMI, please refer to the sMMI menu to search for the Bluetooth name of your sMMI, which consists of a long sequence of letters and numbers.The following features require an active Bluetooth connection. You can recognise a terminated Bluetooth connection by a Bluetooth icon that is red or grey instead of blue.
26
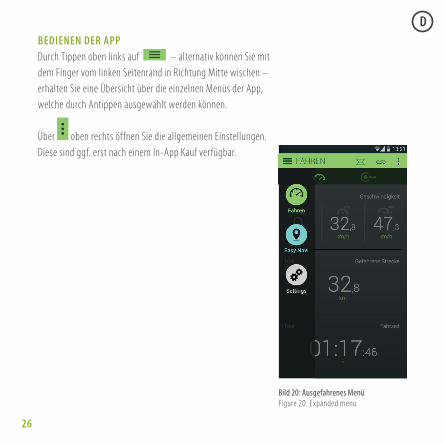
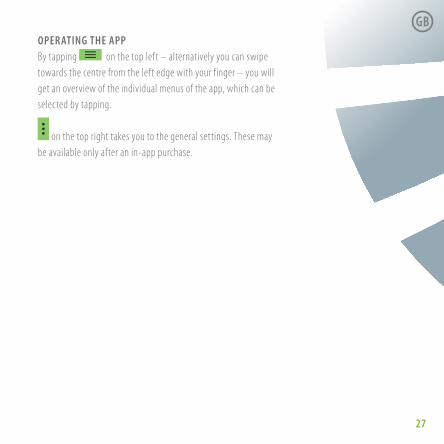
DBEDIENEN DER APPDurch Tippen oben links auf – alternativ können Sie mit dem Finger vom linken Seitenrand in Richtung Mitte wischen – erhalten Sie eine Übersicht über die einzelnen Menüs der App, welche durch Antippen ausgewählt werden können.
Über oben rechts öffnen Sie die allgemeinen Einstellungen. Diese sind ggf. erst nach einem In-App Kauf verfügbar.
Bild 20: Ausgefahrenes MenüFigure 20: Expanded menu
27
OPERATING THE APPBy tapping on the top left – alternatively you can swipe towards the centre from the left edge with your finger – you will get an overview of the individual menus of the app, which can be selected by tapping.
on the top right takes you to the general settings. These may be available only after an in-app purchase.

28
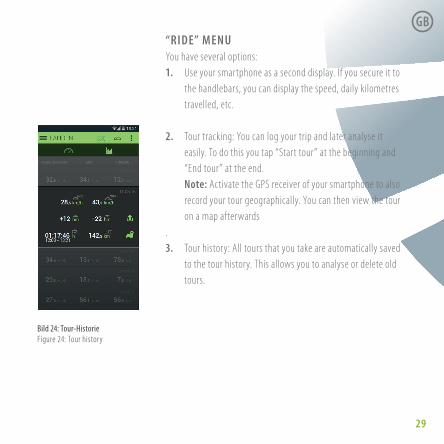
DMENÜ „FAHREN“ Sie haben verschiedene Optionen:1. Verwendung des Smartphones als zweites Anzeigegerät. Bei
Befestigung am Lenker können Sie sich die Geschwindigkeit, die Tages-Kilometer etc. anzeigen lassen.
2. Touren-Tracking: Sie können Ihre Fahrt „mit-loggen“ und später bequem auswerten. Dazu tippen Sie zu Beginn auf „Tour starten“ und am Ende auf „Tour beenden“.
Hinweis: Aktivieren Sie den GPS-Empfang Ihres Smart-phones, um Ihre Tour auch geografisch aufzuzeichnen. Sie können dann hinterher den Verlauf der Tour auf einer Karte einsehen.
3. Tour-Historie: Alle von Ihnen durchgeführten Touren werden automatisch in der Tour-Historie gespeichert. So können Sie alte Touren analysieren bzw. auch löschen.
Bild 23: Ansicht „Fahren“: Über das Play-Symbol starten Sie die Touren-Aufzeichnung.Figure 23: “Ride” view: You start recor-ding the tour by tapping the Play icon
Bild 21: Tour startenBild 21: Start Tour
Bild 22: Tour beendenBild 22: End Tour
29
“RIDE” MENUYou have several options:1. Use your smartphone as a second display. If you secure it to
the handlebars, you can display the speed, daily kilometres travelled, etc.
2. Tour tracking: You can log your trip and later analyse it easily. To do this you tap “Start tour” at the beginning and “End tour” at the end.
Note: Activate the GPS receiver of your smartphone to also record your tour geographically. You can then view the tour on a map afterwards
.3. Tour history: All tours that you take are automatically saved
to the tour history. This allows you to analyse or delete old tours.
Bild 24: Tour-HistorieFigure 24: Tour history
30
DMENÜ „E A S Y NAVI“Die ideale Ergänzung für Touren-Radler und Stadt-Entdecker ist diebedienerfreundliche Navigationsfunktion „Easy Navi“. Diese kann per In-App-Kauf aktiviert werden und stellt dem Nutzer weltweites Kartenmaterial auch off line zur Verfügung. Dies ist besonders vorteilhaft, weil das Smartphone auch ohne Zugang zum Internet das Kartenmaterial stets parat hält und die Daten nicht ständig nachladen muss.*
* Für die Routenplanung ist ggf. kurzzeitig eine Internetverbindung er forderlich.
DIE FEATURES• Anzeige von Pfeil- oder Kartennavigation* im sMMI Display• Routenplanung wahlweise über direkte Adresseingabe oder Import
von GPX Daten* In Abhängigkeit vom Smartphone-Modell kann es zu Unterschieden in den Darstellungs -
möglichkeiten bzw. der Darstellungsgeschwindigkeit bei der Kartennavigation kommen.
Um das Easy Navi zu nutzen, befolgen Sie bitte die Anweisungen zum In-App-Kauf. Sobald die Funktion freigeschaltet ist, haben Sie die Möglichkeit, Kartenmaterial herunterzuladen.
Start-Ziel-NavigationBitte geben Sie Ihren gewünschten Startpunkt und Ihr gewünschtes Ziel ein. Startpunkt: In den häufigsten Fällen wählen Sie Ihre aktuelle Position über Tippen auf das nebenstehende Symbol.
Bild 25: Meine PositionFigure 25: My position

31
“E A S Y NAVI” MENUThe ideal complement for touring cyclists and urban explorers is the user-friendly navigation function “Easy Navi”. It can be activated via in-app purchase and provides the user with global maps even when they are off-line. This is particularly advanta-geous because the smartphone has the maps even without access to the Internet and the data does not need to constantly load.*
* An Internet connection is momentarily required for route planning.
THE FEATURES• Display of arrow or map navigation* on the sMMI display• Routing by entry of an address or import of GPX data
* Depending on the smartphone model, there may be dif ferences in the presentation options and presenta-tion speed of the map navigation.
To use Easy Navi, follow the instructions for in-app purchase. Once the function is enabled, you have the option of downloading maps.
Start-destination navigationPlease enter your desired starting point and your destination. Starting point: In most cases you can select your current location by tapping the adjacent icon.
32
DSofern das GPS auf Ihrem Smartphone noch nicht aktiviert wurde, werden Sie nun dazu aufgefordert. Bestätigen Sie die GPS-Berech-tigungsanfrage. Nach einer kurzen Wartezeit wird ein GPS-Signal erkannt. Wenn die GPS-Ortung nicht funktioniert, sollten Sie eventuell störende Faktoren beseitigen. Nehmen Sie für die Or-tung Ihr Telefon aus der Hülle, um die GPS-Leistung nicht negativ zu beeinflussen. Auch sollten Sie sich nicht in Gebäuden aufhal-ten, da dicke Wände das GPS-Signal stark beeinträchtigen können und Ihr Smartphone keine GPS-Verbindung aufbauen kann. Be-achten Sie zudem, dass in einigen Gegenden dieser Vorgang bis zu fünf Minuten dauern kann. Bringen Sie daher etwas Geduld mit.
Hinweis: Sie können Ihre Tour auch ohne GPS-Empfang planen (durch Eingabe eines Ortes als Startpunkt). Spätestens, wenn Sie die Navigation starten muss die GPS-Verbindung aktiv sein.
Zielpunkt: Bitte geben Sie Ihr Ziel in dieser Reihenfolge ein: Straße, Hausnummer, Ort. z. B. Friedrichstraße 19, Berlin. Andere Eingabeformate werden zum Teil auch erkannt.
Bild 26: AdresseingabeFigure 26: Address entry
33
If GPS is not activated on your phone, you will be prompted to activate it. Confirm the GPS authorisation request. After a short wait, a GPS signal is detected. If the GPS geolocation is not wor-king, you should eliminate any factors that may be interfering with it. For the geolocation, remove your phone from the case so that it does not negatively af fect GPS performance. Also, you should not be in a building, as thick walls can strongly af fect the GPS signal, and your phone will not be able to establish a GPS connection. Also note that in some areas this may take up to five minutes. Please be patient.
Note: You can plan your tour even without GPS reception (by entering a place as a starting point). The GPS connection must be active when you start the navigation at the latest.
Destination: Please enter your destination in this order: street, house number, place, such as Friedrichstrasse 19, Berlin. Other input formats are also recognised to some extent.
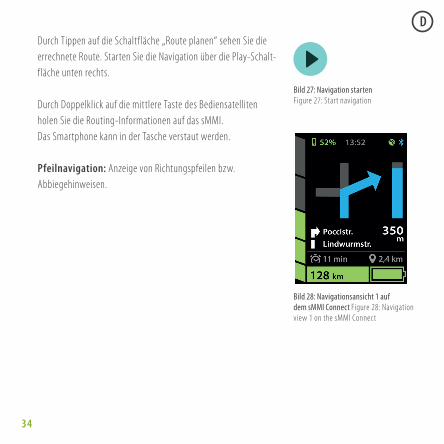
34
DDurch Tippen auf die Schaltf läche „Route planen“ sehen Sie die errechnete Route. Starten Sie die Navigation über die Play-Schalt-f läche unten rechts.
Durch Doppelklick auf die mittlere Taste des Bediensatelliten holen Sie die Routing-Informationen auf das sMMI.Das Smartphone kann in der Tasche verstaut werden.
Pfeilnavi gation: Anzeige von Richtungspfeilen bzw. Abbiegehinweisen.
Bild 27: Navigation startenFigure 27: Start navigation
Bild 28: Navigationsansicht 1 auf dem sMMI Connect Figure 28: Navigation view 1 on the sMMI Connect
35
If you tap the “Plan route” button, you can see the calculated route. Start the navigation by pressing the Play button on the bottom right.
Double-click the middle button of the remote control to copy the routing information to the sMMI.The smartphone can be stowed in your pocket.
Arrow navigation: Display of directional arrows and turning instructions.

36
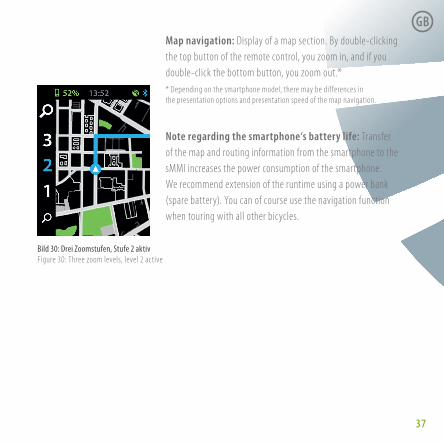
DKartennavigation: Anzeige eines Kartenausschnitts. Mittels Doppelklick auf die obere Taste des Bediensatellits zoomen Sie heran, über Doppelklick auf die untere Taste weiter weg.** In Abhängigkeit vom Smartphone-Modell kann es zu Unterschieden inden Darstellungsmöglichkeiten bzw. der Darstellungsgeschwindigkeit bei der Kartennavigation kommen.
Hinweis zur Akkulaufzeit des Smartphones: Durch die Übertragung der Karten- bzw. Routinginformationen vom Smart-phone auf das sMMI steigt der Stromverbrauch des Smartphones. Wir empfehlen die Verlängerung der Laufzeit mittels einer Powerbank (Zusatzakku). Sie können die Navigations-Funktion selbstverständlich auch bei Touren mit allen anderen Fahrrädern nutzen.
Bild 29: Navigationsansicht 2 auf dem sMMI Connect Figure 29: Navigation view 2 on the sMMI Connect
37
Map navigation: Display of a map section. By double-clicking the top button of the remote control, you zoom in, and if you double-click the bottom button, you zoom out.** Depending on the smartphone model, there may be dif ferences inthe presentation options and presentation speed of the map navigation.
Note regarding the smartphone‘s battery life: Transfer of the map and routing information from the smartphone to the sMMI increases the power consumption of the smartphone. We recommend extension of the runtime using a power bank (spare battery). You can of course use the navigation function when touring with all other bicycles.
Bild 30: Drei Zoomstufen, Stufe 2 aktiv Figure 30: Three zoom levels, level 2 active

38
DWAS TUN, WENN …die Navigations-Übertragung auf das sMMI nicht startet/abbricht? Bitte stellen Sie sicher, dass:• Ihr Smartphone-Akku ausreichend geladen ist• Ihr Smartphone GPS-Empfang hat – Sie erkennen einen
bestehenden GPS-Empfang am grünen GPS-Symbol oben im sMMI
• die Bluetooth-Verbindung zwischen sMMI und Smartphone steht – Sie erkennen eine aktive Verbindung am blau leuchtenden Bluetooth-Symbol oben rechts im sMMI
Weitere Hinweise finden Sie in der Smartphone-App unter dem Menüpunkt „Settings“/Bild, „FAQ“, sowie auf unserer Homepage www.neodrives.de
GPS SymbolGPS symbol
Bluetooth SymbolBluetooth symbol

39
WHAT TO DO IF …the navigation transfer to the sMMI does not start/stops working? Please make sure that:• Your smartphone battery is sufficiently charged• Your smartphone has GPS reception – you can recognise
existing GPS reception by the green GPS icon at the top of the sMMI
• The Bluetooth connection between sMMI and smartphone is established – you can recognise an active connection by the blue Bluetooth icon in the top right corner of the sMMI
For more information, see the Smartphone app under the menu item “Settings”/ image, “FAQ”, and on our website www.neodrives.de

93.0
006.6
.01.01
Editi
on 04
/201
6 ©Al
ber G
mbH
, Alb
stadt
. Sub
ject t
o tec
hnica
l cha
nges
.Certificates of origin at
www.neodrives.de
Alber GmbH Vor dem Weißen Stein 21 72461 Albstadt / Germany Tel. + 49 7432 2006-0 Fax + 49 7432 2006-299 [email protected]