Quick Installation Guide · Sollte einer der oben aufgeführten Artikel fehlen, wenden Sie sich...
92
This document will guide you through the basic installation process for your new D-Link Network Camera. DCS-4705E Documentation also available on CD and via the D-Link Website Quick Installation Guide Vigilance 5 Megapixel H.265 Outdoor Bullet Camera Quick Installation Guide Installationsanleitung Guide d’installation Guía de instalación Guida di Installazione Краткое руководство по установке КОРОТКИЙ ПОСІБНИК ЗІ ВСТАНОВЛЕННЯ Guia de Instalação Rápida 快速安裝指南 Petunjuk Pemasangan Cepat
-
Upload
duongxuyen -
Category
Documents
-
view
216 -
download
0
Transcript of Quick Installation Guide · Sollte einer der oben aufgeführten Artikel fehlen, wenden Sie sich...
This document will guide you through the basic installation process for your new D-Link Network Camera.
DCS-4705E
Documentation also available on CD and via the D-Link Website
Quick Installation GuideVigilance 5 Megapixel H.265 Outdoor Bullet Camera
Quick Installation GuideInstallationsanleitungGuide d’installationGuía de instalaciónGuida di InstallazioneКраткое руководство по установкеКОРОТКИЙ ПОСІБНИК ЗІ ВСТАНОВЛЕННЯGuia de Instalação Rápida快速安裝指南
Petunjuk Pemasangan Cepat

1D-Link DCS-4705E Quick Installation Guide 1
EN
GLIS
H
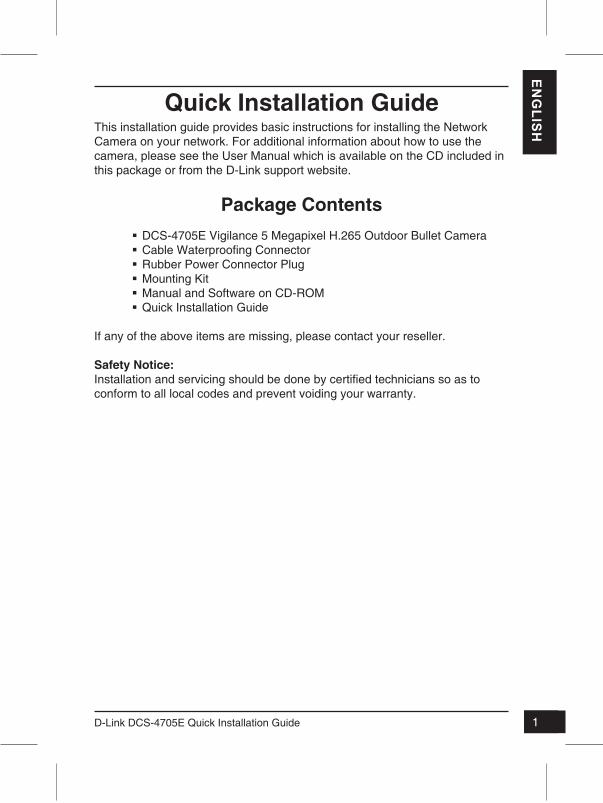
Quick Installation GuideThis installation guide provides basic instructions for installing the Network Camera on your network. For additional information about how to use the camera, please see the User Manual which is available on the CD included in this package or from the D-Link support website.
Package Contents � DCS-4705E Vigilance 5 Megapixel H.265 Outdoor Bullet Camera � Cable Waterproofing Connector � Rubber Power Connector Plug � Mounting Kit � Manual and Software on CD-ROM � Quick Installation Guide
If any of the above items are missing, please contact your reseller.
Safety Notice:Installation and servicing should be done by certified technicians so as to conform to all local codes and prevent voiding your warranty.
2 D-Link DCS-4705E Quick Installation Guide2
EN
GLI
SH
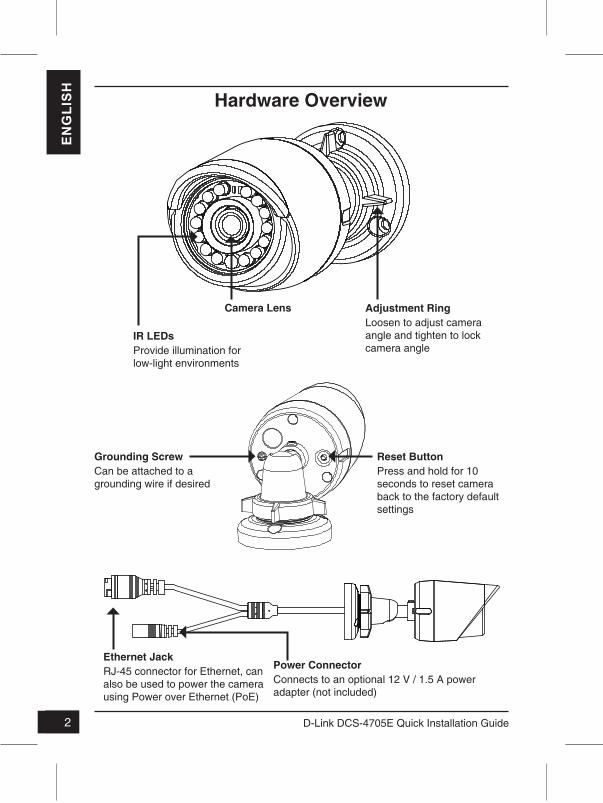
Hardware Overview
Camera Lens
IR LEDsProvide illumination for low-light environments
Adjustment RingLoosen to adjust camera angle and tighten to lock camera angle
Reset ButtonPress and hold for 10 seconds to reset camera back to the factory default settings
Grounding ScrewCan be attached to a grounding wire if desired
Power ConnectorConnects to an optional 12 V / 1.5 A power adapter (not included)
Ethernet JackRJ-45 connector for Ethernet, can also be used to power the camera using Power over Ethernet (PoE)
3D-Link DCS-4705E Quick Installation Guide 3
EN
GLIS
H
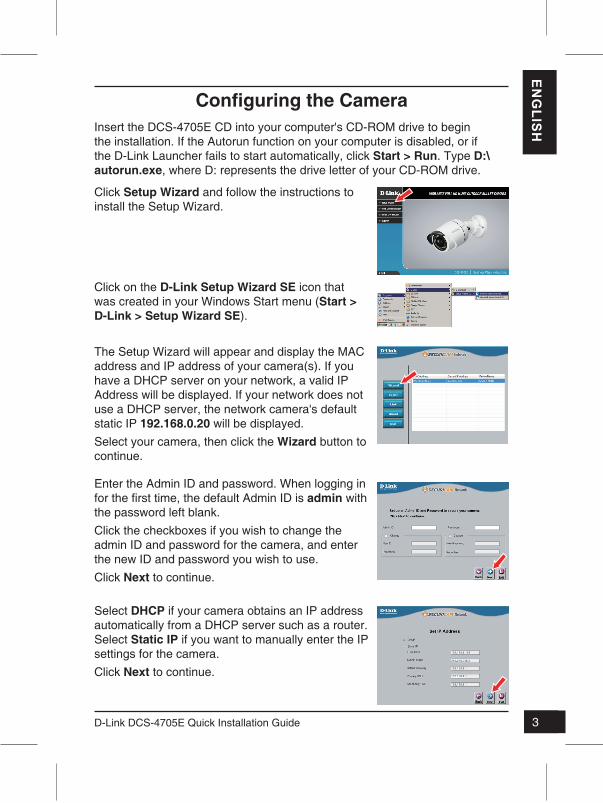
Configuring the CameraInsert the DCS-4705E CD into your computer's CD-ROM drive to begin the installation. If the Autorun function on your computer is disabled, or if the D-Link Launcher fails to start automatically, click Start > Run. Type D:\autorun.exe, where D: represents the drive letter of your CD-ROM drive.
Click on the D-Link Setup Wizard SE icon that was created in your Windows Start menu (Start > D-Link > Setup Wizard SE).
The Setup Wizard will appear and display the MAC address and IP address of your camera(s). If you have a DHCP server on your network, a valid IP Address will be displayed. If your network does not use a DHCP server, the network camera's default static IP 192.168.0.20 will be displayed.Select your camera, then click the Wizard button to continue.
Click Setup Wizard and follow the instructions to install the Setup Wizard.
Enter the Admin ID and password. When logging in for the first time, the default Admin ID is admin with the password left blank.Click the checkboxes if you wish to change the admin ID and password for the camera, and enter the new ID and password you wish to use.Click Next to continue.
Select DHCP if your camera obtains an IP address automatically from a DHCP server such as a router. Select Static IP if you want to manually enter the IP settings for the camera.Click Next to continue.
4 D-Link DCS-4705E Quick Installation Guide4
EN
GLI
SH
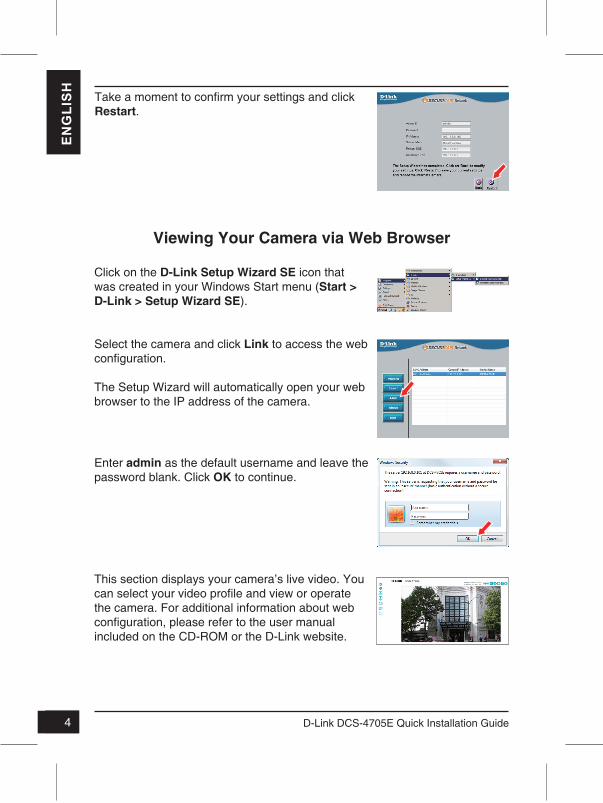
Take a moment to confirm your settings and click Restart.
Viewing Your Camera via Web Browser
Click on the D-Link Setup Wizard SE icon that was created in your Windows Start menu (Start > D-Link > Setup Wizard SE).
Select the camera and click Link to access the web configuration.
The Setup Wizard will automatically open your web browser to the IP address of the camera.
This section displays your camera’s live video. You can select your video profile and view or operate the camera. For additional information about web configuration, please refer to the user manual included on the CD-ROM or the D-Link website.
Enter admin as the default username and leave the password blank. Click OK to continue.
5D-Link DCS-4705E Quick Installation Guide 5
EN
GLIS
H
Mounting InstructionsIt is highly recommended that you configure and test your camera before mounting it.
If you need to waterproof your installation, please continue to the next page.
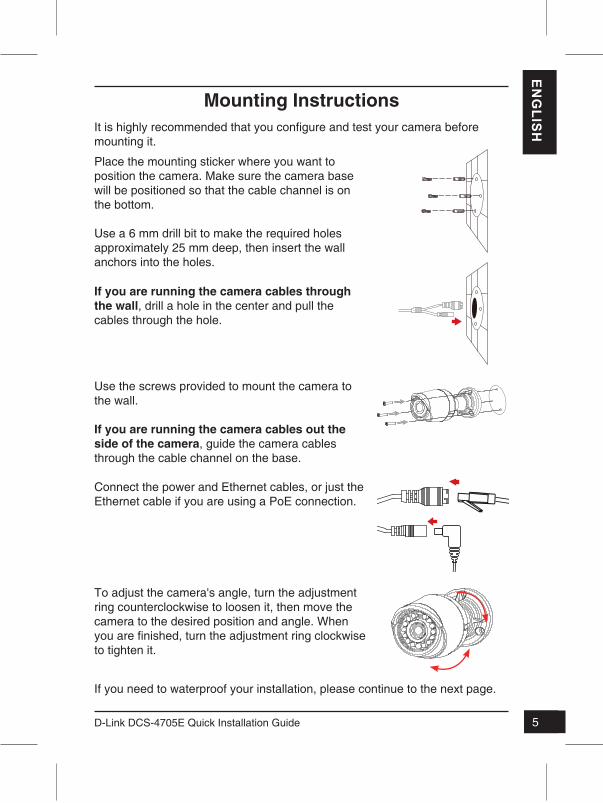
Place the mounting sticker where you want to position the camera. Make sure the camera base will be positioned so that the cable channel is on the bottom.
Use a 6 mm drill bit to make the required holes approximately 25 mm deep, then insert the wall anchors into the holes.
If you are running the camera cables through the wall, drill a hole in the center and pull the cables through the hole.
Connect the power and Ethernet cables, or just the Ethernet cable if you are using a PoE connection.
Use the screws provided to mount the camera to the wall.
If you are running the camera cables out the side of the camera, guide the camera cables through the cable channel on the base.
To adjust the camera's angle, turn the adjustment ring counterclockwise to loosen it, then move the camera to the desired position and angle. When you are finished, turn the adjustment ring clockwise to tighten it.
6 D-Link DCS-4705E Quick Installation Guide6
EN
GLI
SH
To waterproof your camera installation, follow the instructions below. Round Ethernet cable, a crimping tool, and RJ-45 plugs are required for this procedure.
Waterproofing Your Installation
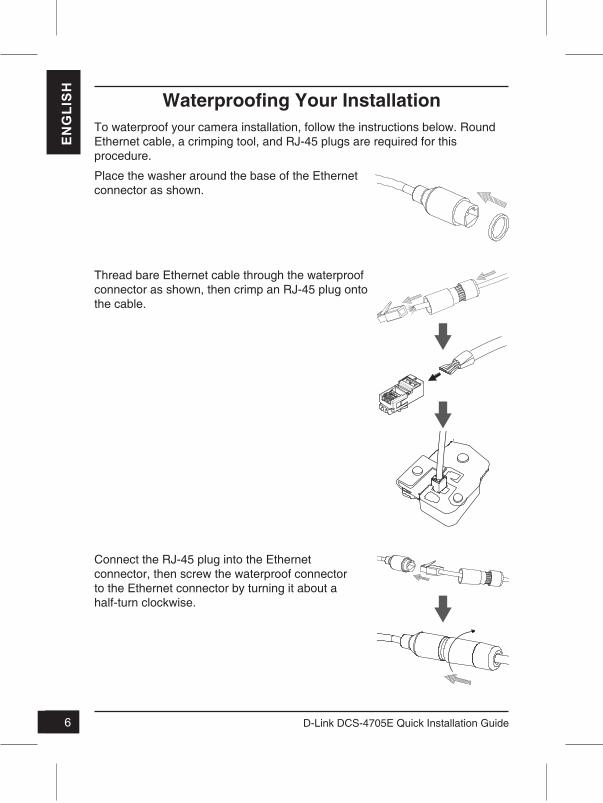
Place the washer around the base of the Ethernet connector as shown.
Connect the RJ-45 plug into the Ethernet connector, then screw the waterproof connector to the Ethernet connector by turning it about a half-turn clockwise.
Thread bare Ethernet cable through the waterproof connector as shown, then crimp an RJ-45 plug onto the cable.
7D-Link DCS-4705E Quick Installation Guide 7
EN
GLIS
H
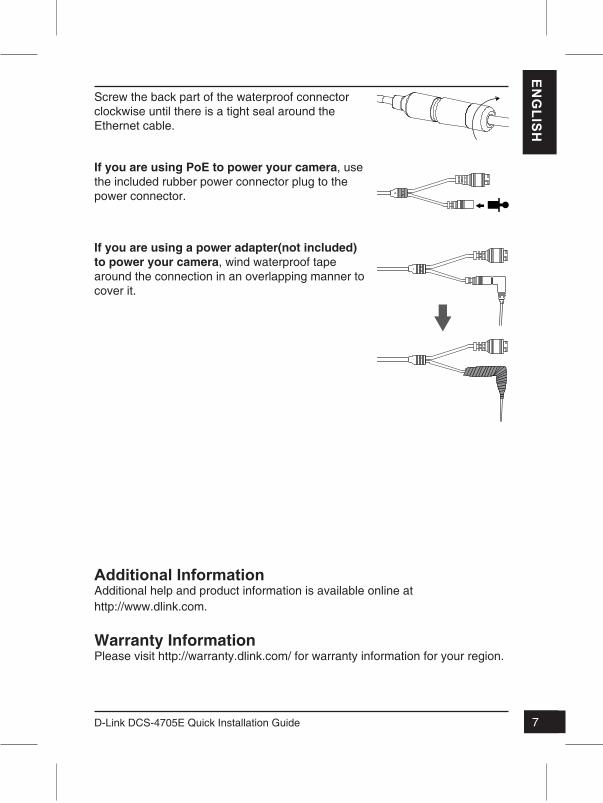
If you are using PoE to power your camera, use the included rubber power connector plug to the power connector.
If you are using a power adapter(not included) to power your camera, wind waterproof tape around the connection in an overlapping manner to cover it.
Additional InformationAdditional help and product information is available online at http://www.dlink.com.
Warranty Information Please visit http://warranty.dlink.com/ for warranty information for your region.
Screw the back part of the waterproof connector clockwise until there is a tight seal around the Ethernet cable.
88 D-Link DCS-4705E Quick Installation Guide
DE
UTS
CH
InstallationsanleitungDiese Installationsanleitung bietet Ihnen grundlegende Anleitungen zur Installation der Netzwerkkamera in Ihrem Netzwerk. Zusätzliche Informationen zur Verwendung der Kamera finden Sie im Benutzerhandbuch, das Ihnen auf der CD, die diesem Paket beiliegt, oder über die D-Link Support-Website zur Verfügung steht.
Packungsinhalt � DCS-4705E Vigilance 5 Megapixel H.265 Outdoor Bullet Camera � Wasserdichter Anschlussstecker � Netzanschlussstecker aus Hartgummi � Montageset � CD-ROM mit Software und Handbuch � Installationsanleitung
Sollte einer der oben aufgeführten Artikel fehlen, wenden Sie sich bitte an Ihren Fachhändler.
Sicherheitshinweis:Installation und Wartungsarbeiten sollten nur von zertifizierten Technikern vorgenommen werden, zu jeder Zeit allen örtlich geltenden Richtlinien und Anforderungen entsprechen sowie verhindern, dass Ihr Garantieanspruch erlischt.

99D-Link DCS-4705E Quick Installation Guide
DE
UTS
CH
Hardware-Überblick
Kameraobjektiv
IR-LEDsBeleuchtung für schwach ausgeleuchtete Umgebungen
AnpassungsringLösen, um Kamerawinkel einzustellen, bzw. festziehen, um Kamerawinkel in einer Position zu fixieren
Rücksetzknopf (Reset)Drücken und 10 Sekunden lang halten, um die Kamera auf die werkseitigen Standardeinstellungen zurückzusetzen
ErdungsschraubeNach Bedarf zum Anbringen eines Erdungskabels verwenden
NetzanschlussZum Anschluss an ein Netzteil (12 V / 1,5 A) (nicht im Lieferumfang enthalten)
Ethernet-AnschlussRJ-45-Anschluss für Ethernet, der auch für die Stromzufuhr (PoE) der Kamera verwendet werden kann
1010 D-Link DCS-4705E Quick Installation Guide
DE
UTS
CH
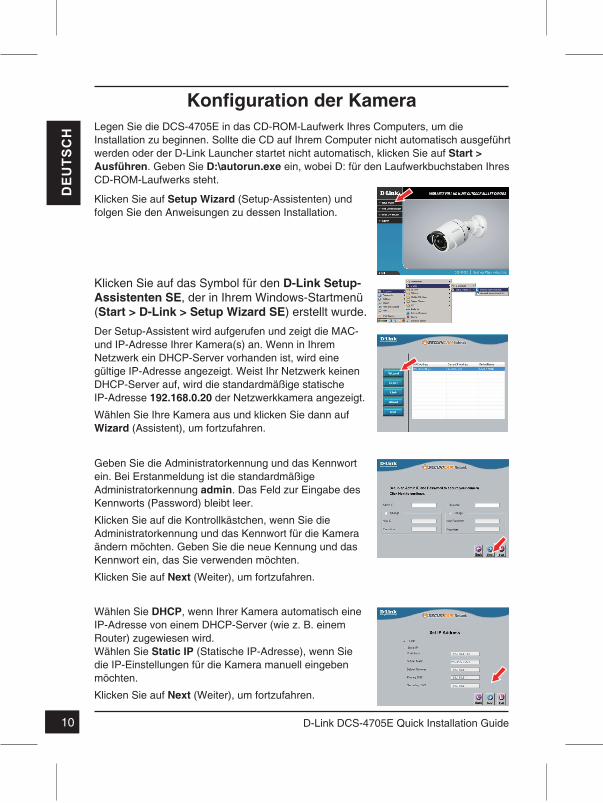
Konfiguration der KameraLegen Sie die DCS-4705E in das CD-ROM-Laufwerk Ihres Computers, um die Installation zu beginnen. Sollte die CD auf Ihrem Computer nicht automatisch ausgeführt werden oder der D-Link Launcher startet nicht automatisch, klicken Sie auf Start > Ausführen. Geben Sie D:\autorun.exe ein, wobei D: für den Laufwerkbuchstaben Ihres CD-ROM-Laufwerks steht.
Klicken Sie auf das Symbol für den D-Link Setup-Assistenten SE, der in Ihrem Windows-Startmenü (Start > D-Link > Setup Wizard SE) erstellt wurde.
Der Setup-Assistent wird aufgerufen und zeigt die MAC- und IP-Adresse Ihrer Kamera(s) an. Wenn in Ihrem Netzwerk ein DHCP-Server vorhanden ist, wird eine gültige IP-Adresse angezeigt. Weist Ihr Netzwerk keinen DHCP-Server auf, wird die standardmäßige statische IP-Adresse 192.168.0.20 der Netzwerkkamera angezeigt.
Wählen Sie Ihre Kamera aus und klicken Sie dann auf Wizard (Assistent), um fortzufahren.
Klicken Sie auf Setup Wizard (Setup-Assistenten) und folgen Sie den Anweisungen zu dessen Installation.
Geben Sie die Administratorkennung und das Kennwort ein. Bei Erstanmeldung ist die standardmäßige Administratorkennung admin. Das Feld zur Eingabe des Kennworts (Password) bleibt leer.
Klicken Sie auf die Kontrollkästchen, wenn Sie die Administratorkennung und das Kennwort für die Kamera ändern möchten. Geben Sie die neue Kennung und das Kennwort ein, das Sie verwenden möchten.
Klicken Sie auf Next (Weiter), um fortzufahren.
Wählen Sie DHCP, wenn Ihrer Kamera automatisch eine IP-Adresse von einem DHCP-Server (wie z. B. einem Router) zugewiesen wird. Wählen Sie Static IP (Statische IP-Adresse), wenn Sie die IP-Einstellungen für die Kamera manuell eingeben möchten.
Klicken Sie auf Next (Weiter), um fortzufahren.
1111D-Link DCS-4705E Quick Installation Guide
DE
UTS
CH
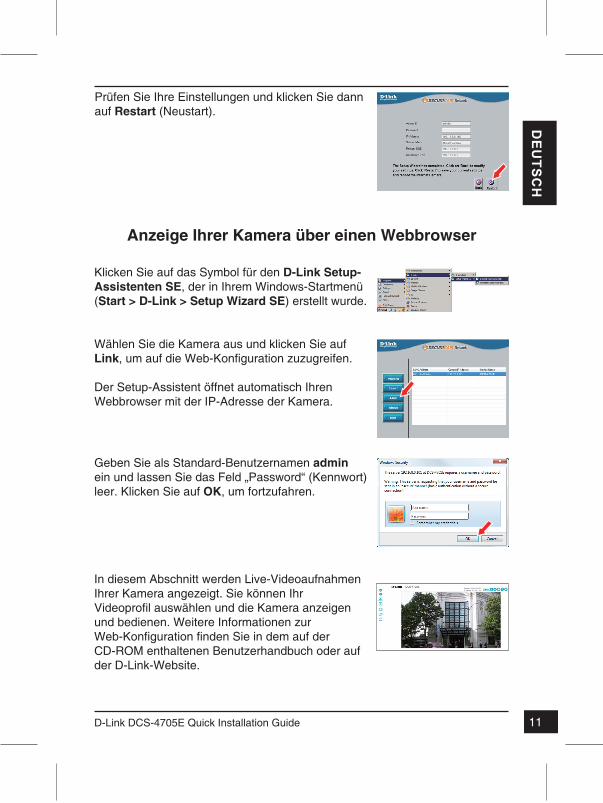
Prüfen Sie Ihre Einstellungen und klicken Sie dann auf Restart (Neustart).
Anzeige Ihrer Kamera über einen Webbrowser
Klicken Sie auf das Symbol für den D-Link Setup-Assistenten SE, der in Ihrem Windows-Startmenü (Start > D-Link > Setup Wizard SE) erstellt wurde.
Wählen Sie die Kamera aus und klicken Sie auf Link, um auf die Web-Konfiguration zuzugreifen.
Der Setup-Assistent öffnet automatisch Ihren Webbrowser mit der IP-Adresse der Kamera.
In diesem Abschnitt werden Live-Videoaufnahmen Ihrer Kamera angezeigt. Sie können Ihr Videoprofil auswählen und die Kamera anzeigen und bedienen. Weitere Informationen zur Web-Konfiguration finden Sie in dem auf der CD-ROM enthaltenen Benutzerhandbuch oder auf der D-Link-Website.
Geben Sie als Standard-Benutzernamen admin ein und lassen Sie das Feld „Password“ (Kennwort) leer. Klicken Sie auf OK, um fortzufahren.
1212 D-Link DCS-4705E Quick Installation Guide
DE
UTS
CH
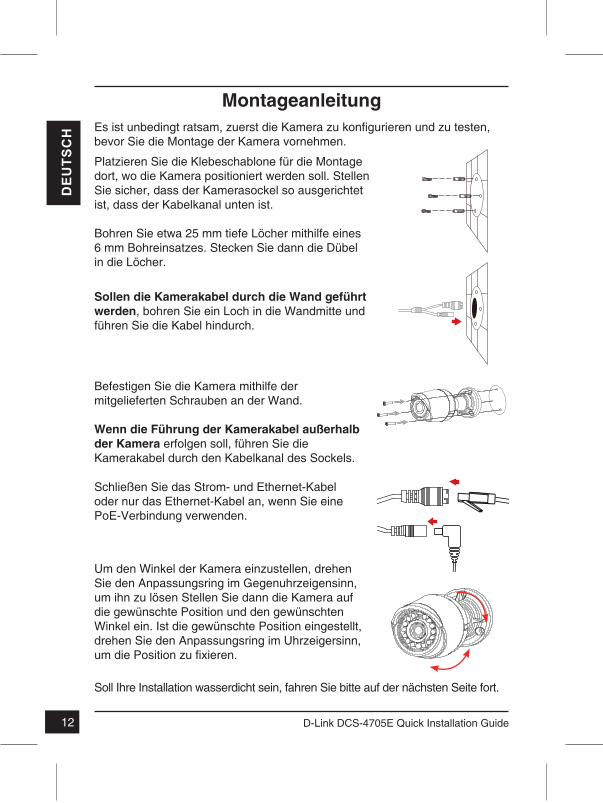
MontageanleitungEs ist unbedingt ratsam, zuerst die Kamera zu konfigurieren und zu testen, bevor Sie die Montage der Kamera vornehmen.
Soll Ihre Installation wasserdicht sein, fahren Sie bitte auf der nächsten Seite fort.
Platzieren Sie die Klebeschablone für die Montage dort, wo die Kamera positioniert werden soll. Stellen Sie sicher, dass der Kamerasockel so ausgerichtet ist, dass der Kabelkanal unten ist.
Bohren Sie etwa 25 mm tiefe Löcher mithilfe eines 6 mm Bohreinsatzes. Stecken Sie dann die Dübel in die Löcher.
Sollen die Kamerakabel durch die Wand geführt werden, bohren Sie ein Loch in die Wandmitte und führen Sie die Kabel hindurch.
Schließen Sie das Strom- und Ethernet-Kabel oder nur das Ethernet-Kabel an, wenn Sie eine PoE-Verbindung verwenden.
Befestigen Sie die Kamera mithilfe der mitgelieferten Schrauben an der Wand.
Wenn die Führung der Kamerakabel außerhalb der Kamera erfolgen soll, führen Sie die Kamerakabel durch den Kabelkanal des Sockels.
Um den Winkel der Kamera einzustellen, drehen Sie den Anpassungsring im Gegenuhrzeigensinn, um ihn zu lösen Stellen Sie dann die Kamera auf die gewünschte Position und den gewünschten Winkel ein. Ist die gewünschte Position eingestellt, drehen Sie den Anpassungsring im Uhrzeigersinn, um die Position zu fixieren.

1313D-Link DCS-4705E Quick Installation Guide
DE
UTS
CH
Um Ihre Kamerainstallation wasserdicht zu machen, befolgen Sie die Anweisungen unten: Für diesen Vorgang sind ein rundes Ethernet-Kabel, eine Crimpzange und RJ-45 Stecker erforderlich.
Ihre Installation wasserdicht machen
Bringen Sie den Dichtungsring auf dem Ethernet-Steckverbinder (wie in der Abbildung zu sehen) an.
Stecken Sie den RJ-45 Stecker in den Ethernet-Steckverbinder und drehen Sie den wasserdichten Steckanschluss im Uhrzeigersinn etwa eine halbe Umdrehung auf den Ethernet-Steckverbinder.
Fädeln Sie das Ethernet-Kabel mit dem freien Kabelende durch den wasserdichten Stecker (siehe Abbildung) und stecken Sie einen RJ-45 Stecker auf das gecrimpte Kabel.
1414 D-Link DCS-4705E Quick Installation Guide
DE
UTS
CH
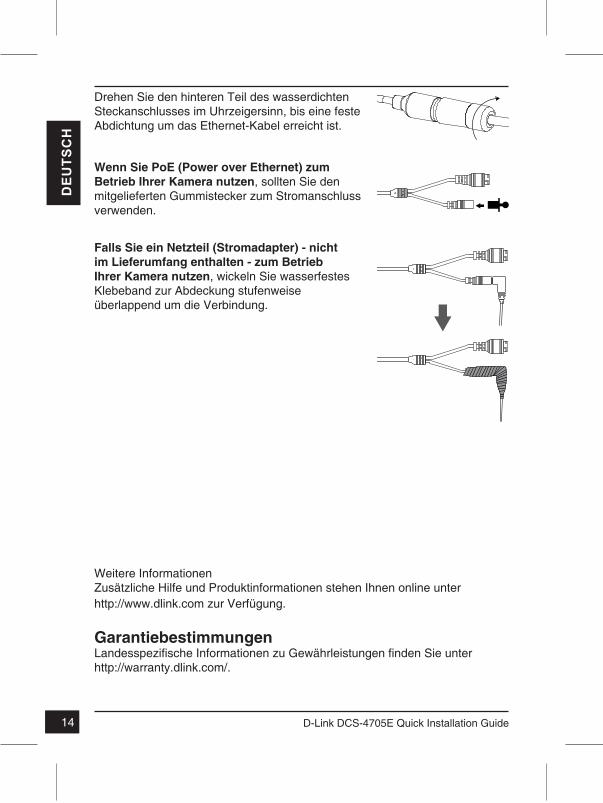
Wenn Sie PoE (Power over Ethernet) zum Betrieb Ihrer Kamera nutzen, sollten Sie den mitgelieferten Gummistecker zum Stromanschluss verwenden.
Falls Sie ein Netzteil (Stromadapter) - nicht im Lieferumfang enthalten - zum Betrieb Ihrer Kamera nutzen, wickeln Sie wasserfestes Klebeband zur Abdeckung stufenweise überlappend um die Verbindung.
Weitere InformationenZusätzliche Hilfe und Produktinformationen stehen Ihnen online unter http://www.dlink.com zur Verfügung.
Garantiebestimmungen Landesspezifische Informationen zu Gewährleistungen finden Sie unter http://warranty.dlink.com/.
Drehen Sie den hinteren Teil des wasserdichten Steckanschlusses im Uhrzeigersinn, bis eine feste Abdichtung um das Ethernet-Kabel erreicht ist.
1515D-Link DCS-4705E Quick Installation Guide
FRA
NÇ
AIS
Guide d'installation rapideCe guide d'installation fournit des instructions élémentaires qui vous aideront à installer la caméra réseau sur votre réseau. Pour obtenir des informations complémentaires sur l'utilisation de la caméra, consultez le Manuel d'utilisation, disponible sur le CD joint à ce coffret, ou sur le site Web d'assistance D-Link.
Contenu de la boîte � DCS-4705E Vigilance 5 Megapixel H.265 Outdoor Bullet Camera � Câble du connecteur étanche � Bouchon en caoutchouc du connecteur d'alimentation � Kit de montage � Manuel et logiciel sur CD-ROM � Guide d'installation rapide
Contactez votre revendeur s'il manque l'un des éléments ci-dessus.
Remarque de sécurité :L'installation et l'entretien doivent etre realises par des techniciens qualifies afin d'etre conformes a tous les codes locaux et d'eviter d'annuler votre garantie.
1616 D-Link DCS-4705E Quick Installation Guide
FRA
NÇ
AIS
Description du matériel
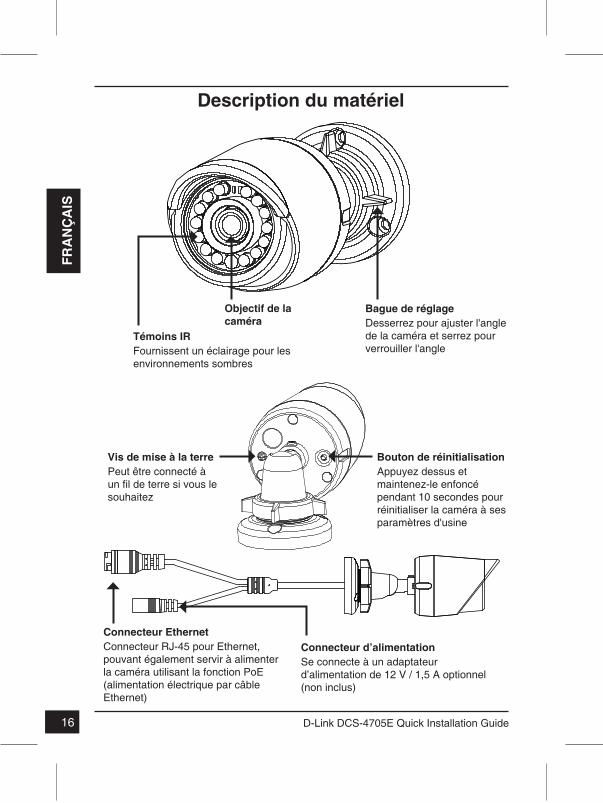
Objectif de la caméra
Témoins IRFournissent un éclairage pour les environnements sombres
Bague de réglageDesserrez pour ajuster l'angle de la caméra et serrez pour verrouiller l'angle
Bouton de réinitialisationAppuyez dessus et maintenez-le enfoncé pendant 10 secondes pour réinitialiser la caméra à ses paramètres d'usine
Vis de mise à la terrePeut être connecté à un fil de terre si vous le souhaitez
Connecteur d’alimentationSe connecte à un adaptateur d’alimentation de 12 V / 1,5 A optionnel (non inclus)
Connecteur EthernetConnecteur RJ-45 pour Ethernet, pouvant également servir à alimenter la caméra utilisant la fonction PoE (alimentation électrique par câble Ethernet)
1717D-Link DCS-4705E Quick Installation Guide
FRA
NÇ
AIS
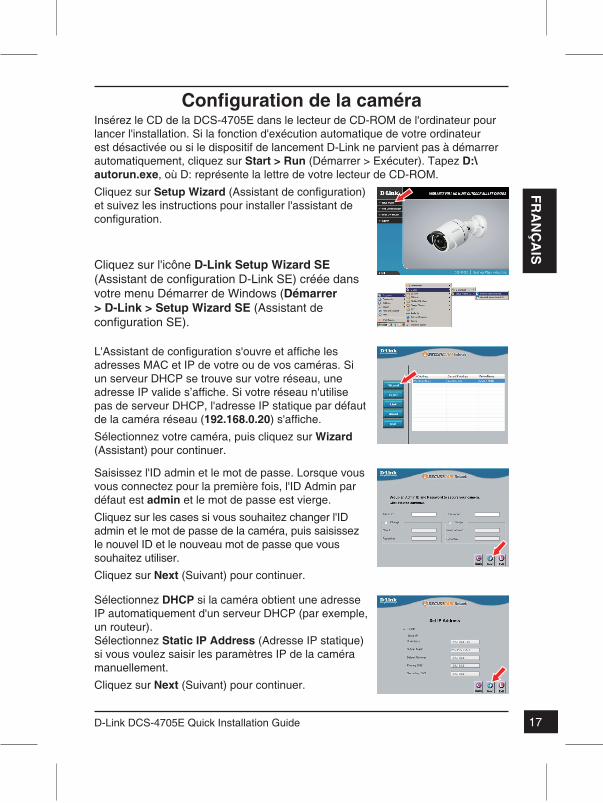
Configuration de la caméraInsérez le CD de la DCS-4705E dans le lecteur de CD-ROM de l'ordinateur pour lancer l'installation. Si la fonction d'exécution automatique de votre ordinateur est désactivée ou si le dispositif de lancement D-Link ne parvient pas à démarrer automatiquement, cliquez sur Start > Run (Démarrer > Exécuter). Tapez D:\autorun.exe, où D: représente la lettre de votre lecteur de CD-ROM.
Cliquez sur l'icône D-Link Setup Wizard SE (Assistant de configuration D-Link SE) creee dans votre menu Démarrer de Windows (Démarrer > D-Link > Setup Wizard SE (Assistant de configuration SE).
L'Assistant de configuration s'ouvre et affiche les adresses MAC et IP de votre ou de vos caméras. Si un serveur DHCP se trouve sur votre réseau, une adresse IP valide s’affiche. Si votre reseau n'utilise pas de serveur DHCP, l'adresse IP statique par défaut de la caméra réseau (192.168.0.20) s'affiche.Sélectionnez votre caméra, puis cliquez sur Wizard (Assistant) pour continuer.
Cliquez sur Setup Wizard (Assistant de configuration) et suivez les instructions pour installer l'assistant de configuration.
Saisissez l'ID admin et le mot de passe. Lorsque vous vous connectez pour la première fois, l'ID Admin par défaut est admin et le mot de passe est vierge.Cliquez sur les cases si vous souhaitez changer l'ID admin et le mot de passe de la caméra, puis saisissez le nouvel ID et le nouveau mot de passe que vous souhaitez utiliser.Cliquez sur Next (Suivant) pour continuer.
Sélectionnez DHCP si la caméra obtient une adresse IP automatiquement d'un serveur DHCP (par exemple, un routeur). Sélectionnez Static IP Address (Adresse IP statique) si vous voulez saisir les paramètres IP de la caméra manuellement.Cliquez sur Next (Suivant) pour continuer.
1818 D-Link DCS-4705E Quick Installation Guide
FRA
NÇ
AIS
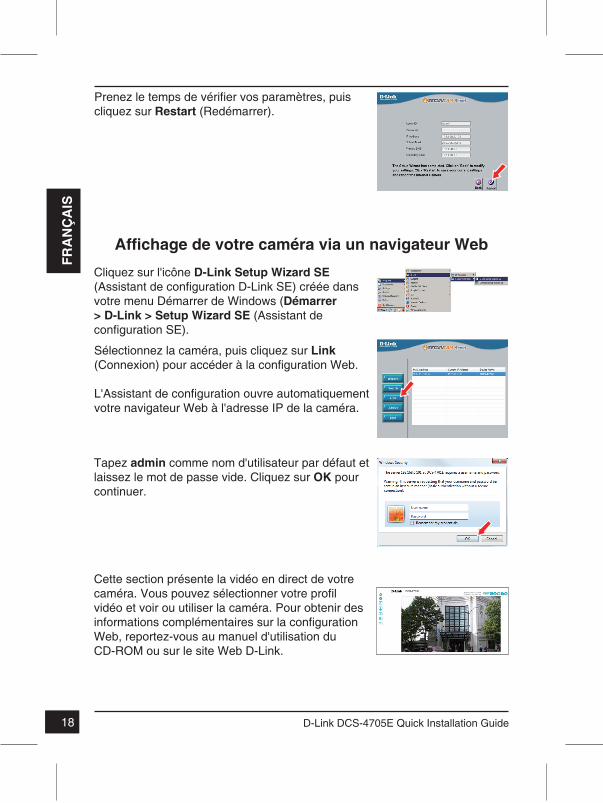
Prenez le temps de verifier vos paramètres, puis cliquez sur Restart (Redémarrer).
Affichage de votre caméra via un navigateur Web
Cliquez sur l'icône D-Link Setup Wizard SE (Assistant de configuration D-Link SE) creee dans votre menu Démarrer de Windows (Démarrer > D-Link > Setup Wizard SE (Assistant de configuration SE).
Sélectionnez la caméra, puis cliquez sur Link (Connexion) pour acceder a la configuration Web.
L'Assistant de configuration ouvre automatiquement votre navigateur Web à l'adresse IP de la caméra.
Cette section présente la vidéo en direct de votre camera. Vous pouvez selectionner votre profil vidéo et voir ou utiliser la caméra. Pour obtenir des informations complementaires sur la configuration Web, reportez-vous au manuel d'utilisation du CD-ROM ou sur le site Web D-Link.
Tapez admin comme nom d'utilisateur par défaut et laissez le mot de passe vide. Cliquez sur OK pour continuer.
1919D-Link DCS-4705E Quick Installation Guide
FRA
NÇ
AIS
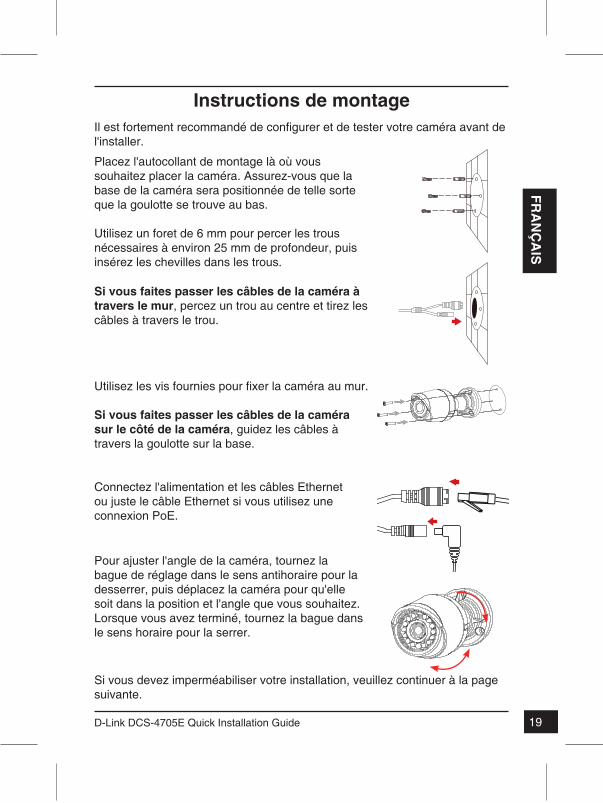
Instructions de montageIl est fortement recommande de configurer et de tester votre camera avant de l'installer.
Si vous devez imperméabiliser votre installation, veuillez continuer à la page suivante.
Placez l'autocollant de montage là où vous souhaitez placer la caméra. Assurez-vous que la base de la caméra sera positionnée de telle sorte que la goulotte se trouve au bas.
Utilisez un foret de 6 mm pour percer les trous nécessaires à environ 25 mm de profondeur, puis insérez les chevilles dans les trous.
Si vous faites passer les câbles de la caméra à travers le mur, percez un trou au centre et tirez les câbles à travers le trou.
Connectez l'alimentation et les câbles Ethernet ou juste le câble Ethernet si vous utilisez une connexion PoE.
Utilisez les vis fournies pour fixer la camera au mur.
Si vous faites passer les câbles de la caméra sur le côté de la caméra, guidez les câbles à travers la goulotte sur la base.
Pour ajuster l'angle de la caméra, tournez la bague de réglage dans le sens antihoraire pour la desserrer, puis déplacez la caméra pour qu'elle soit dans la position et l'angle que vous souhaitez. Lorsque vous avez terminé, tournez la bague dans le sens horaire pour la serrer.
2020 D-Link DCS-4705E Quick Installation Guide
FRA
NÇ
AIS
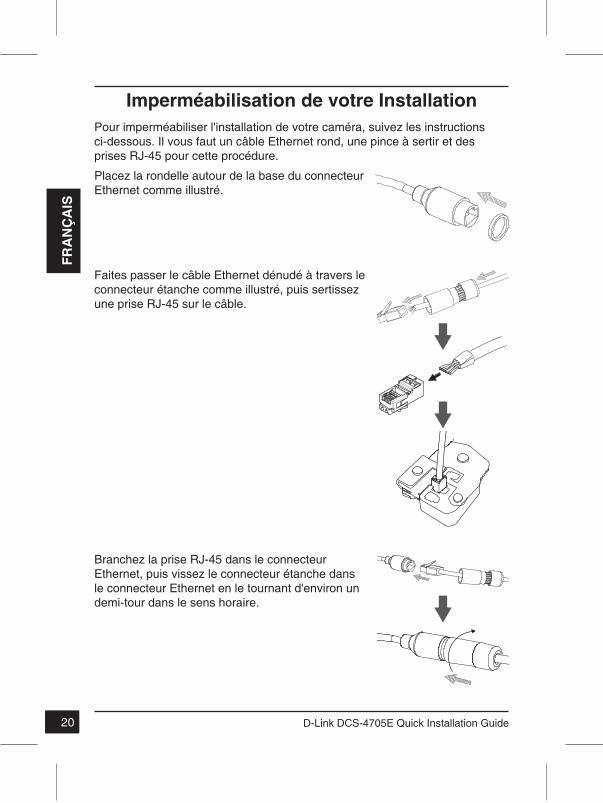
Pour imperméabiliser l'installation de votre caméra, suivez les instructions ci-dessous. Il vous faut un câble Ethernet rond, une pince à sertir et des prises RJ-45 pour cette procédure.
Imperméabilisation de votre Installation
Placez la rondelle autour de la base du connecteur Ethernet comme illustré.
Branchez la prise RJ-45 dans le connecteur Ethernet, puis vissez le connecteur étanche dans le connecteur Ethernet en le tournant d'environ un demi-tour dans le sens horaire.
Faites passer le câble Ethernet dénudé à travers le connecteur étanche comme illustré, puis sertissez une prise RJ-45 sur le câble.

2121D-Link DCS-4705E Quick Installation Guide
FRA
NÇ
AIS
Si vous utilisez une connexion PoE pour alimenter votre caméra, utilisez le bouchon en caoutchouc fourni du connecteur d'alimentation sur le connecteur d'alimentation.
Si vous utilisez un adaptateur d’alimentation (non inclus) pour alimenter votre caméra, enroulez du ruban adhésif étanche autour de la connexion en le superposant pour la couvrir.
Informations complémentairesVous trouverez une aide supplémentaire et des informations sur le produit en ligne à l'adresse http://www.dlink.com.
Informations sur la garantie Consultez le site http://warranty.dlink.com/ pour prendre connaissance de la garantie appliquée dans votre région.
Vissez la partie arrière du connecteur étanche dans le sens horaire jusqu'à former un joint étanche autour du câble Ethernet.
2222 D-Link DCS-4705E Quick Installation Guide
ES
PA
ÑO
L
Guía de instalación rápidaEsta guía de instalación proporciona instrucciones básicas para la instalación de la cámara de red en su red. Para obtener información adicional acerca de cómo utilizar la cámara, consulte el Manual del usuario disponible en el CD incluido en el paquete o en el sitio web de asistencia de D-Link.
¿Qué contiene la caja? � DCS-4705E Vigilance 5 Megapixel H.265 Outdoor Bullet Camera � Conector de impermeabilización del cable � Clavija de goma para conector de alimentación � Kit de montaje � Manual y software en CD-ROM � Guía de instalación rápida
Si falta cualquiera de los componentes anteriores, póngase en contacto con el proveedor.
Aviso de seguridad:La instalación y el mantenimiento deben realizarlo tecnicos cualificados con el fin de cumplir con todos los códigos locales y evitar la anulación de la garantía.
2323D-Link DCS-4705E Quick Installation Guide
ES
PA
ÑO
L
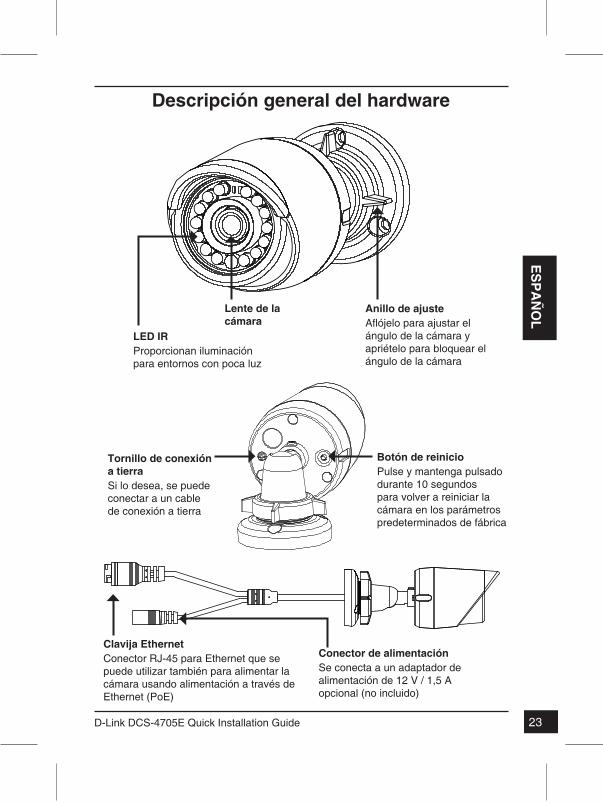
Descripción general del hardware
Lente de la cámara
LED IRProporcionan iluminación para entornos con poca luz
Anillo de ajusteAflójelo para ajustar el ángulo de la cámara y apriételo para bloquear el ángulo de la cámara
Botón de reinicioPulse y mantenga pulsado durante 10 segundos para volver a reiniciar la cámara en los parámetros predeterminados de fábrica
Tornillo de conexión a tierraSi lo desea, se puede conectar a un cable de conexión a tierra
Conector de alimentaciónSe conecta a un adaptador de alimentación de 12 V / 1,5 A opcional (no incluido)
Clavija EthernetConector RJ-45 para Ethernet que se puede utilizar también para alimentar la cámara usando alimentación a través de Ethernet (PoE)

2424 D-Link DCS-4705E Quick Installation Guide
ES
PA
ÑO
L
Configuración de la cámaraInserte el CD de la DCS-4705E en la unidad de CD-ROM del ordenador para comenzar la instalación. Si la función de ejecución automática del ordenador está desactivada o si el iniciador de D-Link no se inicia automáticamente, haga clic en Inicio > Ejecutar. Escriba D:\autorun.exe, donde D: representa la letra de unidad de su unidad de CD-ROM.
Haga clic en el icono Asistente de configuración SE D-Link que se creó en el menú de inicio de Windows (Inicio > D-Link > Asistente de configuración SE).
Aparecerá el asistente de configuración y se mostrará la dirección MAC y la dirección IP de la cámara. Si tiene un servidor DHCP en la red, se mostrará una dirección IP válida. Si la red no utiliza un servidor DHCP, se mostrará la dirección IP estática predeterminada de la cámara (192.168.0.20).
Seleccione la cámara y, a continuación, haga clic en el botón Wizard (Asistente) para continuar.
Haga clic en Setup Wizard (Asistente de configuración) y siga las instrucciones para instalar el asistente de configuración.
Introduzca el ID de administrador y la contraseña. Al iniciar sesión por primera vez, el ID de administrador predeterminado es admin, con la contraseña en blanco.
Haga clic en las casillas de verificación si desea cambiar el ID de administrador y la contraseña para la cámara e introduzca el nuevo ID y contraseña que desee utilizar.
Haga clic en Next (Siguiente) para continuar.
Seleccione DHCP si la cámara consigue una dirección IP automáticamente de un servidor DHCP como, por ejemplo, un router. Seleccione Static IP (IP estática) si desea introducir manualmente los parámetros IP de la cámara.
Haga clic en Next (Siguiente) para continuar.

2525D-Link DCS-4705E Quick Installation Guide
ES
PA
ÑO
L
Tómese un tiempo para confirmar la configuración y haga clic en Restart (Reiniciar).
Visualización de su cámara a través del explorador de web
Haga clic en el icono Asistente de configuración SE D-Link que se creó en el menú de inicio de Windows (Inicio > D-Link > Asistente de configuración SE).
Seleccione la cámara y haga clic en Link (Vincular) para acceder a la configuración web.
El asistente de configuración abrirá automáticamente el explorador de web en la dirección IP de la cámara.
Esta sección muestra el vídeo en directo de la cámara. Puede seleccionar el perfil de vídeo y ver o utilizar la cámara. Para obtener información adicional acerca de la configuración web, consulte el manual de usuario incluido en el CD-ROM o visite el sitio web de D-Link.
Escriba admin como nombre de usuario predeterminado y deje la contraseña en blanco. Haga clic en OK (Aceptar) para continuar.
2626 D-Link DCS-4705E Quick Installation Guide
ES
PA
ÑO
L
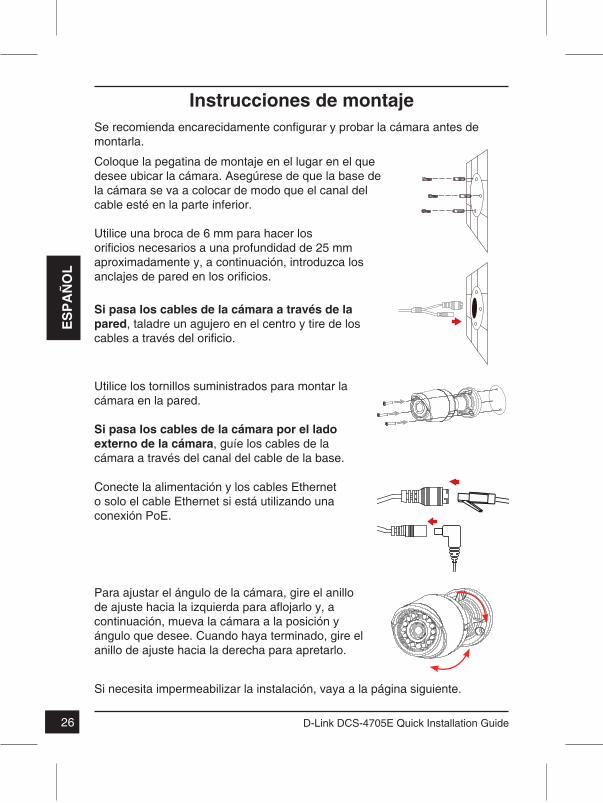
Instrucciones de montajeSe recomienda encarecidamente configurar y probar la cámara antes de montarla.
Si necesita impermeabilizar la instalación, vaya a la página siguiente.
Coloque la pegatina de montaje en el lugar en el que desee ubicar la cámara. Asegúrese de que la base de la cámara se va a colocar de modo que el canal del cable esté en la parte inferior.
Utilice una broca de 6 mm para hacer los orificios necesarios a una profundidad de 25 mm aproximadamente y, a continuación, introduzca los anclajes de pared en los orificios.
Si pasa los cables de la cámara a través de la pared, taladre un agujero en el centro y tire de los cables a traves del orificio.
Conecte la alimentación y los cables Ethernet o solo el cable Ethernet si está utilizando una conexión PoE.
Utilice los tornillos suministrados para montar la cámara en la pared.
Si pasa los cables de la cámara por el lado externo de la cámara, guíe los cables de la cámara a través del canal del cable de la base.
Para ajustar el ángulo de la cámara, gire el anillo de ajuste hacia la izquierda para aflojarlo y, a continuación, mueva la cámara a la posición y ángulo que desee. Cuando haya terminado, gire el anillo de ajuste hacia la derecha para apretarlo.
2727D-Link DCS-4705E Quick Installation Guide
ES
PA
ÑO
L
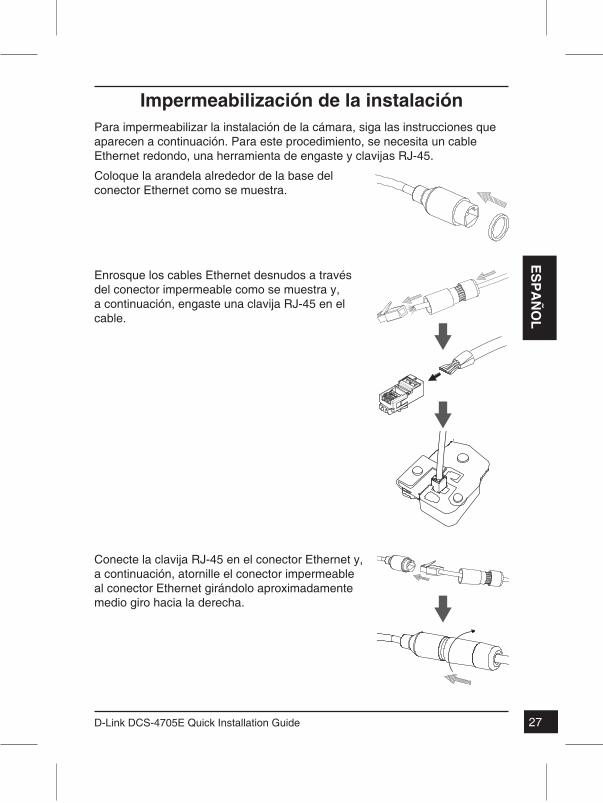
Para impermeabilizar la instalación de la cámara, siga las instrucciones que aparecen a continuación. Para este procedimiento, se necesita un cable Ethernet redondo, una herramienta de engaste y clavijas RJ-45.
Impermeabilización de la instalación
Coloque la arandela alrededor de la base del conector Ethernet como se muestra.
Conecte la clavija RJ-45 en el conector Ethernet y, a continuación, atornille el conector impermeable al conector Ethernet girándolo aproximadamente medio giro hacia la derecha.
Enrosque los cables Ethernet desnudos a través del conector impermeable como se muestra y, a continuación, engaste una clavija RJ-45 en el cable.
2828 D-Link DCS-4705E Quick Installation Guide
ES
PA
ÑO
L
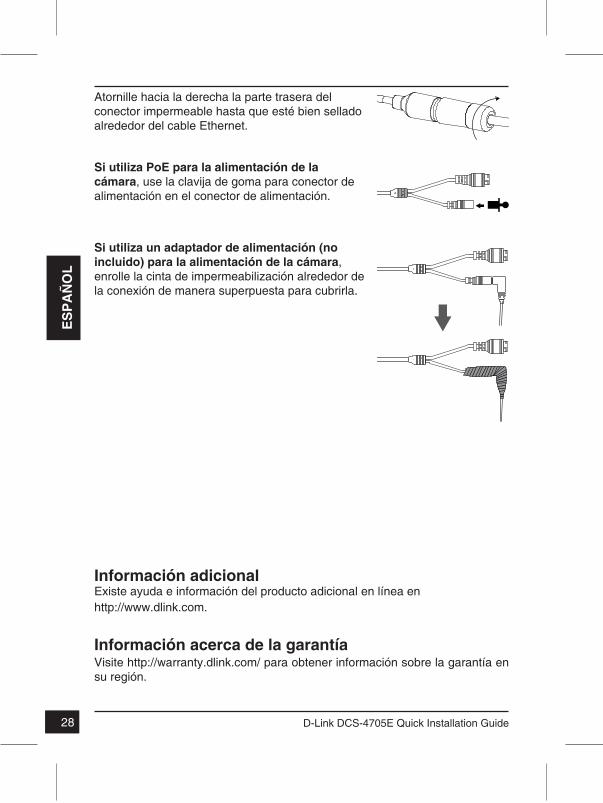
Si utiliza PoE para la alimentación de la cámara, use la clavija de goma para conector de alimentación en el conector de alimentación.
Si utiliza un adaptador de alimentación (no incluido) para la alimentación de la cámara, enrolle la cinta de impermeabilización alrededor de la conexión de manera superpuesta para cubrirla.
Información adicionalExiste ayuda e información del producto adicional en línea en http://www.dlink.com.
Información acerca de la garantía Visite http://warranty.dlink.com/ para obtener información sobre la garantía en su región.
Atornille hacia la derecha la parte trasera del conector impermeable hasta que esté bien sellado alrededor del cable Ethernet.
2929D-Link DCS-4705E Quick Installation Guide
ITALIA
NO
Guida di installazione rapidaIn questa guida di installazione sono riportate le istruzioni di base per installare la telecamera in rete. Per ulteriori informazioni sull'utilizzo della videocamera, consultare il manuale utente disponibile sul CD incluso nella confezione o scaricabile dal sito Web di supporto di D-Link.
Contenuto della confezione � DCS-4705E Vigilance 5 Megapixel H.265 Outdoor Bullet Camera � Connettore impermeabile per cavo � Spinotto in gomma del connettore di alimentazione � Kit di montaggio � Manuale e software su CD-ROM � Guida di installazione rapida
Se uno o più degli articoli sopra elencati risultano mancanti, rivolgersi al rivenditore.
Nota relativa alla sicurezza:Per evitare di invalidare la garanzia, l'installazione e le riparazioni devono essere effettuate da tecnici qualificati in conformita alle normative locali.
3030 D-Link DCS-4705E Quick Installation Guide
ITA
LIA
NO
Panoramica hardware
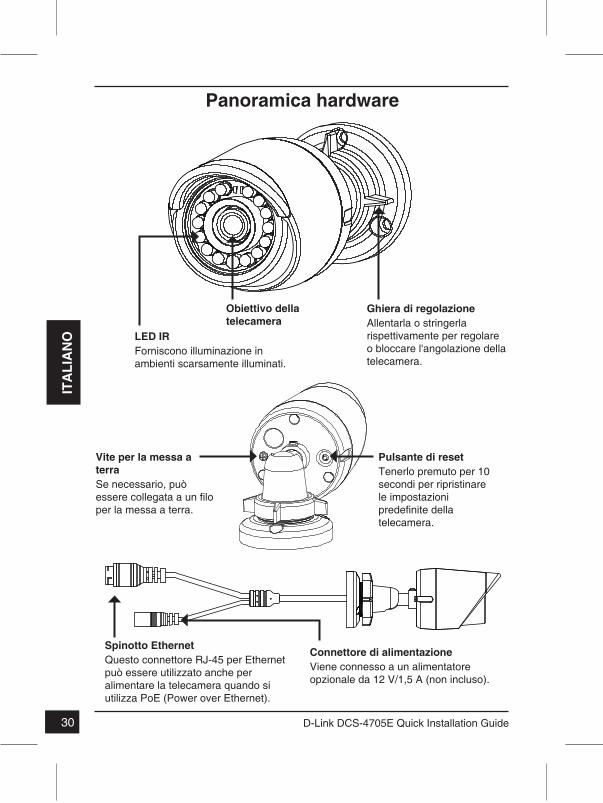
Obiettivo della telecamera
LED IRForniscono illuminazione in ambienti scarsamente illuminati.
Ghiera di regolazioneAllentarla o stringerla rispettivamente per regolare o bloccare l'angolazione della telecamera.
Pulsante di resetTenerlo premuto per 10 secondi per ripristinare le impostazioni predefinite della telecamera.
Vite per la messa a terraSe necessario, può essere collegata a un filo per la messa a terra.
Connettore di alimentazioneViene connesso a un alimentatore opzionale da 12 V/1,5 A (non incluso).
Spinotto EthernetQuesto connettore RJ-45 per Ethernet può essere utilizzato anche per alimentare la telecamera quando si utilizza PoE (Power over Ethernet).

3131D-Link DCS-4705E Quick Installation Guide
ITALIA
NO
Configurazione della telecameraInserire il CD della telecamera DCS-4705E nell'unità CD-ROM del computer per avviare l'installazione. Se la funzione di esecuzione automatica è disabilitata nel computer in uso o se l'utilità di avvio di D-Link non viene avviata automaticamente, fare clic su Start > Run (Start > Esegui). Digitare D:\autorun.exe, dove D: rappresenta la lettera dell'unità CD-ROM.
Fare clic sull'icona D-Link Setup Wizard SE creata nel menu Start di Windows (Start > D-Link > Setup Wizard SE).
Viene visualizzata la pagina dell'installazione guidata che riporta l'indirizzo MAC e l'indirizzo IP della telecamera. Se la rete dispone di un server DHCP, viene visualizzato un indirizzo IP valido. Se la rete non dispone di un server DHCP, viene visualizzato l'indirizzo IP statico predefinito della telecamera di rete, ovvero 192.168.0.20.
Selezionare la telecamera, quindi fare clic sul pulsante Wizard (Procedura guidata) per continuare.
Fare clic su Setup Wizard (Configurazione guidata) e attenersi alle istruzioni per installare la Configurazione guidata.
Immettere l'ID e la password dell'amministratore. Quando si effettua l'accesso per la prima volta, l'ID predefinito dell'amministratore è admin, mentre la password viene lasciata vuota.
Selezionare le caselle di controllo se si desidera cambiare l'ID e la password dell'amministratore della telecamera e immettere quelli nuovi da utilizzare.
Fare clic su Next (Avanti) per continuare.
Selezionare DHCP se la telecamera ottiene un indirizzo IP automaticamente da un server DHCP, ad esempio un router. Selezionare Static IP (IP statico) se si desidera immettere manualmente le impostazioni IP della telecamera.
Fare clic su Next (Avanti) per continuare.

3232 D-Link DCS-4705E Quick Installation Guide
ITA
LIA
NO
Verificare le impostazioni, quindi fare clic su Restart (Riavvia).
Visualizzazione della telecamera tramite il browser Web
Fare clic sull'icona D-Link Setup Wizard SE creata nel menu Start di Windows (Start > D-Link > Setup Wizard SE).
Selezionare la telecamera e fare clic su Link (Collegamento) per accedere alla configurazione Web.
La procedura guidata di configurazione apre automaticamente il browser Web all'indirizzo IP della telecamera.
In questa sezione è visualizzato il video in diretta della videocamera. È possibile selezionare il profilo video desiderato e visualizzare le immagini o mettere in funzione la telecamera. Per ulteriori informazioni sulla configurazione Web, fare riferimento al manuale utente incluso sul CD-ROM o scaricabile dal sito Web di D-Link.
Immettere admin come nome utente predefinito e lasciare il campo password vuoto. Fare clic su OK per continuare.
3333D-Link DCS-4705E Quick Installation Guide
ITALIA
NO
Istruzioni per il montaggioSi consiglia vivamente di configurare e testare la telecamera prima di montarla.
Per rendere impermeabile l'installazione, continuare con la pagina successiva.
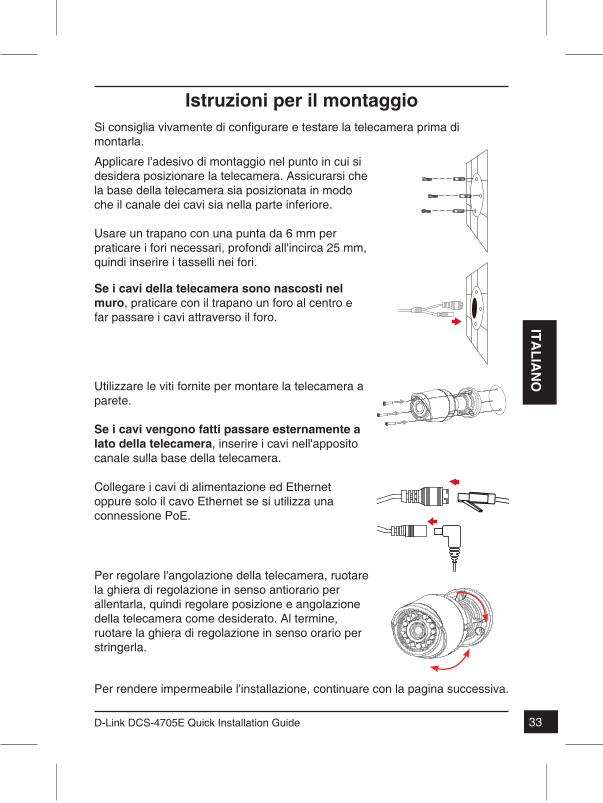
Applicare l'adesivo di montaggio nel punto in cui si desidera posizionare la telecamera. Assicurarsi che la base della telecamera sia posizionata in modo che il canale dei cavi sia nella parte inferiore.
Usare un trapano con una punta da 6 mm per praticare i fori necessari, profondi all'incirca 25 mm, quindi inserire i tasselli nei fori.
Se i cavi della telecamera sono nascosti nel muro, praticare con il trapano un foro al centro e far passare i cavi attraverso il foro.
Collegare i cavi di alimentazione ed Ethernet oppure solo il cavo Ethernet se si utilizza una connessione PoE.
Utilizzare le viti fornite per montare la telecamera a parete.
Se i cavi vengono fatti passare esternamente a lato della telecamera, inserire i cavi nell'apposito canale sulla base della telecamera.
Per regolare l'angolazione della telecamera, ruotare la ghiera di regolazione in senso antiorario per allentarla, quindi regolare posizione e angolazione della telecamera come desiderato. Al termine, ruotare la ghiera di regolazione in senso orario per stringerla.
3434 D-Link DCS-4705E Quick Installation Guide
ITA
LIA
NO
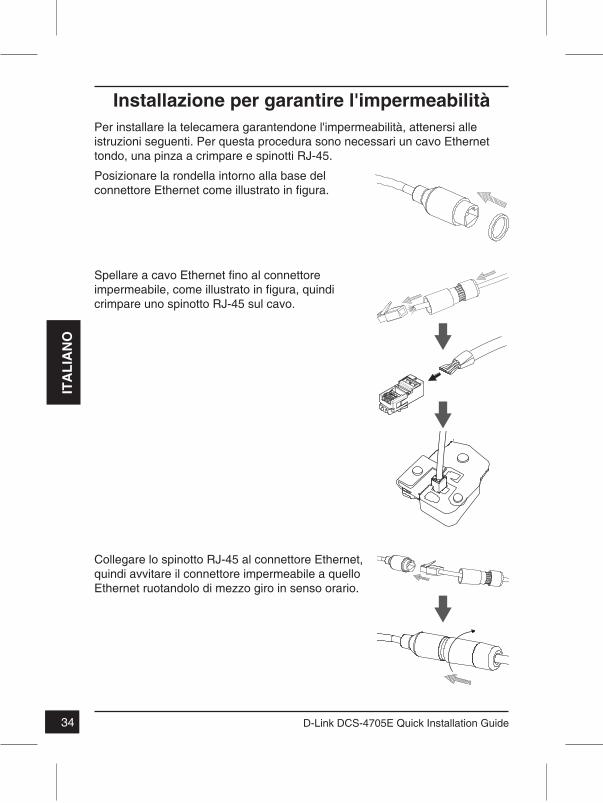
Per installare la telecamera garantendone l'impermeabilità, attenersi alle istruzioni seguenti. Per questa procedura sono necessari un cavo Ethernet tondo, una pinza a crimpare e spinotti RJ-45.
Installazione per garantire l'impermeabilità
Posizionare la rondella intorno alla base del connettore Ethernet come illustrato in figura.
Collegare lo spinotto RJ-45 al connettore Ethernet, quindi avvitare il connettore impermeabile a quello Ethernet ruotandolo di mezzo giro in senso orario.
Spellare a cavo Ethernet fino al connettore impermeabile, come illustrato in figura, quindi crimpare uno spinotto RJ-45 sul cavo.
3535D-Link DCS-4705E Quick Installation Guide
ITALIA
NO
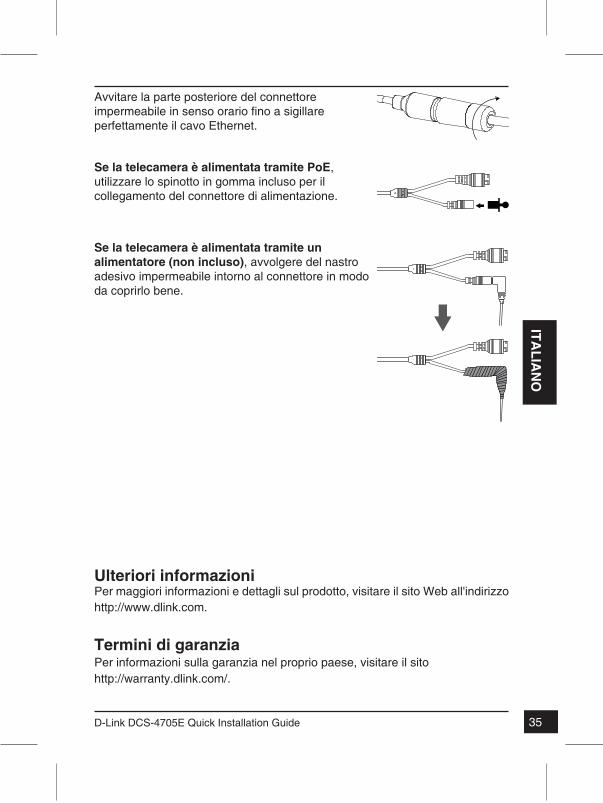
Se la telecamera è alimentata tramite PoE, utilizzare lo spinotto in gomma incluso per il collegamento del connettore di alimentazione.
Se la telecamera è alimentata tramite un alimentatore (non incluso), avvolgere del nastro adesivo impermeabile intorno al connettore in modo da coprirlo bene.
Ulteriori informazioniPer maggiori informazioni e dettagli sul prodotto, visitare il sito Web all'indirizzo http://www.dlink.com.
Termini di garanzia Per informazioni sulla garanzia nel proprio paese, visitare il sito http://warranty.dlink.com/.
Avvitare la parte posteriore del connettore impermeabile in senso orario fino a sigillare perfettamente il cavo Ethernet.
3636 D-Link DCS-4705E Quick Installation Guide
РУС
СКИ
Й
Краткое руководство по установкеДанное руководство содержит основные инструкции по установке камеры DCS-4705E в сети. Для получения дополнительной информации по настройке камеры, пожалуйста, обратитесь к руководству пользователя на CD-диске из комплекта поставки или через Web-сайт D-Link.
Комплект поставки �Внешняя сетевая камера DCS-4705E �Водонепроницаемый коннектор для кабеля �Резиновая заглушка для разъема питания �Комплект для монтажа �CD-диск с руководством пользователя и программным обеспечением �Краткое руководство по установке
Если что-либо из перечисленного отсутствует, обратитесь к поставщику.
Меры безопасностиВо избежание прекращения гарантии установку и обслуживание должны проводить сертифицированные специалисты в соответствии с региональными нормами и правилами.
3737D-Link DCS-4705E Quick Installation Guide
РУС
СКИ
Й
Обзор аппаратной части
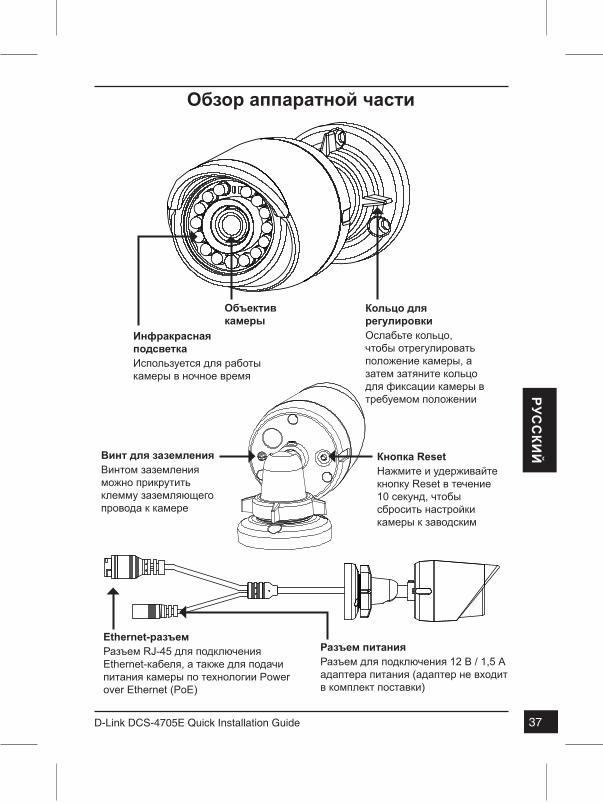
Объектив камеры
Инфракрасная подсветкаИспользуется для работы камеры в ночное время
Кольцо для регулировкиОслабьте кольцо, чтобы отрегулировать положение камеры, а затем затяните кольцо для фиксации камеры в требуемом положении
Кнопка ResetНажмите и удерживайте кнопку Reset в течение 10 секунд, чтобы сбросить настройки камеры к заводским
Винт для заземленияВинтом заземления можно прикрутить клемму заземляющего провода к камере
Разъем питанияРазъем для подключения 12 В / 1,5 А адаптера питания (адаптер не входит в комплект поставки)
Ethernet-разъемРазъем RJ-45 для подключения Ethernet-кабеля, а также для подачи питания камеры по технологии Power over Ethernet (PoE)
3838 D-Link DCS-4705E Quick Installation Guide
РУС
СКИ
Й
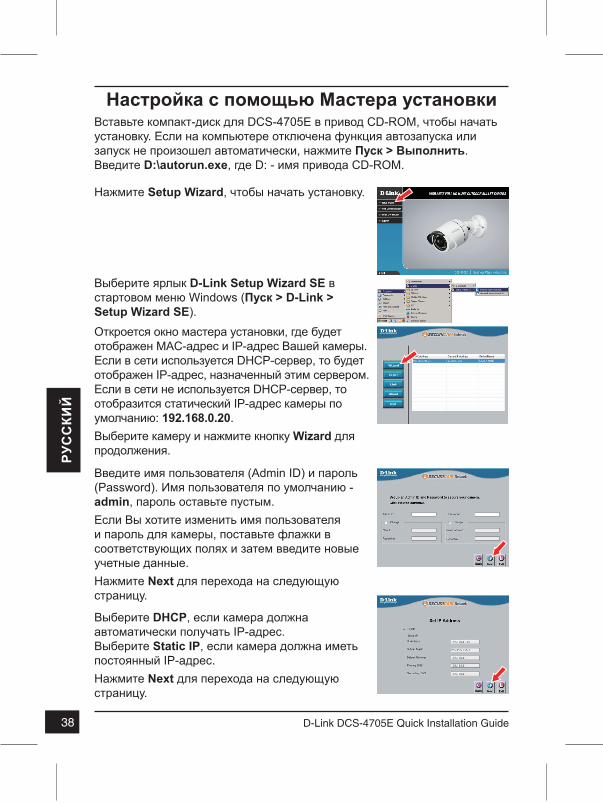
Настройка с помощью Мастера установкиВставьте компакт-диск для DCS-4705E в привод CD-ROM, чтобы начать установку. Если на компьютере отключена функция автозапуска или запуск не произошел автоматически, нажмите Пуск > Выполнить. Введите D:\autorun.exe, где D: - имя привода CD-ROM.
Выберите ярлык D-Link Setup Wizard SE в стартовом меню Windows (Пуск > D-Link > Setup Wizard SE).
Откроется окно мастера установки, где будет отображен MAC-адрес и IP-адрес Вашей камеры. Если в сети используется DHCP-сервер, то будет отображен IP-адрес, назначенный этим сервером. Если в сети не используется DHCP-сервер, то отобразится статический IP-адрес камеры по умолчанию: 192.168.0.20.Выберите камеру и нажмите кнопку Wizard для продолжения.
Нажмите Setup Wizard, чтобы начать установку.
Введите имя пользователя (Admin ID) и пароль (Password). Имя пользователя по умолчанию - admin, пароль оставьте пустым.Если Вы хотите изменить имя пользователя и пароль для камеры, поставьте флажки в соответствующих полях и затем введите новые учетные данные.Нажмите Next для перехода на следующую страницу.
Выберите DHCP, если камера должна автоматически получать IP-адрес. Выберите Static IP, если камера должна иметь постоянный IP-адрес.Нажмите Next для перехода на следующую страницу.
3939D-Link DCS-4705E Quick Installation Guide
РУС
СКИ
Й
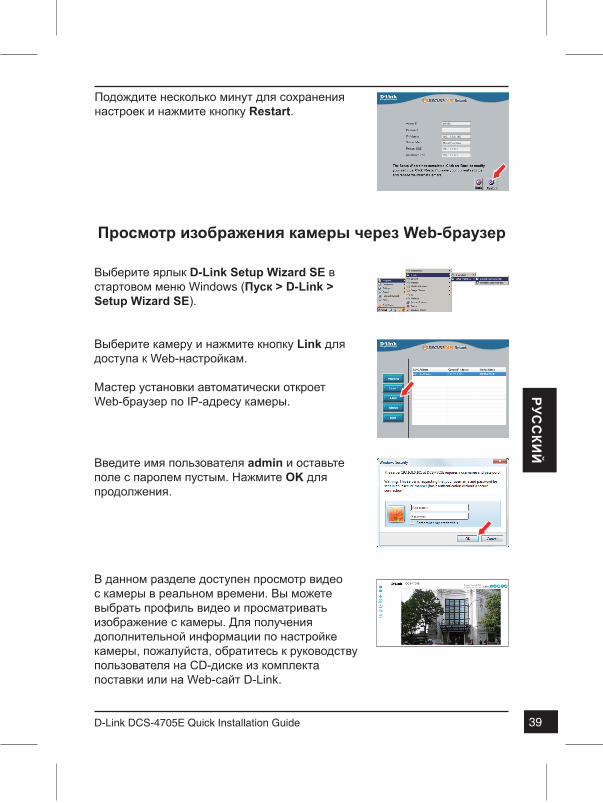
Подождите несколько минут для сохранения настроек и нажмите кнопку Restart.
Просмотр изображения камеры через Web-браузер
Выберите ярлык D-Link Setup Wizard SE в стартовом меню Windows (Пуск > D-Link > Setup Wizard SE).
Выберите камеру и нажмите кнопку Link для доступа к Web-настройкам.
Мастер установки автоматически откроет Web-браузер по IP-адресу камеры.
В данном разделе доступен просмотр видео с камеры в реальном времени. Вы можете выбрать профиль видео и просматривать изображение с камеры. Для получения дополнительной информации по настройке камеры, пожалуйста, обратитесь к руководству пользователя на CD-диске из комплекта поставки или на Web-сайт D-Link.
Введите имя пользователя admin и оставьте поле с паролем пустым. Нажмите OK для продолжения.
4040 D-Link DCS-4705E Quick Installation Guide
РУС
СКИ
Й
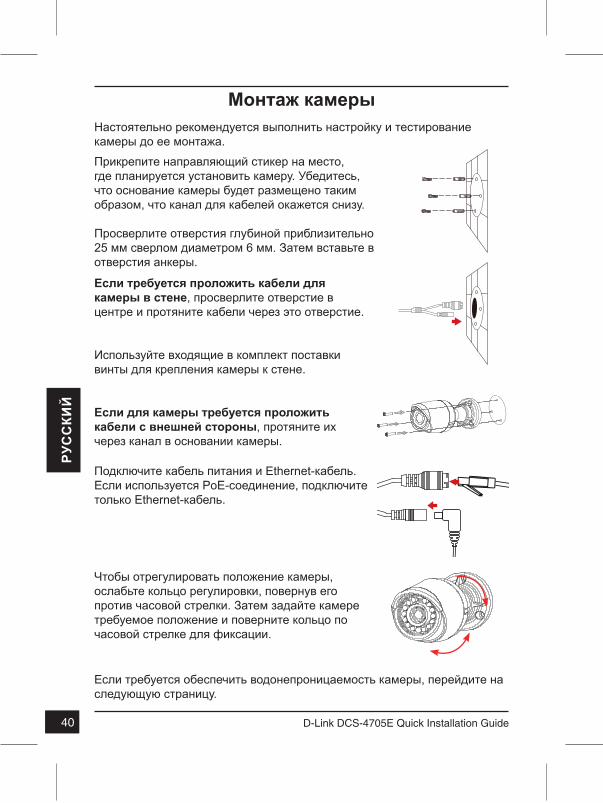
Монтаж камерыНастоятельно рекомендуется выполнить настройку и тестирование камеры до ее монтажа.
Если требуется обеспечить водонепроницаемость камеры, перейдите на следующую страницу.
Прикрепите направляющий стикер на место, где планируется установить камеру. Убедитесь, что основание камеры будет размещено таким образом, что канал для кабелей окажется снизу.
Просверлите отверстия глубиной приблизительно 25 мм сверлом диаметром 6 мм. Затем вставьте в отверстия анкеры.
Если требуется проложить кабели для камеры в стене, просверлите отверстие в центре и протяните кабели через это отверстие.
Используйте входящие в комплект поставки винты для крепления камеры к стене.
Если для камеры требуется проложить кабели с внешней стороны, протяните их через канал в основании камеры.
Подключите кабель питания и Ethernet-кабель. Если используется PoE-соединение, подключите только Ethernet-кабель.
Чтобы отрегулировать положение камеры, ослабьте кольцо регулировки, повернув его против часовой стрелки. Затем задайте камере требуемое положение и поверните кольцо по часовой стрелке для фиксации.
4141D-Link DCS-4705E Quick Installation Guide
РУС
СКИ
Й
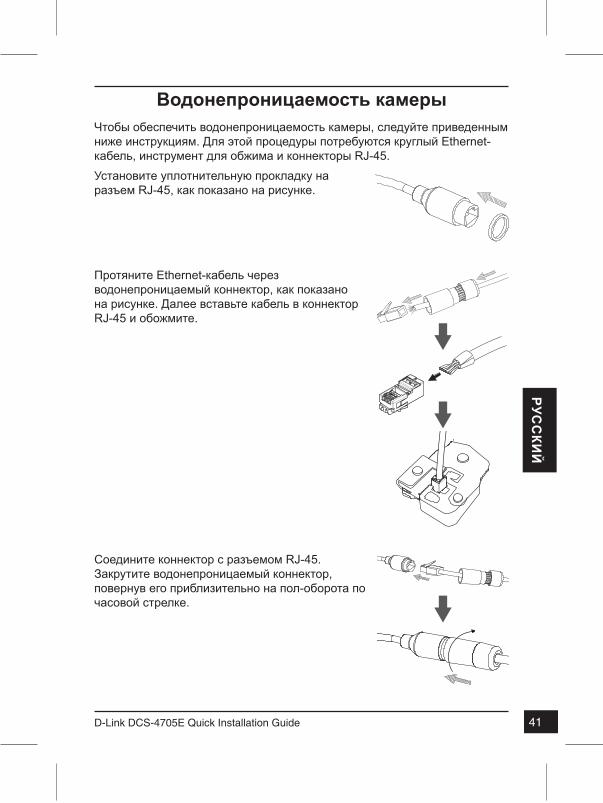
Чтобы обеспечить водонепроницаемость камеры, следуйте приведенным ниже инструкциям. Для этой процедуры потребуются круглый Ethernet-кабель, инструмент для обжима и коннекторы RJ-45.
Водонепроницаемость камеры
Установите уплотнительную прокладку на разъем RJ-45, как показано на рисунке.
Соедините коннектор с разъемом RJ-45. Закрутите водонепроницаемый коннектор, повернув его приблизительно на пол-оборота по часовой стрелке.
Протяните Ethernet-кабель через водонепроницаемый коннектор, как показано на рисунке. Далее вставьте кабель в коннектор RJ-45 и обожмите.
4242 D-Link DCS-4705E Quick Installation Guide
РУС
СКИ
Й
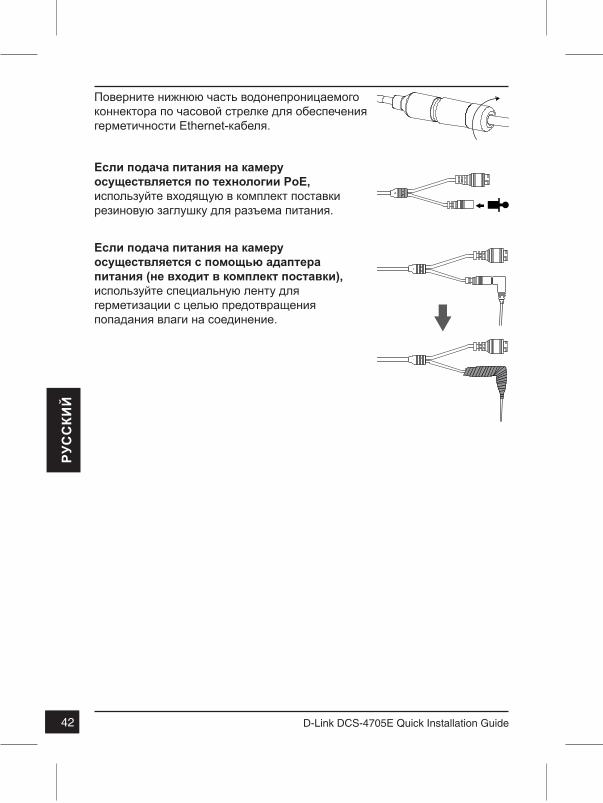
Если подача питания на камеру осуществляется по технологии PoE, используйте входящую в комплект поставки резиновую заглушку для разъема питания.
Если подача питания на камеру осуществляется с помощью адаптера питания (не входит в комплект поставки), используйте специальную ленту для герметизации с целью предотвращения попадания влаги на соединение.
Поверните нижнюю часть водонепроницаемого коннектора по часовой стрелке для обеспечения герметичности Ethernet-кабеля.
4343D-Link DCS-4705E Quick Installation Guide
РУС
СКИ
Й
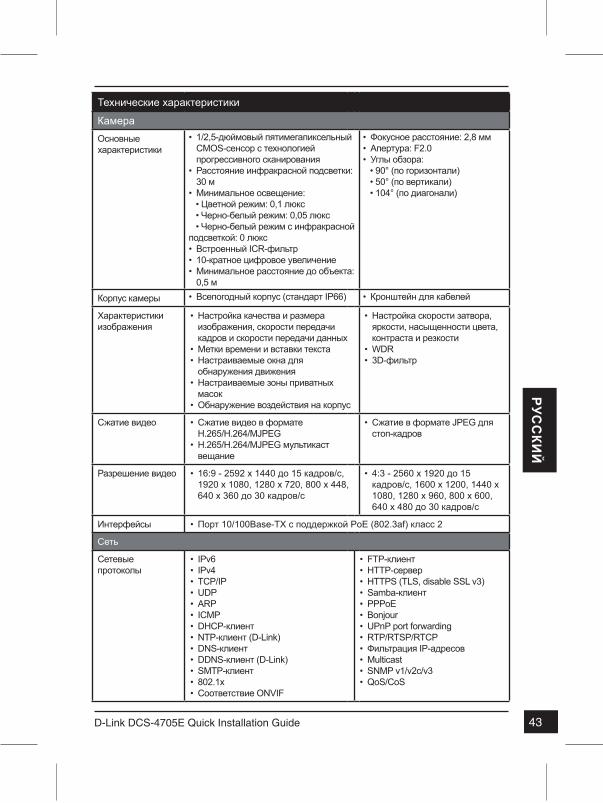
Технические характеристики
КамераОсновные характеристики
• 1/2,5-дюймовый пятимегапиксельный CMOS-сенсор с технологией прогрессивного сканирования
• Расстояние инфракрасной подсветки: 30 м
• Минимальное освещение: • Цветной режим: 0,1 люкс • Черно-белый режим: 0,05 люкс • Черно-белый режим с инфракрасной подсветкой: 0 люкс• Встроенный ICR-фильтр• 10-кратное цифровое увеличение• Минимальное расстояние до объекта:
0,5 м
• Фокусное расстояние: 2,8 мм• Апертура: F2.0• Углы обзора: • 90° (по горизонтали) • 50° (по вертикали) • 104° (по диагонали)
Корпус камеры • Всепогодный корпус (стандарт IP66) • Кронштейн для кабелей
Характеристики изображения
• Настройка качества и размера изображения, скорости передачи кадров и скорости передачи данных
• Метки времени и вставки текста• Настраиваемые окна для
обнаружения движения• Настраиваемые зоны приватных
масок• Обнаружение воздействия на корпус
• Настройка скорости затвора, яркости, насыщенности цвета, контраста и резкости
• WDR• 3D-фильтр
Сжатие видео • Сжатие видео в формате H.265/H.264/MJPEG
• H.265/H.264/MJPEG мультикаст вещание
• Сжатие в формате JPEG для стоп-кадров
Разрешение видео • 16:9 - 2592 x 1440 до 15 кадров/с, 1920 x 1080, 1280 x 720, 800 x 448, 640 x 360 до 30 кадров/с
• 4:3 - 2560 x 1920 до 15 кадров/с, 1600 x 1200, 1440 x 1080, 1280 x 960, 800 x 600, 640 x 480 до 30 кадров/с
Интерфейсы • Порт 10/100Base-TX с поддержкой PoE (802.3af) класс 2
Сеть
Сетевые протоколы
• IPv6• IPv4• TCP/IP• UDP• ARP• ICMP• DHCP-клиент• NTP-клиент (D-Link)• DNS-клиент• DDNS-клиент (D-Link)• SMTP-клиент• 802.1x• Соответствие ONVIF
• FTP-клиент• HTTP-сервер• HTTPS (TLS, disable SSL v3)• Samba-клиент• PPPoE• Bonjour• UPnP port forwarding• RTP/RTSP/RTCP• Фильтрация IP-адресов• Multicast• SNMP v1/v2c/v3• QoS/CoS
4444 D-Link DCS-4705E Quick Installation Guide
РУС
СКИ
Й
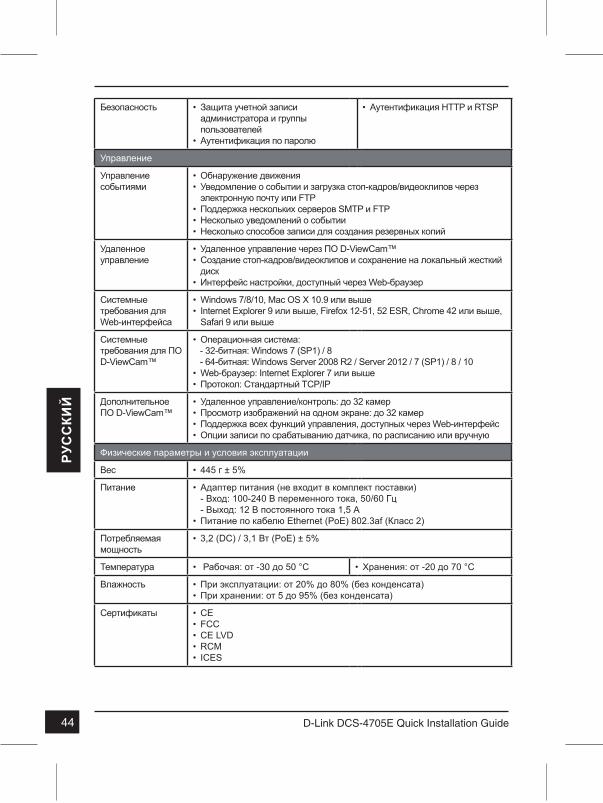
Безопасность • Защита учетной записи администратора и группы пользователей
• Аутентификация по паролю
• Аутентификация HTTP и RTSP
Управление
Управление событиями
• Обнаружение движения• Уведомление о событии и загрузка стоп-кадров/видеоклипов через
электронную почту или FTP• Поддержка нескольких серверов SMTP и FTP• Несколько уведомлений о событии• Несколько способов записи для создания резервных копий
Удаленное управление
• Удаленное управление через ПО D-ViewCam™• Создание стоп-кадров/видеоклипов и сохранение на локальный жесткий
диск• Интерфейс настройки, доступный через Web-браузер
Системные требования для Web-интерфейса
• Windows 7/8/10, Mac OS X 10.9 или выше• Internet Explorer 9 или выше, Firefox 12-51, 52 ESR, Chrome 42 или выше,
Safari 9 или выше
Системные требования для ПО D-ViewCam™
• Операционная система: - 32-битная: Windows 7 (SP1) / 8 - 64-битная: Windows Server 2008 R2 / Server 2012 / 7 (SP1) / 8 / 10• Web-браузер: Internet Explorer 7 или выше• Протокол: Стандартный TCP/IP
Дополнительное ПО D-ViewCam™
• Удаленное управление/контроль: до 32 камер• Просмотр изображений на одном экране: до 32 камер• Поддержка всех функций управления, доступных через Web-интерфейс• Опции записи по срабатыванию датчика, по расписанию или вручную
Физические параметры и условия эксплуатации
Вес • 445 г ± 5%
Питание • Адаптер питания (не входит в комплект поставки)- Вход: 100-240 В переменного тока, 50/60 Гц- Выход: 12 В постоянного тока 1,5 А
• Питание по кабелю Ethernet (PoE) 802.3af (Класс 2)
Потребляемая мощность
• 3,2 (DC) / 3,1 Вт (PoE) ± 5%
Температура • Рабочая: от -30 до 50 °C • Хранения: от -20 до 70 °C
Влажность • При эксплуатации: от 20% до 80% (без конденсата)• При хранении: от 5 до 95% (без конденсата)
Сертификаты • CE• FCC• CE LVD• RCM• ICES
4545D-Link DCS-4705E Quick Installation Guide
РУС
СКИ
Й
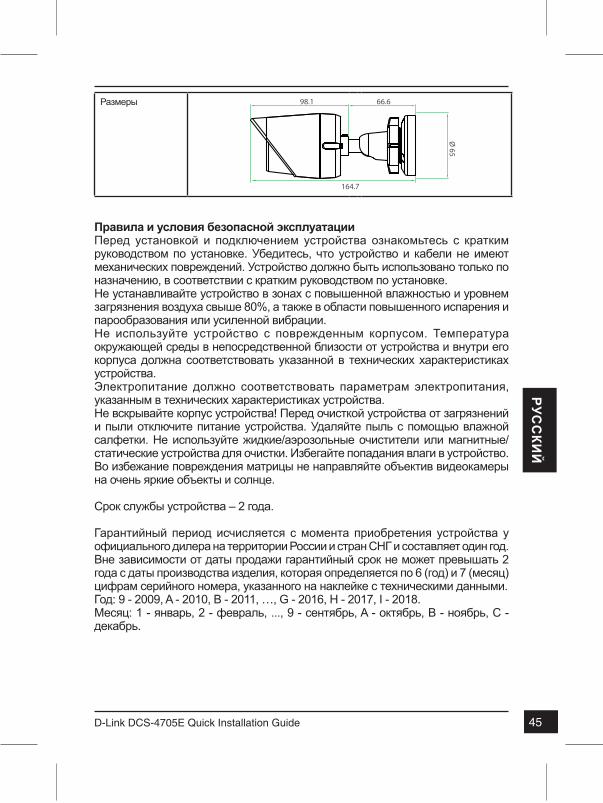
Размеры
Ø 65
164.7
66.698.1
Правила и условия безопасной эксплуатацииПеред установкой и подключением устройства ознакомьтесь с кратким руководством по установке. Убедитесь, что устройство и кабели не имеют механических повреждений. Устройство должно быть использовано только по назначению, в соответствии с кратким руководством по установке. Не устанавливайте устройство в зонах с повышенной влажностью и уровнем загрязнения воздуха свыше 80%, а также в области повышенного испарения и парообразования или усиленной вибрации. Не используйте устройство с поврежденным корпусом. Температура окружающей среды в непосредственной близости от устройства и внутри его корпуса должна соответствовать указанной в технических характеристиках устройства.Электропитание должно соответствовать параметрам электропитания, указанным в технических характеристиках устройства.Не вскрывайте корпус устройства! Перед очисткой устройства от загрязнений и пыли отключите питание устройства. Удаляйте пыль с помощью влажной салфетки. Не используйте жидкие/аэрозольные очистители или магнитные/статические устройства для очистки. Избегайте попадания влаги в устройство. Во избежание повреждения матрицы не направляйте объектив видеокамеры на очень яркие объекты и солнце.
Срок службы устройства – 2 года.
Гарантийный период исчисляется c момента приобретения устройства у официального дилера на территории России и стран СНГ и составляет один год.Вне зависимости от даты продажи гарантийный срок не может превышать 2 года с даты производства изделия, которая определяется по 6 (год) и 7 (месяц) цифрам серийного номера, указанного на наклейке с техническими данными.Год: 9 - 2009, A - 2010, B - 2011, …, G - 2016, H - 2017, I - 2018.Месяц: 1 - январь, 2 - февраль, ..., 9 - сентябрь, A - октябрь, B - ноябрь, С - декабрь.
4646 D-Link DCS-4705E Quick Installation Guide
РУС
СКИ
Й
ТЕХНИЧЕСКАЯ ПОДДЕРЖКА
ОФИСЫ
Обновления программного обеспечения и документация доступны на Интернет-сайте D-Link.D-Link предоставляет бесплатную поддержку для клиентов в течение гарантийного срока.Клиенты могут обратиться в группу технической поддержки D-Link по телефону или через Интернет.Техническая поддержка компании D-Link работает в круглосуточном режиме ежедневно, кроме официальных праздничных дней. Звонок бесплатный по всей России.
Техническая поддержка D-Link: 8-800-700-5465
Техническая поддержка через Интернет: http://www.dlink.rue-mail: [email protected]Изготовитель:Д-Линк Корпорейшн, 114, Тайвань, Тайпей, Нэйху Дистрикт, Шинху 3-Роуд, № 289
Уполномоченный представитель, импортер:ООО “Д-Линк Трейд”390043, г. Рязань, пр. Шабулина, д.16 Тел.: +7 (4912) 503-505
РоссияМосква, Графский переулок, 14Тел. : +7 (495) 744-00-99E-mail: [email protected]
УкраїнаКиїв, вул. Межигірська, 87-АТел.: +38 (044) 545-64-40E-mail: [email protected]
MoldovaChisinau; str.C.Negruzzi-8Tel: +373 (22) 80-81-07E-mail:[email protected]
БеларусьМінск, пр-т Незалежнасці, 169Тэл.: +375 (17) 218-13-65E-mail: [email protected]
ҚазақстанАлматы, Құрманғазы к-cі,143 үйТел.: +7 (727) 378-55-90E-mail: [email protected]
ՀայաստանԵրևան, Դավթաշեն 3-րդթաղամաս, 23/5Հեռ.՝ +374 (10) 39-86-67Էլ. փոստ՝ [email protected]
LatvijaRīga, Lielirbes iela 27Tel.: +371 (6) 761-87-03E-mail: [email protected]
LietuvaVilnius, Žirmūnų 139-303Tel.: +370 (5) 236-36-29E-mail: [email protected]
EestiE-mail: [email protected]
TürkiyeUphill Towers Residence A/99Ataşehir /ISTANBULTel: +90 (216) 492-99-99Email: [email protected]
ישראלרח' המגשימים 20
קרית מטלוןפתח תקווה

47D-Link DCS-4705E Quick Installation Guide
УКРАЇНСЬКА
КОРОТКИЙ ПОСІБНИК ЗІ ВСТАНОВЛЕННЯ
Цей посібник містить основні інструкції зі встановлення камери DCS-4705E в мережі. Для отримання додаткової інформації про налаштування камери, будь ласка, зверніться до керівництва користувача на CD-диску з комплекту постачання або на Web-сайт D-Link.
Комплект постачання � 5 Мп зовнішня мережева камера, день/ніч, з ІЧ-підсвічуванням до 30м, PoE і WDR DCS-4705E �Водонепроникний конектор для кабеля � Гумова заглушка для роз'єму живлення �Комплект для монтажу �CD-диск з керівництвом користувача та програмним забезпеченням �Короткий посібник зі встановлення
Якщо будь-що з переліченого відсутнє, будь ласка, зверніться до постачальника.
Заходи безпекиЩоб уникнути припинення гарантії, встановлення і обслуговування повинні виконувати сертифіковані фахівці відповідно до регіональних норм і правил.

48 D-Link DCS-4705E Quick Installation Guide
УКРА
ЇНСЬ
КА
Огляд апаратної частини
Об'єктив камери
Інфрачервоне підсвічуванняВикористовується для роботи камери в нічний час
Кільце для регулюванняВідпустіть кільце, щоб відрегулювати положення камери, а потім затягніть кільце для фіксації камери в необхідному положенні
Кнопка ResetНатисніть і утримуйте кнопку Reset протягом 10 секунд, щоб скинути налаштування камери до заводських
Гвинт для заземленняГвинтом заземлення можна прикрутити клему заземлюючого проводу до камери
Роз'єм живленняРоз'єм для підключення 12В/1,5А адаптера живлення (адаптер не входить в комплект постачання)
Ethernet-роз'ємРоз'єм RJ-45 для підключення Ethernet -кабелю, а також для подачі живлення камери за технологією Power over Ethernet (PoE)
49D-Link DCS-4705E Quick Installation Guide
УКРАЇНСЬКА
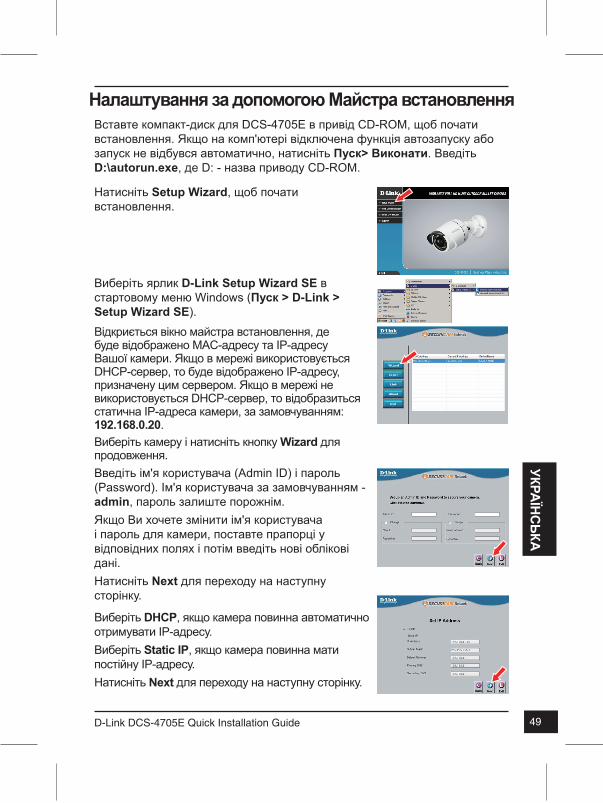
Налаштування за допомогою Майстра встановленняВставте компакт-диск для DCS-4705E в привід CD-ROM, щоб почати встановлення. Якщо на комп'ютері відключена функція автозапуску або запуск не відбувся автоматично, натисніть Пуск> Виконати. Введіть D:\autorun.exe, де D: - назва приводу CD-ROM.
Виберіть ярлик D-Link Setup Wizard SE в стартовому меню Windows (Пуск > D-Link > Setup Wizard SE).
Відкриється вікно майстра встановлення, де буде відображено MAC-адресу та IP-адресу Вашої камери. Якщо в мережі використовується DHCP-сервер, то буде відображено IP-адресу, призначену цим сервером. Якщо в мережі не використовується DHCP-сервер, то відобразиться статична IP-адреса камери, за замовчуванням: 192.168.0.20.Виберіть камеру і натисніть кнопку Wizard для продовження.
Натисніть Setup Wizard, щоб почати встановлення.
Введіть ім'я користувача (Admin ID) і пароль (Password). Ім'я користувача за замовчуванням - admin, пароль залиште порожнім.Якщо Ви хочете змінити ім'я користувача і пароль для камери, поставте прапорці у відповідних полях і потім введіть нові облікові дані.Натисніть Next для переходу на наступну сторінку.
Виберіть DHCP, якщо камера повинна автоматично отримувати IP-адресу.Виберіть Static IP, якщо камера повинна мати постійну IP-адресу.Натисніть Next для переходу на наступну сторінку.
50 D-Link DCS-4705E Quick Installation Guide
УКРА
ЇНСЬ
КА
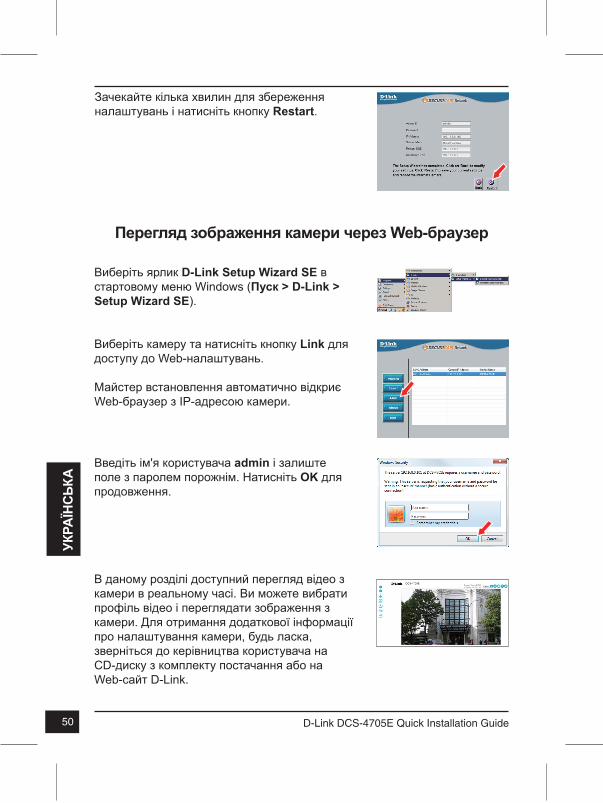
Зачекайте кілька хвилин для збереження налаштувань і натисніть кнопку Restart.
Перегляд зображення камери через Web-браузер
Виберіть ярлик D-Link Setup Wizard SE в стартовому меню Windows (Пуск > D-Link > Setup Wizard SE).
Виберіть камеру та натисніть кнопку Link для доступу до Web-налаштувань.
Майстер встановлення автоматично відкриє Web-браузер з IP-адресою камери.
В даному розділі доступний перегляд відео з камери в реальному часі. Ви можете вибрати профіль відео і переглядати зображення з камери. Для отримання додаткової інформації про налаштування камери, будь ласка, зверніться до керівництва користувача на CD-диску з комплекту постачання або на Web-сайт D-Link.
Введіть ім'я користувача admin і залиште поле з паролем порожнім. Натисніть OK для продовження.

51D-Link DCS-4705E Quick Installation Guide
УКРАЇНСЬКА
Монтаж камериНаполегливо рекомендуємо виконати налаштування і тестування камери до її монтажу.
Якщо потрібно забезпечити водонепроникність камери, перейдіть на наступну сторінку.
Прикріпіть направляючу наклейку на місце, де плануєте встановити камеру. Переконайтеся, що основу камери буде розміщено таким чином, щоб канал для кабелів будев знизу.
Просвердліть отвори завглибшки приблизно 25 мм свердлом діаметром 6 мм. Потім в отвори вставте анкери.
Якщо потрібно прокласти кабелі для камери в стіні, просвердліть отвір в центрі і протягніть кабелі через цей отвір.
Використовуйте гвинти що входять до комплекту постачання, щоб прикріпити камеру до стіни.
Якщо для камери потрібно прокласти кабелі з зовнішнього боку, протягніть їх через канал в основі камери.
Підключіть кабель живлення і Ethernet-кабель. Якщо використовується PoE-живлення, підключіть тільки Ethernet-кабель.
Щоб відрегулювати положення камери, ослабте кільце регулювання, повернувши його проти годинникової стрілки. Потім задайте камері потрібне положення і поверніть кільце за годинниковою стрілкою для фіксації.
52 D-Link DCS-4705E Quick Installation Guide
УКРА
ЇНСЬ
КА
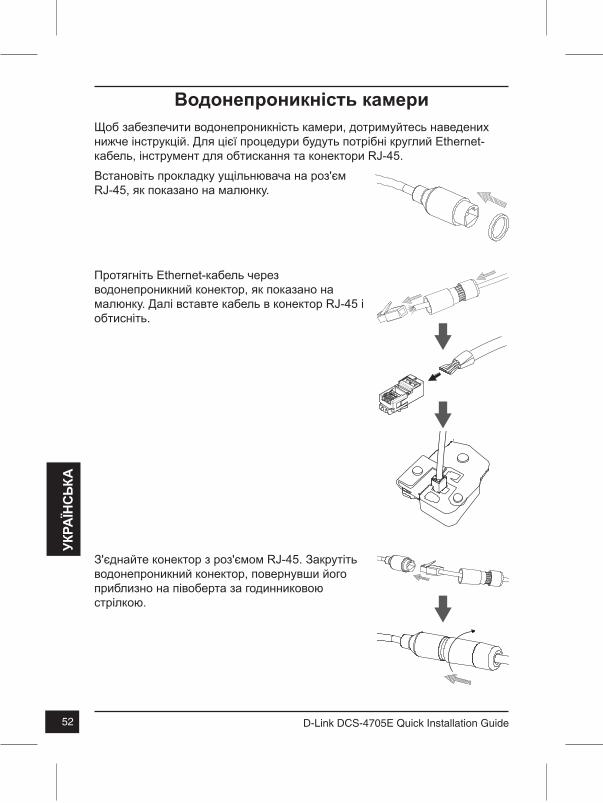
Щоб забезпечити водонепроникність камери, дотримуйтесь наведених нижче інструкцій. Для цієї процедури будуть потрібні круглий Ethernet-кабель, інструмент для обтискання та конектори RJ-45.
Водонепроникність камери
Встановіть прокладку ущільнювача на роз'єм RJ-45, як показано на малюнку.
З'єднайте конектор з роз'ємом RJ-45. Закрутіть водонепроникний конектор, повернувши його приблизно на півоберта за годинниковою стрілкою.
Протягніть Ethernet-кабель через водонепроникний конектор, як показано на малюнку. Далі вставте кабель в конектор RJ-45 і обтисніть.
53D-Link DCS-4705E Quick Installation Guide
УКРАЇНСЬКА
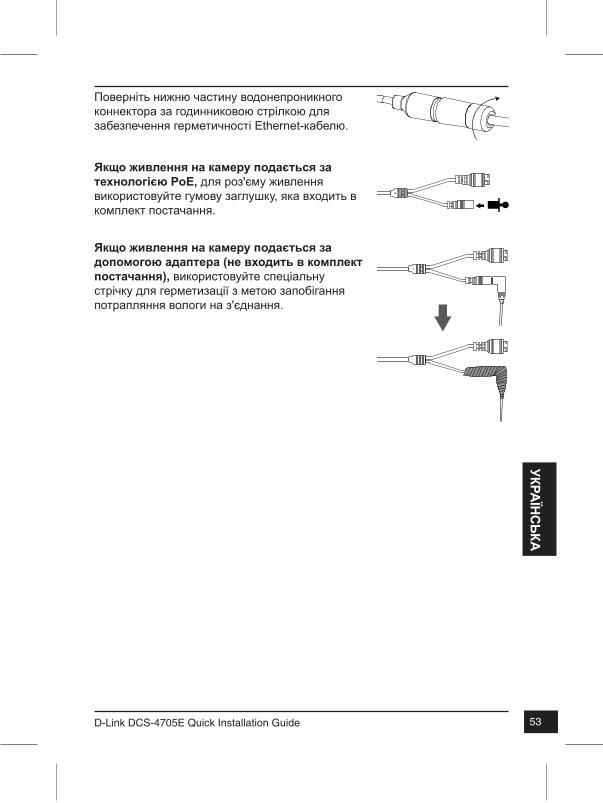
Якщо живлення на камеру подається за технологією PoE, для роз'єму живлення використовуйте гумову заглушку, яка входить в комплект постачання.
Якщо живлення на камеру подається за допомогою адаптера (не входить в комплект постачання), використовуйте спеціальну стрічку для герметизації з метою запобігання потрапляння вологи на з'єднання.
Поверніть нижню частину водонепроникного коннектора за годинниковою стрілкою для забезпечення герметичності Ethernet-кабелю.
54 D-Link DCS-4705E Quick Installation Guide
УКРА
ЇНСЬ
КА
ТЕХНІЧНА ПІДТРИМКАОновлення програмного забезпечення та документація доступні на Інтернет-сайтах нашої корпорації.Корпорація D-Link надає безкоштовну підтримку для клієнтів протягом гарантійного терміну.Клієнти можуть звернутися до групи технічної підтримки D-Link за телефоном або через Інтернет.
ДЛЯ КЛІЄНТІВ D-LINK НА ТЕРИТОРІЇ УКРАЇНИ
ТЕХНІЧНА ПІДТРИМКА ЧЕРЕЗ ІНТЕРНЕТWeb-сайт: http://www.dlink.uaE-mail: [email protected]
ТЕХНІЧНА ПІДТРИМКА ЗА ТЕЛЕФОНОМ(044) 545-64-40(093) 170-00-85
АДРЕСИ ТА ТЕЛЕФОНИ ОФІСІВ D-LINK ПО ВСЬОМУ СВІТУhttp://www.dlink.com/corporate/worldwideoffices/
5555D-Link DCS-4705E Quick Installation Guide
PO
RT
UG
UÊ
S
Guia rápido de instalaçãoEste guia de instalação fornece instruções básicas para a instalação de sua nova câmera de rede. Para obter informações adicionais sobre como usar a câmera, consulte o Manual do Usuário que está disponível no CD incluído neste pacote ou do site de suporte da D-Link.
Conteúdo da embalagem � Mini Bullet Câmara HD/PoE de Vigilância Outdoor DCS-4705E � Conector para cabo de impermeabilização � Conector de alimentação � Kit de montagem � Manual e software em CD-ROM � Guia rápido de instalação
Se qualquer um dos itens acima estiver faltando, entre em contato com o seu revendedor.
Aviso de segurança:Instalação e manutenção devem ser feitas por tecnicos certificados, de modo a estar em conformidade com todas as normas locais e evitar anulação da garantia.
5656 D-Link DCS-4705E Quick Installation Guide
PO
RT
UG
UÊ
S
Visão geral do hardware
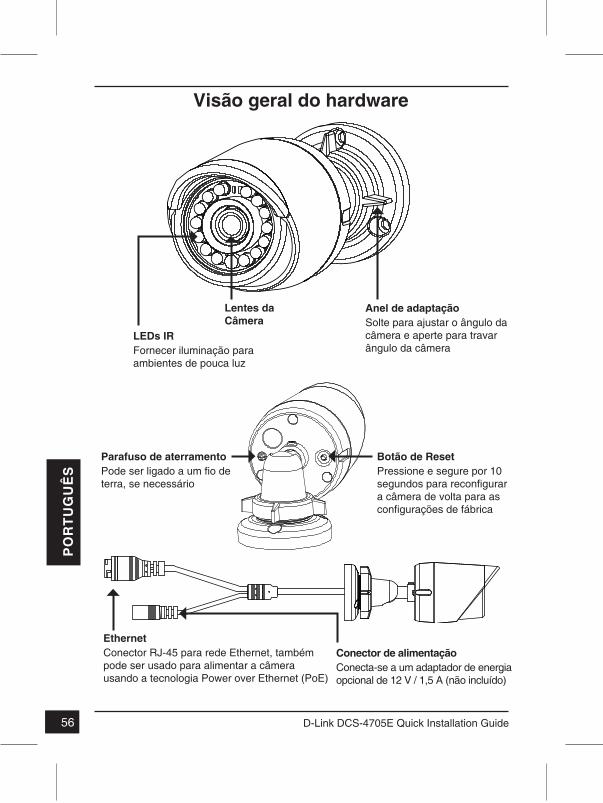
Lentes da Câmera
LEDs IRFornecer iluminação para ambientes de pouca luz
Anel de adaptaçãoSolte para ajustar o ângulo da câmera e aperte para travar ângulo da câmera
Botão de ResetPressione e segure por 10 segundos para reconfigurar a câmera de volta para as configurações de fábrica
Parafuso de aterramentoPode ser ligado a um fio de terra, se necessário
Conector de alimentaçãoConecta-se a um adaptador de energia opcional de 12 V / 1,5 A (não incluído)
EthernetConector RJ-45 para rede Ethernet, também pode ser usado para alimentar a câmera usando a tecnologia Power over Ethernet (PoE)
5757D-Link DCS-4705E Quick Installation Guide
PO
RT
UG
UÊ
S
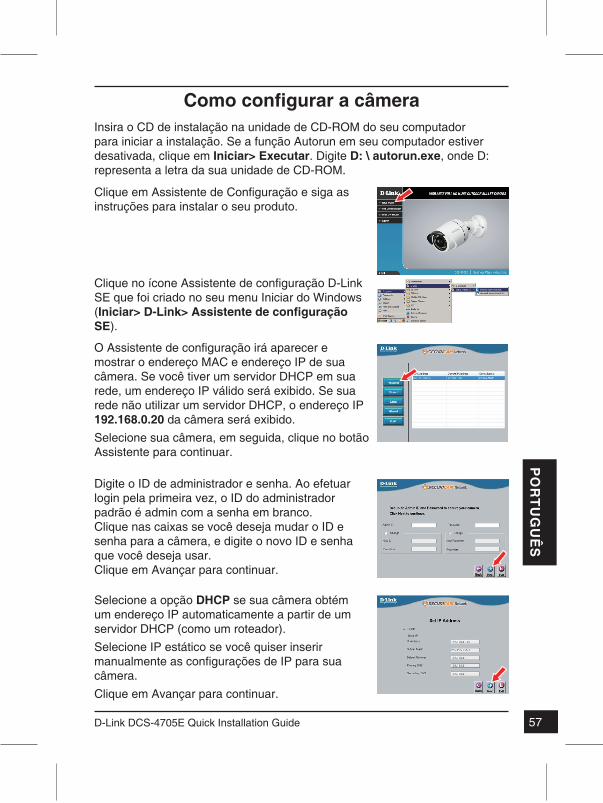
Como configurar a câmeraInsira o CD de instalação na unidade de CD-ROM do seu computador para iniciar a instalação. Se a função Autorun em seu computador estiver desativada, clique em Iniciar> Executar. Digite D: \ autorun.exe, onde D: representa a letra da sua unidade de CD-ROM.
Clique no ícone Assistente de configuração D-Link SE que foi criado no seu menu Iniciar do Windows (Iniciar> D-Link> Assistente de configuração SE).
O Assistente de configuração irá aparecer e mostrar o endereço MAC e endereço IP de sua câmera. Se você tiver um servidor DHCP em sua rede, um endereço IP válido será exibido. Se sua rede não utilizar um servidor DHCP, o endereço IP 192.168.0.20 da câmera será exibido.Selecione sua câmera, em seguida, clique no botão Assistente para continuar.
Clique em Assistente de Configuração e siga as instruções para instalar o seu produto.
Digite o ID de administrador e senha. Ao efetuar login pela primeira vez, o ID do administrador padrão é admin com a senha em branco.Clique nas caixas se você deseja mudar o ID e senha para a câmera, e digite o novo ID e senha que você deseja usar.Clique em Avançar para continuar.
Selecione a opção DHCP se sua câmera obtém um endereço IP automaticamente a partir de um servidor DHCP (como um roteador).Selecione IP estático se você quiser inserir manualmente as configurações de IP para sua câmera.Clique em Avançar para continuar.
5858 D-Link DCS-4705E Quick Installation Guide
PO
RT
UG
UÊ
S
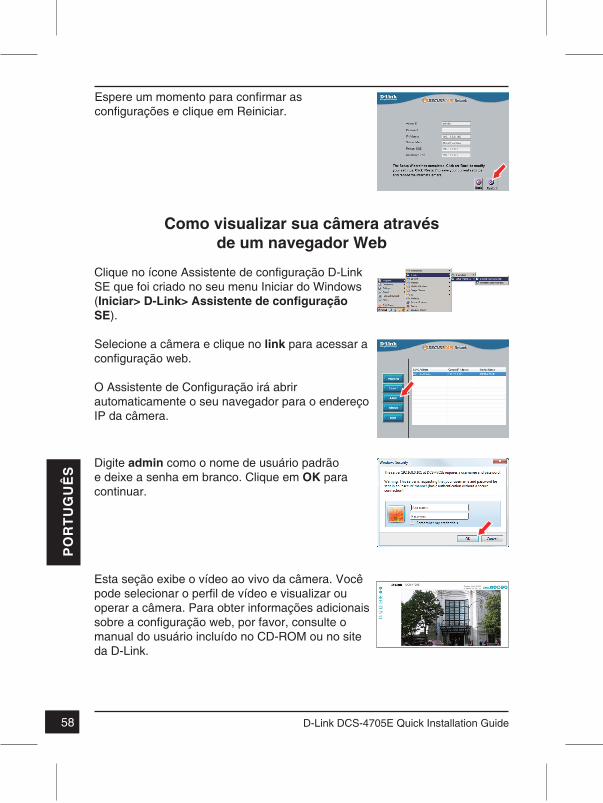
Espere um momento para confirmar as configurações e clique em Reiniciar.
Como visualizar sua câmera através de um navegador Web
Clique no ícone Assistente de configuração D-Link SE que foi criado no seu menu Iniciar do Windows (Iniciar> D-Link> Assistente de configuração SE).
Selecione a câmera e clique no link para acessar a configuração web.
O Assistente de Configuração irá abrir automaticamente o seu navegador para o endereço IP da câmera.
Esta seção exibe o vídeo ao vivo da câmera. Você pode selecionar o perfil de vídeo e visualizar ou operar a câmera. Para obter informações adicionais sobre a configuração web, por favor, consulte o manual do usuário incluído no CD-ROM ou no site da D-Link.
Digite admin como o nome de usuário padrão e deixe a senha em branco. Clique em OK para continuar.
5959D-Link DCS-4705E Quick Installation Guide
PO
RT
UG
UÊ
S
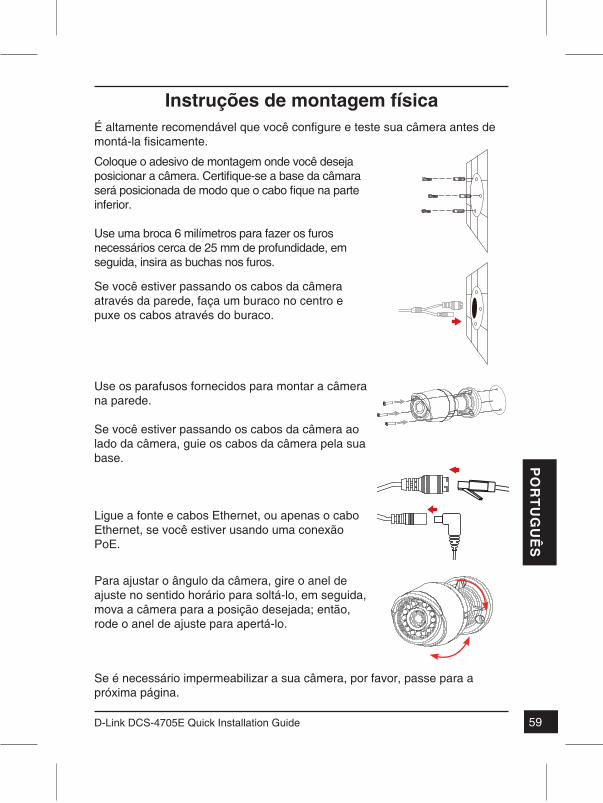
Instruções de montagem físicaÉ altamente recomendável que voce configure e teste sua câmera antes de montá-la fisicamente.
Se é necessário impermeabilizar a sua câmera, por favor, passe para a próxima página.
Coloque o adesivo de montagem onde você deseja posicionar a câmera. Certifique-se a base da câmara será posicionada de modo que o cabo fique na parte inferior.
Use uma broca 6 milímetros para fazer os furos necessários cerca de 25 mm de profundidade, em seguida, insira as buchas nos furos.
Se você estiver passando os cabos da câmera através da parede, faça um buraco no centro e puxe os cabos através do buraco.
Use os parafusos fornecidos para montar a câmera na parede.
Se você estiver passando os cabos da câmera ao lado da câmera, guie os cabos da câmera pela sua base.
Ligue a fonte e cabos Ethernet, ou apenas o cabo Ethernet, se você estiver usando uma conexão PoE.
Para ajustar o ângulo da câmera, gire o anel de ajuste no sentido horário para soltá-lo, em seguida, mova a câmera para a posição desejada; então, rode o anel de ajuste para apertá-lo.
6060 D-Link DCS-4705E Quick Installation Guide
PO
RT
UG
UÊ
S
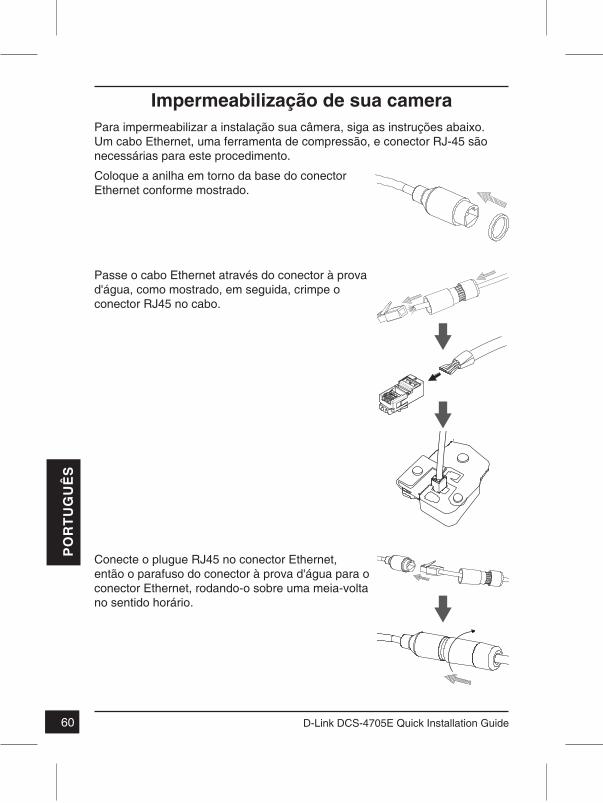
Para impermeabilizar a instalação sua câmera, siga as instruções abaixo. Um cabo Ethernet, uma ferramenta de compressão, e conector RJ-45 são necessárias para este procedimento.
Impermeabilização de sua camera
Coloque a anilha em torno da base do conector Ethernet conforme mostrado.
Conecte o plugue RJ45 no conector Ethernet, então o parafuso do conector à prova d'água para o conector Ethernet, rodando-o sobre uma meia-volta no sentido horário.
Passe o cabo Ethernet através do conector à prova d'água, como mostrado, em seguida, crimpe o conector RJ45 no cabo.
6161D-Link DCS-4705E Quick Installation Guide
PO
RT
UG
UÊ
S
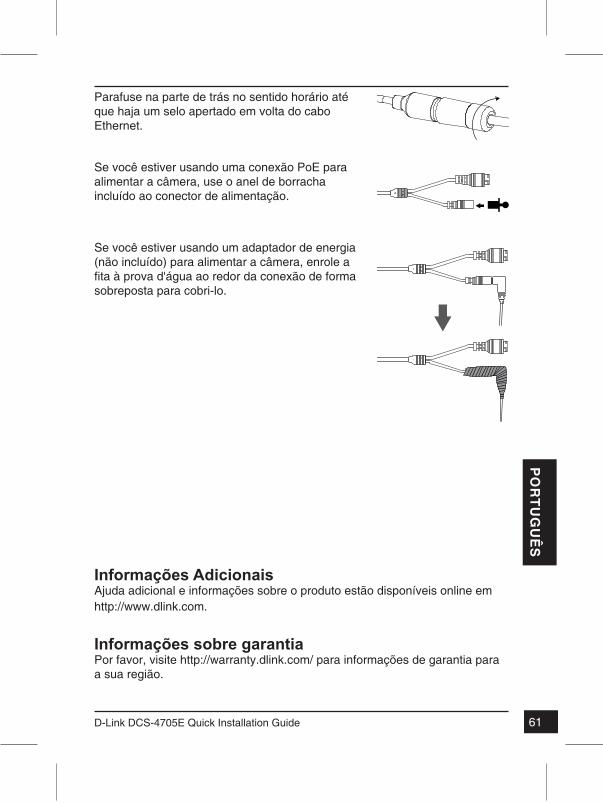
Se você estiver usando uma conexão PoE para alimentar a câmera, use o anel de borracha incluído ao conector de alimentação.
Se você estiver usando um adaptador de energia (não incluído) para alimentar a câmera, enrole a fita a prova d'água ao redor da conexão de forma sobreposta para cobri-lo.
Informações AdicionaisAjuda adicional e informações sobre o produto estão disponíveis online em http://www.dlink.com.
Informações sobre garantia Por favor, visite http://warranty.dlink.com/ para informações de garantia para a sua região.
Parafuse na parte de trás no sentido horário até que haja um selo apertado em volta do cabo Ethernet.

6262 D-Link DCS-4705E Quick Installation Guide
中
文
快速安裝指南此安裝指南提供安裝DCS-4705E網路攝影機在您網路的基本操作。若要取得更多關於使用此攝影機的方式,請參考光碟內附的使用手冊,或
至D-Link技術支援網站下載產品使用手冊。
包裝內容
� DCS-4705E HD室外型PoE網路攝影機�� 網路線防水連接器
�� 橡膠電源連接頭
�� 壁掛配件
�� 光碟(包含使用手冊及安裝程式)
�� 快速安裝指南
若有缺少上述的任何物品,請聯絡您的經銷商。
安全須知:
此產品應該由具備相關證照的技術人員安裝,以符合當地的法規及避免
產品的保固失效。
6363D-Link DCS-4705E Quick Installation Guide
中
文
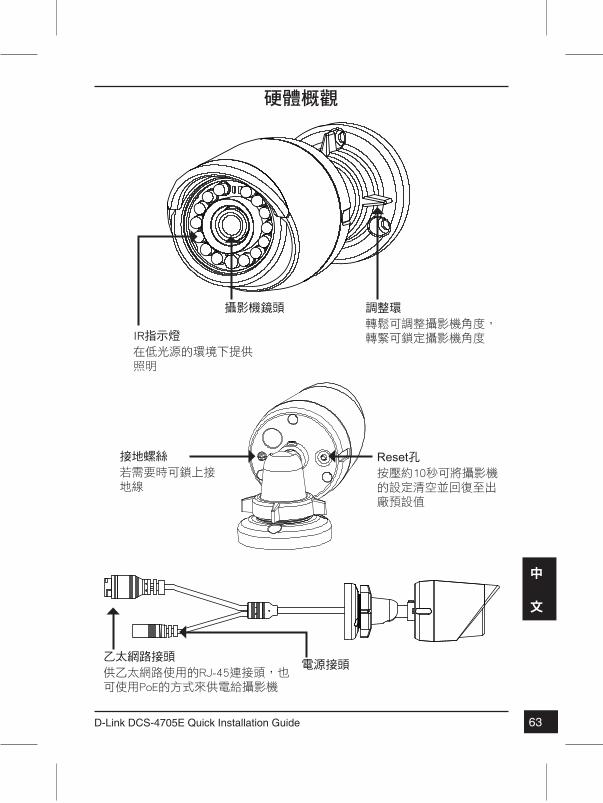
硬體概觀
攝影機鏡頭
IR指示燈
在低光源的環境下提供照明
調整環
轉鬆可調整攝影機角度,轉緊可鎖定攝影機角度
Reset孔按壓約10秒可將攝影機的設定清空並回復至出廠預設值
接地螺絲
若需要時可鎖上接地線
電源接頭乙太網路接頭
供乙太網路使用的RJ-45連接頭,也可使用PoE的方式來供電給攝影機
6464 D-Link DCS-4705E Quick Installation Guide
中
文
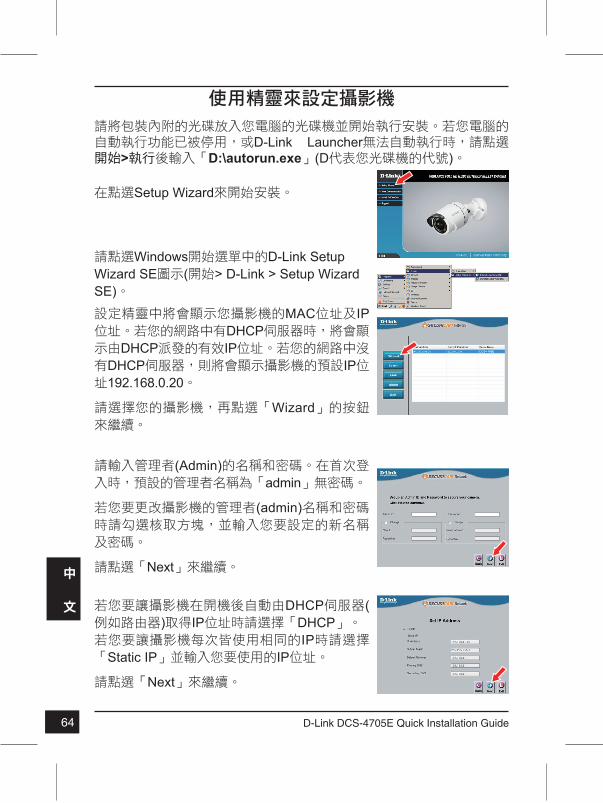
使用精靈來設定攝影機
請將包裝內附的光碟放入您電腦的光碟機並開始執行安裝。若您電腦的自動執行功能已被停用,或D-Link Launcher無法自動執行時,請點選開始>執行後輸入「D:\autorun.exe」(D代表您光碟機的代號)。
請點選Windows開始選單中的D-Link Setup Wizard SE圖示(開始> D-Link > Setup Wizard SE)。
設定精靈中將會顯示您攝影機的MAC位址及IP位址。若您的網路中有DHCP伺服器時,將會顯示由DHCP派發的有效IP位址。若您的網路中沒有DHCP伺服器,則將會顯示攝影機的預設IP位址192.168.0.20。
請選擇您的攝影機,再點選「Wizard」的按鈕來繼續。
在點選Setup Wizard來開始安裝。
請輸入管理者(Admin)的名稱和密碼。在首次登入時,預設的管理者名稱為「admin」無密碼。
若您要更改攝影機的管理者(admin)名稱和密碼時請勾選核取方塊,並輸入您要設定的新名稱及密碼。
請點選「Next」來繼續。
若您要讓攝影機在開機後自動由DHCP伺服器(例如路由器)取得IP位址時請選擇「DHCP」。若您要讓攝影機每次皆使用相同的IP時請選擇「Static IP」並輸入您要使用的IP位址。
請點選「Next」來繼續。
6565D-Link DCS-4705E Quick Installation Guide
中
文
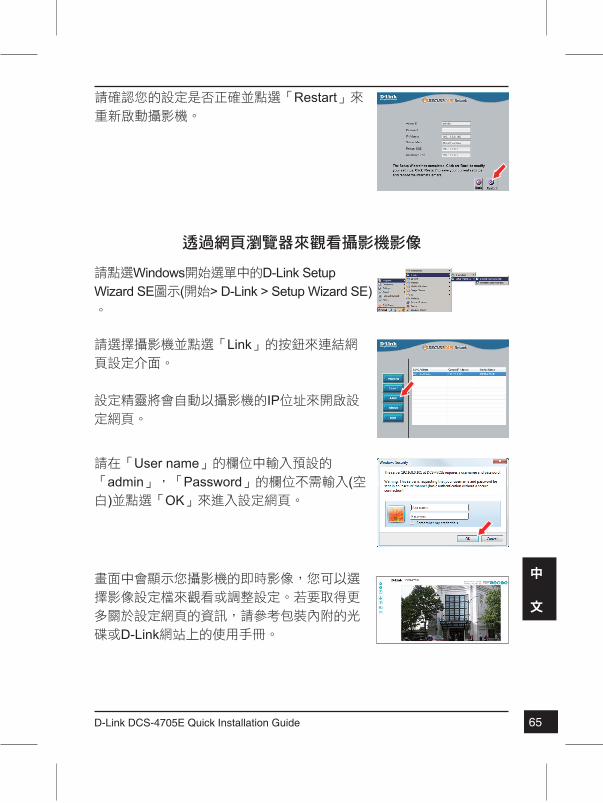
請確認您的設定是否正確並點選「Restart」來重新啟動攝影機。
透過網頁瀏覽器來觀看攝影機影像
請點選Windows開始選單中的D-Link Setup Wizard SE圖示(開始> D-Link > Setup Wizard SE)。
請選擇攝影機並點選「Link」的按鈕來連結網頁設定介面。
設定精靈將會自動以攝影機的IP位址來開啟設定網頁。
畫面中會顯示您攝影機的即時影像,您可以選
擇影像設定檔來觀看或調整設定。若要取得更
多關於設定網頁的資訊,請參考包裝內附的光
碟或D-Link網站上的使用手冊。
請在「User name」的欄位中輸入預設的「admin」,「Password」的欄位不需輸入(空白)並點選「OK」來進入設定網頁。
6666 D-Link DCS-4705E Quick Installation Guide
中
文
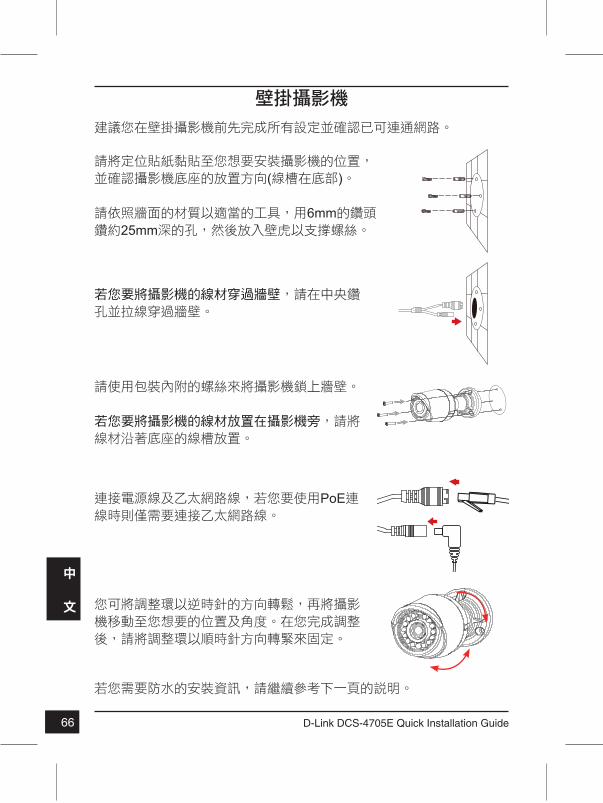
壁掛攝影機
建議您在壁掛攝影機前先完成所有設定並確認已可連通網路。
若您需要防水的安裝資訊,請繼續參考下一頁的說明。
請將定位貼紙黏貼至您想要安裝攝影機的位置,並確認攝影機底座的放置方向(線槽在底部)。
請依照牆面的材質以適當的工具,用6mm的鑽頭鑽約25mm深的孔,然後放入壁虎以支撐螺絲。
若您要將攝影機的線材穿過牆壁,請在中央鑽孔並拉線穿過牆壁。
連接電源線及乙太網路線,若您要使用PoE連線時則僅需要連接乙太網路線。
請使用包裝內附的螺絲來將攝影機鎖上牆壁。
若您要將攝影機的線材放置在攝影機旁,請將線材沿著底座的線槽放置。
您可將調整環以逆時針的方向轉鬆,再將攝影機移動至您想要的位置及角度。在您完成調整後,請將調整環以順時針方向轉緊來固定。
6767D-Link DCS-4705E Quick Installation Guide
中
文
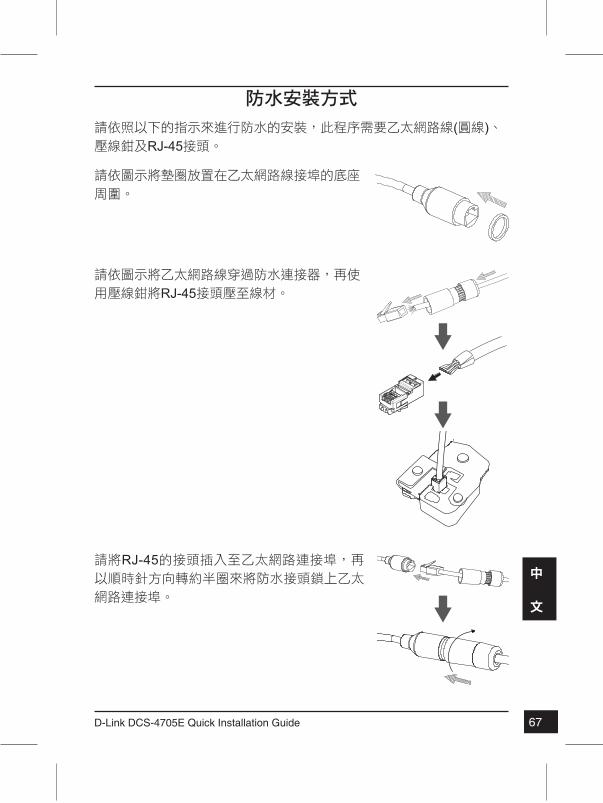
請依照以下的指示來進行防水的安裝,此程序需要乙太網路線(圓線)、壓線鉗及RJ-45接頭。
防水安裝方式
請依圖示將墊圈放置在乙太網路線接埠的底座
周圍。
請將RJ-45的接頭插入至乙太網路連接埠,再以順時針方向轉約半圈來將防水接頭鎖上乙太
網路連接埠。
請依圖示將乙太網路線穿過防水連接器,再使
用壓線鉗將RJ-45接頭壓至線材。
6868 D-Link DCS-4705E Quick Installation Guide
中
文
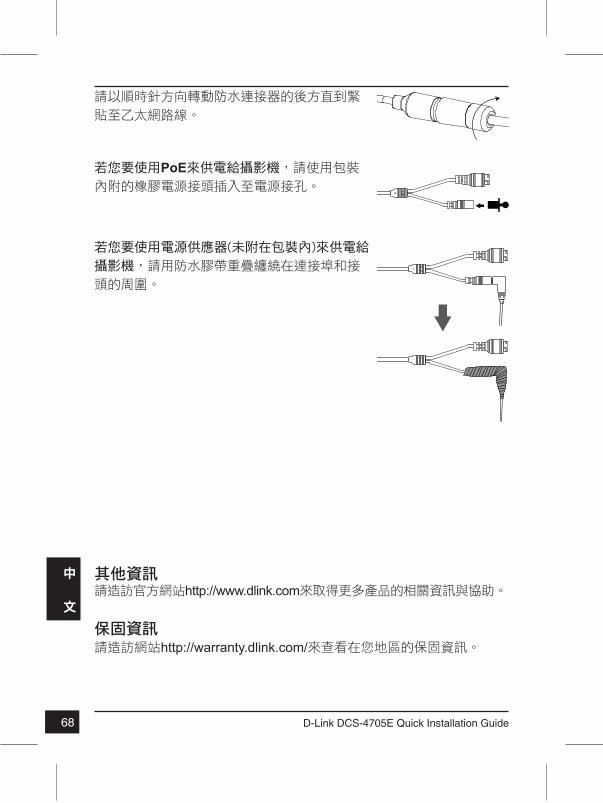
若您要使用PoE來供電給攝影機,請使用包裝內附的橡膠電源接頭插入至電源接孔。
若您要使用電源供應器(未附在包裝內)來供電給
攝影機,請用防水膠帶重疊纏繞在連接埠和接
頭的周圍。
其他資訊請造訪官方網站http://www.dlink.com來取得更多產品的相關資訊與協助。
保固資訊�請造訪網站http://warranty.dlink.com/來查看在您地區的保固資訊。
請以順時針方向轉動防水連接器的後方直到緊
貼至乙太網路線。
6969D-Link DCS-4705E Quick Installation Guide
BA
HA
SA
IND
ON
ES
IA
PANDUAN INSTALASI CEPATPanduan instalasi ini memberikan petunjuk dasar cara menginstal IP Kamera pada jaringan Anda. Untuk informasi tambahan tentang cara menggunakan kamera, silakan lihat Manual Pengguna yang tersedia di CD yang disertakan dalam paket ini atau dari situs web dukungan D-Link.
Isi Kemasan � DCS-4705E Kamera HD luar PoE Mini Bullet � Kabel Waterproofing Connector � Karet Power Konektor Plug � Mounting Kit � Manual dan Software pada CD-ROM � Panduan Instalasi Cepat
Bila terdapat bagian yang hilang, harap segera hubungi penjual Anda.
Catatan Keselamatan:Instalasi dan servis harus dilakukan oleh teknisi bersertifikat sehingga dapat sesuai dengan semua kode lokal dan mencegah hilangnya garansi Anda.
7070 D-Link DCS-4705E Quick Installation Guide
BA
HA
SA
IND
ON
ES
IA
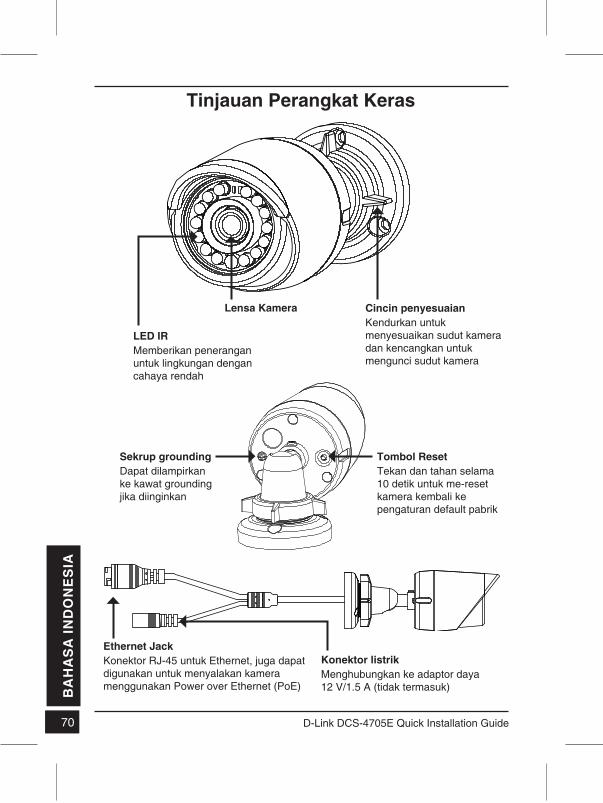
Tinjauan Perangkat Keras
Lensa Kamera
LED IRMemberikan penerangan untuk lingkungan dengan cahaya rendah
Cincin penyesuaianKendurkan untuk menyesuaikan sudut kamera dan kencangkan untuk mengunci sudut kamera
Tombol ResetTekan dan tahan selama 10 detik untuk me-reset kamera kembali ke pengaturan default pabrik
Sekrup groundingDapat dilampirkan ke kawat grounding jika diinginkan
Konektor listrikMenghubungkan ke adaptor daya 12 V/1.5 A (tidak termasuk)
Ethernet JackKonektor RJ-45 untuk Ethernet, juga dapat digunakan untuk menyalakan kamera menggunakan Power over Ethernet (PoE)
7171D-Link DCS-4705E Quick Installation Guide
BA
HA
SA
IND
ON
ES
IA
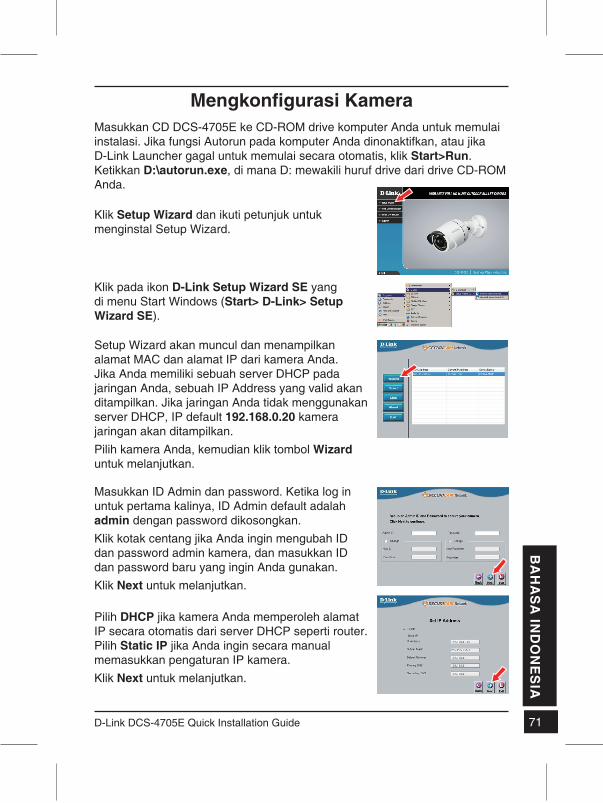
Mengkonfigurasi KameraMasukkan CD DCS-4705E ke CD-ROM drive komputer Anda untuk memulai instalasi. Jika fungsi Autorun pada komputer Anda dinonaktifkan, atau jika D-Link Launcher gagal untuk memulai secara otomatis, klik Start>Run. Ketikkan D:\autorun.exe, di mana D: mewakili huruf drive dari drive CD-ROM Anda.
Klik pada ikon D-Link Setup Wizard SE yang di menu Start Windows (Start> D-Link> Setup Wizard SE).
Setup Wizard akan muncul dan menampilkan alamat MAC dan alamat IP dari kamera Anda. Jika Anda memiliki sebuah server DHCP pada jaringan Anda, sebuah IP Address yang valid akan ditampilkan. Jika jaringan Anda tidak menggunakan server DHCP, IP default 192.168.0.20 kamera jaringan akan ditampilkan.Pilih kamera Anda, kemudian klik tombol Wizard untuk melanjutkan.
Klik Setup Wizard dan ikuti petunjuk untuk menginstal Setup Wizard.
Masukkan ID Admin dan password. Ketika log in untuk pertama kalinya, ID Admin default adalah admin dengan password dikosongkan.Klik kotak centang jika Anda ingin mengubah ID dan password admin kamera, dan masukkan ID dan password baru yang ingin Anda gunakan.Klik Next untuk melanjutkan.
Pilih DHCP jika kamera Anda memperoleh alamat IP secara otomatis dari server DHCP seperti router.Pilih Static IP jika Anda ingin secara manual memasukkan pengaturan IP kamera.Klik Next untuk melanjutkan.
7272 D-Link DCS-4705E Quick Installation Guide
BA
HA
SA
IND
ON
ES
IA
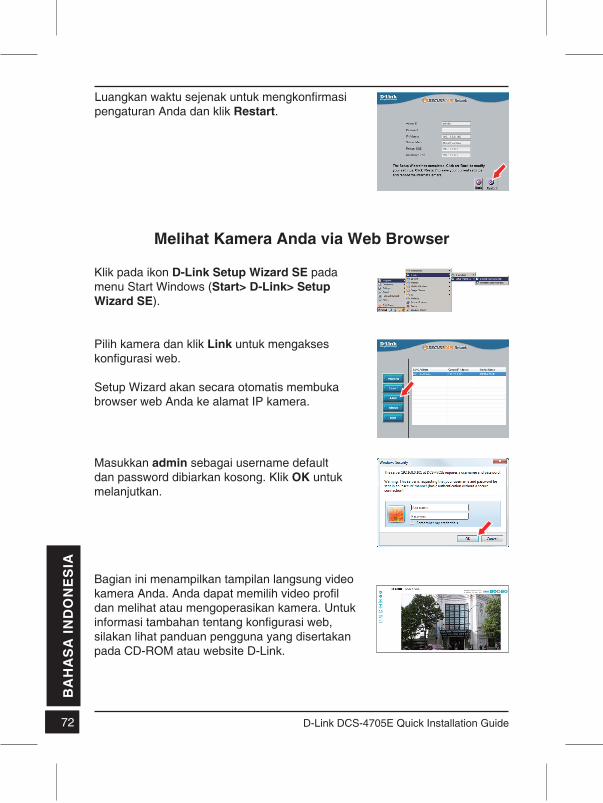
Luangkan waktu sejenak untuk mengkonfirmasi pengaturan Anda dan klik Restart.
Melihat Kamera Anda via Web Browser
Klik pada ikon D-Link Setup Wizard SE pada menu Start Windows (Start> D-Link> Setup Wizard SE).
Pilih kamera dan klik Link untuk mengakses konfigurasi web.
Setup Wizard akan secara otomatis membuka browser web Anda ke alamat IP kamera.
Bagian ini menampilkan tampilan langsung video kamera Anda. Anda dapat memilih video profil dan melihat atau mengoperasikan kamera. Untuk informasi tambahan tentang konfigurasi web, silakan lihat panduan pengguna yang disertakan pada CD-ROM atau website D-Link.
Masukkan admin sebagai username default dan password dibiarkan kosong. Klik OK untuk melanjutkan.
7373D-Link DCS-4705E Quick Installation Guide
BA
HA
SA
IND
ON
ES
IA
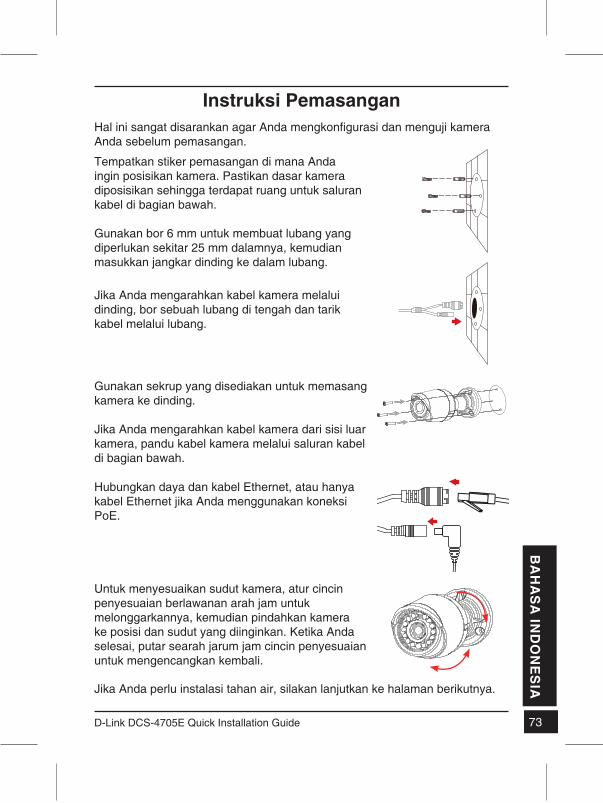
Instruksi PemasanganHal ini sangat disarankan agar Anda mengkonfigurasi dan menguji kamera Anda sebelum pemasangan.
Jika Anda perlu instalasi tahan air, silakan lanjutkan ke halaman berikutnya.
Tempatkan stiker pemasangan di mana Anda ingin posisikan kamera. Pastikan dasar kamera diposisikan sehingga terdapat ruang untuk saluran kabel di bagian bawah.
Gunakan bor 6 mm untuk membuat lubang yang diperlukan sekitar 25 mm dalamnya, kemudian masukkan jangkar dinding ke dalam lubang.
Jika Anda mengarahkan kabel kamera melalui dinding, bor sebuah lubang di tengah dan tarik kabel melalui lubang.
Hubungkan daya dan kabel Ethernet, atau hanya kabel Ethernet jika Anda menggunakan koneksi PoE.
Gunakan sekrup yang disediakan untuk memasang kamera ke dinding.
Jika Anda mengarahkan kabel kamera dari sisi luar kamera, pandu kabel kamera melalui saluran kabel di bagian bawah.
Untuk menyesuaikan sudut kamera, atur cincin penyesuaian berlawanan arah jam untuk melonggarkannya, kemudian pindahkan kamera ke posisi dan sudut yang diinginkan. Ketika Anda selesai, putar searah jarum jam cincin penyesuaian untuk mengencangkan kembali.
7474 D-Link DCS-4705E Quick Installation Guide
BA
HA
SA
IND
ON
ES
IA
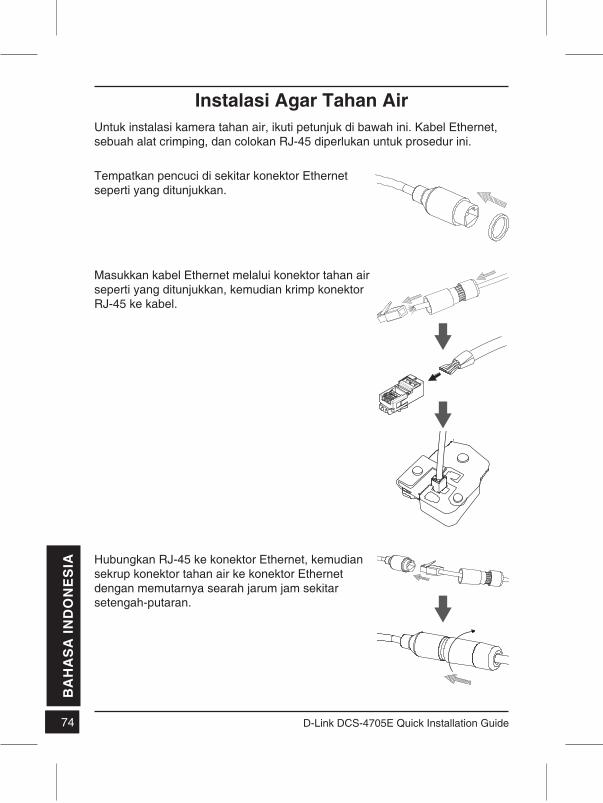
Untuk instalasi kamera tahan air, ikuti petunjuk di bawah ini. Kabel Ethernet, sebuah alat crimping, dan colokan RJ-45 diperlukan untuk prosedur ini.
Instalasi Agar Tahan Air
Tempatkan pencuci di sekitar konektor Ethernet seperti yang ditunjukkan.
Hubungkan RJ-45 ke konektor Ethernet, kemudian sekrup konektor tahan air ke konektor Ethernet dengan memutarnya searah jarum jam sekitar setengah-putaran.
Masukkan kabel Ethernet melalui konektor tahan air seperti yang ditunjukkan, kemudian krimp konektor RJ-45 ke kabel.
7575D-Link DCS-4705E Quick Installation Guide
BA
HA
SA
IND
ON
ES
IA
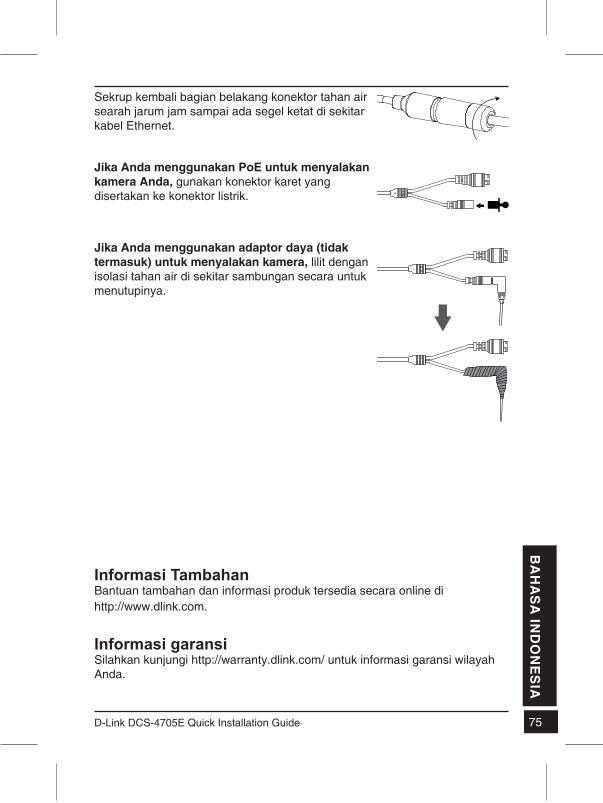
Jika Anda menggunakan PoE untuk menyalakan kamera Anda, gunakan konektor karet yang disertakan ke konektor listrik.
Jika Anda menggunakan adaptor daya (tidak termasuk) untuk menyalakan kamera, lilit dengan isolasi tahan air di sekitar sambungan secara untuk menutupinya.
Informasi TambahanBantuan tambahan dan informasi produk tersedia secara online di http://www.dlink.com.
Informasi garansi Silahkan kunjungi http://warranty.dlink.com/ untuk informasi garansi wilayah Anda.
Sekrup kembali bagian belakang konektor tahan air searah jarum jam sampai ada segel ketat di sekitar kabel Ethernet.

76 D-Link DCS-4705E Quick Installation Guide
Federal Communication Commission Interference StatementThis equipment has been tested and found to comply with the limits for a Class A digital device, pursuant to part 15 of the FCC Rules. These limits are designed to provide reasonable protection against harmful interference when the equipment is operated in a commercial environment. This equipment generates, uses, and can radiate radio frequency energy and, if not installed and used in accordance with the instruction manual, may cause harmful interference to radio communications. Operation of this equipment in a residential area is likely to cause harmful interference in which case the user will be required to correct the interference at his own expense.
Non-modification StatementAny changes or modifications not expressly approved by the party responsible for compliance could void the user's authority to operate the equipment.
CautionThis device complies with Part 15 of the FCC Rules. Operation is subject to the following two conditions: (1) This device may not cause harmful interference, and (2) this device must accept any interference received, including interference that may cause undesired operation.
Innovation, Science and Economic Development Canada (ISED) Statement:This Class A digital apparatus complies with Canadian ICES-003.Cet appareil numérique de la classe A est conforme à la norme NMB-003 du Canada.
警告使用者: 此為甲類的資訊技術設備,在居住環境中使用時,可能會造成射頻擾動,在這種情況下,使用者會被要求採取某些適當的對策。
CE EMI Class A WarningThis equipment is compliant with Class A of CISPR 32. In a residential environment this equipment may cause radio interference.
Regulatory Statements (Only for Class A product)

77D-Link DCS-4705E Quick Installation Guide
Federal Communication Commission Interference StatementThis equipment has been tested and found to comply with the limits for a Class B digital device, pursuant to Part 15 of the FCC Rules. These limits are designed to provide reasonable protection against harmful interference in a residential installation. This equipment generates, uses and can radiate radio frequency energy and, if not installed and used in accordance with the instructions, may cause harmful interference to radio communications. However, there is no guarantee that interference will not occur in a particular installation. If this equipment does cause harmful interference to radio or television reception, which can be determined by turning the equipment off and on, the user is encouraged to try to correct the interference by one of the following measures:- Reorient or relocate the receiving antenna.- Increase the separation between the equipment and receiver.- Connect the equipment into an outlet on a circuit different from that to which the receiver is connected.- Consult the dealer or an experienced radio/TV technician for help.
Non-modification Statement
Any changes or modifications not expressly approved by the party responsible for compliance could void the user's authority to operate the equipment.
CautionThis device complies with Part 15 of the FCC Rules. Operation is subject to the following two conditions: (1) This device may not cause harmful interference, and (2) this device must accept any interference received, including interference that may cause undesired operation.
Innovation, Science and Economic Development Canada (ISED) Statement: This Class B digital apparatus complies with Canadian ICES-003.Cet appareil numérique de la classe B est conforme à la norme NMB-003 du Canada.
Regulatory Statements (Only for Class B product)
78 D-Link DCS-4705E Quick Installation Guide
SAFETY INSTRUCTIONS
SICHERHEITSINSTRUKTION
CONSIGNES DE SÉCURITÉ
The following general safety guidelines are provided to help ensure your own personal safety and protect your product from potential damage. Remember to consult the product user instructions for more details.
• Static electricity can be harmful to electronic components. Discharge static electricity from your body (i.e. touching grounded bare metal) before touching the product.
• Do not attempt to service the product and never disassemble the product. For some products with a user replaceable battery, please read and follow the instructions in the user manual.
• Do not spill food or liquid on your product and never push any objects into the openings of your product.
• Do not use this product near water, areas with high humidity, or condensation unless the product is specifically rated for outdoor application.
• Keep the product away from radiators and other heat sources.• Always unplug the product from mains power before cleaning and use a dry lint free cloth only.
Die folgenden allgemeinen Sicherheitsinstruktionen dienen als Hilfe zur Gewährleistung Ihrer eigenen Sicherheit und zum Schutz Ihres Produkts. Weitere Details finden Sie in den Benutzeranleitungen zum Produkt.
• Statische Elektrizität kann elektronischen Komponenten schaden. Um Schäden durch statische Aufladung zu vermeiden, leiten Sie elektrostatische Ladungen von Ihrem Körper ab, (z. B. durch Berühren eines geerdeten blanken Metallteils), bevor Sie das Produkt berühren.
• Unterlassen Sie jeden Versuch, das Produkt zu warten, und versuchen Sie nicht, es in seine Bestandteile zu zerlegen. Für einige Produkte mit austauschbaren Akkus lesen Sie bitte das Benutzerhandbuch und befolgen Sie die dort beschriebenen Anleitungen.
• Vermeiden Sie, dass Speisen oder Flüssigkeiten auf Ihr Produkt gelangen, und stecken Sie keine Gegenstände in die Gehäuseschlitze oder -öffnungen Ihres Produkts.
• Verwenden Sie dieses Produkt nicht in unmittelbarer Nähe von Wasser und nicht in Bereichen mit hoher Luftfeuchtigkeit oder Kondensation, es sei denn, es ist speziell zur Nutzung in Außenbereichen vorgesehen und eingestuft.
• Halten Sie das Produkt von Wärmequellen entfernt wie z.B. Heizkörper.• Trennen Sie das Produkt immer von der Stromzufuhr, bevor Sie es reinigen und verwenden
Sie dazu ausschließlich ein trockenes fusselfreies Tuch.
Les consignes générales de sécurité ci-après sont fournies afin d’assurer votre sécurité personnelle et de protéger le produit d’éventuels dommages. Veuillez consulter les consignes d’utilisation du produit pour plus de détails.
• L’électricité statique peut endommager les composants électroniques. Déchargez l’électricité statique de votre corps (en touchant un objet en métal relié à la terre par exemple) avant de toucher le produit.
• N’essayez pas d’intervenir sur le produit et ne le démontez jamais. Pour certains produits contenant une batterie remplaçable par l’utilisateur, veuillez lire et suivre les consignes contenues dans le manuel d’utilisation.
• Ne renversez pas d’aliments ou de liquide sur le produit et n’insérez jamais d’objets dans les orifices.• N’utilisez pas ce produit à proximité d’un point d’eau, de zones très humides ou de condensation
sauf si le produit a été spécifiquement conçu pour une application extérieure.• Éloignez le produit des radiateurs et autres sources de chaleur.• Débranchez toujours le produit de l’alimentation avant de le nettoyer et utilisez uniquement un
chiffon sec non pelucheux.
79D-Link DCS-4705E Quick Installation Guide
INSTRUCCIONES DE SEGURIDAD
ISTRUZIONI PER LA SICUREZZA
VEILIGHEIDSINFORMATIE
Las siguientes directrices de seguridad general se facilitan para ayudarle a garantizar su propia seguridad personal y para proteger el producto frente a posibles daños. No olvide consultar las instrucciones del usuario del producto para obtener más información.
• La electricidad estática puede resultar nociva para los componentes electrónicos. Descargue la electricidad estática de su cuerpo (p. ej., tocando algún metal sin revestimiento conectado a tierra) antes de tocar el producto.
• No intente realizar el mantenimiento del producto ni lo desmonte nunca. Para algunos productos con batería reemplazable por el usuario, lea y siga las instrucciones del manual de usuario.
• No derrame comida o líquidos sobre el producto y nunca deje que caigan objetos en las aberturas del mismo.
• No utilice este producto cerca del agua, en zonas con humedad o condensación elevadas a menos que el producto esté clasificado específicamente para aplicación en exteriores.
• Mantenga el producto alejado de los radiadores y de otras fuentes de calor.• Desenchufe siempre el producto de la alimentación de red antes de limpiarlo y utilice solo un
paño seco sin pelusa
Le seguenti linee guida sulla sicurezza sono fornite per contribuire a garantire la sicurezza personale degli utenti e a proteggere il prodotto da potenziali danni. Per maggiori dettagli, consultare le istruzioni per l’utente del prodotto.
• L’elettricità statica può essere pericolosa per i componenti elettronici. Scaricare l’elettricità statica dal corpo (ad esempio toccando una parte metallica collegata a terra) prima di toccare il prodotto.
• Non cercare di riparare il prodotto e non smontarlo mai. Per alcuni prodotti dotati di batteria sostituibile dall’utente, leggere e seguire le istruzioni riportate nel manuale dell’utente.
• Non versare cibi o liquidi sul prodotto e non spingere mai alcun oggetto nelle aperture del prodotto.
• Non usare questo prodotto vicino all’acqua, in aree con elevato grado di umidità o soggette a condensa a meno che il prodotto non sia specificatamente approvato per uso in ambienti esterni.
• Tenere il prodotto lontano da caloriferi e altre fonti di calore.• Scollegare sempre il prodotto dalla presa elettrica prima di pulirlo e usare solo un panno asciutto
che non lasci filacce.
De volgende algemene veiligheidsinformatie werd verstrekt om uw eigen persoonlijke veiligheid te waarborgen en uw product te beschermen tegen mogelijke schade. Denk eraan om de gebruikersinstructies van het product te raadplegen voor meer informatie.
• Statische elektriciteit kan schadelijk zijn voor elektronische componenten. Ontlaad de statische elektriciteit van uw lichaam (d.w.z. het aanraken van geaard bloot metaal) voordat u het product aanraakt.
• U mag nooit proberen het product te onderhouden en u mag het product nooit demonteren. Voor sommige producten met door de gebruiker te vervangen batterij, dient u de instructies in de gebruikershandleiding te lezen en te volgen.
• Mors geen voedsel of vloeistof op uw product en u mag nooit voorwerpen in de openingen van uw product duwen.
• Gebruik dit product niet in de buurt van water, gebieden met hoge vochtigheid of condensatie, tenzij het product specifiek geclassificeerd is voor gebruik buitenshuis.
• Houd het product uit de buurt van radiators en andere warmtebronnen.• U dient het product steeds los te koppelen van de stroom voordat u het reinigt en gebruik
uitsluitend een droge pluisvrije doek
80 D-Link DCS-4705E Quick Installation Guide
DISPOSING AND RECYCLING YOUR PRODUCTENGLISH EN
This symbol on the product or packaging means that according to local laws and regulations this product should be not be disposed of in the household waste but sent for recycling. Please take it to a collection point designated by your local authorities once it has reached the end of its life, some will accept products for free. By recycling the product and its packaging in this manner you help to conserve the environment and protect human health.D-Link and the environmentAt D-Link, we understand and are committed to reducing any impact our operations and products may have on the environment. To minimise this impact D-Link designs and builds its products to be as environmentally friendly as possible, by using recyclable, low toxic materials in both products and packaging.D-Link recommends that you always switch off or unplug your D-Link products when they are not in use. By doing so you will help to save energy and reduce CO2 emissions.To learn more about our environmentally responsible products and packaging please visit www.dlinkgreen.com
DEUTSCH DE
FRANÇAIS FR
Dieses Symbol auf dem Produkt oder der Verpackung weist darauf hin, dass dieses Produkt gemäß bestehender örtlicher Gesetze und Vorschriften nicht über den normalen Hausmüll entsorgt werden sollte, sondern einer Wiederverwertung zuzuführen ist. Bringen Sie es bitte zu einer von Ihrer Kommunalbehörde entsprechend amtlich ausgewiesenen Sammelstelle, sobald das Produkt das Ende seiner Nutzungsdauer erreicht hat. Für die Annahme solcher Produkte erheben einige dieser Stellen keine Gebühren. Durch ein auf diese Weise durchgeführtes Recycling des Produkts und seiner Verpackung helfen Sie, die Umwelt zu schonen und die menschliche Gesundheit zu schützen.D-Link und die UmweltD-Link ist sich den möglichen Auswirkungen seiner Geschäftstätigkeiten und seiner Produkte auf die Umwelt bewusst und fühlt sich verpflichtet, diese entsprechend zu mindern. Zu diesem Zweck entwickelt und stellt D-Link seine Produkte mit dem Ziel größtmöglicher Umweltfreundlichkeit her und verwendet wiederverwertbare, schadstoffarme Materialien bei Produktherstellung und Verpackung.D-Link empfiehlt, Ihre Produkte von D-Link, wenn nicht in Gebrauch, immer auszuschalten oder vom Netz zu nehmen. Auf diese Weise helfen Sie, Energie zu sparen und CO2-Emissionen zu reduzieren.Wenn Sie mehr über unsere umweltgerechten Produkte und Verpackungen wissen möchten, finden Sie entsprechende Informationen im Internet unter www.dlinkgreen.com.
Ce symbole apposé sur le produit ou son emballage signifie que, conformément aux lois et règlementations locales, ce produit ne doit pas être éliminé avec les déchets domestiques mais recyclé. Veuillez le rapporter à un point de collecte prévu à cet effet par les autorités locales; certains accepteront vos produits gratuitement. En recyclant le produit et son emballage de cette manière, vous aidez à préserver l’environnement et à protéger la santé de l’homme.D-Link et l’environnementChez D-Link, nous sommes conscients de l'impact de nos opérations et produits sur l'environnement et nous engageons à le réduire. Pour limiter cet impact, D-Link conçoit et fabrique ses produits de manière aussi écologique que possible, en utilisant des matériaux recyclables et faiblement toxiques, tant dans ses produits que ses emballages.D-Link recommande de toujours éteindre ou débrancher vos produits D-Link lorsque vous ne les utilisez pas. Vous réaliserez ainsi des économies d’énergie et réduirez vos émissions de CO2.Pour en savoir plus sur les produits et emballages respectueux de l’environnement, veuillez consulter le www.dlinkgreen.com
81D-Link DCS-4705E Quick Installation Guide
ESPAÑOL ES
ITALIANO IT
NEDERLANDS NL
Este símbolo en el producto o el embalaje significa que, de acuerdo con la legislación y la normativa local, este producto no se debe desechar en la basura doméstica sino que se debe reciclar. Llévelo a un punto de recogida designado por las autoridades locales una vez que ha llegado al fin de su vida útil; algunos de ellos aceptan recogerlos de forma gratuita. Al reciclar el producto y su embalaje de esta forma, contribuye a preservar el medio ambiente y a proteger la salud de los seres humanos.D-Link y el medio ambienteEn D-Link, comprendemos y estamos comprometidos con la reducción del impacto que puedan tener nuestras actividades y nuestros productos en el medio ambiente. Para reducir este impacto, D-Link diseña y fabrica sus productos para que sean lo más ecológicos posible, utilizando materiales reciclables y de baja toxicidad tanto en los productos como en el embalaje.D-Link recomienda apagar o desenchufar los productos D-Link cuando no se estén utilizando. Al hacerlo, contribuirá a ahorrar energía y a reducir las emisiones de CO2.Para obtener más información acerca de nuestros productos y embalajes ecológicos, visite el sitio www.dlinkgreen.com
La presenza di questo simbolo sul prodotto o sulla confezione del prodotto indica che, in conformità alle leggi e alle normative locali, questo prodotto non deve essere smaltito nei rifiuti domestici, ma avviato al riciclo. Una volta terminato il ciclo di vita utile, portare il prodotto presso un punto di raccolta indicato dalle autorità locali. Alcuni questi punti di raccolta accettano gratuitamente i prodotti da riciclare. Scegliendo di riciclare il prodotto e il relativo imballaggio, si contribuirà a preservare l'ambiente e a salvaguardare la salute umana.D-Link e l'ambienteD-Link cerca da sempre di ridurre l'impatto ambientale dei propri stabilimenti e dei propri prodotti. Allo scopo di ridurre al minimo tale impatto, D-Link progetta e realizza i propri prodotti in modo che rispettino il più possibile l'ambiente, utilizzando materiali riciclabili a basso tasso di tossicità sia per i prodotti che per gli imballaggi.D-Link raccomanda di spegnere sempre i prodotti D-Link o di scollegarne la spina quando non vengono utilizzati. In questo modo si contribuirà a risparmiare energia e a ridurre le emissioni di anidride carbonica.Per ulteriori informazioni sui prodotti e sugli imballaggi D-Link a ridotto impatto ambientale, visitate il sito all'indirizzo www.dlinkgreen.com
Dit symbool op het product of de verpakking betekent dat dit product volgens de plaatselijke wetgeving niet mag worden weggegooid met het huishoudelijk afval, maar voor recyclage moeten worden ingeleverd. Zodra het product het einde van de levensduur heeft bereikt, dient u het naar een inzamelpunt te brengen dat hiertoe werd aangeduid door uw plaatselijke autoriteiten, sommige autoriteiten accepteren producten zonder dat u hiervoor dient te betalen. Door het product en de verpakking op deze manier te recyclen helpt u het milieu en de gezondheid van de mens te beschermen.D-Link en het milieuBij D-Link spannen we ons in om de impact van onze handelingen en producten op het milieu te beperken. Om deze impact te beperken, ontwerpt en bouwt D-Link zijn producten zo milieuvriendelijk mogelijk, door het gebruik van recycleerbare producten met lage toxiciteit in product en verpakking.D-Link raadt aan om steeds uw D-Link producten uit te schakelen of uit de stekker te halen wanneer u ze niet gebruikt. Door dit te doen bespaart u energie en beperkt u de CO2-emissies.Breng een bezoek aan www.dlinkgreen.com voor meer informatie over onze milieuverantwoorde producten en verpakkingen
82 D-Link DCS-4705E Quick Installation Guide
POLSKI PL
ČESKY CZ
MAGYAR HU
Ten symbol umieszczony na produkcie lub opakowaniu oznacza, że zgodnie z miejscowym prawem i lokalnymi przepisami niniejszego produktu nie wolno wyrzucać jak odpady czy śmieci z gospodarstwa domowego, lecz należy go poddać procesowi recyklingu. Po zakończeniu użytkowania produktu, niektóre odpowiednie do tego celu podmioty przyjmą takie produkty nieodpłatnie, dlatego prosimy dostarczyć go do punktu zbiórki wskazanego przez lokalne władze. Poprzez proces recyklingu i dzięki takiemu postępowaniu z produktem oraz jego opakowaniem, pomogą Państwo chronić środowisko naturalne i dbać o ludzkie zdrowie. D-Link i środowiskoW D-Link podchodzimy w sposób świadomy do ochrony otoczenia oraz jesteśmy zaangażowani w zmniejszanie wpływu naszych działań i produktów na środowisko naturalne. W celu zminimalizowania takiego wpływu firma D-Link konstruuje i wytwarza swoje produkty w taki sposób, aby były one jak najbardziej przyjazne środowisku, stosując do tych celów materiały nadające się do powtórnego wykorzystania, charakteryzujące się małą toksycznością zarówno w przypadku samych produktów jak i opakowań.Firma D-Link zaleca, aby Państwo zawsze prawidłowo wyłączali z użytku swoje produkty D-Link, gdy nie są one wykorzystywane. Postępując w ten sposób pozwalają Państwo oszczędzać energię i zmniejszać emisje CO2.Aby dowiedzieć się więcej na temat produktów i opakowań mających wpływ na środowisko prosimy zapoznać się ze stroną internetową www.dlinkgreen.com.
Tento symbol na výrobku nebo jeho obalu znamená, že podle místně platných předpisů se výrobek nesmí vyhazovat do komunálního odpadu, ale odeslat k recyklaci. Až výrobek doslouží, odneste jej prosím na sběrné místo určené místními úřady k tomuto účelu. Některá sběrná místa přijímají výrobky zdarma. Recyklací výrobku i obalu pomáháte chránit životní prostředí i lidské zdraví.D-Link a životní prostředíVe společnosti D-Link jsme si vědomi vlivu našich provozů a výrobků na životní prostředí a snažíme se o minimalizaci těchto vlivů. Proto své výrobky navrhujeme a vyrábíme tak, aby byly co nejekologičtější, a ve výrobcích i obalech používáme recyklovatelné a nízkotoxické materiály.Společnost D-Link doporučuje, abyste své výrobky značky D-Link vypnuli nebo vytáhli ze zásuvky vždy, když je nepoužíváte. Pomůžete tak šetřit energii a snížit emise CO2.Více informací o našich ekologických výrobcích a obalech najdete na adrese www.dlinkgreen.com.
Ez a szimbólum a terméken vagy a csomagoláson azt jelenti, hogy a helyi törvényeknek és szabályoknak megfelelően ez a termék nem semmisíthető meg a háztartási hulladékkal együtt, hanem újrahasznosításra kell küldeni. Kérjük, hogy a termék élettartamának elteltét követően vigye azt a helyi hatóság által kijelölt gyűjtőhelyre. A termékek egyes helyeken ingyen elhelyezhetők. A termék és a csomagolás újrahasznosításával segíti védeni a környezetet és az emberek egészségét. A D-Link és a környezetA D-Linknél megértjük és elkötelezettek vagyunk a műveleteink és termékeink környezetre gyakorolt hatásainak csökkentésére. Az ezen hatás csökkentése érdekében a D-Link a lehető leginkább környezetbarát termékeket tervez és gyárt azáltal, hogy újrahasznosítható, alacsony károsanyag-tartalmú termékeket gyárt és csomagolásokat alkalmaz.A D-Link azt javasolja, hogy mindig kapcsolja ki vagy húzza ki a D-Link termékeket a tápforrásból, ha nem használja azokat. Ezzel segít az energia megtakarításában és a szén-dioxid kibocsátásának csökkentésében.Környezetbarát termékeinkről és csomagolásainkról további információkat a www.dlinkgreen.com weboldalon tudhat meg.
83D-Link DCS-4705E Quick Installation Guide
NORSK NO
DANSK DK
SUOMI FI
Dette symbolet på produktet eller forpakningen betyr at dette produktet ifølge lokale lover og forskrifter ikke skal kastes sammen med husholdningsavfall, men leveres inn til gjenvinning. Vennligst ta det til et innsamlingssted anvist av lokale myndigheter når det er kommet til slutten av levetiden. Noen steder aksepteres produkter uten avgift. Ved på denne måten å gjenvinne produktet og forpakningen hjelper du å verne miljøet og beskytte folks helse.D-Link og miljøetHos D-Link forstår vi oss på og er forpliktet til å minske innvirkningen som vår drift og våre produkter kan ha på miljøet. For å minimalisere denne innvirkningen designer og lager D-Link produkter som er så miljøvennlig som mulig, ved å bruke resirkulerbare, lav-toksiske materialer både i produktene og forpakningen.D-Link anbefaler at du alltid slår av eller frakobler D-Link-produkter når de ikke er i bruk. Ved å gjøre dette hjelper du å spare energi og å redusere CO2-utslipp.For mer informasjon angående våre miljøansvarlige produkter og forpakninger kan du gå til www.dlinkgreen.com
Dette symbol på produktet eller emballagen betyder, at dette produkt i henhold til lokale love og regler ikke må bortskaffes som husholdningsaffald, mens skal sendes til genbrug. Indlever produktet til et indsamlingssted som angivet af de lokale myndigheder, når det er nået til slutningen af dets levetid. I nogle tilfælde vil produktet blive modtaget gratis. Ved at indlevere produktet og dets emballage til genbrug på denne måde bidrager du til at beskytte miljøet og den menneskelige sundhed.D-Link og miljøetHos D-Link forstår vi og bestræber os på at reducere enhver indvirkning, som vores aktiviteter og produkter kan have på miljøet. For at minimere denne indvirkning designer og producerer D-Link sine produkter, så de er så miljøvenlige som muligt, ved at bruge genanvendelige materialer med lavt giftighedsniveau i både produkter og emballage.D-Link anbefaler, at du altid slukker eller frakobler dine D-Link-produkter, når de ikke er i brug. Ved at gøre det bidrager du til at spare energi og reducere CO2-udledningerne.Du kan finde flere oplysninger om vores miljømæssigt ansvarlige produkter og emballage på www.dlinkgreen.com
Tämä symboli tuotteen pakkauksessa tarkoittaa, että paikallisten lakien ja säännösten mukaisesti tätä tuotetta ei pidä hävittää yleisen kotitalousjätteen seassa vaan se tulee toimittaa kierrätettäväksi. Kun tuote on elinkaarensa päässä, toimita se lähimpään viranomaisten hyväksymään kierrätyspisteeseen. Kierrättämällä käytetyn tuotteen ja sen pakkauksen autat tukemaan sekä ympäristön että ihmisten terveyttä ja hyvinvointia.D-Link ja ympäristöD-Link ymmärtää ympäristönsuojelun tärkeyden ja on sitoutunut vähentämään tuotteistaan ja niiden valmistuksesta ympäristölle mahdollisesti aiheutuvia haittavaikutuksia. Nämä negatiiviset vaikutukset minimoidakseen D-Link suunnittelee ja valmistaa tuotteensa mahdollisimman ympäristöystävällisiksi käyttämällä kierrätettäviä, alhaisia pitoisuuksia haitallisia aineita sisältäviä materiaaleja sekä tuotteissaan että niiden pakkauksissa.Suosittelemme, että irrotat D-Link-tuotteesi virtalähteestä tai sammutat ne aina, kun ne eivät ole käytössä. Toimimalla näin autat säästämään energiaa ja vähentämään hiilidioksiidipäästöjä.Lue lisää ympäristöystävällisistä D-Link-tuotteista ja pakkauksistamme osoitteesta www.dlinkgreen.com
84 D-Link DCS-4705E Quick Installation Guide
Этот символ на продукте или упаковке означает, что в соответствии с нормами местного законодательства данный продукт в случае выхода из строя подлежит утилизации, и от него нельзя избавиться как от обычного бытового мусора. Отнесите устройство в ближайшую службу утилизации и переработки. При утилизации продукта и его упаковки таким образом обеспечивается защита окружающей среды и не наносится вред здоровью людей.
Забота D-Link об окружающей среде
Компания D-Link стремится максимально сократить негативное влияние своей деятельности на окружающую среду. Поэтому D-Link разрабатывает максимально экологичные продукты, используя легкоперерабатываемые и низкотоксичные материалы как для изготовления самих продуктов, так и их упаковки.
Кроме того, D-Link рекомендует отключать устройства, если они не используются. Это обеспечит энергосбережение и сократит выброс в атмосферу углекислого газа.
Более подробная информация об экологичной продукции D-Link доступна на сайте www.dlinkgreen.com
SVENSKA SE
PORTUGUÊS
PYCCКИЙ
PT
RU
Den här symbolen på produkten eller förpackningen betyder att produkten enligt lokala lagar och föreskrifter inte skall kastas i hushållssoporna utan i stället återvinnas. Ta den vid slutet av dess livslängd till en av din lokala myndighet utsedd uppsamlingsplats, vissa accepterar produkter utan kostnad. Genom att på detta sätt återvinna produkten och förpackningen hjälper du till att bevara miljön och skydda människors hälsa.D-Link och miljönPå D-Link förstår vi och är fast beslutna att minska den påverkan våra verksamheter och produkter kan ha på miljön. För att minska denna påverkan utformar och bygger D-Link sina produkter för att de ska vara så miljövänliga som möjligt, genom att använda återvinningsbara material med låg gifthalt i både produkter och förpackningar.D-Link rekommenderar att du alltid stänger av eller kopplar ur dina D-Link produkter när du inte använder dem. Genom att göra detta hjälper du till att spara energi och minska utsläpp av koldioxid.För mer information om våra miljöansvariga produkter och förpackningar www.dlinkgreen.com
Este símbolo no produto ou embalagem significa que, de acordo com as leis e regulamentações locais, este produto não deverá ser eliminado juntamente com o lixo doméstico mas enviado para a reciclagem. Transporte-o para um ponto de recolha designado pelas suas autoridades locais quando este tiver atingido o fim da sua vida útil, alguns destes pontos aceitam produtos gratuitamente. Ao reciclar o produto e respectiva embalagem desta forma, ajuda a preservar o ambiente e protege a saúde humana.A D-Link e o ambienteNa D-Link compreendemos e comprometemo-nos com a redução do impacto que as nossas operações e produtos possam ter no ambiente. Para minimizar este impacto a D-Link concebe e constrói os seus produtos para que estes sejam o mais inofensivos para o ambiente possível, utilizando meteriais recicláveis e não tóxicos tanto nos produtos como nas embalagens,A D-Link recomenda que desligue os seus produtos D-Link quando estes não se encontrarem em utilização. Com esta acção ajudará a poupar energia e reduzir as emissões de CO2.Para saber mais sobre os nossos produtos e embalagens responsáveis a nível ambiental visite www.dlinkgreen.com
85D-Link DCS-4705E Quick Installation Guide
D-LINK GPL CODE STATEMENTThis D-Link product includes software code developed by third parties, including software code subject to the GNU General Public License (“GPL”) or GNU Lesser General Public License (“LGPL”). As applicable, the terms of the GPL and LGPL, and information on obtaining access to the GPL code and LGPL code used in this product, are available to you at:
http://tsd.dlink.com.tw/GPL.asp
The GPL code and LGPL code used in this product are distributed WITHOUT ANY WARRANTY and is subject to the copyrights of one or more authors. For details, see the GPL code and the LGPL code for this product and the terms of the GPL and LGPL.
WRITTEN OFFER FOR GPL AND LGPL SOURCE CODEWhere such specific license terms entitle you to the source code of such software, D-Link will provide upon written request via email and/or traditional paper mail the applicable GPL and LGPL source code files via CD-ROM for a nominal cost to cover shipping and media charges as allowed under the GPL and LGPL.
Technical Support: For product support, please visit http://support.dlink.com for further assistance.
General Public License (“GPL”) Inquiries: Please direct all GPL inquiries to the following email/address. Note that technical support inquiries will not be supported at the below address.
Email:[email protected]
Snail Mail:Attn: GPLSOURCE REQUESTD-Link Systems, Inc.17595 Mt. Herrmann StreetFountain Valley, CA 92708
86 D-Link DCS-4705E Quick Installation Guide
0. This License applies to any program or other work which contains a notice placed by the copyright holder saying it may be distributed under the terms of this General Public License. The "Program", below, refers to any such program or work, and a "work based on the Program" means either the Program or any derivative work under copyright law: that is to say, a work containing the Program or a portion of it, either verbatim or with modifications and/or translated into another language. (Hereinafter, translation is included without limitation in the term "modification".) Each licensee is addressed as "you".Activities other than copying, distribution and modification are not covered by this License; they are outside its scope. The act of running the Program is not restricted, and the output from the Program is covered only if its contents constitute a work based on the Program (independent of having been made by running the Program). Whether that is true depends on what the Program does.1. You may copy and distribute verbatim copies of the Program's source code as you receive it, in any medium, provided that you conspicuously and appropriately publish on each copy an appropriate copyright notice and disclaimer of warranty; keep intact all the notices that refer to this License and to the absence of any warranty; and give any other recipients of the Program a copy of this License along with the Program.You may charge a fee for the physical act of transferring a copy, and you may at your option offer warranty protection in exchange for a fee.2. You may modify your copy or copies of the Program or any portion of it, thus forming a work based on the Program, and copy and distribute such modifications or work under the terms of Section 1 above, provided that you also meet all of these conditions:
a) You must cause the modified files to carry prominent notices stating that you changed the files and the date of any change.b) You must cause any work that you distribute or publish, that in whole or in part contains or is derived from the Program or
any part thereof, to be licensed as a whole at no charge to all third parties under the terms of this License.c) If the modified program normally reads commands interactively when run, you must cause it, when started running for
such interactive use in the most ordinary way, to print or display an announcement including an appropriate copyright notice and a notice that there is no warranty (or else, saying that you provide a warranty) and that users may redistribute the program under these conditions, and telling the user how to view a copy of this License. (Exception: if the Program itself is interactive but does not normally print such an announcement, your work based on the Program is not required to print an announcement.)
GNU GENERAL PUBLIC LICENSETERMS AND CONDITIONS FOR COPYING, DISTRIBUTION AND MODIFICATION
GNU GENERAL PUBLIC LICENSEVersion 2, June 1991Copyright (C) 1989, 1991 Free Software Foundation, Inc.51 Franklin Street, Fifth Floor, Boston, MA 02110-1301, USAEveryone is permitted to copy and distribute verbatim copies of this license document, but changing it is not allowed.
PREAMBLE
The licenses for most software are designed to take away your freedom to share and change it. By contrast, the GNU General Public License is intended to guarantee your freedom to share and change free software--to make sure the software is free for all its users. This General Public License applies to most of the Free Software Foundation's software and to any other program whose authors commit to using it. (Some other Free Software Foundation software is covered by the GNU Library General Public License instead.) You can apply it to your programs, too.When we speak of free software, we are referring to freedom, not price. Our General Public Licenses are designed to make sure that you have the freedom to distribute copies of free software (and charge for this service if you wish), that you receive source code or can get it if you want it, that you can change the software or use pieces of it in new free programs; and that you know you can do these things.To protect your rights, we need to make restrictions that forbid anyone to deny you these rights or to ask you to surrender the rights. These restrictions translate to certain responsibilities for you if you distribute copies of the software, or if you modify it.For example, if you distribute copies of such a program, whether gratis or for a fee, you must give the recipients all the rights that you have. You must make sure that they, too, receive or can get the source code. And you must show them these terms so they know their rights.We protect your rights with two steps: (1) copyright the software, and (2) offer you this license which gives you legal permission to copy, distribute and/or modify the software.Also, for each author's protection and ours, we want to make certain that everyone understands that there is no warranty for this free software. If the software is modified by someone else and passed on, we want its recipients to know that what they have is not the original, so that any problems introduced by others will not reflect on the original authors' reputations.Finally, any free program is threatened constantly by software patents. We wish to avoid the danger that redistributors of a free program will individually obtain patent licenses, in effect making the program proprietary. To prevent this, we have made it clear that any patent must be licensed for everyone's free use or not licensed at all.The precise terms and conditions for copying, distribution and modification follow.
87D-Link DCS-4705E Quick Installation Guide
These requirements apply to the modified work as a whole. If identifiable sections of that work are not derived from the Program, and can be reasonably considered independent and separate works in themselves, then this License, and its terms, do not apply to those sections when you distribute them as separate works. But when you distribute the same sections as part of a whole which is a work based on the Program, the distribution of the whole must be on the terms of this License, whose permissions for other licensees extend to the entire whole, and thus to each and every part regardless of who wrote it.Thus, it is not the intent of this section to claim rights or contest your rights to work written entirely by you; rather, the intent is to exercise the right to control the distribution of derivative or collective works based on the Program.In addition, mere aggregation of another work not based on the Program with the Program (or with a work based on the Program) on a volume of a storage or distribution medium does not bring the other work under the scope of this License.3. You may copy and distribute the Program (or a work based on it, under Section 2) in object code or executable form under the
terms of Sections 1 and 2 above provided that you also do one of the following:a) Accompany it with the complete corresponding machine-readable source code, which must be distributed under the terms
of Sections 1 and 2 above on a medium customarily used for software interchange; or,b) Accompany it with a written offer, valid for at least three years, to give any third party, for a charge no more than your cost
of physically performing source distribution, a complete machine-readable copy of the corresponding source code, to be distributed under the terms of Sections 1 and 2 above on a medium customarily used for software interchange; or,
c) Accompany it with the information you received as to the offer to distribute corresponding source code. (This alternative is allowed only for noncommercial distribution and only if you received the program in object code or executable form with such an offer, in accord with Subsection b above.)
The source code for a work means the preferred form of the work for making modifications to it. For an executable work, complete source code means all the source code for all modules it contains, plus any associated interface definition files, plus the scripts used to control compilation and installation of the executable. However, as a special exception, the source code distributed need not include anything that is normally distributed (in either source or binary form) with the major components (compiler, kernel, and so on) of the operating system on which the executable runs, unless that component itself accompanies the executable.If distribution of executable or object code is made by offering access to copy from a designated place, then offering equivalent access to copy the source code from the same place counts as distribution of the source code, even though third parties are not compelled to copy the source along with the object code.4. You may not copy, modify, sublicense, or distribute the Program except as expressly provided under this License. Any attempt otherwise to copy, modify, sublicense or distribute the Program is void, and will automatically terminate your rights under this License. However, parties who have received copies, or rights, from you under this License will not have their licenses terminated so long as such parties remain in full compliance.5. You are not required to accept this License, since you have not signed it. However, nothing else grants you permission to modify or distribute the Program or its derivative works. These actions are prohibited by law if you do not accept this License. Therefore, by modifying or distributing the Program (or any work based on the Program), you indicate your acceptance of this License to do so, and all its terms and conditions for copying, distributing or modifying the Program or works based on it.6. Each time you redistribute the Program (or any work based on the Program), the recipient automatically receives a license from the original licensor to copy, distribute or modify the Program subject to these terms and conditions. You may not impose any further restrictions on the recipients' exercise of the rights granted herein. You are not responsible for enforcing compliance by third parties to this License.7. If, as a consequence of a court judgment or allegation of patent infringement or for any other reason (not limited to patent issues), conditions are imposed on you (whether by court order, agreement or otherwise) that contradict the conditions of this License, they do not excuse you from the conditions of this License. If you cannot distribute so as to satisfy simultaneously your obligations under this License and any other pertinent obligations, then as a consequence you may not distribute the Program at all. For example, if a patent license would not permit royalty-free redistribution of the Program by all those who receive copies directly or indirectly through you, then the only way you could satisfy both it and this License would be to refrain entirely from distribution of the Program.If any portion of this section is held invalid or unenforceable under any particular circumstance, the balance of the section is intended to apply and the section as a whole is intended to apply in other circumstances.It is not the purpose of this section to induce you to infringe any patents or other property right claims or to contest validity of any such claims; this section has the sole purpose of protecting the integrity of the free software distribution system, which is implemented by public license practices. Many people have made generous contributions to the wide range of software distributed through that system in reliance on consistent application of that system; it is up to the author/donor to decide if he or she is willing to distribute software through any other system and a licensee cannot impose that choice.This section is intended to make thoroughly clear what is believed to be a consequence of the rest of this License.8. If the distribution and/or use of the Program is restricted in certain countries either by patents or by copyrighted interfaces, the original copyright holder who places the Program under this License may add an explicit geographical distribution limitation excluding those countries, so that distribution is permitted only in or among countries not thus excluded. In such case, this License incorporates the limitation as if written in the body of this License.9. The Free Software Foundation may publish revised and/or new versions of the General Public License from time to time. Such new versions will be similar in spirit to the present version, but may differ in detail to address new problems or concerns.Each version is given a distinguishing version number. If the Program specifies a version number of this License which applies to it and "any later version", you have the option of following the terms and conditions either of that version or of any later version published by the Free Software Foundation. If the Program does not specify a version number of this License, you may choose any version ever published by the Free Software Foundation.10. If you wish to incorporate parts of the Program into other free programs whose distribution conditions are different, write to the author to ask for permission. For software which is copyrighted by the Free Software Foundation, write to the Free Software Foundation; we sometimes make exceptions for this. Our decision will be guided by the two goals of preserving the free status of all derivatives of our free software and of promoting the sharing and reuse of software generally.
88 D-Link DCS-4705E Quick Installation Guide
NO WARRANTY11. BECAUSE THE PROGRAM IS LICENSED FREE OF CHARGE, THERE IS NO WARRANTY FOR THE PROGRAM, TO THE EXTENT PERMITTED BY APPLICABLE LAW. EXCEPT WHEN OTHERWISE STATED IN WRITING THE COPYRIGHT HOLDERS AND/OR OTHER PARTIES PROVIDE THE PROGRAM "AS IS" WITHOUT WARRANTY OF ANY KIND, EITHER EXPRESSED OR IMPLIED, INCLUDING, BUT NOT LIMITED TO, THE IMPLIED WARRANTIES OF MERCHANTABILITY AND FITNESS FOR A PARTICULAR PURPOSE. THE ENTIRE RISK AS TO THE QUALITY AND PERFORMANCE OF THE PROGRAM IS WITH YOU. SHOULD THE PROGRAM PROVE DEFECTIVE, YOU ASSUME THE COST OF ALL NECESSARY SERVICING, REPAIR OR CORRECTION.12. IN NO EVENT UNLESS REQUIRED BY APPLICABLE LAW OR AGREED TO IN WRITING WILL ANY COPYRIGHT HOLDER, OR ANY OTHER PARTY WHO MAY MODIFY AND/OR REDISTRIBUTE THE PROGRAM AS PERMITTED ABOVE, BE LIABLE TO YOU FOR DAMAGES, INCLUDING ANY GENERAL, SPECIAL, INCIDENTAL OR CONSEQUENTIAL DAMAGES ARISING OUT OF THE USE OR INABILITY TO USE THE PROGRAM (INCLUDING BUT NOT LIMITED TO LOSS OF DATA OR DATA BEING RENDERED INACCURATE OR LOSSES SUSTAINED BY YOU OR THIRD PARTIES OR A FAILURE OF THE PROGRAM TO OPERATE WITH ANY OTHER PROGRAMS), EVEN IF SUCH HOLDER OR OTHER PARTY HAS BEEN ADVISED OF THE POSSIBILITY OF SUCH DAMAGES.END OF TERMS AND CONDITIONS
HOW TO APPLY THESE TERMS TO YOUR NEW PROGRAMS
If you develop a new program, and you want it to be of the greatest possible use to the public, the best way to achieve this is to make it free software which everyone can redistribute and change under these terms.To do so, attach the following notices to the program. It is safest to attach them to the start of each source file to most effectively convey the exclusion of warranty; and each file should have at least the "copyright" line and a pointer to where the full notice is found. <one line to give the program's name and a brief idea of what it does.>Copyright (C) <year> <name of author>This program is free software; you can redistribute it and/or modify it under the terms of the GNU General Public License as published by the Free Software Foundation; either version 2 of the License, or (at your option) any later version.
This program is distributed in the hope that it will be useful, but WITHOUT ANY WARRANTY; without even the implied warranty of MERCHANTABILITY or FITNESS FOR A PARTICULAR PURPOSE. See the GNU General Public License for more details.
You should have received a copy of the GNU General Public License along with this program; if not, write to the Free Software Foundation, Inc., 51 Franklin Street, Fifth Floor, Boston, MA 02110-1301, USA.Also add information on how to contact you by electronic and paper mail.If the program is interactive, make it output a short notice like this when it starts in an interactive mode:Gnomovision version 69, Copyright (C) year name of author Gnomovision comes with ABSOLUTELY NO WARRANTY; for details type `show w'.This is free software, and you are welcome to redistribute it under certain conditions; type `show c' for details.The hypothetical commands `show w' and `show c' should show the appropriate parts of the General Public License. Of course, the commands you use may be called something other than `show w' and `show c'; they could even be mouse-clicks or menu items--whatever suits your program.You should also get your employer (if you work as a programmer) or your school, if any, to sign a "copyright disclaimer" for the program, if necessary. Here is a sample; alter the names:
Yoyodyne, Inc., hereby disclaims all copyright interest in the program `Gnomovision' (which makes passes at compilers) written by James Hacker.<signature of Ty Coon>, 1 April 1989Ty Coon, President of ViceThis General Public License does not permit incorporating your program into proprietary programs. If your program is a subroutine library, you may consider it more useful to permit linking proprietary applications with the library. If this is what you want to do, use the GNU Library General Public License instead of this License.

Ver.1.00(WW)_90x1302018/06/20
RMN0102531