Fino Multi KA4566 - severin.de · 3 DE Auf einen Blick (Lieferumfang)! Bitte klappen Sie vor dem...
72
Fino Multi KA4566 Fino Multi KA4566 DE Kaffee-Center Gebrauchsanweisung
Transcript of Fino Multi KA4566 - severin.de · 3 DE Auf einen Blick (Lieferumfang)! Bitte klappen Sie vor dem...

Fino Multi KA4566
Fino Multi KA4566
DEKa� ee-CenterGebrauchsanweisungGebrauchsanweisung

A
B
I GK
H
L
C
D
E
E.1
D.1
E.2H.1
H.2
H.3
H.4
H.5
H.6
D.2
F
E.3
E.4
BelgiqueDancal N.V.Bavikhoofsestraat 728520 KuurneTel.: 056/71 54 51Fax: 056/70 04 49
Bosnia i HerzegovinaMalisic MP d.o.oTromeda Medugorje bb88260 CitlukTel: + 387 36 650 446Fax: + 387 36 651 062
BulgariaNoviz AGKahn Kubrat 1 Str. BG-4000 PlovdivTel: +359 32 275 617, 275 614e-mail: [email protected]
Czech Republic ARGO spol. s r.o. Žihobce 137CZ 342 01 SušiceTel.: + 376 597 197Fax: + 376 597 197http://[email protected]
CroatiaTD Medimurka d.d.Trg. Republike 6HR-40000 CakovecCroatiaTel: +385-40 328 650Fax: + 385 40 328 134e-mail: [email protected]
CyprusG.L.G. Trading4-6, Oidipodos StreetLarnaca, CyprusTel.: 024/633133Fax: 024/635992
DanmarkScandia Serviceteknik A/SHedeager 52605 BrondbyTel.: 45-43202700Fax: 45-43202709
Estonia:Tallinn: CENTRALSERVICE, Tammsaare tee 134B, tel: 654 3000Tartu: CENTRALSERVICE, Aleksandri 6, tel: 7 344 299, 7 344 337, 56 697 843Pärnu: CENTRALSERVICE, Riia mnt. 64, tel: 44 25 175Narva: CENTRALSERVICE, Tallinna 6A, tel: 35 60 708Haapsalu: Teco KM OÜ, Jalaka 1A, tel: 47 56 900Rakvere: Nirgi Tõnu FIE, tel: 32 40 515Viljandi: Aaber OÜ, Vabaduse pl. 4, tel: 43 33 802Kuressaare: Toomas Teder FIE, Pikk 1B, tel: 45 55 978Käina: Ilmar Pauk Elektroonika FIE, Mäe2S, tel: 46 36 379, 51 87 444
EspanaSeverin Electrodom. España S.L.Plaza de la Almazara Portal 4, 1º E.45200 ILLESCAS(Toledo)Tel: 925 51 34 05Fax: 925 54 19 40eMail: [email protected]://www.severin.es
FranceSEVERIN France Sarl4, rue de ThalB.P. 3867211 OBERNAI CEDEXTel.: 03 88 47 62 08Fax: 03 88 47 62 09
GreeceBERSONC. Sara� dis Bros. S.A.Agamemnonos 47176 75 Kallithea, AthensTel.: 0030-210 9478700
Philippos Business CenterAgias Anastasias & Laertou, PileaService Post of Thermi570 01 Thessaloniki, GreeceTel.: 0030-2310954020
Iran IRAN-SEVERIN KISH CO. LTD.No. 668, 7th. FloorBahar TowerAve. South BaharTEHRAN - IRANTel. : 009821 - 77616767Fax : 009821 – [email protected]
IsraelEatay Agencies109 Herzel St.HaifaPhone: 050-5358648Email: [email protected]
ItaliaVideoellettronica di Sgambati &Gabrini C.S.N.C.via Dino Col 52r-54r-56r,I - 16149 GenovaGreen Number: 800240279Tel.: 010/6 45 11 02 - 01041 86 09Fax: 010/6 42 50 09e-mail: [email protected]
JordanF.A. KettanehP.O. Box 485Amman, 11118, JordanTel: 00962-6-439 8642e-mail: [email protected]
KoreaJung Shin Electronics co., ltd.501, Megaventuretower 77-9, Moonrae-Dong 3ga, Yongdeungpo-GuSeoul, KoreaTel: +82-22-637 3245~7Fax: +82-22-637 3244Service Hotline: 080-001-0190
LatviaSERVO Ltd. Mr. Janis PivovarenoksTel: + 371 [email protected]
LebanonKhoury Home7th Floor, Cité Dora 3 Building, DoraP.O.Box 70611Antelias, LebanonTelephone 01 244200, Fax 01 253535eMail: [email protected] Internet: www.khouryhome.com
LuxembourgSer-TecRue du Chateau d´Eua3364 LeudelangeTel.: 00352 -37 94 94 402Fax 00352 -37 94 94 400
MacedoniaKONCAR servisBul. Partizanski odredi br. 1051000 SkopjeMakedonijaTel: + 389 (2) 365-578Fax: + 389 (2) 365 621e-mail: [email protected]
MagyarországTFK Elektronik Kft.Gyar u.2H-2040 BudaörsTel.: (+36) 23 444 266Fax: (+36) 23 444 267
NederlandHAS b.v.Stedenbaan 8NL-5121 DP RijenTel: 0161-22 00 00Fax: 0161-29 00 50
NorwayLøkken Trading ASTrollåsveien 341414 TrollåsenTlf: 40 00 67 34Fax: 66 80 45 60
ÖsterreichDegupaVertriebsgesellschaft m.b.H.Gewerbeparkstr. 75081 Anif / SalzburgTel.: 0 62 46 / 73 58 10Fax:. 0 62 46 / 72 70 2
PolskaServ-Serwis Sp. z o.o.ul. Wspólna 945-831 Opoletel./fax (077) 457-50-06e-mail: [email protected]
PortugalNovalvaZona Industrial Maia ISector X - Lote 293, N. 904470 MaiaTel.: 02/9 44 03 84Fax: 02/9 44 02 68
Russian FederationOrbita Service123362 Moskauul. Svobody 18,Tel.: (495) 585 05 73
Орбита Сервис 1233 62 г. Москва, ул. Свободы, д. 18. Тел.: (495)585-05-73
RomaniaFor Brands srlStr. Capitan Aviator AlexandruSerbanescu Nr. 33-35, Bl. 20ESc. 2 Et.1, Ap. 27, Sector 1BucurestiTel: + 40 21 233 41 12, + 40 21 233 41 13, + 40 21 688 66 13Fax: + 40 21 233 41 03, + 40 21 688 66 13E-mail: o [email protected] site: www.forbrands.ro
SchweizVB Handels Sàrl GmbHPostfach 3061040 EchallensTel: 021 881 60 45Fax 021 881 60 46mail: [email protected]
SerbiaSMIL dooPasiceva 28, Novi SadSerbia and Montenegrotel: + 381-21-524-638tel: +381-21-553-594fax: +381-21-522-096
Slowak RepublicPREMT,s.r.o.Skladová 1917 01 TrnavaTel: 033/544 7177
FinlandOy Harry Marcell AbRälssitie 6, PL 6301511 VantaaTel.: 0035 / 898 708 70Fax: 0035/ 898 708 7803
SvenskaRakspecialisten HSMöllevångsgatan 34214 20 MalmöTel.: 040/12 07 70Fax: 040/6 11 03 35
SloveniaSEVTIS d.o.o.Smartinska 1301000 LjubljanaTel: 00386 1 542 1927Fax: 00386 1 542 1926
Kundendienstzentralen
Service Centres
Centrales service-après-vente
O� cinas centrales del servicio
Centros de serviço
Centrale del servizio clienti
Service-centrales
Centrale serviceafdelinger
Centrala kundtjänstplatser
Keskushuollot
Servisné stredisko
Centrala obstugi klientów
Szerviz
Κέντρο εξυπηρέτησης πελατών
SEVERIN ServiceAm Brühl 2759846 SundernTelefon (02933) 982-460Telefax (02933) [email protected]
INTERNATIONAL
umschlag_090703.indd 2 08.07.2009 08:24:46

3
DE
Auf einen Blick (Lieferumfang)! Bitte klappen Sie vor dem Weiterlesen die dazugehörende Bildseite am Anfang der Gebrauchsanweisung nach links aus.
A Brühgruppe
B Bügelverschluss
Siebträger (herausnehmbar)
C für Ka�eepads
D für Filterka�ee
D.1 Deckel für Filterka�ee
D.2 Filtertüten Größe 100 (Probepack)
E für Tee
E.1 schwarzer Deckel für erste Teesorte (Werkseinstellung: schwarzer Tee)
E.2 grüner Deckel für zweite Teesorte (Werkseinstellung: grüner Tee)
E.3 Teebox für losen Tee
E.4 Auslaufröhrchen
F Tropfschale zur Höhenverstellung
G Abtropfgitter
H Bedien-, Anzeigeelemente und Speichereinstellungen
H.1 Getränkemenge / Brühvorgang
H.2 Temperatur (nur bei Tee verfügbar)
H.3 Ziehdauer (nur bei Tee verfügbar)
H.4 Störung / Speichereinstellungen
H.5 Start/Stopp-Taste
H.6 Intervallanzeige mit LED-Balken
I Gehäuse
K Anschlussleitung mit Netzstecker
L Wasserbehälter
fino_multi_DE_090706.indd 3 22.07.2009 08:44:33

Fino Multi KA4566
4
Inhaltsverzeichnis1. Sicherheitshinweise
2. Erste Inbetriebnahme
3. Zubereitung von Getränken
3.1 Filterka�ee
Getränkemenge einstellen
3.2 Ka�eepads
Getränkemenge einstellen
3.3 Tee (im Teebeutel oder lose)
Ändern der Einstellungen für die Zubereitung von Tee
3.4 Getränkemenge, Brühtemperatur und Ziehdauer im Überblick
4. Anzeige- und Bedienelemente
5. Reinigung, P�ege und Wartung
5.1 Reinigen der Siebträger
5.2 Entkalken
5.3 Zurücksetzen auf die Werkseinstellung
5.4 Entsorgen
5.5 Ersatzteile und Zubehör
6. Fehlersuche und Behebung
7. Garantie
8. Kundendienst
9. Softwarelizenz
fino_multi_DE_090706.indd 4 22.07.2009 08:44:33

5
DE
1. Sicherheitshinweise Stromschlaggefahr!
Vor jeder Inbetriebnahme das komplette Gerät inkl. Zubehörteile auf Mängel überprüfen, welche die Funktionssicherheit des Gerätes beein-trächtigen könnten. Falls das Gerät z.B. zu Boden gefallen ist, können von außen nicht erkennbare Schäden vorliegen. In diesem Fall das Gerät nicht in Betrieb nehmen.
– Überprüfen Sie die Anschlussleitung (K) regelmäßig auf Beschädigun-gen. Im Falle einer Beschädigung darf das Gerät nicht benutzt werden.
! Wichtig: Ziehen Sie bitte den Netzstecker bei Nichtgebrauch, bei Störungen während des Betriebes und vor jeder Reinigung.
– Den Netzstecker nicht an der Anschlussleitung aus der Steckdose ziehen; fassen Sie den Netzstecker an.
– Achten Sie darauf, dass weder das Gehäuse noch die Anschlussleitung einer heißen Kochplatte oder o�enem Feuer zu nahe kommen. Das gleiche gilt für Flüssigkeiten und Feuchtigkeit.
– Reparaturen an Elektrogeräten müssen von Fachkräften durchgeführt werden, um Gefährdungen zu vermeiden und die Sicherheitsbestim-mungen einzuhalten. Dies gilt auch für den Austausch der Anschluss-leitung. Schicken Sie daher im Reparaturfall das Gerät zu unserem Kundendienst. Die Anschrift �nden Sie im Abschnitt „Kundendienst“ auf den letzten Seiten der Gebrauchsanweisung.
Verbrühungsgefahr! Berühren Sie während und nach dem Brühvorgang keine heißen Teile. Die Brühgruppe (A), der Siebträger (C bis E) und deren Inhalt sind heiß. Bitte beachten Sie, dass auch die zubereiteten Getränke sehr heiß sind.
– Ö�nen Sie den Bügelverschluss (B) nicht, solange die Pumpe arbei-tet und der Brühvorgang noch nicht abgeschlossen ist, da das Gerät unter Druck steht. Warten Sie nach dem Brühvorgang solange, bis die Anzeige elemente (H.1 bis H.4) aufhören zu blinken und ein akustisches Signal ertönt.
– Entfernen Sie aus hygienischen Gründen den jeweiligen Siebträger (C bis E) samt Inhalt nach jedem Brühvorgang. Lassen Sie den Bügel-verschluss (B) geö�net.
– Personen (einschließlich Kinder), die aufgrund ihrer physischen, sen-sorischen oder geistigen Fähigkeiten oder ihrer Unerfahrenheit oder Unkenntnis nicht in der Lage sind, das Gerät sicher zu benutzen, dürfen dieses Gerät nicht ohne Aufsicht oder Anweisung durch eine verant-wortliche Person bedienen.
– Kinder sollten beaufsichtigt werden, um sicherzustellen, dass sie nicht mit dem Gerät spielen.
fino_multi_DE_090706.indd 5 22.07.2009 08:44:33

Fino Multi KA4566
6
– Halten Sie Kinder von Verpackungsmaterial fern. Es besteht unter ande-rem Erstickungsgefahr!
Sachschaden!– Stellen Sie das Gerät auf eine ebene, waagerechte und wasserun-
emp�ndliche Fläche.
– Füllen Sie nur kaltes, klares Wasser (ohne Kohlensäure) in den Wasser-behälter (L). Niemals Milch, Ka�ee oder heißes Wasser einfüllen.
– Nehmen Sie den Wasserbehälter (L) nicht während des Brühvorganges ab, um Störungen zu vermeiden.
Bestimmungsgemäße Verwendung– Wird das Gerät falsch bedient oder zweckentfremdet, kann keine Haf-
tung für evtl. auftretende Schäden übernommen werden.
! Das Gerät ist zur Verwendung im Haushalt bestimmt, nicht für den gewerblichen Einsatz.
fino_multi_DE_090706.indd 6 22.07.2009 08:44:33

7
DE
2. Erste InbetriebnahmeVor dem ersten Gebrauch müssen Sie die folgenden Punkte beachten:
– Reinigen Sie alle Siebträger unter �ießendem warmen Wasser.
– Anschlussleitung mit Netzstecker (K) an das Stromnetz anschließen.
– Wasserbehälter (L) abnehmen, unter �ießendem Wasser gründlich rei-nigen und mit frischem, kaltem Wasser bis zur Markierung MAX (ca. 900 ml) füllen.
– Wasserbehälter (L) gerade aufsetzen und ganz nach unten drücken, damit das Ventil im Boden des Wasserbehälters geö�net wird.
– Tasse mit einem Fassungsvermögen von min. 150 ml auf das Abtropf-gitter (G) stellen.
1. Ö�nen Sie die Brühgruppe (A). Dazu klappen Sie den Bügelverschluss (B) ganz nach oben.
2. Nehmen Sie den Siebträger für Ka�eepads (C) und setzen Sie diesen in die Brühgruppe ein.
3. Jetzt schließen Sie die Brühgruppe (A), indem Sie den Bügelverschluss (B) fest nach unten drücken.
4. Drücken Sie nun kurz die Start/Stopp-Taste (H.5) . Das Tassensymbol (H.1) blinkt. Nach kurzer Aufheizphase startet der Reinigungsvor-
gang und die Tasse wird mit Wasser gefüllt.
! Wichtig: Nachdem das Anzeigeelement (H.1) erloschen ist und ein akustisches Signal ertönt, leeren Sie bitte die Tasse aus und wiederho-len Schritt 4 noch einmal. Danach ist das Gerät betriebsbereit.
fino_multi_DE_090706.indd 7 22.07.2009 08:44:34

Fino Multi KA4566
8
3. Zubereitung von GetränkenSobald der Netzstecker in der Steckdose steckt, ist das Gerät betriebsbereit. Alle Anzeigeelemente sind aus.
Verbrühungsgefahr!Nach der Getränkezubereitung den Siebträger (C bis E) nur am Gri� aus der Brühgruppe (A) entnehmen, da Siebträger und Inhalt heiß sind.
! Wichtig: Prüfen Sie, ob sich ausreichend frisches kaltes Wasser (ohne Kohlensäure) in dem Wasserbehälter (L) be�ndet. Wasser bitte täglich wechseln. Abtropfgitter (G) mit oder ohne Tropfschale (F) je nach Tas-sengröße einsetzen. Der Wasserbehälter (L) darf während des Brühvor-gangs nicht abgenommen werden.
! Wichtig: Der Brühvorgang kann jederzeit durch erneutes Drücken der Start/Stopp-Taste (H.5)
abgebrochen werden.
! Hinweis: Vergessen Sie nicht, die Siebträger (C bis E) nach Gebrauch zu entleeren und zu reinigen. Entsorgen Sie organische Abfälle mit dem Bio-Müll.
fino_multi_DE_090706.indd 8 22.07.2009 08:44:34

9
DE
3.1 Filterka�ee! Tipp: Wir empfehlen für jede normalgroße Tasse (ca. 130 ml) 1,5 bis 2 Teelö�el (ca. 6 g) mittelfein bis fein gemahlenen Ka�ee zu verwenden.
Achtung: Wenn Sie eine größere Menge Ka�eepulver verwen-den wollen, befüllen Sie den Ka�ee�lter bis max. 1 cm Abstand zur Filterkante. Das Ka�eepulver kann während des Brühvorgangs noch aufquellen und überlaufen.
1. Legen Sie eine Filtertüte (D.2) der Größe 100 in den Siebträger (D) und füllen Sie die gewünschte Menge gemahlenen Filterka�ee ein. Verschlie-ßen Sie den Siebträger mit dem zugehörigen Deckel (D.1).
2. Ö�nen Sie nun die Brühgruppe (A). Dazu klappen Sie den Bügelver-schluss (B) ganz nach oben und setzen den Siebträger ein. Achten Sie beim Einsetzen darauf, dass sich Siebträger und Deckel nicht verkanten.
3. Schließen Sie die Brühgruppe (A), indem Sie den Bügelverschluss (B) fest nach unten drücken.
4. Stellen Sie eine geeignete Ka�eetasse auf das Abtropfgitter (G).
5. Drücken Sie nun kurz die Start/Stopp-Taste (H.5) . Die Zubereitung beginnt (Tassensymbol blinkt (H.1) ). Nach kurzer Aufheizphase wird die Tasse mit Ka�ee gefüllt. Der Fortschritt wird durch die Intervall-anzeige angezeigt .
6. Warten Sie die anschließende Nachlaufzeit vollständig ab, bis das Anzei-geelement (H.1) nicht mehr blinkt. Es ertönt ein kurzes akustisches Signal. Der Ka�ee kann auch noch nach dem akustischen Signal nach-laufen. Dies ist abhängig von Menge und Mahlgrad des Ka�eemehls.
7. Entnehmen Sie nun Ihre Tasse, klappen Sie den Bügelverschluss ganz nach oben und entfernen Sie den Siebträger zur Reinigung aus dem Gerät.
8. Fertig! Sie können nun Ihren Ka�ee genießen.
D
D.1
D.2
fino_multi_DE_090706.indd 9 22.07.2009 08:44:35

Fino Multi KA4566
10
Getränkemenge einstellen
Die Getränkemenge für Filterka� ee kann in 5 Intervallstufen eingestellt und gespeichert werden (siehe auch Tabelle unter „3.4 Getränkemenge, Brühtemperatur und Ziehdauer im Überblick“).
1. Legen Sie den Siebträger für Filterka� ee wie oben beschrieben ein
2. Halten Sie die Start/Stopp-Taste (H.5) solange gedrückt, bis die Anzeigeelemente (H.1) und (H.4) au� euchten.
3. Durch wiederholtes kurzes Drücken der Start/Stopp-Taste (H.5) erhöhen Sie die Getränkemenge um je eine Intervallstufe. Haben Sie die maximale Getränkemenge erreicht, beginnt die Einstellung wieder bei der kleinsten Intervallstufe.
4. Sobald die gewünschte Einstellung erreicht ist, halten Sie die Start/Stopp-Taste (H.5) so lange gedrückt, bis die Anzeigeelemente (H.1)
und (H.4) erlöschen. Die Einstellung ist jetzt gespeichert.
! Hinweis: Wenn nach 30 Sekunden keine Taste gedrückt wurde, erfolgt keine Änderung und das Programm wechselt zurück in den Bereitschafts-modus.
3.2 Ka� eepads
1. Legen Sie das Ka� eepad in die Mitte des Siebträgers (C).
! Hinweis: Verwenden Sie nur die im Handel erhältlichen runden Soft-Kaf-feepads. Sollte das Ka� eepad einseitig gewölbt sein, legen Sie das Ka� eepad mit der gewölbten Seiten nach unten in den Siebträger. Niemals Ka� eepul-ver in den Siebträger für Ka� eepads füllen.
2. Ö� nen Sie nun die Brühgruppe (A). Dazu klappen Sie den Bügelver-schluss (B) ganz nach oben und setzen den Siebträger ein. Achten Sie beim Einsetzen in die Brühgruppe (A) darauf, dass der Papierrand des Ka� eepads nicht unter die Dichtung gelangt.
3. Schließen Sie die Brühgruppe (A), indem Sie den Bügelverschluss (B) fest nach unten drücken.
4. Stellen Sie eine geeignete Ka� eetasse auf das Abtropfgitter (G).
5. Drücken Sie nun kurz die Start/Stopp-Taste (H.5) . Die Zubereitung beginnt (Tassensymbol blinkt (H.1) ). Nach kurzer Aufheizphase wird die Tasse mit Ka� ee gefüllt. Der Fortschritt wird durch die Intervallanzei-ge angezeigt .
6. Warten Sie die anschließende Nachlaufzeit vollständig ab, bis das Anzei-geelement (H.1) nicht mehr blinkt. Es ertönt ein kurzes akustisches Signal.
C
fino_multi_DE_090706.indd 10 22.07.2009 08:44:38

11
DE
7. Entnehmen Sie nun Ihre Tasse, klappen Sie den Bügelverschluss ganz nach oben und entfernen Sie den Siebträger zur Reinigung aus dem Gerät.
8. Fertig! Sie können nun Ihren Ka�ee genießen.
Getränkemenge einstellen
Die Getränkemenge für Ka�eepads kann in 5 Intervallstufen eingestellt und gespeichert werden (siehe auch Tabelle unter „3.4 Getränkemenge, Brühtemperatur und Ziehdauer im Überblick“).
1. Legen Sie den Siebträger für Ka�eepads wie oben beschrieben ein.
2. Halten Sie die Start/Stopp-Taste (H.5) solange gedrückt, bis die Anzeigeelemente (H.1) und (H.4) au�euchten.
3. Durch wiederholtes kurzes Drücken der Start/Stopp-Taste (H.5) erhöhen Sie die Getränkemenge um je eine Intervallstufe. Haben Sie die maximale Getränkemenge erreicht, beginnt die Einstellung wieder bei der kleinsten Intervallstufe.
4. Sobald die gewünschte Einstellung erreicht ist, halten Sie die Start/Stopp-Taste (H.5) so lange gedrückt, bis die Anzeigeelemente (H.1)
und (H.4) erlöschen. Die Einstellung ist jetzt gespeichert.
! Hinweis: Wenn nach 30 Sekunden keine Taste gedrückt wurde, erfolgt keine Änderung und das Programm wechselt zurück in den Bereitschafts-modus.
fino_multi_DE_090706.indd 11 22.07.2009 08:44:40
Fino Multi KA4566
12
3.3 Tee! Vorbemerkung: Ab Werk ist das Gerät so programmiert, dass der schwar-ze Deckel (E.1) für die Zubereitung von schwarzem Tee (1. Teesorte) und der grüne Deckel (E.2) für die Zubereitung von grünem Tee (2. Teesorte) verwen-det wird. Diese Einstellungen können Sie jederzeit ändern und separat für jeden Deckel speichern, siehe Abschnitt „3.3 Ändern der Einstellungen für die Zubereitung von Tee“.
1a. Teebeutel:
Entfernen Sie vorab die Teebox (E.3) aus dem Siebträger (E). Legen Sie nun den Teebeutel in den Siebträger (E). Lassen Sie die Teebeutelschnur samt Etikett über den Siebträgerrand heraushängen.
1b. Loser Tee:
Füllen Sie den losen Tee in die Teebox (E.3) und setzen Sie diese in die Siebträger (E) ein. Verwenden Sie bei sehr feinem Tee ggf. einen zusätzlichen Tee�lter.
! Wichtig: Achten Sie darauf, dass der Auslaufröhrchen (E.4) immer eingesetzt ist.
2. Verschließen Sie den Siebträger mit dem gewünschten Deckel (E.1) oder (E.2). Verriegeln Sie den Deckel durch Drehen im Uhrzeigersinn, bis er hörbar einrastet.
3. Ö�nen Sie nun die Brühgruppe (A). Dazu klappen Sie den Bügelver-schluss (B) ganz nach oben und setzen den Siebträger ein. Achten Sie beim Einsetzen darauf, dass sich der Siebträger nicht verkantet.
4. Schließen Sie die Brühgruppe (A), indem Sie den Bügelverschluss (B) fest nach unten drücken.
5. Stellen Sie eine geeignete Teetasse auf das Abtropfgitter (G).
6. Drücken Sie nun kurz die Start/Stopp-Taste (H.5) . Die Zubereitung beginnt (Tassensymbol blinkt (H.1) ). Nach kurzer Aufheizphase wird die Tasse mit Tee gefüllt. Der Fortschritt wird durch die Intervallanzeige angezeigt .
7. Am Ende der Ziehdauer wird die Tasse mit Tee gefüllt.
8. Warten Sie die anschließende Nachlaufzeit vollständig ab, bis das Anzeige element (H.1) nicht mehr blinkt. Es ertönt ein kurzes akusti-sches Signal.
9. Entnehmen Sie nun Ihre Tasse, klappen Sie den Bügelverschluss ganz nach oben und entfernen Sie den Siebträger zur Reinigung aus dem Gerät.
10. Fertig! Sie können nun Ihren Tee genießen.
E
E
E.3
fino_multi_DE_090706.indd 12 22.07.2009 08:44:41
13
DE
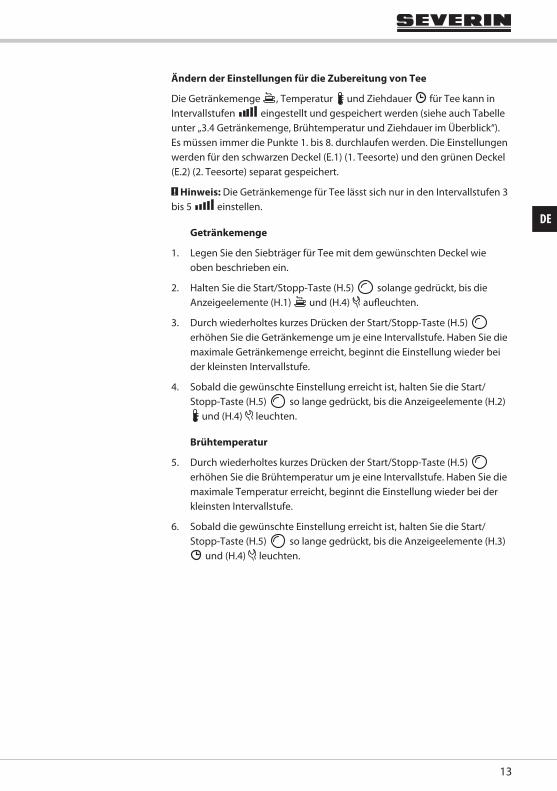
Ändern der Einstellungen für die Zubereitung von Tee
Die Getränkemenge , Temperatur und Ziehdauer für Tee kann in Intervallstufen eingestellt und gespeichert werden (siehe auch Tabelle unter „3.4 Getränkemenge, Brühtemperatur und Ziehdauer im Überblick“). Es müssen immer die Punkte 1. bis 8. durchlaufen werden. Die Einstellungen werden für den schwarzen Deckel (E.1) (1. Teesorte) und den grünen Deckel (E.2) (2. Teesorte) separat gespeichert.
! Hinweis: Die Getränkemenge für Tee lässt sich nur in den Intervallstufen 3 bis 5 einstellen.
Getränkemenge
1. Legen Sie den Siebträger für Tee mit dem gewünschten Deckel wie oben beschrieben ein.
2. Halten Sie die Start/Stopp-Taste (H.5) solange gedrückt, bis die Anzeigeelemente (H.1) und (H.4) au�euchten.
3. Durch wiederholtes kurzes Drücken der Start/Stopp-Taste (H.5) erhöhen Sie die Getränkemenge um je eine Intervallstufe. Haben Sie die maximale Getränkemenge erreicht, beginnt die Einstellung wieder bei der kleinsten Intervallstufe.
4. Sobald die gewünschte Einstellung erreicht ist, halten Sie die Start/Stopp-Taste (H.5) so lange gedrückt, bis die Anzeigeelemente (H.2)
und (H.4) leuchten.
Brühtemperatur
5. Durch wiederholtes kurzes Drücken der Start/Stopp-Taste (H.5) erhöhen Sie die Brühtemperatur um je eine Intervallstufe. Haben Sie die maximale Temperatur erreicht, beginnt die Einstellung wieder bei der kleinsten Intervallstufe.
6. Sobald die gewünschte Einstellung erreicht ist, halten Sie die Start/Stopp-Taste (H.5) so lange gedrückt, bis die Anzeigeelemente (H.3)
und (H.4) leuchten.
fino_multi_DE_090706.indd 13 22.07.2009 08:44:43

Fino Multi KA4566
14
Ziehdauer
7. Durch wiederholtes kurzes Drücken der Start/Stopp-Taste (H.5) erhöhen Sie die Ziehdauer um je eine Intervallstufe. Haben Sie die maximale Ziehdauer erreicht, beginnt die Einstellung wieder bei der kleinsten Intervallstufe.
8. Sobald die gewünschte Einstellung erreicht ist, halten Sie die Start/Stopp-Taste (H.5) so lange gedrückt, bis die Anzeigeelemente (H.3)
und (H.4) erlöschen. Die Einstellung ist jetzt gespeichert.
! Hinweis: Wenn nach 30 Sekunden keine Taste gedrückt wurde, erfolgt keine Änderung und das Programm wechselt zurück in den Bereitschafts-modus.
3.4 Getränkemenge, Brühtemperatur und Ziehdauer im Überblick
Ka�ee
Intervallstufen 1 Balken 2 Balken 3 Balken 4 Balken 5 Balken
Getränkemenge ca. 90ml
ca. 125ml (Werkseinstellung Ka�eepad, Ka�ee �lter)
ca. 170ml
ca. 200ml
ca. 225ml
Tee
Intervallstufen 1 Balken 2 Balken 3 Balken 4 Balken 5 Balken
Getränkemenge – – ca. 170ml (Werkseinstellung Ka�eepad, Ka�ee �lter)
ca. 200ml ca. 225ml
Brüh- temperatur
ca. 70°C ca. 80°C (Werks einstellung grüner Deckel)
ca. 85°C ca. 90°C ca. 95°C (Werks ein stellung schwarzer Deckel)
Ziehdauer ca. 2 Minuten ca. 3 Minuten (Werkseinstellung grüner Deckel)
ca. 5 Minuten (Werkseinstellung schwarzer Deckel)
ca. 8 Minuten ca. 10 Minuten
! Hinweis: Diese Angabe sind Richtwerte, die je nach Ka�ee-/Tee-Mahlgrad (Feinheit), Ka�ee-/Tee-Menge oder Art des Tees und Umgebungsbedingun-gen abweichen können.
fino_multi_DE_090706.indd 14 22.07.2009 08:44:44

15
DE
4. Anzeige- und Bedienelemente
4.1 Anzeigeelemente
Getränkemenge/Brühvorgang (H.1)
– Blinkt während der Zubereitung
– Blinkt schnell, wenn das Gerät entkalkt werden muss
– Blinkt während des Entkalkens
– Leuchtet im Modus „Speichereinstellungen“ bei der Einstellung der Getränkemenge, siehe Abschnitt „3. Zubereitung von Getränken“
Temperatur (H.2) , nur bei Tee verfügbar
– Leuchtet nur im Modus „Speichereinstellungen“ bei der Einstellung der Brühtemperatur, siehe Abschnitt „3. Zubereitung von Getränken“
Ziehdauer (H.3) , nur bei Tee verfügbar
– Leuchtet im Modus „Speichereinstellungen“ bei der Einstellung der Ziehdauer, siehe Abschnitt „3. Zubereitung von Getränken“
Störung / Speichereinstellungen (H.4)
– Blinkt bei Störung, siehe Abschnitt „6. Fehlersuche und Behebung“
– Leuchtet während des Entkalkens
Intervallanzeige mit LED-Balken (H.6)
– Erster Balken leuchtet, sobald das Gerät betriebsbereit ist
– Während der Zubereitung leuchten die restlichen Balken stufenweise auf, bis das Ende der Zubereitung erreicht ist. Unabhängig von der eingestellten Getränkemenge leuchten am Ende der Zubereitung immer alle 5 Balken auf.
– Im Modus „Speichereinstellungen“, siehe Abschnitt „3. Zubereitung von Getränken“ werden über die Balken Getränkemenge, Temperatur und Ziehdauer eingestellt.
fino_multi_DE_090706.indd 15 22.07.2009 08:44:45

Fino Multi KA4566
16
4.2 Bedienelement
Start/Stopp-Taste (H.5)
– Durch kurzes Drücken starten Sie die Zubereitung
– Durch erneutes kurzes Drücken brechen Sie die Zubereitung ab
– Bei einer Störung betätigen Sie durch kurzes Drücken die Fehlerbeseiti-gung
– Durch längeres Drücken min. 3 Sekunden mit eingesetztem Siebträger gelangen Sie in den Modus „Speichereinstellungen“, siehe Abschnitt „3. Zubereitung von Getränken“
– Durch längeres Drücken min. 3 Sekunden ohne eingesetzten Siebträger gelangen Sie in den Modus „Entkalken“, siehe Abschnitt „5. Reinigung, P�ege und Wartung“
! Hinweis: Mit der Start/Stopp-Taste können Sie auch die Werkseinstellun-gen zurücksetzen, siehe Abschnitt „5. Reinigung, P�ege und Wartung“.
fino_multi_DE_090706.indd 16 22.07.2009 08:44:45

17
DE
5. Reinigung, P� ege und Wartung! Wichtig: Vor der Reinigung den Netzstecker ziehen und das Gerät abkühlen lassen.
Achtung: Einzelteile nicht im Geschirrspüler reinigen!
Das Gerät darf aus Gründen der elektrischen Sicherheit nicht mit Flüs-sigkeiten behandelt oder gar darin eingetaucht werden.
Keine scharfen oder scheuernden Reinigungsmittel verwenden.
Das Gehäuse außen mit einem feuchten Tuch gegebenenfalls mit etwas Spülmittel abwischen.
5.1 Reinigen der Siebträger
Auseinandergebaute Siebträger (C bis E), Wasserbehälter (L), Abtropfgitter (G) und Tropfschale (F) im Spülwasser reinigen. Anschließend mit klarem Wasser abspülen und abtrocknen.
D
D.1
C
E
E.1/2
E.3
E.4
fino_multi_DE_090706.indd 17 22.07.2009 08:44:47

Fino Multi KA4566
18
5.2 Entkalken
Blinkt das Anzeigeelement (H.1) während der Zubereitung schnell, muss das Gerät entkalkt werden.
Hierzu eignen sich handelsübliche Entkalkungsmittel für Ka�eeautomaten. Setzen Sie 900 ml eines Entkalkungsmittels entsprechend den Vorgaben des Entkalkungsmittelherstellers an.
! Wichtig: Verwenden Sie keinen Essig oder auf Essigsäure basierende Entkalkungsmittel, da sonst innere Schäden am Gerät z.B. an den Dich-tungen entstehen können!
Achtung: Bitte beachten Sie die Sicherheitshinweise des Entkal-kungsmittelherstellers. Entkalkungsmittel nicht in emaillierte Ab�uss-becken gießen.
1. Wasserbehälter (L) mit Entkalkungsmittel bis zur Markierung MAX (ca. 900 ml) füllen.
2. Ö�nen Sie die Brühgruppe (A). Dazu klappen Sie den Bügelverschluss (B) ganz nach oben.
3. Entnehmen Sie den Siebträger aus der Brühgruppe.
4. Nehmen Sie ein hohes Gefäß mit einem Fassungsvermögen von min. 900 ml (z.B. ein Litermaß) und stellen dieses auf das Abtropfgitter (G) ohne Tropfschale (F).
5. Drücken Sie min. 3 Sekunden die Start/Stopp-Taste (H.5) , bis die An-zeigeelemente (H.1) und (H.4) leuchten. Der Entkalkungsvorgang startet und das Anzeigeelement (H.1) beginnt zu blinken. Das Gefäß wird intervallweise gefüllt, bis der Wasserbehälter leer ist. Dazwischen macht das Gerät Pausen (ca. 30 Sekunden).
6. Wenn der Wasserbehälter leer ist, beginnt das Anzeigeelement (H.4) zu blinken. Der Klarspülvorgang kann gestartet werden. Nehmen
Sie dazu den Wasserbehälter (L) ab, reinigen Sie ihn gründlich unter �ießendem Wasser und füllen Sie ihn mit frischem, kaltem Wasser bis zur Markierung MAX (ca. 900 ml). Entleeren Sie das hohe Gefäß mit dem gebrauchten Entkalkungsmittel und stellen Sie es wieder auf das Abtropfgitter. Drücken Sie jetzt die Start/Stopp-Taste (H.5) . Das Anzeigeelement (H.4) leuchtet wieder und das Gerät wird mit kaltem Wasser gespült, bis der Wasserbehälter leer ist.
7. Das Gerät ist jetzt entkalkt und wieder betriebsbereit.
fino_multi_DE_090706.indd 18 22.07.2009 08:44:48

19
DE
5.3 Zurücksetzen auf die Werkseinstellung
Klappen Sie den Bügelverschluss (B) der Brühgruppe (A) ohne eingelegten Siebträger nach unten. Drücken Sie die Start/Stopp-Taste (H.5) so lange, bis alle Anzeigeelemente au�euchten. Alle Einstellungen für Getränke-menge, Temperatur und Ziehdauer sind jetzt auf Werkseinstellungen zurück-gesetzt. Die Start/Stopp-Taste kann wieder losgelassen werden.
5.4 Entsorgen Bitte entsorgen Sie unbrauchbar gewordene Geräte in den dafür vorge-sehenen ö�entlichen Entsorgungsstellen.
5.5 Ersatzteile und Zubehör
Falls Sie Ersatzteile oder Zubehör für Ihr Gerät benötigen, können Sie diese auch bequem über unseren Onlineshop im Internet bestellen. Sie �nden unseren Onlineshop unter www.severin.de im Menüpunkt „Ersatzteilshop“.
fino_multi_DE_090706.indd 19 22.07.2009 08:44:49

Fino Multi KA4566
20
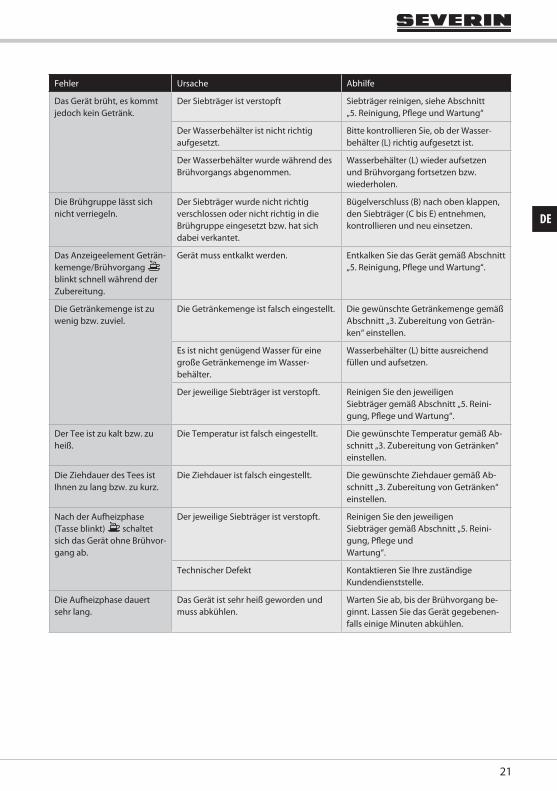
6. Fehlersuche und BehebungDie folgende Tabelle hilft Ihnen dabei, auftretende Probleme selbst zu beheben. Falls Sie keine passende Lösung für das Problem �nden, kontaktie-ren Sie bitte unseren Kundendienst, siehe Abschnitt „Kundendienst“ auf den letzten Seiten dieser Gebrauchsanweisung.
Fehler Ursache Abhilfe
Nach dem Drücken der Start/Stopp-Taste funk-tioniert das Gerät nicht.
Das Gerät hat eventuell keine Stromver-sorgung
Kontrollieren Sie, ob die Anschluss-leitung mit Netzstecker (K) am Stromnetz angeschlossen ist.
Das Anzeigeelement Störung / Speichereinstel-lungen blinkt.
Es ist kein Siebträger eingesetzt. Setzen Sie den benötigten Siebträger (C bis E) ein. Drücken Sie die Start/Stopp-Taste .
Der Bügelverschluss ist geö�net. Schließen Sie den Bügelverschluss (B). Drücken Sie die Start/Stopp-Taste .
Der Wasserbehälter ist leer oder nicht aufgesetzt bzw. der Wasserstand ist unterhalb der Markierung MIN.
Wasserbehälter (L) bitte ausreichend füllen und aufsetzen. Drücken Sie die Start/Stopp-Taste .
Das Ventil am Boden des Wasserbehäl-ters ist verstopft.
Wasserbehälter reinigen, siehe Abschnitt „5. Reinigung, P�ege und Wartung“.
Ventil durch leichtes Drücken von unten wieder beweglich machen.
Drücken Sie die Start/Stopp-Taste .
Der Schwimmer im Wasserbehälter zur Füllstandsmessung klemmt.
Wasserbehälter reinigen, siehe Abschnitt „5. Reinigung, P�ege und Wartung“
Schwimmer durch leichtes Schütteln des Wasserbehälters wieder beweglich machen.
Drücken Sie die Start/Stopp-Taste .
Aus der Brühgruppe tropft Wasser.
Der Bügelverschluss ist nicht richtig geschlossen.
Verbrühungsgefahr!
Sofort Brühvorgang durch Drücken der Start/Stopp-Taste abbrechen und warten bis das Anzeigeelement erloschen ist. Den Bügelverschluss (B) vorsichtig nach oben klappen, entspre-chenden Siebträger (C bis E) entneh-men, kontrollieren und neu einsetzen. Schließen Sie die Brühgruppe (A), indem Sie den Bügelverschluss (B) fest nach unten drücken.
fino_multi_DE_090706.indd 20 22.07.2009 08:44:50
21
DE
Fehler Ursache Abhilfe
Das Gerät brüht, es kommt jedoch kein Getränk.
Der Siebträger ist verstopft Siebträger reinigen, siehe Abschnitt „5. Reinigung, P�ege und Wartung“
Der Wasserbehälter ist nicht richtig aufgesetzt.
Bitte kontrollieren Sie, ob der Wasser-behälter (L) richtig aufgesetzt ist.
Der Wasserbehälter wurde während des Brühvorgangs abgenommen.
Wasserbehälter (L) wieder aufsetzen und Brühvorgang fortsetzen bzw. wiederholen.
Die Brühgruppe lässt sich nicht verriegeln.
Der Siebträger wurde nicht richtig verschlossen oder nicht richtig in die Brühgruppe eingesetzt bzw. hat sich dabei verkantet.
Bügelverschluss (B) nach oben klappen, den Siebträger (C bis E) entnehmen, kontrollieren und neu einsetzen.
Das Anzeigeelement Geträn-kemenge/Brühvorgang blinkt schnell während der Zubereitung.
Gerät muss entkalkt werden. Entkalken Sie das Gerät gemäß Abschnitt „5. Reinigung, P�ege und Wartung“.
Die Getränkemenge ist zu wenig bzw. zuviel.
Die Getränkemenge ist falsch eingestellt. Die gewünschte Getränkemenge gemäß Abschnitt „3. Zubereitung von Geträn-ken“ einstellen.
Es ist nicht genügend Wasser für eine große Getränkemenge im Wasser-behälter.
Wasserbehälter (L) bitte ausreichend füllen und aufsetzen.
Der jeweilige Siebträger ist verstopft. Reinigen Sie den jeweiligen Siebträger gemäß Abschnitt „5. Reini-gung, P�ege und Wartung“.
Der Tee ist zu kalt bzw. zu heiß.
Die Temperatur ist falsch eingestellt. Die gewünschte Temperatur gemäß Ab-schnitt „3. Zubereitung von Getränken“ einstellen.
Die Ziehdauer des Tees ist Ihnen zu lang bzw. zu kurz.
Die Ziehdauer ist falsch eingestellt. Die gewünschte Ziehdauer gemäß Ab-schnitt „3. Zubereitung von Getränken“ einstellen.
Nach der Aufheizphase (Tasse blinkt) schaltet sich das Gerät ohne Brühvor-gang ab.
Der jeweilige Siebträger ist verstopft. Reinigen Sie den jeweiligen Siebträger gemäß Abschnitt „5. Reini-gung, P�ege und Wartung“.
Technischer Defekt Kontaktieren Sie Ihre zuständige Kunden dienststelle.
Die Aufheizphase dauert sehr lang.
Das Gerät ist sehr heiß geworden und muss abkühlen.
Warten Sie ab, bis der Brühvorgang be-ginnt. Lassen Sie das Gerät gegebenen-falls einige Minuten abkühlen.
fino_multi_DE_090706.indd 21 22.07.2009 08:44:51

Fino Multi KA4566
22
7. GarantieSeverin gewährt Ihnen eine Herstellergarantie von zwei Jahren ab Kauf-datum.
In diesem Zeitraum beseitigen wir kostenlos alle Mängel, die nachweislich auf Material- oder Fertigungsfehlern beruhen und die Funktion wesentlich beeinträchtigen. Weitere Ansprüche sind ausgeschlossen.
Von der Garantie ausgenommen sind:
Schäden, die auf Nichtbeachtung der Gebrauchsanweisung, unsachgemäße Behandlung oder normalen Verschleiß zurückzuführen sind, ebenso leicht zerbrechliche Teile wie z. B. Glas, Kunststo� oder Glühlampen.
Die Garantie erlischt bei Eingri� durch nicht von uns autorisierten Stellen. Sollte eine Reparatur erforderlich werden, senden Sie bitte das komplette Gerät gut verpackt, mit Fehlerbeschreibung und Kaufbeleg, direkt an den Severin-Service, siehe Abschnitt „Kundendienst“ auf den letzten Seiten dieser Gebrauchsanweisung.
Die gesetzlichen Gewährleistungsrechte gegenüber dem Verkäufer und eventuelle Verkäufergarantien bleiben unberührt.
8. KundendienstSie �nden Ihren zuständigen Kundendienst auf den letzten Seiten der Gebrauchsanweisung.
9. SoftwarelizenzWir unterstützen die Entwicklung von freier Software.
Wir nutzen freie Software bei der Entwicklung und als Bestandteil unserer Produkte. Detaillierte Hinweise einschließlich Lizenzbedingungen und Copy-right �nden Sie auf unseren Internetseiten unter http://www.severin.de.
fino_multi_DE_090706.indd 22 22.07.2009 08:44:51

A
B
I GK
H
L
C
D
E
E.1
D.1
E.2H.1
H.2
H.3
H.4
H.5
H.6
D.2
F
E.3
E.4
BelgiqueDancal N.V.Bavikhoofsestraat 728520 KuurneTel.: 056/71 54 51Fax: 056/70 04 49
Bosnia i HerzegovinaMalisic MP d.o.oTromeda Medugorje bb88260 CitlukTel: + 387 36 650 446Fax: + 387 36 651 062
BulgariaNoviz AGKahn Kubrat 1 Str. BG-4000 PlovdivTel: +359 32 275 617, 275 614e-mail: [email protected]
Czech Republic ARGO spol. s r.o. Žihobce 137CZ 342 01 SušiceTel.: + 376 597 197Fax: + 376 597 197http://[email protected]
CroatiaTD Medimurka d.d.Trg. Republike 6HR-40000 CakovecCroatiaTel: +385-40 328 650Fax: + 385 40 328 134e-mail: [email protected]
CyprusG.L.G. Trading4-6, Oidipodos StreetLarnaca, CyprusTel.: 024/633133Fax: 024/635992
DanmarkScandia Serviceteknik A/SHedeager 52605 BrondbyTel.: 45-43202700Fax: 45-43202709
Estonia:Tallinn: CENTRALSERVICE, Tammsaare tee 134B, tel: 654 3000Tartu: CENTRALSERVICE, Aleksandri 6, tel: 7 344 299, 7 344 337, 56 697 843Pärnu: CENTRALSERVICE, Riia mnt. 64, tel: 44 25 175Narva: CENTRALSERVICE, Tallinna 6A, tel: 35 60 708Haapsalu: Teco KM OÜ, Jalaka 1A, tel: 47 56 900Rakvere: Nirgi Tõnu FIE, tel: 32 40 515Viljandi: Aaber OÜ, Vabaduse pl. 4, tel: 43 33 802Kuressaare: Toomas Teder FIE, Pikk 1B, tel: 45 55 978Käina: Ilmar Pauk Elektroonika FIE, Mäe2S, tel: 46 36 379, 51 87 444
EspanaSeverin Electrodom. España S.L.Plaza de la Almazara Portal 4, 1º E.45200 ILLESCAS(Toledo)Tel: 925 51 34 05Fax: 925 54 19 40eMail: [email protected]://www.severin.es
FranceSEVERIN France Sarl4, rue de ThalB.P. 3867211 OBERNAI CEDEXTel.: 03 88 47 62 08Fax: 03 88 47 62 09
GreeceBERSONC. Sara� dis Bros. S.A.Agamemnonos 47176 75 Kallithea, AthensTel.: 0030-210 9478700
Philippos Business CenterAgias Anastasias & Laertou, PileaService Post of Thermi570 01 Thessaloniki, GreeceTel.: 0030-2310954020
Iran IRAN-SEVERIN KISH CO. LTD.No. 668, 7th. FloorBahar TowerAve. South BaharTEHRAN - IRANTel. : 009821 - 77616767Fax : 009821 – [email protected]
IsraelEatay Agencies109 Herzel St.HaifaPhone: 050-5358648Email: [email protected]
ItaliaVideoellettronica di Sgambati &Gabrini C.S.N.C.via Dino Col 52r-54r-56r,I - 16149 GenovaGreen Number: 800240279Tel.: 010/6 45 11 02 - 01041 86 09Fax: 010/6 42 50 09e-mail: [email protected]
JordanF.A. KettanehP.O. Box 485Amman, 11118, JordanTel: 00962-6-439 8642e-mail: [email protected]
KoreaJung Shin Electronics co., ltd.501, Megaventuretower 77-9, Moonrae-Dong 3ga, Yongdeungpo-GuSeoul, KoreaTel: +82-22-637 3245~7Fax: +82-22-637 3244Service Hotline: 080-001-0190
LatviaSERVO Ltd. Mr. Janis PivovarenoksTel: + 371 [email protected]
LebanonKhoury Home7th Floor, Cité Dora 3 Building, DoraP.O.Box 70611Antelias, LebanonTelephone 01 244200, Fax 01 253535eMail: [email protected] Internet: www.khouryhome.com
LuxembourgSer-TecRue du Chateau d´Eua3364 LeudelangeTel.: 00352 -37 94 94 402Fax 00352 -37 94 94 400
MacedoniaKONCAR servisBul. Partizanski odredi br. 1051000 SkopjeMakedonijaTel: + 389 (2) 365-578Fax: + 389 (2) 365 621e-mail: [email protected]
MagyarországTFK Elektronik Kft.Gyar u.2H-2040 BudaörsTel.: (+36) 23 444 266Fax: (+36) 23 444 267
NederlandHAS b.v.Stedenbaan 8NL-5121 DP RijenTel: 0161-22 00 00Fax: 0161-29 00 50
NorwayLøkken Trading ASTrollåsveien 341414 TrollåsenTlf: 40 00 67 34Fax: 66 80 45 60
ÖsterreichDegupaVertriebsgesellschaft m.b.H.Gewerbeparkstr. 75081 Anif / SalzburgTel.: 0 62 46 / 73 58 10Fax:. 0 62 46 / 72 70 2
PolskaServ-Serwis Sp. z o.o.ul. Wspólna 945-831 Opoletel./fax (077) 457-50-06e-mail: [email protected]
PortugalNovalvaZona Industrial Maia ISector X - Lote 293, N. 904470 MaiaTel.: 02/9 44 03 84Fax: 02/9 44 02 68
Russian FederationOrbita Service123362 Moskauul. Svobody 18,Tel.: (495) 585 05 73
Орбита Сервис 1233 62 г. Москва, ул. Свободы, д. 18. Тел.: (495)585-05-73
RomaniaFor Brands srlStr. Capitan Aviator AlexandruSerbanescu Nr. 33-35, Bl. 20ESc. 2 Et.1, Ap. 27, Sector 1BucurestiTel: + 40 21 233 41 12, + 40 21 233 41 13, + 40 21 688 66 13Fax: + 40 21 233 41 03, + 40 21 688 66 13E-mail: o [email protected] site: www.forbrands.ro
SchweizVB Handels Sàrl GmbHPostfach 3061040 EchallensTel: 021 881 60 45Fax 021 881 60 46mail: [email protected]
SerbiaSMIL dooPasiceva 28, Novi SadSerbia and Montenegrotel: + 381-21-524-638tel: +381-21-553-594fax: +381-21-522-096
Slowak RepublicPREMT,s.r.o.Skladová 1917 01 TrnavaTel: 033/544 7177
FinlandOy Harry Marcell AbRälssitie 6, PL 6301511 VantaaTel.: 0035 / 898 708 70Fax: 0035/ 898 708 7803
SvenskaRakspecialisten HSMöllevångsgatan 34214 20 MalmöTel.: 040/12 07 70Fax: 040/6 11 03 35
SloveniaSEVTIS d.o.o.Smartinska 1301000 LjubljanaTel: 00386 1 542 1927Fax: 00386 1 542 1926
Kundendienstzentralen
Service Centres
Centrales service-après-vente
O� cinas centrales del servicio
Centros de serviço
Centrale del servizio clienti
Service-centrales
Centrale serviceafdelinger
Centrala kundtjänstplatser
Keskushuollot
Servisné stredisko
Centrala obstugi klientów
Szerviz
Κέντρο εξυπηρέτησης πελατών
SEVERIN ServiceAm Brühl 2759846 SundernTelefon (02933) 982-460Telefax (02933) [email protected]
INTERNATIONAL
umschlag_090703.indd 2 08.07.2009 08:24:46

Fino Multi KA4566Fino Multi KA4566
Fino Multi KA4566Fino Multi KA4566
DE
EN
FR
NL
ES
IT
DK
SE
FI
PL
GR
RU
Ka ee-CenterGebrauchsanweisung
Multi-function co ee makerInstructions for use
Centre caféMode d‘emploi
Ko ecenterGebruiksaanwijzing
Centro de caféInstrucciones de uso
Macchina da ca èManuale d‘uso
Ka ecenterBrugervejledning
Ka ecenterBruksanvisning
KahvikeskusKäyttöohje
Centrum kawoweInstrukcja obsługi
ΚαφετιέραΟδηγίες χρήσης
Кофейная машинаРуководство по эксплуатации
Liebe Kundin, lieber Kunde,
Sie haben sich für ein SEVERIN-Qualitäts produkt entschieden, vielen Dank für Ihr Vertrauen!
Seit 1952 werden Elektrogeräte der Marke SEVERIN produziert. Durch diese jahrzehntelange Erfahrung und modernste Produktionsstätten wird der hohe Qualitätsstandard der Produkte garantiert.
Mit über 160 verschiedenen Produkten bietet SEVERIN wie kaum ein anderer Hersteller dieser Branche ein nahezu komplettes Sortiment im Bereich Elektrokleingeräte an.
So umfasst das SEVERIN-Sortiment neben den traditionellen Küchengerä-ten wie Ka eeautomat, Toastern, Kochplatten oder Wa elautomaten auch vielseitige Grillgeräte, Produkte für die Haarp� ege sowie verschiedene Heizgeräte und Ventilatoren.
Jedes Gerät, das die Marke SEVERIN trägt, wurde mit Sorgfalt hergestellt und geprüft.
! Wichtig: Bitte lesen Sie diese Gebrauchsanweisung sorgfältig durch, bevor Sie Ihr Gerät in Betrieb nehmen und bewahren diese Anweisung auf.
Wir wünschen Ihnen an Ihrem SEVERIN-Gerät viel Freude!
Geschäftsleitung und Mitarbeiterder SEVERIN-Unternehmen
Aktion zum Schutz der Umwelt:Nehmen auch Sie aktiv am Umweltschutz teil.Umwelt-Tipp: Entsorgen Sie organische Abfälle mit dem Bio-Müll.
www.severin.de
Fino Multi KA4566
Gebrauchsanweisung
Multi-function co ee makerInstructions for use
Gebruiksaanwijzing
Instrucciones de uso
Macchina da ca è
Brugervejledning
Centrum kawoweInstrukcja obsługi
Οδηγίες χρήσης
Кофейная машинаРуководство по эксплуатации
I/M No.: 8255.0000
umschlag_090703.indd 1 08.07.2009 08:24:45
Fino Multi KA4566
Fino Multi KA4566
ENMulti-function co� ee makerInstructions for use
Multi-function co� ee makerInstructions for use

A
B
I GK
H
L
C
D
E
E.1
D.1
E.2H.1
H.2
H.3
H.4
H.5
H.6
D.2
F
E.3
E.4
BelgiqueDancal N.V.Bavikhoofsestraat 728520 KuurneTel.: 056/71 54 51Fax: 056/70 04 49
Bosnia i HerzegovinaMalisic MP d.o.oTromeda Medugorje bb88260 CitlukTel: + 387 36 650 446Fax: + 387 36 651 062
BulgariaNoviz AGKahn Kubrat 1 Str. BG-4000 PlovdivTel: +359 32 275 617, 275 614e-mail: [email protected]
Czech Republic ARGO spol. s r.o. Žihobce 137CZ 342 01 SušiceTel.: + 376 597 197Fax: + 376 597 197http://[email protected]
CroatiaTD Medimurka d.d.Trg. Republike 6HR-40000 CakovecCroatiaTel: +385-40 328 650Fax: + 385 40 328 134e-mail: [email protected]
CyprusG.L.G. Trading4-6, Oidipodos StreetLarnaca, CyprusTel.: 024/633133Fax: 024/635992
DanmarkScandia Serviceteknik A/SHedeager 52605 BrondbyTel.: 45-43202700Fax: 45-43202709
Estonia:Tallinn: CENTRALSERVICE, Tammsaare tee 134B, tel: 654 3000Tartu: CENTRALSERVICE, Aleksandri 6, tel: 7 344 299, 7 344 337, 56 697 843Pärnu: CENTRALSERVICE, Riia mnt. 64, tel: 44 25 175Narva: CENTRALSERVICE, Tallinna 6A, tel: 35 60 708Haapsalu: Teco KM OÜ, Jalaka 1A, tel: 47 56 900Rakvere: Nirgi Tõnu FIE, tel: 32 40 515Viljandi: Aaber OÜ, Vabaduse pl. 4, tel: 43 33 802Kuressaare: Toomas Teder FIE, Pikk 1B, tel: 45 55 978Käina: Ilmar Pauk Elektroonika FIE, Mäe2S, tel: 46 36 379, 51 87 444
EspanaSeverin Electrodom. España S.L.Plaza de la Almazara Portal 4, 1º E.45200 ILLESCAS(Toledo)Tel: 925 51 34 05Fax: 925 54 19 40eMail: [email protected]://www.severin.es
FranceSEVERIN France Sarl4, rue de ThalB.P. 3867211 OBERNAI CEDEXTel.: 03 88 47 62 08Fax: 03 88 47 62 09
GreeceBERSONC. Sara� dis Bros. S.A.Agamemnonos 47176 75 Kallithea, AthensTel.: 0030-210 9478700
Philippos Business CenterAgias Anastasias & Laertou, PileaService Post of Thermi570 01 Thessaloniki, GreeceTel.: 0030-2310954020
Iran IRAN-SEVERIN KISH CO. LTD.No. 668, 7th. FloorBahar TowerAve. South BaharTEHRAN - IRANTel. : 009821 - 77616767Fax : 009821 – [email protected]
IsraelEatay Agencies109 Herzel St.HaifaPhone: 050-5358648Email: [email protected]
ItaliaVideoellettronica di Sgambati &Gabrini C.S.N.C.via Dino Col 52r-54r-56r,I - 16149 GenovaGreen Number: 800240279Tel.: 010/6 45 11 02 - 01041 86 09Fax: 010/6 42 50 09e-mail: [email protected]
JordanF.A. KettanehP.O. Box 485Amman, 11118, JordanTel: 00962-6-439 8642e-mail: [email protected]
KoreaJung Shin Electronics co., ltd.501, Megaventuretower 77-9, Moonrae-Dong 3ga, Yongdeungpo-GuSeoul, KoreaTel: +82-22-637 3245~7Fax: +82-22-637 3244Service Hotline: 080-001-0190
LatviaSERVO Ltd. Mr. Janis PivovarenoksTel: + 371 [email protected]
LebanonKhoury Home7th Floor, Cité Dora 3 Building, DoraP.O.Box 70611Antelias, LebanonTelephone 01 244200, Fax 01 253535eMail: [email protected] Internet: www.khouryhome.com
LuxembourgSer-TecRue du Chateau d´Eua3364 LeudelangeTel.: 00352 -37 94 94 402Fax 00352 -37 94 94 400
MacedoniaKONCAR servisBul. Partizanski odredi br. 1051000 SkopjeMakedonijaTel: + 389 (2) 365-578Fax: + 389 (2) 365 621e-mail: [email protected]
MagyarországTFK Elektronik Kft.Gyar u.2H-2040 BudaörsTel.: (+36) 23 444 266Fax: (+36) 23 444 267
NederlandHAS b.v.Stedenbaan 8NL-5121 DP RijenTel: 0161-22 00 00Fax: 0161-29 00 50
NorwayLøkken Trading ASTrollåsveien 341414 TrollåsenTlf: 40 00 67 34Fax: 66 80 45 60
ÖsterreichDegupaVertriebsgesellschaft m.b.H.Gewerbeparkstr. 75081 Anif / SalzburgTel.: 0 62 46 / 73 58 10Fax:. 0 62 46 / 72 70 2
PolskaServ-Serwis Sp. z o.o.ul. Wspólna 945-831 Opoletel./fax (077) 457-50-06e-mail: [email protected]
PortugalNovalvaZona Industrial Maia ISector X - Lote 293, N. 904470 MaiaTel.: 02/9 44 03 84Fax: 02/9 44 02 68
Russian FederationOrbita Service123362 Moskauul. Svobody 18,Tel.: (495) 585 05 73
Орбита Сервис 1233 62 г. Москва, ул. Свободы, д. 18. Тел.: (495)585-05-73
RomaniaFor Brands srlStr. Capitan Aviator AlexandruSerbanescu Nr. 33-35, Bl. 20ESc. 2 Et.1, Ap. 27, Sector 1BucurestiTel: + 40 21 233 41 12, + 40 21 233 41 13, + 40 21 688 66 13Fax: + 40 21 233 41 03, + 40 21 688 66 13E-mail: o [email protected] site: www.forbrands.ro
SchweizVB Handels Sàrl GmbHPostfach 3061040 EchallensTel: 021 881 60 45Fax 021 881 60 46mail: [email protected]
SerbiaSMIL dooPasiceva 28, Novi SadSerbia and Montenegrotel: + 381-21-524-638tel: +381-21-553-594fax: +381-21-522-096
Slowak RepublicPREMT,s.r.o.Skladová 1917 01 TrnavaTel: 033/544 7177
FinlandOy Harry Marcell AbRälssitie 6, PL 6301511 VantaaTel.: 0035 / 898 708 70Fax: 0035/ 898 708 7803
SvenskaRakspecialisten HSMöllevångsgatan 34214 20 MalmöTel.: 040/12 07 70Fax: 040/6 11 03 35
SloveniaSEVTIS d.o.o.Smartinska 1301000 LjubljanaTel: 00386 1 542 1927Fax: 00386 1 542 1926
Kundendienstzentralen
Service Centres
Centrales service-après-vente
O� cinas centrales del servicio
Centros de serviço
Centrale del servizio clienti
Service-centrales
Centrale serviceafdelinger
Centrala kundtjänstplatser
Keskushuollot
Servisné stredisko
Centrala obstugi klientów
Szerviz
Κέντρο εξυπηρέτησης πελατών
SEVERIN ServiceAm Brühl 2759846 SundernTelefon (02933) 982-460Telefax (02933) [email protected]
INTERNATIONAL
umschlag_090703.indd 2 08.07.2009 08:24:46

3
EN
Overview (Delivery contents)! Before carrying on reading, please fold open the page at the beginning of these instructions for use that contains an image of the appliance.
A Brewing unit
B Bracket closure
Strainer support (removable)
C For co�ee pads
D For �lter co�ee
D.1 Lid for �lter co�ee
D.2 Filter bags, size 100 (trial pack)
E For tea
E.1 Black lid for one type of tea (factory setting: black tea)
E.2 Green lid for another type of tea (factory setting: green tea)
E.3 Tea box for loose tea
E.4 Spout
F Drip tray for height adjustment
G Drainage grille
H Control and display elements and storage settings
H.1 Beverage quantity / brewing process
H.2 Temperature (only available for tea)
H.2 Steep time (only available for tea)
H.4 Error / storage settings
H.5 Start/Stop button
H.6 Interval indication with LED bars
I Housing
K Connection cable with mains plug
L Water reservoir
Fino Multi KA4566
4
Dear Customers,! Important: Please read these instructions for use carefully before taking your appliance into operation and please keep this instructions document in a safe place.
Table of contents1. Safety information
2. Initial start-up
3. Preparation of beverages
3.1 Filter co�ee
Adjusting the beverage quantity
3.2 Co�ee pads
Adjusting the beverage quantity
3.3 Tea (in bag or loose)
Changing the settings for preparation of tea
3.4 Beverage quantity, brewing temperature and steep time – overview
4. Display and control elements
5. Cleaning, care and maintenance
5.1 Cleaning the strainer support
5.2 Descaling
5.3 Resetting to factory settings
5.4 Disposal
6. Fault �nding and problem solving
7. Guarantee
8. Customer service
9. Software license

5
EN
1. Safety information Risk of electric shock
Before every start-up, the entire appliance including all accessories must be inspected for defects that might impair functional safety of the device. In the event that the appliance has, for instance, been dropped onto a hard surface, damage might have occurred that is not visible from the outside. In such a case the appliance must not be used.
– Inspect the connection line (K) for damage on a regular basis. In case of existing damage the appliance must not be used any longer.
! Important: Please disconnect the appliance from the mains supply if it is not in use, in case of faults during operation and before every cleaning process.
– Do not disconnect the appliance from the mains supply by pulling the cable but by grasping the plug.
– Please ensure that both the housing and the connection line are not placed in close proximity of a hot plate or open �re. The same is applicable for liquids and humidity.
– Repairs and maintenance operations at electric appliances must be carried out by quali�ed personnel in order to prevent any risks for health and safety and in order to comply with safety regulations. The same is applicable for replacement of the connection line. For this reason, in case of repair send the appliance to our customer service department. The address list is enclosed in the section "Customer service" on the last pages of this instructions document.
Danger of scalding! Do not touch any hot parts during and after the brewing process. The brewing unit (A), the strainer supports (C to E) and their contents are hot. Please note that the prepared beverages are also very hot.
– Do not open the bracket closure (B) as long as the pump is stil in operation and the brewing process is not completed since the appliance is under pressure. After the brewing process, please wait until the display elements (H.1 to H.4) stop �ashing and an acoustic signal is generated.
– For reasons of hygiene, completely remove the respective strainer support (C to E) with its contents after every brewing process. Leave the bracket closure (B) open.
– This appliance is not intended for use by any person (including children) with reduced physical, sensory or mental capabilities, or lacking experience and knowledge, unless they have been given supervision or instruction concerning the use of the appliance by a person responsible for their safety.

Fino Multi KA4566
6
– Children should be supervised to ensure that they do not play with the appliance.
– Keep packaging out of reach of children. There is danger of su�ocation, among others!
Material damage!– Position the appliance on an even, horizontal surface that is not water-
sensitive.
– Only �ll the water reservoir (L) with cold, clean water (without gas). Never �ll with milk, co�ee or hot water.
– Do not remove the water reservoir (L) during the brewing process in order to prevent malfunctions and defects.
Intended use– In case of incorrect use or misuse of the appliance, responsibility shall
not be assumed for any potential damage.
! This appliance is intended for domestic use only, and not for commercial applications.
7
EN
2. Initial start-upBefore initial use the following advice list must be observed.
– Rinse all strainer supports with warm water.
– Plug in the connection line with mains plug (K) to the mains supply.
– Remove the water reservoir (L) and rinse thoroughly with water and �ll with fresh, cold water up to the mark MAX (approx. 900 ml).
– Place the water reservoir (L) straight onto its support and press it downwards completely so that the valve in the bottom of the reservoir is opened.
– Place a cup with a minimum capacity of 150 ml onto the drainage grille (G).
1. Open brewing unit (A). For this purpose, fully fold the bracket closure (B) upwards.
2. Then take the strainer support for co�ee pads (C) and place it into the brewing unit.
3. Close the brewing unit (A) by �rmly pressing the bracket closure (B) downwards.
4. Press the Start/Stop button (H.5) . The display element (H.1) is �ashing. After a short heat-up phase the cleaning process is started and the cup is �lled with water.
! Important: When the display element (H.1) extinguishes and an acoustic signal is generated the cup must be emptied and step 4 must be repeated. Then, the appliance is ready for operation.
Fino Multi KA4566
8
3. Preparation of beveragesThe appliance is ready for operation as soon as it is connected to the mains supply. All display elements are o�.
Danger of scalding!After preparation of beverages remove the strainer support (C to E) from the brewing unit (A) by merely holding it at the handle since the support itself and its contents are hot.
! Important: Please check if su�cient fresh, cold water (without gas) is in the water reservoir (L). Please change water on a daily basis. Insert the drainage grille (G) with or without drip tray (F), depending on the size of the cup. Do not remove the water reservoir (L) during the brewing process.
! Important: The brewing process can be terminated any time by pressing the Start/Stop button (H.5)
.
! Note: Please remember to empty and clean the strainer support (C to E) after use. Dispose biodegradable components with your organic waste.

9
EN
3.1 Filter co�ee! Advice: We recommend using 1.5 to 2 tea spoons (approx. 6g) of medium to �ne ground co�ee per one normal-size cup (approx. 130 ml).
Please note: If you wish to use a larger amount of ground co�ee, please leave free at least 1cm up to the edge of the �lter paper. During the brewing process the ground co�ee may swell up and spill over.
1. Place the �lter bag (D.2) of size 100 into the strainer support (D) and �ll in the desired amount of ground �lter co�ee. Close the strainer support with the corresponding lid (D.1).
2. Now, open brewing unit (A). For this purpose, fully fold open the bracket closure (B) and insert the strainer support. When inserting the components, make sure the strainer support and lid do not get entangled.
3. Close the brewing unit (A) by �rmly pressing the bracket closure (B) downwards.
4. Place a suitable co�ee cup onto the drainage grille (G).
5. Press the Start/Stop button (H.5) . The brewing process is started (cup symbol �ashing (H.1) ). After a short heat-up phase the cup is �lled with co�ee. Progress is displayed by means of the interval indication .
6. Please wait until your appliance has completed the follow-up time, i.e. the display element (H.1) stops �ashing. A short acoustic signal is generated. However, co�ee may continue pouring after the acoustic signal has stopped. This depends on the amount and grinding degree of the co�ee powder.
7. Then, remove your cup from the appliance, fold the bracket closure upwards and remove the strainer support for cleaning.
8. Ready! Enjoy your co�ee!
D
D.1
D.2

Fino Multi KA4566
10
Adjusting the beverage quantity
The beverage quantity for � lter co� ee can be adjusted and saved in 5 interval steps (also see table in section „3.4 Beverage quantity, brewing temperature and steep time – overview“).
1. Insert the strainer support for � lter co� ee into the appliance as described above.
2. Press and hold the Start/Stop button (H.5) until the display elements (H.1) and (H.4) light up.
3. Through repeated short pressing of the Start/Stop button (H.5) you can increase the beverage quantity by one interval step, respectively. If the maximum beverage quantity has been reached and you press the button again, setting starts again with the � rst interval step.
4. When you have reached the desired setting, press and hold the Start/Stop button (H.5) until the display elements (H.1) and (H.4) extinguish. Now the setting is saved.
! Note: If no button is pressed within 30 seconds, the settings are not changed and the programme returns to stand-by mode.
3.2 Co� ee pads
1. Place a co� ee pad into the centre of strainer support (C).
! Note: Only use commercially available round soft co� ee pads. If the co� ee pad is slightly bulged on one side, place the pad into the strainer support with the bulged side facing downwards. Never � ll co� ee powder into the strainer support for co� ee pads.
2. Now open brewing unit (A). For this purpose, fully fold open the bracket closure (B) and insert the strainer support. When inserting the components into the brewing unit (A), make sure the paper edge of the co� ee pad is not placed below the gasket.
3. Close the brewing unit (A) by � rmly pressing the bracket closure (B) downwards.
4. Place a suitable co� ee cup onto the drainage grille (G).
5. Press the Start/Stop button (H.5) . The brewing process is started (cup symbol � ashing (H.1) ). After a short heat-up phase the cup is � lled with co� ee. Progress is displayed by means of the interval indication .
6. Please wait until your appliance has completed the follow-up time, i.e. the display element (H.1) stops � ashing. A short acoustic signal is generated.
C

11
EN
7. Then, remove your cup from the appliance, fold the bracket closure upwards and remove the strainer support for cleaning.
8. Ready! Enjoy your co�ee!
Adjusting the beverage quantity
The beverage quantity for co�ee pads can be adjusted and saved in 5 interval steps (also see table in section „3.4 Beverage quantity, brewing temperature and steep time – overview“).
1. Insert the strainer support for co�ee pads into the appliance as described above.
2. Press and hold the Start/Stop button (H.5) until the display elements (H.1) and (H.4) light up.
3. Through repeated short pressing of the Start/Stop button (H.5) you can increase the beverage quantity by one interval step, respectively. If the maximum beverage quantity has been reached and you press the button again, setting starts again with the �rst interval step.
4. When you have reached the desired setting, press and hold the Start/Stop button (H.5) until the display elements (H.1) and (H.4) extinguish. Now the setting is saved.
! Note: If no button is pressed within 30 seconds, the settings are not changed and the programme returns to stand-by mode.

Fino Multi KA4566
12
3.3 Tea! Preliminary remarks: The factory settings for this appliance are such that the black lid (E.1) is programmed for preparation of black tea (�rst tea type) and the green lid (E.2) is to be used for preparation of green tea (second tea type). However, you can change these settings any time and save your settings separately for every lid, see section "3.3 Changing the settings for preparation of tea".
1a. Tea bags:
As a �rst step remove the tea box (E.3) from strainer support (E). Then, place the tea bag into strainer support (E). Leave the string and paper label hang out over the edge of the strainer support.
1b. Loose tea:
Fill loose tea into the tea box (E.3) and place it into the strainer support (E). For very �ne tea you may want to use an additional tea �lter.
! Important: Please make sure that the spout (E.4) is always attached.
2. Close the strainer support with the desired lid (E.1) or (E.2). Lock the lid by rotating it in clockwise direction until it engages with a sound.
3. Now, open brewing unit (A). For this purpose, fully fold open the bracket closure (B) and insert the strainer support. When inserting the components, make sure the strainer does not get entangled.
4. Close the brewing unit (A) by �rmly pressing the bracket closure (B) downwards.
5. Place a suitable tea cup onto the drainage grille (G).
6. Press the Start/Stop button (H.5) . The brewing process is started (cup symbol �ashing (H.1) ). After a short heat-up phase the strainer support is �lled with water. Progress is displayed by means of the interval indication .
7. At the end of the steep time the cup is �lled with tea.
8. Please wait until your appliance has completed the follow-up time, i.e. the display element (H.1) stops �ashing. A short acoustic signal is generated.
9. Then, remove your cup from the appliance, fold the bracket closure upwards and remove the strainer support for cleaning.
10. Ready! Enjoy your tea!
E
E
E.3

13
EN
Changing the settings for preparation of tea
The beverage quantity , temperature and steep time for tea can be adjusted and saved in interval steps (also see table in section „3.4 Beverage quantity, brewing temperature and steep time – overview“). Steps 1 to 8 must always be completed. The settings are adjusted and saved separately for the black lid (E.1) (�rst tea type) and for the green lid (E.2) (second tea type), respectively.
! Note: The beverage quantity can only be set in intervals 3 to 5 .
Beverage quantity
1. Place the strainer support for tea with the desired lid into the appliance as described above.
2. Press and hold the Start/Stop button (H.5) until the display elements (H.1) and (H.4) light up.
3. Through repeated short pressing of the Start/Stop button (H.5) you can increase the beverage quantity by one interval step, respectively. If the maximum beverage quantity has been reached and you press the button again, setting starts again with the �rst interval step.
4. When you have reached the desired setting, press and hold the Start/Stop button (H.5) until the display elements (H.2) and (H.4) light up.
Brewing temperature
5. Through repeated short pressing of the Start/Stop button (H.5) you can increase the brewing temperature by one interval step, respectively. If the maximum temperature has been reached and you press the button again, setting starts again with the �rst interval step.
6. When you have reached the desired setting, press and hold the Start/Stop button (H.5) until the display elements (H.3) and (H.4) light up.

Fino Multi KA4566
14
Steep time
7. Through repeated short pressing of the Start/Stop button (H.5) you can increase the steep time by one interval step, respectively. If the maximum steep time has been reached and you press the button again, setting starts again with the �rst interval step.
8. When you have reached the desired setting, press and hold the Start/Stop button (H.5) until the display elements (H.3) and (H.4) extinguish. Now the setting is saved.
! Note: If no button is pressed within 30 seconds, the settings are not changed and the programme returns to stand-by mode.
3.4 Beverage quantity, brewing temperature and steep time – overview
Co�ee
Interval steps 1 bar 2 bars 3 bars 4 bars 5 bars
Beverage quantity
approx. 90ml approx. 125ml (factory setting for co�ee pad, �lter co�ee)
approx. 170ml approx. 200ml approx. 225ml
Tea
Interval steps 1 bars 2 bars 3 bars 4 bars 5 bars
Beverage quantity
– – approx. 170ml (factory setting for co�ee pad, �lter co�ee)
approx. 200ml approx. 225ml
Brewing temperature
approx. 70°C approx. 80°C (factory setting for green lid)
approx. 85°C approx. 90°C approx. 95°C (factory setting for black lid)
Steep time approx. 2 minutes
approx. 3 minutes (factory setting for green lid)
approx. 5 minutes (factory setting for black lid)
approx. 8 minutes
approx. 10 minutes
! Note: The above stated data are guide values that may deviate in accordance with the type of tea, grinding degree (�neness) of the co�e/tea used, amount of co�ee/tea and ambient conditions.

15
EN
4. Display and control elements
4.1 Display elements
Beverage quantity / brewing process (H.1)
– �ashes during brewing process
– �ashes fast when the appliance must be descaled
– �ashes during descaling process
– lights up permanently in the "storage settings" mode for the adjustment of beverage quantity, see section "3. Preparation of beverages"
Temperature (H.2) , only available for tea
– lights up permanently in the "storage settings" mode for the adjustment of brewing temperature, see section "3. Preparation of beverages"
Steep time (H.3) , only available for tea
– lights up permanently in the "storage settings" mode for the adjustment of steep time, see section "3. Preparation of beverages"
Error / storage settings (H.4)
– �ashes in case of error/fault, see section "6. Fault �nding and problem solving"
– lights up permanently during descaling process
Interval indication with LED bars (H.6)
– �rst bar lights up as soon as the appliance is ready for operation
– during the brewing process the other bars gradually light up until the end of the brewing phase is reached. At the end of the brewing phase all 5 bars light up, regardless of the beverage quantity set.
– In the "storage settings" mode, see section "3. Preparation of beverages", beverage quantity, temperature and steep time can be adjusted by means of the bars.
Fino Multi KA4566
16
4.2 Control element
Start/Stop button (H.5)
– brewing process is started by pressing this button
– prewing process is terminated by pressing the button again
– in case of an error/fault, problem solving function is activated by pressing the button
– by pressing and holding the button for at least 3 seconds with the strainer support inserted, the "storage settings" mode is activated, see section "3. Preparation of beverages"
– by pressing and holding the button for at least 3 seconds with the strainer support not inserted, the "descaling" mode is activated, see section "5. Cleaning, care and maintenance"
! Note: By means of the Start/Stop button you can restore the factory settings, see section "5. Cleaning, care and maintenance".

17
EN
5. Cleaning, care and maintenance! Important: Before cleaning the appliance disconnect from mains supply and leave it to cool.
Please note: Do not clean the individual components in the dishwasher!
For reasons of electrical safety, the appliance must not be cleaned with nor immersed in liquids.
Do not use aggressive or abrasive cleaning agents.
The housing must only be wiped with a damp cloth and, if required, with washing-up liquid.
5.1 Cleaning the strainer support
Clean disassembled strainer supports (C to E), water reservoir (L), drainage grille (G) and drip tray (F) in dishwater. Then rinse with fresh water and dry.
D
D.1
C
E
E.1/2
E.3
E.4

Fino Multi KA4566
18
5.2 Descaling
If the display element (H.1) �ashes quickly during the brewing process, the appliance requires descaling.
Commercially available products for descaling of co�ee makers are suitable for this purpose. Prepare a batch of 900ml of the descaling liqud in accordance with the instructions of the manufacturer of the descaling agent.
! Important: Do not use vinegar or descaling agents on the basis of acetic acid as there is a risk of damaging the appliance, e.g. at the gaskets!
Please note: The safety information of the manufacturer of the descaling agent must be observed. Do not pour the descaling liquid into enamelled sinks.
1. Fill the descaling liquid into the water reservoir (L) up to the mark MAX (approx. 900ml).
2. Open brewing unit (A). For this purpose, fully fold the bracket closure (B) upwards.
3. Remove the strainer support from the brewing unit.
4. Use a tall container with a capacity of minimum 900ml (e.g. a measuring jug for 1l) and place it onto the drainage grille (G) without drip tray (F).
5. Press and hold the Start/Stop (H.5) for at least 3 seconds, until the
display elements (H.1) and (H.4) light up. The descaling process is started and the display element (H.1) starts �ashing. The container is �lled in intervals until the water reservoir is empty. The appliance will stop between the individual intervals (for approx. 30 seconds).
6. When the water reservoir is empty the display element (H.4) starts �ashing. The rinsing process can be started. For this purpose, remove the water reservoir (L), rinse it thoroughly in running water and �ll it up with fresh, cold water up to the mark MAX (approx. 900ml). Empty the used descaling liquid from the tall container and place the container back onto the drainage grille. Then, press the Start/Stop button (H.5)
. The display element (H.4) is lit up again and the appliance is rinsed with cold water until the water reservoir is empty.
7. Now the appliance is descaled and ready for operation.

19
EN
5.3 Resetting to factory settings
Fold the bracket closure (B) of brewing unit (A) downwards without the strainer support assembled. Press and hold the Start/Stop button (H.5)
until all display elements light up. All settings for beverage quantity, temperature and steep time are now reset to factory settings. You can release the Start/Stop button.
5.4 Disposal
Please dispose of unserviceable appliances at the provided public disposal sites.
Fino Multi KA4566
20
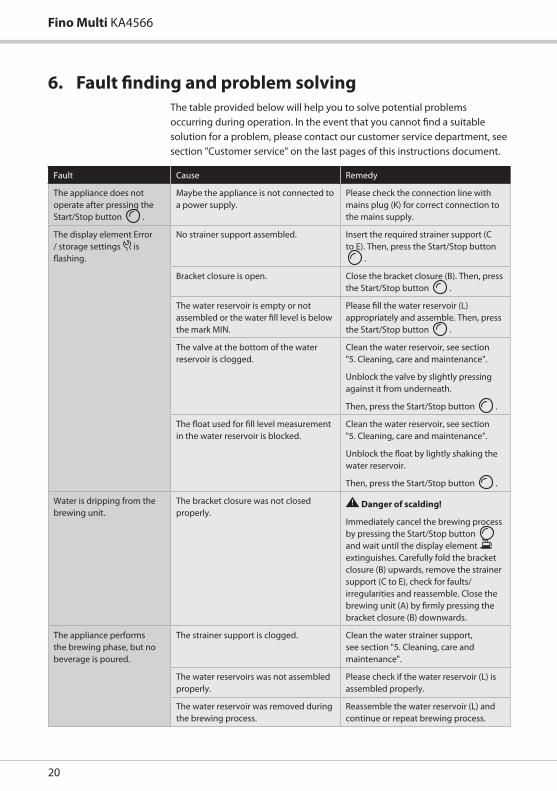
6. Fault �nding and problem solvingThe table provided below will help you to solve potential problems occurring during operation. In the event that you cannot �nd a suitable solution for a problem, please contact our customer service department, see section "Customer service" on the last pages of this instructions document.
Fault Cause Remedy
The appliance does not operate after pressing the Start/Stop button .
Maybe the appliance is not connected to a power supply.
Please check the connection line with mains plug (K) for correct connection to the mains supply.
The display element Error / storage settings is �ashing.
No strainer support assembled. Insert the required strainer support (C to E). Then, press the Start/Stop button
.
Bracket closure is open. Close the bracket closure (B). Then, press the Start/Stop button .
The water reservoir is empty or not assembled or the water �ll level is below the mark MIN.
Please �ll the water reservoir (L) appropriately and assemble. Then, press the Start/Stop button .
The valve at the bottom of the water reservoir is clogged.
Clean the water reservoir, see section "5. Cleaning, care and maintenance".
Unblock the valve by slightly pressing against it from underneath.
Then, press the Start/Stop button .
The �oat used for �ll level measurement in the water reservoir is blocked.
Clean the water reservoir, see section "5. Cleaning, care and maintenance".
Unblock the �oat by lightly shaking the water reservoir.
Then, press the Start/Stop button .
Water is dripping from the brewing unit.
The bracket closure was not closed properly.
Danger of scalding!
Immediately cancel the brewing process by pressing the Start/Stop button and wait until the display element extinguishes. Carefully fold the bracket closure (B) upwards, remove the strainer support (C to E), check for faults/irregularities and reassemble. Close the brewing unit (A) by �rmly pressing the bracket closure (B) downwards.
The appliance performs the brewing phase, but no beverage is poured.
The strainer support is clogged. Clean the water strainer support, see section "5. Cleaning, care and maintenance".
The water reservoirs was not assembled properly.
Please check if the water reservoir (L) is assembled properly.
The water reservoir was removed during the brewing process.
Reassemble the water reservoir (L) and continue or repeat brewing process.

21
EN
Fault Cause Remedy
The brewing unit cannot be closed.
The strainer support was not closed correctly or not appropriately assembled into the brewing unit and got entangled.
Fold the bracket closure (B) upwards, remove the strainer support (C to E), check for faults/irregularities and reassemble.
The display element beverage quantity / brewing process �ashes quickly during the brewing phase.
Appliance requires descaling. Descale the appliance according to section "5. Cleaning, care and maintenance".
The beverage quantity is too high or too low.
The beverage quantity was not set appropriately.
Set the desired beverage quantity according to section "3. Preparation of beverages".
The water reservoir does not contain su�cient water for preparation of a large beverage quantity.
Please �ll the water reservoir (L) appropriately and assemble.
The respective strainer support is clogged.
Clean the respective strainer support according to section "5. Cleaning, care and maintenance".
Tea is too cold or too hot. The temperature was not set appropriately.
Set the desired temperature according to section "3. Preparation of beverages".
You feel the steep time for tea is too short or too long.
The steep time was not set appropriately.
Set the desired steep time according to section "3. Preparation of beverages".
After the heat-up phase (cup is �ashing) the appliance switches o� without performing the brewing process.
The respective strainer support is clogged.
Clean the respective strainer support according to section "5. Cleaning, care and maintenance".
Technical fault Contact your competent customer support desk.
The heat-up phase takes very long.
The appliance has become very hot and must cool.
Pleas wait until the brewing process is started. If applicable, leave the appliance to cool for a few minutes.

Fino Multi KA4566
22
7. GuaranteeSeverin grants a manufacturer's warantee of 2 years starting with the date of purchase.
Within this period Severin undertakes to remedy and repair any defects in materials and workmanship that considerably impair the functionality of this appliance. Additional claims are excluded.
This guarantee is not applicable for:
Damage that has occurred as a consequence of non-observance of the instructions for use, of inappropriate use or of regular wear and tear; nither does the guarantee cover breakables, such as glass and plastic items and light bulbs.
In case of interference by the customer or unauthorised third parties the guarantee becomes null and void. If the product fails to operate and needs to be returned, pack it carefully including all components enclosing the reason for return and proof of purchase, then send it directly to Severin-Service, see section "Customer service" on the last pages of this instructions document.
The legal warantee rights to the seller or possible guarantees o�ered by the seller shall not be a�ected.
8. Customer serviceYou can select your competent customer service department on the last pages of this instructions document.
9. Software licenseWe at Severin support the development of free software.
We employ free software in development and as integral part of our products. Detailed information, including licence conditions and copyright, is available on our internet sites under http://www.severin.de.

A
B
I GK
H
L
C
D
E
E.1
D.1
E.2H.1
H.2
H.3
H.4
H.5
H.6
D.2
F
E.3
E.4
BelgiqueDancal N.V.Bavikhoofsestraat 728520 KuurneTel.: 056/71 54 51Fax: 056/70 04 49
Bosnia i HerzegovinaMalisic MP d.o.oTromeda Medugorje bb88260 CitlukTel: + 387 36 650 446Fax: + 387 36 651 062
BulgariaNoviz AGKahn Kubrat 1 Str. BG-4000 PlovdivTel: +359 32 275 617, 275 614e-mail: [email protected]
Czech Republic ARGO spol. s r.o. Žihobce 137CZ 342 01 SušiceTel.: + 376 597 197Fax: + 376 597 197http://[email protected]
CroatiaTD Medimurka d.d.Trg. Republike 6HR-40000 CakovecCroatiaTel: +385-40 328 650Fax: + 385 40 328 134e-mail: [email protected]
CyprusG.L.G. Trading4-6, Oidipodos StreetLarnaca, CyprusTel.: 024/633133Fax: 024/635992
DanmarkScandia Serviceteknik A/SHedeager 52605 BrondbyTel.: 45-43202700Fax: 45-43202709
Estonia:Tallinn: CENTRALSERVICE, Tammsaare tee 134B, tel: 654 3000Tartu: CENTRALSERVICE, Aleksandri 6, tel: 7 344 299, 7 344 337, 56 697 843Pärnu: CENTRALSERVICE, Riia mnt. 64, tel: 44 25 175Narva: CENTRALSERVICE, Tallinna 6A, tel: 35 60 708Haapsalu: Teco KM OÜ, Jalaka 1A, tel: 47 56 900Rakvere: Nirgi Tõnu FIE, tel: 32 40 515Viljandi: Aaber OÜ, Vabaduse pl. 4, tel: 43 33 802Kuressaare: Toomas Teder FIE, Pikk 1B, tel: 45 55 978Käina: Ilmar Pauk Elektroonika FIE, Mäe2S, tel: 46 36 379, 51 87 444
EspanaSeverin Electrodom. España S.L.Plaza de la Almazara Portal 4, 1º E.45200 ILLESCAS(Toledo)Tel: 925 51 34 05Fax: 925 54 19 40eMail: [email protected]://www.severin.es
FranceSEVERIN France Sarl4, rue de ThalB.P. 3867211 OBERNAI CEDEXTel.: 03 88 47 62 08Fax: 03 88 47 62 09
GreeceBERSONC. Sara� dis Bros. S.A.Agamemnonos 47176 75 Kallithea, AthensTel.: 0030-210 9478700
Philippos Business CenterAgias Anastasias & Laertou, PileaService Post of Thermi570 01 Thessaloniki, GreeceTel.: 0030-2310954020
Iran IRAN-SEVERIN KISH CO. LTD.No. 668, 7th. FloorBahar TowerAve. South BaharTEHRAN - IRANTel. : 009821 - 77616767Fax : 009821 – [email protected]
IsraelEatay Agencies109 Herzel St.HaifaPhone: 050-5358648Email: [email protected]
ItaliaVideoellettronica di Sgambati &Gabrini C.S.N.C.via Dino Col 52r-54r-56r,I - 16149 GenovaGreen Number: 800240279Tel.: 010/6 45 11 02 - 01041 86 09Fax: 010/6 42 50 09e-mail: [email protected]
JordanF.A. KettanehP.O. Box 485Amman, 11118, JordanTel: 00962-6-439 8642e-mail: [email protected]
KoreaJung Shin Electronics co., ltd.501, Megaventuretower 77-9, Moonrae-Dong 3ga, Yongdeungpo-GuSeoul, KoreaTel: +82-22-637 3245~7Fax: +82-22-637 3244Service Hotline: 080-001-0190
LatviaSERVO Ltd. Mr. Janis PivovarenoksTel: + 371 [email protected]
LebanonKhoury Home7th Floor, Cité Dora 3 Building, DoraP.O.Box 70611Antelias, LebanonTelephone 01 244200, Fax 01 253535eMail: [email protected] Internet: www.khouryhome.com
LuxembourgSer-TecRue du Chateau d´Eua3364 LeudelangeTel.: 00352 -37 94 94 402Fax 00352 -37 94 94 400
MacedoniaKONCAR servisBul. Partizanski odredi br. 1051000 SkopjeMakedonijaTel: + 389 (2) 365-578Fax: + 389 (2) 365 621e-mail: [email protected]
MagyarországTFK Elektronik Kft.Gyar u.2H-2040 BudaörsTel.: (+36) 23 444 266Fax: (+36) 23 444 267
NederlandHAS b.v.Stedenbaan 8NL-5121 DP RijenTel: 0161-22 00 00Fax: 0161-29 00 50
NorwayLøkken Trading ASTrollåsveien 341414 TrollåsenTlf: 40 00 67 34Fax: 66 80 45 60
ÖsterreichDegupaVertriebsgesellschaft m.b.H.Gewerbeparkstr. 75081 Anif / SalzburgTel.: 0 62 46 / 73 58 10Fax:. 0 62 46 / 72 70 2
PolskaServ-Serwis Sp. z o.o.ul. Wspólna 945-831 Opoletel./fax (077) 457-50-06e-mail: [email protected]
PortugalNovalvaZona Industrial Maia ISector X - Lote 293, N. 904470 MaiaTel.: 02/9 44 03 84Fax: 02/9 44 02 68
Russian FederationOrbita Service123362 Moskauul. Svobody 18,Tel.: (495) 585 05 73
Орбита Сервис 1233 62 г. Москва, ул. Свободы, д. 18. Тел.: (495)585-05-73
RomaniaFor Brands srlStr. Capitan Aviator AlexandruSerbanescu Nr. 33-35, Bl. 20ESc. 2 Et.1, Ap. 27, Sector 1BucurestiTel: + 40 21 233 41 12, + 40 21 233 41 13, + 40 21 688 66 13Fax: + 40 21 233 41 03, + 40 21 688 66 13E-mail: o [email protected] site: www.forbrands.ro
SchweizVB Handels Sàrl GmbHPostfach 3061040 EchallensTel: 021 881 60 45Fax 021 881 60 46mail: [email protected]
SerbiaSMIL dooPasiceva 28, Novi SadSerbia and Montenegrotel: + 381-21-524-638tel: +381-21-553-594fax: +381-21-522-096
Slowak RepublicPREMT,s.r.o.Skladová 1917 01 TrnavaTel: 033/544 7177
FinlandOy Harry Marcell AbRälssitie 6, PL 6301511 VantaaTel.: 0035 / 898 708 70Fax: 0035/ 898 708 7803
SvenskaRakspecialisten HSMöllevångsgatan 34214 20 MalmöTel.: 040/12 07 70Fax: 040/6 11 03 35
SloveniaSEVTIS d.o.o.Smartinska 1301000 LjubljanaTel: 00386 1 542 1927Fax: 00386 1 542 1926
Kundendienstzentralen
Service Centres
Centrales service-après-vente
O� cinas centrales del servicio
Centros de serviço
Centrale del servizio clienti
Service-centrales
Centrale serviceafdelinger
Centrala kundtjänstplatser
Keskushuollot
Servisné stredisko
Centrala obstugi klientów
Szerviz
Κέντρο εξυπηρέτησης πελατών
SEVERIN ServiceAm Brühl 2759846 SundernTelefon (02933) 982-460Telefax (02933) [email protected]
INTERNATIONAL
umschlag_090703.indd 2 08.07.2009 08:24:46

Fino Multi KA4566Fino Multi KA4566
Fino Multi KA4566Fino Multi KA4566
DE
EN
FR
NL
ES
IT
DK
SE
FI
PL
GR
RU
Ka ee-CenterGebrauchsanweisung
Multi-function co ee makerInstructions for use
Centre caféMode d‘emploi
Ko ecenterGebruiksaanwijzing
Centro de caféInstrucciones de uso
Macchina da ca èManuale d‘uso
Ka ecenterBrugervejledning
Ka ecenterBruksanvisning
KahvikeskusKäyttöohje
Centrum kawoweInstrukcja obsługi
ΚαφετιέραΟδηγίες χρήσης
Кофейная машинаРуководство по эксплуатации
Liebe Kundin, lieber Kunde,
Sie haben sich für ein SEVERIN-Qualitäts produkt entschieden, vielen Dank für Ihr Vertrauen!
Seit 1952 werden Elektrogeräte der Marke SEVERIN produziert. Durch diese jahrzehntelange Erfahrung und modernste Produktionsstätten wird der hohe Qualitätsstandard der Produkte garantiert.
Mit über 160 verschiedenen Produkten bietet SEVERIN wie kaum ein anderer Hersteller dieser Branche ein nahezu komplettes Sortiment im Bereich Elektrokleingeräte an.
So umfasst das SEVERIN-Sortiment neben den traditionellen Küchengerä-ten wie Ka eeautomat, Toastern, Kochplatten oder Wa elautomaten auch vielseitige Grillgeräte, Produkte für die Haarp� ege sowie verschiedene Heizgeräte und Ventilatoren.
Jedes Gerät, das die Marke SEVERIN trägt, wurde mit Sorgfalt hergestellt und geprüft.
! Wichtig: Bitte lesen Sie diese Gebrauchsanweisung sorgfältig durch, bevor Sie Ihr Gerät in Betrieb nehmen und bewahren diese Anweisung auf.
Wir wünschen Ihnen an Ihrem SEVERIN-Gerät viel Freude!
Geschäftsleitung und Mitarbeiterder SEVERIN-Unternehmen
Aktion zum Schutz der Umwelt:Nehmen auch Sie aktiv am Umweltschutz teil.Umwelt-Tipp: Entsorgen Sie organische Abfälle mit dem Bio-Müll.
www.severin.de
Fino Multi KA4566
Gebrauchsanweisung
Multi-function co ee makerInstructions for use
Gebruiksaanwijzing
Instrucciones de uso
Macchina da ca è
Brugervejledning
Centrum kawoweInstrukcja obsługi
Οδηγίες χρήσης
Кофейная машинаРуководство по эксплуатации
I/M No.: 8255.0000
umschlag_090703.indd 1 08.07.2009 08:24:45

Fino Multi KA4566
Fino Multi KA4566
FRCentre caféMode d‘emploi

A
B
I GK
H
L
C
D
E
E.1
D.1
E.2H.1
H.2
H.3
H.4
H.5
H.6
D.2
F
E.3
E.4
BelgiqueDancal N.V.Bavikhoofsestraat 728520 KuurneTel.: 056/71 54 51Fax: 056/70 04 49
Bosnia i HerzegovinaMalisic MP d.o.oTromeda Medugorje bb88260 CitlukTel: + 387 36 650 446Fax: + 387 36 651 062
BulgariaNoviz AGKahn Kubrat 1 Str. BG-4000 PlovdivTel: +359 32 275 617, 275 614e-mail: [email protected]
Czech Republic ARGO spol. s r.o. Žihobce 137CZ 342 01 SušiceTel.: + 376 597 197Fax: + 376 597 197http://[email protected]
CroatiaTD Medimurka d.d.Trg. Republike 6HR-40000 CakovecCroatiaTel: +385-40 328 650Fax: + 385 40 328 134e-mail: [email protected]
CyprusG.L.G. Trading4-6, Oidipodos StreetLarnaca, CyprusTel.: 024/633133Fax: 024/635992
DanmarkScandia Serviceteknik A/SHedeager 52605 BrondbyTel.: 45-43202700Fax: 45-43202709
Estonia:Tallinn: CENTRALSERVICE, Tammsaare tee 134B, tel: 654 3000Tartu: CENTRALSERVICE, Aleksandri 6, tel: 7 344 299, 7 344 337, 56 697 843Pärnu: CENTRALSERVICE, Riia mnt. 64, tel: 44 25 175Narva: CENTRALSERVICE, Tallinna 6A, tel: 35 60 708Haapsalu: Teco KM OÜ, Jalaka 1A, tel: 47 56 900Rakvere: Nirgi Tõnu FIE, tel: 32 40 515Viljandi: Aaber OÜ, Vabaduse pl. 4, tel: 43 33 802Kuressaare: Toomas Teder FIE, Pikk 1B, tel: 45 55 978Käina: Ilmar Pauk Elektroonika FIE, Mäe2S, tel: 46 36 379, 51 87 444
EspanaSeverin Electrodom. España S.L.Plaza de la Almazara Portal 4, 1º E.45200 ILLESCAS(Toledo)Tel: 925 51 34 05Fax: 925 54 19 40eMail: [email protected]://www.severin.es
FranceSEVERIN France Sarl4, rue de ThalB.P. 3867211 OBERNAI CEDEXTel.: 03 88 47 62 08Fax: 03 88 47 62 09
GreeceBERSONC. Sara� dis Bros. S.A.Agamemnonos 47176 75 Kallithea, AthensTel.: 0030-210 9478700
Philippos Business CenterAgias Anastasias & Laertou, PileaService Post of Thermi570 01 Thessaloniki, GreeceTel.: 0030-2310954020
Iran IRAN-SEVERIN KISH CO. LTD.No. 668, 7th. FloorBahar TowerAve. South BaharTEHRAN - IRANTel. : 009821 - 77616767Fax : 009821 – [email protected]
IsraelEatay Agencies109 Herzel St.HaifaPhone: 050-5358648Email: [email protected]
ItaliaVideoellettronica di Sgambati &Gabrini C.S.N.C.via Dino Col 52r-54r-56r,I - 16149 GenovaGreen Number: 800240279Tel.: 010/6 45 11 02 - 01041 86 09Fax: 010/6 42 50 09e-mail: [email protected]
JordanF.A. KettanehP.O. Box 485Amman, 11118, JordanTel: 00962-6-439 8642e-mail: [email protected]
KoreaJung Shin Electronics co., ltd.501, Megaventuretower 77-9, Moonrae-Dong 3ga, Yongdeungpo-GuSeoul, KoreaTel: +82-22-637 3245~7Fax: +82-22-637 3244Service Hotline: 080-001-0190
LatviaSERVO Ltd. Mr. Janis PivovarenoksTel: + 371 [email protected]
LebanonKhoury Home7th Floor, Cité Dora 3 Building, DoraP.O.Box 70611Antelias, LebanonTelephone 01 244200, Fax 01 253535eMail: [email protected] Internet: www.khouryhome.com
LuxembourgSer-TecRue du Chateau d´Eua3364 LeudelangeTel.: 00352 -37 94 94 402Fax 00352 -37 94 94 400
MacedoniaKONCAR servisBul. Partizanski odredi br. 1051000 SkopjeMakedonijaTel: + 389 (2) 365-578Fax: + 389 (2) 365 621e-mail: [email protected]
MagyarországTFK Elektronik Kft.Gyar u.2H-2040 BudaörsTel.: (+36) 23 444 266Fax: (+36) 23 444 267
NederlandHAS b.v.Stedenbaan 8NL-5121 DP RijenTel: 0161-22 00 00Fax: 0161-29 00 50
NorwayLøkken Trading ASTrollåsveien 341414 TrollåsenTlf: 40 00 67 34Fax: 66 80 45 60
ÖsterreichDegupaVertriebsgesellschaft m.b.H.Gewerbeparkstr. 75081 Anif / SalzburgTel.: 0 62 46 / 73 58 10Fax:. 0 62 46 / 72 70 2
PolskaServ-Serwis Sp. z o.o.ul. Wspólna 945-831 Opoletel./fax (077) 457-50-06e-mail: [email protected]
PortugalNovalvaZona Industrial Maia ISector X - Lote 293, N. 904470 MaiaTel.: 02/9 44 03 84Fax: 02/9 44 02 68
Russian FederationOrbita Service123362 Moskauul. Svobody 18,Tel.: (495) 585 05 73
Орбита Сервис 1233 62 г. Москва, ул. Свободы, д. 18. Тел.: (495)585-05-73
RomaniaFor Brands srlStr. Capitan Aviator AlexandruSerbanescu Nr. 33-35, Bl. 20ESc. 2 Et.1, Ap. 27, Sector 1BucurestiTel: + 40 21 233 41 12, + 40 21 233 41 13, + 40 21 688 66 13Fax: + 40 21 233 41 03, + 40 21 688 66 13E-mail: o [email protected] site: www.forbrands.ro
SchweizVB Handels Sàrl GmbHPostfach 3061040 EchallensTel: 021 881 60 45Fax 021 881 60 46mail: [email protected]
SerbiaSMIL dooPasiceva 28, Novi SadSerbia and Montenegrotel: + 381-21-524-638tel: +381-21-553-594fax: +381-21-522-096
Slowak RepublicPREMT,s.r.o.Skladová 1917 01 TrnavaTel: 033/544 7177
FinlandOy Harry Marcell AbRälssitie 6, PL 6301511 VantaaTel.: 0035 / 898 708 70Fax: 0035/ 898 708 7803
SvenskaRakspecialisten HSMöllevångsgatan 34214 20 MalmöTel.: 040/12 07 70Fax: 040/6 11 03 35
SloveniaSEVTIS d.o.o.Smartinska 1301000 LjubljanaTel: 00386 1 542 1927Fax: 00386 1 542 1926
Kundendienstzentralen
Service Centres
Centrales service-après-vente
O� cinas centrales del servicio
Centros de serviço
Centrale del servizio clienti
Service-centrales
Centrale serviceafdelinger
Centrala kundtjänstplatser
Keskushuollot
Servisné stredisko
Centrala obstugi klientów
Szerviz
Κέντρο εξυπηρέτησης πελατών
SEVERIN ServiceAm Brühl 2759846 SundernTelefon (02933) 982-460Telefax (02933) [email protected]
INTERNATIONAL
umschlag_090703.indd 2 08.07.2009 08:24:46
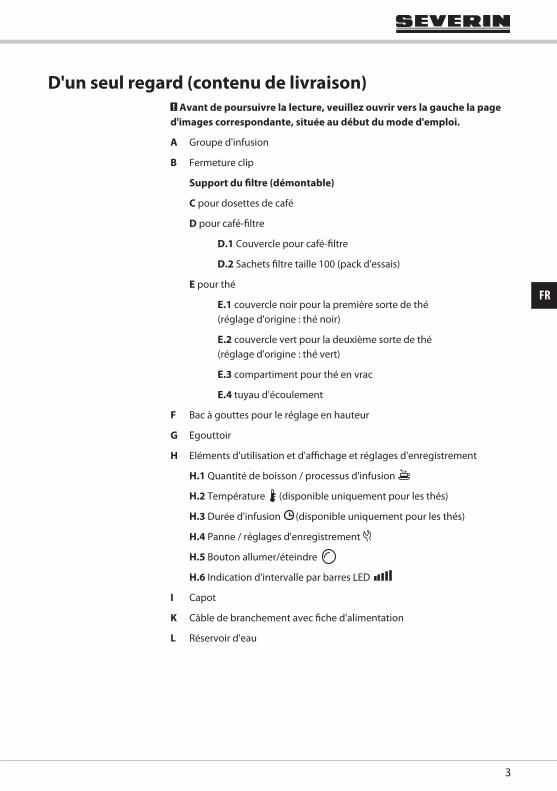
3
FR
D'un seul regard (contenu de livraison)! Avant de poursuivre la lecture, veuillez ouvrir vers la gauche la page d'images correspondante, située au début du mode d'emploi.
A Groupe d'infusion
B Fermeture clip
Support du �ltre (démontable)
C pour dosettes de café
D pour café-�ltre
D.1 Couvercle pour café-�ltre
D.2 Sachets �ltre taille 100 (pack d'essais)
E pour thé
E.1 couvercle noir pour la première sorte de thé (réglage d'origine : thé noir)
E.2 couvercle vert pour la deuxième sorte de thé (réglage d'origine : thé vert)
E.3 compartiment pour thé en vrac
E.4 tuyau d'écoulement
F Bac à gouttes pour le réglage en hauteur
G Egouttoir
H Eléments d'utilisation et d'a�chage et réglages d'enregistrement
H.1 Quantité de boisson / processus d'infusion
H.2 Température (disponible uniquement pour les thés)
H.3 Durée d'infusion (disponible uniquement pour les thés)
H.4 Panne / réglages d'enregistrement
H.5 Bouton allumer/éteindre
H.6 Indication d'intervalle par barres LED
I Capot
K Câble de branchement avec �che d'alimentation
L Réservoir d'eau

Fino Multi KA4566
4
Chère cliente, cher client,! Important : Avant de mettre votre appareil en marche, lisez attentive-ment ce mode d’emploi et conservez-le.
Table des matières1. Indications de sécurité
2. Première mise en marche
3. Préparation de boissons
3.1 Café-�ltre
Régler la quantité de boisson
3.2 Café en dosettes
Régler la quantité de boisson
3.3 Thé (en sachet ou en vrac)
Modi�cation des réglages pour la préparation de thé
3.4 Aperçu des quantité de boisson, température d'infusion et durée d'infu-sion
4. Eléments d'a�chage et d'utilisation
5. Nettoyage, entretien et maintenance
5.1 Lavage des supports de �ltres
5.2 Détartrage
5.3 Rétablir le réglage d'origine
5.4 Evacuation
6. Recherche d'erreurs et correction
7. Garantie
8. Service après vente
9. Licence logicielle
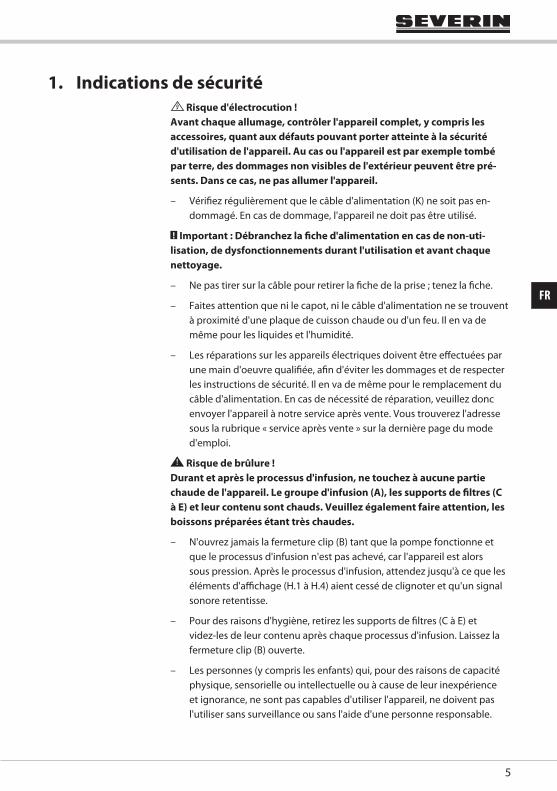
5
FR
1. Indications de sécurité Risque d'électrocution !
Avant chaque allumage, contrôler l'appareil complet, y compris les accessoires, quant aux défauts pouvant porter atteinte à la sécurité d'utilisation de l'appareil. Au cas ou l'appareil est par exemple tombé par terre, des dommages non visibles de l'extérieur peuvent être pré-sents. Dans ce cas, ne pas allumer l'appareil.
– Véri�ez régulièrement que le câble d'alimentation (K) ne soit pas en-dommagé. En cas de dommage, l'appareil ne doit pas être utilisé.
! Important : Débranchez la �che d'alimentation en cas de non-uti-lisation, de dysfonctionnements durant l'utilisation et avant chaque nettoyage.
– Ne pas tirer sur la câble pour retirer la �che de la prise ; tenez la �che.
– Faites attention que ni le capot, ni le câble d'alimentation ne se trouvent à proximité d'une plaque de cuisson chaude ou d'un feu. Il en va de même pour les liquides et l'humidité.
– Les réparations sur les appareils électriques doivent être e�ectuées par une main d'oeuvre quali�ée, a�n d'éviter les dommages et de respecter les instructions de sécurité. Il en va de même pour le remplacement du câble d'alimentation. En cas de nécessité de réparation, veuillez donc envoyer l'appareil à notre service après vente. Vous trouverez l'adresse sous la rubrique « service après vente » sur la dernière page du mode d'emploi.
Risque de brûlure ! Durant et après le processus d'infusion, ne touchez à aucune partie chaude de l'appareil. Le groupe d'infusion (A), les supports de �ltres (C à E) et leur contenu sont chauds. Veuillez également faire attention, les boissons préparées étant très chaudes.
– N'ouvrez jamais la fermeture clip (B) tant que la pompe fonctionne et que le processus d'infusion n'est pas achevé, car l'appareil est alors sous pression. Après le processus d'infusion, attendez jusqu'à ce que les éléments d'a�chage (H.1 à H.4) aient cessé de clignoter et qu'un signal sonore retentisse.
– Pour des raisons d'hygiène, retirez les supports de �ltres (C à E) et videz-les de leur contenu après chaque processus d'infusion. Laissez la fermeture clip (B) ouverte.
– Les personnes (y compris les enfants) qui, pour des raisons de capacité physique, sensorielle ou intellectuelle ou à cause de leur inexpérience et ignorance, ne sont pas capables d'utiliser l'appareil, ne doivent pas l'utiliser sans surveillance ou sans l'aide d'une personne responsable.

Fino Multi KA4566
6
– Assurez-vous que les enfants ne jouent pas avec l'appareil.
– Tenez le matériel d'emballage hors de portée des enfants. Il peut pré-senter entre autre un risque d'étou�ement !
Dommage matériel !– Installez l'appareil sur une surface plane, horizontale et résistant à l'eau.
– Ne remplissez le réservoir d'eau (L) qu'avec de l'eau claire et froide (non gazeuse) Ne jamais y verser du lait, du café ou de l'eau chaude.
– A�n d'éviter des dysfonctionnements, n'enlevez jamais le réservoir d'eau (L) durant le processus d'infusion.
Utilisation conforme aux instructions– Si l'appareil n'est pas utilisé correctement ou dans un but inhabituel,
nous déclinons toute responsabilité pour d'éventuels dommages.
! L'appareil est prévu pour une utilisation privée, pas pour une applica-tion professionnelle.
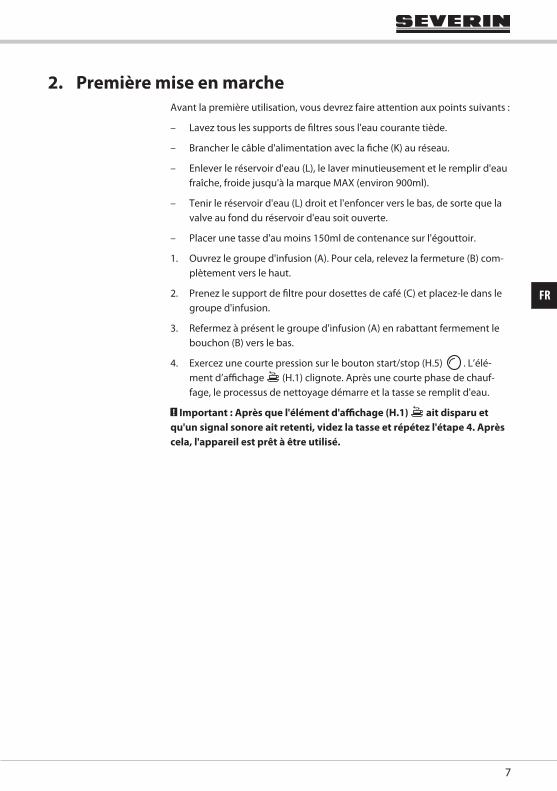
7
FR
2. Première mise en marcheAvant la première utilisation, vous devrez faire attention aux points suivants :
– Lavez tous les supports de �ltres sous l'eau courante tiède.
– Brancher le câble d'alimentation avec la �che (K) au réseau.
– Enlever le réservoir d'eau (L), le laver minutieusement et le remplir d'eau fraîche, froide jusqu'à la marque MAX (environ 900ml).
– Tenir le réservoir d'eau (L) droit et l'enfoncer vers le bas, de sorte que la valve au fond du réservoir d'eau soit ouverte.
– Placer une tasse d'au moins 150ml de contenance sur l'égouttoir.
1. Ouvrez le groupe d'infusion (A). Pour cela, relevez la fermeture (B) com-plètement vers le haut.
2. Prenez le support de �ltre pour dosettes de café (C) et placez-le dans le groupe d'infusion.
3. Refermez à présent le groupe d'infusion (A) en rabattant fermement le bouchon (B) vers le bas.
4. Exercez une courte pression sur le bouton start/stop (H.5) . L’élé-ment d’a�chage (H.1) clignote. Après une courte phase de chauf-fage, le processus de nettoyage démarre et la tasse se remplit d'eau.
! Important : Après que l'élément d'a�chage (H.1) ait disparu et qu'un signal sonore ait retenti, videz la tasse et répétez l'étape 4. Après cela, l'appareil est prêt à être utilisé.

Fino Multi KA4566
8
3. Préparation de boissonsDès que la �che d'alimentation est dans la prise de courant, l'appareil est prêt à être utilisé. Tous les éléments d'a�chage sont éteints.
Risque de brûlure !Après la préparation des boissons, ne tenez le support de �ltre (C à E) qu'à la poignée du groupe d'infusion (A) pour l'enlever, étant donné que le support de �ltre et son contenu sont chauds.
! Important : Véri�ez que le réservoir d'eau (L) contient su�samment d'eau claire et froide (non gazeuse). Changez l'eau tous les jours. Utilisez l'égouttoir (G) avec ou sans bac à gouttes (F), selon la taille de la tasse. N'enlevez jamais le réservoir d'eau (L) durant le processus d'infusion.
! Important : Le processus d'infusion peut être interrompu à tout mo-ment par une pression du bouton start/stop (H.5)
.
! Indication : N'oubliez pas de vider et de nettoyer les supports de �ltre (C à E) après utilisation. Débarrassez-vous des déchets organiques dans la poubelle bio.
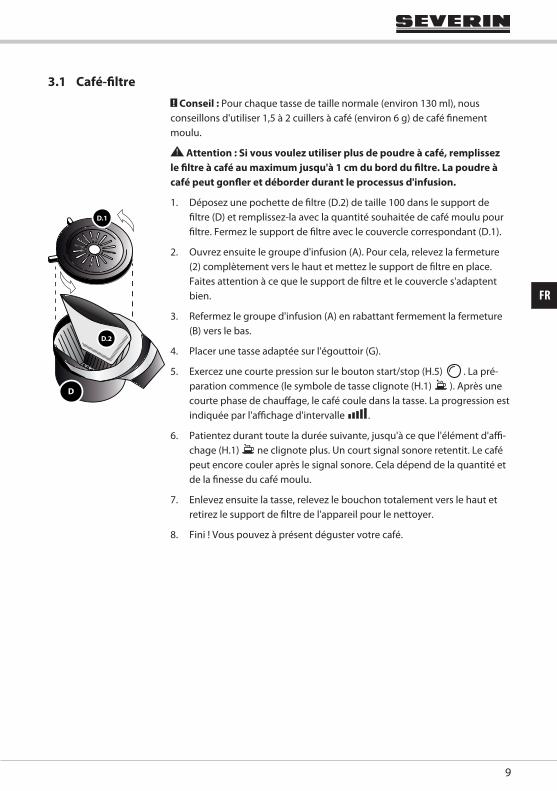
9
FR
3.1 Café-�ltre! Conseil : Pour chaque tasse de taille normale (environ 130 ml), nous conseillons d'utiliser 1,5 à 2 cuillers à café (environ 6 g) de café �nement moulu.
Attention : Si vous voulez utiliser plus de poudre à café, remplissez le �ltre à café au maximum jusqu'à 1 cm du bord du �ltre. La poudre à café peut gon�er et déborder durant le processus d'infusion.
1. Déposez une pochette de �ltre (D.2) de taille 100 dans le support de �ltre (D) et remplissez-la avec la quantité souhaitée de café moulu pour �ltre. Fermez le support de �ltre avec le couvercle correspondant (D.1).
2. Ouvrez ensuite le groupe d'infusion (A). Pour cela, relevez la fermeture (2) complètement vers le haut et mettez le support de �ltre en place. Faites attention à ce que le support de �ltre et le couvercle s'adaptent bien.
3. Refermez le groupe d'infusion (A) en rabattant fermement la fermeture (B) vers le bas.
4. Placer une tasse adaptée sur l'égouttoir (G).
5. Exercez une courte pression sur le bouton start/stop (H.5) . La pré-paration commence (le symbole de tasse clignote (H.1) ). Après une courte phase de chau�age, le café coule dans la tasse. La progression est indiquée par l'a�chage d'intervalle .
6. Patientez durant toute la durée suivante, jusqu'à ce que l'élément d'a�-chage (H.1) ne clignote plus. Un court signal sonore retentit. Le café peut encore couler après le signal sonore. Cela dépend de la quantité et de la �nesse du café moulu.
7. Enlevez ensuite la tasse, relevez le bouchon totalement vers le haut et retirez le support de �ltre de l'appareil pour le nettoyer.
8. Fini ! Vous pouvez à présent déguster votre café.
D
D.1
D.2
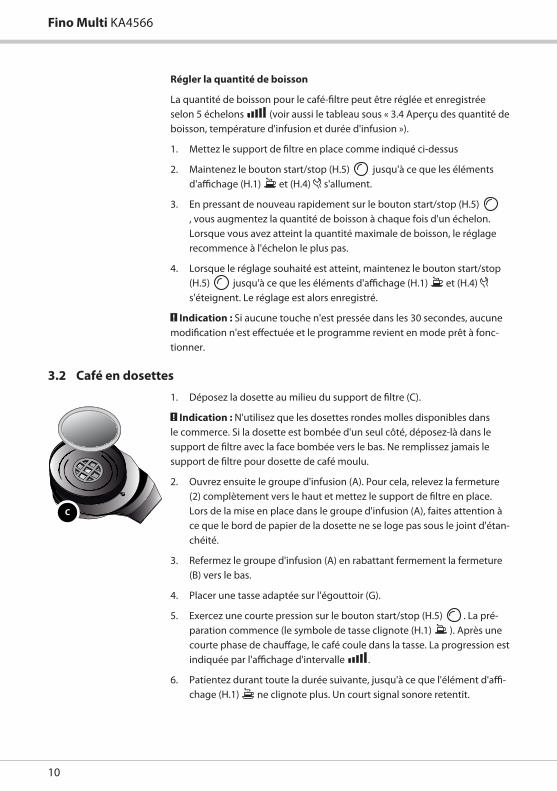
Fino Multi KA4566
10
Régler la quantité de boisson
La quantité de boisson pour le café-� ltre peut être réglée et enregistrée selon 5 échelons (voir aussi le tableau sous « 3.4 Aperçu des quantité de boisson, température d'infusion et durée d'infusion »).
1. Mettez le support de � ltre en place comme indiqué ci-dessus
2. Maintenez le bouton start/stop (H.5) jusqu'à ce que les éléments d'a� chage (H.1) et (H.4) s'allument.
3. En pressant de nouveau rapidement sur le bouton start/stop (H.5) , vous augmentez la quantité de boisson à chaque fois d'un échelon. Lorsque vous avez atteint la quantité maximale de boisson, le réglage recommence à l'échelon le plus pas.
4. Lorsque le réglage souhaité est atteint, maintenez le bouton start/stop (H.5) jusqu'à ce que les éléments d'a� chage (H.1) et (H.4) s'éteignent. Le réglage est alors enregistré.
! Indication : Si aucune touche n'est pressée dans les 30 secondes, aucune modi� cation n'est e� ectuée et le programme revient en mode prêt à fonc-tionner.
3.2 Café en dosettes
1. Déposez la dosette au milieu du support de � ltre (C).
! Indication : N'utilisez que les dosettes rondes molles disponibles dans le commerce. Si la dosette est bombée d'un seul côté, déposez-là dans le support de � ltre avec la face bombée vers le bas. Ne remplissez jamais le support de � ltre pour dosette de café moulu.
2. Ouvrez ensuite le groupe d'infusion (A). Pour cela, relevez la fermeture (2) complètement vers le haut et mettez le support de � ltre en place. Lors de la mise en place dans le groupe d'infusion (A), faites attention à ce que le bord de papier de la dosette ne se loge pas sous le joint d'étan-chéité.
3. Refermez le groupe d'infusion (A) en rabattant fermement la fermeture (B) vers le bas.
4. Placer une tasse adaptée sur l'égouttoir (G).
5. Exercez une courte pression sur le bouton start/stop (H.5) . La pré-paration commence (le symbole de tasse clignote (H.1) ). Après une courte phase de chau� age, le café coule dans la tasse. La progression est indiquée par l'a� chage d'intervalle .
6. Patientez durant toute la durée suivante, jusqu'à ce que l'élément d'a� -chage (H.1) ne clignote plus. Un court signal sonore retentit.
C
11
FR
7. Enlevez ensuite la tasse, relevez le bouchon totalement vers le haut et retirez le support de �ltre de l'appareil pour le nettoyer.
8. Fini ! Vous pouvez à présent déguster votre café.
Régler la quantité de boisson
La quantité de boisson pour le café en dosette peut être réglée et enre-gistrée selon 5 échelons (voir aussi le tableau sous « 3.4 Aperçu des quantité de boisson, température d'échaudage et durée d'infusion »).
1. Mettez en place le support de �ltre pour dosette comme indiqué ci-des-sus.
2. Maintenez le bouton start/stop (H.5) jusqu'à ce que les éléments d'a�chage (H.1) et (H.4) s'allument.
3. En pressant de nouveau rapidement sur le bouton start/stop (H.5) , vous augmentez la quantité de boisson à chaque fois d'un échelon. Lorsque vous avez atteint la quantité maximale de boisson, le réglage recommence à l'échelon le plus bas.
4. Lorsque le réglage souhaité est atteint, maintenez le bouton start/stop (H.5) jusqu'à ce que les éléments d'a�chage (H.1) et (H.4) s'éteignent. Le réglage est alors enregistré.
! Indication : Si aucune touche n'est pressée dans les 30 secondes, aucune modi�cation n'est e�ectuée et le programme revient en mode prêt à fonc-tionner.

Fino Multi KA4566
12
3.3 Thé! Remarque préalable : Au sorti de l'usine, l'appareil est programmé de sorte que le couvercle noir (E.1) soit utilisé pour la préparation de thé noir (1ère sorte de thé) et le couvercle vert (E.2) pour la préparation de thé vert (2ème sorte de thé). Vous pouvez modi�er ces réglages à tout moment et enregistrer un autre réglage séparément pour chaque couvercle, voir para-graphe « 3.3 Modi�cation des réglages pour la préparation de thé ».
1a. Sachet de thé :
Retirez auparavant la boîte à thé (E.3) du support de �ltre (E). Déposez le sachet de thé au milieu du support de �ltre (E). Laissez la �celle et l'étiquette du sachet de thé pendre en dehors par dessus le bord du support de �ltre.
1b. Thé en vrac :
Remplissez la boîte à thé (E.3) de thé en vrac et déposez-la dans le support de �ltre (E). En cas de thé très �n, utilisez un �ltre à thé supplémentaire.
! Important : Faites attention à ce que le tuyau d'écoulement (E.4) soit toujours en place.
2. Fermez le support de �ltre avec le couvercle correspondant (E.1) ou (E.2). Fermez le couvercle en le vissant dans le sens des aiguilles d'une montre, jusqu'à ce qu'on puisse entendre un enclenchement.
3. Ouvrez ensuite le groupe d'infusion (A). Pour cela, relevez la fermeture (2) complètement vers le haut et mettez le support de �ltre en place. Lors de la mise en place, faites attention à ce que le support de �ltre s'adapte bien.
4. Refermez le groupe d'infusion (A) en rabattant fermement la fermeture (B) vers le bas.
5. Placer une tasse à thé adaptée sur l'égouttoir (G).
6. Exercez une courte pression sur le bouton start/stop (H.5) . La pré-paration commence (le symbole de tasse clignote (H.1) ). Après une courte phase de chau�age, le thé coule dans la tasse. La progression est indiquée par l'a�chage d'intervalle .
7. A la �n de la durée d'infusion, le thé coule dans la tasse.
8. Patientez durant toute la durée suivante, jusqu'à ce que l'élément d'a�-chage (H.1) ne clignote plus. Un court signal sonore retentit.
9. Enlevez ensuite la tasse, relevez la fermeture totalement vers le haut et retirez le support de �ltre de l'appareil pour le nettoyer.
10. Fini ! Vous pouvez à présent déguster votre thé.
E
E
E.3

13
FR
Modi�cation des réglages pour la préparation de thé
La quantité de boisson , la température et la durée d'infusion pour le thé peuvent être réglées et enregistrées selon des échelons (voir aussi le tableau sous « 3.4 Aperçu des quantité de boisson, température d'échaudage et durée d'infusion »). Les points 1 à 8 doivent toujours être appliqués. Les réglages sont enregistrés séparément pour le couvercle noir (E.1) (1ère sorte de thé) et le couvercle vert (E.2) (2ème sorte de thé).
! Indication : La quantité de boisson pour le thé ne peut être réglée que selon les intervalles 3 à 5 .
Quantité de boisson
1. Mettez en place le support de �ltre pour thé avec le couvercle souhaité comme indiqué ci-dessus.
2. Maintenez le bouton start/stop (H.5) jusqu'à ce que les éléments d'a�chage (H.1) et (H.4) s'allument.
3. En pressant de nouveau rapidement sur le bouton start/stop (H.5) , vous augmentez la quantité de boisson à chaque fois d'un échelon. Lorsque vous avez atteint la quantité maximale de boisson, le réglage recommence à l'échelon le plus bas.
4. Lorsque le réglage souhaité est atteint, maintenez le bouton start/stop (H.5) jusqu'à ce que les éléments d'a�chage (H.2) et (H.4) s'allument.
Température d'infusion
5. En pressant successivement rapidement sur le bouton start/stop (H.5) , vous augmentez la température d'infusion à chaque fois d'un
échelon. Lorsque vous avez atteint la température d'infusion maximale, le réglage recommence à l'échelon le plus bas.
6. Lorsque le réglage souhaité est atteint, maintenez le bouton start/stop (H.5) jusqu'à ce que les éléments d'a�chage (H.3) et (H.4) s'allument.

Fino Multi KA4566
14
Durée d'infusion
7. En pressant successivement rapidement sur le bouton start/stop (H.5) , vous augmentez la durée d'infusion à chaque fois d'un échelon.
Lorsque vous avez atteint la durée maximale d'infusion, le réglage recommence à l'échelon le plus bas.
8. Lorsque le réglage souhaité est atteint, maintenez le bouton start/stop (H.5) jusqu'à ce que les éléments d'a�chage (H.3) et (H.4) s'éteignent. Le réglage est alors enregistré.
! Indication : Si aucune touche n'est pressée dans les 30 secondes, aucune modi�cation n'est e�ectuée et le programme revient en mode prêt à fonc-tionner.
3.4 Aperçu des quantité de boisson, température d'infusion et durée d'infu-sion
Café
Échelons d'inter-valle
1 barre 2 barres 3 barres 4 barres 5 barres
Quantité de boisson
environ 90ml environ 125ml (Réglage d'origine dosette, café �ltre)
environ 170ml environ 200ml environ 225ml
Thé
Échelons d'inter-valle
1 barre 2 barres 3 barres 4 barres 5 barres
Quantité de boisson
– – environ 170ml (Réglage d'origine dosette, café �ltre)
environ 200ml environ 225ml
Température d'infusion
environ 70°C environ 80°C (réglage d'origine couvercle vert)
environ 85°C environ 90°C environ 95°C (réglage d'origine couvercle noir)
Durée d'infusion environ 2 minutes
environ 3 minutes (réglage d'origine couvercle vert)
environ 5 minutes (réglage d'origine couvercle noir)
environ 8 minutes
environ 10 minutes
! Indication : Ces donnés ne sont que des indications qui peuvent varier en fonction de la �nesse du café/thé, la quantité de café/thé ou le type de thé et de l'environnement direct.
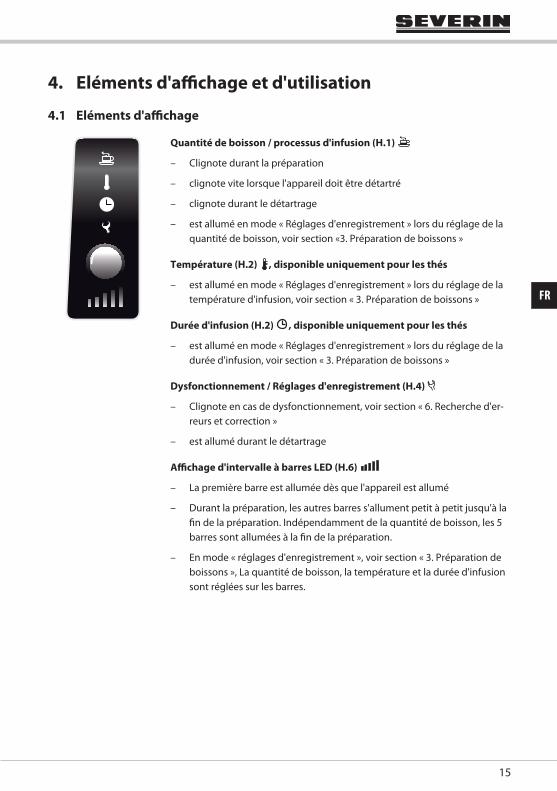
15
FR
4. Eléments d'a�chage et d'utilisation
4.1 Eléments d'a�chage
Quantité de boisson / processus d'infusion (H.1)
– Clignote durant la préparation
– clignote vite lorsque l'appareil doit être détartré
– clignote durant le détartrage
– est allumé en mode « Réglages d'enregistrement » lors du réglage de la quantité de boisson, voir section «3. Préparation de boissons »
Température (H.2) , disponible uniquement pour les thés
– est allumé en mode « Réglages d'enregistrement » lors du réglage de la température d'infusion, voir section « 3. Préparation de boissons »
Durée d'infusion (H.2) , disponible uniquement pour les thés
– est allumé en mode « Réglages d'enregistrement » lors du réglage de la durée d'infusion, voir section « 3. Préparation de boissons »
Dysfonctionnement / Réglages d'enregistrement (H.4)
– Clignote en cas de dysfonctionnement, voir section « 6. Recherche d'er-reurs et correction »
– est allumé durant le détartrage
A�chage d'intervalle à barres LED (H.6)
– La première barre est allumée dès que l'appareil est allumé
– Durant la préparation, les autres barres s'allument petit à petit jusqu'à la �n de la préparation. Indépendamment de la quantité de boisson, les 5 barres sont allumées à la �n de la préparation.
– En mode « réglages d'enregistrement », voir section « 3. Préparation de boissons », La quantité de boisson, la température et la durée d'infusion sont réglées sur les barres.

Fino Multi KA4566
16
4.2 Eléments d'utilisation
Bouton start/stop (H.5)
– Une courte pression de ce bouton lance la préparation
– Une nouvelle pression courte interromp la préparation
– Lors d'un dysfonctionnement, vous lancez la correction d'erreur par une pression courte sur ce bouton
– Par une pression de plus de 3 secondes, alors que le support de �ltre est en place, vous êtes en mode « réglages d'enregistrement », voir section « 3. Préparation de boissons »
– Par une pression de plus de 3 secondes, sans que le support de �ltre soit en place, vous êtes en mode « détartrage », voir section « 5. Nettoyage, entretien et maintenance »
! Indication : Avec le bouton start/stop, vous pouvez également rétablir les réglages d'origine, voir section « 5. Nettoyage, entretien et maintenance ».

17
FR
5. Nettoyage, entretien et maintenance! Important : Avant le nettoyage, débrancher la � che d'alimentation et laissez refroidir l'appareil.
Attention : Ne pas laver les pièces détachées au lave-vaisselle !
Pour des raisons de sécurité électrique, l'appareil de doit pas être mani-pulé avec des liquides, ni être plongé dedans.
Ne pas utiliser de produits d'entretien agressifs ou abrasifs.
Nettoyer l'extérieur du capot avec un chi� on humide et éventuellement du liquide vaisselle.
5.1 Lavage des supports de � ltres
Laver à l'eau de vaisselle les supports de � ltre (C à E), le réservoir d'eau (L), l'égouttoir (G) et le bac à gouttes (F) une fois démontés. Pour � nir, laver à l'eau claire et sécher.
D
D.1
C
E
E.1/2
E.3
E.4

Fino Multi KA4566
18
5.2 Détartrage
Si l'élément d'a�chage (H.1) clignotte rapidement durant la préparation, l'appareil a besoin d'être détartré.
Pour cela, les produits détartrants pour cafetières courants dans le commer-ce sont adaptés. Utilisez 900ml d'un produit détartrant selon les indications du producteur du produit détartrant.
! Important : N'utilisez pas de vinaigre ou de produit détartrant à base d'acide acétique, faute de quoi des dommages internes peuvent surve-nir, par exemple aux niveau de l'étanchéité !
Attention : Veuillez respecter les indications de sécurité du fabricant du produit détartrant. Ne pas verser de produit détartrant dans les bassins émaillés.
1. Remplir le réservoir d'eau (L) jusqu'à la marque MAX (environ 900ml).
2. Ouvrez le groupe d'infusion (A). Pour cela, relevez la fermeture (B) com-plètement vers le haut.
3. Retirez le support de �ltre du groupe d'infusion.
4. Prenez un récipient haut d'une contenance d'au moins 900ml (par exemple un verre d'un litre) et placez-le sur l'égouttoir (G) sans le bac à gouttes (F).
5. Pressez le bouton start/stop (H.5) durant au moins 3 secondes, jusqu'à ce que les éléments d'a�chage (H.1) et (H.4) s'allument. Le processus de détartrage démarre et l'élément d'a�chage (H.1) com-mence à clignoter. Le récipient se remplit par intervalles jusqu'à ce que le réservoir d'eau soit vide. L'appareil fait des pauses régulières (environ 30 secondes).
6. Lorsque le réservoir d'eau est vide, l'élément d'a�chage (H.4) com-mence à clignoter. Le processus de rinçage peut être lancé. Pour cela, retirez le réservoir d'eau (L), rincez-le abondamment à l'eau courante et remplissez-le d'eau fraîche, froide, jusqu'à la marque MAX (environ 900ml). Videz le grand récipient du produit détartrant utilisé et replacez-le sur l'égouttoir. Pressez à présent sur le bouton start/stop (H.5) . L'élément d'a�chage (H.4) s'allume de nouveau et l'appareil est rincé avec l'eau froide jusqu'à ce que le réservoir d'eau soit vide.
7. L'appareil est alors détartré et prêt à être utilisé.

19
FR
5.3 Rétablir le réglage d'origine
Rabattez le bouchon (B) du groupe d'échaudage (A) vers le bas, sans support de �ltre en place. Maintenez le bouton start/stop (H.5) jusqu'à ce que les éléments d'a�chage s'allument. Tous les réglages de quantité de boisson, température et durée d'infusion sont rétablis sur les réglages d'origine. Vous pouvez de nouveau cesser d'appuyer sur le bouton start/stop.
5.4 Evacuation Veuillez vous débarrasser des appareils devenus inutilisables dans les dé-charges prévues à cet e�et.
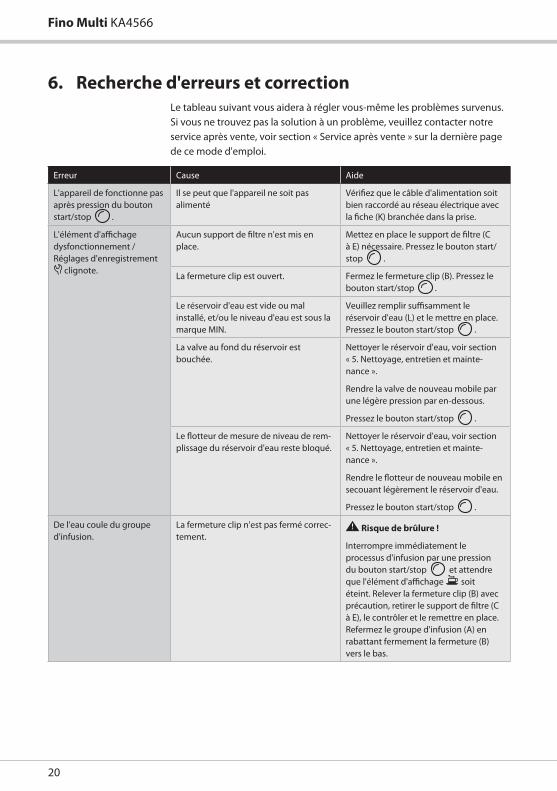
Fino Multi KA4566
20
6. Recherche d'erreurs et correctionLe tableau suivant vous aidera à régler vous-même les problèmes survenus. Si vous ne trouvez pas la solution à un problème, veuillez contacter notre service après vente, voir section « Service après vente » sur la dernière page de ce mode d'emploi.
Erreur Cause Aide
L'appareil de fonctionne pas après pression du bouton start/stop .
Il se peut que l'appareil ne soit pas alimenté
Véri�ez que le câble d'alimentation soit bien raccordé au réseau électrique avec la �che (K) branchée dans la prise.
L'élément d'a�chage dysfonctionnement / Réglages d'enregistrement
clignote.
Aucun support de �ltre n'est mis en place.
Mettez en place le support de �ltre (C à E) nécessaire. Pressez le bouton start/stop .
La fermeture clip est ouvert. Fermez le fermeture clip (B). Pressez le bouton start/stop .
Le réservoir d'eau est vide ou mal installé, et/ou le niveau d'eau est sous la marque MIN.
Veuillez remplir su�samment le réservoir d'eau (L) et le mettre en place. Pressez le bouton start/stop .
La valve au fond du réservoir est bouchée.
Nettoyer le réservoir d'eau, voir section « 5. Nettoyage, entretien et mainte-nance ».
Rendre la valve de nouveau mobile par une légère pression par en-dessous.
Pressez le bouton start/stop .
Le �otteur de mesure de niveau de rem-plissage du réservoir d'eau reste bloqué.
Nettoyer le réservoir d'eau, voir section « 5. Nettoyage, entretien et mainte-nance ».
Rendre le �otteur de nouveau mobile en secouant légèrement le réservoir d'eau.
Pressez le bouton start/stop .
De l'eau coule du groupe d'infusion.
La fermeture clip n'est pas fermé correc-tement.
Risque de brûlure !
Interrompre immédiatement le processus d'infusion par une pression du bouton start/stop et attendre que l'élément d'a�chage soit éteint. Relever la fermeture clip (B) avec précaution, retirer le support de �ltre (C à E), le contrôler et le remettre en place. Refermez le groupe d'infusion (A) en rabattant fermement la fermeture (B) vers le bas.
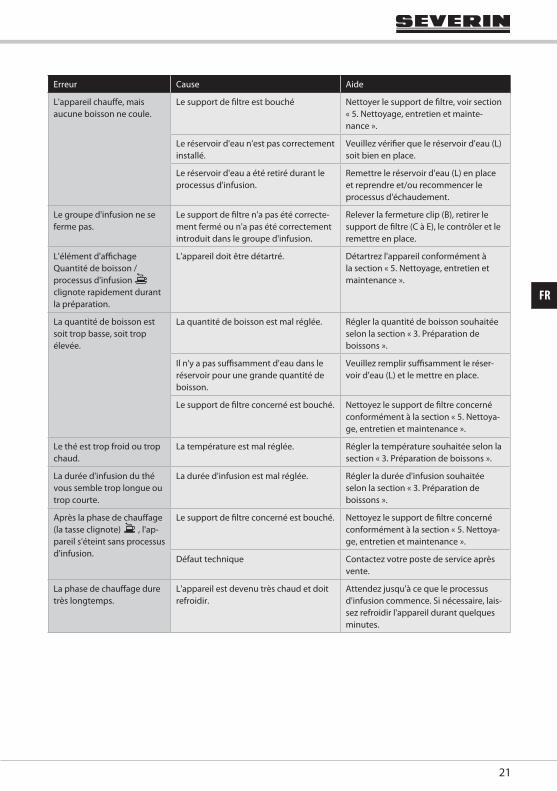
21
FR
Erreur Cause Aide
L'appareil chau�e, mais aucune boisson ne coule.
Le support de �ltre est bouché Nettoyer le support de �ltre, voir section « 5. Nettoyage, entretien et mainte-nance ».
Le réservoir d'eau n'est pas correctement installé.
Veuillez véri�er que le réservoir d'eau (L) soit bien en place.
Le réservoir d'eau a été retiré durant le processus d'infusion.
Remettre le réservoir d'eau (L) en place et reprendre et/ou recommencer le processus d'échaudement.
Le groupe d'infusion ne se ferme pas.
Le support de �ltre n'a pas été correcte-ment fermé ou n'a pas été correctement introduit dans le groupe d'infusion.
Relever la fermeture clip (B), retirer le support de �ltre (C à E), le contrôler et le remettre en place.
L'élément d'a�chage Quantité de boisson / processus d'infusion clignote rapidement durant la préparation.
L'appareil doit être détartré. Détartrez l'appareil conformément à la section « 5. Nettoyage, entretien et maintenance ».
La quantité de boisson est soit trop basse, soit trop élevée.
La quantité de boisson est mal réglée. Régler la quantité de boisson souhaitée selon la section « 3. Préparation de boissons ».
Il n'y a pas su�samment d'eau dans le réservoir pour une grande quantité de boisson.
Veuillez remplir su�samment le réser-voir d'eau (L) et le mettre en place.
Le support de �ltre concerné est bouché. Nettoyez le support de �ltre concerné conformément à la section « 5. Nettoya-ge, entretien et maintenance ».
Le thé est trop froid ou trop chaud.
La température est mal réglée. Régler la température souhaitée selon la section « 3. Préparation de boissons ».
La durée d'infusion du thé vous semble trop longue ou trop courte.
La durée d'infusion est mal réglée. Régler la durée d'infusion souhaitée selon la section « 3. Préparation de boissons ».
Après la phase de chau�age (la tasse clignote) , l'ap-pareil s'éteint sans processus d'infusion.
Le support de �ltre concerné est bouché. Nettoyez le support de �ltre concerné conformément à la section « 5. Nettoya-ge, entretien et maintenance ».
Défaut technique Contactez votre poste de service après vente.
La phase de chau�age dure très longtemps.
L'appareil est devenu très chaud et doit refroidir.
Attendez jusqu'à ce que le processus d'infusion commence. Si nécessaire, lais-sez refroidir l'appareil durant quelques minutes.

Fino Multi KA4566
22
7. GarantieSeverin vous o�re une garantie constructeur de deux ans à compter de la date d'achat.
Durant cette période, nous réglons tous les problèmes liés à des défauts matériels ou de conception et qui porte atteinte au fonctionnement de l'appareil. D'autres revendications sont exclues.
Sont exclus de la garantie :
Les dommages dus au non respect du mode d'emploi, à une manipulation inappropriée ou à l'usure normale, y compris pour les pièces facilement cassables comme en verre, matière synthétique ou lampes à incandescence.
La garantie s'annule lors d'une réparation par une personne que nous n'avons pas autorisée. Si une réparation devait être nécessaire, veuillez nous envoyer l'appareil bien emballé, avec une description du dysfonctionnement et le justi�catif d'achat, directement au service Severin, voir section « Service après vente » sur la dernière page de ce mode d'emploi.
Les droits légaux de prestation envers le vendeur et une éventuelle garantie vendeur restent valables.
8. Service après venteVous trouverez votre service après vente compétent dans les dernières pages du mode d'emploi.
9. Licence logicielleNous soutenons le développement de logiciels libres.
Nous utilisons des logiciels libres lors du développement et comme pièce intégrée de nos produits. Vous trouverez des indications détaillées, y com-pris conditions de licence et copyright sur notre site internet sur http://www.severin.de.
A
B
I GK
H
L
C
D
E
E.1
D.1
E.2H.1
H.2
H.3
H.4
H.5
H.6
D.2
F
E.3
E.4
BelgiqueDancal N.V.Bavikhoofsestraat 728520 KuurneTel.: 056/71 54 51Fax: 056/70 04 49
Bosnia i HerzegovinaMalisic MP d.o.oTromeda Medugorje bb88260 CitlukTel: + 387 36 650 446Fax: + 387 36 651 062
BulgariaNoviz AGKahn Kubrat 1 Str. BG-4000 PlovdivTel: +359 32 275 617, 275 614e-mail: [email protected]
Czech Republic ARGO spol. s r.o. Žihobce 137CZ 342 01 SušiceTel.: + 376 597 197Fax: + 376 597 197http://[email protected]
CroatiaTD Medimurka d.d.Trg. Republike 6HR-40000 CakovecCroatiaTel: +385-40 328 650Fax: + 385 40 328 134e-mail: [email protected]
CyprusG.L.G. Trading4-6, Oidipodos StreetLarnaca, CyprusTel.: 024/633133Fax: 024/635992
DanmarkScandia Serviceteknik A/SHedeager 52605 BrondbyTel.: 45-43202700Fax: 45-43202709
Estonia:Tallinn: CENTRALSERVICE, Tammsaare tee 134B, tel: 654 3000Tartu: CENTRALSERVICE, Aleksandri 6, tel: 7 344 299, 7 344 337, 56 697 843Pärnu: CENTRALSERVICE, Riia mnt. 64, tel: 44 25 175Narva: CENTRALSERVICE, Tallinna 6A, tel: 35 60 708Haapsalu: Teco KM OÜ, Jalaka 1A, tel: 47 56 900Rakvere: Nirgi Tõnu FIE, tel: 32 40 515Viljandi: Aaber OÜ, Vabaduse pl. 4, tel: 43 33 802Kuressaare: Toomas Teder FIE, Pikk 1B, tel: 45 55 978Käina: Ilmar Pauk Elektroonika FIE, Mäe2S, tel: 46 36 379, 51 87 444
EspanaSeverin Electrodom. España S.L.Plaza de la Almazara Portal 4, 1º E.45200 ILLESCAS(Toledo)Tel: 925 51 34 05Fax: 925 54 19 40eMail: [email protected]://www.severin.es
FranceSEVERIN France Sarl4, rue de ThalB.P. 3867211 OBERNAI CEDEXTel.: 03 88 47 62 08Fax: 03 88 47 62 09
GreeceBERSONC. Sara� dis Bros. S.A.Agamemnonos 47176 75 Kallithea, AthensTel.: 0030-210 9478700
Philippos Business CenterAgias Anastasias & Laertou, PileaService Post of Thermi570 01 Thessaloniki, GreeceTel.: 0030-2310954020
Iran IRAN-SEVERIN KISH CO. LTD.No. 668, 7th. FloorBahar TowerAve. South BaharTEHRAN - IRANTel. : 009821 - 77616767Fax : 009821 – [email protected]
IsraelEatay Agencies109 Herzel St.HaifaPhone: 050-5358648Email: [email protected]
ItaliaVideoellettronica di Sgambati &Gabrini C.S.N.C.via Dino Col 52r-54r-56r,I - 16149 GenovaGreen Number: 800240279Tel.: 010/6 45 11 02 - 01041 86 09Fax: 010/6 42 50 09e-mail: [email protected]
JordanF.A. KettanehP.O. Box 485Amman, 11118, JordanTel: 00962-6-439 8642e-mail: [email protected]
KoreaJung Shin Electronics co., ltd.501, Megaventuretower 77-9, Moonrae-Dong 3ga, Yongdeungpo-GuSeoul, KoreaTel: +82-22-637 3245~7Fax: +82-22-637 3244Service Hotline: 080-001-0190
LatviaSERVO Ltd. Mr. Janis PivovarenoksTel: + 371 [email protected]
LebanonKhoury Home7th Floor, Cité Dora 3 Building, DoraP.O.Box 70611Antelias, LebanonTelephone 01 244200, Fax 01 253535eMail: [email protected] Internet: www.khouryhome.com
LuxembourgSer-TecRue du Chateau d´Eua3364 LeudelangeTel.: 00352 -37 94 94 402Fax 00352 -37 94 94 400
MacedoniaKONCAR servisBul. Partizanski odredi br. 1051000 SkopjeMakedonijaTel: + 389 (2) 365-578Fax: + 389 (2) 365 621e-mail: [email protected]
MagyarországTFK Elektronik Kft.Gyar u.2H-2040 BudaörsTel.: (+36) 23 444 266Fax: (+36) 23 444 267
NederlandHAS b.v.Stedenbaan 8NL-5121 DP RijenTel: 0161-22 00 00Fax: 0161-29 00 50
NorwayLøkken Trading ASTrollåsveien 341414 TrollåsenTlf: 40 00 67 34Fax: 66 80 45 60
ÖsterreichDegupaVertriebsgesellschaft m.b.H.Gewerbeparkstr. 75081 Anif / SalzburgTel.: 0 62 46 / 73 58 10Fax:. 0 62 46 / 72 70 2
PolskaServ-Serwis Sp. z o.o.ul. Wspólna 945-831 Opoletel./fax (077) 457-50-06e-mail: [email protected]
PortugalNovalvaZona Industrial Maia ISector X - Lote 293, N. 904470 MaiaTel.: 02/9 44 03 84Fax: 02/9 44 02 68
Russian FederationOrbita Service123362 Moskauul. Svobody 18,Tel.: (495) 585 05 73
Орбита Сервис 1233 62 г. Москва, ул. Свободы, д. 18. Тел.: (495)585-05-73
RomaniaFor Brands srlStr. Capitan Aviator AlexandruSerbanescu Nr. 33-35, Bl. 20ESc. 2 Et.1, Ap. 27, Sector 1BucurestiTel: + 40 21 233 41 12, + 40 21 233 41 13, + 40 21 688 66 13Fax: + 40 21 233 41 03, + 40 21 688 66 13E-mail: o [email protected] site: www.forbrands.ro
SchweizVB Handels Sàrl GmbHPostfach 3061040 EchallensTel: 021 881 60 45Fax 021 881 60 46mail: [email protected]
SerbiaSMIL dooPasiceva 28, Novi SadSerbia and Montenegrotel: + 381-21-524-638tel: +381-21-553-594fax: +381-21-522-096
Slowak RepublicPREMT,s.r.o.Skladová 1917 01 TrnavaTel: 033/544 7177
FinlandOy Harry Marcell AbRälssitie 6, PL 6301511 VantaaTel.: 0035 / 898 708 70Fax: 0035/ 898 708 7803
SvenskaRakspecialisten HSMöllevångsgatan 34214 20 MalmöTel.: 040/12 07 70Fax: 040/6 11 03 35
SloveniaSEVTIS d.o.o.Smartinska 1301000 LjubljanaTel: 00386 1 542 1927Fax: 00386 1 542 1926
Kundendienstzentralen
Service Centres
Centrales service-après-vente
O� cinas centrales del servicio
Centros de serviço
Centrale del servizio clienti
Service-centrales
Centrale serviceafdelinger
Centrala kundtjänstplatser
Keskushuollot
Servisné stredisko
Centrala obstugi klientów
Szerviz
Κέντρο εξυπηρέτησης πελατών
SEVERIN ServiceAm Brühl 2759846 SundernTelefon (02933) 982-460Telefax (02933) [email protected]
INTERNATIONAL
umschlag_090703.indd 2 08.07.2009 08:24:46
Fino Multi KA4566Fino Multi KA4566
Fino Multi KA4566Fino Multi KA4566
DE
EN
FR
NL
ES
IT
DK
SE
FI
PL
GR
RU
Ka ee-CenterGebrauchsanweisung
Multi-function co ee makerInstructions for use
Centre caféMode d‘emploi
Ko ecenterGebruiksaanwijzing
Centro de caféInstrucciones de uso
Macchina da ca èManuale d‘uso
Ka ecenterBrugervejledning
Ka ecenterBruksanvisning
KahvikeskusKäyttöohje
Centrum kawoweInstrukcja obsługi
ΚαφετιέραΟδηγίες χρήσης
Кофейная машинаРуководство по эксплуатации
Liebe Kundin, lieber Kunde,
Sie haben sich für ein SEVERIN-Qualitäts produkt entschieden, vielen Dank für Ihr Vertrauen!
Seit 1952 werden Elektrogeräte der Marke SEVERIN produziert. Durch diese jahrzehntelange Erfahrung und modernste Produktionsstätten wird der hohe Qualitätsstandard der Produkte garantiert.
Mit über 160 verschiedenen Produkten bietet SEVERIN wie kaum ein anderer Hersteller dieser Branche ein nahezu komplettes Sortiment im Bereich Elektrokleingeräte an.
So umfasst das SEVERIN-Sortiment neben den traditionellen Küchengerä-ten wie Ka eeautomat, Toastern, Kochplatten oder Wa elautomaten auch vielseitige Grillgeräte, Produkte für die Haarp� ege sowie verschiedene Heizgeräte und Ventilatoren.
Jedes Gerät, das die Marke SEVERIN trägt, wurde mit Sorgfalt hergestellt und geprüft.
! Wichtig: Bitte lesen Sie diese Gebrauchsanweisung sorgfältig durch, bevor Sie Ihr Gerät in Betrieb nehmen und bewahren diese Anweisung auf.
Wir wünschen Ihnen an Ihrem SEVERIN-Gerät viel Freude!
Geschäftsleitung und Mitarbeiterder SEVERIN-Unternehmen
Aktion zum Schutz der Umwelt:Nehmen auch Sie aktiv am Umweltschutz teil.Umwelt-Tipp: Entsorgen Sie organische Abfälle mit dem Bio-Müll.
www.severin.de
Fino Multi KA4566
Gebrauchsanweisung
Multi-function co ee makerInstructions for use
Gebruiksaanwijzing
Instrucciones de uso
Macchina da ca è
Brugervejledning
Centrum kawoweInstrukcja obsługi
Οδηγίες χρήσης
Кофейная машинаРуководство по эксплуатации
I/M No.: 8255.0000
umschlag_090703.indd 1 08.07.2009 08:24:45