MISSIONSHEFT II b - spieltrieb-frankfurt.de · Flames of War ist eines der am häufigsten im...
34
1 MISSIONSHEFT II b
Transcript of MISSIONSHEFT II b - spieltrieb-frankfurt.de · Flames of War ist eines der am häufigsten im...

1
MISSIONSHEFT
II b

2
INHALTSVERZEICHNIS
Seite
Einleitung 3
Kampagnenregeln des Spieltriebs Frankfurt 4
Special Rules
Airborne Assault 5
Coup-de-Main Glider Assault 6
Ambush, Defensive Battle, Fair Fight, Hasty Defence, Intense Battle 7
Limited Fortifications, Mobile Battle 8
Night Attack, Night Fighting, Night Training 9
Preliminary Bombardment, Prepared Positions, Random Deployment 10
Reserves (including Delayed, Mobile, Scattered, Local, and Marching Reserves) 11
River Assault 12
Strategic Withdrawal, Surprise, Unload the Gliders 13
Missions
2 - Free-for-All 14
3 – Trench Fight 15
4 - Delaying Action 16
5 - Hasty Attack 17
6 – Breakthrough 18
7 - Hold the Line 19
8 – Consolidate 20
9 – Counterattack 21
10 - King of the Hill 22
11 – Envelopment 23
12 – Encounter 24
S1 - Armoured Encounter 25
S2 - Fighting Withdrawal 26
S3 - Seize and Hold 27
S4 - Clean Sweep 28 S5 - River Crossing 29
Fortifications
Trench Lines, Gun Pits, Tank Pits 30
Bunkers 31
Barbed Wire Entanglements, Anti-tank Obstacles 32
Minefields 33

3
EINLEITUNG
Danksagung Viele der Missionen in diesem Handbuch
stammen aus den Zeiten von FoW 1.0 und
sind auf der Battlefront Homepage
veröffentlicht. Für dieses Handbuch wurden
die Missionen leicht überarbeitet und an die
Regeln von FoW 2.0 angepasst. Wir möchten
an dieser Stelle den FoW-Enthusiasten
danken, die sich diese Missionen ausgedacht
und ins Netz gestellt haben.
Spieltrieb Frankfurt Beim Spieltrieb Frankfurt handelt es sich um
eine Gruppe Männer in den besten Jahren, die
in der Frankfurter Innenstadt (zwischen Zoo
und Konstablerwache) einen Raum einzig zu
dem Zweck angemieteten haben, ihrem
Spieltrieb nachzugehen.
Der Raum wird von uns regelmäßig für
Flames of War, Herr der Ringe und alles
andere genutzt, was Spaß macht (Star Wars
Miniatures, Brettspiele, Warhammer
Historical, etc.). Kurzum: Jeder Form von
Spielchen wird gefrönt.
Der Spieltrieb Frankfurt kann im Internet
unter www.spieltrieb-frankfurt.de besucht
werden. Gäste, Zuschauer, neue Mitglieder,
etc. sind grundsätzlich willkommen. Sehr
empfohlen sei in diesem Zusammenhang
auch www.sweetwater-forum.de. Dort
tummeln sich regelmäßig auch Mitglieder des
Spieltriebs Frankfurt.
Das Missionsheft für FoW Flames of War ist eines der am häufigsten im
Spieltrieb Frankfurt gezockten Systeme. Um
nicht immer zwischen diversen Battlefront
Veröffentlichungen hin und her springen zu
müssen, haben wir einige Missionen und
deren Special Rules in diesem Heftchen hier
zusammengetragen.
Die Missionen in diesem Heft sind sortiert von
2 bis 12 und nach Sondermissionen. Der
Grund dafür ist, dass die zu spielenden
Missionen bei den FoW-Kampagnen des
Spieltriebs Frankfurt jeweils per Würfelwurf
ermittelt werden. Ansonsten hat diese
Anordnung keine weitere Bedeutung. Alle
Missionen in diesem Handbuch sind
eigenständig und ohne eine Kampagne
spielbar!
Tischgrößen Die im Spieltrieb Frankfurt verwendeten
Spielflächen haben die Ausmaße
1,20m x 1,80m. Die Längenangaben in
diesem Heft beziehen sich auf Spielflächen
dieser Größe. Beim Spiel auf einem Tisch
anderer Größe, muss eine Mission ggf.
entsprechend angepasst werden.
Der Spieltrieb Frankfurt wünscht
jedem viel Spaß beim Zocken!

4
KAMPAGNENREGELN DES SPIELTRIEBS FRANKFURT
Die folgenden Regeln sind zusammengefasst
aus den FoW-Kampagnenregeln des
Spieltriebs Frankfurt. Sie sind hier aufgeführt,
um springen zwischen diesem Missionsheft
und den Kampagnenregeln unnötig zu
machen. Für Spieler außerhalb der FoW-
Kampagnen des Spieltriebs Frankfurt
haben diese Regeln natürlich keinerlei
Bedeutung! Sie können sich eine Mission
frei aussuchen. Die vollständigen
Kampagnenregeln befinden sich auf unserer
Homepage www.spieltrieb-frankfurt.de.
Missionsauswahl Bevor die Spieler ihre Kompanien
zusammenstellen, wird die zu spielende
Mission ausgewürfelt. Der Spieler mit dem besseren Initiative-Kronkorken ☺ darf das
fertige Würfelergebnis um plus oder minus
eins verändern.
Würfelwurf Mission
2 Free-for-All
3 Trench Fight
4 Delaying Action
5 Hasty Attack
6 Breakthrough
7 Hold the Line
8 Consolidate
9 Counterattack
10 King of the Hill
11 Envelopment
12 Encounter
Sondermissionen Unter den anfolgend beschriebenen
Umständen kann statt der ausgewürfelten
Mission eine Sondermission gespielt werden.
Das Spielen einer Sondermission wird
bekannt gegeben bevor die Spieler ihre
Kompanien zusammenstellen
S1 Armoured Encounter
Sofern beide Spieler damit einverstanden
sind, können sie auf das Auswürfeln einer
Mission verzichten und die Mission Armoured
Encounter spielen. Beide Spieler müssen
dann allerdings eine Tank Company
aufstellen.
S2 Fighting Withdrawal
Befindet sich in keinem Nachbarfeld des
umkämpften Felds eine verbündete Kompanie
des Eigentümer des umkämpften Felds, dann
kann dieser statt der ausgewürfelten Mission
Fighting Withdrawal spielen lassen.
Entscheidet sich der Eigentümer des
umkämpften Felds dazu, Figthing Withdrawal
zu spielen, dann muss er sich nach dem
Gefecht aus dem Feld zurückziehen, egal wie
das Spiel ausgegangen ist. Der Gegenspieler
bleibt im Feld. Siegpunkte und Verluste
werden jedoch unverändert anhand des
Ergebnisses des Spiels ermittelt.
S3 Seize and Hold
Beabsichtigt der Spieler, der das umkämpfte
Feld betreten hat, eine Luftlandeeinheit zu
spielen, dann kann er bestimmen, dass statt
einer erwürfelten Mission Seize and Hold
gespielt wird.
Luftlandeeinheiten sind:
- Parachute Company (British)
- Airlanding Company (British)
- Parachute Rifle Company (US)
- Glider Rifle Company (US)
- Gvardeyskiy Vozdushno-Dasantniy Batalon
- Fallschirmjägerkompanie
- Fallschirmpionierkompanie
- Compagnia Paracadutisti
Die großen Luflandeoperationen der
Westalliierten dürften den meisten FoW-
Spielern bekannt sein. Weniger bekannt ist,
dass im Zeitraum von 1943 bis 1945 auch die
Sowjetunion und Deutschland mehrere
zumeist kleine Luftlandeoperationen
durchgeführt haben. Gerade in dem kleinen
Rahmen von Kompanien in dem FoW sich
bewegt ist die Seize and Hold Mission für
diese Nationen daher durchaus passend.
S4 Clean Sweep
Beträgt der Punktwert des Spielers dessen
Feld betreten wurde nur 60% oder weniger
seines Gegenspielers, dann kann er
bestimmen, dass statt der erwürfelten
Mission Clean Sweep gespielt wird.
S5 River Crossing Mission
Betritt ein Angreifer das Feld des Verteidigers
über einen Fluss, dann kann der Verteidiger
statt der ausgewürfelten Mission die River
Crossing Mission spielen lassen.

5
MISSION SPECIAL RULES
To reflect their unique circumstances most missions use a number of special rules that make them
more realistic and add exciting tactical twists to each engagement. Each mission tells you which
special rules apply.
Airborne Assault Only platoons that can be dropped by
parachute or delivered by glider can be
included in airborne attack force. Additionally,
no Snipers may be included in the attacker's
force during an airborne assault as every
rifleman is expected to engage in close
combat.
Prepare your Airborne Force
Before Deployment in an airborne assault you
must assign all HQ support weapons to
platoons. No platoons may make combat
attachments for an airborne assault.
Each of the Independent teams in your force
must join a platoon for the purposes of
deployment. However, your Company
Command team and 2iC Command team
must join different platoons for an airborne
assault.
Roll for Wind Direction
To determine the wind direction, the airborne
player chooses either long table edge as their
own, then rolls a die and checks the Wind
Direction Diagram to determine where the
wind is coming from.
Pathfinders
During your deployment choose any table
edge or corner and place your Pathfinder
marker on it. During the game whenever you
roll for Scattered Reserves any die roll of 2 or
5 will result in the platoon arriving on the
table edge or corner marked by your
Pathfinder marker. If the marker is located on
a corner, any platoons arriving there must
enter the table within 16"/40cm of the
corner.
Bezüglich der Pathfinder Marker ist
anzumerken, dass Sowjets und
Achsenmächte zwar nicht über genau diese
Art von Einheiten verfügten, aber auch sie
hatten natürlich Methoden und Personal
eingeführt, um ihre Luftlandetruppen nach
einem Abwurf möglichst schnell und geordnet
ins Kampfgeschehen zu bringen (mit genauso
bescheidenem Erfolg wie die Westalliierten).
Die Benutzung dieser Marker für Sowjets und
Achsenmächte ist also durchaus
gerechtfertigt.
Parachute Landings
Parachute platoons do not deploy on table at
the start of the game, instead each platoon
will move on during the game as detailed in
the mission rules.
Containers
All Parachute platoons have collected their
containers and are fully armed when they
move onto the table during the game.

6
Coup-de-Main Glider Assault Only the Combat platoons of a British
Airlanding Company German Parachute
Pioneer Platoons may make a Coup-de-main
Glider Assault. If they do so add +145 points
to the cost of each platoon conducting the
assault. If they do not, their glider is
considered to have landed off-table and the
platoon will move onto the table as detailed
in the mission rules. All other Airlanding or
Glider platoons land off-table and move onto
the table as detailed in the mission rules.
A British Airlanding Platoon is carried in a
single Horsa glider. A German Pioneer Platoon
has one DFS 230 Glider per Pioneer Squad.
The German Platoon Command team is in one
of these squad gliders. Independent teams
that have joined the platoon are carried in the
platoon's glider(s) for no additional cost.
Conducting a Coup-de-main
Attempt to land all Coup-de-main gliders at
the start of the first Movement Step.
Find the Landing Zone
For each glider conducting a Coup-de-main,
roll a die.
- On a roll of 2+ the glider finds the Landing
Zone.
- Otherwise the glider misses the Landing
Zone, the glider will land off-table and the
passengers it is carrying are now in
reserve.
Glider Landing Run
Pick the landing point anywhere on the table,
place the glider on that point facing into the
wind. To find the length of the glider's landing
run, roll a die. Move the glider forward
2"/5cm for each point on the die roll.
On a landing run roll of 1, the glider crash
lands due to pilot error or enemy fire.
Obstacles
If the glider's fuselage runs into Rough
terrain, an enemy gun (except Man-packed
Gun teams), an enemy vehicle or the
fuselage of another glider. The glider crash
lands and stops immediately. However if the
glider's wings hit an obstacle, they just snap
off and the wingless fuselage carries on
unharmed. The glider only crash lands if the
fuselage itself hits an obstacle.
If the glider's fuselage passes through or
ends its run on the position of an enemy
Infantry or Man-packed Gun team, the
defending player moves the team aside just
far enough to avoid the body of the glider as
they dive out of its path.
Glider Crash Landings
If the glider crash lands, the passengers may
be killed or injured. Roll a die for each team
carried in a crashed glider except Command
teams. On a roll of 5+ they survive, but on a
lesser roll they are Destroyed.
Dismounting Gliders
Once the glider has come to a stop, all teams
immediately dismount anywhere adjacent to
the fuselage of the glider. The platoons may
either:
- Move as normal in this Movement Step, or
- launch an assault, if they are able, in the
Assault Step.
For this turn only however, they may only
perform one or the other action, not both. All
movement is measured from the fuselage of
the glider.
Additionally, because they are totally focused
on getting amongst the enemy the platoon
may not conduct any shooting in the Shooting
Step, regardless of whether they move or
not.
Shooting through Gliders
Gliders are only markers showing where
troops land and cannot be shot. Gliders
provide Concealment to any teams targeted
through them.
Moving through Gliders
A glider counts as Very Difficult Going to
teams attempting to move through it.
Rommel's Asparagus
The Seize and Hold mission allows the
defending player to place three Rommel's
Asparagus markers to counter glider landings.
Each marker should be modelled 8"/20cm
long by 2"/5cm deep. They count as Rough
terrain (Difficult Going), and therefore force
any glider that contacts them to crash land.

7
Ambush In missions with the Ambush special rule, the
ambushing player holds one or more platoons
(as specified in the mission) in ambush when
they deploy. Platoons held in ambush count
as being on the table, but their location isn't
specified until they reveal themselves. Place
platoons being held in ambush to one side at
the start of the game.
Revealing Ambushes
At the start of your turn, in the Starting Step,
you may deploy any or all platoons that you
have been holding in ambush. You must
deploy an entire platoon at a time and the
platoon must be deployed In Command.
You can deploy a platoon held in ambush
anywhere in your deployment area. You do
not have to decide where your platoon will be
deployed until you deploy it.
Teams deployed in ambush must be either:
- More than 16"/40cm away from all enemy
teams, or
- More than 4"/10cm away from all enemy
teams and either in concealing terrain or
out of Line of Sight of the enemy.
(Note that stationary Infantry teams in the
open are concealed but not in concealing
terrain!)
Reconnaissance avoids Ambushes
An ambushing platoon may not deploy teams
within 8"/20cm and in Line of Sight of a
Recce team unless the Recce team moved At
the Double their last turn.
Defensive Battle In a defensive battle mission a Tank
Company will always be the attacker and an
Infantry Company will always defend.
This means that a Tank Company will attack a
Mechanised Company or an Infantry
Company, while a Mechanised Company will
attack an Infantry Company.
In other circumstances, such as when both
sides are Tank Companies, both players roll a
die with the higher-scoring player attacking.
Obacht! Bei Kampagnenspielen des
Spieltriebs Frankfurt gilt die Defensive Battle
Regel nicht. Angreifer ist automatisch der
Spieler, der auf dem Kampagnenplan ins Feld
seines Gegenspielers gezogen ist. Der andere
Spieler ist entsprechend der Verteidiger. Eine
Ausnahme hierzu ist die Mission
Counterattack. Bei dieser Mission ist der
Spieler, der ins Feld seines Gegenspielers
gezogen ist, der Verteidiger.
Fair Fight In missions using the Fair Fight special rule it
is possible for neither player to win. If neither
player wins, both players look up the number
of enemy platoons they destroyed as though
their opponent was the winner and use the
Loser's Points column to determine their
Victory Points.
Hasty Defence The defender gets one defence point per
platoon that starts the game on the table. It
costs two defence points for the defender to
place a platoon in Ambush. It costs one
defence point for the defender to place a
platoon in Prepared Positions. To place a
platoon both in Ambush and Prepared
Positions would cost three defence points.
Intense Battle Ignore the first platoon Destroyed on either
side when calculating Victory Points in a
mission designated as an Intense Battle.

8
Limited Fortifications Given time, an army will prepare fortifications
to make its defensive positions secure.
Basic Fortifications
Every platoon that contains 4 or more
Infantry teams and that begins the game
deployed on the table has the following
fortifications:
- one section of Trench Line for each 4
Infantry teams it has, plus one section of
Trench Line for all of the remaining
Infantry teams, and
- three sections of Barbed Wire
Entanglements.
Platoons that begin the game on table may
deploy their Gun teams in Gun Pits and their
Tank teams in Tank Pits.
Additional Fortifications
In addition to the Basic Fortifications listed
above, the defenders also get fortification
points to buy Fortifications of their choice.
The number of fortification points they have
is determined by the width of the table.
Table Width Fortification Points
4'/120cm 24 points
5'/150cm 30 points
6'/180cm 36 points
Once you have determined how many
fortification points you have you may use
them to buy fortifications. You may not spend
more than half of you total fortification points
on any one type of fortification.
Fortification Costs
Fortification Cost per Section
Trench Lines 2 points
Barbed Wire Entanglement 2 points
Bunker 6 points
Minefield 5 points
Anti-tank Obstacle 10 points
Once purchased all fortifications are placed on
the table in the are shown on the mission
map during the defender's Deployment.
Pioneer Deployment
In missions with the Fortifications special
rule, attacking Pioneer teams may be
deployed 4"/10cm further forward than usual,
but they may not be within 4"/10cm of any
defending team.
Die genauen Regeln zu den einzelnen
Fortifications befinden sich am Ende
dieses Hefts!
Mobile Battle In a mission with the Mobile Battle special
rule the following rules apply in the first
Shooting Step of the player who has the first
turn. They do not apply in the second player's
turn, nor in subsequent turns.
- All teams belonging to the player who has
the first turn count as having moved in
their first Movement Step, whether they
actually moved or not. They must fire at
their reduced ROF for moving and cannot
fire artillery bombardments.
- All teams belonging to the second player
count as if they had moved in their last
turn, so teams cannot be Gone to Ground
and Infantry teams cannot be Concealed in
open terrain.
- The player who has the first turn cannot use
Ground-attack aircraft in that Shooting
Step.
These rules only apply in the Shooting Step of
the player taking the first turn. Their teams
can still move or dig in as normal in their
Movement Step and launch assaults in the
Assault Step.

9
Night Attack The game starts in darkness and uses the
Night Fighting rules until morning breaks.
- At the start of the defender's turn three, the
defender rolls a die. On a roll of 5+,
morning has broken.
- If the roll is unsuccessful, at the start of the
attacker's next turn they roll two dice with
morning breaking on any roll of 5+
- If it is still dark at the start of the defender's
next turn, they roll three dice, and so on
until morning breaks on any roll of 5+
Once morning breaks the Night Fighting rules
are no longer used, and it is daylight for the
remainder of the game.
Night Fighting Moving at Night
Teams may not move further than 8"/20cm
or move At the Double at night.
Teams must re-roll successful Bogging Tests
when moving through Rough terrain.
Shooting at Night
Each time you select a platoon to shoot with,
roll a die and consult the Night Visibility table.
The result is the maximum distance that the
platoon's teams can shoot at targets that did
not shoot. This does not affect Line of Sight,
just effective range of your weapons, and
only applies to that platoon for this turn.
The platoon can only shoot at, or range in on,
teams within that distance unless the target
team fired its weapons. Anything further
away is invisible in the darkness.
Enemy teams that fired in their Shooting Step
are always visible as long as they are within
Line of Sight.
Roll to determine the visibility distance before
you select your targets.
Night Visibility
1 4"/10cm
2 8"/20cm
3 12"/30cm
4 16"/40cm
5 20"/50cm
6 24"/60cm
Teams spotting for an Artillery Bombardment
must choose a team that is within the
distance rolled on the Night Visibility table as
their Aiming Point. Teams firing an Artillery
Bombardment do not have their range
restricted by Night Fighting rules.
Concealment
All teams count as Concealed at night. This
only benefits teams that are not already
Concealed.
Night is not Concealing Terrain, however, so
ambushing troops must deploy at least
16"/40cm from the enemy when in the open.
The Concealment of night does not allow
reconnaissance troops to use Cautious
Movement. They must be Concealed by
terrain.
No Air Support
Air Support may not be requested on turns
where the night-fighting rules are in effect.
Night Training The attacking Company may ignore the usual
rules regarding movement at night and may
instead move normally.

10
Preliminary Bombardment To conduct a preliminary bombardment, the
attacking player works through the defending
platoons deployed on the table one at a time,
including platoons that are held in Ambush.
The attacker rolls a die per team in the
platoon as if the whole platoon were under
the template of an artillery bombardment. For
each roll of 4+ the defending platoon takes a
hit on a team in the platoon chosen by the
defender. As always, hits must be distributed
evenly and should be assigned as though
they were caused by an artillery
bombardment.
The defender then rolls a save for each
Infantry or Gun team that was hit. Any team
that fails their save is removed from the
game even if it is in Bulletproof Cover.
The defender gets an Armour Save roll for
armoured vehicles. The Anti-tank rating of
the heavy guns firing the bombardment is 6,
so if the die roll plus the vehicle's Top armour
is 5 or less, the vehicle is removed from the
game. On a higher roll the vehicle is
unharmed.
Vehicle in Tank Pits roll their extra 4+ Tank
Pit Save if they fail their normal Armoured
Save. If they pass this, they are unharmed
and remain on table.
Unarmoured vehicles do not have any save
due to the intensity of the bombardment and
are automatically removed from the table
unless the are in a Tank Pit where they get
their 4+ Tank Pit Save.
To reflect the mind-numbing fury of the
bombardment all defending platoons on the
table start the game Pinned Down and all
defending Armoured vehicles on the table
start the game Bailed Out.
Defending teams may not start the game
mounted in their transport vehicles or on
tanks and, as normal, may not mount up
Bailed Out transport vehicles or tanks until
the crew have remounted.
Company and Higher Command teams and
Warrior teams are hardened veterans and
always survive a preliminary bombardment,
so do not roll to hit them.
Remember that losses taken before the first
turn of play do not affect Platoon or Company
Morale Checks.
Prepared Positions Players who start missions in Prepared
Positions my have all of their Infantry and
Gun teams deployed in Foxholes. All of their
Concealed teams begin the game Gone to
Ground.
Random Deployment When a player deploys a platoon under the
Random Deployment special rule, they roll a
die to determine where it is deployed.
- On a roll of 1 to 4, deploy the platoon in the
corresponding area shown on the mission
map.
- On a roll of 5 or 6, the player may deploy
the platoon in an area of their choice or
hold it in Reserve.
All teams must deploy more than 16"/40cm
away from enemy teams within Line of Sight,
or more than 8"/20cm from teams outside of
Line of Sight.
Roll for, and deploy, each platoon in turn. Do
not roll for the next platoon until the current
one is deployed.
Independent teams may choose to deploy
anywhere in the deployment area. They do
not need to roll to determine their location.

11
Reserves In missions that use the Reserves special
rule, players with reserves hold one or more
platoon (as specified in the mission) in
reserve when they deploy. Place these
platoons to one side at the start of the game.
At the start of your first turn roll a die. On a
roll of 5+ your first reserve platoon arrives. It
may be any platoon of your choice.
At the start of you second turn roll two dice.
Each roll of 5+ results in another platoon
arriving from your reserves. So, if you're
lucky, you could have up to two platoons
arriving from reserves during your second
turn.
Keep rolling at the start of each of your
following turns adding one more die than the
previous turn, so at the start of turn 3 you
roll three dice, at the start of turn 4 you roll
four dice, and so on. Each roll of 5+ brings
another platoon on from your reserves.
When a reserve platoon arrives place its
Platoon Command team at you edge of the
table to remind you of its arrival. During your
Movement Step move the newly arrived
platoon on from the table edge indicated in
the mission briefing. Immobile Gun teams
without Transport teams can be placed just
on from the table edge counting as moving,
but cannot move further from there.
Delayed Reserves
The Delayed Reserves special rule works the
same as the normal Reserves special rule
except that the player does not start rolling
for their Reserves until turn three, and then
they got one die.
This increases by one die per turn as normal,
so that on turn four they roll two dice, on
turn five they roll three dice, and so on.
Mobile Reserves
The defender may deploy only one platoon
with its vehicles on the table. Any other
platoons that wish to use their tanks and
transport must be held in Reserve.
The defending player may deploy any or all of
their remaining platoons on the table, but
they fight without their vehicles. These
platoons may only deploy their Infantry and
Gun teams. All Tank and Transport in these
platoons are sent to the rear before the game
begins and take no part in the battle.
Scattered Reserves
The Scattered Reserves special rule operates
in the same way as the Reserves special rule
with the following exception.
When each platoon arrives from reserve, the
defender rolls a die to determine from which
table edge or corner it will arrive (the mission
map shows the edge or corner for each roll).
If the reserves arrive from a corner, they
must enter the table within 16"/40cm of the
corner.
Local Reserves
Local Reserves are handled like Reserves with
two exceptions:
1. Start rolling for reserves at the start of
your second turn but start with two dice (3 on
your third turn and so forth).
2. No matter how many 5+ results you get
only one platoon may enter per turn.
Marching Reserves
At the beginning of turn one and afterwards,
roll one die for every platoon in your force
which is currently in Marching Reserve off
table. For example for a force of 6 platoons
roll six dice on the first turn. If ANY of these
dice score a 5 or higher you may select ONE
platoon to enter the table this turn.
You must select platoons with a faster speed
before platoons with a slower speed. For
example a platoon with a speed of 16"/40cm
(light tanks) would have to be chosen for
entry before a platoon with a speed of
8"/20cm (heavy tanks).

12
River Assault Landing Points
An Infantry or Man-packed Gun team that
began its Movement Step adjacent to a river
edge may enter the river and begin crossing.
Place the team in the river adjacent to the
opposite bank of the river at the landing point
it is paddling towards.
Teams cannot be placed at a landing point
closer than 2”/5cm to an enemy team that is
visible to it.
Get Across
While in the river, teams may not shoot,
move, assault, or be assaulted.
Get Out
When a team begins its Movement Step at its
landing point in the river, it exits the river
during its movement. It uses its normal
movement counting as if they started their
movement in Difficult Going.
Sitting Ducks
Teams cannot be Concealed or Gone to
Ground while in a river.
Teams crossing a river do not have their
normal Infantry Save.
Instead, roll a die for each hit:
• If the result is 5+, the team manages to
avoid any casualties despite their exposed
position.
• Otherwise, the team has been cut down
during the crossing and is Destroyed.
Pioneers
Pioneer Infantry teams ignore the Sitting
Ducks special rule, and retain their normal
Infantry 3+ save.
Rivers in FoW
FoW distinguishes between rivers and
streams. Make sure you define your
waterways before the start of the game.
Streams are Very Difficult Going and can only
be forded by Fully-tracked vehicles and
troops on foot. Creeks, like fords across
streams, are usually Difficult Going.
A river that is approximately 4”/10cm to
8”/20cm wide is Impassable to all teams but
Infantry and Man-packed Gun teams may
cross rivers up to 8”/20cm wide in Missions
using the River Assault special rules.
Amphibious vehicles using the Amphibious
special rule found on page 46 of the Flames
Of War rulebook can also cross rivers.

13
Strategic Withdrawal Only a fool stays in a losing position.
Timing a Platoon Withdrawal
Starting with turn three, in the Starting Step
when they would roll for Reserves if they had
any, the defending player counts the number
of platoons that they have on table.
- If the number is 5 or more, the defender
must withdraw one platoon.
- If they have less than 5 platoons, they gain
a Delay Counter instead.
Delay Counters
Add the number of Delay Counters to the
number of platoons that you have on table
when working out whether to withdraw a
platoon this turn.
When you withdraw a platoon, remove all
Delay Counters as well.
How to Withdraw Platoons
When the defending player is required to
withdraw a platoon they may withdraw any
platoon on the table. All of the teams of that
platoon are removed from the table and it is
considered to have withdrawn.
If a withdrawing platoon is both below half
strength and has teams within 8"/20cm of
enemy teams, there is a chance of their
withdrawal breaking into a rout. Make a Skill
Test before removing the teams.
- If the platoon passes, they successfully
withdraw.
- If they fail, they withdraw, but the whole
platoon counts as Destroyed.
Company Morale
Platoons that withdraw without being
destroyed are ignored and do not count as
either present on the table or Destroyed for
Company Morale Checks.
Platoons that were Destroyed during their
withdrawal count as Destroyed for Company
Morale Checks.
Phased Objective Withdrawal
At the start of their turns six and seven the
defender removes one of the objectives
placed by the attacker.
Surprise To simulate the time taken to get the
defending force fully ready to fight, all
defending platoons on the table start the
game Pinned Down and all defending
Armoured vehicles on the table start the
game Bailed Out.
Defending teams may not start the game
mounted in their transport vehicles or on
tanks, and as normal, may not mount Bailed
Out transport vehicles or tanks until the crew
have remounted.
Unload the Gliders During the game all Glider delivered platoons,
except those that land on the table in a Coup-
de-main, may only arrive on table after all
Parachute platoons. Glider delivered Support
platoons must arrive last of all.

14
2 – FREE-FOR-ALL
Both sides attacking each other in force
simultaneously was a rare event but not
totally unheard of. Especially the confusing
nature of urban fighting did produce such
battles.
Free-for-All uses the Fair Fight and Mobile
Battle special rules.
Attacker's table edge
Defender's table edge
YOUR ORDERS ATTACKER
Your force is punching into enemy territory.
You must seize one of your objective points
before the enemy seizes one of theirs.
DEFENDER
The enemy is breaking through our frontline
and your company has to counterattack.
You must seize one of your objective points
before the enemy seizes one of theirs.
PREPARING FOR BATTLE 1. Both players roll a die. The player with the
higher score chooses one of the long table
edges to attack from. The other player
defends from the opposite table edge.
2. The attacking player now places two
objectives on the defender's side of the
table. The defending player then places
two objectives on the attacker's side of the
table. The objectives must be at least
16"/40cm from the centre line of the table
and may not be placed within 8"/20cm of
the side table edges. Both of a player's
objectives must be within 48"/120cm of
each other.
3. Both players, starting with the attacking
player, alternate placing platoons in their
own half of the table. The platoons may
not be placed within 12"/30cm of the
centre line of the table.
4. Both players now alternate placing their
independent teams in their deployment
areas starting with the attacking player.
BEGINNING THE BATTLE 1. Starting with the attacker, both players
make Reconnaissance Deployment moves
for any Recce Platoons they have on the
table.
2. Both players now roll a die. The player
finishing their deployment first adds +1 to
their roll. The player with the higher result
has the first turn. In the event of a tie roll
again.
3. Because the Free-for-All mission uses the
Mobile Battle special rule all teams are
moving at the start of the battle.
ENDING THE BATTLE The battle ends when either:
� a player starts their turn in possession of
any of the objectives that they placed in
the enemy deployment area, or
� the game runs out of time.
DECIDING WHO WON The player that took their objective has
secured a key piece of terrain on the field,
forcing the enemy onto the defensive and
winning the day.
Calculate your Victory Points using the Victory
Points Table on page 195 of the Rulebook.
(Page 149 of the Free Rulebook.)
If neither side won use the Fair Fight special
rule to determine their Victory Points.

15
3 – TRENCH FIGHT
Sometimes manoeuvring around a
strongpoint isn't feasible and a direct
assault becomes necessary.
The Trench Fight uses the Ambush,
Defensive Battle, Intense Battle,
Limited Fortifications, Preliminary
Bombardment, Prepared Positions, and
Reserves special rules.
Attacker's table edge
Defender's table edge
YOUR ORDERS ATTACKER
We have forced the enemy to fall back to
fortified positions.
You must break the enemy trench line and
capture one of your objectives.
DEFENDER
You must hold the enemy back until
reinforcements arrive.
If necessary you must drive the enemy
back out of you trenches and restore the
situation.
PREPARING FOR BATTLE 1. Determine the attacker and defender
using the Defensive Battle special rule.
2. The defending player chooses which
short table end they will deploy in.
3. Starting with the defender, both players
now place one objective each in the
defender's end of the table. The
objectives must be at least 8"/20cm from
the centre table line, and all table edges.
4. Next the defender places the
fortifications they have selected in their
half of the table and up to 8"/20cm into
the attacker's half of the table.
5. The defending player nominates at least
half of their platoons to be hold off the
table in Reserve at the start of the
game. Of the remaining platoons up to
half may be held in Ambush. Finally,
they deploy the rest of their forces in the
defender's half of the table.
6. The attacker deploys their entire force at
least 16"/40cm back from the table's
centre line. Remember, Pioneer teams
may be deployed 4"/10cm further
forward, but not within 4"/10cm of any
defending team.
7. Both players now place their independent
teams in their deployment areas starting
with the defending player.
BEGINNING THE BATTLE 1. Both sides begin the game in Prepared
Positions, so the troops are in Foxholes
and Gone to Ground.
2. The attacking player conducts a
Preliminary Bombardment on the
defender's forces.
3. The attacker makes Reconnaissance
Deployment moves for any Recce
Platoons they have on table.
4. The attacking player has the first turn.
ENDING THE BATTLE The battle ends when either:
� the attacker holds any of the objectives
at the start of their turn, or
� the defender starts any of their turns
from turn six with no attacking teams in
the defender's half of the table.
DECIDING WHO WON The attacker wins if the game is ended
because they started one of their turns
holding an objective. The defences proved
unable to stop their attack.
Otherwise the defender wins. The
fortifications proved to be too tough for the
enemy.
Calculate your Victory Points using the
Victory Points Table on page 195 of the
rulebook (Page 149 of the Free Rulebook)
and the Intense Battle special rule.

16
4 – DELAYING ACTION
Once an offensive strikes it is up to the first
line of defence to either beat off the attack
or to delay it long enough for the reserves
to react.
Delaying Action uses the Ambush,
Defensive Battle, Local Reserves, and
Prepared Positions special rules.
Attacker's table edge
Defender's table edge
YOUR ORDERS ATTACKER
You are the spearhead of a larger offensive.
Your orders are to defeat the enemy
covering your front within the time line.
This will allow our reserves to exploit the
situation before the enemy can react.
DEFENDER
The enemy has launched an offensive in
your sector. You must delay their forward
spearhead long enough for our reserves to
react.
PREPARING FOR BATTLE 8. Determine the attacker and defender
using the Defensive Battle special rule.
9. The defending player chooses which
short table end they will deploy in.
10. Starting with the defender, both
players now place one objective each in
the defender's end of the table. The
objectives must be at least 12"/30cm
from the centre line of the table, and
may not be placed within 8"/20cm of any
table edge.
11. Next the defending player nominates
at least half of their platoons to be hold
off the table in Local Reserve at the
start of the game. Of the remaining
platoons one may be held in Ambush.
This platoon may deploy anywhere on
the board except for No Man's Land using
the normal rules for revealing ambushes.
Finally, they deploy the rest of their
forces. Platoons capable of firing
bombardments may deploy anywhere
except for No Man's Land (allowing them
to be placed in the rear), all other
platoons must deploy in the attacker's
half of the table within 12"/30cm of the
centre line.
12. The attacker deploys any Recce
Platoons they have within 4"/10cm of
their table edge. All other attacking
forces enter on turn one.
BEGINNING THE BATTLE 5. The defender's platoon held in Ambush
is in Prepared Positions, so the troops
are in Foxholes and Gone to Ground.
6. The attacker makes Reconnaissance
Deployment moves for any Recce
Platoons they have on table.
7. The defending player has the first turn.
ENDING THE BATTLE The battle ends when either:
� the attacker holds any of the objectives
at the start of their turn, or
� at the start of the defender's thirteenth
turn (remember to check Company
Morale if necessary before determining
who won).
DECIDING WHO WON The attacker wins if the game is ended
because they started one of their turns
holding an objective. An exploitable hole
has been opened in the enemy's front line.
Otherwise the defender wins. The enemy's
offensive has been delayed long enough to
stabilize the front line.
Calculate your Victory Points using the
Victory Points Table on page 195 of the
Rulebook. (Page 149 of the Free Rulebook.)

17
5 – HASTY ATTACK
Whatever the reasons are, for some assaults
the time could not be taken to properly form
up the attacking forces.
Hasty Attack uses the Ambush, Defensive
Battle, Prepared Positions, and Reserves
special rules.
YOUR ORDERS ATTACKER
Time has been traded for speed in this attack
Exploit the enemies position and breach their
defence before they can react.
DEFENDER
Your forces have been caught off guard. You
must hold until reinforcements arrive to
secure your position.
Attacker's table edge
Defender's table edge
PREPARING FOR BATTLE 1. Determine the attacker and defender using
the Defensive Battle special rule.
2. The defending player chooses which short
table end they will deploy in.
3. Starting with the defender, both players
now place one objective each in the
defender's end of the table. The objectives
must be at least 20"/50cm from the centre
line of the table, and may not be placed
within 8"/20cm of any table edge.
4. Next the defending player nominates at
least half of their platoons to be hold off
the table in Reserve at the start of the
game. Then the defender nominates one of
the remaining platoons to be held in
Ambush. Finally, they deploy the rest of
their platoons in their half of the table at
least 12"/30cm back from the centre table
line.
5. The attacker nominates two of their
platoons to be hold off the table in
Reserve at the start of the game. Then
the attacker deploys a single platoon in the
forward position (12" square, see
diagram). Finally, they deploy the rest of
their platoons within 12"/30cm of their
table's edge.
6. Both players now place their independent
teams in their deployment areas starting
with the defending player.
BEGINNING THE BATTLE 1. The defending force begins the game in
Prepared Positions, so their troops are in
Foxholes and Gone to Ground.
2. Starting with the defender, both players
make Reconnaissance Deployment moves
for any Recce Platoons they have on the
table.
3. The attacking player has the first turn.
ENDING THE BATTLE The battle ends when either:
� the attacker starts any of their turns from
turn three holding one of the objectives,
or
� the defender starts any of their turns from
turn six with no enemy teams within
16"/40cm of an objective.
DECIDING WHO WON The attacker wins if the game is ended
because they started one of their turns
holding an objective. The attacker hasty
attack has been successfully and their forces
have broken the enemy is a daring attack.
Otherwise the defender wins. The defender
has reacted before the attacker could
concentrate their forces properly.
Calculate your Victory Points using the Victory
Points Table on page 195 of the Rulebook.
(Page 149 of the Free Rulebook.)

18
6 – BREAKTHROUGH
Often a defence line is formed ahead of an
important objective thus forcing the attacker
to break through and gain ground to achieve
their goals.
Breakthrough uses the Defensive Battle,
Delayed Reserves, Mobile Reserves, and
Prepared Positions special rules.
Attacker's table edge
Defender's table edge
YOUR ORDERS ATTACKER
The enemy does not have sufficient strength
to cover the entire front and has left gaps big
enough to send a small flanking force
through to help you break their defences.
You must seize one of the objectives, either
by direct assault, or with a cunning flank
attack.
DEFENDER
Your force is too small to hold everywhere so
you have concentrated your defences at the
vital points. Now your reconnaissance troops
report a strong attack force moving around
your flank while another strong force is
massing for a frontal assault.
You must secure the objectives and drive the
enemy back.
PREPARING FOR BATTLE 1. Mark the centre of the table so that the
table quarters are obvious to both players.
2. Determine the attacker and defender
using the Defensive Battle special rule.
3. The defending player chooses two
diagonally opposite table quarters to
deploy in. The attacker then chooses one
of the remaining table quarters as their
deployment area.
4. The attacker places two objectives in the
final table quarter. They must be at least
8"/20cm from the table centre lines and
edges.
5. The defender deploys any or all of their
platoons in their deployment area using the
Mobile Reserves special rule. All
remaining platoons are held off the table in
Reserve.
6. The attacker must hold one platoon, and
may hold up to half of their platoons, off
table to make a flank attack as Delayed
Reserves. The rest of the force deploys in
their table quarter more than 12"/30cm
from all enemy teams.
7. Both players now place their independent
teams in their deployment areas starting
with the defending player.
BEGINNING THE BATTLE 1. The defending force begins the game in
Prepared Positions, so their troops are in
Foxholes and Gone to Ground.
2. Starting with the defender, both players
make Reconnaissance Deployment moves
for any Recce Platoons they have on the
table.
3. The attacking player has the first turn.
ENDING THE BATTLE The battle ends on or after six turns when
either:
� the attacker holds any of the objectives at
the start of their turn, or
� the defender starts their turn with no
enemy teams within 16"/40cm of the
objectives.
DECIDING WHO WON The attacker wins if the game is ended
because they started one of their turns
holding an objective. They attacker has
broken through and is now deep behind the
enemy line.
Otherwise the defender wins. The
breakthrough has been cut off and the front
line held.
Calculate your Victory Points using the Victory
Points Table on page 195 of the Rulebook.
(Page 149 of the Free Rulebook.)
19
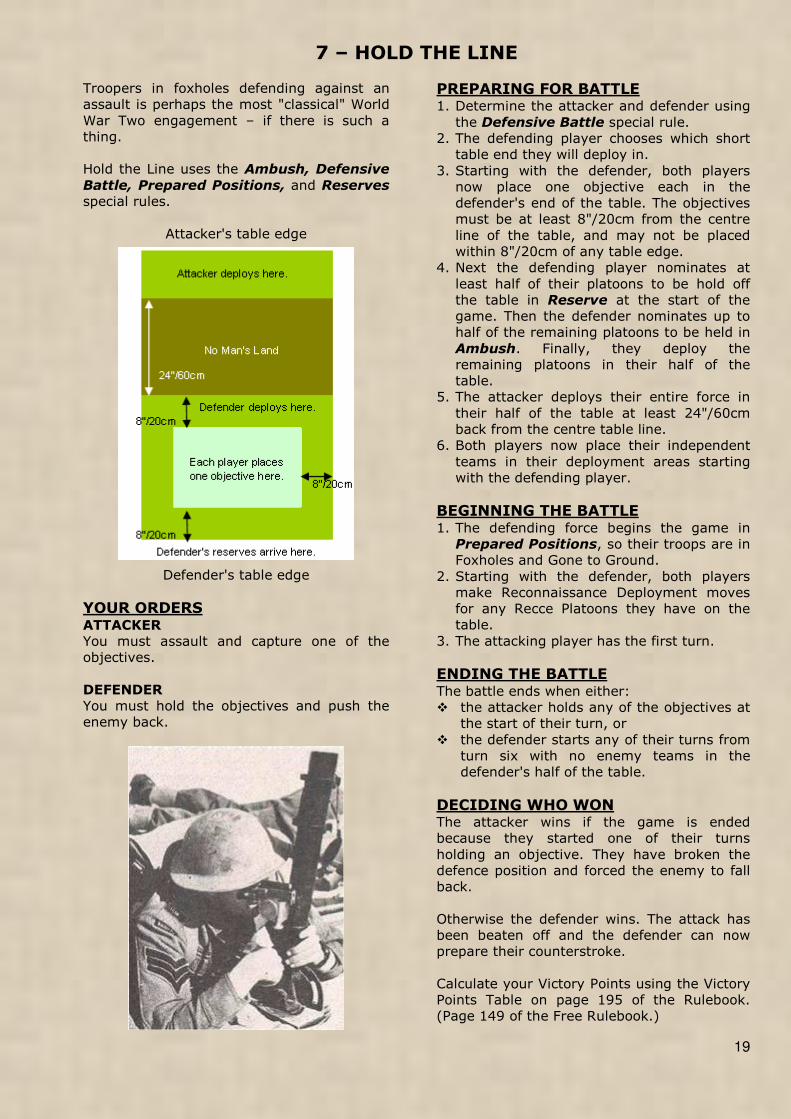
7 – HOLD THE LINE
Troopers in foxholes defending against an
assault is perhaps the most "classical" World
War Two engagement – if there is such a
thing.
Hold the Line uses the Ambush, Defensive
Battle, Prepared Positions, and Reserves
special rules.
Attacker's table edge
Defender's table edge
YOUR ORDERS ATTACKER
You must assault and capture one of the
objectives.
DEFENDER
You must hold the objectives and push the
enemy back.
PREPARING FOR BATTLE 1. Determine the attacker and defender using
the Defensive Battle special rule.
2. The defending player chooses which short
table end they will deploy in.
3. Starting with the defender, both players
now place one objective each in the
defender's end of the table. The objectives
must be at least 8"/20cm from the centre
line of the table, and may not be placed
within 8"/20cm of any table edge.
4. Next the defending player nominates at
least half of their platoons to be hold off
the table in Reserve at the start of the
game. Then the defender nominates up to
half of the remaining platoons to be held in
Ambush. Finally, they deploy the
remaining platoons in their half of the
table.
5. The attacker deploys their entire force in
their half of the table at least 24"/60cm
back from the centre table line.
6. Both players now place their independent
teams in their deployment areas starting
with the defending player.
BEGINNING THE BATTLE 1. The defending force begins the game in
Prepared Positions, so their troops are in
Foxholes and Gone to Ground.
2. Starting with the defender, both players
make Reconnaissance Deployment moves
for any Recce Platoons they have on the
table.
3. The attacking player has the first turn.
ENDING THE BATTLE The battle ends when either:
� the attacker holds any of the objectives at
the start of their turn, or
� the defender starts any of their turns from
turn six with no enemy teams in the
defender's half of the table.
DECIDING WHO WON The attacker wins if the game is ended
because they started one of their turns
holding an objective. They have broken the
defence position and forced the enemy to fall
back.
Otherwise the defender wins. The attack has
been beaten off and the defender can now
prepare their counterstroke.
Calculate your Victory Points using the Victory
Points Table on page 195 of the Rulebook.
(Page 149 of the Free Rulebook.)

20
8 – CONSOLIDATE
After achieving a breakthrough an attacking
force had to exploit the situation and occupy
key terrain as fast a possible before the
resistance stiffened.
Consolidate uses the Hasty Defence,
Delayed Reserves, and Scattered
Reserves special rules.
Attacker's table edge
Defender's table edge
YOUR ORDERS ATTACKER
You have broken through their main line of
resistance. You must assemble your forces in
order to occupy the forward favourable
ground to prepare for the final offensive
planned to destroy the enemy.
DEFENDER
Your main line of resistance has been broken.
While forces are on their way to reinforce the
line you must delay the enemy from
occupying favourable ground.
PREPARING FOR BATTLE 1. Determine the attacker and defender using
the Defensive Battle special rule.
2. The defending player chooses which long
side of the table they will deploy in.
3. Starting with the attacker, both players
now place one objective each in the
defender's side of the table. The objectives
must be at least 8"/20cm from the centre
line of the table, and may not be placed
within 8"/20cm of any table edge. The
objectives may not be closer than
24"/60cm to each other.
4. Next the defending player nominates at
least half of their platoons to be hold off
the table in Delayed Reserve at the start
of the game. Then the defender deploys
the rest of their platoons in their side of
the table.
The attacker nominates at least half of
their platoons to be hold off the table in
Scattered Reserve at the start of the
game. The attacker deploys the rest of
their platoons in their half of the table at
least 16"/40cm back from the centre table
line.
5. Both players now place their independent
teams in their deployment areas starting
with the defending player.
BEGINNING THE BATTLE 1. Starting with the defender, both players
make Reconnaissance Deployment moves
for any Recce Platoons they have on the
table.
2. The defending player has the first turn.
ENDING THE BATTLE The battle ends when either:
� the attacker holds any of the objectives at
the start of their turn, or
� the defender starts any of their turns from
turn six with no enemy teams in the
defender's half of the table.
DECIDING WHO WON The attacker wins if the game is ended
because they started one of their turns
holding an objective. The breakthrough has
been successfully exploited.
Otherwise the defender wins. The
breakthrough has been stalled.
Calculate your Victory Points using the Victory
Points Table on page 195 of the Rulebook.
(Page 149 of the Free Rulebook.)

21
9 – COUNTERATTACK
All armies launched counterattacks to
recapture recently lost positions before the
enemy had a chance to consolidate their hard
won victory.
Counterattack uses the Ambush, Defensive
Battle, Prepared Positions, Delayed
Reserves, and Random Deployment
special rules.
Attacker's table edge
Defender's table edge
YOUR ORDERS ATTACKER
The enemy has recently captured a vital piece
of ground creating a salient in the frontlines.
Your company is the only available reserve
and has been ordered to launch an immediate
counterattack to dislodge the enemy from his
positions and restore the situation.
DEFENDER
You have just captured a vital objective and
are ordered to hold it until relieved. Strong
enemy forces are still present in the vicinity
and may launch a counterattack. Dig in and
hold until relieved.
PREPARING FOR BATTLE Determine the attacker and defender using
the Defensive Battle special rule.
1. The defending player chooses which long
side of the table they will deploy in.
2. Starting with the defender, both players
now place one objective each in the
defender's deployment area but at least
8"/20cm back from the table edge.
3. Next the defending player nominates at
least half of their platoons to be hold off
the table in Delayed Reserve at the start
of the game. Then the defender nominates
one platoon to be held in Ambush. Finally,
they deploy the remaining platoons in their
half of the table but at least 24"/60cm
back from both short table edges.
4. The attacker deploys all of their platoons
using the Random Deployment special
rule.
5. Both players now place their independent
teams in their deployment areas starting
with the defending player.
BEGINNING THE BATTLE 1. Both players' forces begin the game in
Prepared Positions, so their troops are in
Foxholes and Gone to Ground.
2. Starting with the attacker, both players
make Reconnaissance Deployment moves
for any Recce Platoons they have on the
table.
3. The defending player has the first turn.
ENDING THE BATTLE The battle ends on or after four turns when
either:
� the attacker holds any of the objectives at
the start of their turn, or
� the defender starts any of their turns with
no enemy teams within 16"/40cm of the
objectives.
DECIDING WHO WON The attacker wins if the game is ended
because they started one of their turns
holding an objective. The enemy penetration
has been neutralised and the front stabilised
once more.
Otherwise the defender wins. The
counterattack has been repulsed and the
position reinforced.
Calculate your Victory Points using the Victory
Points Table on page 195 of the Rulebook.
(Page 149 of the Free Rulebook.)
22
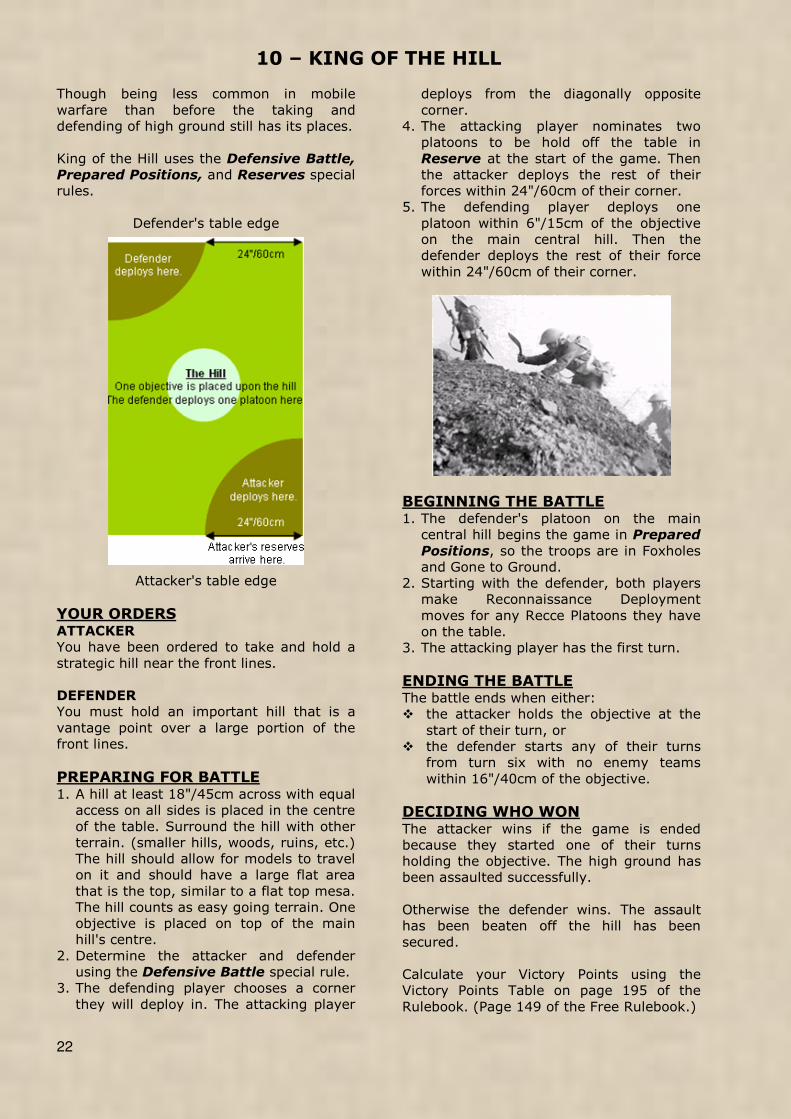
10 – KING OF THE HILL
Though being less common in mobile
warfare than before the taking and
defending of high ground still has its places.
King of the Hill uses the Defensive Battle,
Prepared Positions, and Reserves special
rules.
Defender's table edge
Attacker's table edge
YOUR ORDERS ATTACKER
You have been ordered to take and hold a
strategic hill near the front lines.
DEFENDER
You must hold an important hill that is a
vantage point over a large portion of the
front lines.
PREPARING FOR BATTLE 1. A hill at least 18"/45cm across with equal
access on all sides is placed in the centre
of the table. Surround the hill with other
terrain. (smaller hills, woods, ruins, etc.)
The hill should allow for models to travel
on it and should have a large flat area
that is the top, similar to a flat top mesa.
The hill counts as easy going terrain. One
objective is placed on top of the main
hill's centre.
2. Determine the attacker and defender
using the Defensive Battle special rule.
3. The defending player chooses a corner
they will deploy in. The attacking player
deploys from the diagonally opposite
corner.
4. The attacking player nominates two
platoons to be hold off the table in
Reserve at the start of the game. Then
the attacker deploys the rest of their
forces within 24"/60cm of their corner.
5. The defending player deploys one
platoon within 6"/15cm of the objective
on the main central hill. Then the
defender deploys the rest of their force
within 24"/60cm of their corner.
BEGINNING THE BATTLE 1. The defender's platoon on the main
central hill begins the game in Prepared
Positions, so the troops are in Foxholes
and Gone to Ground.
2. Starting with the defender, both players
make Reconnaissance Deployment
moves for any Recce Platoons they have
on the table.
3. The attacking player has the first turn.
ENDING THE BATTLE The battle ends when either:
� the attacker holds the objective at the
start of their turn, or
� the defender starts any of their turns
from turn six with no enemy teams
within 16"/40cm of the objective.
DECIDING WHO WON The attacker wins if the game is ended
because they started one of their turns
holding the objective. The high ground has
been assaulted successfully.
Otherwise the defender wins. The assault
has been beaten off the hill has been
secured.
Calculate your Victory Points using the
Victory Points Table on page 195 of the
Rulebook. (Page 149 of the Free Rulebook.)

23
11 – ENVELOPMENT
One of the main tactics in WWII was to by-
pass or outflank pockets of resistance and
leave them for follow up troops (often
infantry) to deal with.
Envelopment uses the Ambush, Defensive
Battle, Delayed Reserves, Intense
Battle, Limited Fortifications,
Preliminary Bombardment, Prepared
Positions, and Reserves special rules.
Attacker's table edge
Defender's table edge
YOUR ORDERS ATTACKER
Your orders are to mop up an outflanked
enemy strong-point.
DEFENDER
You have received reports that the enemy is
trying to outflank your fortified positions. You
must hold until reinforcements arrive.
PREPARING FOR BATTLE 1. Determine the attacker and defender
using the Defensive Battle special rule.
2. The defending player chooses which short
table end they will deploy in.
3. Starting with the defender, both players
now place one objective each in the
defender's end of the table. The objectives
must be at least 12"/30cm from the
centre line of the table, and may not be
placed within 8"/20cm of any table edge.
4. Next the defender places the fortifications
they have selected in their half of the
table and up to 8"/20cm into the
attacker's half of the table.
5. Then the defending player nominates at
least half of their platoons to be hold off
the table in Reserve at the start of the
game. Then the defender nominates up to
half of the remaining platoons to be held in
Ambush. Finally, they deploy the
remaining platoons in their half of the
table.
6. The attacker must hold one platoon, and
may hold up to half of their platoons, off
table to make a flanking move as Delayed
Reserves. The rest of the platoons deploy
in their half of the table at least 24"/60cm
back from the centre table line. Remember,
Pioneer teams may be deployed 4"/10cm
further forward, but not within 4"/10cm of
any defending team.
7. Both players now place their independent
teams in their deployment areas starting
with the defending player.
BEGINNING THE BATTLE 1. The defending force begins the game in
Prepared Positions, so their troops are in
Foxholes and Gone to Ground.
2. The attacking player conducts a
Preliminary Bombardment on the
defender's forces.
3. Starting with the defender, both players
make Reconnaissance Deployment moves
for any Recce Platoons they have on the
table.
4. The attacking player has the first turn.
ENDING THE BATTLE The battle ends on or after six turns when
either:
� the attacker holds any of the objectives at
the start of their turn, or
� the defender starts any of their turns with
no enemy teams within 16"/40cm of the
objectives.
DECIDING WHO WON The attacker wins if the game is ended
because they started one of their turns
holding an objective. The enemy's strong-
point has been neutralised.
Otherwise the defender wins. The attack has
been held off.
Calculate your Victory Points using the Victory
Points Table on page 195 of the Rulebook.
(Page 149 of the Free Rulebook.)

24
12 – ENCOUNTER
Manoeuvring units can encounter a lot of
trouble very easily. If neither side backs off
but instead calls for additional support the
action escalates.
Encounter uses the Delayed Reserves, Fair
Fight, Mobile Battle, and Scattered
Reserves special rules.
Attacker's table edge
Defender's table edge
YOUR ORDERS ATTACKER
Your force was advancing when it
encountered opposition.
You must crush the enemy resistance and
seize one of your objectives before the enemy
captures one of theirs.
DEFENDER
While on their way towards new positions
your force has encountered advancing enemy
spearheads.
You must act aggressively until your
reinforcements arrive. Capture one of your
objectives before the enemy captures one of
theirs.
PREPARING FOR BATTLE 1. Both players roll a die. The player with the
higher score chooses one of the long table
edges to attack from. The other player
defends from the opposite table edge.
2. Starting with the attacker, both players
place an objective in their own half of the
table.
3. Both players, having placed an objective in
their own half of the table, now place a
second objective, this time in their
opponent's half of the table, again starting
with the attacking player. The objectives
must be at least 16"/40cm from the centre
line of the table and may not be placed
within 8"/20cm of the side table edges.
4. Starting with the attacker, both players
now nominate at least half of their
platoons to be held off the table in
Delayed Reserve and Scattered
Reserve at the start of the game.
5. Both players, starting with the attacking
player, now alternate placing platoons in
their own half of the table. The platoons
may not be placed within 12"/30cm of the
centre line of the table.
6. Again starting with the attacker, both
players now place their independent teams
in their own deployment areas.
BEGINNING THE BATTLE 1. Starting with the attacker, both players
make Reconnaissance Deployment moves
for any Recce Platoons they have on the
table.
2. Finally both players now roll a die. The
player finishing their deployment first adds
+1 to their roll. The player with the higher
result has the first turn. In the event of a
tie roll again.
3. Because the Encounter mission uses the
Mobile Battle special rule all teams are
moving at the start of the battle.
ENDING THE BATTLE The battle ends when either:
� a player starts their turn in possession of
any of the objectives in the enemy
deployment area, or
� the game runs out of time.
DECIDING WHO WON The player that took their objective wins the
battle. Favourable ground has been occupied
successfully while the enemy has been
blocked from reaching their objectives.
Calculate your Victory Points using the Victory
Points Table on page 195 of the Rulebook.
(Page 149 of the Free Rulebook.)
If neither side won use the Fair Fight special
rule to determine their Victory Points.

25
S1 ARMOURED ENCOUNTER
When they were part of an active or mobile
defence tank units could be ordered to
engage advancing armoured columns.
Armoured Encounter uses the Fair Fight and
Marching Reserves special rules.
Attacker's table edge
Defender's table edge
YOUR ORDERS ATTACKER
Elements of your division have broken
through the enemies front line.
You must exploit the breakthrough and
capture objectives in the enemies rear area
with your armoured company.
DEFENDER
A breach has occurred in the front and enemy
armoured units are pouring through the gap
to endanger vital supply routes in the rear.
You must throw the enemy spearhead back
and defend the objectives with your
armoured company.
PREPARING FOR BATTLE Both players must field a Tank Company.
1. Both players roll a die. The player with the
higher score chooses one of the short table
edges to attack from. The other player
defends from the opposite table edge.
2. Starting with the attacker, both players
place an objective in their opponent's half
of the table. The objectives must be within
8"/20cm of opponent's table edge and may
not be placed within 8"/20cm of the long
table edges.
3. Starting with the attacker, both players
now deploy their Recce Platoons within
8"/20cm of their own table edge but not
within 8"/20cm of the long table edges. All
other forces are held off the table in
Marching Reserve at the start of the
game.
BEGINNING THE BATTLE 1. Starting with the attacker, both players
make Reconnaissance Deployment moves
for any Recce Platoons they have on the
table.
2. Finally both players now roll a die. The
player with the most Recce Platoons adds
+1 to their roll. The player with the higher
result has the first turn. In the event of a
tie roll again.
ENDING THE BATTLE The battle ends on or after four turns when
either:
� a player starts their turn in possession of
the objective in the enemy's half of the
table, or
� the game runs out of time.
DECIDING WHO WON The player that took their objective wins the
battle. Your tankers were able to beat the
enemy in this swirling armoured encounter.
Calculate your Victory Points using the Victory
Points Table on page 195 of the Rulebook.
(Page 149 of the Free Rulebook.)
If neither side won use the Fair Fight special
rule to determine their Victory Points.
26
S2 FIGHTING WITHDRAWAL
A fighting withdrawal allows a commander to
preserve the bulk of his forces while falling
back.
Fighting Withdrawal uses the Ambush,
Defensive Battle, Prepared Positions,
and Strategic Withdrawal special rules.
Attacker's table edge
Defender's table edge
YOUR ORDERS ATTACKER
You must smash the enemy rearguard and
turn their retreat into a full-fledged rout.
Break through the enemy line and capture
one of the objective points before it is too
late.
DEFENDER
You must cover your withdrawal as the army
falls back. The enemy is moving around your
flanks so you cannot stay too long. Hold the
objectives long enough for the rest of the
army to get clear.
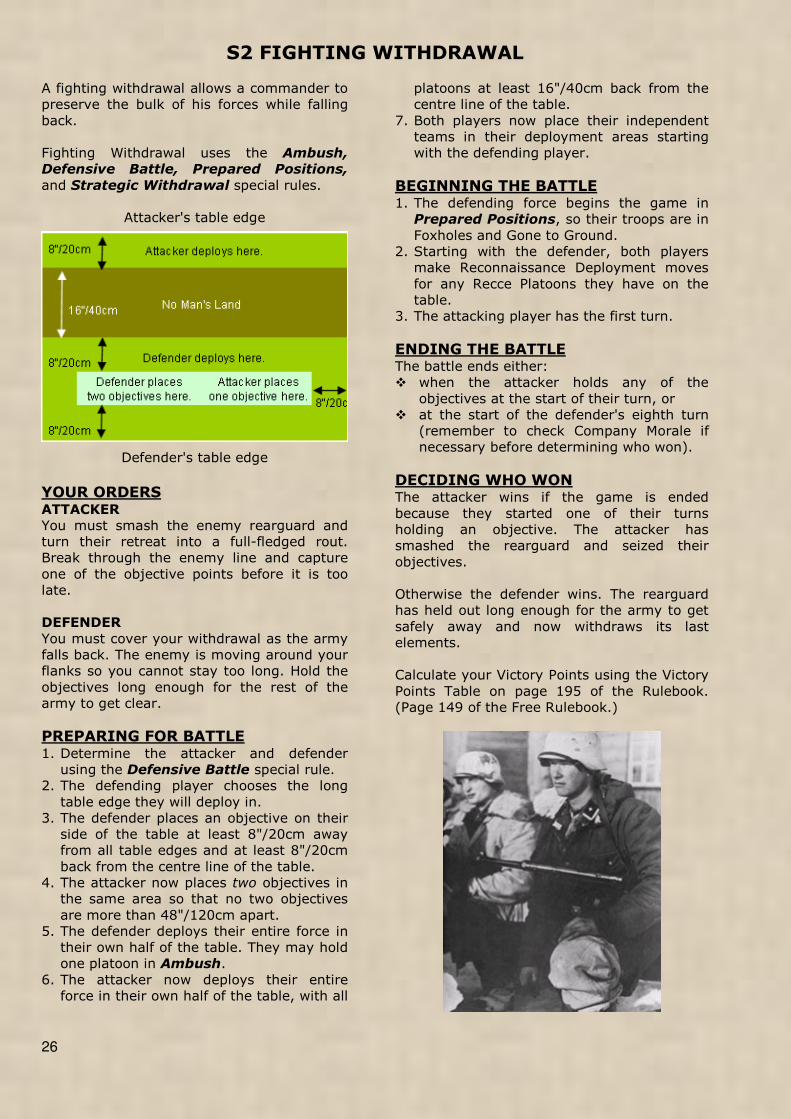
PREPARING FOR BATTLE 1. Determine the attacker and defender
using the Defensive Battle special rule.
2. The defending player chooses the long
table edge they will deploy in.
3. The defender places an objective on their
side of the table at least 8"/20cm away
from all table edges and at least 8"/20cm
back from the centre line of the table.
4. The attacker now places two objectives in
the same area so that no two objectives
are more than 48"/120cm apart.
5. The defender deploys their entire force in
their own half of the table. They may hold
one platoon in Ambush.
6. The attacker now deploys their entire
force in their own half of the table, with all
platoons at least 16"/40cm back from the
centre line of the table.
7. Both players now place their independent
teams in their deployment areas starting
with the defending player.
BEGINNING THE BATTLE 1. The defending force begins the game in
Prepared Positions, so their troops are in
Foxholes and Gone to Ground.
2. Starting with the defender, both players
make Reconnaissance Deployment moves
for any Recce Platoons they have on the
table.
3. The attacking player has the first turn.
ENDING THE BATTLE The battle ends either:
� when the attacker holds any of the
objectives at the start of their turn, or
� at the start of the defender's eighth turn
(remember to check Company Morale if
necessary before determining who won).
DECIDING WHO WON The attacker wins if the game is ended
because they started one of their turns
holding an objective. The attacker has
smashed the rearguard and seized their
objectives.
Otherwise the defender wins. The rearguard
has held out long enough for the army to get
safely away and now withdraws its last
elements.
Calculate your Victory Points using the Victory
Points Table on page 195 of the Rulebook.
(Page 149 of the Free Rulebook.)

27
S3 SEIZE AND HOLD
The Seize and Hold mission reflects the
daring airborne assaults conducted by the
Allied Airborne forces. It is also suitable to
simulate the smaller airborne operations
conducted by other nations.
Seize and Hold uses the Airborne Assault,
Coup-de-Main Glider Assault, Night
Attack, Night Fighting, Night Training,
Reserves, Scattered Reserves, Surprise,
and Unload the Gliders special rules.
Defender's table edge
Airborne player's table edge
YOUR ORDERS ATTACKER
Your airborne troops have been dropped into
enemy territory to capture vital objectives
ahead of the advancing main force.
You must seize an objective point and hold it
until a link-up can be established with your
ground troops.
DEFENDER
You are attacked by airborne assault!
Your mission is to hold both objectives and
drive the attacking force back.
PREPARING FOR BATTLE 1. The player with the airborne force is
always the attacker. If both players have
airborne forces, both player roll a die. The
player with the higher result is the
attacker. In the event of a tie roll again.
2. The defending player places one objective
anywhere on the table at least 16"/40cm
from the table edges.
3. The attacking player places two objectives
anywhere on the table at least 16"/40cm
from the table edges.
4. The defender must hold at least half of
their platoons off table in Scattered
Reserve at the start of the game. The
remaining platoons deploy anywhere on
the table.
5. The attacker must hold at least half of
their platoons off table in Scattered
Reserve, ignoring any that are to be used
in a Coup-de-main. The remaining
platoons are not deployed on table at the
start of the game and will instead move
onto the table in the attacker's first
Movement Step.
6. The attacking player now removes one of
the objectives that they placed (not the
objective that the defender placed).
7. The defender may now place up to three
Rommel's Asparagus markers anywhere on
the table.
8. The attacker selects their table edge and
rolls of Wind Direction.
9. The attacker places the Pathfinder marker
using the Airborne Assault rules.
BEGINNING THE BATTLE 1. Neither player may make any
Reconnaissance Deployment moves.
2. The attacking player has the first turn.
Remember to roll for Reserves in the
Starting Step.
3. At the start of their first Movement Step
the attacker lands any Coup-de-main
gliders.
4. In their first Movement Step the attacker
moves that portion of their force that is
not in reserve onto the table as if arriving
as Scattered Reserves. All reserves
arrive on the table as Scattered
Reserves.
ENDING THE BATTLE The battle ends on or after six turns when
either:
� the attacker holds any of the objectives at
the start of their turn, or
� the defender starts any of their turns with
no enemy teams within 16"/40cm of
either objective.
DECIDING WHO WON The attacker wins if the game is ended
because they started one of their turns
holding an objective. The attack has gained a
foothold and reinforcements are on the way.
Otherwise the defender wins. The airborne
assault has failed.
Calculate your Victory Points using the Victory
Points Table on page 195 of the Rulebook.
(Page 149 of the Free Rulebook.)

28
__
S4 CLEAN SWEEP
It is difficult to completely surround an
enemy force but very much worth the effort.
Mopping pockets up before they can break
out or are relieved can become hazardous
though.
Clean Sweep uses the Defensive Battle and
Prepared Positions special rules.
There are no Attacker's and Defender's table
edges.
YOUR ORDERS ATTACKER
An enemy force has been surrounded at a
strategic objective.
You must attack immediately to take the
objective and clean the area of any enemy
resistance.
DEFENDER
Your force has been hit hard and is now
surrounded. There is little hope of
reinforcements.
You must take up strong defensive positions
and hold on to the objective for as long as
possible.
PREPARING FOR BATTLE 1. Determine the attacker and defender using
the Defensive Battle special rule.
2. Mark the centre of the table.
3. The defending player chooses which short
table end they will deploy in.
4. The attacking player places two objectives
within 8"/20cm of the centre of the table
and at least 8"/20cm from each other.
5. The defending player now places at least
half of their platoons on the table. Each
platoon must be deployed within 8"/20cm
of an objective.
6. The attacker then deploys all of their force
within 6"/15cm of any table edge and at
least 12"/30cm from any of the defenders.
7. Finally the defender deploys the rest of
their force on the table. These must be
16"/40cm from any attacker or 8"/20cm
from any attacker if out of sight.
BEGINNING THE BATTLE 1. Both sides begin the game in Prepared
Positions, so all troops are in Foxholes
and Gone to Ground.
2. The attacking player makes
Reconnaissance Deployment moves for
any Recce Platoons they have on the table.
3. The attacking player has the first turn.
ENDING THE BATTLE The battle ends when either:
� the attacking player starts any turn
holding both objectives, or
� the defending player starts any turn from
turn six holding both objectives.
DECIDING WHO WON The attacker wins if the game is ended
because they started one of their turns
holding both objectives. The enemy
resistance has been neutralised and the
pocket is closed.
Otherwise the defender wins. The attack has
been repulsed and your defences are strong.
Maybe you can hold out long enough to be
relieved?
Calculate your Victory Points using the Victory
Points Table on page 195 of the Rulebook.
(Page 149 of the Free Rulebook.)
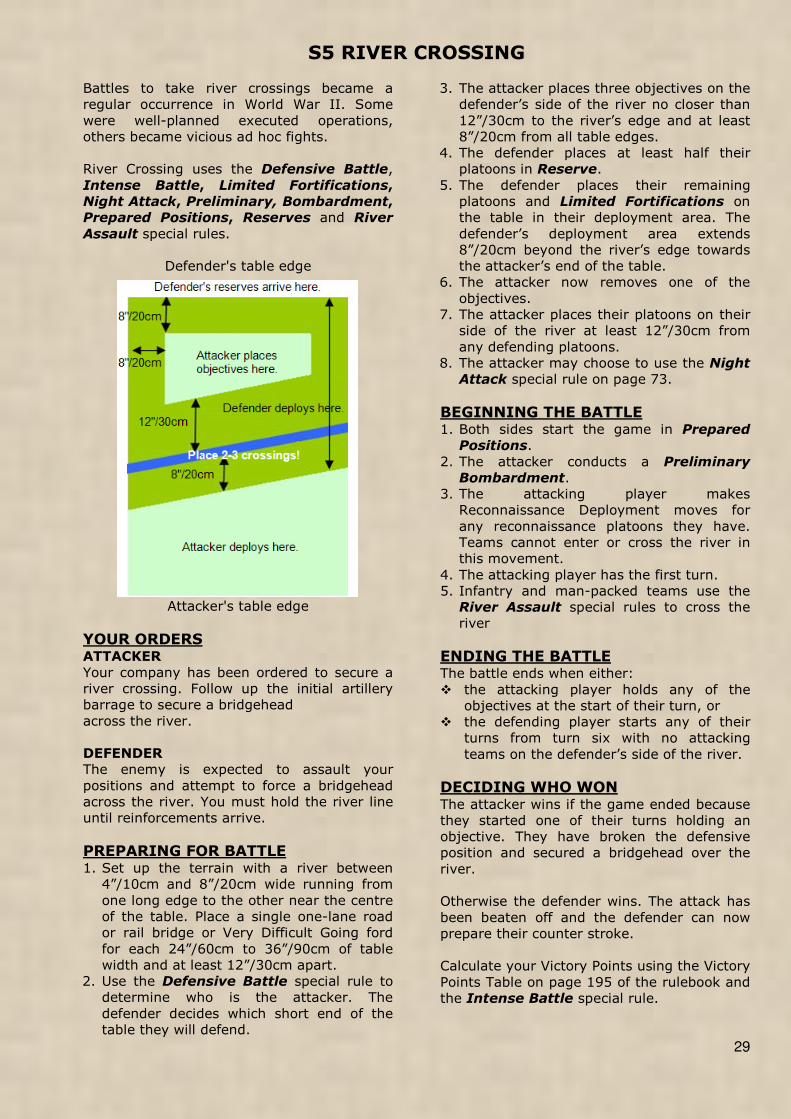
29
S5 RIVER CROSSING
Battles to take river crossings became a
regular occurrence in World War II. Some
were well-planned executed operations,
others became vicious ad hoc fights.
River Crossing uses the Defensive Battle,
Intense Battle, Limited Fortifications,
Night Attack, Preliminary, Bombardment,
Prepared Positions, Reserves and River
Assault special rules.
Defender's table edge
Attacker's table edge
YOUR ORDERS ATTACKER
Your company has been ordered to secure a
river crossing. Follow up the initial artillery
barrage to secure a bridgehead
across the river.
DEFENDER
The enemy is expected to assault your
positions and attempt to force a bridgehead
across the river. You must hold the river line
until reinforcements arrive.
PREPARING FOR BATTLE 1. Set up the terrain with a river between
4”/10cm and 8”/20cm wide running from
one long edge to the other near the centre
of the table. Place a single one-lane road
or rail bridge or Very Difficult Going ford
for each 24”/60cm to 36”/90cm of table
width and at least 12”/30cm apart.
2. Use the Defensive Battle special rule to
determine who is the attacker. The
defender decides which short end of the
table they will defend.
3. The attacker places three objectives on the
defender’s side of the river no closer than
12”/30cm to the river’s edge and at least
8”/20cm from all table edges.
4. The defender places at least half their
platoons in Reserve.
5. The defender places their remaining
platoons and Limited Fortifications on
the table in their deployment area. The
defender’s deployment area extends
8”/20cm beyond the river’s edge towards
the attacker’s end of the table.
6. The attacker now removes one of the
objectives.
7. The attacker places their platoons on their
side of the river at least 12”/30cm from
any defending platoons.
8. The attacker may choose to use the Night
Attack special rule on page 73.
BEGINNING THE BATTLE 1. Both sides start the game in Prepared
Positions.
2. The attacker conducts a Preliminary
Bombardment.
3. The attacking player makes
Reconnaissance Deployment moves for
any reconnaissance platoons they have.
Teams cannot enter or cross the river in
this movement.
4. The attacking player has the first turn.
5. Infantry and man-packed teams use the
River Assault special rules to cross the
river
ENDING THE BATTLE The battle ends when either:
� the attacking player holds any of the
objectives at the start of their turn, or
� the defending player starts any of their
turns from turn six with no attacking
teams on the defender’s side of the river.
DECIDING WHO WON The attacker wins if the game ended because
they started one of their turns holding an
objective. They have broken the defensive
position and secured a bridgehead over the
river.
Otherwise the defender wins. The attack has
been beaten off and the defender can now
prepare their counter stroke.
Calculate your Victory Points using the Victory
Points Table on page 195 of the rulebook and
the Intense Battle special rule.
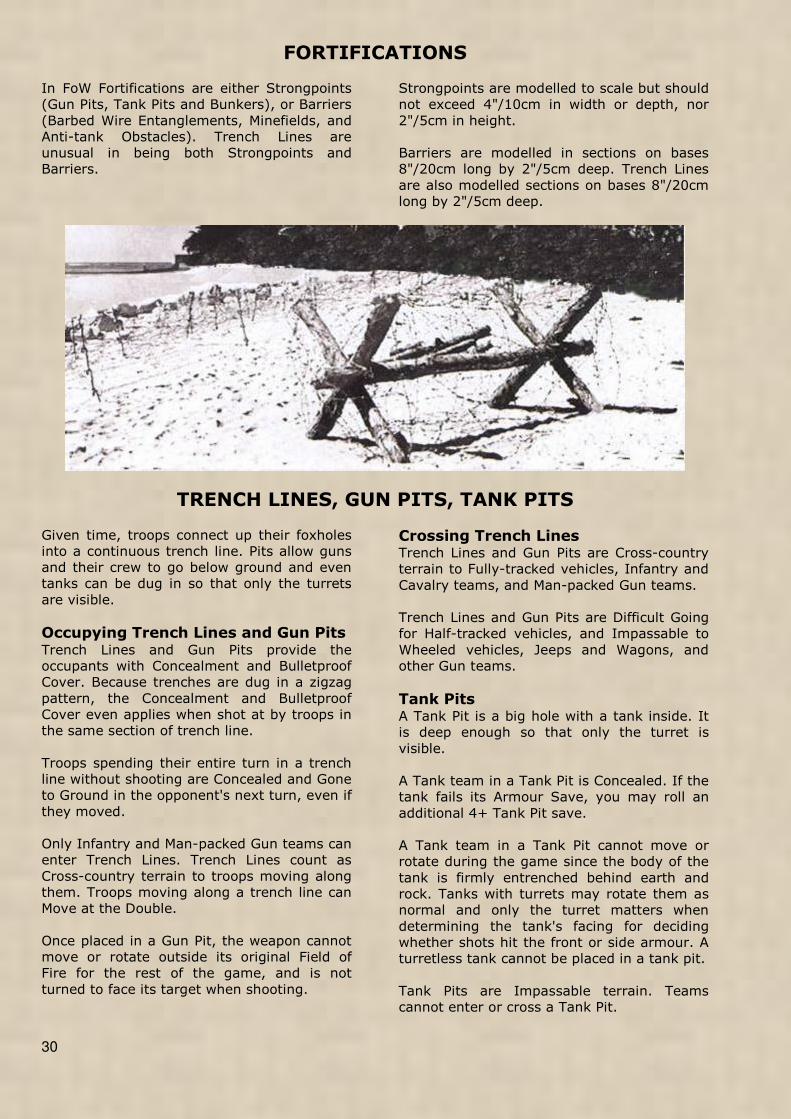
30
FORTIFICATIONS
In FoW Fortifications are either Strongpoints
(Gun Pits, Tank Pits and Bunkers), or Barriers
(Barbed Wire Entanglements, Minefields, and
Anti-tank Obstacles). Trench Lines are
unusual in being both Strongpoints and
Barriers.
Strongpoints are modelled to scale but should
not exceed 4"/10cm in width or depth, nor
2"/5cm in height.
Barriers are modelled in sections on bases
8"/20cm long by 2"/5cm deep. Trench Lines
are also modelled sections on bases 8"/20cm
long by 2"/5cm deep.
TRENCH LINES, GUN PITS, TANK PITS
Given time, troops connect up their foxholes
into a continuous trench line. Pits allow guns
and their crew to go below ground and even
tanks can be dug in so that only the turrets
are visible.
Occupying Trench Lines and Gun Pits Trench Lines and Gun Pits provide the
occupants with Concealment and Bulletproof
Cover. Because trenches are dug in a zigzag
pattern, the Concealment and Bulletproof
Cover even applies when shot at by troops in
the same section of trench line.
Troops spending their entire turn in a trench
line without shooting are Concealed and Gone
to Ground in the opponent's next turn, even if
they moved.
Only Infantry and Man-packed Gun teams can
enter Trench Lines. Trench Lines count as
Cross-country terrain to troops moving along
them. Troops moving along a trench line can
Move at the Double.
Once placed in a Gun Pit, the weapon cannot
move or rotate outside its original Field of
Fire for the rest of the game, and is not
turned to face its target when shooting.
Crossing Trench Lines Trench Lines and Gun Pits are Cross-country
terrain to Fully-tracked vehicles, Infantry and
Cavalry teams, and Man-packed Gun teams.
Trench Lines and Gun Pits are Difficult Going
for Half-tracked vehicles, and Impassable to
Wheeled vehicles, Jeeps and Wagons, and
other Gun teams.
Tank Pits A Tank Pit is a big hole with a tank inside. It
is deep enough so that only the turret is
visible.
A Tank team in a Tank Pit is Concealed. If the
tank fails its Armour Save, you may roll an
additional 4+ Tank Pit save.
A Tank team in a Tank Pit cannot move or
rotate during the game since the body of the
tank is firmly entrenched behind earth and
rock. Tanks with turrets may rotate them as
normal and only the turret matters when
determining the tank's facing for deciding
whether shots hit the front or side armour. A
turretless tank cannot be placed in a tank pit.
Tank Pits are Impassable terrain. Teams
cannot enter or cross a Tank Pit.
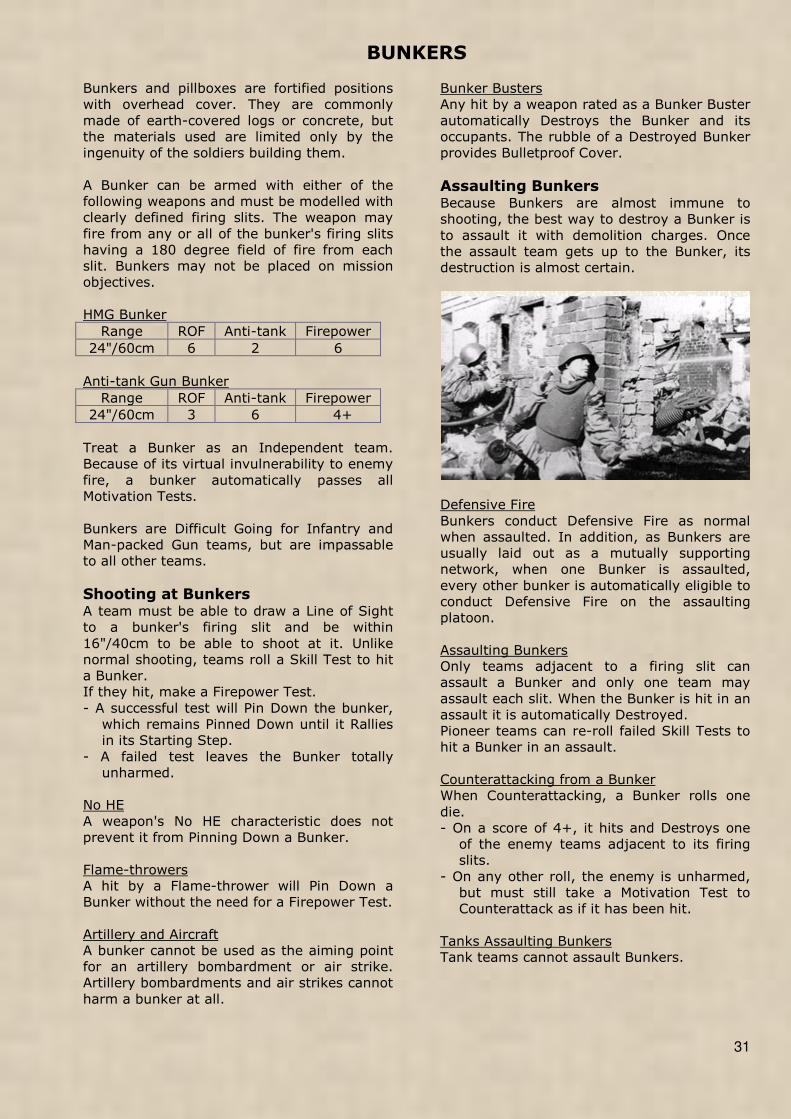
31
BUNKERS
Bunkers and pillboxes are fortified positions
with overhead cover. They are commonly
made of earth-covered logs or concrete, but
the materials used are limited only by the
ingenuity of the soldiers building them.
A Bunker can be armed with either of the
following weapons and must be modelled with
clearly defined firing slits. The weapon may
fire from any or all of the bunker's firing slits
having a 180 degree field of fire from each
slit. Bunkers may not be placed on mission
objectives.
HMG Bunker
Range ROF Anti-tank Firepower
24"/60cm 6 2 6
Anti-tank Gun Bunker
Range ROF Anti-tank Firepower
24"/60cm 3 6 4+
Treat a Bunker as an Independent team.
Because of its virtual invulnerability to enemy
fire, a bunker automatically passes all
Motivation Tests.
Bunkers are Difficult Going for Infantry and
Man-packed Gun teams, but are impassable
to all other teams.
Shooting at Bunkers A team must be able to draw a Line of Sight
to a bunker's firing slit and be within
16"/40cm to be able to shoot at it. Unlike
normal shooting, teams roll a Skill Test to hit
a Bunker.
If they hit, make a Firepower Test.
- A successful test will Pin Down the bunker,
which remains Pinned Down until it Rallies
in its Starting Step.
- A failed test leaves the Bunker totally
unharmed.
No HE
A weapon's No HE characteristic does not
prevent it from Pinning Down a Bunker.
Flame-throwers
A hit by a Flame-thrower will Pin Down a
Bunker without the need for a Firepower Test.
Artillery and Aircraft
A bunker cannot be used as the aiming point
for an artillery bombardment or air strike.
Artillery bombardments and air strikes cannot
harm a bunker at all.
Bunker Busters
Any hit by a weapon rated as a Bunker Buster
automatically Destroys the Bunker and its
occupants. The rubble of a Destroyed Bunker
provides Bulletproof Cover.
Assaulting Bunkers Because Bunkers are almost immune to
shooting, the best way to destroy a Bunker is
to assault it with demolition charges. Once
the assault team gets up to the Bunker, its
destruction is almost certain.
Defensive Fire
Bunkers conduct Defensive Fire as normal
when assaulted. In addition, as Bunkers are
usually laid out as a mutually supporting
network, when one Bunker is assaulted,
every other bunker is automatically eligible to
conduct Defensive Fire on the assaulting
platoon.
Assaulting Bunkers
Only teams adjacent to a firing slit can
assault a Bunker and only one team may
assault each slit. When the Bunker is hit in an
assault it is automatically Destroyed.
Pioneer teams can re-roll failed Skill Tests to
hit a Bunker in an assault.
Counterattacking from a Bunker
When Counterattacking, a Bunker rolls one
die.
- On a score of 4+, it hits and Destroys one
of the enemy teams adjacent to its firing
slits.
- On any other roll, the enemy is unharmed,
but must still take a Motivation Test to
Counterattack as if it has been hit.
Tanks Assaulting Bunkers
Tank teams cannot assault Bunkers.

32
BARBED WIRE ENTANGLEMENTS
Crossing Barbed Wire Composed of masses of densely coiled wire
interwoven with sharp barbs, Entanglements
are capable of holding up the advance of
anything short of a tank.
Infantry and Man-packed Guns
To cross a Barbed Wire Entanglement,
Infantry and Man-packed Gun teams on foot
(but not Cavalry teams) must start their
movement –whether it's a normal move, a
charge into contact, or whatever–adjacent to
the Entanglement.
Each team must make a Skill Test to cross
the Wire.
- If they pass the test, they move as normal.
- If they fail, they cannot move at all.
Pioneer teams may re-roll failed Skill Test
when attempting to cross Barbed Wire
Entanglements.
Barbed Wire Entanglements are Rough
Terrain, so troops may not Move at the
Double across them.
Fully-tracked Vehicles
A Barbed Wire Entanglement slows a Fully-
tracked down as if it were Rough Terrain, but
does not cause it to take a Bogging Check.
Remove a section of Barbed Wire
Entanglement once the tank has crossed it,
although the area remains Rough Terrain to
all troops. However, fully-tracked vehicles do
still not need to take a Bogging Check.
Other Teams
Barbed Wire Entanglements are Impassable
to all other types of teams.
Gapping Barbed Wire To gap a Barbed Wire Entanglement an
Infantry team must start the turn adjacent to
the Entanglement and not be Pinned Down.
The team cannot move in the Movement Step
although they do count as moving and cannot
claim to be Concealed in the open or Gone to
Ground.
Instead of shooting, roll a Skill Test for each
team attempting to gap the wire at the end of
the Shooting Step.
- If they pass the test, remove the section of
Barbed Wire Entanglement.
- If they fail, more work is needed and they
will have to try again next turn.
Pioneer teams may re-roll failed Skill Test
when attempting to gap Barbed Wire
Entanglements.
ANTI-TANK OBSTACLES
The most primitive Anti-tank Obstacle is an
anti-tank ditch deep and wide enough to stop
a tank. With more time, armies emplace rows
of steel or concrete 'dragons teeth' or erect
high, thick concrete anti-tank walls.
Crossing Anti-tank Obstacles Anti-tank Obstacles are Impassable to all
vehicles, Cavalry teams and non Man-packed
Gun teams, but only Difficult Going to
Infantry teams and Man-packed Gun teams.
Anti-tank Obstacles provide Concealment and
Bulletproof Cover for Infantry and Man-
packed Gun teams.
Gapping Anti-tank Obstacles To gap an Anti-tank Obstacle a Pioneer team
must start the turn adjacent to the Obstacle
and not be Pinned Down. It must also have a
Pioneer Supply vehicle within Command
Distance.
The team cannot move in the Movement Step
although they do count as moving and cannot
claim to be Concealed in the open or Gone to
Ground.
Instead of shooting, roll a Skill Test for each
team attempting to gap the Anti-tank
Obstacle at the end of the Shooting Step.
Place a die beside the Obstacle showing the
total number of successful Skill Tests. If at
the end of the Step the total number of
successful test from all Pioneer teams
working on this Obstacle is 6 or more,
remove the Obstacle. The area remains
Difficult Going.

33
MINEFIELDS
Minefields make no-man's land a real devil's
garden, springing up around every defensive
position a littering the battlefield wherever
trench warfare sets in.
Crossing Minefields It takes nerves an skill to cross a Minefield
Motivation Test to Cross Minefields
A platoon attempting to cross one or more
minefields must make a Motivation Test
before moving.
- If they pass the Motivation Test, they move
as normal across all of the Minefields.
- If they fail the test, they move to the edge
of the first Minefield and stop facing
towards the minefield, and cannot move or
assault further this turn.
If a Soviet platoon containing a Komissar fails
its Motivation Test to cross a Minefield, you
may use the Komissar special rule to re-roll
the test.
Teams may not attempt to cross a Minefield
At the Double.
Moving through a Minefield
Roll a Skill Test for each team that crosses a
minefield.
- If they pass the Skill Test, they are
unharmed.
- If they fail, they take a hit from a mine and
must stop moving immediately after they
cross the Minefield. Even if the team ends
up on or partly on the Minefield it counts
as having crossed the Minefield.
If any team in a platoon is hit by a mine,
whether the hit causes casualty or not, the
entire platoon is Pinned Down at the end of
their movement.
If a team enters more than one Minefield in a
turn, roll a Skill Test for each one.
Armoured Vehicles Hit by Mines
Treat hits on armoured vehicles as a hit on
the Top armour by a gun with an Anti-tank
rating of 5 and a Firepower rating of 1+.
Unarmoured Vehicles Hit by Mines
Unarmoured vehicles that are hit by mines
are Destroyed.
Infantry and Gun teams hit by Mines
Roll a save for each team hit by mines. An
Infantry team survives on a roll of 3+, but is
destroyed otherwise. Gun teams survive on a
roll of 5+.
Passengers
Passengers carried in a vehicle Destroyed by
mines must roll a 5+ save. If they pass the
save, they have survived crossing the
minefield and are placed adjacent to their
destroyed vehicle on the far side of the
minefield. Otherwise they are Destroyed with
their vehicle.
Gapping Minefields To gap a Minefield an Infantry team must
start the turn adjacent to the Minefield and
not be Pinned Down.
The team cannot move in the Movement Step
although they do count as moving and cannot
claim to be Concealed in the open or Gone to
Ground.
Instead of shooting, roll a Skill Test for each
team attempting to gap the mines at the end
of the Shooting Step.
- If they pass the test, remove the section of
Minefields, but the area becomes Difficult
Going as it is always possible to find that
one stray mine the pioneers missed.
- Any teams that fail the test accidentally
detonate a mine. The team must pass a
3+ save or be Destroyed, and the whole
platoon is Pinned Down at the end of the
Step.
Due to their lack of
training, Infantry teams
that are not Pioneer
teams must re-roll
successful Skill Tests to
clear a lane through the
Minefield.

34
SPIELTRIEB FRANKFURT
Hermesweg 6
60316 Frankfurt
www.spieltrieb-frankfurt.de