DoorBird Connect Kurzanleitung - peaknx.com · Um zu gewährleisten, dass die X-Lite App bei einem...
24
DoorBird Connect Kurzanleitung
Transcript of DoorBird Connect Kurzanleitung - peaknx.com · Um zu gewährleisten, dass die X-Lite App bei einem...
DoorBird Connect Kurzanleitung

www.peaknx.com2
DE Doorbird Connect Kurzanleitung
Inhaltsverzeichnis
1. Einleitung . . . . . . . . . . . . . . . . . . . . . . . . . . . . . . . . . . . . . . . . . . . . . . . . . . . . . . . . . . . . . . . . . . . . . . . . . . . 42. Einrichtung der VoIP-Kommunikation . . . . . . . . . . . . . . . . . . . . . . . . . . . . . . . . . . . . . . . . . . . . . . . . 4
2.1. Einrichtung von VoIP auf dem PEAKnx Touch-Panel mit X-Lite . . . . . . . . . . . . . . . . . . . . . 42.2. Einrichtung der DoorBird IP Video Türstation. . . . . . . . . . . . . . . . . . . . . . . . . . . . . . . . . . . . . 6
3. Einrichtung der Kamera . . . . . . . . . . . . . . . . . . . . . . . . . . . . . . . . . . . . . . . . . . . . . . . . . . . . . . . . . . . . . 84 Technischer Support . . . . . . . . . . . . . . . . . . . . . . . . . . . . . . . . . . . . . . . . . . . . . . . . . . . . . . . . . . . . . . . . 10Über PEAKnx . . . . . . . . . . . . . . . . . . . . . . . . . . . . . . . . . . . . . . . . . . . . . . . . . . . . . . . . . . . . . . . . . . . . . . . . . 11
www.peaknx.com 3
DE Doorbird Connect Kurzanleitung
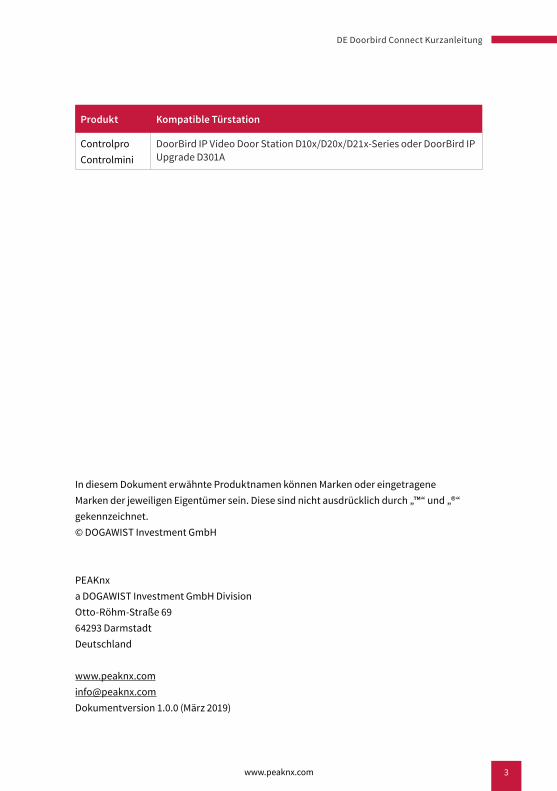
In diesem Dokument erwähnte Produktnamen können Marken oder eingetragene Marken der jeweiligen Eigentümer sein. Diese sind nicht ausdrücklich durch „™“ und „®“ gekennzeichnet.© DOGAWIST Investment GmbH
PEAKnx a DOGAWIST Investment GmbH Division Otto-Röhm-Straße 69 64293 Darmstadt Deutschland
www.peaknx.com [email protected] 1.0.0 (März 2019)
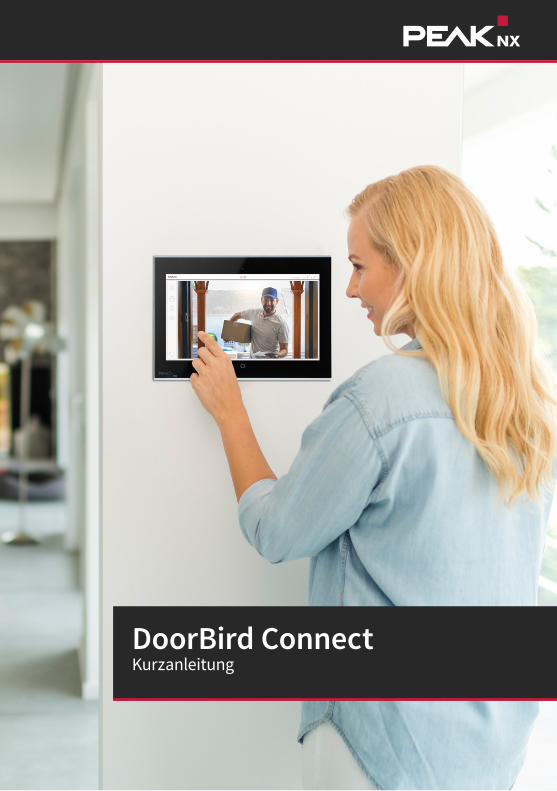
Produkt Kompatible Türstation
ControlproControlmini
DoorBird IP Video Door Station D10x/D20x/D21x-Series oder DoorBird IP Upgrade D301A
www.peaknx.com4
DE Doorbird Connect Kurzanleitung
1. Einleitung
Die folgende Anleitung wird Sie durch die Schritte führen, die zur Integration einer DoorBird IP Video Türstation mit einem PEAKnx Touch-Panel notwendig sind.
Stellen Sie bitte sicher, dass das PEAKnx Touch-Panel eine IP-Adresse erhält und mit dem-selben lokalen Netzwerk verbunden ist, wie Ihre DoorBird IP Video Türstation. Stellen Sie bitte außerdem sicher, dass Ihre DoorBird IP Video Türstation mit dem Internet verbunden ist.Dies lässt sich über den folgenden Webservice feststellen:
https://www.doorbird.com/checkonline
Die lokale IP-Adresse Ihrer DoorBird IP Video Türstation lässt sich ebenfalls auf dieser Seite ablesen.
2. Einrichtung der VoIP-Kommunikation
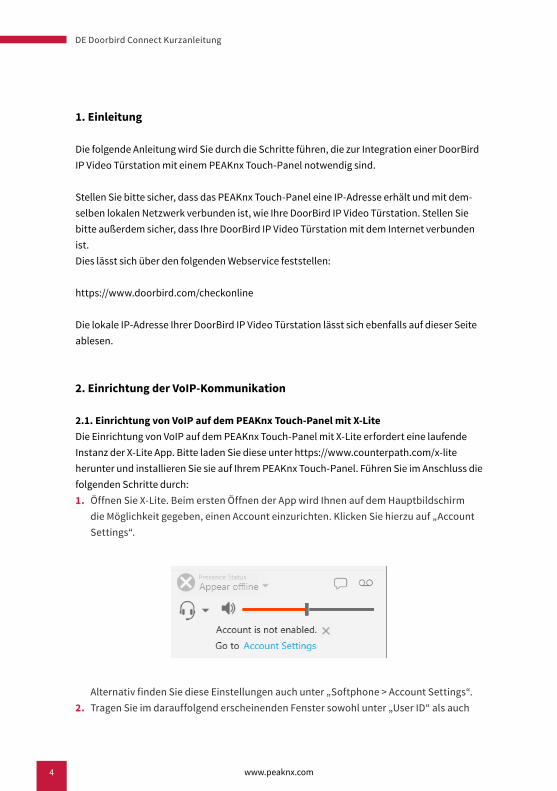
2.1. Einrichtung von VoIP auf dem PEAKnx Touch-Panel mit X-LiteDie Einrichtung von VoIP auf dem PEAKnx Touch-Panel mit X-Lite erfordert eine laufende Instanz der X-Lite App. Bitte laden Sie diese unter https://www.counterpath.com/x-lite herunter und installieren Sie sie auf Ihrem PEAKnx Touch-Panel. Führen Sie im Anschluss die folgenden Schritte durch:1. Öffnen Sie X-Lite. Beim ersten Öffnen der App wird Ihnen auf dem Hauptbildschirm
die Möglichkeit gegeben, einen Account einzurichten. Klicken Sie hierzu auf „Account Settings“.
Alternativ finden Sie diese Einstellungen auch unter „Softphone > Account Settings“.2. Tragen Sie im darauffolgend erscheinenden Fenster sowohl unter „User ID“ als auch
www.peaknx.com 5
DE Doorbird Connect Kurzanleitung
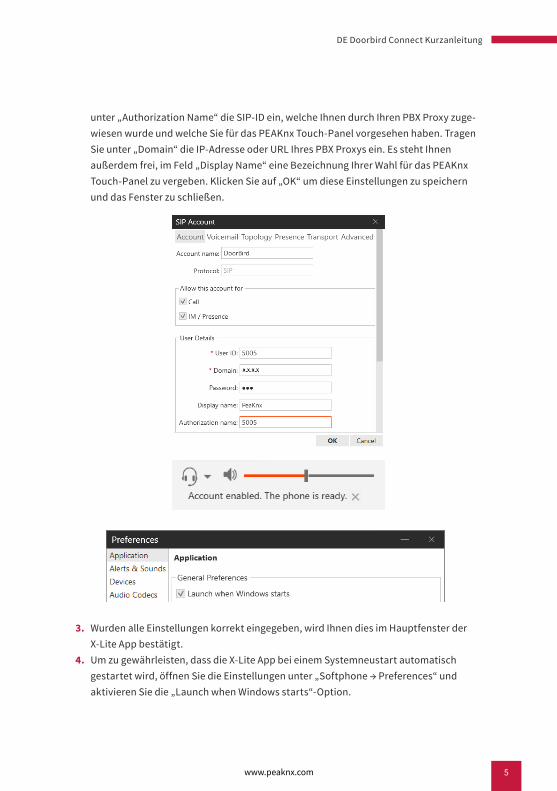
unter „Authorization Name“ die SIP-ID ein, welche Ihnen durch Ihren PBX Proxy zuge-wiesen wurde und welche Sie für das PEAKnx Touch-Panel vorgesehen haben. Tragen Sie unter „Domain“ die IP-Adresse oder URL Ihres PBX Proxys ein. Es steht Ihnen außerdem frei, im Feld „Display Name“ eine Bezeichnung Ihrer Wahl für das PEAKnx Touch-Panel zu vergeben. Klicken Sie auf „OK“ um diese Einstellungen zu speichern und das Fenster zu schließen.
3. Wurden alle Einstellungen korrekt eingegeben, wird Ihnen dies im Hauptfenster der X-Lite App bestätigt.
4. Um zu gewährleisten, dass die X-Lite App bei einem Systemneustart automatisch gestartet wird, öffnen Sie die Einstellungen unter „Softphone → Preferences“ und aktivieren Sie die „Launch when Windows starts“-Option.
www.peaknx.com6
DE Doorbird Connect Kurzanleitung
2.2. Einrichtung der DoorBird IP Video TürstationUm Ihrer DoorBird IP Video Türstation die Kommunikation mit dem PEAKnx Touch-Panel zu ermöglichen, müssen die SIP-Einstellungen Ihrer DoorBird IP Video Türstation entspre-chend angepasst werden.1. Öffnen Sie hierzu die DoorBird App und loggen Sie sich mit den Zugangsdaten des
Administrator Users, welche Sie auf Ihrem „DIGITAL PASSPORT“-Dokument finden, in den Administrationsbereich ein.
2. Wählen Sie „SIP Einstellungen” aus und aktivieren Sie zunächst den „SIP aktiv”-Schal-ter.
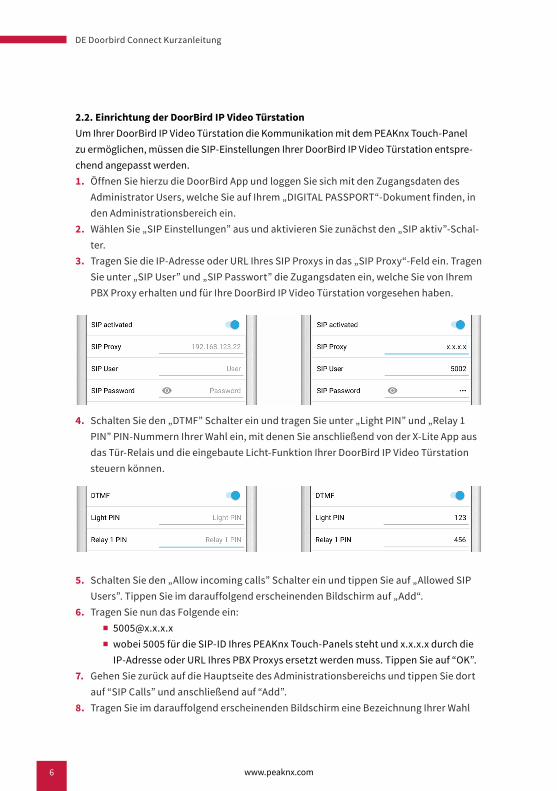
3. Tragen Sie die IP-Adresse oder URL Ihres SIP Proxys in das „SIP Proxy“-Feld ein. Tragen Sie unter „SIP User” und „SIP Passwort” die Zugangsdaten ein, welche Sie von Ihrem PBX Proxy erhalten und für Ihre DoorBird IP Video Türstation vorgesehen haben.
4. Schalten Sie den „DTMF” Schalter ein und tragen Sie unter „Light PIN” und „Relay 1 PIN” PIN-Nummern Ihrer Wahl ein, mit denen Sie anschließend von der X-Lite App aus das Tür-Relais und die eingebaute Licht-Funktion Ihrer DoorBird IP Video Türstation steuern können.
5. Schalten Sie den „Allow incoming calls” Schalter ein und tippen Sie auf „Allowed SIP Users”. Tippen Sie im darauffolgend erscheinenden Bildschirm auf „Add“.
6. Tragen Sie nun das Folgende ein:
■ wobei 5005 für die SIP-ID Ihres PEAKnx Touch-Panels steht und x.x.x.x durch die IP-Adresse oder URL Ihres PBX Proxys ersetzt werden muss. Tippen Sie auf “OK”.
7. Gehen Sie zurück auf die Hauptseite des Administrationsbereichs und tippen Sie dort auf “SIP Calls” und anschließend auf “Add”.
8. Tragen Sie im darauffolgend erscheinenden Bildschirm eine Bezeichnung Ihrer Wahl
www.peaknx.com 7
DE Doorbird Connect Kurzanleitung
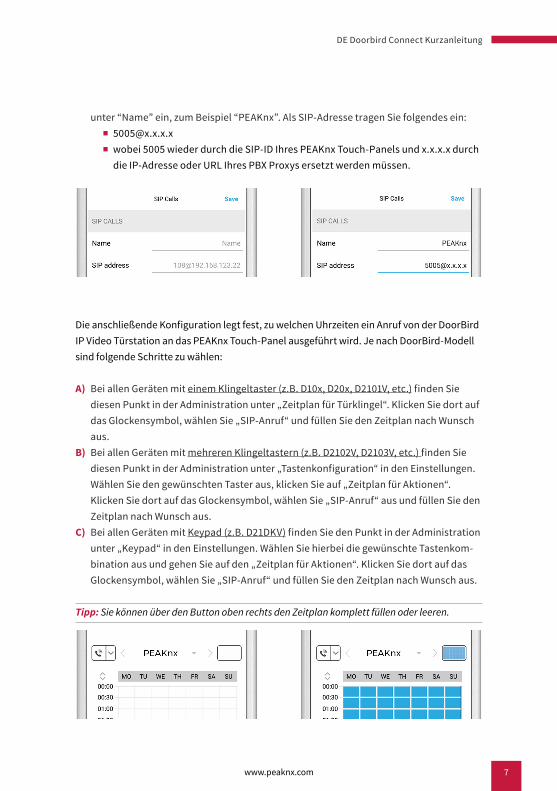
unter “Name” ein, zum Beispiel “PEAKnx”. Als SIP-Adresse tragen Sie folgendes ein:
■ wobei 5005 wieder durch die SIP-ID Ihres PEAKnx Touch-Panels und x.x.x.x durch die IP-Adresse oder URL Ihres PBX Proxys ersetzt werden müssen.
Die anschließende Konfiguration legt fest, zu welchen Uhrzeiten ein Anruf von der DoorBird IP Video Türstation an das PEAKnx Touch-Panel ausgeführt wird. Je nach DoorBird-Modell sind folgende Schritte zu wählen:
A) Bei allen Geräten mit einem Klingeltaster (z.B. D10x, D20x, D2101V, etc.) finden Sie diesen Punkt in der Administration unter „Zeitplan für Türklingel“. Klicken Sie dort auf das Glockensymbol, wählen Sie „SIP-Anruf“ und füllen Sie den Zeitplan nach Wunsch aus.
B) Bei allen Geräten mit mehreren Klingeltastern (z.B. D2102V, D2103V, etc.) finden Sie diesen Punkt in der Administration unter „Tastenkonfiguration“ in den Einstellungen. Wählen Sie den gewünschten Taster aus, klicken Sie auf „Zeitplan für Aktionen“. Klicken Sie dort auf das Glockensymbol, wählen Sie „SIP-Anruf“ aus und füllen Sie den Zeitplan nach Wunsch aus.
C) Bei allen Geräten mit Keypad (z.B. D21DKV) finden Sie den Punkt in der Administration unter „Keypad“ in den Einstellungen. Wählen Sie hierbei die gewünschte Tastenkom-bination aus und gehen Sie auf den „Zeitplan für Aktionen“. Klicken Sie dort auf das Glockensymbol, wählen Sie „SIP-Anruf“ und füllen Sie den Zeitplan nach Wunsch aus.
Tipp: Sie können über den Button oben rechts den Zeitplan komplett füllen oder leeren.
4. 5. 6. 7. 8.
www.peaknx.com8
DE Doorbird Connect Kurzanleitung
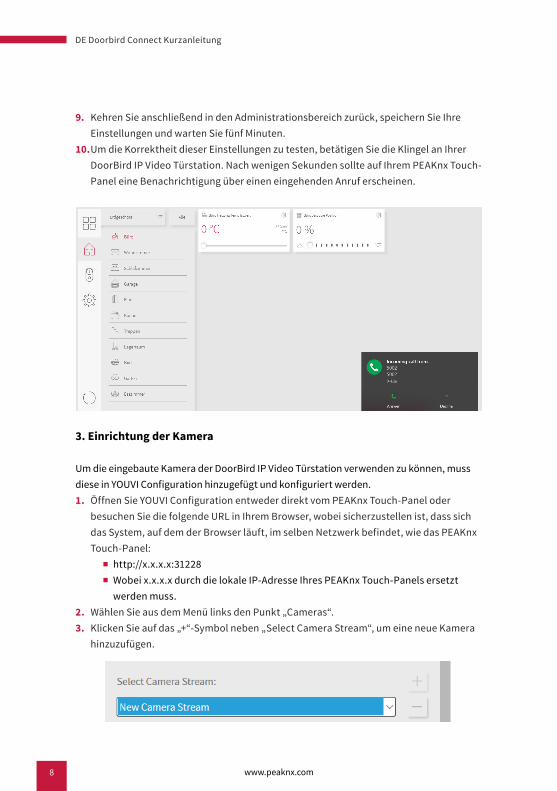
9. Kehren Sie anschließend in den Administrationsbereich zurück, speichern Sie Ihre Einstellungen und warten Sie fünf Minuten.
10. Um die Korrektheit dieser Einstellungen zu testen, betätigen Sie die Klingel an Ihrer DoorBird IP Video Türstation. Nach wenigen Sekunden sollte auf Ihrem PEAKnx Touch- Panel eine Benachrichtigung über einen eingehenden Anruf erscheinen.
3. Einrichtung der Kamera
Um die eingebaute Kamera der DoorBird IP Video Türstation verwenden zu können, muss diese in YOUVI Configuration hinzugefügt und konfiguriert werden. 1. Öffnen Sie YOUVI Configuration entweder direkt vom PEAKnx Touch-Panel oder
besuchen Sie die folgende URL in Ihrem Browser, wobei sicherzustellen ist, dass sich das System, auf dem der Browser läuft, im selben Netzwerk befindet, wie das PEAKnx Touch-Panel:
■ http://x.x.x.x:31228
■ Wobei x.x.x.x durch die lokale IP-Adresse Ihres PEAKnx Touch-Panels ersetzt werden muss.
2. Wählen Sie aus dem Menü links den Punkt „Cameras“.3. Klicken Sie auf das „+“-Symbol neben „Select Camera Stream“, um eine neue Kamera
hinzuzufügen.

www.peaknx.com 9
DE Doorbird Connect Kurzanleitung
4. Geben Sie der Kamera der DoorBird IP Video Türstation unter „Stream Name“ einen passenden Namen, z.B. „DoorBird“. Belassen Sie „Stream Type“ auf „RTSP“.
5. Tragen Sie sowohl unter „Low Resolution URL“, als auch unter „High Resolution URL“ eine URL mit folgender Signatur ein:
■ rtsp://user0001:[email protected]/mpeg/media.amp
■ Wobei „user0001“ und „password“ durch den App User und das zugehörige Pass-wort vom „DIGITAL PASSPORT“-Dokument ersetzt werden müssen, welches mit Ihrer DoorBird IP Video Türstation ausgeliefert wurde und x.x.x.x durch die lokale IP-Adresse Ihrer DoorBird IP Video Türstation ersetzt werden muss.
6. Speichern Sie diese Einstellungen mit Klick auf „Save“.7. Wechseln Sie innerhalb des PEAKnx Touch-Panels zurück zu YOUVI Visu, wo Sie sich
durch Tippen auf das Dashboard-Symbol im Menü links das Kamerabild ansehen können.
www.peaknx.com10
DE Doorbird Connect Kurzanleitung
4 Technischer Support
Sollten Probleme mit Ihrem Controlmini oder Controlpro auftreten, kontaktieren Sie bitte unser PEAKnx Support Team:
■ Mail: [email protected]
■ Support Ticket erstellen: https://support.peaknx.com/?lang=de
■ Tel.: +49-6151-279 1825
Bei Fragen und Problemen zur DoorBird IP Video Türstation oder DoorBird IP Upgrade kontaktieren Sie bitte den entsprechenden technischen Support über das Kontaktformular online:
■ https://www.doorbird.com/de/contact
www.peaknx.com 11
DE Doorbird Connect Kurzanleitung
PEAKnx a DOGAWIST Investment GmbH Division Otto-Röhm-Straße 69 64293 DarmstadtDeutschland
Service & Support: +49-6151-2791825 Vertrieb & Administration: +49-6151-2791824 Web: www.peaknx.com Mail: [email protected]
Über PEAKnx
PEAKnx ist ein innovatives Unternehmen aus Darmstadt (www.peaknx.com) und Hersteller von Lösungen für die Haus- und Gebäudeautomation. Als neuster Geschäftsbereich der PEAK-Firmengruppe bietet PEAKnx innovative Hard- und Softwarekomponenten für die moderne Gebäudesteuerung – wie zum Beispiel individuelle Front-End-Panels, die alle Informationen eines Smart Homes den Hausbesitzern an einem zentralen Punkt zur Verfü-gung stellen. Dabei legt PEAKnx großen Wert auf das qualitative Zusammenspiel von Design und Funktionalität.
Die Experten für Hausautomation bieten auch die dazugehörigen Dienstleistungen – von der Planung des Bauvorhabens über die Beratung bis hin zur Installation und Realisierung durch zertifizierte Partner. Das Ziel von PEAKnx ist es, das alltägliche Leben seiner Kunden komfortabler, sicherer und kostensparender zu machen. Dabei greift das Unternehmen auf die mehr als 20-jährige Erfahrung der PEAK-Firmengruppe zurück.
Zudem ist PEAK Premiumsponsor des SV Darmstadt 98 und engagiert sich gemeinsam mit dem Verein für soziale Projekte im Raum Darmstadt.

www.peaknx.com12
EN Doorbird Connect Short Guide
www.peaknx.com 13
EN Doorbird Connect Short Guide
Doorbird ConnectEN Short Guide
www.peaknx.com14
EN Doorbird Connect Short Guide
Contents
1. Introduction . . . . . . . . . . . . . . . . . . . . . . . . . . . . . . . . . . . . . . . . . . . . . . . . . . . . . . . . . . . . . . . . . . . . . . . 162. Setting up the Doorcom . . . . . . . . . . . . . . . . . . . . . . . . . . . . . . . . . . . . . . . . . . . . . . . . . . . . . . . . . . . . 16
2.1. Setting up the PEAKnx Touch Panel for VoIP using X-Lite . . . . . . . . . . . . . . . . . . . . . . . . . 162.2. Setting up the Doorbird IP Video Door Station . . . . . . . . . . . . . . . . . . . . . . . . . . . . . . . . . . . 17
3. Setting up the video camera . . . . . . . . . . . . . . . . . . . . . . . . . . . . . . . . . . . . . . . . . . . . . . . . . . . . . . . . 194 Technical Support . . . . . . . . . . . . . . . . . . . . . . . . . . . . . . . . . . . . . . . . . . . . . . . . . . . . . . . . . . . . . . . . . . 22About PEAKnx . . . . . . . . . . . . . . . . . . . . . . . . . . . . . . . . . . . . . . . . . . . . . . . . . . . . . . . . . . . . . . . . . . . . . . . . 23
www.peaknx.com 15
EN Doorbird Connect Short Guide
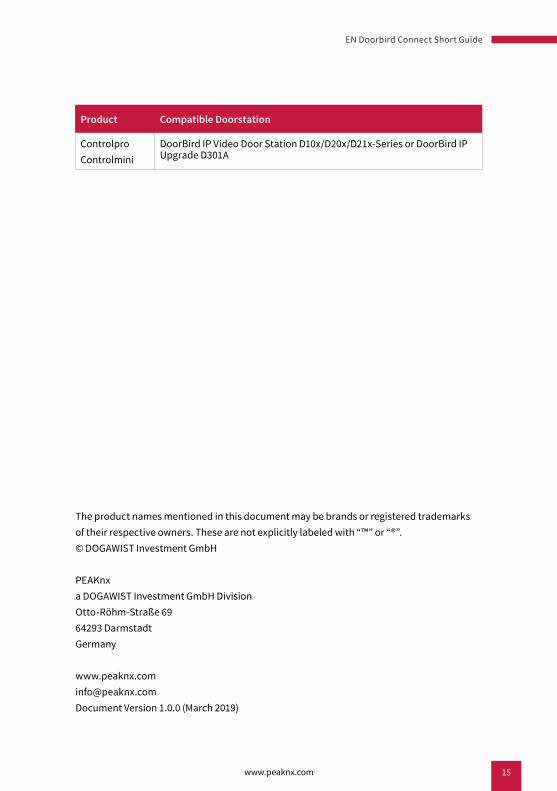
Product Compatible Doorstation
ControlproControlmini
DoorBird IP Video Door Station D10x/D20x/D21x-Series or DoorBird IP Upgrade D301A
The product names mentioned in this document may be brands or registered trademarksof their respective owners. These are not explicitly labeled with “™” or “®”.© DOGAWIST Investment GmbH
PEAKnxa DOGAWIST Investment GmbH DivisionOtto-Röhm-Straße 6964293 DarmstadtGermany
[email protected] Version 1.0.0 (March 2019)
www.peaknx.com16
EN Doorbird Connect Short Guide
1. Introduction
The following guide will take you through the steps of setting up a DoorBird IP Video Door Station in connection with a PEAKnx touch panel.
Please make sure that the PEAKnx touch panel receives an IP address and is connected to the same local network your DoorBird IP Video Door Station is connected to. Please also make sure that your DoorBird IP Video Station is online, using this service:
https://www.doorbird.com/checkonline
The local IP address of your DoorBird IP Video Door Station is available from the same page.
2. Setting up the Doorcom
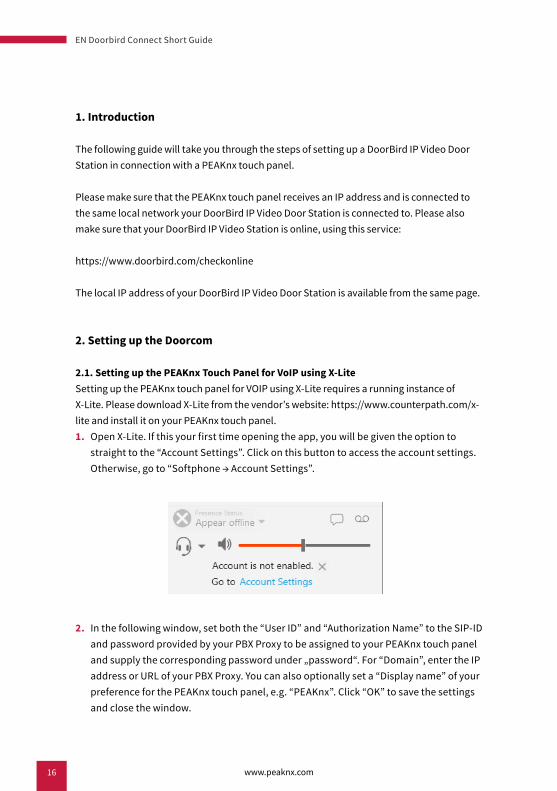
2.1. Setting up the PEAKnx Touch Panel for VoIP using X-LiteSetting up the PEAKnx touch panel for VOIP using X-Lite requires a running instance of X-Lite. Please download X-Lite from the vendor’s website: https://www.counterpath.com/x-lite and install it on your PEAKnx touch panel.1. Open X-Lite. If this your first time opening the app, you will be given the option to
straight to the “Account Settings”. Click on this button to access the account settings.Otherwise, go to “Softphone → Account Settings”.
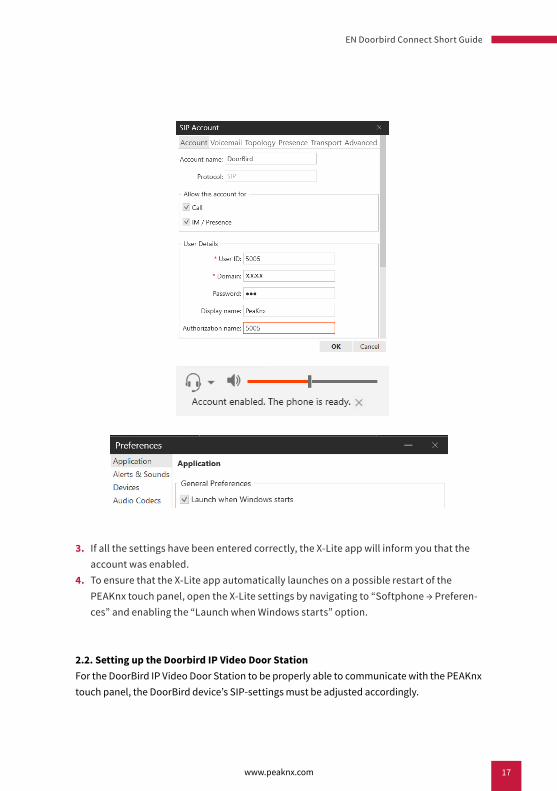
2. In the following window, set both the “User ID” and “Authorization Name” to the SIP-ID and password provided by your PBX Proxy to be assigned to your PEAKnx touch panel and supply the corresponding password under „password“. For “Domain”, enter the IP address or URL of your PBX Proxy. You can also optionally set a “Display name” of your preference for the PEAKnx touch panel, e.g. “PEAKnx”. Click “OK” to save the settings and close the window.
www.peaknx.com 17
EN Doorbird Connect Short Guide
3. If all the settings have been entered correctly, the X-Lite app will inform you that the account was enabled.
4. To ensure that the X-Lite app automatically launches on a possible restart of the PEAKnx touch panel, open the X-Lite settings by navigating to “Softphone → Preferen-ces” and enabling the “Launch when Windows starts” option.
2.2. Setting up the Doorbird IP Video Door StationFor the DoorBird IP Video Door Station to be properly able to communicate with the PEAKnx touch panel, the DoorBird device’s SIP-settings must be adjusted accordingly.
www.peaknx.com18
EN Doorbird Connect Short Guide
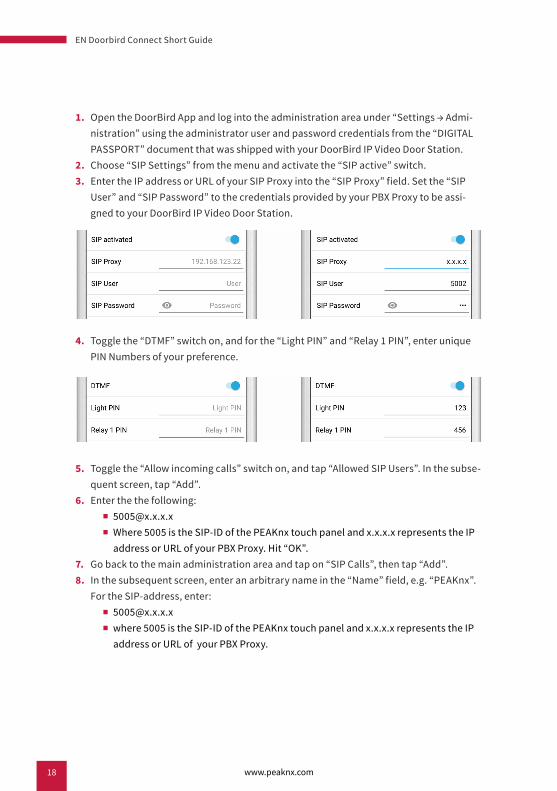
1. Open the DoorBird App and log into the administration area under “Settings → Admi-nistration” using the administrator user and password credentials from the “DIGITAL PASSPORT” document that was shipped with your DoorBird IP Video Door Station.
2. Choose “SIP Settings” from the menu and activate the “SIP active” switch.3. Enter the IP address or URL of your SIP Proxy into the “SIP Proxy” field. Set the “SIP
User” and “SIP Password” to the credentials provided by your PBX Proxy to be assi-gned to your DoorBird IP Video Door Station.
4. Toggle the “DTMF” switch on, and for the “Light PIN” and “Relay 1 PIN”, enter unique PIN Numbers of your preference.
5. Toggle the “Allow incoming calls” switch on, and tap “Allowed SIP Users”. In the subse-quent screen, tap “Add”.
6. Enter the the following:
■ Where 5005 is the SIP-ID of the PEAKnx touch panel and x.x.x.x represents the IP address or URL of your PBX Proxy. Hit “OK”.
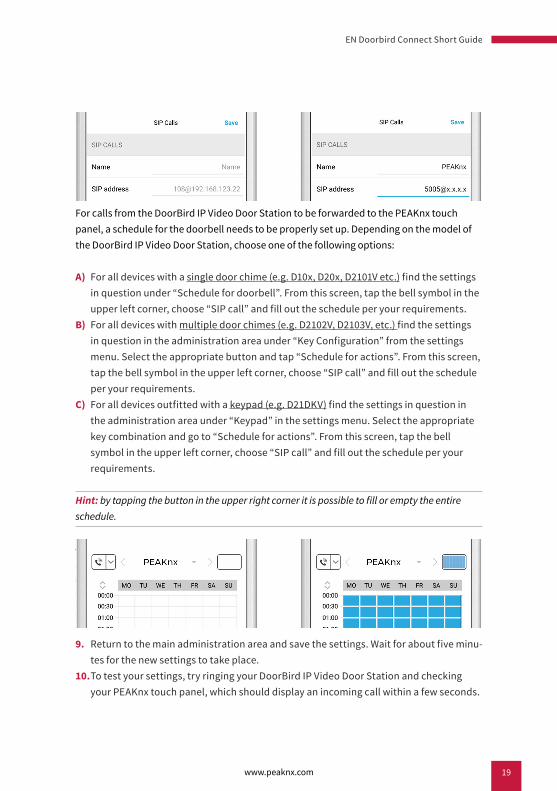
7. Go back to the main administration area and tap on “SIP Calls”, then tap “Add”.8. In the subsequent screen, enter an arbitrary name in the “Name” field, e.g. “PEAKnx”.
For the SIP-address, enter:
■ where 5005 is the SIP-ID of the PEAKnx touch panel and x.x.x.x represents the IP address or URL of your PBX Proxy.
www.peaknx.com 19
EN Doorbird Connect Short Guide
For calls from the DoorBird IP Video Door Station to be forwarded to the PEAKnx touch panel, a schedule for the doorbell needs to be properly set up. Depending on the model of the DoorBird IP Video Door Station, choose one of the following options:
A) For all devices with a single door chime (e.g. D10x, D20x, D2101V etc.) find the settings in question under “Schedule for doorbell”. From this screen, tap the bell symbol in the upper left corner, choose “SIP call” and fill out the schedule per your requirements.
B) For all devices with multiple door chimes (e.g. D2102V, D2103V, etc.) find the settings in question in the administration area under “Key Configuration” from the settings menu. Select the appropriate button and tap “Schedule for actions”. From this screen, tap the bell symbol in the upper left corner, choose “SIP call” and fill out the schedule per your requirements.
C) For all devices outfitted with a keypad (e.g. D21DKV) find the settings in question in the administration area under “Keypad” in the settings menu. Select the appropriate key combination and go to “Schedule for actions”. From this screen, tap the bell symbol in the upper left corner, choose “SIP call” and fill out the schedule per your requirements.
Hint: by tapping the button in the upper right corner it is possible to fill or empty the entire schedule.
4. 5. 6. 7. 8.
9. Return to the main administration area and save the settings. Wait for about five minu-tes for the new settings to take place.
10. To test your settings, try ringing your DoorBird IP Video Door Station and checking your PEAKnx touch panel, which should display an incoming call within a few seconds.
www.peaknx.com20
EN Doorbird Connect Short Guide
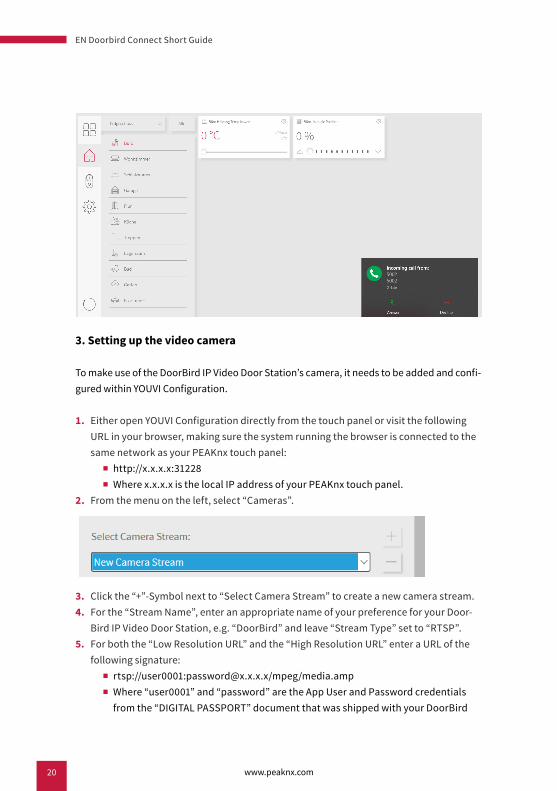
3. Setting up the video camera
To make use of the DoorBird IP Video Door Station’s camera, it needs to be added and confi-gured within YOUVI Configuration.
1. Either open YOUVI Configuration directly from the touch panel or visit the following URL in your browser, making sure the system running the browser is connected to the same network as your PEAKnx touch panel:
■ http://x.x.x.x:31228
■ Where x.x.x.x is the local IP address of your PEAKnx touch panel. 2. From the menu on the left, select “Cameras”.
3. Click the “+”-Symbol next to “Select Camera Stream” to create a new camera stream.4. For the “Stream Name”, enter an appropriate name of your preference for your Door-
Bird IP Video Door Station, e.g. “DoorBird” and leave “Stream Type” set to “RTSP”.5. For both the “Low Resolution URL” and the “High Resolution URL” enter a URL of the
following signature:
■ rtsp://user0001:[email protected]/mpeg/media.amp
■ Where “user0001” and “password” are the App User and Password credentials from the “DIGITAL PASSPORT” document that was shipped with your DoorBird
www.peaknx.com 21
EN Doorbird Connect Short Guide
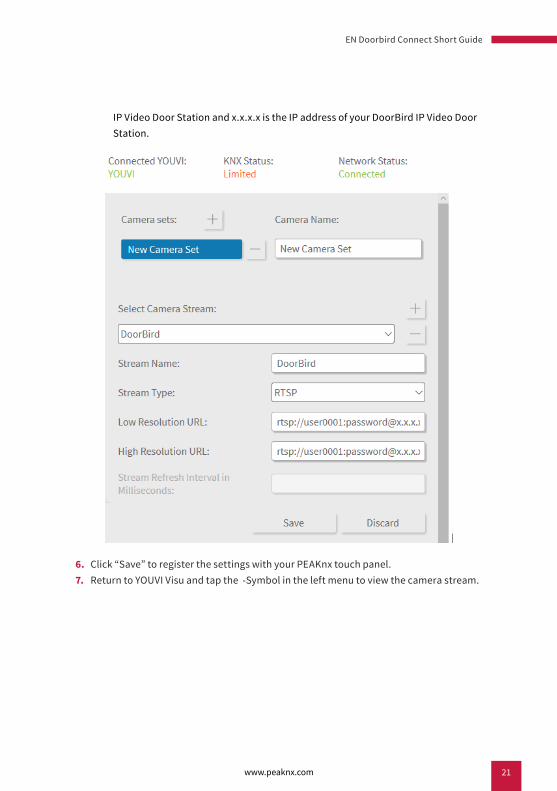
IP Video Door Station and x.x.x.x is the IP address of your DoorBird IP Video Door Station.
6. Click “Save” to register the settings with your PEAKnx touch panel.7. Return to YOUVI Visu and tap the -Symbol in the left menu to view the camera stream.
www.peaknx.com22
EN Doorbird Connect Short Guide
4 Technical Support
If you experience problems with your Controlmini or Controlpro please contact our PEAKnx Support Team:
■ Mail: [email protected]
■ Create a Support Ticket: https://support.peaknx.com/?lang=en_US
■ Tel.: +49-6151-279 1825
For questions and problems regarding the DoorBird IP Video Door Station please use the contact form to get In touch with the corresponding technical support:
■ https://www.doorbird.com/contact

www.peaknx.com 23
EN Doorbird Connect Short Guide
PEAKnx a DOGAWIST Investment GmbH Division Otto-Röhm-Straße 69 64293 Darmstadt Germany
About PEAKnx
PEAKnx is an innovative company from Darmstadt, Germany (www.peaknx.com) and a manufacturer of solutions for home and facility automation. As the newest department of the PEAK holding, PEAKnx offers innovative hardware and software components for modern building control – such as individual front-end panels, which make a smart home’s full information available to home-owners at one central point. PEAKnx places great value on the qualitative interplay of design and functionality along the way.
The facility automation experts also offer associated services – from construction project planning, through consultation, to installation and realization by certified partners. The aim of PEAKnx is to make its customers’ everyday life more convenient, safe and economical. Along the way, the company can draw on more than 20 years of experience within the PEAK holding. In addition, PEAK is premium sponsor of SV Darmstadt 98 and, with this association, is committed to social projects in the Darmstadt region
Service & Support: +49-6151-279 1825 Sales & Administration: +49-6151-279 1824 Web: www.peaknx.com Email: [email protected]