iBook G3 (14-inch) Multilingual User's Guide (Manual) - Apple
40
User’s Guide • • Manuel de l’utilisateur • Benutzerhandbuch Manual del usuario • Manuale Utente • Guia do Usuário • Gebruikershandleiding • Handbok Brukerhåndbok • Brugerhåndbog • Käsikirja • • • iBook
Transcript of iBook G3 (14-inch) Multilingual User's Guide (Manual) - Apple

User’s Guide • • Manuel de l’utilisateur • BenutzerhandbuchManual del usuario • Manuale Utente • Guia do Usuário • Gebruikershandleiding • Handbok
Brukerhåndbok • Brugerhåndbog • Käsikirja • • •
iBook
034-2095-A_UMCvr 11/28/01 10:50 AM Page 1
1
To get started using your iBook, plug in the power adapter and connect a phone cord from a walljack to the modem port. Then press the power button and follow the onscreen guide to connectto the Internet. Read on to learn more about using your iBook:
2 Your iBook at a glance
4 Mac OS X basics
8 What you can do with your iBook
10 Listen to music on your computer or on the go
12 Make your own movie or watch a movie on DVD
14 Search the Internet
16 Get more out of the Internet
18 Send and receive email
20 Organize, plan, and create
22 Keep your iBook’s software up-to-date
24 Learn more and solve problems
30 Install memory and an AirPort Card
34 Work more comfortably
36 Safety and cleaning

2
Your iBook at a glanceYour computer has these built-in features:
Volume and brightness controls
Adjust sound volume andscreen brightness.
Two built-in stereo speakers
Listen to music, movies, games, and multimedia.
Optional AirPort wireless Internet and networking
(underneath keyboard)Using the optional
AirPort Card, you canconnect to the Internet,
use email, share files,play network games, and
more—without any wires to hold you down.
Sleep indicator lightPulsating light indicates
that the computeris in sleep.
Built-in microphoneRecord sound or control your computer withspoken commands.
® Power buttonTurn your computer on,put it to sleep, or shut itdown.
Media Eject (F12) keyPress and hold to eject a CD or DVD or to openthe optical drive tray.
¯ Power adapterconnectorPlug in the power adapter(included) to recharge youriBook’s battery.
Optical disc driveInstall and run software or listen to music CDs.Play DVD videos if youhave the DVD/CD-RW or Combo drive, or create your own CDs ifyou have the CD-RW orcombo drive.

3
Kensington security slotAttach a lock and cableto prevent theft.
ModemConnect to the Internet,browse the World WideWeb, and send andreceive electronic mail.
EthernetShare files with anothercomputer or access a computer network.
FireWireConnect a digital videocamera and use it tocreate your own desktopmovies. You can alsoconnect FireWire harddisks, printers, and more.
USBConnect printers, Zip and other disk drives,digital cameras, joysticks,and more.
VGA portConnect an externalmonitor (using the included Apple VGA Display Adapter).
Reset buttonUse duringtroubleshooting to restartyour computer.
Audio/video portConnect headphones orexternal speakers.Connect a TV or videoprojector using theoptional Apple AV cable.
Battery level indicator(underneath) When youpress the button on thebattery, one to four lightsglow to show how muchcharge is left.
To learn more about your iBook’s features:m Choose Mac Help from the Help menu.
Then click Go under “iBook at a glance.”

4
Mac OS X basicsThe Macintosh desktop is your starting place.
Finder iconClick to open a
Finder window so you can see the filesand applications on
your computer.
Window buttonsClick the red button toclose the window, the
yellow one to minimize itinto the Dock, and thegreen one to resize it.
Apple menuUse to change
system settings, openrecent items, and restart
or shut down yourcomputer. To see themenu, click the apple
() in the menu bar.
View buttonsClick to see your
files as icons, in lists, or in columns.
Toolbar buttonClick to show or hide the toolbar.
Toolbar iconsClick to navigate quicklyto different folders. Your home foldercontains your personaldocuments.
TrashDrag an item here todelete it. Items remainhere until you chooseEmpty Trash from theFinder menu.
To learn more about Mac OS X:m See the Welcome to Mac OS X document in the
Documents folder on your hard disk.
Modem statusUse this menu to connect to anddisconnect fromthe Internet using a dialup modem.

5
DockClick icons in the Dock
to open applications,documents, folders,
or minimized windows.
Application menuShows the name of the
application you’re using. Use to set preferences
or quit applications (other than the Finder).
DocumentDocuments are files that
you create with anapplication (such as a
letter you create with yourword processor). Double-click the icon to open thefile in the application used
to create it.
FolderFolders help organize your files andapplications. Double-click a folder to see what’s inside.
DiscThis appears when a CDor DVD is in the disc drive.Double-click the icon tosee what’s on the disc.To eject a disc, press andhold the Media Eject ( )key on the keyboard.
ApplicationApplications are software
programs (such as agame or word processor)
that you use with yourcomputer. Double-clickan application’s icon to
open the application.
6
Change the Mac OS to suit your preferences.There are lots of ways to customize Mac OS X.
To change the size of the Dock or move it to a different place, openSystem Preferences and click Dock.
To change Findersettings, choose
Preferences from theFinder menu.
To change icon sizes or the background of aFinder window, chooseShow View Options fromthe View menu.
Choose SystemPreferences from
the Apple menu to change most of yourcomputer’s settings.
To select a desktopbackground picture, open
System Preferences and click Desktop.

7
Click the icons in the Dock or toolbar to find and open files and applications.
The triangle indicates the application is open. Drag this bar up or down to
resize the Dock.
. Drag applications,files, and foldersinto the Dock forone-click access.
This side of the Dockshows application icons.
To set up the toolbar theway you want it, chooseCustomize Toolbar fromthe Finder’s View menu,then drag items to the toolbar.
Press a folder icon to see its contents and openitems in it.
This side of the Dockshows files, windows, and folders.

8
Make your own CDs. Use iTunes to transfer music from your CD collection. If your iBook
has a CD-RW or Combo drive, burn your own music CDs. Transfer music to an iPod or other MP3
player to listen on the go. Make a movie. Shoot video on a DV camcorder and import it into
iMovie . Then rearrange, edit, polish, and add titles and soundtracks. Connect to the
Internet to send email and browse the Web, or use iTools to post digital photos to the Web
for everyone to see.
Browse through the next few pages to find out more.
What you can do with your iBookNot sure how to get the most out of your new iBook? Read on for a few ideas.
9
Send digital photos tofriends and family.
The iBook is yourdigital hub.
Watch DVD movies. Listen to music andburn your own CDs.
Send email and surfthe 'Net.
Import and edithomemade movies.
Put 1,000 songs inyour pocket.

10
Listen to music on your computer or on the go.Use iTunes to create a library of music and make your own CDs.
LibraryYour collection of
songs, imported fromyour own audio CDs or
downloaded from theInternet. Easily browse
or search for music.
Radio TunerChoose from hundreds
of Internet radiostations – jazz, rock,
talk, and more.
Audio CDsPlay an audio CD on your
computer. Import songsto your Library to playthem without the CD.
To learn more about iTunes:m See iTunes Help, available in the Help menu. m Go to www.apple.com/itunes
Burn CDsIf your iBook has a CD-RW or Combo drive,make your own audioCDs that play in standardCD players.
PlaylistsMake personalizedplaylists using songs from your Library.Arrange your music bymood, artist, genre, orhowever you like.
EqualizerAdjust the sound to your tastes using the 10-band EQ with22 presets.

11
If you have an iPod, you can transfer up to 1,000 songs.
1. Connect iPod using the FireWire cable included with iPod.iTunes automatically transfers your music Library to iPod.
2. Unplug iPod.
3. Browse for a song on iPod and press the Play button.
To learn more about iPod:m Open iTunes and choose iPod Help from the Help menu. m Go to www.apple.com/ipod

12
Make your own movie or watch a movie on DVD.Use iMovie to edit video from a digital video camera.
Playback controls Use these to play the movie in theiMovie monitor. Click the Play Full
Screen button to use the entire screen.
To learn more about iMovie:m Open iMovie and choose iMovie Help from the
Help menu.m Go to www.apple.com/store to find compatible
DV cameras or to purchase a FireWire cable.
. Shoot video with a digital videocamera. Thenconnect thecamera using a 6-pin to 4-pinFireWire cable andimport your clips.
iMovie monitor Preview your movie or
view video from aconnected DV camera.
ViewersClick the clip viewer (eye tab) to edit andplace clips. Click the
timeline viewer (clock tab)to edit sound.
Editing buttons Click to open panels foradjusting and selectingsounds, video effects,titles, and transitions.
ShelfClips appear here whenyou import them. Moveclips to the viewerto make them part ofyour movie.
. You can exportyour finishedmovie to atape in your DVcamera or to aQuickTime file.

13
If your computer has a DVD drive or Combo drive, you can watch DVD movies.
2. Use the controller to play the movieor see the DVD’s special features.1. Insert a DVD video disc. DVD Player
opens automatically.
To learn more about DVD Player:m Choose DVD Player Help from the Help menu.
14
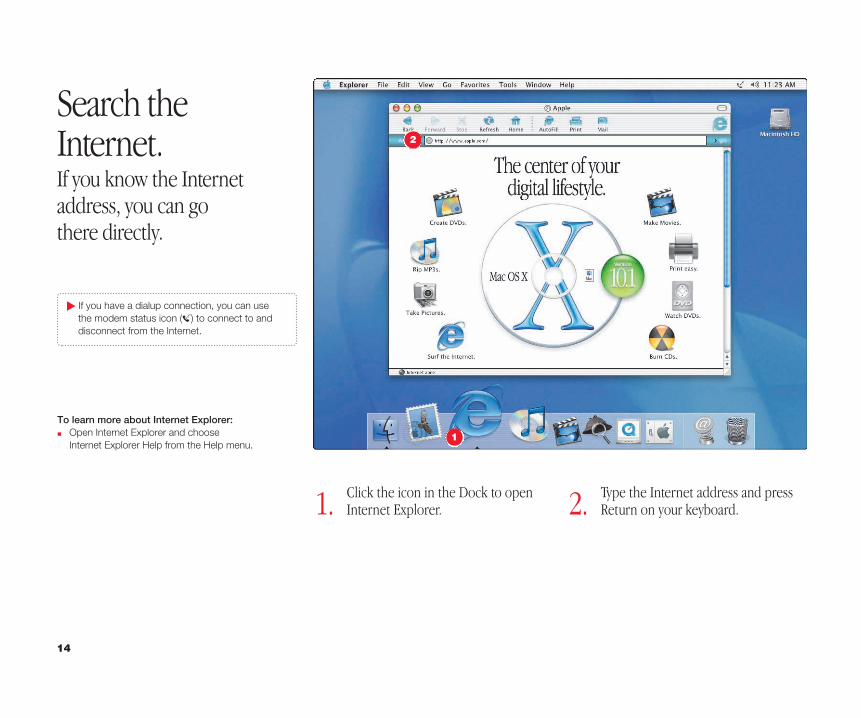
Search the Internet.If you know the Internetaddress, you can go there directly.
1
2
1. Click the icon in the Dock to openInternet Explorer.
To learn more about Internet Explorer: m Open Internet Explorer and choose
Internet Explorer Help from the Help menu.
2. Type the Internet address and pressReturn on your keyboard.
. If you have a dialup connection, you can use the modem status icon (W) to connect to anddisconnect from the Internet.
1
2

15
1
1. Click the icon in the Dock to open Sherlock.
2. Click the Internet icon and typea question in the search field.
3. Click the Search button ( ). Thendouble-click an item inthe list of sites.
. Click the other buttons to find people, read thenews, shop, and more.
. Click the hard disk icon to search the files onyour computer.
Or you can search the Internetwith Sherlock.
2
3

16
Get more out of the Internet with iTools.iTools is a suite of Internet services integrated into Mac OS X.
iDisk
Your own storage space on Apple’s Internetserver. Share photos, movies, and otherfiles over the Internet. Access your files fromanother Macintosh or PC.
HomePage
Build a personal Web site in three easysteps. Create a photo album, publish an iMovie, post your résumé, and more.Anyone can view your site on the WorldWide Web.
iCards
Send an elegant iCard, just right for anyoccasion. Choose a ready-made photo, orcreate a personalized iCard using a photoon your iDisk.
Get your own Mac.com email address. It’s easy and works with your favorite email application.
To learn more about iTools:m Go to www.apple.com/itools and click Help on the
iTools menu bar.
. If you signed up for iTools when you first turnedon your computer, you already have an account.Go to www.apple.com/itools to get started.
. To sign up for a new iTools account, open System Preferences and click Internet. Thenclick Sign Up.

17
Store pictures, movies, documents, and other files remotely.
1
2
2. Drag files to a folder on your iDiskto copy them.1. Choose iDisk from
the Go menu.
. To access your files from another computer, log into your iTools account atwww.apple.com/itools
. Anyone can access the files in your Public folder.
. To find out how to use pictures and other files from your iDisk to create a personal Website, go to www.apple.com/itools and click theHomePage icon.

18
Send and receive email.Follow these steps to createand send a message.
1
1. Click the Mail icon in the Dockto open the Mail application.
. To check for new messages, click Get Mail. To view a message, click its subject.
. If you entered email information or got aMac.com account when you first turned on yourcomputer, Mail is already set up. To set up anew email account, choose Preferences fromthe Mail menu, then click Accounts.

19
To learn more about Mail:m Open Mail, then choose Mail Help from the
Help menu.m Go to www.apple.com/macosx/applications/
mail.html2
3
2. To create a new email message, click Compose. 3. Type the email address and a
subject. Then type your message and click Send.

20
Organize, plan, and create using AppleWorks.Use AppleWorks for writing, drawing, making presentations, and more.
Layout capabilities Add photos, tables,
charts, and sidebars. Link text frames, layer
graphics, and wrap text.
Word processing Write letters, create
brochures, make greeting cards and
party invitations.
Presentation tool Create an onscreen
slide presentation. Add movies, art,
graphs, and charts.
Database Keep records, save
addresses, makeinventories. Merge
mailing information withthe word processor to
send form letters.
Customizabletemplates Choose from a wide range of predesigneddocuments and modifythem as needed.
Spreadsheet Compute data easily using over 100 built-infunctions, then useformatting options tomake it stand out.
Painting Create art from scratch or apply effects to existing pictures or scanned photos.
Extensive clip art librariesChoose from over 25,000 high-quality clip art images.

21
. Click the Web tab to download more templatesfrom the Internet.
To learn more about AppleWorks:m See AppleWorks Help, available in the Help menu.m Go to the AppleWorks Web site at
www.apple.com/appleworks
1. Click the icon in the Dockto open AppleWorks. 2. Click the type of document you want
to create, or click the Templates tab tomodify a ready-made document.
To get started using AppleWorks:
1
2

22
Keep your iBook’ssoftware up-to-date.Use Software Update to get the latest updates and drivers.
1. Click the icon in the Dockto open System Preferences. 2. Click
Software Update.
1
2
. To use Software Update, you must have anInternet connection.

23
3. Then clickUpdate Now. 4. Select the software you want to
update and then click Install.
3
4
. Click the name of a software item to learnmore about it.
. You can schedule your computer to checkautomatically for software updates.

24
Learn more about using yourcomputer.Look in Mac Help for more information on usingyour computer.
1
1. Click the Finder icon in the Dock.
2. Then choose Mac Help from the Help menu.
3. Type a question and click Ask.
4. Click an item in the list of Help topics.
. To browse the features of your computer, clickGo under “At a glance.”
. Click Quick Clicks topics for answers tofrequently asked questions.
. To look at Help for other applications, clickthe ? button.
2
3
4

25
These Apple Web sites will help you get the most out of your computer.
Apple Service and Supportwww.apple.com/support
Product support, software updates, and technical information.
Apple Storewww.apple.com/store
Purchase the latest Apple and third-party hardware,software, and accessories.
Macintosh Products Guidewww.apple.com/guide
For great hardware and software productsfor your Mac, check the Web site or look forthe Mac symbol. Also get contact andsupport information for third-party softwaremanufacturers.
. From these Web sites you can quickly link toother Apple Web sites around the world.

26
If you don’t find the answer to your problem on the following pages:Look in Mac Help.
m In Mac Help (see page 24), you can find a great deal of troubleshootingadvice, including information to help you solve problems withm Connecting to the Internetm Using software installation and restore discsm Changing your computer’s settingsm Printingm And more
m Click the Finder icon in the Dock, then choose Mac Help from theHelp menu. Type a question in the search window (for example, type “How do I eject a disc?”) and click Ask.
Switching between Mac OS X and Mac OS 9Your iBook is set to use Mac OS X. Most applications made for Mac OS 9will work in the Mac OS X Classic environment. Just open the applicationas you normally would. You can also start up your computer using Mac OS 9.
To set your computer to use Mac OS 9:
m Choose System Preferences from the Apple (K) menu in Mac OS X.m Click the Startup Disk icon to open the Startup Disk pane.m Select the Mac OS 9 folder as your startup disk. If the icons are
dimmed, click the padlock icon and enter the password you chosewhen you first set up Mac OS X.
m Click Restart.
To set your computer to use Mac OS X again:
m Choose Control Panels from the Apple (K) menu.m Open the Startup Disk control panel.m Click the triangle next to the hard disk that contains your operating
system folders.m Select the Mac OS X System as your startup disk.m Click Restart.
Advice and troubleshooting

27
If the computer won’t respond:Try to cancel what the computer is doing.
m Try to force problem applications to quit. Hold down the Option andCommand (x) keys, then press the Esc key. Select the application andclick Force Quit.
If that doesn’t work, restart the computer.
m Hold the Power button for several seconds. When the computer turnsoff, press the Power button again to restart it.
m If that doesn’t work, hold down the Control and Command (x) keysand then press the Power button.
m If that doesn’t work, gently press the Reset ( ) button by inserting theend of a paper clip into the small hole above the audio/video port,wait a few seconds, and then press the Power (®) button.
Then do this:If the problem occurs frequently when you use a particularapplication:
m Check with the application’s manufacturer to see if it is compatible withyour computer.
m For support and contact information about the software that camewith your computer, go to www.apple.com/guide
If the problem occurs frequently:
m You may need to reinstall your system software. Choose Mac Help fromthe Help menu and type “install system software” for moreinformation.
If you see a flashing question mark during startup:If the computer doesn’t start up after a delay, hold down theOption key and restart your computer.
m When your computer starts up, click the hard disk icon, then click the arrow.
Then do this:After the computer starts up:
m Open System Preferences and click Startup Disk. Select a local Mac OS X System folder.
If the problem occurs frequently:
m You may need to reinstall your system software. Choose Mac Help from the Help menu and type “install system software” for moreinformation.

28
If the computer won’t turn on or start up:First, make sure the power adapter is plugged into thecomputer and into a functioning power outlet.
m Your battery may need to be recharged. Press the small button on thebattery. One to four lights glow indicating the battery’s level of charge.
If that doesn’t work or if you hear a strange sound duringstartup:
m If you recently installed additional memory, make sure that it iscorrectly installed. Try removing the memory; if the computer starts upnormally, the memory is not compatible with your computer.
m If that doesn’t work, gently press the Reset ( ) button by inserting theend of a paper clip into the small hole above the audio/video port, waita few seconds, and then press the Power (®) button.
m See the service and support information that came with your iBook forinformation on having your computer serviced.
If you can’t log into your computer:Make sure you are typing your user name and passwordcorrectly.
m Make sure you are using the same capitalization and punctuation thatyou used originally. Check to see if the Caps Lock key has beenpressed.
If that doesn’t work, reset your password.
m Insert the Mac OS X software install CD that came with your computer.Restart your computer while holding down the C key. When theInstaller appears, choose Reset Password from the Installer menu andfollow the onscreen instructions.
If you can’t eject a CD or DVD or open theoptical drive tray:Make sure the disc is not in use.
m Quit all applications that are using files on the disc.m Then press the Media Eject ( ) key at the top-right corner of
the keyboard.m If that doesn’t work, hold down the function (fn) key and press
the Media Eject key.m If that doesn’t work, drag the disc’s icon to the Trash.m If that doesn’t work, restart the computer, then hold down the mouse
button. To restart, choose Restart from the Apple (K) menu.
If the disc still won’t eject, eject it manually:
m Carefully insert the end of a straightened paper clip into theemergency eject hole on the drive tray.

29
Other problems:If you have a problem with your Internet connection:
m Make sure the telephone line is connected to the modem (W) portand the line is functioning properly.
If that doesn’t work, make sure your Internet settings areconfigured correctly.
m Open the Internet Connect application in the Applications folder tocheck your dialup or AirPort settings. Open System Preferences andclick Network to check your Internet settings.
m If you’re not sure of the correct information for your Internet settings,contact your Internet service provider.
If you have a problem connecting other devices:
m Make sure that the device is properly connected. Try unplugging andplugging in the device again.
m Check to see if the devbice has software that needs to be installed.m If that doesn’t work, contact the device manufacturer.
If you have a problem with an application:
m For problems with software, contact the software manufacturer. m For support and contact information about the software that came
with your computer, go to www.apple.com/guide
If you didn’t find the information you were looking for on thispage:
m Look in Mac Help. Click the Finder icon in the Dock, then choose Mac Help from the Help menu. Type a question in the search window(for example, type “How do I eject a disc?”) and click Ask.
If you suspect there may be a problem with your computerhardware:
m You can use the Apple Hardware Test CD to help you determine ifthere is a problem with one of your computer’s components, such asthe memory or processor.

30
Install memory and an AirPort Card.For detailed instructions, refer to Mac Help (see page 24).
2. Release the keyboard by sliding thetwo plastic tabs away from the display.Then lift the keyboard, flip it over, andlay it on the palm rests.
1. Shut down your computer. Thendisconnect the power adapter andphone cord. Turn the computer overand remove the battery.
3. If necessary, remove the metal clipand pull the AirPort Card from theadapter. The adapter is not used withthe iBook.
. If the keyboard doesn’t pop up, it may belocked. Locate the plastic tab next to the Num Lock key. Use a small flathead screwdriverto turn the screw counter-clockwise 1/2 turn.
31
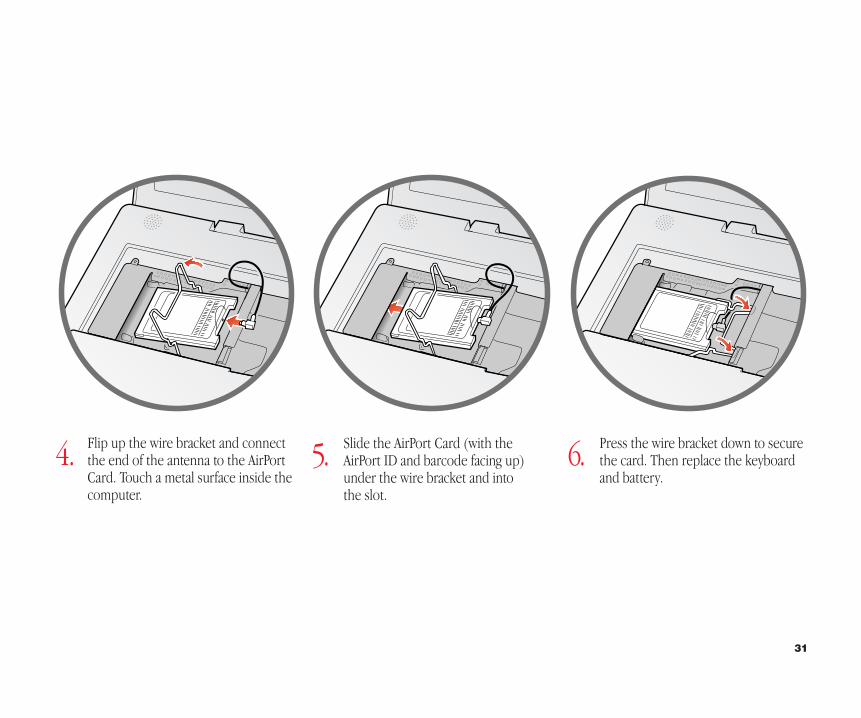
4. Flip up the wire bracket and connectthe end of the antenna to the AirPortCard. Touch a metal surface inside thecomputer.
5. Slide the AirPort Card (with theAirPort ID and barcode facing up)under the wire bracket and into the slot.
6. Press the wire bracket down to securethe card. Then replace the keyboardand battery.

32
Add additional memory.
2. Release the keyboard by sliding thetwo plastic tabs away from the display.Then lift the keyboard, flip it over, andlay it on the palm rests.
1. Shut down your computer. Thendisconnect the power adapter andphone cord. Turn the computer overand remove the battery.
3. If necessary, remove the AirPort Card.
. Your iBook has one expansion slot that acceptsa standard PC-100 compliant, SO-DIMMmemory module (1.25-inch or shorter). For more information on installing memory, look inMac Help, available in the Help menu.
. If the keyboard doesn’t pop up, it may belocked. Locate the plastic tab next to the NumLock key. Use a small flathead screwdriver toturn the screw counter-clockwise 1/2 turn.
. To prevent scratching, place a soft clothbetween the AirPort Card and the iBook case.

33
4. Remove the two screws that securethe RAM shield, then carefully lift it out.
5. Insert the RAM into the slot at anangle and press down to lock it inplace. Replace the RAM shield andAirPort Card (if necessary).
6. Replace the keyboard and battery.
. If you already have a memory card installed,remove it first.
. For more information on the type of memory to use with your computer, choose Mac Helpfrom the Help menu. Then type “memory” andclick Ask.
. Never turn your computer on unless all of itsinternal and external parts are in place.

34
Keyboard and trackpadWhen you use the keyboard and trackpad, your shoulders should berelaxed. Your upper arm and forearm should form an angle that is slightly greater than a right angle, with your wrist and hand in roughly a straight line.
Use a light touch when typing or using the trackpad and keep your handsand fingers relaxed. Avoid rolling your thumbs under your palms.
Change hand positions often to avoid fatigue. Some computer users maydevelop discomfort in their hands, wrists, or arms after intensive workwithout breaks. If you begin to develop chronic pain or discomfort in yourhands, wrists, or arms, consult a qualified health specialist.
Not thisThis
Not thisThis
Work more comfortably
35
ChairAn adjustable chair that provides firm, comfortable support is best. Adjustthe height of the chair so your thighs are horizontal and your feet flat onthe floor. The back of the chair should support your lower back (lumbarregion). Follow the manufacturer’s instructions for adjusting the backrestto fit your body properly.
You may have to raise your chair so your forearms and hands are at theproper angle to the keyboard. If this makes it impossible to rest your feetflat on the floor, you can use a footrest with adjustable height and tilt tomake up for any gap between the floor and your feet. Or you can lowerthe desktop to eliminate the need for a footrest. Another option is to usea desk with a keyboard tray that’s lower than the regular work surface.
External mouseIf you use an external mouse, position the mouse at the same height asyour keyboard and within a comfortable reach.
Built-in displayAdjust the angle of the display to minimize glare and reflections fromoverhead lights and windows.
You can adjust the brightness of the screen when you take the computerfrom one work location to another, if the lighting in your work areachanges.
For more informationFor additional ergonomic information, see the Apple ergonomic Web site at www.apple.com/about/ergonomics

36
When setting up and using your computer, remember the following:m Read all the installation instructions carefully before you plug your
computer into a wall socket.m Keep these instructions handy for reference by you and others.m Follow all instructions and warnings dealing with your system.m Use only the Apple Portable Power Adapter that came with your
computer. Adapters for other electronic devices may look similar, butthey may damage your computer.
m Always leave space around your power adapter. Do not use thisequipment in a location where airflow around the power adapter isconfined, such as a bookcase.
m Always disconnect the power adapter, phone line, and any other cablesbefore opening the computer to perform procedures such as installingmemory.
m Never turn on your computer unless all of its internal and externalparts are in place. Operating the computer with missing parts can bedangerous and damage your computer.
m Do not connect a digital telephone line to the modem, because thewrong type of line could damage the modem.
m When using your computer or when charging the battery, it is normalfor the bottom of the case to get warm. The bottom of the computercase functions as a cooling surface that transfers heat from inside thecomputer to the cooler air outside. The bottom of the case is raisedslightly to allow airflow that keeps the unit within normal operatingtemperatures.
m Keep your computer away from sources of liquids, such as drinks,washbasins, bathtubs, shower stalls, and so on.
m Protect your computer from dampness or wet weather, such as rain,snow, and so on.
Warning Electrical equipment may be hazardous if misused.Operation of this product, or similar products, must always be supervised by an adult. Do not allow children access to theinterior of any electrical product and do not permit them to handleany cables.Never push objects of any kind into this product through theopenings in the case. Doing so may result in fire or a dangerouselectric shock.
Safety and cleaning

37
For your own safety and that of your equipment, always disconnect thepower plug (by pulling the plug, not the cord), disconnect the phone line,and remove the battery if any of the following conditions exists:m you want to remove any parts (leave the power cord disconnected as
long as the keyboard is open) m the power cord or plug becomes frayed or otherwise damagedm you spill something into the casem your computer is exposed to rain or any other excess moisturem your computer has been dropped or the case has been otherwise
damagedm you suspect that your computer needs service or repairm you want to clean the case (use only the recommended procedure)
Important The only way to disconnect power completely is to unplugthe power plug, disconnect the phone cord, and remove the battery.Make sure at least one end of the power cord is within easy reach so thatyou can unplug the computer when you need to.
Your iBook has a unique appearance and finish that may contain minorimperfections, some of which may increase over time. Exposing youriBook to extreme temperatures or humidity may cause this process toaccelerate. Proper care and handling, as described in this manual, will helpkeep your iBook looking its best.
To clean the case, do the following:1 Disconnect the power plug and phone cord and remove the battery.
(Pull the plug, not the cord.)2 Wipe the surfaces lightly with a clean, soft cloth.
Warning Do not use any substance containing isopropyl alcohol. Itcan damage the case. If necessary, use products made specifically forcleaning computers.
Warning To avoid damage to your computer, Apple recommendsthat only an Apple-certified technician install additional RAM or anAirPort Card. Consult the service and support information that camewith your computer for instructions on how to contact an Apple-authorized service provider or Apple for service. If you attempt toinstall additional RAM or an AirPort Card yourself, any damage youmay cause to your equipment will not be covered by the limitedwarranty on your computer. See an Apple-authorized dealer orservice provider for additional information about this or any otherwarranty question.

38
Communications, Telephone, and Modem Regulation Information
For information on FCC regulations, radio and television interference, and telephone and modem information related to this product, see the files in theCommunications Regulations folder, inside the Documents folder on your hard disk.
Laser Information
Warning Making adjustments or performing procedures other than those specified inyour equipment’s manual may result in hazardous radiation exposure.
Do not attempt to disassemble the cabinet containing the laser. The laser beam used in this product is harmful to the eyes. The use of optical instruments, such asmagnifying lenses, with this product increases the potential hazard to your eyes. For your safety, have this equipment serviced only by an Apple-authorized service provider.
Service Warning Label
Apple Portable Power Adapter
The Apple Portable Power Adapter that comes with your computer is a high-voltagecomponent and should not be opened for any reason, even when the computer is turnedoff. If your computer needs service, contact your Apple-authorized dealer or serviceprovider.
Battery
Warning Risk of explosion if battery is replaced by an incorrect type. Dispose of usedbatteries according to your local environmental guidelines. Do not puncture orincinerate.
High-Risk Activities Warning
This computer system is not intended for use in the operation of nuclear facilities, aircraftnavigation or communications systems, or air traffic control machines, or for any otheruses where the failure of the computer system could lead to death, personal injury, orsevere environmental damage.
iPod Information
The Apple iPod pictured on page 11 of this manual is not included with this product. Formore information on iPod, go to www.apple.com/ipod
ENERGY STAR®
As an ENERGY STAR® partner, Apple Computer has determined that standardconfigurations of this product meet the ENERGY STAR® guidelines for energy efficiency.The United States Environmental Protection Agency’s ENERGY STAR® program is apartnership with office product equipment manufacturers to promote energy-efficiency.Reducing energy consumption of office products saves money and reduces pollution byeliminating wasted energy.
This information applies to the standard configurations of the computer using the Mac OS X operating system.
Every effort has been made to ensure that the information in this manual is accurate.Apple is not responsible for printing or clerical errors.
Where’s the fine print?

www.apple.com
© 2002 Apple Computer, Inc. All rights reserved. AirPort, Apple, the Apple logo, AppleWorks, FireWire, the FireWire logo, iBook, Mac, the Mac logo, Macintosh, QuickTime, and Sherlock are trademarks of Apple Computer, Inc., registered in the U.S. and other countries.
Finder, iMovie, iPod, and iTunes are trademarks of Apple Computer, Inc. ENERGY STAR® is a U.S. registered trademark. Digital imagery copyright 1998 PhotoDisc, Inc.034-2095-A Printed in Taiwan
034-2095-A_UMCvr 11/28/01 10:50 AM Page 2